


 Loading...


 ™
™
E-DOCS
HOW TO USE
USING LINKS
Left-click on brown, underlined text to jump to a section.
You can also click on bookmark text to jump to a section.
(Click arrows to expand/ collapse sections.)
MOVING/CHANGING ZOOM
EARTH
 BASIC STUFF
Game Setup Menu
Your Objective
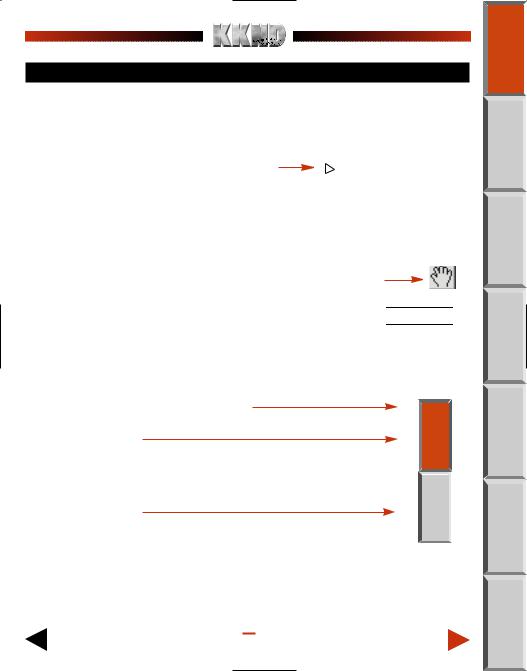
Left-click and drag anywhere to move around the page
Change page magnification 
 (Click and hold, then select zoom level.
USING TABS
Return to Table of Contents page
Active chapter (Brown: Jumps to top of active chapter.)
HOME
Inactive chapter
(Gray: Jumps to a new chapter.)
 HOME
HOME
Return to |
0 |
Go to |
|
previous page |
next page |
||
|
KKND Electronic Documentation
Ð TABLE OF CONTENTS
TO USE THIS BOOK
REFERENCE . . . . . . . . . . . . . . . . . . . . . . . . . . 1 TH: WHAT THE HELL HAPPENED? . . . . . . . . . . . . . . . . 2 STUFF . . . . . . . . . . . . . . . . . . . . . . . . . . . . . . . . . 3
Setup Menu . . . . . . . . . . . . . . . . . . . . . . . . . . . . . . . . . . . . . . . 3
Objective . . . . . . . . . . . . . . . . . . . . . . . . . . . . . . . . . . . . . . . . . . 4
the Land: Oil, Resource Units, and You. . . . . . . . . . . . . . . . . . 4
Levels . . . . . . . . . . . . . . . . . . . . . . . . . . . . . . . . . . . . . . . . . . . . 5
Your Control Panel . . . . . . . . . . . . . . . . . . . . . . . . . . . . . . . . . . . 6
things Around. . . . . . . . . . . . . . . . . . . . . . . . . . . . . . . . . . . . 9
Stuff. . . . . . . . . . . . . . . . . . . . . . . . . . . . . . . . . . . . . . . . . . . 10
Stuff. . . . . . . . . . . . . . . . . . . . . . . . . . . . . . . . . . . . . . . . . . . . 11
Units: The Wonders of Shell Shock . . . . . . . . . . . . . . . . . . . . . 11
The Inside Story . . . . . . . . . . . . . . . . . . . . . . . . . . . . . . . . 12
Bunkers: The Untold Story . . . . . . . . . . . . . . . . . . . . . . . . . . . . . 12
VIVOR BUILDINGS AND UNITS . . . . . . . . . . . . . . . . . . 12
Buildings. . . . . . . . . . . . . . . . . . . . . . . . . . . . . . . . . . . . . . . 12
Infantry and Warriors . . . . . . . . . . . . . . . . . . . . . . . . . . . . . . 14
Vehicles . . . . . . . . . . . . . . . . . . . . . . . . . . . . . . . . . . . . . . . 16
Defensive Structures . . . . . . . .
VED BUILDINGS AND UNITS . .
Buildings . . . . . . . . . . . . . . . . .
Infantry and Warriors . . . . . . . .
Vehicles and Animals . . . . . . . . .
Defensive Structures . . . . . . . . .
TIPLAYER MAYHEM . . . . . . . .
up a Multiplayer Game . . . . . . . . . . . . . . . . . . . . . . . . . . . . . . 29 a Multiplayer Game . . . . . . . . . . . . . . . . . . . . . . . . . . . . . . . . 32
. . . . . . . . . . . . . . . . . . . . . . . . . . . . . . . . . . . . 34 SUPPORT. . . . . . . . . . . . . . . . . . . . . . . . . . . 35
has been rated by the Entertainment Software Rating Board.
about the ESRB rating, or to comment about the appropriateness of the ratcontact the ESRB at 1-800-771-3772.
 HOME
HOME
 QUIT
QUIT 
COMMAND REFERENCE
MOUSE COMMANDS
LUse the left mouse button to:
Select Units |
Left-click on a single unit or drag a selection box around a |
|
number of units. |
|
|
Determine Unit |
Click on a unit to see its Status bar (hit points, etc.). |
Status |
|
|
|
MOVE UNITS |
Click a map point while a unit or group is selected to move the |
|
unit(s) to the map point. If your unit(s) are able to reach the |
|
selected point, they will comply. |
|
|
ATTACK |
Click an enemy unit/building while a unit or group is selected |
|
to attack that target. To force an attack on your own units or |
|
buildings, hold awhile clicking on your unit/building. |
: Use the right mouse button to:
FAST SCROLL |
In the game, right-click and drag to scroll rapidly over the map. |
|
DESELECT |
Right-click on the map. Right-clicking also cancels the |
|
|
|
“Information (?)” command. |
|
|
|
|
CANCEL |
Right-click on a production button to cancel production currently |
|
PRODUCTION |
in progress. |
|
|
|
KEYBOARD COMMANDS
Menu Controls
To go back one menu screen, press s.
To move forward/back through option buttons, press t/ st.
To select the highlighted option, press e.
To pause and access the Main menu during a game, press q.
NOTE: Keyboard menu controls donÕt work when the gameÕs paused.
Gameplay Controls
To assign units to a Group, select the units that you want to group then press c+ 1 – 0 at the top of the keyboard.
To select an assigned Group, press the assigned number key (1 – 0). All units within the Group are selected.
 COMMAND HOME
 REF
REF
1
EARTH: WHAT THE HELL HAPPENED?
THE PAST
It’s unclear who threw the first stone, but in any case it was a big one with “Warning—Nuclear Device” plastered all over Lots of warheads rained down from the heavens following the first, and within a week little was left of humanity. A few stragglers stayed alive on the surface, while others scuttled underground at the first hint of nuclear war and were spared the initial effects. But most of the population turned to ash (although it must be pointed out that they saved on cremation fees), leaving two “races” of “people,” the Survivors and the Evolved.
THE SURVIVORS
The Survivors stayed underground for 60 years, eating recycled food that made Soylent Green look like haute cuisine. But it wasn’t the tin can dinners that drove them back to the surface. It was a lack of the resources needed to run their rapidly decaying technology. The war had destroyed most machines, and those left over were cannibalized to create life-support systems. The Survivors managed to hold on to the technological know-how to create just about anything; all they needed was resources. And maybe some time in the sun. A military community, the Survivors now want to take the surface and “Wipe the tainted land with the freakers’ filthy, stinkin’ dead hides.”
THE EVOLVED
When the sunblock ran out, the living folks on the surface mutated pretty badly. These people, eventually calling themselves The Evolved, had to battle mutated beasties and plants and even though they eventually tamed some of these critters, they still didn’t have too good a time. Their mutant warrior brains didn’t quite cook in the intensified sun, but sautéed lightly in their natural juices. The Evolved came to believe that the fiery destruction was caused by angry gods, The Scourge, who punished humans for doing forbidden scientific and political things. If the Evolved see the Earth returning to former methods of leadership, well... they won’t be too pleased at all. And they’ll try to stop it. With force.
THE PRESENT
Ever since the first Survivor popped his blinking head above ground, there’s been trouble. Survivors want to reclaim what they believe belongs to them, the true humans. The Evolved want to stop the Survivors for the sake of the planet, for to continue on their path would be to bring down an even less forgiving Scourge. So there is war. And war needs war machines, and war machines need oil. Oil is the basic and rare commodity. You got oil, you got power. Simple. Whoever wins the war wins the near-barren land. Not much of a prize, but there ain’t much else to win.
 HOME
HOME
 EARTH
EARTH
BASIC STUFF
This section tells you everything you need to know to get up and running. Or killing. Whatever. Unless you’re one of those smart ass kids who beats everyone at every game without ever cracking a manual, you probably should at least skim this section before getting started.
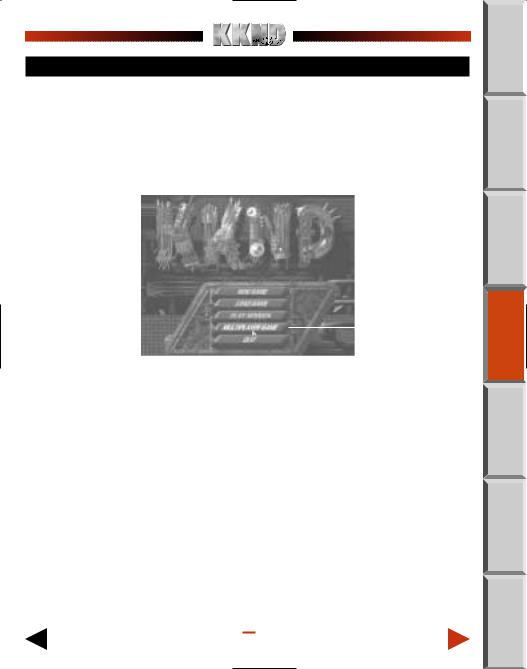
GAME SETUP MENU
When you start Krush, Kill 'N' Destroy™ (KKND for short), the Main menu appears after the intro. Use it to start a new game, load a saved game, join a multiplayer game, and other stuff.
 HOME
HOME
|
|
|
HIGHLIGHTED OPTION (DUH) |
|
|
|
|
NEW GAME |
Strangely enough, this starts a new game. When you start a new |
||
|
game, you get to choose the side you’ll play as. Click on either |
||
|
the Survivors (the underground, militant, “normal”-lookin’ folk) or |
||
|
the Evolved (the above-ground, tribal, mutated-lookin’ folk). You’re |
||
|
sent |
||
|
to the first mission briefing for that side, then it’s game on! |
||
LOAD GAME |
Access previously saved games. Scroll through the list using the |
||
|
on-screen arrows, then click on the game you want to continue. |
||
|
Click LOAD to proceed. |
||
PLAY MISSION |
Replay a mission that you’ve previously completed. The button at |
||
|
the top toggles between the Survivor missions and the Evolved |
||
|
missions. Select the mission you want and hit OK. |
||
 BASICS

MULTIPLAYER GAME |
Enter the hugely fun arena of multiplayer gaming, where you get |
|
to blow your friends to garden fertilizer. See Multiplayer Mayhem |
|
on p. 29 for details on how to bring out your inner bastard. |
QUIT |
Exit the game and return to your operating system. |
YOUR OBJECTIVE
You are briefed in detail before every mission via your mobile communications system. The overall objective is to
a)Build and maintain your troops, buildings, and vehicles by finding and extracting oil to power your base, then
b)Obliterate the other side.
We’ll first discuss the gettin’ of the oil, then go onto an explanation of tech levels in the game, using your control panel, controlling your troops, making units, and stuff like that.
PLUNDERING THE LAND:
OIL, RESOURCE UNITS, AND YOU
Everyone wants oil. It fuels things, lubricates things, keeps pasta from sticking, and can give you that “no-fuss” hairstyle that every post-apocalyptic swinger wants. But how do you get it?
Oil reservoirs lie underground, and can be tapped at certain points where the earth’s crust is weakest. The reservoirs vary in how much oil they hold, but they all look the same on the surface—a bubbling, gooey puddle.
MOBILE OIL DERRICK
With a Machine Shop (Survivor) or Blacksmith (Evolved), you can build a Mobile Oil Derrick. Send this unit out a-huntin.’ When an available tap-in point is uncovered on the ground, order your derrick to sit on it. The derrick converts into a monstrous Oil Rig and starts bleeding the Earth dry. A small display appears above the unit, indicating how much oil remains in the seam, as well as the rig’s hit points, number of contained defenders, and all that good stuff.
NOTE: Once the Oil Rig is constructed, it can no longer be moved.
RESOURCE UNITS
 HOME
HOME
 BASICS
Oil is converted to Resource Units when it’s taken to a Power Station. Resource Units (R.U.) are the basic units of the game, funds allowing you to create more units, repair existing ones, and possibly even buy a European sedan and take an interest in dressage and small, rat-like dogs.

OIL TANKERS
Oil Tankers haul your oil from Rig to Power Station. As a special offer, you get a free Oil Tanker with each Power Station you build. At higher Tech Levels (see below) you can build additional Oil Tankers to speed up the oil gathering process. Newly created tankers travel to the nearest tap-in point, unless directed otherwise. They then travel between the two constructions until the oil seam has dried up, after which they head back to base and complain about the sudden lack of job satisfaction. The same tanker can be used for other Oil Rigs.
TECH LEVELS
Tech Levels determine the level of technology you can create in a mission. The more complex the vehicle, animal, or unit, the higher the tech level required before it can be made useful. There are two types of Tech Levels: Global and Local.
GLOBAL TECH LEVELS
The folks with fully developed craniums are constantly working at improving existing technology and creating new technology. As you progress through the missions, these people get more ideas. Their results are represented in the complexity of units, buildings, and vehicles you can potentially build at that time. What you can actually build at any particular moment is determined by ...
LOCAL TECH LEVELS
When you first construct a building, it exists at its lowest tech level. It can produce only basic units, vehicles, whatever. Buildings can have their own tech level increased to the maximum allowed by the current global level, and can then produce more complex units. This is made possible through the use of a Research Lab or Alchemy Hall.
Research Lab/Alchemy Hall
Building a Research Lab (Survivor) or Alchemy Hall (Evolved) gets you the groundwork for increasing Tech Levels. It really is the first step towards a more advanced you.
Increasing Tech Levels
To increase a building’s tech level, left-click on the Research Lab/Alchemy Hall, then move the cursor over the desired building. If the building is upgradable, the cursor changes to four white research arrows. Left-click on the building to begin research. When the “Researching” icon pulses at full color, research is complete and the Tech Level of that building increases by one.
 HOME
HOME
 BASICS
NOTE: You can only advance one building at a time. Note also that if the building cannot currently be advanced any further, a ÒNo AdvanceÓ cursor (a red circle with a line through it) appears. The symbol is a bit like a ÒNo SmokingÓ symbol, only it means ÒNo Thinking.Ó
FURTHER NOTE: You can also upgrade the tech level of your Repair Bay/ Menagerie using the method described above. Doing so makes for faster and cheaper repairs on vehicles and/or animals.
Canceling Research
If you wave the cursor over any building currently being researched, the cursor becomes a “Research Cancel” cursor. Click this on the building to stop the research, but beware—you lose all Research Units that were spent in this latest round of upgrading.
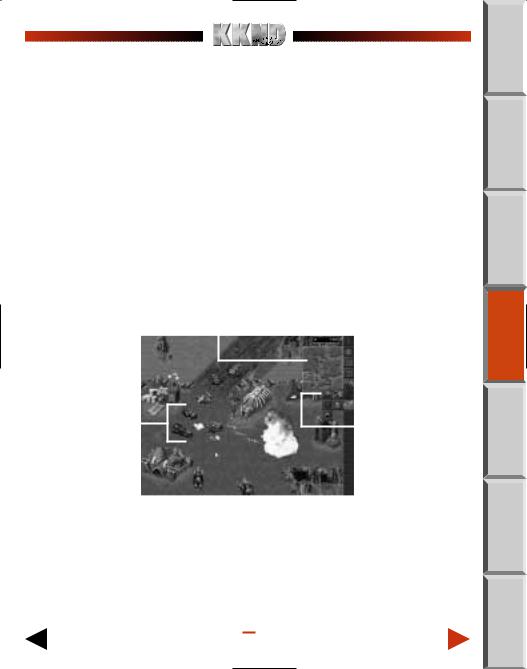
KNOW YOUR CONTROL PANEL
The on-screen control panel is active throughout each mission, sitting snugly to the right of the main gameplay screen. Positioning the cursor over these buttons for about one second brings up text showing that button’s name.
|
|
RADAR MAP |
RESOURCE UNITS AVAILABLE |
||||||||
|
|
|
|
|
|
|
|
|
|
|
RESOURCES BUTTON |
|
|
|
|
|
|
|
|
|
|
|
|
|
|
|
|
|
|
|
|
|
|
|
|
|
|
|
|
|
|
|
|
|
|
|
RADAR BUTTON |
|
|
|
|
|
|
|
|
|
|
|
|
|
|
|
|
|
|
|
|
|
|
|
OPTIONS |
|
|
|
|
|
|
|
|
|
|
|
|
|
|
|
|
|
|
|
|
|
|
|
|
|
|
|
|
|
|
|
|
|
|
|
INFORMATION |
|
|
|
|
|
|
|
|
|
|
|
|
|
|
|
|
|
|
|
|
|
|
|
CREATE INFANTRY/WARRIORS |
|
|
|
|
|
|
|
|
|
|
|
|
|
|
|
|
|
|
|
|
|
|
|
CREATE VEHICLES/ANIMALS |
COOL CARNAGE AND STUFF |
|
|
|
|
|
|
|
|
|
|
CREATE BUILDINGS |
|
|
|
|
|
|
|
|
|
FLY-OUT MENU |
||
|
|
|
|
|
|
|
|
|
|
||
|
|
|
|
|
|
|
|
|
|
|
|
|
|
|
|
|
|
|
|
|
|
|
|
EVOLVED CONTROL PANEL/GAMEPLAY SCREEN
 HOME
HOME
 BASICS
Here are more details about the buttons:
RESOURCES
Toggles between displaying how many Resource Units you own, and...well...not displaying them.
RADAR
The Radar button toggles an overview of the mission area on/off. The basic map, showing uncovered terrain and your own units, is activated when you upgrade your Outpost or Clan Hall to Tech Level 2. Upgrading the Outpost/Clan Hall again allows the Radar to display enemy units also. Left-clicking in this miniature map is a quick way to move the main display to an area you wish to look at, but note that you can’t select anything on this smaller map, nor can you order anything about.
OPTIONS
Accesses the KKND Options menu. (You can also press qduring gameplay to pause the game and access this menu.) From here you can elect to access further options (sound and mouse), Load Game, Save Game, Restate the current Mission Briefing, Return to the current game, Restart the current mission, or Quit to the Main screen.
1.To save a game, click SAVE GAME in this Options menu. Scroll up and down the list of numbers (using the on-screen arrows) until you reach the save game slot you wish to use, then click on that slot position.
2.Click the SAVE GAME button, then type in a name for this slot. Hit e, and the game is saved.
To overwrite an existing saved game, select its slot then click SAVE GAME.
3. To get back in the action, select RETURN TO GAME.
INFORMATION
Clicking this button turns the cursor into a question mark. But not only that, it also allows you
to find a unit’s name just by passing the cursor over it. Right-click to cancel this function, and remember that left-clicking on a unit shows its health, tech level, etc.
CREATE INFANTRY/CREATE WARRIORS
Accesses a fly-out menu of all available Infantry/Warriors (if you own an Outpost or Clan Hall).
To begin training, left-click a fly-out button. When the button’s progress bar is full, the new unit pops out of the relevant Outpost/Clan Hall.
 HOME
HOME
 BASICS
To schedule production of multiple units, keep clicking. Up to nine units can be scheduled to be produced automatically, one after the other. Queue more than nine units and production enters infinite mode, where units continually produce until resources run out or production is canceled (right-click the button).
To cancel the production of one unit, right-click on the button. To cancel queued units, keep right-clicking. You get back any unspent Resource Units.
When you own multiple Outpost/Clan Halls, you get multiple columns of fly-out menus. Each column is color-coded to match the color bar on the side of the relevant building’s status bar.
CREATE VEHICLES/CREATE VEHICLES & ANIMALS
This fly-out menu displays a column of Vehicles if you’ve built a Survivor Machine Shop or an Evolved Blacksmith. If you’re Evolved and you’ve built a Beast Enclosure, you get a separate column of animals you can make. Again, multiple creation buildings results in multiple, colorcoded fly-out menus.
CREATE BUILDING
To create a building, click the building’s creation button from this fly-out menu. The cursor is now a ghostly image of that building when moved out to the main gameplay screen.
Click this image where you want to build, and construction begins (assuming no obstructions are present).
See Makin’ Stuff on p. 10 for more details.
NOTE: If your Outpost/Clan Hall is destroyed, your building creation is initially limited to replacing that building.
CREATE DEFENSIVE STRUCTURE
Displays a list of Guard Towers available at the present time, which are created in the same way that buildings are created. Upgrading your Outpost/Clan Hall gives you access to higher Tech Levels of Guard Towers. Expecting guests? The Defensive Structure menu may just be for you!
NOTE: You can only have up to eight guard towers at one time. DonÕt sit
back and defendÑATTACK, ATTACK, ATTACK!
AIRCRAFT MENU
When your Outpost and Machine Shop (for Survivors) or Beast Enclosure and Clan Hall (for Evolved) reach the maximum Global Tech level (only possible in the later missions), all the wonders of the Air Strike become available via your CREATE PLANE or CREATE WASP button. Click the button to access the next button...
 HOME
HOME
 BASICS

CREATE BOMBER/WASP
Click this button to begin preparations for an Air Strike. When it’s ready (and it takes a little while), the final, dastardly button appears below the Aircraft menu button...
DEPLOY AIR STRIKE
Click this button, then click the cursor on your desired target. Your aerial attack squad starts heads toward the target. Sit back and enjoy the screams!
ORDERING THINGS AROUND
The interface is designed to keep mouse bashing to a minimum, as decided by the International Excessive Game Users Collective and the Rodent Protection Foundation.
SELECTING
To select a person, vehicle, or animal, left-click on the unit. The unit’s health bar is displayed. You can click on buildings to see their health and other stats, but they’re much less likely to move if you order them.
DESELECTING
Clicking the right mouse button deselects the current unit/group.
GROUPING
Hey, we said “Grouping” not “Groping,” so watch those big hands of yours! To simultaneously select a number of units, click and drag a selection box around the desired units. While a group is selected, any unit command affects the entire group.
SAVING AND RECALLING GROUPS
For quick access to different units or sets of units, you can use the “Group Save” feature. After selecting a unit or group of units, press c+ 1 – 0 on the top of your keyboard to assign the selected units to the number. To re-select the assigned units, press the number (1 – .0). Up to 10 groups can be saved and recalled in this manner (’cause there’s 10 number keys, you see).
MOVING
To move a unit or group of units, select it, then left-click on the desired destination. This destination can either be anywhere in the unexposed black area or on any exposed terrain that’s valid. What constitutes valid terrain? Well, something that isn’t a whopping great hole in the ground, a cliff, or an ocean. You get the picture. If the terrain’s invalid, you’ll see the “No-Go” cursor when you point at it (a red circle with a line through it).
 HOME
HOME
 BASICS
Loading...