


 Loading...
Telewizor LED LCD HD
LED40-H9825M |
Instrukcja obsługi |
Polski |
|
LED LCD HD Fernseher
Bedienungsanleitung Deutsch
LED LCD HD tévé
Használati Utasítás Magyar
Televizor LED LCD HD
Manualul utilizatorului Român
LED LCD HD televizor
Uživatelská příručka Čeština
LED LCD HD televízia
Príručka používateľa Slovenčina
Téléviseur LED LCD HD
Manuel du propriétaire Français
LED LCD HD teler
Kasutusjuhend Eesti keel
LED LCD HD televizors
Lietotāja rokasgrāmata Latviešu
LED LCD HD televizorius
Instrukcija Lietuviškai
LED LCD HD Television
Owner’s Manual English
Светодиодный ЖК телевизор HD
Руководство для пользователя Русский
LED LCD HD телевизия
Упътване на потребителя Бъларскиг
HD РК-телевізор зі світодіодним
Інструкціядлявласникапристрою Українська

To aid reporting in case of loss or theft, please record the unit’s model and serial numbers in the space provided. The numbers are located at the rear of the unit.
Model number:_________________ Serial number:_________________
PRECAUTIONS
WARNING:TO REDUCE THE RISK OF FIRE OR ELECTRIC SHOCK, DO NOT EXPOSE THIS APPARATUS TO RAIN OR MOISTURE.
CAUTION
RISK OF ELECTRIC SHOCK
DO NOT OPEN
CAUTION:
TO REDUCE THE RISK OF ELECTRIC SHOCK, DO NOT REMOVE COVER (OR BACK).
NO USER SERVICEABLE PARTS INSIDE. REFER SERVICING TO QUALIFIED SERVICE PERSONNEL.
The lightning flash with arrowhead symbol, within an equilateral triangle, is intended to alert the user to the presence of uninsulated “dangerous voltage” within the apparatus’s enclosure that may be of sufficient magnitude to constitute a risk of electric shock to persons.
The exclamation point within an equilateral triangle is intended to alert the user to the presence of important operating and maintenance (servicing) instructions in the literature accompanying the apparatus.
CAUTION
1.Do not attempt to open the cabinet. There are no user serviceable parts inside. Refer all servicing to qualified service personnel.
2.Slots and openings in the cabinet and the sides or bottom are provided for ventilation. To ensure reliable operation and to protect the unit from overheating, these openings must not be blocked or covered. Avoid installation in enclosed spaces such as bookcases unless proper ventilation is provided.
3.Keep the unit away from radiators and other heat sources.
4.Do not push objects of any kind into the unit through the cabinet slots or openings as they could touch electrically live parts or short circuit parts resulting in a fire or electric shock.
5.To prevent fire or shock hazard, do not expose this unit to dripping or splashing, no objects filled with liquids, such as vases, should be placed on the unit.
6.Use the unit on a horizontal (flat) surface only.
7.Do not place any combustible objects on the unit (candles, etc.).
8.The LCD panel used in this unit is made of glass. Therefore, it can break when the unit is dropped or applied with impact. Be careful not to be injured by broken glass pieces in case the LCD panel breaks. The LCD panel is a very high technology product with 921,600 thin film transistors,
giving you fine picture details. Occasionally, a few non-active pixels may appear on the TV screen as a fixed point of blue, green or red. Please note that this does not affect the performance of your unit.
9.Disconnect the mains plug to switch off when the unit becomes faulty or not in use.
10.The mains plug shall remain readily operable.
11.Read the manual instructions to ensure correct and safe installation and interconnection of the unit in multimedia systems.
12.Keep a distance of 20cm around the ventilation openings of the unit.
13.Batteries (battery pack or batteries installed) shall not be exposed to excessive heat such as sunshine, fire or the like.
Do not place the unit on the furniture that is capable of being tilted by a child or an adult leaning, pulling, standing or climbing on it. A falling unit can cause serious injury or even death.
POWER SUPPLY
The main power supply is engaged when the main plug is plugged in a 220-240 V~, 50 Hz AC outlet. To operate the unit, press Q (power) to turn on the unit.
WARNING: LIVE PARTS INSIDE. DO NOT REMOVE ANY SCREWS.
WHEN CARRYING THIS UNIT
• At least 2 people are required when carrying this unit.
• Make sure to hold the upper and bottom frames of the unit firmly as illustrated.
WARNING: To prevent the spread of fire, keep candles or other open flames away from this product at all times
2
EN

|
Contents |
|
|
PRECAUTIONS ...................................................................... |
2 |
|
INTRODUCTION.................................................................. |
3 |
|
Supplied Accessories ................................................................................ |
4 |
|
Symbols Used in this Manual ............................................................... |
4 |
|
Attaching the Base ..................................................................................... |
4 |
|
Adjusting the Swivel Angles.................................................................. |
4 |
|
Installing the Batteries............................................................................... |
4 |
|
Remote Control.......................................................................................... |
4 |
|
Your TV ........................................................................................................... |
5 |
|
PREPARATION FOR USE .................................................... |
6 |
|
Antenna Connection................................................................................ |
6 |
|
External Connection................................................................................. |
6 |
|
Plug In the AC Power Cord................................................................. |
7 |
|
Initial Setup..................................................................................................... |
7 |
|
OPERATIONS ......................................................................... |
8 |
|
Watching a TV Programme.................................................................. |
8 |
|
Channel List ................................................................................................... |
8 |
|
Sleep Timer.................................................................................................... |
8 |
|
ECO Mode..................................................................................................... |
8 |
|
Sound Select.................................................................................................. |
8 |
|
TV Screen Information ............................................................................ |
9 |
|
EPG (Electronic Programme Guide) ............................................... |
9 |
|
Switching the Input Mode...................................................................... |
9 |
|
Photo / Music / Video Playback....................................................... |
10 |
|
Changing the TV Screen Display Mode ..................................... |
14 |
|
OTHER SETTINGS ............................................................. |
15 |
|
Picture Adjustment................................................................................. |
15 |
|
Advanced Picture Adjustment ......................................................... |
15 |
|
PC Settings .................................................................................................. |
16 |
|
Sound Adjustment .................................................................................. |
16 |
|
TV Settings .................................................................................................. |
17 |
|
Channel Settings....................................................................................... |
17 |
|
Setup Adjustment.................................................................................... |
19 |
|
Subtitle Settings ........................................................................................ |
19 |
|
Teletext......................................................................................................... |
20 |
|
Common Interface (CI) ....................................................................... |
20 |
|
DivX® VOD.............................................................................................. |
20 |
|
Software Download............................................................................... |
21 |
|
Demo ............................................................................................................. |
21 |
|
Reset Default ............................................................................................. |
21 |
|
Parental Lock.............................................................................................. |
21 |
Pb, Hg, Cd |
|
|
|
fun-Link.......................................................................................................... |
22 |
|
TROUBLESHOOTING GUIDE........................................ |
23 |
|
OTHER INFORMATIONS ................................................ |
24 |
|
Specifications .............................................................................................. |
24 |
|
Trademark Information ........................................................................ |
24 |
|
Declaration of Conformity................................................................. |
25 |
|
Servicing ........................................................................................................ |
25 |
|
Cabinet Cleaning...................................................................................... |
25 |
|
Panel Cleaning ........................................................................................... |
25 |
|
License ........................................................................................................... |
25 |
|
License Statement.............................................. |
end of book |
3
EN

Supplied Accessories
•Remote Control
•Batteries (R03 / AAA, 1.5 V x 2)
•Owner's Manual
•Screw kit for attaching the base
•AC power cord
Symbols Used in this Manual
The followings are the description for the symbols used in this manual.
If neither symbol appears, the operation is applicable to both.
DTV Digital TV operation ATV Analogue TV operation
Attaching the Base
You must attach the base to the unit to have it as a table top unit. Be sure the front and rear of the base match the proper direction.
•When attaching the base, ensure that all screws are tightly fastened. If the base is not properly attached, it could cause the unit to fall, resulting in injuries as well as damage to the unit.
•Make sure the table is in a stable location.
1Insert the main unit into metal neck of the base. Make sure not to put the AC power cord between the base and the unit.
At least 2 people are required for this step.
2Drive Phillips head screws into the 4 threaded holes at the rear of this unit until they are tight.
To remove the base from this unit
Unscrew the Phillips head screws on step 2. After the screws are removed, move the unit up from the base. Be careful not to drop the unit when you remove it.
Adjusting the Swivel Angles
You can adjust the viewing angle of your TV.
|
Top of the unit |
approx. |
approx. |
15° |
15° |
approx. |
approx. |
15° |
15° |
•While adjusting the swivel angle of your TV, hold the base firmly to prevent the TV from tipping over and falling down.
Installing the Batteries
Install the batteries (R03 / AAA, 1.5 V x 2) matching the polarity indicated inside battery compartment of the remote control.
Remote Control
1 |
|
|
|
|
15 |
|
|
||||
|
|
|
16 |
||
|
|
||||
2

 17
17
3


4

 18
18
5 |
|
|
|
|
|
|
|
|
19 |
|
|
|
|
||||||
6 |
|
|
|
|
|
|
|
|
|
|
|
|
|
|
|
|
|
|
|
7 |
|
|
|
|
|
|
|
|
|
8 |
|
|
|
|
|
|
|
|
20 |
|
|
|
|
||||||
9 |
|
|
|
|
|
|
|
|
|
|
|
|
|
|
|
|
|
|
|
10 |
|
|
|
|
|
|
|
|
21 |
|
|
|
|
||||||
11 |
|
|
|
|
|
|
|
|
|
|
|
|
|
|
|
|
|
|
|
|
|
|
|
|
|
|
|
|
|
12 |
|
|
|
|
|
|
|
|
|
13 |
|
|
|
|
|
|
|
|
22 |
|
|
|
|
|
|
|
|
||
|
|
|
|
|
|
|
|
||
14 |
|
|
|
|
|
|
|
||
|
|
|
|
||||||
|
|
|
|
|
|
|
|
|
|
|
|
|
|
|
|
|
|
|
|
4
EN

Your TV
 26
26

 10
10


 21
21
 15
15
 8
8
 1
1
|
34 33 |
29 |
28 |
31


 32
32
30


 27
27
12.RED / GREEN / YELLOW / BLUE (p. 8, 9, 10, 11, 20, 22)
23 |
|
Uses for EPG / teletext / fun-Link. |
|
|||||
13. |
|
|
|
|
buttons (p. 22) |
|||
|
|
Functionally useful for fun-Link. |
|
|||||
24 |
14. |
|
|
(expand) / |
(subpage) / |
(hold) / |
||
|
|
|
(text) / |
(reveal) / |
(index) (p. 20) |
|||
|
|
|
|
|||||
|
|
|
|
|||||
|
|
|
|
|||||
|
15. |
SOURCE |
|
(p. 9) |
|
|
||
25 |
|
SOURCE (control panel) works same function as |
||||||
|
|
OK to determine the setting menu. |
|
|||||
|
16. |
PICTURE MODE (p. 15) |
|
|
||||
26 |
17. |
SOUND MODE (p. 16) |
|
|
||||
18. |
GUIDE (p. 9) |
|
|
|
||||
|
|
|
|
|||||
|
19. |
ECO |
(p. 8) |
|
|
|||
20.I(information) (p. 9)
21. PROG. Î / ï(control panel) /
J/ K(remote control) (p. 8)
PROG. Î / ï (control panel) works same function as Î / ï (cursor) on the menu.
22. (subtitle) (p. 19)
Terminals
23.PC (VGA) Input jack (p. 7)
24.USB terminal (p. 10)
35 36 37
1.Q(power) (p. 6, 7)
Turns the unit on and go into the standby mode.
2.SLEEP (p. 8)
3.Number buttons (p. 8)
Selects the desired channel in TV mode and enters the password in the PIN code input field.
4.ASPECT  (p. 14)
5.BACK (p. 8)
Returns to the previous display.
6.Î / ï / Í / Æ (cursor) (p. 7)
7.OK
8. MENU (control panel) / MENU (remote control) (p. 15)
9.AUDIO (p. 8)
10.VOL. X / Y (control panel) /
 +/– (remote control) (p. 8)
VOL. X works same function as Æ (cursor) and VOL. Y works same function as Í (cursor) on the menu.
11.
 (mute) (p. 8)
•Data input from USB flash memory only.
•User should not connect any devices to the USB terminal such as digital camera, keyboard, mouse, etc. (because these will not work.)
•The software update is, in most cases, handled by an authorized service person or in some circumstances the user may be asked to do the software update themselves.
25.CI slot (p. 20)
26.HDMI (HDMI 1 / HDMI 2 / HDMI 3) Input jack (p. 6)
27.Headphone Audio Output jack
28.
 (aerial) Input jack (p. 6)
29.Audio Input jack for PC connection (p. 7)
30.Coaxial Digital Audio Output jack (p. 6)
31.Component Video, Composite Video and Audio (L/R) Input jacks (p. 6)
32.SCART jack (p. 6)
•The Audio (L) jack is for monaural input. The sound is heard from both speakers. Use this jack for a monaural audio devices.
33.AC power cord Inlet
34.Main power switch 

Turns this unit's main power on and off.
35.Illuminance sensor window
Alter the brightness of the TV screen automatically by detecting your room lighting level. Do not block anything in front of its window to work properly.
36.Standby / Power indicator
Lights up red when the unit goes into standby mode.
Light off when power is on.
37.Infrared sensor window
Receives the infrared rays transmitted from the remote control.
5
EN
PREPARATION FOR USE
Read this first
•No supplied cables are used with these connection. Please purchase the necessary cables at your local store.
•Illustration in the following connection are example. Read the manual accompanying your device for more detail.
•Before you connect, be sure your antenna or other device is connected properly before plugging in the AC power cord.
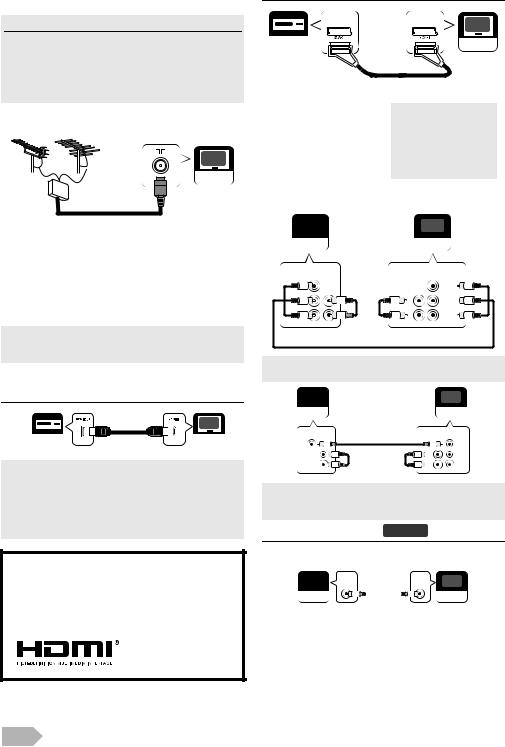
Antenna Connection
UHF VHF
Your TV
VHF/UHF
MIXER
RF cable
1Connect an RF cable to 
 (aerial) Input jack at the rear of this unit.
2Plug this unit into an AC outlet.
3Turns on the main power switch.
4When the Standby / Power indicator on the front panel lights red, then press Qto turn on the unit.
•If you like to connect an active DVB-T antenna, the antenna must have its own power supply.
•It is not possible to power the antenna from the TV.
External Connection
HDMI Connection (HDMI 1 / HDMI 2 / HDMI 3 )
Your device |
HDMI cable |
Your TV |
|
|
•This unit accepts 480i / 480p / 576i / 576p / 720p / 1080i / 1080p video signals and 32 kHz / 44.1 kHz / 48 kHz only 2 channel audio signals (LPCM).
•You need to select “PCM” for the digital audio output of the device you connect. Make sure the device outputs the digital audio. Audio sometimes makes no sound if you select “Bitstream”, etc.
Dear Customer,
By connecting an HDMI cable to your Funai LCD TV, you have to use only a certified HDMI cable to guarantee a sufficient immunity against parasitic frequency radiation. A certified HDMI cable can be identified by the HDMI logo on the cable or the cable package.
SCART Connection
Your device |
Your TV |
|
|
|
|
|
|
|
|
|
SCART cable |
|||||
|
|
|
|
|
|
|
|
|
|
|
|
|
|
|
|
|
|
|
|
|
|
|
|
|
|
|
|
|
|
|
|
|
|
Input |
|
|
|
|
|
|
Output |
|
||
|
S-Video |
Audio |
CVBS |
RGB |
Video and Audio (L/R) |
|
||||||||
|
(L/R) |
|
||||||||||||
|
|
|
|
|
|
|
|
|
|
|
|
|
||
|
Yes |
|
|
Yes |
Yes |
Yes |
Outputs the RF input |
|
||||||
|
|
|
signal converted as CVBS |
|
||||||||||
|
|
|
|
|
|
|
|
|
|
signal. |
|
|
|
|
|
|
|
|
|
|
|
|
|
|
|
|
|
|
|
Component / Composite video Connection |
||||||||||||||
|
|
|
|
|
|
|
|
|
|
|
||||
|
|
|
|
|
|
|
|
|
|
|
|
|
|
|
|
|
|
|
|
|
|
|
|
|
|
|
|
||
|
|
Your device |
|
|
|
|
|
|
|
|
||||
|
|
|
|
|
|
|
|
Your TV |
||||||
|
|
|
|
COMPONENT |
|
|
|
|
|
COMPONENT |
||||
|
|
|
|
VIDEO OUT |
audio |
|
/ VIDEO IN |
|||||||
|
|
|
|
AUDIO |
|
|
Y |
|||||||
|
|
|
|
|
OUT |
cable |
|
|
/ VIDEO |
|||||
|
|
|
|
|
|
|
|
|
|
|
||||
|
|
|
|
|
|
|
|
|
|
|
|
|
|
|
|
|
|
|
|
|
|
|
|
|
L |
|
Pb |
||
|
|
|
|
|
|
|
|
|
|
AUDIO |
|
Pr |
||
|
|
|
|
|
|
|
|
|
|
|
||||
|
|
|
|
|
|
|
|
|
|
R |
|
|||
component video cable
•This unit accepts 480i / 480p / 576i / 576p / 720p / 1080i video signals for component connection.
|
|
|
|
|
|
|
|
Your device |
|
||
Your TV |
|||
composite video cable
Y
/ VIDEO
|
L |
Pb |
|
AUDIO |
Pr |
audio cable |
R |
|
|
|
•Make sure the rest of Component Video jacks (Pb/Pr) are unplugged completely when you plug the Composite Video jack to Y / VIDEO terminal.
Audio Output connection DTV
For digital broadcasting only
|
|
|
digital audio |
|
|||
|
|
DIGITAL |
DIGITAL |
|
|||
|
|
COAXIAL IN |
coaxial cable |
COAXIAL |
|
||
|
|
AUDIO |
|
|
|
AUDIO |
|
|
|
|
|
|
|
OUT |
|
Your device |
|
|
|
|
|
||
|
|
|
|
Your TV |
|||
|
|
|
|
||||
6
EN

PC Connection
VGA cable with ferrite core
|
|
|
|
|
|
|
|
|
|
|
|
|
RGB |
PC-IN |
|
||||
|
|
|
AUDIO |
PC-IN |
|
||||
Your device |
|
||||||||
Your TV |
|||||||||
LINE OUT |
AUDIO |
||||||||
|
|
|
|
|
|
|
|
|
|
|
|
|
|
|
|
|
|
|
|
|
|
|
|
|
|
|
|
|
|
 Mini-plug audio cable
The following signals can be displayed.
Format |
Resolution |
Refresh rate |
VGA |
640 x 480 |
|
SVGA |
800 x 600 |
|
XGA |
1,024 x 768 |
|
WXGA |
1,360 x 768 |
|
WXGA+ |
1,440 x 900 |
60 Hz |
SXGA |
1,280 x 1,024 |
|
SXGA+ |
1,400 x 1,050 |
|
WSXGA+ |
1,680 x 1,050 |
|
HDTV |
1,920 x 1,080 |
|
•Other formats or non-standard signals will not be displayed correctly.
•Please use the VGA cable that has a ferrite core.
Plug In the AC Power Cord
Make sure that the AC power cord must be plugged to an AC outlet after all the necessary connections are completed.
AC outlet |
Your TV |
Initial Setup
This section will guide you through the unit's initial setting which includes selecting a language for your on-screen menu and auto scan, which automatically scans and memorises viewable channels.
1After making all the necessary connections, turns on the unit using the main power switch, then press Q.
2Use Î / ï repeatedly to select the menu language, then press OK.
|
|
InitialI iti l Setupt |
Language |
|
|
|
Please select your language. |
Български |
|
|
|
|
Česky |
|
|
|
|
Dansk |
|
|
|
|
Deutsch |
|
|
|
|
Eesti |
|
|
|
|
Ελληνικά |
|
|
|
|
English |
|
|
|
|
|
|
|
|
Select |
Exit |
|
3 |
Use Î / ï to select the location, then press OK. |
|||
•Select [at Home], this unit is set to maximise the energy efficiency for home setting and it can be adjusted through a choice of picture and sound quality according to your preference.
•Select [Retailstore], this unit will be set up with predefined setting for retail displays. If you select [Retailstore], the settings of picture and sound quality you adjusted will not be memorised after the unit goes to the standby mode.
•When “Initial Setup” (p. 7) is completed, you cannot change the location setting unless you restore this unit to “Factory Reset” (p. 22) and that restarts all over again such as channel scanning.
4Use Î / ï repeatedly to select the country, then press OK.
•Scan confirmation menu will appear.
•You can also set regions at “Region” (p. 19), when you select
[Spain] or [Portugal].
5When below display appear, then use Î / ï to select [Scan] and press OK to start scanning.
|
InitialI iti l Setupt |
|
|
Autoto Scan |
|
|
First, please connect antenna. |
|
|
|
|
|
|
Scan |
|
||
|
Start channel scan now? |
|
Skip |
|
|
|
|
|
|
||
|
If you skip this step, the channel |
|
|
|
|
|
scan could be performed in Menu. |
|
|
|
|
|
|
|
|
|
|
|
|
|
|
|
|
|
|
|
|
|
|
|
Back |
Select |
OK |
Exit |
|
|
|
|
|
|
|
•If you press MENU during channel scanning, this operation will be paused, then press MENU again to exit the initial setup.
7
EN

OPERATIONS
Read this first
These operations are accessible by remote control. Some may also be accessible by controls on the main unit.
Watching a TV Programme
To select a channel
Use  J/ Krepeatedly to select your desired channel, or use the Number buttons to enter a channel number, then press OK for quicker access.
(e.g.) If you want to select the channel 24 without pressing OK, press 2 first, then press 4 within 3 seconds.
To adjust the volume
Use  +/– to adjust the audio volume.
Press  to turn on or off the sound right away.
•You can recover the original volume by pressing  again or
 +/–.
+/–.
Channel List
You can easily find a channel you want.
1Press OK while watching a programme.
2Use Î / ï to select the channel you want to watch, then press OK.
Channell Listi
|
|
|
|
|
|
|
|
|
|
|
|
Prev Page |
Next Page |
|
|
|
|
|
|
1 |
|
|
Radio Channel |
|
|
|
|
|
|
2 |
|
|
Analogue Channel |
|
|
|
|
|
|
• Use RED / GREEN to move to the previous or next page.
3 Press BACK to exit.
• You can edit the channel list at “Channel Settings” (p. 17).
Sleep Timer
The sleep timer can be set the unit to go to the standby mode after an incremental period of time.
1Press SLEEP repeatedly to change the sleep time period.
•Each time you press SLEEP, the timer increases from 10 minutes up to 120 minutes.
•Press SLEEP repeatedly until [Off] appears to cancel the sleep timer.
•If the unit goes into standby mode, the sleep timer will be cancelled.
ECO Mode
When you set [ECO Mode] to [On], backlight brightness will be reduced automatically which may save on power consumption.
Press ECO  repeatedly to select [On] or [Off].
On The illuminance sensor senses the brightness of the environment and, darkens the backlight automatically when the room gets dark.
Off The illuminance sensor is not effect, and the backlight level gets back the value you adjusted.
Sound Select
DTV
Press AUDIO to display currently selected audio language with the number of available ones and press repeatedly to cycle through them.
•The display image can be found on the “TV Screen Information” (p. 9).
|
Dolby Digital sound |
|
|
|
Dolby Digital Plus sound |
|
|
|
HE-AAC sound |
|
|
no icon |
MPEG sound |
ATV
Press AUDIO to display currently selected audio mode and press repeatedly to cycle through the available audio mode.
(e.g.)
Nicam Stereo 
 Mono
Mono
Nicam |
|
Nicam |
|
Mono |
Dual1 |
|
Dual2 |
|
|
|
|
Nicam Mono 
 Mono
Mono
Stereo 
 Mono
Mono
Dual1 
 Dual2
Dual2
Mono
8
EN

TV Screen Information
You can see the broadcasting information.
1Press Ito display fewer information and press again more information will appear.
English
Dual 1
English
1Channel name
2Present programme name / Use Í / Æ to switch the present
time |
and next programme. (if |
|
available) |
3Current time
4Channel number
5Resolution / Format / TV aspect ratio
6Audio language (DTV) / Audio Mode (ATV)
7Audio mode (DTV)
8 |
Subtitle (p. 19) |
|
|
|
|
is displayed if the subtitle of |
|
|
|
|
|||
|
|
|
the |
|
TV programme is available. |
|
|
|
|
|
|
|
is displayed if the subtitle of |
|
|
|
|
|
|
|
|
|
|
the |
TV programme is for hearing |
||
|
|
impaired. |
||||
9 |
Programme information When the programme |
|||||
|
|
information consists of more |
||||
|
|
than 3 lines, use Î / ï to scroll. |
||||
10 Audio Description (p. 17) |
|
|
|
|
is displayed when the TV |
|
|
|
programme provides additional |
||||
|
|
audio description for visually |
||||
|
|
impaired. |
||||
11 |
Teletext (p. 20) |
|
|
|
|
is displayed if the teletext of |
|
|
|
|
|
|
|
|
|
TV programme is available. |
||||
12 |
Scrambled programme |
|
|
|
|
is displayed, when you are |
|
|
|
|
|||
|
|
watching the scrambled |
||||
|
|
programme. |
||||
13 Parental rating (p. 21) |
|
|
|
|
is displayed if the parental |
|
|
|
|
|
|||
|
|
|
rating of TV programme is |
|||
|
|
available. |
||||
|
|
* The icon may differ depending |
||||
|
|
on the ratings. |
||||
14 Lock status (p. 21) |
|
|
|
|
is displayed when you are |
|
|
|
|
|
|||
|
|
|
watching the TV programme |
|||
|
|
which you set the parental lock |
||||
|
|
or channel lock. |
||||
15 |
ATV broadcast |
|
|
|
|
is displayed when it receives |
|
|
|
|
|||
|
|
|
analogue TV broadcast. |
|||
|
DTV broadcast |
|
|
|
|
is displayed when it receives |
|
|
digital TV broadcast. |
||||
|
Radio service |
|
|
|
|
is displayed when it receives |
|
|
|
|
|
|
|
|
|
digital audio broadcast. |
||||
2 Press BACK to exit.
EPG (Electronic Programme Guide)
DTV
You can easily find a channel or see the detailed channel information. EPG gives you scheduled information of the TV programmes.
1 Press GUIDE and use Î / ï to select a channel.
Programme Guide
Viewing date: Tue Feb Current time:Tue
  Feb
Feb


 Music
Music
Prev Page 
 Next Page
•Press RED or GREEN to move the channel list to the previous or next page.
•Press OK to watch the selected channel.
2Press Æ (cursor), then use Î / ï to select a programme.
•Press RED or GREEN to move the programme list to the previous or next day.
•Press OK to watch the selected programme if it is currently available.
3Press YELLOW to display more detailed programme information.
•When the programme information consists of more than 2 pages, use RED or GREEN to move to the previous or next page.
4Press GUIDE to exit.
Switching the Input Mode
You can switch the input mode to TV mode or external input mode.
1Press SOURCE  .
.
2Use Î / ï to select the input mode you want, then press
OK.
Select Input
TV
SCART
VIDEO
HDMI 1
HDMI 2
HDMI 3
PC
USB
•[COMPONENT] will be displayed if you connected component video cables to this unit.
9
EN
Loading...