


V2.12F

About FUNAI website
zURL: http://www.funai.de
zFrom the FUNAI website, you can learn more about our company, keep informed of the latest news about FUNAI, read more about our products, download related software and receive technical support.
zYou can download the latest version of firmware to keep the player in optimal condition at all times.
FUNAI makes no representation for the errors, omissions or updates of this document. FUNAI also makes no representation for the data or music files lost of the player. Users should download the latest version of the user's manual from our website.
FUNAI is a registered trademark of Funai Europe GmbH. Trademarks of Microsoft Windows Media and Windows are owned by Microsoft Corporation.Trademarks of other products mentioned in this user's manual are owned by respective companies or organizations.
○C 2004 Funai Europe GmbH. All rights reserved.
1
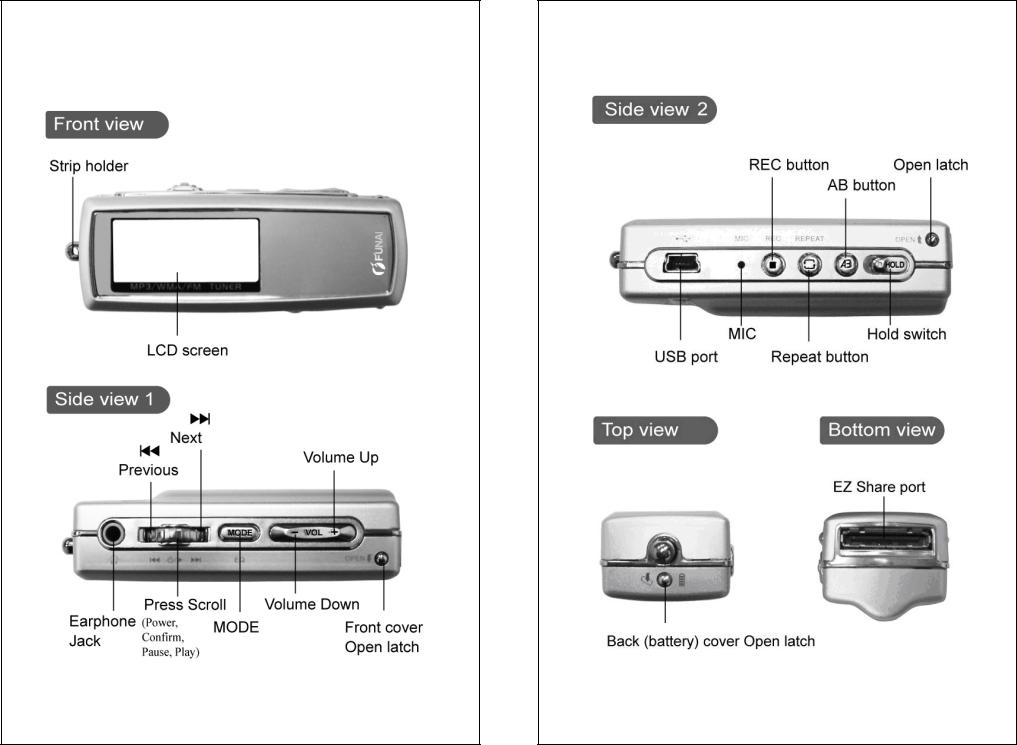
Product features
z Unique design
Mirror surface design; special grid-structure for
thumbnail pictures; changeable panels; and unique blue and white backlight.
z World-premiered player-to-player data transfer function
Exclusive data transfer kit to allow player-to-player data transfer for sharing of music, voice and file data.
z Changeable cabinets to match your
moods (MX-125D / 225D series)
High-quality aluminum alloy cabinets in a wide variety of colors allow you to change the appearance of the player to match your moods everyday.
z Multilingual display support
Supports over 40 languages and offers user interface in 10 different languages.
z Multiple audio file format support
Supports MP3, WMA and ADPCM (WAVE) formats.
z Super energy saving
Supports continuous playing for 18 hours for one alkaline battery.
2

Product features
z Firmware update
With the free online firmware download, you can update new firmware to the player via USB easily.
z Listening to FM channels
You can listen to any FM channel loud and clear with the Player. You can also search and store your favorite FM channels, and even record a program on the player
if you feel like it.
z 19 EQ options
The Player comes with 19 different equalizer options: Normal, Rock, Jazz, Classic, Pop, Ultra-Bass, Blues, Club, Dance, Full Bass & Treble, Full Treble, Large Hall, Live, Party, Reggae, Ska, Soft Music, Soft Rock, and Techno.
z High quality sound effects
The Player has an S/N ratio greater than 95dB.
z Portable storage device
The Player is also a portable storage device allowing high speed data transfer to and from a PC with USB
1.1 / 2.0 full-speed interface.
3
Contents |
|
About FUNAI website ........................................ |
1 |
Product features ................................................ |
2 |
Appearance....................................................... |
5 |
Installing batteries ............................................. |
7 |
Changing panel ............................................... |
12 |
Turning the player on....................................... |
14 |
Turning the player off....................................... |
15 |
LCD display description................................... |
16 |
Basic operation ............................................... |
18 |
Installing software............................................ |
20 |
Connecting the player to a PC......................... |
26 |
Copy files into the player ................................. |
28 |
Firmware update ............................................. |
29 |
Main menu ...................................................... |
33 |
Connecting your player with another player..... |
34 |
Playing back music.......................................... |
36 |
Recording and playing back voice files............ |
41 |
Listening to FM channels................................. |
43 |
Recording an FM program............................... |
45 |
Setup............................................................... |
48 |
Changing cabinets........................................... |
58 |
Troubleshooting............................................... |
59 |
Cautions .......................................................... |
61 |
List of accessories........................................... |
62 |
Firmware update failure................................... |
66 |
Certification information................................... |
67 |
4
Appearance |
Appearance |
(MX-125D/225D)
(MX-125D/225D)
|
(MX-125D/225D) |
|
(MX-125D/225D) |
|
|
|
|
|
|
|
|
5 |
|
6 |
|

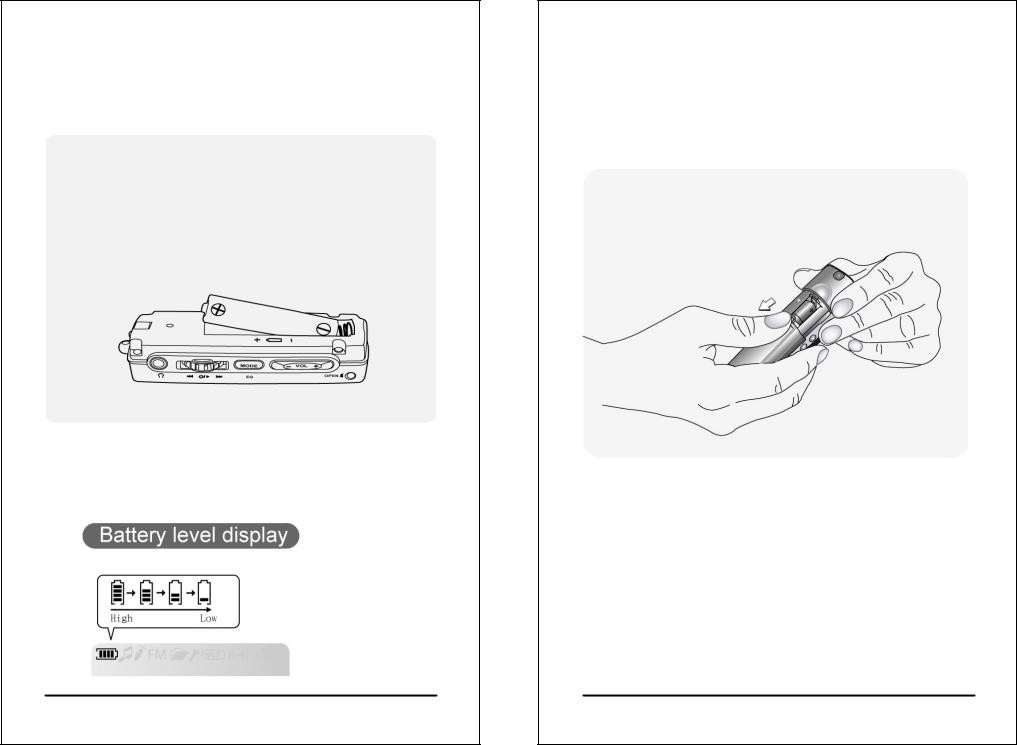
Installing batteries
Turn the player off before installing batteries. Open the back (battery) cabinet.
z Installing batteries for MX-125D / 225D
1. Press and hold the strip holder (p. 5) with one thumb and press and hold the back
cabinet Open latch (p. 6) with alternate thumb. Hold the player with other fingers
at the same time.
7
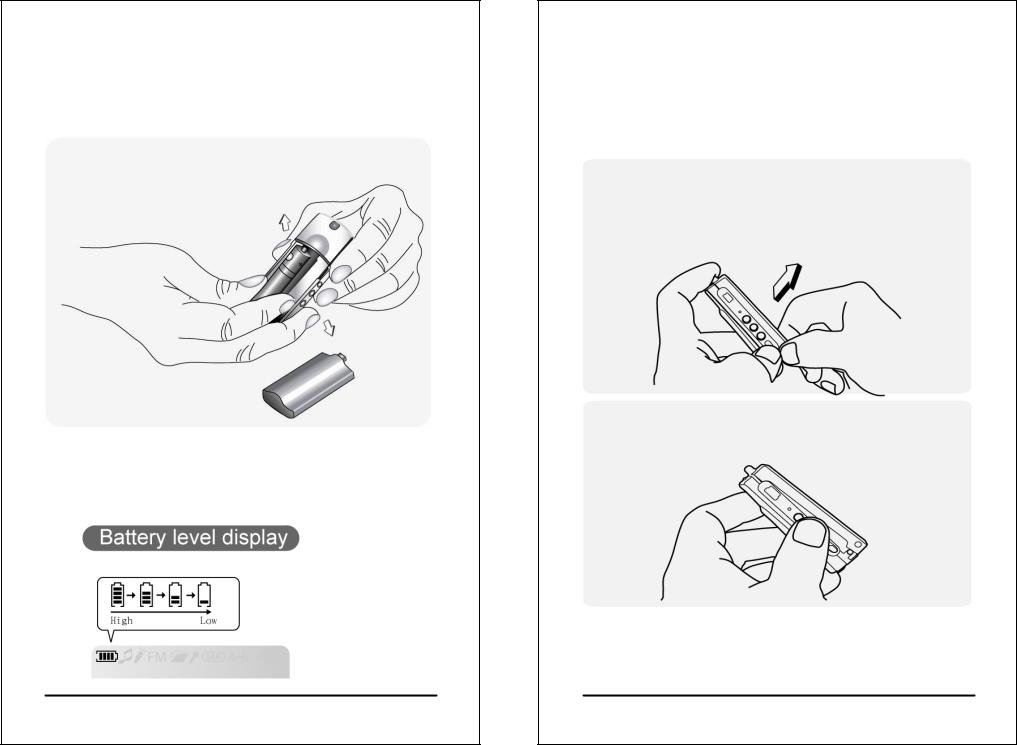
Installing batteries
(For MX-125D and MX-225D only)
2. Open the back cabinet by pressing and holding the two sides of Open latch as shown in the picture below. Do not press the Open latch directly to avoid damaging.
3. Move the back cabinet downward to detach it from the player.
8
Installing batteries
(For MX-125D and MX-225D only)
4.Install new batteries in the battery compartment. Make sure that the poles of batteries are installed correctly. Wrong battery installation will cause the player damage.
5.Install the back cabinet by aligning it to the player and then the latch.
9
Installing batteries
z Installing batteries for MX-110D / 210D
1. Press and hold the two sides of the player body with one hand, and press and push down
the battery cabinet with alternate thumb. Hold the player with other fingers
at the same time.
10
Installing batteries
(For MX-110D and MX-210D only)
2. Install new batteries in the battery compartment. Make sure that the poles of batteries are installed correctly. Wrong battery installation will cause
the player damage.
3. Install the back cabinet by aligning it to the player and then the latch.
11
Changing panel
(For MX-125D and MX-225D only)
Please power off the player and tear off the protective membrane before changing the front panel.
1. Hold the player with one hand and press and hold the front cabinet Open latch (p.5) with the thumb of another hand. Slowly lift the front cabinet near the bottom of the player.
2. Lift the front cabinet near the bottom of
the player about 1cm, as shown in the picture below.
12
Changing panel
(For MX-125D and MX-225D only)
1.Push the front cabinet toward the direction of the strip holder (p. 5) to detach it from the player.
2.Place the panel you want to replace with in the slot and install back the front cabinet according to the reverse order of opening the front cabinet.
13
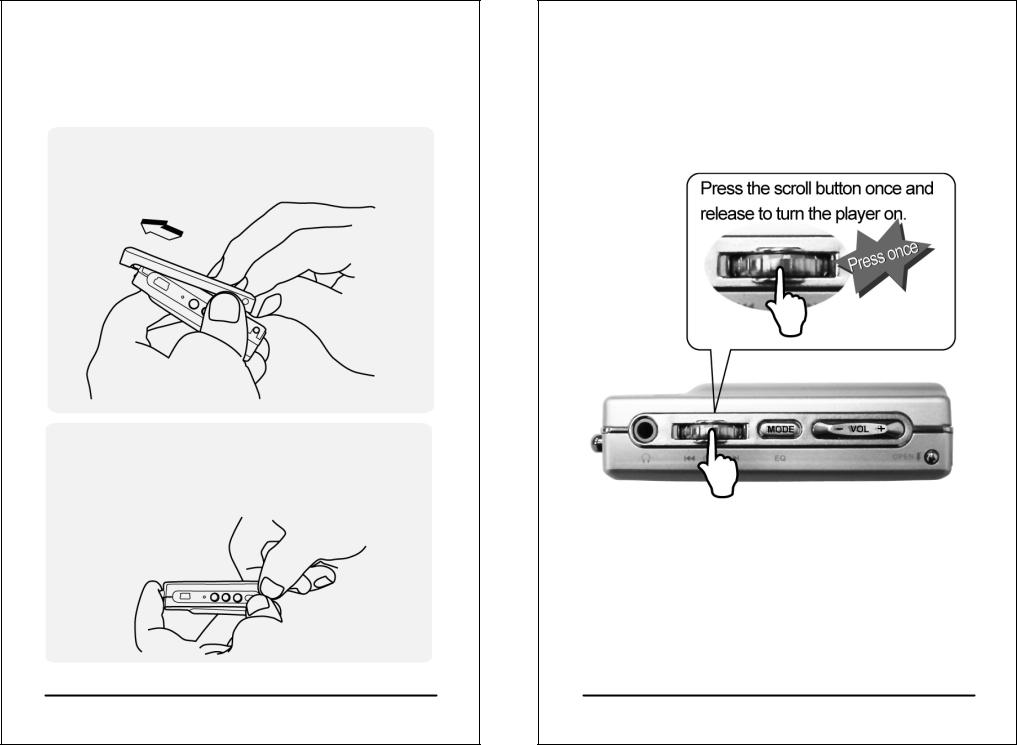
Turning the player on
zPress the Scroll button to turn the player on.
zIf the player turns on the backlight and show nothing on the screen, please try to exchange a new battery. If the status is still the same after exchanging a battery, try to install the firmware driver from your CDROM and update the firmware of the player, follow the procedure as p. 29.
14
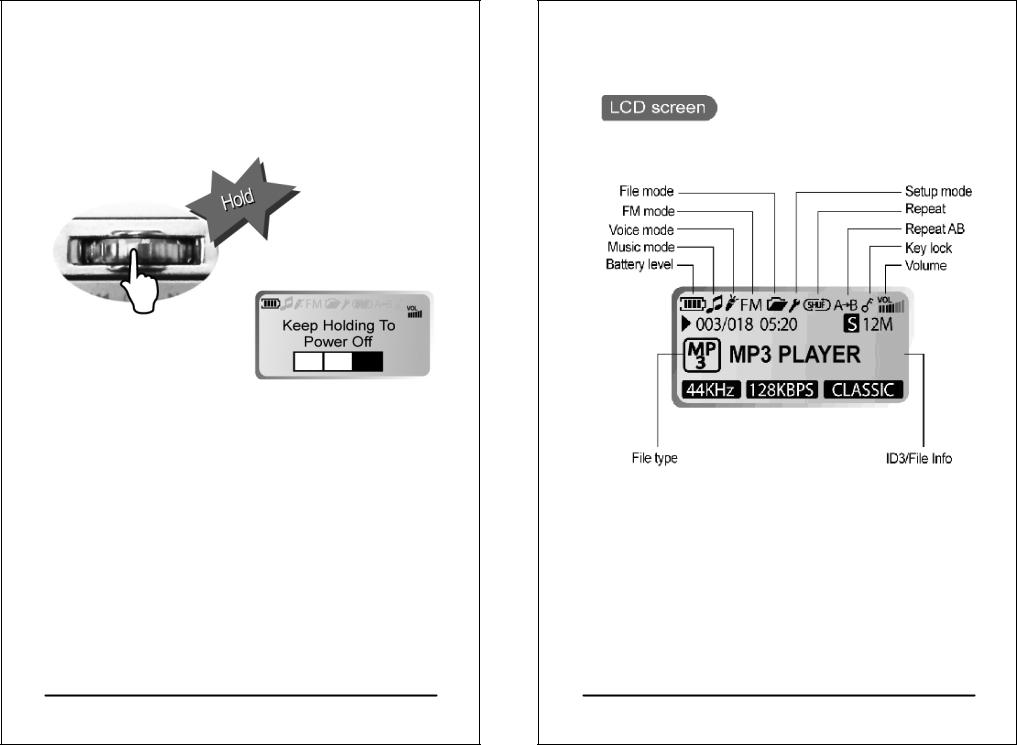
Turning the player off |
LCD display description |
zPress and hold the Scroll button for about 3 seconds to turn the player off.
z Timer off
The player will turn off automatically when being idle or operating for a period of time. You can set the timer from Setup to adjust the duration of idling or operating. (Default is 5 minutes) (See p. 54 and p. 55 for details)
15 |
16 |

LCD display description
*The free memory size will be less than the internal memory size (128MB or 256MB) when the player is empty because the firmware of player stored in the player to occupy some free space.
17
Basic operation
1.Select previous track/channel/file/item
2.Play/Pause/Confirm/Power
3.Select next track/channel/file/item
4.Enter Main Menu to select other mode / select EQ
5.Reduce volume
6.Increase volume
7.Start/Stop recording
8.Repeat/Shuffle
9.Repeat AB for language learning
10.Key lock / Hold switch
18
Basic operation
zPress + on the volume button to increase volume. Press - on the volume button to reduce volume.
zWhile playing back an audio file, press and hold MODE for about 3 seconds, the EQ indicator on the lower right corner of the LCD screen will blink. Scroll the Scroll button to select an EQ type and press Scroll button to confirm selection.
(Default EQ: ROCK)
EQ options cycle : NORMAL |
ROCK JAZZ |
|||
CLASSIC |
POP |
U.BASS |
BLUES |
CLUB |
DANCE |
FULL BT |
FULL TRE L.HALL |
LIVE |
|
PARTY REGGAE SKA SOFT S.ROCK |
||||
TECHNO |
NORMAL |
|
|
|
Where “U.BASS” means Ultra-Bass; “FULL BT” means Full Bass & Treble; “FULL TRE” means Full Treble; “L.HALL” means Large Hall; “S.ROCK” means Soft Rock.
19
Installing software
z Put the Installation CD in the CD-ROM, and the following screen will pop up on your PC monitor automatically.
(Screen is subject to change due to different versions of software.)
zIf the installation program does not run automatically, run the autorun.exe program on the Installation CD manually.
zThe Installation CD contains the driver installation (Firmware Download) program and the user's manual.
zClick Install to start software installation.
20
 Loading...