

Page 1
7583
Page 2

Table of Contents
• • • • • • • • • • • • • • • • • • • • • • • • • • • • • • • • • • • • • • • • • • • • • • • • • • • • • • • • • • • • • • • • • • • • • • • • • • • • • • • • • • • • • • • • • • • • • • •
Table of Contents
General Remarks...................................................................................................... 7
Safety Instructions ............................................................................................ 8
Instructions and Help ....................................................................................... 11
Symbols Used...................................................................................................... 13
Device Data on the Type Label ....................................................................... 14
Package Contents ............................................................................................. 15
Functions and Structure ......................................................................................... 16
Functions ............................................................................................................. 17
Connection Sockets .......................................................................................... 20
Buttons ................................................................................................................. 23
LEDs ...................................................................................................................... 24
Requirements for Operation ........................................................................... 27
Connecting ................................................................................................................. 28
Overview: Connecting the FRITZ!Box............................................................. 29
Placement............................................................................................................. 30
Connecting to Electrical Power ...................................................................... 33
Connecting with the Internet via VDSL or G.fast connection ..................... 34
Connecting to the Internet Access: Cable Connection ................................ 36
Connecting to the Internet Access: Fiber Optic Modem .............................. 38
Connecting to the Internet Access: Existing Router .................................... 39
Connecting to the Internet Access: Mobile Network ................................... 40
Connecting a Computer with a Network ....................................................... 42
Connecting the Computer via Wireless LAN ................................................ 44
Connecting Telephones .................................................................................... 48
Connecting Smartphones ................................................................................ 52
Connecting a Door Intercom System ............................................................. 54
• • • • • • • • • • • • • • • • • • • • • • • • • • • • • • • • • • • • • • • • • • • • • • • • • • • • • • • • • • • • • • • • • • • • • • • • • • • • • • • • • • • • • • • • • • • • • • •
2FRITZ!Box7583
Page 3

Table of Contents
• • • • • • • • • • • • • • • • • • • • • • • • • • • • • • • • • • • • • • • • • • • • • • • • • • • • • • • • • • • • • • • • • • • • • • • • • • • • • • • • • • • • • • • • • • • • • • •
User Interface ........................................................................................................... 56
Opening the User Interface.............................................................................. 57
Using the Wizard for Basic Configuration .................................................... 60
Logging Out of the User Interface .................................................................. 62
Using the Standard View and Advanced View.............................................. 64
Configuring ................................................................................................................ 65
Overview: Configuring the FRITZ!Box............................................................ 66
Configuring an Internet Connection via VDSL or G.fast .............................. 67
Configuring Internet Access via Cable Modem............................................. 68
Configuring Internet Access via Fiber Optic Modem.................................... 69
Configuring Internet Access via Another Router.......................................... 71
Configuring Internet Access via Another Router: IP Client......................... 72
Configuring Internet Access via a Wireless Device...................................... 73
Configuring Internet Access via the Mobile Network .................................. 74
Extending Wireless LAN Range ...................................................................... 75
Expanding a Wireless Radio Network ........................................................... 76
Configuring Your Telephone Numbers ......................................................... 78
Configuring Telephones ................................................................................... 79
Configuring a Door Intercom System ............................................................ 81
Saving Power with the FRITZ!Box................................................................... 82
Mesh with FRITZ! ...................................................................................................... 84
Mesh in the Home Network of the FRITZ!Box .............................................. 85
Updating the FRITZ!Box for Mesh................................................................... 87
Integrating FRITZ!Repeater in the FRITZ!Box Mesh .................................... 88
Integrating FRITZ!Powerline into the Mesh of the FRITZ!Box ................... 90
Deploying an Additional FRITZ!Box as a Mesh Repeater............................ 92
Using Telephony in the Mesh .......................................................................... 93
User Interface: Overview Menu.............................................................................. 94
Overview Menu: Settings and Features ........................................................ 95
• • • • • • • • • • • • • • • • • • • • • • • • • • • • • • • • • • • • • • • • • • • • • • • • • • • • • • • • • • • • • • • • • • • • • • • • • • • • • • • • • • • • • • • • • • • • • • •
3FRITZ!Box7583
Page 4

Table of Contents
• • • • • • • • • • • • • • • • • • • • • • • • • • • • • • • • • • • • • • • • • • • • • • • • • • • • • • • • • • • • • • • • • • • • • • • • • • • • • • • • • • • • • • • • • • • • • • •
User Interface: Internet Menu................................................................................ 98
Internet Menu: Settings and Features........................................................... 99
Using AVM Services for Diagnostics and Maintenance .............................. 100
Configuring Parental Controls ........................................................................ 102
Creating and Assigning Access Profiles ....................................................... 104
Editing Filter Lists ............................................................................................. 106
Configuring Priorities for Internet Use ......................................................... 107
Configuring Port Sharing.................................................................................. 109
Enabling Dynamic DNS..................................................................................... 111
Remote Access to the FRITZ!Box ................................................................... 112
Configuring VPN Remote Access.................................................................... 114
Configuring IPv6 ................................................................................................ 116
Configuring FRITZ!Box as a LISP Router....................................................... 118
User Interface: Telephony Menu............................................................................ 119
Telephony Menu: Settings and Features ...................................................... 120
Configuring and Using the Telephone Book ................................................. 121
Configuring and Using the Answering Machine........................................... 123
Using the Fax Function..................................................................................... 125
Configuring Call Diversion ............................................................................... 126
Configuring Call Blocks .................................................................................... 127
Configuring Do Not Disturb ............................................................................. 129
Setting Up an Alarm ......................................................................................... 130
Configuring a Dialing Rule ............................................................................... 131
User Interface: Home Network Menu....................................................................132
Home Network Menu: Settings and Features............................................... 133
Managing the Home Network.......................................................................... 134
Managing Network Devices ............................................................................. 137
Changing IPv4 Settings .................................................................................... 140
Distributing IPv4 Addresses ........................................................................... 143
Changing IPv6 Settings .................................................................................... 146
Configuring a Static IP Route .......................................................................... 148
• • • • • • • • • • • • • • • • • • • • • • • • • • • • • • • • • • • • • • • • • • • • • • • • • • • • • • • • • • • • • • • • • • • • • • • • • • • • • • • • • • • • • • • • • • • • • • •
4FRITZ!Box7583
Page 5

Table of Contents
• • • • • • • • • • • • • • • • • • • • • • • • • • • • • • • • • • • • • • • • • • • • • • • • • • • • • • • • • • • • • • • • • • • • • • • • • • • • • • • • • • • • • • • • • • • • • • •
Obtaining an IP Address Automatically ........................................................ 150
Configuring LAN Guest Access ....................................................................... 152
Configuring Wake on LAN ................................................................................ 154
Configuring USB Devices ................................................................................. 155
Configuring and Using the Media Server ...................................................... 163
Assigning a FRITZ!Box Name .......................................................................... 165
Controlling Smart Home Devices ................................................................... 166
User Interface: Wireless Menu............................................................................... 168
Wireless Menu: Settings and Features.......................................................... 169
Switching the Wireless Radio Network On and Off ..................................... 170
Selecting the Radio Channel............................................................................ 171
Configuring Wireless Guest Access .............................................................. 173
User Interface: DECT Menu..................................................................................... 177
DECT Menu: Settings and Features................................................................ 178
Enabling DECT Eco............................................................................................. 179
Allowing Non-encrypted Connections ........................................................... 180
Switching DECT On and Off.............................................................................. 181
User Interface: Diagnostics Menu..........................................................................182
Diagnostics Menu: Settings and Features..................................................... 183
Starting the Function Diagnostics ................................................................. 184
Using Security Diagnostics ............................................................................. 186
User Interface: System Menu................................................................................. 189
System Menu: Settings and Features............................................................ 190
Configuring Push Services .............................................................................. 191
Selecting Signaling of the “Info” LED ............................................................ 193
Locking Buttons...................................................................................................194
Configuring FRITZ!Box Users and FRITZ!Box Password ............................195
Saving Settings ...................................................................................................200
Loading Settings ............................................................................................... 201
Restarting the FRITZ!Box ................................................................................ 202
Updating FRITZ!OS ............................................................................................ 203
• • • • • • • • • • • • • • • • • • • • • • • • • • • • • • • • • • • • • • • • • • • • • • • • • • • • • • • • • • • • • • • • • • • • • • • • • • • • • • • • • • • • • • • • • • • • • • •
5FRITZ!Box7583
Page 6

Table of Contents
• • • • • • • • • • • • • • • • • • • • • • • • • • • • • • • • • • • • • • • • • • • • • • • • • • • • • • • • • • • • • • • • • • • • • • • • • • • • • • • • • • • • • • • • • • • • • • •
User Interface: Wizards Menu................................................................................208
Using Wizards .....................................................................................................209
FRITZ!NAS ................................................................................................................. 211
FRITZ!NAS Features.......................................................................................... 212
Expanding FRITZ!NAS Storage........................................................................ 214
Displaying FRITZ!NAS in a File Manager....................................................... 215
Saving FRITZ!NAS Storage .............................................................................. 216
MyFRITZ! .................................................................................................................... 217
What Is MyFRITZ!?.............................................................................................. 218
Creating a MyFRITZ! Account .......................................................................... 221
Configuring MyFRITZ!App: with Android ...................................................... 222
Configuring MyFRITZ!App: with iOS ............................................................... 223
Controlling FRITZ!Box with Keypad Codes ..........................................................224
Information on Keypad Codes......................................................................... 225
Configuration on the Telephone...................................................................... 227
Operating on the Telephone............................................................................. 240
Restoring Factory Settings with the Telephone ...........................................252
Malfunctions ..............................................................................................................254
Troubleshooting Procedures........................................................................... 255
Troubleshooting Chart...................................................................................... 256
Opening the User Interface with the Emergency IP Address .................... 259
Knowledge Base ................................................................................................ 261
Support ................................................................................................................ 262
Decommissioning and Disposal............................................................................. 264
Decommissioning............................................................................................... 265
Disposal ............................................................................................................... 266
Appendix..................................................................................................................... 267
Technical Specifications................................................................................... 268
Legal...................................................................................................................... 272
Information on Cleaning................................................................................... 276
Index............................................................................................................................ 277
• • • • • • • • • • • • • • • • • • • • • • • • • • • • • • • • • • • • • • • • • • • • • • • • • • • • • • • • • • • • • • • • • • • • • • • • • • • • • • • • • • • • • • • • • • • • • • •
6FRITZ!Box7583
Page 7

General Remarks
• • • • • • • • • • • • • • • • • • • • • • • • • • • • • • • • • • • • • • • • • • • • • • • • • • • • • • • • • • • • • • • • • • • • • • • • • • • • • • • • • • • • • • • • • • • • • • •
General Remarks
Safety Instructions .................................................................................................... 8
Instructions and Help ............................................................................................... 11
Symbols Used............................................................................................................. 13
Device Data on the Type Label ................................................................................ 14
Package Contents ...................................................................................................... 15
• • • • • • • • • • • • • • • • • • • • • • • • • • • • • • • • • • • • • • • • • • • • • • • • • • • • • • • • • • • • • • • • • • • • • • • • • • • • • • • • • • • • • • • • • • • • • • •
7FRITZ!Box7583
Page 8

General Remarks
• • • • • • • • • • • • • • • • • • • • • • • • • • • • • • • • • • • • • • • • • • • • • • • • • • • • • • • • • • • • • • • • • • • • • • • • • • • • • • • • • • • • • • • • • • • • • • •
Safety Instructions
Overview
Before connecting the FRITZ!Box, observe the following security
instructions in order to protect yourself, the surroundings, and the
FRITZ!Box from harm.
Fires and Electrical Shocks
Overloaded outlets, extension cords and power strips can cause fires
or electric shocks.
• Avoid using socket strips and extension cords if at all possible.
• Do not connect multiple extension cords or socket strips to each
other.
Overheating
Heat accumulation can lead to overheating of the FRITZ!Box and
subsequently damage the FRITZ!Box.
• Provide for sufficient air circulation around the FRITZ!Box.
• Make sure that the ventilation slits on the FRITZ!Box housing are
always unobstructed.
• The FRITZ!Box should not be placed on carpets or upholstery.
• Do not cover the FRITZ!Box.
Power Surges Caused by Lightning
During electrical storms, electrical surges caused by lightning present
a danger to connected electrical devices.
• Do not install the FRITZ!Box during an electrical storm.
Moisture, Liquids and Vapors
Moisture, liquids and vapors that find their way into the FRITZ!Box can
cause electric shocks or short circuits.
• Only use the FRITZ!Box indoors.
• • • • • • • • • • • • • • • • • • • • • • • • • • • • • • • • • • • • • • • • • • • • • • • • • • • • • • • • • • • • • • • • • • • • • • • • • • • • • • • • • • • • • • • • • • • • • • •
8FRITZ!Box7583
Page 9

General Remarks
• • • • • • • • • • • • • • • • • • • • • • • • • • • • • • • • • • • • • • • • • • • • • • • • • • • • • • • • • • • • • • • • • • • • • • • • • • • • • • • • • • • • • • • • • • • • • • •
• Never let liquids get inside the FRITZ!Box.
• Protect the FRITZ!Box from vapors and moisture.
Improper Cleaning
Improper cleaning with strong detergents, solvents or wet cloths can
cause damage to the FRITZ!Box.
• Please refer to the information about how to clean your
FRITZ!Box, see page 276.
Improper Opening and Repairs
The device contains hazardous components and should only be opened
by authorized repair technicians.
• Do not open the FRITZ!Box housing.
• If the FRITZ!Box needs to be repaired, please take it to a special
ized vendor.
Internet Security
Comprehensive information about how to protect your FRITZ!Box and
your home network from access by strangers is presented in the
internet at:
en.avm.de/guide
Radio and Electromagnetic Interference
Radio interference can be generated by every device that emits elec
tromagnetic signals. With so many devices transmitting and receiving
radio waves, interference can occur when radio waves overlap.
• Do not use the FRITZ!Box in places where the use of radio devices
is prohibited.
• Follow any instructions to switch off radio devices – especially in
hospitals, outpatient treatment centers, medical practices and
other medical facilities – in order to prevent interference with
sensitive medical equipment.
• • • • • • • • • • • • • • • • • • • • • • • • • • • • • • • • • • • • • • • • • • • • • • • • • • • • • • • • • • • • • • • • • • • • • • • • • • • • • • • • • • • • • • • • • • • • • • •
9FRITZ!Box7583
Page 10

General Remarks
• • • • • • • • • • • • • • • • • • • • • • • • • • • • • • • • • • • • • • • • • • • • • • • • • • • • • • • • • • • • • • • • • • • • • • • • • • • • • • • • • • • • • • • • • • • • • • •
• Consult your doctor and the manufacturer of your medical device
(pacemaker, hearing aid, electronically controlled implant, etc.) to
find out whether it could be affected by interference from your
FRITZ!Box.
• If applicable, maintain the recommended minimum distance of
15cm recommended by the manufacturers of medical devices in
order to prevent malfunctions of your medical device.
Potentially Explosive Environments
Under unfavorable conditions, radio waves in the vicinity of explosive
environments can cause fires or explosions.
• Do not install and operate your FRITZ!Box in the vicinity of explo
sive environments, flammable gases, areas in which the air
contains chemicals or particles like grain, dust or metal powder,
or in the vicinity of detonation grounds.
• In locations with potentially explosive atmospheres, and in the
vicinity of detonation grounds, follow the instructions to switch off
electronic devices in order to prevent interference with detonation
and ignition systems.
• • • • • • • • • • • • • • • • • • • • • • • • • • • • • • • • • • • • • • • • • • • • • • • • • • • • • • • • • • • • • • • • • • • • • • • • • • • • • • • • • • • • • • • • • • • • • • •
10FRITZ!Box7583
Page 11
General Remarks
• • • • • • • • • • • • • • • • • • • • • • • • • • • • • • • • • • • • • • • • • • • • • • • • • • • • • • • • • • • • • • • • • • • • • • • • • • • • • • • • • • • • • • • • • • • • • • •
Instructions and Help
Media
Use the comprehensive customer documentation to connect, configure
and operate your FRITZ!Box.
The latest information on products, important developments or
updates is presented in the social media.
After a FRITZ!OS update, download the latest manual from
en.avm.de/service/manuals.
Medium Contents Location
Manual
FRITZ!OS version status
Connecting, configuration and
operation
Range of functions of your
FRITZ! device
en.avm.
de/service/manuals
Technical specifications
Quick guide Connecting and configuration Is provided in print
with your FRITZ!Box
Online help
Instructions on configuration
http://fritz.box /
and operation
Help on the functions and
settings options in the user
interface
Knowledge
base
Solutions for common prob
lems during connection,
en.avm.de/service
configuration and operation
• • • • • • • • • • • • • • • • • • • • • • • • • • • • • • • • • • • • • • • • • • • • • • • • • • • • • • • • • • • • • • • • • • • • • • • • • • • • • • • • • • • • • • • • • • • • • • •
11FRITZ!Box7583
Page 12

General Remarks
• • • • • • • • • • • • • • • • • • • • • • • • • • • • • • • • • • • • • • • • • • • • • • • • • • • • • • • • • • • • • • • • • • • • • • • • • • • • • • • • • • • • • • • • • • • • • • •
Medium Contents Location
Social media The latest about the FRITZ!Box
and your FRITZ!Box home
network
Facebook
Instagram
Twitter
YouTube
• • • • • • • • • • • • • • • • • • • • • • • • • • • • • • • • • • • • • • • • • • • • • • • • • • • • • • • • • • • • • • • • • • • • • • • • • • • • • • • • • • • • • • • • • • • • • • •
12FRITZ!Box7583
Page 13
General Remarks
• • • • • • • • • • • • • • • • • • • • • • • • • • • • • • • • • • • • • • • • • • • • • • • • • • • • • • • • • • • • • • • • • • • • • • • • • • • • • • • • • • • • • • • • • • • • • • •
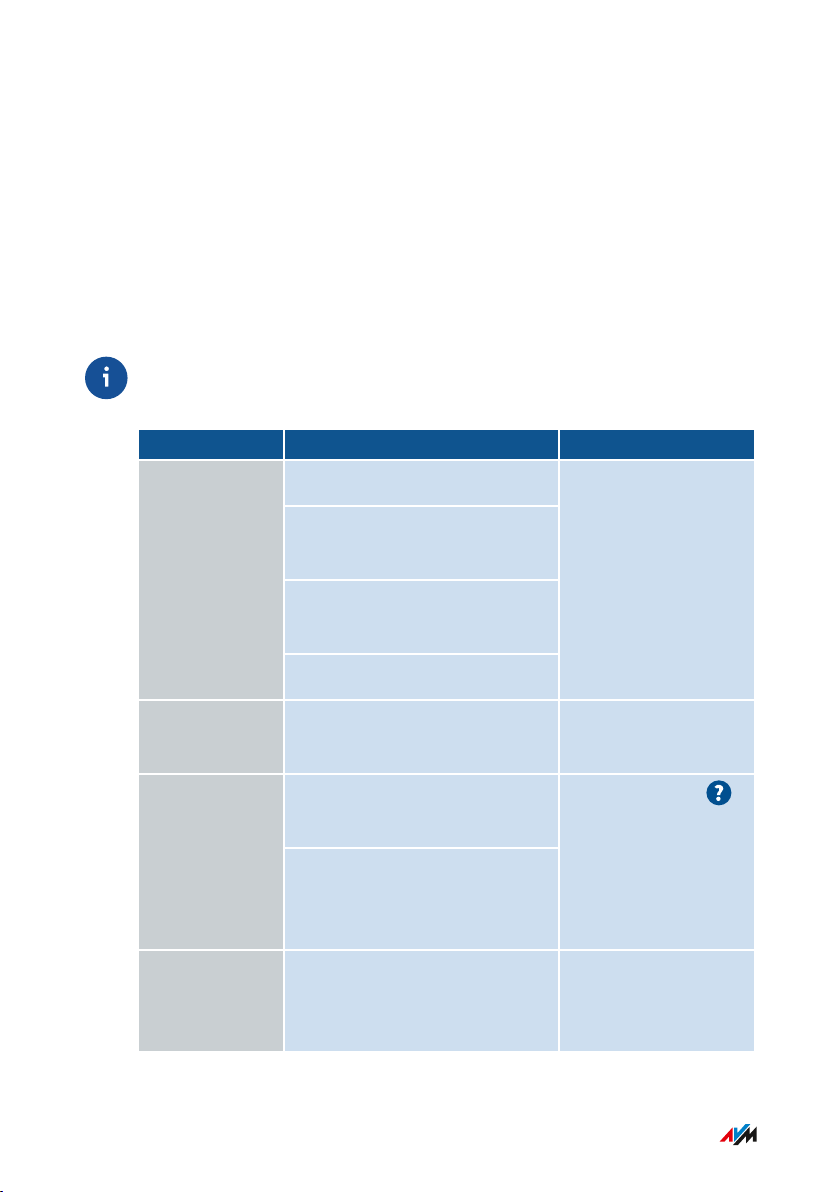
Symbols Used
Symbols used
The following symbols are used in this manual:
Symbol Meaning
Important message that should be complied with in order to
prevent material damage, errors or malfunctions
Useful tip for configuring and operating the FRITZ!Box
• • • • • • • • • • • • • • • • • • • • • • • • • • • • • • • • • • • • • • • • • • • • • • • • • • • • • • • • • • • • • • • • • • • • • • • • • • • • • • • • • • • • • • • • • • • • • • •
13FRITZ!Box7583
Page 14

H515.123.45.678.901
3779 8981 1562 8981 1234
FRITZ!Box 7583 WW
afbecd1234
00040E-123456789012
WLAN Network (SSID)
FRITZ!Box password
FRI !Box 7583
Serial no.
WLAN Network Key (WPA2)
Article no.: 2000 2847
CWMP account
Installation: http://fritz.box
Power units: 311P0W134,
311P0W165 12V 2,5A
AVM GmbH,
10547 Berlin
1
2
3
4
5
6
7
8
General Remarks
• • • • • • • • • • • • • • • • • • • • • • • • • • • • • • • • • • • • • • • • • • • • • • • • • • • • • • • • • • • • • • • • • • • • • • • • • • • • • • • • • • • • • • • • • • • • • • •
Device Data on the Type Label
Overview
Important device data on your FRITZ!Box, such as the preconfigured
network key, the FRITZ!Box password and the serial number, are
presented on the type label on the rear panel. The network key is
required in order to safely connect computers and other devices with
the FRITZ!Box. The FRITZ!Box password is needed to open the user
interface. The serial number should be provided when submitting
support requests.
Device Data on the Type Label
No. Meaning
1 Product name
2 Address of the user interface
3 Name of wireless radio network (SSID)
4 Password of the user interface
5 Network key (wireless LAN password)
6 Power adapter specification
7 Serial number
• • • • • • • • • • • • • • • • • • • • • • • • • • • • • • • • • • • • • • • • • • • • • • • • • • • • • • • • • • • • • • • • • • • • • • • • • • • • • • • • • • • • • • • • • • • • • • •
8 Article number
14FRITZ!Box7583
Page 15

General Remarks
• • • • • • • • • • • • • • • • • • • • • • • • • • • • • • • • • • • • • • • • • • • • • • • • • • • • • • • • • • • • • • • • • • • • • • • • • • • • • • • • • • • • • • • • • • • • • • •
Package Contents
Package contents
No. Supplied Part Details
1 FRITZ!Box7583
1 Power adapter white
1 Network cable also “LAN cable”, yellow
1 DSL cable Y cable, also suitable for bonding
connections
1 RJ45/2xRJ45 adapter black
1 Quick guide Connecting the FRITZ!Box
• • • • • • • • • • • • • • • • • • • • • • • • • • • • • • • • • • • • • • • • • • • • • • • • • • • • • • • • • • • • • • • • • • • • • • • • • • • • • • • • • • • • • • • • • • • • • • •
15FRITZ!Box7583
Page 16

Functions and Structure
• • • • • • • • • • • • • • • • • • • • • • • • • • • • • • • • • • • • • • • • • • • • • • • • • • • • • • • • • • • • • • • • • • • • • • • • • • • • • • • • • • • • • • • • • • • • • • •
Functions and Structure
Functions .................................................................................................................... 17
Connection Sockets ................................................................................................... 20
Buttons ........................................................................................................................ 23
LEDs ............................................................................................................................. 24
Requirements for Operation ................................................................................... 27
• • • • • • • • • • • • • • • • • • • • • • • • • • • • • • • • • • • • • • • • • • • • • • • • • • • • • • • • • • • • • • • • • • • • • • • • • • • • • • • • • • • • • • • • • • • • • • •
16FRITZ!Box7583
Page 17

Functions and Structure
• • • • • • • • • • • • • • • • • • • • • • • • • • • • • • • • • • • • • • • • • • • • • • • • • • • • • • • • • • • • • • • • • • • • • • • • • • • • • • • • • • • • • • • • • • • • • • •
Functions
Internet Router
• VDSL2 line with vectoring, also bundled (bonding)
• VDSL2 line with supervectoring, also bundled (bonding)
• G.fast line, also bundled (bonding)
Telephone System
The FRITZ!Box is a telephone system (or PBX: Private Branch
Exchange) for internet telephony (IP telephony, VoIP) on IP-based lines.
The following devices can be connected to the FRITZ!Box:
• 6 cordless (DECT) telephones
• 2 analog devices (telephones, answering machines, door inter
coms)
• 8 ISDN telephones or 1 ISDN telephone system
• 10 IP telephones (FRITZ!App Fon, for instance)
Up to five integrated answering machines can be used to save voice
messages and, upon request, send them to you by email. Via the inte
grated fax function you can also send and receive faxes without an
external fax machine.
Wireless Access Point
The FRITZ!Box is a wireless access point for any wireless LAN devices,
for instance:
• Notebooks
• Tablets
• Smartphones
• Wireless printers
• • • • • • • • • • • • • • • • • • • • • • • • • • • • • • • • • • • • • • • • • • • • • • • • • • • • • • • • • • • • • • • • • • • • • • • • • • • • • • • • • • • • • • • • • • • • • • •
17FRITZ!Box7583
Page 18

Functions and Structure
• • • • • • • • • • • • • • • • • • • • • • • • • • • • • • • • • • • • • • • • • • • • • • • • • • • • • • • • • • • • • • • • • • • • • • • • • • • • • • • • • • • • • • • • • • • • • • •
DECT Base Station
The FRITZ!Box is a DECT base station that supports the DECTULE stan
dard. The following DECT devices can be operated simultaneously on
the FRITZ!Box:
• up to 6 cordless (DECT) telephones
• up to 10 FRITZ!DECT200/210 outlet switches
• up to 12 FRITZ!DECT301/300/Comet DECT radiator controls
• up to 10 FRITZ!DECT400 switches
• up to 10 Smart Home devices via HANFUN
Hub in the Home Network
The FRITZ!Box is the hub in the home network. All of the devices
connected with the FRITZ!Box make up the home network. With the
FRITZ!Box you can keep track of all devices. The functions available for
the home network include:
• A media server for transmission of music, pictures and video to
playback devices in the home network
• MyFRITZ!, for access to your own FRITZ!Box over the internet from
anywhere
• FRITZ!NAS, for easy access to all files in the network
USB Ports
The FRITZ!Box has two USB3.0 ports to which you can connect the
following devices:
• USB storage devices (for example, flash drives. external hard
drives, card readers)
• USB printers, USB all-in-one printers, USB scanners
• USB hubs
• • • • • • • • • • • • • • • • • • • • • • • • • • • • • • • • • • • • • • • • • • • • • • • • • • • • • • • • • • • • • • • • • • • • • • • • • • • • • • • • • • • • • • • • • • • • • • •
18FRITZ!Box7583
Page 19

Functions and Structure
• • • • • • • • • • • • • • • • • • • • • • • • • • • • • • • • • • • • • • • • • • • • • • • • • • • • • • • • • • • • • • • • • • • • • • • • • • • • • • • • • • • • • • • • • • • • • • •
Smart Home
The following Smart Home devices can be registered with the
FRITZ!Box at the same time and configured and controlled via the
FRITZ!Box:
Type of Device Number Features
Smart plugs
• FRITZ!DECT 200
• FRITZ!DECT 210
Radiator control
• FRITZ!DECT 300
• FRITZ!DECT 301
• Comet DECT
Button
• FRITZ!DECT 400
Smart Home devices via
HAN-FUN
up to 10 • Control the power supply to
connected devices
• Measure the power
consumption of connected
devices
up to 12 • Control the room tempera
ture automatically and save
energy costs
up to 10 • Switch smart plugs
up to 10 • Connect Smart Home
devices from other manu
facturers with the FRITZ!Box
• Switch smart plugs
• • • • • • • • • • • • • • • • • • • • • • • • • • • • • • • • • • • • • • • • • • • • • • • • • • • • • • • • • • • • • • • • • • • • • • • • • • • • • • • • • • • • • • • • • • • • • • •
19FRITZ!Box7583
Page 20
1 2 3 54 6
7
Functions and Structure
• • • • • • • • • • • • • • • • • • • • • • • • • • • • • • • • • • • • • • • • • • • • • • • • • • • • • • • • • • • • • • • • • • • • • • • • • • • • • • • • • • • • • • • • • • • • • • •
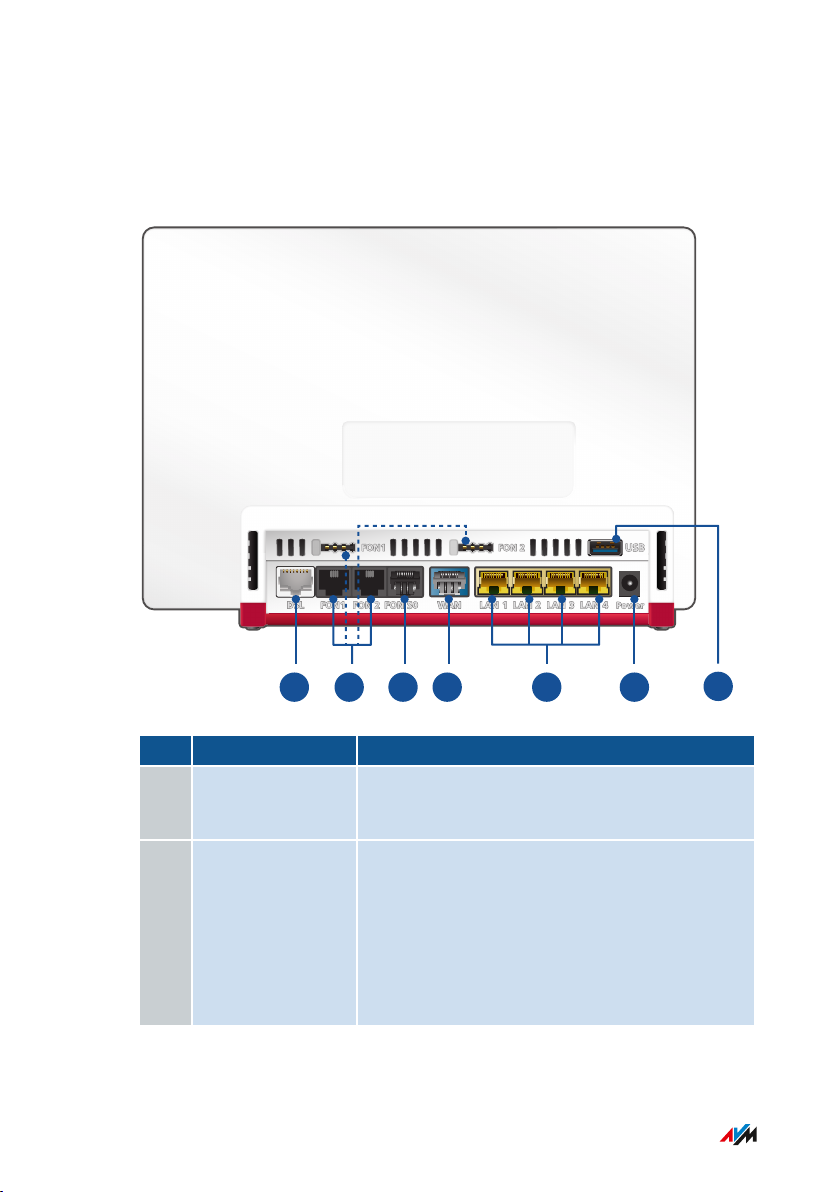
Connection Sockets
Connector Panel
No. Name Function
1 DSL Socket for connecting to the VDSL or G.fast
line
2 FON1 and FON2 R11 and TAE sockets for connecting analog
telephones, answering machines, fax
machines, and door intercom systems You
can use one of the FON1 jacks and one of the
FON2 jacks, but not all jacks at the same
time.
• • • • • • • • • • • • • • • • • • • • • • • • • • • • • • • • • • • • • • • • • • • • • • • • • • • • • • • • • • • • • • • • • • • • • • • • • • • • • • • • • • • • • • • • • • • • • • •
20FRITZ!Box7583
Page 21

Functions and Structure
• • • • • • • • • • • • • • • • • • • • • • • • • • • • • • • • • • • • • • • • • • • • • • • • • • • • • • • • • • • • • • • • • • • • • • • • • • • • • • • • • • • • • • • • • • • • • • •
No. Name Function
3 FONS
0
RJ45 port for connecting ISDN telephones
and telephone systems (PBXs)
4 WAN RJ45 socket for connecting to a modem or a
router for internet access. If the socket is not
used for the internet connection, then it is an
additional gigabit Ethernet port for
connecting computers and other networkcompatible devices.
5 LAN1 to LAN4 Ports for connecting computers and other
network-compatible devices like hubs and
game consoles
6 Power Socket for plugging in the power supply
7 USB USB3.0 port for connecting USB devices like
printers or storage media
• • • • • • • • • • • • • • • • • • • • • • • • • • • • • • • • • • • • • • • • • • • • • • • • • • • • • • • • • • • • • • • • • • • • • • • • • • • • • • • • • • • • • • • • • • • • • • •
21FRITZ!Box7583
Page 22
Power
Fon
WLAN
Internet
Info
1
Functions and Structure
• • • • • • • • • • • • • • • • • • • • • • • • • • • • • • • • • • • • • • • • • • • • • • • • • • • • • • • • • • • • • • • • • • • • • • • • • • • • • • • • • • • • • • • • • • • • • • •
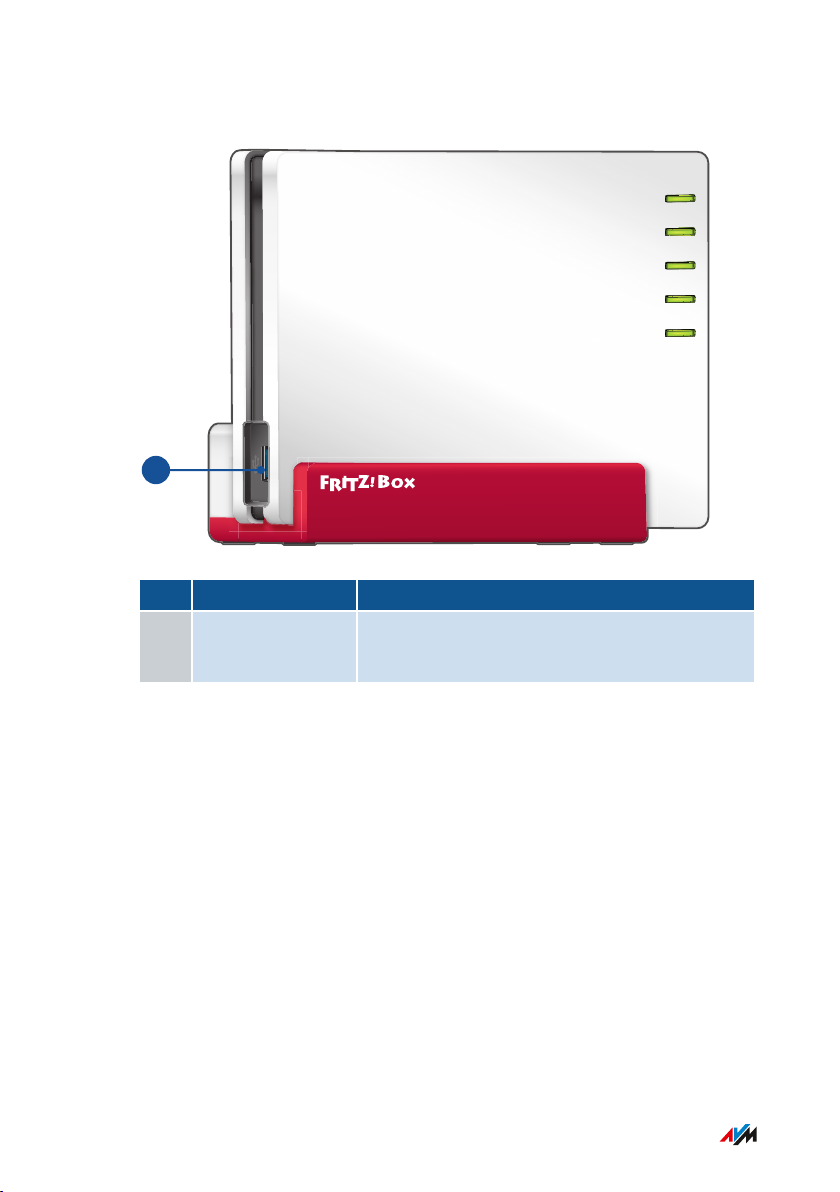
Connectors on the Sides: USB
No. Name Function
1 USB USB3.0 port for connecting USB devices like
printers or storage media
• • • • • • • • • • • • • • • • • • • • • • • • • • • • • • • • • • • • • • • • • • • • • • • • • • • • • • • • • • • • • • • • • • • • • • • • • • • • • • • • • • • • • • • • • • • • • • •
22FRITZ!Box7583
Page 23
Power
Fon
WLAN
Internet
Info
1
2
3
Functions and Structure
• • • • • • • • • • • • • • • • • • • • • • • • • • • • • • • • • • • • • • • • • • • • • • • • • • • • • • • • • • • • • • • • • • • • • • • • • • • • • • • • • • • • • • • • • • • • • • •
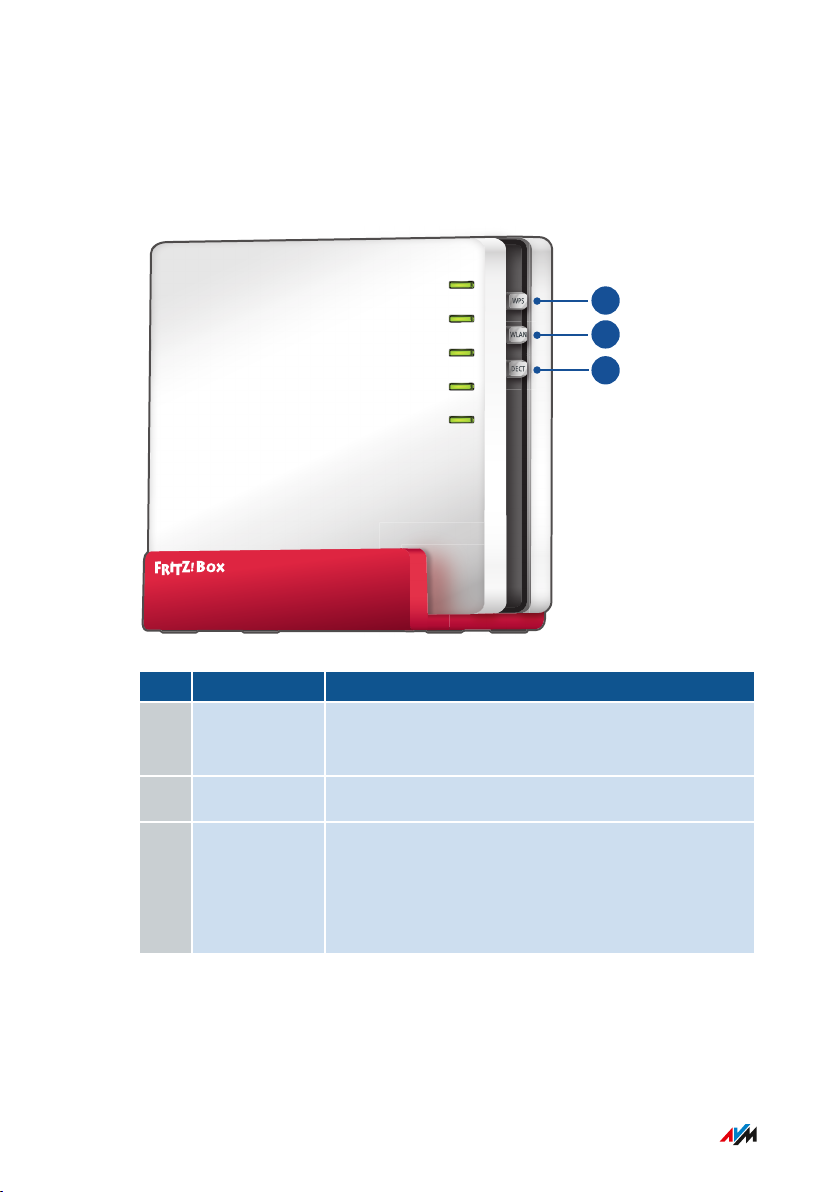
Buttons
Button Functions
No. Button Function
1 WPS Register wireless devices with the FRITZ!Box via
WPS; see page 47
2 WLAN Switch wireless LAN on and off; see page 170
3 DECT • Register cordless telephones with the
• • • • • • • • • • • • • • • • • • • • • • • • • • • • • • • • • • • • • • • • • • • • • • • • • • • • • • • • • • • • • • • • • • • • • • • • • • • • • • • • • • • • • • • • • • • • • • •
FRITZ!Box; see page 48
• Find misplaced cordless phones (paging
call)
23FRITZ!Box7583
Page 24
Info
Fon
WLAN
Internet
Power
123
4
5
Functions and Structure
• • • • • • • • • • • • • • • • • • • • • • • • • • • • • • • • • • • • • • • • • • • • • • • • • • • • • • • • • • • • • • • • • • • • • • • • • • • • • • • • • • • • • • • • • • • • • • •
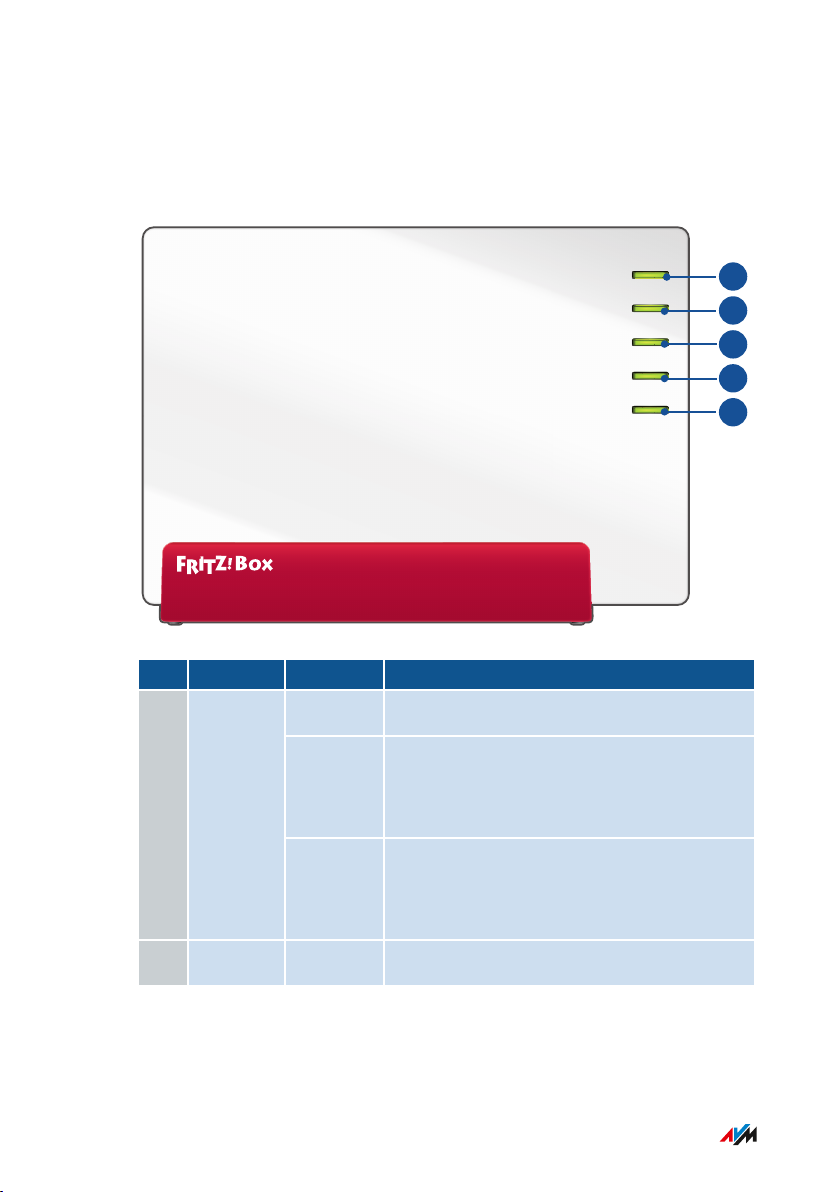
LEDs
Meaning of the LEDs
No. LED Condition Meaning
1 Power
off The device has no electric power
flashing Device has electric power and connection
to DSL is being established or is inter
rupted
on Device has electric power. The connection
to DSL is being established. The
FRITZ!Box is ready for operation
2 Internet on Connected to internet
• • • • • • • • • • • • • • • • • • • • • • • • • • • • • • • • • • • • • • • • • • • • • • • • • • • • • • • • • • • • • • • • • • • • • • • • • • • • • • • • • • • • • • • • • • • • • • •
24FRITZ!Box7583
Page 25

Functions and Structure
• • • • • • • • • • • • • • • • • • • • • • • • • • • • • • • • • • • • • • • • • • • • • • • • • • • • • • • • • • • • • • • • • • • • • • • • • • • • • • • • • • • • • • • • • • • • • • •
No. LED Condition Meaning
2 Internet flashing There is an active connection to a modem
or router, but the internet connection is
not enabled or is being established now.
3 WLAN
4 Fon
off Wireless LAN is switched off
on Wireless LAN is switched on
lit up Registration of a wireless, DECT, Smart
Home or powerline device successful
flashing • Applying changes to the wireless
LAN settings.
• Switching wireless LAN function on
or of
• WPS in progress: Registration proce
dure for a WiFi, DECT, Smart Home
or powerline device in progress
flashing
fast
WPS procedure aborted: More than two
devices are performing WPS at the same
time; repeat WPS procedure.
off No calls in progress
on Telephone connected via landline
network
flashing Messages in your voice mail/email inbox
This feature must be supported by your
telephony provider.
5 Info off None of the following processes active
• • • • • • • • • • • • • • • • • • • • • • • • • • • • • • • • • • • • • • • • • • • • • • • • • • • • • • • • • • • • • • • • • • • • • • • • • • • • • • • • • • • • • • • • • • • • • • •
25FRITZ!Box7583
Page 26

Functions and Structure
• • • • • • • • • • • • • • • • • • • • • • • • • • • • • • • • • • • • • • • • • • • • • • • • • • • • • • • • • • • • • • • • • • • • • • • • • • • • • • • • • • • • • • • • • • • • • • •
No. LED Condition Meaning
on • Adjustable; see Selecting Signaling
of the “Info” LED, page 193
• AVMStick&Surf with FRITZ!WLAN
USB Stick is concluded
flashing • FRITZ!OS Updating
• Adjustable; see Selecting Signaling
of the “Info” LED, page 193
• AVM Stick & Surf for FRITZ!WLAN
USB Stick in progress
on
or
flashing
red
Error:
• Open the user interface, see page 57.
• Follow the instructions on the
“Overview” page in the user inter
face.
• • • • • • • • • • • • • • • • • • • • • • • • • • • • • • • • • • • • • • • • • • • • • • • • • • • • • • • • • • • • • • • • • • • • • • • • • • • • • • • • • • • • • • • • • • • • • • •
26FRITZ!Box7583
Page 27

Functions and Structure
• • • • • • • • • • • • • • • • • • • • • • • • • • • • • • • • • • • • • • • • • • • • • • • • • • • • • • • • • • • • • • • • • • • • • • • • • • • • • • • • • • • • • • • • • • • • • • •
Requirements for Operation
Requirements
• For an internet connection via DSL:
- VDSL connection or
- G.fast connection
• For an internet connection via cable:
- cable connection with cable modem
• For an internet connection via fiber optic:
- fiber optic connection with fiber optic modem
• For an internet connection via mobile network:
- USB modem with mobile internet access
• For an internet connection via another access device
- any internet connection with a modem or router
• Computer with network connection (to establish a connection with
the internet connection of the FRITZ!Box via LAN cable)
• Computer, tablet or smartphone with support for wireless LAN (to
establish a wireless connection with the internet connection of the
FRITZ!Box)
• An up-to-date web browser
For comprehensive technical information about your FRITZ!Box,
see page 268.
• • • • • • • • • • • • • • • • • • • • • • • • • • • • • • • • • • • • • • • • • • • • • • • • • • • • • • • • • • • • • • • • • • • • • • • • • • • • • • • • • • • • • • • • • • • • • • •
27FRITZ!Box7583
Page 28

Connecting
• • • • • • • • • • • • • • • • • • • • • • • • • • • • • • • • • • • • • • • • • • • • • • • • • • • • • • • • • • • • • • • • • • • • • • • • • • • • • • • • • • • • • • • • • • • • • • •
Connecting
Overview: Connecting the FRITZ!Box..................................................................... 29
Placement.................................................................................................................... 30
Connecting to Electrical Power .............................................................................. 33
Connecting with the Internet via VDSL or G.fast connection ............................ 34
Connecting to the Internet Access: Cable Connection ........................................ 36
Connecting to the Internet Access: Fiber Optic Modem ..................................... 38
Connecting to the Internet Access: Existing Router ........................................... 39
Connecting to the Internet Access: Mobile Network ........................................... 40
Connecting a Computer with a Network ............................................................... 42
Connecting the Computer via Wireless LAN ........................................................ 44
Connecting Telephones ............................................................................................ 48
Connecting Smartphones ........................................................................................ 52
Connecting a Door Intercom System ..................................................................... 54
• • • • • • • • • • • • • • • • • • • • • • • • • • • • • • • • • • • • • • • • • • • • • • • • • • • • • • • • • • • • • • • • • • • • • • • • • • • • • • • • • • • • • • • • • • • • • • •
28FRITZ!Box7583
Page 29
Connecting
• • • • • • • • • • • • • • • • • • • • • • • • • • • • • • • • • • • • • • • • • • • • • • • • • • • • • • • • • • • • • • • • • • • • • • • • • • • • • • • • • • • • • • • • • • • • • • •
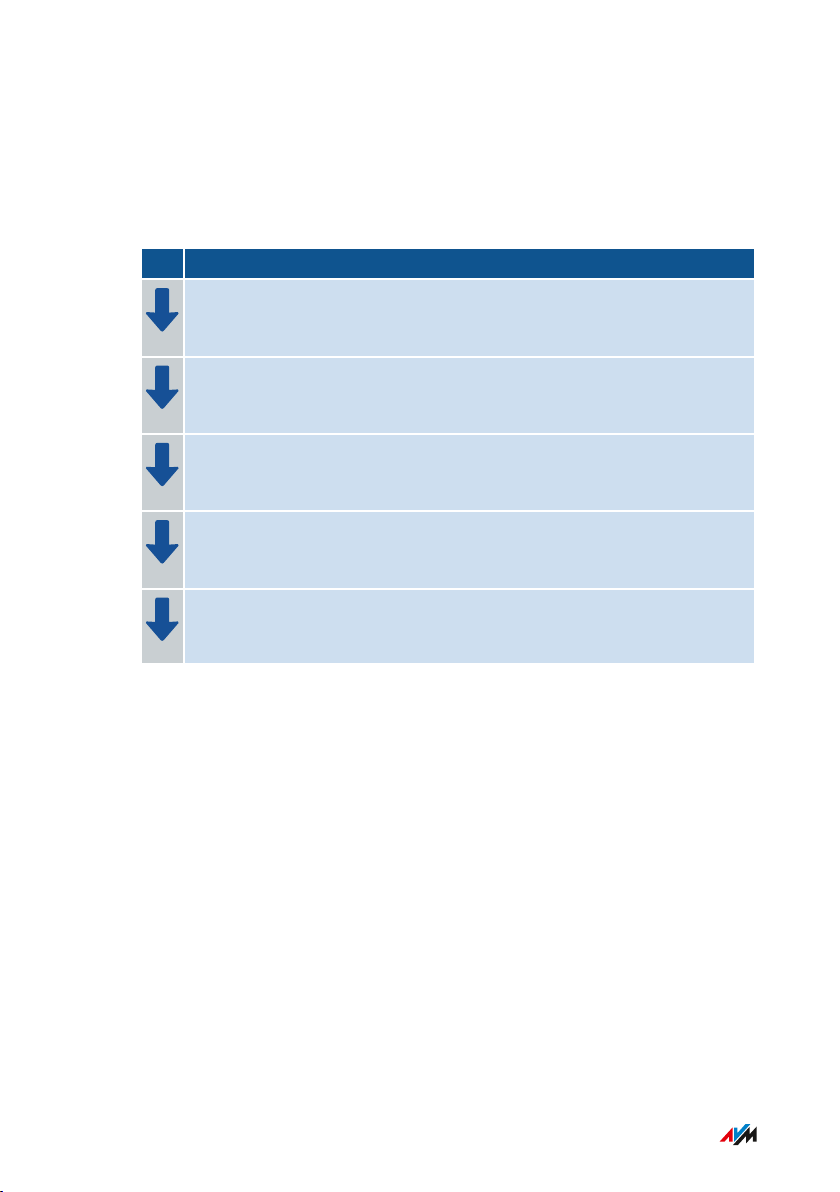
Overview: Connecting the FRITZ!Box
Overview
Connecting the FRITZ!Box entails the following steps:
Instructions
Place or hang up the FRITZ!Box in a suitable location.
Connect the FRITZ!Box to the power supply.
Connect the FRITZ!Box with your VDSL or G.fast connection.
Connect your computers and network devices to the FRITZ!Box.
Connect your telephones to the FRITZ!Box.
• • • • • • • • • • • • • • • • • • • • • • • • • • • • • • • • • • • • • • • • • • • • • • • • • • • • • • • • • • • • • • • • • • • • • • • • • • • • • • • • • • • • • • • • • • • • • • •
29FRITZ!Box7583
Page 30

Connecting
• • • • • • • • • • • • • • • • • • • • • • • • • • • • • • • • • • • • • • • • • • • • • • • • • • • • • • • • • • • • • • • • • • • • • • • • • • • • • • • • • • • • • • • • • • • • • • •
Placement
Overview
You can either place the FRITZ!Box on a horizontal surface or mount it
on a wall.
For ideal operating conditions, we recommend mounting the FRITZ!Box
on a wall.
Rules for Setting Up the FRITZ!Box
• Only use the FRITZ!Box indoors.
• Position the FRITZ!Box near an electrical outlet that is easy to
reach, so that you can unplug the FRITZ!Box at any time.
• Position the FRITZ!Box in a dry location that is free of dust.
• Do not place the FRITZ!Box on heat-sensitive surfaces like furni
ture with sensitive paintwork.
• To avoid heat accumulation, the FRITZ!Box should not be placed
on carpets or upholstered furniture.
• Provide for sufficient air circulation around the FRITZ!Box and do
not cover up the FRITZ!Box. The ventilation slits must never be
obstructed.
Rules for Optimum Wireless LAN Reception
Radio wave propagation during wireless LAN operation is strongly
dependent on the position of your FRITZ!Box. Keep the following rules
in mind for good reception:
• Position the FRITZ!Box in a central location.
• Position the FRITZ!Box in an elevated location.
• • • • • • • • • • • • • • • • • • • • • • • • • • • • • • • • • • • • • • • • • • • • • • • • • • • • • • • • • • • • • • • • • • • • • • • • • • • • • • • • • • • • • • • • • • • • • • •
30FRITZ!Box7583
Page 31

Connecting
• • • • • • • • • • • • • • • • • • • • • • • • • • • • • • • • • • • • • • • • • • • • • • • • • • • • • • • • • • • • • • • • • • • • • • • • • • • • • • • • • • • • • • • • • • • • • • •
• Keep sufficient distance from potential sources of interference
like DECT base stations, microwave devices or electric devices
with large metal housings.
• Position the FRITZ!Box so that it is not covered by other objects
and there are as few obstacles as possible between it and the
other wireless devices.
By slightly shifting the position of the FRITZ!Box it is often possible to
improve the wireless connection significantly. If reception is still
unsatisfactory, note our recommendations; see Extending Wireless
LAN Range, page 75.
Instructions: FRITZ!Box Placement
1. In compliance with the rules mentioned above, select a suitable
location for the FRITZ!Box.
2. Place the FRITZ!Box in this location.
Instructions: Mounting FRITZ!Box on the Wall
Damage to electric wiring or gas or water pipes during drilling can
present a significant danger. Before mounting the FRITZ!Box, make
sure that there are no electricity lines, gas or water pipes located
where you need to drill the holes. If necessary, check the site with a
pipe detector or consult with qualified experts.
1. In compliance with the rules mentioned above, select a suitable
location for mounting the FRITZ!Box on the wall.
2. Mark the spots for drilling at the desired location using the wall
mount included in the package.
• • • • • • • • • • • • • • • • • • • • • • • • • • • • • • • • • • • • • • • • • • • • • • • • • • • • • • • • • • • • • • • • • • • • • • • • • • • • • • • • • • • • • • • • • • • • • • •
31FRITZ!Box7583
Page 32

Connecting
• • • • • • • • • • • • • • • • • • • • • • • • • • • • • • • • • • • • • • • • • • • • • • • • • • • • • • • • • • • • • • • • • • • • • • • • • • • • • • • • • • • • • • • • • • • • • • •
3. Mount the wall mount on the wall.
4. Place the FRITZ!Box on the wall mount:
• • • • • • • • • • • • • • • • • • • • • • • • • • • • • • • • • • • • • • • • • • • • • • • • • • • • • • • • • • • • • • • • • • • • • • • • • • • • • • • • • • • • • • • • • • • • • • •
32FRITZ!Box7583
Page 33

Connecting
• • • • • • • • • • • • • • • • • • • • • • • • • • • • • • • • • • • • • • • • • • • • • • • • • • • • • • • • • • • • • • • • • • • • • • • • • • • • • • • • • • • • • • • • • • • • • • •
Connecting to Electrical Power
Overview
Connect the FRITZ!Box to the power supply.
Rules
• Avoid using socket strips and extension cords if at all possible.
• If it is not possible to avoid using socket strips and extension
cords, then do not connect multiple extension cords or socket
strips to each other.
• Use only the power adapter included with delivery.
Instructions: Plugging In to Electric Power
1. Remove the power adapter from the FRITZ!Box package.
2. Connect the power adapter to the socket on the labeled “Power”.
3. Plug the other end into a power outlet.
The “Power” LED begins flashing after a few seconds to indicate that
the FRITZ!Box is ready for operation.
• • • • • • • • • • • • • • • • • • • • • • • • • • • • • • • • • • • • • • • • • • • • • • • • • • • • • • • • • • • • • • • • • • • • • • • • • • • • • • • • • • • • • • • • • • • • • • •
33FRITZ!Box7583
Page 34

Connecting
• • • • • • • • • • • • • • • • • • • • • • • • • • • • • • • • • • • • • • • • • • • • • • • • • • • • • • • • • • • • • • • • • • • • • • • • • • • • • • • • • • • • • • • • • • • • • • •
Connecting with the Internet via VDSL or G.fast connection
Overview
If you have a VDSL or G.fast connection, then connect the FRITZ!Box
directly to the telephone jack. Use the connecting cable included with
delivery.
Instructions: Connecting to the VDSL or G.fast connection
1. Insert the long end of the cable into the “DSL” socket on the
FRITZ!Box.
2. Insert one of the short ends of the cable into the telephone jack.
After a short time the “Power” LED on the FRITZ!Box lights up.
• • • • • • • • • • • • • • • • • • • • • • • • • • • • • • • • • • • • • • • • • • • • • • • • • • • • • • • • • • • • • • • • • • • • • • • • • • • • • • • • • • • • • • • • • • • • • • •
34FRITZ!Box7583
Page 35

Connecting
• • • • • • • • • • • • • • • • • • • • • • • • • • • • • • • • • • • • • • • • • • • • • • • • • • • • • • • • • • • • • • • • • • • • • • • • • • • • • • • • • • • • • • • • • • • • • • •
Instructions: Connecting to the Bonding Line
1. Insert the long end of the cable into the “DSL” socket on the
FRITZ!Box.
2. Insert the short ends of the cable into the two sockets on the
telephone jack.
After a short time the “Power” LED on the FRITZ!Box lights up.
• • • • • • • • • • • • • • • • • • • • • • • • • • • • • • • • • • • • • • • • • • • • • • • • • • • • • • • • • • • • • • • • • • • • • • • • • • • • • • • • • • • • • • • • • • • • • • •
35FRITZ!Box7583
Page 36

FRITZ!Box
Internet
Connecting
• • • • • • • • • • • • • • • • • • • • • • • • • • • • • • • • • • • • • • • • • • • • • • • • • • • • • • • • • • • • • • • • • • • • • • • • • • • • • • • • • • • • • • • • • • • • • • •
Connecting to the Internet Access: Cable Connection
Overview
If you have a cable connection with a cable modem, you can connect
the FRITZ!Box to the cable modem, from where it interfaces with the
cable connection. Use a network cable.
Example Configuration
Instructions: Connecting to a Cable Modem
1. Connect the one end of the network cable to the LAN (Ethernet)
port on the cable modem.
2. Insert the other end of the network cable into the “WAN” port on
the FRITZ!Box.
• • • • • • • • • • • • • • • • • • • • • • • • • • • • • • • • • • • • • • • • • • • • • • • • • • • • • • • • • • • • • • • • • • • • • • • • • • • • • • • • • • • • • • • • • • • • • • •
36FRITZ!Box7583
Page 37

Connecting
• • • • • • • • • • • • • • • • • • • • • • • • • • • • • • • • • • • • • • • • • • • • • • • • • • • • • • • • • • • • • • • • • • • • • • • • • • • • • • • • • • • • • • • • • • • • • • •
3. Connect a computer with the FRITZ!Box, see page 42 or
see page 44.
4. Set up the internet connection for connections via cable in the
FRITZ!Box; see Configuring Internet Access via Cable Modem,
page 68.
• • • • • • • • • • • • • • • • • • • • • • • • • • • • • • • • • • • • • • • • • • • • • • • • • • • • • • • • • • • • • • • • • • • • • • • • • • • • • • • • • • • • • • • • • • • • • • •
37FRITZ!Box7583
Page 38

FRITZ!Box
Internet
Connecting
• • • • • • • • • • • • • • • • • • • • • • • • • • • • • • • • • • • • • • • • • • • • • • • • • • • • • • • • • • • • • • • • • • • • • • • • • • • • • • • • • • • • • • • • • • • • • • •
Connecting to the Internet Access: Fiber Optic Modem
Overview
You can connect your FRITZ!Box to a fiber optic modem (FTTH-ONT).
Requirements
• A fiber optic modem that is connected to your fiber optic connec
tion
• A network cable (for instance, from the FRITZ!Box package)
Example Configuration
Instructions: Connecting to a Fiber Optic Modem
1. Insert one end of the network cable into the “WAN” port on the
FRITZ!Box.
2. Insert the other end of the network cable into the LAN (Ethernet)
port on the fiber optic modem.
• • • • • • • • • • • • • • • • • • • • • • • • • • • • • • • • • • • • • • • • • • • • • • • • • • • • • • • • • • • • • • • • • • • • • • • • • • • • • • • • • • • • • • • • • • • • • • •
38FRITZ!Box7583
Page 39

Internet
FRITZ!Box
Router
Connecting
• • • • • • • • • • • • • • • • • • • • • • • • • • • • • • • • • • • • • • • • • • • • • • • • • • • • • • • • • • • • • • • • • • • • • • • • • • • • • • • • • • • • • • • • • • • • • • •
Connecting to the Internet Access: Existing Router
Overview
You can use the FRITZ!Box at an already existing internet access. To do
this, connect the FRITZ!Box to the existing internet router.
Example Configuration
Instructions: Connecting to the Router with a Network Cable
1. Insert the one end of the network cable into the “WAN” port on
the FRITZ!Box.
2. Insert the other end of the cable into a network socket on the
internet router.
• • • • • • • • • • • • • • • • • • • • • • • • • • • • • • • • • • • • • • • • • • • • • • • • • • • • • • • • • • • • • • • • • • • • • • • • • • • • • • • • • • • • • • • • • • • • • • •
39FRITZ!Box7583
Page 40

Connecting
• • • • • • • • • • • • • • • • • • • • • • • • • • • • • • • • • • • • • • • • • • • • • • • • • • • • • • • • • • • • • • • • • • • • • • • • • • • • • • • • • • • • • • • • • • • • • • •
Connecting to the Internet Access: Mobile Network
Overview
The FRITZ!Box can connect to the internet via the mobile communica
tions network.
Supported Devices and Mobile Communications Standards
The FRITZ!Box supports the following devices and mobile communica
tions standards:
• USB mobile communications dongles for LTE/UMTS/HSPA
• Mobile communications dongles and smartphones that support
USB tethering
• Smartphones configured as wireless LAN hotspots
Requirements
You need the following:
• a mobile communications device for internet access via LTE,
UMTS or HSPA
• a SIM card from a mobile communications network provider
Restrictions by the Mobile Communications Network Provider
Due to technical limitations on the part of the mobile communications
network providers, some limitations may arise for internet telephone
calls and for applications requiring an incoming connection. This is
also true for using port sharing, releasing USB storage media for
sharing, remote maintenance over HTTPS, Dynamic DNS and VPN.
Contact your network provider for details on any restrictions that may
apply.
• • • • • • • • • • • • • • • • • • • • • • • • • • • • • • • • • • • • • • • • • • • • • • • • • • • • • • • • • • • • • • • • • • • • • • • • • • • • • • • • • • • • • • • • • • • • • • •
40FRITZ!Box7583
Page 41

TV
FRITZ!Box
Internet
Connecting
• • • • • • • • • • • • • • • • • • • • • • • • • • • • • • • • • • • • • • • • • • • • • • • • • • • • • • • • • • • • • • • • • • • • • • • • • • • • • • • • • • • • • • • • • • • • • • •
Example Configuration
Instructions: Connecting the Mobile Broadband Dongle
1. Insert the mobile broadband dongle into a USB port of the
FRITZ!Box.
Instructions: Connecting with the Smartphone via USB
1. Connect the smartphone to a USB port on the FRITZ!Box using a
USB cable.
Connecting with the Smartphone via Wireless LAN
You can establish the connection to the smartphone via wireless LAN;
see Configuring Internet Access via a Wireless Device, page 73.
• • • • • • • • • • • • • • • • • • • • • • • • • • • • • • • • • • • • • • • • • • • • • • • • • • • • • • • • • • • • • • • • • • • • • • • • • • • • • • • • • • • • • • • • • • • • • • •
41FRITZ!Box7583
Page 42

Connecting
• • • • • • • • • • • • • • • • • • • • • • • • • • • • • • • • • • • • • • • • • • • • • • • • • • • • • • • • • • • • • • • • • • • • • • • • • • • • • • • • • • • • • • • • • • • • • • •
Connecting a Computer with a Network
Overview
You can connect computers and other network devices with the
FRITZ!Box using a network cable. This is recommended especially for
the initial configuration of your FRITZ!Box. The way a computer is
connected to the FRITZ!Box is the same regardless of the operating
system on the computer. Open the user interface of the FRITZ!Box in
an up-to-date web browser (see page 57).
Rules
• The network cable used to connect the computer and other
network devices to the FRITZ!Box must be no more than 100m in
length.
Instructions: Connecting the Computer Using a Network Cable
1. Insert the network cable into the network (LAN) port of the
computer.
2. Insert the free end of the cable into a LAN port on the FRITZ!Box.
• • • • • • • • • • • • • • • • • • • • • • • • • • • • • • • • • • • • • • • • • • • • • • • • • • • • • • • • • • • • • • • • • • • • • • • • • • • • • • • • • • • • • • • • • • • • • • •
42FRITZ!Box7583
Page 43

Connecting
• • • • • • • • • • • • • • • • • • • • • • • • • • • • • • • • • • • • • • • • • • • • • • • • • • • • • • • • • • • • • • • • • • • • • • • • • • • • • • • • • • • • • • • • • • • • • • •
Instructions: Connecting a Network Hub or Network Switch
You can connect a network hub or network switch to the FRITZ!Box.
1. Insert the network cable included in the package into the uplink
port of the network hub or network switch.
2. Insert the free end of the cable into a LAN port on the FRITZ!Box.
• • • • • • • • • • • • • • • • • • • • • • • • • • • • • • • • • • • • • • • • • • • • • • • • • • • • • • • • • • • • • • • • • • • • • • • • • • • • • • • • • • • • • • • • • • • • • • •
43FRITZ!Box7583
Page 44

Connecting
• • • • • • • • • • • • • • • • • • • • • • • • • • • • • • • • • • • • • • • • • • • • • • • • • • • • • • • • • • • • • • • • • • • • • • • • • • • • • • • • • • • • • • • • • • • • • • •
Connecting the Computer via Wireless LAN
Overview
You can connect computers and other network devices to the
FRITZ!Box without cables via wireless LAN.
Secure Wireless Connections
Wireless connections can be secured using encryption. Two things are
required for encryption:
• an encryption technique
• a key
An encryption technique and a network key are preconfigured in the
FRITZ!Box. A network device that would like to connect with the
FRITZ!Box must register with the FRITZ!Box using the network key.
The network key can be made known to a network device in the
following ways:
• by entering the network key manually
• by transmitting the network key via WPS
As soon as the network key is known, a secure wireless connection is
established.
• • • • • • • • • • • • • • • • • • • • • • • • • • • • • • • • • • • • • • • • • • • • • • • • • • • • • • • • • • • • • • • • • • • • • • • • • • • • • • • • • • • • • • • • • • • • • • •
44FRITZ!Box7583
Page 45

Connecting
• • • • • • • • • • • • • • • • • • • • • • • • • • • • • • • • • • • • • • • • • • • • • • • • • • • • • • • • • • • • • • • • • • • • • • • • • • • • • • • • • • • • • • • • • • • • • • •
Encryption
WPA encryption with WPA2 mode is preconfigured in the FRITZ!Box.
WPA2 mode is more secure than the older WPA mode.
The more up-to-date the encryption mode, the more secure the wire
less connection:
Encryption Mode Protocol Security
WPA2 CCMP Very secureWPA
WPA TKIP Secure
non-encrypted – – Very insecure, not
recommended
The encryption method and mode must be supported by the network
devices. Set the encryption mode in the FRITZ!Box according to the
following table:
Mode Use
WPA2 This mode is preconfigured in the FRITZ!Box. This
mode is suitable if you use only network devices
that support WPA2. Most up-to-date wireless
devices support this mode.
WPA + WPA2 Set this mode if you would also like to use older
network devices that do not support WPA2. With
this setting, the FRITZ!Box automatically uses the
WPA mode most suitable for your connections.
Network devices that do not support WPA can establish only nonencrypted wireless connections to the FRITZ!Box. You should avoid
using such devices if at all possible.
• • • • • • • • • • • • • • • • • • • • • • • • • • • • • • • • • • • • • • • • • • • • • • • • • • • • • • • • • • • • • • • • • • • • • • • • • • • • • • • • • • • • • • • • • • • • • • •
45FRITZ!Box7583
Page 46

Connecting
• • • • • • • • • • • • • • • • • • • • • • • • • • • • • • • • • • • • • • • • • • • • • • • • • • • • • • • • • • • • • • • • • • • • • • • • • • • • • • • • • • • • • • • • • • • • • • •
Comprehensive information about how to protect your FRITZ!Box and
the wireless network from access by strangers is presented in the
internet at:
en.avm.de/guide/security
Requirements
Wireless LAN must be enabled in the FRITZ!Box. Wireless LAN is
enabled when the “WLAN” LED is lit up.
Instructions: Entering the Network Key Manually
1. Start the wireless LAN software on your wireless device.
2. Search for wireless networks in the environment (see the docu
mentation of your wireless device) and select the wireless
network of the FRITZ!Box.
The preconfigured name of the FRITZ!Box’s wireless network is
composed of “FRITZ!Box7583” and two random letters (for
instance, “FRITZ!Box7583 XY”), and is printed on the type label
on the rear panel.
3. Click “OK”.
4. Enter the network key of the FRITZ!Box. The network key is
printed on the rear panel of the FRITZ!Box; see Device Data on
the Type Label, page 14.
The wireless LAN connection will be established.
• • • • • • • • • • • • • • • • • • • • • • • • • • • • • • • • • • • • • • • • • • • • • • • • • • • • • • • • • • • • • • • • • • • • • • • • • • • • • • • • • • • • • • • • • • • • • • •
46FRITZ!Box7583
Page 47

Power
Fon
WLAN
Internet
Info
Connecting
• • • • • • • • • • • • • • • • • • • • • • • • • • • • • • • • • • • • • • • • • • • • • • • • • • • • • • • • • • • • • • • • • • • • • • • • • • • • • • • • • • • • • • • • • • • • • • •
Instructions: Transferring the network key using WPS
With WPS (Wi-Fi Protected Setup) you can connect a wireless device
with the FRITZ!Box quickly and easily without entering the wireless
network key of your FRITZ!Box. This key is transmitted to the wireless
device automatically.
1. Start the wireless LAN software on your wireless device.
2. Search for wireless networks in the environment on the wire
less device (see the documentation of your wireless device) and
select the wireless network of the FRITZ!Box.
The preconfigured name of the FRITZ!Box’s wireless network is
composed of “FRITZ!Box7583” and two random letters (for
instance, “FRITZ!Box7583 XY”). The name is printed on the type
label on the rear panel.
3. Start the connection procedure via WPS (see the documentation
of your wireless device).
4. On the FRITZ!Box: Press the “WPS” button briefly.
The “WLAN” LED on the FRITZ!Box flashes while the wireless
connection is being established.
• • • • • • • • • • • • • • • • • • • • • • • • • • • • • • • • • • • • • • • • • • • • • • • • • • • • • • • • • • • • • • • • • • • • • • • • • • • • • • • • • • • • • • • • • • • • • • •
47FRITZ!Box7583
Page 48

Power
Fon
WLAN
Internet
Info
Connecting
• • • • • • • • • • • • • • • • • • • • • • • • • • • • • • • • • • • • • • • • • • • • • • • • • • • • • • • • • • • • • • • • • • • • • • • • • • • • • • • • • • • • • • • • • • • • • • •
Connecting Telephones
Overview
You can connect telephones, fax machines, answering machines, and
telephone systems to your FRITZ!Box.
Up to six cordless telephones like FRITZ!Fon can be registered with the
integrated DECT base station.
During a power outage you cannot make any telephone calls with the
connected telephones.
Instructions: Registering a Cordless Telephone
1. On a cordless telephone: Start registration with a base station.
2. On the FRITZ!Box: Hold the “DECT” button down until the “Info”
LED starts flashing.
3. On a cordless telephone: Enter the PIN of the FRITZ!Box on the
telephone (preset value: 0000).
4. In the user interface of your FRITZ!Box: Configure the telephone;
see Configuring Telephones, page 79.
• • • • • • • • • • • • • • • • • • • • • • • • • • • • • • • • • • • • • • • • • • • • • • • • • • • • • • • • • • • • • • • • • • • • • • • • • • • • • • • • • • • • • • • • • • • • • • •
48FRITZ!Box7583
Page 49

Connecting
• • • • • • • • • • • • • • • • • • • • • • • • • • • • • • • • • • • • • • • • • • • • • • • • • • • • • • • • • • • • • • • • • • • • • • • • • • • • • • • • • • • • • • • • • • • • • • •
Instructions: Connecting an Analog Telephone
1. Connect the telephone, the answering machine or the fax
machine to a “FON1” port. The other “FON1” port must remain
free.
2. In the user interface of your FRITZ!Box: Configure the connected
device; see Configuring Telephones, page 79.
Instructions: Connecting a Second Analog Telephone
1. Connect the telephone, the answering machine or the fax
machine to a “FON2” port. The other “FON2” port must remain
free.
2. In the user interface of your FRITZ!Box: Configure the connected
device; see Configuring Telephones, page 79.
• • • • • • • • • • • • • • • • • • • • • • • • • • • • • • • • • • • • • • • • • • • • • • • • • • • • • • • • • • • • • • • • • • • • • • • • • • • • • • • • • • • • • • • • • • • • • • •
49FRITZ!Box7583
Page 50

Connecting
• • • • • • • • • • • • • • • • • • • • • • • • • • • • • • • • • • • • • • • • • • • • • • • • • • • • • • • • • • • • • • • • • • • • • • • • • • • • • • • • • • • • • • • • • • • • • • •
Instructions: Connecting an ISDN Telephone
1. Connect the telephone to the “FONS0” port.
2. In the user interface of your FRITZ!Box: Configure the telephone;
see Configuring Telephones, page 79.
Connecting Multiple ISDN Devices
You can connect up to eight ISDN devices to the FRITZ!Box. The
FRITZ!Box can provide power to one ISDN device, but the other ISDN
devices must use their own power supply. Multiple ISDN devices can
be connected in the following ways:
• with an ISDN distributor (available from vendors)
• by having a technician install a S0 bus, which is connected to the
“FONS0” port. Note for the technician: The “FONS0” port is termi
nated. Two terminating resistors are included in the FRITZ!Box.
Connecting a ISDN Telephone System for 4 B Channels (Hunt Group)
With the RJ45/2xRJ45 adapter included with delivery you can connect
an ISDN telephone system that supports point to point connections
with 4 B channels (hunt group).
• • • • • • • • • • • • • • • • • • • • • • • • • • • • • • • • • • • • • • • • • • • • • • • • • • • • • • • • • • • • • • • • • • • • • • • • • • • • • • • • • • • • • • • • • • • • • • •
50FRITZ!Box7583
Page 51

Connecting
• • • • • • • • • • • • • • • • • • • • • • • • • • • • • • • • • • • • • • • • • • • • • • • • • • • • • • • • • • • • • • • • • • • • • • • • • • • • • • • • • • • • • • • • • • • • • • •
Instructions: Connecting an IP Telephone
IP telephones are special telephones for internet telephony (IP stands
for Internet Protocol).
1. Connect the IP telephone to the FRITZ!Box using a LAN cable or
wireless LAN.
2. In the user interface of your FRITZ!Box: Configure the telephone;
see Configuring Telephones, page 79.
• • • • • • • • • • • • • • • • • • • • • • • • • • • • • • • • • • • • • • • • • • • • • • • • • • • • • • • • • • • • • • • • • • • • • • • • • • • • • • • • • • • • • • • • • • • • • • •
51FRITZ!Box7583
Page 52

Connecting
• • • • • • • • • • • • • • • • • • • • • • • • • • • • • • • • • • • • • • • • • • • • • • • • • • • • • • • • • • • • • • • • • • • • • • • • • • • • • • • • • • • • • • • • • • • • • • •
Connecting Smartphones
Overview
You can register your iPhone or Android smartphone with the
FRITZ!Box using the FRITZ!App Fon. Then you can make calls with the
your smartphone at home, using the telephone numbers configured in
the FRITZ!Box. The smartphone can also be reached at your mobile
telephone number.
Requirements
• iPhone or Android smartphone
• The setting “Allow access for applications” is enabled in the
FRITZ!Box (in the user interface under “Home Network / Home
Network Overview / Network Settings”)
Instructions: Connecting a Smartphone
1. Establish a wireless LAN connection to the FRITZ!Box on your
smartphone.
2. Install FRITZ!App Fon on your smartphone. FRITZ!App Fon is
available from the Google Play Store and the Apple App Store.
3. Start the FRITZ!App Fon.
FRITZ!App Fon is automatically configured as an IP telephone in
the FRITZ!Box.
4. In the user interface of your FRITZ!Box: Configure the IP tele
phone “FRITZ!App Fon”; see Configuring Telephones, page 79.
Connection Status of FRITZ!App Fon
The icon in the FRITZ!App Fon title bar shows the state of the connec
tion with the FRITZ!Box.
• • • • • • • • • • • • • • • • • • • • • • • • • • • • • • • • • • • • • • • • • • • • • • • • • • • • • • • • • • • • • • • • • • • • • • • • • • • • • • • • • • • • • • • • • • • • • • •
52FRITZ!Box7583
Page 53

Connecting
• • • • • • • • • • • • • • • • • • • • • • • • • • • • • • • • • • • • • • • • • • • • • • • • • • • • • • • • • • • • • • • • • • • • • • • • • • • • • • • • • • • • • • • • • • • • • • •
Symbol Meaning
The wireless connection to the FRITZ!Box is
active.
You can make calls via the FRITZ!Box with
your smartphone.
• • • • • • • • • • • • • • • • • • • • • • • • • • • • • • • • • • • • • • • • • • • • • • • • • • • • • • • • • • • • • • • • • • • • • • • • • • • • • • • • • • • • • • • • • • • • • • •
53FRITZ!Box7583
Page 54

Connecting
• • • • • • • • • • • • • • • • • • • • • • • • • • • • • • • • • • • • • • • • • • • • • • • • • • • • • • • • • • • • • • • • • • • • • • • • • • • • • • • • • • • • • • • • • • • • • • •
Connecting a Door Intercom System
Overview
Door intercom systems with an a/b interface and IP door intercoms
can be connected to the FRITZ!Box. Then you have the following
options:
• You can answer the doorbell on your telephones, speak with visi
tors, and open the door, even on a mobile telephone or other tele
phone connection away from home.
• You can have the camera image from your door intercom system
displayed on FRITZ!Fon telephones with a color display.
• You can configure a special ring tone to signal the doorbell on a
FRITZ!Fon.
Supported Door Intercom Systems
• Door intercom system with an a/b interface that uses DTMF tone
dialing
• IP door intercom systems that can be configured as SIP clients (by
entering the login data for a SIP registrar)
Instructions: Connecting a Door Intercom System with an a/b Interface
1. Connect the door intercom system to a “FON1” or “FON2” jack.
Note: one of the “FON1” sockets and one of the“FON2” sockets
have to remain free (not allocated).
2. In the user interface of your FRITZ!Box: Configure the door
intercom system; see Configuring a Door Intercom System, page
81.
• • • • • • • • • • • • • • • • • • • • • • • • • • • • • • • • • • • • • • • • • • • • • • • • • • • • • • • • • • • • • • • • • • • • • • • • • • • • • • • • • • • • • • • • • • • • • • •
54FRITZ!Box7583
Page 55

Connecting
• • • • • • • • • • • • • • • • • • • • • • • • • • • • • • • • • • • • • • • • • • • • • • • • • • • • • • • • • • • • • • • • • • • • • • • • • • • • • • • • • • • • • • • • • • • • • • •
Instructions: Connecting an IP Door Intercom System
1. Connect the IP door intercom system to the FRITZ!Box using a
LAN cable or wireless LAN.
2. In the user interface of your FRITZ!Box: Configure the door
intercom system; see Configuring a Door Intercom System, page
81.
• • • • • • • • • • • • • • • • • • • • • • • • • • • • • • • • • • • • • • • • • • • • • • • • • • • • • • • • • • • • • • • • • • • • • • • • • • • • • • • • • • • • • • • • • • • • • • •
55FRITZ!Box7583
Page 56

User Interface
• • • • • • • • • • • • • • • • • • • • • • • • • • • • • • • • • • • • • • • • • • • • • • • • • • • • • • • • • • • • • • • • • • • • • • • • • • • • • • • • • • • • • • • • • • • • • • •
User Interface
Opening the User Interface...................................................................................... 57
Using the Wizard for Basic Configuration ............................................................ 60
Logging Out of the User Interface .......................................................................... 62
Using the Standard View and Advanced View...................................................... 64
• • • • • • • • • • • • • • • • • • • • • • • • • • • • • • • • • • • • • • • • • • • • • • • • • • • • • • • • • • • • • • • • • • • • • • • • • • • • • • • • • • • • • • • • • • • • • • •
56FRITZ!Box7583
Page 57

User Interface
• • • • • • • • • • • • • • • • • • • • • • • • • • • • • • • • • • • • • • • • • • • • • • • • • • • • • • • • • • • • • • • • • • • • • • • • • • • • • • • • • • • • • • • • • • • • • • •
Opening the User Interface
Overview
The FRITZ!Box has a user interface you can open in a web browser on
your computer or on mobile devices like a tablet or smartphone. In the
user interface you configure the FRITZ!Box, enable or disable func
tions, and receive information on connections, interfaces, and on the
entire home network. You can also configure whether and how you
would like to use the AVM services for diagnostics and maintenance of
your FRITZ!Box.
Requirements
• Your computer, tablet or smartphone is connected with the
FRITZ!Box by wireless LAN or with the network cable.
Instructions: Opening the User Interface
1. Start a web browser on your computer or mobile device and
enter http://fritz.box in the address bar.
2. Enter the preset FRITZ!Box password and click “Log In”.
The preset password is printed on the type label on the rear
panel and on the FRITZ!Notes service card.
The FRITZ!Box user interface opens.
• • • • • • • • • • • • • • • • • • • • • • • • • • • • • • • • • • • • • • • • • • • • • • • • • • • • • • • • • • • • • • • • • • • • • • • • • • • • • • • • • • • • • • • • • • • • • • •
57FRITZ!Box7583
Page 58

1
2
3
4
5
6
7
User Interface
• • • • • • • • • • • • • • • • • • • • • • • • • • • • • • • • • • • • • • • • • • • • • • • • • • • • • • • • • • • • • • • • • • • • • • • • • • • • • • • • • • • • • • • • • • • • • • •
Areas of the User Interface
The following figure shows you the different areas of the user inter
face:
No. Function / Display
1 The FRITZ!Box user interface menu
2 Functions and settings for the given menu command
3 Links to the MyFRITZ! and FRITZ!NAS areas
4 3 vertical dots menu
• Log off the user interface
• Change password
• Switch between standard and advanced view
• Links to the MyFRITZ! and FRITZ!NAS areas
5 Question mark symbol for opening the online help
6 Wizards for configuration of the FRITZ!Box
• • • • • • • • • • • • • • • • • • • • • • • • • • • • • • • • • • • • • • • • • • • • • • • • • • • • • • • • • • • • • • • • • • • • • • • • • • • • • • • • • • • • • • • • • • • • • • •
58FRITZ!Box7583
Page 59

User Interface
• • • • • • • • • • • • • • • • • • • • • • • • • • • • • • • • • • • • • • • • • • • • • • • • • • • • • • • • • • • • • • • • • • • • • • • • • • • • • • • • • • • • • • • • • • • • • • •
No. Function / Display
7 Related links
• View: Switches between standard and advanced view
• Contents: Overview of all pages in the user interface
• Manual: FRITZ!Box7583 (PDF)
• Tips & Tricks: Link to the FRITZ!Box Knowledge Base
• en.avm.de: AVM web pages
• • • • • • • • • • • • • • • • • • • • • • • • • • • • • • • • • • • • • • • • • • • • • • • • • • • • • • • • • • • • • • • • • • • • • • • • • • • • • • • • • • • • • • • • • • • • • • •
59FRITZ!Box7583
Page 60

User Interface
• • • • • • • • • • • • • • • • • • • • • • • • • • • • • • • • • • • • • • • • • • • • • • • • • • • • • • • • • • • • • • • • • • • • • • • • • • • • • • • • • • • • • • • • • • • • • • •
Using the Wizard for Basic Configuration
Overview
The first time the user interface is opened, the wizard for Basic Config
uration of the FRITZ!Box is started. This wizard assists you in entering
your account information to connect to the internet and use your tele
phones.
Requirements
• The FRITZ!Box password has been supplied. The preset password
is printed on the type label on the rear panel.
• The account information has been supplied by your internet
service provider.
• The telephone numbers have been supplied by your telephony
provider.
Instructions: Using the Wizard for Basic Configuration
To protect your private data, settings and account information, the
wizard starts by prompting you to assign a password for access to the
user interface.
You can also choose whether you would like to use the AVM services
for diagnostics and maintenance of your FRITZ!Box; see Using AVM
Services for Diagnostics and Maintenance, page 100.
1. Enter the preset FRITZ!Box password and click “Log In”. The
preset password is printed on the type label on the rear panel.
2. Choose whether you would like to use the AVM services for
diagnostics and maintenance. We recommend leaving this
option enabled. You can change the setting later at any time.
• • • • • • • • • • • • • • • • • • • • • • • • • • • • • • • • • • • • • • • • • • • • • • • • • • • • • • • • • • • • • • • • • • • • • • • • • • • • • • • • • • • • • • • • • • • • • • •
60FRITZ!Box7583
Page 61

User Interface
• • • • • • • • • • • • • • • • • • • • • • • • • • • • • • • • • • • • • • • • • • • • • • • • • • • • • • • • • • • • • • • • • • • • • • • • • • • • • • • • • • • • • • • • • • • • • • •
3. Click “Next.”
4. Follow the wizard’s instructions.
Once the wizard is complete, the basic configuration of the
FRITZ!Box has been concluded. The FRITZ!Box is ready for the
internet and for telephony.
The wizard can be restarted at any time via the FRITZ!Box user inter
face.
• • • • • • • • • • • • • • • • • • • • • • • • • • • • • • • • • • • • • • • • • • • • • • • • • • • • • • • • • • • • • • • • • • • • • • • • • • • • • • • • • • • • • • • • • • • • • • •
61FRITZ!Box7583
Page 62

User Interface
• • • • • • • • • • • • • • • • • • • • • • • • • • • • • • • • • • • • • • • • • • • • • • • • • • • • • • • • • • • • • • • • • • • • • • • • • • • • • • • • • • • • • • • • • • • • • • •
Logging Out of the User Interface
Overview
Session IDs are assigned for access to the FRITZ!Box user interface.
The use of session IDs offers effective protection from attacks from the
internet in which attackers send unauthorized data to a web applica
tion. For security reasons, we therefore recommend that you log out of
the user interface before surfing the web.
Use push services to have yourself notified each time someone logs
into or out of your FRITZ!Box; see Configuring Push Services, page 191.
Automatic Logout when Idle
If you have not logged out of the FRITZ!Box user interface, and have not
been active in the browser for 20minutes, you will be logged off auto
matically. You must log in again to regain access to the FRITZ!Box user
interface.
• • • • • • • • • • • • • • • • • • • • • • • • • • • • • • • • • • • • • • • • • • • • • • • • • • • • • • • • • • • • • • • • • • • • • • • • • • • • • • • • • • • • • • • • • • • • • • •
62FRITZ!Box7583
Page 63

User Interface
• • • • • • • • • • • • • • • • • • • • • • • • • • • • • • • • • • • • • • • • • • • • • • • • • • • • • • • • • • • • • • • • • • • • • • • • • • • • • • • • • • • • • • • • • • • • • • •
Instructions: Manual Logout
1. Click the menu with the three dots (1) in the header of the
FRITZ!Box user interface:
2. Click “Log Off” (2) in the menu.
You have been logged out of the FRITZ!Box user interface.
• • • • • • • • • • • • • • • • • • • • • • • • • • • • • • • • • • • • • • • • • • • • • • • • • • • • • • • • • • • • • • • • • • • • • • • • • • • • • • • • • • • • • • • • • • • • • • •
63FRITZ!Box7583
Page 64

User Interface
• • • • • • • • • • • • • • • • • • • • • • • • • • • • • • • • • • • • • • • • • • • • • • • • • • • • • • • • • • • • • • • • • • • • • • • • • • • • • • • • • • • • • • • • • • • • • • •
Using the Standard View and Advanced View
Overview
The FRITZ!Box user interface offers two views: the standard view and
the advanced view.
The standard view of the FRITZ!Box user interface includes all settings
and functions that are needed for normal operation of the FRITZ!Box.
In the advanced view, additional settings options are offered for
advanced users. These settings are not required for everyday opera
tion of the FRITZ!Box.
Instructions: Switching between the Views
You should use the advanced view of the “Internet” and “Home
Network” menus only if you have advanced network expertise.
Combining various settings in these menus can produce a situation in
which the user interface of the FRITZ!Box can no longer be opened.
1. Click on “View” in the area to the left under the menu (1) to
switch back and forth between the “Standard” and “Advanced”
views.
• • • • • • • • • • • • • • • • • • • • • • • • • • • • • • • • • • • • • • • • • • • • • • • • • • • • • • • • • • • • • • • • • • • • • • • • • • • • • • • • • • • • • • • • • • • • • • •
64FRITZ!Box7583
Page 65

Configuring
• • • • • • • • • • • • • • • • • • • • • • • • • • • • • • • • • • • • • • • • • • • • • • • • • • • • • • • • • • • • • • • • • • • • • • • • • • • • • • • • • • • • • • • • • • • • • • •
Configuring
Overview: Configuring the FRITZ!Box..................................................................... 66
Configuring an Internet Connection via VDSL or G.fast ..................................... 67
Configuring Internet Access via Cable Modem..................................................... 68
Configuring Internet Access via Fiber Optic Modem........................................... 69
Configuring Internet Access via Another Router................................................. 71
Configuring Internet Access via Another Router: IP Client................................ 72
Configuring Internet Access via a Wireless Device............................................. 73
Configuring Internet Access via the Mobile Network ......................................... 74
Extending Wireless LAN Range .............................................................................. 75
Expanding a Wireless Radio Network ................................................................... 76
Configuring Your Telephone Numbers .................................................................. 78
Configuring Telephones ........................................................................................... 79
Configuring a Door Intercom System .................................................................... 81
Saving Power with the FRITZ!Box........................................................................... 82
• • • • • • • • • • • • • • • • • • • • • • • • • • • • • • • • • • • • • • • • • • • • • • • • • • • • • • • • • • • • • • • • • • • • • • • • • • • • • • • • • • • • • • • • • • • • • • •
65FRITZ!Box7583
Page 66

Configuring
• • • • • • • • • • • • • • • • • • • • • • • • • • • • • • • • • • • • • • • • • • • • • • • • • • • • • • • • • • • • • • • • • • • • • • • • • • • • • • • • • • • • • • • • • • • • • • •
Overview: Configuring the FRITZ!Box
Overview
Configuration of the FRITZ!Box entails the following steps:
Instructions
Set up the internet connection in the FRITZ!Box.
Set up the connected telephones and their telephone numbers in
the FRITZ!Box.
Configure your smartphone in the FRITZ!Box (optional).
Requirements
• The FRITZ!Box is connected with the internet access.
• You have connected all of the telephones you want to use with the
FRITZ!Box.
• • • • • • • • • • • • • • • • • • • • • • • • • • • • • • • • • • • • • • • • • • • • • • • • • • • • • • • • • • • • • • • • • • • • • • • • • • • • • • • • • • • • • • • • • • • • • • •
66FRITZ!Box7583
Page 67

Configuring
• • • • • • • • • • • • • • • • • • • • • • • • • • • • • • • • • • • • • • • • • • • • • • • • • • • • • • • • • • • • • • • • • • • • • • • • • • • • • • • • • • • • • • • • • • • • • • •
Configuring an Internet Connection via VDSL or G.fast
Overview
The internet connection via your VDSL or G.fast connection is config
ured in the FRITZ!Box user interface. A wizard assists you in entering
the account information from your internet service provider.
Requirements
• The account information has been supplied by your internet
service provider.
Instructions: Configuring the Internet Connection
1. Open the user interface, see page 57.
2. The first time the user interface is opened, a wizard starts auto
matically to assist you in configuring the internet connection. If
the wizard does not start automatically, select “Wizards” and
click on “Configure Internet Connection”.
3. Follow the wizard’s instructions. This will guide you step by step
through configuration of the internet connection.
• • • • • • • • • • • • • • • • • • • • • • • • • • • • • • • • • • • • • • • • • • • • • • • • • • • • • • • • • • • • • • • • • • • • • • • • • • • • • • • • • • • • • • • • • • • • • • •
67FRITZ!Box7583
Page 68

Configuring
• • • • • • • • • • • • • • • • • • • • • • • • • • • • • • • • • • • • • • • • • • • • • • • • • • • • • • • • • • • • • • • • • • • • • • • • • • • • • • • • • • • • • • • • • • • • • • •
Configuring Internet Access via Cable Modem
Overview
You can connect the FRITZ!Box to a cable modem which provides the
internet connection.
Operating Mode of the FRITZ!Box
If the FRITZ!Box is connected with the internet access via cable
modem, the following applies:
• The FRITZ!Box obtains the public IP address from the internet
service provider via DHCP.
• The FRITZ!Box establishes the internet connection itself.
• The FRITZ!Box functions as a router.
• The FRITZ!Box opens up its own IP network.
• The firewall of the FRITZ!Box is enabled.
Requirements
• The FRITZ!Box is connected to a cable modem, which is connected
with the cable junction; see Connecting to the Internet Access:
Cable Connection, page 36.
Instructions: Setting Up Internet Access on the Cable Connection
1. Open the user interface, see page 57.
2. Select the “Internet / Account Information” menu and the
“Internet Connection” tab.
3. In the “Internet Service Provider” area, select the settings “More
internet service providers” and then “Other internet service
provider”.
4. In the “Connect via” area, select the option “Connection to a
cable modem (cable connection)”.
5. For further settings, use the online help of the FRITZ!Box.
• • • • • • • • • • • • • • • • • • • • • • • • • • • • • • • • • • • • • • • • • • • • • • • • • • • • • • • • • • • • • • • • • • • • • • • • • • • • • • • • • • • • • • • • • • • • • • •
68FRITZ!Box7583
Page 69

Configuring
• • • • • • • • • • • • • • • • • • • • • • • • • • • • • • • • • • • • • • • • • • • • • • • • • • • • • • • • • • • • • • • • • • • • • • • • • • • • • • • • • • • • • • • • • • • • • • •
Configuring Internet Access via Fiber Optic Modem
Overview
You can connect the FRITZ!Box to a fiber optic modem which provides
the internet connection.
Operating Mode of the FRITZ!Box
If the FRITZ!Box is connected with the internet access via fiber optic
modem, the following applies:
• The FRITZ!Box obtains the public IP address from the internet
service provider via DHCP or PPPoE.
• The FRITZ!Box establishes the internet connection itself.
• The FRITZ!Box functions as a router.
• The FRITZ!Box opens up its own IP network.
• The firewall of the FRITZ!Box is enabled.
Requirements
• The FRITZ!Box is connected to a fiber optic modem, which is
connected with the fiber optic connection; see Connecting to the
Internet Access: Fiber Optic Modem, page 38.
Instructions: Setting Up Internet Access on the Fiber Optic Connection
1. Open the user interface, see page 57.
2. Select the “Internet / Account Information” menu and the
“Internet Connection” tab.
3. Select your fiber optic operator from the “Internet Service
Provider” area. If your fiber optic operator is not included in the
list, select the “More internet service providers” and “Other
internet service provider”.
• • • • • • • • • • • • • • • • • • • • • • • • • • • • • • • • • • • • • • • • • • • • • • • • • • • • • • • • • • • • • • • • • • • • • • • • • • • • • • • • • • • • • • • • • • • • • • •
69FRITZ!Box7583
Page 70

Configuring
• • • • • • • • • • • • • • • • • • • • • • • • • • • • • • • • • • • • • • • • • • • • • • • • • • • • • • • • • • • • • • • • • • • • • • • • • • • • • • • • • • • • • • • • • • • • • • •
4. When you have selected your fiber optic network operator in the
“Internet Provider” area, then go to “Change connection
settings” and select the “Via an external modem” option. If you
selected “More internet service providers” and “Other internet
service provider”, then go to the “Connect via” area and select
the “Connection to an external modem or router” option.
5. For further settings, use the online help of the FRITZ!Box.
• • • • • • • • • • • • • • • • • • • • • • • • • • • • • • • • • • • • • • • • • • • • • • • • • • • • • • • • • • • • • • • • • • • • • • • • • • • • • • • • • • • • • • • • • • • • • • •
70FRITZ!Box7583
Page 71

Configuring
• • • • • • • • • • • • • • • • • • • • • • • • • • • • • • • • • • • • • • • • • • • • • • • • • • • • • • • • • • • • • • • • • • • • • • • • • • • • • • • • • • • • • • • • • • • • • • •
Configuring Internet Access via Another Router
Overview
You can connect the FRITZ!Box to a router which provides the internet
connection.
Operating Mode of the FRITZ!Box
The following applies to this kind of internet connection:
• The FRITZ!Box receives an IP address from the upstream device
via DHCP (default setting).
• The FRITZ!Box functions as its own router.
• The FRITZ!Box opens up its own IP network.
• The firewall of the FRITZ!Box is enabled.
Requirements
• The FRITZ!Box is connected with a router that provides the
internet connection; see Connecting to the Internet Access:
Existing Router, page 39.
Instructions: Setting Up Internet Access via WAN (as a Router)
1. Open the user interface, see page 57.
2. Select the “Internet / Account Information” menu and the
“Internet Connection” tab.
3. In the “Internet Service Provider” area, select the settings “More
internet service providers” and then “Other internet service
provider”.
4. From the “Connect via” area, select the “Connection to an
external modem or router” option.
5. For further settings, use the online help of the FRITZ!Box.
• • • • • • • • • • • • • • • • • • • • • • • • • • • • • • • • • • • • • • • • • • • • • • • • • • • • • • • • • • • • • • • • • • • • • • • • • • • • • • • • • • • • • • • • • • • • • • •
71FRITZ!Box7583
Page 72

Configuring
• • • • • • • • • • • • • • • • • • • • • • • • • • • • • • • • • • • • • • • • • • • • • • • • • • • • • • • • • • • • • • • • • • • • • • • • • • • • • • • • • • • • • • • • • • • • • • •
Configuring Internet Access via Another Router: IP Client
Overview
You can connect the FRITZ!Box as an IP client to a router which
provides the internet connection.
Operating Mode of the FRITZ!Box
The following apply in IP client mode:
• The FRITZ!Box receives an IP address from the upstream router
via DHCP (default setting).
• The FRITZ!Box becomes a part of the router’s IP network.
• The network devices connected to the FRITZ!Box receive their IP
addresses from the upstream router.
• The firewall of the FRITZ!Box is disabled.
Requirements
• The FRITZ!Box is connected with a router that provides the
internet connection; see Connecting to the Internet Access:
Existing Router, page 39.
Instructions: Setting Up Internet Access via LAN (as an IP Client)
1. Open the user interface, see page 57.
2. Select the “Internet / Account Information” menu and the
“Internet Connection” tab.
3. In the “Internet Service Provider” area, select the settings “More
internet service providers” and then “Other internet service
provider”.
4. From the “Connect via” area, select the “Connection to an
external modem or router” option.
5. In the “Operating Mode” menu, select the “Share existing
internet connection in the network (IP client mode)” setting.
6. For further settings, use the online help of the FRITZ!Box.
• • • • • • • • • • • • • • • • • • • • • • • • • • • • • • • • • • • • • • • • • • • • • • • • • • • • • • • • • • • • • • • • • • • • • • • • • • • • • • • • • • • • • • • • • • • • • • •
72FRITZ!Box7583
Page 73

Configuring
• • • • • • • • • • • • • • • • • • • • • • • • • • • • • • • • • • • • • • • • • • • • • • • • • • • • • • • • • • • • • • • • • • • • • • • • • • • • • • • • • • • • • • • • • • • • • • •
Configuring Internet Access via a Wireless Device
Overview
You can use the FRITZ!Box on an existing internet connection by
connecting to it via wireless LAN. The FRITZ!Box can share the internet
connection of another device via a wireless connection. The other
device can be a router, for instance, or a smartphone configured as a
hotspot.
The FRITZ!Box is connected with the radio network of other device. In
this type of connection the FRITZ!Box works as an independent router
to provide a network with its own network address range.
Requirements
• The radio network transmits in the 2.4-GHz frequency range.
• The connection is encrypted using WPA2.
• The radio network allows the FRITZ!Box to set up a wireless LAN
connection.
Instructions: Configuring Internet Access via Wireless LAN
1. Open the user interface, see page 57.
2. Select the “Internet / Account Information” menu.
3. Select the “Existing connection over wireless LAN” entry from
the “Internet service provider” list.
A list of the radio networks in the vicinity is displayed.
4. Select the radio network you want to connect the FRITZ!Box
with.
5. Enter the network key of the radio network in the “Network key”
field in the “Security” area.
6. Click “Apply”.
The FRITZ!Box is configured as a router and the network range is
changed automatically. The FRITZ!Box, along with the connected
network devices, forms its own self-contained network.
• • • • • • • • • • • • • • • • • • • • • • • • • • • • • • • • • • • • • • • • • • • • • • • • • • • • • • • • • • • • • • • • • • • • • • • • • • • • • • • • • • • • • • • • • • • • • • •
73FRITZ!Box7583
Page 74

Configuring
• • • • • • • • • • • • • • • • • • • • • • • • • • • • • • • • • • • • • • • • • • • • • • • • • • • • • • • • • • • • • • • • • • • • • • • • • • • • • • • • • • • • • • • • • • • • • • •
Configuring Internet Access via the Mobile Network
Overview
In the FRITZ!Box you can configure internet access via the mobile
network.
Requirements
• A mobile broadband dongle or a smartphone with USB tethering
enabled must be connected to the USB port of the FRITZ!Box; see
Connecting to the Internet Access: Mobile Network, page 40.
Instructions: Setting Up Internet Access via the Mobile Telephone Network
1. Open the user interface, see page 57.
2. Select “Internet / Mobile Communications”.
3. For instructions, open the online help .
• • • • • • • • • • • • • • • • • • • • • • • • • • • • • • • • • • • • • • • • • • • • • • • • • • • • • • • • • • • • • • • • • • • • • • • • • • • • • • • • • • • • • • • • • • • • • • •
74FRITZ!Box7583
Page 75

Configuring
• • • • • • • • • • • • • • • • • • • • • • • • • • • • • • • • • • • • • • • • • • • • • • • • • • • • • • • • • • • • • • • • • • • • • • • • • • • • • • • • • • • • • • • • • • • • • • •
Extending Wireless LAN Range
Overview
In large apartments or houses the wireless LAN radio signal does not
always reach into every corner. However, you can generally extend the
range of your wireless network by placing your FRITZ!Box at a better
location.
Extending the Wireless LAN Range by Optimizing the Location
When selecting the location of your FRITZ!Box, consider the following
conditions. They will have a positive influence on the extension of your
FRITZ!Box's wireless radio signal:
• Place the FRITZ!Box in a room located centrally.
• Put the FRITZ!Box on an elevated surface.
• Place the FRITZ!Box in an unobstructed location, and not, for
instance, in a cabinet or behind a large object.
• Account for structural conditions such as thick concrete walls or
ceilings.
• Eliminate sources of interference in the vicinity of your wireless
radio network, for instance, microwaves, refrigerator or baby
monitors.
• Make sure that the FRITZ!Box uses frequency ranges that are
used by as few other devices as possible. To do this, open the
FRITZ!Box user interface and select the “Wireless / Radio
Channel” menu.
If these measures are not sufficient, then you can extend the range of
your wireless radio network with a wireless repeater; see Expanding a
Wireless Radio Network, page 76.
• • • • • • • • • • • • • • • • • • • • • • • • • • • • • • • • • • • • • • • • • • • • • • • • • • • • • • • • • • • • • • • • • • • • • • • • • • • • • • • • • • • • • • • • • • • • • • •
75FRITZ!Box7583
Page 76

FRITZ!Box
Internet
Configuring
• • • • • • • • • • • • • • • • • • • • • • • • • • • • • • • • • • • • • • • • • • • • • • • • • • • • • • • • • • • • • • • • • • • • • • • • • • • • • • • • • • • • • • • • • • • • • • •
Expanding a Wireless Radio Network
Overview
If the FRITZ!Box is placed in a favorable location, but the WiFi signal
still does not reach all of your rooms, then you can extend the range of
your wireless radio network with a wireless repeater, a powerline
device with WiFi function, or with an additional FRITZ!Box. In combina
tion with the FRITZ!Box, FRITZ! devices are especially suitable.
Example Configuration: Using a FRITZ!Repeater
How a Wireless Repeater Works
With a wireless repeater you extend the range of your wireless radio
network. The wireless repeater is connected to the wireless radio
network of the FRITZ!Box and then it makes a further wireless network
available, via which wireless devices like smartphones, tablets or
game consoles can connect with your home network. The WiFi signal
• • • • • • • • • • • • • • • • • • • • • • • • • • • • • • • • • • • • • • • • • • • • • • • • • • • • • • • • • • • • • • • • • • • • • • • • • • • • • • • • • • • • • • • • • • • • • • •
76FRITZ!Box7583
Page 77

Configuring
• • • • • • • • • • • • • • • • • • • • • • • • • • • • • • • • • • • • • • • • • • • • • • • • • • • • • • • • • • • • • • • • • • • • • • • • • • • • • • • • • • • • • • • • • • • • • • •
of the FRITZ!Box is not amplified by a wireless repeater, but merely
repeated.
To extend the wireless radio network of your FRITZ!Box you can use
FRITZ! devices and wireless repeaters from other manufacturers. You
can also deploy multiple wireless repeaters. Either the wireless
repeaters are connected directly with the wireless router to increase
the range in different directions, or they can be connected with each
other (wireless cascading) to increase the range in a particular direc
tion.
Extending the Wireless Network with a FRITZ! Device
If you use FRITZ! devices like the FRITZ!Repeater and FRITZ!Powerline
with WiFi function to expand your wireless radio network, then you can
integrate these devices in the Mesh of the FRITZ!Box. In the FRITZ!Box
Mesh, all individual radio networks are woven together into one big
wireless network with increased range and more stable data commu
nication.
FRITZ! Device Instructions
Extending the Wireless Network with a
see page 88
FRITZ!Repeater
Extending the Wireless Network with
see page 90
FRITZ!Powerline with WiFi Function
Extending the Wireless Network with an Addi
see page 92
tional FRITZ!Box
• • • • • • • • • • • • • • • • • • • • • • • • • • • • • • • • • • • • • • • • • • • • • • • • • • • • • • • • • • • • • • • • • • • • • • • • • • • • • • • • • • • • • • • • • • • • • • •
77FRITZ!Box7583
Page 78

Configuring
• • • • • • • • • • • • • • • • • • • • • • • • • • • • • • • • • • • • • • • • • • • • • • • • • • • • • • • • • • • • • • • • • • • • • • • • • • • • • • • • • • • • • • • • • • • • • • •
Configuring Your Telephone Numbers
Overview
Configure all telephone numbers in the FRITZ!Box that are not config
ured automatically.
Some telephony providers configure your telephone numbers auto
matically. This configuration starts either right after the FRITZ!Box is
connected to the internet or after the FRITZ!Box user interface is
opened.
Instructions: Configuring Your Telephone Numbers
1. Open the user interface, see page 57.
2. Select “Wizards / Manage Telephone Numbers”.
3. Click “Add Telephone Number” and follow the wizard’s instruc
tions.
• • • • • • • • • • • • • • • • • • • • • • • • • • • • • • • • • • • • • • • • • • • • • • • • • • • • • • • • • • • • • • • • • • • • • • • • • • • • • • • • • • • • • • • • • • • • • • •
78FRITZ!Box7583
Page 79

Configuring
• • • • • • • • • • • • • • • • • • • • • • • • • • • • • • • • • • • • • • • • • • • • • • • • • • • • • • • • • • • • • • • • • • • • • • • • • • • • • • • • • • • • • • • • • • • • • • •
Configuring Telephones
Overview
Once you have connected your telephones, answering machines and
fax machines to the FRITZ!Box, configure these devices in the
FRITZ!Box. For each device, specify:
• The telephone number for outgoing calls to the public telephone
network
• How incoming calls should be handled: Should the device ring
(telephone) or pick up (fax machine, answering machine) for every
call, or only respond to calls for certain telephone numbers?
• The internal name of the device to be displayed in the call list of
the FRITZ!Box
• Further settings that depend on the kind of device. For analog and
DECT telephones, for instance, you can enable the “call waiting”
function.
Requirements
• Your telephone numbers have been set up in the FRITZ!Box (see
the previous section).
Instructions: Configuring Telephones and Other Devices
1. Open the user interface, see page 57.
2. Select “Telephony / Telephony Devices”.
• • • • • • • • • • • • • • • • • • • • • • • • • • • • • • • • • • • • • • • • • • • • • • • • • • • • • • • • • • • • • • • • • • • • • • • • • • • • • • • • • • • • • • • • • • • • • • •
79FRITZ!Box7583
Page 80

Configuring
• • • • • • • • • • • • • • • • • • • • • • • • • • • • • • • • • • • • • • • • • • • • • • • • • • • • • • • • • • • • • • • • • • • • • • • • • • • • • • • • • • • • • • • • • • • • • • •
3. If the device to be configured is not yet included in the list of
telephony devices, click “Configure New Device”. Follow the
wizard’s instructions.
The wizard guides you through the assignment of telephone
numbers and enters the device in the list.
4. To configure further settings for a device in the list, click the
“Edit” button of the device .
The kind of device determines which additional settings are
available.
• • • • • • • • • • • • • • • • • • • • • • • • • • • • • • • • • • • • • • • • • • • • • • • • • • • • • • • • • • • • • • • • • • • • • • • • • • • • • • • • • • • • • • • • • • • • • • •
80FRITZ!Box7583
Page 81

Configuring
• • • • • • • • • • • • • • • • • • • • • • • • • • • • • • • • • • • • • • • • • • • • • • • • • • • • • • • • • • • • • • • • • • • • • • • • • • • • • • • • • • • • • • • • • • • • • • •
Configuring a Door Intercom System
Overview
Once you have connected your door intercom system to the FRITZ!Box,
configure the door intercom system in the FRITZ!Box. Specify the tele
phones or telephone numbers to which door calls should be
forwarded. You can also configure other settings, for instance, to have
the camera image sent from the door intercom system to your
FRITZ!Fon.
Requirements
• Your telephones are configured in the FRITZ!Box (see previous
section).
Instructions: Configuring a Door Intercom System
1. Open the user interface, see page 57.
2. Select “Telephony / Telephony Devices”.
3. Click “Configure New Device”. With the “Edit” button you
can also change the settings of a door intercom system that has
already been configured.
• • • • • • • • • • • • • • • • • • • • • • • • • • • • • • • • • • • • • • • • • • • • • • • • • • • • • • • • • • • • • • • • • • • • • • • • • • • • • • • • • • • • • • • • • • • • • • •
81FRITZ!Box7583
Page 82

Configuring
• • • • • • • • • • • • • • • • • • • • • • • • • • • • • • • • • • • • • • • • • • • • • • • • • • • • • • • • • • • • • • • • • • • • • • • • • • • • • • • • • • • • • • • • • • • • • • •
Saving Power with the FRITZ!Box
Overview
The FRITZ!Box offers various settings for energy-saving operation. The
following section describes how you can configure these settings and
what potential energy savings can be expected.
Viewing Information on Energy Consumption
The current power consumption of the total FRITZ!Box system is
displayed on the “Overview” page of the user interface.
Information on the power consumption of the individual areas, and on
the average power consumption over the last 24 hours, is presented in
the FRITZ!Box user interface under “System / Energy Monitor / Energy
Consumption”.
Using Savings Potential
What How to Where
Wire
less
configure a schedule;
see page 170
“Wireless / Schedule” menu
LAN
switch off wireless LAN,
see page 170
• “WLAN” button
• “Wireless / Radio Network”
menu
reduce the maximum trans
mitter power
“Wireless / Radio Channel /
Radio Channel Settings / Adjust
Radio Channel Settings” menu
LAN use the LAN port in energy-
saving (Green) mode
“Home Network / Network /
Network Settings / LAN
Settings” menu
• • • • • • • • • • • • • • • • • • • • • • • • • • • • • • • • • • • • • • • • • • • • • • • • • • • • • • • • • • • • • • • • • • • • • • • • • • • • • • • • • • • • • • • • • • • • • • •
82FRITZ!Box7583
Page 83

Configuring
• • • • • • • • • • • • • • • • • • • • • • • • • • • • • • • • • • • • • • • • • • • • • • • • • • • • • • • • • • • • • • • • • • • • • • • • • • • • • • • • • • • • • • • • • • • • • • •
What How to Where
USB use the USB port in energy-
saving (Green) mode;
“Home Network / USB Devices /
USB Settings”
see page 162
Saving Power with Smart Home
With intelligent Smart Home devices like FRITZ!DECT, electrical appli
ances are integrated into the home network. This way they can be
switched on and off by schedule. At the same time, they inform the
FRITZ!Box about consumption, energy costs incurred, and the CO2
footprint.
Instructions: Configuring a Schedule for Electrical Appliances in the Home Network
1. Open the user interface, see page 57.
2. Select “Home Network / Smart Home”.
3. For instructions, open the online help .
• • • • • • • • • • • • • • • • • • • • • • • • • • • • • • • • • • • • • • • • • • • • • • • • • • • • • • • • • • • • • • • • • • • • • • • • • • • • • • • • • • • • • • • • • • • • • • •
83FRITZ!Box7583
Page 84

Mesh with FRITZ!
• • • • • • • • • • • • • • • • • • • • • • • • • • • • • • • • • • • • • • • • • • • • • • • • • • • • • • • • • • • • • • • • • • • • • • • • • • • • • • • • • • • • • • • • • • • • • • •
Mesh with FRITZ!
Mesh in the Home Network of the FRITZ!Box ...................................................... 85
Updating the FRITZ!Box for Mesh........................................................................... 87
Integrating FRITZ!Repeater in the FRITZ!Box Mesh ........................................... 88
Integrating FRITZ!Powerline into the Mesh of the FRITZ!Box .......................... 90
Deploying an Additional FRITZ!Box as a Mesh Repeater.................................... 92
Using Telephony in the Mesh .................................................................................. 93
• • • • • • • • • • • • • • • • • • • • • • • • • • • • • • • • • • • • • • • • • • • • • • • • • • • • • • • • • • • • • • • • • • • • • • • • • • • • • • • • • • • • • • • • • • • • • • •
84FRITZ!Box7583
Page 85

Mesh with FRITZ!
• • • • • • • • • • • • • • • • • • • • • • • • • • • • • • • • • • • • • • • • • • • • • • • • • • • • • • • • • • • • • • • • • • • • • • • • • • • • • • • • • • • • • • • • • • • • • • •
Mesh in the Home Network of the FRITZ!Box
Overview
Mesh is a networking concept that combines the individual wireless
radio networks of your FRITZ! devices in the FRITZ!Box home network
into a single powerful wireless radio network. Mesh requires FRITZ!OS
version 7.00 or higher.
Only FRITZ! devices can be integrated into the FRITZ!Box Mesh.
Devices from other manufacturers can be integrated into the
FRITZ!Box home network, but not into the FRITZ!Box Mesh.
How Mesh Works
A Mesh always has a FRITZ!Box at its center. This central FRITZ!Box is
the Mesh Master. Other FRITZ! devices like FRITZ!Repeaters,
FRITZ!Powerline devices or other FRITZ!Box products adopt the
settings of the Mesh Master – the first time they are configured, and
every time these settings change. The FRITZ! devices also constitute
wireless access points in the Mesh, where they thus function as Mesh
Repeaters.
The FRITZ! devices in a Mesh coordinate with each other. For instance,
all devices automatically use the best connection signal in order to
achieve the fastest possible data transmission.
• • • • • • • • • • • • • • • • • • • • • • • • • • • • • • • • • • • • • • • • • • • • • • • • • • • • • • • • • • • • • • • • • • • • • • • • • • • • • • • • • • • • • • • • • • • • • • •
85FRITZ!Box7583
Page 86

Mesh with FRITZ!
• • • • • • • • • • • • • • • • • • • • • • • • • • • • • • • • • • • • • • • • • • • • • • • • • • • • • • • • • • • • • • • • • • • • • • • • • • • • • • • • • • • • • • • • • • • • • • •
Benefits of Mesh
Combining all wireless radio networks into one big wireless radio
network brings many benefits to the FRITZ!Box home network:
• Shared settings
As Mesh Master, the FRITZ!Box transfers all wireless LAN settings
to the Mesh Repeaters: wireless network name (SSID), network
key, wireless guest access and wireless schedule. This way you
only have to set up a single wireless connection on your smart
phones, tablets, and notebooks to gain access to the home
network and the FRITZ!Box's internet connection.
Settings for push services, automatic updates and AVM services
are also shared in the Mesh.
• Central home network overview
The Mesh overview in the FRITZ!Box user interface shows you
which devices in the home and guest network are active, how they
are connected with each other, and which throughput rates are
available over the individual connections.
You can check in the Mesh Overview whether any updates are
available for FRITZ! devices. Updates can be started directly in the
Mesh Overview.
• Powerful WiFi
Mesh enables improved information exchange among the FRITZ!
devices and thus provides for faster and more stable wireless
connections. Better ranges are achieved by using the access
points distributed through the Mesh.
• • • • • • • • • • • • • • • • • • • • • • • • • • • • • • • • • • • • • • • • • • • • • • • • • • • • • • • • • • • • • • • • • • • • • • • • • • • • • • • • • • • • • • • • • • • • • • •
86FRITZ!Box7583
Page 87

Mesh with FRITZ!
• • • • • • • • • • • • • • • • • • • • • • • • • • • • • • • • • • • • • • • • • • • • • • • • • • • • • • • • • • • • • • • • • • • • • • • • • • • • • • • • • • • • • • • • • • • • • • •
Updating the FRITZ!Box for Mesh
Overview
In order to be able to use Mesh in the home network, your FRITZ!Box
must have FRITZ!OS version 7.00 or higher. We recommend updating
to the latest version of FRITZ!OS.
If you have an older FRITZ!Box which can no longer be updated to
FRITZ!OS version 7.00 or higher, then you cannot use this FRITZ!Box
for Mesh.
Updating Instructions: FRITZ!Box
1. Open the user interface, see page 57.
2. Click on “Update” in the “System” menu.
3. Click the “Find New FRITZ!OS” button.
4. Click on the “Start Update Now” button.
The FRITZ!OS is updated. The FRITZ!Box is now ready for Mesh.
• • • • • • • • • • • • • • • • • • • • • • • • • • • • • • • • • • • • • • • • • • • • • • • • • • • • • • • • • • • • • • • • • • • • • • • • • • • • • • • • • • • • • • • • • • • • • • •
87FRITZ!Box7583
Page 88

1
Mesh with FRITZ!
• • • • • • • • • • • • • • • • • • • • • • • • • • • • • • • • • • • • • • • • • • • • • • • • • • • • • • • • • • • • • • • • • • • • • • • • • • • • • • • • • • • • • • • • • • • • • • •
Integrating FRITZ!Repeater in the FRITZ!Box Mesh
Overview
To expand your wireless radio network, you can integrate a
FRITZ!Repeater into the Mesh of the FRITZ!Box. Mesh connects the
individual wireless networks of your FRITZ! devices to form a
combined wireless network.
Requirements
The FRITZ!Repeater is located in the home network of a FRITZ!Box with
FRITZ!OSversion 7.00 or higher.
Enabling Instructions: Mesh for the FRITZ!Repeater
1. Open the FRITZ!Box user interface; see Instructions: Opening the
User Interface, page 57.
2. Select “Home Network / Mesh”.
The home network is displayed in a graphic overview. The
FRITZ!Box is the Mesh Master and designated with the “Mesh
enabled” icon: .
3. Make sure that the FRITZ!Repeater is marked with the “Mesh
enabled” icon (1).
If the symbol is displayed, then the FRITZ!Repeater was already
successfully integrated into the Mesh.
If the symbol is missing, continue with the next step.
• • • • • • • • • • • • • • • • • • • • • • • • • • • • • • • • • • • • • • • • • • • • • • • • • • • • • • • • • • • • • • • • • • • • • • • • • • • • • • • • • • • • • • • • • • • • • • •
88FRITZ!Box7583
Page 89

Mesh with FRITZ!
• • • • • • • • • • • • • • • • • • • • • • • • • • • • • • • • • • • • • • • • • • • • • • • • • • • • • • • • • • • • • • • • • • • • • • • • • • • • • • • • • • • • • • • • • • • • • • •
4. If the “Perform Update” button is available next to the
“FRITZ!Repeater” in the overview: Perform the update and wait
until the message “Update was successful” appears.
If no update is available, continue with the next step.
5. Start WPS on the FRITZ!Box. To do this, press the “WPS” button
on the FRITZ!Box until the “Info” LED starts flashing.
6. Within 2 minutes, start WPS on FRITZ!Repeater. Press the
“WPS” button briefly.
The FRITZ!Repeater is integrated into the Mesh of the FRITZ!Box. As
soon as the procedure is concluded, the FRITZ!Repeater is displayed
in the Mesh Overview of the FRITZ!Box with the “Mesh enabled”
symbol: .
• • • • • • • • • • • • • • • • • • • • • • • • • • • • • • • • • • • • • • • • • • • • • • • • • • • • • • • • • • • • • • • • • • • • • • • • • • • • • • • • • • • • • • • • • • • • • • •
89FRITZ!Box7583
Page 90

1
Mesh with FRITZ!
• • • • • • • • • • • • • • • • • • • • • • • • • • • • • • • • • • • • • • • • • • • • • • • • • • • • • • • • • • • • • • • • • • • • • • • • • • • • • • • • • • • • • • • • • • • • • • •
Integrating FRITZ!Powerline into the Mesh of the FRITZ!Box
Overview
To expand your wireless radio network, you can integrate a
FRITZ!Powerline with WiFi function into the Mesh of the FRITZ!Box.
Mesh connects the individual wireless networks of your FRITZ! devices
to form a combined wireless network.
Requirements
The FRITZ!Powerline is located in the home network of a FRITZ!Box
with FRITZ!OS 7.00 or higher.
Instructions: Integrating FRITZ!Powerline into the Mesh
1. Open the FRITZ!Box user interface; see Instructions: Opening the
User Interface, page 57.
2. Select “Home Network / Mesh”.
The home network is displayed in a graphic overview. The
FRITZ!Box is the Mesh Master and designated with the “Mesh
enabled” symbol: .
3. Make sure that the FRITZ!Powerline is marked with the “Mesh
enabled” symbol (1).
If the symbol is displayed, then FRITZ!Powerline was already
successfully integrated into the Mesh.
If the symbol is missing, continue with the next step.
4. If the “Perform Update” button is available next to the
FRITZ!Powerline in the overview: Perform the update and wait
until the message “Update was successful” appears.
If no update is available, continue with the next step.
• • • • • • • • • • • • • • • • • • • • • • • • • • • • • • • • • • • • • • • • • • • • • • • • • • • • • • • • • • • • • • • • • • • • • • • • • • • • • • • • • • • • • • • • • • • • • • •
90FRITZ!Box7583
Page 91

Mesh with FRITZ!
• • • • • • • • • • • • • • • • • • • • • • • • • • • • • • • • • • • • • • • • • • • • • • • • • • • • • • • • • • • • • • • • • • • • • • • • • • • • • • • • • • • • • • • • • • • • • • •
5. Start WPS on the FRITZ!Box. To do this, press the “WPS” button
on the FRITZ!Box until the “Info” LED starts flashing.
6. Within 2 minutes, start WPS on FRITZ!Powerline. To do this,
press briefly on either the “Connect” or the “WLAN/WPS” button,
depending on the model.
The FRITZ!Powerline is integrated into the Mesh of the FRITZ!Box. As
soon as the procedure is concluded, FRITZ!Powerline is displayed in
the Mesh Overview of the FRITZ!Box with the “Mesh enabled”
symbol: .
• • • • • • • • • • • • • • • • • • • • • • • • • • • • • • • • • • • • • • • • • • • • • • • • • • • • • • • • • • • • • • • • • • • • • • • • • • • • • • • • • • • • • • • • • • • • • • •
91FRITZ!Box7583
Page 92

Mesh with FRITZ!
• • • • • • • • • • • • • • • • • • • • • • • • • • • • • • • • • • • • • • • • • • • • • • • • • • • • • • • • • • • • • • • • • • • • • • • • • • • • • • • • • • • • • • • • • • • • • • •
Deploying an Additional FRITZ!Box as a Mesh Repeater
Overview
You can use another FRITZ!Box in the home network to improve the
WiFi coverage in the home network. In this operating mode, a central
FRITZ!Box is the Mesh Master, and the other FRITZ!Box is a Mesh
Repeater. By integrating an additional FRITZ!Box as a Mesh Repeater
you benefit from not only wireless repeating, but also from all other
benefits of Mesh; see Benefits of Mesh, page 86.
Requirements
• The FRITZ!Box that is to serve as the Mesh Repeater was reset to
its factory settings; see page .
• The FRITZ!Box that is to serve as the Mesh Repeater has FRITZ!OS
version 7.00 or higher installed; see page 203.
• The FRITZ!Box that is to function as a Mesh Repeater is a network
device (IP client) in the home network of the Mesh Master.
Instructions: Deploying an Additional FRITZ!Box as a Mesh Repeater
1. Open the user interface, see page 57.
2. Select “Home Network / Mesh / Mesh Settings”.
3. For instructions, open the online help .
• • • • • • • • • • • • • • • • • • • • • • • • • • • • • • • • • • • • • • • • • • • • • • • • • • • • • • • • • • • • • • • • • • • • • • • • • • • • • • • • • • • • • • • • • • • • • • •
92FRITZ!Box7583
Page 93

Mesh with FRITZ!
• • • • • • • • • • • • • • • • • • • • • • • • • • • • • • • • • • • • • • • • • • • • • • • • • • • • • • • • • • • • • • • • • • • • • • • • • • • • • • • • • • • • • • • • • • • • • • •
Using Telephony in the Mesh
Overview
In a Mesh with more than one FRITZ!Box, you can configure your tele
phone numbers in one FRITZ!Box (the Mesh Master) and adopt them
automatically on every other FRITZ!Box in the Mesh.
Whenever you add or change telephone numbers in the Mesh Master,
the changes are automatically applied to the other FRITZ!Boxes.
Requirements
• Your telephone numbers are registered in the FRITZ!Box that is
configured as the Mash Master.
• All FRITZ!Boxes on which you would like to adopt the telephone
numbers are configured as Mesh Repeaters.
Instructions: Setting up Telephony in the Mesh
1. Open the user interface, see page 57.
2. Select “Home Network / Mesh / Mesh Settings”.
3. For instructions, open the online help .
• • • • • • • • • • • • • • • • • • • • • • • • • • • • • • • • • • • • • • • • • • • • • • • • • • • • • • • • • • • • • • • • • • • • • • • • • • • • • • • • • • • • • • • • • • • • • • •
93FRITZ!Box7583
Page 94

User Interface: Overview Menu
• • • • • • • • • • • • • • • • • • • • • • • • • • • • • • • • • • • • • • • • • • • • • • • • • • • • • • • • • • • • • • • • • • • • • • • • • • • • • • • • • • • • • • • • • • • • • • •
User Interface: Overview Menu
Overview Menu: Settings and Features ................................................................ 95
• • • • • • • • • • • • • • • • • • • • • • • • • • • • • • • • • • • • • • • • • • • • • • • • • • • • • • • • • • • • • • • • • • • • • • • • • • • • • • • • • • • • • • • • • • • • • • •
94FRITZ!Box7583
Page 95

User Interface: Overview Menu
• • • • • • • • • • • • • • • • • • • • • • • • • • • • • • • • • • • • • • • • • • • • • • • • • • • • • • • • • • • • • • • • • • • • • • • • • • • • • • • • • • • • • • • • • • • • • • •
Overview Menu: Settings and Features
Overview
The “Overview” menu is the start page of the FRITZ!Box user interface.
This page presents an overview of all FRITZ!Box features and compo
nents: energy consumption, connections, ports, calls, answering
machine messages, convenience functions (parental controls, alarm,
etc.) and all devices in the home network.
In addition to the overview, next to the FRITZ!OS version currently
installed, you will also find notifications important for secure and reli
able operation of your FRITZ!Box.
“Overview” menu
• • • • • • • • • • • • • • • • • • • • • • • • • • • • • • • • • • • • • • • • • • • • • • • • • • • • • • • • • • • • • • • • • • • • • • • • • • • • • • • • • • • • • • • • • • • • • • •
95FRITZ!Box7583
Page 96

2
1
User Interface: Overview Menu
• • • • • • • • • • • • • • • • • • • • • • • • • • • • • • • • • • • • • • • • • • • • • • • • • • • • • • • • • • • • • • • • • • • • • • • • • • • • • • • • • • • • • • • • • • • • • • •
FRITZ!Box Status Information at a Glance
The following figure shows you the different areas of the user inter
face that present status information:
No. Function / Display
1 System Information
• Product name or individually assigned name of the
FRITZ!Box
• FRITZ!OS installed
• Current power consumption
• Important notifications for secure, reliable operation of your
FRITZ!Box
• • • • • • • • • • • • • • • • • • • • • • • • • • • • • • • • • • • • • • • • • • • • • • • • • • • • • • • • • • • • • • • • • • • • • • • • • • • • • • • • • • • • • • • • • • • • • • •
96FRITZ!Box7583
Page 97

User Interface: Overview Menu
• • • • • • • • • • • • • • • • • • • • • • • • • • • • • • • • • • • • • • • • • • • • • • • • • • • • • • • • • • • • • • • • • • • • • • • • • • • • • • • • • • • • • • • • • • • • • • •
No. Function / Display
2 Information about connections and interfaces
• Information on internet and telephony connections and on all
FRITZ!Box interfaces
• Information on telephone calls and voice messages on the
integrated answering machine
• Devices connected to the FRITZ!Box, such as computers,
smartphones, network storage, printers, or Smart Home
devices
• Configured convenience features
For a comprehensive description of the FRITZ!Box user interface: see
User Interface, page 56.
• • • • • • • • • • • • • • • • • • • • • • • • • • • • • • • • • • • • • • • • • • • • • • • • • • • • • • • • • • • • • • • • • • • • • • • • • • • • • • • • • • • • • • • • • • • • • • •
97FRITZ!Box7583
Page 98

User Interface: Internet Menu
• • • • • • • • • • • • • • • • • • • • • • • • • • • • • • • • • • • • • • • • • • • • • • • • • • • • • • • • • • • • • • • • • • • • • • • • • • • • • • • • • • • • • • • • • • • • • • •
User Interface: Internet Menu
Internet Menu: Settings and Features.................................................................... 99
Using AVM Services for Diagnostics and Maintenance .................................... 100
Configuring Parental Controls ...............................................................................102
Creating and Assigning Access Profiles ..............................................................104
Editing Filter Lists ....................................................................................................106
Configuring Priorities for Internet Use .................................................................107
Configuring Port Sharing......................................................................................... 109
Enabling Dynamic DNS.............................................................................................111
Remote Access to the FRITZ!Box .......................................................................... 112
Configuring VPN Remote Access............................................................................114
Configuring IPv6 .......................................................................................................116
Configuring FRITZ!Box as a LISP Router.............................................................. 118
• • • • • • • • • • • • • • • • • • • • • • • • • • • • • • • • • • • • • • • • • • • • • • • • • • • • • • • • • • • • • • • • • • • • • • • • • • • • • • • • • • • • • • • • • • • • • • •
98FRITZ!Box7583
Page 99

User Interface: Internet Menu
• • • • • • • • • • • • • • • • • • • • • • • • • • • • • • • • • • • • • • • • • • • • • • • • • • • • • • • • • • • • • • • • • • • • • • • • • • • • • • • • • • • • • • • • • • • • • • •
Internet Menu: Settings and Features
Overview
The “Internet” menu pools all of the features for the internet connec
tion. Users of the FRITZ!Box interested in technology can read informa
tion on the DSL connection here.
“Internet” menu
Description of the Submenus
The online help of the user interface includes a detailed description of
the submenus.
• • • • • • • • • • • • • • • • • • • • • • • • • • • • • • • • • • • • • • • • • • • • • • • • • • • • • • • • • • • • • • • • • • • • • • • • • • • • • • • • • • • • • • • • • • • • • • •
99FRITZ!Box7583
Page 100

User Interface: Internet Menu
• • • • • • • • • • • • • • • • • • • • • • • • • • • • • • • • • • • • • • • • • • • • • • • • • • • • • • • • • • • • • • • • • • • • • • • • • • • • • • • • • • • • • • • • • • • • • • •
Using AVM Services for Diagnostics and Maintenance
Overview
The AVM services for diagnostics and maintenance keep your
FRITZ!Box and the FRITZ!OS operating system up to date and support
the security and further development of your FRITZ!Box.
We recommend leaving the use of all AVM services enabled for your
FRITZ! device.
AVM Services
The following AVM services are provided by your FRITZ!Box:
AVM Service Explanation
Search for updates Your FRITZ!Box connects with the AVM update
server regularly to search for and install new
versions of FRITZ!OS.
Diagnostics data for
error analysis
Upon suspicions of misuse by third parties,
your FRITZ!Box transmits error reports or tech
nical diagnostics data to AVM for analysis.
Diagnostics data for
system maintenance
Your FRITZ!Box transmits device-specific data
to AVM for the development of security updates
and to further develop FRITZ!OS.
Data Privacy
The diagnostics data and the device-specific data transmitted by your
FRITZ!Box to AVM do not contain any personalized data. The data
transmitted serve the exclusive purpose of technical adaptations and
optimizations of your FRITZ!Box. Also, AVM does not pass these data
on to third parties. The exact wording of the data privacy statement is
presented under “Legal Notice / Data Privacy Statement” in the online
help.
• • • • • • • • • • • • • • • • • • • • • • • • • • • • • • • • • • • • • • • • • • • • • • • • • • • • • • • • • • • • • • • • • • • • • • • • • • • • • • • • • • • • • • • • • • • • • • •
100FRITZ!Box7583
 Loading...