


1200
Table of contents
 Loading...
Repeater
1200
Configuration and Operation

Table of Contents
• • • • • • • • • • • • • • • • • • • • • • • • • • • • • • • • • • • • • • • • • • • • • • • • • • • • • • • • • • • • • • • • • • • • • • • • • • • • • • • • • • • • • • • • • • • • • • •
Table of Contents
General Remarks...................................................................................................... 4
Safety Instructions ............................................................................................ 5
Instructions and Help ....................................................................................... 7
Device Data on the Type Label ....................................................................... 9
Package Contents ............................................................................................. 10
Functions and Structure ......................................................................................... 11
Functions ............................................................................................................. 12
Connection Socket ............................................................................................ 13
Button.................................................................................................................... 14
LEDs ...................................................................................................................... 15
LED ........................................................................................................................ 18
Requirements for Operation ........................................................................... 20
Connecting ................................................................................................................. 21
Connecting to FRITZ!Box................................................................................... 22
Connecting to Another Router......................................................................... 24
Finding the Ideal Location for FRITZ!Repeater............................................ 29
Mesh ........................................................................................................................... 31
Mesh of the FRITZ!Box...................................................................................... 32
Enabling Mesh for FRITZ!Repeater................................................................. 33
Connecting FRITZ!Repeater with Another Mesh Repeater......................... 35
Connecting Devices with FRITZ!Repeater............................................................ 37
Connecting Devices with the Wireless Radio Network ............................... 38
Connecting Devices with a LAN Cable............................................................ 40
User Interface ........................................................................................................... 41
Opening the User Interface.............................................................................. 42
Configuring AVM Services for Diagnostics and Maintenance ................... 47
• • • • • • • • • • • • • • • • • • • • • • • • • • • • • • • • • • • • • • • • • • • • • • • • • • • • • • • • • • • • • • • • • • • • • • • • • • • • • • • • • • • • • • • • • • • • • • •
2FRITZ!Repeater1200

Table of Contents
• • • • • • • • • • • • • • • • • • • • • • • • • • • • • • • • • • • • • • • • • • • • • • • • • • • • • • • • • • • • • • • • • • • • • • • • • • • • • • • • • • • • • • • • • • • • • • •
User Interface: Access to Home Network Menu................................................. 49
Access to Home Network Menu: Settings and Features............................. 50
Adopting Wireless LAN Settings from the Router (FRITZ!Box).................. 51
Changing the Type of Connection.................................................................... 53
User Interface: Network.......................................................................................... 54
The Network Menu: Settings and Features................................................... 55
Configuring the IP Address Manually............................................................. 56
User Interface: Wireless Menu............................................................................... 57
Wireless Menu: Settings and Features.......................................................... 58
Configuring a Schedule for the Wireless Radio Network ........................... 59
Changing the Name of the Wireless Network (SSID) .................................. 60
Configuring Wireless Guest Access .............................................................. 61
User Interface: System Menu................................................................................. 62
System Menu: Settings and Features............................................................ 63
Switching LED On and Off................................................................................. 64
Configuring a FRITZ!Repeater Password ..................................................... 65
Saving Settings ................................................................................................... 67
Loading Settings ............................................................................................... 68
Updating FRITZ!OS ............................................................................................ 69
Restoring Factory Settings ............................................................................. 71
Malfunctions .............................................................................................................. 72
Troubleshooting Procedures........................................................................... 73
Appendix..................................................................................................................... 77
Technical Specifications................................................................................... 78
Legal...................................................................................................................... 80
Information on Cleaning................................................................................... 84
Disposal ............................................................................................................... 85
Index............................................................................................................................ 86
• • • • • • • • • • • • • • • • • • • • • • • • • • • • • • • • • • • • • • • • • • • • • • • • • • • • • • • • • • • • • • • • • • • • • • • • • • • • • • • • • • • • • • • • • • • • • • •
3FRITZ!Repeater1200

General Remarks
• • • • • • • • • • • • • • • • • • • • • • • • • • • • • • • • • • • • • • • • • • • • • • • • • • • • • • • • • • • • • • • • • • • • • • • • • • • • • • • • • • • • • • • • • • • • • • •
General Remarks
Safety Instructions .................................................................................................... 5
Instructions and Help ............................................................................................... 7
Device Data on the Type Label ................................................................................ 9
Package Contents ...................................................................................................... 10
• • • • • • • • • • • • • • • • • • • • • • • • • • • • • • • • • • • • • • • • • • • • • • • • • • • • • • • • • • • • • • • • • • • • • • • • • • • • • • • • • • • • • • • • • • • • • • •
4FRITZ!Repeater1200

General Remarks
• • • • • • • • • • • • • • • • • • • • • • • • • • • • • • • • • • • • • • • • • • • • • • • • • • • • • • • • • • • • • • • • • • • • • • • • • • • • • • • • • • • • • • • • • • • • • • •
Safety Instructions
Overview
Before connecting the FRITZ!Repeater, observe the following security
instructions in order to protect yourself, the surroundings, and the
FRITZ!Repeater from harm.
Easy Accessibility
It must always be possible to disconnect the FRITZ!Repeater from
electrical power.
• Insert the FRITZ!Repeater into an electrical outlet that is easy to
reach.
Overheating
Heat accumulation can lead to overheating of the FRITZ!Repeater and
subsequently damage the FRITZ!Repeater.
• Install the FRITZ!Repeater in a place that is protected from direct
sunlight.
• Provide for sufficient air circulation around the FRITZ!Repeater.
• Make sure that the ventilation slits on the housing are always
unobstructed.
• Do not cover the FRITZ!Repeater.
• Avoid operation in the direct vicinity of a radiator or heating unit.
Moisture, Liquids and Vapors
Moisture, liquids and vapors that find their way into the
FRITZ!Repeater can cause electric shocks or short circuits.
• Only use the FRITZ!Repeater indoors.
• Never let liquids get inside the FRITZ!Repeater.
• Protect the FRITZ!Repeater from vapors and moisture.
• • • • • • • • • • • • • • • • • • • • • • • • • • • • • • • • • • • • • • • • • • • • • • • • • • • • • • • • • • • • • • • • • • • • • • • • • • • • • • • • • • • • • • • • • • • • • • •
5FRITZ!Repeater1200

General Remarks
• • • • • • • • • • • • • • • • • • • • • • • • • • • • • • • • • • • • • • • • • • • • • • • • • • • • • • • • • • • • • • • • • • • • • • • • • • • • • • • • • • • • • • • • • • • • • • •
Improper Cleaning
Improper cleaning with strong detergents, solvents or wet cloths can
cause damage to the FRITZ!Repeater.
• Please refer to the information about cleaning; see page 84.
Improper Opening and Repairs
Improper opening and improper repairs can present a hazard to users
of the FRITZ!Repeater.
• Do not open the FRITZ!Repeater.
Power Surges Caused by Lightning
During electrical storms, electrical surges caused by lightning present
a danger to connected electrical devices.
• Do not install the FRITZ!Repeater during an electrical storm.
• During a storm, disconnect the FRITZ!Repeater from the power
supply.
• • • • • • • • • • • • • • • • • • • • • • • • • • • • • • • • • • • • • • • • • • • • • • • • • • • • • • • • • • • • • • • • • • • • • • • • • • • • • • • • • • • • • • • • • • • • • • •
6FRITZ!Repeater1200

General Remarks
• • • • • • • • • • • • • • • • • • • • • • • • • • • • • • • • • • • • • • • • • • • • • • • • • • • • • • • • • • • • • • • • • • • • • • • • • • • • • • • • • • • • • • • • • • • • • • •
Instructions and Help
Instructions and Help
To connect, configure and operate your FRITZ!Repeater1200, use the
following instructions and help:
Instructions,
Contents Location
Help
Manual
Status: current version of
en.avm.
de/service/manuals
FRITZ!OS
Connecting, configuration and
operation
Range of functions of your
FRITZ! device
Quick guide Connecting and configuration Is provided in print
with your
FRITZ!Repeater
Online help Instructions on configuration
http://fritz.repeater /
and operation
Knowledge
Base
Solutions for common prob
lems during connection,
en.avm.de/service
configuration and operation
Newsletter and
social media
The latest information on
FRITZ! products, updates, and
practical tips
en.avm.
de/newsletter
Facebook
Instagram
Twitter
YouTube
• • • • • • • • • • • • • • • • • • • • • • • • • • • • • • • • • • • • • • • • • • • • • • • • • • • • • • • • • • • • • • • • • • • • • • • • • • • • • • • • • • • • • • • • • • • • • • •
7FRITZ!Repeater1200

General Remarks
• • • • • • • • • • • • • • • • • • • • • • • • • • • • • • • • • • • • • • • • • • • • • • • • • • • • • • • • • • • • • • • • • • • • • • • • • • • • • • • • • • • • • • • • • • • • • • •
Symbols Used
The following symbols are used in this manual:
Symbol Meaning
Important message that should be complied with in order to
prevent material damage, errors or malfunctions
Useful tip for configuring and operating the FRITZ!Repeater
• • • • • • • • • • • • • • • • • • • • • • • • • • • • • • • • • • • • • • • • • • • • • • • • • • • • • • • • • • • • • • • • • • • • • • • • • • • • • • • • • • • • • • • • • • • • • • •
8FRITZ!Repeater1200
R987.321.65.498.777
00:00:00:00:00:00
S/N:
Input: 230V~ 50Hz 50mA
WLAN network key:
3779
8981 1562 8981 1234
MAC:
FRI !Repeater 1200
AVM GmbH, 10547 Berlin
1
2
3
5
4
General Remarks
• • • • • • • • • • • • • • • • • • • • • • • • • • • • • • • • • • • • • • • • • • • • • • • • • • • • • • • • • • • • • • • • • • • • • • • • • • • • • • • • • • • • • • • • • • • • • • •
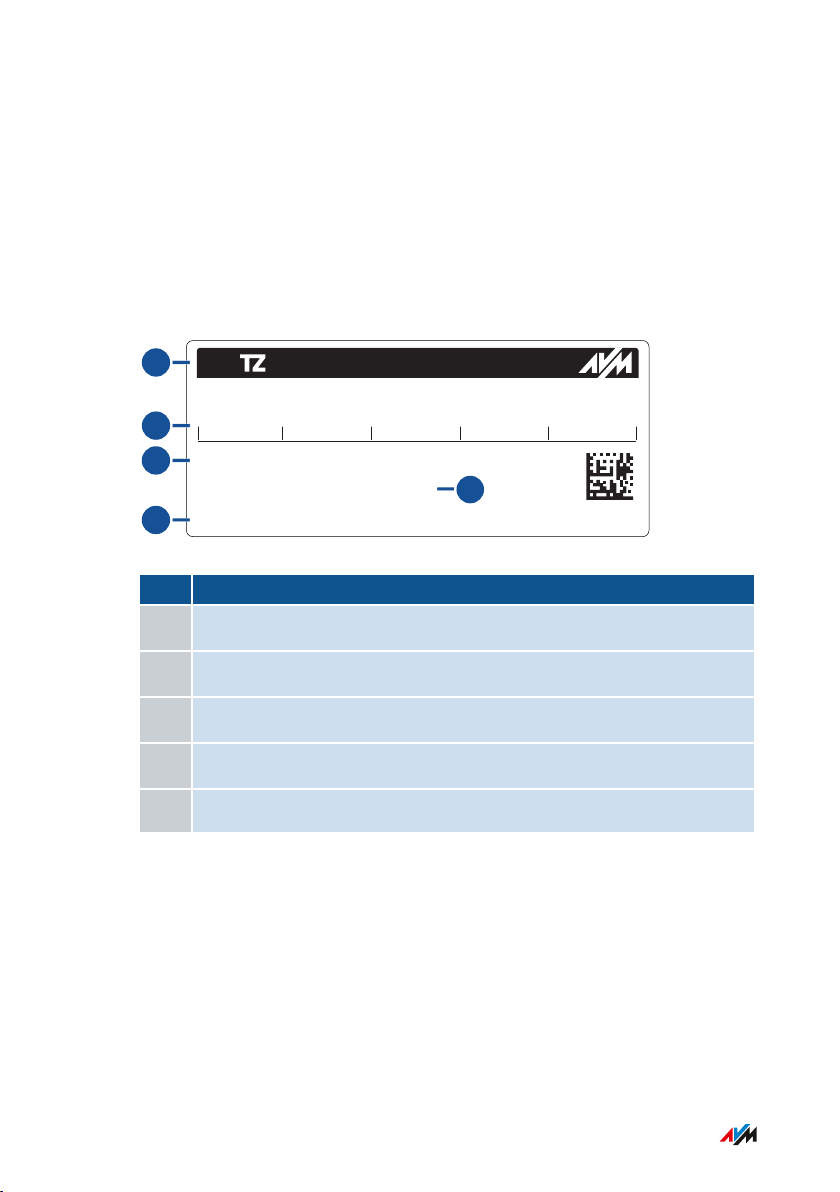
Device Data on the Type Label
Overview
Important device data on your FRITZ!Repeater device are presented on
the type label on the Back of the Device.
Device Data on the Type Label
No. Meaning
1 Product name
2 Network key (wireless LAN password)
3 Serial number
4 MAC address of the FRITZ!Repeater1200
5 Power adapter specification
• • • • • • • • • • • • • • • • • • • • • • • • • • • • • • • • • • • • • • • • • • • • • • • • • • • • • • • • • • • • • • • • • • • • • • • • • • • • • • • • • • • • • • • • • • • • • • •
9FRITZ!Repeater1200
General Remarks
• • • • • • • • • • • • • • • • • • • • • • • • • • • • • • • • • • • • • • • • • • • • • • • • • • • • • • • • • • • • • • • • • • • • • • • • • • • • • • • • • • • • • • • • • • • • • • •
Package Contents
Package Contents
Number Supplied Part
1 FRITZ!Repeater1200
1 CEE7/4 (Schuko) adapter (installed)
1 LAN cable
1 Quick guide
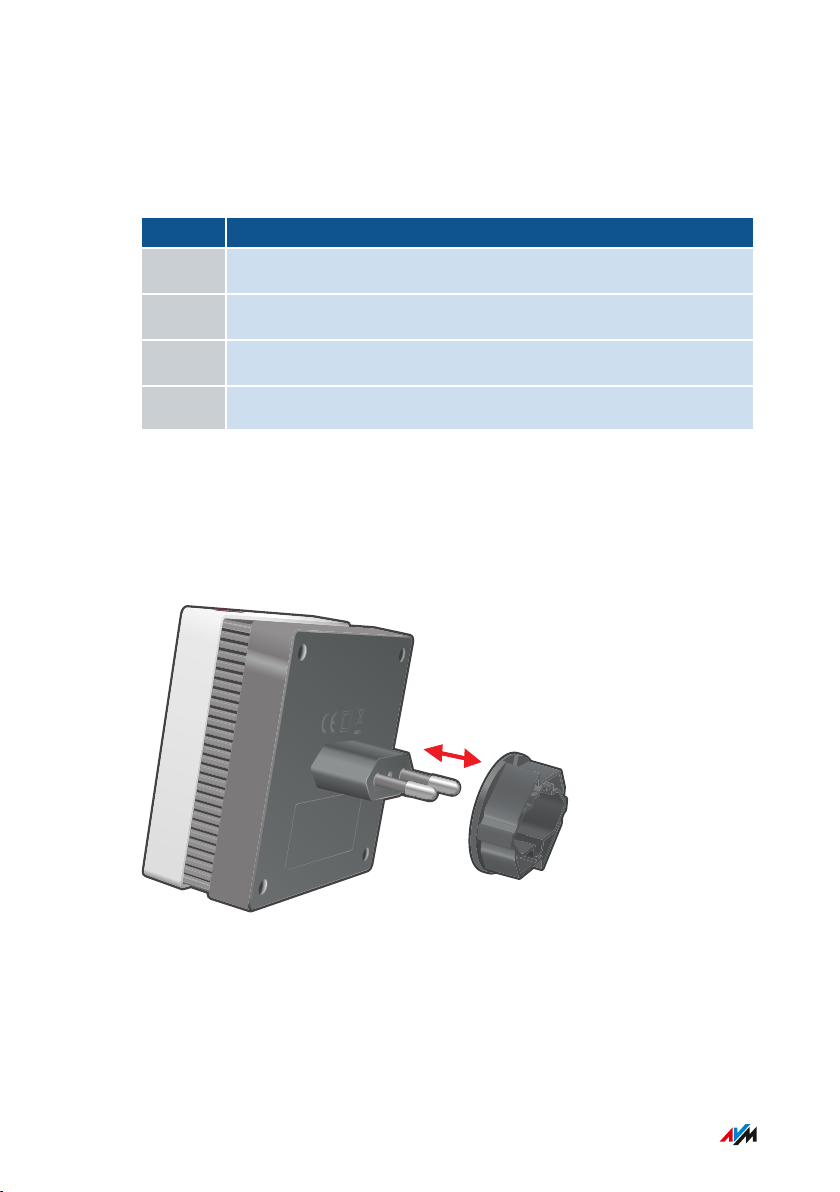
CEE7/4 (Schuko) adapter
To stabilize the FRITZ!Repeater in CEE7/4 (Schuko) outlets, a Schuko
adapter ring is premounted on the plug. If this adapter is not needed, it
can be removed.
• • • • • • • • • • • • • • • • • • • • • • • • • • • • • • • • • • • • • • • • • • • • • • • • • • • • • • • • • • • • • • • • • • • • • • • • • • • • • • • • • • • • • • • • • • • • • • •
10FRITZ!Repeater1200

Functions and Structure
• • • • • • • • • • • • • • • • • • • • • • • • • • • • • • • • • • • • • • • • • • • • • • • • • • • • • • • • • • • • • • • • • • • • • • • • • • • • • • • • • • • • • • • • • • • • • • •
Functions and Structure
Functions .................................................................................................................... 12
Connection Socket ..................................................................................................... 13
Button........................................................................................................................... 14
LEDs ............................................................................................................................. 15
LED ............................................................................................................................... 18
Requirements for Operation ................................................................................... 20
• • • • • • • • • • • • • • • • • • • • • • • • • • • • • • • • • • • • • • • • • • • • • • • • • • • • • • • • • • • • • • • • • • • • • • • • • • • • • • • • • • • • • • • • • • • • • • •
11FRITZ!Repeater1200

Functions and Structure
• • • • • • • • • • • • • • • • • • • • • • • • • • • • • • • • • • • • • • • • • • • • • • • • • • • • • • • • • • • • • • • • • • • • • • • • • • • • • • • • • • • • • • • • • • • • • • •
Functions
Extending Wireless LAN
The wireless radio network of an internet router (FRITZ!Box) often
does not cover all rooms in an apartment or a house. With
FRITZ!Repeater1200 wireless devices like computers, tablets and
smartphones get a connection to the internet router even where its
wireless radio network is poor or cannot be received at all. For this the
FRITZ!Repeater expands the wireless radio network of the internet
router (FRITZ!Box).
Connecting Network Devices
Computers, smartphones, media receivers and other network devices
can be connected in the following ways:
• Wireless
• LAN cable
Connection with a LAN cable is possible only when the connection
to the internet router (FRITZ!Box) is established wirelessly.
Connecting the Router by LAN Cable
You can connect the FRITZ!Repeater1200 to your internet router
(FRITZ!Box) with a LAN cable. Use this kind of connection in the
following cases:
• The internet router does not have wireless LAN.
• The FRITZ!Repeater is to be deployed at a location where no
stable wireless connection to the internet router is possible.
• • • • • • • • • • • • • • • • • • • • • • • • • • • • • • • • • • • • • • • • • • • • • • • • • • • • • • • • • • • • • • • • • • • • • • • • • • • • • • • • • • • • • • • • • • • • • • •
12FRITZ!Repeater1200
1
Functions and Structure
• • • • • • • • • • • • • • • • • • • • • • • • • • • • • • • • • • • • • • • • • • • • • • • • • • • • • • • • • • • • • • • • • • • • • • • • • • • • • • • • • • • • • • • • • • • • • • •
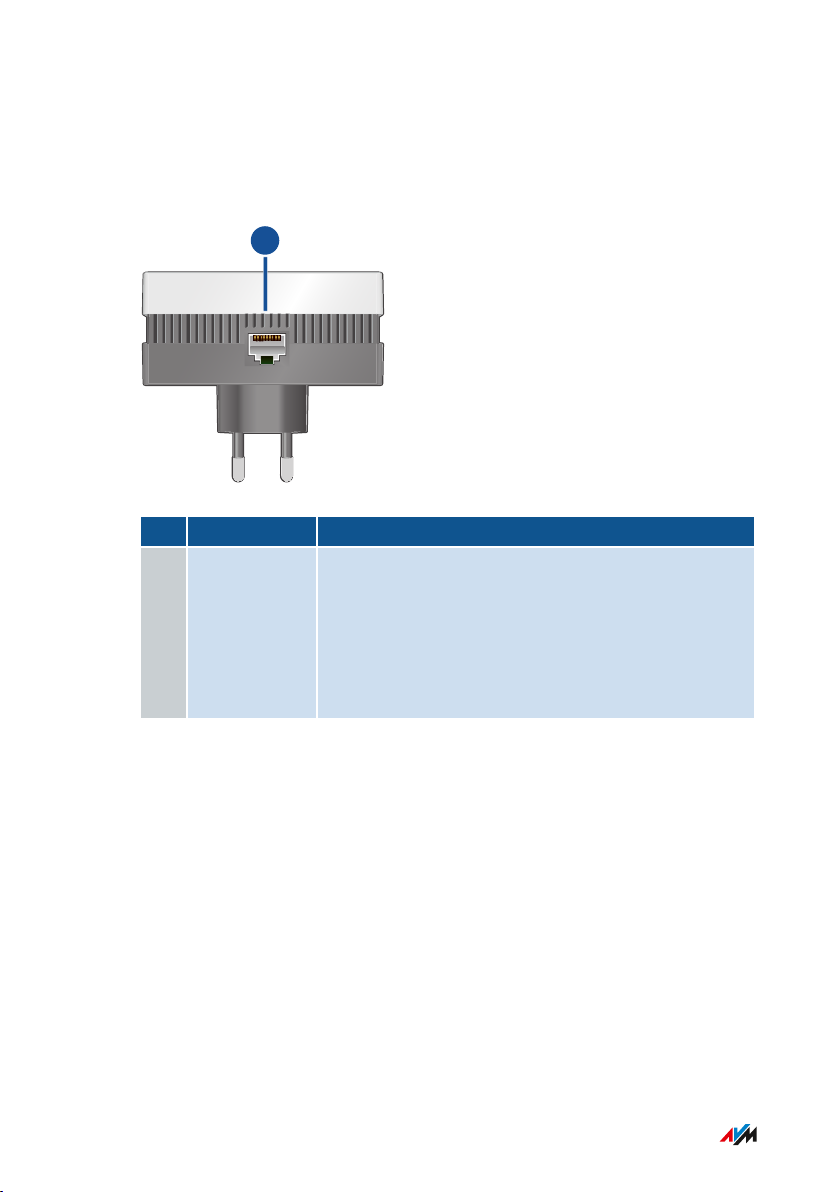
Connection Socket
Socket Function
No. Name Function
1 LAN Gigabit Ethernet port for:
• Connecting PCs, notebooks, game consoles,
smart TV and other network-compatible
devices
• Connection to router
• • • • • • • • • • • • • • • • • • • • • • • • • • • • • • • • • • • • • • • • • • • • • • • • • • • • • • • • • • • • • • • • • • • • • • • • • • • • • • • • • • • • • • • • • • • • • • •
13FRITZ!Repeater1200
Connect
1
Functions and Structure
• • • • • • • • • • • • • • • • • • • • • • • • • • • • • • • • • • • • • • • • • • • • • • • • • • • • • • • • • • • • • • • • • • • • • • • • • • • • • • • • • • • • • • • • • • • • • • •
Button
Button Functions
No. Button Press Function
1 Connect
for 1second • Establishes a connection
(starts WPS)
• Enables Mesh
6seconds Connects with another wireless
access point
at least 15seconds Loads factory settings
• • • • • • • • • • • • • • • • • • • • • • • • • • • • • • • • • • • • • • • • • • • • • • • • • • • • • • • • • • • • • • • • • • • • • • • • • • • • • • • • • • • • • • • • • • • • • • •
14FRITZ!Repeater1200

1
Connect
Functions and Structure
• • • • • • • • • • • • • • • • • • • • • • • • • • • • • • • • • • • • • • • • • • • • • • • • • • • • • • • • • • • • • • • • • • • • • • • • • • • • • • • • • • • • • • • • • • • • • • •
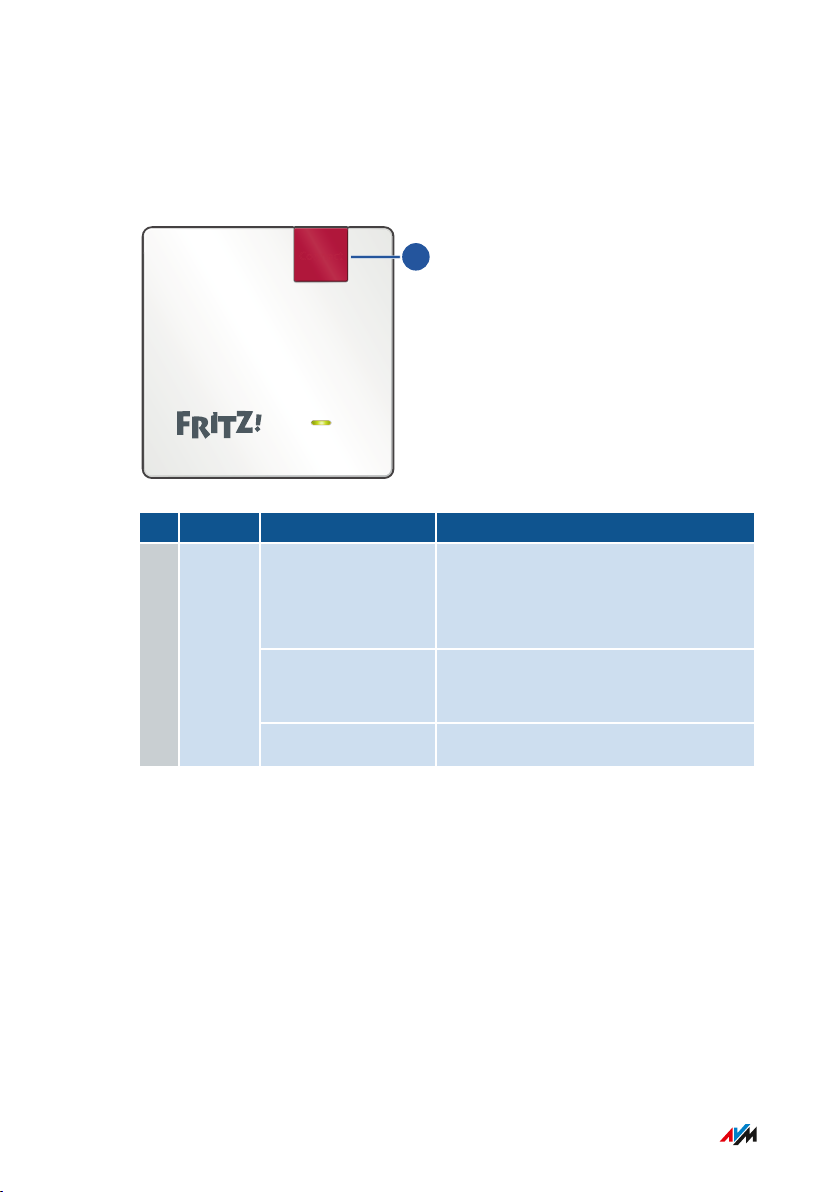
LEDs
LEDs during a wireless connection to the router (FRITZ!Box)
No. LED Condition Meaning
1
glows
green
flashes
green
FRITZ!Repeater ready for operation, good
wireless connection to a router/repeater
slowly (every 2seconds)
• FRITZ!Repeater ready to configure a
connection
fast (twice per second)
• Registering with router
• Performing WPS
• FRITZ!OS update in progress
• Loading factory settings
glows
orange
flashes
Weak wireless connection to a
router/repeater
No connection to router/repeater
orange
• • • • • • • • • • • • • • • • • • • • • • • • • • • • • • • • • • • • • • • • • • • • • • • • • • • • • • • • • • • • • • • • • • • • • • • • • • • • • • • • • • • • • • • • • • • • • • •
15FRITZ!Repeater1200
1
Connect
Functions and Structure
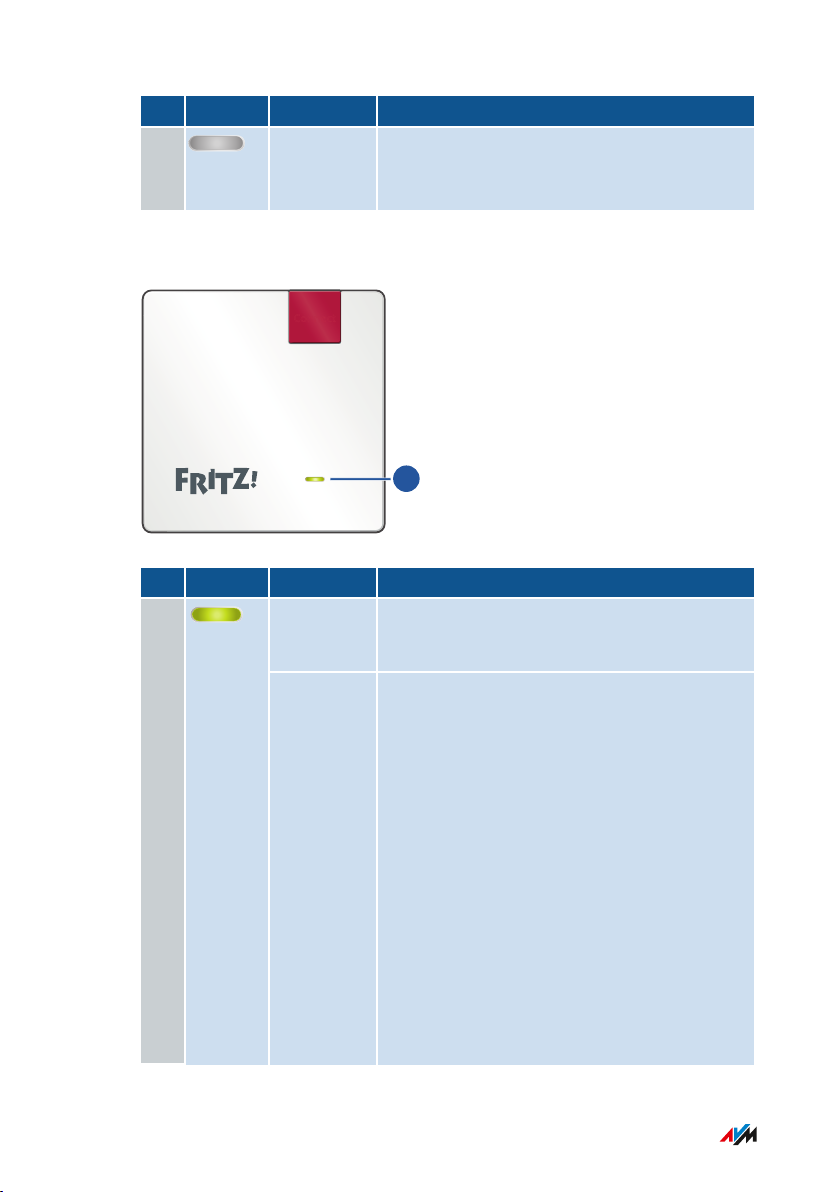
• • • • • • • • • • • • • • • • • • • • • • • • • • • • • • • • • • • • • • • • • • • • • • • • • • • • • • • • • • • • • • • • • • • • • • • • • • • • • • • • • • • • • • • • • • • • • • •
No. LED Condition Meaning
1 off • No electrical power
• Wireless switching schedule enabled
LEDs while connecting to the router (FRITZ!Box) by LAN cable
No. LED Condition Meaning
1
glows
green
flashes
green
Connection to a router/repeater estab
lished
slowly (every 2seconds)
• FRITZ!Repeater ready to configure a
connection
fast (twice per second)
• Connection to a router/repeater
configured, searching for
router/repeater.
• Registering with router
• Performing WPS
• Enabling Mesh
• FRITZ!OS update in progress
• Loading factory settings
• • • • • • • • • • • • • • • • • • • • • • • • • • • • • • • • • • • • • • • • • • • • • • • • • • • • • • • • • • • • • • • • • • • • • • • • • • • • • • • • • • • • • • • • • • • • • • •
16FRITZ!Repeater1200

Functions and Structure
• • • • • • • • • • • • • • • • • • • • • • • • • • • • • • • • • • • • • • • • • • • • • • • • • • • • • • • • • • • • • • • • • • • • • • • • • • • • • • • • • • • • • • • • • • • • • • •
No. LED Condition Meaning
flashes
No connection to router/repeater1
orange
off • No electrical power
• Wireless switching schedule enabled
• • • • • • • • • • • • • • • • • • • • • • • • • • • • • • • • • • • • • • • • • • • • • • • • • • • • • • • • • • • • • • • • • • • • • • • • • • • • • • • • • • • • • • • • • • • • • • •
17FRITZ!Repeater1200
1
Connect
Functions and Structure
• • • • • • • • • • • • • • • • • • • • • • • • • • • • • • • • • • • • • • • • • • • • • • • • • • • • • • • • • • • • • • • • • • • • • • • • • • • • • • • • • • • • • • • • • • • • • • •
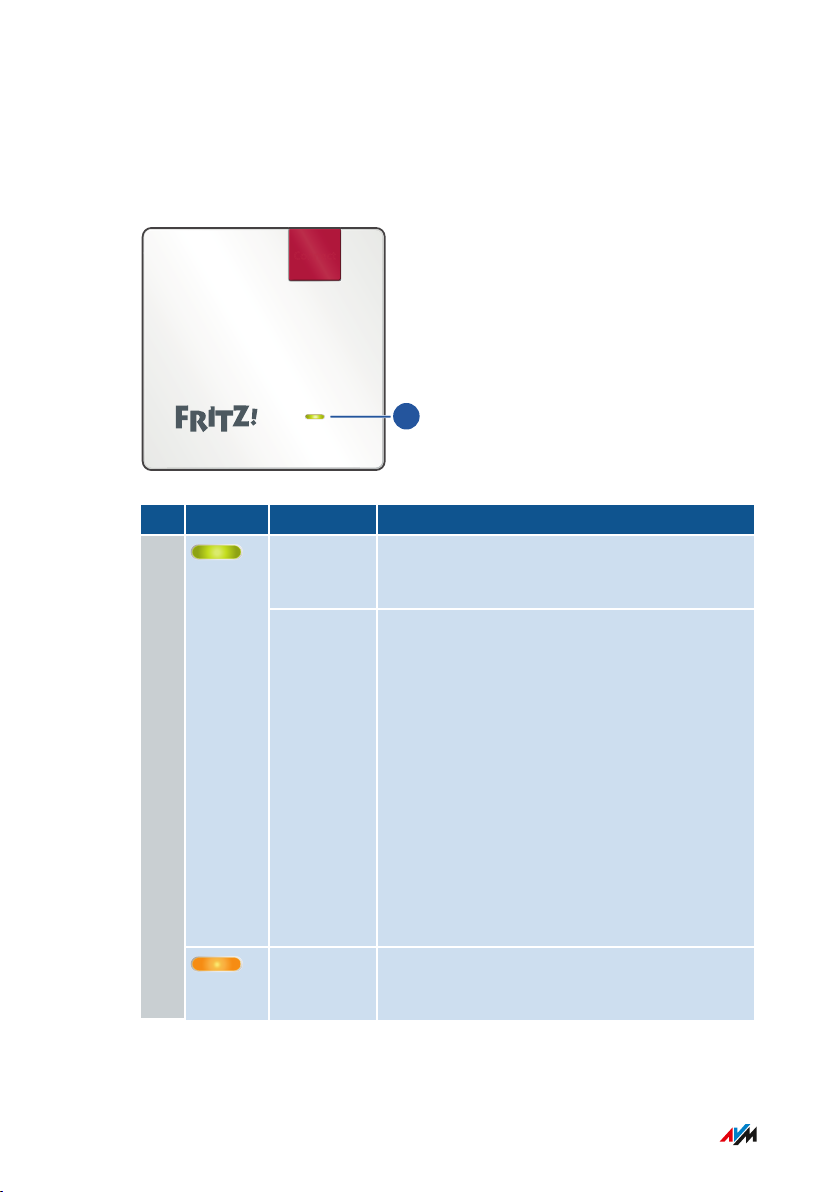
LED
Meaning of the LED
No. LED Condition Meaning
1
glows
green
flashes
green
FRITZ!Repeater ready for operation, good
wireless connection to a router/repeater
slowly (every 2seconds)
• FRITZ!Repeater ready to configure a
connection
fast (twice per second)
• FRITZ!Repeater starting
• Registering with router
• Performing WPS
• Enabling Mesh
• FRITZ!OS update in progress
• Loading factory settings
glows
orange
• • • • • • • • • • • • • • • • • • • • • • • • • • • • • • • • • • • • • • • • • • • • • • • • • • • • • • • • • • • • • • • • • • • • • • • • • • • • • • • • • • • • • • • • • • • • • • •
Weak wireless connection to a
router/repeater
18FRITZ!Repeater1200

Functions and Structure
• • • • • • • • • • • • • • • • • • • • • • • • • • • • • • • • • • • • • • • • • • • • • • • • • • • • • • • • • • • • • • • • • • • • • • • • • • • • • • • • • • • • • • • • • • • • • • •
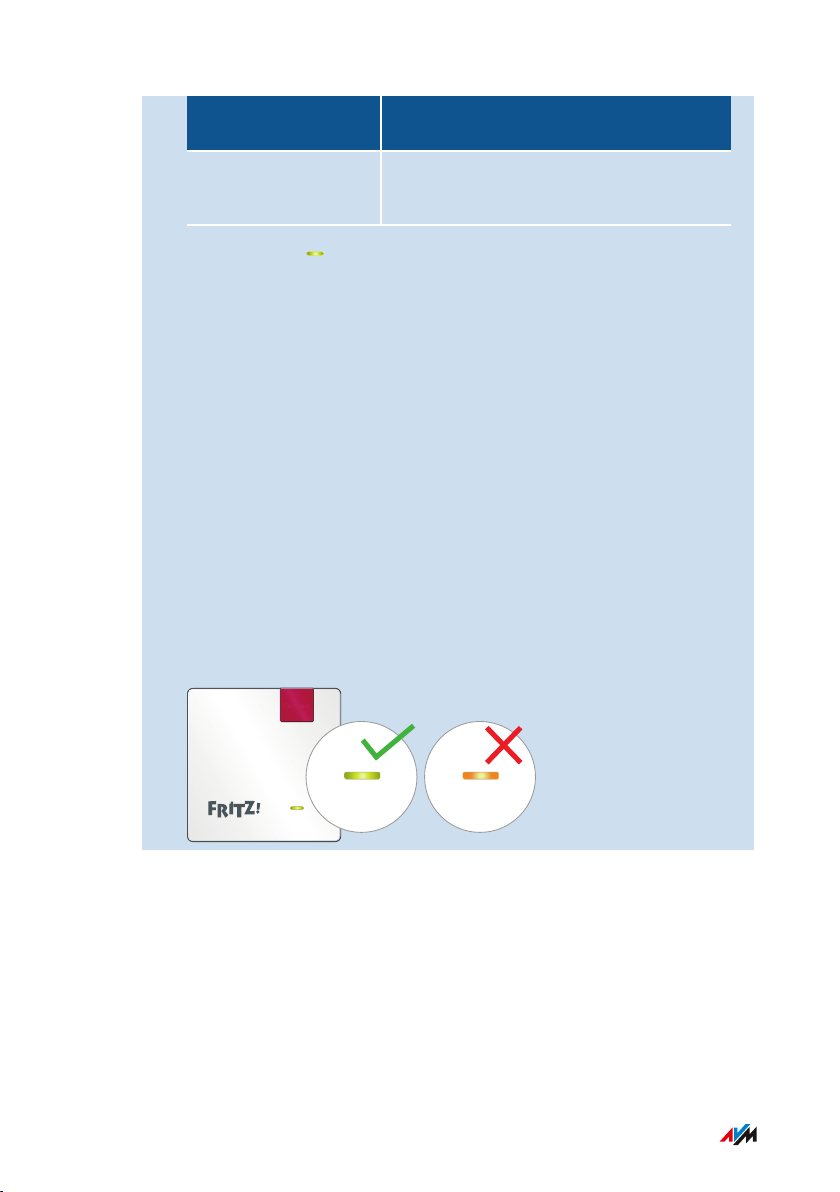
No. LED Condition Meaning
flashes
No connection to router/repeater1
orange
off • No electrical power
• Wireless switching schedule enabled
• • • • • • • • • • • • • • • • • • • • • • • • • • • • • • • • • • • • • • • • • • • • • • • • • • • • • • • • • • • • • • • • • • • • • • • • • • • • • • • • • • • • • • • • • • • • • • •
19FRITZ!Repeater1200

Functions and Structure
• • • • • • • • • • • • • • • • • • • • • • • • • • • • • • • • • • • • • • • • • • • • • • • • • • • • • • • • • • • • • • • • • • • • • • • • • • • • • • • • • • • • • • • • • • • • • • •
Requirements for Operation
Requirements
In order to operate the FRITZ!Repeater1200, you must have the
following:
• Router with automatic IP address assignment (DHCP)
• For operation as a wireless repeater: FRITZ!Box or other wireless
router compliant with IEEE802.11ac, 802.11n, 802.11g, 802.11b
or 802.11a
• For operation with a LAN cable: Router with free LAN port
• For Mesh: FRITZ!Box with FRITZ!OS7.00 or newer
• • • • • • • • • • • • • • • • • • • • • • • • • • • • • • • • • • • • • • • • • • • • • • • • • • • • • • • • • • • • • • • • • • • • • • • • • • • • • • • • • • • • • • • • • • • • • • •
20FRITZ!Repeater1200

Connecting
• • • • • • • • • • • • • • • • • • • • • • • • • • • • • • • • • • • • • • • • • • • • • • • • • • • • • • • • • • • • • • • • • • • • • • • • • • • • • • • • • • • • • • • • • • • • • • •
Connecting
Connecting to FRITZ!Box........................................................................................... 22
Connecting to Another Router................................................................................. 24
Finding the Ideal Location for FRITZ!Repeater..................................................... 29
• • • • • • • • • • • • • • • • • • • • • • • • • • • • • • • • • • • • • • • • • • • • • • • • • • • • • • • • • • • • • • • • • • • • • • • • • • • • • • • • • • • • • • • • • • • • • • •
21FRITZ!Repeater1200

Connecting
• • • • • • • • • • • • • • • • • • • • • • • • • • • • • • • • • • • • • • • • • • • • • • • • • • • • • • • • • • • • • • • • • • • • • • • • • • • • • • • • • • • • • • • • • • • • • • •
Connecting to FRITZ!Box
Overview
The FRITZ!Repeater can be connected with a FRITZ!Box in two ways:
You can establish a wireless connection to the FRITZ!Box or connect
the FRITZ!Repeater with a LAN cable.
Adopting FRITZ!Box Settings
The FRITZ!Repeater adopts the following settings from the FRITZ!Box:
• Wireless network name (SSID)
• Network key
• Wireless guest access
• Wireless LAN schedule
Requirements
• If the FRITZ!Repeater has already been in use: The factory settings
have been restored to the FRITZ!Repeater; see page 71.
Instructions: Establishing a Wireless Connection to the FRITZ!Box
1. Connect the FRITZ!Repeater to an electrical outlet in the vicinity
of the FRITZ!Box.
2. Wait until the LED starts flashing slowly.
3. Press the “Connect” key.
The LED flashes faster.
4. Start WPS on the FRITZ!Box. The procedure depends on the
buttons on the FRITZ!Box:
FRITZ!Box with
Start WPS
Button
“WPS” or
Press button briefly.
“Connect/WPS”
• • • • • • • • • • • • • • • • • • • • • • • • • • • • • • • • • • • • • • • • • • • • • • • • • • • • • • • • • • • • • • • • • • • • • • • • • • • • • • • • • • • • • • • • • • • • • • •
22FRITZ!Repeater1200
Connect
Connecting
• • • • • • • • • • • • • • • • • • • • • • • • • • • • • • • • • • • • • • • • • • • • • • • • • • • • • • • • • • • • • • • • • • • • • • • • • • • • • • • • • • • • • • • • • • • • • • •
FRITZ!Box with
Start WPS
Button
“WLAN” or “WLAN /
WPS”
Press and hold the button down for at
least 6seconds.
5. Wait until the LED on the FRITZ!Repeater lights up.
The wireless connection to the FRITZ!Box is established.
6. Insert the FRITZ!Repeater into an electrical outlet where the
wireless radio network is to be expanded. The distance from the
FRITZ!Box should be about the same as the distance from the
wireless devices for which the radio network is being expanded.
The FRITZ!Repeater starts and reconnects to the FRITZ!Box (LED
flashes). A steady green LED indicates that the connection has
been established.
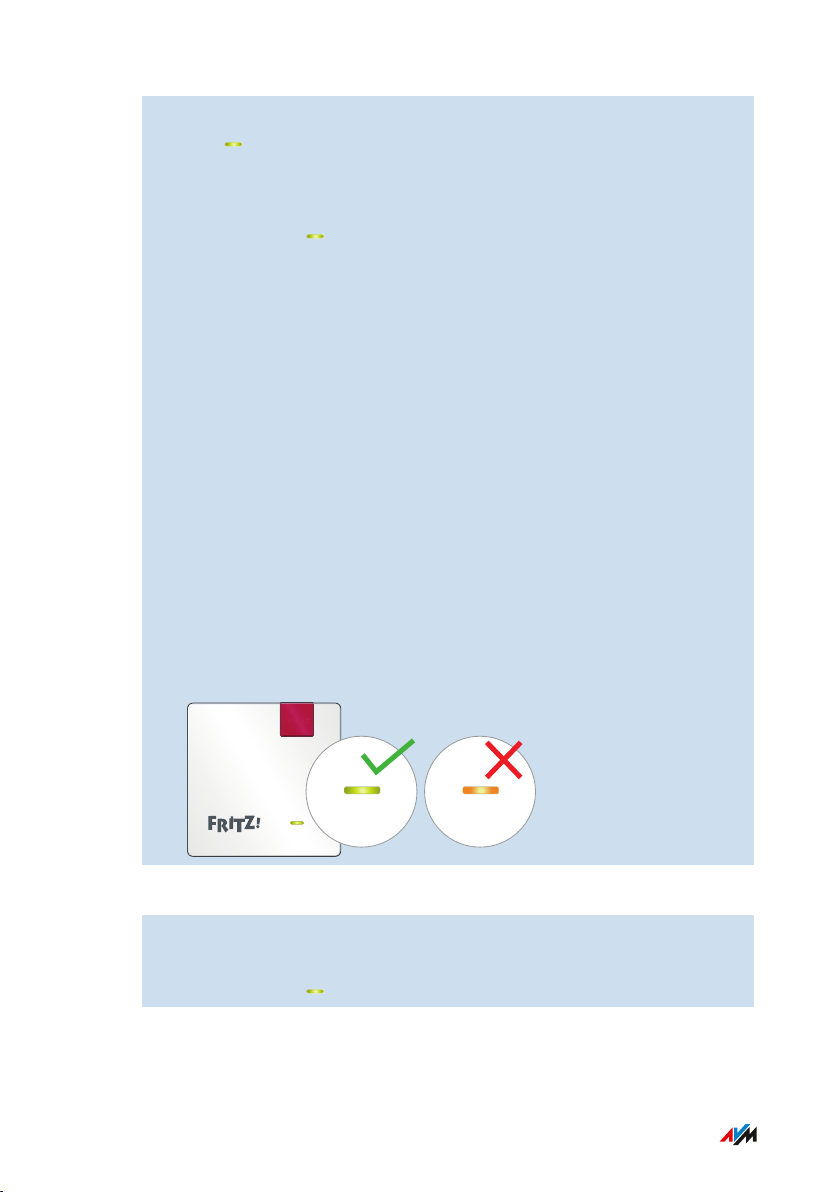
7. A green LED indicates that the FRITZ!Repeater is positioned in a
good location.
If the LED is orange or flashing orange, then the wireless
connection to the FRITZ!Box is weak or could not be established.
Test other outlets; see Finding the Ideal Location for
FRITZ!Repeater, page 29.
• • • • • • • • • • • • • • • • • • • • • • • • • • • • • • • • • • • • • • • • • • • • • • • • • • • • • • • • • • • • • • • • • • • • • • • • • • • • • • • • • • • • • • • • • • • • • • •
23FRITZ!Repeater1200

Connecting
• • • • • • • • • • • • • • • • • • • • • • • • • • • • • • • • • • • • • • • • • • • • • • • • • • • • • • • • • • • • • • • • • • • • • • • • • • • • • • • • • • • • • • • • • • • • • • •
Connecting to Another Router
Overview
Connect the FRITZ!Repeater as described below if your router is not a
FRITZ!Box.
Two kinds of connection are available: You can establish a wireless
connection to the router or connect the FRITZ!Repeater to the router
with a LAN cable.
You can establish the wireless connection via WPS. If the router does
not support WPS, you can use a wizard.
Requirements
• If the FRITZ!Repeater has already been in use: The factory settings
have been restored to the FRITZ!Repeater; see page 71.
• For wireless connections using WPS: The router must support
WPS and WPS must be enabled.
Rules
• If you would like to connect network-enabled devices like a TV,
gaming console or media receiver to the FRITZ!Repeater via LAN
cable, then you have to establish a wireless connection between
the FRITZ!Repeater and the router.
• When establishing a wireless connection, the FRITZ!Repeater
adopts the following wireless LAN settings from the router: wire
less network name/SSID, network key, and channel settings. If
you change these settings in the router, you have to adopt the
wireless settings for the repeater again; see page 51.
Instructions: Establishing a Wireless Connection to the Router with WPS
1. Connect the FRITZ!Repeater to an electrical outlet in the vicinity
of the router.
2. Wait until the LED starts flashing slowly.
• • • • • • • • • • • • • • • • • • • • • • • • • • • • • • • • • • • • • • • • • • • • • • • • • • • • • • • • • • • • • • • • • • • • • • • • • • • • • • • • • • • • • • • • • • • • • • •
24FRITZ!Repeater1200
Connect
Connecting
• • • • • • • • • • • • • • • • • • • • • • • • • • • • • • • • • • • • • • • • • • • • • • • • • • • • • • • • • • • • • • • • • • • • • • • • • • • • • • • • • • • • • • • • • • • • • • •
3. Press the “Connect” key.
The LED flashes faster.
4. Start WPS on the router. See the documentation of the router for
instructions.
5. Wait until the LED on the FRITZ!Repeater lights up.
The wireless connection to the FRITZ!Box is established.
6. Insert the FRITZ!Repeater into an electrical outlet where the
wireless radio network is to be expanded.
The distance from the wireless router should be about the same
as the distance from the wireless devices for which the radio
network is being expanded.
The FRITZ!Repeater starts and reconnects to the FRITZ!Box (LED
flashes). A steady green LED indicates that the connection has
been established.
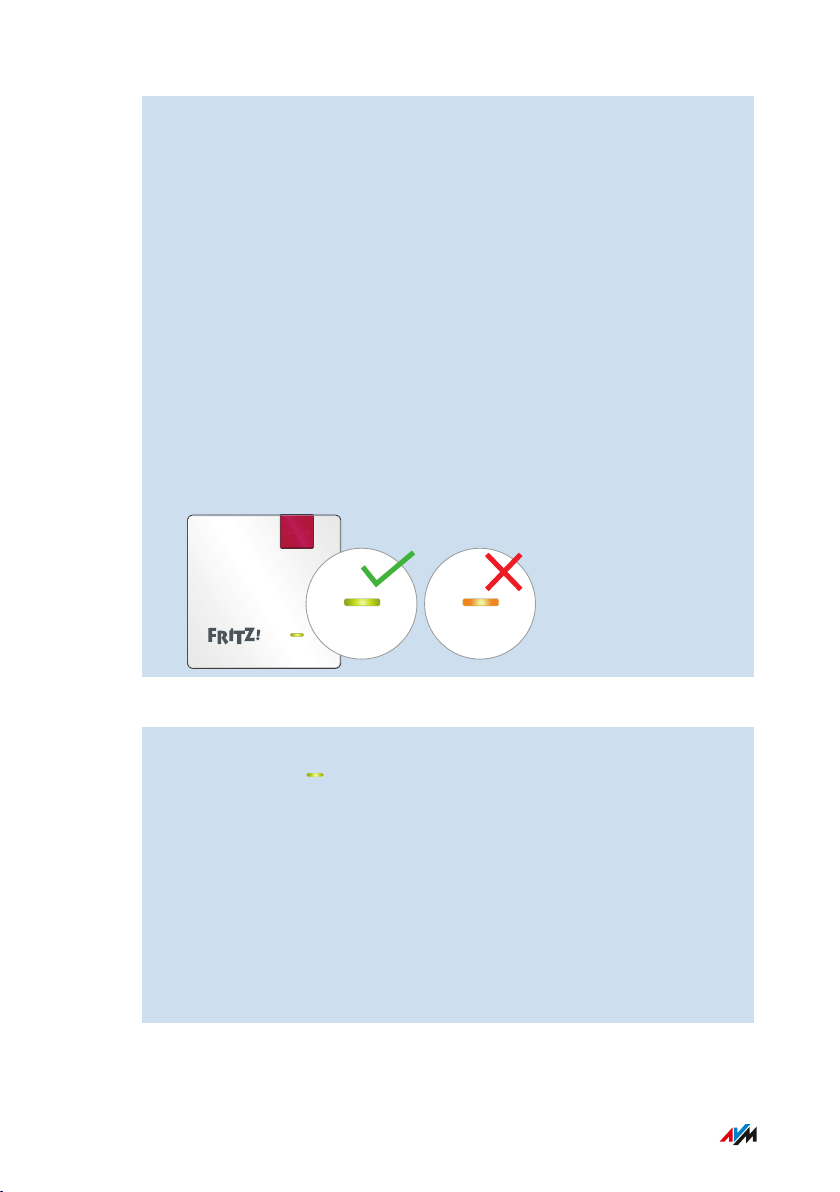
7. A green LED indicates that the FRITZ!Repeater is positioned in a
good location.
If the LED is orange or flashing orange, then the wireless
connection to the wireless router is weak or could not be estab
lished. Test other outlets; see Finding the Ideal Location for
FRITZ!Repeater, page 29.
Instructions: Establishing a Wireless Connection to the Router with a Wizard
1. Connect the FRITZ!Repeater to an electrical outlet in the vicinity
of the router.
2. Wait until the LED starts flashing slowly.
• • • • • • • • • • • • • • • • • • • • • • • • • • • • • • • • • • • • • • • • • • • • • • • • • • • • • • • • • • • • • • • • • • • • • • • • • • • • • • • • • • • • • • • • • • • • • • •
25FRITZ!Repeater1200

Connecting
• • • • • • • • • • • • • • • • • • • • • • • • • • • • • • • • • • • • • • • • • • • • • • • • • • • • • • • • • • • • • • • • • • • • • • • • • • • • • • • • • • • • • • • • • • • • • • •
3. Connect the FRITZ!Repeater to a computer using a LAN cable, or
establish a wireless connection to the FRITZ!Repeater on a
computer, tablet or smartphone.
The preset network key of the FRITZ!Repeater is located on the
Back of the Device.
4. Enter the address http://fritz.repeater in a web browser on a
computer.
The user interface of the FRITZ!Repeater appears.
5. Enter a password for the user interface.
We recommend leaving the AVM services for diagnostics and
maintenance of the FRITZ!Repeater enabled. You can change
this setting at any time.
6. Click on “OK”.
7. Enable the connection type “Wireless bridge” and click on
“Next”.
8. Select the radio network of your router and click on “Next”.
9. Enter your network key for the router‘s wireless network, and
click on “Next” and then on “Finish”.
10. Wait until the LED on the FRITZ!Repeater lights up.
The wireless connection to the FRITZ!Box is established.
• • • • • • • • • • • • • • • • • • • • • • • • • • • • • • • • • • • • • • • • • • • • • • • • • • • • • • • • • • • • • • • • • • • • • • • • • • • • • • • • • • • • • • • • • • • • • • •
26FRITZ!Repeater1200
Connect
Connecting
• • • • • • • • • • • • • • • • • • • • • • • • • • • • • • • • • • • • • • • • • • • • • • • • • • • • • • • • • • • • • • • • • • • • • • • • • • • • • • • • • • • • • • • • • • • • • • •
11. Insert the FRITZ!Repeater into an electrical outlet where the
wireless radio network is to be expanded.
The distance from the wireless router should be about the same
as the distance from the wireless devices for which the radio
network is being expanded.
The FRITZ!Repeater starts and reconnects to the FRITZ!Box (LED
flashes). A steady green LED indicates that the connection has
been established.
12. A green LED indicates that the FRITZ!Repeater is positioned in a
good location.
If the LED is orange or flashing orange, then the wireless
connection to the wireless router is weak or could not be estab
lished. Test other outlets; see Finding the Ideal Location for
FRITZ!Repeater, page 29.
Instructions: Connecting FRITZ!Repeater with a LAN Cable
1. Plug the FRITZ!Repeater into an outlet.
2. Wait until the LED starts flashing slowly.
3. Connect the FRITZ!Repeater to a computer using a LAN cable, or
establish a wireless connection to the FRITZ!Repeater on a
computer, tablet or smartphone.
The preset network key of the FRITZ!Repeater is located on the
Back of the Device.
4. In the web browser, enter the following IP address:
http://fritz.repeater
The user interface of the FRITZ!Repeater appears.
• • • • • • • • • • • • • • • • • • • • • • • • • • • • • • • • • • • • • • • • • • • • • • • • • • • • • • • • • • • • • • • • • • • • • • • • • • • • • • • • • • • • • • • • • • • • • • •
27FRITZ!Repeater1200
Loading...