


7560
FRITZ!Box 7560
Configuration
and Operation
Configuration
an
d
O
p
eratio
n

FRITZ!Box 7560 2
Table of Contents
Safety Instructions . . . . . . . . . . . . . . . . . . . . . . . . . . . . . . 8
Conventions in the Manual . . . . . . . . . . . . . . . . . . . . . . 10
1 The FRITZ!Box 7560 . . . . . . . . . . . . . . . . . . . . . . . . . . . . 11
2 Ports, Interfaces, Buttons and LEDs . . . . . . . . . . . . . . . 12
2.1 Ports and Interfaces. . . . . . . . . . . . . . . . . . . . . . . . . . . . . . . . . . . . . . 12
2.2 Buttons . . . . . . . . . . . . . . . . . . . . . . . . . . . . . . . . . . . . . . . . . . . . . . . . 13
2.3 LEDs . . . . . . . . . . . . . . . . . . . . . . . . . . . . . . . . . . . . . . . . . . . . . . . . . . 14
3 Before You Connect the FRITZ!Box . . . . . . . . . . . . . . . . . 17
3.1 Contents of the FRITZ!Box Package. . . . . . . . . . . . . . . . . . . . . . . . . . 17
3.2 Requirements for Operation . . . . . . . . . . . . . . . . . . . . . . . . . . . . . . . 17
3.3 Handling the FRITZ!Box . . . . . . . . . . . . . . . . . . . . . . . . . . . . . . . . . . . 18
3.4 Tips for Passwords. . . . . . . . . . . . . . . . . . . . . . . . . . . . . . . . . . . . . . . 19
4 Connecting the FRITZ!Box. . . . . . . . . . . . . . . . . . . . . . . . 20
4.1 Connecting to Electrical Power . . . . . . . . . . . . . . . . . . . . . . . . . . . . . 20
4.2 Connecting to the Internet. . . . . . . . . . . . . . . . . . . . . . . . . . . . . . . . . 20
5 Connecting a Computer with a Network Cable . . . . . . . 23
5.1 Connect the Computer. . . . . . . . . . . . . . . . . . . . . . . . . . . . . . . . . . . . 23
5.2 Connecting a Network Hub or Switch . . . . . . . . . . . . . . . . . . . . . . . . 24
5.3 Saving Energy at the LAN Ports . . . . . . . . . . . . . . . . . . . . . . . . . . . . . 24
6 Connecting Devices with the FRITZ!Box
over Wireless LAN . . . . . . . . . . . . . . . . . . . . . . . . . . . . . . . . . . . . 26
6.1 Establishing a Wireless LAN Connection Using WPS . . . . . . . . . . . . 26
6.2 Entering the Network Key on the Wireless Device . . . . . . . . . . . . . . 28
6.3 Connecting to Mobile Devices Wirelessly Using the QR Code. . . . . 29

FRITZ!Box 7560 3
7 The FRITZ!Box User Interface . . . . . . . . . . . . . . . . . . . . . 30
7.1 Opening the User Interface . . . . . . . . . . . . . . . . . . . . . . . . . . . . . . . . 30
7.2 Overview: FRITZ!Box at a Glance . . . . . . . . . . . . . . . . . . . . . . . . . . . . 31
7.3 Standard View and Advanced View . . . . . . . . . . . . . . . . . . . . . . . . . 32
7.4 Assigning FRITZ!Box a Name . . . . . . . . . . . . . . . . . . . . . . . . . . . . . . . 33
8 Password Protection: Using FRITZ!Box Safely . . . . . . . . 34
8.1 Overview. . . . . . . . . . . . . . . . . . . . . . . . . . . . . . . . . . . . . . . . . . . . . . . 34
8.2 Setting a FRITZ!Box Password . . . . . . . . . . . . . . . . . . . . . . . . . . . . . . 34
8.3 Creating FRITZ!Box Users. . . . . . . . . . . . . . . . . . . . . . . . . . . . . . . . . . 36
8.4 “No login” Mode . . . . . . . . . . . . . . . . . . . . . . . . . . . . . . . . . . . . . . . . 41
9 Configuring an Internet Connection in the FRITZ!Box . . 42
9.1 Internet Connection for DSL . . . . . . . . . . . . . . . . . . . . . . . . . . . . . . . 42
9.2 Configuring an Internet Connection for Cable . . . . . . . . . . . . . . . . . 43
9.3 Internet Connection over LAN 1: FRITZ!Box as a Router. . . . . . . . . . 44
10 Connecting Telephones and Other Terminal Devices . . 46
10.1 Connecting an Analog Telephone or Terminal Device . . . . . . . . . . . 46
10.2 Registering FRITZ!Fon and Other Cordless (DECT) Telephones . . . . 47
10.3 Registering an iPhone or Android Smartphone . . . . . . . . . . . . . . . . 47
10.4 Connecting an IP Telephone . . . . . . . . . . . . . . . . . . . . . . . . . . . . . . . 49
10.5 Connecting a Door Intercom System. . . . . . . . . . . . . . . . . . . . . . . . . 49
11 Configuring the FRITZ!Box for Telephone Calls . . . . . . . 50
11.1 Configuring Your Telephone Numbers . . . . . . . . . . . . . . . . . . . . . . . 50
11.2 Configuring Telephones and Other Terminal Devices
in the FRITZ!Box . . . . . . . . . . . . . . . . . . . . . . . . . . . . . . . . . . . . . . . . . 51

FRITZ!Box 7560 4
12 FRITZ!Box as an Internet Router . . . . . . . . . . . . . . . . . . . 52
12.1 Parental Controls: Access Profiles for Internet Use . . . . . . . . . . . . . 52
12.2 Sharing: Making Computers Accessible from the Internet . . . . . . . 62
12.3 Dynamic DNS: Name Instead of IP Address . . . . . . . . . . . . . . . . . . . 64
12.4 Access from the Internet via HTTPS, FTP and FTPS. . . . . . . . . . . . . . 65
12.5 Prioritization: Right of Way for Internet Access . . . . . . . . . . . . . . . . 67
12.6 VPN: Remote Access to the Home Network . . . . . . . . . . . . . . . . . . . 69
12.7 Freely Selectable DNS Servers . . . . . . . . . . . . . . . . . . . . . . . . . . . . . 71
12.8 DNSSEC: Security for DNS Queries . . . . . . . . . . . . . . . . . . . . . . . . . . 72
12.9 IPv6: The New Internet Protocol . . . . . . . . . . . . . . . . . . . . . . . . . . . . 73
12.10 LISP: FRITZ!Box as a LISP Router . . . . . . . . . . . . . . . . . . . . . . . . . . . . 75
13 FRITZ!Box as a Wireless Access Point . . . . . . . . . . . . . . 79
13.1 Switching the Wireless Radio Network On and Off by Schedule. . . 79
13.2 Extending a Wireless LAN Network . . . . . . . . . . . . . . . . . . . . . . . . . . 80
14 FRITZ!Box as a Telephone System . . . . . . . . . . . . . . . . . 82
14.1 Telephone Book . . . . . . . . . . . . . . . . . . . . . . . . . . . . . . . . . . . . . . . . . 82
14.2 Call List . . . . . . . . . . . . . . . . . . . . . . . . . . . . . . . . . . . . . . . . . . . . . . . . 84
14.3 Answering Machine . . . . . . . . . . . . . . . . . . . . . . . . . . . . . . . . . . . . . . 86
14.4 Fax Function . . . . . . . . . . . . . . . . . . . . . . . . . . . . . . . . . . . . . . . . . . . . 89
14.5 Call Diversion . . . . . . . . . . . . . . . . . . . . . . . . . . . . . . . . . . . . . . . . . . . 91
14.6 Dialing Rules for Outgoing Calls . . . . . . . . . . . . . . . . . . . . . . . . . . . . 92
14.7 Dial Around Service Using Dialing Rules . . . . . . . . . . . . . . . . . . . . . 92
14.8 Blocking Telephone Numbers and Callers . . . . . . . . . . . . . . . . . . . . 94
14.9 Do Not Disturb . . . . . . . . . . . . . . . . . . . . . . . . . . . . . . . . . . . . . . . . . . 95
14.10 Alarm . . . . . . . . . . . . . . . . . . . . . . . . . . . . . . . . . . . . . . . . . . . . . . . . . 96
14.11 Baby Monitor . . . . . . . . . . . . . . . . . . . . . . . . . . . . . . . . . . . . . . . . . . . 96
14.12 Making Telephone Calls with Convenience Functions. . . . . . . . . . . 98
15 Configuring FRITZ!Box on the Telephone . . . . . . . . . . . 103
15.1 Alarm . . . . . . . . . . . . . . . . . . . . . . . . . . . . . . . . . . . . . . . . . . . . . . . . 103
15.2 Call Diversion . . . . . . . . . . . . . . . . . . . . . . . . . . . . . . . . . . . . . . . . . . 103
15.3 Switching the Wireless Network On and Off. . . . . . . . . . . . . . . . . . 106
15.4 Loading Factory Settings . . . . . . . . . . . . . . . . . . . . . . . . . . . . . . . . . 107

FRITZ!Box 7560 5
16 FRITZ!Box as a Base Station for DECT
Cordless Telephones. . . . . . . . . . . . . . . . . . . . . . . . . . . . . . . . . 108
16.1 Paging Cordless Telephones . . . . . . . . . . . . . . . . . . . . . . . . . . . . . . 108
16.2 Registering a Cordless Telephone. . . . . . . . . . . . . . . . . . . . . . . . . . 108
16.3 Deregistering a Cordless Telephone . . . . . . . . . . . . . . . . . . . . . . . . 108
16.4 Enabling DECT Eco . . . . . . . . . . . . . . . . . . . . . . . . . . . . . . . . . . . . . . 109
17 FRITZ!Box Connects Network Devices . . . . . . . . . . . . . 110
17.1 Network Settings in the FRITZ!Box . . . . . . . . . . . . . . . . . . . . . . . . . 110
17.2 Obtaining an IP Address Automatically . . . . . . . . . . . . . . . . . . . . . 120
18 Connecting USB Devices to the FRITZ!Box. . . . . . . . . . 122
18.1 Power Supply for USB Devices . . . . . . . . . . . . . . . . . . . . . . . . . . . . 122
18.2 USB Devices on the FRITZ!Box. . . . . . . . . . . . . . . . . . . . . . . . . . . . . 122
18.3 Using USB Devices Safely . . . . . . . . . . . . . . . . . . . . . . . . . . . . . . . . 123
18.4 Configuring Access Rights. . . . . . . . . . . . . . . . . . . . . . . . . . . . . . . . 124
18.5 Accessing USB Memory . . . . . . . . . . . . . . . . . . . . . . . . . . . . . . . . . . 124
18.6 Enabling Energy-saving Mode for USB Hard Drives . . . . . . . . . . . . 125
18.7 Sharing a USB Printer . . . . . . . . . . . . . . . . . . . . . . . . . . . . . . . . . . . 126
19 Managing Memory with FRITZ!NAS . . . . . . . . . . . . . . . 133
19.1 Requirements for FRITZ!NAS . . . . . . . . . . . . . . . . . . . . . . . . . . . . . . 133
19.2 Starting FRITZ!NAS . . . . . . . . . . . . . . . . . . . . . . . . . . . . . . . . . . . . . . 133
19.3 FRITZ!NAS Password Protection . . . . . . . . . . . . . . . . . . . . . . . . . . . 133
20 Extending the Scope of Functions with Smart Home . 135
21 Configuring Internet Access for Guests . . . . . . . . . . . . 136
21.1 Requirements. . . . . . . . . . . . . . . . . . . . . . . . . . . . . . . . . . . . . . . . . . 136
21.2 Wireless Guest Access: Private Hotspot. . . . . . . . . . . . . . . . . . . . . 136
21.3 Configuring Guest Access on the LAN 4 Port . . . . . . . . . . . . . . . . . 138

FRITZ!Box 7560 6
22 MyFRITZ!: Accessing the FRITZ!Box from Anywhere . . 139
22.1 Overview: The MyFRITZ! Service . . . . . . . . . . . . . . . . . . . . . . . . . . . 139
22.2 Creating a MyFRITZ! Account . . . . . . . . . . . . . . . . . . . . . . . . . . . . . . 140
22.3 Registering a FRITZ!Box with an Existing MyFRITZ! Account . . . . . 141
22.4 Configuring the MyFRITZ!App . . . . . . . . . . . . . . . . . . . . . . . . . . . . . 142
22.5 Using MyFRITZ! . . . . . . . . . . . . . . . . . . . . . . . . . . . . . . . . . . . . . . . . . 143
23 Push Services: Using Notification Services. . . . . . . . . 144
23.1 Available Push Services . . . . . . . . . . . . . . . . . . . . . . . . . . . . . . . . . 144
23.2 Enabling Push Services . . . . . . . . . . . . . . . . . . . . . . . . . . . . . . . . . . 145
23.3 Configuring Push Services. . . . . . . . . . . . . . . . . . . . . . . . . . . . . . . . 145
24 Diagnostics: Checking Function and Security. . . . . . . 146
24.1 Checking FRITZ!Box Functions. . . . . . . . . . . . . . . . . . . . . . . . . . . . . 146
24.2 Checking the Security of the FRITZ!Box . . . . . . . . . . . . . . . . . . . . . 147
25 Saving and Restoring Settings . . . . . . . . . . . . . . . . . . . 148
25.1 Saving Settings . . . . . . . . . . . . . . . . . . . . . . . . . . . . . . . . . . . . . . . . 148
25.2 Restoring Settings . . . . . . . . . . . . . . . . . . . . . . . . . . . . . . . . . . . . . . 149
25.3 Restarting the FRITZ!Box . . . . . . . . . . . . . . . . . . . . . . . . . . . . . . . . . 150
26 Update: Updating FRITZ!OS . . . . . . . . . . . . . . . . . . . . . 151
26.1 Updating FRITZ!Box Automatically . . . . . . . . . . . . . . . . . . . . . . . . . 151
26.2 Performing an Update with the Wizard. . . . . . . . . . . . . . . . . . . . . . 153
26.3 Updating the Firmware Manually . . . . . . . . . . . . . . . . . . . . . . . . . . 154
27 Taking FRITZ!Box Out of Operation. . . . . . . . . . . . . . . . 156
27.1 Deleting User Settings. . . . . . . . . . . . . . . . . . . . . . . . . . . . . . . . . . . 156
27.2 Uninstalling Supplementary Software . . . . . . . . . . . . . . . . . . . . . . 157
28 Help in Case of Errors . . . . . . . . . . . . . . . . . . . . . . . . . . 159
28.1 The User Interface Does Not Open . . . . . . . . . . . . . . . . . . . . . . . . . 159
28.2 Cannot Establish a Wireless LAN Connection . . . . . . . . . . . . . . . . 163
28.3 Wireless LAN Connection Interrupted. . . . . . . . . . . . . . . . . . . . . . . 164

FRITZ!Box 7560 7
29 Technical Specifications. . . . . . . . . . . . . . . . . . . . . . . . 166
29.1 Ports and Interfaces. . . . . . . . . . . . . . . . . . . . . . . . . . . . . . . . . . . . . 166
29.2 Router Functions . . . . . . . . . . . . . . . . . . . . . . . . . . . . . . . . . . . . . . . 167
29.3 User Interface and Display . . . . . . . . . . . . . . . . . . . . . . . . . . . . . . . 167
29.4 Tones . . . . . . . . . . . . . . . . . . . . . . . . . . . . . . . . . . . . . . . . . . . . . . . . 167
29.5 Device Properties. . . . . . . . . . . . . . . . . . . . . . . . . . . . . . . . . . . . . . . 167
29.6 Cable. . . . . . . . . . . . . . . . . . . . . . . . . . . . . . . . . . . . . . . . . . . . . . . . . 168
30 Customer Service . . . . . . . . . . . . . . . . . . . . . . . . . . . . . 171
30.1 FRITZ!Box Help . . . . . . . . . . . . . . . . . . . . . . . . . . . . . . . . . . . . . . . . . 171
30.2 Information in the Internet . . . . . . . . . . . . . . . . . . . . . . . . . . . . . . . 171
30.3 Feedback on FRITZ!Box . . . . . . . . . . . . . . . . . . . . . . . . . . . . . . . . . . 172
30.4 Assistance from the Support Team. . . . . . . . . . . . . . . . . . . . . . . . . 173
Legal Notice. . . . . . . . . . . . . . . . . . . . . . . . . . . . . . . . . . 174
Legal Notice . . . . . . . . . . . . . . . . . . . . . . . . . . . . . . . . . . . . . . . . . . . 174
Manufacturer’s Warranty. . . . . . . . . . . . . . . . . . . . . . . . . . . . . . . . . 175
Declaration of CE Conformity . . . . . . . . . . . . . . . . . . . . . . . . . . . . . 175
Disposal Information . . . . . . . . . . . . . . . . . . . . . . . . . . . . . . . . . . . . 175
Drilling Template. . . . . . . . . . . . . . . . . . . . . . . . . . . . . . 176
Index . . . . . . . . . . . . . . . . . . . . . . . . . . . . . . . . . . . . . . . 178

FRITZ!Box 7560 8
Safety Instructions
Before connecting the FRITZ!Box 7560, observe the following
security instructions in order to protect yourself and the
FRITZ!Box from harm.
• The FRITZ!Box has no on/off switch. Therefore it must al-
ways be possible to disconnect the FRITZ!Box from the
power supply.
– Insert the power supply unit of the FRITZ!Box into an
electrical outlet that is easy to reach.
• Overloaded outlets, extension cords and power strips
can lead to fires or electric shocks.
– Avoid using socket strips and extension cords if at all
possible.
– Do not connect multiple extension cords or socket
strips to each other.
• Damage to electric wiring or gas or water pipes during
drilling can present a significant danger.
– Before mounting the FRITZ!Box on the wall, make
sure that there are no electrical lines, gas or water
pipes located where you need to drill the holes. If
necessary, check the site with a pipe detector or con-
sult with qualified experts.
• Heat accumulation can lead to overheating of the
FRITZ!Box and subsequently damage the FRITZ!Box.
– Provide for sufficient air circulation around the
FRITZ!Box.
– Make sure that the ventilation slits on the FRITZ!Box
housing are always unobstructed.
– The FRITZ!Box should not be placed on a carpet or on
upholstered furniture.
– Do not cover the FRITZ!Box.

FRITZ!Box 7560 9
• The base of the FRITZ!Box can heat up during normal op-
eration. This heat can cause damage to heat-sensitive
surfaces.
– Do not place the FRITZ!Box on heat-sensitive surfac-
es.
• During electrical storms, lightning and electrical surges
present a danger to connected electrical devices.
– Do not install the FRITZ!Box during an electrical
storm.
– During a storm, disconnect the FRITZ!Box from the
power supply and from the ADSL or VDSL line.
• Moisture and liquids that find their way into the
FRITZ!Box can cause electric shocks or short circuits.
– Only use the FRITZ!Box indoors.
– Never let liquids get inside the FRITZ!Box.
• The FRITZ!Box contains hazardous components and
should only be opened by authorized repair technicians.
– Do not open the FRITZ!Box housing.
– If the FRITZ!Box needs to be repaired, please take it
to a specialized vendor.
• Dust, moisture and vapors as well as caustic cleaners or
solvents can damage the FRITZ!Box.
– Protect the FRITZ!Box from dust, moisture and fumes.
– Remove the FRITZ!Box from the mains before clean-
ing.
– Clean the FRITZ!Box with a slightly moist, lint-free
cloth.

FRITZ!Box 7560 10
Conventions in the Manual
This manual uses the following symbols and emphases:
• Quotation marks designate elements and features in the
user interface and paths.
Example
Select “System / Push Service” and click “Sender”.
• Pointed brackets mark wild cards.
Example
To edit the device called <Name>, click the “Edit” button.
• Bold type in the text emphasizes important words.
Example
Do not leave the page without saving.
• Blue font in the text designates links and references
within this manual and addresses to be entered in the
browser.
Example
See also the information on page 10.
This symbol marks useful hints and tips.
This symbol indicates important instructions that must be
observed to avoid malfunctions.

The FRITZ!Box 7560
FRITZ!Box 7560 11
1 The FRITZ!Box 7560
Welcome! We are pleased you decided on a FRITZ!Box. The
FRITZ!Box 7560 is the hub of your home network, connecting
your computers and network devices with the Internet. You
can operate the FRITZ!Box as an Internet router on a ADSL or
VDSL line.
The FRITZ!Box is equipped with ports to connect computers, a
USB device and a telephone, an answering machine or a fax
machine. Additionally, the FRITZ!Box supports the radio tech-
nologies wireless LAN and DECT. You can use the FRITZ!Box as
a wireless LAN access point for wireless devices like note-
books, tablets or smartphones and as a DECT base station for
your cordless telephones.
A connected telephone uses the FRITZ!Box as a PBX.
The FRITZ!Box integrates connected computers and network
devices into your private home network. The devices can ex-
change data with each other and enjoy shared access to USB
hard drives, USB printers and other USB devices. The
FRITZ!Box transmits music, video and image files to suitable
playback devices in the home network.
You can expand the scope of functions of your FRITZ!Box with
AVM smart home devices for home automation.
Settings for the FRITZ!Box and for your private network are
configured in an easy-to-use user interface. The user interface
can be opened in any web browser. Wizards guide you step by
step through the setup of the most important FRITZ!Box func-
tions, and comprehensive help is available on all functions.
This manual assists you in connecting, configuring and oper-
ating your FRITZ!Box. Its purpose is not only to introduce to
you the many functions of the FRITZ!Box, but also to familiar-
ize you with some of the technical context.
FRITZ!Box 7560 12
Ports, Interfaces, Buttons and LEDs
2 Ports, Interfaces, Buttons and LEDs
This chapter describes the ports, interfaces, buttons and
LEDs of the FRITZ!Box.
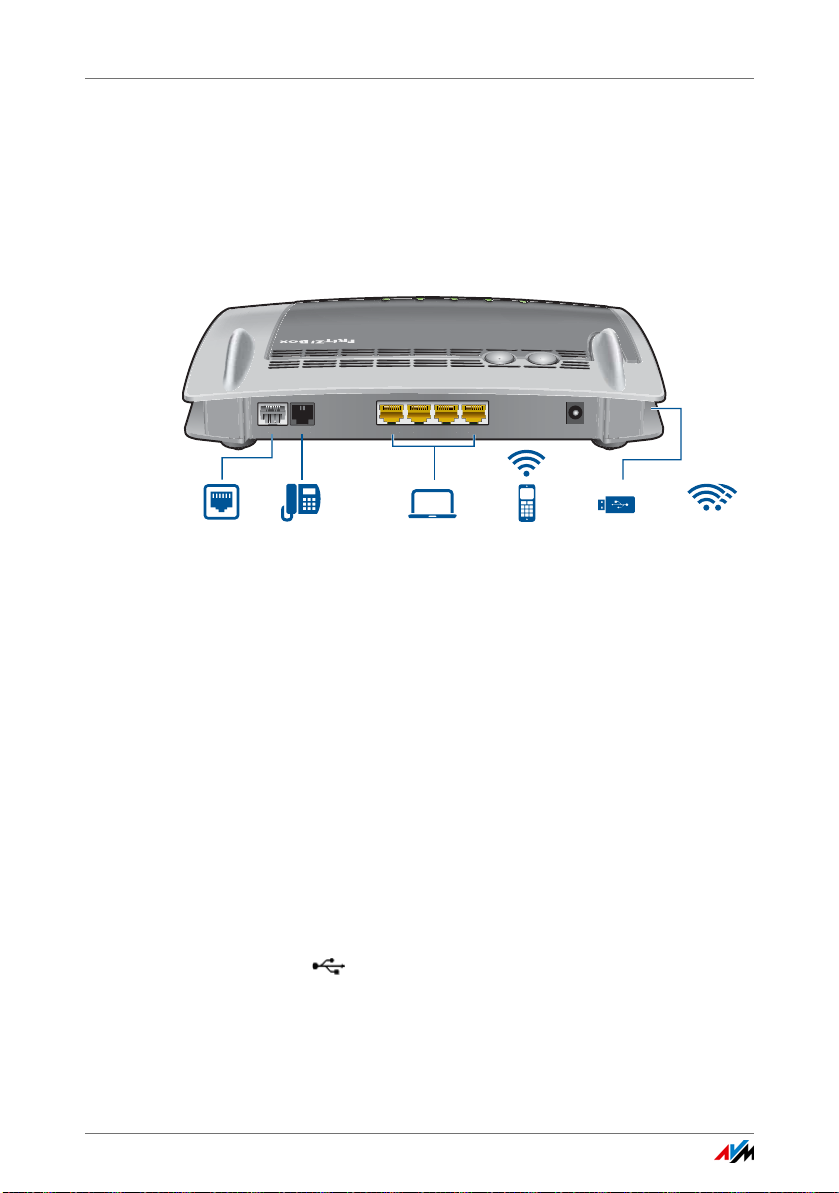
2.1 Ports and Interfaces
Possibilities for connecting the FRITZ!Box
• DSL
Socket for connecting to ADSL, ADSL2+ or VDSL
• FON 1
one RJ11 socket for connecting an analog telephone or
another analog terminal device
You can use either the TAE socket or the RJ11 socket, but
not both at the same time.
• LAN 1 – LAN 4
4 gigabit Ethernet ports (10/100/1000 Base-T) for con-
necting computers and other network devices like game
consoles and network hubs
• USB
USB 2.0 port for connecting USB devices like printers or
storage media
D
S
L
DSL
F
O
N
1
FON 1
P
ower
Power
LAN
4
LAN 4
LA
3
LAN 3
LAN
2
2
LAN 2
LAN
1
LAN 1
Power/DSL
Fon
WLAN
DECT
Info
WLAN
DECT
Analog telephone,
fax, answering machine
DSL/
VDSL
4 x gigabit-LAN
computer, game console,
network
USB 2.0
storage media, printer
Wireless
2.4 GHz and 5 GHz
DECT
telephone
Buttons
FRITZ!Box 7560 13
• Wireless access point
Integrated wireless access point for connecting to wire-
less LAN devices that use the radio standard
IEEE 802.11a, IEEE 802.11b, IEEE 802.11g or
IEEE 802.11n (in the 2.4- or 5-GHz frequency band) or
IEEE 802.11ac
• DECT base station
Integrated DECT base station that supports the DECT-ULE
standard. Up to 6 cordless telephones that use the DECT
radio standard can be connected, as well as up to
10 FRITZ!DECT smart plugs.
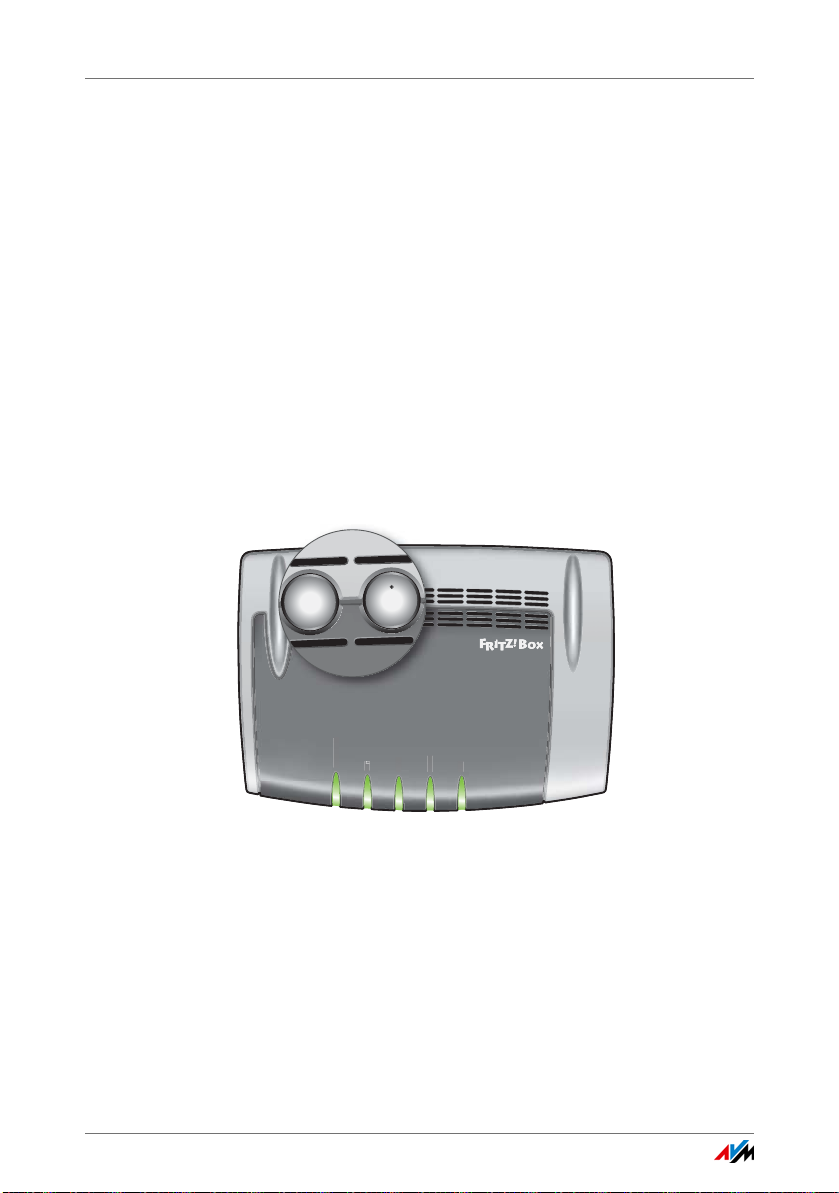
2.2 Buttons
The FRITZ!Box has the following buttons:
FRITZ!Box buttons
WLAN
DECT
Power/DSL
Fon
DECT
WLAN
Info
DEC
T
wer
/
DS
L
DE
C
T
AN
Info
WLAN
DECT

FRITZ!Box 7560 14
LEDs
Button Functions
“WLAN” Button
• Switches wireless LAN on and off
• Establishes a wireless LAN connection using WPS, see
Establishing a Wireless LAN Connection Using WPS from
page 26
“DECT” Button
• Registers cordless telephones, see page 47
• Pages cordless telephones, see page 108
Locking the Buttons on the FRITZ!Box
You can lock the buttons on the FRITZ!Box. Locking the but-
tons prevents the settings for your FRITZ!Box or your home
network from being changed unintentionally or without au-
thorization.
Example
With the “WLAN” button the wireless network of the FRITZ!Box
can be switched off at the touch of a button. If this happens
by accident, in some cases it may take some time before the
cause is found and the wireless LAN radio network can be re-
stored to all FRITZ!Box users in the home network.
The button lock is configured in the FRITZ!Box user interface,
under “System / Buttons and LEDs” on the “Keylock” tab.
2.3 LEDs
The FRITZ!Box 7560 has five LEDs, which flash or light up to
display various connection statuses and events.
For the “Info” LED you can assign any event desired in addi-
tion to the preset events. For more information, read Assign-
ing Any Event to the “Info” LED on page 16.

LEDs
FRITZ!Box 7560 15
Meaning of the LEDs
LED Condition Meaning
Power/DSL on Device has electrical power and the DSL line is ready for
operation
flashing Device has electrical power and the connection to DSL is
being established or has been interrupted
Fon on Telephone connection to the Internet is active
flashing Messages in your voice mail or inbox
This function must be supported by your telephony provider
DECT on DECT function is enabled
flashing Registration procedure for a DECT device in progress
WLAN on Wireless LAN is enabled
flashing
• Switching wireless LAN function on or off
• Applying changes to the wireless LAN settings
• performing WPS
• WPS procedure aborted: More than two wireless LAN
devices are performing WPS at the same time. Repeat
the WPS procedure.
Info glows green
• Stick & Surf procedure with FRITZ!WLAN USB Stick from
AVM concluded
• The LED signals an event specified in the user interface
under “System / Buttons and LEDs / “Info” Display”
flashing
green
• Updating FRITZ!OS
• Stick & Surf procedure with FRITZ!WLAN USB Stick from
AVM in progress
• Signals an event specified in the user interface under
“System / Buttons and LEDs / “Info” Display”
lights or
flashes red
Error:
• Open the FRITZ!Box user interface.
• Follow the instructions on the “Overview” page in the
user interface

FRITZ!Box 7560 16
LEDs
Assigning Any Event to the “Info” LED
The “Info” LED signals various events. Some events for which
the “Info” LED flashes or lights up are preset. You can also as-
sign to the LED any additional event you like.
1. Open the FRITZ!Box user interface.
2. Under “System / Buttons and LEDs”, click the ““Info”
Display” tab.
3. In the “Freely Selectable Options” area, select an event
from the list for the “Info” LED.
4. Click the “Apply” button.
The “Info” LED now flashes or lights up not only for the preset
events, but also for the event you selected.
Before You Connect the FRITZ!Box
FRITZ!Box 7560 17
3 Before You Connect the FRITZ!Box
• Read the Safety Instructions from page 8.
• Check the contents of your FRITZ!Box package. The con-
tents are described on page 17.
• Make sure that the requirements for operating the
FRITZ!Box have been met; see page 17.
• Read the handling instructions for your FRITZ!Box on
page 18.
• Note the tips for passwords on page 19.
3.1 Contents of the FRITZ!Box Package
• FRITZ!Box 7560
• one power supply unit
• one network cable
• one DSL cable (gray)
• one quick guide
3.2 Requirements for Operation
In order to operate the FRITZ!Box, you must have the follow-
ing:
• an up-to-date web browser
Some of the FRITZ!Box functions can be used only with a
web browser that supports HTML5, for instance Firefox
version 35 or higher, Internet Explorer version 10 or
higher, or Google Chrome version 40 or higher.
The FRITZ!Box 7560 is available in several different product
variants, each of which is delivered with different compo-
nents. See the FRITZ!Box 7560 box for details about what is
included in your FRITZ!Box package.

FRITZ!Box 7560 18
Handling the FRITZ!Box
• a connection to the Internet
– DSL line with or without splitter:
ADSL/ADSL2/ADSL2+ compliant with ITU G.992.1,
ITU G.992.3 or ITU G.992.5 (Annex B or J)
– or VDSL2 compliant with ITU G.993.2
– or an Internet cable access with cable modem
– or another Internet connection
• for the wireless LAN connection to tablets, smartphones
and computers:
Tablets, smartphones or computers that support wire-
less LAN compliant with IEEE 802.11ac, IEEE 802.11n,
IEEE 802.11g, IEEE 802.11a, or IEEE 802.11b. Comput-
ers that do not have wireless LAN integrated can be
equipped with wireless LAN support by installing a wire-
less LAN device, like a FRITZ!WLAN USB Stick, for in-
stance.
• for connecting computers using network cables:
computer with a network port (network adapter standard
Ethernet 10/100/1000 Base-T)
3.3 Handling the FRITZ!Box
• Read the Safety Instructions from page 8.
• You can place the FRITZ!Box on a horizontal surface or
mount it on a wall. For a drilling template to mount the
FRITZ!Box on a wall, see page 176.
• Place or hang the FRITZ!Box in a dry location that is free
of dust and protected from direct sunlight.
• For ideal operating conditions, mount the FRITZ!Box on a
wall with the cables connected on the bottom.
• When connecting the FRITZ!Box to your computer using a
network cable, keep in mind that the cable can be no
longer than 100 m.

Tips for Passwords
FRITZ!Box 7560 19
• If you would like to establish wireless connections be-
tween the FRITZ!Box and the computer, position the
FRITZ!Box at a central location.
• Make sure to keep sufficient distance from potential
sources of interference like microwave devices or elec-
tric devices with large metal housings.
3.4 Tips for Passwords
Passwords are assigned at various places in the user inter-
face to protect your settings and data in the FRITZ!Box. The
FRITZ!Box assists you in assigning secure passwords, for in-
stance when creating new users or configuring MyFRITZ!: A
graphic display indicates how secure the password is. Note
the following:
• Use a password rated as secure.
• Select a password with at least twelve characters, which
includes capitals and lower-case letters as well as nu-
merals and special characters.
• Under the search term “Characters for Passwords” the
help of the FRITZ!Box user interface contains more infor-
mation about which characters you can use.
• Be sure to keep your passwords in a safe place!
• Configure the “Forgot password” push service. This noti-
fication service sends you an access link at regular inter-
vals, with which you can access the FRITZ!Box user inter-
face even if you have forgotten your password. See Push
Services: Using Notification Services from page 144.
• If you lose your password for the user interface, you will
have to restore the factory settings to the FRITZ!Box and,
for reasons of security, reconfigure all of your personal
settings for your Internet connection, your telephone
system and your home network.
FRITZ!Box 7560 20
Connecting the FRITZ!Box
4 Connecting the FRITZ!Box
• Read the Safety Instructions from page 8.
• Connect the FRITZ!Box to the power supply.
• Connect the FRITZ!Box with your ADSL or VDSL line.
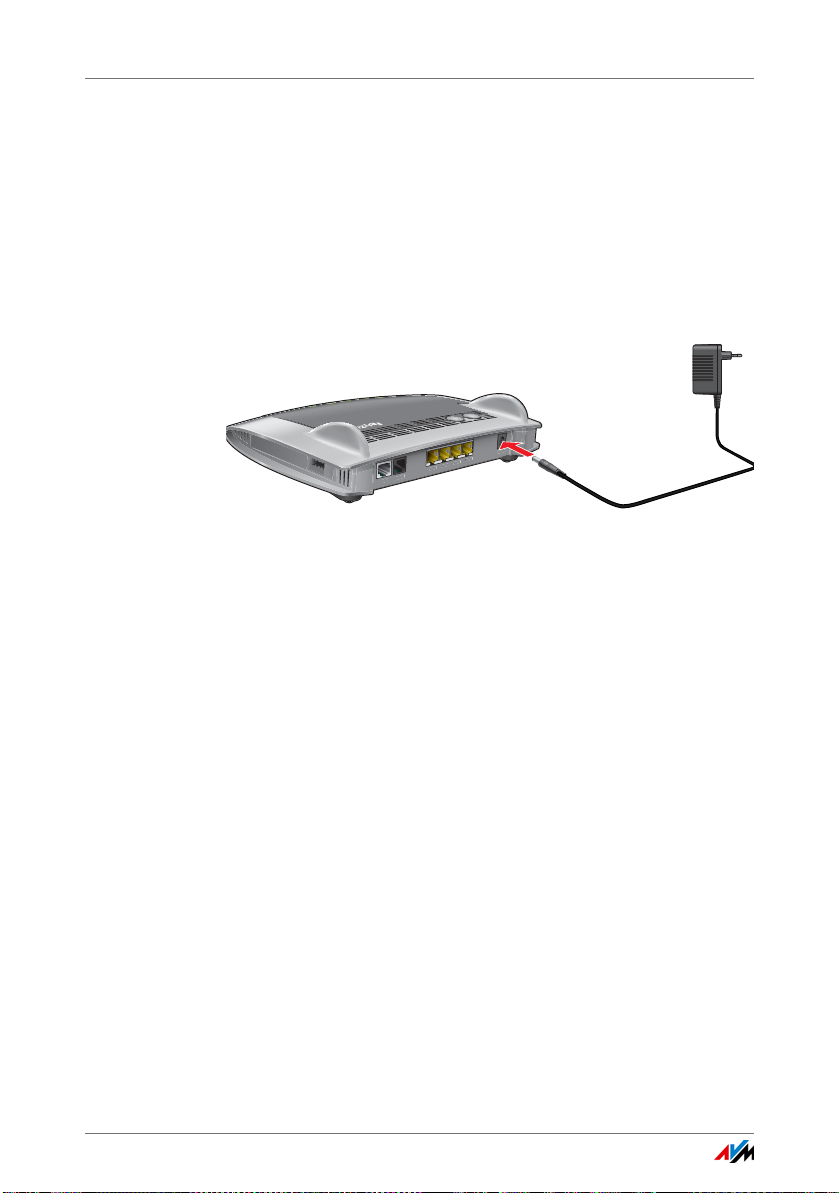
4.1 Connecting to Electrical Power
Connecting to the power supply
1. Pick up the power supply unit included in the FRITZ!Box
package.
Use only this power supply unit for connecting to electri-
cal power.
2. Connect the power supply unit to the socket on the
FRITZ!Box labeled “Power”.
3. Plug the other end into an AC power outlet.
The “Power / DSL” LED begins flashing after a few seconds to
indicate that the FRITZ!Box is ready for operation.
4.2 Connecting to the Internet
The FRITZ!Box can be connected using various types of Inter-
net connections:
• on the DSL/VDSL line
• on the cable connection via a cable modem
• on another router with Internet access
LAN 2
LAN 3
LAN 4
Power
P
ower/
D
S
L
DECT
F
o
n
W
L
A
N
In
f
o
DSL
FON 1
LAN 1
DECT
W
L
AN
FO
FON
1
FON 1
Connecting to the Internet
FRITZ!Box 7560 21
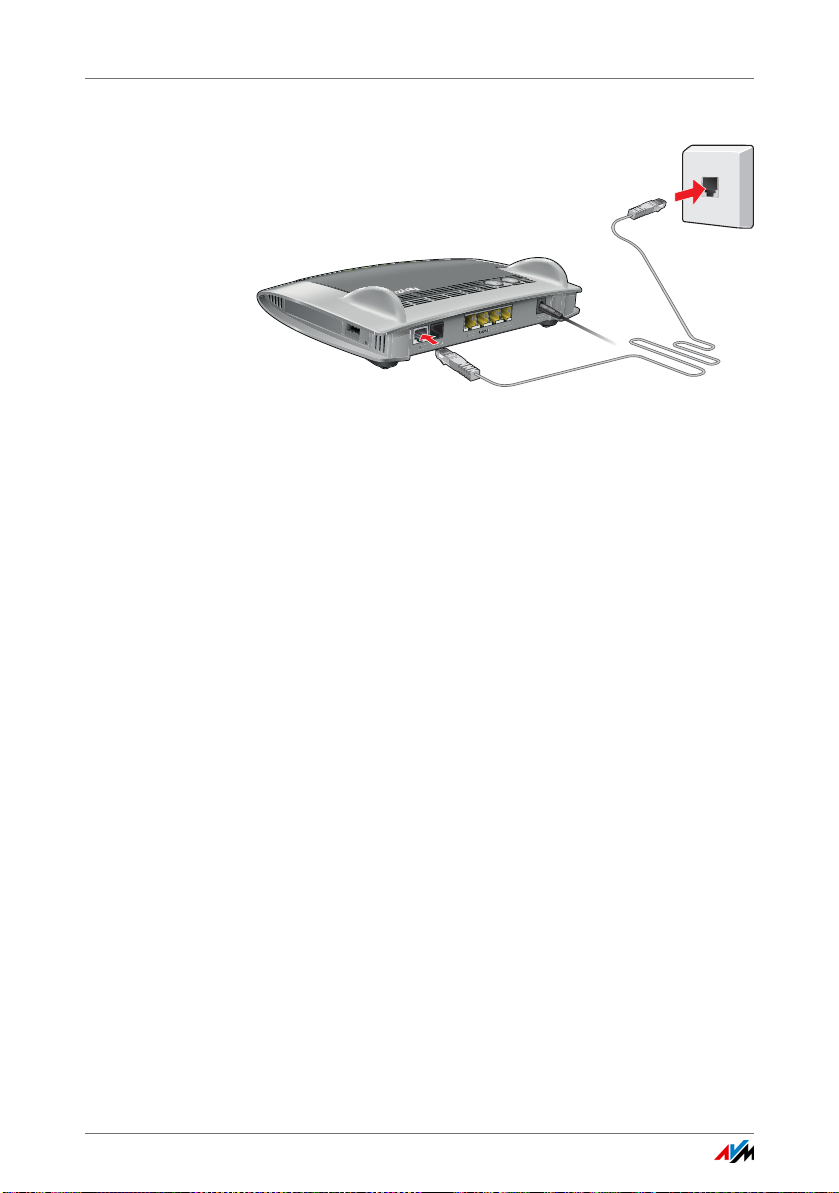
Connecting to the ADSL or VDSL Line
Connecting to a telephone socket
1. Insert the DSL cable (gray) into the “DSL” socket on the
FRITZ!Box.
2. Insert the free end of the cable into the telephone socket
on the wall.
After a short time the “Power / DSL” LED on the FRITZ!Box
lights up. The FRITZ!Box is ready to connect to the Internet.
Connecting to the Cable Junction
With an additional cable modem you can also use your
FRITZ!Box 7560 on a cable connection. Use a network cable.
1. Connect the free end of the network cable to the LAN
(Ethernet) port on the cable modem.
2. Connect the other end of the network cable to the socket
on the FRITZ!Box labeled “LAN 1”.
3. Connect a computer with the FRITZ!Box either via wire-
less LAN or using a network cable; see Connecting a
Computer with a Network Cable from page 23 and Con-
necting Devices with the FRITZ!Box over Wireless LAN
from page 26.
4. Set up the Internet connection for connections via cable
in the FRITZ!Box; see page 43.
LAN 2
LAN 3
LAN 4
Power
Power/DSL
DECT
Fon
WLAN
Info
DSL
FON 1
LAN 1
DECT
W
LAN
F
FON
FON
1
1
1
1
FON 1

FRITZ!Box 7560 22
Connecting to the Internet
Connecting to a Router or a Network
You can use the FRITZ!Box at an already existing Internet ac-
cess. To do this the FRITZ!Box is connected to the router or
network.
A network cable is required to connect the FRITZ!Box to a rout-
er.
1. Insert one end of the cable into the socket on the
FRITZ!Box labeled “LAN 1”.
2. Insert the other end of the cable into a network socket
on the router or in the network.
Once you have connected a computer to the FRITZ!Box, you
can configure the Internet connection, see Internet Connec-
tion over LAN 1: FRITZ!Box as a Router on page 44.
Connecting a Computer with a Network Cable
FRITZ!Box 7560 23
5 Connecting a Computer with a Network
Cable
You can connect computers and other network devices with
the FRITZ!Box using a network cable.
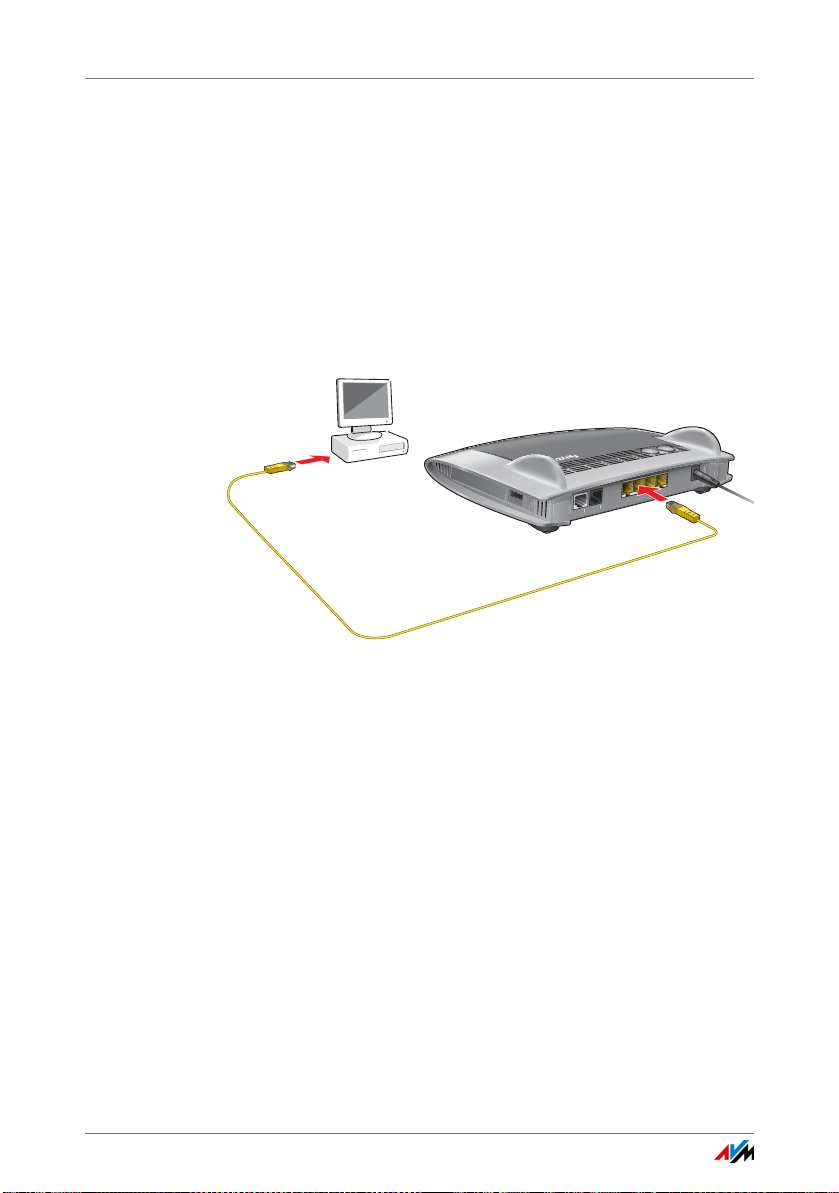
5.1 Connect the Computer
One computer or other network device can be connected to
each LAN port of the FRITZ!Box.
Connecting a computer using a network cable
1. Insert the network cable included in the package into
the LAN port of the computer.
You can also use any other network cable. For more in-
formation, see page 168.
2. Insert the free end of the cable into a LAN socket on the
FRITZ!Box.
Now the FRITZ!Box and the computer are connected with each
other.
LAN 2
LAN 3
LAN 4
Power
Po
we
r/D
S
L
DEC
T
F
on
W
L
A
N
Inf
o
DSL
FON 1
LAN 1
DECT
W
LAN
FO
FON
1
FON 1
FRITZ!Box 7560 24
Connecting a Network Hub or Switch
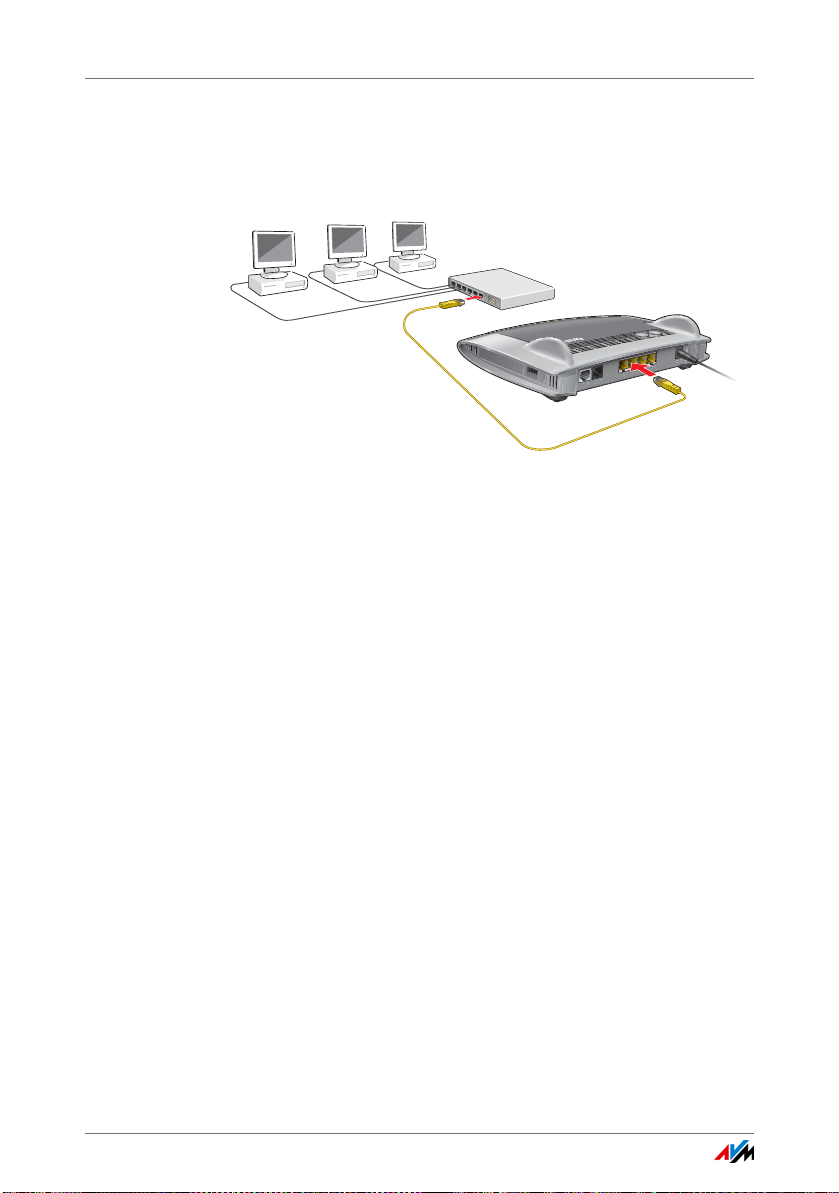
5.2 Connecting a Network Hub or Switch
You can connect a network hub or network switch to the
FRITZ!Box.
1. Insert the network cable included in the package into
the uplink port of the network hub or network switch.
You can also use any other network cable. For more in-
formation, see page 168.
2. Insert the free end of the cable into a LAN socket on the
FRITZ!Box.
The FRITZ!Box and the network hub are now connected with
each other.
5.3 Saving Energy at the LAN Ports
For energy-efficient use of your gigabit LAN ports you can
specify for each individual LAN port whether it should always
operate with full power (power mode) or with reduced energy
consumption (green mode). With green mode you can reduce
the power consumption of the FRITZ!Box to the level neces-
sary for your applications.
The LAN ports can be configured in the advanced view of the
FRITZ!Box user interface; see page 32.
Under “Home Network / Home Network Overview / Network
Settings” you can select from among the following operating
modes in the “LAN Settings” area:
LAN 2
LAN 3
LAN 4
Power
Pow
e
r/D
SL
D
E
CT
F
on
WL
A
N
I
nfo
DSL
FON 1
LAN 1
DECT
W
LAN
FO
FON
1
FON 1

Saving Energy at the LAN Ports
FRITZ!Box 7560 25
Operating Mode Functionality and Power Consumption
Power Mode In this setting LAN connections are estab-
lished with a maximum transmission rate of
1Gbit/s.
Higher power consumption than in green
mode if the LAN port is used.
Green Mode As needed, the FRITZ!Box establishes LAN
connections with a transmission rate of
100 Mbit/s.
Lower power consumption than for the “Power
Mode” setting.

FRITZ!Box 7560 26
Connecting Devices with the FRITZ!Box over Wireless LAN
6Connecting Devices with the FRITZ!Box
over Wireless LAN
Computers and other devices with wireless LAN, for instance
smartphones and network printers, can be connected wire-
lessly with the FRITZ!Box.
You can establish the wireless LAN connection using WPS or
by entering the FRITZ!Box network key on the wireless device.
Mobile devices with a camera, like smartphones or tablets,
can scan the QR code of the network key to establish a wire-
less LAN connection.
6.1 Establishing a Wireless LAN Connection Using
WPS
WPS is a procedure for establishing secure wireless LAN con-
nections. With WPS, connecting a wireless device with the
FRITZ!Box is quick and easy.
Requirements
The wireless device must support WPS.
Establishing a Connection on a Windows Computer
Using WPS
Here is how to establish a wireless connection with WPS on a
computer with Windows 10, 8, or 7:
1. If the “WLAN” LED on the FRITZ!Box is off, press the
“WLAN” button briefly.
The wireless radio network of the FRITZ!Box will be
switched on.
2. Open the wireless LAN software on the computer.
In Windows 10 and 8, for instance, click the wireless
network icon in the task bar.

Establishing a Wireless LAN Connection Using WPS
FRITZ!Box 7560 27
3. Select the wireless radio network of the FRITZ!Box.
The preconfigured name of the wireless radio network
(SSID) is consists of “FRITZ!Box 7560” and two capital
letters, and is printed on the bottom.
4. Click “Connect”.
The field for the network key appears, along with the in-
formation that you can establish the connection by
pressing a button on the router:
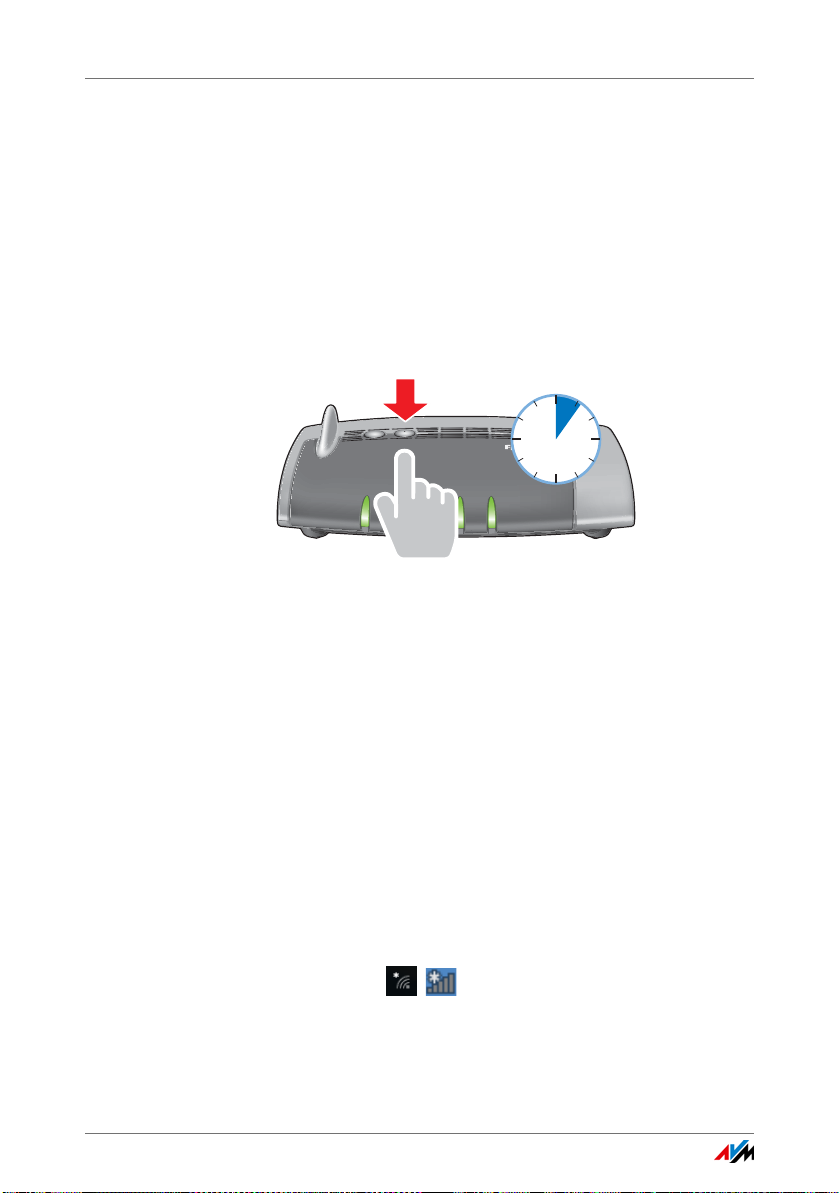
5. For this step you have two minutes: Press the “WLAN”
button on the FRITZ!Box and hold it down until the
“WLAN” LED begins flashing.
The wireless LAN connection will be established.
Connecting on Other Wireless Devices Using WPS
Here is how to establish a wireless connection with WPS on a
wireless LAN device without Windows:
1. If the “WLAN” LED on the FRITZ!Box is off, press the
“WLAN” button briefly.
The wireless radio network of the FRITZ!Box will be
switched on.
WLAN
DECT
Power/DSL
Fon
DECT
WLAN
Info
6 s
FRITZ!Box 7560 28
Entering the Network Key on the Wireless Device
2. Use your wireless device to search for wireless networks
in the vicinity.
See the documentation of the wireless LAN device for in-
structions on how to do this.
3. Select the wireless radio network of the FRITZ!Box and
start connecting with WPS.
4. For this step you have two minutes: Press the “WLAN”
button on the FRITZ!Box and hold it down until the
“WLAN” LED begins flashing.
The wireless LAN connection will be established.
6.2 Entering the Network Key on the Wireless Device
You can establish a wireless LAN connection by entering the
FRITZ!Box network key on the wireless device.
The preset network key is printed on the bottom on the
FRITZ!Box. A new network key can be entered in the user inter-
face.
1. If the “WLAN” LED on the FRITZ!Box is off, press the
“WLAN” button briefly.
The wireless radio network will be switched on.
2. Open the wireless LAN software on your wireless device.
In Windows 10 and 8, do this by clicking the wireless
network icon in the task bar.
WLAN
DECT
Power/DSL
Fon
DECT
WLAN
Info
6 s

Connecting to Mobile Devices Wirelessly Using the QR Code
FRITZ!Box 7560 29
3. Select the wireless radio network of the FRITZ!Box.
The preconfigured name of the wireless radio network
(SSID) is consists of “FRITZ!Box 7560” and two capital
letters, and is printed on the bottom.
4. Click “Connect”.
5. Enter the network key of the FRITZ!Box in the wireless
LAN software.
6. Start the connection procedure.
6.3 Connecting to Mobile Devices Wirelessly Using
the QR Code
With mobile devices that have a camera and a QR code reader
(app), like smartphones and tablets, you can connect wire-
lessly by reading a QR code.
1. Open the FRITZ!Box user interface.
2. Select “Wireless / Radio Network”.
The FRITZ!Box shows QR codes for the wireless radio net-
works in the 2.4-GHz and the 5-GHz bands.
3. Scan the QR code with your mobile device’s QR code
reader, directly from the monitor of from a printout.
The mobile device automatically establishes a secure wire-
less connection to the FRITZ!Box.

FRITZ!Box 7560 30
The FRITZ!Box User Interface
7 The FRITZ!Box User Interface
The FRITZ!Box has a user interface you can open in a web
browser on your computer or on mobile devices like a tablet
or smartphone.
In the user interface you can configure the FRITZ!Box, enable
or disable functions and receive information on the FRITZ!Box
and on your connections.
7.1 Opening the User Interface
The FRITZ!Box user interface can be opened on any computer,
tablet or smartphone connected with the FRITZ!Box.
1. Start a web browser on your computer.
2. Enter http://fritz.box
in the address bar of your web
browser.
The FRITZ!Box user interface opens.
The first time the user interface is opened, the Wizard for the
Basic Configuration is started. To protect your private data,
settings and account information, the wizard starts by
prompting you to assign of a password for access to the user
interface.
3. Enter a FRITZ!Box password and click “OK”.
If the user interface is not opened, read the information start-
ing from page 159.
 Loading...