


6840 LTE
Table of contents
 Loading...
FRITZ!Box 6840 LTE
n
Configuration
Configuratio
and Operation
and Operation

Table of Contents
Symbols and Highlighting . . . . . . . . . . . . . . . . . . . . . . . . 7
1 Getting to Know FRITZ!Box . . . . . . . . . . . . . . . . . . . . . . . . 8
1.1 FRITZ!Box at a Glance . . . . . . . . . . . . . . . . . . . . . . . . . . . . . . . . . . . . . 8
1.2 LTE: Radio Standard for Connecting to the Internet. . . . . . . . . . . . . 10
1.3 Ports and Interfaces. . . . . . . . . . . . . . . . . . . . . . . . . . . . . . . . . . . . . . 11
1.4 Buttons. . . . . . . . . . . . . . . . . . . . . . . . . . . . . . . . . . . . . . . . . . . . . . . . 12
1.5 LEDs . . . . . . . . . . . . . . . . . . . . . . . . . . . . . . . . . . . . . . . . . . . . . . . . . . 13
2 Before You Connect the FRITZ!Box . . . . . . . . . . . . . . . . . 15
2.1 Contents of the FRITZ!Box Package. . . . . . . . . . . . . . . . . . . . . . . . . . 15
2.2 Requirements for Operation . . . . . . . . . . . . . . . . . . . . . . . . . . . . . . . 15
2.3 Security and Handling . . . . . . . . . . . . . . . . . . . . . . . . . . . . . . . . . . . . 16
3 Connecting FRITZ!Box . . . . . . . . . . . . . . . . . . . . . . . . . . . 18
3.1 Screwing On the LTE Antennae . . . . . . . . . . . . . . . . . . . . . . . . . . . . . 18
3.2 Inserting the SIM Card. . . . . . . . . . . . . . . . . . . . . . . . . . . . . . . . . . . . 19
3.3 Connecting to Electrical Power . . . . . . . . . . . . . . . . . . . . . . . . . . . . . 20
4 Connecting the Computer to the FRITZ!Box. . . . . . . . . . 22
4.1 Connecting Computers to the LAN Port . . . . . . . . . . . . . . . . . . . . . . 22
4.2 Connecting Computers Wirelessly over WLAN . . . . . . . . . . . . . . . . . 23
5 The FRITZ!Box User Interface . . . . . . . . . . . . . . . . . . . . . 30
5.1 Opening the User Interface . . . . . . . . . . . . . . . . . . . . . . . . . . . . . . . . 30
5.2 Protecting the User Interface with a Password. . . . . . . . . . . . . . . . . 31
5.3 Saving the FRITZ!Box Settings. . . . . . . . . . . . . . . . . . . . . . . . . . . . . . 32
6 Configuring an Internet Connection into
the LTE Network. . . . . . . . . . . . . . . . . . . . . . . . . . . . . . . . 33
2

7 Connecting Telephony Devices to the FRITZ!Box. . . . . . 34
7.1 Connecting an Analog Telephony Device . . . . . . . . . . . . . . . . . . . . . 34
7.2 Registering Cordless (DECT) Telephones . . . . . . . . . . . . . . . . . . . . . 34
7.3 Registering Smartphones with FRITZ!App Fon . . . . . . . . . . . . . . . . . 36
7.4 Connecting an IP Telephone . . . . . . . . . . . . . . . . . . . . . . . . . . . . . . . 37
8 Setting Up the FRITZ!Box for Telephone Calls . . . . . . . . 39
8.1 Entering Internet Telephone Numbers . . . . . . . . . . . . . . . . . . . . . . . 39
8.2 Configuring Connected Telephones and Terminal Devices . . . . . . . 40
8.3 Making Telephone Calls . . . . . . . . . . . . . . . . . . . . . . . . . . . . . . . . . . 41
9 Firmware Update: Updating the FRITZ!Box Software . . 42
10 FRITZ!Box as an Internet Router . . . . . . . . . . . . . . . . . . . 43
10.1 Child Protection: Restricting Internet Access. . . . . . . . . . . . . . . . . . 43
10.2 Port Forwarding: Making Computers Accessible from the Internet. 44
10.3 Dynamic DNS: Name Instead of IP Address . . . . . . . . . . . . . . . . . . . 45
10.4 Remote Access over HTTPS . . . . . . . . . . . . . . . . . . . . . . . . . . . . . . . . 46
10.5 Prioritization: Right of Way for Internet Access . . . . . . . . . . . . . . . . 46
10.6 VPN: Remote Access to the Home Network . . . . . . . . . . . . . . . . . . . 49
10.7 DNSSEC: Security for DNS Queries . . . . . . . . . . . . . . . . . . . . . . . . . . 50
11 FRITZ!Box as a WLAN Base Station. . . . . . . . . . . . . . . . . 52
11.1 Security. . . . . . . . . . . . . . . . . . . . . . . . . . . . . . . . . . . . . . . . . . . . . . . . 52
11.2 Guest Access: WLAN Connection for Guests . . . . . . . . . . . . . . . . . . 52
11.3 Setting Up Night Service for WLAN . . . . . . . . . . . . . . . . . . . . . . . . . . 53
11.4 Increasing the Range of the WLAN Connection . . . . . . . . . . . . . . . . 54
11.5 WLAN Standards . . . . . . . . . . . . . . . . . . . . . . . . . . . . . . . . . . . . . . . . 57
11.6 Frequency Ranges . . . . . . . . . . . . . . . . . . . . . . . . . . . . . . . . . . . . . . . 62
3

12 FRITZ!Box as a Telephone System . . . . . . . . . . . . . . . . . 65
12.1 Using the Telephone Book and Call List . . . . . . . . . . . . . . . . . . . . . . 65
12.2 Setting Up the FRITZ!Box Answering Machine . . . . . . . . . . . . . . . . . 66
12.3 Setting Up FRITZ!Box Fax Reception . . . . . . . . . . . . . . . . . . . . . . . . . 69
12.4 Setting Up Call Diversion. . . . . . . . . . . . . . . . . . . . . . . . . . . . . . . . . . 69
12.5 Saving Costs with Dialing Rules . . . . . . . . . . . . . . . . . . . . . . . . . . . . 71
12.6 Blocking Telephone Numbers and Callers . . . . . . . . . . . . . . . . . . . . 71
12.7 Setting Up Do Not Disturb . . . . . . . . . . . . . . . . . . . . . . . . . . . . . . . . . 72
12.8 Setting Up the Alarm . . . . . . . . . . . . . . . . . . . . . . . . . . . . . . . . . . . . . 73
12.9 Enabling the Baby Monitor . . . . . . . . . . . . . . . . . . . . . . . . . . . . . . . . 74
12.10 Making Telephone Calls with Convenience Functions. . . . . . . . . . . 75
13 FRITZ!Box as a DECT Base Station . . . . . . . . . . . . . . . . . 83
13.1 Paging Cordless Telephones . . . . . . . . . . . . . . . . . . . . . . . . . . . . . . . 83
13.2 Deregistering a Cordless Telephone from the FRITZ!Box . . . . . . . . . 83
13.3 Enabling DECT Eco . . . . . . . . . . . . . . . . . . . . . . . . . . . . . . . . . . . . . . . 84
14 The FRITZ!Box Home Network. . . . . . . . . . . . . . . . . . . . . 85
15 Network Devices in the FRITZ!Box Home Network . . . . 87
15.1 Network Settings in the FRITZ!Box . . . . . . . . . . . . . . . . . . . . . . . . . . 87
15.2 Obtaining an IP Address Automatically . . . . . . . . . . . . . . . . . . . . . . 93
16 USB Devices in the FRITZ!Box Home Network . . . . . . . . 97
16.1 Power Supply for USB Devices . . . . . . . . . . . . . . . . . . . . . . . . . . . . . 97
16.2 USB Devices on the FRITZ!Box. . . . . . . . . . . . . . . . . . . . . . . . . . . . . . 97
16.3 Using USB Devices Safely . . . . . . . . . . . . . . . . . . . . . . . . . . . . . . . . . 98
16.4 Accessing USB Memory. . . . . . . . . . . . . . . . . . . . . . . . . . . . . . . . . . . 99
16.5 Sharing a USB Printer . . . . . . . . . . . . . . . . . . . . . . . . . . . . . . . . . . . . 99
17 Saving Energy with FRITZ!Box. . . . . . . . . . . . . . . . . . . . 106
17.1 Saving Energy with the WLAN Radio Network . . . . . . . . . . . . . . . . 106
17.2 Enabling Energy-saving Mode for USB Hard Drives. . . . . . . . . . . . 106
17.3 Saving Energy at the LAN Ports. . . . . . . . . . . . . . . . . . . . . . . . . . . . 107
4

18 Help in Case of Errors . . . . . . . . . . . . . . . . . . . . . . . . . . 108
18.1 The User Interface Does Not Open . . . . . . . . . . . . . . . . . . . . . . . . . 108
18.2 Cannot Establish a WLAN Connection . . . . . . . . . . . . . . . . . . . . . . 114
19 Configuring FRITZ!Box on the Telephone. . . . . . . . . . . 120
19.1 Restoring Factory Settings. . . . . . . . . . . . . . . . . . . . . . . . . . . . . . . . 120
19.2 Switching WLAN On and Off . . . . . . . . . . . . . . . . . . . . . . . . . . . . . . 120
19.3 Turning Do Not Disturb On/Off . . . . . . . . . . . . . . . . . . . . . . . . . . . . 121
19.4 Switching the Alarm On and Off . . . . . . . . . . . . . . . . . . . . . . . . . . . 122
19.5 Setting Up Call Diversion. . . . . . . . . . . . . . . . . . . . . . . . . . . . . . . . . 123
19.6 Disabling Automatic Outside Dialing . . . . . . . . . . . . . . . . . . . . . . . 127
20 Taking FRITZ!Box out of Operation . . . . . . . . . . . . . . . . 128
20.1 Removing the SIM Card . . . . . . . . . . . . . . . . . . . . . . . . . . . . . . . . . . 128
20.2 Restoring the FRITZ!Box Factory Settings . . . . . . . . . . . . . . . . . . . . 128
20.3 Uninstalling Software . . . . . . . . . . . . . . . . . . . . . . . . . . . . . . . . . . . 128
21 Technical Specifications. . . . . . . . . . . . . . . . . . . . . . . . 130
21.1 Ports and Interfaces. . . . . . . . . . . . . . . . . . . . . . . . . . . . . . . . . . . . . 130
21.2 Router Functions . . . . . . . . . . . . . . . . . . . . . . . . . . . . . . . . . . . . . . . 130
21.3 User Interface and Display . . . . . . . . . . . . . . . . . . . . . . . . . . . . . . . 131
21.4 Physical Specifications . . . . . . . . . . . . . . . . . . . . . . . . . . . . . . . . . . 131
21.5 Cable. . . . . . . . . . . . . . . . . . . . . . . . . . . . . . . . . . . . . . . . . . . . . . . . . 131
22 Customer Service . . . . . . . . . . . . . . . . . . . . . . . . . . . . . 132
22.1 Documentation on the FRITZ!Box . . . . . . . . . . . . . . . . . . . . . . . . . . 132
22.2 Information in the Internet . . . . . . . . . . . . . . . . . . . . . . . . . . . . . . . 133
22.3 Support from the Support Team . . . . . . . . . . . . . . . . . . . . . . . . . . . 133
23 AVM Products for the FRITZ!Box . . . . . . . . . . . . . . . . . . 135
Legal Notice. . . . . . . . . . . . . . . . . . . . . . . . . . . . . . . . . . 141
Legal Notice . . . . . . . . . . . . . . . . . . . . . . . . . . . . . . . . . . . . . . . . . . . 141
Declaration of CE Conformity . . . . . . . . . . . . . . . . . . . . . . . . . . . . . 142
Disposal Information . . . . . . . . . . . . . . . . . . . . . . . . . . . . . . . . . . . . 143
5

Drilling Template. . . . . . . . . . . . . . . . . . . . . . . . . . . . . . 144
Glossary. . . . . . . . . . . . . . . . . . . . . . . . . . . . . . . . . . . . . 146
Index . . . . . . . . . . . . . . . . . . . . . . . . . . . . . . . . . . . . . . . 162
6

Symbols and Highlighting
Symbols and emphasized text are used to mark certain information in
this manual.
Symbols
This symbol designates hints and tips that are useful in operating your product.
This symbol indicates important instructions that must be
observed to avoid malfunctions.
Highlighting
Highlighting Function Examples
Quotation marks Keys
Pointed brackets Joker <Telephone number>
Blue and underlined
Blue text links and references
Bold Emphasis Do not click the button ...
Buttons
Menus
File paths
Folder and file
names
Address to be entered in the web
browser
within this manual
“F1” key
“Help”
“Home Network”
“C:\My Documents”
“Documentation”
fritz.box
For more information on
customer service, see
the section from
page 132.
7

Getting to Know FRITZ!Box
1 Getting to Know FRITZ!Box
This chapter gives you an overview of the features and functions of
your FRITZ!Box 6840 LTE and describes ports, buttons and LEDs.
1.1 FRITZ!Box at a Glance
Access to the Internet
The FRITZ!Box connects multiple computers fast and safely
with the Internet. Other network-compatible devices like
smartphones and game consoles can use the FRITZ!Box for
their Internet connection.
For fast Internet connections via the LTE radio standard, an
LTE modem is integrated into the FRITZ!Box. A preconfigured
firewall protects your network from attacks from the Internet.
The FRITZ!Box also offers a variety of functions to control access to the Internet as well as access from the Internet. The
“Internet filter” feature allows you to restrict access to the Internet for individual Windows users or computers, for instance for you children’s computers. With the integrated VPN
server you can link remote computers securely with the home
network of the FRITZ!Box over the Internet.
WLAN Base Station for Wireless Connections
Computers and other network devices that support WLAN can
be connected wirelessly with the FRITZ!Box. If no WLAN device is integrated in your computer, you can install an external
WLAN adapter like a FRITZ!WLAN USB Stick by AVM (see also
AVM Products for the FRITZ!Box from page 135).
The FRITZ!Box supports the fast WLAN N standard, which provides for data throughput of up to 300 Mbit/s (gross).
You can use the FRITZ!Box in either the 2.4-GHz frequency
band or the 5-GHz frequency band (dual band). Because the
5-GHz frequency band is used less frequently, connections in
this band are subject to less interference.
With the “guest access” feature you can grant friends and visitors fast, secure access to the Internet over your wireless network.
8

FRITZ!Box at a Glance
Telephone System (PBX)
The FRITZ!Box is a telephone system (or PBX: private branch
exchange) for the Internet telephone line.
The PBX is also equipped with up to five integrated answering
machines and one integrated fax machine for fax reception.
You do not need any more additional devices for these functions. For up to five different telephone numbers in the
FRITZ!Box you can configure a separate answering machine.
The FRITZ!Box can be configured to forward new messages on
an answering machine and new faxes automatically by email.
The FRITZ!Box telephone book is easy to manage in the web
browser. If you use multiple FRITZ!Box cordless telephones on
the FRITZ!Fon, you can use a shared telephone book or set up
a separate telephone book for each FRITZ!Fon in the
FRITZ!Box.
In addition, the FRITZ!Box telephone functions offer convenience features like a call list, call diversion and do not DisturbDo Not Disturb.
DECT Base Station for Cordless Telephones
A DECT base station is integrated in your FRITZ!Box. Up to six
cordless telephones can be connected with the FRITZ!Box:
you do not need an additional base station.
You can use the FRITZ!Box as a DECT base station or as a repeater. When used as a repeater, the FRITZ!Box increases the
range of another FRITZ!Box’s DECT radio network.
Switchboard in the Home Network
The FRITZ!Box connects your computers and other network
devices not only with the Internet, but also with each other.
The connected network devices constitute the home network
of the FRITZ!Box and can exchange data among each other.
You connect computers and other network devices with the
FRITZ!Box either wirelessly via WLAN or using a network cable.
9

LTE: Radio Standard for Connecting to the Internet
The FRITZ!Box can manage various storage media and make
them available to all participants in the home network. These
include connected USB flash drives, USB hard drives and online storage.
USB 2.0 Port
The FRITZ!Box has a USB port which can be used to integrate
USB devices into your home network, for instance a printer or
a storage medium. The connected USB devices can then be
used simultaneously by all network devices in the home network of the FRITZ!Box.
Media Server for Music, Images, and Video in the Home
Network
As a media server the FRITZ!Box makes music, video and image files available throughout the entire home network. With
suitable playback devices in the home network of the
FRITZ!Box you can even play back the media files when the
computer is turned off.
Your music, video and image files can be stored on a USB
storage medium connected to the FRITZ!Box.
The playback devices or programs, for instance computers or
television sets, must support the UPnP AV or DLNA standard.
1.2 LTE: Radio Standard for Connecting to the Internet
LTE (Long Term Evolution) is a radio standard specified according to the 3GPP standard, Release 8 . Within this standard the FRITZ!Box belongs to category 3 UE (user equipment).
Frequency Ranges
LTE supports two frequency bands:
• 791 - 862 MHz: the LTE band 20 is located in this range.
This band is called the “digital dividend” spectrum.
• 2500 - 2690 MHz: the LTE band 7 is located in this range.
10
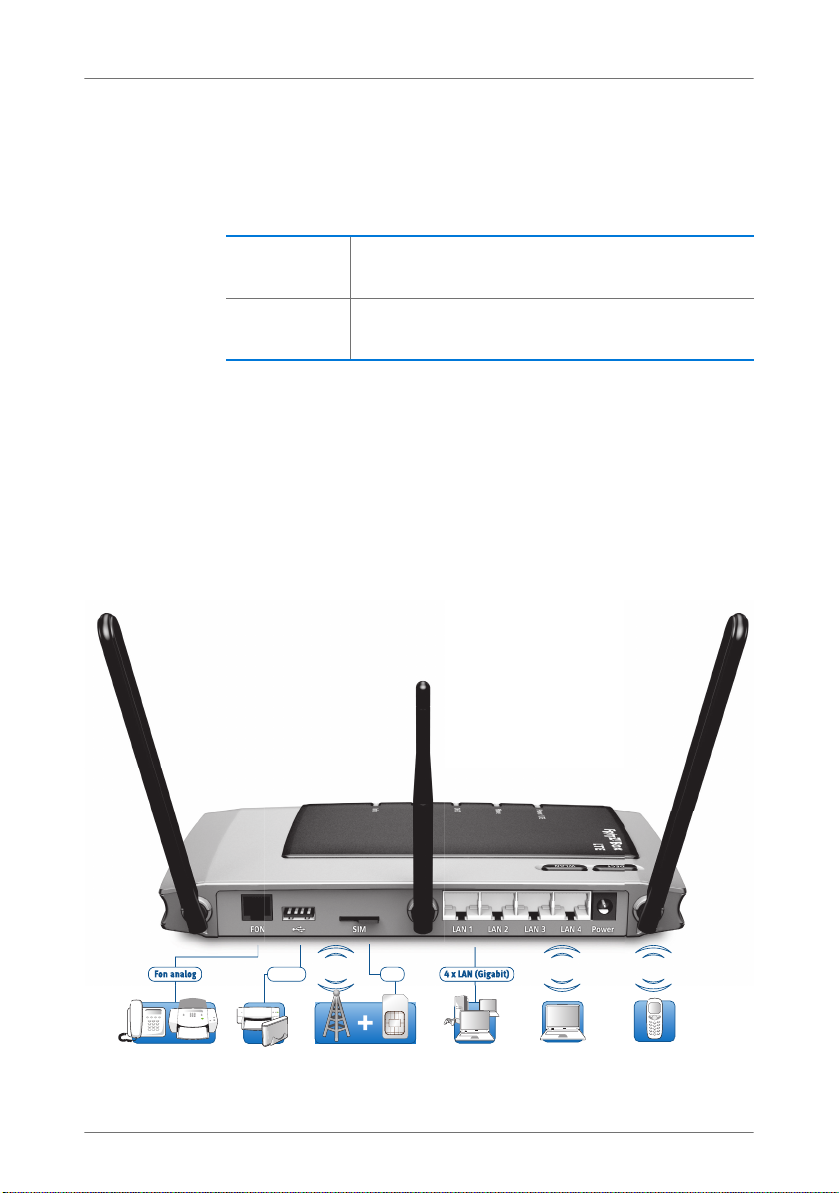
Ports and Interfaces
Computer, game
console, network
Anal og telephone,
fax
4 x LAN (Gigabit)
Notebook, smartphone,
video/TV Streaming
Fon analog
Printer,
storage media
USB 2.0
FRITZ!Fon or other
DECT telephones
DECT
LTE SIM card
SIM
WLANLT E
Channel Bandwidth
Within these two frequency bands the FRITZ!Box supports the
channel bandwidths 5, 10 and 20 MHz.
The smaller the channel bandwidth, the lower the throughput:
20 MHz up to 100 Mbit/s download
10 MHz up to 60 Mbit/s download
All devices located in the same radio cell share the bandwidth and thus the throughput.
Antenna Technology
The FRITZ!Box supports Multiple-In-Multiple-Out (MIMO) antenna technology.
1.3 Ports and Interfaces
up to 50 Mbit/s upload
up to 38 Mbit/s upload
Possibilities for connecting the FRITZ!Box
11
Buttons
PhonePhone
PowePower/ LTELTE
DECTDECT
WLANWLAN
InfoInfo
• FON
One RJ11 socket for one analog telephone or another analog terminal device
• LAN 1 – LAN 4
4 gigabit Ethernet ports (10/100/1000 Base-T) for connecting computers and other network devices like game
consoles and network hubs
• USB
USB 2.0 port for connecting USB devices like printers or
storage media
• WLAN base station
Integrated WLAN base station for connecting to WLAN
devices that use the radio standard IEEE 802.11a,
IEEE 802.11b, IEEE 802.11g or IEEE 802.11n (in the 2.4or 5-GHz frequency band)
• DECT base station
Integrated DECT base station for connecting up to
6 cordless telephones that use the DECT standard
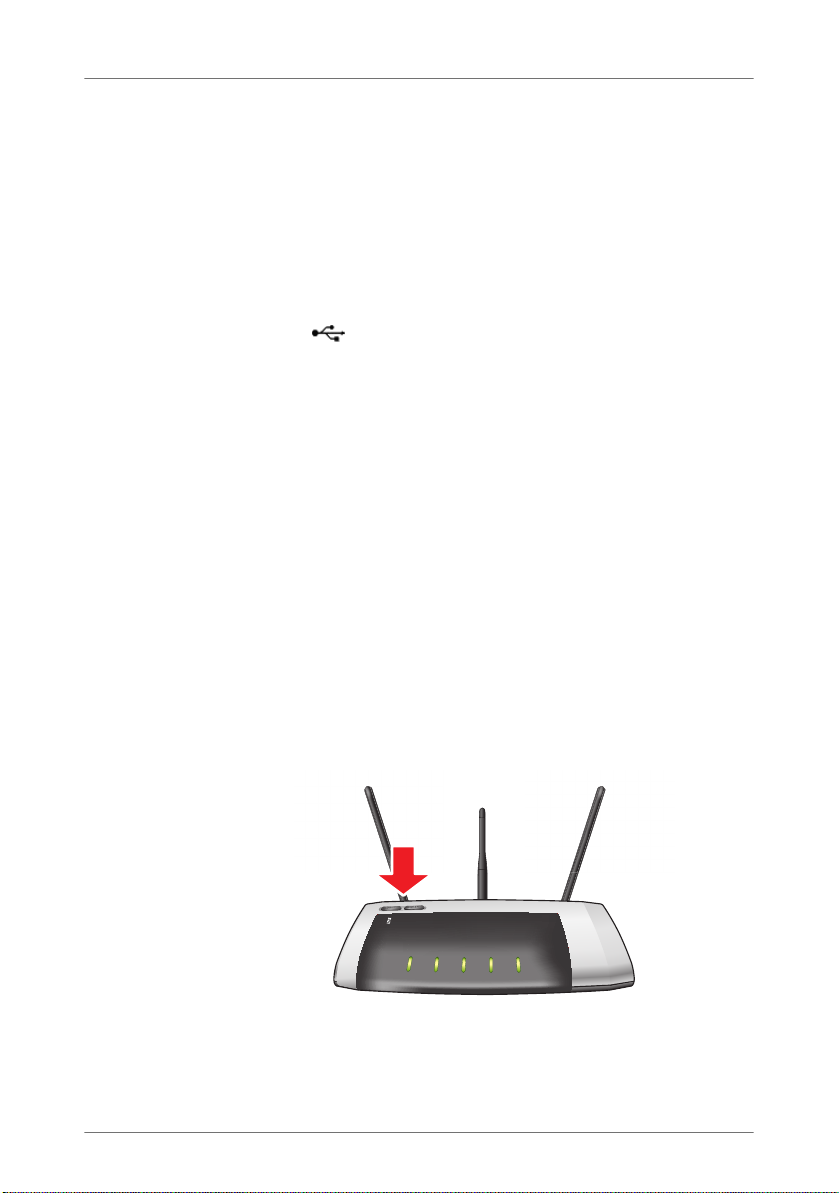
1.4 Buttons
The FRITZ!Box has two buttons on the upper side of the housing.
FRITZ!Box buttons
12

LEDs
WLAN Button
With the WLAN button you can turn the WLAN function on and
off and connect wireless devices with the FRITZ!Box by WPS.
WPS is an easy way to establish secure wireless connections
(see page 25).
DECT Button
With the DECT button you can register cordless telephones on
the FRITZ!Box (see page 34) and page misplaced cordless
handsets (see page 83).
1.5 LEDs
LED Condition Meaning
Power /
LT E
Phone on Telephone connection to the Internet active
DECT on DECT function enabled
WLAN on WLAN function enabled
on
flashing
flashing Messages in your voicemail/e-mail inbox (this function
flashing Registration procedure for a DECT handset in progress
flashing
• FRITZ!Box on standby
• Device has electrical power and the LTE connection has
been established
• Device has electrical power
• LTE connection is being established or has been inter-
rupted
must be supported by your telephony provider)
• Enabling or disabling WLAN function
• Adopting the WLAN settings
13

LEDs
LED Condition Meaning
Info on • Telephone connection between two Internet telephony
subscribers is active; the call is free of charge (this function must be supported by your Internet telephony provider)
• Signals an event specified by the user
flashing
flashing red Error: Open the FRITZ!Box user interface and follow the in-
• Updating the firmware
• Specified value for online meter reached
• Signals an event specified by the user
structions on the “Overview” page
Info LED
Here you can define what additional information should be
displayed on the “Info” LED. For details, see the “System / Info Display” section of the user interface of your FRITZ!Box
6840 LTE.
14

Before You Connect the FRITZ!Box
2 Before You Connect the FRITZ!Box
• Check the contents of your FRITZ!Box package. See the section
Contents of the FRITZ!Box Package on page 15 for more informa-
tion.
• Make sure that the requirements for connecting and operating
the FRITZ!Box have been met. See the section Requirements for
Operation on page 15 for more information.
• Please see the security and handling instructions in the section
Security and Handling on page 16.
2.1 Contents of the FRITZ!Box Package
• FRITZ!Box 6840 LTE
• two LTE antennae
• one power supply unit
• one network cable
• a FRITZ!Box CD with the FRITZ!Box manual as a PDF file
• printed product information
2.2 Requirements for Operation
In order to operate the FRITZ!Box, you must have the following:
• a web browser that supports Java script (for instance, In-
ternet Explorer version 8.0 or higher, or Firefox version 7
or higher)
• an LTE SIM card for the Internet connection
• for connecting computers via WLAN:
computer with WLAN support (compliant with
IEEE 802.11n, IEEE 802.11g, IEEE 802.11a or
IEEE 802.11b). Computers that do not have integrated
WLAN can be equipped with WLAN support by installing
a WLAN device like a FRITZ!WLAN USB Stick N, for instance.
15

Security and Handling
• for connecting computers using network cable:
computer with a network port (network adapter standard
Ethernet 10/100/1000 Base-T)
2.3 Security and Handling
Before installing and using the FRITZ!Box, please read the following security and handling instructions.
Safety Instructions
When working with the FRITZ!Box 6840 LTE, be sure to observe the following security instructions in order to protect
yourself and the FRITZ!Box from harm.
• Before mounting the FRITZ!Box on the wall, make sure
that there are no electrical lines, gas or water pipes located where you need to drill the holes.
If necessary, check the site it with a pipe detector or consult with qualified experts.
• Do not place FRITZ!Box on excessively heat-sensitive sur-
faces, as the base of the device can heat up during normal operation.
• Make sure that the ventilation slits on the FRITZ!Box
housing are always unobstructed. The ventilation slits
provide for air cooling.
– The FRITZ!Box should not be placed on a carpet or on
upholstered furniture.
– Do not cover the FRITZ!Box.
• Do not install the FRITZ!Box during an electrical storm.
• Disconnect the FRITZ!Box from the power supply during
electrical storms.
• Never let liquids get inside the FRITZ!Box. Otherwise,
electric shocks or short circuits may result.
• The FRITZ!Box is intended for indoor use only.
16

Security and Handling
• Do not open the FRITZ!Box housing. The device contains
Handling the FRITZ!Box
• You can either place FRITZ!Box on a horizontal surface or
• Place or hang the FRITZ!Box in a dry location that is free
• For ideal operating conditions, mount the FRITZ!Box on a
• When connecting FRITZ!Box to your computer using a
• If you would like to establish wireless connections be-
• Make sure to keep sufficient distance from potential
hazardous components and should only be opened by
authorized repair technicians.
mount it on a wall. For a drilling template to mount the
FRITZ!Box on a wall, see page 144.
of dust and protected from direct sunlight.
wall with the cables connected on the bottom.
network cable, keep in mind that the cable can be no
longer than 100 m.
tween the FRITZ!Box and the computer, position the
FRITZ!Box at a central location.
sources of interference like microwave devices or electric devices with large metal housings.
17
Connecting FRITZ!Box
SIM
SIM
LTE
LTE
LTE
LTE
3 Connecting FRITZ!Box
• Screw the LTE antennae onto the FRITZ!Box and insert the SIM
card.
• Connect the FRITZ!Box to the power supply.
This chapter tells you how.
Before you connect the FRITZ!Box, note the additional instructions in the section Security and Handling on page 16.
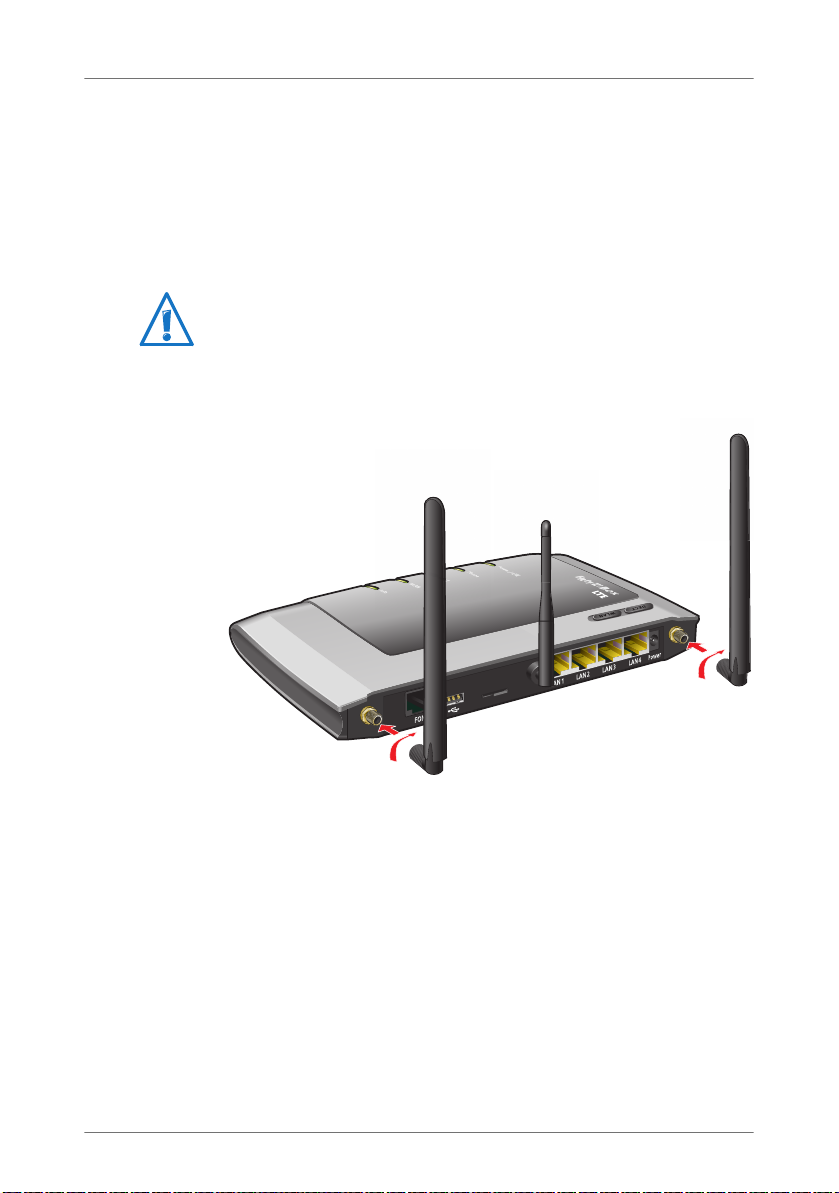
3.1 Screwing On the LTE Antennae
Screwing On the LTE Antennae
1. Pick up the two LTE antennae included in the package.
2. Screw the antennae onto the sockets labeled “LTE”.
Connecting Exterior Antenna
You can also connect the FRITZ!Box 6840 LTE with an exterior
antenna rather than using the LTE antennae included with delivery. If areas located on the edge of LTE radio coverage, the
two LTE included in the package may not be sufficient for successful radio traffic. If this is the case, you can use a stronger
antenna, for instance, one mounted on your roof.
18
Inserting the SIM Card
SIM
SIM
LTE
LTE
Please note the following if you would like to use an exterior
antenna:
• The antenna has to fit into an SMA socket. The antenna
• The plugs on the antenna cable used to connect the
• The FRITZ!Box 6840 LTE receives on both antenna sock-
sockets on the FRITZ!Box 6840 LTE are SMA connectors.
FRITZ!Box 6840 LTE and the antenna must be SMA plugs.
ets and transmits on only one. The antenna socket on
the left of the FRITZ!Box 6840 LTE socket panel ist the
one for transmission:
If your exterior antenna has only one connector, connect
the antenna to this antenna socket and screw one of the
LTE antennae included with delivery into the other antenna socket.
If the exterior antenna has two connectors, connect the
antenna to both antenna sockets on the FRITZ!Box 6840
LTE .
3.2 Inserting the SIM Card
You received a SIM card from your LTE provider. This card
must be inserted into the card holder in the FRITZ!Box SIM
card slot.
19

Connecting to Electrical Power
DECT
WLAN
Info
SIM
DECT
WLAN
Info
SIM
123
DECT
WLAN
Info
PhonePhone
SIM
SIM
LTE
LTE
LTE
LTE
D
WLAN
Info
WLAN
DECT
SIM
1. Pull the card holder completely out of the SIM card slot.
2. Place the SIM card with the slanted edge in the bottom
right corner with the contacts facing downwards.
3. Insert the card holder with the SIM card back into the
SIM card slot.
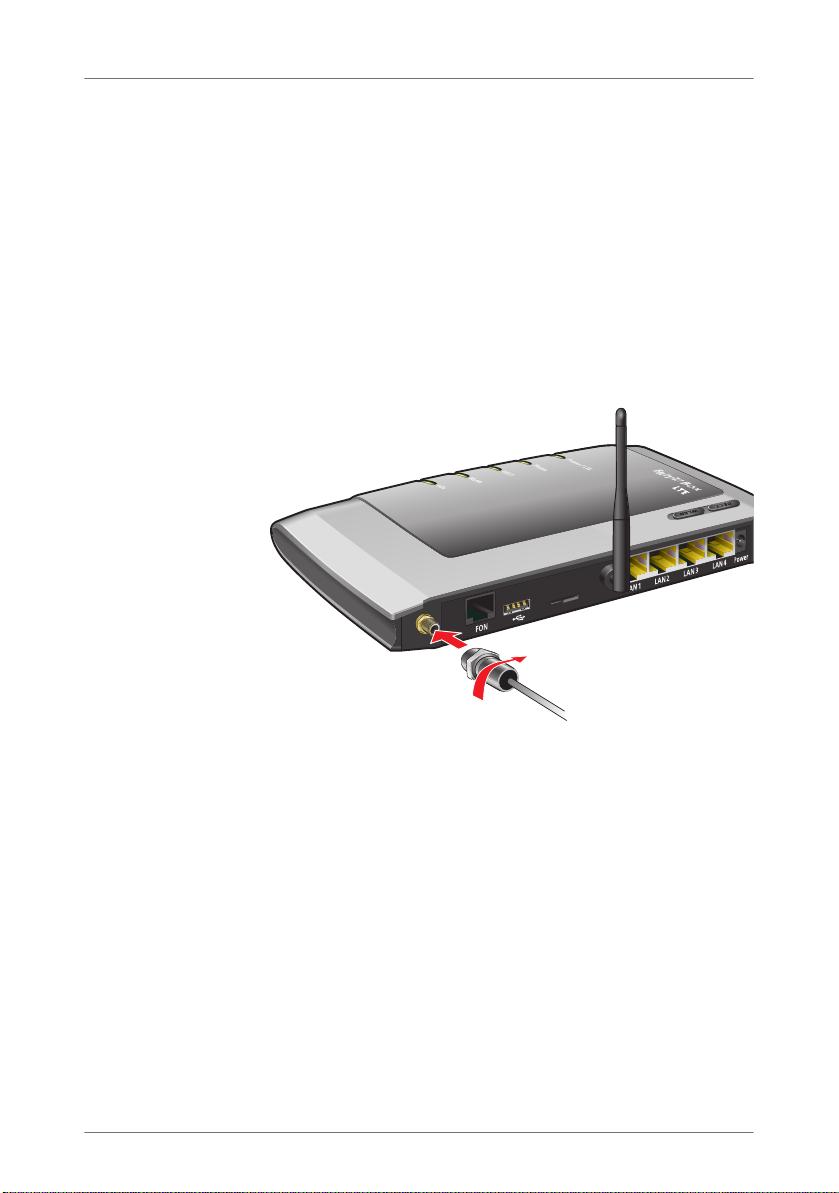
3.3 Connecting to Electrical Power
SIM-Karte
SIM-Karte
Info
WLAN
DECT
SIM
Connecting to the power supply
1. Pick up the power supply unit included in the FRITZ!Box
package.
Use only this power supply unit for connecting to electrical power.
2. Connect the power supply unit to the socket on the
FRITZ!Box labeled “Power”.
20

Connecting to Electrical Power
3. Plug the other end into an AC power outlet.
The “Power / LTE” LED begins flashing after a few seconds to
indicate that the LTE connection is being established.
21

Connecting the Computer to the FRITZ!Box
SIM
SIM
LTE
LTE
LTE
LTE
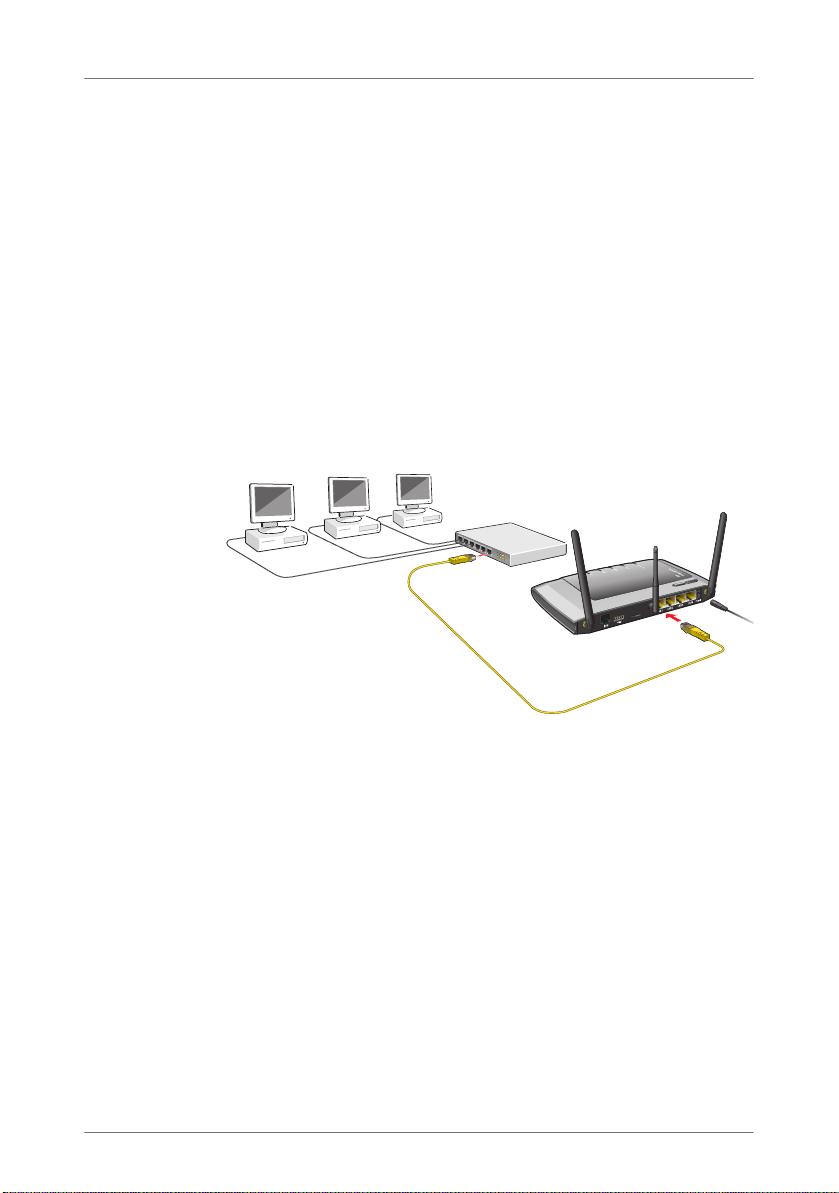
4 Connecting the Computer to the FRITZ!Box
Connect one or several computers to the FRITZ!Box.
4.1 Connecting Computers to the LAN Port
Connecting a computer to a LAN port on the FRITZ!Box
1. Set aside the network cable (yellow) from the FRITZ!Box
package.
2. If you work with a Linux operating system: Configure the
network adapter of the computer with the setting
“DHCP”.
3. Connect one end of the network cable to the network
port (network card) of the computer.
4. Connect the other end to the “LAN 1”, “LAN 2”, “LAN 3”
or “LAN 4” socket on the FRITZ!Box.
22
Connecting Computers Wirelessly over WLAN
SIM
SIM
LTE
LTE
LTE
LTE
Now the FRITZ!Box and the computer are connected to each
other.
Connecting More Computers to the LAN Ports
Additional cables are required to connect further computers.
In purchasing a LAN cable, note the instructions in the section Network Cable on page 131.
One computer can be connected to each network port of the
FRITZ!Box.
Connecting a Network Hub or Switch
You can also connect a network hub or switch to the LAN
ports on the FRITZ!Box.
Connecting FRITZ!Box to a network hub
1. Set aside the network cable (yellow) from the FRITZ!Box
package.
2. Connect one end of the LAN cable to the uplink port (see
glossary) of the network hub or network switch.
3. Connect the other end of the cable to one of the LAN
ports on the FRITZ!Box.
The FRITZ!Box and the network hub are now connected with
each other.
4.2 Connecting Computers Wirelessly over WLAN
Using WLAN radio technology you can connect multiple computers with the FRITZ!Box wirelessly.
23
Connecting Computers Wirelessly over WLAN
Please note the following before establishing a wireless connection between the computer and the FRITZ!Box:
• WLAN device
A computer to be connected to the FRITZ!Box via WLAN
must be equipped with a WLAN device for it to support
WLAN. A WLAN device can be an external WLAN adapter—like a USB stick, for example—or a device integrated
in the computer. Many modern computers and notebooks come with a WLAN device integrated.
• WLAN security settings
In the FRITZ!Box, WLAN security settings are enabled upon delivery. Before a computer can establish a wireless
connection to the FRITZ!Box, the WLAN security settings
of the FRITZ!Box must be transferred to the WLAN device.
For this procedure the FRITZ!Box supports the two automatic methods AVM Stick & Surf and WPS (Wi-Fi Protected Setup). The security settings can also be transferred
manually.
For more information on WLAN, see the section FRITZ!Box as
a WLAN Base Station from page 52.
24
Connecting Computers Wirelessly over WLAN
Establishing a WLAN Connection with AVM Stick & Surf
If you use a FRITZ!WLAN USB Stick from AVM as the WLAN device, you can use AVM Stick & Surf to establish a secure
WLAN connection quickly and conveniently.
1. Switch on your computer.
2. Insert the your FRITZ!WLAN USB Stick into the USB port
on the FRITZ!Box.
The WLAN security settings are transmitted to the
FRITZ!WLAN USB Stick. The “Info” LED on the FRITZ!Box
begins flashing quickly.
As soon as the “Info” LED stops flashing, transmission
of the settings has been concluded.
3. Remove the FRITZ!WLAN USB Stick.
4. Now insert the FRITZ!WLAN USB Stick into the USB port
of the computer.
The security settings will be adopted and the WLAN connection between the FRITZ!Box and the FRITZ!WLAN USB Stick
will be established. As soon as the WLAN connection has
been established the computer is connected to the FRITZ!Box.
See the AVM FRITZ!WLAN USB Stick manual for details.
Establishing a WLAN Connection Using WPS
The FRITZ!Box supports WPS (Wi-Fi Protected Setup). WLAN
devices that also support WPS can be connected with your
FRITZ!Box securely using this method. All of the necessary
WLAN security settings are transferred in the process. There
are two kinds of WPS: the push-button method and the PIN
method.
25
Connecting Computers Wirelessly over WLAN
PhonePhone
PowePower/ LTELTE
DECTDECT
WLANWLAN
InfoInfo
WPS with the Push-button Method
The push-button method (WPS PBC) can be used if your WLAN
device is also equipped with a WPS button, or if WPS can be
enabled via the control software of the WLAN device.
1. Press the “WLAN” button on the FRITZ!Box and hold it
down for at least six seconds.
2. As soon as the “WLAN” LED begins flashing, enable the
WPS function on the other WLAN device, either by pressing a button or in the device’s user interface (depending
on the device). Activation must be started within
two minutes.
The FRITZ!Box and the WLAN device now connect with each
other automatically. The WLAN device adopts the security settings of the FRITZ!Box.
As soon as the WLAN connection has been established the
computer is connected to the FRITZ!Box.
26

Connecting Computers Wirelessly over WLAN
WPS with the PIN Method
If your WLAN device supports WPS, but does not have a button to start the push method nor any possibility to enable it in
its control software, use the PIN method to establish the
WLAN connection.
You can choose between two methods:
• the FRITZ!Box specifies the PIN
• the WLAN device specifies the PIN.
The FRITZ!Box Specifies the PIN
1. Open the FRITZ!Box user interface.
2. Select the “WLAN / Security” menu.
3. Go to the “WPS / Quick Connection”page.
4. Enable the setting “WPS enabled”.
5. Select the option “PIN method (WPS-PIN), the FRITZ!Box
specifies the PIN”.
6. The PIN will be displayed. Enter this PIN in the control
software of the WLAN device.
7. Click “Start WPS”.
The “WLAN” LED on the FRITZ!Box flashes slowly, indicating
that the WPS procedure has begun. Now a secure WLAN connection is being established between the FRITZ!Box and the
WLAN device.
The WLAN Device Specifies the PIN
1. Open the FRITZ!Box user interface.
2. Select the “WLAN / Security” menu.
3. Go to the “WPS / Quick Connection”page.
4. Enable the setting “WPS enabled”.
5. Select the option “PIN method (WPS-PIN), the WLAN de-
vice specifies the PIN”.
27

Connecting Computers Wirelessly over WLAN
6. Now start the control software of the WLAN device. The
program outputs a PIN for establishing a connection.
7. Enter this PIN in the FRITZ!Box user interface.
8. Click “Start WPS”.
The “WLAN” LED on the FRITZ!Box flashes slowly, indicating
that the WPS procedure has begun. Now a secure WLAN connection is being established between the FRITZ!Box and the
WLAN device.
Transferring the WLAN Security Settings Manually
The WLAN security settings for WLAN devices can also be
transferred manually. Manual transfer is unavoidable if a
WLAN device does not support any methods for transferring
the security settings automatically.
For manual transfer the WLAN security settings have to be entered in the WLAN software.
WLAN devices are generally delivered with their own WLAN
software, which is installed in the computer along with the
WLAN device. By now many operating systems have WLAN
software included. Integrated WLAN devices sometimes use
the operating system’s WLAN software.
Installing a WLAN Device
If you need to use a separate WLAN device because you do
not have one integrated, then install the WLAN device in the
computer along with the corresponding WLAN software.
Please take note of the instructions in the documentation of
the device.
28

Connecting Computers Wirelessly over WLAN
Transferring WLAN Security Settings
The values for WLAN security preconfigured in the FRITZ!Box
have to be transferred to the WLAN device.
If you would like to establish a WLAN connection using the
values preset in the FRITZ!Box, then your WLAN device must
support the WPA encryption procedure.
1. Start the WLAN software.
2. Enter the following values for the connection between
the FRITZ!Box and the WLAN device:
SSID (name of the
WLAN radio network)
Encryption method WPA (TKIP) or WPA2 (AES-CCMP)
Encryption WPA PSK or WPA2 PSK (AES)
WLAN key The key is printed on the sticker on the
Network mode Infrastructure
FRITZ!Box 6840 LTE
bottom of the housing and on the cover
of the FRITZ!Box CD.
3. Confirm your entries using the relevant button in the us-
er interface (for instance, “OK” or “Connect”).
Now your WLAN device and the FRITZ!Box are connected with
each other wirelessly.
29
The FRITZ!Box User Interface
5The FRITZ!Box User Interface
The FRITZ!Box has a user interface you can open in a web browser on
your computer.
In the user interface you can set up the FRITZ!Box, enable or disable
functions and receive information on the FRITZ!Box and on your connections.
5.1 Opening the User Interface
The FRITZ!Box user interface can be opened on every computer connected with the FRITZ!Box.
1. Start a web browser on your computer.
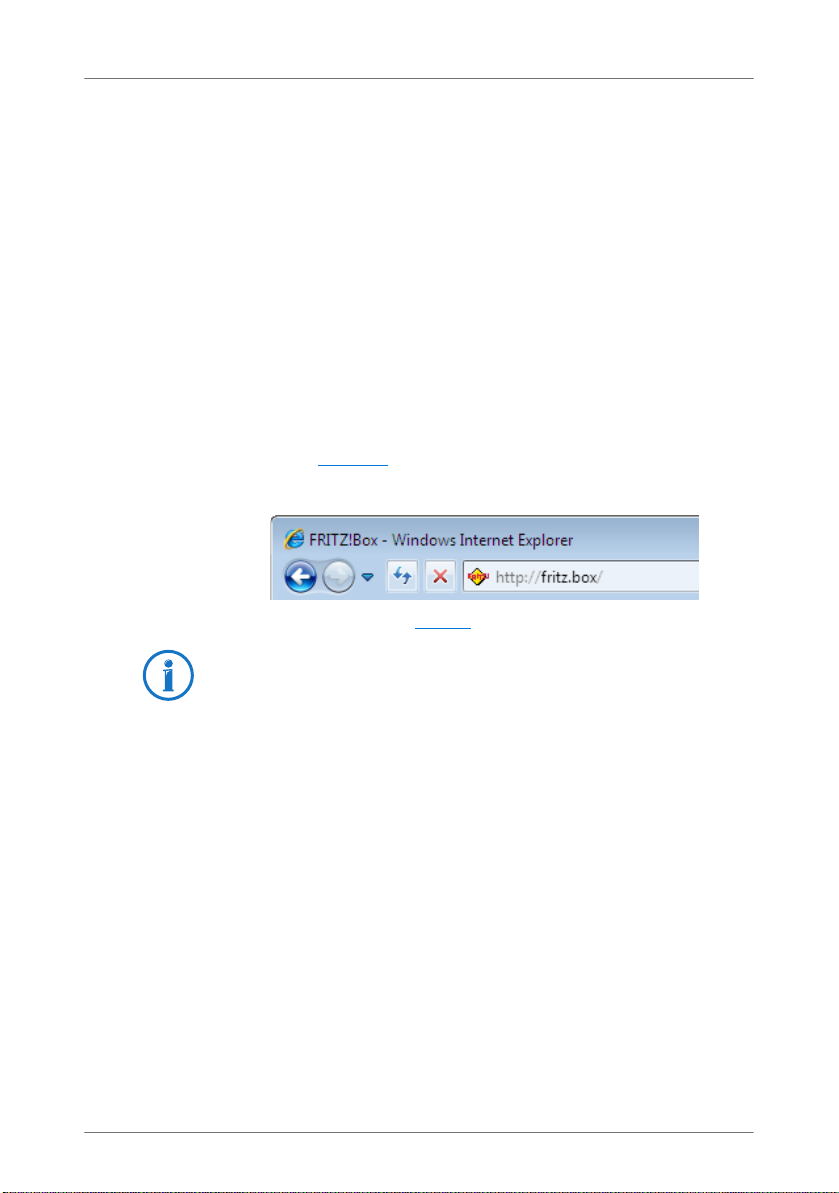
2. Enter fritz.box
in the address line of the browser.
The FRITZ!Box user interface opens.
Entering the address fritz.box in the browser
If the user interface does not open, see the instructions on
resolving errors in the section from page 108.
The Wizard: Opening the User Interface for the First Time
When you open the user interface for the first time, a wizard
starts to assist you in configuring the FRITZ!Box.
If you cancel the wizard, you can configure your FRITZ!Box
without this wizard. You can change the settings configured
with this wizard at any time.
For comprehensive information on configuring the many diverse functions of your FRITZ!Box, see the following chapters
in this manual.
30
Loading...