


 Loading...
FORD TRANSIT Owner's Manual

The information contained in this publication was correct at the time of going to print. In the interest of continuous development, we reserve the right to change specifications, design or equipment at any time without notice or obligation. No part of this publication may be reproduced, transmitted, stored in a retrieval system or translated into any language in any form by any means without our written permission. Errors and omissions excepted.
© Ford Motor Company 2013
All rights reserved.
Part Number: CG3527en 07/2012 20130121154218

Table of Contents
Introduction |
|
About This Manual........................................... |
7 |
Symbols Glossary............................................. |
7 |
Replacement Parts |
|
Recommendation........................................ |
8 |
Special Notices................................................. |
8 |
At a Glance |
|
At a Glance.......................................................... |
9 |
Occupant protection |
|
Principle of Operation................................... |
16 |
Fastening the seat belts................................ |
17 |
Seat belt height adjustment....................... |
18 |
Using seat belts during pregnancy........... |
19 |
Disabling the passenger airbag................. |
19 |
Keys and Remote Controls |
|
General Information on Radio |
|
Frequencies................................................... |
21 |
Programming the remote control............. |
21 |
Wipers and Washers |
|
Windscreen Wipers........................................ |
31 |
Autowipers......................................................... |
31 |
Windscreen Washers.................................... |
32 |
Rear Window Wiper and Washers........... |
32 |
Checking the Wiper Blades........................ |
33 |
Changing the Wiper Blades........................ |
33 |
Lighting |
|
Lighting Control.............................................. |
34 |
Daytime Running Lamps............................. |
35 |
Autolamps........................................................ |
35 |
Front Fog Lamps............................................ |
35 |
Rear Fog Lamps.............................................. |
36 |
Headlamp Levelling...................................... |
36 |
Hazard Warning Flashers............................ |
36 |
Direction Indicators....................................... |
36 |
Interior Lamps.................................................. |
37 |
Stepwell Lamps............................................. |
38 |
Changing a Bulb............................................. |
38 |
Bulb Specification Chart............................. |
46 |
Locks |
|
Locking and Unlocking................................. |
22 |
Engine immobiliser |
|
Principle of Operation.................................. |
26 |
Coded keys....................................................... |
26 |
Arming the engine immobiliser................ |
26 |
Disarming the engine immobiliser........... |
26 |
Alarm |
|
Principle of Operation................................... |
27 |
Arming the alarm............................................ |
27 |
Disarming the alarm..................................... |
28 |
Steering Wheel |
|
Audio Control................................................... |
29 |
Voice Control................................................... |
30 |
Windows and Mirrors |
|
Power Windows............................................. |
48 |
Exterior Mirrors................................................ |
48 |
Electric exterior mirrors................................ |
48 |
Sliding Windows............................................ |
49 |
Rear Quarter Windows................................ |
49 |
Instrument Cluster |
|
Gauges............................................................... |
50 |
Warning Lamps and Indicators................. |
52 |
Audible Warnings and Indicators............. |
56 |
Information Displays |
|
General Information...................................... |
57 |
Information Messages................................. |
59 |
Personalised Settings.................................. |
62 |
1
Transit (TT9) Vehicles Built From: 26-09-2011, Vehicles Built Up To: 31-12-2013

Table of Contents
Climate Control |
|
Principle of Operation.................................. |
65 |
Air Vents............................................................ |
65 |
Manual Climate Control.............................. |
66 |
Heated Windows and Mirrors................... |
68 |
Auxiliary Heater.............................................. |
68 |
Seats |
|
Sitting in the Correct Position.................... |
72 |
Front Seats........................................................ |
72 |
Rear Seats......................................................... |
74 |
Head Restraints............................................... |
75 |
Heated Seats................................................... |
76 |
Convenience features |
|
Clock.................................................................... |
77 |
Ticket Holders.................................................. |
77 |
Cigar Lighter...................................................... |
77 |
Ashtray............................................................... |
78 |
Auxiliary Power Points.................................. |
78 |
Cup Holders...................................................... |
78 |
Storage compartments............................... |
79 |
Bottle Holder.................................................... |
79 |
Floor Mats........................................................ |
80 |
Auxiliary Input Socket.................................. |
80 |
USB Port........................................................... |
80 |
Fuel and Refuelling |
|
Safety Precautions........................................ |
86 |
Fuel Quality - Petrol...................................... |
86 |
Fuel Quality - Diesel..................................... |
86 |
Catalytic Converter....................................... |
86 |
Fuel filler flap................................................... |
87 |
Refuelling.......................................................... |
87 |
Fuel Consumption......................................... |
88 |
Technical Specifications............................. |
88 |
Transmission |
|
Manual Transmission................................... |
93 |
All-Wheel Drive............................................... |
93 |
Brakes |
|
Principle of Operation.................................. |
94 |
Hints on Driving With Anti-Lock |
|
Brakes............................................................ |
94 |
Parking Brake................................................... |
94 |
Stability Control |
|
Principle of Operation.................................. |
95 |
Using Stability Control................................. |
95 |
Traction Control |
|
Principle of Operation................................... |
97 |
Using Traction Control.................................. |
97 |
Starting and Stopping the |
|
Hill Start Assist |
|
Engine |
|
|
|
General Information....................................... |
81 |
Principle of Operation.................................. |
98 |
Ignition Switch................................................. |
81 |
Using hill start assist.................................... |
98 |
Starting a Petrol Engine................................ |
81 |
Parking Aids |
|
Starting a Diesel Engine.............................. |
82 |
|
|
Diesel Particulate Filter................................ |
82 |
Principle of Operation................................ |
100 |
Switching Off the Engine............................ |
83 |
Parking Aid..................................................... |
100 |
Start-Stop |
|
Rear view camera |
|
Principle of Operation.................................. |
84 |
Principle of Operation................................. |
101 |
Using start-stop............................................. |
84 |
Rear View Camera........................................ |
101 |
|
|
2 |
|
Transit (TT9) Vehicles Built From: 26-09-2011, Vehicles Built Up To: 31-12-2013

Table of Contents
Cruise Control |
|
Principle of Operation................................ |
104 |
Using Cruise Control................................... |
104 |
Automatic speed limiter |
|
(ASL) |
|
Principle of Operation................................ |
106 |
Load Carrying |
|
General Information.................................... |
107 |
Load Retaining Fixtures.............................. |
107 |
Roof Racks and Load Carriers................. |
109 |
Towing |
|
Towing a Trailer.............................................. |
110 |
Driving Hints |
|
Running-In......................................................... |
111 |
Reduced Engine Performance................... |
111 |
Cold Weather Precautions.......................... |
111 |
Roadside Emergencies |
|
First Aid Kit....................................................... |
112 |
Warning Triangle............................................ |
112 |
Emergency Exit............................................... |
112 |
Status after a collision |
|
Fuel Shutoff..................................................... |
113 |
Fuses |
|
Fuse Box Locations....................................... |
114 |
Changing a Fuse............................................ |
116 |
Fuse Specification Chart............................ |
116 |
Vehicle recovery |
|
Towing Points................................................. |
125 |
Towing the Vehicle on Four Wheels...... |
125 |
Towing the Vehicle on Four Wheels - |
|
Vehicles With: AWD................................. |
126 |
3
Maintenance |
|
General Information..................................... |
127 |
Opening and Closing the Bonnet............ |
127 |
Under Bonnet Overview - 2.3L |
|
Duratec-HE (MI4).................................... |
128 |
Under Bonnet Overview - 2.2L |
|
Duratorq-TDCi (Puma) Diesel............ |
129 |
Under Bonnet Overview - 2.2L |
|
Duratorq-TDCi (Puma) Diesel/2.4L |
|
Duratorq-TDCi (Puma) Diesel/3.2L |
|
Duratorq-TDCi (Puma) Diesel.............. |
131 |
Engine Oil Dipstick - 2.3L Duratec-HE |
|
(MI4).............................................................. |
132 |
Engine Oil Dipstick - 2.2L Duratorq-TDCi |
|
(Puma) Diesel............................................ |
132 |
Engine Oil Dipstick - 2.4L Duratorq-TDCi |
|
(Puma) Diesel/3.2L Duratorq-TDCi |
|
(Puma) Diesel............................................ |
132 |
Engine Oil Check........................................... |
132 |
Engine Coolant Check................................. |
133 |
Brake and Clutch Fluid Check.................. |
134 |
Power Steering Fluid Check...................... |
134 |
Draining the Fuel Filter Water Trap........ |
134 |
Washer Fluid Check..................................... |
135 |
Technical Specifications............................ |
135 |
Vehicle Care |
|
Cleaning the Exterior................................... |
139 |
Cleaning the Interior.................................... |
140 |
Repairing Minor Paint Damage............... |
140 |
Vehicle battery |
|
Jump-Starting the Vehicle......................... |
141 |
Battery care..................................................... |
142 |
Changing the 12V Battery.......................... |
142 |
Battery connection points......................... |
142 |
Child Safety |
|
Child Seats...................................................... |
144 |
Child Seat Positioning................................ |
145 |
Booster Seats................................................. |
147 |
Transit (TT9) Vehicles Built From: 26-09-2011, Vehicles Built Up To: 31-12-2013

Table of Contents
ISOFIX Anchor Points................................. |
148 |
Child Safety Locks....................................... |
148 |
Wheels and Tyres |
|
General Information.................................... |
150 |
Changing a Road Wheel............................ |
150 |
Temporary Mobility Kit................................ |
157 |
Tyre Care......................................................... |
160 |
Using Winter Tyres........................................ |
161 |
Using Snow Chains....................................... |
161 |
Technical Specifications............................ |
162 |
Vehicle identification |
|
Vehicle Identification Plate........................ |
171 |
Vehicle Identification Number.................. |
171 |
Balance/fade control.................................. |
187 |
Audio menu control..................................... |
187 |
Station preset buttons............................... |
189 |
Waveband button........................................ |
189 |
Autostore control......................................... |
189 |
Traffic information control....................... |
190 |
Station tuning control.................................. |
191 |
Audio unit menus |
|
Automatic volume control........................ |
193 |
Digital signal processing (DSP).............. |
193 |
Audio distortion reduction (CLIP).......... |
193 |
Alternative frequencies.............................. |
194 |
Regional mode (REG)................................ |
194 |
News broadcasts.......................................... |
195 |
Capacities and Specific- |
|
ations |
|
Technical Specifications............................ |
172 |
Audio introduction |
|
Important audio information................... |
180 |
Audio unit overview |
|
Audio unit overview...................................... |
181 |
Audio System Security |
|
Security code................................................. |
185 |
Lost security code........................................ |
185 |
Entering a security code............................ |
185 |
Incorrect security code............................... |
185 |
Compact Disc Player |
|
Loading compact discs.............................. |
196 |
Track selection.............................................. |
196 |
Compact disc playback.............................. |
197 |
Compact disc selection.............................. |
197 |
Fast forward/reverse................................... |
197 |
Shuffle/random............................................. |
197 |
Compact disc track compression.......... |
198 |
Compact disc track scanning.................. |
198 |
Ejecting compact discs.............................. |
198 |
Repeat compact disc tracks.................... |
199 |
MP3 file playback......................................... |
199 |
MP3 display options................................... |
199 |
Ending compact disc playback............. |
200 |
Ejecting multiple compact discs .......... |
200 |
Audio Unit Clock and Date |
|
Displays |
|
Setting the clock and date on the audio |
|
unit................................................................. |
186 |
Auxiliary input (AUX IN) |
|
socket |
|
Auxiliary input (AUX IN) socket.............. |
201 |
Audio unit operation |
Audio Troubleshooting |
|
|
Audio troubleshooting |
202 |
||
On/off control |
|||
187 |
|
||
Bass/treble control...................................... |
187 |
|
|
|
4 |
|
Transit (TT9) Vehicles Built From: 26-09-2011, Vehicles Built Up To: 31-12-2013

Table of Contents
Telephone |
|
General Information................................... |
204 |
Telephone setup.......................................... |
204 |
Bluetooth setup........................................... |
205 |
Telephone controls..................................... |
206 |
Using the telephone - Vehicles Without: |
|
Navigation System................................. |
206 |
Using the telephone - Vehicles With: |
|
Navigation System................................. |
209 |
Voice control |
|
Principle of Operation.................................. |
211 |
Using voice control........................................ |
211 |
Audio unit commands................................ |
212 |
Telephone commands................................ |
221 |
Connectivity |
|
General Information.................................... |
227 |
Connecting an external device............... |
228 |
Connecting an external device - Vehicles |
|
With: Bluetooth........................................ |
228 |
Using a USB device..................................... |
229 |
Using an iPod.................................................. |
231 |
Appendices |
|
Type approvals............................................. |
235 |
Electromagnetic compatibility............... |
235 |
5
Transit (TT9) Vehicles Built From: 26-09-2011, Vehicles Built Up To: 31-12-2013

6
Transit (TT9) Vehicles Built From: 26-09-2011, Vehicles Built Up To: 31-12-2013

Introduction
ABOUT THIS MANUAL
Thank you for choosing Ford. We recommend that you take some time to get to know your vehicle by reading this manual. The more that you know about it, the greater the safety and pleasure you will get from driving it.
WARNING
Always drive with due care and attention when using and operating the controls and features on your
vehicle.
Note: This manual describes product features and options available throughout the range, sometimes even before they are generally available. It may describe options not fitted to your vehicle.
Note: Some of the illustrations in this manual may be used for different models, so may appear different to your vehicle. However, the essential information in the illustrations is always correct.
Note: Always use and operate your vehicle in line with all applicable laws and regulations.
Note: Pass on this manual when selling your vehicle. It is an integral part of the vehicle.
This manual may qualify the location of a component as left-hand side or right-hand side. The side is determined when facing forward in the seat.
7
A Right-hand side
BLeft-hand side
Protecting the Environment
You must play your part in protecting the environment. Correct vehicle usage and the authorised disposal of waste, cleaning and lubrication materials are significant steps toward this aim.
SYMBOLS GLOSSARY
Symbols in this handbook
WARNING
You risk death or serious injury to yourself and others if you do not follow the instructions highlighted
by the warning symbol.
CAUTION
You risk damaging your vehicle if you do not follow the instructions highlighted by the caution symbol.
Symbols on your vehicle
Transit (TT9) Vehicles Built From: 26-09-2011, Vehicles Built Up To: 31-12-2013

Introduction
When you see these symbols, read and follow the relevant instructions in this handbook before touching or attempting adjustment of any kind.
REPLACEMENT PARTS
RECOMMENDATION
Your vehicle has been built to the highest standards using quality parts. We recommend that you demand the use of genuine Ford and Motorcraft parts whenever your vehicle requires scheduled maintenance or repair. You can clearly identify genuine Ford and Motorcraft parts by looking for the Ford, FoMoCo or Motorcraft branding on the parts or their packaging.
Scheduled Maintenance and
Mechanical Repairs
One of the best ways for you to make sure that your vehicle provides years of service is to have it maintained in line with our recommendations using parts that conform to the specifications detailed in this Owner’s Manual. Genuine Ford and Motorcraft parts meet or exceed these specifications.
Collision Repairs
We hope that you never experience a collision, but accidents do happen. Genuine Ford replacement collision parts meet our stringent requirements for fit, finish, structural integrity, corrosion protection and dent resistance. During vehicle
8
development we validate these parts deliver the intended level of protection as a whole system. A great way to know for sure you are getting this level of protection is to use genuine Ford replacement collision parts.
Warranty on Replacement Parts
Genuine Ford and Motorcraft replacement parts are the only replacement parts that benefit from a Ford Warranty. Damage caused to your vehicle as a result of the failure of non-Ford parts may not be covered by the Ford Warranty. For additional information, refer to the terms and conditions of the Ford Warranty.
SPECIAL NOTICES
If converting or modifying your Transit vehicle from production specification, refer to the Body and Equipment Mounting Manual (BEMM) at www.etis.ford.com/fordservice
Transit (TT9) Vehicles Built From: 26-09-2011, Vehicles Built Up To: 31-12-2013
At a Glance
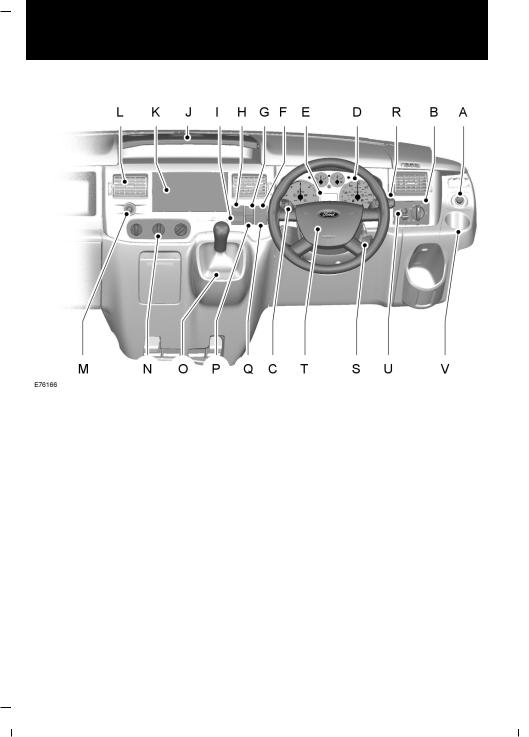
Instrument panel overview - left-hand drive
9
Transit (TT9) Vehicles Built From: 26-09-2011, Vehicles Built Up To: 31-12-2013
At a Glance
Instrument panel overview - right-hand drive
A Electric exterior mirror switch. See Electric exterior mirrors (page 48).
BLighting control. See Lighting Control (page 34).
CMultifunction lever. See DirectionIndicators (page 36). See LightingControl (page 34).
D Instrument cluster. See Gauges (page 50).
EInformation display. See Gauges (page 50).
FECO switch. See Start-Stop (page 84). See Automaticspeedlimiter(ASL)
(page 106).
GHazard warning flasher switch. See Hazard Warning Flashers (page 36).
HHeated windscreen switch. See Heated Windows and Mirrors (page 68).
IHeated rear window switch. Heated exterior mirrors switch. See Heated Windows and Mirrors (page 68).
J Tray with cup holders. See Cup Holders (page 78).
K Audio unit. See separate handbook.
LAir vents. See Air Vents (page 65).
10
Transit (TT9) Vehicles Built From: 26-09-2011, Vehicles Built Up To: 31-12-2013

At a Glance
MCigar lighter. See Cigar Lighter (page 77).
N Climate controls. See Climate Control (page 65).
OGear lever. See Manual Transmission (page 93).
PPassenger airbag deactivation warning lamp. See Disabling the passenger airbag (page 19).
QAll wheel drive (AWD) switch. See All-WheelDrive (page 93). Stability control (ESP) switch. See Stability Control (page 95).
R Wiper lever. See Wipers and Washers (page 31).
SIgnition switch.
THorn.
U Headlamp levelling control. See Headlamp Levelling (page 36).
VCup holder. See Cup Holders (page 78).
11
Transit (TT9) Vehicles Built From: 26-09-2011, Vehicles Built Up To: 31-12-2013
At a Glance
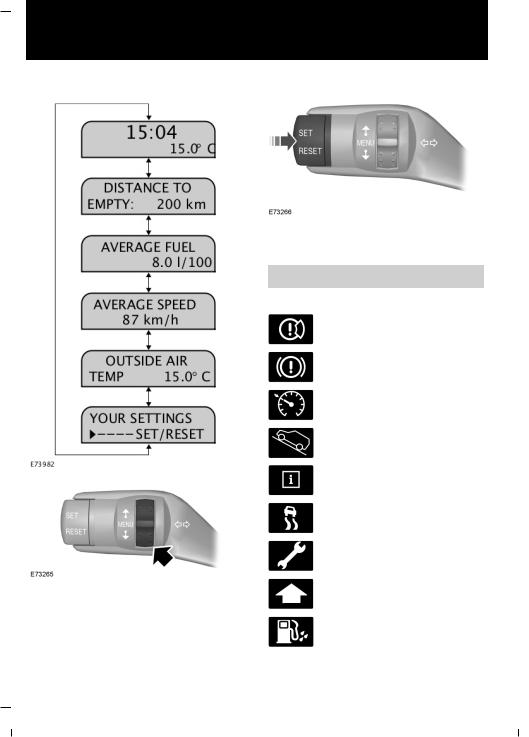
Information displays
Press the SETandRESET button to select a sub-menu or the item that you want to adjust.
See Information Displays (page 57).
Warning lamps and indicators
Brake pad wear warning lamp
Brake system warning lamp
Cruise control indicator
Hill start assist indicator
Message indicator lamp
Stability control (ESP) and traction control warning lamp
Service interval indicator lamp (vehicles with a diesel engine)
Shift indicator
Use the rotary control to scroll through the menu.
Water-in-fuel indicator lamp (vehicles with a diesel engine)
12
Transit (TT9) Vehicles Built From: 26-09-2011, Vehicles Built Up To: 31-12-2013
At a Glance
See Warning Lamps and Indicators
(page 52).
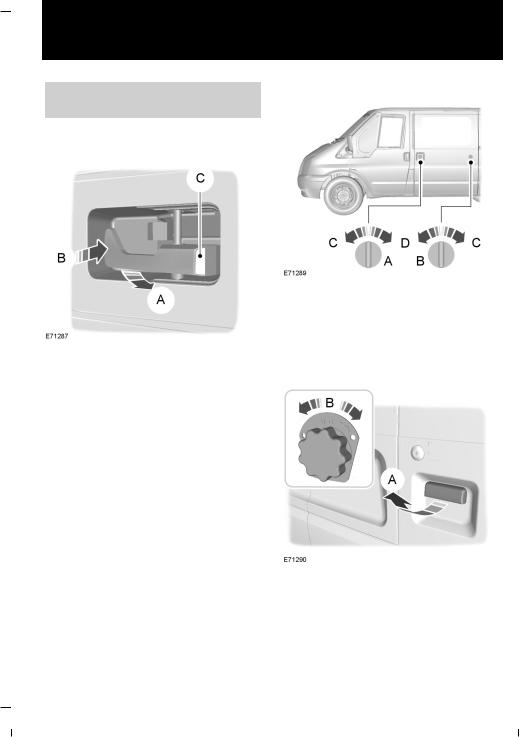
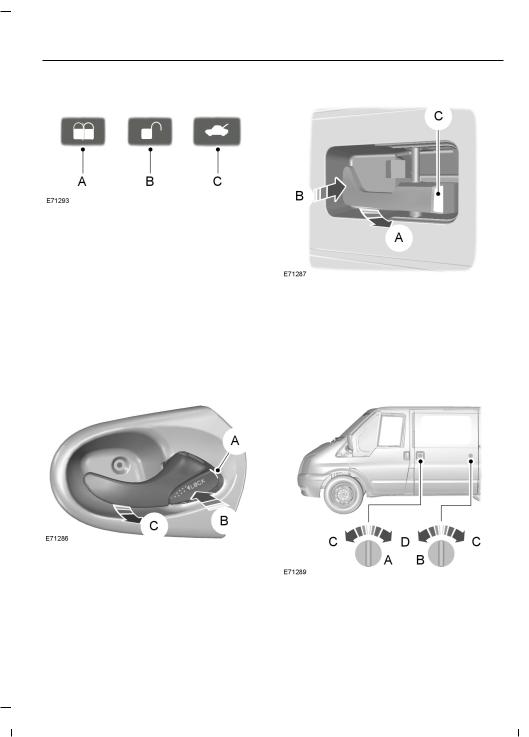
Locking and unlocking
Rear doors
AUnlock or open
BLock
CWhite visible, door locked
Sliding door
AVan and Kombi
BBus
C Lock
DUnlock
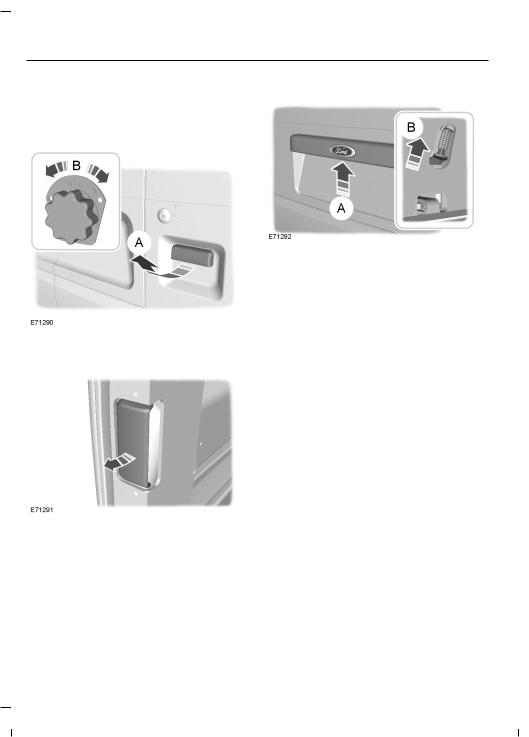
Double rear doors
A Outside
BInside
13
Transit (TT9) Vehicles Built From: 26-09-2011, Vehicles Built Up To: 31-12-2013

At a Glance
Tailgate
A Outside
BInside
Locking system operation
The locking system of your vehicle may have been configured to operate in one of three main lock operation combinations.
See Auxiliary Power Points (page 78).
Engine idle speed after starting
The engine may idle at a higher speed than normal immediately after starting from cold.
See Locking and Unlocking (page 22).
Auxiliary Power Points
WARNING
If used when the engine is not running, the battery will discharge. There may be insufficient power to
restart your engine.
See StartingandStoppingtheEngine
(page 81).
Manual transmission
Selecting reverse gear
On some vehicles it is necessary to raise the collar whilst selecting reverse gear.
See Manual Transmission (page 93).
14
Transit (TT9) Vehicles Built From: 26-09-2011, Vehicles Built Up To: 31-12-2013

At a Glance
Diesel particulate filter (DPF)
WARNING
Do not park or idle your vehicle over dry leaves, dry grass or other combustible materials. The DPF
regeneration process creates very high exhaust gas temperatures and the exhaust will radiate a considerable amount of heat during and after DPF regeneration, and after you have switched the engine off. This is a potential fire hazard.
See DieselParticulateFilter (page 82).
15
Transit (TT9) Vehicles Built From: 26-09-2011, Vehicles Built Up To: 31-12-2013
Occupant protection
PRINCIPLE OF OPERATION
Airbags
WARNINGS
Do not modify the front of your vehicle in any way. This could adversely affect deployment of the
airbags.
Original text according to ECE R94.01: Extreme Hazard! Do not use a rearward facing child restraint on
a seat protected by an air bag in front of it!
Wear a seat belt and keep sufficient distance between yourself and the steering wheel. Only when you use
the seat belt properly, can it hold you in a position that allows the airbag to achieve its optimum effect. See Sitting in the Correct Position (page 72).
Have repairs to the steering wheel, steering column, seats, airbags and seat belts carried out by properly
trained technicians.
Keep the areas in front of the airbags free from obstruction. Do not affix anything to or over the airbag covers.
Do not poke sharp objects into areas where airbags are fitted. This could damage and adversely affect
deployment of the airbags.
Use seat covers designed for seats with side airbags. Have these fitted by properly trained technicians.
Note: You will hear a loud bang and see a cloud of harmless powdery residue if an airbag deploys. This is normal.
Note: The front passenger airbag protects both positions of a double seat.
Note: Only wipe airbag covers with a damp cloth.
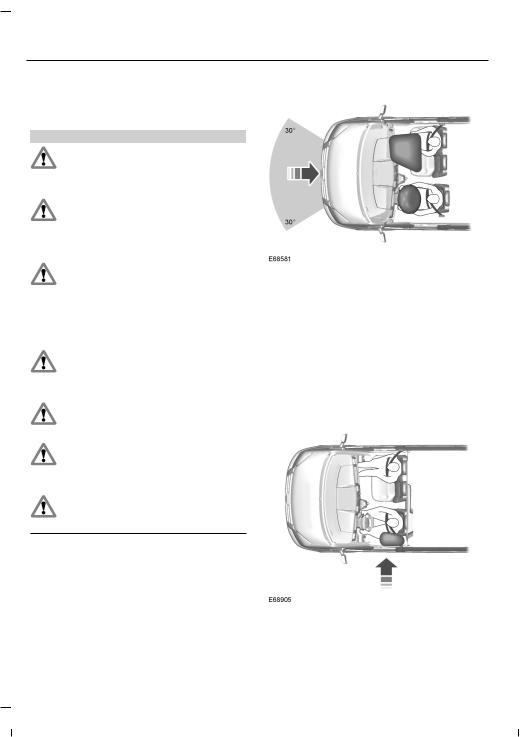
Driver and front passenger airbags
The driver and front passenger airbags will deploy during significant frontal collisions or collisions that are up to 30 degrees from the left or the right. The airbags will inflate within a few thousandths of a second and deflate on contact with the occupants, thus cushioning forward body movement. During minor frontal collisions, overturns, rear collisions and side collisions, the driver and front passenger airbags will not deploy.
Side airbags
Side airbags are fitted inside the seatback of the front seats. A label indicates that side airbags are fitted to your vehicle.
16
Transit (TT9) Vehicles Built From: 26-09-2011, Vehicles Built Up To: 31-12-2013
Occupant protection
The side airbags will deploy during significant lateral collisions. Only the airbag on the side affected by the collision will deploy. The airbags will inflate within a few thousandths of a second and deflate on contact with the occupants, thus providing protection for the head and rib areas. During minor lateral collisions, overturns, front collisions and rear collisions, the side airbags will not deploy.
Seat belts
WARNINGS
Wear a seat belt and keep sufficient distance between yourself and the steering wheel. Only when you use
the seat belt properly, can it hold you in a position to achieve its optimum effect. See
Sitting in the Correct Position (page 72).
 Use a seat belt for only one person.
Use the correct buckle for each seat belt.
Do not use a seat belt that is slack or twisted.
Do not wear thick clothing. The seat belt must fit tightly around your body to achieve its optimum effect.
Position the shoulder strap of the seat belt over the centre of your shoulder and position the lap strap
tightly across your hips.
Seat belt pretensioners have a lower deployment threshold than the airbags. During minor collisions, it is possible that only the seat belt pretensioner will deploy.
17
Status after a collision
WARNING
Seat belts subjected to strain, as a result of an accident, should be renewed and the anchorages
checked by a properly trained technician.
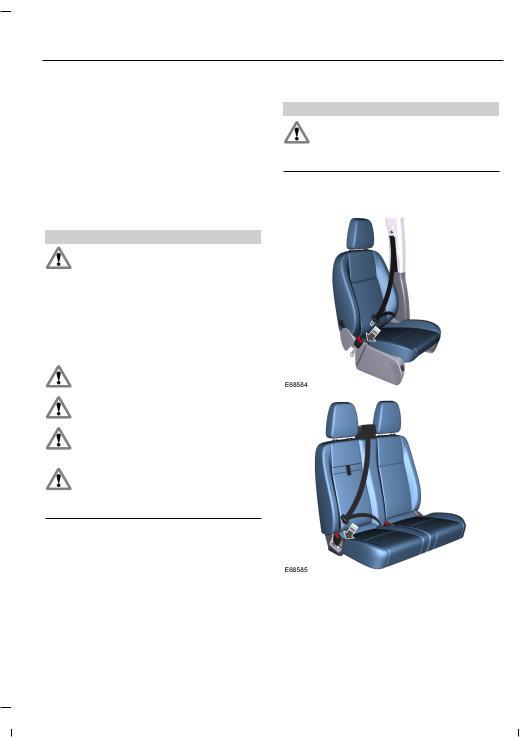
FASTENING THE SEAT BELTS
Transit (TT9) Vehicles Built From: 26-09-2011, Vehicles Built Up To: 31-12-2013
Occupant protection
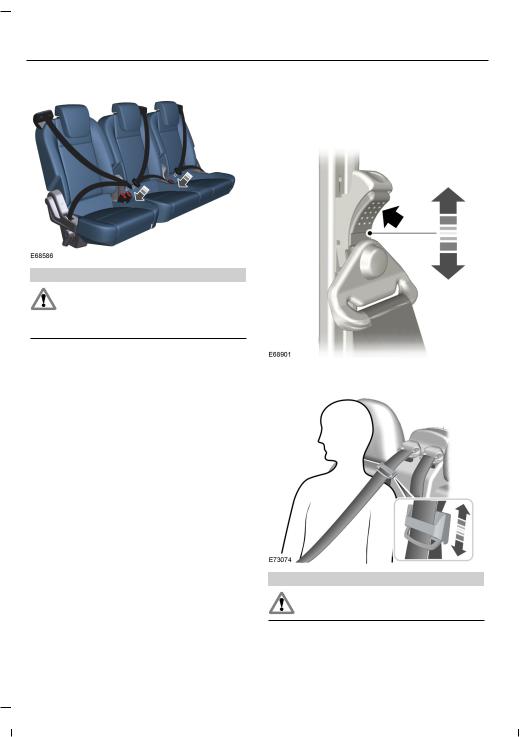
SEAT BELT HEIGHT ADJUSTMENT
Front seat belt
WARNING
Insert the tongue into the buckle until you hear a distinct click. You have not fastened the seat belt properly
if you do not hear a click.
Pull the seat belt out steadily. It may lock if you pull it sharply or if the vehicle is on a slope.
Press the red button on the buckle to release the seat belt. Let it retract completely and smoothly.
18
Rear seat belt
WARNING
Make sure that the seat belt runs smoothly through the guide.
Transit (TT9) Vehicles Built From: 26-09-2011, Vehicles Built Up To: 31-12-2013
Occupant protection
USING SEAT BELTS DURING PREGNANCY
WARNING
Position the seat belt correctly for your safety and that of your unborn child. Do not use only the lap strap
or the shoulder strap.
Position the lap strap comfortably across your hips and low beneath your pregnant abdomen. Position the shoulder strap between your breasts, above and to the side of your pregnant abdomen.
The key switch and the airbag deactivation lamp are located in the instrument panel.
If the airbag warning lamp in the instrument cluster illuminates intermittently, it means that there is a malfunction. Remove the child restraint from the front. Have the system checked by a suitably trained technician for your own safety. See Warning Lamps and Indicators (page 52).
Disabling the passenger airbag
DISABLING THE PASSENGER AIRBAG
WARNING
To avoid the risk of death or serious injury, NEVER use a rearward facing child restraint in the front, unless the
airbag is OFF.
To use a child restraint in the front, make sure that the key switch is turned to position A.
When you switch the ignition on, check that the passenger airbag deactivation warning lamp comes on. See At a Glance (page 9).
19
Transit (TT9) Vehicles Built From: 26-09-2011, Vehicles Built Up To: 31-12-2013

Occupant protection
Enabling the passenger airbag
WARNING
For the adult restraint system to perform as intended, make sure that the airbag is ON.
After removing the child restraint from the front, make sure that you turn the key switch to position B.
20
Transit (TT9) Vehicles Built From: 26-09-2011, Vehicles Built Up To: 31-12-2013
Keys and Remote Controls
GENERAL INFORMATION ON
RADIO FREQUENCIES
CAUTIONS
The radio frequency used by your remote control can also be used by other short distance radio
transmissions (e.g. amateur radios, medical equipment, wireless headphones, remote controls and alarm systems). If the frequencies are jammed, you will not be able to use your remote control. You can lock and unlock the doors with the key.
Check your vehicle is locked before leaving it unattended. This will safeguard against any potential
malicious frequency blocking.
Note: You could unlock the doors if you press the buttons on the remote control unintentionally.
The operating range between your remote control and your vehicle varies depending on the environment.
PROGRAMMINGTHEREMOTE
CONTROL
You can programme a maximum of eight remote controls to use with your vehicle (including any supplied with your vehicle). Ask your dealer for instructions.
21
Transit (TT9) Vehicles Built From: 26-09-2011, Vehicles Built Up To: 31-12-2013
Locks
LOCKING AND UNLOCKING
Double locking
WARNING
Do not activate double locking when persons or animals are inside the vehicle. You will not be able to
unlock the doors from the inside if you have double locked them.
Double locking is a theft protection feature that prevents someone from opening the doors from the inside. You can only double lock the doors if they are all closed. If you try to double lock the doors when a door is still open, you may hear a short tone from the horn and the locks will cycle. The door locks will return to their previous state.
If you have double locked the doors successfully, the direction indicators will flash twice. If the hazard warning flashers are on, the direction indicators will give two long flashes.
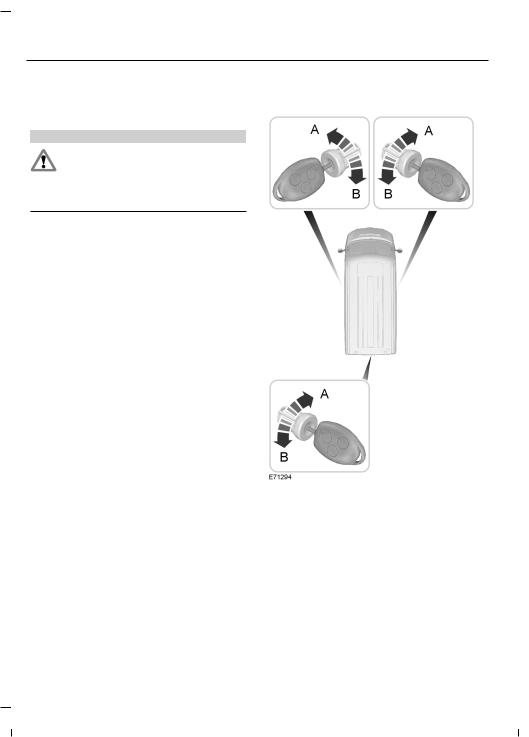
Locking and unlocking the doors with the key
A Unlock
BLock
Double locking the doors with the key
Turn the key to the unlock position and then to the lock position to double lock the doors.
22
Transit (TT9) Vehicles Built From: 26-09-2011, Vehicles Built Up To: 31-12-2013
Locks
Locking and unlocking the doors with the remote control
ALock
BUnlock
CCargo unlock
Press the appropriate button once.
Double locking the doors with the remote control
Press the lock button twice.
Locking and unlocking the doors with the handles
Front doors
AWhite mark
BLock
CUnlock
If you see the white mark, the door is locked.
Rear doors
AUnlock or open
BLock
CWhite mark
If you see the white mark, the door is locked.
Sliding door
A Van and Kombi
BBus
23
Transit (TT9) Vehicles Built From: 26-09-2011, Vehicles Built Up To: 31-12-2013
Locks
C Lock
DUnlock
Double rear doors
A Outside
BInside
Tailgate
A Outside
BInside
Access the release button through the aperture at the bottom of the tailgate.
Slam locking
Note: Do not leave your keys in the vehicle.
Note: You may hear a short tone from the horn if you try to lock the doors when a door is still open.
Slam locking allows you to lock a door with the key or remote control with the door open. The door will be locked when it is closed.
Automatic locking
Your vehicle has the capability for the doors to lock automatically when you exceed 8 km/h (5 mph). Your dealer can enable or disable this function if required. If this function is enabled, to unlock the rear or side load doors, switch the ignition off and use the key or remote control.
24
Transit (TT9) Vehicles Built From: 26-09-2011, Vehicles Built Up To: 31-12-2013

Locks
Automatic re-locking
The doors will re-lock automatically if you do not open a door within 45 seconds of unlocking the doors with the remote control. The door locks and the alarm will return to their previous state.
One-stage unlocking
Note: The direction indicators will flash once when you unlock the doors.
When enabled, the following features are available:
You will unlock all of the doors when you:
•Pull either interior handle (except if you have double locked the doors).
•Turn the key in either of the door locks.
•Press the unlock button on the remote control once.
•Press the cargo unlock button on the remote control once (Chassis Cab).
You will unlock the rear doors or tailgate and the sliding door if you press the cargo unlock button once.
Two-stage unlocking
Note: The direction indicators will flash once when you unlock the doors.
You will unlock the front doors when you:
•Pull either interior handle (except if you have double locked the doors).
•Turn the key in either of the door locks.
•Press the unlock button on the remote control once (Van, Bus and Kombi).
You will unlock the driver side door when you:
•Press the unlock button on the remote control once (Chassis Cab).
25
You will unlock the front doors, rear doors and loadspace doors when you:
•Turn the key in either of the front door locks twice within three seconds.
•Press the unlock button on the remote control twice within three seconds.
On Van vehicles, you will unlock the rear doors or tailgate and the sliding door if you press the cargo unlock button once.
On Chassis Cab vehicles, you will unlock the passenger side door if you press the cargo unlock button once.
Zone re-locking
The locks on Van, Bus and Kombi are split into two zones, cabin and cargo. Chassis Cab has only the cabin zone.
•Exit the vehicle and press the lock button.
•Press the unlock button or the cargo unlock button once to open the respective zone.
If you now open a door within the unlocked zone, the other doors in that zone will automatically lock.
Configurable unlocking
Configurable unlocking is set at the time of vehicle purchase and allows you to select which doors unlock when the unlock and cargo unlock buttons on the remote control are pressed once or twice. If you have this feature deactivated, it can not be reactivated. Ask your dealer for further information.
Transit (TT9) Vehicles Built From: 26-09-2011, Vehicles Built Up To: 31-12-2013

Engine immobiliser
PRINCIPLE OF OPERATION
The engine immobiliser is a theft protection system that prevents someone from starting the engine with an incorrectly coded key.
The indicator in the instrument cluster will come on for approximately three seconds and then go out. If the indicator stays on for one minute or flashes for approximately one minute and then repeatedly at irregular intervals, your key has not been recognised. Remove the key and try again.
CODED KEYS
Note: Do not shield your keys with metal objects. This may prevent the receiver from recognising your key as a valid one.
Note: Have all of your remaining keys erased and recoded if you lose a key. Ask your dealer for further information. Have replacement keys recoded together with your existing keys.
If you lose a key, you can obtain a replacement from your Ford Dealer. If possible, provide them with the key number from the tag provided with the original keys. You can also obtain additional keys from your Ford Dealer.
If you are unable to start the engine with a correctly coded key, this indicates a malfunction.Have the immobiliser checked immediately.
ARMING THE ENGINE
IMMOBILISER
The engine immobiliser is armed automatically a short time after you have switched the ignition off.
The indicator in the instrument cluster will flash to confirm that the system is operating.
DISARMING THE ENGINE IMMOBILISER
The engine immobiliser is disarmed automatically when you switch the ignition on with a correctly coded key.
26
Transit (TT9) Vehicles Built From: 26-09-2011, Vehicles Built Up To: 31-12-2013

Alarm
PRINCIPLE OF OPERATION
All vehicles
If the alarm is triggered, the alarm horns will sound for 30 seconds and the hazard warning flashers will flash for five minutes. If the cause of the alarm being triggered has been removed, the alarm will return to its previous armed state. If the cause has not been removed, the alarm horns will sound again.
Vehicles with a perimeter alarm
The perimeter alarm is a deterrent against unauthorised access to your vehicle through the doors and the bonnet. It also protects the audio unit and the trailer (if a Ford trailer-tow kit is fitted). You can fully arm or partially arm the alarm. Trailer detection is disabled when you have partially armed the alarm.
The perimeter alarm will be triggered if someone:
•opens a door
•opens the bonnet
•attempts to start the engine with an incorrectly coded key
•removes the audio unit
•disconnects the trailer electrical connector (if it was connected at the time the alarm was armed).
Vehicleswithacategoryonealarm
Note: False alarms can also be triggered by the auxiliary heater. See Auxiliary Heater (page 68). If you are using the auxiliary heater, direct the air flow towards the footwell.
The category one alarm is additional to the perimeter alarm. Ultrasonic interior motion detection protects your vehicle against unauthorised access to the passenger compartment and the cargo area. You can fully arm or partially arm the alarm. Trailer detection and interior motion detection are disabled when you have partially armed the alarm. Interior motion detection is not activated if you arm the alarm when a door is open.
The category one alarm will only function correctly if all windows are fully closed. Keep the area in front of the motion sensors free from obstruction.
The category one alarm is triggered if:
•motion is detected in the passenger compartment or cargo area
•someone attempts to access the cargo area through the rear door or tailgate window.
ARMING THE ALARM
Perimeter alarm
The alarm is armed 20 seconds after you have locked the doors. This delay allows you to close any doors or the bonnet without triggering the alarm.
Partial arming
Lock the doors with the key. See Locking and Unlocking (page 22).
Full arming
Lock the doors with the remote control or double lock the doors with the key or the remote control. See Locking and Unlocking (page 22).
27
Transit (TT9) Vehicles Built From: 26-09-2011, Vehicles Built Up To: 31-12-2013

Alarm
Category one alarm
Partial arming
Lock the doors with the key. See Locking and Unlocking (page 22).
Full arming
Note: Do not fully arm the alarm if someone is inside the vehicle.
Lock the doors with the remote control or double lock the doors with the key or the remote control. See Locking and Unlocking (page 22).
DISARMING THE ALARM
Perimeter alarm
Disarm and silence the alarm by unlocking the doors with the key, switching the ignition on with a correctly coded key or unlocking the doors with the remote control. See Locking and Unlocking
(page 22).
Category one alarm
Disarm and silence the alarm by unlocking the doors with the key in the driver’s door and switching the ignition on with a correctly coded key within 12 seconds or unlocking the doors with the remote control. See Locking and Unlocking
(page 22).
28
Transit (TT9) Vehicles Built From: 26-09-2011, Vehicles Built Up To: 31-12-2013
Loading...