

Page 1

®
PETROL LAWNMOWER FBM 450 A1
PETROL LAWNMOWER
Translation of the original instructions
IAN 270733
BENZIN-RASENMÄHER
Originalbetriebsanleitung
Page 2

Before reading, unfold the page containing the illustrations and familiarise yourself with all functions of the
device.
Klappen Sie vor dem Lesen die Seite mit den Abbildungen aus und machen Sie sich anschließend mit allen
Funktionen des Gerätes vertraut.
GB / IE Translation of the original instructions Page 5
DE / AT / CH Originalbetriebsanleitung Seite 25
Page 3
27
1
2
3
4
1
44
5
6
6
7
8 9 10
11
13
12
14
15
161718
19
21
20
22
24
23
25
26
21
21
25
25
Page 4

19
2
7
7
3
3
22
20
23
23a
2820
30
31
2
1
32
29
Page 5

5
GB IE
Content
Introduction .................................6
Intended Use ................................6
General Description ......................6
Delivery Contents ............................. 6
Summary ........................................ 7
Functional Description .......................7
Safety Equipment ............................. 7
Technical Specications ................8
Symbols and icons .......................8
Symbols on the device ..................... 8
Symbols in the manual ...................... 9
Safety Instructions......................10
Initial Operation .........................12
Mounting grip rod .......................... 13
Fitting the starter cord ..................... 13
Installing the Grass Collection Box ... 13
Filling with Engine Oil and Checking
the Oil Level .................................. 14
Filling with Petrol ............................ 14
Operation .................................. 14
Starting and Stopping the Engine ..... 15
Mowing ........................................ 15
Working Instructions ..................15
General Working Instructions .......... 15
Setting the Cutting Height................ 16
Emptying the Grass Collection Box ... 16
Cleaning and Maintenance ......... 16
Cleaning and General Maintenance
Work ............................................ 16
Cleaning/Replacing the Air Filter ..... 17
Maintaining the Spark Plug ............. 17
Changing the Engine Oil ................ 17
Checking/Sharpening/Replacing the
Blade ........................................... 18
Adjusting the Carburettor ................ 18
Storage ......................................18
General Storage Instructions ............ 18
Fold up device ............................... 18
Storage during the winter break ....... 18
Disposal/Environmental
Protection ..................................19
Maintenance Intervals ................20
Replacement parts/Accessories ..21
Troubleshooting .........................22
Guarantee .................................23
Repair Service ............................ 24
Service-Center ............................ 24
Importer .................................... 24
Translation of the original EC
declaration of conformity ........... 47
Exploded Drawing .....................49
Page 6

6
GB IE
Introduction
Congratulations on the purchase of your
new device. With it, you have chosen a
high quality product.
During production, this equipment has been
checked for quality and subjected to a nal
inspection. The functionality of your equipment is therefore guaranteed.
The operating instructions constitute
part of this product. They contain
important information on safety, use
and disposal.
Before initial use, please read
these operating instructions and the
Briggs & Stratton instruction manual
carefully in order to avoid incorrect
handling.
Use the product only as described
and for the applications specied.
Keep this manual safely and in the
event that the product is passed on,
hand over all documents to the third
party.
Intended Use
The equipment is intended only for mowing
lawns and grass areas in domestic use.
This equipment is not suitable for commercial use. Commercial use will invalidate the
guarantee.
Any use other than specically permitted in
these instructions may result in damage to
the equipment and represent a serious risk
to the user.
The equipment is intended for use by
adults. Children or other people who are
unfamiliar with the operating instructions
must not use the equipment.
The operator or user is responsible for accidents or damage to other persons or their
property.
General Description
The illustration of the princi-
pal functioning parts can be
found on the front and back
foldout pages.
Delivery Contents
Carefully unpack the appliance and check
that it is complete. Dispose of the packaging material correctly.
- Petrol lawn mower (already mounted)
- Grass collection box
- Cable clamp
- Spare spark plug
- Spark plug wrench
- Quick guide
- Operating instructions
- Briggs & Stratton operating instructions
- Briggs & Stratton dealer list
Page 7

7
GB IE
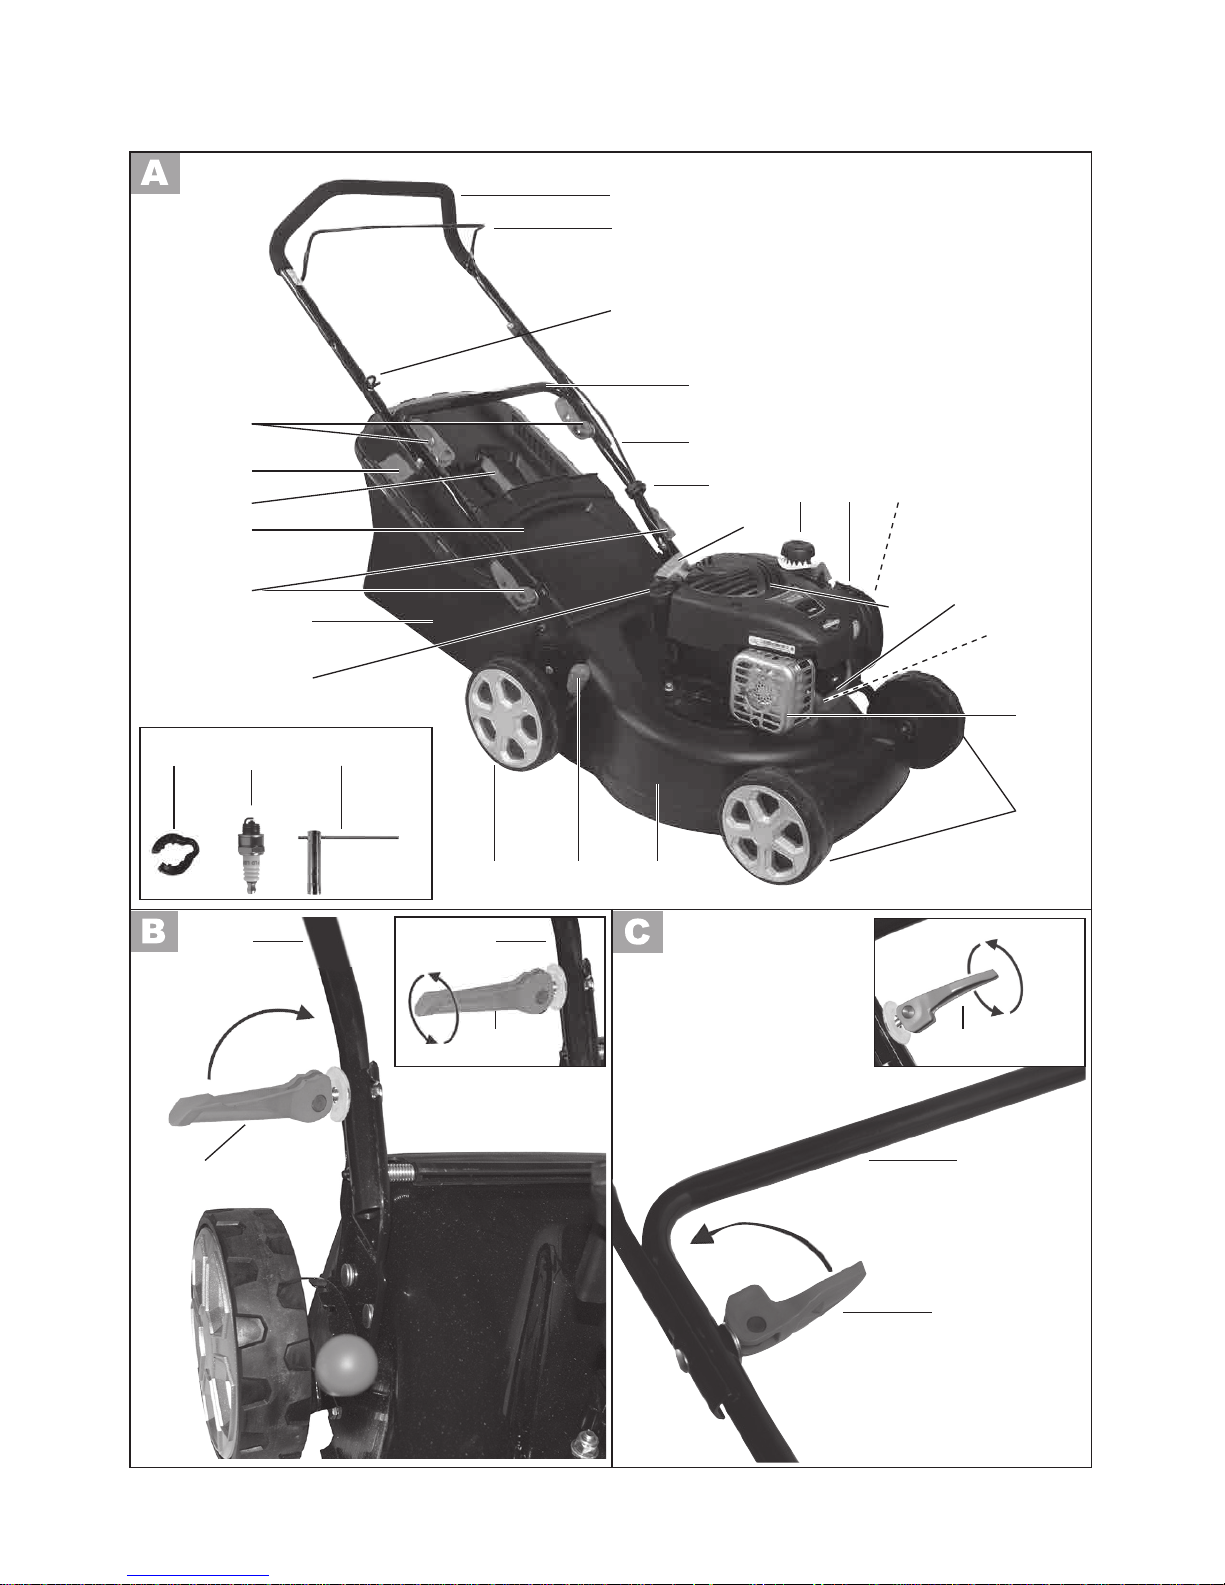
Summary
1 Upper handle bar
2 Safety catch
3 Starter cord guide
4 Bottom handle
5 Bowden cable
6 Cable clamp
7 Starter handle with starter cord
8 Filler cap
9 Air lter box
10 Air lter (no illustration)
11 Engine cover with ventilation
holes (nger protection)
12 Spark plug connector
13 Spark plug (no illustration)
14 Exhaust guard
15 2 front wheels
16 Steel plate housing
17 Lever for cutting height adjust-
ment
18 2 rear wheels
19 Oil ller cap with dipstick
20 Grass collection box
21 2 quick-release levers on bottom
handle
22 Rear impact protection
23 Grass collection box carrying
handle
24 Fill level indicator
25 2 quick-release levers on upper
grip handle
26 Spare spark plug
27 Spark plug wrench
28 Plastic straps catcher
29 Grass catcher rod
30 Grass collector hanger bracket
31 Filler plugs
32 Bar slot
33 Cut height position
Functional Description
The equipment is driven by a powerful
four-stroke engine (Briggs & Stratton 450E
Series).
The device is equipped with a high quality
steel plate housing, a grass catcher and a
foldable grip handle.
Refer to the following descriptions for a
functional description of the controls.
Safety Equipment
2 Safety catch
The equipment stops when the
safety catch is released.
14 Exhaust guard
prevents hands or combustible
materials from coming into contact with a hot exhaust.
22 Rear and side impact pro-
tection
protect the operator from parts
that are ung out and from accidentally touching the blades
when mowing with no grass collection box.
Page 8
8
GB IE
Technical Specications
Engine .............. 4-stroke B&S 450 E Series
Engine size .......................... 125 cm
3
(cc)
Power input ................1.82 kW (2,47 HP)
Blade rotation speed (n
0
).. max. 2900 min
-1
Blade torque .................................45 Nm
Petrol tank volume ............................ 0.8 l
Octane rating ................................ 95-98
Engine oil tank volume ...................... 0.5 l
Spark plug ................Champion QC12YC
Cutting circle ........................... ø 420 mm
Cutting height... 5-stage, 25-37-50-62-75 mm
Grass collection box volume ............... 45 l
Weight (inc. collection box,
with an empty tank) .........................24 kg
Sound pressure level
(L
PA) .................... 81.9 dB(A); K=3.0 dB
Sound power level (L
WA)
measured ............ 93.4 dB(A); K=3.0 dB
guaranteed ............................ 96 dB(A)
Vibration at the handle
(a
h)..................... 8.0 m/s
2
; K=1.5 m/s
2
Noise and vibration values have been
determined according to the standards and
regulations mentioned in the declaration of
conformity.
Technical and optical changes can be
carried out in the course of further development without notice. All dimensions, references and information of this instruction
manual are therefore without guarantee.
Legal claims, which are made on the basis
of the instruction manual, cannot thus be
considered as valid.
The stated vibration emission value was
measured in accordance with a standard
testing procedure and may be used to compare one power tool to another.
The stated vibration emission value may
also be used for a preliminary exposure
assessment.
Warning:
The vibration emission value may
differ during actual use of the
power tool from the stated value depending on the manner in which the
power tool is used.
Safety precautions aimed at protecting the user should be based on
estimated exposure under actual
usage conditions (all parts of the operating cycle are to be considered,
including, for example, times during
which the power tool is turned off
and times when the tool is turned on
but is running idle).
Symbols and icons
Symbols on the device
Attention!
Read the instruction manual.
Risk of injury from parts being
ung out.
Keep bystanders away from the
equipment.
Risk of injury from sharp blades.
Keep feet and hands away.
Caution – toxic fumes!
Do not operate the equipment in
enclosed areas.
Caution – petrol is ammable!
Do not smoke and keep away from
heat sources.
Page 9

9
GB IE
Caution – hot surfaces!
Risk of burning.
Symbol on petrol pump:
Press petrol pump (primer) 3x be-
fore the start.
Symbol on grip handle:
Information
on starting
and stopping
the motor
0
I
ON
OFF
Switch device on (ON):
Pull up safety loop.
Switch device off (OFF):
Release safety loop.
Fill Level Indicator:
GO
STOP
Fill level indicator open:
Grass collection box empty
STOP
Fill level indicator closed:
Grass collection box full
Symbols in the manual
Warning symbols with in-
formation on damage and
injury prevention.
Instruction symbols (the instruction
is explained at the place of the exclamation mark) with information on
preventing damage.
Help symbols with information on
improving tool handling.
Do not expose the unit to humidity.
Do not work in the rain.
Caution! The lawnmower blade
continues to run after switching off.
Caution – risk of injury!
Before maintenance work,
switch off the engine and take
out the spark plug connector.
Caution – hot surfaces!
Risk of burning.
Caution – risk of injury!
Wear eye and ear protection.
dB
L
WA
Information of the acoustic power
level L
WA
in dB.
Symbols on the ller cap:
Note on the petrol ller
Do not fuel any E85-mixtures.
Caution! Before start-
ing, check the oil
level.
Symbols on the oil ller cap:
Note on the oil ller
Symbols on the Tank:
Attention!
Read the instruction manual.
Caution – petrol is ammable!
Allow the engine to cool for at least
2 min. before refuelling.
Caution – toxic CO fumes! Do not
operate the equipment in enclosed
areas.
Page 10

10
GB IE
Safety Instructions
This section deals with the basic safety procedures when working with the equipment.
WARNING! Read all of the safety
instructions and directions. Failure
to observe the safety instructions
and directions may result in electric
shock, re and/or serious injury.
Instructions:
• Read the operating instructions careful-
ly. Familiarise yourself with the controls
and with the correct use of the equipment.
• In case of uncertainties, allow yourself
to be given instruction concerning the
use of the device and prohibited operations.
• Pay attention, be aware of what you
are doing and take the utmost care
when working. Do not use the device
if you are tired or ill or you are under
the inuence of drugs, alcohol or other
medication. A moment of inattention
whilst using the device can result in serious injuries.
• This appliance is not intended for use
by persons with reduced physical, sensory or mental capabilities, or lack of
experience and knowledge, unless they
have been given supervision or instruction concerning use of the appliance by
a person responsible for their safety.
• Children should be supervised to en-
sure that they do not play with the appliance.
• Do not allow children or other people
who are unfamiliar with the operating
instructions to use the equipment. Local
regulations may set a minimum age for
the user.
• Do not mow whilst people – especially
children – or animals are nearby. If
distracted, you may lose control of the
equipment.
• The operator or user is responsible for
accidents or damage to other persons
or their property.
• Observe noise control and local regulations.
Preparatory Measures:
• When mowing, always wear slip restistant shoes and long trousers. Do not
mow barefoot or in light sandals. Loose
clothing, jewellery or long hair can
become caught in moving parts. Wearing suitable clothing reduces the risk of
injury.
• Check the area on which the equipment is to be used and remove all
objects (stones, sticks, wires, toy) that
could be caught and ung out.
• Warning: Petrol is highly ammable.
Fire or explosions can result in serious
burns:
- Keep petrol only in containers in-
tended for this purpose;
- Only refuel outdoors and do not
smoke whilst refuelling;
- Fill with petrol before starting the
engine. Do not open the ller cap or
rell with petrol whilst the engine is
running or the equipment is hot:
- If petrol is spilled, do not attempt to
start the engine. Instead, remove the
equipment from the surface on which
the petrol has been spilled. Avoid
any ignition attempt until the petrol
fumes have evaporated;
- For reasons of safety, replace petrol
and other ller caps in the event of
damage.
• Replace defective silencers.
Page 11

11
GB IE
• Before use, always carry out a visual
inspection to check whether the cutting
tools, mounting bolts and entire cutting
unit are worn or damaged. To avoid
imbalance, only replace worn or damaged tools and bolts in sets.
• Take care with equipment that has
several cutting tools, as the movement
of one blade may result in rotation of
other blades.
• Use only replacement parts and accessories supplied and recommended
by the manufacturer. The use of parts
from other manufacturers may result
in injuries and will result in immediate
invalidation of the guarantee.
Handling:
• Do not run the combustion engine in
enclosed spaces, in which dangerous
carbon monoxide can collect.
• Mow only in daylight or with good
articial lighting. An unlit working area
can result in accidents.
• If possible, avoid using the equipment
on wet grass.
• Always ensure secure positioning, par-
ticularly on hillsides, landlls, ditches or
dykes. This will give you better control
of the equipment in unexpected situations.
- Always work across the slope, never
upwards or downwards.
- Take particular care when changing
the direction of travel on the slope.
- Do not mow on excessively steep
slopes (max. 10°).
• Run the equipment only at walking
speed.
• Take particular care when turning the
equipment around or pulling it towards
you.
• Stop the cutting tool if the equipment
has to be tipped up for transportation
over a surface other than grass and
when moving the equipment from and
to the surface to be mown.
• Do not use the equipment with damaged safety equipment or guards or
with no safety equipment attached, e.g.
impact protection and/or grass catchers. This ensures that the equipment
remains safe.
• Do not change the engine regulator
setting and do not over-rev it. This may
damage the equipment.
• Before starting, the engine, disengage
all cutting tools and drives.
• Start or operate the start switch with
care and in accordance with the manu-
facturer’s instructions. Ensure sufcient
space between feet and the cutting
tool. Risk of injury.
• When starting or activating the engine,
do not tip the equipment unless the
equipment has to be lifted for this procedure. In this case, tip the equipment
only as far as is absolutely necessary
and lift only the side that is away from
the user.
• Do not start the engine when standing
in front of the ejection channel.
• Switch on the engine in accordance
with the instructions and only if your
feet are a safe distance away from the
cutting tools.
• Do not place hands or feet under rotating parts. Always keep away from the
ejection opening. A moment of carelessness when using the equipment may
result in serious injury.
• Do not leave or carry the equipment
when the engine is running.
• Switch off the engine, take out the
spark plug connector and ensure that
all moving parts are still:
- Before releasing blockages or remov-
ing obstructions in the ejection chan-
Page 12

12
GB IE
nel;
- Before checking, cleaning or working
on the equipment;
- If a foreign body is struck. Look for
damage to the equipment and carry
out the necessary repairs before restarting and working with the equipment;
- If the equipment starts to vibrate unusually strongly, an immediate check
is required.
• Switch off the engine, take out the
spark plug connector and ensure that
all moving parts are still:
- When leaving the equipment;
- Before refuelling;
• Close the throttle valve when stopping
the engine.
• Do not leave the equipment unattended
in the workplace.
• Do not work with equipment that is
damaged or incomplete or has been
converted without the approval of the
manufacturer.
Using machines for applications other
than those intended may result in dangerous situations.
• Do not work with the device if there
is a risk of lightning strike. Danger of
electric shock.
Maintenance and Storage:
• Ensure that all nuts, bolts and screws
are tightened rmly and the equipment
is in safe working condition. Many
accidents are caused by poorly maintained equipment.
• Do not keep the equipment with petrol
in the tank inside a building in which
petrol fumes could potentially come into
contact with open re or sparks.
• Allow the engine to cool before placing
the equipment in enclosed spaces. Risk
of re.
• To avoid the risk of re, keep the en-
gine, exhaust and area around the fuel
tank free of grass, leaves or leaking
grease (oil).
• Check the grass catcher regularly for
wear or loss of function.
• For reasons of safety, replace worn or
damaged parts. Replace defective silencers.
• If the fuel tank is to be drained, do this
outdoors.
• Handle your equipment with care. Keep
the tools sharp and clean to enable you
to work better and more safely. Follow
the maintenance directions.
• Do not attempt to repair the equipment
yourself unless you are trained to do so.
Any work not specied in these instructions is to be carried out only by customer service centres authorised by us.
• Keep the equipment in a dry place and
out of reach of children. Machines are
dangerous if used by inexperienced
people.
Initial Operation
Caution! Risk of injury from
rotating blades. Carry out
work on the equipment only
when the blade is switched
off and stationary.
Observe the Briggs & Stratton in-
struction manual supplied.
Before starting the device, you must
- remove all transport safety devices,
- fold up the grip rod and lock the quickrelease levers,
- ll in motor oil,
- ll in petrol,
- mount the grass catcher if necessary,
- set the cutting height if necessary.
Page 13

13
GB IE
Mounting grip rod
Make sure that the Bowden cable
(
5) is not crushed during the as-
sembly of the grip handle.
1. Fold the bottom handle (4) and
the upper grip handle (1) upwards.
2. Bring the bottom handle (4) into
the desired position and lock
the quick-release levers (21) by
pushing them in the direction of
the handle (4). The quick-release
lever should be facing upwards.
They must t the handle so that a
tensioning with medium force can
be carried out.
Otherwise, the quick-release le-
vers must be turned clockwise for
tensioning them or anti-clockwise
to loosen them.
3. The upper grip handle (1) has
two separate mounting holes.
Mount the grip handle at the
desired height onto the bottom
handle (4) with the aid of the
quick-release lever.
4. Lock the quick-release levers (25)
to the upper grip handle (1) as
described below 2.
5. Fasten the Bowden cable (
5) using a cable clamp ( 6) to
the bottom handle (
4).
Fitting the starter cord
1. Pull the safety bar (2) towards the
grip handle (1) and hold it in this
position.
2. Slowly pull the starter cord by
the starter handle (7) in the direction of the handlebar and hang
the starter cord in the starter cord
guide (3).
3. Release the safety catch (2).
Installing the Grass Collection
Box
Caution: Do not operate the
equipment with the grass collection box or impact protection installed incompletely.
Risk of injury!
Mounting the net
1. Put the plastic straps (28) on the
grass catcher (20) over the grass
catcher rod (29).
Fixing the Grass Collection
Box onto the Equipment:
2. Lift the rear impact protection
(22).
3. Hook the grass collection box
(20) into the mounting provided
for this (30) on the rear of the
equipment.
4. Hold the grass collection box
(20) by the carrying handle (23)
and hang it on the grass collector hanger (30) at the rear of the
device which is provided for this
purpose.
Dismantling the Grass Col-
lection Box:
5. Raise the impact protection (22)
and remove the grass collection
box (20) by the carrying handle
(23).
Page 14

14
GB IE
Filling with Engine Oil and
Checking the Oil Level
Place the equipment on a level
base.
1. Unscrew the oil ller cap and
dipstick (19) and pour oil into
the tank. The oil tank holds 0.5l
oil. Use brand oil (e.g. SAE 30).
2. To check the oil level, wipe the
dipstick (19) on a clean cloth
and replace it in the tank until it
stops.
3. After pulling it out, read off
the oil level on the dipstick.
The oil level should be in
the marked area between
the minimum and maximum
marks (maximum: 0.5 litres
of engine oil in the oil
tank).
4. Wipe off any spilt oil and
close the oil ller cap (19).
Check the oil level every time be-
fore mowing and add oil before the
lower marking point is reached.
Filling with Petrol
Warning! Petrol is ammable and
hazardous to health:
- Keep petrol in containers intended for
this purpose;
- Only refuel outdoors and never with the
engine running or when the machine is
hot;
- Open the ller cap carefully to allow
excess pressure to escape;
- Do not smoke whilst refuelling;
- Avoid skin contact and inhalation of
the fumes;
- Remove spilt petrol;
- Keep petrol away from sparks, open
ames and other ignition sources;
- Dispose of leftover petrol in an environmentally friendly way (see “Disposal /
Environmental Protection”).
- Do not use petrol/oil mixtures;
- Use normal or super unleaded
petrol;
- Only use clean, fresh petrol;
- Do not store petrol for longer
than one month, as its quality
deteriorates.
1. Unscrew the ller cap ( 8)
and pour in the petrol to the ller
plugs (31). Do not ll the tank
entirely, to allow the petrol room
to expand.
2. Wipe away petrol residues
around the ller cap and close
the ller cap.
Operation
A certain level of noise exposure
caused by this device is unavoidable. Rearrange noise-intensive works
to times approved and specied for
this purpose. Comply with the rest
periods and reduce the work period
down to the minimum. For your personal protection and the protection
of people near by, suitable hearing
protection must be worn.
Page 15

15
GB IE
Starting and Stopping the
Engine
Warning! Petrol is ammable.
Start the engine at least 3 m
away from the lling location. There is a risk of re.
Start the equipment on a sturdy,
level base, if possible not in long
grass. Ensure that the cutting tool
is touching neither objects nor the
ground.
For your safety: Stand behind the
device when starting it.
Check the petrol and oil levels regu-
larly (see “initial operation”) and
rell in time.
Cold start:
1. Press the petrol pump (32)
(primer) 3 x.
2. Pull the safety loop (2)
towards the grip handle
(1) and hold it.
3. Pull the starter handle (7).
4. If the motor starts slowly, release
the starter handle into the starter
rope-guide (3).
For a warm start it is not necessary
to press the primer (32).
If the primer is pressed too often,
too much petrol will enter the car-
burettor and the motor is difcult to
start.
Motor stop:
• Release the safety loop (2). The motor
switches off and the knife is braked.
Knife stopping device:
Regularly examine the knife stopping device:
Release the safety loop (2). The motor
switches off and the knife is braked. The
knife must stop within 7 seconds.
Mowing
1. Start the engine (see ).
2. Hold the grip handle (1) and the
safety loop (2) with both hands
while mowing.
Working Instructions
General Working Instructions
• As far as possible, mow the lawn when
it is dry in order to protect the turf.
• Set the cutting height such that the
equipment is not overloaded.
• Run the equipment at walking speed in
lines that are as straight as possible. For
uninterrupted mowing, the lines should
always overlap by a few centimetres.
• Do not move backwards.
• On slopes, always work across the
slope.
• If the blade comes into contact with
a foreign body, switch off the engine
immediately. Wait until the blade is
stationary and check the equipment for
damage. Restart work only if the equipment is undamaged.
• Switch off the equipment during longer
breaks and for transportation and wait
until the blade is stationary.
Page 16

16
GB IE
• Clean the equipment after each use, as
described in the “cleaning and maintenance“ chapter.
Setting the Cutting Height
The equipment has 5 positions for setting
the cutting height (25-37-50-62-75 mm):
1. Pull the lever (17) outwards and
push it to the desired position
(33).
2. Push the lever (17) back in.
The correct cutting height is around
30–45mm for an ornamental lawn and
around 40–65mm for a utility lawn.
Select a greater cutting height for
the rst cut of the season.
Emptying the Grass Collection Box
Fill Level Indicator:
The ll level indicator (
24) attached to
the side of the grass collection box (
20)
shows when the grass collection box is full.
GO
STOP
Fill level indicator open:
Grass collection box empty
STOP
Fill level indicator closed:
Grass collection box full
1. Stop the engine and wait until
the blade is stationary.
2. Lift the rear impact protection
(22) and remove the grass collection box (20).
3. To empty the grass collection box
(20) hold it by the carrying handle (23) and the lower handle
(23a) (see “Disposal/Environmental protection“). Reassemble
the grass collection box (20).
Cleaning and
Maintenance
Have any repair and mainte-
nance work not described in
these instructions carried out
by a specialist workshop. Use
only original Grizzly replacement parts. Risk of accidents!
Carry out maintenance and
cleaning work strictly with
the engine switched off and
spark plug connectors removed. Risk of injury!
Allow the equipment to cool
before any maintenance and
cleaning work. Elements of
the engine are hot. Risk of
burning!
Wear gloves when handling the
blade.
For cleaning and maintenance
work, also observe the Briggs &
Stratton instruction manual supplied.
We recommend contacting an au-
thorised Briggs & Stratton dealer for
maintenance work on the engine
(see Briggs & Stratton dealer list).
Cleaning and General Maintenance Work
Fold the upper handle bar (1) and
tilt the device back for cleaning and
maintenance jobs at the bottom
side so that the spark plug faces
upwards.
Page 17

17
GB IE
Make sure that a second person
holds the device because there is a
danger of tipping backwards.
Do not tilt the equipment sideways
or forwards. Operating uids could
leak out and the engine could be
damaged.
• Always keep the equipment clean. To
clean, use a toothbrush or cloth but no
corrosive cleaning agents or solvents.
Do not use water to clean the engine
as it could contaminate the fuel system.
• After mowing, remove plant remains
that are stuck to the equipment by using
a piece of wood or plastic. Clean the
vent holes (
11), ejection hole and
blade area especially. Do not use hard
or pointed objects, which could damage the equipment.
• Oil the wheels from time to time.
• Before each use, check the lawnmower
for obvious defects such as loose, worn
or damaged parts. Check that all nuts
bolts and screws are sitting rmly.
• Check covers and guards (
2,11,14,22) for damage and that they
are sitting correctly. Replace if necessary.
Cleaning/Replacing the Air
Filter
Do not operate the equipment
without the air lter otherwise dust
and dirt will get into the engine and
result in damage to the machine.
1. Remove the spark plugs connector (
12) (see “Maintaining
the Spark Plug”).
2. Open the air lter box (9) and
take out the air lter (10).
3. Clean the air lter (10) with soap
solution and let it dry. Put a few
drops of fresh engine oil into the
air lter.
4. To install, place the air lter (10)
in the air lter box (9) and re-
close it.
Maintaining the Spark Plug
A worn spark plug or a spark gap
that is too large will result in a reduction of engine performance.
1. Disconnect the spark plug connector (12) from the spark plug
(13) by simultaneously pulling
and turning.
2. Unscrew the spark plug (13)
anticlockwise using the enclosed
spark plug wrench (
27).
3. Check the spark gap using a
feeler gauge (available from
specialist shops). The spark gap
must be at least 0.7-0.8mm.
4. If necessary, adjust the gap by
carefully bending the ground
electrode on the spark plug.
5. Clean the spark plug with a wire
brush.
6. Insert the cleaned and adjusted
spark plug or replace a damaged spark plug with a new one
(recommended torque 20Nm,
determined with a torque
wrench) (see “Replacement
parts/Accessories“).
Changing the Engine Oil
Change the engine oil with the
petrol tank empty and the engine
warm.
Page 18

18
GB IE
• Change the engine oil for the
rst time after around 5 operating hours then every 50 operating hours or annually.
• Dispose of the used oil in an ecofriendly manner (see “Disposal/
Environmental protection“).
1. Remove the spark plug connector (
12) (see “Maintaining the Spark Plug”).
2. Open the oil tank cover (
19) and
pump out the motor oil with an oil
pump.
3. Rell with engine oil (see “Initial Operation”).
Checking/Sharpening/
Replacing the Blade
Only allow specialist companies to
install and dismantle the knife.
Wear gloves when handling the
blade.
• Take off the spark plug connector (
12) and check the blade for wear and
damage.
• Always have a blunt blade resharpened
by a specialist company, as an imbalance check can be carried out there.
• Always have a specialist workshop
change a damaged or imbalanced
blade.
Incorrect installation can re-
sult in serious injury.
Adjusting the Carburettor
The carburettor has been preset in the factory for optimum performance. If readjustments are required, have the adjustments
made by a specialist workshop.
Storage
General Storage Instructions
Do not store the equipment
with a full collection box. In
hot weather, the grass begins
to ferment when heat is gen-
erated. Risk of re.
• Clean and service the equipment before
storage.
• Allow the engine to cool before storing
the equipment in enclosed areas.
• Use suitable and authorised containers
for storing fuel.
• Keep the equipment in a dry place that
is protected from dust and out of reach
of children.
• Do not wrap the equipment in nylon
bags as damp and mould could form.
Fold up device
For space-saving storage the grip rod can
be folded twice.
1. Remove the grass catcher (20).
2. Hang out the starter cord (
7).
3. Open the quick clamping cable
levers (21/25) on the bottom handle (4) and the upper grip handle
(1).
4. Fold both handles down again.
The Bowden cable (5) must not be
jammed when you do this.
Storage during the winter
break
Non-observance of the storage
instructions may cause starting problems or permanent damage as a result of fuel residues in the carburettor.
Page 19

19
GB IE
• Start the engine and allow it to run until
it stops due to running out of petrol.
• Change the oil (see “changing the engine oil “).
• Preserve the engine:
- Unscrew the spark plug (
13) (see
“cleaning and maintenance“);
- Pour a tablespoon of engine oil
through the spark plug hole into the
engine compartment;
- Pull the starter cord (
7) slowly several times with the safety catch
(
2) pulled in order to distribute
the oil inside the engine;
- Screw the spark plug (
13) tight.
• Dispose of used oil and petrol residues
in an ecofriendly manner (see “Disposal/environmental protection“).
There is no need to drain the petrol
tank if a fuel stabiliser is added to
the petrol (see “replacement parts”
and Briggs & Stratton instruction
manual).
Disposal/Environmental
Protection
• Return the tool, accessories and packaging to a recycling centre when you
have nished with them.
- Carefully drain the petrol and oil
tanks and take your equipment to
a recycling centre. The plastic and
metal parts that are used can be
separated by type and thus recycled.
- Take used oil and petrol residues to a
disposal point and do not pour them
into the sewer system or down the
drain.
- Ask our Service-Center for details.
• Defective units returned to us will be
disposed of for free.
• Do not throw cut grass in the dustbin
but rather compost it or spread it under
bushes and trees as a mulch layer.
Page 20

20
GB IE
Maintenance Intervals
Regularly carry out the maintenance work listed in the “maintenance intervals” table.
Regular maintenance prolongs the life of the equipment. It also gives optimum cutting performance and avoids accidents.
Maintenance Work
(See “cleaning and maintenance“)
Before After
After 1
st
5 Hrs.
After
8Hrs.
After
50Hrs.
Annual
Work
Check and tighten screws, nuts
and bolts
Check the engine oil level/petrol
level and rell with engine oil/
petrol if required
Clean operating elements / the
area around the silencer
Clean the nger protection
b
Change the engine oil
Replace the air lter
a
Clean/adjust the spark plug
Replace the spark plug
Check the silencer and spark
catcher
b
Clean the air cooling system
a,b
a
Replace more often if there is a high level of dust or heavy dirt
b
See Briggs & Stratton instruction manual
Page 21

21
GB IE
Replacement parts/Accessories
Spare parts and accessories can be obtained at
www.grizzly-service.eu
If you do not have internet access, please contact the Service Centre (see “Service-Center”
page 24). Please have the order number and the B&S engine number (for spare parts for
the engine) mentioned below ready.
Pos. Pos. Description Order No.
Instruction Exploded
Manual Drawing
5 SET 5 Bowden cable 91103624
10 B&S air lter 91102800
15 SET 1 Front wheel 91103620
18 SET 2 Rear wheel 91103622
20 SET 3 Grass collection box 91103625
21/25 SET 4 Quick-release lever
with mounting accessories 91103623
26 Spare spark plug 91103626
SET 6 Blade/Blade support/Blade screw 91103621
B&S fuel stabiliser, 125ml 30230027
B&S engine oil, 500ml 30230026
B&S Maintenance set (air lter,
engine oil, spark plug 91102802
Replacement parts and accessories for the engine (e.g. air lters and spark plugs) can
also be ordered directly from Briggs & Stratton.
If further spare parts should be necessary, please nd the part number on the exploded
drawing.
Page 22

22
GB IE
Troubleshooting
Problem Possible Cause Fault Correction
Engine does not
start
Too little petrol in the tank Fill with petrol
Incorrect starting sequence
Follow the instructions for starting the engine (see ”operation“)
Spark plug connector (
12)
not put on correctly
Sooted spark plug
Attach the spark plug connector
Clean, adjust or replace the spark plug
(see “cleaning and maintenance“)
Incorrectly adjusted carburettor
mix
Have the carburettor adjusted by a specialist workshop
Engine starts but
equipment does
not run at full
power
Dirty air lter (
10)
Replace the air lter (see “cleaning and
maintenance“)
Incorrectly adjusted carburettor
mix
Have the carburettor adjusted by a specialist workshop
Engine splutters,
stops
Incorrectly adjusted carburettor
mix
Have the carburettor adjusted by a specialist workshop
Sooted spark plug (
13)
Clean, adjust or replace the spark plugs
(see “cleaning and maintenance“)
Engine overheats
Ventilation holes (
11)
blocked
Clean the ventilation slot
Incorrect spark plug (
13) Change the spark plug
Too little engine oil in the engine Fill with engine oil (see “initial operation”)
Engine smokes
Dirty air lter (
10)
Replace the air lter (see “Cleaning and
Maintenance”)
Too little engine oil in the engine Fill with engine oil (see “initial operation”)
Output unsatisfactory or engine
labouring
Grass too short or too long
Change the cutting height (see “setting
the cutting height“)
Blade blunt
Have the blade sharpened or replaced
by a specialist workshop
Blade blocked with grass, grass
collection box full, ejection channel blocked
Remove the grass (see “cleaning and
maintenance“)
Blade does not
turn
Blade blocked with grass Remove the grass
Blade not installed correctly
Have the blade installed by a specialist
workshop
Abnormal noises,
rattling or vibrations
Blade not installed correctly
Have the blade installed by a specialist
workshop
Blade damaged
Page 23

23
GB IE
Guarantee
Dear Customer,
This equipment is provided with a 3-year
guarantee from the date of purchase.
Please note any different guarantee conditions for the motor and read the enclosed
operating instructions from motor manufacturer “Briggs & Stratton” carefully. This
guarantee does not affect your legal guarantee rights.
In case of defects, you have statutory rights
against the seller of the product. These
statutory rights are not restricted by our
guarantee presented below.
Terms of Guarantee
The term of the guarantee begins on the
date of purchase. Please retain the original
receipt. This document is required as proof
of purchase.
If a material or manufacturing defect
occurs within three years of the date of
purchase of this product, we will repair or
replace – at our choice – the product for
you free of charge. This guarantee requires
the defective equipment and proof of purchase to be presented within the three-year
period with a brief written description of
what constitutes the defect and when it occurred.
If the defect is covered by our guarantee,
you will receive either the repaired product
or a new product. No new guarantee period begins on repair or replacement of the
product.
Guarantee Period and Statutory
Claims for Defects
The guarantee period is not extended by
the guarantee service. This also applies for
replaced or repaired parts. Any damages
and defects already present at the time of
purchase must be reported immediately after unpacking. Repairs arising after expiry
of the guarantee period are chargeable.
Guarantee Cover
The equipment has been carefully produced in accordance with strict quality
guidelines and conscientiously checked
prior to delivery.
The guarantee applies for all material and
manufacturing defects. This guarantee
does not extend to cover product parts that
are subject to normal wear and may therefore be considered as wearing parts (e.g.
cutting unit, carbon brush, air lter, starter
rope) or to cover damage to breakable
parts (e.g. switches).
This guarantee shall be invalid if the product has been damaged, used incorrectly or
not maintained. Precise adherence to all of
the instructions specied in the operating
manual is required for proper use of the
product. Intended uses and actions against
which the operating manual advises or
warns must be categorically avoided.
The product is designed only for private
and not commercial use. The guarantee
will be invalidated in case of misuse or
improper handling, use of force, or interventions not undertaken by our authorised
service branch.
Processing in Case of Guarantee
To ensure quick handling of you issue,
please follow the following directions:
• Please have the receipt and identication number (IAN 270733) ready as
proof of purchase for all enquiries.
• Please nd the item number on the rating plate.
• Should functional errors or other defects occur, please initially contact the
Page 24

24
GB IE
service department specied below by
telephone or by e-mail. You will then
receive further information on the processing of your complaint.
• After consultation with our customer
service, a product recorded as defective can be sent postage paid to the
service address communicated to you,
with the proof of purchase (receipt)
and specication of what constitutes
the defect and when it occurred. In order to avoid acceptance problems and
additional costs, please be sure to use
only the address communicated to you.
Ensure that the consignment is not sent
carriage forward or by bulky goods,
express or other special freight. Please
send the equipment inc. all accessories
supplied at the time of purchase and
ensure adequate, safe transport packaging.
Repair Service
For a charge, repairs not covered by the
guarantee can be carried out by our ser-
vice branch, which will be happy to issue
a cost estimate for you.
We can handle only equipment that has
been sent with adequate packaging and
postage.
Attention: Please send your equipment to
our service branch in clean condition and
with an indication of the defect.
Equipment sent carriage forward or by
bulky goods, express or other special
freight will not be accepted.
We will dispose of your defective devices
free of charge when you send them to us.
Service-Center
The responsible “Briggs & Stratton” service
is responsible for motor problems on your
lawn mower in accordance with the enclosed dealer list.
Service Great Britain
Tel.: 0871 5000 720
(£ 0.10/Min.)
E-Mail: grizzly@lidl.co.uk
IAN 270733
Service Ireland
Tel.: 1890 930 034
(0,08 EUR/Min., (peak))
(0,06 EUR/Min., (off peak))
E-Mail: grizzly@lidl.ie
IAN 270733
Importer
Please note that the following address is not
a service address. Please initially contact
the service centre specied above.
Grizzly Tools GmbH & Co. KG
Stockstädter Straße 20
63762 Großostheim
Germany
www.grizzly-service.eu
GB
IE
Page 25

25
DE AT CH
Inhalt
Einleitung ...................................26
Bestimmungsgemäße
Verwendung .............................. 26
Allgemeine Beschreibung ...........26
Lieferumfang.................................. 26
Übersicht ...................................... 27
Funktionsbeschreibung .................... 27
Schutzeinrichtungen ....................... 27
Technische Daten ........................28
Bildzeichen/Symbole ..................28
Bildzeichen auf dem Gerät .............. 28
Symbole in der Betriebsanleitung ..... 30
Sicherheitshinweise ....................30
Inbetriebnahme .........................33
Griffgestänge montieren ................. 33
Starterseil montieren ....................... 33
Grasfangkorb montieren/
demontieren .................................. 34
Motoröl einfüllen und Ölstand
kontrollieren ..................................34
Benzin einfüllen ............................. 34
Bedienung .................................35
Motor starten und stoppen .............. 35
Mähen .......................................... 36
Arbeitshinweise .........................36
Allgemeine Arbeitshinweise ............. 36
Schnitthöhe einstellen ..................... 36
Grasfangkorb entleeren ..................36
Reinigung und Wartung .............37
Reinigung und allgemeine
Wartungsarbeiten .......................... 37
Luftlter austauschen ...................... 38
Zündkerze warten .......................... 38
Motoröl wechseln ........................... 38
Messer prüfen/schleifen/
austauschen .................................. 39
Vergaser einstellen ......................... 39
Lagerung ...................................39
Allgemeine Lagerungshinweise ........ 39
Gerät zusammenklappen ................ 39
Lagerung während der
Winterpause ................................. 40
Entsorgung/Umweltschutz ..........40
Wartungsintervalle ....................41
Ersatzteile/Zubehör ...................42
Fehlersuche ................................ 43
Garantie ....................................44
Reparatur-Service ......................45
Service-Center ............................ 45
Importeur .................................. 45
Original EG-Konformitäts-
erklärung ...................................48
Explosionszeichnung .................. 49
Page 26

26
DE AT CH
Einleitung
Herzlichen Glückwunsch zum Kauf Ihres
neuen Gerätes. Sie haben sich damit für ein
hochwertiges Gerät entschieden.
Dieses Gerät wurde während der Produktion
auf Qualität geprüft und einer Endkontrolle
unterzogen. Die Funktionsfähigkeit Ihres Gerätes ist somit sichergestellt.
Die Betriebsanleitung ist Bestandteil
dieses Gerätes. Sie enthält wichtige
Hinweise für Sicherheit, Gebrauch
und Entsorgung. Bitte lesen Sie vor
der ersten Inbetriebnahme diese Betriebsanleitung und die Betriebsanleitung von Briggs & Stratton aufmerksam durch, um eine falsche Handhabung zu vermeiden. Machen Sie
sich vor der Benutzung des Gerätes
mit allen Bedien- und Sicherheitshinweisen vertraut. Benutzen Sie das
Gerät nur wie beschrieben und für
die angegebenen Einsatzbereiche.
Bewahren Sie die Betriebsanleitung
gut auf und händigen Sie alle Unterlagen bei Weitergabe des Gerätes
an Dritte mit aus.
Bestimmungsgemäße
Verwendung
Das Gerät ist nur für das Mähen von
Rasen- und Grasächen im häuslichen Bereich bestimmt. Dieses Gerät ist nicht zur
gewerblichen Nutzung geeignet. Bei gewerblichem Einsatz erlischt die Garantie.
Jede andere Verwendung, die in dieser
Betriebsanleitung nicht ausdrücklich zugelassen wird, kann zu Schäden am Gerät
führen und eine ernsthafte Gefahr für den
Benutzer darstellen.
Das Gerät ist zum Gebrauch durch Erwachsene bestimmt. Kinder sowie Personen, die
mit dieser Betriebsanleitung nicht vertraut
sind, dürfen das Gerät nicht benutzen.
Der Bediener oder Nutzer ist für Unfälle
oder Schäden an anderen Menschen oder
deren Eigentum verantwortlich.
Allgemeine
Beschreibung
Die Abbildung der wichtigsten
Funktionsteile nden Sie auf
der vorderen und hinteren Ausklappseite.
Lieferumfang
Nehmen Sie das Gerät vorsichtig aus der
Packung und prüfen Sie, ob die nachfolgenden Teile vollständig sind:
- Benzin-Rasenmäher (bereits montiert)
- Grasfangkorb
- Kabelklemme
- Ersatzzündkerze
- Zündkerzenschlüssel
- Kurzanleitung
- Betriebsanleitung
- Betriebsanleitung Briggs & Stratton
- Händlerliste Briggs & Stratton
Page 27

27
DE AT CH
Übersicht
1 Oberer Griffholm
2 Sicherheitsbügel
3 Starterseil-Führung
4 Unterer Holm
5 Bowdenzug
6 Kabelklemme
7 Startergriff mit Starterseil
8 Tankdeckel
9 Luftlterbox
10 Luftlter (nicht sichtbar)
11 Motorabdeckung mit Lüftungsöff-
nungen (Fingerschutz)
12 Zündkerzenstecker
13 Zündkerze (nicht sichtbar)
14 Auspuffschutz
15 2 Vorderräder
16 Stahlblechgehäuse
17 Hebel zur Schnitthöhen-
Einstellung
18 2 Hinterräder
19 Öltankkappe mit Ölmessstab
20 Grasfangkorb
21 2 Schnellspannhebel am unteren
Holm
22 Hinterer Prallschutz
23 Tragegriff Grasfangkorb
24 Füllstandsanzeige
25 2 Schnellspannhebel am oberen
Griffholm
26 Ersatzzündkerze
27 Zündkerzenschlüssel
28 Kunststoff-Laschen
29 Grasfangkorb-Gestänge
30 Grasfangkorb-Aufhängung
31 Einfüllstutzen
32 Benzinpumpe (Primer)
33 Position Schnitthöhe
Funktionsbeschreibung
Das Gerät wird mit einem leistungsfähigen
4-Takt-Motor (Briggs & Stratton 450 E Series) angetrieben.
Das Gerät ist mit einem hochwertigen
Stahlblechgehäuse, einem Grasfangkorb
und einem zusammenklappbaren Griffholm
ausgestattet.
Die Funktion der Bedienteile entnehmen Sie
bitte den nachfolgenden Beschreibungen.
Schutzeinrichtungen
2 Sicherheitsbügel
Bei Loslassen des Sicherheitsbügels stoppt das Gerät.
14 Auspuffschutz
verhindert, dass Hände oder
brennbare Materialien mit einem
heißen Auspuff in Kontakt kommen.
22 Hinterer Prallschutz
schützt die Bedienperson vor
weggeschleuderten Teilen und
vor unbeabsichtigter Messerberührung, wenn ohne Grasfangkorb gemäht wird.
Page 28

28
DE AT CH
Vorsicht!
Betriebsanleitung lesen.
Verletzungsgefahr durch wegge-
schleuderte Teile.
Umstehende Personen von dem
Gerät fernhalten.
Verletzungsgefahr durch scharfe
Messer!
Füße und Hände fernhalten.
Technische Daten
Motor ................. 4-Takt B&S 450 E Series
Motorhubraum .....................125 cm
3
(cc)
Leistungsaufnahme ......1,82 kW (2,47 PS)
Leerlaufdrehzahl (n
0
) ........max. 2900 min
-1
Anzugsdrehmoment Messer ........... 45 Nm
Volumen Benzintank ........................ 0,8 l
Oktanzahl .................................... 95-98
Volumen Motoröltank ....................... 0,5 l
Zündkerze ................ Champion QC12YC
Schnittkreis ............................
ø 420 mm
Schnitthöhe .... 5-stug, 25-37-50-62-75 mm
Volumen Grasfangkorb ..................... 45 l
Gewicht (inkl. Grasfangkorb,
mit leerem Tank) ............................. 24 kg
Schalldruckpegel
(L
PA) .................... 81,9 dB(A); K=3,0 dB
Schallleistungspegel (L
WA)
gemessen ............93,4 dB(A); K=3,0 dB
garantiert .............................. 96 dB(A)
Vibration am Handgriff
(a
h) .....................8,0 m/s
2
; K=1,5 m/s
2
Lärm- und Vibrationswerte wurden entsprechend den in der Konformitätserklärung
genannten Normen und Bestimmungen
ermittelt.
Technische und optische Veränderungen
können im Zuge der Weiterentwicklung
ohne Ankündigung vorgenommen werden.
Alle Maße, Hinweise und Angaben dieser
Betriebsanleitung sind deshalb ohne Gewähr. Rechtsansprüche, die aufgrund der
Betriebsanleitung gestellt werden, können
daher nicht geltend gemacht werden.
Der angegebene Schwingungsemissionswert ist nach einem genormten Prüfverfahren gemessen worden und kann zum
Vergleich eines Gerätes mit einem anderen
verwendet werden.
Der angegebene Schwingungsemissi-
onswert kann auch zu einer einleitenden
Einschätzung der Aussetzung verwendet
werden.
Warnung: Der Schwingungsemis-
sionswert kann sich während der
tatsächlichen Benutzung des Gerätes
von dem Angabewert unterscheiden,
abhängig von der Art und Weise, in
der das Gerät verwendet wird.
Es besteht die Notwendigkeit, Sicherheitsmaßnahmen zum Schutz
des Bedieners festzulegen, die
auf einer Abschätzung der Aussetzung während der tatsächlichen
Benutzungsbedingungen beruhen
(hierbei sind alle Anteile des Betriebszyklus zu berücksichtigen,
beispielsweise Zeiten, in denen das
Gerät abgeschaltet ist, und solche,
in denen es zwar eingeschaltet ist,
aber ohne Belastung läuft).
Bildzeichen/Symbole
Bildzeichen auf dem Gerät
Page 29

29
DE AT CH
Vorsicht - Giftige Dämpfe!
Gerät nicht in geschlossenen
Räumen betreiben.
Vorsicht - Benzin ist brennbar!
Nicht rauchen und Wärme quellen fernhalten.
Setzen Sie das Gerät nicht der
Feuchtigkeit aus. Arbeiten Sie
nicht bei Regen.
Achtung! Nachlauf des Rasenmä-
hermessers.
Vorsicht Verletzungsgefahr!
Vor Wartungsarbeiten Motor
ausschalten und Zündkerzenstecker ziehen.
Vorsicht - Heiße Flächen!
Verbrennungsgefahr.
Vorsicht Verletzungsgefahr!
Tragen Sie Augen- und
Gehörschutz.
dB
L
WA
Angabe des Schallleistungspegels
L
wa
in dB.
Bildzeichen Tankdeckel:
Hinweis auf Benzineinfüllstutzen
Kein E85-Gemisch tanken!
Vorsicht! Vor dem
Start Ölstand prüfen.
Bildzeichen an der Öltankkappe:
Hinweis auf Öleinfüllstutzen
Bildzeichen auf dem Benzintank:
Achtung!
Betriebsanleitung lesen
Vorsicht - Benzin ist brennbar!
Motor mind. 2 Min. abkühlen lassen, bevor aufgetankt wird.
Vorsicht - Giftige CO-Dämpfe! Gerät
nicht in geschlossenen Räumen betreiben.
Vorsicht - Heiße Flächen!
Verbrennungsgefahr.
Bildzeichen an der Benzinpumpe:
Benzinpumpe (Primer) vor dem
Start 3x drücken.
Bildzeichen am Griffholm:
Hinweise zum
Starten und
Stoppen des
Motors
0
I
ON
OFF
Gerät einschalten (ON):
Sicherheitsbügel heranziehen.
Gerät ausschalten (OFF):
Sicherheitsbügel loslassen.
Füllstandsanzeige:
GO
STOP
Füllstandsanzeige geöffnet:
Grasfangkorb leer
STOP
Füllstandsanzeige geschlossen:
Grasfangkorb gefüllt
Page 30

30
DE AT CH
Symbole in der Betriebsanleitung
Gefahrenzeichen mit Angaben
zur Verhütung von Personenoder Sachschäden.
Gebotszeichen (anstelle des Ausru-
fungszeichens ist das Gebot erläutert) mit Angaben zur Verhütung von
Schäden.
Hinweiszeichen mit Informationen
zum besseren Umgang mit dem Gerät.
Sicherheitshinweise
Dieser Abschnitt behandelt die grundlegenden Sicherheitsvorschriften bei der Arbeit
mit dem Gerät.
WARNUNG! Lesen Sie alle Sicher-
heitshinweise und Anweisungen.
Versäumnisse bei der Einhaltung der
Sicherheitshinweise und Anweisungen können Brand und/oder schwere Verletzungen verursachen.
Hinweise:
• Lesen Sie die Betriebsanleitung sorgfältig. Machen Sie sich mit den Einstellmöglichkeiten und dem richtigen
Gebrauch des Gerätes vertraut.
• Lassen Sie sich bei Unsicherheiten im
Gebrauch des Gerätes und über verbotene Betätigungen angemessen schulen.
• Seien Sie aufmerksam, achten Sie darauf, was Sie tun, und gehen Sie mit
Vernunft an die Arbeit. Benutzen Sie
das Gerät nicht, wenn Sie müde oder
krank sind oder unter dem Einuss von
Drogen, Alkohol oder Medikamenten
stehen. Ein Moment der Unachtsamkeit
beim Gebrauch des Gerätes kann zu
ernsthaften Verletzungen führen.
• Dieses Gerät ist nicht dafür bestimmt,
durch Personen mit eingeschränkten
physischen, sensorischen oder geistigen
Fähigkeiten oder mangels Erfahrung
und/oder mangels Wissen benutzt zu
werden; es sei denn, sie werden durch
eine für ihre Sicherheit zuständige Person beaufsichtigt oder erhalten von ihr
Anweisungen, wie das Gerät zu benutzen ist.
• Kinder müssen beaufsichtigt werden, um
sicherzustellen, dass sie nicht mit dem
Gerät spielen.
• Erlauben Sie niemals Kindern oder
anderen Personen, die die Betriebsanleitung nicht kennen, das Gerät zu benutzen. Örtliche Bestimmungen können das
Mindestalter des Benutzers festlegen.
• Mähen Sie niemals, während Personen,
besonders Kinder, oder Tiere in der
Nähe sind. Bei Ablenkung können Sie
die Kontrolle über das Gerät verlieren.
• Denken Sie daran, dass der Benutzer
für Unfälle mit anderen Personen oder
deren Eigentum verantwortlich ist.
• Beachten Sie den Lärmschutz und örtliche Vorschriften.
Vorbereitende Maßnahmen:
• Während des Mähens sind immer rutschfestes Schuhwerk und lange Hosen zu
tragen. Mähen Sie nicht barfüßig oder
in leichten Sandalen. Lockere Kleidung,
Schmuck oder lange Haare können von
sich bewegenden Teilen erfasst werden.
Das Tragen geeigneter Kleidung verringert das Risiko von Verletzungen.
• Überprüfen Sie das Gelände, auf dem
das Gerät eingesetzt wird und entfernen
Sie alle Gegenstände (z.B. Steine, Stöcke, Drähte, Spielzeug), die erfasst und
weggeschleudert werden können.
Page 31

31
DE AT CH
• Warnung: Benzin ist hochgradig entammbar. Feuer oder Explosionen können zu schweren Verbrennungen führen:
- bewahren Sie Benzin nur in den da-
für vorgesehenen Behältern auf;
- tanken Sie nur im Freien und rauchen
Sie nicht während des Einfüllvorgangs;
- Benzin ist vor dem Starten des Mo-
tors einzufüllen. Während der Motor
läuft oder bei heißem Gerät darf der
Tankdeckel nicht geöffnet oder Benzin
nachgefüllt werden.
- falls Benzin übergelaufen ist, darf
kein Versuch unternommen werden,
den Motor zu starten. Stattdessen ist
das Gerät von der benzinverschmutzten Fläche zu entfernen. Jeglicher
Zündversuch ist zu vermeiden, bis
sich die Benzindämpfe verüchtigt
haben;
- aus Sicherheitsgründen sind Ben-
zintank- und andere Tankdeckel bei
Beschädigung auszutauschen.
• Ersetzen Sie defekte Schalldämpfer.
• Vor dem Gebrauch ist immer durch
Sichtkontrolle zu prüfen, ob die
Schneidwerkzeuge, Befestigungsbolzen
und die gesamte Schneideinrichtung
abgenutzt oder beschädigt sind. Zur
Vermeidung einer Unwucht dürfen abgenutzte oder beschädigte Werkzeuge
und Bolzen nur satzweise ausgetauscht
werden.
• Seien Sie vorsichtig bei Geräten mit
mehreren Schneidwerkzeugen, da die
Bewegung eines Messers zur Rotation
der übrigen Messer führen kann.
• Benutzen Sie nur Ersatz- und Zubehörteile, die vom Hersteller geliefert und
empfohlen werden. Der Einsatz von
Fremdteilen kann zu Verletzungen führen und führt zum sofortigen Verlust des
Garantieanspruches.
Handhabung:
• Lassen Sie den Verbrennungsmotor nicht
in geschlossenen Räumen laufen, in
denen sich gefährliches Kohlenmonoxid
sammeln kann.
• Mähen Sie nur bei Tageslicht oder bei
guter künstlicher Beleuchtung. Ein unbeleuchteter Arbeitsbereich kann zu Unfällen führen.
• Vermeiden Sie, wenn möglich, den Einsatz des Gerätes bei nassem Gras.
• Achten Sie immer auf einen sicheren
Stand, besonders an Hängen, Müllhalden, Gräben oder Deichen. Dadurch
können Sie das Gerät in unerwarteten
Situationen besser kontrollieren.
- Arbeiten Sie immer quer zum Hang,
niemals auf- oder abwärts.
- Seien Sie besonders vorsichtig, wenn
Sie die Fahrtrichtung am Hang ändern.
- Mähen Sie nicht an übermäßig steilen
Hängen (maximal 10°).
• Führen Sie das Gerät nur im Schritttempo.
• Seien Sie besonders vorsichtig, wenn
Sie das Gerät umkehren oder es zu sich
heranziehen.
• Halten Sie das Schneidwerkzeug an,
wenn das Gerät gekippt werden muss,
zum Transport über andere Flächen als
Gras und wenn das Gerät von und zu
der zu mähenden Fläche bewegt wird.
• Benutzen Sie niemals das Gerät mit
beschädigten Schutzeinrichtungen oder
Schutzgittern oder ohne angebaute
Schutzeinrichtungen, z.B. Prallschutz
und/oder Grasfangeinrichtungen. Damit
wird sichergestellt, dass die Sicherheit
des Gerätes erhalten bleibt.
• Ändern Sie nicht die Reglereinstellung
des Motors oder überdrehen Sie ihn
nicht. Sie könnten das Gerät beschädigen.
Page 32

32
DE AT CH
• Bevor Sie den Motor starten, kuppeln
Sie alle Schneidwerkzeuge und Antriebe aus.
• Starten Sie das Gerät mit Vorsicht, entsprechend den Herstelleranweisungen.
Achten Sie auf ausreichenden Abstand
der Füße zu dem Schneidwerkzeug. Es
besteht Verletzungsgefahr.
• Beim Starten oder Anlassen des Motors
darf das Gerät nicht gekippt werden,
es sei denn, das Gerät muss bei dem
Vorgang angehoben werden. In diesem
Fall kippen Sie das Gerät nur so weit,
wie es unbedingt erforderlich ist und
heben Sie nur die vom Benutzer abgewandte Seite hoch.
• Starten Sie den Motor nicht, wenn Sie
vor der Auswurföffnung stehen.
• Schalten Sie den Motor nach Anweisung ein und nur dann, wenn Ihre Füße
in sicherem Abstand von den Schneidwerkzeugen sind.
• Führen Sie niemals Hände oder Füße an
oder unter sich drehende Teile. Halten
Sie sich immer entfernt von der Auswurföffnung. Ein Moment der Unachtsamkeit bei Benutzung des Gerätes
kann zu schweren Verletzungen führen.
• Heben oder tragen Sie niemals das Gerät mit laufendem Motor.
• Stellen Sie den Motor ab, ziehen Sie
den Zündkerzenstecker ab und vergewissern Sie sich, dass alle beweglichen
Teile still stehen:
- bevor Sie Blockierungen lösen oder
Verstopfungen in der Auswurföffnung
beseitigen;
- bevor Sie das Gerät überprüfen, rei-
nigen oder daran arbeiten;
- wenn ein Fremdkörper getroffen wur-
de. Suchen Sie nach Beschädigungen
am Gerät und führen Sie die erforderlichen Reparaturen durch, bevor
Sie erneut starten und mit dem Gerät
arbeiten;
- falls das Gerät anfängt, ungewöhnlich
stark zu vibrieren, ist eine sofortige
Überprüfung erforderlich.
• Stellen Sie den Motor ab, ziehen Sie
den Zündkerzenstecker ab und vergewissern Sie sich, dass alle beweglichen
Teile still stehen:
- wenn Sie das Gerät verlassen;
- bevor Sie nachtanken.
• Hinterlassen Sie das Gerät nie unbeaufsichtigt am Arbeitsplatz.
• Arbeiten Sie nicht mit einem beschädigten, unvollständigen oder ohne die
Zustimmung des Herstellers umgebauten
Gerät. Der Gebrauch von Geräten für
andere als die vorgesehenen Anwendungen kann zu gefährlichen Situationen
führen.
• Arbeiten Sie nicht mit dem Gerät bei
Blitzschlaggefahr. Gefahr durch elektrischen Schlag
Wartung und Lagerung:
• Sorgen Sie dafür, dass alle Muttern, Bolzen und Schrauben fest angezogen sind
und das Gerät in einem sicheren Arbeitszustand ist. Viele Unfälle haben ihre
Ursache in schlecht gewarteten Geräten.
• Bewahren Sie niemals das Gerät mit
Benzin im Benzintank innerhalb eines
Gebäudes auf, in dem möglicherweise
Benzindämpfe mit offenem Feuer oder
Funken in Berührung kommen können.
• Lassen Sie den Motor abkühlen, bevor
Sie das Gerät in geschlossenen Räumen
abstellen. Es besteht Brandgefahr.
• Um Brandgefahr zu vermeiden, halten
Sie Motor, Auspuff und den Bereich um
den Benzintank frei von Gras, Blättern
oder austretendem Fett (Motoröl).
• Prüfen Sie regelmäßig die Grasfangeinrichtung auf Verschleiß oder Verlust der
Funktionsfähigkeit.
Page 33

33
DE AT CH
• Ersetzen Sie aus Sicherheitsgründen
abgenutzte oder beschädigte Teile. Ersetzen Sie defekte Schalldämpfer.
• Falls der Benzintank zu entleeren ist,
sollte dies im Freien erfolgen.
• Behandeln Sie Ihr Gerät mit Sorgfalt.
Halten Sie die Werkzeuge scharf und
sauber, um besser und sicherer arbeiten
zu können. Befolgen Sie die Wartungsvorschriften.
• Versuchen Sie nicht, das Gerät selbst
zu reparieren, es sei denn, Sie besitzen
hierfür eine Ausbildung. Sämtliche
Arbeiten, die nicht in dieser Betriebsanleitung angegeben werden, dürfen
nur von Kundendienststellen ausgeführt
werden, die von uns ermächtigt sind.
• Bewahren Sie das Gerät an einem
trockenen Ort und außerhalb der Reichweite von Kindern auf. Geräte sind
gefährlich, wenn sie von unerfahrenen
Personen benutzt werden.
Inbetriebnahme
Vorsicht! Verletzungsgefahr
durch rotierendes Messer.
Nehmen Sie Arbeiten am Gerät nur bei abgeschaltetem
und stillstehendem Messer
vor.
Beachten Sie auch die mitgelieferte
Betriebsanleitung von Briggs&Stratton.
Bevor Sie das Gerät starten, müssen Sie
- alle Transportsicherungen entfernen,
- das Griffgestänge hochklappen und die
Schnellspannhebel verriegeln,
- Motoröl einfüllen,
- Benzin einfüllen,
- ggf. den Grasfangkorb montieren,
- ggf. die Schnitthöhe einstellen.
Griffgestänge montieren
Achten Sie darauf, dass bei der Mon-
tage des Griffholms der Bowdenzug
(
5) nicht gequetscht wird.
1. Klappen Sie den unteren Holm
(4) und den oberen Griffholm (1)
hoch.
2. Bringen Sie den unteren Holm (4)
in die gewünschte Position und
verriegeln Sie die Schnellspannhebel (21), indem Sie diese in
Richtung Holm (4) drücken Die
Schnellspannhebel müssen dabei
nach oben zeigen. Die Schnellspannhebel müssen so am Holm
anliegen, dass ein Spannen mit
mittlerer Kraft erfolgen kann.
Ansonsten muss der Schnell-
spannhebel zum Spannen im
Uhrzeigersinn gedreht werden
oder gegen den Uhrzeigersinn
gelockert werden.
3. Der obere Griffholm (1) besitzt
jeweils zwei Montagelöcher.
Montieren Sie den Griffholm mit
Hilfe der Schnellspannhebel in
der gewünschten Höhe am unteren Holm (4).
4. Verriegeln Sie die Schnellspannhebel (25) am oberen Griffholm
(1) wie unter 2. beschrieben.
5. Befestigen Sie den Bowdenzug
(
5) mit Hilfe der Kabelklemme
(
6) am unteren Holm (4).
Starterseil montieren
1. Ziehen Sie den Sicherheitsbügel
(2) in Richtung oberem Griffholm
(1) und halten Sie ihn.
2. Ziehen Sie langsam das Starterseil am Startergriff (7) in Richtung
Page 34

34
DE AT CH
Holm und hängen Sie das Starterseil in die Starterseil-Führung
(3) ein.
3. Lassen Sie den Sicherheitsbügel
(2) los.
Grasfangkorb montieren/
demontieren
Achtung: Gerät nicht ohne
vollständig angebrachten
Grasfangkorb oder ohne Prallschutz betreiben. Verletzungsgefahr!
Fangnetz montieren
1.
Stülpen Sie die Kunststoff-Laschen (28) am Grasfangkorb
(20) über das Grasfangk
orb-Ge-
stänge (29).
Grasfangkorb am Gerät
anbringen:
2. Heben Sie den hinteren Prallschutz (22) an.
3. Fassen Sie den Grasfangkorb
(20) am Tragegriff (23) und hängen Sie ihn in die dafür vorgesehene Grasfangkorb-Aufhängung
(30) an der Rückseite des Gerätes ein.
4. Legen Sie den Prallschutz (22)
ab, er hält den Grasfangkorb
(20) in Position.
Grasfangkorb demontieren:
5. Heben Sie den Prallschutz (22)
an und nehmen Sie den Grasfangkorb (20) am Tragegriff (23)
heraus.
Motoröl einfüllen und
Ölstand kontrollieren
Stellen Sie das Gerät auf ebenen
Boden.
1. Drehen Sie die Öltankkappe
mit Ölmessstab (19) ab und
füllen Sie Motoröl in den Öltank.
Der Öltank fasst 0,5l Motoröl.
Verwenden Sie Markenöl (z.B.
SAE31).
2. Zum Kontrollieren des Ölstands
wischen Sie den Ölmessstab (19)
mit einem sauberen Lappen ab
und setzen ihn wieder bis zum
Anschlag in den Öltank ein.
3. Lesen Sie nach dem
Herausziehen den Ölstand
am Ölmessstab ab.
Der Ölstand muss sich in
dem markierten Feld zwischen Minimum- und Maximummarke (Maximum: 0,5 l
Motoröl im Öltank) benden.
4. Wischen Sie eventuell verschüttetes Motoröl ab und schließen Sie
die Öltankkappe (19) wieder.
Prüfen Sie vor jedem Mähen den
Ölstand und füllen Sie vor Erreichen
des unteren Markierungspunktes Motoröl nach.
Benzin einfüllen
Warnung! Benzin ist entammbar,
gesundheits- und umweltschädlich:
- Benzin in dafür vorgesehenen Behältern
aufbewahren;
- Tanken nur im Freien und niemals bei
Page 35

35
DE AT CH
laufendem oder heißem Motor;
- Tankdeckel vorsichtig öffnen, damit sich
Überdruck abbauen kann;
- beim Tanken nicht rauchen;
- Hautkontakt und das Einatmen der
Dämpfe vermeiden;
- verschüttetes Benzin entfernen;
- Benzin von Funken, offenen Flammen
und anderen Zündquellen fernhalten.
- Benzinreste umweltgerecht entsorgen
(siehe „Entsorgung/Umweltschutz“).
- Verwenden Sie kein Benzin/
Öl-Gemisch.
- Verwenden Sie bleifreies Normaloder Superbenzin;
bei Einsatz von Bio-Kraftstoff darf
nicht mehr als 10% Ethanol beigemischt sein.
- Verwenden Sie nur sauberes, frisches Benzin.
- Lagern Sie Benzin nicht länger
als einen Monat, da sich seine
Qualität verschlechtert.
1. Schrauben Sie den Tankdeckel
(
8) ab und füllen Sie Benzin
bis zur Unterkante des Einfüllstutzens (31) ein. Füllen Sie den Benzintank nicht ganz voll, damit das
Benzin Platz zum Ausdehnen hat.
2. Wischen Sie um den Tankdeckel
Benzinreste ab und schließen Sie
den Tankdeckel wieder.
Bedienung
Eine gewisse Lärmbelastung durch
dieses Gerät ist nicht vermeidbar.
Verlegen Sie lärmintensive Arbeiten
auf zugelassene und dafür bestimmte Zeiten. Halten Sie sich ggf. an
Ruhezeiten und beschränken Sie die
Arbeitsdauer auf das Notwendigste.
Zu Ihrem persönlichen Schutz und
Schutz in der Nähe bendlicher Personen ist ein geeigneter Gehörschutz
zu tragen.
Motor starten und stoppen
Warnung! Benzin ist ent-
ammbar. Starten Sie den
Motor mindestens 3 m vom
Befüllungsort entfernt.
Es besteht Brandgefahr.
Starten Sie das Gerät auf festem, ebe-
nem Boden, möglichst nicht in hohem
Gras. Vergewissern Sie sich, dass
das Schneidwerkzeug weder Gegenstände noch den Boden berührt.
Zu Ihrer Sicherheit: Stehen Sie hinter
dem Gerät, wenn Sie es starten.
Kontrollieren Sie regelmäßig Benzin
und Ölstand (siehe „Inbetriebnahme“) und füllen Sie rechtzeitig nach.
Kaltstart:
1. Drücken Sie 3 x die
Benzinpumpe (32) (Primer).
2. Ziehen Sie den Sicherheitsbügel (2) in Richtung
Griffholm (1) und halten Sie ihn.
3. Ziehen Sie am Startergriff (7).
4. Wenn der Motor startet, lassen
Sie den Startergriff langsam in die
Starterseil-Führung (3) zurückgleiten.
Bei einem Warmstart ist das Drücken
des Primers (32) nicht notwendig.
Page 36

36
DE AT CH
Wenn der Primer zu oft gedrückt
wird, gelangt zu viel Benzin in den
Vergaser und der Motor ist schwierig
zu starten.
Motor-Stopp:
• Lassen Sie den Sicherheitsbügel (2) los.
Der Motor schaltet ab und das Messer
wird abgebremst.
Messerstoppvorrichtung:
Überprüfen Sie regelmäßig die Messerstoppvorrichtung:
Lassen Sie den Sicherheitsbügel (2) los. Der
Motor schaltet ab und das Messer wird abgebremst. Das Messer muss innerhalb von 7
Sekunden stoppen.
Mähen
1. Starten Sie den Motor
(siehe
).
2. Halten Sie den Griffholm (1) und
den Sicherheitsbügel (2) beim Mähen mit beiden Händen fest.
Arbeitshinweise
Allgemeine Arbeitshinweise
• Mähen Sie möglichst trockenen Rasen,
um die Grasnarbe zu schonen.
• Stellen Sie die Schnitthöhe so ein, dass
das Gerät nicht überlastet wird.
• Führen Sie das Gerät im Schritttempo in
möglichst geraden Bahnen. Für ein lückenloses Mähen sollten sich die Bahnen
immer um wenige Zentimeter überlappen.
• Bewegen Sie sich nicht rückwärts.
• Arbeiten Sie an Hängen immer quer
zum Hang.
• Sollten die Messer mit einem Fremdkör-
per in Berührung kommen, stellen Sie
den Motor sofort ab. Warten Sie den
Stillstand des Messers ab und prüfen
Sie das Gerät auf Beschädigungen.
Nehmen Sie die Arbeit nur bei einem
unbeschädigten Gerät wieder auf.
• Schalten Sie in längeren Arbeitspausen
und zum Transport das Gerät aus und
warten Sie den Stillstand des Messers ab.
• Reinigen Sie das Gerät nach jedem
Einsatz wie im Kapitel „Reinigung und
Wartung“ beschrieben.
Schnitthöhe einstellen
Das Gerät besitzt 5 Positionen zur Einstellung der Schnitthöhe (25-37-50-62-75 mm):
1. Ziehen Sie den Hebel (17) zur
Schnitthöheneinstellung nach
außen und verschieben Sie ihn in
die gewünschte Position (33).
2. Drücken Sie den Hebel (17) wieder nach innen.
Die richtige Schnitthöhe beträgt bei einem
Zierrasen etwa 30 - 45 mm, bei einem Nutzrasen etwa 40 - 65 mm.
Für den ersten Schnitt in der Saison
sollte eine hohe Schnitthöhe gewählt
werden.
Grasfangkorb entleeren
Füllstandsanzeige:
Durch die seitlich am Grasfangkorb (
20)
angebrachte Füllstandsanzeige (
24) se-
hen Sie, wann der Grasfangkorb gefüllt ist.
GO
STOP
Füllstandsanzeige geöffnet:
Grasfangkorb leer
STOP
Füllstandsanzeige geschlossen:
Grasfangkorb gefüllt
Page 37

37
DE AT CH
Die Füllstandsanzeige ( 24)
funktioniert nur, wenn das Gerät in
Betrieb ist.
1. Stoppen Sie den Motor und
warten Sie den Stillstand des
Messers ab.
2. Heben Sie den hinteren Prallschutz (22) an und nehmen Sie
den Grasfangkorb (20) heraus.
3. Zum Entleeren fassen Sie den
Grasfangkorb (20) am Tragegriff
(23) und am unteren Griff (23a)
(siehe auch „Entsorgung/Umweltschutz“). Montieren Sie den
Grasfangkorb wieder.
Reinigung und Wartung
Lassen Sie Instandsetzungsar-
beiten und Wartungsarbeiten,
die nicht in dieser Betriebsanleitung beschrieben sind, von
einer Fachwerkstatt durchführen. Benutzen Sie nur originale Grizzly-Ersatzteile. Es
besteht Unfallgefahr!
Führen Sie Wartungs- und
Reinigungsarbeiten grundsätzlich bei ausgeschaltetem
Motor und gezogenem Zündkerzenstecker durch. Es besteht Verletzungsgefahr!
Lassen Sie das Gerät vor allen
Wartungs- und Reinigungsarbeiten abkühlen. Elemente
des Motors sind heiß. Es besteht Verbrennungsgefahr!
Tragen Sie beim Umgang mit dem
Messer Handschuhe.
Beachten Sie für Reinigungs- und
Wartungsarbeiten auch die mitgelieferte Betriebsanleitung von Briggs &
Stratton.
Wir empfehlen, dass Sie sich für
Wartungsarbeiten am Motor an
einen Briggs & Stratton-Vertragshändler wenden (siehe beiliegende
Händlerliste).
Reinigung und allgemeine
Wartungsarbeiten
Für Reinigungs- und Wartungsarbei-
ten an der Geräteunterseite klappen
Sie den oberen Griffholm (1) ein
und kippen Sie das Gerät nur nach
hinten, sodass die Zündkerze nach
oben ragt.
Sorgen Sie dafür, dass eine zweite
Person das Gerät hält, da die Gefahr des Zurückkippens besteht.
Kippen Sie das Gerät nicht auf die
Seite oder nach vorne. Betriebsüssigkeiten können auslaufen und der
Motor kann beschäd
igt werden.
• Halten Sie das Gerät stets sauber. Ver
wenden Sie zum Reinigen eine Bürste
oder ein Tuch, aber k
eine scharfen Rei-
nigungs- oder Lösungsmittel.
Verwenden Sie zum Reinigen des Mo-
tors kein Wasser, es könnte die Kraftstoffanlage verunreinigen.
•
Entfernen Sie nach dem Mähen an-
haftende Panzenreste mit einem
Holz- oder Plastik
stück. Reinigen Sie
insbesondere die Lüftungsöffnungen
(
11), die Auswurföffnung und den
Messerbereich. Verwenden Sie keine
harten oder spitzen Gegenstände, diese könnten das Gerät beschädigen.
Page 38

38
DE AT CH
• Kontrollieren Sie das Gerät vor jedem
Gebrauch auf offensichtliche Mängel
wie lose, abgenutzte oder beschädigte
Teile. Prüfen Sie den festen Sitz aller
Muttern, Bolzen und Schrauben.
• Überprüfen Sie Abdeckungen und
Schutzeinrichtungen (
2, 11, 14, 22)
auf Beschädigungen und korrekten Sitz.
Tauschen Sie diese gegebenenfalls aus.
Luftlter austauschen
Betreiben Sie das Gerät nie ohne
Luftlter. Staub und Schmutz gelangen sonst in den Motor und führen
zu Schäden.
1. Ziehen Sie den Zündkerzenstecker (
12) ab (siehe „Zündker-
ze warten“.
2. Öffnen Sie die Luftlterbox (9)
und nehmen Sie den Luftlter (10)
heraus.
3. Reinigen Sie den Luftlter (10)
in Seifenlösung und lassen sie
ihn trocknen. Kneten Sie einige
Tropfen frisches Motoröl in den
Luftlter ein.
4. Tauschen Sie einen defekten Luft-
lter gegen einen neuen Luftlter
aus (siehe „Ersatzteile/Zubehör)“).
5. Zur Montage setzen Sie den Luftlter (10) in die Luftlterbox (9) ein
und verschließen diese wieder.
Zündkerze warten
Verschlissene Zündkerzen oder ein
zu großer Zündabstand führen zu einer Leistungsreduzierung des Motors.
1. Ziehen Sie den Zündkerzenstecker (12) durch gleichzeitiges
Ziehen und Drehen von der Zündkerze (13) ab.
2. Schrauben Sie die Zündkerze (13)
gegen den Uhrzeigersinn mit dem
beiliegenden Zündkerzenschlüssel
(
27) heraus.
3. Prüfen Sie den Zündabstand mit
Hilfe einer Fühlerlehre (im Fachhandel erhältlich). Der Zündabstand
muss 0,7-0,8 mm betragen.
4. Stellen Sie den Abstand gegebenenfalls ein, indem Sie die
Masse-Elektrode der Zündkerze
vorsichtig biegen.
5. Reinigen Sie die Zündkerze mit
einer Drahtbürste.
6. Setzen Sie die gereinigte und
eingestellte Zündkerze ein oder
tauschen Sie eine beschädigte
Zündkerze gegen eine Ersatzzündkerze (
26) aus (empfohlenes
Anzugsdrehmoment 20Nm, mit
Drehmomentschlüssel ermittelt) (siehe „Ersatzteile/Zubehör“).
Motoröl wechseln
Führen Sie den Motorölwechsel bei
leerem Benzintank und warmem Motor durch.
• Führen Sie den ersten Motoröl-
wechsel nach etwa 5Betriebsstunden, danach alle 50Betriebsstun-
den oder jährlich durch.
• Entsorgen Sie das Altöl umweltgerecht (siehe „Entsorgung/Umweltschutz“).
1. Ziehen Sie den Zündkerzenstecker (
12) ab (siehe „Zündkerze warten“).
2. Öffnen Sie die Öltankkappe (
19)
und pumpen Sie das Motoröl mit einer
Ölpumpe ab.
Page 39

39
DE AT CH
3. Füllen Sie Motoröl nach (siehe „Inbetriebnahme“).
Messer prüfen/schleifen/
austauschen
Lassen Sie das Messer nur von einer
Fachwerkstatt ein- und ausbauen.
Tragen Sie beim Umgang mit dem
Messer Handschuhe.
• Ziehen Sie den Zündkerzenstecker
(
12) ab und prüfen Sie das Messer
auf Abnutzung und Beschädigungen.
• Lassen Sie ein stumpfes Messer immer
von einer Fachwerkstatt nachschleifen,
da diese eine Unwuchtprüfung vornehmen kann.
• Lassen Sie ein beschädigtes Messer
oder ein Messer mit Unwucht immer
von einer Fachwerkstatt auswechseln.
Eine unsachgemäße Montage
kann zu schweren Verletzungen führen.
Vergaser einstellen
Der Vergaser wurde werkseitig auf optimale
Leistung voreingestellt. Sollten Nacheinstellungen erforderlich sein (siehe „Fehlersuche“)
lassen Sie die Einstellungen durch eine Fachwerkstatt durchführen.
Lagerung
Allgemeine
Lagerungshinweise
Lagern Sie das Gerät nicht
mit gefülltem Grasfangkorb.
Bei heißem Wetter beginnt
das Gras unter Wärmeentwicklung zu gären. Es besteht
Brandgefahr.
• Reinigen und warten Sie das Gerät vor
der Lagerung.
• Lassen Sie den Motor abkühlen, bevor
Sie das Gerät in geschlossenen Räumen
abstellen.
• Verwenden Sie zur Aufbewahrung des
Kraftstoffs geeignete und zulässige Behälter.
• Bewahren Sie das Gerät an einem trockenen und staubgeschützten Ort auf,
außerhalb der Reichweite von Kindern.
• Umhüllen Sie das Gerät nicht mit Nylonsäcken, da sich Feuchtigkeit und Schimmel bilden könnten.
Gerät zusammenklappen
Zur platzsparenden Aufbewahrung ist das
Griffgestänge zweifach klappbar.
1. Nehmen Sie den Grasfangkorb
(20) ab.
2. Hängen Sie das Starterseil (
7)
aus.
3. Öffnen Sie die Schnellspannhebel (21/25) am unteren Holm (4)
und oberen Griffholm (1).
4. Klappen Sie die beiden Holme
nach unten.
Der Bowdenzug (5) darf dabei
nicht eingeklemmt werden.
Page 40

40
DE AT CH
Lagerung während der
Winterpause
Ein Nichtbeachten der Lagerungs-
hinweise kann durch Kraftstoffreste
im Vergaser zu Startproblemen oder
permanenten Schäden führen.
• Starten Sie den Motor und lassen Sie
ihn so lange laufen, bis er aus Mangel
an Benzin ausgeht.
• Führen Sie einen Ölwechsel durch (siehe „Motoröl wechseln“).
• Konservieren Sie den Motor:
- Drehen Sie die Zündkerze (
13)
heraus (siehe „Reinigung und Wartung);
- füllen Sie einen Esslöffel Motoröl
durch die Zündkerzenöffnung in den
Motorraum;
- ziehen Sie das Starterseil (
7) bei
gezogenem Sicherheitsbügel (
2)
mehrmals langsam zum Verteilen des
Öls im Innern des Motors;
- schrauben Sie die Zündkerze (
13)
wieder fest.
• Entsorgen Sie Altöl und Benzinreste
umweltgerecht (siehe „Entsorgung/Umweltschutz“).
Der Benzintank muss nicht entleert
werden, wenn Sie dem Benzin einen Kraftstoffzusatz zusetzen (siehe
„Ersatzteile“ und Betriebsanleitung
Briggs & Stratton).
Entsorgung/
Umweltschutz
• Führen Sie Gerät, Zubehör und Verpackung einer umweltgerechten Wiederverwertung zu.
- Entleeren Sie den Benzin- und Öltank
sorgfältig und geben Sie Ihr Gerät an
einer Verwertungsstelle ab. Die verwendeten Kunststoff- und Metallteile
können sortenrein getrennt werden
und so einer Wiederverwertung zugeführt werden.
- Geben Sie Altöl und Benzinreste an
einer Entsorgungsstelle ab und schütten diese nicht in die Kanalisation
oder in den Abuss.
- Fragen Sie hierzu unser Service-Cen-
ter.
• Die Entsorgung Ihrer defekten eingesendeten Geräte führen wir kostenlos
durch.
• Werfen Sie geschnittenes Gras nicht in
die Mülltonne, sondern führen Sie es
der Kompostierung zu oder verteilen
Sie es als Mulchschicht unter Sträuchern
und Bäumen.
Page 41

41
DE AT CH
Wartungsintervalle
Führen Sie die in der Tabelle aufgeführten Wartungsarbeiten regelmäßig durch. Durch
regelmäßige Wartung wird die Lebensdauer des Gerätes verlängert. Sie erreichen zudem
optimale Schnittleistungen und vermeiden Unfälle.
Wartungsarbeiten
(siehe „Reinigung und
Wartung“)
Vor Nach
nach
ersten
5Std.
nach
8Std.
nach
50Std.
jährlich
der Arbeit
Schrauben, Muttern, Bolzen
prüfen und anziehen
Motorölstand/Benzinstand
kontrollieren und bei Bedarf
Motoröl/Benzin nachfüllen
Bedienungselemente/Bereich
um Schalldämpfer reinigen
Fingerschutz reinigen
b
Motoröl wechseln
Luftlter austauschen
a
Zündkerze reinigen/einstellen/
austauschen
Messer reinigen/prüfen
schärfen
Schalldämpfer und Funkenfänger prüfen
b
Luftkühlungssystem reinigen
a,b
a
bei hohem Staubaufkommen oder starker Verschmutzung öfter austauschen
b
siehe Betriebsanleitung von Briggs & Stratton
Page 42

42
DE AT CH
Ersatzteile/Zubehör
Ersatzteile und Zubehör erhalten Sie unter
www.grizzly-service.eu
Sollten Sie kein Internet haben, so wenden Sie sich bitte telefonisch an das Service-Center
(siehe „Service-Center“ Seite 45). Halten Sie die unten genannten Bestellnummern und die
B&S Motornummer (für Ersatzteile für den Motor) bereit.
Position Position Bezeichnung Bestell-Nr.
Betriebs- Explosionsanleitung zeichnung
5 SET 5 Bowdenzug 91103624
10 Original Luftlter 91102800
15 SET 1 Vorderrad 91103620
18 SET 2 Hinterrad 91103622
20 SET 3 Grasfangkorb 91103625
21/25 SET 4 Schnellspannhebel mit Montagezubehör 91103623
26 Ersatzzündkerze 91103626
SET 6 Messer/Messeraufnahme/Messerschraube 91103621
B&S Kraftstoffzusatz, 125ml 30230027
B&S Motoröl, 500ml 30230026
B&S Wartungsset
(Luftlter, Motoröl, Zündkerze) 91102802
Ersatzteile und Zubehör für den Motor (z.B. Luftlter und Zündkerzen) können Sie auch
direkt über Briggs & Stratton bestellen. Sollten weitere Ersatzteile erforderlich sein, entnehmen Sie die Teilenummer bitte der Explosionszeichnung.
Page 43

43
DE AT CH
Problem Mögliche Ursache Fehlerbehebung
Motor startet
nicht
Zu wenig Benzin im Benzintank
Benzin einfüllen
Falsche Startreihenfolge
Anweisungen zum Starten des Motors
beachten (siehe „Bedienung“)
Zündkerzenstecker (
12)
nicht richtig aufgesteckt
Verrußte Zündkerze
Zündkerzenstecker aufstecken
Zündkerze reinigen, einstellen oder ersetzen (siehe „Reinigung und Wartung“)
Falsch eingestellter Vergaser
Vergaser durch eine Fachwerkstatt einstellen lassen
Motor startet,
Gerät läuft aber
nicht mit voller
Leistung
Verschmutzter Luftlter (
10)
Luftlter ersetzen (siehe „Reinigung und
Wartung“)
Falsch eingestellter Vergaser
Vergaser von einer Fachwerkstatt einstellen lassen
Motor stottert,
stockt
Falsch eingestellter Vergaser
Vergaser von einer Fachwerkstatt einstellen lassen
Verrußte Zündkerze (
13)
Zündkerzen reinigen, einstellen oder ersetzen (siehe „Reinigung und Wartung“)
Motor wird
überhitzt
Lüftungsöffnungen (
11)
verstopft
Lüftungsöffnungen reinigen
Falsche Zündkerze (
13) Zündkerze wechseln
Zu wenig Motoröl im Motor Motoröl einfüllen (siehe „Inbetriebnahme“)
Motor qualmt
Verschmutzter Luftlter (
10)
Luftlter ersetzen (siehe „Reinigung und
Wartung“)
Zu wenig Motoröl im Motor Motoröl einfüllen (siehe „Inbetriebnahme“)
Arbeitsergebnis
nicht zufriedenstellend oder
Motor arbeitet
schwer
Gras zu kurz oder zu hoch
Schnitthöhe ändern
(siehe „Schnitthöhe einstellen“)
Messer stumpf
Messer von Fachwerkstatt schärfen oder
austauschen lassen
Messer durch Gras blockiert,
Grasfangkorb voll,
Auswurföffnung verstopft
Gras entfernen (siehe „Reinigung und
Wartung“)
Messer rotiert
nicht
Messer durch Gras blockiert Gras entfernen
Messer nicht korrekt montiert
Messer von Fachwerkstatt montieren
lassen
Abnorme Geräusche, Klappern
oder Vibrationen
Messer nicht korrekt montiert
Messer von Fachwerkstatt montieren
lassen
Messer beschädigt
Fehlersuche
Page 44

44
DE AT CH
Garantie
Sehr geehrte Kundin, sehr geehrter Kunde,
Sie erhalten auf dieses Gerät 3 Jahre Garantie ab Kaufdatum.
Bitte beachten Sie gegebenenfalls unterschiedliche Garantiebedingungen für den
Motor und lesen Sie dazu sorgfältig die
beiliegende Betriebsanleitung des Motorherstellers „Briggs & Stratton“. Ihre gesetzlichen
Gewährleistungsansprüche werden von dieser Garantie nicht beeinträchtigt.
Im Falle von Mängeln dieses Gerätes stehen
Ihnen gegen den Verkäufer des Gerätes
gesetzliche Rechte zu. Diese gesetzlichen
Rechte werden durch unsere im Folgenden
dargestellte Garantie nicht eingeschränkt.
Garantiebedingungen
Die Garantiefrist beginnt mit dem Kaufdatum. Bitte bewahren Sie den Original-Kassenbon gut auf. Diese Unterlage wird als
Nachweis für den Kauf benötigt.
Tritt innerhalb von drei Jahren ab dem Kaufdatum dieses Gerätes ein Material- oder
Fabrikationsfehler auf, wird das Gerät von
uns – nach unserer Wahl – für Sie kostenlos
repariert oder ersetzt. Diese Garantieleistung setzt voraus, dass innerhalb der DreiJahres-Frist das defekte Gerät und der Kaufbeleg (Kassenbon) vorgelegt und schriftlich
kurz beschrieben wird, worin der Mangel
besteht und wann er aufgetreten ist.
Wenn der Defekt von unserer Garantie
gedeckt ist, erhalten Sie das reparierte oder
ein neues Gerät zurück. Mit Reparatur oder
Austausch des Gerätes beginnt kein neuer
Garantiezeitraum.
Garantiezeit und gesetzliche
Mängelansprüche
Die Garantiezeit wird durch die Gewährleistung nicht verlängert. Dies gilt auch
für ersetzte und reparierte Teile. Eventuell
schon beim Kauf vorhandene Schäden und
Mängel müssen sofort nach dem Auspacken gemeldet werden. Nach Ablauf der
Garantiezeit anfallende Reparaturen sind
kostenpichtig.
Garantieumfang
Das Gerät wurde nach strengen Qualitätsrichtlinien sorgfältig produziert und vor
Anlieferung gewissenhaft geprüft.
Die Garantieleistung gilt für Material- oder
Fabrikationsfehler. Diese Garantie erstreckt
sich nicht auf Geräteteile, die normaler
Abnutzung ausgesetzt sind und daher als
Verschleißteile angesehen werden können
(z.B. Schneideinrichtung, Zündkerze, Luftlter, Starterseil) oder für Beschädigungen an
zerbrechlichen Teilen (z.B. Schalter).
Diese Garantie verfällt, wenn das Gerät
beschädigt, nicht sachgemäß benutzt oder
nicht gewartet wurde. Für eine sachgemäße
Benutzung des Gerätes sind alle in der Betriebsanleitung aufgeführten Anweisungen
genau einzuhalten. Verwendungszwecke
und Handlungen, von denen in der Betriebsanleitung abgeraten oder vor denen gewarnt wird, sind unbedingt zu vermeiden.
Das Gerät ist lediglich für den privaten
und nicht für den gewerblichen Gebrauch
bestimmt. Bei missbräuchlicher und unsachgemäßer Behandlung, Gewaltanwendung
und bei Eingriffen, die nicht von unserer
autorisierten Service-Niederlassung vorgenommen wurden, erlischt die Garantie.
Abwicklung im Garantiefall
Um eine schnelle Bearbeitung Ihres Anliegens zu gewährleisten, folgen Sie bitte den
folgenden Hinweisen:
• Bitte halten Sie für alle Anfragen den
Kassenbon und die Identikationsnummer (IAN270733) als Nachweis für
den Kauf bereit.
• Die Artikelnummer entnehmen Sie bitte
Page 45

45
DE AT CH
dem Typenschild.
• Sollten Funktionsfehler oder sonstige
Mängel auftreten, kontaktieren Sie zunächst die nachfolgend benannte Serviceabteilung telefonisch oder per E-Mail.
Sie erhalten dann weitere Informationen
über die Abwicklung Ihrer Reklamation.
• Ein als defekt erfasstes Gerät können
Sie, nach Rücksprache mit unserem Kundenservice, unter Beifügung des Kaufbelegs (Kassenbons) und der Angabe,
worin der Mangel besteht und wann er
aufgetreten ist, für Sie portofrei an die
Ihnen mitgeteilte Service-Anschrift übersenden. Um Annahmeprobleme und Zusatzkosten zu vermeiden, benutzen Sie
unbedingt nur die Adresse, die Ihnen
mitgeteilt wird. Stellen Sie sicher, dass
der Versand nicht unfrei, per Sperrgut,
Express oder sonstiger Sonderfracht
erfolgt. Senden Sie das Gerät bitte inkl.
aller beim Kauf mitgelieferten Zubehörteile ein und sorgen Sie für eine ausreichend sichere Transportverpackung.
Reparatur-Service
Sie können Reparaturen, die nicht der Garantie unterliegen, gegen Berechnung von
unserer Service-Niederlassung durchführen
lassen. Sie erstellt Ihnen gerne einen Kostenvoranschlag.
Wir können nur Geräte bearbeiten, die ausreichend verpackt und frankiert eingesandt
wurden.
Achtung: Bitte senden Sie Ihr Gerät gereinigt und mit Hinweis auf den Defekt an
unsere Service-Niederlassung.
Nicht angenommen werden unfrei - per
Sperrgut, Express oder mit sonstiger Sonderfracht - eingeschickte Geräte.
Die Entsorgung Ihrer defekten eingesendeten Geräte führen wir kostenlos durch.
DE
AT
CH
Service-Center
Für Motorenprobleme an Ihrem Benzin-Rasenmäher ist der zuständige „Briggs &
Stratton“-Service gemäß beiliegender Händlerliste zuständig.
Service Deutschland
Tel.: 0800 54 35 111
E-Mail: grizzly@lidl.de
IAN 270733
Service Österreich
Tel.: 0820 201 222
(0,15 EUR/Min.)
E-Mail: grizzly@lidl.at
IAN 270733
Service Schweiz
Tel.: 0842 665566
(0,08 CHF/Min.,
Mobilfunk max. 0,40 CHF/Min.)
E-Mail: grizzly@lidl.ch
IAN 270733
Importeur
Bitte beachten Sie, dass die folgende
Anschrift keine Serviceanschrift ist. Kontaktieren Sie zunächst das oben genannte
Service-Center.
Grizzly Tools GmbH & Co. KG
Stockstädter Straße 20
D-63762 Großostheim
www.grizzly-service.eu
Page 46

46
DE AT CH
Page 47

47
Original EG-Konformitätserklärung
Hiermit bestätigen wir, dass der
Benzin-Rasenmäher
Modell FBM 450 A1
Seriennummer
201509000001 - 201512020580
folgenden einschlägigen EU-Richtlinien in ihrer jeweils gültigen Fassung entspricht:
2006/42/EG • 2004/108/EG • 2000/14/EG • 2005/88/EG
Um die Übereinstimmung zu gewährleisten, wurden folgende harmonisierte Normen
sowie nationale Normen und Bestimmungen angewendet:
EN ISO 5395-1:2013 • EN ISO 5395-2:2013 • EN ISO 14982:2009
Zusätzlich wird entsprechend der Geräuschemissionsrichtlinie 2000/14/EG bestätigt:
Schallleistungspegel:
Garantiert: 96 dB(A);
Gemessen: 93,4 dB(A)
Angewendetes Konformitätsbewertungsverfahren entsprechend Anh. VI /
2000/14/EG und 2005/88/EG
Benannte Stelle: Intertek Testing & Certication Ltd. (NB0359)
Grizzly Tools GmbH & Co. KG
Stockstädter Straße 20
D-63762 Großostheim, GERMANY
08.01.2016
Volker Lappas
(Dokumentationsbevollmächtigter)
DE
AT
CH
Page 48

48
Translation of the original
EC declaration of conformity
We herewith conrm that the
Petrol lawn mower
Series FBM 450 A1
Serial number
201509000001 - 201512020580
is compliant with the current versions of the following relevant EU guidelines:
2006/42/EC • 2004/108/EC • 2000/14/EC • 2005/88/EC
In order to guarantee compliance, the following harmonised standards, national standards and regulations have been applied:
EN ISO 5395-1:2013 • EN ISO 5395-2:2013 • EN ISO 14982:2009
The following are also conrmed as being compliant with Noise Emissions Directive
2000/14/EC:
Guaranteed sound power level: 96 dB(A);
Measured sound power level: 93.4 dB(A)
The conformity evaluation procedure employed is compliant with appendix VI of
2000/14/EC and 2005/88/EC.
Registered Ofce: Intertek Testing & Certication Ltd., NB0359
Grizzly Tools GmbH & Co. KG
Stockstädter Straße 20
D-63762 Großostheim, GERMANY
08.01.2016
Volker Lappas
(Documentation Representative)
GB
IE
Page 49

49
1
678
10
17
18
19
23
24
25
28
31
32
35
36
68
37
38
42
29
30
43
47
48
49 50 5 1
20
21
22
16
66
67
9
56
2
3
4
5
11
12
13
14
15
39
40
41
45
46
52
53
54
55
57 58
59
60
61
62
63
64
65
44
Explosionszeichnung • Exploded Drawing
FBM 450 A1
informativ, informative
270733_20151029_rev02_gs
Page 50

17
10
33
9
13
12
2
1
1
0,7-0,8 mm
Page 51

Page 52

GRIZZLY TOOLS GMBH & CO. KG
Stockstädter Straße 20
D-63762 Großostheim
Last Information Update · Stand der Informationen:
10 / 2015 · Ident.-No.: 89420214102015-6
IAN 270733
 Loading...