


Fisher & Paykel Refrigerator Freezer User Manual

Refrigerator & Freezer
User guide
New Zealand Australia USA Canada United Kingdom Europe Asia Pacific


Contents
General Operating Instructions – All Products
Important Safety Information 4
Installation - Four Essential Requirements 6
Moving or Storing Your Refrigerator 8
Door Conversion 9
Active Smart™ Refrigerators
Operating Instructions 11
Special Features 13
Maintenance 15
Cleaning Care 16
Cyclic and Compact Refrigerators
Operating Instructions 21
Special Features and Maintenance 22
Cleaning Care 23
Ver tical Freezers
Operating Instructions 26
Chest Freezers
Operating Instructions 26
Special Features and Maintenance 27
Food Care – All Products
Storing Food in your Refrigerator 28
Storing Food in your Freezer 30
Problem Solving Checklist
Customer Care Information
32
34
Active Smart™ Models
635mm wide E331T, E372B, E381T, E402B, E411T, E415H
680mm wide E406B, E413T, E440T, E442B
790mm wide E521T, E522B
Cyclic and Compact Models
525mm wide P120, E169T, C170T, C190, E240B, E249T, C270
635mm wide C373, C450
Vertical Freezer Models
525mm wide N150, N210
635mm wide N308, N388
Chest Freezer Models
Slimline H215, H275, H320
Standard H160, H220, H280, H360, H510, H701
3

Important Safety Information
To reduce the risk of fire, electric shock, or injury to persons read the IMPORTANT SAFETY
INSTRUCTIONS before operating this appliance.
Use this appliance only for its intended purpose as described in this User Guide.
Warning
When using this appliance always exercise basic safety precautions including the following:
Danger
This appliance is not intended for use by young children or infirm persons without supervision.
Young children should be supervised to ensure they do not play with the appliance.
Risk of child entrapment. Before you throw away your old refrigerator or freezer:
– Take off the doors
– Leave the shelves in place so that children may not easily climb inside.
Disposal
Extreme care must be taken when disposing of your old appliance to avoid hazards. The
refrigerant gas must be safely removed and for the safety of young children, remove doors.
Your Fisher & Paykel Appliances Authorised Service Centre will be able to give advice on
environmentally friendly methods of disposing of your old refrigerator or freezer.
Electrical
This appliance must be properly installed in accordance with the installation instruction before it
is used.
Never unplug your refrigerator or freezer by pulling on the power cord.
Always grip the plug firmly and pull straight out from the outlet.
Do not plug in any other appliance at the same power point as your refrigerator or freezer or use
extension cords or double adapters.
Repair or replace immediately all electric service cords that have become frayed or otherwise
damaged. Do not use a cord that shows cracks or abrasion along its length or at either the plug
or appliance end.
If the power supply cord is damaged, it must only be replaced by your Fisher & Paykel Appliances
Authorised Service Centre because special purpose tools are required.
When moving your appliance away from the wall, be careful not to roll over or damage the
power cord.
Unplug your refrigerator or freezer before cleaning or replacing the lightbulb.
4

Important Safety Information
Storing Food and Drinks
Never store volatile or flammable materials in your refrigerator or freezer as they may explode.
Never freeze liquids in glass containers. Liquid expands during freezing, which may cause the
container to explode.
Never freeze carbonated drinks. They may explode.
Do not consume food if it is too cold. Food removed from the freezer compartment may be cold
enough to cause damage when brought into contact with bare skin e.g. frozen ice cubes.
Power Failure – Food Safety
Do not refreeze frozen foods that have thawed completely. Follow the recommendations below
if you discover food in your freezer has thawed:
1) Ice crystals still visible – food may be refrozen but should be stored for a shorter period than
recommended.
2) Thawed but refrigerator cold – refreezing generally not recommended. Fruits and some
cooked food can be refrozen but use as soon as possible. Meat, fish, poultry – use immediately
or cook then refreeze. Vegetables – discard as they usually go limp and soggy.
3) Thawed but warmer than 4˚C. Red meat can be cooked immediately and refrozen but use as
soon as possible. Discard all other frozen foods.
Do not refreeze frozen foods that have thawed completely. The food may be dangerous
to eat.
Cleaning
Many commercially available cleaning products contain solvents which may attack plastic
components of your refrigerator or freezer and cause them to crack. Please refer to the cleaning
care section of this booklet for further advice.
SAVE THESE INSTRUCTIONS
5

Installation - Four Essential Requirements
Please follow the steps for installation to ensure your appliance operates correctly.
1. Power
The appliance must be installed so the plug is accessible.
To ensure that the appliance is not accidentally switched off, connect your refrigerator or freezer
to its own power point. Do not plug in any other appliance at this power point or use extension
cords and double adaptors, as the combined weight of both power cords can pull the double
adaptor from a wall outlet socket.
For power requirements, refer to the information on the serial plate located at the front bottom
right-hand side of the refrigerator when the door is open.
It is essential that the appliance be properly grounded (earthed).
2. Location
Your refrigerator or freezer should not be located in direct sunlight or next to any heat
generating appliance such as a cooktop, oven or dishwasher.
3. Stability
It is important that all four corners of the refrigerator or freezer base are supported firmly on the
floor to eliminate any cabinet movement.
Installing the appliance on a soft or uneven or unlevel floor may result in twisting of the cabinet
and poor sealing of the doors. If the doors do not seal properly, warm air will enter
the food storage areas causing the temperature to increase, resulting in food spoilage and
food loss.
Before moving your refrigerator or freezer into its position, ensure that the adjustable front feet
are fully retracted by turning them anticlockwise, i.e. towards the right of the cabinet.
Position your refrigerator or freezer. Turn the adjustable feet clockwise, i.e. to the left, to lower
the adjustable front feet. Raise the front of the appliance until it is stable and the doors move
towards the closed position, on their own, when open.
The front levelling foot on the hinge side should take the majority of the weight of the cabinet
and the cabinet should be stable, i.e. cabinet should not rock or wobble.
Raise
6
Lower

Installation - Four Essential Requirements
4. Ventilation and Installation
To ensure adequate ventilation for your refrigerator or vertical freezer, allow a minimum of 50mm
of airspace above the cabinet, 20mm on each side, and 30mm at the rear.
(See diagram 1). To ensure adequate ventilation for chest freezers, allow a minimum of 20mm of
airspace on each side of the cabinet, and 75mm at the rear.
The appliance is intended to be placed against a wall with a free distance not exceeding 75mm.
If integrating your refrigerator, follow installation instructions provided with the integration kits.
Ensure the front face of the bench is aligned to the front corner edge of the refrigerator door.
This will allow the door to fully open. (See diagram 2).
If placing the refrigerator in a corner allow 140mm clearance for the door to be able to open.
(See diagram 3).
20mm
50mm
Diagram 1
20mm
630mm
20mm
30mm
20mm
Diagram 2
630mm
660mm
20mm
140mm
Diagram 3
30mm
Before Placing Food in the Fresh Food or Freezer Compartments
Remove all packaging. Ensure that all transit clips are removed from the refrigerator. These are
small rubber stops located at the back of the shelves.
Allow the refrigerator and freezer to run empty for 2 – 3 hours to allow each compartment to
cool to the appropriate temperature.
Clean the inside of the appliance with warm water and a little liquid detergent to remove
manufacturing and transportation dust.
The appliance may have an odour on its initial operation, but this will go when the refrigerator
and freezer have cooled sufficiently.
Energy Efficiency
Do not cover your appliances with any material that will prevent air from flowing around the
cabinet sides.
Do not leave the door open for any longer than is necessary.
Allow good clearances in front of the air ducts within the cabinet for maximum cold air
distribution.
7

Moving or Storing Your Refrigerator
If your refrigerator or freezer is turned off for any reason, wait 10 minutes before turning it back
on. This will allow the refrigeration system pressures to equalise before restarting.
Moving Your Refrigerator
Turn off the appliance and unplug from the power point. Remove all food.
Turn the adjustable feet to the right as far as they will turn (see page 6).
Ease the refrigerator out of its position. Tuck the power cord away and tape the doors closed.
Tape the shelves in place. If the cabinet needs to be placed at an angle or laid down, carefully lay
it on its side (the right hand side when viewed from the front).
Relocate and install. If the appliance has been left on its side for any length of time, leave it
standing upright for at least 10 minutes before turning on.
Storing Your Refrigerator or Freezer
When storing your cleaned appliance, leave the door(s) open. This allows air to circulate and
prevents the build up of bacteria and moulds.
Before using again, clean well using a mixture of warm water and baking soda (add 1 teaspoon
of baking soda to each 500 ml of water). Rinse with clean water.
Holiday Time
We recommend you leave your refrigerator or freezer operating while you are on holiday.
8

Door Conversion
If you need to hinge your door on the opposite side we
recommend that you call your local Fisher and Paykel Authorised
Service Centre or Dealer to make this conversion.
Active Smart™ refrigerators with silver handles need to be ordered
either with left or right opening doors and can not be interchanged.
All other models except those models listed below need to have an
appropriate conversion kit for your model refrigerator.
The kit is available from your Authorised Service Centre or Dealer.
Full instructions are included in the conversion kit.
If you have the following compact model refrigerators you
can change the door by following these instructions:
P120, C190, C270, N150, N210
Switch off the appliance and remove all the food stuffs and shelves
from the doors.
Remove the hinge cover from the top of the cabinet. This is
achieved by levering it up carefully from the front.
Remove the top hinge bracket screws using a ‘Philips’ screwdriver
and remove the top hinge bracket, ensuring that the door is held
firmly. (Refer Figure 1).
Open the door and lift it off.
Insert the plastic hinge plugs supplied with the installation kit into
the removed top hinge bracket holes. Remove the existing plastic
hinge plugs from the opposite side.
Tilt the refrigerator back, either right onto its back or lean it against
a wall, and unscrew both adjustable feet.
Remove the plastic bottom hinge bracket bolt holding the bottom
hinge bracket to the underside of the cabinet. Replace the bottom
hinge bracket bolt without the bottom hinge bracket.
Remove existing cap door closing from bottom hinge bracket.
On the opposite side remove the bottom hinge bracket bolt and fit
the bottom hinge bracket.
Note: that it is rotated so that it is a mirror image of itself on the
other side (refer Figure 2).
Replace the adjustable feet turning them as far as they will go.
Carefully stand the refrigerator upright again.
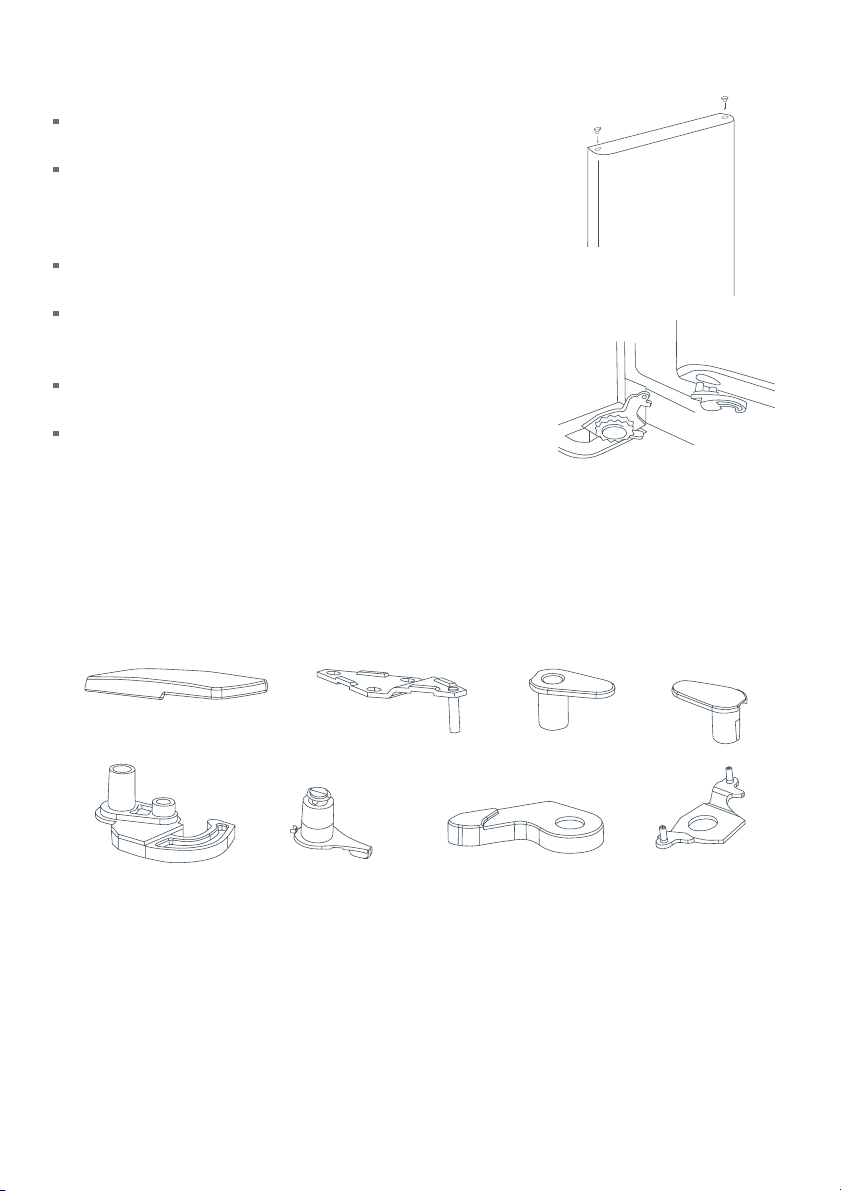
Figure 1
Figure 2
9
Door Conversion
Fit new cap door closing to bottom hinge bracket. The new
cap door closing is a mirror image of the existing part.
Remove the hinge hole covers from the ends of the door
using a narrow blade to prise them away from the door. The
hinge hole covers are the components without holes. Keep
them for re-use.
Move the hinge bearing on the door to the opposite side of
the top of the door (refer Figure 3).
Fit the new hinge bearing closing hook to the opposite side
of the bottom door. The new hinge bearing hook is a mirror
image of the existing part.
Remove the old hinge bearing closing hook from the door
(refer Figure 4).
Replace the door. Replace the top hinge bracket and secure
with the top hinge bracket screws making sure that the door
is square.
Figure 3
Figure 4
10
Hinge Cover
Hinge Bearing
Closing Hook
Bottom Hinge
Bolt
Top Hinge
Bracket
Hinge Bearing
Cap Door Closing Bottom Hinge
Hinge Hole
Cover
Bracket
Active Smart™ Operating Instructions
Models: 635mm wide E331T, E372B, E381T, E402B, E411T, E415H
680mm wide E406B, E413T, E440T, E442B
790mm wide E521T, E522B
Temperature Control
When the refrigerator is first turned on, the powerful cooling system will automatically cool both
refrigerator and freezer compartments to their set temperatures. This will take between 2 – 3 hours
depending on the temperature and humidity of the environment.
The two compartment temperatures are accurately and independently controlled and do not
change with the temperature or humidity of the surroundings; whether summer or winter.
If you wish to alter the temperature of either the fresh food compartment or freezer compartment, this
can be easily done by using the control panel located at the back of the fresh food compartment.
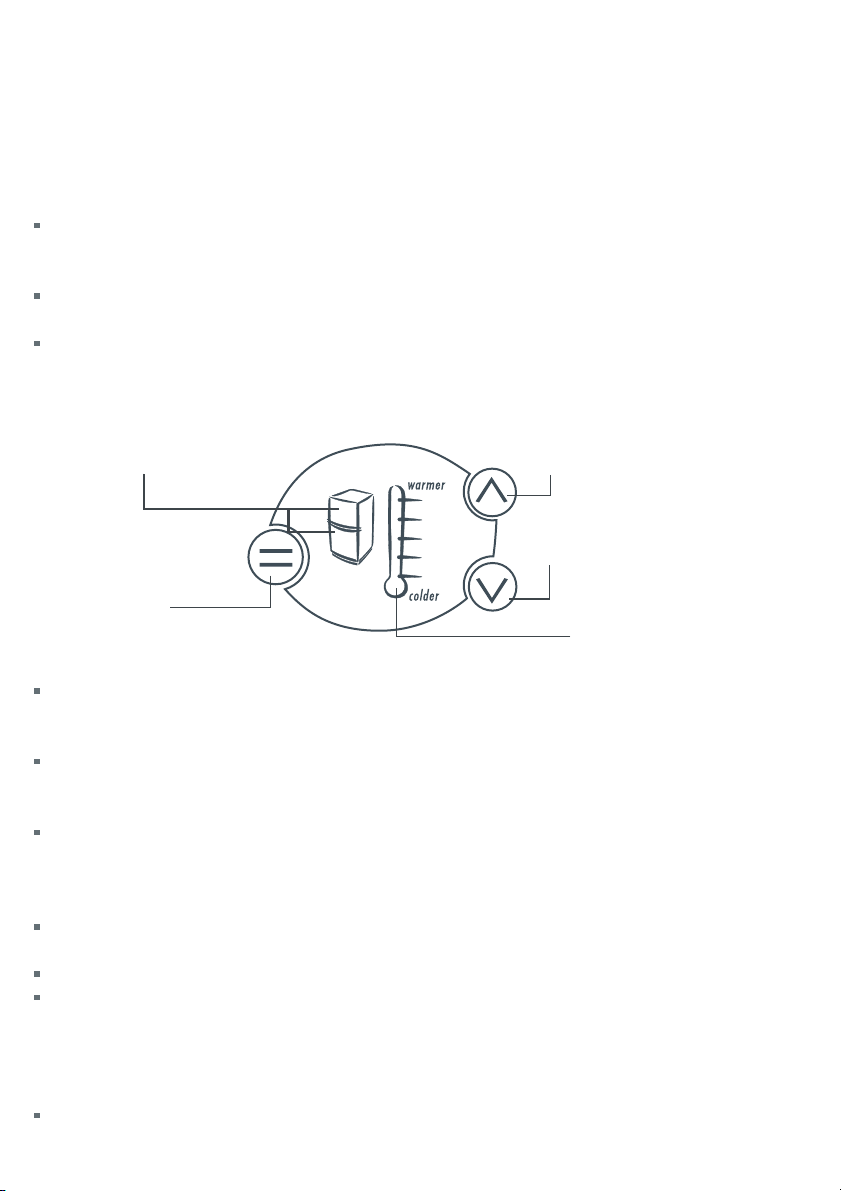
Control Panel To adjust temperatures
Fresh food and freezer
compartment indicator
Compartment
select button
Fresh Food Compartment
The fresh food compartment light on the refrigerator diagram will be showing. The temperature
indicator illustrated by a thermometer will show the temperature setting for this compartment as
a series of lights.
The temperature may be altered by pressing the increase temperature or decrease temperature
buttons. One press on either of these buttons will produce a dimmer light which indicates a
small change in temperature.
Pressing either button twice gives a brighter light and indicates a greater change in temperature.
Fewer lights on the thermometer means a cooler temperature for the compartment selected.
Increase temperature button
Decrease temperature button
Temperature
indicator (thermometer)
Freezer Food Compartment
To adjust the freezer temperature press the compartment select button until the light flashes on
the freezer compartment indicator.
The freezer temperature can be altered by pressing the increase or decrease temperature buttons.
One press on either of these buttons will produce a dimmer light which indicates a small change
in temperature. Pressing either button twice gives a brighter light and indicates a greater change
in temperature.
Note: Successively pressing the compartment select button will automatically select between the
compartments, a return to the fresh food compartment will be accompanied by a longer beep.
When the door is reopened the control panel will return automatically to the fresh food
compartment setting.
11
 Loading...