


GAS RANGES
PROFESSIONAL
RGV-488, RGV-485GD
USER GUIDE
US CA
!
WARNING!
If the information in this guide is not
followed exactly, a fire or explosion
may result causing property damage,
personal injury or death.
Do not store or use gasoline or other
flammable vapors and liquids in the
vicinity of this or any other appliance.
NEVER use this appliance as a space
heater to heat or warm the room. Doing
so may result in carbon monoxide
poisoning and overheating of the
appliance.
WHAT TO DO IF YOU SMELL GAS
• Do not try to light any appliance.
• Do not touch any electrical switch.
• Do not use any phone in your
building.
• Immediately call your gas supplier
from a neighbor’s phone.
• Follow the gas supplier’s instructions.
• If you cannot reach your gas supplier,
call the fire department.
Installation and service must be
performed by a qualified installer,
service agency or the gas supplier.
!
WARNING!
Never operate the top surface cooking
section of this appliance unattended.
• Failure to follow this warning statement
could result in fire, explosion or burn
hazard that could cause property damage,
personal injury or death.
• If a fire should occur, keep away from the
appliance and immediately call your fire
department.
an oil/grease fire with water
Do not attempt to extinguish

CONTENTS
Safety and warnings 5
Before you begin 10
First use 11
Cooking guide 16
Cooking charts 20
Burner use 25
Care and cleaning 28
Troubleshooting 37
Alert codes 40
Warranty and service 41
Registration
To register your product visit our website: fisherpaykel.com/register
4
SAFETY AND WARNINGS
!
WARNING!
Electric Shock Hazard
Failure to follow this advice may result in
electric shock or death.
• Turn the range off at the wall before replacing
the oven lamp.
!
WARNING!
Fire Hazard
Failure to follow this advice may result in
overheating, burning, and injury.
• Do not place aluminium foil, dishes, trays, water
or ice on the oven floor during cooking, this will
irreversibly damage the enamel. Lining the oven
with aluminium foil may cause fire.
• Never use the appliance for warming or heating
the room. Persons could be burned or injured or
a fire could start.
• Flammable materials should not be stored in an
oven or near its surface.
!
WARNING!
Cut Hazard
Failure to use caution could result in injury.
• Take care: some edges may be sharp.
5
SAFETY AND WARNINGS
!
WARNING!
Hot Surface Hazard
Failure to follow this advice could result in
burns and scalds.
• To avoid burns and scalds, keep children away
from the appliance.
• Surfaces of the appliance may become hot
enough to cause burns. Examples include the
oven vent, the surface near the oven vent, and
the oven door.
• Do not touch heating elements or interior
surfaces of the oven. Heating elements may be
hot, even when they are dark in colour.
• Use protection when handling hot surfaces, such
as oven shelves or dishes.
• Be careful when opening the oven door. Let
hot air or steam escape before removing or
replacing food.
• During and after use, do not touch or let
clothing or other flammable materials contact
heating elements or interior surfaces of the oven
until they have had sufficient time to cool.
!
WARNING!
Tipping Hazard
Failure to use caution could result in death or
serious burns.
• Range must be secured by a correctly installed
anti-tip bracket. See installation guide for details.
• Ensure the anti-tip bracket is re-engaged when
the range is moved. Do not use the appliance
until it has been secured.
6
SAFETY AND WARNINGS
!
WARNING!
Explosion Hazard
Failure to follow this advice may result in
injury or death.
• If you smell gas, do not use the appliance. Open
a window or door to let the gas escape, then
follow the guidance on the inside front cover of
this manual.
• Do not use water on grease fires. A violent
steam explosion may result.
• Turn all burners off, then smother fire or flame
or use dry chemical or foam-type extinguisher.
• Do not heat unopened food containers, such as
cans. The build-up of pressure may cause the
container to burst.
!
WARNING!
Poisoning Hazard
Failure to follow this advice may result in
carbon monoxide poisoning or overheating.
• Never use material, such as aluminium foil, to
cover an entire rack or the oven floor. Doing so
block airflow through the oven.
• Clean the appliance with caution. Some
cleaners can produce noxious fumes if applied
to a hot surface. Follow the directions of the
cleaner manufacturer.
• Never use the appliance as a space heater to
heat or warm the room.
7

SAFETY AND WARNINGS
WARNING!
To reduce the risk of fire, electrical shock, injury to persons or damage when using the
oven, follow the important safety instructions listed below. Read all the instructions
before using the oven. Use the oven only for its intended purpose as described in these
instructions.
Installation
z
Ensure the appliance is properly installed and earthed by a qualified technician.
z
Ensure this range is connected to a circuit that incorporates an isolating switch
providing full disconnection from the power supply.
z
Do not install or operate the appliance if it is damaged or not working properly. If you
receive a damaged product, contact your dealer or installer immediately.
z
Verify the anti-tip device has been correctly installed and engaged. See installation
guide for details.
Servicing
z
Do not repair or replace any part of the appliance unless specifically recommended in
the user guide. All other servicing should be undertaken by a Fisher & Paykel trained
and supported service technician or qualified person.
Fire Hazard
z
Use only dry oven mitts or potholders. Moist or damp potholders on hot surfaces could
result in burns from steam. Do not let potholders touch hot areas or heating elements.
Do not use a towel or a bulky cloth for a potholder. It could catch fire.
Food Safety
z
Leave food in the oven for as short a time as possible before and after cooking. This is
to avoid contamination by organisms that may cause food poisoning. Take particular
care during warm weather.
General Use
z
Household appliances are not intended to be played with by children.
z
Children should not be left alone or unattended in the area where the appliance is in
use. They should never be allowed to sit or stand on any part of the appliance.
z
Children of less than 8 years old must be kept away from the appliance unless
continuously supervised.
z
This appliance can be used by children aged from 8 years and above, and persons with
reduced physical, sensory or mental capabilities or lack of experience and knowledge,
if they have been given supervision or instruction concerning the use of the appliance
in a safe way and they understand the hazards involved. Cleaning and user maintenance
shall not be carried out by children without supervision.
z
Caution: Do not store items of interest to children in cabinets above the range or on the
backguard of the range. Children climbing to reach items could be seriously injured.
8

SAFETY AND WARNINGS
z
Do not place heavy objects on the oven door.
z
Always keep oven vents unobstructed.
z
Do not wear loose fitting or hanging garments when using the appliance. They could
ignite or melt if they touch an element or hot surface and you could be burned.
z
Caution: Hot air can blow from the vent at the top of the range as part of the range’s
cooling system.
z
Always position shelves in the desired location while the oven is cool (before
preheating). If a shelf must be removed while the oven is hot, do not let the oven mitts
or potholder contact hot heating elements in the oven or the base of the oven.
z
Use only bakeware approved for oven use. Follow the bakeware manufacturer’s guides.
z
Only certain types of glass, glass/ceramic, earthenware or other glazed utensils are
suitable for range-top service without breaking due to sudden temperature changes.
z
Ensure flow of combustion and ventilation is unobstructed.
z
Do not use the oven for storage.
z
Do not cook on a broken cooktop. Should the cooktop break, cleaning solutions
and spillovers may penetrate the broken cooktop and create a risk of electric shock.
Contact a qualified electrician immediately.
z
Do not place metallic objects such as knives, forks, spoons and lids on the cooktop
surface as they can get hot.
z
Never leave surface units unattended at a high heat setting. Boilover causes smoking
and greasy spillover that may ignite.
z
Utensil handles should be turned inward and not extend over adjacent surface.
Cleaning and maintenance
z
Do not clean the oven seal or use any oven-cleaning products on it. This is essential for
a good seal, which ensures that the oven operates efficiently. Care should be taken not
to rub, damage or move the oven seal.
z
Do not use oven cleaners, harsh/abrasive cleaning agents, waxes, or polishes. No
commercial oven cleaner, oven liner, or protective coating of any kind should be used in
or around any part of the range.
z
Do not use harsh/abrasive cleaners, scourers or sharp metal scrapers to clean the oven
door glass since they scratch the surface, which may result in the glass shattering.
z
Clean only the parts listed in this guide.
z
Do not use a steam cleaner to clean any part of the range.
z
Keep appliance area clear and free from combustible materials.
9
BEFORE YOU BEGIN
IMPORTANT!
Do not block the vents of the oven or the oven door with cookware, utensils or towels.
During cleaning, take care not to let any liquids run down these vents.
z
Ensure that the anti-tip bracket at the right rear of the range has been correctly installed.
z
Read this guide, taking special note of the 'Safety and warnings' section.
z
Remove all packaging from the oven and cooktop. Recycle responsibly.
z
Remove any adhesive residue using dishwashing liquid on a soft cloth. Do not use any
harsh or abrasive cleaners.
z
Condition the oven using the instructions under 'First use'.
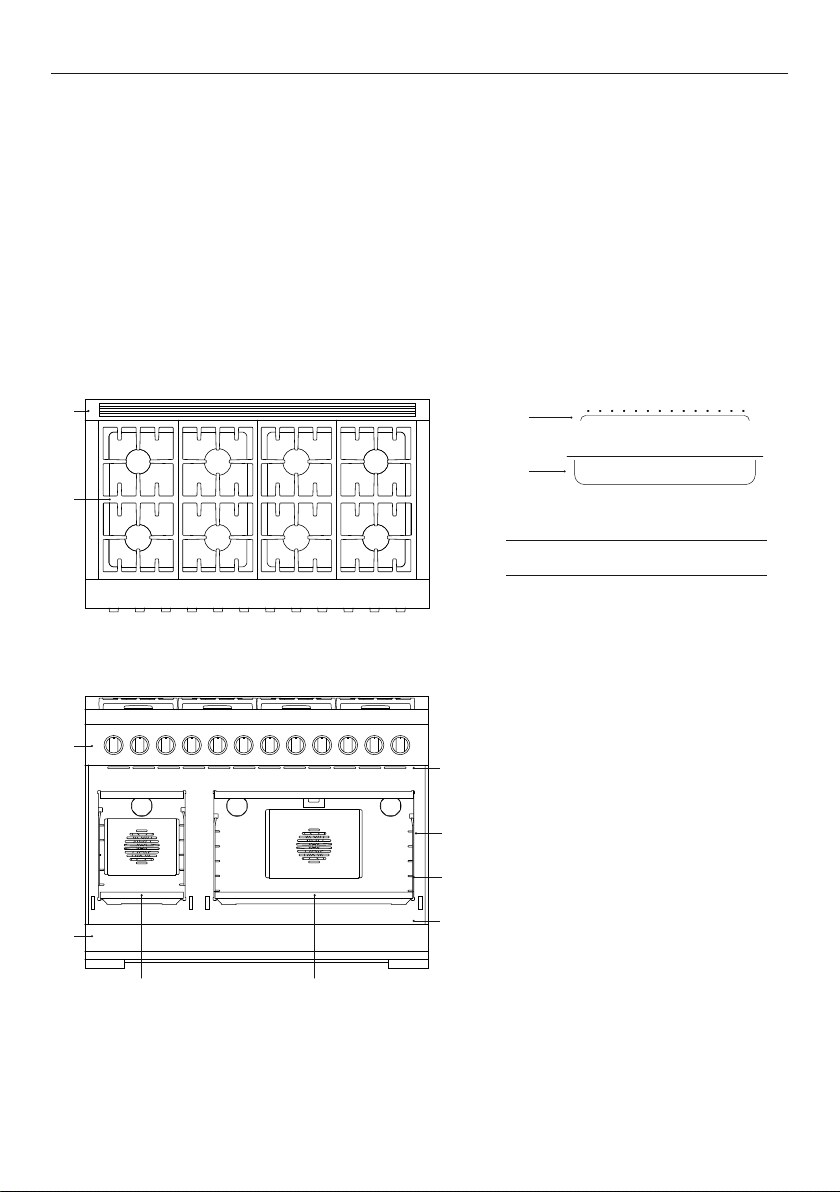
RGV3-488 model illustrated
1
2
3
8
9
!0
!1
!2
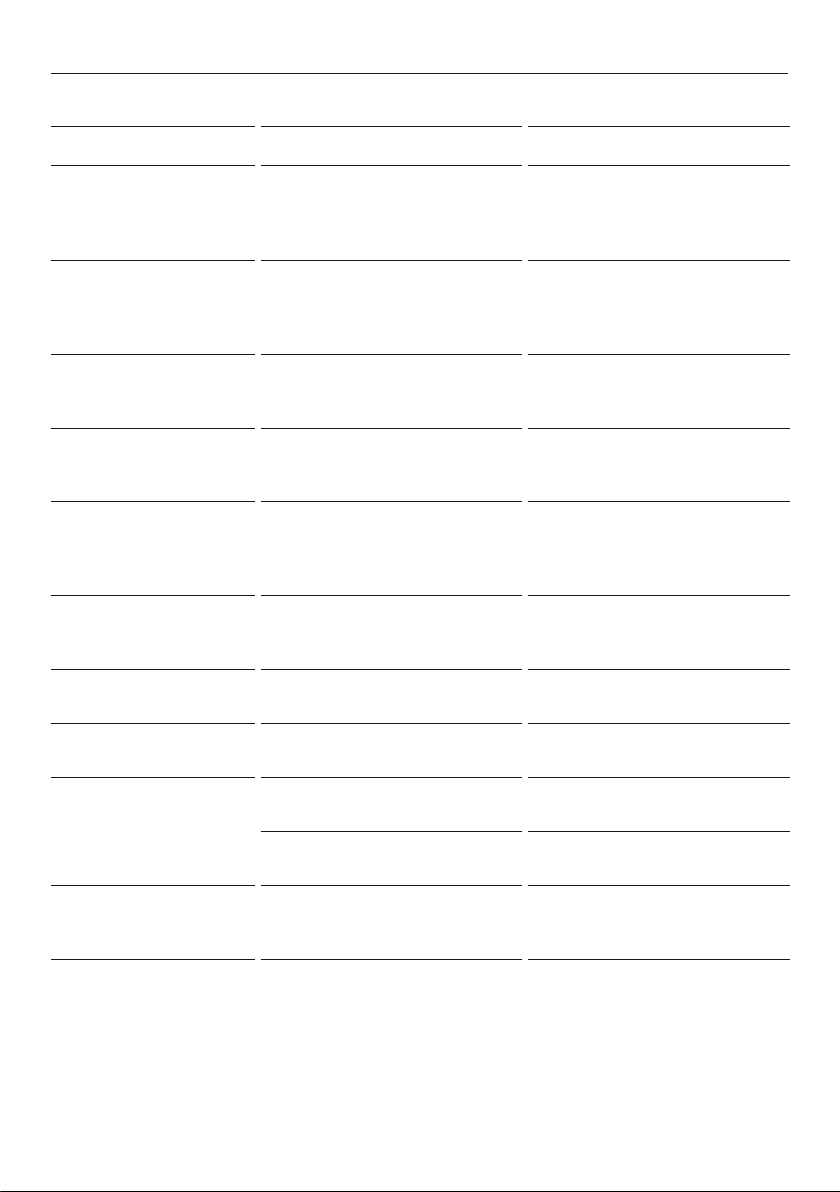
Oven features and accessories
1 Back trim
2 Burner grates
3 Control panel
4 Oven vent louvres
5 Oven seal
6 Side rack
4
7 Serial label
8 Toe kick
5
9 Secondary oven
6
!0 Main oven
7
!1 Broil rack
!2 Broil pan
10
Guard rail
Front bar
FIRST USE
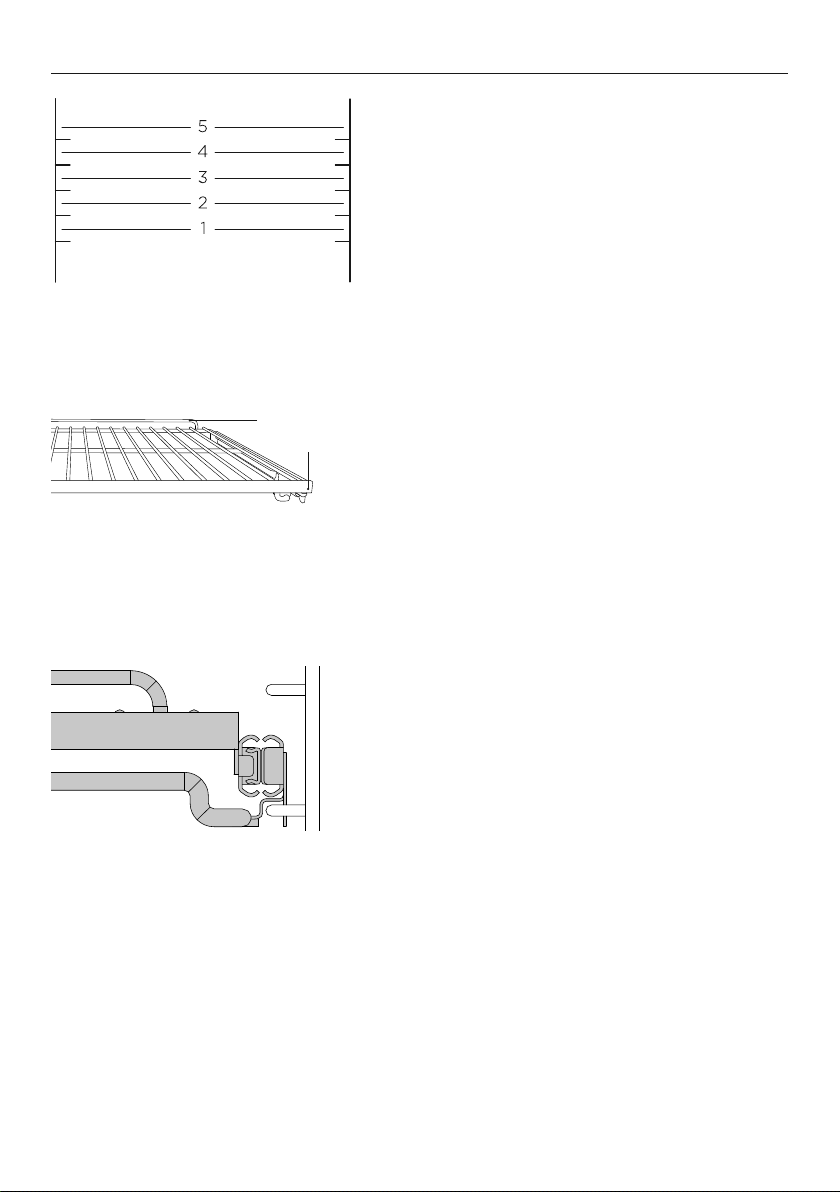
Shelf positions
Always position the oven shelves before turning
the oven on. Remove any unused shelves and
baking utensils from the oven.
For advice on which shelf position to use, see
sections 'Cooking charts'.
RGV3-488 main cavity illustrated
Replacing the shelves
1 Grip the shelf at the front (ensuring you
are holding the wire shelf and the sliding
frame together).
2 Ensure the shelf is level and facing the
right way with the guard rail at the back.
3 Place the shelf on top of the side racks
at the desired height, hooking the rear
tags over the side racks on both sides.
4 Push the shelf all the way into the oven,
making sure the front tags are also
securely hooked over the side racks.
Ensure sliding shelves are positioned on top
of the side rack wires instead of between
them.
The wire shelves and slides are built together
as one unit. When positioned correctly, the
slides will prevent the wire shelves from
tilting when pulled forward.
11
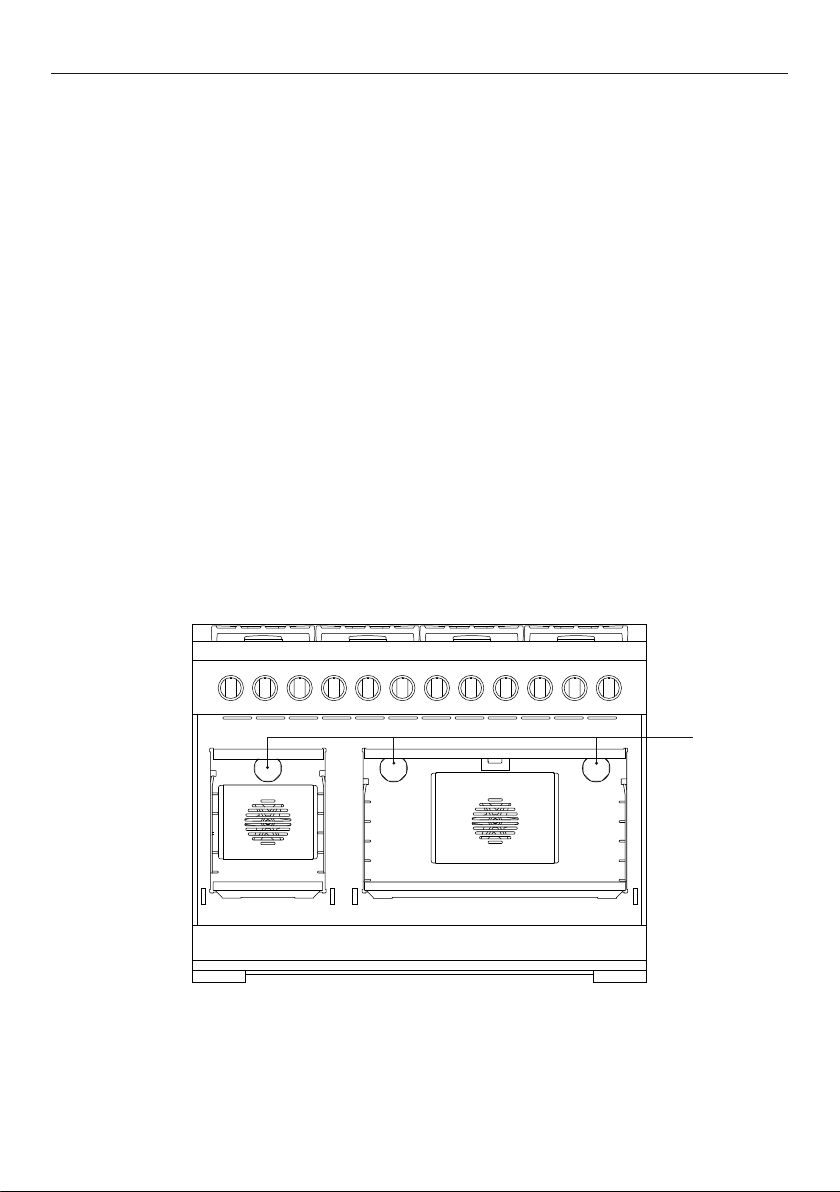
Control panel
RGV3-488 model illustrated
FIRST USE
3
6 6
55
54 55 5 51 25
Control panel features
1 Main oven mode dial
2 Main oven temperature dial
3 Secondary oven mode dial
4 Secondary oven temperature dial
5 Burner dials
6 Burner indicators
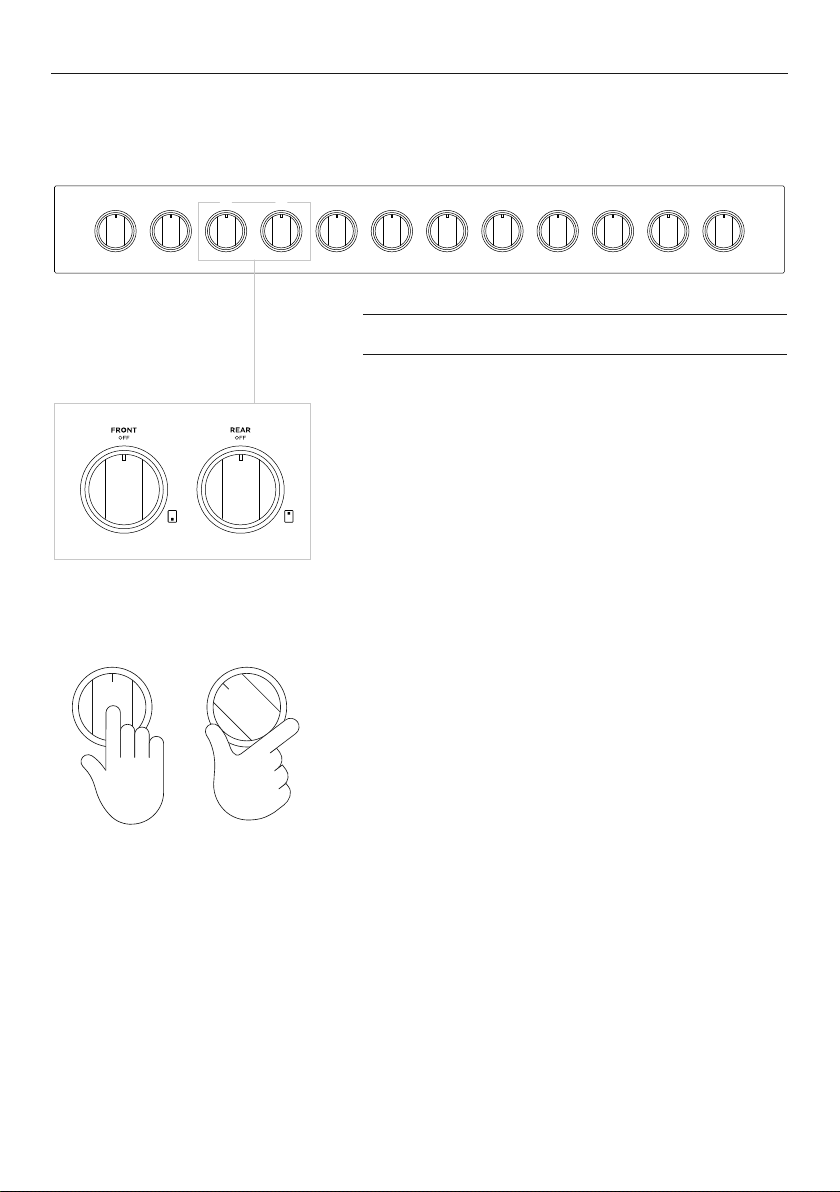
Using the burner and griddle* dials
To use the burner and griddle dials, push in and
turn counterclockwise to
LITE before turning to a flame setting.
LITE. Hold the dial at
Dial halos
When a function dial is in use, a red halo will
illuminate. When a temperature dial is in use, the
halo will transition from white to red as the cavity
reaches the set temperature (
PROOF will turn red immediately).
If all dials are turned
OFF, all halos will dim.
SLOW COOK, BROIL and
12
*some models only
FIRST USE
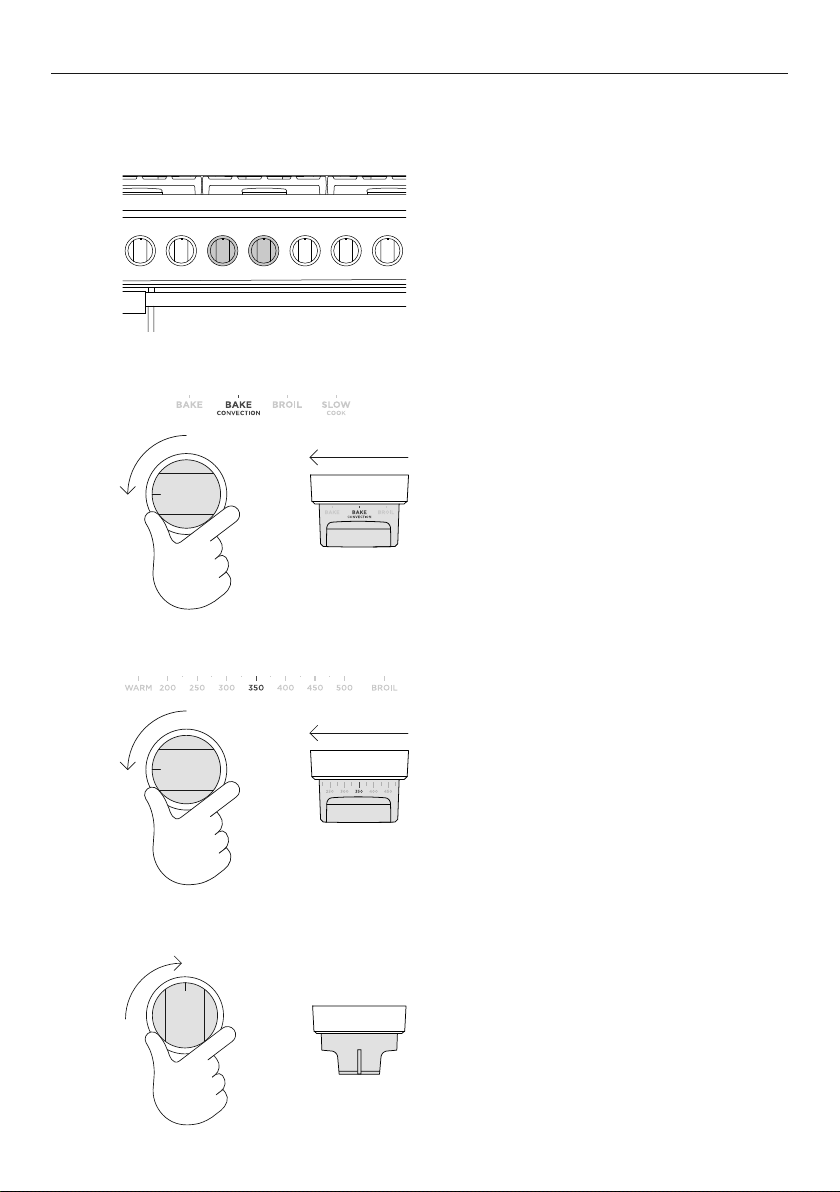
Setting a function and temperature
For more information on the functions, see the 'Cooking guide' section of this book.
Before you begin, identify the
1
desired oven cavity and its
corresponding OVEN MODE dial.
2
3
4
Set the oven function by turning the
dial counterclockwise.
Set the oven temperature by turning
the adjacent
counterclockwise to the desired
setting.
To stop cooking and turn the oven off,
turn the dial back to the OFF position.
TEMPERATURE dial
13

FIRST USE
Editing or cancelling cooking
Turn the function or temperature dial any point during cooking to adjust.
Changing the temperature
Turn the dial at any point during cooking to
change the temperature.
Changing the function
Turn the
cooking to change the function.
14
OVEN MODE dial at any point during

FIRST USE
Conditioning the oven
It is important to condition both cavities of your oven before using them for cooking.
This will burn off any manufacturing residues and ensure that you get the best results
right from the start.
Before you start
Ensure all packaging is removed and any cables used to secure the shelving during
transit. Make sure all shelves are fitted in the oven. Ensure the kitchen is well ventilated
during conditioning.
1
2
4
Set the oven to
heat for 30 minutes.
Main cavity
After 30 minutes change both dials to
BROIL and heat for a further 30 minutes.
When you have finished, turn the dial
clockwise back to OFF.
BAKE at 450
o
F (230oC) and
After conditioning
There will be a distinctive smell and a small amount of smoke during the conditioning
process as manufacturing residue is burnt off, this is normal. Once cooled, wipe out the
oven with a damp cloth and mild detergent, and dry thoroughly.
15

COOKING GUIDE
General guidelines
This range has been designed to utilise the bake burner, broiler and cavity fan in different
combinations to provide you with enhanced performance. The variety of functions, allows
you to cook all food types to perfection.
1
Oven elements
1 broil burner
2
2 cavity fan
3
3 bake burner (concealed)
Ensure all functions are used with the oven door closed.
Baking
z
For best results when baking, always pre-heat your oven.
z
Single shelf cooking: place your baking on a shelf that will position the top of your pan
near the centre of the oven.
z
Multi shelf cooking: Always leave a space between shelves to allow the air to circulate.
Broiling
z
Always broil with the oven door completely shut.
z
Always keep a close watch on your food to avoid charring or burning.
z
If you use glass or ceramic pans, be sure they can withstand high oven temperatures.
z
For thinner cuts of meat, or for toasting or browning foods, use a higher shelf position.
z
Thicker cuts of meats should be broiled on lower shelves or at a lower broil setting to
ensure even cooking.
Setting BROIL in the main cavity
Turn both the OVEN MODE and TEMPERATURE
dials to BROIL. The temperature is automatically
calibrated for optimal broiling.
Roasting
z
Boneless, rolled or stuffed roasts require longer than roasts containing bones. Poultry
should be well cooked with the juices running clear and a minimum internal temperature
of 165°F (75°C).
z
Always roast meat fat side up.
z
Use a meat thermometer to determine when meat is cooked.
z
Always rest the meat for at least 10 minutes after roasting to allow the juices to settle.
The meat will continue to cook for a few minutes after removing it from the oven.
16

COOKING GUIDE
Reheating
z
Never reheat food more than once.
z
Use BAKE to reheat food, once hot, use the BAKE function at 200°F (90°C) to keep the
food warm.
z
Always reheat food to piping hot, or to a minimum internal temperature of 185°F (85°C).
This reduces the risk of contamination.
z
Reheat food in a dish with a lid or cover tightly with foil.
Dough proofing
z
Place dough in a lightly oiled bowl and cover with a clean, damp cloth.
z
Position in the centre of the oven and to prevent overproofing check, every 30 minutes.
z
We recommend using the secondary cavity for proofing.
Proofing in the secondary cavity
Turn the secondary
the secondary TEMPERATURE dial to WARM. Preheat
for 5 minutes before placing the dough in the oven.
Once dough has risen to size, remove and turn the
OVEN MODE dial to OFF.
Proofing in the main cavity
Turn the main
main TEMPERATURE dial to WARM. Heat for 5
minutes before turning the TEMPERATURE dial to
OFF and placing the dough in the oven.
Once dough has risen to size, remove and turn the
OVEN MODE dial to OFF.
OVEN MODE dial to PROOF and
OVEN MODE dial to BAKE and the
17

COOKING GUIDE
BAKE
heat is generated by the lower burner
Ideal for:
foods that require a longer cooking time, eg rich fruit cake,
brownies, or bread.
z
Retains moisture.
z
Ideal for cakes and foods that require baking for a long
time or at low temperatures.
z
This function is not suitable for multi-shelf cooking.
BAKE CONVECTION
heat is generated by lower burner and distributed via fan
Ideal for:
Single shelf baking that requires less than an hour to cook.
Foods such as muffins, English scones, cupcakes & enchiladas.
z
Hot air is blown into cavity, providing a consistent
temperature.
z
If using for multi shelf cooking, always leave a gap between
to allow air to move freely. This ensures food on the lower
tray can still brown.
PROOF
heat is generated by the lower burner
z
The PROOF function is available in the secondary cavity
only, for full guidance refer to 'Dough Proofing'.
z
Gentle heat is generated from the lower burner.
z
Provides the optimum warm and draft-free environment for
proving yeast dough.
z
This method provides a faster proof time than at room
temperature.
18

COOKING GUIDE
SLOW COOK
heat is generated by lower burner and distributed via fan
This function has been designed in collaboration with Star-K
for religious faiths that observe a ‘no work’ requirement on
the Sabbath*.
Ideal for:
Slow-cooked dishes such as casseroles, stews and braises.
z
The fan circulates heat inside the cavity to gently cook food.
z
This function has low energy consumption. During use, the
lights will not be active.
z
The oven does not need preheating.
z
The recommended temperature for operating SLOW COOK is
250°F – 325°F (120°C – 165°C).
BROIL
heat is generated by the broil burner
Ideal for:
toasting bread or for top-browning to finish off dishes.
z
The BROIL function is available in the main cavity only, refer
to 'Broiling' for details.
z
Intense radiant heat is delivered from the broil burner.
z
For best results allow oven to preheat for 5 minutes.
z
The dial halo will remain red while using the broil function.
*Oven operation during Slow Cook mode has been developed in collaboration with Star-K (USA - www.star-k.org).
Further information for using the product in compliance with Jewish Law can be found on their websites
19

COOKING CHARTS
Shelf positions
z
Position shelves before you turn the oven on.
z
Shelf positions are counted from the base up, with
1 being the lowest shelf position and 5 the highest.
During cooking
z
Preheat the oven to the required temperature.
z
Oven accessories may temporarily deform slightly when they become hot. This is normal
and does not affect their function.
The information in these charts is for guidance only. Refer to your recipe or the packaging
and be prepared to adjust the cooking times and settings accordingly.
BAKING
SHELVES FUNCTION
SHELF
POSITION
TEMP
(°F)
TEMP
(°C)
BISCUITS
Plain Single Bake 3 400-425 210-220 8-15
Multi Bake Convection 2 and 4 425-450 215- 230 10-15
Chocolate chip Single Bake 3 355 - 375 180-190 10-15
Multi Bake Convection 2 and 4 325-340 160-170 10- 15
Sugar cookies Single Bake 4 350 - 375 175-190 7-15
Multi Bake Convection 2 and 4 325-350 160-175 7-15
CAKES
Pound cake Single Bake 3 325 160 70-80
Chocolate Brownie
(8"x8"/20x20cm pan)
Angel Food Cake
(10"x4"/25x10cm tube pan)
Single Bake 3 350 175 20- 25
Single Bake 3 325- 350
160-175
50-60
Rich Fruit Cake Single Bake 3 275-300 135- 150 3-6hrs
(single large) Single Bake 3 350 175 30-40
Sponge
(2x20cm) Single Bake 3 350 175 15-25
Sponge
TIME
(MIN)
SCONES
English Scones Single Bake 3 425-450 215-230 10-12
MERINGUES
Meringues Single Bake 3 250-270 120-130 60-70
20

COOKING CHARTS
BAKING
SHELVES FUNCTION
SHELF
POSITION
TEMP
(°F)
TEMP
(°C)
MUFFINS/CUPCAKES
Muffins Single Bake 3 345 170 23-30
Multi Bake Convection 2 and 4 345 170 23-30
Cupcakes Single Bake 3 365 185 13-18
Multi Bake Convection 2 and 4 345 170 13-18
BREAD/BREAD ROLLS
Sandwich Loaf
(9"x5"/23x13cm Loaf Pan)
Whole-wheat loaf
(9"x5"/23x13cm Loaf Pan)
Multi Bake 3 350 175 40-50
Single Bake 3 375 190 35-45
Soft Dinner Rolls Single Bake 3 375 190 15-18
Dough Proof Single Proof 2 LO LO 30
PASTRY
Pastry Shell
(baked blind)
Single Bake 1 350 175 15
PIES
Fruit pie
(2 crust) Single Bake Convection 3 400- 350 200-175 20-25
TIME
(MIN)
Baked cheesecake
(in waterbath)
Pumpkin pie
(blind bake, add filling)
English custard tart
(blind bake, then add filling)
DESSERTS
Crème brulee
(in waterbath)
Crème Caramel
(in waterbath)
Single Bake 2 325 160 50- 60
Single Bake 3 350 -375 175- 190 15 - 30
Single Bake 3 350-300 175-150 15- 30
Single Bake 2 275 135 35-45
Single Bake 2 350 175 35-45
21

COOKING CHARTS
SAVOURY
SHELVES FUNCTION
SHELF
POSITION
TEMP
(°F)
TEMP
(°C)
TIME
(MIN)
CORNBREAD Single Bake Convection 3 400 - 425 210-215 20- 25
VEGETABLES Single Bake Convection 3 350- 375 175- 190 30 - 50
LASAGNE Single Bake Convection 3 350- 375 175 -190 35-40
CASSEROLES Single Bake 2 300-350 150-175 1- 2 hrs
PIZZA Single Bake 1 425 220 10-15
QUICHE Single Bake Convection 3 350 175 15 - 30
POTATOES
Whole baked Single Bake 3 390 200 50- 60
FRITTATA
Grill to finish Single Bake Convection 3 340 - 360 170-180 15-20
OVEN MEALS Single Bake Convection 3 340-375 170-190 30- 40
ROASTING
SHELVES FUNCTION
SHELF
POSITION
TEMP
(°F)
TEMP
(°C)
TIME
(MIN)
BEEF, BONELESS (times per 1lb/450g)
Rare Single Bake 2 320-340 160- 170 18-32
Medium Single Bake 2 320-340 160- 170 25-40
Well done Single Bake 2 320-340 160-170 30-55
PRIME RIB ROAST
(times per 1lb/450g)
Rare Single Bake 2 320 -340 160-170 15-30
Medium Single Bake 2 320 -340 160-170 20-35
Well done Single Bake 2 320-340 160 -170 25-40
LAMB RACK
Medium Rare Single Bake 2 390 200 20
LAMB LEG, BONE IN
(times per 1lb/450g)
Medium Single Bake 2 320-340 160-170 18-28
Well done Single Bake 2 320-340 160 -170 20-33
22

COOKING CHARTS
ROASTING
SHELVES FUNCTION
SHELF
POSITION
TEMP
(°F)
TEMP
(°C)
(MIN)
LAMB LEG, BONELESS (times per 1lb/450g)
Medium Single Bake 2 320-340 160-170 20 -35
Well done Single Bake 2 320-340 160-170 25- 45
(times per 1lb/450g)
VEAL
Medium Single Bake 2 320-340 160-170 20-40
Well done Single Bake 2 320-340 160-170 25-45
CHICKEN (WHOLE)
(times per 1lb/450g)
Without stuffing Single Bake 2 350 175 15-20
With Stuffing Single Bake 2 350 175 17-22
Butterflied Single Bake 2 350 175 40-50
TURKEY, WHOLE
(times per 1lb/450g)
Stuffed Single Bake 1 or 2 320-340 160-170 17-22
Unstuffed Single Bake 2 or 2 300-330 150-165 15-20
PORK, BONELESS
(times per 1lb/450g)
Medium Single Bake 3 340-350 170-175 25-40
Well done Single Bake 3 340-350 170-175 30-45
PORK CRACKLING
Crisp Single Broil 3 or 4 430 220 5-10
TIME
VENISON
(times per 1”/2.5cm thickness)
Rare Single Bake 3 435 225 7
Medium Single Bake 3 435 225 9
BROILING
SHELVES FUNCTION
SHELF
POSITION
TEMP
(°F)
TEMP
(°C)
BEEF
Steak, rare Single Broil 4 Broil Broil 8-10
Steak, medium Single Broil 4 Broil Broil 10-15
(ground patties) Single Broil 3 Broil Broil 12 - 15
Burgers
Meatballs
(ground) Single Broil 3 Broil Broil 12-15
TIME
(MIN)
23

COOKING CHARTS
BROILING
SHELVES FUNCTION
SHELF
POSITION
TEMP
(°F)
TEMP
(°C)
TIME
(MIN)
LAMB CHOPS
Medium Single Broil 4 Broil Broil 15 - 20
Well done Single Broil 4 Broil Broil 20 - 25
PORK
Chops, well done Single Broil 3 Broil Broil 15 -20
Ham steak Single Broil 3 Broil Broil 15 - 20
Bacon Single Broil 3 Broil Broil 4-7
CHICKEN
Boneless pieces Single Broil 3 Broil Broil 30-40
Bone-in pieces Single Broil 3 Broil Broil 40-50
SAUSAGES Single Broil 3 Broil Broil 10 - 15
FISH
Fillets Single Broil 3 Broil Broil 8 -12
Whole Single Broil 3 Broil Broil 15 - 20
VEGETABLES
Sliced Single Broil 3 Broil Broil 8 - 12
24

Selecting and using burners
BURNER USE
1
2
3
Identify the desired burner and the
corresponding dial.
Push the dial in and turn counterclockwise
to
LITE. Hold the dial at LITE before turning
to a flame setting.
You should hear a clicking sound when
setting to
present, turn the dial back clockwise to OFF
and refer to 'Troubleshooting' for advice.
When the burner is lit, turn the dial to any
setting between
The clicking should stop as soon as
the burner is lit. If the burner doesn’t light,
and/or the clicking doesn’t stop, turn
the dial clockwise back to
'Troubleshooting' for advice.
LITE. If no clicking sound is
HI (high) and SIM (simmer).
OFF refer to
4
When you have finished cooking, turn the
dial clockwise back to
If you are using LP gas, there may be
a slight extinction pop or flash at the flame
spreader a few seconds after the burner has
been turned off. This is normal.
OFF.
25

BURNER USE
Manual lighting
If there has been a power outage, the burners can be manually lit. If the flame is blown
out during a power failure, turn the dial immediately to
and gas may escape.
OFF as the burner will not relight
1
2
3
Carefully hold a battery operated lighter
near the desired burner.
Push the dial in and turn counterclockwise
to LITE. Hold the dial at LITE before turning
to a flame setting.
When the burner is lit, turn the dial to any
setting between
HI (high) and SIM (simmer).
26
4
When you have finished cooking, turn the
dial clockwise back to
If you are using LP gas, there may be
a slight extinction pop or flash at the flame
spreader a few seconds after the burner has
been turned off. This is normal.
OFF.

BURNER USE
Burner use guidelines
Burner output
All burners have the same low turn-down setting (
hr). Use SIM for melting chocolate and butter, cooking rice and delicate sauces, simmering
soups and stews, and keeping cooked food hot.
For cooking that requires intense heat use the burners listed below. These have a higher
maximum output (23,500 BTU/hr for Natural gas) than other burners (17,000 BTU/hr for LP
gas).
RGV3-485GD models: Center burner
RGV3-488 models: Front left or front right burner
All other models: Front left burner
Use and care
z
Never leave the cooktop unattended when in use. Boil-over causes smoking and greasy
spills that may ignite.
z
Never allow flames to extend beyond cookware or curl up its sides. This could discolor
and damage the utensil and you may get burned touching a hot handle.
z
Keep handles out of the way. Turn handles so that they don’t extend over the edge of the
cooktop or another burner that is on.
z
Take care when deep-frying. Oil or fat can overheat very quickly, particularly on a high
setting.
z
Make sure that all burner parts are correctly fitted. Incorrectly or incompletely assembled
burners may produce dangerous flames. See 'Replacing burner parts'.
z
Keep the burners clean. Especially after a spill or boilover, ensure the affected burners
are cleaned before using them again. Food residue may clog the ignitor and the notches
of the flame spreader, stopping the burner from functioning correctly. See 'Care and
cleaning' for instructions.
z
Check that the burner flames are regular. They should be blue with no yellow tipping,
and burn without fluttering around the burner cap. If not, see 'Troubleshooting'
for advice.
z
Use woks only with a wok ring. Wok rings can be purchased separately through your
Fisher & Paykel dealer or Customer Care. To use, place the wok ring over the grates,
making sure the small protrusions on its bottom straddle the grate fingers. The wok ring
should be stable and unable to rotate.
SIM) for gentle simmering (1,300 BTU/
CORRECT INCORRECT
27

CARE AND CLEANING
ALWAYS NEVER
• Read these instructions and the 'Safety and warnings'
section before you start cleaning your range.
• Before cleaning or removing any part, make sure that
everything on the range has been turned off.
• Unless suggested otherwise in the chart following,
allow any part to cool to a safe temperature before
cleaning. If you do need to handle a warm or hot
part take extreme care. Wear long protective mitts to
avoid burns from steam or hot surfaces.
• Try using any cleaner on a small area first, to ensure it
doesn’t stain.
• See the pages following this chart for instructions on
removing and replacing different parts of the range
for cleaning or maintenance.
• Ensure the anti-tip device is re-engaged if you move
the range for cleaning. Failure to do this may result in
the oven tipping which may cause death.
• Use aerosol cleaners until the range
has completely cooled. The propellant
substance in these cleaners could catch
fire in the presence of heat.
• Let soiling or grease accumulate
anywhere in or on the range. This will
make future cleaning more difficult and
may present a fire hazard.
• Use any abrasive or harsh cleaners,
cloths, scouring pads or steel wool. These
will scratch your range and damage its
appearance.
• Use a steam cleaner to clean any part of
the range.
• Lift the black grill and griddle frames off
the cooktop.
Manual cleaning
WHAT? HOW? IMPORTANT!
Door frame exterior
Control panel
Sump area around
cooktop burners
Back trim
Control dials
Oven handles
Toe kick
• Soften any stubborn stains
using a hot soapy cloth before
cleaning with a solution of mild
detergent and hot water. Wipe
dry with a microfiber cloth.
• For extra shine, use a suitable
stainless steel cleaner and
polish, following manufacturer’s
instructions. Always rub the
stainless steel in the direction of
the polish lines.
• Wipe with a damp cloth using a
solution of mild detergent and
hot water then dry thoroughly
with microfiber cloth.
• If desired, the dials can be
removed for cleaning. Before
removing, ensure that dial is set
to OFF. Remove only one dial
at a time ensuring that you refit
completely and correctly.
• Always read the label to ensure
your stainless steel cleaner does
not contain chlorine compounds
as these are corrosive and may
damage the appearance of
your cooktop.
• Do not use stainless steel cleaner
on the dials, oven handles, or the
toe kick. These are not stainless
steel parts and their surface may be
damaged by stainless steel cleaner.
• When cleaning the back trim and
the top of the oven door, ensure
liquid does not run down the vents.
• Do not use stainless steel cleaner
on these parts, as doing so may
damage their coating.
• The dials are not interchangeable:
if removed for cleaning, do so one
at a time. This is to ensure that they
are replaced correctly.
28

CARE AND CLEANING
WHAT? HOW? IMPORTANT!
Enamel
oven interior –
light soiling
Side racks
Oven shelves To remove stubborn soiling, scrub
Broil pan and rack Pre-soak any stubborn soiling in
Burners Do not clean these parts. They
Oven door glass
(exterior)
Oven door gasket Avoid cleaning this part.
Wipe with a damp cloth and
a solution of hot water and
mild detergent then dry with a
soft cloth.
Note: the oven door may be
removed for ease of access.
Pre-soak any stubborn, soiling,
then clean with a solution of mild
detergent and hot water and wipe
dry with a microfiber cloth. These
parts are dishwasher safe
with a damp, soap-filled, nonabrasive pad, then wipe dry.
Apply a chrome cleaner with a
damp sponge or cloth following
manufacturer instructions. the
wipe and dry.
a solution of mild detergent and
hot water. Wash by hand or in
a dishwasher.
self-clean during normal use.
Clean using a soft cloth and
a mixture of warm water and
dishwashing liquid or glass cleaner.
To remove large food particles,
dampen a sponge with hot water
and gently wipe — do not rub
Press a towel gently on the gasket
to dry.
• To prevent soiling from becoming
‘baked on’, we recommend
removing any easy-to-reach spills,
from the enamel after each use.
Do not wash the main oven shelves
in the dishwasher — doing so will
remove the lubricating grease in
the slides, stopping them from
running smoothly.
Do not use any cleaning agent on
the gasket.
The gasket is essential for a good
seal. Take care not to rub, displace, or
damage it.
29

CARE AND CLEANING
WHAT? HOW? IMPORTANT!
Burner caps and brass
flame spreaders
Ignitors Ensure the burner is turned
Burner grates
Wok ring
(not supplied)
Ensure the burner is turned OFF
and cool. Lift off the burner cap
and brass flame spreader and wash
in hot soapy water. Rinse and dry.
Use a stiff nylon brush or straightended paper clip to clear the
notches of the flame spreader.
Replace the flame spreader
and burner cap correctly. See
'Replacing burner parts'.
Clean the ignitor with a small
brush or cotton swab that has
been dipped into rubbing alcohol.
Ensure grates/wok ring has cooled
completely before carefully lifting
them off the cooktop. Place on
a protected surface. To remove
stubborn stains, soak the grates
in a mixture of clothes detergent
and water.Wash in a mixture of hot
water and dishwashing liquid, then
rinse and allow to dry. The grates
are also dishwasher safe.
OFF.
Keep the notches of the flame
spreaders clear. Soiling may clog
these and cause ignition problems.
Before replacing the burner parts,
ensure they are dry. Wet burner parts
may result in an irregular flame.
Before lighting a burner, ensure
all parts are positioned correctly.
Incorrect assembly can cause
dangerous irregular flames and
ignition problems.
The ignitors must be kept clean
and dry to work correctly. Dirty or
wet ignitors could cause constant
clicking and sparking, even if a flame
is present.
Take care, the grates are heavy.
Ensure you place a dish towel or
other soft cover on the surface before
putting a grate on it.
30

CARE AND CLEANING
Removing the side racks
Remove the side racks to make cleaning the oven easier.
Always turn the oven off at the wall first. Ensure the oven has cooled down completely
before starting.
1
2
3
Slide out all shelves and remove.
Gently pull down on the retaining wire
from underneath the lock stud. The
retaining wire will pop out.
Swing the bottom of the side rack up
towards the center of the oven until it
is almost horizontal. Slide the prongs
at the top out of the mounting slots.
31

Refitting the side racks
1
2
CARE AND CLEANING
Supporting the side rack from
underneath, hold it almost horizontally
and place the prongs into the
mounting slots.
Ensure the prongs are fully inserted
into the slots, then lower the side rack
carefully, and gently push the retaining
wire underneath the lock stud.
32
CARE AND CLEANING
Replacing the oven light bulbs
Use a 40 W, 120 V appliance light bulb for replacement. Do not use a standard light bulb
in any oven, the heat will break it.
Changing the bulb
1 Allow the oven (including the lamp cover and the bulb) to cool completely.
2 Remove any shelves that may get in the way.
3 Remove the door if the lamp will be hard to reach.
4 Turn the power supply to the range off at the main fuse or circuit breaker panel. If you
don’t know how to do this, contact an electrician.
IMPORTANT!
Failure to disconnect the range from the power supply may result in death or
electrical shock.
5 Remove the lamp cover: turn it counterclockwise to unscrew.
6 Remove the faulty bulb and replace with a new 40 W appliance light bulb.
7 Replace the lamp cover: turn it clockwise to tighten.
8 Turn the power supply to the range back on at the main fuse or circuit breaker panel.
Lamp covers
33

CARE AND CLEANING
Removing and refitting the oven door.
z
Take care, the oven door is heavy.
z
Do not lift the oven door by its handle. Doing so may damage the door.
z
Ensure the oven and the door are cool before you begin to remove the door.
z
Before removing the door, ensure there is a large enough clear, protected surface in
the kitchen to rest the door on.
To remove the door
Open the door completely.
1
34
2
3
Open the hinge locks fully on both sides.
Holding the door on both sides, lift door
back up to 45° and carefully pull the door
out and away from the hinges.

To refit the door
1
CARE AND CLEANING
Holding the door at 45°, carefully align the
hinge tongues with the hinge slots. Push
the door in until you feel the latches slot
into position on each side.
2
3
4
Open the door completely and ensure both
hinges are secured by the correct notches.
Rotate the locks up into the closed
position ensuring they rest inside the
slots completely. Incorrect installation will
prevent door from correctly sealing.
Close the oven door ensuring that when
closed, the door is vertical and parallel to
any surrounding cabinetry.
35
CARE AND CLEANING
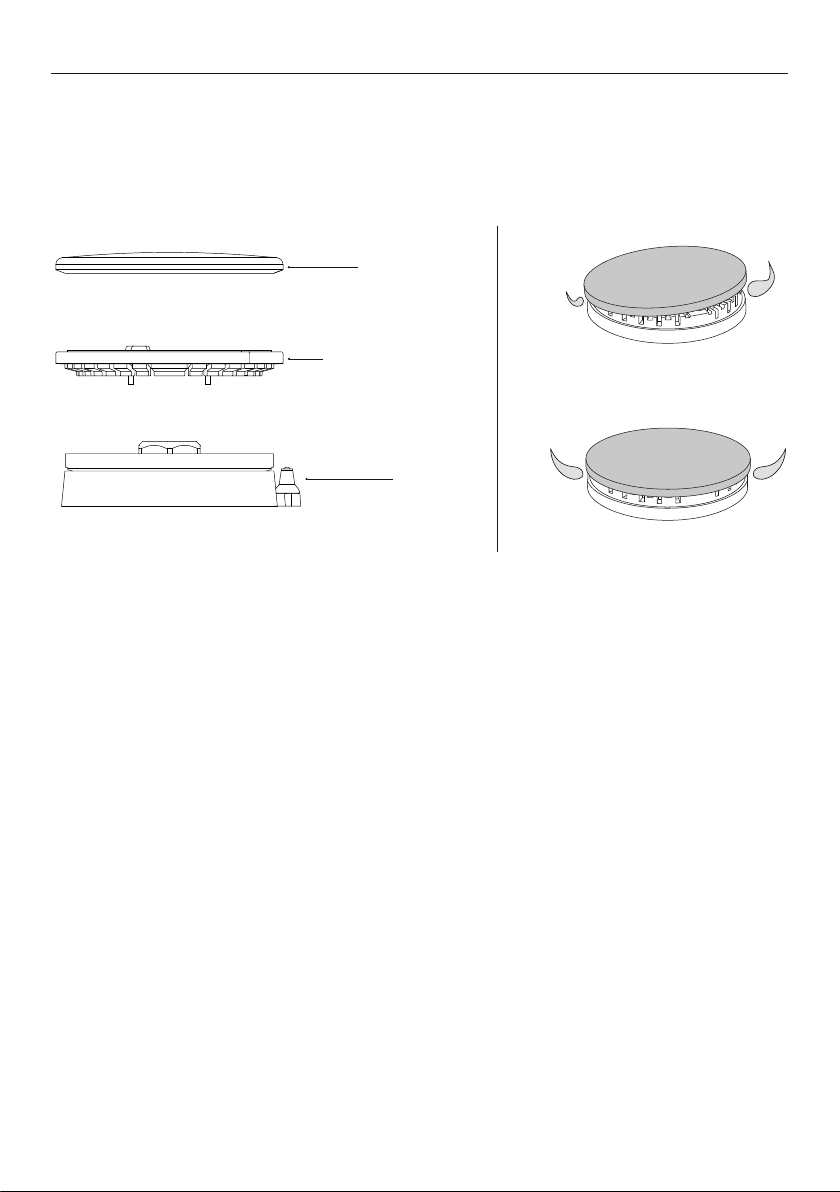
Replacing burner parts
When replacing the burners, ensure the two locating pins on the bottom of the brass flame
spreader are correctly aligned with the locating pin holes on the top of the simmer ring.
Incorrect alignment will produce a potentially dangerous flame and cause poor burner
performance.
Burner cap
Flame spreader
Ignitor
Incorrect alignment
Correct alignment
36

TROUBLESHOOTING
If there is a problem with your oven, please check the following points before contacting
your local Fisher & Paykel trained and supported service technician or the Customer Care
Centre.
General
PROBLEM POSSIBLE CAUSES WHAT TO DO
The oven does not work
(no heating).
One of the oven lights
does not come on, but the
oven works.
The oven is not heating. The door is not properly closed or
A glass pane in the
oven door has cracked,
chipped, or shattered.
I can feel hot air blowing
out of the vents after I
have turned the oven off.
Steam coming from vents
at the back of the range.
The oven fan comes on
when I select a function
that does not use a fan
(eg BAKE).
The oven fan comes on
when I select a function
that does not use a fan
BAKE).
(eg
No power supply (oven light and
dial halos do not come on)
No gas supply The supply to the house may be
The oven light bulb(s) have
blown
The light bulb is loose Ensure bulb is secure See 'Care
it is opened too frequently during
cooking
Incorrect cleaning or the edge of
the glass hitting against something
This is normal For safety reasons the cooling fans
Moisture from food evaporating
during cooking
This is normal. The fan comes on
while the oven is preheating. It
may turn off when the oven has
reached the set temperature
When heating from cold, your
oven is designed to initially heat
to a temperature higher than what
is set
Ensure the circuit breaker hasn’t
tripped and there is no power
outage in your area. If there is a
power outage, you cannot use the
oven until power is restored.
faulty or there may be an outage.
Contact your local gas supplier.
Replace the light bulb(s). See 'Care
and cleaning' for instructions.
and cleaning' for instructions.
The heating elements are disabled
while the door is open. Ensure the
door is properly closed and avoid
opening it during cooking.
You must NOT use the oven.
Contact a Fisher & Paykel trained
and supported service technician
or Customer Care.
will continue to run even when you
have turned the oven off. The fans
will switch off automatically.
This is normal, especially if you are
cooking large quantities of food.
37
TROUBLESHOOTING
General
PROBLEM POSSIBLE CAUSES WHAT TO DO
The oven has reached the
set temperature but the
temperature dial halo is
still red.
The oven sounds a tone
when I try to set the
temperature below a
certain temperature.
The temperature dial halo
never turns white when I
use BROIL
Fan noise and warm air
coming from the range
during and after use.
Condensation around oven
(eg on control panel or
top of oven door).
The oven door does not
align with the control
panel or cabinetry.
Temperature is not
calibrated correctly.
The fan does not come on
in a convection mode.
Uneven baking. Oven not correctly preheated Ensure the dial halo has changed
The halo around the dial
alternates between white
and red during use.
.
The oven is set to BROIL This is normal. The dial halo will
stay red whenever this function
is in use as the broil element is
always heating.
This is normal: for food safety
reasons, the oven functions
have factory-set minimum
temperature settings
This is normal: the halo stays red
to indicate that the broil element
provides instant radiant heat
A cooling fan in the range runs to
prevent the oven door and control
panel from overheating
Food has high moisture content
or the local climate is contributing
to condensation
The oven door has been installed
incorrectly and the hinges are
misaligned within the slots
Door is not sealing correctly Re-install the door. See ‘Care and
Technical fault Contact your Authorized Service
Unsuitable or incorrectly
arranged bakeware
The oven needs to heat
periodically to maintain the set
temperature during use
Select a different temperature
or try a different function that is
designed for low temperatures.
This is normal and requires
no action.
If there is frequent or excessive
condensation, ensure that
cabinetry around the range is
moisture-proof.
Re-install the door. See 'Care and
cleaning' for instructions.
cleaning’ for instructions.
Center or Customer Care.
to red before beginning.
See 'Cooking guide' for advice.
This is normal.
38

TROUBLESHOOTING
Cooktop burners
PROBLEM POSSIBLE CAUSES WHAT TO DO
The ignitor keeps clicking
(continuous spark) even
when a burner has lit.
None of the burners
will light.
Some burners will not
light – Flames do not burn
all around the burner cap.
There is no clicking when I
try to light a burner.
There is a slight ‘extinction
pop’ or flash after I’ve
turned a burner off.
The flames have suddenly
gone out.
The burner flames are
uneven, very large, yellow
or yellow-tipped or sooty.
Dirty or wet ignitor(s) Clean the ignitor(s).
See 'Care and cleaning'
for guidance.
No power supply The cooktop burners can still be
used. To light them manually refer
to 'Manual lighting' for guidance.
No gas supply Check that the gas supply to the
house is working. You should hear
the gas when you turn a burner on.
If you are using bottled gas, check
that it is not empty.
Burner parts or ignitors may be
wet, dirty, or misaligned.
The ignitor is dirty or there is a
power outage.
This is normal for LP gas and
requires no action.
A draft or a spill has extinguished
the flame.
Technical fault: the gas is the
wrong type or hasn’t been
adjusted properly.
Check that the burner parts
are clean, dry, and correctly
assembled. Ensure the ignitors
are clean and dry. See 'Care and
cleaning' for guidance.
Clean the ignitor(s).
See 'Care and cleaning'
for guidance.
No action required. The burner
will detect this and automatically
relight. However, if there has
been a large spill, we recommend
turning the burners off and
cleaning the burners and sump
area. See 'Care and cleaning'
for guidance.
Do not use your cooktop burners.
Contact a Fisher & Paykel trained
and supported service technician or
Customer Care.
39

ALERT CODES
If there is a problem, the oven will automatically suspend all oven functions and either the
TEMPERATURE or OVEN MODE dial will flash.
Do not turn off the mains power supply to the oven (wall switch) if you get an alert
unless the instructions in the chart following instruct you to. There are cooling fans within
the oven which are needed to cool the oven’s components. Turning off the power while
the oven is too hot may damage the oven and its surrounding cabinetry.
What to do if an alert is displayed
1 Make a note of the alert displayed. You may need this information.
2 If you can fix the problem and the alert code does not reappear, you may continue
using your oven.
If you can’t fix the problem yourself or the alert reappears and the problem persists: wait
until the cooling fans have stopped and the oven has completely cooled down, then turn
the power to the oven off at the wall and contact a Fisher & Paykel trained and supported
service technician or Customer Care with the alert code information.
ALERT POSSIBLE CAUSES WHAT TO DO
Electronics fault • Allow the oven to cool down.
• Once the oven has cooled completely,
The
OVEN MODE dial
is flashing red
disconnect and reconnect the power supply
• If the alert reappears, contact a
Fisher & Paykel trained and supported service
technician or Customer Care.
The TEMPERATURE
dial is flashing red
The OVEN MODE dial
is flashing white
40
Electronics fault • Allow the oven to cool down.
• Once the oven has cooled completely,
disconnect and reconnect the power supply
• If the alert reappears, contact a
Fisher & Paykel trained and supported service
technician or Customer Care.
Technical fault • Contact a Fisher & Paykel trained and
supported service technician or Customer
Care.

WARRANTY AND SERVICE
Before you call for service or assistance
Refer to the installation guide and user guide and check that your product is correctly
installed and you are familiar with its normal operation.
If after checking these points you still need assistance or parts, please refer to the Service
& Warranty book for warranty details and your nearest Service Center, Customer Care, or
contact us through our website www.fisherpaykel.com
Complete and keep for safe reference:
Model
Serial No.
Purchase Date
Purchaser
Dealer
Suburb
Town
Country
41

FISHERPAYKEL.COM
© Fisher & Paykel Appliances 2020. All rights reserved.
The models shown in this guide may not be available in all markets
The product specifications in this guide apply to the specific products and
models described at the date of issue. Under our policy of continuous product
improvement, these specifications may change at any time.
For current details about model and specification availability in your country,
please go to our website or contact your local Fisher&Paykel dealer.
and are subject to change at any time.
592181A 05.20
 Loading...