

Fisher Paykel RF135BDLUX4, RF170WDLX5N, RF170WDLX5, RF201ADUSX5N, RF201ADUSX5 User Manual
...
servIce summary
Refrigeration
RF135B, RF170A, RF170W, RF201A, RS36A72J, RS36A72U, RS36A80J, RS36A80U, E522B models
US CA
Important!
SAVE THESE INSTRUCTIONS
This information is intended for use by individuals possessing adequate experience in servicing electrical, electronic and
mechanical appliances. Any attempt to repair a major appliance may result in personal injury and property damage. The
manufacturer or seller cannot be responsible for the interpretation of this information, nor can it assume any liability in
connection with its use.
!
IMPORTANT SAFETY INSTRUCTIONS!
CAUTION:
This machine must be electrically grounded. It can be grounded through the grounding lead in the 3-prong
power cord, if plugged into a properly grounded appliance outlet or through a separate No. 13 (14 gauge
(1.5mm)) or large wire from the cabinet to an established ground. In all cases the grounding method must
comply with any local electrical code requirements. Certain internal parts are intentionally NOT GROUNDED and
may present a risk of electrical shock only during servicing. To reduce the risk of shock, disconnect the power
supply cord before servicing.
CAUTION: ALL TERMINALS AND INTERNAL PARTS SHOULD BE TREATED AS LIVE.
IMPORTANT – RE-CONNECT ALL GROUNDING DEVICES.
If grounding wires, screws, straps, clips, nuts or washers used to complete a path to ground are removed for
service, they must be returned to their original position and properly fastened.
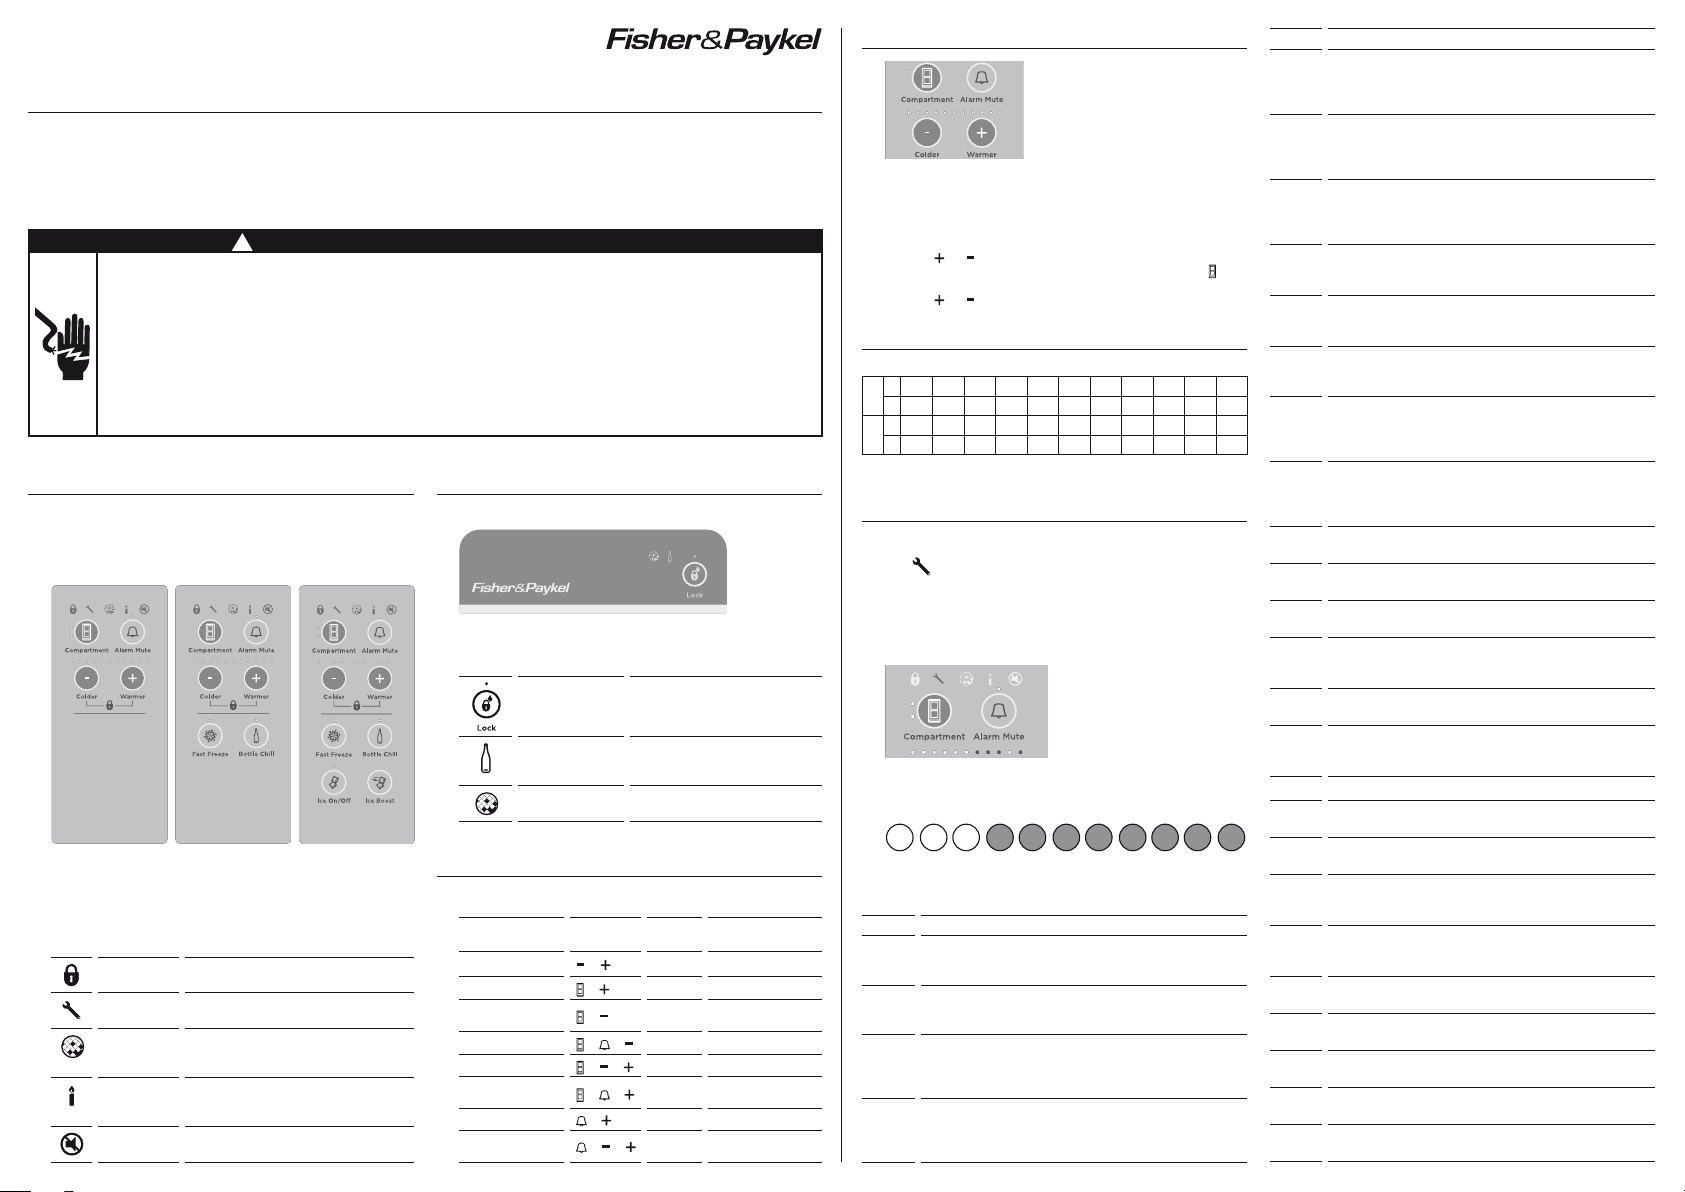
1 INTERNAL LED DISPLAY INTERFACE
All models are fitted with an internal display which
consists of several LED indicators and several capacitive
touch buttons. Three versions of the internal display are
shown below.
Internal display for
Tasman models
There are five LED indicators along the top of the display.
These are:
Key Lock Illuminated when keys are disabled.
Spanner Illuminated when a fault is detected
Filter
change
indicator
Sabbath
mode
Key Mute Illuminated when key beeps are
Internal display
for Designer and
Elegance models
in the product.
Illuminated when the timer for the
filter has expired. Only applicable to
ice & water models.
Illuminated when Sabbath mode is
enabled. In this mode all other LEDs
are off and all keys are locked.
muted.
Internal display for
Ice & Water models
2 EXTERNAL LED DISPLAY INTERFACE
Ice & Water models are fitted with an external display.
External display for Ice & Water models
There is one button with LED indicator and two LED icons
along the top of the display.
Dispenser lock
button and light
Bottle Chill
indicator
Filter change
indicator
Locks/unlocks the water
dispenser. Light is on when
the water dispenser is locked.
Indicates when ‘Bottle Chill’ is
on and flashes when beverage
is ready.
Indicates when the water
filter requires changing.
3 KEY PRESSES
Secondary functions are entered through multiple button
presses on the LED display interface. These are:
FUNCTION KEY
Key Lock
Diagnostic mode
Manually force
defrost
Sabbath mode
Showroom mode
Disable filter
alarm
Filter reset
Manually force
icemaker
PRESSES
+
+
+
+ +
+ +
+ +
+
+ +
ACTION PRESS TIME
On/Off Hold for 4 seconds
On Hold for 4 seconds
On Hold for 4 seconds
On/Off Hold for 4 seconds
On/Off Hold for 4 seconds
On/Off Hold for 4 seconds
Reset Hold for 4 seconds
Activate Hold for 4 seconds
4 TEMPERATURE ADJUSTMENT
Internal controls for temperature adjustment
To adjust compartment temperatures:
1 The PC compartment LED will automatically be illuminated.
The temperature will show as a series of LEDs.
2 Use the or to adjust the PC temperature.
3 To adjust the FC compartment temperature press the
button once so the FC compartment LED is illuminated.
4 Use the or to adjust the FC temperature.
5 TEMPERATURE SETTINGS
The default set temperatures are shown below:
°F 32.0 32.9 33.8 34.7 35.6 37. 4 39.2 41.0 42.8 44.6 46.4
PC
°C 0.0 0.5 1.0 1.5 2 .0 3.0 4.0 5.0 6.0 7.0 8.0
°F -7. 6 -5.8 -4.0 -3.1 -1.3 -0.4 1.4 2.3 4.1 5.0 6.8
FC
°C -22.0 -21.0 -20.0 -19.5 -18.5 -18.0 -1 7.0 -16.5 -15.5 -15.0 -14.0
Note these are approximate temperatures
6 ELECTRONIC/ELECTRICAL FAULTS
Fault codes
The
icon will appear automatically if there is a fault in
the temperature measuring system, defrost system, fans or
low ambient heater. When the PC door is opened an alarm
will sound.
– The number of beeps will indicate the fault code.
– OR adding the value of illuminated LEDs will indicate
the fault code.
Fault indicated on Internal control panel
The temperature LEDs display the fault reading in a binary code.
– – – 128 32 16 8 4 2 164
The value for each temperature LED (read from right to left)
VALUE TABLE OF FAULTS
1
Reason: On last power up, the power module failed
self test.
Primary action: Replace power module.
2 Reason: The previous 2 defrosts were aborted after
40minutes.
Primary action: Check defrost element.
3 Reason: The resistance of all the temperature
sensors is outside the normal range (>45K Ohms).
Primary action: Check the connector at the power
module.
4 Reason: The resistance of all the temperature
sensors is outside the normal range (< 660 Ohms).
Primary action: Check the connector at the power
module.
VALUE TABLE OF FAULTS
5 Reason: The resistance of the FC sensors is outside
the normal range (>45K Ohms).
Primary action: Check sensor connector at power
module.
6 Reason: The resistance of the FC sensors is outside
the normal range (<660 Ohms).
Primary action: Check sensor connector at power
module.
7 Reason: The resistance of the defrost sensor is
outside the normal range (>45K Ohms).
Primary action: Check sensor connector at power
module.
8 Reason: The resistance of the defrost sensor is
outside the normal range (<660 Ohms).
Primary action: Check sensor connector.
9 Reason: The resistance of the PC sensors is outside
the normal range (>45K Ohms).
Primary action: Check sensor connector.
10 Reason: The resistance of the PC sensors is outside
the normal range (<660 Ohms).
Primary action: Check sensor connector.
11 Reason: The current for the LAH, PC & FC fan is
lower than expected.
Primary action: Check the fan/LAH connector at
module.
12 Reason: The current for the LAH, PC & FC fan is
higher than expected.
Primary action: Check the fan/LAH connector at
module.
13 Reason: LAH is drawing less current than expected.
Primary action: LAH open circuit.
14 Reason: LAH is drawing higher current than expected.
Primary action: Check wiring connection.
15 Reason: PC fan is drawing less current than expected.
Primary action: PC fan open circuit.
16 Reason: PC fan is drawing higher than expected
current.
Primary action: Check fan wiring or connections.
17 Reason: FC fan is drawing less current than expected.
Primary action: FC fan open circuit.
18 Reason: FC fan is drawing higher current than
expected.
Primary action: Check FC fan & wiring circuit.
19
Reserved.
20 Reason: Flapper heater current low.
Primary action: Check for open circuit.
21 Reason: Flapper current high.
Primary action: Check for short circuit.
22 Reason: PC2 sensor/Ambient sensor outside limit
(>45K Ohms).
Primary action: Check connection at module.
23 Reason: PC2 sensor/Ambient sensor outside limit
(<660 Ohms).
Primary action: Check connection at module.
24 Reason: IM sensor outside limit (>45K Ohms).
Primary action: Check connection at module.
25 Reason: IM sensor outside limit (<660 Ohms).
Primary action: Check connection at module.
26 Reason: IM Motor timed out.
Primary action: Check gearbox operation.
27 Reason: IM Motor current too high.
Primary action: Check for obstruction.
28 Reason: IM Water solenoid current high.
Primary action: Check solenoid resistance.
VALUE TABLE OF FAULTS
29 Reason: IM Water solenoid current low.
Primary action: Open circuit solenoid.
30 Reason: No display signal.
Primary action: Check short/broken wire. Test wire
continuity.
31 Reason: No display signal.
Primary action: Check short clock/data line. Test
wire continuity.
32 Reason: Display water transistor 1 failure.
Primary action: Check solenoid valve resistance.
Secondary action: Replace dispenser display.
33 Reason: Display water transistor 2 failure.
Primary action: Check solenoid valve resistance.
Secondary action: Replace dispenser display.
34 Reason: Display water transistor 1 and 2 failure.
Primary action: Check solenoid valve resistance.
Secondary action: Replace dispenser display.
40 Reason: IM solenoid short circuit transistor 1.
Primary action: Check solenoid resistance.
41 Reason: IM solenoid short circuit transistor 2.
Primary action: Check connections.
42 Reason: IM heater is drawing higher current than
expected.
Primary action: Check wiring connection.
43 Reason: IM heater is drawing less current than
expected.
Primary action: IM heater open circuit.
49 Reason: Communication error between control
module and inverter
Primary action: Check wiring connections on
control module and inverter.
Secondary action: Replace control module
Tertiary action: Replace inverter
7 DIAGNOSTIC MODE
There are several diagnostic modes available to the service
technician to assist them in diagnosing product faults.
To enter diagnostic mode, press and hold the and
buttons together for 4seconds.
The temperature LEDs indicate the current diagnostic mode.
When diagnostic mode is first entered it will be in PC
temperature sensor mode (2). Use the
scroll through the various diagnostic modes (1 – 8).
To return to normal operation press the button once.
The following temperature LEDs are illuminated to indicate
the current diagnostic mode:
MODE DESCRIPTION
1
2 Provisions compartment (PC) temperature
3
4
5
6 Provisions compartment 2nd (PC2) temperature
7
8
Optical Download
sensor
Freezer compartment (FC) temperature sensor
Evaporator (EV) temperature sensor
Inputs and Outputs display
sensor or Ambient temperature sensor (French
door models only)
Ice Tray Temperature sensor
Fault History
and buttons to
Diagnostic mode 1
Optical Download
This sends encoded data through the Key Lock LED
indicator at the top of the display.
A light pen is required to retrieve information from the
power/control module.
– Light Pen (425930) & a laptop computer with F&P
Smart Tool diagnostic program installed.
1 Enter diagnostic mode.
2 Scroll to the Optical Download mode by pressing the
button once.
3 Place a light pen over the Key Lock LED indicator until
download is complete.
4 Return to normal operation by pressing the button.
Diagnostic modes 2, 3, 4, 6 and 7
Temperature Sensor Indication
In these modes LED indicators and temperature LEDs are
used to show the temperature reading of sensors.
The following table shows which LED indicators are used to
represent the various temperature sensors.
TEMPERATURE SENSOR LED INDICATOR
2 – PC temp PC Compartment
3 – FC temp FC Compartment
4 – EV temp PC + FC Compartment
6 – PC2 temp/Ambient
temp (FD models)
PC compart + Blinking
7 – Ice tray temp Ice On/Off
The temperature LEDs display the temperature reading in a
binary code.
– – – 64 16 8 4 2 1 0.532
The value for each temperature LED (°C)
cautIon!
In reading sensor temperatures there is a need to enter the
required diagnostic mode as soon as soon as possible as
temperatures will change rapidly once door is opened.
1 Enter diagnostic mode and then scroll to the desired mode
using the
2 Add up the binary number indicated by the temperature
LEDs.
3 Subtract 40 from the result in order to get the temperature.
4 Return to normal operation by pressing the button.
button.
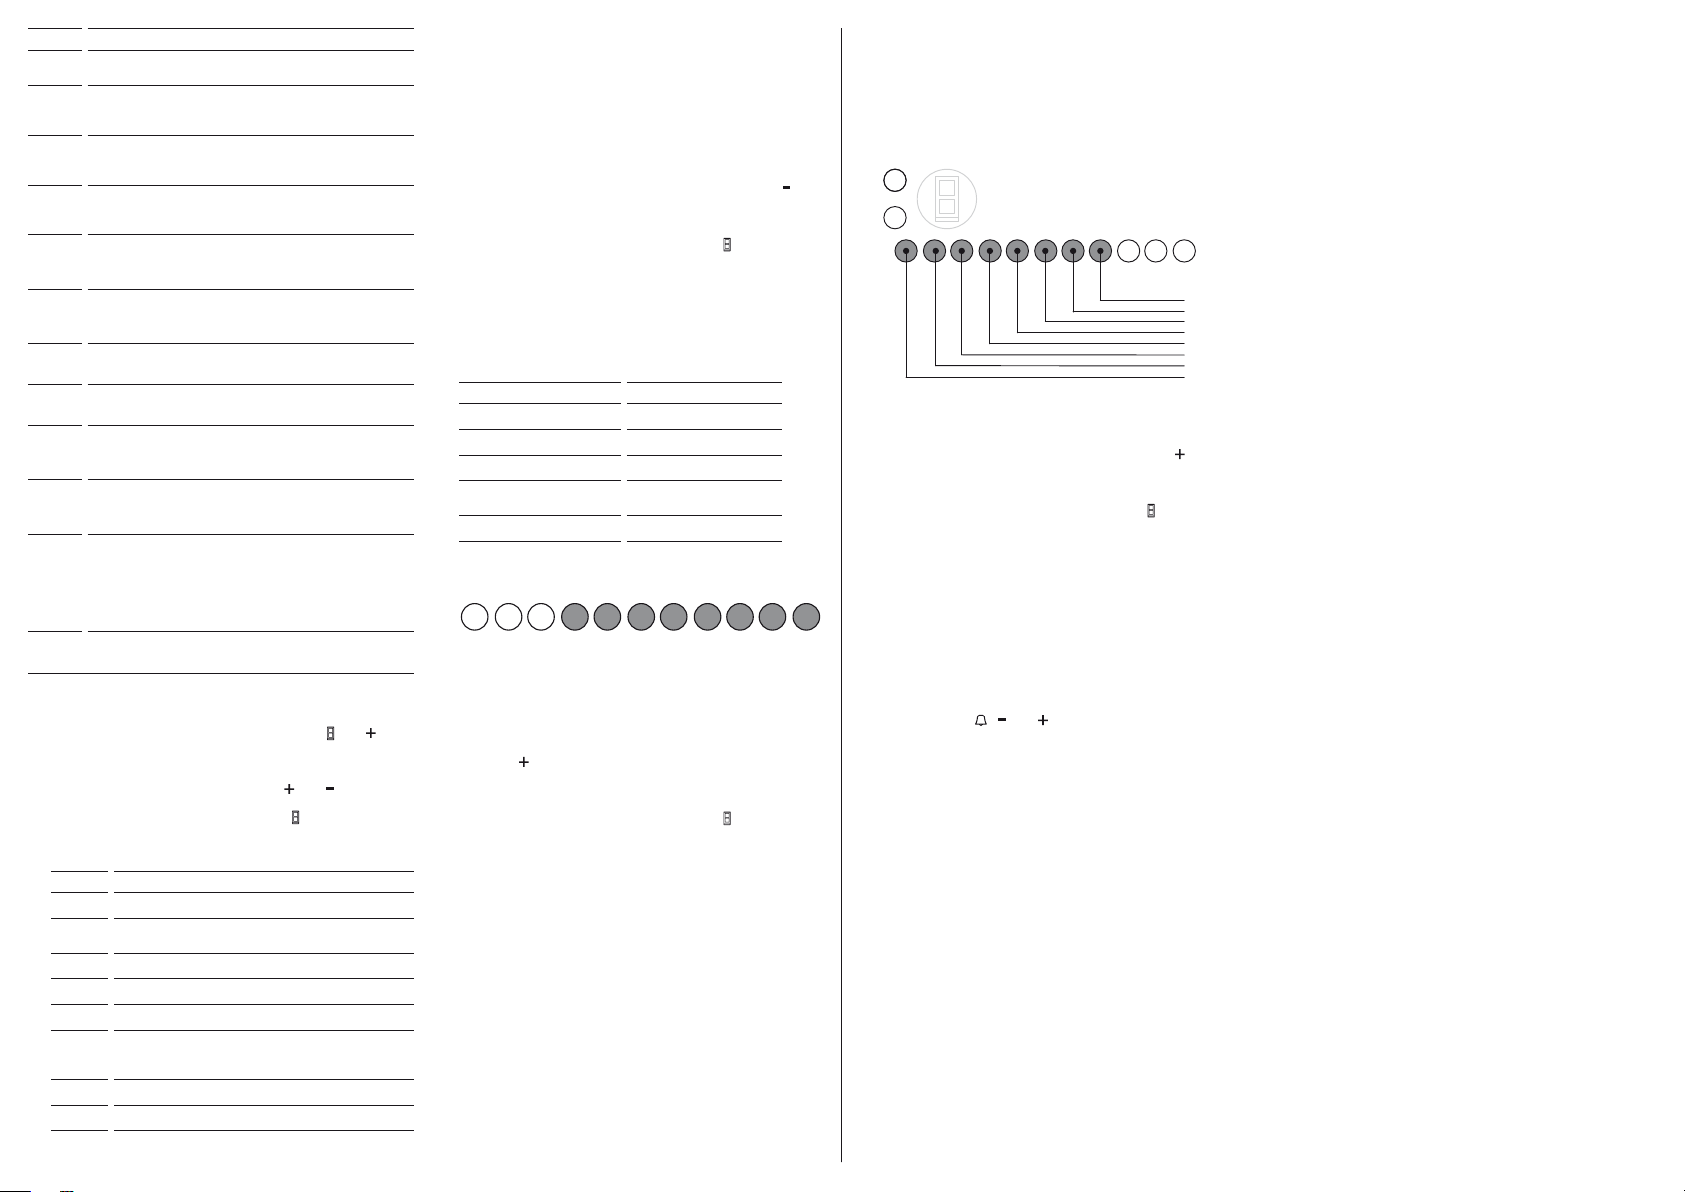
Diagnostic mode 5
Input / Output display
The Input/Output Status menu displays what devices (eg
light, PC door, FC door, compressor, etc) are currently
running or turned on.
In this mode, the state of each peripheral input and output
is displayed.
-
-
-
- - -
LOWER DOOR
UPPER DOOR
PC FAN
LOW AMB HTR
LAMP
FC FAN
DEFROST HTR
Fig.1 Input/output assigned to each LED
To enter the mode, the steps are:
1 Enter the diagnostic mode.
2 Scroll to the input/output mode by pressing the button
3times.
3 The respective LED turns on when a device is running, as
shown in Fig.1 above.
4 Return to normal operation by pressing the button.
COMPRESSOR
Diagnostic mode 8
Fault History
The fault history will indicate the last fault that occurred
with the appliance. This will be displayed for a period of
four days, after which it can only be accessed via optical
download.
Fault history is displayed in the same format to normal fault
code except the LEDs are not flashing.
Manually force harvest
Press and hold , and together for 4 seconds then
close the door(s). The ice tray will flip. Force another cycle.
The ice tray will flip and spill the water into the ice bin.
Empty water and replace bin.
Not activating harvest
Check icemaker sensor continuity.
Environmental health and safety
When servicing products, consider safety and health issues
and requirements which must be adhered to at all times.
Specific safety issues are:
1 Electrical safety.
2 Electrostatic discharge.
3 Vapors while brazing.
4 Reclaiming of refrigerant.
Good practice and safety
1 Take care when removing or servicing any electrical
components to avoid electrical shock or short circuit
conditions.
2 Take care when removing plastic components at low
temperatures as breakages can occur with these
components.
3 Extreme heating of plastic components can cause distortion
of those parts being heated.
4 Avoid overheating temperature sensitive devices such as the
element thermal fuses and cabinet sensors.
5 Avoid using solvents, citrus-based cleaners on all plastic
parts. We advise only warm soapy water be used.
If further help is needed concerning this appliance call:
Toll free: 1.888.9.FNP.USA (1.888.936.7872)
Website: www.fisherpaykel.com
842118 A 02.15
 Loading...