


L800
Table of contents
 Loading...
Home 2
Product Parts 3
Control Panel Buttons and Lights 4
Control Panel Buttons 4
Control Panel Lights 5
Load Paper 6
Load Paper for Documents or Photos 6
Load Envelopes 8
General Paper Information 10
Print From Your Computer 15
Windows Printing 15
Mac OS X Printing 25
Print On a CD or DVD 33
Guidelines for Printing on CDs and DVDs 33
Load a CD/DVD 34
Print a CD/DVD From Your Computer 37
Refill Ink 48
Check Ink Levels 48
Purchase EPSON Ink Bottles 51
Precautions on Refilling Ink 52
Refill Ink Tanks 52
Adjust Print Quality 58
Clean the Print Head 58
Align the Print Head 63
Clean the Paper Guide 64
Solve Problems 65
Check for Software Updates 65
Problem-solving Tools 65
Problems and Solutions 68
Re-install Software 77
Get More Help 78
Clean and Transport Your Product 80
Cleaning 80
Transportation 80
Use Your Product on a Network 82
Windows 7, Windows Vista, and Windows XP Network Setup 82
Mac OS X Network Setup 83
Specifications and Notices 85
Important Safety Instructions 85
Computer System Requirements 87
Product Specifications 88
Copyright and Trademarks 93
1

Home
Welcome to the L800 User’s Guide.
2
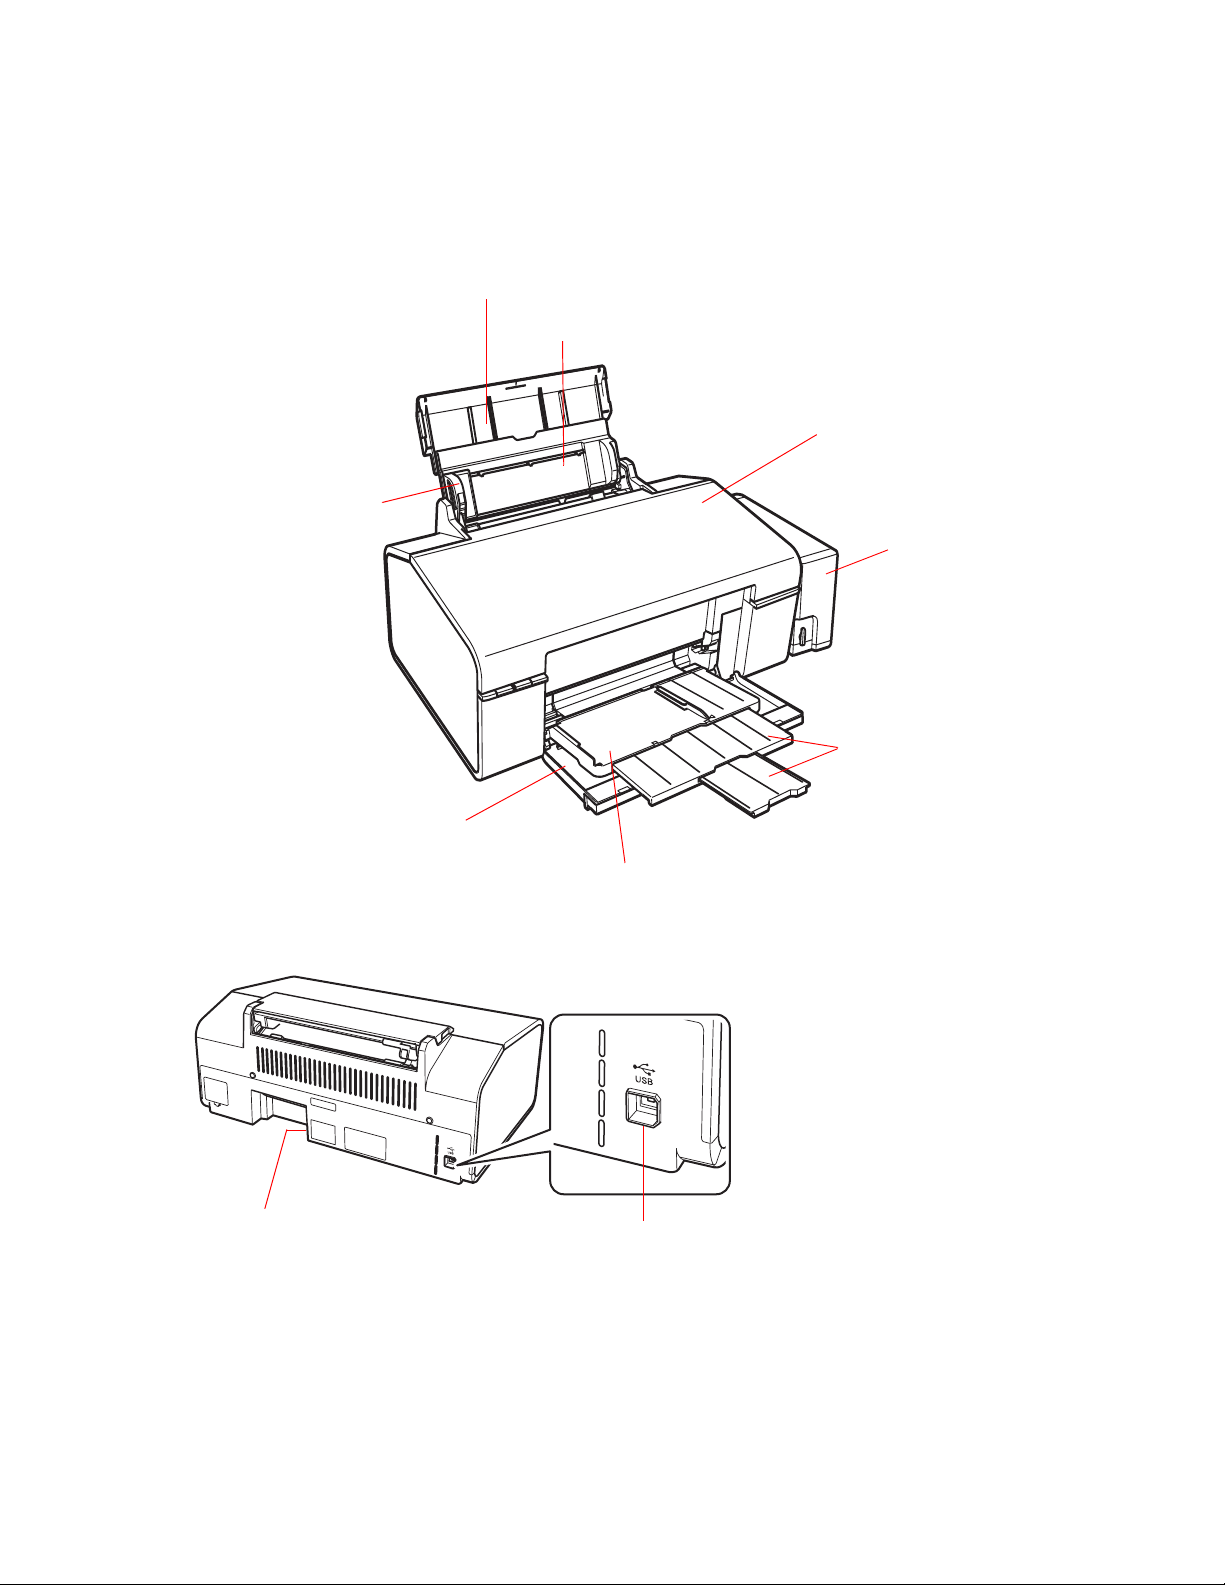
Product Parts
Use these illustrations to identify the parts on your product.
Paper support
Sheet feeder
Edge guide
Printer cover
Ink tank unit
Output tray
extensions
Power inlet
Front cover
Output tray
USB port
3
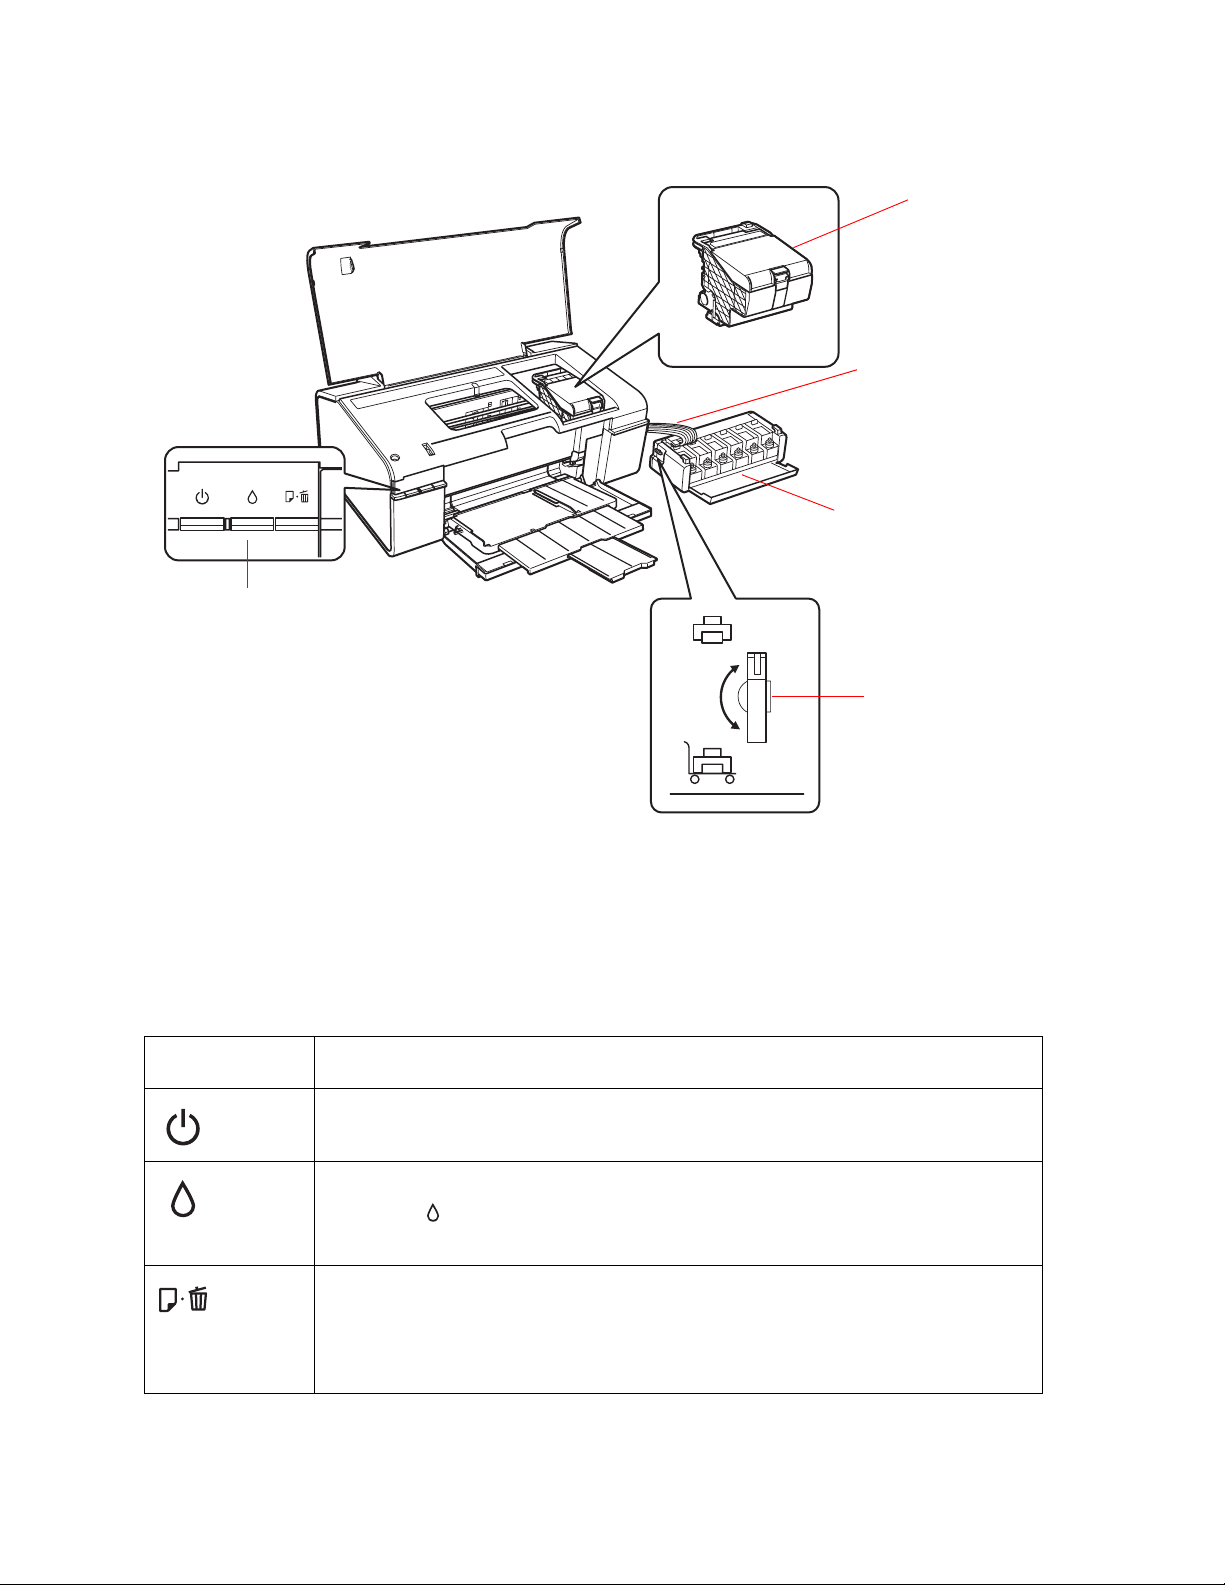
Control panel
Print head
Ink tubes
Ink tanks
Transportation lock
Control Panel Buttons and Lights
Control Panel Buttons
Button Function
Press to turn the printer on and off.
Press to move the print head to its home position.
When the ink light is off, press and hold for at least 3 seconds to clean
the print head.
Press to load or eject paper.
Press to resume printing after a paper out error or multiple page feed
error.
Press to cancel printing during a print job.
4
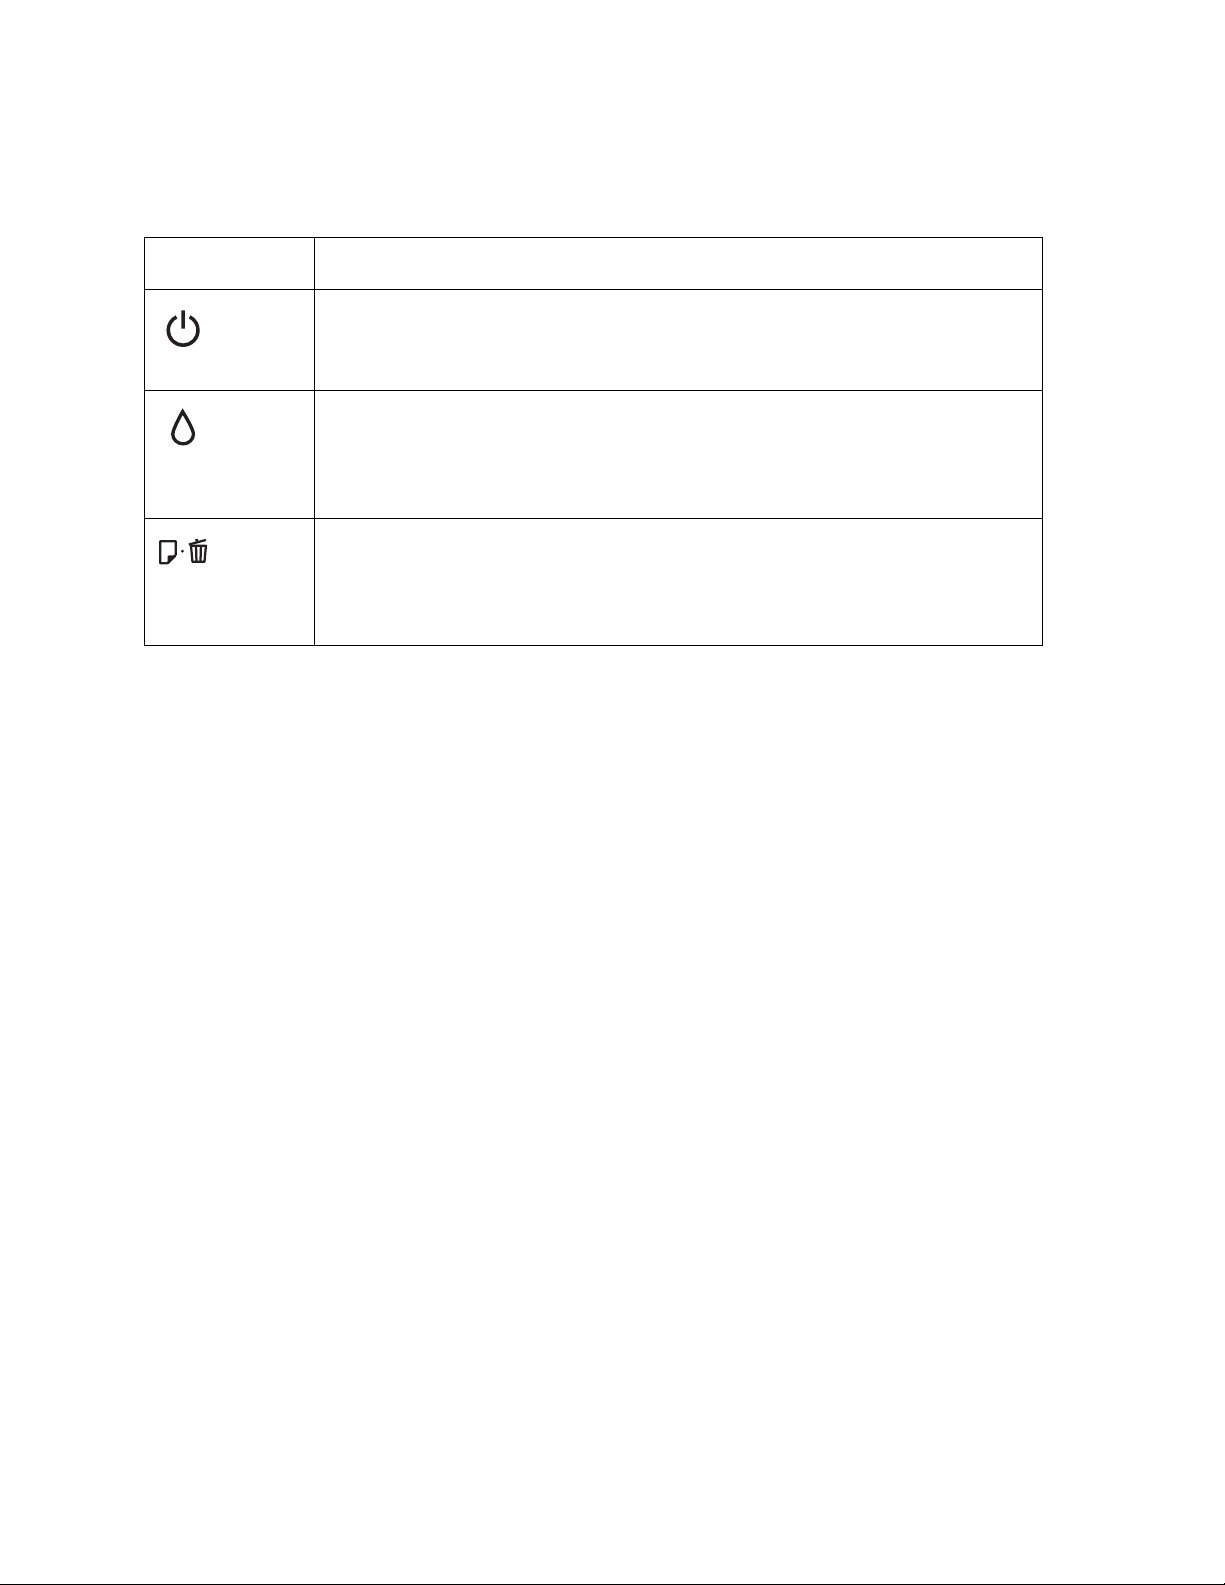
Control Panel Lights
Light Description
On when the printer is on.
Flashes when the printer is receiving data, printing, charging ink, or
cleaning the print head.
On when the ink level of one or more ink tanks may have reached the
lower line.
Flashes when the ink level of one or more ink tanks may be low . You may
continue printing until the ink level reaches the lower line.
On when the printer is out of paper or the CD/DVD tray is not loaded
corretly.
Flashes when paper or the CD/DVD tray is jammed, or when the output
tray is in an incorrect position.
5
Load Paper
Before you print, load paper for the type of printing you will do.
Load Paper for Documents or Photos
Load Envelopes
General Paper Information
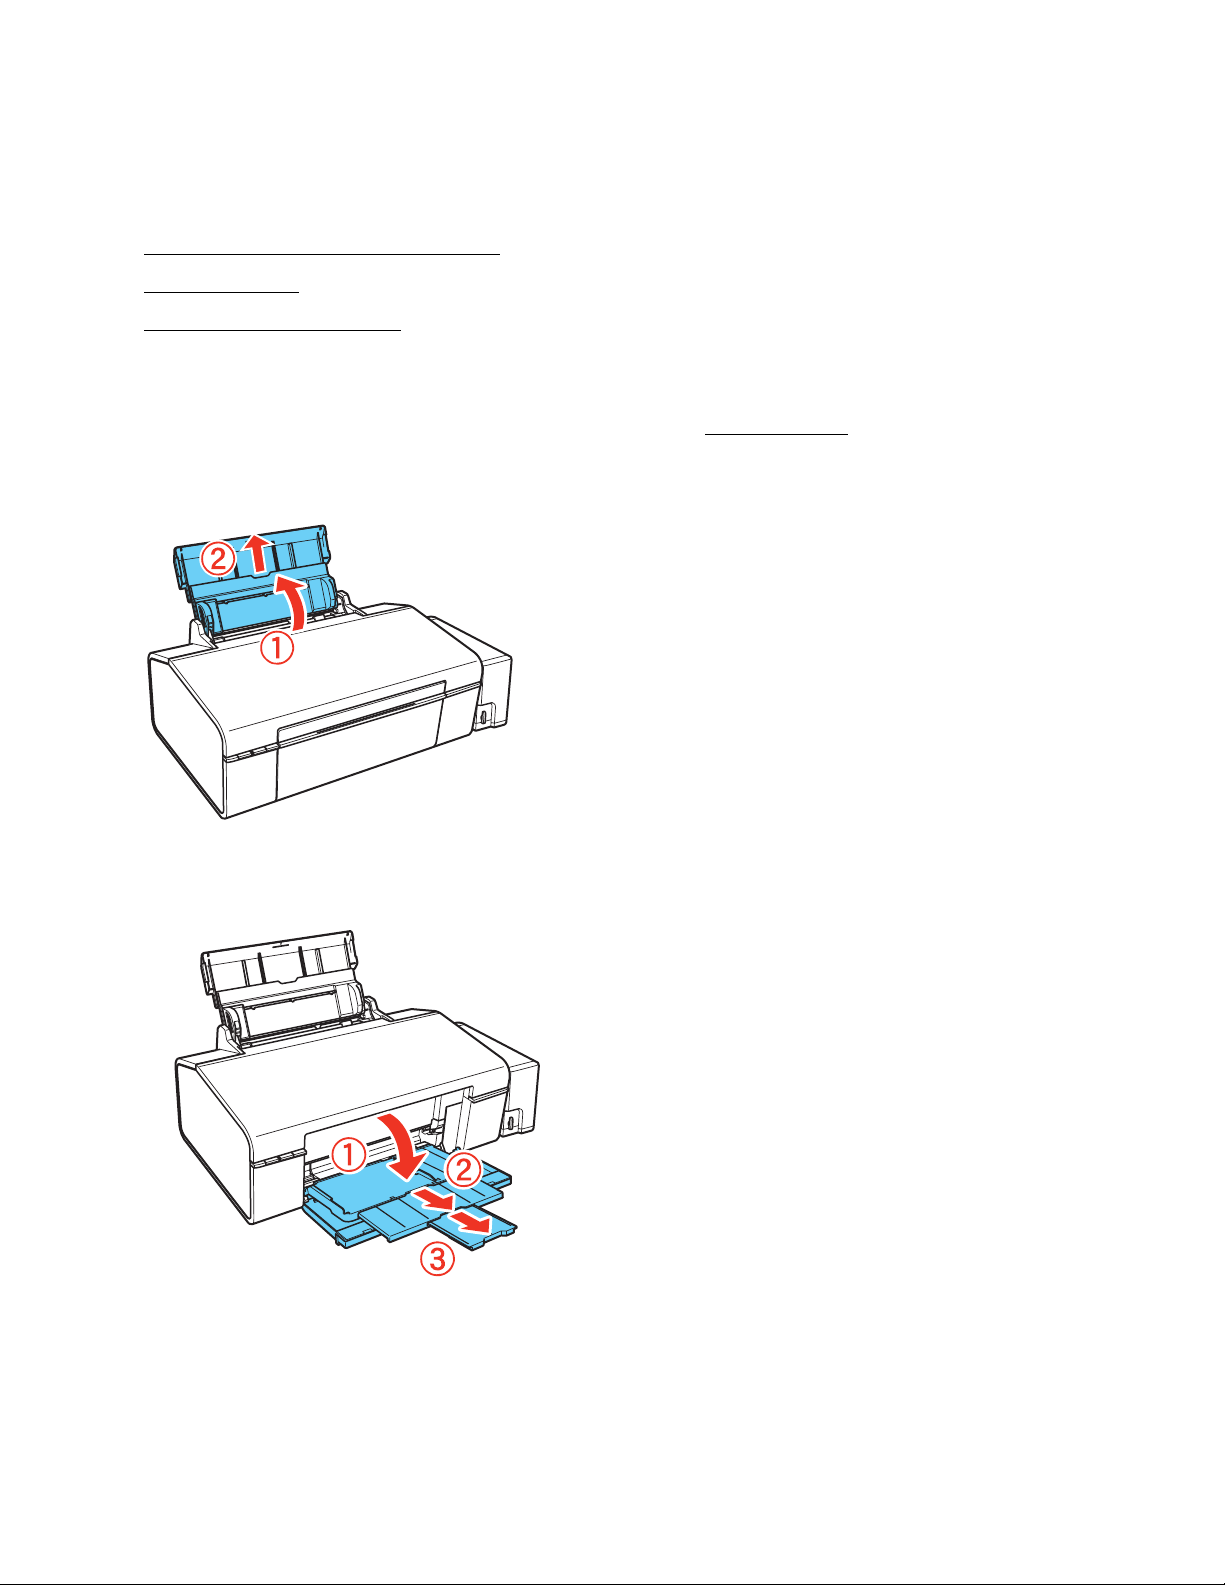
Load Paper for Documents or Photos
You can print documents and photos on a variety of paper types and sizes.
1. Open the paper support, then pull up the extension.
2. Open the front cover, then extend the output tray.
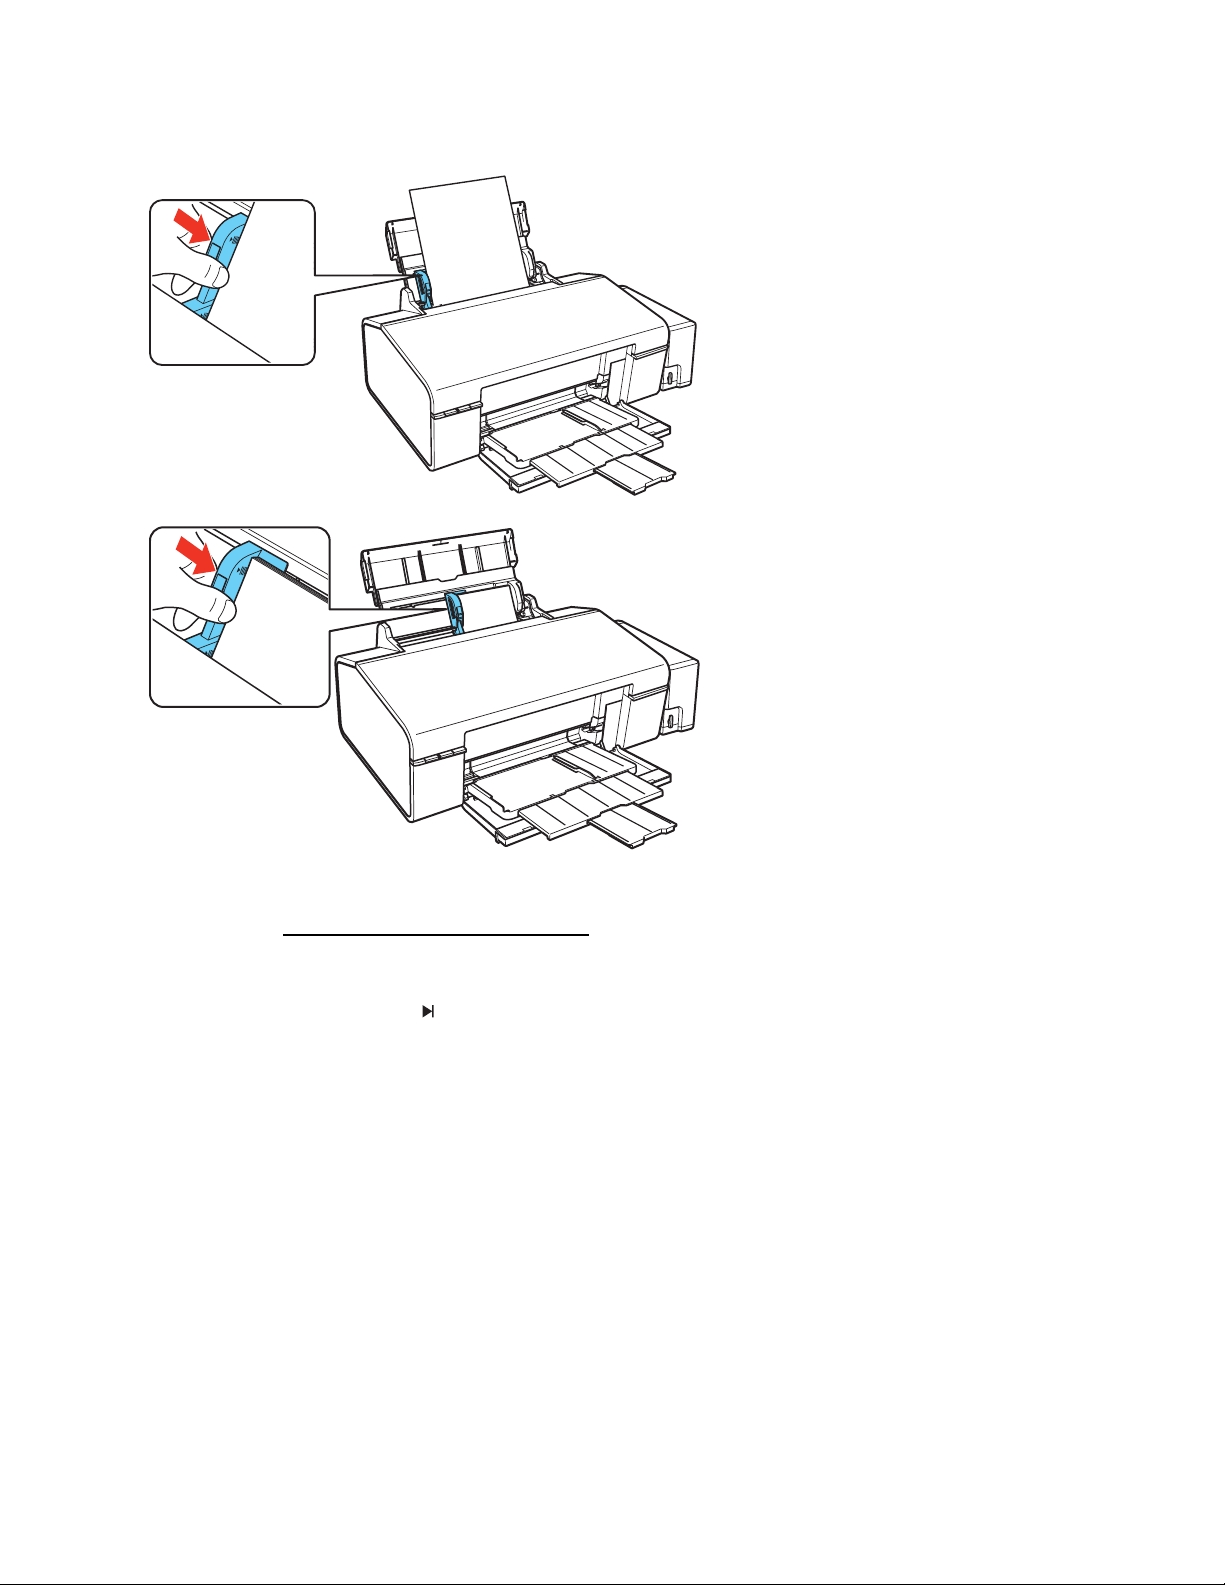
3. Squeeze the tab on the edge guide and slide it to the left.
6
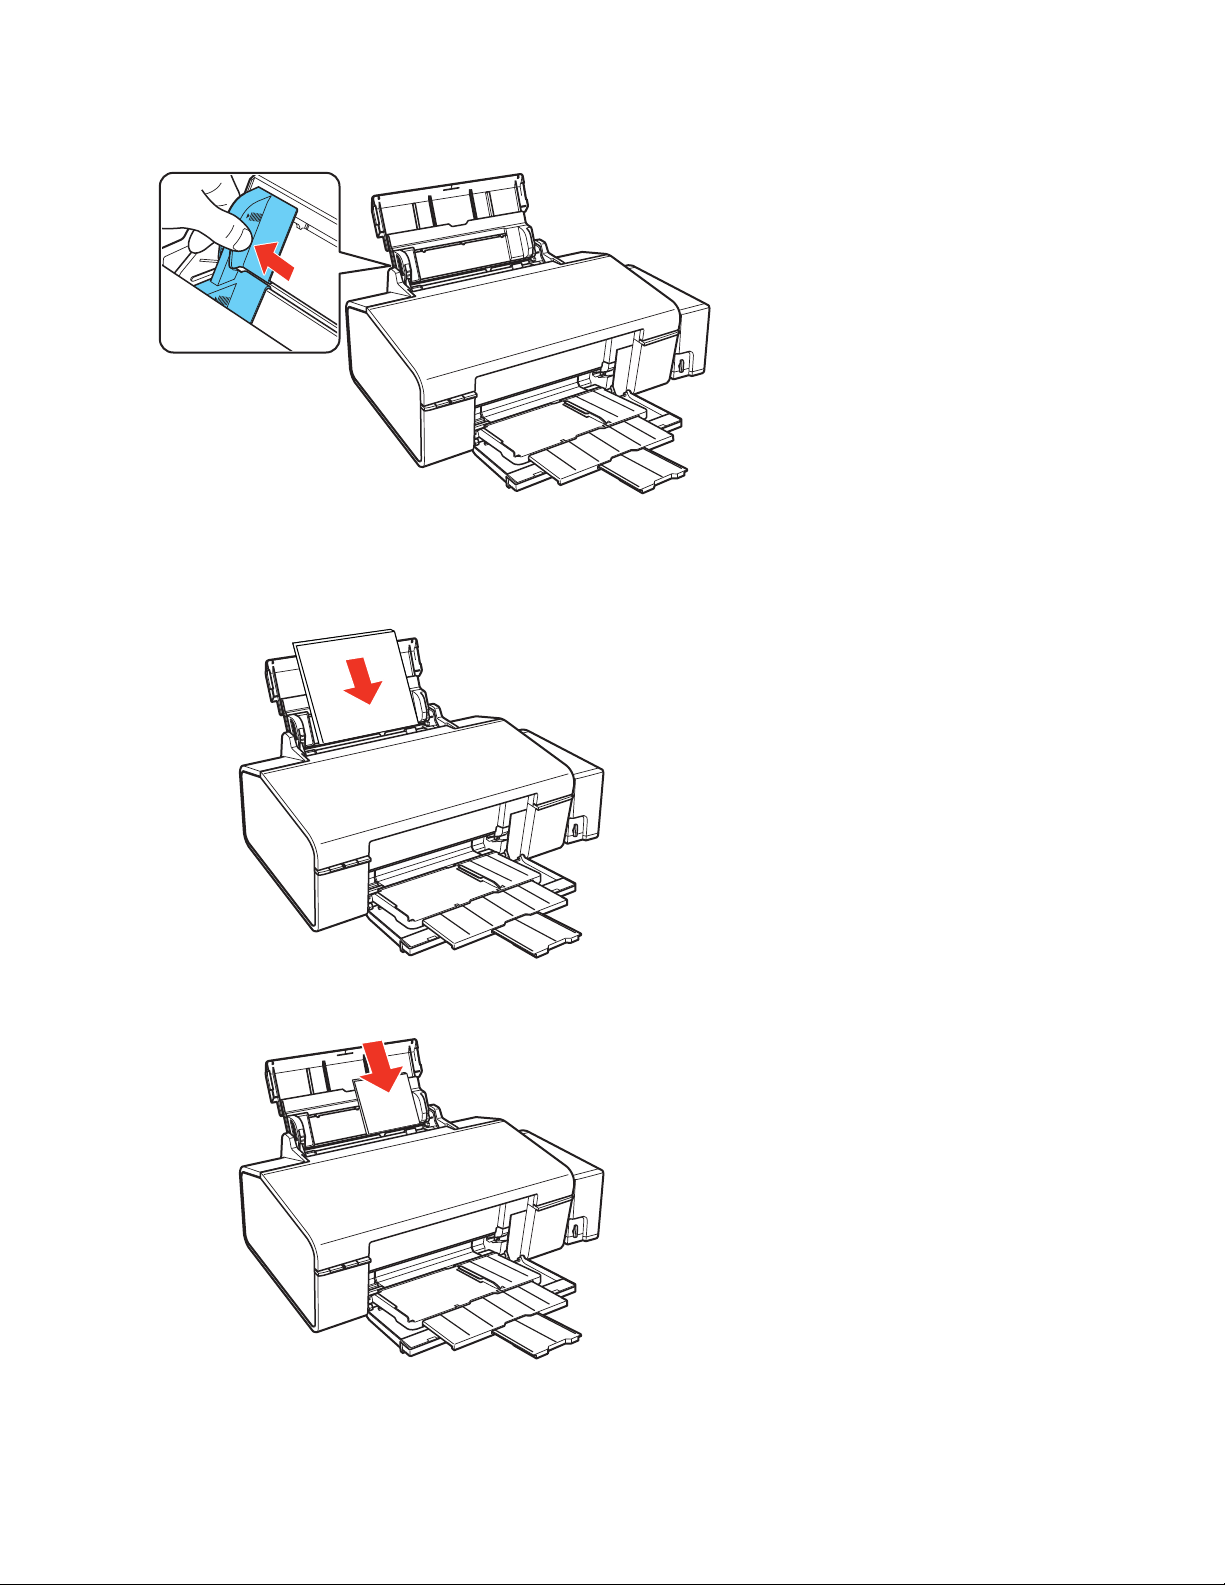
4. Insert paper, glossy or printable side up and short edge first, against the right side of the sheet
feeder and place it behind the tabs on the edge guides.
If you are inserting a stack of paper, fan the
sheets first and tap the stack on a flat surface to
even the edges.
Letter- or A4-size
Smaller paper
5. Slide the edge guide against the paper, but not too tightly.
7
Tip:
Load only the recommended number of sheets
Load paper short edge first, no matter which way your document or photo faces.
Load letterhead or pre-printed paper top edge first.
Do not load paper above the arrow marks on the edge guide.
Check the paper package for any additional loading instructions.
Leave enough space in front of the printer for the paper to be fully ejected.
.
Load Envelopes
You can print on plain paper envelopes in 4 1/8 × 9 1/2 inch (#10) (105 × 241 mm) size.
1. Open the paper support, then pull up the extension.
8
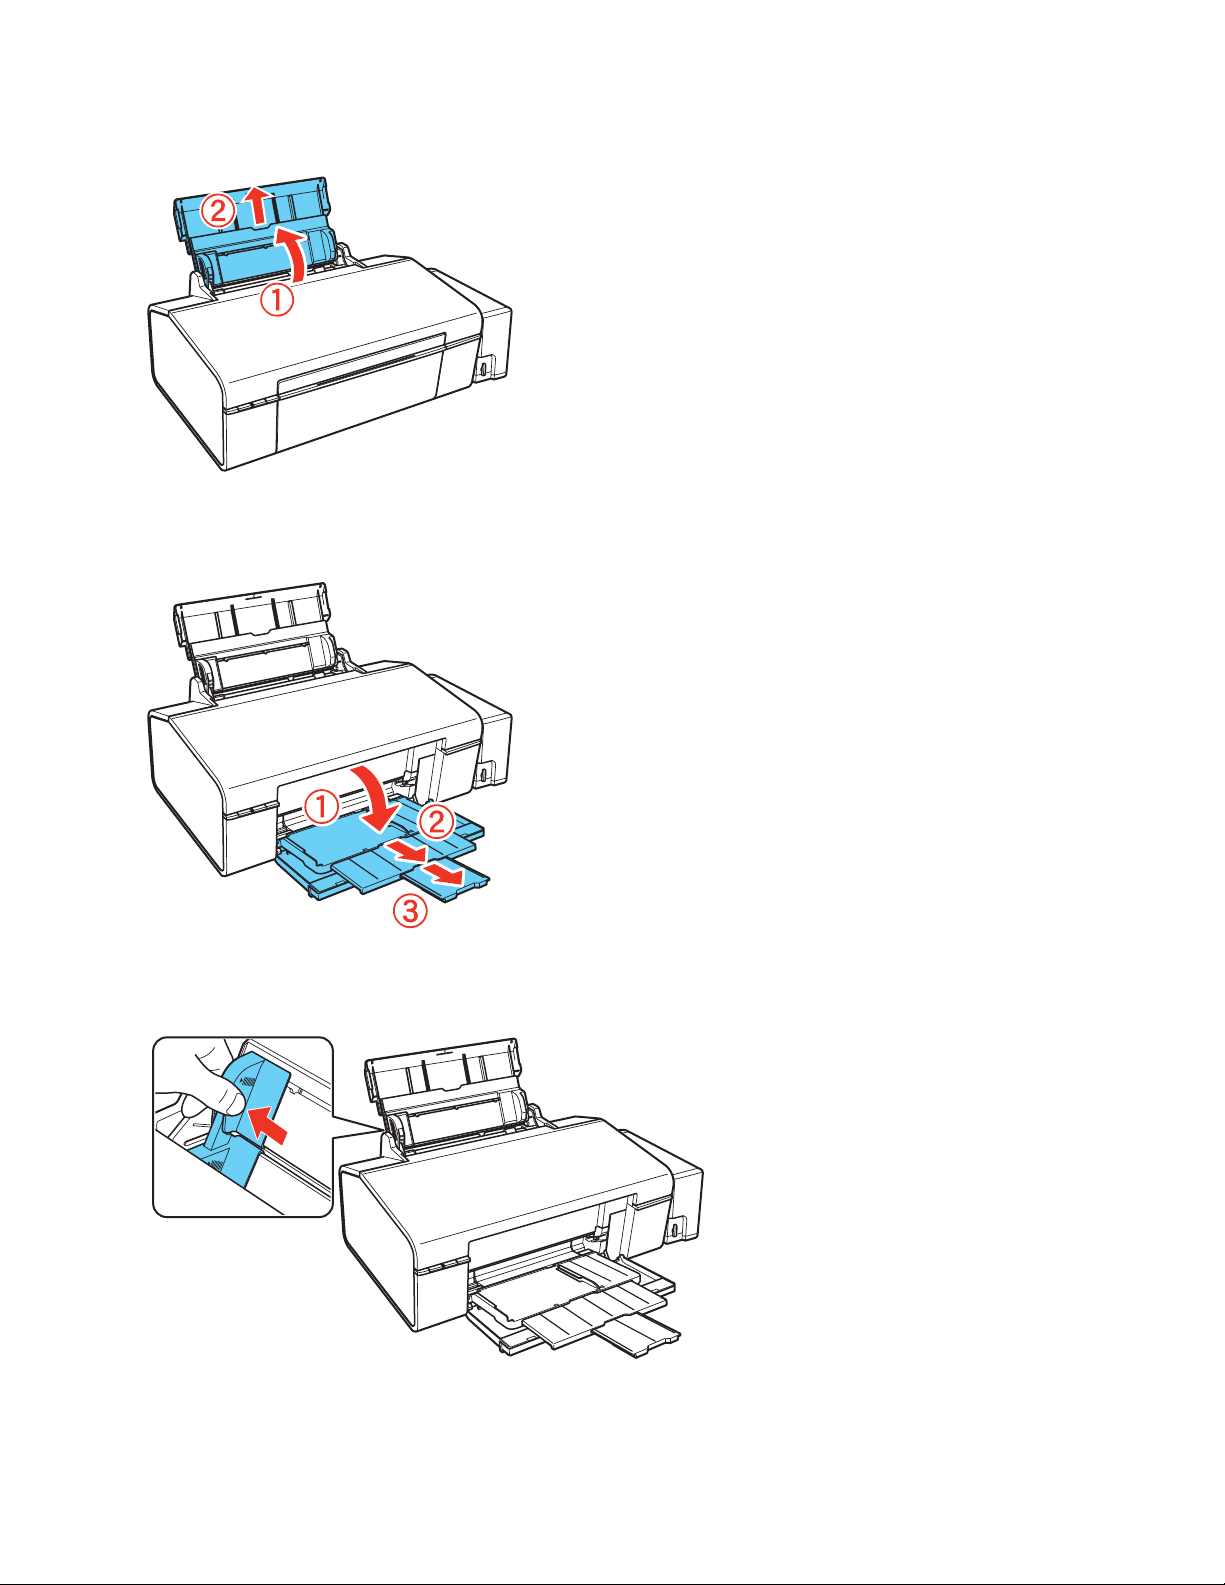
2. Open the front cover, then extend the output tray.
3. Squeeze the tab on the edge guide and slide it to the left.
9
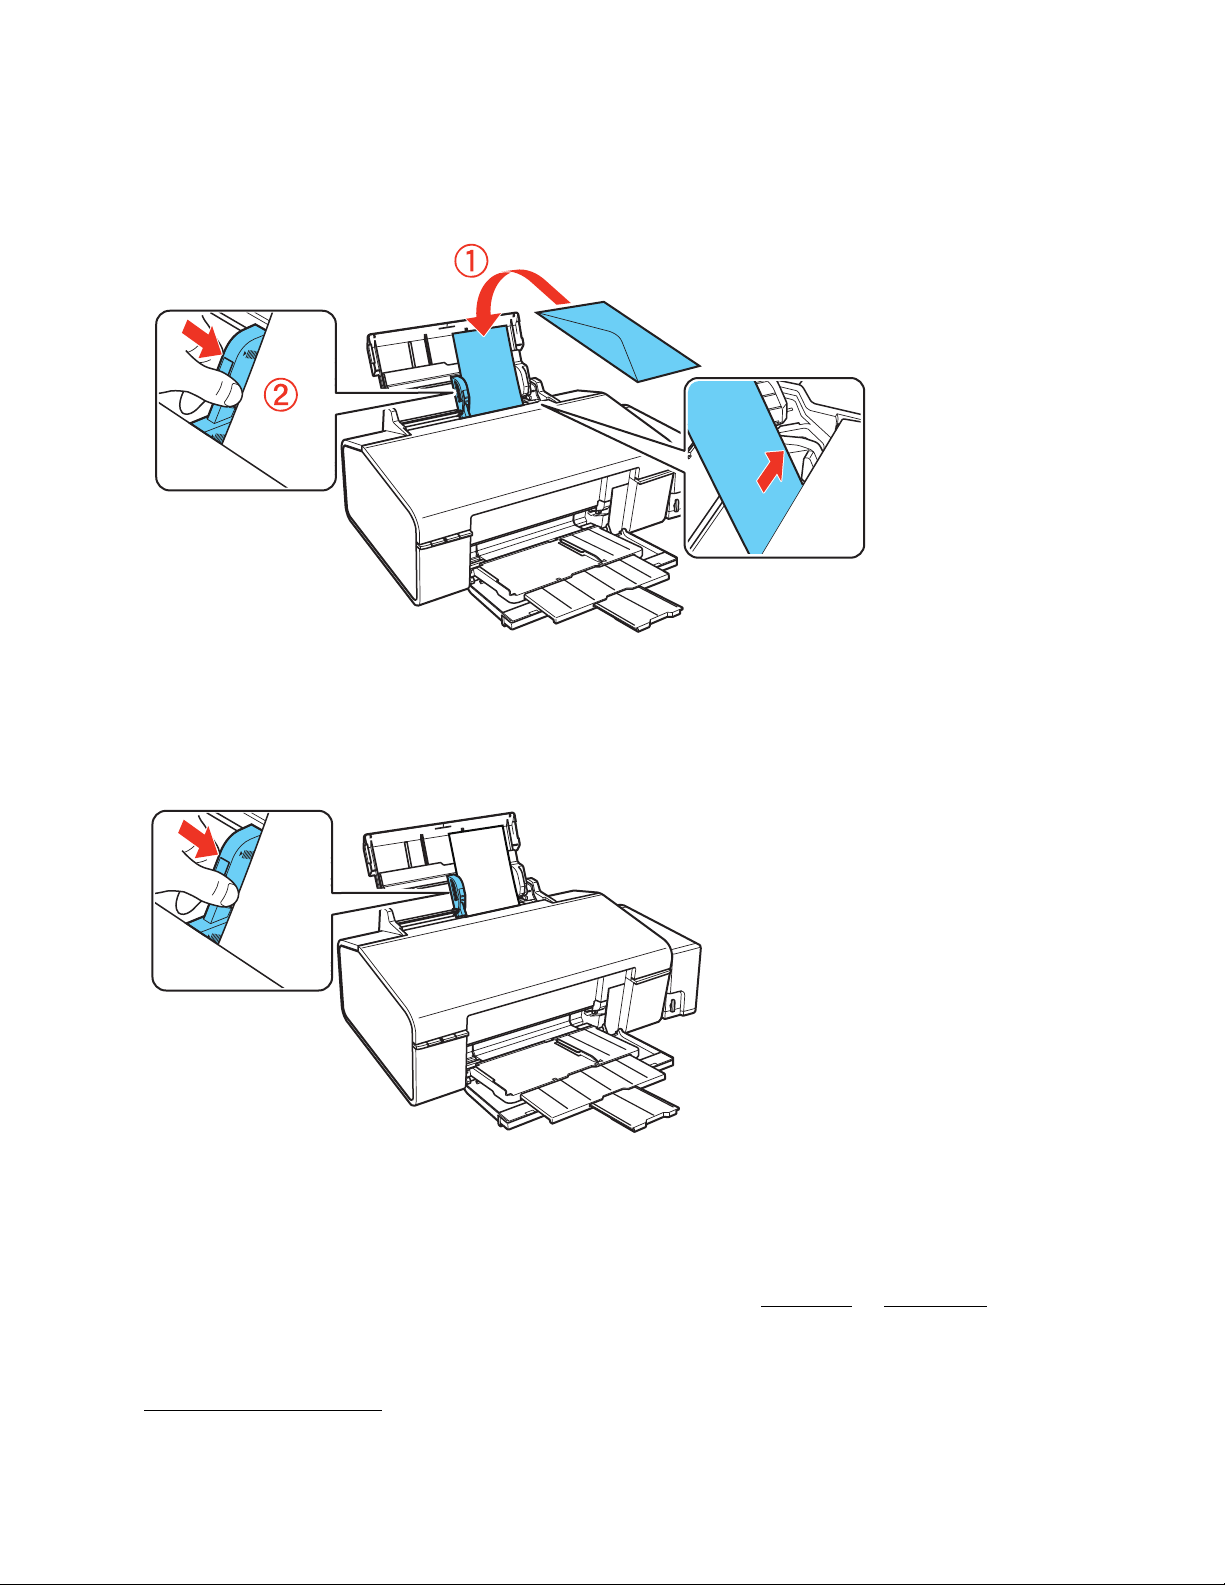
4. Load up to 10 envelopes against the right side. Load them printable side up and flap edge left
and behind the tabs on the edge guides.
Tip:
Press each envelope flat before loading it or load one envelope at a time.
5. Slide the edge guide against the envelopes, but not too tightly.
Tip:
Do not use envelopes that are curled or folded, and avoid using envelopes that are too thin
because they may curl during printing. Before printing from your computer, select Envelope as
the paper type, Envelope #10 as the paper size, and Landscape as the orientation. If you are
printing on envelopes of a different size, create a custom size in Windows
or Mac OS X.
General Paper Information
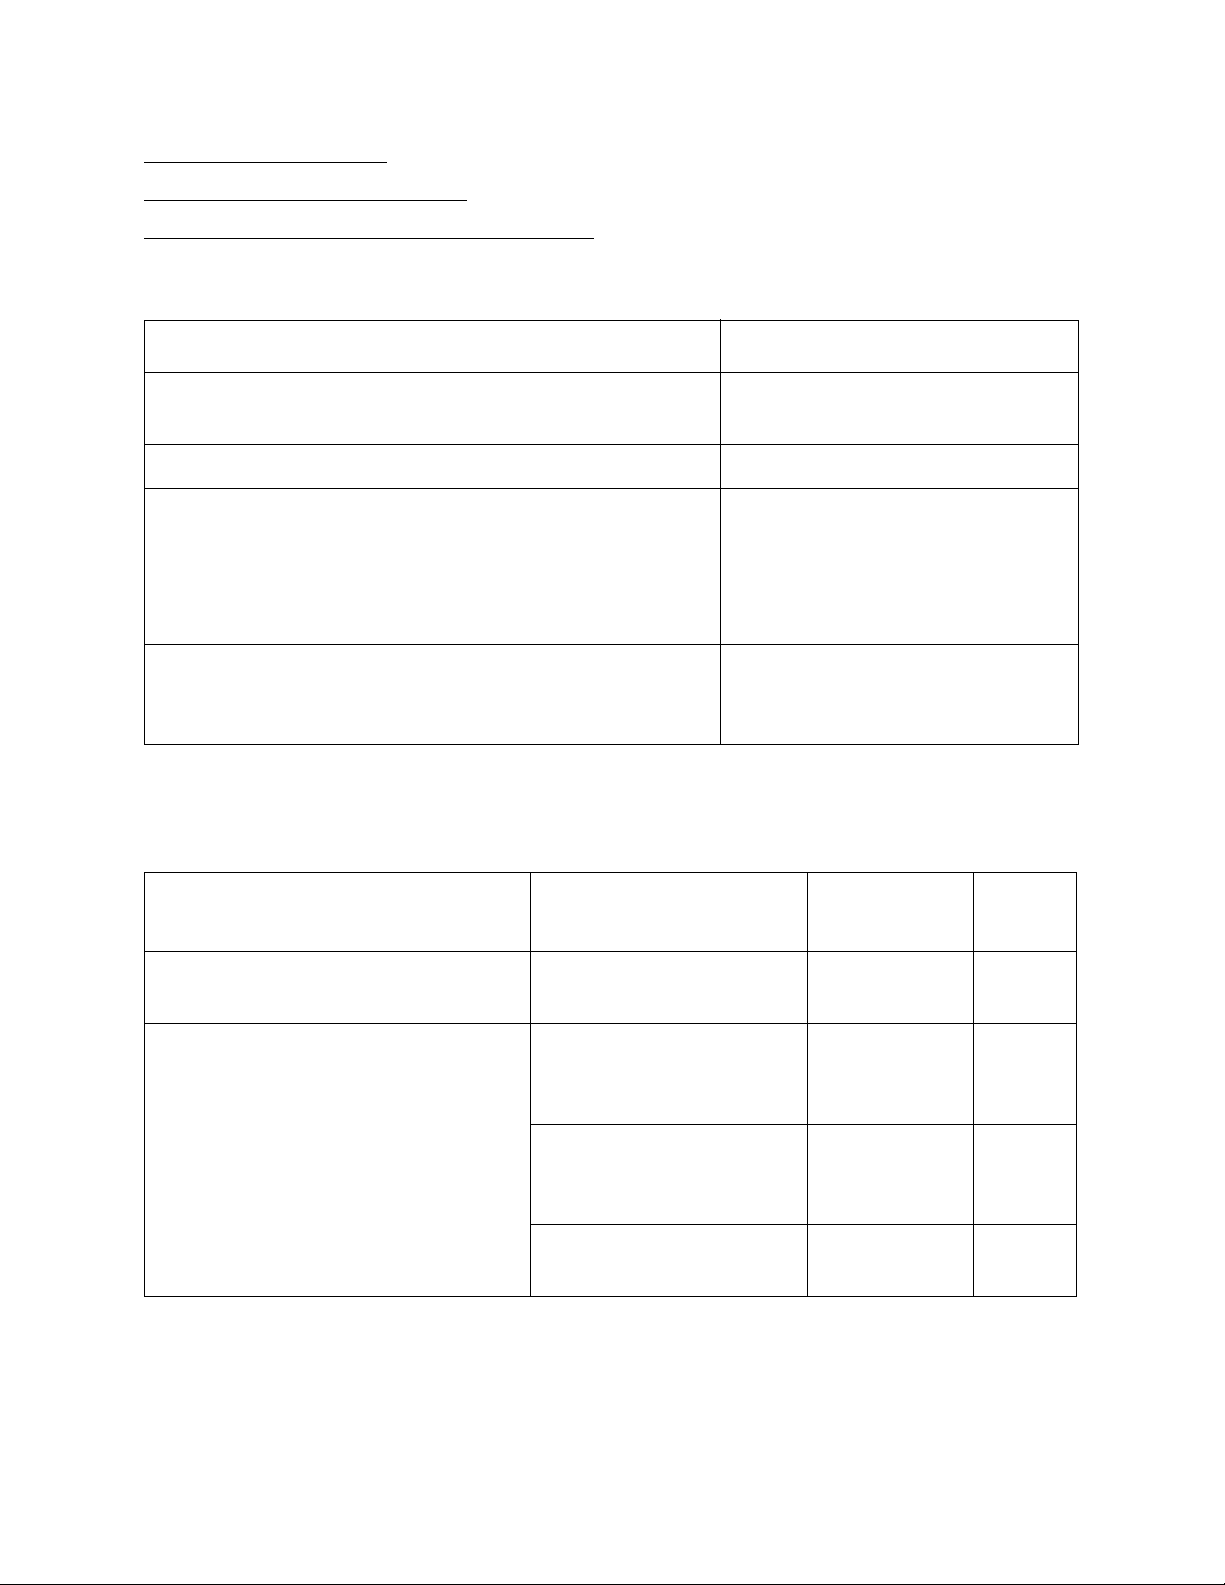
Media Loading Capacity
10
Available EPSON Papers
Borderless Paper Types and Sizes
Type or Media Type Settings for Loaded Paper
Media Loading Capacity
Paper type* Load up to this many sheets
Plain paper
EPSON Presentation Paper Matte
EPSON Bright White Paper Up to 80 sheets
EPSON Photo Paper Glossy
EPSON Premium Photo Paper Glossy
EPSON Premium Photo Paper Semi-gloss
EPSON Ultra Premium Photo Paper Glossy
EPSON Premium Presentation Paper Matte
EPSON Premium Presentation Paper Matte Double-sided
EPSON Photo Quality Self-adhesive Sheets
EPSON Iron-on Cool Peel Transfer paper
* Availability of media varies by country.
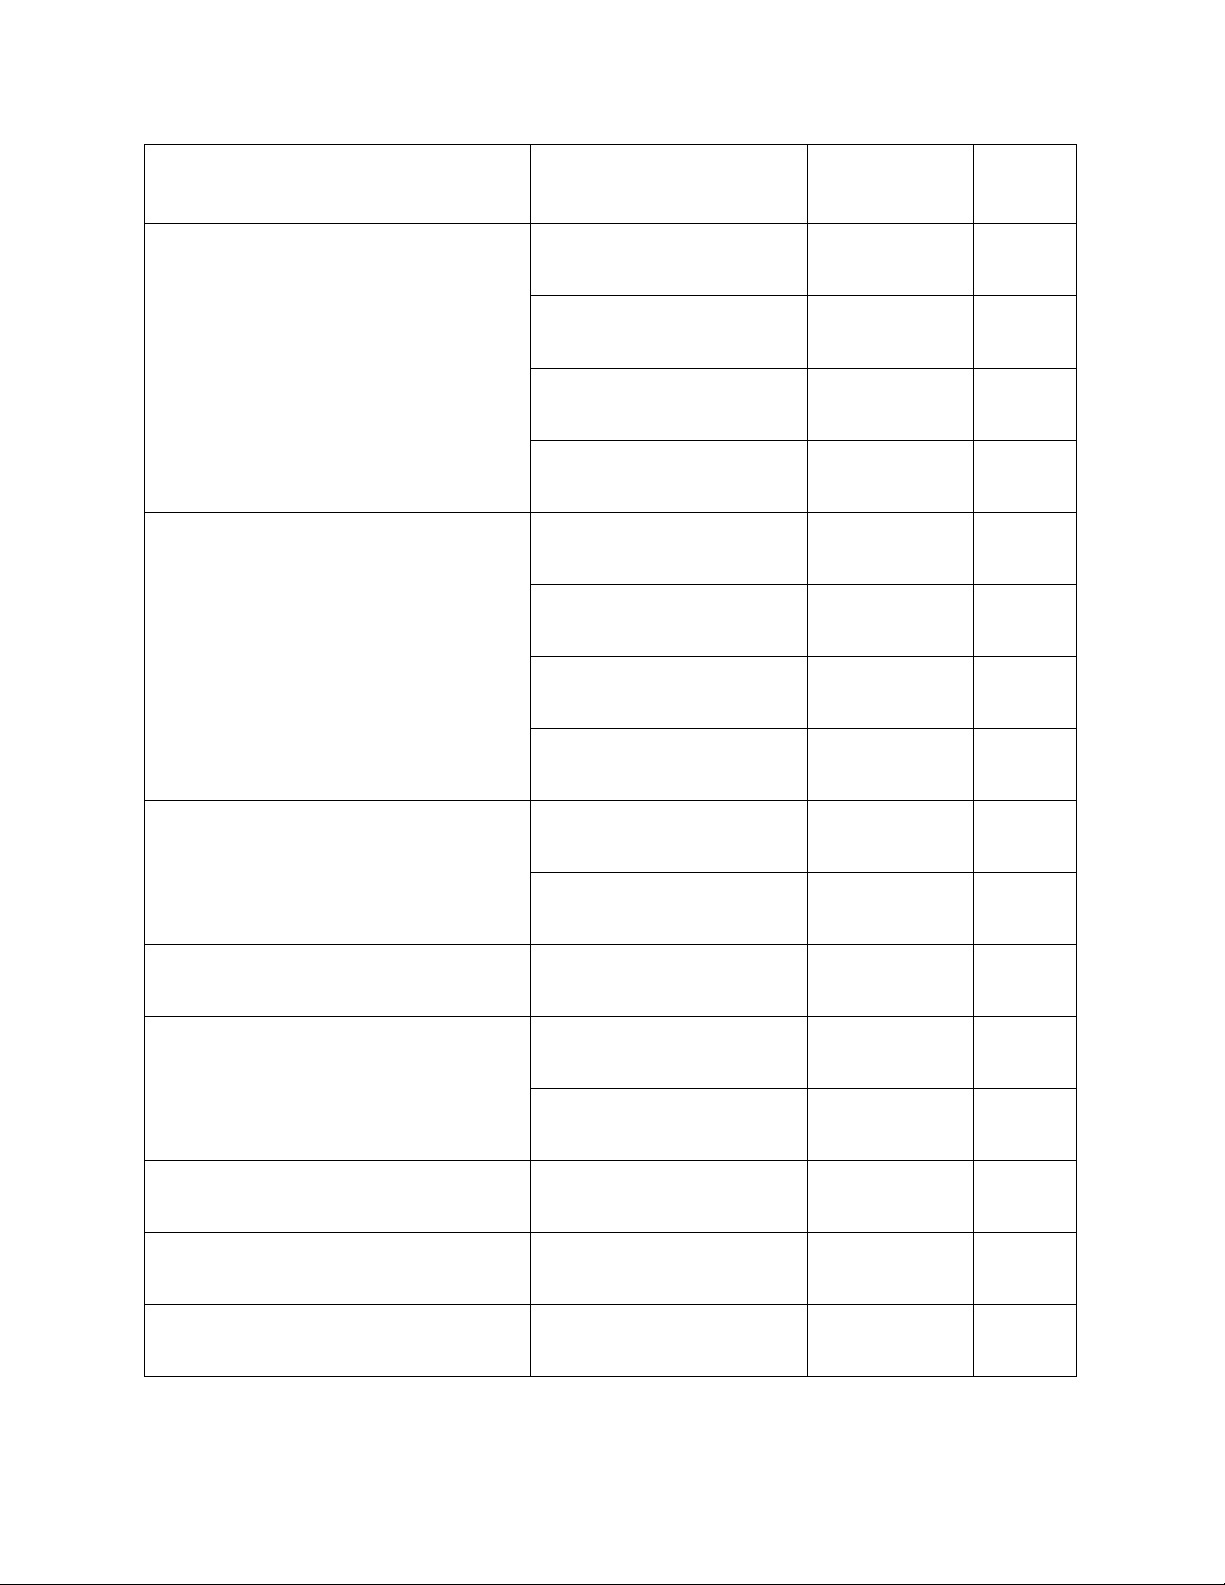
Available EPSON Papers
Paper type Size Part number
100 sheets
20 sheets
1 sheet
Sheet
count
EPSON Bright White Paper Letter (8.5 × 11 inches
[216 × 279 mm])
EPSON Photo Paper Glossy 4 × 6 inches (102 × 152
mm)
Letter (8.5 × 11 inches
[216 × 279 mm])
A4 (8.3 × 11.7 inches
[210 × 297 mm])
S041586 500
S041809-20
S041809
S042038
S041141
S041649
S041271
S041140 20
20
50
100
20
50
100
11
Paper type Size Part number
Sheet
count
EPSON Premium Photo Paper Glossy 4 × 6 inches (102 × 152
mm)
5 × 7 inches (127 × 178
mm)
8 × 10 inches (203 × 254
mm)
Letter (8.5 × 11 inches
[216 × 279 mm])
EPSON Ultra Premium Photo Paper
Glossy
EPSON Premium Photo Paper Semigloss
4 × 6 inches (102 × 152
mm)
5 × 7 inches (127 × 178
mm)
8 × 10 inches (203 × 254
mm)
Letter (8.5 × 11 inches
[216 × 279 mm])
4 × 6 inches (102 × 152
mm)
S041808
S041727
S041464 20
S041465 20
S042183
S041667
S0412174 100
S041945 20
S041946 20
S042182
S042175
S041982 40
40
100
25
50
25
50
Letter (8.5 × 11 inches
[216 × 279 mm])
EPSON Presentation Paper Matte Letter (8.5 × 11 inches
[216 × 279 mm])
EPSON Premium Presentation Paper
Matte
EPSON Premium Presentation Paper
Matte Double-sided
EPSON Photo Quality Self-adhesive
Sheets
EPSON Iron-on Cool Peel Transfer
paper
8 × 10 inches (203 × 254
mm)
Letter (8.5 × 11 inches
[216 × 279 mm])
Letter (8.5 × 11 inches
[216 × 279 mm])
A4 (8.3 × 11.7 inches
[210 × 297 mm])
Letter (8.5 × 11 inches
[216 × 279 mm])
S041331 20
S041062 100
S041467 50
S041257
S042180
S041568 50
S041106 10
S041153 10
50
100
12
Note:
Availability of paper types varies by country.
You can purchase genuine EPSON ink and paper from an EPSON authorized reseller. To find the
nearest one, contact Epson
Borderless Paper Types and Sizes
Borderless paper type Borderless paper size
EPSON Photo Paper Glossy 4 × 6 inches (102 × 152 mm)
EPSON Premium Photo Paper Glossy 4 × 6 inches (102 × 152 mm)
EPSON Ultra Premium Photo Paper Glossy 4 × 6 inches (102 × 152 mm)
EPSON Premium Photo Paper Semi-gloss 4 × 6 inches (102 × 152 mm)
.
Letter (8.5 × 11 inches [216 × 279 mm])
5 × 7 inches (127 × 178 mm)
Letter (8.5 × 11 inches [216 × 279 mm])
5 × 7 inches (127 × 178 mm)
Letter (8.5 × 11 inches [216 × 279 mm])
Letter (8.5 × 11 inches [216 × 279 mm])
EPSON Premium Presentation Paper Matte Letter (8.5 × 11 inches [216 × 279 mm])
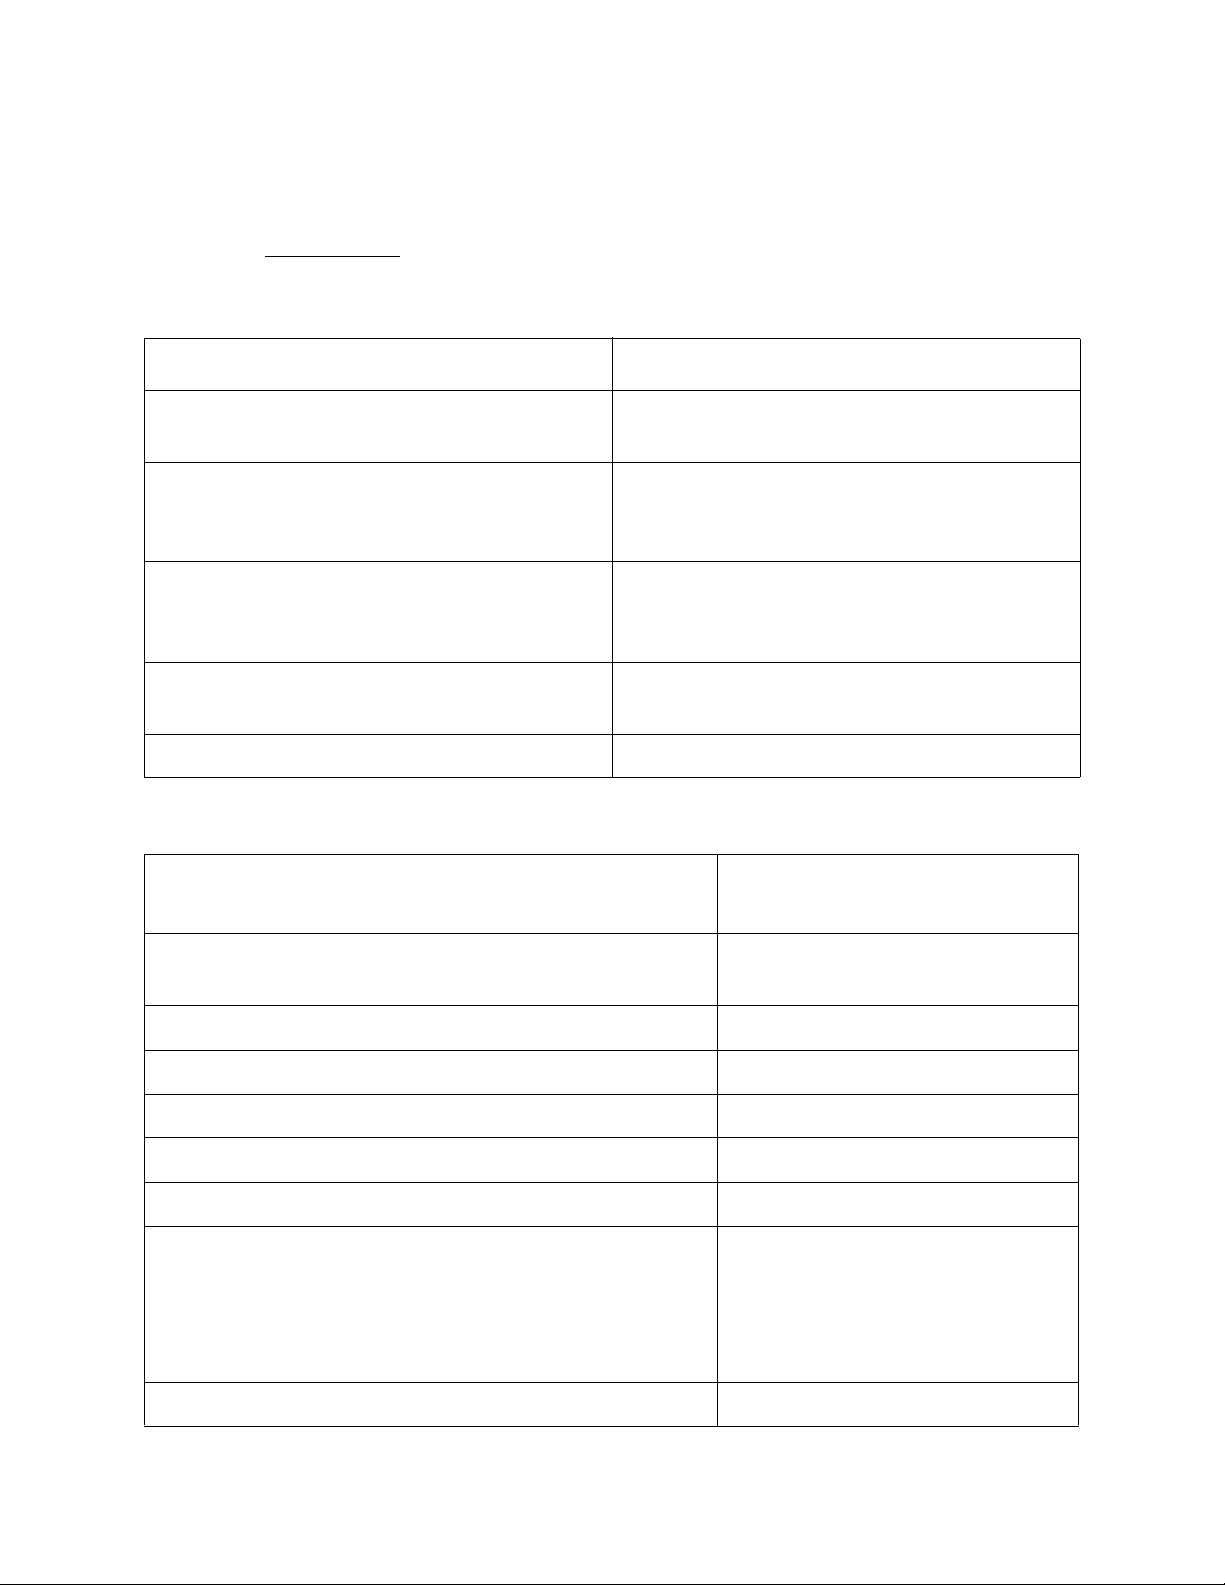
Type or Media Type Settings for Loaded Paper
For this paper/media
Plain paper
EPSON Bright White Paper
EPSON Ultra Premium Photo Paper Glossy Ultra Premium Photo Paper Glossy
EPSON Premium Photo Paper Glossy Premium Photo Paper Glossy
EPSON Photo Paper Glossy Photo Paper Glossy
EPSON Presentation Paper Matte Presentation Paper Matte
EPSON Premium Photo Paper Semi-gloss Premium Photo Paper Semi-Gloss
EPSON Premium Presentation Paper Matte
EPSON Premium Presentation Paper Matte Doublesided
EPSON Photo Quality Self-adhesive Sheets
EPSON Iron-on Cool Peel Transfer paper
Select this paper Type or Media
Type setting
Plain Paper/Bright White Paper
Premium Presentation Paper Matte
CDs/DVDs CD/DVD
13

For this paper/media
Envelopes Envelope
Select this paper Type or Media
Type setting
14

Print From Your Computer
After you connect the printer to your computer and install its software, you can print documents
and photos from your computer.
Follow the instructions in these sections to print documents and photos:
Windows Printing
Mac OS X Printing
To print on CDs/DVDs, follow the steps in Print on a CD or DVD.
Before you print, make sure you installed your software and connected the printer to your
computer; see the Start Here sheet for instructions.
Tip:
It’s a good idea to check for updates to your printer software (see Check for Printer Updates for
instructions).
Also be sure to load paper in the sheet feeder.
Windows Printing
You can print using any Windows® printing program. Follow the steps in these sections:
Print From a Program
Select Basic Options
Change Print Layout
Select Advanced Options
Print Your Document or Photo
Check Printing Status
Change Default Print Settings
Change the Language
See also:
Mac OS X Printing
Print From a Program
After you open a document or photo in a Windows program, follow these steps to access your
print settings:
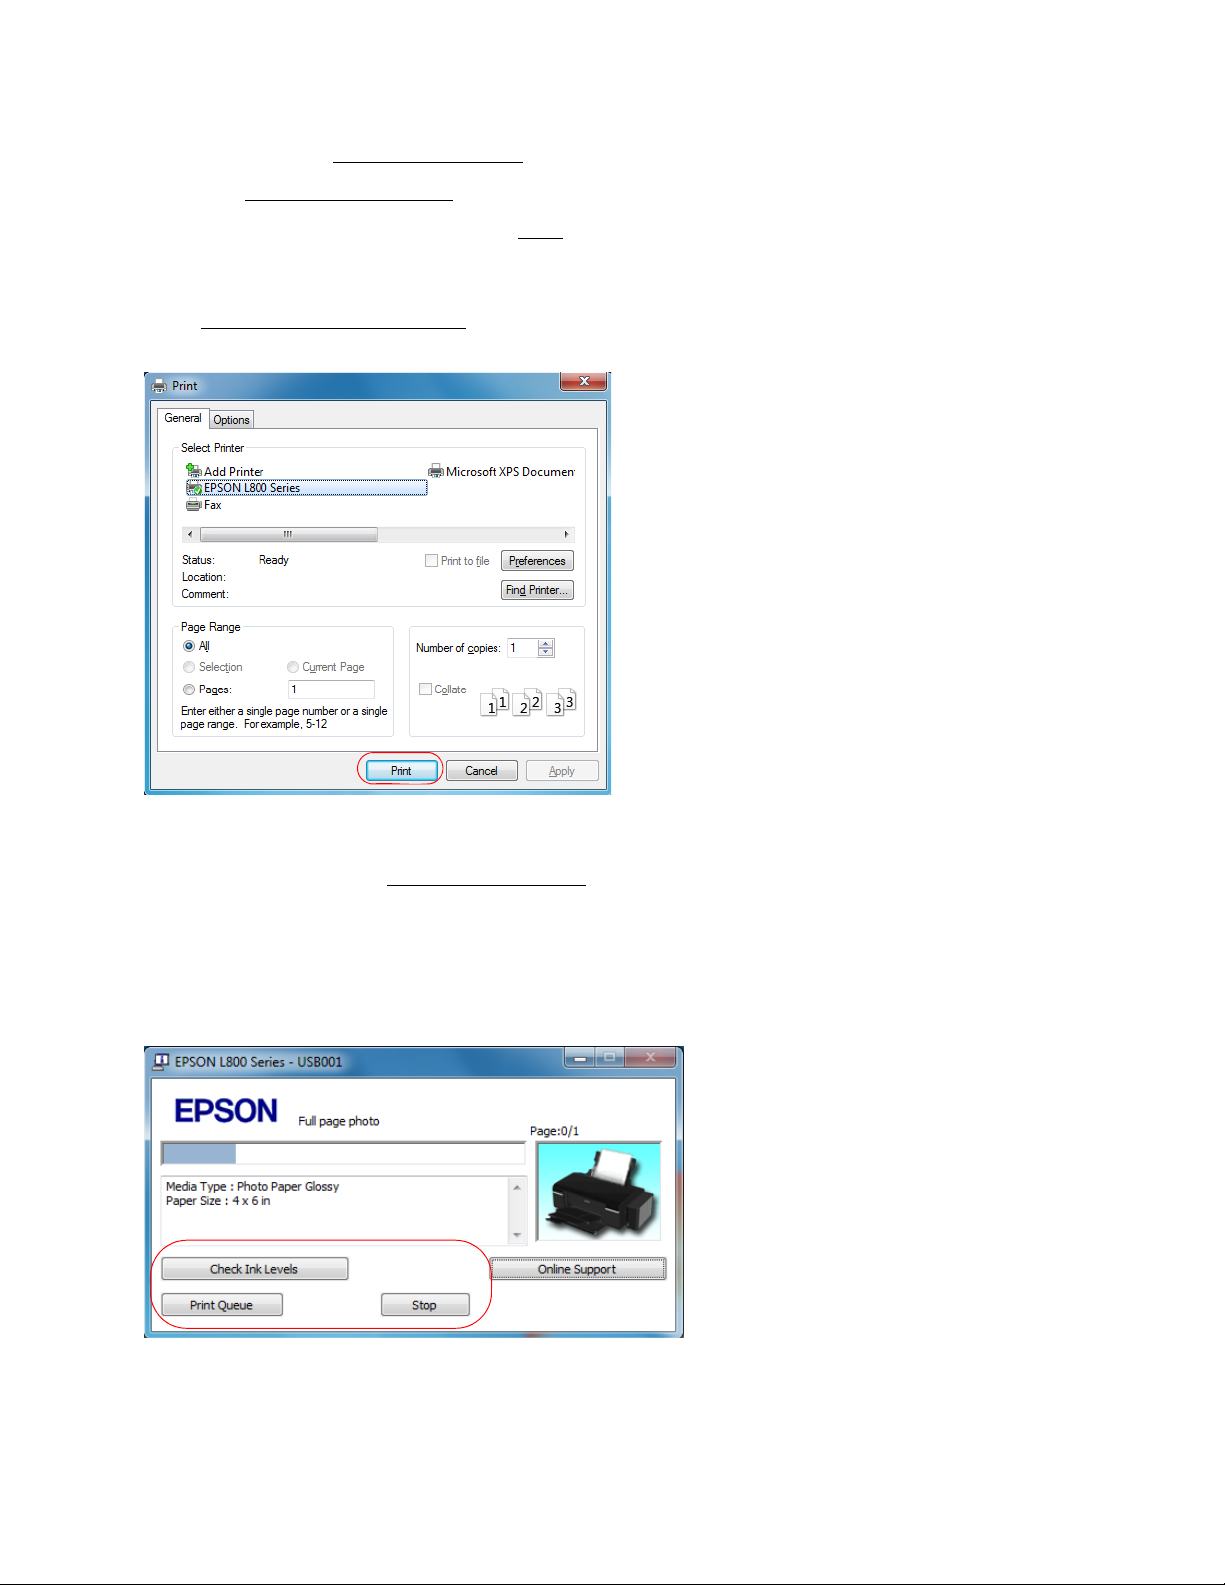
1. Select the print option from your application.
15
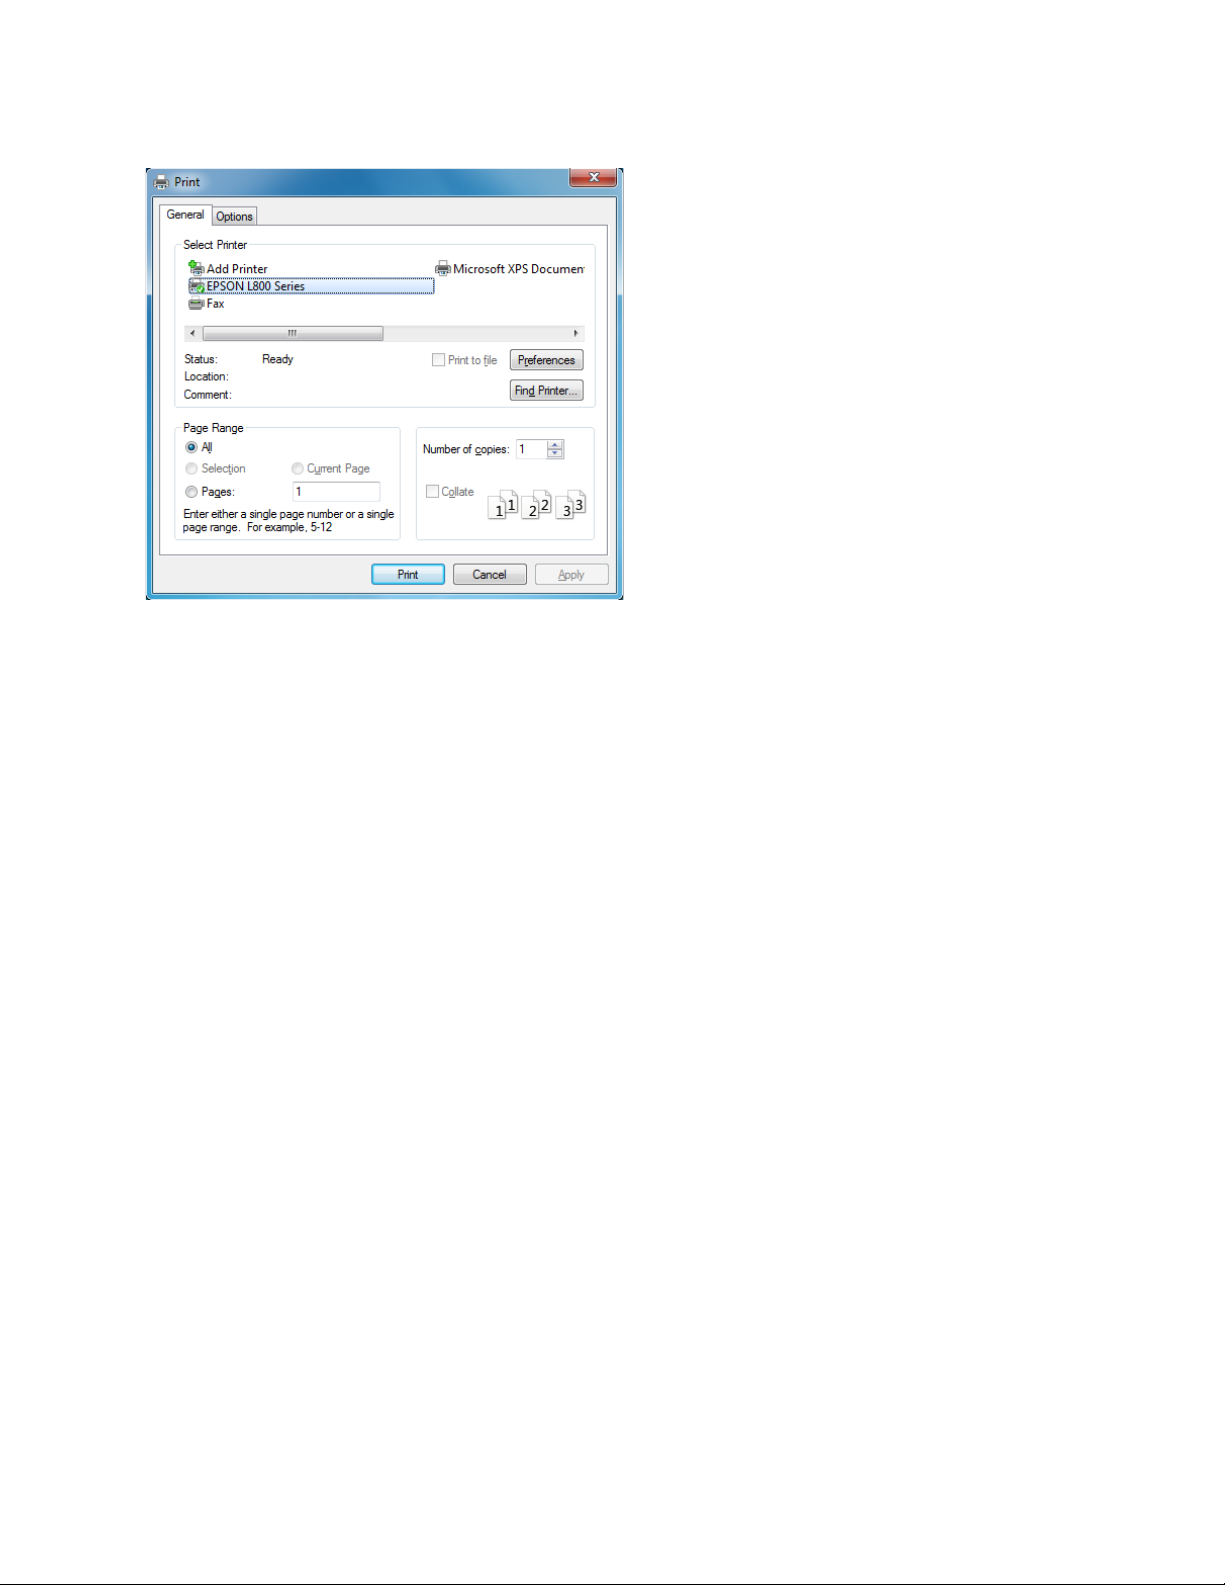
2. Select EPSON L800 Series.
3. Click Properties or Preferences.
Note:
If you don’t see these buttons, click Setup, Printer, or Options, then click Properties or
Preferences on the next screen.
Your printer settings window opens:
16
Follow the steps in these sections to select settings, print, and control printing:
Select Basic Options
Change Print Layout
Select Advanced Options
Print Your Document or Photo
Check Printing Status
Change Default Print Settings
Select Basic Options
There are two ways to select basic printing options:
• Select a printing preset to quickly select settings for common paper types, sizes, and print
qualities.
• Select individual settings on the Main tab.
Select a Printing Preset
For quick access to the most common settings, click the Shortcuts tab. Point to one of the
Printing Presets to view a list of the settings for it.
17
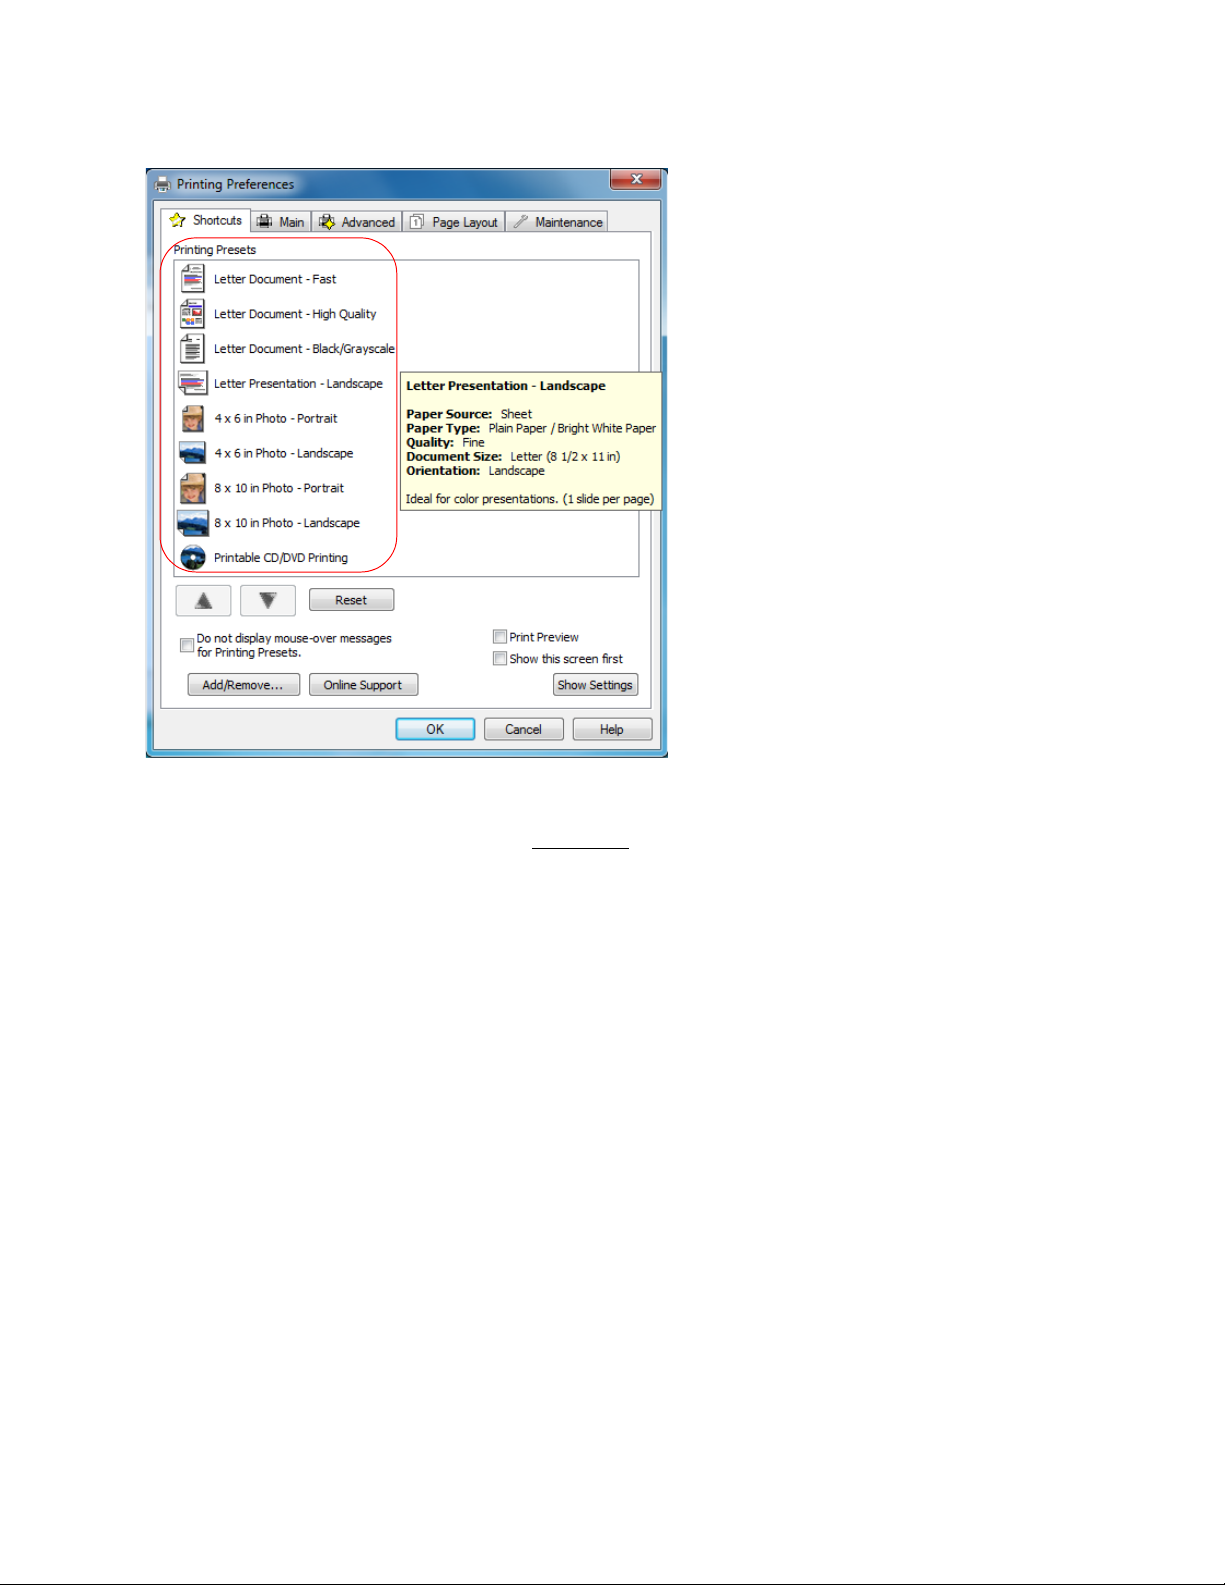
If the settings are correct for your print job, click the preset and print.
To create your own presets, click on the Advanced
tab, select your settings, and then click on the
Save Settings button.
T o delete a preset you created, click Add/Remove on the Shortcuts tab, select the preset, and click
Delete.
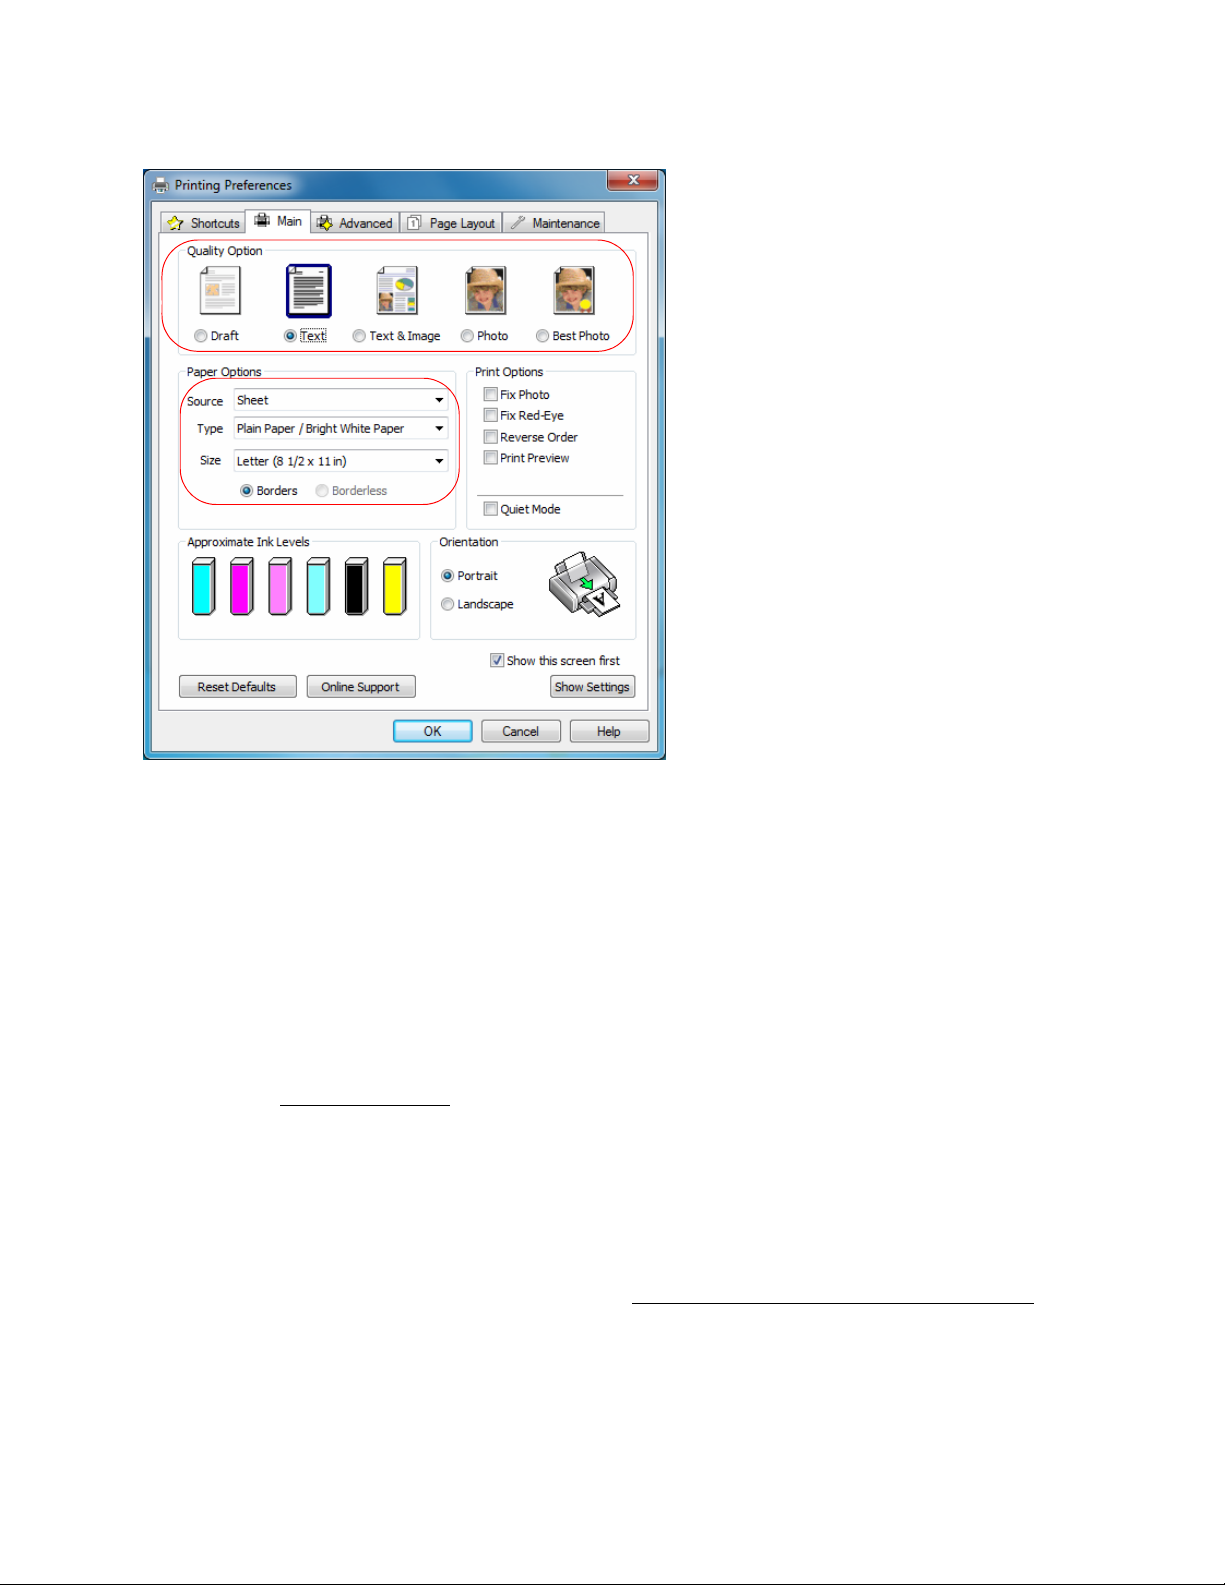
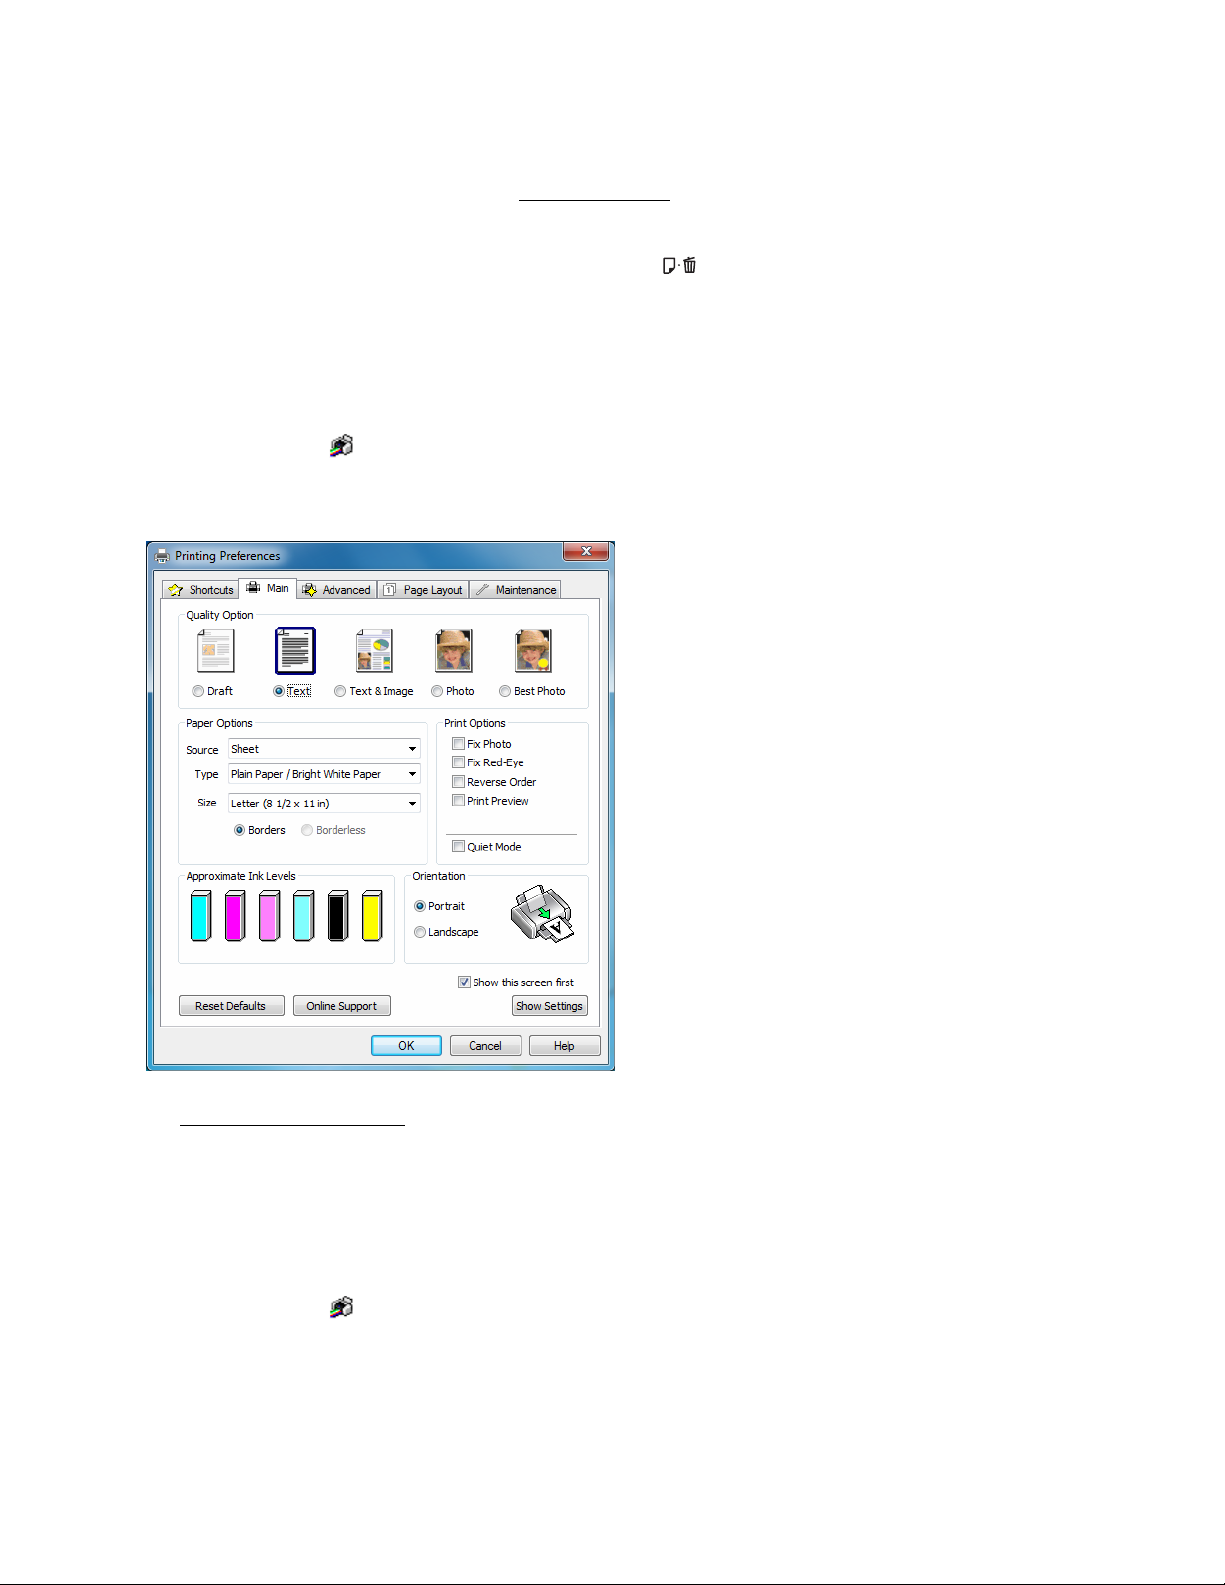
Select Basic Settings on the Main Tab
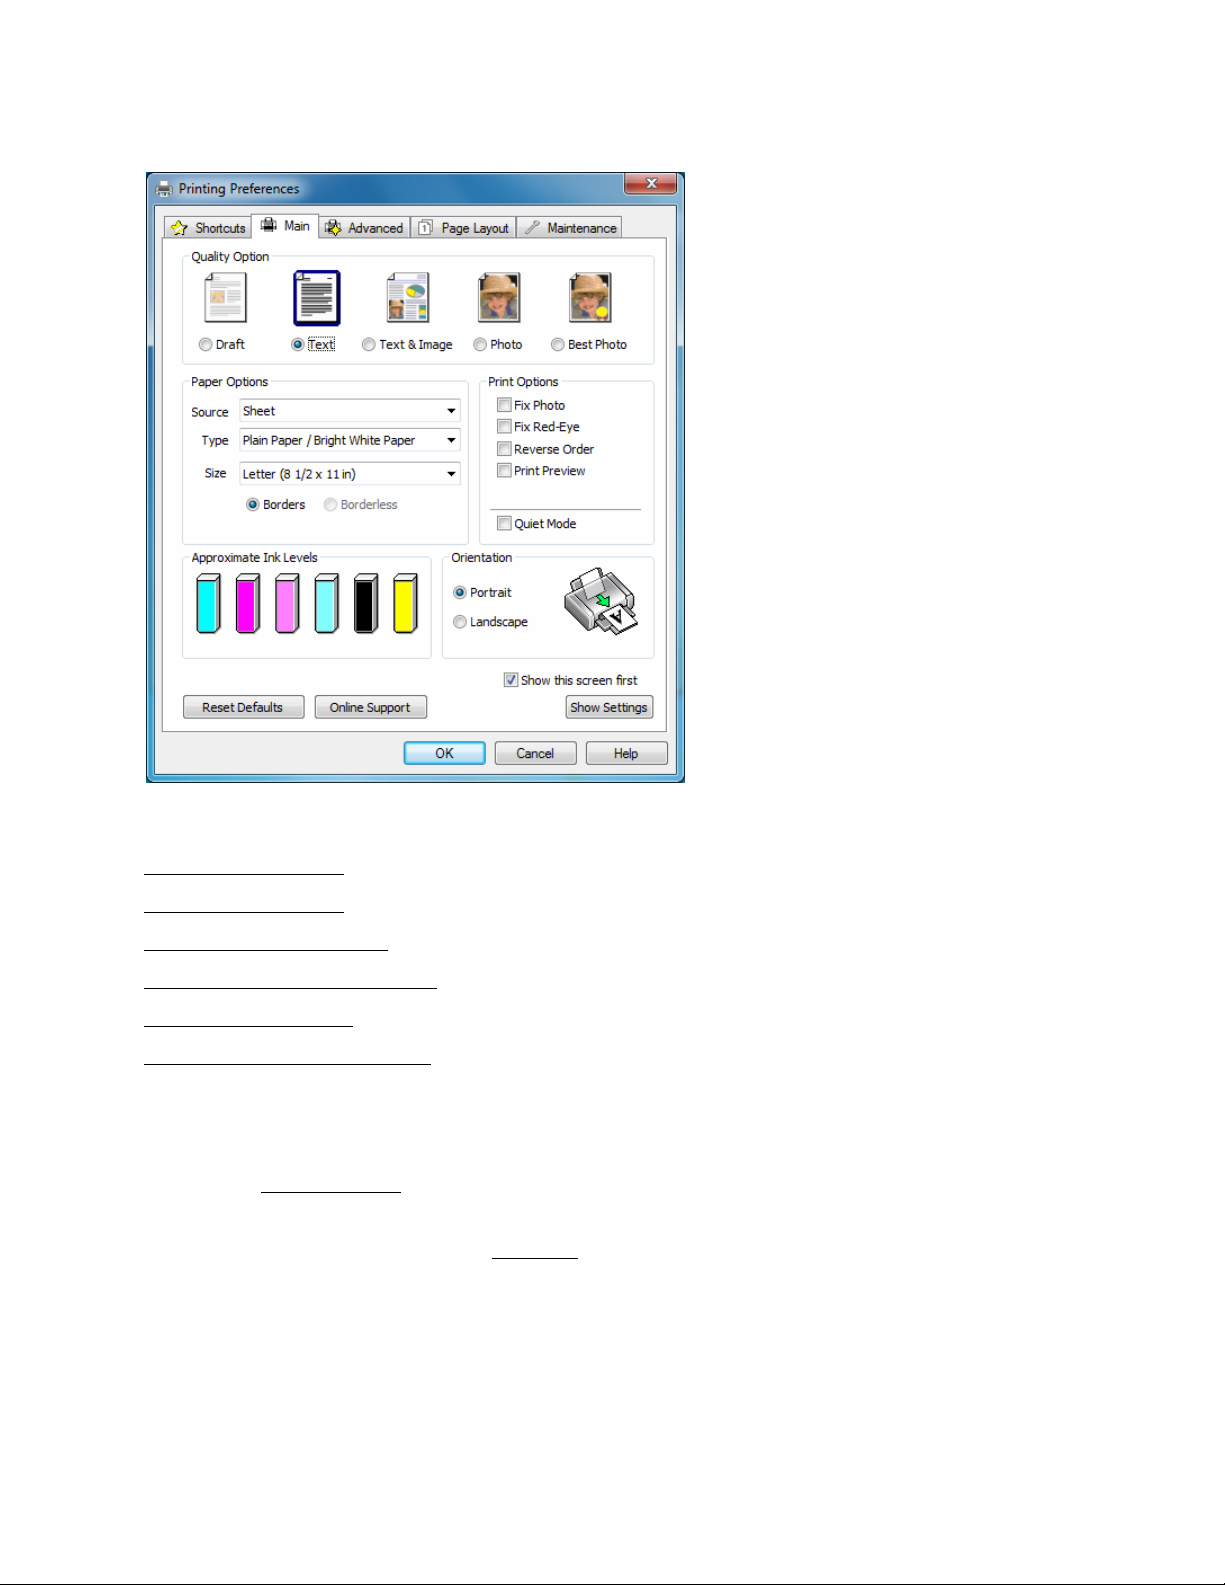
Click the Main tab at the top of the printer settings window to select your basic print options.
18
Tip:
For information about an option, move the mouse over the setting or right-click it to access the
Help utility.
Note:
When printing borderless photos, part of the image will be cropped because this option enlarges
the image slightly beyond the paper size. Adjust the image to the size of the paper and set the
margins in your application to zero.
1. Select a Source option (if you are printing on paper, select Sheet).
2. Select a Quality Option that matches your document or photo and the print quality you want.
3. Select the paper type setting that matches the paper you loaded.
4. Select the paper size setting for the paper you loaded. A User Defined option is also available
so you can create a custom size.
5. If you’re printing borderless photos, select Borderless. For documents or photos with borders,
select Borders.
Note:
For borderless photos, make sure you loaded a compatible borderless paper size and type
6. Select any of the Print Options you want for your document or photo—such as Fix Photo to
improve the color, contrast, and sharpness of flawed photos—or Quiet Mode to lessen noise
during printing when Plain Paper/Bright White Paper is selected for the paper Type.
.
19

Note:
Fix Photo uses a sophisticated face recognition technology to optimize photos that include
faces. For this to work, both eyes and the nose must be visible in the subject’s face. If your
photo includes a face with an intentional color cast, such as a statue, you may want to turn off
Fix Photo to retain the special color effects.
7. Choose Portrait or Landscape orientation for your document or photo. (Choose Landscape
for printing envelopes.)
You can also:
• Select different print layout settings
• Select advanced printing options
• See a summary of your settings (click Show Settings)
• Return to the default settings (click Reset Defaults)
• Access the Epson support website (click Online Support; website is available in Spanish and
Portuguese)
When you’re finished, you’re ready to print.
Change Print Layout
You can select a variety of sizing and layout options on the Page Layout tab.
20

• To size your printed document or photo, click the Reduce/Enlarge Document checkbox and
select sizing options.
• To print on both sides of your paper, select On for 2-sided printing and adjust the margins or
select Folded Booklet as necessary.
• To print multiple pages on one sheet, or one image across multiple sheets, click the Multi-
Page checkbox and select the multi-page options you want for your document.
• To select multiple copies and their print order, use the Copies, Reverse Order, and Collate
options.
• To adjust the amount of image expansion when printing borderless photos, select Auto
Expand as the Enlargement Method, then adjust the Borderless Expansion slider to Min,
Mid, or Max. (If you select Retain Size, the image is printed at its actual size without
scaling.)
Note:
You may see white borders on your printed photo if you use the Min setting.
• To add a watermark message to your printed document or photo, select a Watermark setting.
• To rotate or flip the image you’re printing, click the Rotate 180° or Mirror Image
checkboxes.
See also:
Select Basic Options
Select Advanced Options
Print Your Document or Photo
Select Advanced Options
Click the Advanced tab at the top of the printer settings window to select Advanced options.
21
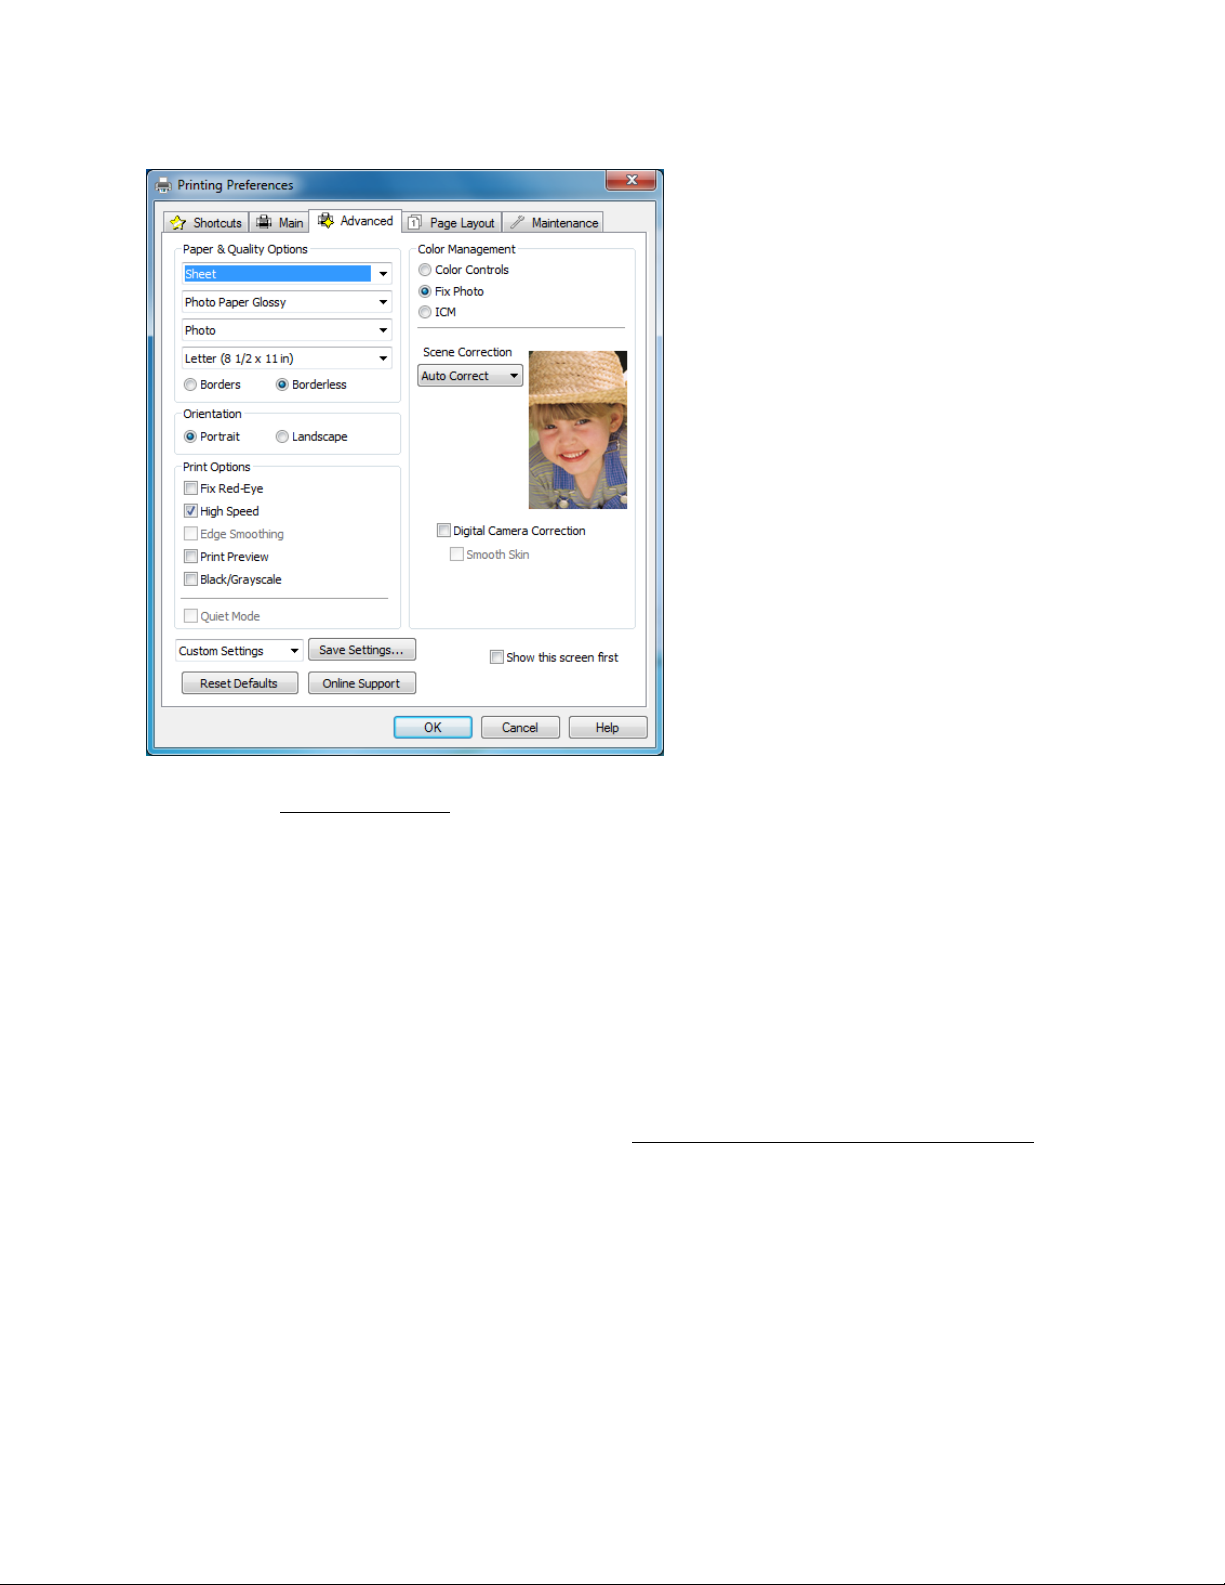
1. Select the paper type setting
2. Select the print quality setting for your document or photo, such as Fast Economy for the
fastest printing or Photo or Photo RPM for the best print quality.
Note:
Available print quality settings depend on the selected paper type setting.
3. Select the paper size setting for the paper you loaded. A User Defined option is also available
so you can create a custom size.
4. If you’re printing borderless photos, select Borderless. For documents or photos with borders,
select Borders.
Note:
For borderless photos, make sure you loaded a compatible borderless paper size and type.
5. Choose Portrait or Landscape orientation for your document or photo. (Choose Landscape
for printing envelopes.)
6. Select any of the Print Options you want for your document or photo.
7. Select Color Management options for finer control of the color in your document or photo.
You can also:
• Save all your selected settings for later use (click Save Settings and name the settings); to use
saved settings later, select them from the Custom Settings list or from the Shortcuts tab
that matches the paper you loaded.
• Return to the default settings (click Reset Defaults)
22
• Select different print layout settings
• Select basic printing options
When you’re finished, you’re ready to print.
Print Your Document or Photo
After selecting your print settings, click OK to save them and return to the Print window.
Click OK or Print to start printing.
During printing, you can check printing status.
Check Printing Status
During printing, you see this window showing the progress of your print job. It allows you to
control printing and check ink levels.
To cancel printing, click Stop.
To see print jobs lined up for printing, click Print Queue.
23
To check ink status, click Check Ink Levels.
If you see an error during printing, see Solve Problems
Note:
You can also cancel printing by pressing the printer’s paper button.
Change Default Print Settings
When you change your print settings from within a program, the changes apply only while you’re
printing at that time. If you want to select different settings to use in all your Windows programs,
you can change the default print settings.
1. Right-click the printer icon in the taskbar.
2. Select Printer Settings. You see the printer settings window:
for solutions.
3. Select the print settings
You can still change the default settings from within a program as needed.
Change the Language
In Windows, you can choose English, Spanish or Portuguese as the language of the printer
software screens.
1. Right-click the printer icon in the taskbar and select Printer Settings.
2. Click the Maintenance tab.
24
you want to use as defaults in all your Windows programs.
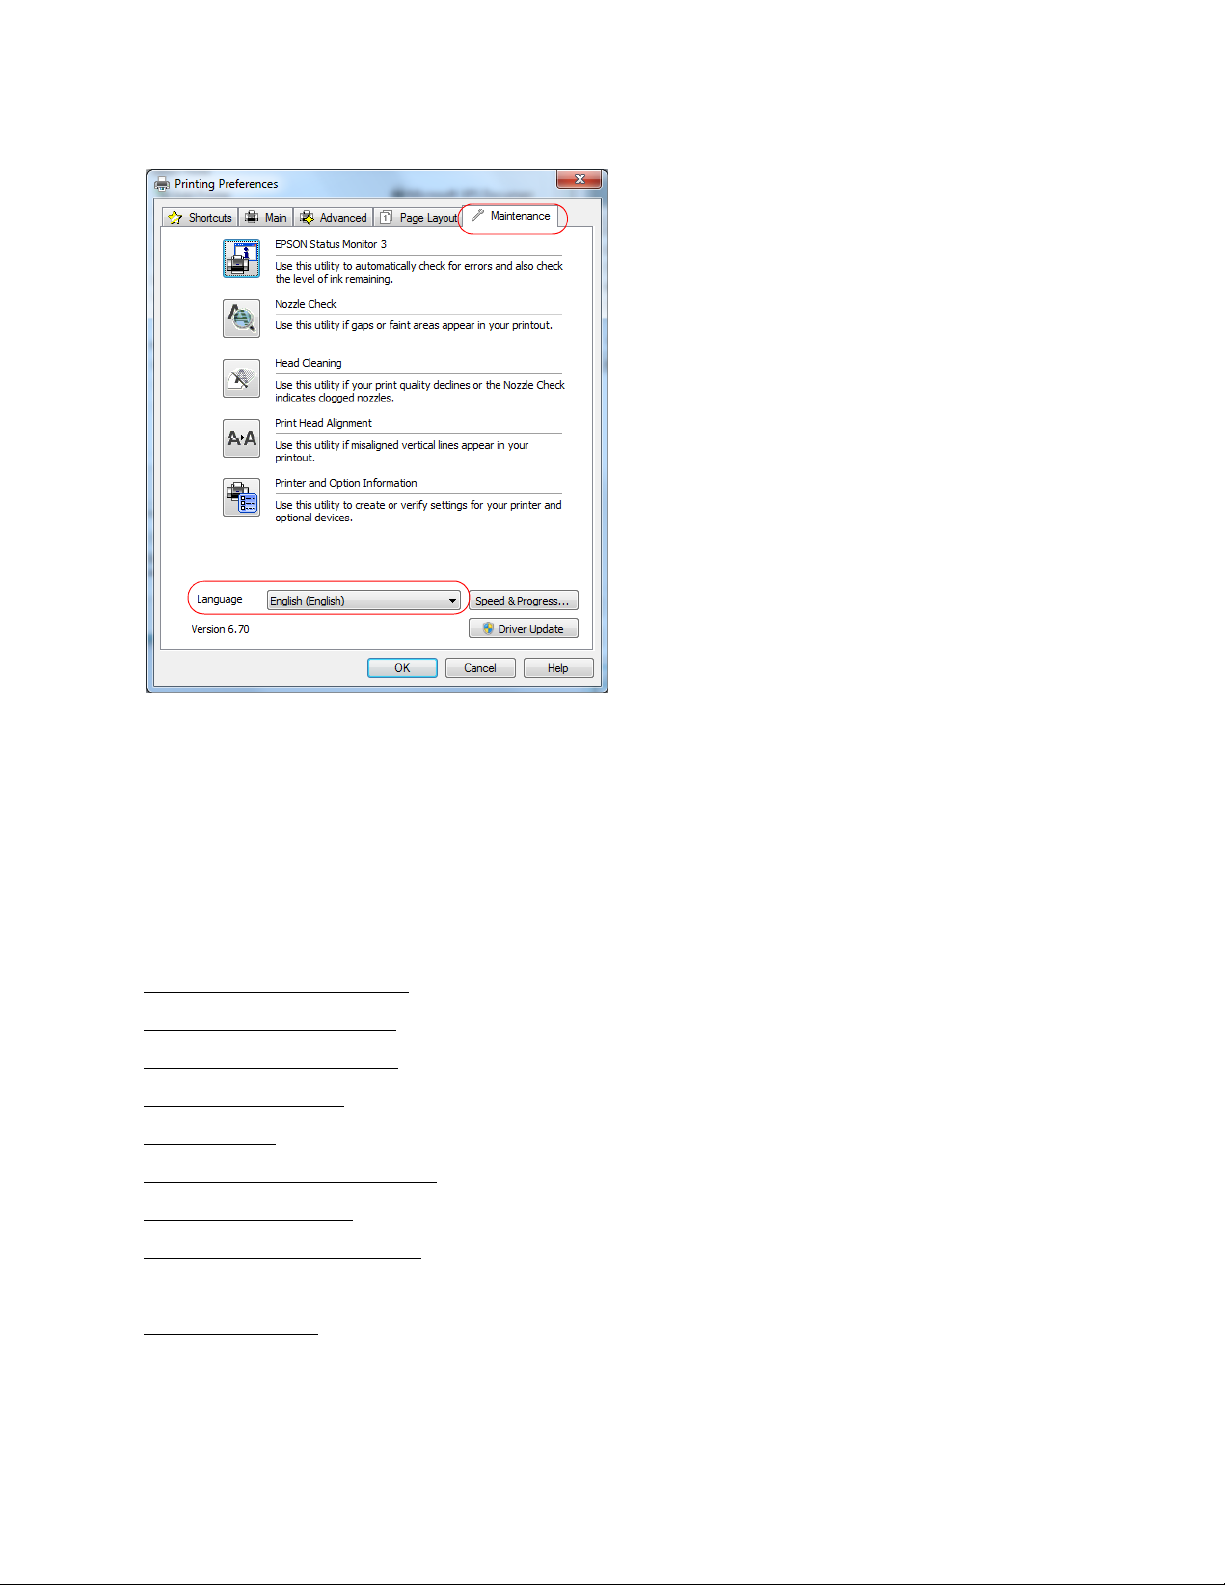
3. Select the language you want to display.
4. Click OK to close the driver screen. The language used on the driver screen changes to your
selection the next time you access it.
Mac OS X Printing
You can print using any Mac OS X printing program.
Follow the steps in these sections to print from your Mac:
Open Your File for Printing
Select Basic Print Options
Select Page Setup Options
Change Print Layout
Manage color
Print Your Document or Photo
Check Printing Status
General Printing Preferences
See also:
Windows Printing
Open Your File for Printing
You can open a file for printing by either:
25
• Starting a printing program and opening a document or photo from it.
• Double-clicking a document or photo file icon on the screen.
When you’re ready to print, select print options
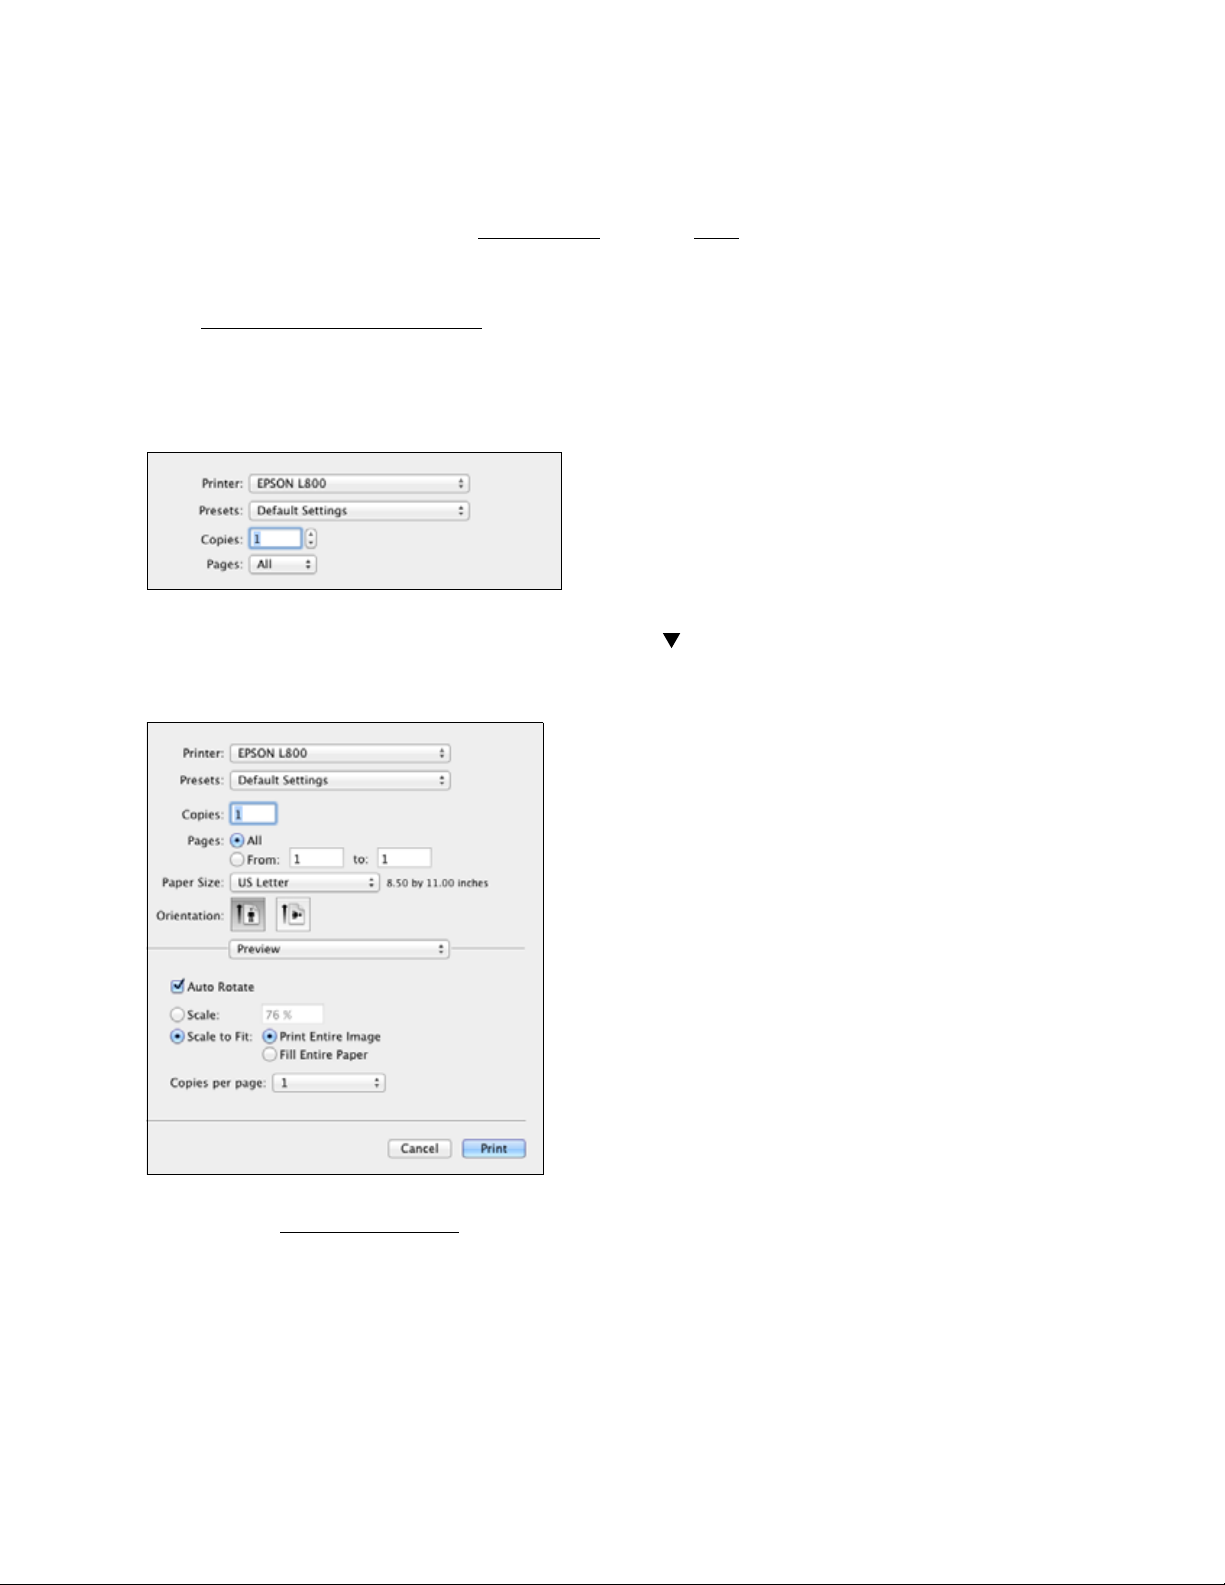
Select Basic Print Options
After opening your file for printing, open the print window to select your print options.
1. Open the File menu and select Print.
2. Select the name of your EPSON product as the Printer setting.
3. If necessary, click the Show Details button or the button next to the Printer setting to
expand the print window.
and then print.
4. Select the page setup options
Note:
If you don’t see these settings here, check for them in your application before printing. For
example, you may be able to select them by opening the File menu and selecting Page Setup.
5. Select any settings that are specific to the application you’re using. For example, if you’re
printing from Preview, you see the application settings shown above.
6. Select Print Settings from the pop-up menu.
26
. Choose the Paper Size and Orientation settings.
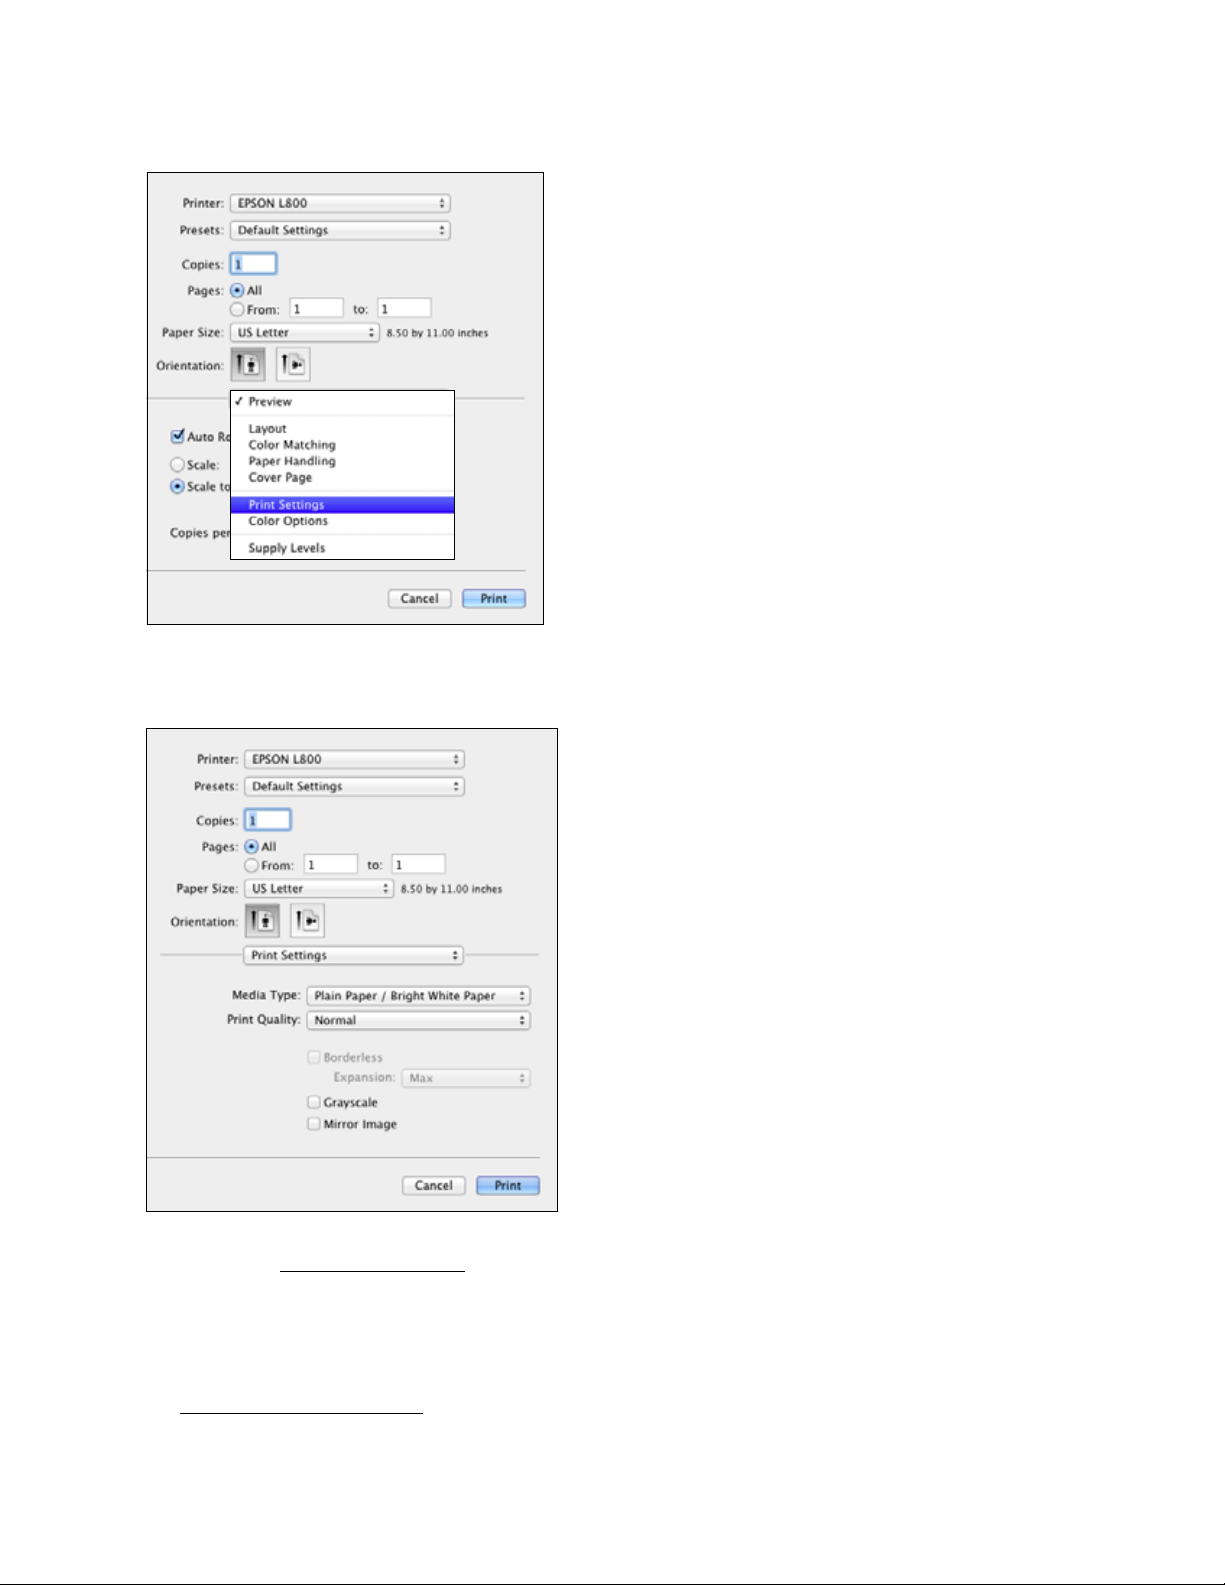
These settings appear on the screen:
7. Select the Media Type setting that matches the paper you loaded.
8. Select a Print Quality for your document or photo. Available settings depend on the selected
Media Type setting.
You can also:
• Select page setup options
27
• Select different print layout settings
• Manage colors
When you’re finished, you’re ready to print.
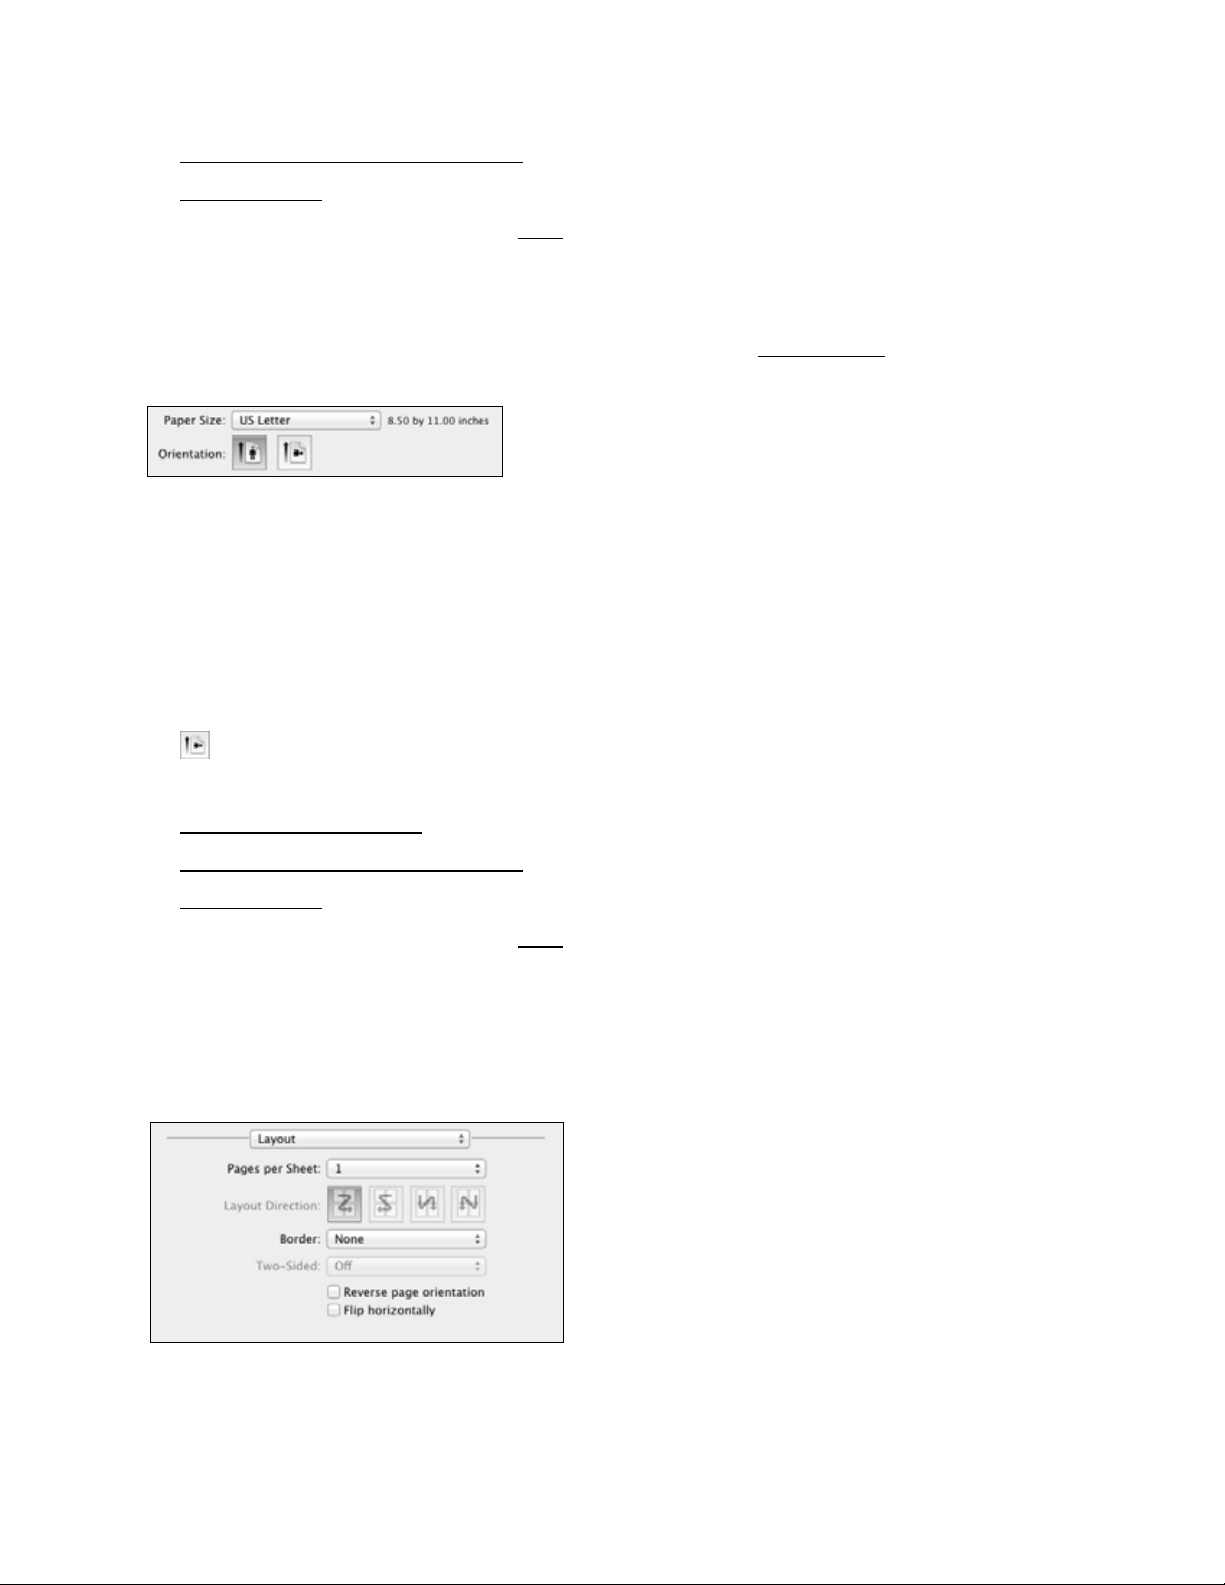
Select Page Setup Options
Depending on your application, you may be able to select the paper size and orientation settings,
and adjust the size of your printed document or photo, from the print window.
Note:
If you don’t see these settings in the print window, check for them in your application before
printing. For example, you may be able to select them by opening the File menu and selecting
Page Setup.
1. Select the Paper Size setting for the paper you loaded. A custom option is also available so
you can create a custom paper size.
2. Choose a portrait or landscape Orientation option for your document or photo. (Choose
landscape left for envelopes.)
You can also:
• Select basic print options
• Select different print layout settings
• Manage colors
When you’re finished, you’re ready to print.
Change Print Layout
Select Layout from the pop-up menu to select a variety of layout options.
1. Select Layout in the pop-up menu.
2. Select from the following options, as necessary:
28
To print multiple pages on one sheet, select 2, 4, 6, 9, or 16 in the Pages per Sheet pop-up
menu.
Select the order in which the multiple pages print on the sheet as the Layout Direction
setting.
To print borders around each page, select one of the line settings in the Border pop-up menu.
You can also flip the direction of your image by selecting Reverse page orientation or Flip
horizontally.
You can also:
• Select basic print options
• Select page setup options
• Manage colors
When you’re finished, you’re ready to print.
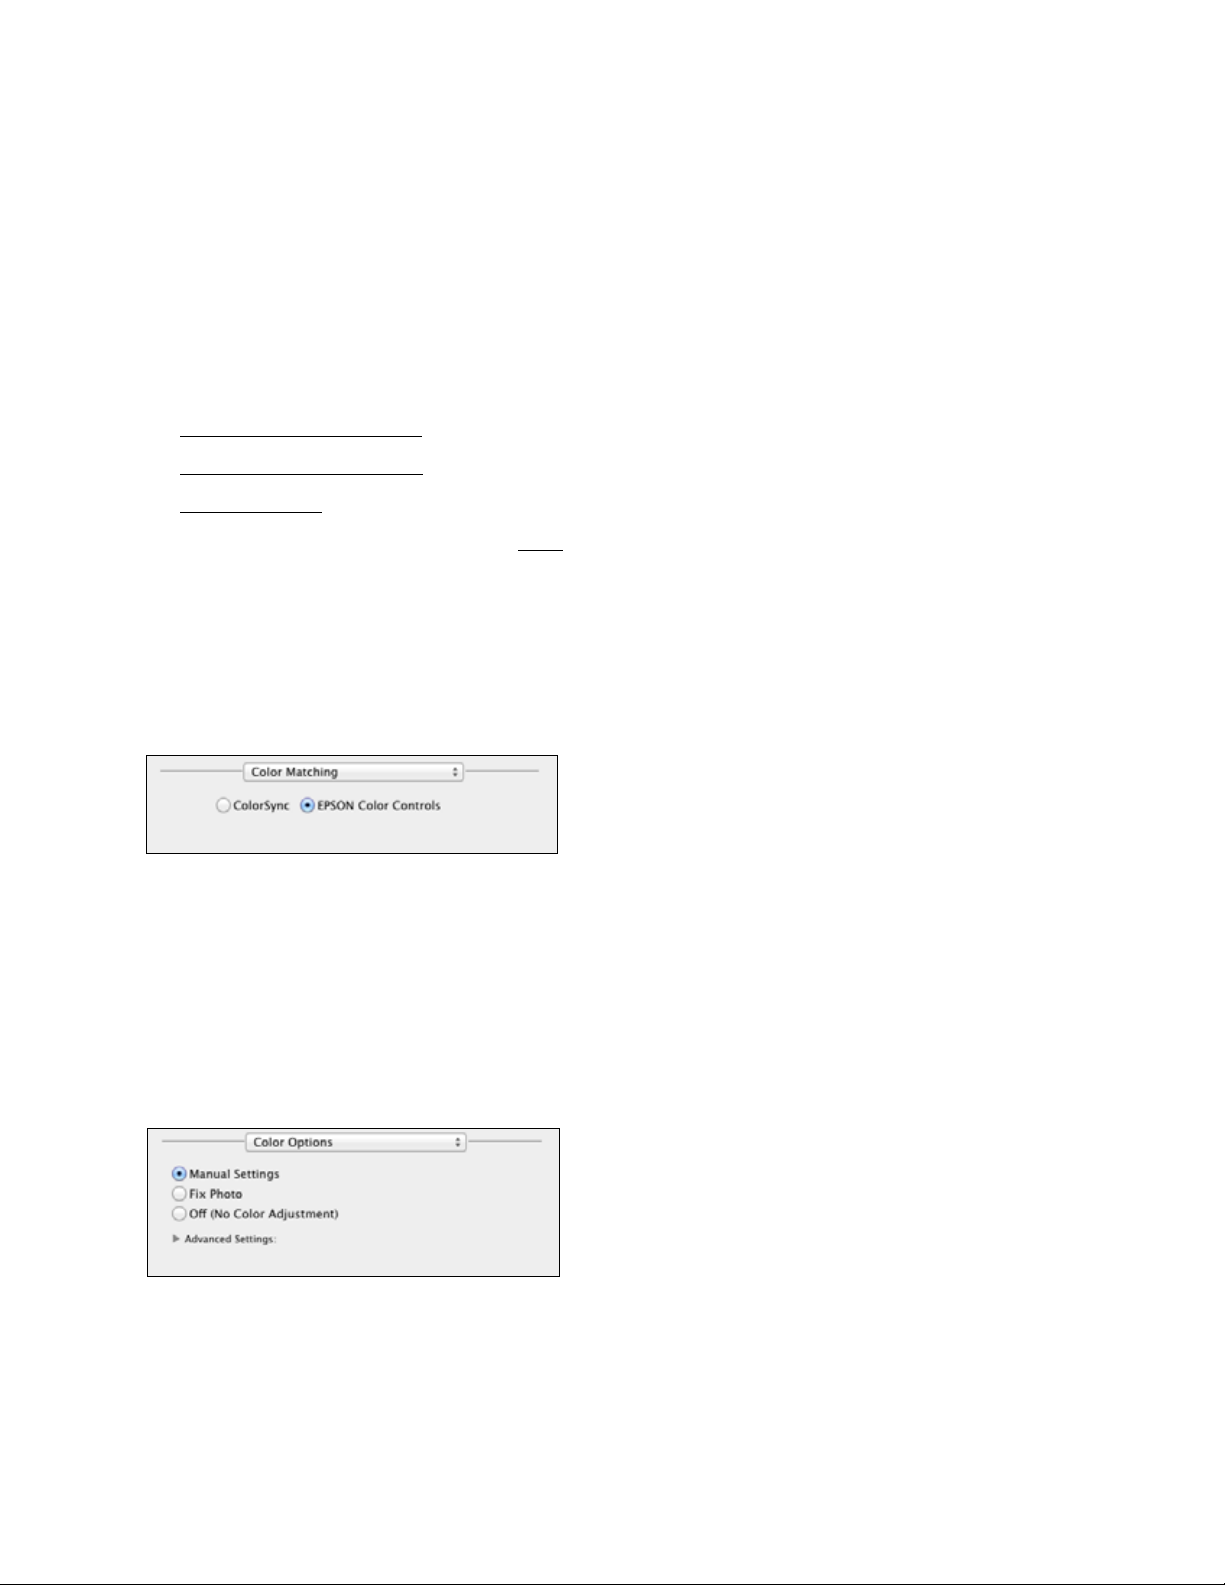
Manage color
You can adjust the Color Matching and Color Options settings to fine-tune the colors in your
printout, or turn off color management in your printer software.
1. Select Color Matching in the pop-up menu.
2. Select from the following options, if necessary:
EPSON Color Controls lets you manage color using controls in your printer software, or turn
off color management.
ColorSync prints using standard color profiles for your product and paper to help match
image colors.
3. Select Color Options in the pop-up menu.
Note:
The available settings on the Color Options menu depends on the option you selected on the
Color Matching menu.
4. Select from the following options, if necessary:
29
Loading...