


Instruction Book
GB |
INSTRUCTION BOOK |
CT |
|
KO |
|
VI SÁCH HƯỚNG DẪN |
CS |
|
ID |
BUKU PETUNJUK |
TH |
|
|
2 Safety precautions
Safety precautions
This appliance can be used by children aged from 8 years and above and persons with reduced physical, sensory or mental capabilities or lack of experience and knowledge if they have been given supervision or instruction concerning use of the appliance in a safe way and understand the hazards involved.
The robot should only be used for normal vacuuming in a domestic/indoor environment.
Make sure the robot is stored in a dry place.
All service or repairs must be carried out by an authorized Electrolux service centre.
Remove the robot from the charger before cleaning or maintaining your robot.
Do not allow children to play with the appliance.
Packaging material, e.g. plastic or fabric bags should not be accessible to children to avoid suffocation.
The robot is designed for a specific voltage. Check that your supply voltage is the same as that stated on the rating plate on the charging adaptor.
Use only the original charging station and adaptor designed for the robot.
Never use the robot:
•In wet areas.
•Close to flammable gases, etc.
•When the product shows visible signs of damage.
•On sharp objects or fluids.
•On hot or cold ashes, lighted cigarette butts, etc.
•On fine dust, for instance from plaster, concrete, flour, hot or cold ashes.
•Do not leave the robot in direct sunlight.
•Avoid exposing the robot to strong heat.
•The battery pack within must not be dismantled, short circuited or placed against a metal surface. Use only the battery pack designed for the robot.
•Batteries must be removed from the appliance before it is disposed of.
•The appliance must not be plugged in when removing the battery.
•The battery is to be disposed of safely.
•Never use the robot without filter.
•Do not touch the brush roll while the cleaner is switched on and the brush roll is turning. Do not touch the wheels while the robot is operating.
Using the robot in a manner that conflicts with above recommendations may cause serious personal injury or damage to the product. Such injury or damage is not covered by the warranty or by Electrolux.
The warranty does not cover reduction in battery runtime due to battery age or use, as the life of the battery depends upon the length and number of times the robot is used.
Before cleaning, remove small and fragile objects such as clothing, curtain strings, papers and power cords from the floor. If the device passes over
a power cord and pulls it, there is a risk that an object could be pulled off a table or shelf.
The robot is designed to not move any larger objects in its way. Objects such as chairs can therefore be left on the floor as the robot will clean around them.
Strong light, mirrored walls, floor-to-ceiling windows and very shining objects could disturb the 3D Vision system.
Visit our website to:
Get usage advice, brochures, trouble shooter, service information: www.electrolux.com
Register your product for better service:
www.electrolux.com/productregistration
Buy Accessories and Consumables for your appliance: www.electrolux.com/shop
Recommended operation, charging and storage environment for Electrolux battery products
1. Operation, charging and storage conditions
This product is intended to be used in normal household environment and should not be exposed to abnormal temperature.
To protect the internal parts of product it should not be stored, charged or operated in:
•An ambient temperature below 10 °C or exceeding 30 °C.
•If the product is stored in temperature below 10 °C or exceeding 30 °C. Please wait a few hours so that the internal components of the products can cool down or warm up and dry before usage. Usage and storage outside temperature interval might harm the product or reduce lifetime.
•Below 20% or over 80% humidity levels (NonCondensing)
Charge the product for minimum 24 hours:
•Before first use.
•Before storage for a longer time period. (Remove batteries from the robot before long time storage.)
•After storage for a longer time period.
2. Dew condensation warning
Dew condensation may form inside the product under the following conditions:
•The unit is moved from a cold to a warm place.
•Under conditions of very high humidity.
•After heating a cold room.
Please wait a few hours for the internal components of the products to warm up and dry before usage.
3. To preserve the battery life and performance:
•Always keep the robot charging when not in use.
•Charge it as soon as possible after the cleaning cycle. Waiting too long might affect the batteries.
3 |
|
|||||||||||||||||||||||||||||||
Environmental concerns |
|
|||||||||||||||||||||||||||||||
|
|
|
|
This symbol on the product indicates |
|
|||||||||||||||||||||||||||
|
|
|
|
|
||||||||||||||||||||||||||||
|
|
|
|
|
||||||||||||||||||||||||||||
|
|
|
|
that this product contains a built-in |
GB |
|||||||||||||||||||||||||||
|
|
|
|
rechargeable battery which shall not be |
CS |
|||||||||||||||||||||||||||
|
|
|
|
disposed with normal household waste. |
|
|||||||||||||||||||||||||||
|
|
|
|
This symbol on the product or on its |
|
|||||||||||||||||||||||||||
|
|
|
|
|
||||||||||||||||||||||||||||
|
|
|
|
|
||||||||||||||||||||||||||||
|
|
|
|
packaging indicates that the product may |
CT |
|||||||||||||||||||||||||||
|
|
|
|
|||||||||||||||||||||||||||||
|
|
|
|
not be treated as household waste. |
||||||||||||||||||||||||||||
|
|
|
|
ID |
||||||||||||||||||||||||||||
|
|
|
|
To recycle your product, please take it to an |
||||||||||||||||||||||||||||
|
|
|
|
|
||||||||||||||||||||||||||||
|
|
|
|
official collection point or to an Electrolux |
|
|||||||||||||||||||||||||||
|
|
|
|
service center that can remove and recycle |
|
|||||||||||||||||||||||||||
|
|
|
|
the battery and electric parts in a safe and |
KO |
|||||||||||||||||||||||||||
|
|
|
|
professional way. Follow your country’s |
||||||||||||||||||||||||||||
|
|
|
|
TH |
||||||||||||||||||||||||||||
|
|
|
|
rules for the separate collection of electrical |
||||||||||||||||||||||||||||
|
|
|
|
|
||||||||||||||||||||||||||||
|
|
|
|
products and rechargeable batteries. |
|
|||||||||||||||||||||||||||
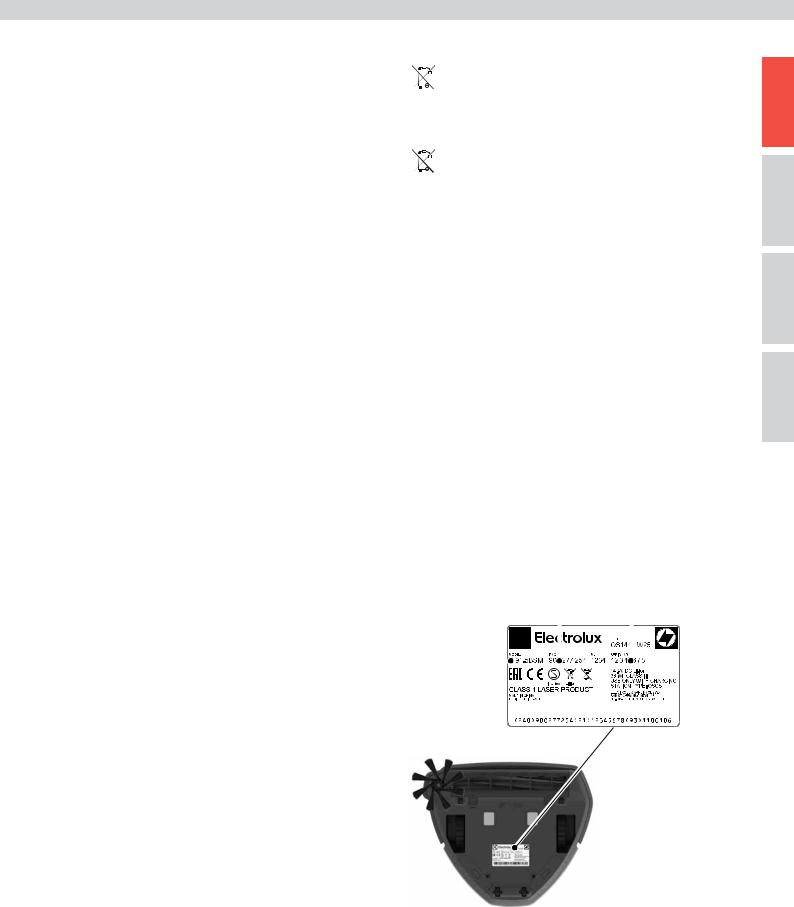
Customer care and service |
VI |
|||||||||||||||||||||||||||||||
When contacting the Electrolux service center, |
|
|||||||||||||||||||||||||||||||
ensure that you have following data available: |
|
|||||||||||||||||||||||||||||||
- Model number |
|
|||||||||||||||||||||||||||||||
- PNC number |
|
|||||||||||||||||||||||||||||||
- Serial number |
|
|||||||||||||||||||||||||||||||
The information can be found on the rating plate. |
|
|||||||||||||||||||||||||||||||
|
|
|
|
|
|
|
|
|
PNC number Serial number |
|
||||||||||||||||||||||
Model number |
|
|
|
|
|
|
|
|
|
|
|
|
|
|
|
|
|
|
|
|
|
|
|
|
|
|
|
|
||||
|
|
|
|
|
|
|
|
|
|
|
|
|
|
|
|
|
|
|
|
|
|
|
|
|
|
|
|
|||||
|
|
|
|
|
|
|
|
|
|
|
|
|
|
|
|
|
|
|
|
|
|
|
|
|
|
|
|
|||||
|
|
|
|
|
|
|
|
|
|
|
|
|
|
|
|
|
|
|
|
|
|
|
|
|
|
|
|
|||||
|
|
|
|
|
|
|
|
|
|
|
|
|
|
|
|
|
|
|
|
|
|
|
|
|
|
|||||||
|
|
|
|
|
|
|
|
|
|
|
|
|
|
|
|
|
|
|
|
|
|
|
|
|
|
|||||||
|
|
|
|
|
|
|
|
|
|
|
|
|
|
|
|
|
|
|
|
|
|
|
|
|
|
|
|
|
|
|
|
|
|
|
|
|
|
|
|
|
|
|
|
|
|
|
|
|
|
|
|
|
|
|
|
|
|
|
|
|
|
|
|
|
|
|
|
|
|
|
|
|
|
|
|
|
|
|
|
|
|
|
|
|
|
|
|
|
|
|
|
|
|
|
|
|
|
|
|
|
|
|
|
|
|
|
|
|
|
|
|
|
|
|
|
|
|
|
|
|
|
|
|
|
|
|
|
|
|
|
|
|
|
|
|
|
|
|
|
|
|
|
|
|
|
|
|
|
|
|
|
|
|
|
|
|
|
|
|
|
|
|
|
|
4
8
/
Electrolux
断开。
• 灰烬。
• 器人运行时切勿触摸滚轮。
Electrolux
的使用时间长短和次数。
的风险。
在它们周围清洁。
干扰3D

 www.electrolux.com.cn
95105801
800-820-0096

Electrolux
1.
中。
•10°C 30°C
•10°C 30°C
•20% 80%
24
• 器人的电池。
2.
升温和干燥。
3.
5
GB
CS
Electrolux CT
ID
|
KO |
|
TH |
|
Electrolux
VI
-PNC
PNC
*


*
*

6 Overview of the robot /
4 |
1 |
3 |
2 |
5 |
7 8
11 |
10 |
6 |
9 |
|
|
|
22
24
23
25
27
29 26
22 |
12 |
13 |
|||
|
|
|
|
||
|
|
|
|
|
|
|
|
|
|
|
|
28
15
16
14 |
15 |
|
|
20 |
|
||
|
|
|
|
19 |
|
|
|
|
|
|
|
|
|
|
|
|
|
|
|
|
|
|
|
|
|
|
|
|
18 |
|
|
|
|
|
|
17 |
17 |
|
|
|
|
|
|||||
 21
21

English
Before starting
•Unpack your Electrolux PUREi9 robot vacuum cleaner and check that all accessories are included.*
•Read the instruction manual carefully.
•Pay special attention to the Safety advice chapter.
We recommend that you download the ”PUREi9” App, and update the software before the first use.
Enjoy your Electrolux PUREi9 robot vacuum cleaner!
Table of contents: |
|
Safety precautions . . . . . . . . . . . . . . . . . . . . . . . . . . . . . . . . |
. 2 |
Consumer information and sustainability policy . . . . . . . . . . . . . . . . . . . . |
2 |
How to use the robot . . . . . . . . . . . . . . . . . . . . . . . . . . . . . . . . |
8 |
How to connect to the ”PUREi9” APP . . . . . . . . . . . . . . . . . . . . . . . . . |
9 |
Tips on how to get the best results . . . . . . . . . . . . . . . . . . . . . . . . . |
11 |
Emptying the Dust container . . . . . . . . . . . . . . . . . . . . . . . . . . . . |
13 |
Cleaning/Replacing the Filter . . . . . . . . . . . . . . . . . . . . . . . . . . . . |
13 |
Cleaning and maintenance . . . . . . . . . . . . . . . . . . . . . . . . . . . . . |
14 |
Changing the batteries . . . . . . . . . . . . . . . . . . . . . . . . . . . . . . |
15 |
Error handling. . . . . . . . . . . . . . . . . . . . . . . . . . . . . . . . . . |
15 |
Troubleshooting . . . . . . . . . . . . . . . . . . . . . . . . . . . . . . . . . |
16 |
Description of your robot vacuum cleaner
1Display / Control panel
2ECO function button
3SPOT cleaning button
4Play/Pause button / Off button (long press)
5Home button
6Clock
7Dust container indicator
8WIFI connection indicator
9Scheduled cleaning indicator
10Warning indicator
11Battery status indicator
12Fan unit
13Air outlet
14Bumper
15Side brush
163D Vision System (Camera)
17Main wheels
18Charging connectors
19Brush roll lid
20Brush roll
21Battery compartments
22Dust container release button
23Dust container lid
24Filter
25Filter frame (and mesh net)
26Dust container
27Charging base
28Charging connectors
29Power adaptor and cord
* Accessories may vary from model to model.
Content / 7
|
|
• Electrolux PUREi9 |
GB |
|
CS |
• |
|
• |
|
“PUREi9” |
|
Electrolux PUREi9 |
CT |
|
|
|
ID |
|
. . . . . . . . . . . . . . . . . . . . . . . . .4. . . .
.. .. |
.. .. .. |
.. .. .. .. .. .. .. .. .. .. .. .. .. .. .. .. |
.. |
.. .. |
.. |
.. .. .. .. .. .. 4 |
.. .. .. |
.. .. .. |
.. .. .. .. .. .. .. .. .. .. .. .. .. .. .. |
.. .. |
.. |
.. .. |
.. .. .. .. .. 8 |
“PUREi9” . . |
. . . . . . . . . |
. |
. |
. |
. . . . 9. . . . . |
|
|
|
|
|
|
|
KO |
. . . . . . . . . . . . . . . . . . . 11. . . . . |
||||||
. . . . . . . |
. . |
. . . . . . . . . . |
. |
. |
. |
. . . .13. . . . |
|
|
|
|
|
|
TH |
/ . . . . . . . . . . . . . . . . . . . . . . . . 13. . . . .
. . . . . . . . . . . . . . . . . . . . . . . . . .14. . . .
. . |
. . . . . . . . . . . . |
. . . . . . . . . |
. |
. . |
. 15. . . . . |
. . |
. . . . . . . . . . . . |
. . . . . . . . . |
. |
. . |
. 15. . . . . |
. . |
. . . . . . . . . . . . |
. . . . . . . . . |
. |
. . |
. 17. . . . . |
|
|
|
|
|
VI |
1/
2
3SPOT
4 / /
5
7 |
|
8 |
WIFI |
9 |
|
163D
*

8 How to use the robot vacuum cleaner /
Installation of the robot vacuum cleaner
|
|
|
|
|
|
|
|
|
|
|
|
|
|
|
|
|
|
|
|
|
|
|
|
|
|
|
|
|
|
|
|
|
|
|
|
|
|
|
|
|
|
|
|
|
|
|
|
|
|
|
|
|
|
|
|
|
|
|
|
|
|
|
|
|
|
|
|
|
|
|
|
|
|
|
|
|
|
|
|
|
|
|
|
0.5 m |
|
|
|
|
|
|
|
|
|
|
|
|
|
|
|
|
|
|
|
|
|
|
|
|
1.5 m |
|
|
|
|
|
|
|
|
|
|
|
|
|
|
|
|
|
|
||
|
|
0.5 m |
|
|
|
|
|
|
||||
1. Place the Charging base on the floor against the wall. |
2. Place the side brush. |
3. Place the robot on the Charging base. |
||||||||||
Plug the adaptor to the power jack on the side of the base. |
Note: If the robot is used to clean rooms with wall-to-wall |
The Battery icon will pulse, to indicate that the robot is |
||||||||||
Connect the Power cord plug to the main socket. Wind up |
carpet, remove the side brush for best cleaning results. |
recharging. |
||||||||||
excessive cord on the back of the base. Make sure there is |
|
|
|
|
|
|
||||||
an empty area of 0.5 m on the sides and 1.5 m in front of |
|
|
|
|
|
|
||||||
the Charging base. |
|
|
|
|
|
|
||||||
WiFi model: Place the base in range of the WiFi router. |
|
|
|
|
|
|
||||||
1. |
2. |
3. |
||||||||||
|
|
|
||||||||||
|
|
|
||||||||||
0..5 m 1..5 m |
|
|
|
|
||||||||
|
|
|
|
|
|
|
||||||
WiFi WiFi |
|
|
|
|
|
|
||||||
Battery/Charging status
/
A B C D
|
|
|
|
|
|
|
|
|
|
|
|
|
|
|
|
1. Red battery (A) indicates that the robot needs to get |
2. |
To preserve the battery life and performance: |
3. Storage (not plugged): In case the robot is stored |
||||
charged. |
- |
Always keep the robot charging when not in use. |
without being charged for a longer period of time, remove |
||||
Red light pulse (B): The robot is charging – Low |
- |
Charge it as soon as possible in the charging base after the |
the batteries and store them separately. (Charge batteries |
||||
charging level. |
|
cleaning cycle. Waiting too long might affect the batteries. |
before removing them). |
||||
White light pulse (C):The robot has charged enough to |
|
|
|||||
|
|
To remove the batteries see instruction page 15. |
|||||
be used. (Press Play/Pause button to clean.) |
|
|
|||||
|
|
|
|
|
|
|
|
White light (D): The robot is ready for use. |
|
|
|
|
|
|
|
Full charging time is ~ 3 hours. |
|
|
|
|
|
|
|
1. (A) |
2. |
|
3. |
||||
|
- |
|
|
||||
(B) – |
- |
|
|||||
|
|
|
15 |
||||
(C) |
|
|
|
|
|
|
|
/ |
|
|
|
|
|
|
|
(D) |
|
|
|
|
|
|
|
3 |
|
|
|
|
|
|
|

How to use the robot vacuum cleaner / 9
How to connect to the ”PUREi9” APP |
We recommend to download the App and update the software before the first use. |
|
||||||
“PUREi9” |
|
|
||||||
|
|
|
|
|
|
|
|
GB |
|
|
|
|
|
|
|
|
|
2.4 GHz |
|
|
|
|
|
|
A |
CS |
|
|
|
|
|
|
|
|
|
5 GHz |
|
|
|
|
A |
|
|
|
|
|
|
|
|
|
|
|
|
|
|
|
|
|
B |
|
|
CT |
|
|
|
|
|
||||
|
|
|
|
|
|
|
|
|
|
|
|
|
|
|
|
|
ID |
1. Download the ”PUREi9” App in the App Store or |
2. During the process the App will ask you to turn the |
3. When the setup is completed, turn the robot back |
|
|||||
Google play and then follow the instruction to create the |
robot upside down to activate the WiFi module and scan |
to its normal position. The WiFi symbol (A) will be lit |
|
|||||
account and connect to the robot. |
the serial number bar code (A) or enter it manually (B). |
up to indicate that the robot is connected to your home |
KO |
|||||
Note: Make sure that the phone is connected to the home WiFi |
Then continue following the instruction from the App. |
network. Note: it could take a few moments for the robot |
||||||
(2.4 GHz). |
Note: before turning the robot, make sure that it has been |
clock to automatically synchronise with your mobile device. |
TH |
|||||
|
switched on for at least one minute. |
Note: Pulsing WiFi symbol indicates that the robot is trying |
||||||
|
|
|||||||
|
|
|
|
|
|
|
to connect to the network. |
|
1. App Store Google Play “PUREi9” |
2. |
3. |
|
|||||
|
WiFi (A) |
WiFi (A) |
|
|||||
WiFi (2.4 GHz) |
(B) App |
|
VI |
|||||
|
|
|
||||||
|
|
|
|
|||||
|
|
WiFi |
|
|||||
|
|
|
|
|
|
|
|
|
Cleaning schedule |
Cleaning modes |
|
|
|
|
|
A |
~2m |
|
PUREi9 |
|
Cleaning can be scheduled in the APP (Days & time) |
1. Press Play/Pause button (A) to start cleaning. |
2. Large rooms will be divided into cells of at most 2 x 2 m. |
|
After a few seconds of start-up, cleaning will be |
Note: The cleaning pattern is more efficient if the robot is |
|
commenced. The robot will start cleaning alongside |
started next to a wall. |
|
walls, working its way inwards. |
|
|
Note: Press “Play/Pause” (A) briefly to pause cleaning, or |
|
|
press and hold to terminate cleaning. |
|
APP |
1. / (A) |
2. 2 x 2 |
|
|
|
|
|
|
|
|
|
|
“ / ” (A) |
|
|
|
|

10 How to use the robot vacuum cleaner /
Auto Docking/Charging |
Auto charging during cleaning cycle |
Crossing threshold |
|||||||||||||
/ |
|
|
|
||||||||||||
|
|
|
|
|
|
2h |
|
|
|
|
|
|
|
C |
|
|
|
|
|
|
|
|
|
|
|
|
|
|
|||
|
|
|
|
|
|
|
|
|
|||||||
|
|
|
|
|
|
|
|
|
|
|
|
|
|
|
|
|
|
|
|
|
|
|
|
|
|
|
|
|
|
|
|
|
|
|
|
A |
|
|
|
|
|
|
A |
|
|
||
|
|
|
|
|
|
|
|
|
|
|
|
B |
|||
|
|
|
|
|
|
|
|
|
|
|
|
||||
|
|
|
|
|
|
|
|
|
|
|
|
||||
|
|
|
|
|
|
|
|
|
|||||||
|
|
|
|
|
|
B |
|
|
|
|
|||||
|
|
|
|
|
|
|
|
|
|
|
|
|
|
||
|
|
|
|
|
|
|
|
|
|
|
Before crossing a threshold or climbing over any |
||||
|
|
|
|
|
|
|
|
|
|
|
|||||
|
|
|
|
|
|
|
|
||||||||
When cleaning is completed, the robot automatically |
Should recharging be needed during cleaning, |
||||||||||||||
returns to the charging base. |
the home button will light up and the robot will return to the |
obstacle, the robot will stop and check: |
|||||||||||||
Note: If the robot is not started from the charging base, |
charging base. Home button (A) is lit. The battery and Play/ |
- the heights (A & B) on both sides of the threshold/obstacle |
|||||||||||||
it will return to the start position when finished. |
Pause button (B) flash to indicate that the robot is charging |
- that the area on the other side is clear to operate (C) |
|||||||||||||
|
|
|
and that it will resume where it stopped. |
|
|
|
|
||||||||
|
|
|
The robot will recharge up to 80 % to resume cleaning quicker. |
|
|
|
|
||||||||
|
|
|
Charging time is ~ 2 hours. |
|
|
|
|
||||||||
|
|
|
|||||||||||||
|
|
|
|
||||||||||||
|
(A) / |
- / A B |
|||||||||||||
|
|
|
(B) |
- (C) |
|||||||||||
|
|
|
|
|
|
|
|
||||||||
|
|
|
80% |
|
|
|
|
||||||||
|
|
|
2 |
|
|
|
|
||||||||
|
|
|
|
|
|
|
|
|
|
|
|
|
|
|
|
ECO Mode |
Docking |
SPOT Cleaning |
|
||||||||||||
|
|
|
|
||||||||||||
B |
A |
ECO mode: For a lighter cleaning, press the ECO button to |
Stop cleaning and send the robot to the charging base: |
SPOT cleaning (small area, ~ 1 m2): Place the robot facing |
reduce the power, prolong the running time and reduce noise |
Press the Home button. If the robot is not started from the |
the spot and press the SPOT button. The robot will will clean |
level. The robot will stay in ECO mode until the button is |
charging base, it will return to the starting position. |
the area twice. |
pressed again. |
|
|
ECO 1 SPOT
Tips on how to get the best results / 11
Preparing the cleaning area
|
|
|
|
D |
B |
|
|
|
|
|
|
|
|
|
|
|
|
|
|
|
|
|
|
||||
|
A |
|
|
|
|
|
|
|
|
|
|
|
|
|
|
|
|
|
|
|
|||||||
|
|
|
|
|
|
22 mm |
|
|
|
|
|
|
|
|
|
|
|
|
|
|
|
|
|
|
|
|
|
|
|
|
|
|
|
|
|
|
|
|
|
|
|
|
|
|
|
|
|
|
|
|
|
|
|
||
|
40 cm |
|
|
|
|
|
|
|
|
|
C |
|
|
|
|
|
|
|
|
|
D |
|
|||||
|
|
|
|
|
|
|
|
|
|
|
|
|
|
|
|
|
|
|
|
|
|
|
|||||
|
|
|
|
|
|
|
|
|
A |
|
|
|
|
|
|
|
|
|
|
|
|
|
|||||
|
|
|
|
|
|
|
|
|
|
|
|
|
|
|
|
|
|
|
|
|
|
||||||
|
|
|
|
|
|
|
|
|
|
|
B |
|
|
|
|
|
|
|
|
|
|
|
|
|
|||
|
|
|
|
|
|
|
|
C |
|
|
|
|
|
|
|
|
|
|
|
|
|
|
|
|
|||
|
|
|
|
|
|
|
|
|
|
|
|
|
|
|
|
|
|
|
|
|
|
|
|
||||
|
|
|
|
|
|
|
|
|
|
|
|
|
|
|
|
|
|
|
|
|
|
|
|
||||
|
|
|
|
|
|
|
|
|
|
|
|
|
|
|
|
|
|
|
|
|
|
|
|
|
|
|
|
|
|
|
E |
|
95 mm |
|
|
|
|
||||||||||||||||||
|
|
|
|
|
|
|
|
|
|
|
|
|
|
|
|
|
|
|
|
|
|
|
|||||
|
|
|
|
|
|
|
|
|
|
|
|
|
|
|
|
|
|
|
|
|
|
|
|
|
|||
(A) Leave a space of 40 cm around furniture without legs. |
|
|
|
Carpets: The robot cleans |
|
|
|
|
|||||||||||||||||||
(B) The robot easily crosses thresholds with a height up to 22 mm. |
|
|
|
- short-pile carpets: (A) in the same pattern as the room |
|
|
|
|
|||||||||||||||||||
(C) It cleans under furniture with more than 95 mm space under. |
|
|
|
- medium-pile carpets : (B) first around it (C) and comes back later to clean the carpet |
|||||||||||||||||||||||
(D) Place the charging base on the left side of a door. |
|
|
|
separately |
|
|
|
|
|||||||||||||||||||
(E) The robot detects stairs and steep cliffs. |
|
|
|
- high-pile carpets: (D) are not cleaned. When the robot reaches the edge it continues with |
|||||||||||||||||||||||
|
|
|
|
|
|
|
|
|
the rest of the cleaning. |
|
|
|
|
||||||||||||||
(A) 40 |
|
|
|
|
|
|
|
|
|||||||||||||||||||
(B) 22 |
|
|
|
- (A) |
|
|
|
|
|||||||||||||||||||
(C) 95 |
|
|
|
- (B) (C) |
|||||||||||||||||||||||
(D) |
|
|
|
- (D) |
|||||||||||||||||||||||
(E) |
|
|
|
|
|
|
|
|
|||||||||||||||||||
Preparing the cleaning area |
|
|
Before cleaning, remove smaller and fragile objects such as clothing, curtain strings, papers and |
|
|
power cords from the floor. If the device passes over a power cord and drags it, there is a risk |
|
|
|
||
that an object could be pulled off a table or shelf. |
||
|
||
Larger/taller objects such as chairs can be left as the robot will clean around them. |
/ |
|
Strong light, Mirrored walls, floor-to-ceiling windows and very shining objects could disturb |
|
|
|
||
the 3D Vision system. |
3D |
|
Limiting the cleaning area |
|
|
The robot will clean all floors it can access. To limit the cleaning area, simply close doors or put |
||
|
||
an obstacle in the way. |
|
|
Dust emptying between scheduled cleanings |
|
|
To get the most out of scheduled cleaning, empty the dust container regularly. |
||
|
GB CS
CT ID
KO TH
VI

12 Tips on how to get the best results /
Always carry the robot with two hands keeping the front up. Manual moving of the robot:
Moving the robot during the cleaning process is not advised, as it might restart the cleaning from the beginning.
朝上。手动移动机器人
它重新开始清洁。
B
 A
A
Cleaning of a house with more than one floor can be facilitated by using an extra charging base on each floor. (ANC: 406000071)
(ANC:406000071)

Emptying the Dust container, Replacing/Cleaning the Filter / / 13
Emptying the Dust container
B
A
1. Empty the dust container regularly or when the dust |
2. Press Release button (A), remove the Dust container |
3. After emptying the container, close the lid and put |
container icon lights up. |
by swinging it upwards (B). |
it back in place |
If the dust bin symbol remains lit up when the dust bin is |
Open the lid by swinging it upwards. |
Refit the Dust container in the robot. |
empty, please clean the filter. |
Empty the dust container into a waste bin. |
Note: If the Dust container has not been properly assembled |
|
Note: The dust container icon flashes to indicate that the |
and Play/Pause button is pressed, the dust container icon |
|
Dust container has been removed, or is not in the right |
flashes. Refit the Dust container properly. |
|
position. |
|
1. |
2. (A) |
3. |
|
(B) |
|
|
|
|
|
|
/ |
|
|
|
|
|
|
Cleaning the Filter |
|
|
B |
A
|
|
|
D |
|
|
|
|
|
|
|
|
|
|
|
|
|
|
|
||
|
C |
|
||||
|
|
|||||
1. For best performance, we recommend to clean the |
2. Remove the filter: |
3. Rinse the filter with cold water. Tap the filter frame to |
||||
filter every 5th cleaning and to replace it every 6 months. |
Remove the Dust container by swinging it upwards (B). |
remove water. Let dry for 24 hours before placing it back in |
||||
(Ref: ERK2) |
Open the lid by swinging it upwards. |
the machine. |
||||
|
Swing the Filter frame downwards (C). |
|
||||
|
Remove the filter (D). |
|
||||
1. 5 |
2. |
3. |
||||
6 |
(B) |
24 |
||||
|
|
|
||||
ERK2 |
(C) |
|
||||
|
(D) |
|
||||
|
|
|
|
|
|
|
GB CS
CT ID
KO TH
VI
14 Maintenance /
Cleaning the 3D Vision System (Camera) |
Cleaning the Wheels |
|
|
|
3D |
|
|
|
|
A |
|
|
|
|
|
|
|
|
|
B |
|
|
|
|
|
|
|
|
|
C |
|
|
|
|
The 3D Vision System works best if the windows |
1. Remove entangled hairs or such from the main |
2. Should the small wheels get stuck, remove them |
||
(A,B,C) are kept clean and free from scratches. |
wheels so that they can turn freely. |
carefully by using a small screwdriver and clean the |
||
Clean off light dust by using a dry soft cloth. If its heavily |
|
wheels. |
||
soiled you can use a mild detergent to clean it. |
|
|
|
|
A B C |
1. |
2. |
||
3D |
|
|
||
|
|
|
|
|
|
|
|
|
|
Cleaning the Side brush |
Cleaning the Brush roll |
|
|
|
|
|
|
|
|
|
|
|
|
|
|
|
|
|
|
|
|
|
|
|
|
|
|
|
|
|
|
|
|
|
|
|
|
|
|
|
|
|
|
|
|
|
|
|
|
|
|
|
|
|
|
|
|
|
|
|
|
|
|
|
|
|
|
|
|
|
|
|
|
|
|
|
|
|
|
|
|
|
|
|
|
|
|
|
|
|
|
|
|
|
|
|
|
|
|
|
|
|
|
|
|
|
|
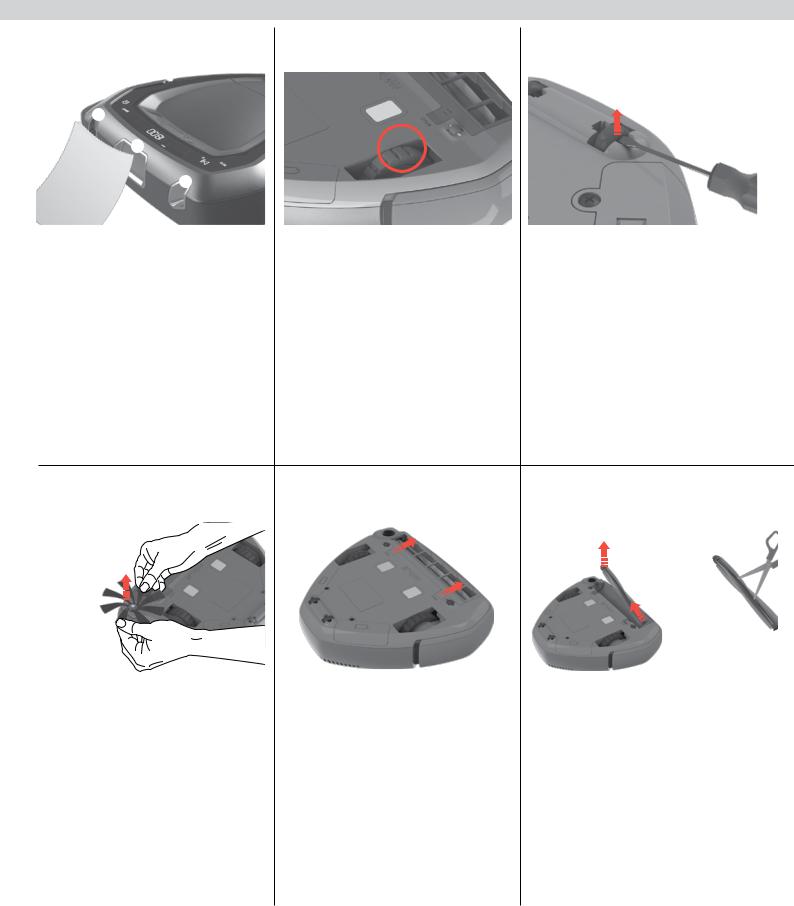
Pull the Side brush to remove it. Clean the Side brush. |
1. Press the two latches and slide the lid forward to |
2. Pull out the Brush roll and clean the brush and |
||||||||||
Reattach the Side brush in the socket. |
remove the brush roll lid. |
bearings. Remove entangled threads by snipping them |
||||||||||
Side brush can be changed. (Ref: ERK2 / EBSB2) |
|
|
|
|
|
away with scissors. Refit in reverse order. |
||||||
|
|
|
|
|
|
|
|
Brush roll can be replaced. (Ref: ERK2) |
||||
|
1. |
2. |
|
|
|
ERK2 / EBSB2 |
|
ERK2 |

|
Cleaning the Air channel, Changing the batteries / 15 |
Cleaning the Air channel |
Changing the batteries |
|
|
|
|
|
|
|
|
|
2. Use only original supplier batteries. |
|
|
|
|
|
|
|
|
|
|
|
|
|
|
|
|
|
|
|
|
|
|
|
|
Remove the dust container. Remove clogged debris in the |
1. The battery compartments are located on the |
||||||
air channel. Put the dust container back into place. |
bottom side of the robot. Use a screwdriver (PH2) |
Batteries must be removed and disposed of safely, before |
|||||
|
|
|
to unscrew the battery compartment lids. Replace the |
desposing of the machine. |
|||
|
|
|
battery packs and refit the battery compartment lids. |
(ANC: 405 537 959/0) |
|||
|
|
|
Caution! Make sure to change the two battery packs at |
|
|||
|
|
|
the same time. |
|
|||
|
1. |
2. |
|||||
|
(PH2) |
|
|||||
|
|
|
|
|
|||
|
|
|
|
(ANC:405 537 959/0) |
|||
Cleaning the charging connectors |
Error handling |
|
|
|
|
|
|
|
|
|
|
|
|
|
|
|
|
|
|
Use a dry soft cloth to clean regularly the charging |
1. If an error occurs, the robot stops cleaning. The warning |
2. When an error is resolved, press Play/Pause button to |
connectors on the charging base and under the machine. |
icon will pulse and the digits “E:” followed by an error |
start cleaning. |
|
code, is shown on the display. The speaker will also |
Note: For a complete list of the error codes and solutions, see |
|
describe the error. After an error has occured, press any |
instructions in “Troubleshooting”. |
|
button to play the audio message again. |
|
|
1. |
2. / |
|
“E:” |
|
|
|
|
|
|
“ ” |
GB CS
CT ID
KO TH
VI

16 |
Troubleshooting |
|
|
||
Troubleshooting |
|
|
|
|
|
|
|
|
|
|
|
Problem |
Error |
Cause |
Solution |
||
|
|
Code |
|
|
|
The display is blank. |
- |
|
The battery is empty. |
Charge the battery. |
|
|
|
|
|
|
|
The robot does not start. |
|
|
The Dust container is |
Place the Dust container in the |
|
|
|
||||
|
|
||||
|
|
|
|
not present or properly |
robot, properly close the lid. |
|
|
|
|
closed. |
|
|
|
|
|
The robot is lifted. |
Place the robot on the floor before |
|
|
|
|
||
|
|
|
|
||
|
|
|
|
|
starting. |
|
|
|
|
|
|
|
|
(x3) |
|
|
|
The robot does not |
E:10 |
The bumper is stuck |
Please make sure the bumper can |
||
move/clean properly. |
|
|
|
move properly and remove any |
|
|
|
|
|
|
debris that might block it. |
|
|
E:11 |
Right wheel is stuck |
Check that all parts turn freely. |
|
|
|
E:12 |
Left wheel is stuck |
Clean and remove entangled |
|
|
|
E:13 |
Brush roll is stuck |
threads from parts if needed. |
|
|
|
Replace Brush roll or Side brush if |
|||
|
|
E:14 |
Side brush is stuck |
||
|
|
damaged. |
|||
|
|
|
|
|
|
|
|
|
|
|
Check ”Cleaning and maintenance” |
|
|
|
|
|
page 14. |
|
|
E:15 |
The robot is stuck or |
Lift and place the robot where it |
|
|
|
|
|
unable to navigate. |
can move freely. Check ”Tips on how |
|
|
|
|
|
to get the best results” page 11. |
|
|
E:16 |
The 3D Vision System is |
Clean the 3D Vision System and |
|
|
|
|
|
blocked or dusty. |
make sure nothing is blocking |
|
|
|
|
|
the sight. Check ”Cleaning and |
|
|
|
|
|
maintenance” page 14. |
|
|
|
|
The Dust container is |
Empty and/or clean the Dust |
|
|
|
|
full or blocked. |
Container. Check ”Emptying the Dust |
|
|
|
|
|
container” page 13. |
|
|
|
|
The robot is opperating |
Move the robot and charger to a |
|
|
E:17 |
on a surface which is too |
new location and start again. |
|
|
|
|
|
slippery. |
|
No charge indication |
- |
|
The power cord and |
Connect the adapter connector to |
|
|
|
|
|
adapter is not properly |
the Charging base. Connect the |
|
|
|
|
assembled, and/or |
power cable to the mains. Make |
|
|
|
|
connected to the mains. |
sure the Charging plates on the |
|
|
|
|
The Charging plates |
robot and the Charging base are |
|
|
|
|
connected. |
|
|
|
|
|
on the robot and the |
|
|
|
|
|
Charging base are not |
Check that the plug and cable are |
|
|
|
|
connected. |
not damaged. |
|
|
|
|
|
|
The batteries runs |
- |
|
The batteries life has |
Change the 2 battery packs. |
|
empty fast |
|
|
expired. |
Check “Changing the batteries” page |
|
|
|
|
|
|
15. |
Battery related |
E:20 |
Incorrect Charging base |
Only use the original Electrolux |
||
problems |
|
|
|
is used. |
Charging base, supplied with the |
|
|
|
|
|
robot. If the Charging base needs to |
|
|
|
|
|
be replaced; use Electrolux Charging |
|
|
|
|
|
base (ANC: 406000071). |
|
|
E:21 |
Batteries are |
Change the 2 battery packs. |
|
|
|
|
|
malfunctioning during |
Check “Changing the batteries” page |
|
|
|
|
use. |
15. |
|
|
E:22 |
Product temperature is |
Let the robot paused outside the |
|
|
|
|
|
too high. |
charging station for 6 hours. |
|
|
E:23 |
Batteries are not |
Connect batteries to robot. Check |
|
|
|
|
|
properly connected to |
“Changing the batteries” page 15. |
|
|
|
|
the robot. |
|
The time is not |
|
|
The current time is |
When the robot is connected to WiFi |
|
displayed. |
|
|
not set. |
the time will automatically set. |
|
Problem |
Error |
Cause |
Solution |
|
Code |
|
|
Wrong time is displayed |
|
The robot has not |
Make sure the robot is connected to |
on the robot. |
|
received updated time |
the WiFi network and wait until it |
|
|
from the WiFi network. |
receives the correct time. If it does |
|
|
|
not update within 24 hours redo the |
|
|
|
onboarding procedure. |
The room is not properly |
- |
The robot is returning |
The robot will automatically |
cleaned, but the robot |
|
to the Charging base to |
continue the cleaning program as |
returns to the Charging |
|
charge the batteries. |
soon as the batteries are recharged. |
base. |
|
|
|
Water has been sucked |
- |
- |
It will be necessary to replace the |
into the robot. |
|
|
motor at an authorized Electrolux |
|
|
|
service centre. |
|
|
|
Damage to the motor caused by the |
|
|
|
penetration of water is not covered |
|
|
|
by the warranty. |
Software issue |
E:30 |
Software is not working |
Please update the robot’s software. |
|
|
correctly. |
|
|
E:31 |
Software upgrade has |
Please redo software update. |
|
|
failed. |
|
Service needed |
E:40 |
- |
Contact an authorized Electrolux |
|
|
|
service center. |
System error |
E:41 |
Internal error. |
Please restart desired operation. |
|
E:42 |
|
|
For any further problems, please check the service area in the APP or on our website.
Consumables & Accessories
www.electrolux.com/shop |
|
|
PUREi9 Performance kit |
|
PUREi9 Power brush |
Ref: ERK2 |
|
REF: EBSB2 |
PNC: 9001677674 |
|
PNC: 9001683938 |
1x |
4x |
|
|
|
|
3x |
|
|
3x |
|
|
|
|
|
Charging base |
Battery pack |
ANC: 406000071 |
ANC: 405 537 959/0 |

|
|
|
|
|
|
|
|
|
|
|
|
|
|
|
|
- |
|
|
|
|
|
|
|
|
|
|
|
|
|
|
|
|||
|
|
|||
|
|
|
|
|
|
|
|
|
|
|
|
|
|
|
|
|
|
|
|
|
|
|
|
|
|
|
|
||
|
|
|
||
|
|
|
|
|
|
|
|
|
|
|
|
|
|
|
|
(x3) |
|
|
|
|
E:10 |
|
|
|
/ |
|
|
|
|
|
|
|
|
|
|
|
|
|
|
|
E:11 |
|
|
|
|
E:12 |
|
|
|
|
|
|||
|
E:13 |
|
||
|
|
|||
|
E:14 |
|
||
|
14 “ |
|||
|
|
|||
|
|
|
|
” |
|
E:15 |
|
|
|
|
|
|
|
|
|
|
|
|
11 “ |
|
|
|
|
” |
|
E:16 |
3D |
3D |
|
|
|
|
|
14 “ |
|
|
|
|
” |
|
|
|
|
/ |
|
|
|
|
13 “ ” |
|
|
|
|
|
|
E:17 |
|
|
|
|
|
|
||
|
|
|
||
|
- |
|
|
|
|
|
|
/ |
|
|
|
|
|
|
|
|
|
|
|
|
|
|
|
|
|
|
|
|
|
|
|
|
|
|
|
|
|
|
|
|
- |
|
|
2 15 |
|
|
|
|
“ ” |
|
E:20 |
|
|
|
|
|
|
|
Electrolux |
|
|
|
|
|
|
|
|
|
Electrolux |
|
|
|
|
(ANC:406000071) |
|
E:21 |
|
2 15 |
|
|
|
|
|
“ ” |
|
E:22 |
|
|
|
|
|
|
|
6 |
|
E:23 |
|
|
|
|
|
|
|
15 “ ” |
|
|
|
|
WiFi |
|
|
|
|
|
|
|
|
|
|
|
|
|
|
WiFi |
|
|
|
WiFi |
|
|
|
|
|
24 |
|
|
|
|
|
|
|
|
|
|
|
- |
|
|
|
|
|
|
|
|
|
|
|
|
|
|
|
|
|
|
|
- |
|
- |
Electrolux |
|
|
|
|
|
|
|
|
|
|
|
|
|
|
17 |
|
|
|
|
|
|
|
|
|
|
|
|
|
|
|
|
|
|
|
|
|
|
|
|
|
|
|
|
|
GB |
|
E:30 |
|
|
|
||
|
CS |
|||||
|
E:31 |
|
|
|
|
|
|
|
|
|
|
|
|
|
E:40 |
- |
Electrolux |
|
|
|
|
|
|
|
|
|
|
|
E:41 |
|
|
|
|
|
|
E:42 |
|
|
|
|
|
APP |
|
|
CT |
|||
|
|
|
|
|
|
|
ID
KO
TH
VI
 800-820-0096
PUREi9 |
|
PUREi9 |
Ref: ERK2 |
|
REF: EBSB2 |
PNC: 9001677674 |
|
PNC: 9001683938 |
1x |
4x |
|
|
|
|
3x |
|
|
3x |
|
|
|
|
|
|
|
ANC: 406000071 |
ANC: 405 537 959/0 |

18
8
( )/
由伊萊克斯原廠維修中心進行產品檢修。
吸塵器從充電座上取下。
害。
相同。
• 滾輪。
內。
或櫃架上掉落的風險。
行清掃。
可能會干擾機器的3D Vision
NCC :
指依電信法規定作業之無線電通信。
www.electrolux.com.tw
electrolux.com.tw/Support/WarrantyRegistration/
0800-888-259

19
1.
溫度下。
•10 °C 30 °C
•10 °C 30
°C
命縮短。
•20% 80%
24
2.
燥。
3.
GBCS
安全、專業的方式來移除和回收電池與電器CTID
|
KO |
|
TH |
||
|
||
|
||
|
|
|
- |
VI |
|
- PNC |
||
|
||
- |
|
|
|
||
PNC |
|
|
|
PI91-5SSM/PI91-5SGM

20 Tindakan pencegahan keamanan
Tindakan pencegahan keamanan
Alat ini dapat digunakan oleh anak-anak berusia setidaknya 8 tahun dan ke atas serta orang dengan kemampuan mental, sensorik, dan fisik yang kurang atau memiliki sedikit pengalaman dan pengetahuan jika mereka diberikan pengawasan dan pengarahan tentang cara menggunakan alat ini secara aman dan mengetahui bahaya-bahaya yang ada.
Robot ini hanya dapat digunakan untuk mengisap debu di lingkungan rumah/dalam ruangan yang normal.
Pastikan robot disimpan di tempat yang kering.
Semua layanan atau perbaikan harus dilakukan oleh pusat servis resmi Electrolux.
Lepaskan robot dari pengisi daya sebelum melakukan pembersihan atau merawat robot.
Jangan biarkan anak-anak bermain dengan alat ini.
Bahan kemasan, misalnya tas kain atau plastik harus dijauhkan dari anak-anak untuk menghindari sesak napas.
Robot ini dirancang untuk tegangan tertentu. Periksa apakah tegangan yang masuk sama besarnya dengan yang disebutkan pada pelat keterangan yang ada di adaptor pengisian daya
Hanya gunakan stasiun pengisi daya yang asli dan adaptor yang dirancang untuk robot.
Jangan pernah gunakan robot:
•Di tempat yang basah.
•Dekat dengan gas yang mudah terbakar, dll.
•Jika produk menunjukkan tanda-tanda kerusakan yang terlihat.
•Di atas permukaan benda cair atau tajam.
•Di atas abu dingin atau panas, puntung rokok yang menyala, dll.
•Di atas debu halus, misalnya plester, beton, tepung, abu dingin atau panas.
•Jangan biarkan robot tergeletak di tempat yang terkena sinar matahari langsung.
•Jangan biarkan robot terpapar suhu yang tinggi.
•Dilarang membongkar kemasan baterai, menghubungkannya dengan sirkuit pendek, atau
menempatkannya pada permukaan logam. Hanya gunakan kemasan baterai yang dirancang untuk robot.
•Baterai harus dikeluarkan dari alat sebelum alat dibuang.
•Dilarang memasang alat ini saat mengeluarkan baterai.
•Baterai harus dikeluarkan secara aman.
•Jangan gunakan robot tanpa filter.
•Jangan sentuh rol sikat saat pembersih menyala dan rol sikat sedang berputar. Jangan sentuh bagian roda saat robot sedang beroperasi.
Penggunaan robot yang tidak sesuai dengan cara yang direkomendasikan di atas akan menyebabkan cedera tubuh yang serius atau kerusakan pada produk. Cedera atau kerusakan tersebut tidak dilindungi oleh garansi atau oleh Electrolux.
Garansi ini tidak mencakup pengurangan waktu proses baterai yang disebabkan oleh penggunaan atau umur baterai, karena masa pakai baterai bergantung pada lama dan frekuensi penggunaan robot.
Sebelum membersihkan, singkirkan benda yang kecil dan rapuh seperti pakaian, tali tirai, kertas, dan kabel listrik dari lantai. Jika alat melewati kabel listrik dan menyedotnya, maka kabel listrik dapat terlepas dari meja atau rak.
Robot ini tidak dirancang untuk memindahkan benda yang lebih besar dengan sendirinya. Oleh sebab itu, benda seperti kursi dapat dibiarkan di lantai karena robot akan membersihkan benda di sekelilingnya.
Cahaya yang sangat terang, cermin pada dinding, dinding kaca, dan benda yang sangat berkilau dapat mengganggu sistem Visi 3D.
Kunjungi situs web kami untuk:
Mendapatkan saran penggunaan, brosur, pemecahan masalah, informasi layanan: www.electrolux.com
Daftarkan produk Anda untuk mendapatkan layanan yang lebih baik:
www.electrolux.com/productregistration
Beli Aksesori dan Benda Habis Pakai untuk alat Anda:
www.electrolux.com/shop
 Loading...