


Read each section of this manual before
installing and operating
Leggere tutte le parti di questo manuale
prima di installare o mettere in funzione
l'apparecchiatura.
Lire toutes les parties de ce mode d’emploi
avant d’installer ou mettre en fonction
l’appareil.
Leer todas las partes de este manual antes
PR 700
de llevar a cabo la instalación o de poner
en marcha el aparato.
ELECTROLUX PROFESSIONAL FOOD SERVICE EQUIPMENT
- ELECTRIC PASTA COOKER WITH BASKET LIFTING
INSTALLATION, OPERATION AND MAINTENANCE Page 5
- CUOCIPASTA ELETTRICO CON SOLLEVAMENTO CESTELLI
INSTALLAZIONE, USO E MANUTENZIONE Pag. 12
- CUISEUR DE PATES ELECTRIQUE AVEC LEVAGE DES CORBILLONS
INSTALLATION, EMPLOI ET ENTRETIEN Page 19
- CUECE PASTAS ELECTRICO CON LEVAMINETO DE LOS CESTOS
INSTALACION, USO Y MANTENIMIENTO Páginas 26
FOR YOUR SAFETY
Do not store or use gasoline or other
flammable vapors or liquids in the vicinity
of this or any other appliance.
PER LA VOSTRA SICUREZZA
Non immagazzinare o usare benzina o
altri materiali infiammabili o liquidi nelle
vicinanze di questa o qualsiasi altra apparecchiatura.
POUR VOTRE SECURITE
Il ne faut pas emmagasiner ou utiliser
l’essence ou d’autres matériaux inflammables ou liquides à côté de cet appareil
ou d’autres appareils.
WARNING: Improper installation,
adjustment, alteration, service or
maintenance can cause property
damage, injury or death. Read the
installation, operating and maintenance
instructions thoroughly before installing
or servicing this equipment
AVVERTENZA: Installazione impropria,
adattamenti, modifiche o manutenzione possono causare danni alla proprieta` o morte.
Leggere attentamente le istruzioni per l'installazione, il funzionamento e la manutenzione prima di installare questa
apparecchatura
AVERTISSEMENT
l’adaptation, la modification et l’entretien
inadéquats peuvent causer des dommages
aux structures ou aux personnes et la mort.
Lire attentivement les instructions
d’installation, de fonctionnement et d’entretien
avant d’installer cet appareil
: L’installation,
PARA SALVAGUARDAR VUESTRA SEGURIDAD
No almacenar o utilizar gasolina u otros
materiales inflamables o líquidos cerca
de este u otros aparatos.
ADVERTENCIA: Una instalación
indacuada, lo mismo que modificaciones y
operaciones de mantenimiento incorrectas
pueden causar daños a la estructura y a las
personas y provocar la muerte. Antes de
instalar el aparato leer con mucha atención
las instrucciones de la instalación, del
funcionamiento y del mantenimiento
DOC. NO. 5958 869 00
EDITION 2 0206

2
2
targ_app.eps
_CP/E2SUW1
targ_lib.tif
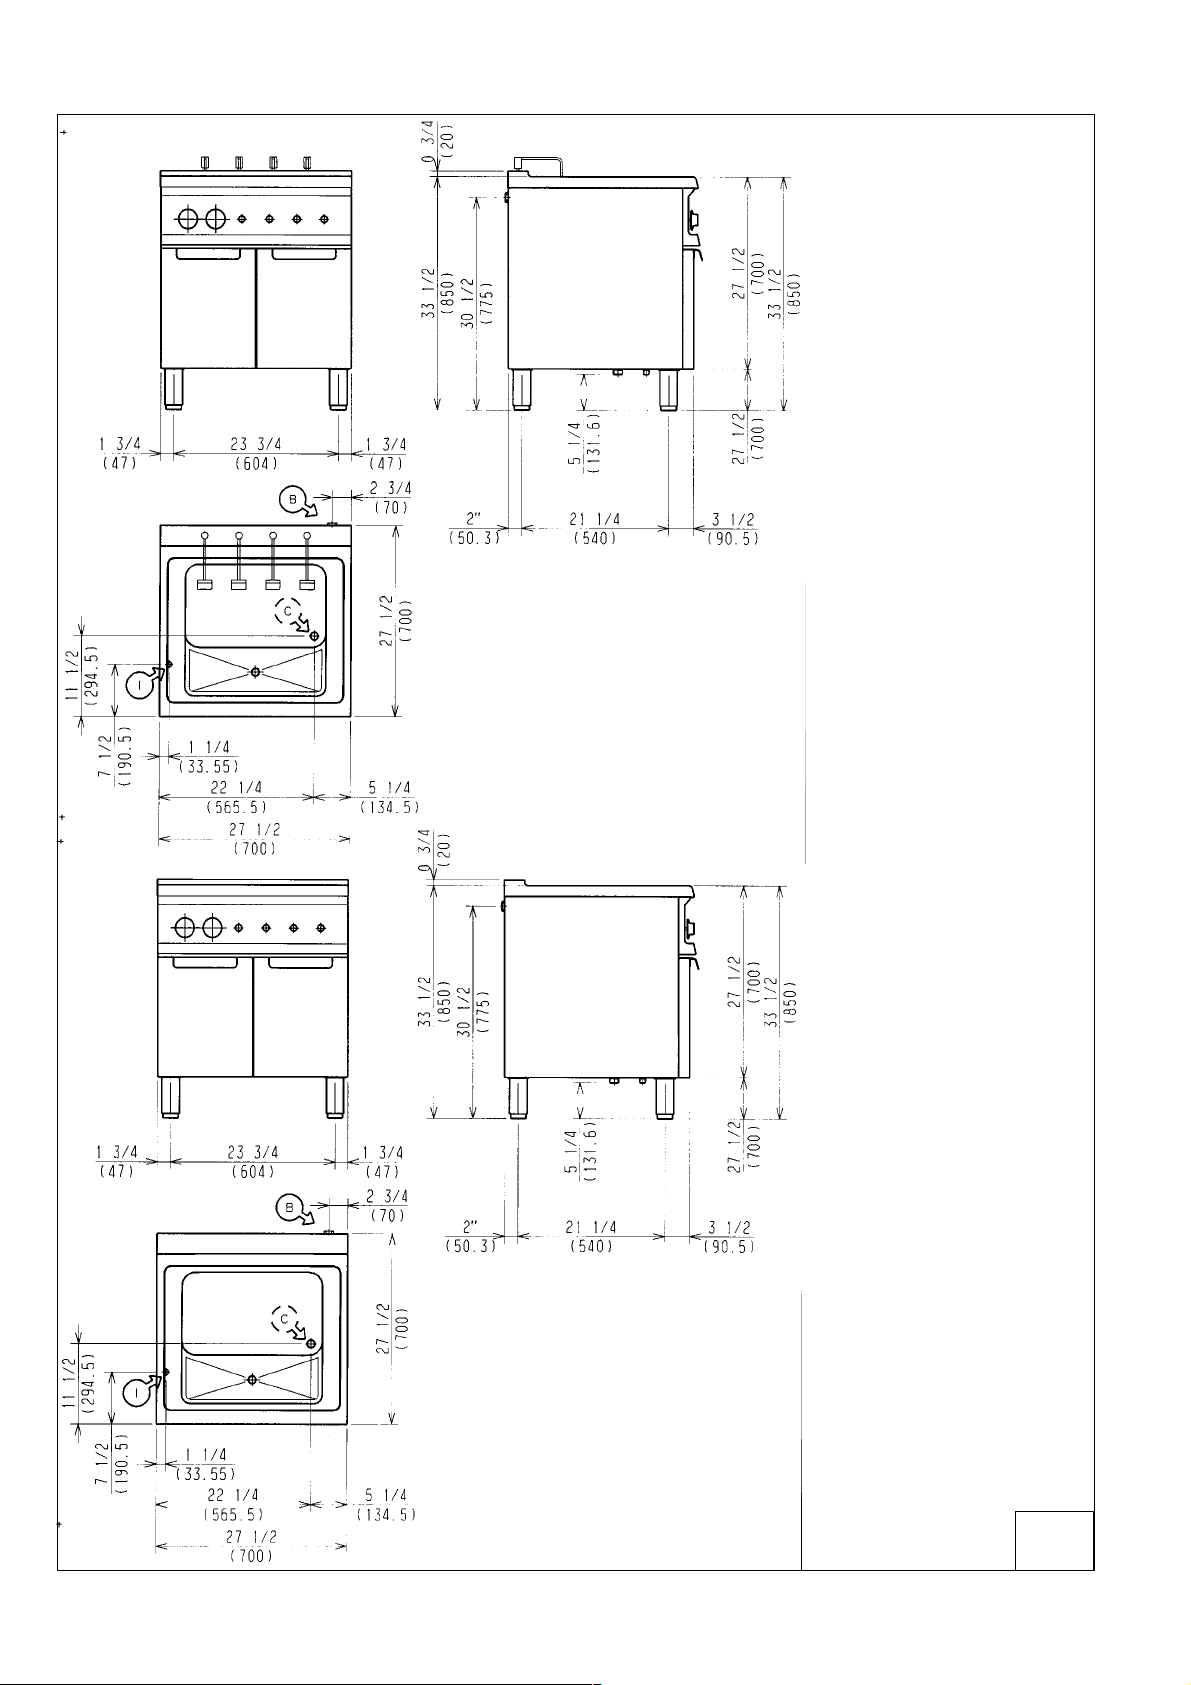
INSTALLATION DIAGRAM
SCHEMI DI INSTALLAZIONE
SCHEMAS D'INSTALLATION
ESQUEMA PARA LA INSTALACIÓN
3
1 M - Pasta cooker 168947
1 M - Cuocipasta 168947
1 M - Cuiser de pates a gaz 168947
1 M - Cuece pastas a gas 168947
1 M - Pasta cooker 168948
1 M - Cuocipasta 168948
1 M - Cuiser de pates a gaz 168948
1 M - Cuece pastas a gas 168948
B - Water inlet connection
C - Water drain connection
I - Power supply cable inlet
B - raccord alimentation d'eau
C - décharge d'eau
I - arrivée câble électrique
B - Attacco alimentazione acqua
C - Scarico acqua
I - Entrata cavo elettrico
B -Conexión entrada de agua
C - Desagüe
I - Entrada cable eléctrico
4
1
4

ELECTRIC PASTA COOKER
INSTRUCTIONS FOR THE INSTALLATION AND USE
CONTENTS Page
- Compliance statement .......................................................................................................................2
- Installation diagrams .......................................................................................................................... 3
I. GENERAL FEATURES .................................................................................................... 5
1. Precautions ........................................................................................................................................ 5
2. Safeguarding the environment ........................................................................................................... 5
II. TECHNICAL DATA........................................................................................................... 7
III. INSTRUCTIONS FOR INST ALLATION ............................................................................ 8
1. Compliance reference........................................................................................................................8
2. Packaging ..........................................................................................................................................8
3. Positioning .........................................................................................................................................8
4. Electrical connection..........................................................................................................................9
5. Water connection ............................................................................................................................... 9
6. Cooking accessories..........................................................................................................................9
IV. INSTRUCTIONS FOR USE ............................................................................................ 10
1. Introduction ......................................................................................................................................10
2. Use...................................................................................................................................................10
3. Cleaning and servicing .................................................................................................................... 11
5

I. GENERAL FEATURES
1. PRECAUTIONS
• The following terms alert you to potentially dangerous conditions
to the operator, service personnel or to the equipment.
• Danger! This term warns of immediate hazards which will result
in severe injury or death.
• Warning! This term refers to a potential hazard or unsafe
practice which could result in injury or death.
• Notice. This term refers to information that needs special
attention or must be fully understood, even though not dangerous.
• Keep the appliance area free and clear from combustibles.
Warning
For your safety, do not store or use gasoline or other
flammable, vap ors an d liq uids i n the vicin ity of thi s or an y othe r
appliance.
Keep area around appliances free and clear of combustibles
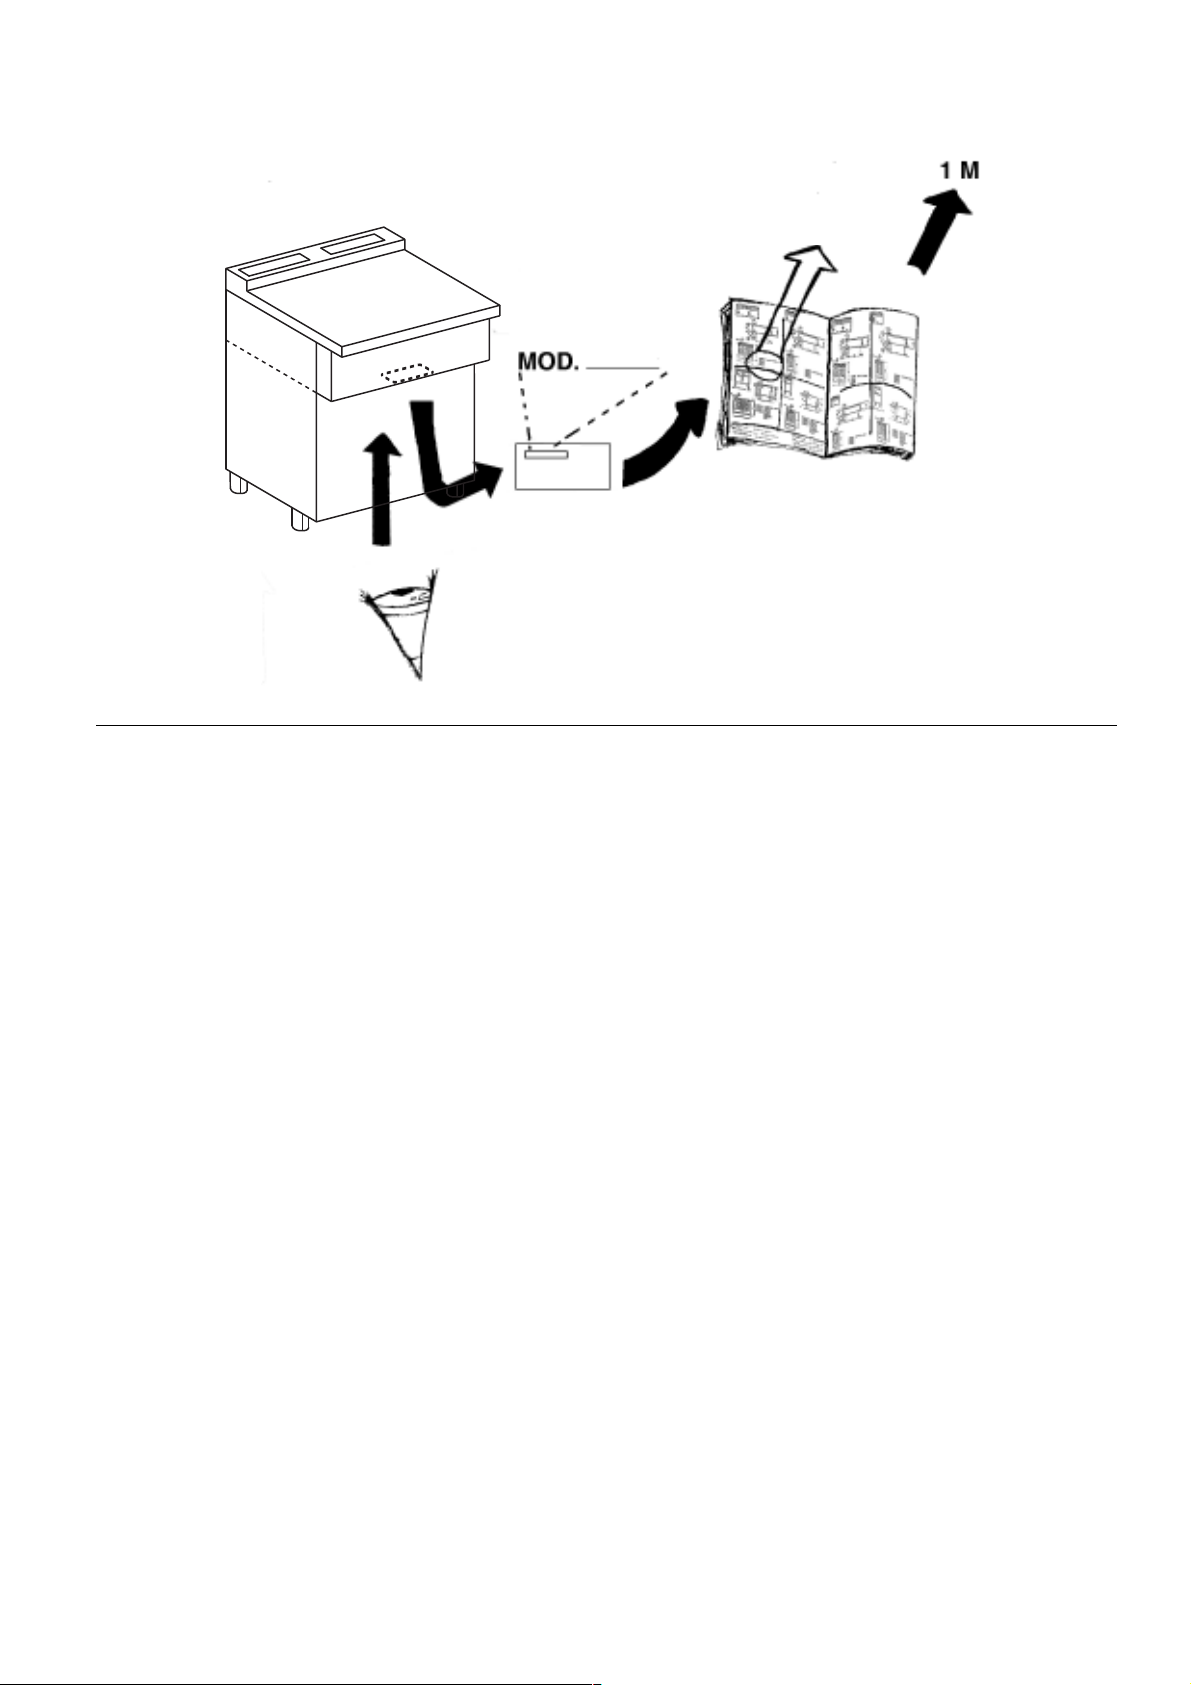
• Before installing or using the appliance, carefully read this
instructions booklet, in as much as it contains important information concerning the safety, operation and maintenance of the
appliance.
• Keep this instructions booklet in a safe place for future consultation by other users or purchasers in the event that the appliance
is resold.
Important
and its conversion to a different gas supply, must only be
performed by a qualified installer authorised by the
manufacturer.
This appliance is intended for industrial use only and is specifically designed to cook food. Any other use of the appliance is
deemed improper.
The appliance must only be used by trained staff and must
be supervised at all times when in use.
• Switch off the appliance if it breaks down or malfunctions.
• Only contact the technical service centre authorised by
the manufacturer for repairs and only use original spare
parts.
Failure to comply with the above requirement may jeopardise
the safety of the appliance and render the guarantee null
and void.
• Do not wash the appliance with water jets.
• Do not use products containing chlorine (bleach, hydrochloric
acid etc.) even diluted, to clean steel surfaces.
• Do not use corrosive substances (i.e. muriatic acid) to clean the
floor under the appliance.
• For more information, refer to the chapter on "Care and
maintenance".
• the plate characteristics is positioned under the control panel,
before removal of the same with appropriate utensil.
Fire hazard.
:
Installation and maintenance of the appliance
2. SAFEGUARDING THE ENVIRONMENT
2.1. PACKAGING
• All the packaging materials used are environmentally friendly.
They may be stored at no risk or burnt at an authorised incineration plant. Plastic materials suitable for recycling are marked with
the following symbols:
polyethylene : external wrapping film, instructions
PE booklet bag and gas injectors bag
polypropylene: top packaging panels and straps
pp
expanded polystyrene: protective surround elements
PS
2.2. USE
• The appliance has been designed and perfected under laboratory testing conditions to offer exceptional levels of performance.
However, to minimise energy consumption (electricity, gas and
water) , we recommend turning the appliance off when not in use
for long periods and not using it, for example, with the door open
as this may impair the oven's performance. We also recommend
preheating the appliance immediately prior to use.
2.3. CLEANING
• To minimise the emission of pollutants into the environment, we
recommend cleaning the appliance (externally and, where necessary, internally) with products which are at least 90% biode-
gradable.
2.4 DISPOSAL
• The appliance must be disposed of properly at the end of its
service life.
• The appliance is made from 90% recyclable materials (stainless
steel, iron, aluminium, galvanised sheet steel, etc.). These materials may therefore be scrapped in accordance with local waste
disposal regulations at a conventional recycling plant.
• Make the appliance unusable by cutting off the power cord. Also
remove any compartment or interior closure device fitted on the
appliance to prevent persons from becoming trapped inside.
6
6

II. TECHNICAL DA TA
Electrolux Professional reserves the right to change specifications and product design
without notice. Such revisions do not entitle the buyer to corresponding changes,
additions, or replacements for previously purchased equipment.
&2'(6
02'(/6
32:(56833/<92/7$*(92/7
)5(48(1&<+]
0D[LPXPSRZHUFRQVXPSWLRQ
.Z
3RZHUFDEOHFURVVVHFWLRQ$:*
ZLUHVFDEOHW\SH6-2PLQLPXP&FDEOH
OHQJWKEDVLQ
PP
GHSWKEDVLQ
PP
KHLJKWEDVLQ
PP
%DVLQFDSDFLW\
O
0 0
208 3~ 208 3~
50/60 50/60
8,7 8,7
10 10
515 515
305 305
270 270
40 40
7

III. INSTRUCTIONS FOR INSTALLATION
1. COMPLIANCE REFERENCE
• Local codes regarding installation vary greatle from one area to
another.
• This equipment is to be installed to comply with the applicable
federal, state or local codes.
These installation procedures must be followed by qualified
personnel or warranty will be void.
The National Fire Protection Association, Inc states in its NFPA
latestedition that local codes are the "authority having jurisdiction"
when it comes to installation requirements for equipment.
Therefore, installations should comply with all local codes.
2. PACKAGING
• Remove the appliance from the packaging and take away the
protective film that covers the appliance's external panels carefully to avoid leaving any trace of glue. If necessary remove the glue
using an appropriate diluent.
• Dispose off the packaging material following instructions given
in section "Notes on ecology and environment".
Notice:
Immediately inspect for shipping damage.
• All containers should be examined for damage before and during
unloading
• The freight carrier has assumed responsibility for its safe transit
and delivery.
• If damaged equipment is receivd, either aparent or concealed,
a claim must be made with the delivering carrier. Apparent
damage or loss must be noted on the freight bill at the time of
delivery.
• The freight bill must be then be signed by the carrier representative
(driver). If the bill is not signed, the carrier may refuse the claim.
The carrier can supply the necessary forms.
• A request for inspection must be made to the carrier within 15
days if there is concealed damage or loss that is not apparent until
after the equipment is uncrated. The carrier should arrange an
inspection.
• Be certain to hold all contents plus all packing material.
3. POSITIONING
• Refer to the technical data and installation diagrams at the
beginning of this instructions manual for the space requirements
and connection dimensions of the appliance.
• The appliances can be installed alone, side by side with other
appliances of the same series, or otherwise laid on supporting
structures .
• The appliance is not suitable for embedding.
• There must be adequate clearance between units and
combustible construction. Clearance must also be provided for
servicing and for operation.
3.2. LEVELING.
• The appliance has equipped with adjustable feet in height by
means of their rotation (2"/50 millimeters of excursion).
• For a better operation of the apparatus it is recommend to adjust
the feet so that the ledge is perfectly horizontal.
Possible wheels instead of the feet are not adjustable; therefore
the floor must be horizontal.
3.3. ASSEMBLY (fig. 2)
• Place the appliances nearby, level them at the same height and
then separate them.
• Place the thin masking tape "C" on the border of the upper plane
to be assembled together.
• Apply a seam "D" of special seal on the upper zone of the top
side (DOW CORNING® 732 - Adhesive/Sealant Silicone).
• Place the appliances together again, fasten them by means of
the holes "A" and "B" with the screws and block with nuts and
washers.
• Trim with a brush the excess of seal and remove the masking
tape.
2
Warning!
The sealant begins polymerization starting from the external
surface: it is recommended not to touch the sealant in the first
three hours after application in order to avoid any trimming.
MINIMUM BACK CLEARANCE
4"/100 mm
3.1. INSTALL CASTERS KIT (available on request and only
for freestanding appliances wide not less than 26.7"/700mm)
Refers to the specific accessory handbook.
8
8

4. ELECTRICAL CONNECTION (fig.3)
5. WATER CONNECTION
• The connection to the electrical supply must be carried out
according to the standards in force.
• Before carrying out the electrical connection make sure the
voltage and frequency on the data plate correspond to those of
the supply system.
• A protection onnipolar switch must be installed upstream from
the appliance with a suitable capacity and a contact opening
distance of at least 3 mm.
• This switch must be installed in the building's main power
supply line and near the appliance.
• It is important to connect the appliance to an efficient earth
outlet. For this purpose, there is a screw with the symbol G in the
connection terminal board, to which the earth wire is to be
connected. The appliance must be included in an unipotential
system.
This connection is carried out with a setscrew marked E placed
under the appliance. The unipotential wire must have a 10 mm
section.
4.1. ACCESS TO THE MAIN TERMINAL BOARD (fig. 3)
To gain access to the main terminal board first remove the panel
below the access door:
• Connect the cable to the terminal board "ma1" following the
indications laid down in the wiring diagram attached to the
appliance.
The appliance must be supplied with softened drinking water at
0.5 to 5 Fh (French hardness) and at a pressure of between 1.5
to 3 bar.
For correct installation, it is also necessary to ensure that:
• The water-inlet pipe "B" (fig.1) is connected to the water mains
by means of a cutoff cock with a mechanical filter.
Before connecting the filter run off a certain amount of water in
order to remove any eventual ferrous particles from the piping.
5.1. DRAINAGE
• Water must be drained from the appliance using a suitable
drainage collector. The steam produced during the drainage
cycle must not blow back onto the appliance.
6. COOKING ACCESSORIES
Rectangular basket kit:
2
Type 1/3 code-number 927214
" 1/2 code-number 927221
Round basket kit
Type 1/3 code-number 927212
Type 1/6 code-number 927213
(*)
Used with a lower grill code-number 927219
Tank lid code-number 927218
(*)
:
3
The manufacturer declines all responsability if the accident
prevention standards are not observed.
9

IV. INSTRUCTIONS FOR USE
This appliance is intended for industrial use, and must only
be used by trained staff.
2.2. HEATING THE WATER IN THE BASIN (fig. 4)
The control knob "A" has the following positions:
1. INTRODUCTION
The appliance must be used exclusively for its intended use, i.e.
for the cooking of foodstuffs such as pasta, rice etc. in water. Any
other use is therefore to be considered improper.
• Our appliances have been designed and optimised by means
of laboratory tests to guarantee high levels of performance and
efficiency. Avoid using the appliance under no-load conditions.
Also, when possible, pre-heat the appliance before use.
Before using the appliance, make sure that the basin, baskets
and water pre-heater have been cleaned of any residue of
industrial protective grease by carrying out a cooking cycle using
a neutral detergent in place of food.
2. USE
• Switch on the power at the mains and open the water cut-off cock.
• Close the water drainage valve "R" fig. 3 (lever positioned
horizontally).
2.1. FILLING THE BASIN WITH WATER (fig. 4)
• The control knob "B" has 3 operational positions:
0 Power off (green indicator light "C" off)
1 Rapid water filling
2 - Water filling stop
- Basin heater enabled
3 Slow water filling
• Fill the basin by turning the control knob "B" to position "1".
• To interrupt the water filling process turn knob "B" to position "2".
V Basin heater off
1 to 5 Low to medium power level
(stand by mode maintaining the water basin at
about 90°C - pos.5 -)
6 to 8 Medium to high power level (cooking positions)
I Maximum power (reaching the temperature or
regaining the boiling point)
Important: Never insert the heating elements or leave them
inserted if the water level in the basin is lower than the
reference mark on the right-hand wall of the basin.
Failure to comply with this safety standard can cause
damage to the basin and internal components of the
appliance.
• Turn knob "A" to the position "I" (temperature reaching stage)
2.3. COOKING
When the water contained in the basin is at boiling point:
• Add salt (it is recommended that only refined salt be used in
order to avoid corrosive deposits on the basin bottom. If the only
type available is the coarse grain type then this must be first dissolved in a separate container).
• Introduce the baskets containing the food to be cooked into the
basin.
The overflow pipe "E" (fig.4) guarantees the control of the maximum water filling level and allows the starch produced during
cooking to be removed.
• Turn knob "A" to a higher or lower setting depending on the type
and quantity of the food that is to be cooked.
2.4. SWITCHING OFF (fig. 4)
• To switch off the heating elements rotate knob "A" to the position "V".
• To turn off the power supply turn the knob "B" to the position "0".
2.5. TEMPERATURE SETTING (fig. 4)
Press shortly down “A” (SET).
Press down “B” for increasing (up).
Press down “C” for decreasing (down).
Value shown by display “D” will be automatically saved after few
seconds.
2.6. TIME PROGRAMMING (fig. 4)
Computer can store up to 4 programs.
Press down “F”/”G”: program 1 will blink on display “E” (further left side
lifter).
4
Press down “I” (+) to increase the time.
Press down “L” (-) to decrease the time.
Press down “M” (OK) to store the program in memory.
Press down once “F”/”G” for switching the programming mode to
the next program (program 2) and so on till to the right side lifter.
To gain direct access to the program you need to set (1, 2, 3, 4)
press down the push button "Q"/"V" as many times as needed.
Press down OK for storing each new memorization.
Press down “H” (ESC) to escape from programming mode
without saving.
Speedy of time increasing/decreasing will be higher if holding on
“I”/”L” (+/-).
10
10

2.7. BASKET LIFTING (fig.4 - only for models supplied with
automatic lifting system)
• Press push buttons “D” to lift supports “I”, positioning the baskets
with the food to be cooked on the runners.
• Set the cooking time like suitable in the paragraph 2.6
• Press push buttons “D” and the supports will lower introducing
into the basin the baskets starting the cooking cycle. At the end
of the cycle, the supports will be lifted together with the baskets.
• To repeat the same cycle, just press push buttons “D”. The timer
does not have to be reset.
2.8. LUMINOUS PUSH BUTTONS (fig. 5 - only for models
supplied without automatic lifting system)
The luminous push buttons "D" keep on with green light while the
cooking cycles lasts; when the cooking cycle is over push buttons
"D" go off and the red lamp "Z" starts flashing.
5
2.9. PROCEDURES TO BE CARRIED OUT AT THE END OF
WORKING DAY
• Make sure the heating elements are switched off and turn off
the power supply.
• Drain the water from the basin by opening on the drainage tap
"R" fig. 3 (lever positioned vertically).
• Clean the basin and baskets of any food residue.
• Switch off the power at the mains and close the water cut-off cock.
3.0. SAFETY DEVICE (fig.3)
• Fuse replacement: The fuse protecting the electrical compo-
nents can be found by the terminal block. To replace it, lift up the
fuse holder and slide it out.
This operation must be carried out by a specialised technician.
3. CLEANING AND SERVICING
Before carrying out any maintenance operations make sure
that the power supply is switched off at the mains.
• Clean the stainless steel surfaces daily with warm water and a
neutral soap; rinse thoroughly and dry carefully.
• Water must not be left in the basin when the appliance is not
being used because the normal passivation of the steel would be
hindered making its surfaces less resistant to the corrosive affects
of salt.
• Periodically check that the overflow pipe "E" (fig.4) is clean,
remove any eventual deposits caused by the froth generated
while cooking.
• Never use sharp implements when cleaning the rubber pipes.
• When cleaning the stainless steel surfaces never use aggressive detergents, common wire wool, wire brushes or other such
implements as ferrous particles can deposit on the stainless steel
surfaces causing rust spots due to their oxidation. Stainless steel
wool can be used, but remember to rub in the direction of the
stainless steel satin finish.
• If the appliance is not to be used for a long period, then these
instructions must be followed:
- apply a protective film of Vaseline oil on the stainless steel
surfaces using a damp cloth and make sure that the premises is
aired regularly.
Caution:
• Do not wash the appliance with water jets.
• For the cleaning of the appliance do not use products containing
chlorine, bleach, chloric acid etc. even if diluted.
• Do not use corrosive substances such as hydrochloric acid
when cleaning the pavement surrounding the appliance.
• When scrapping the appliance, onbserve all regulations
governing waste displosal in the country of installation.
• Our appliances are manufactured using more than 90 % metal
(stainless steel, iron, aluminium, galvanaised sheet metal) and
therefore these may be recycled in conventioanl waste recovery
sites in compliance with current standards in the country of
installation.
• Render the appliance completely inoperative by removing the
power cable and any other closure device (where fitted) to avoid
the risk of children being trapped inside.
Suggestions
It is advisable to periodically check the appliance (at least once a
year). To this end we advise you to obtain a maintenance
contract.
The manufacturer accepts no liability for situations arising
from failure to comply with these indications.
11
 Loading...