


NT 1200
NT 1500 A
GB |
Instructions for use |
|
Please read and save these |
|
instructions. |
D |
Gebrauchsanleitung |
|
Bitte lesen und aufbewahren. |
F |
Instruction d'utilisation |
|
Prière de lire et de conserver. |
I |
Istruzioni d'uso |
|
Si prega di leggere le istruzioni e |
|
di conservarle. |
E |
Instrucciones de uso |
|
Lea y conserve estas |
|
instrucciones por favor. |
P |
Instruções de serviço |
|
Por favor leia e conserve em seu |
|
poder. |
NL |
Gebruiksaanwijzing |
A
DK Brugsanvisning
Vñr venlight at lñse og opbevare.
S Bruksanvisning
Var god läs och tag tillvara dessa instruktioner.
FIN Käyttöohje
Lue ja säilytö
TR Kullanøm kølavuzu
Lütfen okuyun ve saklayin
RUS )-.,/&2$: +* $-+*'7#* )$9
=RJDOWMUVD STR[VLVI L URYTDQLVI QDUVRc]Wb LQUVTWNZLb
Lees en let goed op deze adviezen.

|
|
You demand the best and buy quality ± quality provided by Atlas Copco. |
||||
|
|
We have built for you a reliable and lasting tool. Working effectively and without |
||||
|
|
endangering your health is only possible if these instructions for use are being read |
||||
|
|
carefully before first using this tool. We want to satisfy our customers and would |
||||
|
|
like you to buy again |
AEG Electric Power Tools from Atlas Copco. |
|||
|
|
|
|
|
||
|
|
|
NT 1200 |
NT 1500 A |
||
Technical Data |
|
Power (motor) |
|
|
|
|
|
|
Pnom . . . . . . . . . . . . . . . . . . . . . |
. . 1000 |
W . . . . . . . . . . . |
1200 |
W |
|
|
Pmax . . . . . . . . . . . . . . . . . . . . . . |
. 1200 |
W . . . . . . . . . . . |
1500 |
W |
|
|
Rate of air flow . . . . . . . . . . . . . . . |
. . . 60 |
l/s . . . . . . . . . . . . |
. . 60 |
l/s |
|
|
Vacuum . . . . . . . . . . . . . . . . . . . . . |
. . 145 |
mbar . . . . . . . . . . |
. 180 |
mbar |
|
|
Capacity |
|
|
|
|
|
|
Container . . . . . . . . . . . . . . . . . . |
. . . 20 |
l . . . . . . . . . . . . . . |
. . 30 |
l |
|
|
Solid . . . . . . . . . . . . . . . . . . . . . . |
. . . 16 |
l . . . . . . . . . . . . . . |
. . 26 |
l |
|
|
Liquid . . . . . . . . . . . . . . . . . . . . . |
. . . 12 |
l . . . . . . . . . . . . . . |
. . 20 |
l |
|
|
Filter surface . . . . . . . . . . . . . . . . . |
. 2500 |
cm2 . . . . . . . . . . |
2500 |
cm2 |
|
|
Maximum power off-take . . . . . . |
. . . . . ± |
. . . . . . . . . . . . . |
2000 |
W |
|
|
Suction hose diameter . . . . . . . . |
. . . 50 |
mm . . . . . . . . . . . |
. . 50 |
mm |
|
|
Weight . . . . . . . . . . . . . . . . . . . . . . |
. . . 5,6 |
kg . . . . . . . . . . . . |
. 6,8 |
kg |
Advice for your |
Please pay attention to the safety instructions in the attached leaflet! |
|||||
safety |
Appliances used at many different locations including open air must be connected |
|||||
|
|
via a current surge preventing switch. |
|
|
|
|
Do not drill the housing, as the protective insulation would be rendered ineffective.
Use adhesive labels.
Before doing any work on the machine, pull the plug out of the socket.
Make sure the machine is switched off before plugging in.
Always keep the connection cable well away from the machine's operation area. Lead it away behind the machine.
Never suck up into the machine any inflammable or explosive solvents, or liquids like
petrol, oil, alcohol, thinners, or small particles (such as metal filings or ash) that may be hotter than 60oC - otherwise there is danger of explosion or fire!
Do not use suction on health damaging dusts.
Not suitable for sweeping up liquids which form a large foam.
Make sure that the mains connection cable is not damaged, squashed, bent, or damaged by being run over or in any other way.
If the mains connection cable is damaged the machine must not be used.
Extension cables to the mains must at least be protected from water spray and contain an earth lead.
The machine is to be connected to the mains via an H 16A contact-breaker or a 16A fuse.
Measured sound |
|
Typically the A-weighted sound pressure level of the tool is |
|
value |
|
NT 1200 A: 80 dB (A) |
|
|
|
NT 1500 A: 79 dB (A) |
|
|
|
The noise level when working can exceed 85 dB (A). |
|
|
|
Wear ear protectors! |
|
Use |
|
The vacuum cleaner can be used as follows: suction of non±toxic dusts and |
|
|
|
non±cumbustible liquids, aspiration of sloppy or muddy water, clearing up clogged |
|
|
|
drains, on±site cleaning (building sites, working places, etc.). |
|
|
|
Dust extraction from connected power tools (with built±in socket for NT 1500 A). |
|
|
|
Do not use this product in another way as stated for normal use. |
|
Mains |
|
Connect only to a single-phase AC current supply and only to the mains voltage |
|
connection |
|
specified on the rating plate. Must only be used from sockets with earth wire (earth |
|
|
|
protection in accordance with DIN VDE 0730 and CEE)! The radio + TV suppression |
|
|
|
complies with the European norm 55014. |
|
|
|
When fitting the plug, make sure that the brown (live) wire of this appliance is |
|
|
|
connected to the plug terminal marked L or coloured red and the blue (neutral) wire |
|
|
|
of this appliance is connected to the plug terminal marked N or coloured black. |
|
|
|
Under no circumstances must the wires of this appliance be connected to the earth |
|
|
|
terminal of the plug marked either E, with the earth symbol or coloured green or |
|
|
|
green/yellow |
|
|
|
|
|
ENGLISH |
1 |
NT 1200, NT 1500 A |
|

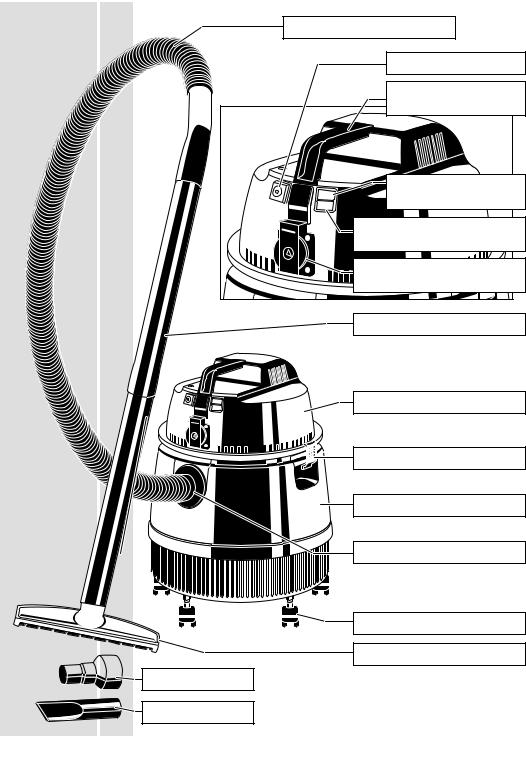
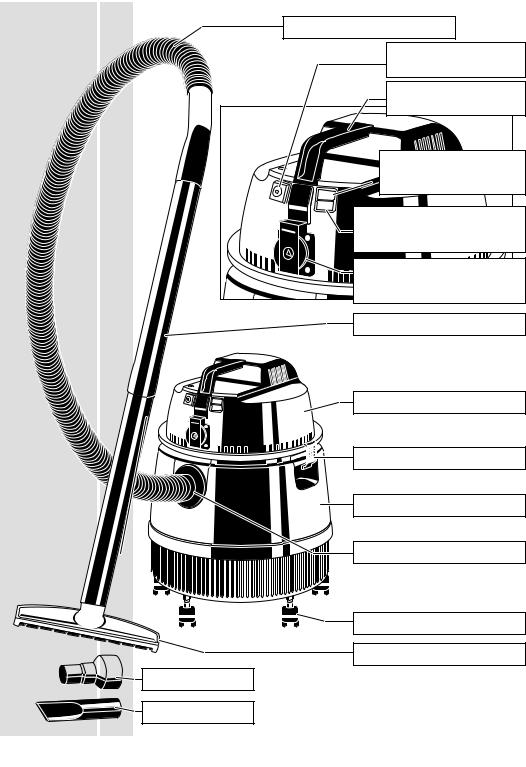
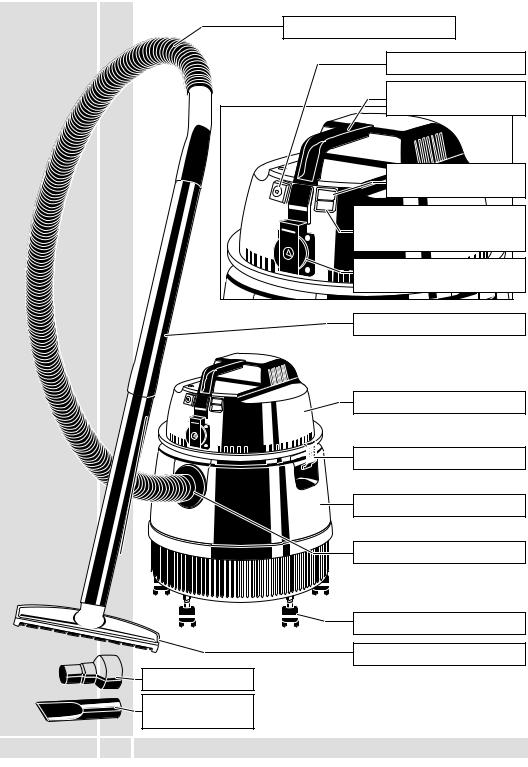
Brief description
A
Adapter
Seam nozzle
ENGLISH 2
Suction hose
On-/off switch
Carrying handle with cable storage
|
Switch for automatic |
|
N A |
operation (only applicable |
|
for NT 1500 A) |
||
|
Pilot light for automatic operation (only applicable for NT 1500 A)
Socket for power tool
(only applicable for NT 1500 A)
Suction tubes
Motor section
Snap-open grip
Dust collection container
Aspiration hole
Steerable castors
Universal nozzle
Modifications: Text, diagrams and data are correct at the time of printing. In the interest of continuous improvement of our products, technical specifications are subject to alteration without prior notice.
NT 1200, NT 1500 A

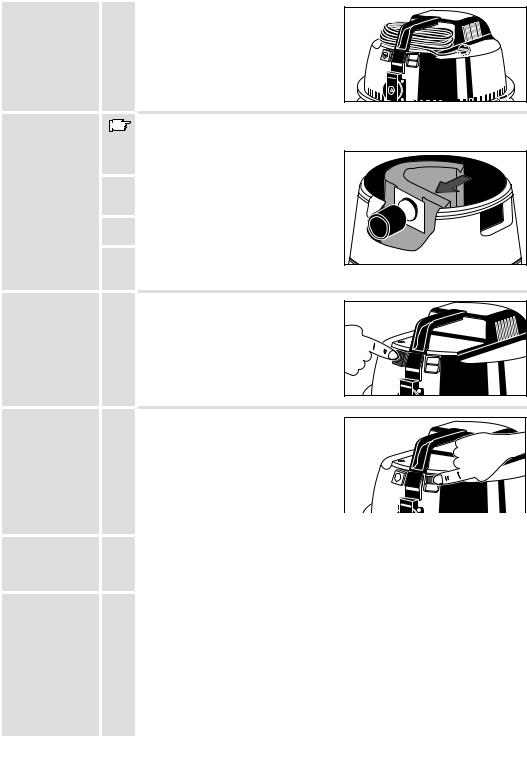
Assembling the |
Always disconnect the plug from the socket before carrying out any work on the |
machine |
machine. |
Mounting the |
1. |
Open the snap-open grip and lift out the |
|
|
undercarriage |
|
motor section. (The container can only be |
N A |
|
|
|
stood on its head for the castors to be |
|
|
|
|
mounted.) |
|
|
|
2. |
Press the castors and the respective bolts |
|
|
|
|
firmly by hand into the provided borings of |
|
|
|
|
the container base, as far as they will go. |
|
|
|
|
NT 1200: |
4 castors |
|
|
|
NT 1500 A: 5 castors |
|
|
Fit the motor |
3. |
Fit the motor section such that the On/Off |
|
|
section |
|
switch is located above the aspiration hole. |
N A |
|
|
4. |
Snap shut the grips. |
|
|
Connect the |
5. |
Press the vacuum hose into the connector |
|
|
vacuum hose |
|
with the markings lined up to one another, |
|
|
|
|
and listen for the hose to snap into place. |
|
|
|
|
To remove the vacuum hose, turn the |
|
|
|
|
connector slightly to the right or the left |
|
|
|
|
and pull it out. |
|
|
Connecting the |
The vacuum cleaner can be connected with several accessories res. with a power |
accessories |
tool. |
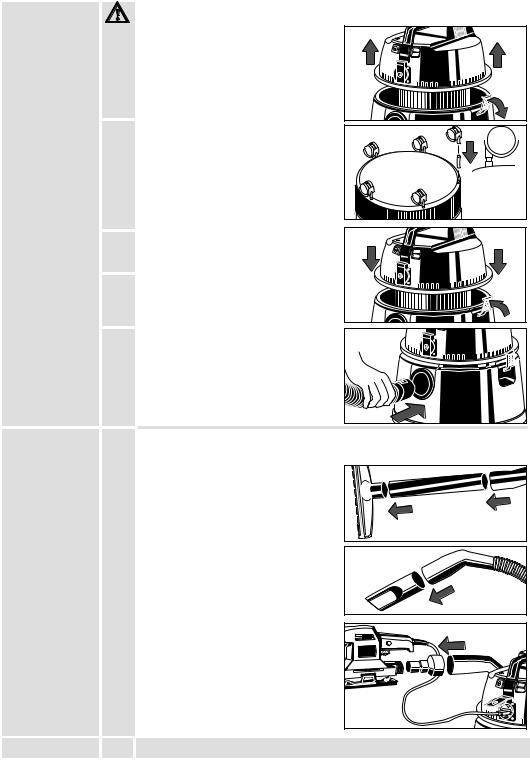
All-purpose |
Fit together the all±purpose nozzle, the |
nozzle |
two suction tubes, and the suction hose. |
Upholstery |
Fit the upholstery nozzle directly onto the |
nozzle |
vacuum hose or onto one of the vacuum |
|
tubes. |
Power tools |
Connect power tools with the adapter onto |
|
|
the vacuum hose. |
|
|
Connect the mains cable of the power tool |
|
|
with the socket of the vacuum cleaner. In |
|
|
automatic operation, the vacuum cleaner |
A |
|
starts automatically when the power tool is |
|
|
switched on.(only applicable for |
|
|
NT 1500 A). |
|
ENGLISH |
3 |
NT 1200, NT 1500 A |
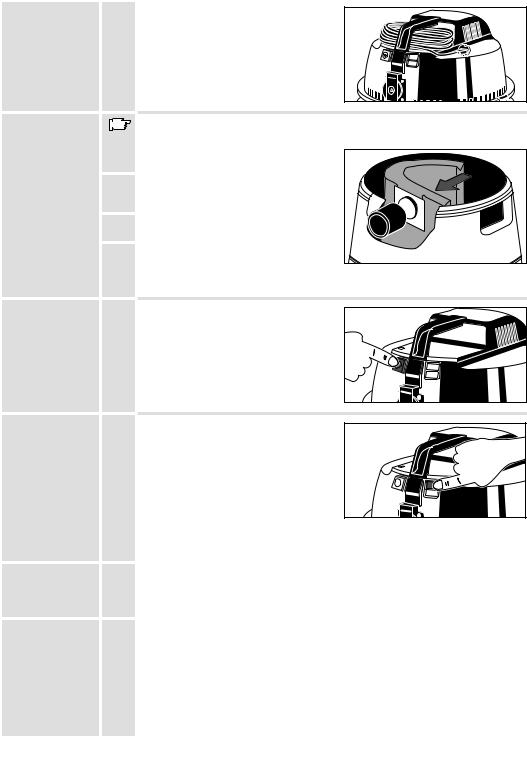
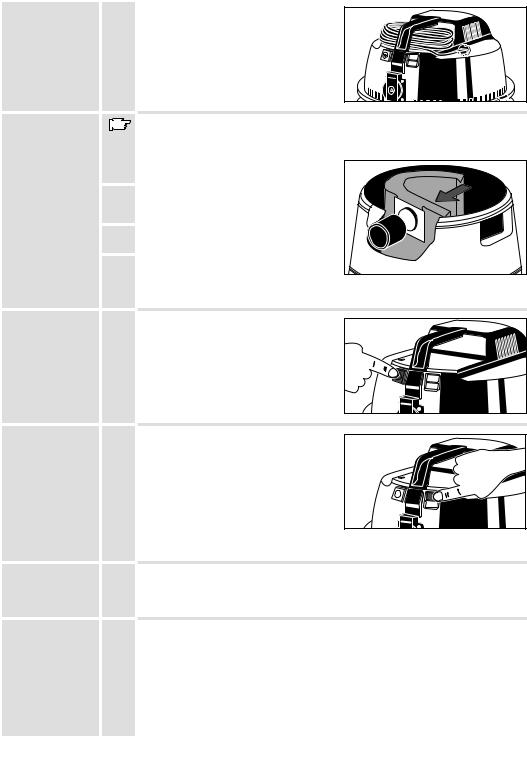
Cable storage |
For storage, coil up the mains cable and |
|
insert it between carrying handle and |
|
motor section, as shown in illustration. |
|
N A |
Paper dust-sack |
Use the paper dust-sack as well when sweeping up fine dust such as sawdust, |
|
soot, ashes, etc. |
Inserting the |
1. Open the snap±open grips and remove the |
paper dust-sack |
motor section. |
2. Take hold of the paper dust-sack by the cardboard edges and press them firmly against the vacuum hose connector.
3.Fit the paper dust-sack against the wall of the container.
4.Fit the motor section such that the On/Off switch is located above the aspiration hole and snap shut the grips.
On-/off switch |
Switching on: |
|
Switch the toggle switch to the ºIº position. |
|
Switching off: |
|
Switch the toggle switch to the º0º position. |
|
N A |
Switching on |
To switch on automatic control: |
automatic control |
set switch to ºAº and turn the On/Off switch |
(only applicable for |
to ºIº ± the pilot light comes on. If a power |
NT 1500 A) |
tool is connected to the plug, the vacuum |
cleaner is switched on automatically |
|
|
together with the power tool |
|
To switch off automatic control: |
||
|
set switch to ºNº ± the pilot light goes out. |
|
|
|
|
||
|
Turn the On/Off switch to º0º. |
||
Vacuuming dry |
|
|
|
Take care when vacuuming dry matter that all parts are completely dry, particularly |
|||
matter |
the filter cartridge. |
||
|
Additionally use the paper filter bag when vacuuming fine dusts like grinding dust, |
||
|
soot, ashes, or similar. |
||
Collecting up |
Before starting to collect up liquids, clean the dust collection container and the filter |
||
liquids |
cartridge thoroughly of all dry residues, in order to avoid their getting unnecessarily |
||
|
dirty. |
||
Remove paper dust±bag, if inserted.
When the container is full, a floating valve closes the suction channel and thus prevents the container from running over. When this happens, switch the machine off and empty the container.
Should the machine fall over while vacuuming the floating valve closes the suction channel. Put the machine up again and switch it off until the floating valve can be heard opening. Switch the machine on again.
Always keep the floating valve clean and accessible.
ENGLISH |
4 |
NT 1200, NT 1500 A |
|
|
After using the machine to collect up liquids, leave it standing open to dry. Take the |
|
|||||||||||
|
|
accessories apart and dry them as well. This is particularly important if the machine |
|
|||||||||||
|
|
is to be used for sweeping up dry matter later. |
|
|||||||||||
|
|
Due to the machin's high cleaning/air power as well as the optimum flow container |
|
|||||||||||
|
|
form (tangential±cyclone±principle; no obstruction, filter is protected from damage) it |
|
|||||||||||
|
|
is possible that after having switched the machine off some water will flow back from |
|
|||||||||||
|
|
the hose or the container. This can be sucked off when restarting work. |
|
|
||||||||||
Emptying the |
1. |
Switch the machine off |
|
|||||||||||
machine |
2. |
|
|
|
|
|
|
|
|
|
|
|
|
|
|
Pull the plug out of the socket. |
|
||||||||||||
|
3. |
Open the snap-open grip and lift out the motor section. |
|
|||||||||||
|
4. |
Empty the container and if necessary clean it. |
|
|||||||||||
|
5. |
Fit the motor section and seal the snap±open grips. |
|
|||||||||||
|
|
|
|
|
|
|
|
|
|
|
|
|
|
|
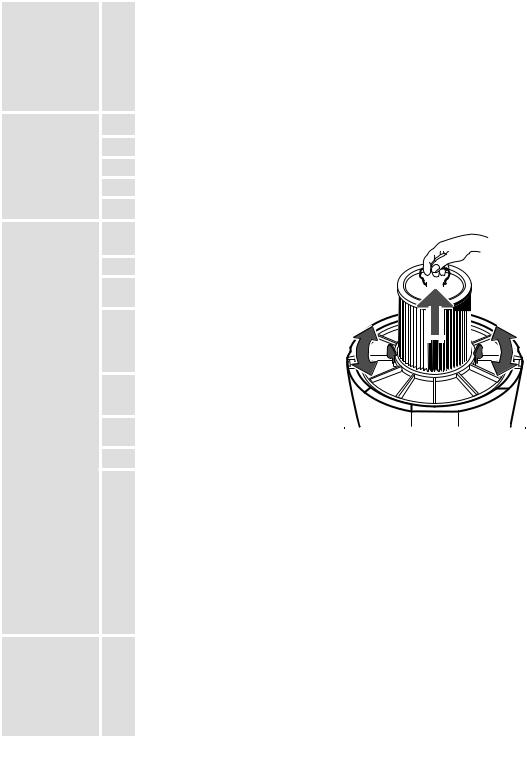
Exchanging the |
1. Open the snap±open grips and remove the |
|
|
|
|
|
|
|
|
|
|
|||
|
|
|
|
|
|
|
|
|
|
|
||||
filter cartridge |
|
motor section. |
|
|
|
|
|
|
|
|
|
|
||
|
2. |
Fold the fastener to the side. |
|
|
|
|
|
|
|
|
|
|
||
|
|
|
|
|
|
|
|
|
|
|
|
|||
|
3. |
Take hold of the filter cartridge by the grip |
|
|
|
|
|
|
|
|
|
|
||
|
|
|
|
|
|
|
|
|
|
|
|
|||
|
4. |
and pull it straight out of the filter guides. |
|
|
|
|
|
|
|
|
|
|
||
|
|
|
|
|
|
|
|
|
|
|
|
|||
|
The filter cartridge can be cleaned with a |
|
|
|
|
|
|
|
|
|
|
|
||
|
|
|
|
|
|
|
|
|
|
|||||
|
|
hand±brush ± hold it over a container to |
|
|
|
|
|
|
|
|
|
|
|
|
|
|
|
|
|
|
|
|
|
|
|
|
|
|
|
|
|
catch the dust. If it is very dirty or |
|
|
|
|
|
|
|
|
|
|||
|
|
|
|
|
|
|
|
|
|
|
|
|
|
|
|
|
damaged it should be replaced. |
|
|
|
|
|
|
|
|
|
|||
|
5. |
Insert new or cleaned filter cartridge and |
|
|
|
|
|
|
|
|
|
|||
|
|
push in to its full extent. |
|
|
|
|
|
|
|
|
|
|||
|
6. |
Fix the filter cartridge by folding back the |
|
|
|
|
|
|
|
|
|
|||
|
7. |
fastener. |
|
|
|
|
|
|
|
|
|
|
|
|
|
|
|
|
|
|
|
|
|
|
|
|
|||
|
Fit the motor section and seal the snap±open grips. |
|
||||||||||||
Malfunctions |
|
|
|
|
|
|
|
|
|
|
|
|
|
|
|
The suction strength decreases. |
|
||||||||||||
|
|
Possible causes: |
|
|||||||||||
|
|
± The collection container is full |
|
|||||||||||
|
|
± The filter cartridge is clogged with fine dust |
|
|||||||||||
|
|
± The suction hose, the suction tubes, or the nozzles are clogged |
|
|||||||||||
|
|
with bulky material. |
|
|||||||||||
|
|
When dust is being swept up the dust is thrown out through the ventilation opening. |
|
|||||||||||
|
|
Possible causes: |
|
|||||||||||
|
|
- Filter cartridge not fitted properly |
|
|||||||||||
|
|
- Filter cartridge damaged. |
|
|||||||||||
|
|
If the malfunction is not caused by any of the above possibilities, please contact |
|
|||||||||||
|
|
your local AEG after±sales services. |
|
|||||||||||
Maintenance |
|
|
|
|
|
|
|
|
|
|
|
|
|
|
|
Use only AEG accessories and spare parts. Should components need to be |
|
||||||||||||
|
|
replaced which have not been described, please contact one of our AEG service |
|
|||||||||||
|
|
agents (see our list of guarantee/service addresses). |
|
|||||||||||
|
|
If needed, an exploded view of the tool can be ordered. Please state the ten±digit |
|
|||||||||||
|
|
No. as well as the machine type printed on the label and order the drawing at your |
|
|||||||||||
|
|
local service agents or directly at: Atlas Copco Electric Tools GmbH, Postfach 320, |
|
|||||||||||
|
|
D±71361 Winnenden. |
|
|||||||||||
|
|
|
|
|
|
|
|
|
|
|
|
|
|
|
ENGLISH |
5 |
|
|
|
|
|
|
NT 1200, NT 1500 A |
|
|||||

|
|
Sie sind anspruchsvoll und kaufen Qualität ± Qualität von Atlas Copco. |
||||
|
|
Wir haben für Sie ein haltbares und möglichst sicheres Elektrowerkzeug gebaut. |
||||
|
|
Effektives und weitgehend gefahrloses Arbeiten ist aber nur möglich, wenn Sie diese |
||||
|
|
Gebrauchsanleitung lesen und danach handeln. Wir wollen, daû Sie sich auch in |
||||
|
|
Zukunft entscheiden für |
AEG-Elektrowerkzeuge von Atlas Copco |
|||
|
|
|
|
|
||
|
|
|
NT 1200 |
NT 1500 A |
||
Technische |
|
Leistung (Motor) |
|
|
|
|
Daten |
|
Pnom . . . . . . . . . . . . . . . . . . . . . . . |
1000 |
W . . . . . . . . . . . |
1200 |
W |
|
|
Pmax . . . . . . . . . . . . . . . . . . . . . . . |
1200 |
W . . . . . . . . . . . |
1500 |
W |
|
|
Luftstrom . . . . . . . . . . . . . . . . . . . . . . |
. 60 |
l/s . . . . . . . . . . . . |
. . 60 |
l/s |
|
|
Unterdruck . . . . . . . . . . . . . . . . . . . . |
145 |
mbar . . . . . . . . . . |
. 180 |
mbar |
|
|
Fassungsvermögen: |
|
|
|
|
|
|
Behälter . . . . . . . . . . . . . . . . . . . . . |
. 20 |
l . . . . . . . . . . . . . . |
. . 30 |
l |
|
|
Festkörper . . . . . . . . . . . . . . . . . . . |
. 16 |
l . . . . . . . . . . . . . . |
. .26 |
l |
|
|
Flüssigkeit . . . . . . . . . . . . . . . . . . . |
. 12 |
l . . . . . . . . . . . . . . |
. . 20 |
l |
|
|
Filterfläche . . . . . . . . . . . . . . . . . . . |
2500 |
cm2 . . . . . . . . . . |
2500 |
cm2 |
|
|
Gerätesteckdose max. . . . . . . . . . . |
. . . ± |
. . . . . . . . . . . . . |
2000 |
W |
|
|
Saugschlauchdurchmesser . . . . . . |
. 50 |
mm . . . . . . . . . . . |
. . 50 |
mm |
|
|
Gewicht . . . . . . . . . . . . . . . . . . . . . . . |
. 5,6 |
kg . . . . . . . . . . . . |
. 6,8 |
kg |
Hinweise für |
Sicherheitshinweise der beiliegenden Broschüre beachten! |
|
|
|||
Ihre Sicherheit |
Steckdosen in Auûenbereichen müssen mit Fehlerstrom-Schutzschaltern |
|||||
|
|
ausgerüstet sein. Das verlangt die Installationsvorschrift für Ihre Elektroanlage. Bitte |
||||
|
|
beachten Sie das bei der Verwendung unseres Gerätes ± sprechen Sie mit Ihrem |
||||
|
|
Elektroinstallateur. |
|
|
|
|
Gehäuse des Gerätes nicht anbohren, da sonst die Schutzisolierung unterbrochen wird (Klebeschilder verwenden).
Vor allen Arbeiten am Gerät Stecker aus der Steckdose ziehen.
Gerät nur ausgeschaltet an die Steckdose anschlieûen.
Anschluûkabel stets vom Wirkungsbereich des Gerätes fernhalten. Kabel immer nach hinten von der Maschine wegführen.
Generell dürfen keine brennbaren oder explosiven Lösungsmittel, Flüssigkeiten wie
Benzin, Öl, Alkohol, Verdünnung und keine Teile (Metallspäne, Asche), mit einer Temperatur über 60 oC aufgesaugt werden; es besteht sonst Explosionsund Brandgefahr!
Nicht für die Absaugung gesundheitsgefährlicher Stäube verwenden.
Nicht geeignet zum Aufsaugen stark schäumender Flüssigkeiten.
Darauf achten, daû die Netzanschluûleitung nicht durch Überfahren, Quetschen, Zerren und dergleichen beschädigt wird.
Bei Beschädigung der Netzanschluûleitung darf das Gerät nicht mehr verwendet werden.
Kupplungen von Netzanschluûoder Geräteanschluûleitungen müssen mindestens spritzwassergeschützt und mit Schutzleiter ausgerüstet sein.
Das Gerät ist an eine Leitung anzuschlieûen, die mit einem Schutzschalter H 16A oder einer Schmelzsicherung 16A abgesichert ist.
Geräusch- |
|
Der A-bewertete Schalldruckpegel des Gerätes beträgt typischerweise |
|
meûwerte |
|
NT 1200 A: 80 dB (A) |
|
|
|
NT 1500 A: 79 dB (A) |
|
|
|
Der Geräuschpegel beim Arbeiten kann 85 dB (A) überschreiten. |
|
|
|
Gehörschutz tragen! |
|
Verwendung |
|
Das Gerät ist für folgende Arbeiten geeignet: Absaugen nicht toxischer Stäube und |
|
|
|
nicht brennbarer Flüssigkeiten, Aufsaugen von Putzoder Schmutzwasser, |
|
|
|
Freisaugen verstopfter Abflüsse, Endreinigung vor Ort (Baustelle, Arbeitsplatz etc.). |
|
|
|
Staubabsaugung von angeschlossenen Elektrowerkzeugen (über eingebaute |
|
|
|
Steckdose bei NT 1500 A). |
|
|
|
Dieses Gerät darf nur wie angegeben bestimmungsgemäû verwendet werden. |
|
Netzanschluû |
|
Nur an Einphasen-Wechselstrom und nur an die auf dem Leistungsschild |
|
|
|
angegebene Netzspannung anschlieûen. Nur an Steckdosen mit Schutzkontakt |
|
|
|
anschlieûen (Schutzerdung nach DIN VDE 0730 bzw. CEE)! Die Funkentstörung |
|
|
|
entspricht der Europa-Norm EN 55014. |
|
|
|
|
|
DEUTSCH |
6 |
NT 1200, NT 1500 A |
|
Kurzbeschreibung
|
Saugschlauch |
|
|
|
Ein-/Ausschalter |
|
|
Tragegriff mit |
|
|
Kabelaufbewahrung |
|
N A |
Automatikschalter |
|
(nur bei NT 1500 A) |
|
|
|
|
|
|
Kontrollampe für Automatikbetrieb |
|
|
(nur bei NT 1500 A) |
|
|
Steckdose für Elektrowerkzeug |
|
|
(nur bei NT 1500 A) |
|
|
Saugrohre |
A |
|
Motorteil |
|
|
|
|
|
Griffschnapper |
|
|
Auffangbehälter |
|
|
Ansaugstutzen |
|
|
Lenkrollen |
|
|
Allzweckdüse |
Reduzierstück
Änderungen: Text, Bild und Daten entsprechen dem
technischen Stand zur Zeit des Drucktermins. Änderungen im Fugendüse Sinne der Weiterentwicklung unserer Produkte sind
vorbehalten.
DEUTSCH |
7 |
NT 1200, NT 1500 A |
Zusammenbau |
Vor allen Arbeiten an der Maschine Stecker aus der Steckdose ziehen. |
des Gerätes |
|
Fahrwerk |
1. |
Griffschnapper öffnen und Motorteil |
|
|
montieren |
|
abheben. (Der Behälter kann nun für die |
N A |
|
|
|
Lenkrollenmontage auf den Kopf gestellt |
|
|
|
|
werden) |
|
|
|
2. |
Die Lenkrollen und die dazugehörigen |
|
|
|
|
Bolzen in die Bohrungen am |
|
|
|
|
Behälterboden kräftig von Hand bis zum |
|
|
|
|
Anschlag eindrücken. |
|
|
|
|
NT 1200: |
4 Lenkrollen |
|
|
|
NT 1500 A: 5 Lenkrollen |
|
|
Motorteil |
3. |
Motorteil so aufsetzen, daû der |
|
|
aufsetzen |
|
Ein-/Ausschalter über dem Ansaugstutzen |
N A |
|
|
|
steht. |
|
|
|
4. |
Griffschnapper einrasten. |
|
|
Saugschlauch |
5. |
Saugschlauch so in den Ansaugstutzen |
|
|
anschlieûen |
|
eindrücken, daû die Markierungen |
|
|
|
|
übereinstimmen und fühlbar einrastet. |
|
|
|
|
Zum Abnehmen des Saugschlauches das |
|
|
|
|
Schlauchanschluûstück etwas nach rechts |
|
|
|
|
oder links drehen und abziehen. |
|
|
Anschluû des |
An das Gerät kann verschiedenes Zubehör bzw. ein Elektrowerkzeug angeschlossen |
Zubehörs |
werden. |
Allzweckdüse |
Die Allzweckdüse, die zwei Saugrohre und |
|
den Saugschlauch zusammenstecken. |
Fugendüse |
|
Die Fugendüse direkt auf den |
|
|
|
Saugschlauch oder auf ein Saugrohr |
|
|
|
stecken. |
|
Elektrowerkzeug |
|
Elektrowerkzeuge mit Reduzierstück an |
|
|
|
Saugschlauch anschlieûen. |
|
|
|
Das Netzkabel des Elektrowerkzeugs an |
|
|
|
die Gerätesteckdose des Staubsaugers |
|
|
|
anschlieûen. Im Automatikbetrieb läuft der |
A |
|
|
Staubsauger nach Einschalten des |
|
|
|
Elektrowerkzeugs automatisch an (nur |
|
|
|
bei NT 1500 A). |
|
DEUTSCH |
8 |
|
NT 1200, NT 1500 A |
Kabelaufbe- |
Zur Aufbewahrung Netzkabel wie in |
wahrung |
Abbildung aufgewickelt zwischen |
|
Tragegriff und Motorteil einschieben. |
|
N A |
Papierstaubsack |
|
Zum Saugen von Feinstaub, wie Schleifstaub, Ruû, Asche, u.ä. zusätzlich den |
|
|
Papierstaubsack verwenden. |
Einlegen des |
1. Griffschnapper öffnen und Motorteil |
|
Papierstaub- |
|
abnehmen. |
sacks |
2. |
Papierstaubsack an den Kartonkanten |
|
||
|
|
fassen und fest an den Ansaugstutzen |
|
|
drücken. |
|
3. |
Papierstaubsack an die Behälterwand |
|
|
anlegen. |
|
4. |
Motorteil wieder so aufsetzen, daû |
|
|
Ein-/Ausschalter über dem Ansaugstutzen |
|
|
steht und Griffschnapper wieder einrasten |
|
|
lassen. |
Ein-/Ausschalten |
Einschalten: |
|
Kippschalter auf I drücken. |
|
Ausschalten: |
|
Kippschalter auf 0 drücken |
|
N A |
Einschalt- |
Einschaltautomatik ein: |
automatik |
Schalter auf ºAº drücken und |
(nur bei |
Ein-/Ausschalter auf ºIº stellen ± die |
NT 1500 A) |
Kontrollampe leuchtet. |
|
Bei Anschluû eines Elektrowerkzeugs an |
|
die Steckdose wird bei Einschalten des |
|
Elektrowerkzeugs der Staubsauger |
|
automatisch zugeschaltet. |
|
|
Einschaltautomatik aus: |
|
|
|
Schalter auf ºNº drücken ± Kontrollampe erlischt. |
|
|
|
Ein-/Ausschalter auf º0º stellen. |
|
Saugen von |
|
|
|
|
Beim Saugen von Trockengut darauf achten, daû alle Teile insbesondere die |
||
Trockengut |
|
Filterpatrone völlig trocken sind. |
|
|
|
Zum Saugen von Feinstaub wie Schleifstaub, Ruû, Asche, u.ä. zusätzlich die |
|
|
|
Papierfiltertüte verwenden. |
|
Aufsaugen von |
|
Vor dem Aufsaugen von Flüssigkeiten den Auffangbehälter und die Filterpatrone von |
|
Flüssigkeiten |
|
Trockengut reinigen, somit werden unnötige Verschmutzungen vermieden. |
|
|
|
Den ggf. eingesetzten Papierstaubsack herausnehmen. |
|
|
|
Ist der Auffangbehälter voll, schlieût ein Schwimmerventil den Ansaugkanal und |
|
|
|
verhindert so ein Überlaufen des Auffangbehälters. |
|
|
|
Bei vollem Auffangbehälter Gerät ausschalten und Auffangbehälter entleeren. |
|
|
|
Sollte das Gerät beim Saugen umfallen, schlieût das Schwimmerventil. Damit das |
|
|
|
Schwimmerventil wieder öffnet, nach dem Aufstellen das Gerät ausschalten bis das |
|
|
|
Schwimmerventil hörbar öffnet. Danach Gerät wieder einschalten. |
|
|
|
|
|
DEUTSCH |
9 |
NT 1200, NT 1500 A |
|
|
|
Das Schwimmerventil immer sauber und gangbar halten. |
|
|||||||||||
|
|
Nach dem Naûsaugen das Gerät offen stehen lassen und austrocknen lassen. |
|
|||||||||||
|
|
Zubehör auseinandernehmen und ebenfalls trocknen lassen. |
|
|||||||||||
|
|
Dies gilt insbesondere dann, wenn das Gerät später zum Trockensaugen verwendet |
|
|||||||||||
|
|
werden soll. |
|
|||||||||||
|
|
Durch die hohe Saug-/Luftleistung des Gerätes und die strömungsgünstige |
|
|||||||||||
|
|
Behälterform (Tangential-Zyklon-Prinzip: kein Verstopfen, Filter vor Beschädigung |
|
|||||||||||
|
|
geschützt), kann nach dem Abschalten etwas Wasser aus dem Schlauch oder |
|
|||||||||||
|
|
Behälter zurücklaufen. Dies kann beim nächsten Saugvorgang wieder aufgesaugt |
|
|||||||||||
|
|
werden. |
|
|
||||||||||
Entleeren des |
1. |
Gerät abschalten. |
|
|||||||||||
Staubsaugers |
2. |
Netzstecker aus der Steckdose ziehen. |
|
|||||||||||
|
|
|||||||||||||
|
3. |
Griffschnapper öffnen und Motorteil abheben. |
|
|||||||||||
|
4. |
Auffangbehälter entleeren und ggf. reinigen. |
|
|||||||||||
|
5. |
Motorteil aufsetzen und Griffschnapper einrasten lassen. |
|
|||||||||||
Wechseln der |
1. |
|
|
|
|
|
|
|
|
|
|
|
|
|
Griffschnapper öffnen und Motorteil |
|
|
|
|
|
|
|
|
|
|
||||
|
|
|
|
|
|
|
|
|
|
|
||||
Filterpatrone |
|
abnehmen. |
|
|
|
|
|
|
|
|
|
|
||
|
2. |
Drehriegel seitlich wegklappen. |
|
|
|
|
|
|
|
|
|
|
||
|
3. |
Filterpatrone am Handgriff fassen und |
|
|
|
|
|
|
|
|
|
|
|
|
|
|
gerade von der Filterführung abziehen. |
|
|
|
|
|
|
|
|
|
|
|
|
|
4. |
Die Filterpatrone kann mit einem |
|
|
|
|
|
|
|
|
|
|
|
|
|
|
|
|
|
|
|
|
|
|
|
|
|||
|
|
Handfeger über einem Behälter gereinigt |
|
|
|
|
|
|
|
|
|
|||
|
|
werden. |
|
|
|
|
|
|
|
|
|
|
|
|
|
|
|
|
|
|
|
|
|
|
|
|
|
|
|
|
|
Stark verschmutzte oder beschädigte |
|
|
|
|
|
|
|
|
|
|||
|
|
|
|
|
|
|
|
|
|
|
|
|
|
|
|
|
Filterpatrone ersetzen. |
|
|
|
|
|
|
|
|
|
|||
|
5. |
Gereinigte bzw. neue Filterpatrone |
|
|
|
|
|
|
|
|
|
|||
|
|
aufsetzen und bis zum Anschlag |
|
|
|
|
|
|
|
|
|
|||
|
|
aufschieben. |
|
|
|
|
|
|
|
|
|
|||
|
6. |
Filterpatrone durch Zurückklappen des |
|
|
|
|
|
|
|
|
|
|||
|
7. |
Drehriegels befestigen. |
|
|
|
|
|
|
|
|
|
|
|
|
|
|
|
|
|
|
|
|
|
|
|
||||
|
Motorteil aufsetzen und Griffschnapper einrasten lassen. |
|
||||||||||||
|
|
|
|
|
|
|
|
|
|
|
|
|
|
|
Funktions- |
|
Saugkraft läût nach |
|
|||||||||||
störungen |
|
Mögliche Ursachen: |
|
|||||||||||
|
|
- Auffangbehälter voll |
|
|||||||||||
|
|
- Filterpatrone stark mit Feinstaub zugesetzt. |
|
|||||||||||
|
|
- Saugschlauch, Saugrohr oder Düsen sind durch |
|
|||||||||||
|
|
sperriges Sauggut verstopft. |
|
|||||||||||
|
|
Beim Staubsaugen wird Staub aus der Ausblasöffnung geschleudert. |
|
|||||||||||
|
|
Mögliche Ursachen: |
|
|||||||||||
|
|
- Filterpatrone nicht richtig angebracht. |
|
|||||||||||
|
|
- Filterpatrone beschädigt. |
|
|||||||||||
|
|
Beruhen die Funktionsstörungen auf keinem der oben aufgeführten Gründe , |
|
|||||||||||
|
|
wenden Sie sich bitte an eine AEG-Kundendienststelle. |
|
|||||||||||
Wartung |
|
|
|
|
|
|
|
|
|
|
|
|
|
|
|
Nur AEG Zubehör und Ersatzteile verwenden. Bauteile, deren Austausch nicht |
|
||||||||||||
|
|
beschrieben wurde, bei einer AEG Kundendienststelle auswechseln lassen |
|
|||||||||||
|
|
(Broschüre Garantie/Kundendienstadressen beachten). |
|
|||||||||||
|
|
Bei Bedarf kann eine Explosionszeichnung des Gerätes unter Angabe der |
|
|||||||||||
|
|
Maschinen Type und der zehnstelligen Nummer auf dem Leistungsschild bei Ihrer |
|
|||||||||||
|
|
Kundendienststelle oder direkt bei Atlas Copco Electric Tools GmbH, Postfach 320, |
|
|||||||||||
|
|
D±71361 Winnenden angefordert werden. |
|
|||||||||||
|
|
|
|
|
|
|
|
|
|
|
|
|
|
|
DEUTSCH |
10 |
|
|
|
|
|
|
NT 1200, NT 1500 A |
|
|||||

|
|
Vous exigez ce qu'il y a de meilleur et vous achetez de la qualité ± la qualité offerte |
||||
|
|
par Atlas Copco. Vous vous êtes dotés d'un outil de qualité durable. Ce n'est qu'en |
||||
|
|
lisant attentivement ces instructions avant d'utiliser l'outil que vous assurerez un |
||||
|
|
travail efficace et sans risque. Nous tenons à satisfaire notre clientèle et nous |
||||
|
|
espérons que vous achèterez encore des outils électriques AEG d'Atlas Copco . |
||||
|
|
|
|
|
||
Caractéristiques |
|
Puissance (moteur) |
NT 1200 |
NT 1500 A |
||
|
|
|
|
|
||
techniques |
|
Pnom . . . . . . . . . . . . . . . . . . . . . . . |
1000 |
W . . . . . . . . . . . |
1200 |
W |
|
|
Pmax . . . . . . . . . . . . . . . . . . . . . . . |
1200 |
W . . . . . . . . . . . |
1500 |
W |
|
|
Courant d'air . . . . . . . . . . . . . . . . . . . |
. 60 |
l/s . . . . . . . . . . . . |
. . 60 |
l/s |
|
|
Sous-pression . . . . . . . . . . . . . . . . . |
145 |
mbar . . . . . . . . . . |
. 180 |
mbar |
|
|
Contenance |
|
|
|
|
|
|
Réservoir . . . . . . . . . . . . . . . . . . . . |
. 20 |
l . . . . . . . . . . . . . . |
. . 30 |
l |
|
|
Corps solides . . . . . . . . . . . . . . . . . |
. 16 |
l . . . . . . . . . . . . . . |
. . 26 |
l |
|
|
Liquides . . . . . . . . . . . . . . . . . . . . . |
. 12 |
l . . . . . . . . . . . . . . |
. . 20 |
l |
|
|
Surface du filtre . . . . . . . . . . . . . . . |
2500 |
cm2 . . . . . . . . . . |
2500 |
cm2 |
|
|
Prise pour appareils, max. . . . . . . . |
. . . ± |
. . . . . . . . . . . . . |
2000 |
W |
|
|
Diamètre du tuyau d'aspiration . . . |
. 50 |
mm . . . . . . . . . . . |
. . 50 |
mm |
|
|
Poids . . . . . . . . . . . . . . . . . . . . . . . . . |
. 5,6 |
kg . . . . . . . . . . . . |
. 6,8 |
kg |
Conseils de |
Respecter les instructions de sécurité se trouvant dans le prospectus ci-joint. |
|||||
sécurité |
Les prises de courant se trouvant à l'extérieur doivent être équipées de disjoncteurs |
|||||
|
|
de protection, répondant ainsi à la prescription de mise en place de votre installation |
||||
|
|
électrique. Veuillez, d'une part, en tenir compte lors de l'utilisation de notre appareil |
||||
|
|
et d'autre part, en parler à votre électricien. |
|
|
||
Ne pas endommager le boîtier, cela provoquerait la détérioration de l'isolation de protection (utiliser des adhésifs).
Toujours extraire la fiche hors de la prise de courant avant d'intervenir sur l'appareil.
Ne relier l'appareil à la prise de courant que lorsqu'il est débranché.
Le câble d'alimentation doit toujours être maintenu éloigné, c'est-à-dire, hors de la zone opérationnelle de l'appareil. Le câble d'alimentation doit toujours se trouver à l'arrière de la machine.
En règle générale, ne jamais aspirer de produits solvants inflammables ou explosifs, de liquides tels que l'essence, l'huile, l'alcool, dilution et petites pièces (copeaux
o
métalliques, cendres) à une température supérieure à 60 C car dans le cas contraire, il y a un risque d'explosion et d'incendie!
Ne pas utiliser pour l'aspiration de poussières nuisibles à la santé.
L'appareil ne doit pas être utilisé pour aspirer les liquides très moussants.
Veiller à ce que le câble d'alimentation secteur ne soit pas écrasé, pincé, tiré ou endommagé d'une façon ou d'une autre.
Si le câble d'alimentation est endommagé, ne plus utiliser l'appareil.
Les raccordements des conducteurs d'alimentation secteur et des branchements d'appareils doivent au moins être protégés contre les éclaboussures et être équipés d'un conducteur de protection.
L'appareil doit être raccordé à un conducteur équipé d'un disjoncteur de protection du type H 16 A ou d'un fusible coupe-circuit de 16 A.
Mesure de bruit |
|
La mesure réelle (A) du niveau de bruit de l'outil est |
|
|
|
NT 1200 A: 80 dB (A) |
|
|
|
NT 1500 A: 79 dB (A) |
|
|
|
Le niveau du briut en fonctionement peut dépasser 85 dB (A). |
|
|
|
Toujours porter des casques protecteurs! |
|
Utilisation |
|
L'appareil peut être utilisé pour des travaux suivants: aspiration de poussières non |
|
|
|
toxiques et de liquides non inflammables, aspiration d'eau boueuse et de liquides |
|
|
|
décapants, aspiration d'égouts bouchés, nettoyage final sur les lieux (chantier, place |
|
|
|
de travail, etc.) |
|
|
|
Aspiration de poussières des outils électriques raccordés (par l'intermédiaire d'une |
|
|
|
prise de courant intégrée dans NT 1500 A). |
|
|
|
Comme déjà indiqué, cette machine n'est conçue que pour une utilisation normale. |
|
Branchement |
|
Ne brancher que sur du courant alternatif monophasé et en respectant la tension |
|
secteur |
|
indiquée sur la plaque signalétique. Ne raccorder qu'à des prises avec mise à la |
|
|
|
terre (mise à la terre selon DIN VDE 0730 et CEE)! L'antiparasitage répond aux |
|
|
|
prescriptions EG 82/499/EWG. |
|
|
|
|
|
FRANÇAIS |
11 |
NT 1200, NT 1500 A |
|
Description
Tuyau flexible d'aspiration
Interrupteur de marche/arrêt
Poignée avec ramasse-câble
Interrupteur de fonctionnement automatique  (uniquement sur NT 1500 A) N A
Lampe-témoin du fonctionnement automatique
(uniquement sur NT 1500 A)
Prise de courant pour outils électriques 
 (uniquement sur NT 1500 A)
Tuyaux d'aspiration
A |
Bloc-moteur |
Fermoir de poignée
Collecteur
Tubulure d'aspiration
Roulettes
Buse universelle
Manchon réducteur
Modifications: Les textes, les illustrations et les données techniques correspondent à la situation au moment de
Buse mince l'impression. Toutes modifications techniques sont réservées dans le cadre du développement technique permanent.
FRANÇAIS |
12 |
NT 1200, NT 1500 A |

Assemblage de |
|
Avant tous travaux sur la machine extraire la fiche de la prise de courant. |
||
l'appareil |
|
|
|
|
Montage des |
1. |
Ouvrir le fermoir de poignée et enlever le |
|
|
roulettes |
|
bloc-moteur. (le conteneur ne doit être |
N A |
|
|
|
inversé que pour permettre le montage |
|
|
|
|
des roulettes) |
|
|
|
2. Enfoncer à fond et à la main les roulettes |
|
||
|
|
ainsi que les boulons dans les alésages se |
|
|
|
|
trouvant dans le fond du réservoir en |
|
|
|
|
exerçant une pression. |
|
|
|
|
NT 1200: |
4 roulettes |
|
|
|
NT 1500 A: 5 roulettes |
|
|
Mettre en place |
3. |
Monter le bloc±moteur de sorte que |
|
|
le bloc-moteur |
|
l'interrupteur Marche / Arrêt soit positionné |
N A |
|
|
|
au±dessus de la tubulure d'aspiration. |
|
|
|
4. Enclencher les fermoirs de poignées. |
|
||
Raccorder le |
5. |
Introduire le flexible sur le manchon |
|
|
flexible |
|
d'aspiration de façon à ce que les repères |
|
|
d'aspiration |
|
coïncident et que l'enclenchement soit |
|
|
|
|
audible. |
|
|
|
|
Pour enlever le flexible d'aspiration, |
|
|
|
|
tourner légèrement la partie de |
|
|
|
|
raccordement du flexible vers la droite ou |
|
|
|
|
vers la gauche et l'extraire. |
|
|
Raccordement |
Il est possible de brancher différents accessoires ou un outil électrique sur l'appareil. |
des accessoires |
|
Buse polyvalente |
Raccorder la buse universelle, les deux |
|
tuyaux d'aspiration et le tuyau flexible |
|
d'aspiration. |
Suceur |
Emboîter directement le suceur plat sur le |
|
flexible d'aspiration ou sur un autre tube. |
Outil électrique |
|
Raccorder les outils électriques avec le |
|
|
|
manchon réducteur sur le flexible |
|
|
|
d'aspiration. |
|
|
|
Brancher le câble d'alimentation de l'outil |
|
|
|
électrique sur la prise de courant de |
|
|
|
l'aspirateur. En mode de service |
A |
|
|
|
|
|
|
automatique, l'aspirateur se met |
|
|
|
automatiquement en marche dès que |
|
|
|
l'outil électrique est mis en |
|
|
|
marche.(uniquement sur NT 1500 A). |
|
FRANÇAIS |
13 |
|
NT 1200, NT 1500 A |
Ramasse-câble |
Lorsque l'aspirateur n'est plus utilisé, |
|
mettre le câble d'alimentation enroulé |
|
entre la poignée et le bloc±moteur |
|
conformément à la figure ci±contre. |
|
N A |
Sac à poussières |
Pour l'aspiration de la poussière fine, comme par exemple celle résultant du |
en papier |
ponçage, suie, cendres et autres, il est recommandé d'utiliser en plus le sac à |
|
poussières en papier. |
Mise en place du |
1. Ouvrir le fermoir de poignée et enlever la |
sac à poussières |
partie moteur. |
2.Saisir les bords en carton du sac à poussières en papier et l'appuyer sur le manchon d'aspiration.
3.Appliquer le sac à poussière en papier sur la paroi du conteneur.
4.Monter le bloc±moteur de sorte que l'interrupteur Marche / Arrêt soit positionné au±dessus de la tubulure d'aspiration et faire encliqueter les fermoirs de poignée.
Mise en |
Mise en marche: |
|
marche/arrêt |
Mettre l'interrupteur à bascule en position |
|
|
I. |
|
|
Arrêt: |
|
|
Mettre l'interrupteur à bascule en position |
N A |
|
0 |
|
Mise en marche |
Mise en marche automatique: |
automatique |
Appuyer le commutateur sur «A» et mettre |
(uniquement sur |
l'interrupteur Marche / Arrêt en position |
NT 1500 A) |
«I». Le voyant s'allume. Lorsqu'un appareil |
|
électrique est relié à la prise de courant, |
|
l'aspirateur se met automatiquement en |
|
marche dès qu'on met en marche cet |
|
appareil électrique. |
|
Arrêt de la mise en marche automatique: Appuyer le commutateur sur «N» ± le |
|
voyant s'éteint. Mettre l'interrupteur Marche / Arrêt en position «0». |
Aspiration de |
Lorsqu'on aspire de la matière sèche, toujours veiller à ce que la cartouche filtrante |
matière sèche |
soit parfaitement sèche. |
|
Pour l'aspiration des poussières fines, telles que poussières de polissage, suie, |
|
cendres et autres, utiliser en plus le sac en papier. |
Aspiration de |
Avant d'aspirer des liquides, toujours nettoyer le collecteur et la cartouche filtre de |
liquides |
matières sèches, afin d'éviter tout encrassement inutile. |
Sortir le sac à poussières en papier éventuellement mis en place.
Si le collecteur est plein, la soupape ferme le canal d'aspiration, empêchant ainsi tout débordement du collecteur.
Lorsque le collecteur est plein, débrancher l'appareil et le vider.
La soupape se ferme en cas de renversement de l'appareil pendant l'aspiration.
Pour que la soupape s'ouvre à nouveau, arrêter l'appareil après l'avoir relevé, jusqu'à ce que vous entendiez la réouverture de la soupape.
FRANÇAIS |
14 |
NT 1200, NT 1500 A |
|
|
La soupape doit être maintenue en très bon état de propreté et être toujours |
|
|||||||||||
|
|
accessible. |
|
|||||||||||
|
|
Après aspiration de liquide, laisser l'appareil ouvert et le faire sécher. Détacher les |
|
|||||||||||
|
|
accessoires et les laisser sécher également. Ceci est notamment applicable lorsque |
|
|||||||||||
|
|
l'appareil doit être utilisé pour une aspiration à sec. |
|
|||||||||||
|
|
En raison de la grande puissance d'aspiration ainsi que de la forme carénée du |
|
|||||||||||
|
|
collecteur (principe de cyclone tangentielle: pas d'obstruction, filtre protégé contre |
|
|||||||||||
|
|
des endommagements), il se peut qu'il sorte un peu d'eau par le collecteur ou par le |
|
|||||||||||
|
|
tuyau flexible. Celle±ci peut être aspirée lors de la prochaine opération d'aspiration. |
|
|
||||||||||
Vidage de |
1. |
Débrancher l'appareil. |
|
|||||||||||
l'aspirateur |
2. |
Extraire la fiche hors de la prise de courant. |
|
|||||||||||
|
|
|||||||||||||
|
3. |
Ouvrir le fermoir de poignée et enlever le bloc-moteur. |
|
|||||||||||
|
4. |
Vider le collecteur et le nettoyer le cas échéant. |
|
|||||||||||
|
5. |
Monter la partie moteur et faire encliqueter les fermoirs de poignée. |
|
|||||||||||
Remplacement |
1. |
|
|
|
|
|
|
|
|
|
|
|
|
|
Ouvrir le fermoir de poignée et enlever la |
|
|
|
|
|
|
|
|
|
|
||||
|
|
|
|
|
|
|
|
|
|
|
||||
de la cartouche |
|
partie moteur. |
|
|
|
|
|
|
|
|
|
|
||
filtre |
2. |
Basculer le verrou vers le côté. |
|
|
|
|
|
|
|
|
|
|
|
|
|
|
|
|
|
|
|
|
|
|
|
||||
|
|
|
|
|
|
|
|
|
|
|
|
|||
|
3. |
Saisir la cartouche filtre par sa poignée et |
|
|
|
|
|
|
|
|
|
|
||
|
|
|
|
|
|
|
|
|
|
|
|
|||
|
4. |
la sortir verticalement de son logement. |
|
|
|
|
|
|
|
|
|
|
||
|
La cartouche filtre peut être nettoyée |
|
|
|
|
|
|
|
|
|
|
|
|
|
|
|
|
|
|
|
|
|
|
|
|
|
|||
|
|
rapidement au-dessus du conteneur. |
|
|
|
|
|
|
|
|
|
|||
|
|
Remplacer immédiatement les cartouches |
|
|
|
|
|
|
|
|
|
|
|
|
|
|
filtres fortement encrassées ou |
|
|
|
|
|
|
|
|
|
|
|
|
|
|
endommagées. |
|
|
|
|
|
|
|
|
|
|||
|
5. |
Remettre en place la cartouche nettoyée |
|
|
|
|
|
|
|
|
|
|||
|
|
ou remplacée en l'introduisant jusqu'à |
|
|
|
|
|
|
|
|
|
|||
|
|
concurrence de sa butée. |
|
|
|
|
|
|
|
|
|
|||
|
6. |
Fixer la cartouche filtre en remettant le |
|
|
|
|
|
|
|
|
|
|
|
|
|
|
|
|
|
|
|
|
|
|
|
|
|||
|
|
verrou en position initiale. |
|
|||||||||||
|
7. |
Monter la partie moteur et faire encliqueter les fermoirs de poignée. |
|
|||||||||||
Dérangements |
|
|
|
|
|
|
|
|
|
|
|
|
|
|
|
Puissance d'aspiration diminue |
|
||||||||||||
de |
|
Causes possibles: |
|
|||||||||||
fonctionnement |
|
± Réservoir plein |
|
|||||||||||
|
|
± Cartouche filtre encrassée par de la poussière fine |
|
|||||||||||
|
|
± Tuyau flexible, tuyaux d'aspiration ou buses d'aspiration obstrués par des corps |
|
|||||||||||
|
|
encombrants |
|
|||||||||||
|
|
De la poussière est éjectée de l'orifice de soufflage. |
|
|||||||||||
|
|
Causes possibles: |
|
|||||||||||
|
|
- la cartouche filtre n'est positionnée correctement |
|
|||||||||||
|
|
- la cartouche filtre est endommagée |
|
|||||||||||
|
|
Au cas où les perturbations dans le fonctionnement ne seraient pas dues aux |
|
|||||||||||
|
|
raisons mentionnées ci±dessus, veuillez contacter le service après±vente AEG. |
|
|||||||||||
Entretien |
|
|
|
|
|
|
|
|
|
|
|
|
|
|
|
N'utiliser que des pièces et accessoires AEG. Pour des pièces dont l'échange n'est |
|
||||||||||||
|
|
pas décrit, s'adresser de préférence aux stations de service après-vente AEG (voir |
|
|||||||||||
|
|
brochure Garantie/Adresses des stations de service après-vente). |
|
|||||||||||
|
|
Si besoin est, une vue éclatée de l'appareil peut être fournie. S'adresser, en |
|
|||||||||||
|
|
indiquant bien le numéro à dix chiffres porté sur la plaque signalétique, à votre |
|
|||||||||||
|
|
station de service après±vente (voir liste jointe) ou directement à Atlas Copco |
|
|||||||||||
|
|
Electric Tools GmbH, B.P. 320, D±71361 Winnenden. |
|
|||||||||||
|
|
|
|
|
|
|
|
|
|
|
|
|
|
|
FRANÇAIS |
15 |
|
|
|
|
|
|
NT 1200, NT 1500 A |
|
|||||

|
|
Lei è decisamente esigente e per questa ragione acquista solo prodotti di qualità. |
||||
|
|
Qualità che la Atlas Copco è perfettamente in grado di garantirLe. Abbiamo |
||||
|
|
realizzato proprio per Lei un utensile che sia il più possibile affidabile e sicuro. Ora |
||||
|
|
tocca a Lei. Perchè anche il Suo lavoro sia sicuro e di ottima qualità, La preghiamo |
||||
|
|
di voler leggere attentamente le istruzioni per l'uso. E' nostro desiderio, infatti, che |
||||
|
|
anche in futuro acquisti utensili elettrici AEG della Atlas Copco. |
|
|||
|
|
|
|
|
||
|
|
|
NT 1200 |
NT 1500 A |
||
Dati tecnici |
|
Potenza assorbita nominale (motore) |
|
|
|
|
|
|
Pnom . . . . . . . . . . . . . . . . . . . . . . . |
1000 |
W . . . . . . . . . . . |
1200 |
W |
|
|
Pmax . . . . . . . . . . . . . . . . . . . . . . . |
1200 |
W . . . . . . . . . . . |
1500 |
W |
|
|
Corrente d'aria . . . . . . . . . . . . . . . . . |
. 60 |
l/s . . . . . . . . . . . . |
. . 60 |
l/s |
|
|
Depressione/aspirazione . . . . . . . . |
145 |
mbar . . . . . . . . . . |
. 180 |
mbar |
|
|
Capacità |
|
|
|
|
|
|
Capacità serbatoio . . . . . . . . . . . . |
. 20 |
l . . . . . . . . . . . . . . |
. . 30 |
l |
|
|
Capacità corpi solidi . . . . . . . . . . . |
. 16 |
l . . . . . . . . . . . . . . |
. . 26 |
l |
|
|
Volume utile per l'acqua . . . . . . . . |
. 12 |
l . . . . . . . . . . . . . . |
. . 20 |
l |
|
|
Capacità filtro . . . . . . . . . . . . . . . . . |
2500 |
cm2 . . . . . . . . . . |
2500 |
cm2 |
|
|
Potenza massima . . . . . . . . . . . . . . |
. . . ± |
. . . . . . . . . . . . . |
2000 |
W |
|
|
Diametro tubo d'aspirazione . . . . . |
. 50 |
mm . . . . . . . . . . . |
. . 50 |
mm |
|
|
Peso . . . . . . . . . . . . . . . . . . . . . . . . . |
. 5,6 |
kg . . . . . . . . . . . . |
. 6,8 |
kg |
Norme di |
Si prega di leggere con attenzione le istruzioni riguardanti la sicurezza, nel volantino |
|||||
sicurezza |
|
allegato. |
|
|
|
|
Gli apparecchi mobili usati all'aperto devono essere collegati interponendo un interruttore di sicurezza per guasti di corrente.
Evitare di forare la carcassa dell'apparecchio, l'isolamento verrebbe danneggiato (utilizzare piastrine adesive)
Prima di effettuare qualsiasi lavoro sull'apparecchio, estrarre la spina dalla presa di corrente
Inserire la spina nella presa di corrente solo ad apparecchio spento
Tenere il cavo di allacciamento alla rete lontano dal raggio d'azione dell'utensile.
Allontanare il cavo sempre dal retro dell'utensile.
In generale, non dovranno essere aspirate né sostanze esplosive o infiammabili come solventi, benzina, alcool, né trucioli di metallo o cenere aventi una temperatura superiore ai 605C, pena il rischio di incendio ed esplosione.
Non aspirare polveri che possano essere pericolose per la salute.
Fare attenzione che il cavo non venga danneggiato, calpestandolo, schiacciandolo o pinzandolo.
Non utilizzare l'apparecchio quando il cavo è danneggiato.
Le giunzioni del cavo di allacciamento alla rete e ed il cavi di collegamento dell'apparecchio devono essere dotati di protezione contro gli spruzzi d'acqua e di conduttore di protezione.
L'apparecchio dovrà essere collegato ad un conduttore protetto con un relè di protezione H 16A o con un fusibile da 16A.
Livello di |
|
La misurazione A della pressione del livello sonoro di un utensile di solito deve |
|
rumorosità |
|
essere |
|
|
|
NT 1200 A: 80 dB (A) |
|
|
|
NT 1500 A: 79 dB (A) |
|
|
|
Il livello di rumorosità durante le lavorazioni può superare gli 85 dB (A). |
|
|
|
Utilizzare le protezioni per l'udito! |
|
Possibilità' di |
|
L'apparecchio è adatto per i seguenti lavori: aspirare polveri non tossiche, liquidi |
|
utilizzo |
|
non infiammabili, acqua sporca, per liberare fori di scarico intasati o per la pulizia |
|
|
|
finale di luoghi (per esempio cantieri o luoghi di lavoro in genere). |
|
|
|
Staubabsaugung von angeschlossenen Elektrowerkzeugen (über eingebaute |
|
|
|
Steckdose bei NT 1500 A). |
|
|
|
Utilizzare il prodotto solo per l'uso per cui è previsto. |
|
Collegamento |
|
Alimentazione solo a corrent alternata monofase di tensione pari a quella indicata |
|
alla rete |
|
sulla targhetta. Collegare solo a prese con contatto di terra (collegamento a terra |
|
|
|
secondo DIN VDE 0730 e CEE). Schermatura contro i radiodisturbi conforme alla |
|
|
|
direttiva CEE 82/499/CEE. |
|
|
|
|
|
ITALIANO |
16 |
NT 1200, NT 1500 A |
|
Breve indicazione
A
Adattatore
Bocchetta per fessure
ITALIANO 17
Tubo di aspirazione flessibile
Interruttore
Maniglia per il trasporto e alloggiamento cavo
Interruttore automatico (solo per NT 1500 A)
N A
Luce di controllo per interruttore automatico
(solo per NT 1500 A)
Presa per attacco elettroutensile (solo per NT 1500 A) 

Tubi di aspirazione
Sezione motore
Maniglia a scatto
Bidoncino di raccolta polvere
Bocchettone d'aspirazione
Rotelle direzionali
Bocchetta multiuso
Modifiche: Testo, figure e dati corrispondono allo standard tecnico aggiornato all'epoca della stampa. Ci riserviamo pertanto eventuali modifiche tecniche dovute all'ulteriore sviluppo dei nostri prodotti.
NT 1200, NT 1500 A

Montaggio |
|
Prima di effettuare qualsiasi lavoro sulla macchina togliere la spina dalla presa di |
||
dell'apparecchio |
|
corrente. |
|
|
Montaggio del |
1. |
Aprire la maniglia a scatto e rimuovere la |
|
|
supporto a |
|
sezione motore (Il contenitore può essere |
N A |
|
rotelle |
|
collocato solo sulle rotelle). |
|
|
|
2. Inserire fino all'arresto le rotelle e il |
|
||
|
|
rispettivo bullone nella fessura del corpo |
|
|
|
|
del contenitore. |
|
|
|
|
NT 1200: |
4 rotelle |
|
|
|
NT 1500 A: 5 rotelle |
|
|
Aprire la sezione |
3. |
Aprire la sezione motore in modo tale che |
|
|
motore |
|
l'interruttore d'accensione/spegnimento |
N A |
|
|
|
stia attraverso il bocchettone |
|
|
|
|
d'aspirazione. |
|
|
|
4. Fissare la maniglia a scatto. |
|
||
Collegamento del |
5. |
Introdurre la canna aspirazione flessibile a |
|
|
tubo di |
|
nel bocchettone dell'aspiratore facendo |
|
|
aspirazione |
|
scattare il bottone di arresto. |
|
|
flessibile |
|
Per togliere il tubo d'aspirazione flessibile |
|
|
|
|
|
||
|
|
girare verso sinistra o destra la canna |
|
|
|
|
d'aspirazione. |
|
|
Collegamento |
|
All'utensile possono essere collegati ogni tipo d'accessori. |
|
|
dell'utensile |
|
|
|
|
Ugello universale |
Collegare la canna d'aspirazione e il tubo |
|
con l'ugello universale. |
Ugello di |
Collegare l'ugello di giuntura direttamente |
giuntura |
al tubo d'aspirazione o alla canna. |
Utensile elettrico |
Collegare l'utensile elettrico con un |
|
|
riduttore al tubo d'aspirazione. |
|
|
Il cavo di rete dell'utensile deve essere |
|
|
collegato alla presa dell'aspiratore. In |
|
|
automatico l'aspiratore si azionerà |
A |
|
automaticamente all'accensione |
|
|
dell'elettro utensile.(solo per NT 1500 A). |
|
ITALIANO |
18 |
NT 1200, NT 1500 A |
 Loading...