


 Loading...
Echo LAYLA 24, LAYLA LapTop, MONA, MONA LapTop, GINA 24 Owner`s Manual
...LAYLA 24 LAYLA LapTop
MONA™ |
MONA™ LapTop |
GINA 24
MIA™
Owner’s Manual Version 3.0 for Macintosh
Designed and Manufactured in the U.S. by Echo Corporation
Important Safety Instructions
1.Read Instructions - Be sure to read all of the safety and operating instructions before operating this product.
2.Retain Instructions - The safety instructions and owner's manual should be retained for future reference.
3.Heed Warnings - All warnings on your Echo hardware and in the Owner's Manual should be followed.
4.Follow Instructions - All operating and use instructions should be followed.
5.Moisture - Water and moisture are detrimental to the continued good health of your Echo hardware. Do not install or operate your Echo hardware near sources of water or moisture such as sinks, damp basements, leaky roofs, etc.
6.Heat – Your Echo hardware should be situated away from sources of heat such as heaters or radiators.
7.Power Sources - This unit should be operated only from the type of power source indicated in this documentation or on your Echo hardware. If you are unsure about the type of power at your location, contact your local power company.
8.Grounding - Precautions should be taken so that the grounding capabilities of the unit are not undermined. This equipment is provided with a cord having an equipment grounding conductor and grounding plug. This plug must be plugged into an outlet that is properly installed and grounded in accordance with all local rules and ordinances. Do not modify the plug provided with the equipment. If the plug will not fit into your outlet, have a proper outlet installed by a qualified electrician.
9.Power Cord Protection (not Mia) - Power supply cords should be routed so that they are unlikely to be walked on or pinched by items placed upon or against them. Pay particular attention to protecting the plugs, outlets, and the point at which the cord exits your Echo hardware.
10.Servicing - Do not attempt to service this unit yourself, as opening the case will expose you to hazardous voltage or other dangers. All servicing should be referred to qualified service personnel.
11.Damage Requiring Service - Unplug this unit and refer it to a qualified service technician when any of the following occur:
a)Objects have fallen or liquid has spilled into the unit
b)The product has been exposed to rain or water
c)The product does not operate normally or when a marked change in performance is noticed
d)The product has been dropped or damaged in any way
Sending in your registration card – or registering online at http://www.echoaudio.com/register.html - allows us to register key information so that we may handle problems faster and inform you of advance information on upgrades and other news. Thanks in advance for filling out your registration card and sending it to us. We hope you enjoy your Echo product.
Limited Warranty
Echo Digital Audio Corporation warrants this product, when purchased at an Authorized Echo Dealer in the United States of America, to be free of defects in materials and manufacturing workmanship for a period of one year from the date of original purchase. During the warranty period Echo shall, at its option, either repair or replace any product that proves to be defective upon inspection by Echo. Final determination of warranty coverage lies solely with Echo. Echo reserves the right to update any unit returned for repair, and reserves the right to change or improve the design of the product at any time without notice.
This is your sole warranty. Echo does not authorize any third party, including any dealer or sales representative, to assume any liability on behalf of Echo or to make any warranty for Echo.
Service and repairs of Echo products are to be performed only at the factory (see below) unless otherwise authorized in advance by the Echo Service Department. Unauthorized service, repair or modification will void this warranty.
To obtain factory service:
Contact Echo Digital Audio Corporation at (805) 684-4593, 9AM to 5PM Monday through Friday (Pacific Time). If necessary, you will be given a return authorization number. Products returned without an RA number will be refused. Echo may, at its option, require proof of the original date of purchase in the form of a dated copy of the original authorized dealer’s invoice or sales receipt. Pack the product in its original shipping carton and attach a description of the problem along with your name and a phone number where Echo can contact you if necessary. Ship the product insured and freight prepaid to:
Echo Digital Audio Corporation
6460 Via Real
Carpinteria, CA 93013
DISCLAIMER AND LIMITATION OF WARRANTY
Echo makes no other warranties, express, implied, or otherwise, regarding Echo products, and specifically disclaims any warranty for merchantability or fitness for a particular purpose. The exclusion of implied warranties is not permitted in some states and the exclusions specified herein may not apply to you. This warranty provides you with specific legal rights. There may be other rights that you have which vary from state to state.
In no event will Echo be liable for any lost profits, or for any consequential, direct or indirect damages, however caused and on any theory of liability, arising from this warranty and sale.
©2000 by Echo Digital Audio Corporation 6460 Via Real
Carpinteria, CA 93013
Echo®, Layla®24, Layla LapTop®, Mona |
, Mona LapTop |
, Gina®24, and Mia are trademarks of Echo Digital |
Audio Corporation. |
|
|
ADAT is a registered trademark of Alesis Corporation.
Windows®, Windows 98®, Windows Me®, Windows XP®, and Windows 2000® are registered trademarks of Microsoft, Inc.
INTRODUCTION.................................................................................................. |
5 |
WHAT YOU SHOULD HAVE RECEIVED IN THE BOX ............................................... |
5 |
CHECKING OUT YOUR MAC........................................................................... |
7 |
SOFTWARE INSTALLATION ........................................................................... |
8 |
HARDWARE INSTALLATION........................................................................ |
10 |
INSTALLING THE PCI CARD FOR DESKTOP COMPUTERS ....................... |
10 |
INSTALLING THE CARDBUS ADAPTER FOR LAPTOP COMPUTERS......................... |
12 |
CONNECTING TO LAYLA24’S RACK-MOUNT AUDIO INTERFACE.......................... |
13 |
CONNECTING TO MONA’S RACK-MOUNT AUDIO INTERFACE............................... |
17 |
CONNECTING TO MIA .......................................................................................... |
26 |
ASIO DRIVER INSTALLATION & CONFIGURATION.............................................. |
27 |
OMS SETUP (LAYLA24 ONLY) ........................................................................... |
28 |
INSTALL CUBASIS............................................................................................ |
32 |
THE CONSOLE – GINA24, LAYLA24, AND MONA.................................... |
33 |
RUNNING THE CONSOLE ................................................................................ |
33 |
THE CONSOLE WINDOW ................................................................................. |
33 |
MENUS ................................................................................................................ |
37 |
SHORTCUTS ......................................................................................................... |
37 |
THE CONSOLE - MIA ....................................................................................... |
38 |
RUNNING THE CONSOLE ................................................................................ |
38 |
THE CONSOLE WINDOW ................................................................................. |
38 |
MENUS ................................................................................................................ |
42 |
SHORTCUTS ......................................................................................................... |
42 |
SYNCHRONIZING MULTIPLE DEVICES.................................................... |
43 |
ASIO DIRECT MONITORING ........................................................................ |
46 |
ASIO CONTROL PANEL .................................................................................. |
48 |
CONTACTING CUSTOMER SERVICE ......................................................... |
50 |
CONTACTING STEINBERG CUSTOMER SERVICE................................. |
50 |
APPENDIX A: GENERAL TROUBLESHOOTING GUIDE ........................ |
51 |
APPENDIX B: ASIO AUDIO SOFTWARE FAQ............................................ |
55 |
ASIO SOFTWARE COMPATIBILITY LIST – 11/12/2001........................................ |
55 |
ECHO24 ASIO DRIVER AND ASIO 2.0 ............................................................... |
55 |
APPENDIX C: INTRODUCTION TO DIGITAL RECORDING.................. |
56 |
APPENDIX D: SPECIFICATIONS................................................................... |
63 |
Checking out your Mac – all products
Introduction
Thank you for choosing Echo Digital Audio. We think you’ll find your Echo product to be an extremely flexible, high-performance tool for your computerbased hard disk recording system.
What You Should Have Received in the Box
When you opened the box, you should have found the following:
•A PCI card wrapped in an anti-static cover OR a CardBus Adapter
•An audio interface box (Layla24, Mona, and Gina24 only)
•Four adhesive backed rubber feet (Layla24, Mona, and Gina24 only)
•Four mounting screws with collars (Layla24 and Mona only)
•An interface cable (Layla24, Mona, and Gina24 only)
Please note: The cable included with the Gina24 system is a shielded audio cable that has been custom manufactured to exacting standards. Use of any other cable, such as a computer printer cable, will substantially reduce the system’s overall audio quality.
•A power cable (Layla24 and Mona only)
•An Esync cable (Gina24)
•A CD-ROM containing:
•Windows 98/Me/2000/XP Drivers
•Macintosh Drivers
•.PDF Users Guide
•Steinberg’s Cubasis VST multitrack recording and editing software, Windows and Macintosh versions.
•Demo versions of digital audio recording, editing, and processing software from a variety of manufacturers
•Quick Start Guide
5
Checking out your Mac – all products
Checking out your Mac – all products
System Requirements
In order to use Layla24, Mona, Gina24 or Mia PCI you’ll need the following:
An Apple brand Macintosh computer with:
•PCI architecture expansion slots (PCI version 2.1)
•A 604 or higher processor (G3 or G4 highly recommended)
•A minimum 128Mb RAM (more highly recommended)
•OS 8.6 or 9.x
•A fast, high-capacity IDE, SCSI or firewire hard disk drive.
•A audio software program that supports ASIO.
•Peripheral audio equipment, such as a mixer, microphones, studio monitors, musical instruments, etc.
Note: Echo will not be able to supply technical support for any non-Apple brand Macintosh clone computers. In addition, your Echo hardware may not work properly if you have a processor upgrade card installed.
In order to use Layla24 LapTop or Mona LapTop you’ll need the following:
•An Apple Macintosh laptop G3 or G4 computer
•MacOS 8.6 or 9.x
•A minimum 128Mb RAM (more highly recommended)
•A fast, high-capacity IDE, SCSI or firewire hard disk drive.
•An audio software program that supports ASIO.
•Peripheral audio equipment, such as a mixer, microphones, studio monitors, musical instruments, etc.
6
Checking out your Mac – all products
Checking out your Mac – all products
Checking out your Mac
Before you install anything, you should double-check that your Mac is compatible with your new hardware.
1.Do you have enough memory? With your mouse select “About This Computer” from the “Apple” menu. Look at the amount of “Built-in Memory.” You will need at least 128MB to use your Echo hardware properly. We strongly recommend having at least 256 MB.
2.Is your processor compatible? If you have a G3 or G4 then you can skip to step three. If you have an older Macintosh, select “Apple System Profiler” from the “Apple” menu. Under the “System Profile” tab, look at the section entitled “Hardware overview” and see what kind of processor you have. If it’s a PowerPC 604 or higher, then you can use your Echo hardware.
3.Does your desktop machine have an open PCI slot? Make sure you have an open PCI slot in your Mac. If you don’t know if you have one offhand, you will have to open up the Mac and look. Make sure you shut down the Mac and unplug the power cable before you open it. If you see an open PCI slot, then you’re OK.
Note: your Echo hardware may not work properly if you have a processor upgrade card installed.
If everything looks good, it’s time to move on to the next phase of installation.
7
Checking out your Mac – all products

Software Installation – all products
Software Installation
The first step is to install the software needed to support your Echo hardware.
1.Power up. Power up your Macintosh.
2.Start the Installer. Insert the Installation CD into your CD-ROM drive. Double click the icon called Install Echo24. Click the Continue button.
8
Software installation – all products

Software Installation – all products
3.Install the software. Now you will be able to choose where the Echo24 Console software is installed. The default setting will create a folder called “Echo” on your main hard drive. When you are ready, click the Install button. The installer will now create the folder where you told it to and place the Console, the ASIO driver, and this manual inside it.
4.Installation completed. You will now see a message telling you that the installation was successful. Go ahead and click the Quit button. If you do not see this message, then please turn to Appendix A: General Troubleshooting Guide in the back of this manual for help.
Now that you have finished installing the software, turn off your Mac so you can install the hardware.
9
Software installation – all products
Hardware installation – all products
Hardware Installation
The following steps will guide you through installing your Echo hardware.
Installing the PCI Card for Desktop Computers
Once you have checked your system requirements, verified that there are no problems with your system, and installed your ASIO-based software, it is time to install the Echo hardware into your computer. Please refer to the section in your Macintosh manual for installing a PCI card.
IMPORTANT - Unplug your computer and detach all peripherals before proceeding with the following steps.
1.Remove your computer’s cover. This operation differs from computer to computer. Refer to your computer’s manual for a further explanation of this step if necessary.
2.Select the slot into which you will install the Layla24 card. You may use any of the available PCI slots in your computer for Layla24. Remove the bracket covering the expansion slot where you would like to install Layla24. If there was a screw for the bracket, put it in a safe place, as you will need it later to complete the installation.
3.Insure that you have fully discharged all static electricity from your body before handling the card. This can be done through the use of a grounding strap or, more simply, by touching your bare hand to the metal casing of the computer’s power supply. (For this latter method to work, the computer must be plugged in, though not turned on.) After you’ve discharged your static, unplug the computer before proceeding to the next step.
4.Remove the card from its protective anti-static bag. Handle the card carefully by its edges, and insert it into the selected expansion slot. Insure that the card’s edge connector (the protruding edge with the gold leads) is seated firmly into the slot. Centering the card over the slot and using a gentle rocking motion while pushing downward into the slot generally works well. Be careful not to force the card into the slot, or bend or twist it while it is being inserted, as this could result in the card being damaged.
5.Now use the screw that you removed earlier, from the protective back plate, to attach the metal bracket on the card to the computer’s rear panel. On some older Macs, the locking mechanisms used to hold down the PCI cards cause difficulties properly seating the cards. We recommend checking the card and making sure it is well seated and liable to stay that way. If the card is loose or being pushed around by the locking mechanism, we recommend loosening the
10
Hardware installation – all products
Hardware installation – all products
hex screws that hold the back-plate of the card to the Mac. The back-plate is the thin piece of metal connected to the Layla24 card that sits against the case of your computer. Another option, if that piece needs a little more play, is to gently bend it back. Some users have broken the plastic that comes with their Mac to solve this problem. However, due to Mac warranty issues, we are not able to recommend this approach.
6.OPTIONAL: (If you have Mia, skip this step.) Esync cables come with Gina24, and can be used to daisy chain several 24-bit Echo cards together. Esync is a proprietary form of super clock that allows you to sync together multiple 24-bit Echo products. Simply attach the Esync cable to the two-prong “Esync Out” connector on the Layla24/Mona/Gina24 PCI card, and attach the other end to the “Esync In” connector on your Gina24 PCI card.
7.Replace the computer’s cover, and secure it. Reattach its power supply cord and reconnect any peripherals that you may have removed prior to beginning the installation.
8.(If you have Mia, skip this step.) Locate the audio interface box (Layla24, Mona, and Gina24), the interface cable, and the power cable. Securely mount the interface into your equipment rack (Layla24 and Mona). If you will not be mounting the box in a rack, remove the backing from the four rubber feet and place one in each bottom corner of the interface unit. Then be sure to locate the rack-mount box in a secure location.
Plug one end of the cable into the connector on the Echo PCI card that now protrudes through the back panel of your computer, and secure the cable using the built-in screws located on both sides of the connector. Attach the other end of the cable to the rear of the interface and fasten the cable securely with the screws. Plug the power cable firmly into the interface and a power socket, but do not turn on the interface at this time (Layla24 and Mona).
Caution: Never connect the rack-mount interface to the computer while either the interface or your computer is turned on.
9.You can now attach external audio devices to the connectors. Information on attaching external devices to your particular interface may be found in the following sections.
10.Layla24 and Mona only – Turn on your Layla24 or Mona audio interface box.
11.Turn on your Mac.
11
Hardware installation – all products
Hardware installation – all products
Installing the CardBus Adapter for Laptop Computers
1.Locate the rack-mount interface, the 9-pin interface cable, and the power cable. Securely mount the interface into your equipment rack. If you will not be mounting the box in a rack, remove the backing from the four rubber feet and place one in each bottom corner of the interface unit. Then be sure to locate the rack-mount box in a secure location.
2.Connect the cable. Before installing the card into the computer, connect the cable between the card and the rack-mount chassis. Make sure the cable is fully inserted into the card and that it “clicks” into place. You may have to wiggle it a bit for this to happen.
3.Insert the LapTop adapter into your computer. Make sure the computer is turned off. To install the card, insert it into any available CardBus slot. Next, turn on the audio interface box.
4.You can now attach external audio devices to the connectors. Information on attaching external devices to your particular interface may be found in the following sections.
5.Turn on your audio interface box.
6.Turn on your Mac.
When the desktop appears, there should be a “CardBus” icon on the desktop labeled “Layla24” or “Mona”. This shows the card is recognized and that your Layla24 or Mona is ready to use.
While it is possible to “hot-dock” the card and insert it with the laptop powered up, it is recommended that the card only be inserted or removed with the power off. If you have to remove the card with the power on, you must disable it first.
To do this, drag the CardBus icon into the trashcan. Once the icon is no longer visible, you may remove the card. Failure to disable the card before removing it could potentially damage the card or the computer.
Note: There is a known incompatibility with the LapTop adapter and the older “Lombard” Powerbooks (G3, 300400MHz) from Apple. Unfortunately, this is a problem that cannot be resolved. The adapter should work properly in newer PowerBooks and has been used successfully in the G4 Titanium.
12
Hardware installation – all products
Audio connections – Layla24
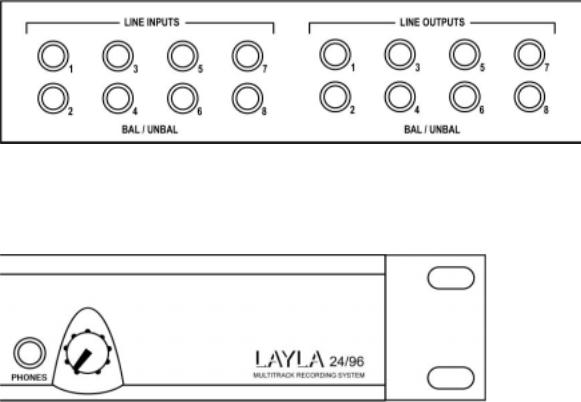
Connecting to Layla24’s Rack-mount Audio Interface
The back panel of Layla24’s rack-mount audio interface contains a wide variety of connections that allow great flexibility in the operation of Layla24. For optimal performance with Layla24, it is critical to use the appropriate cabling and connectors.
Analog Inputs and Outputs
Layla24 has eight analog inputs and eight analog outputs on the rear panel. The input and output connections can accept unbalanced or balanced signals via ¼” connectors. For more information see “Unbalanced and Balanced Inputs and Outputs” in Appendix C.
Layla24’s front panel has a ¼” headphone output jack with a corresponding volume knob which monitors analog outputs 1 and 2.
13
Audio connections – Layla24
Audio connections – Layla24
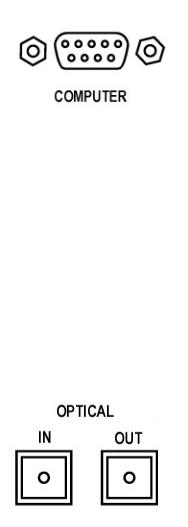
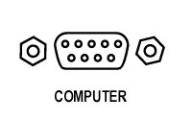
The Computer Connector
Next to the analog inputs and outputs is a connector labeled COMPUTER. This connector is known as a DB-9, and is similar to the serial port on a PC. It is the point at which the audio interface connects to the Layla24 PCI card inside your computer.
A cable was supplied with your Layla24 for this purpose. This custom made cable is manufactured to certain specifications; if you need to replace it, you should only use a replacement cable from Echo.
ADAT / S/PDIF Optical I/O
Next to the COMPUTER connector is a pair of connectors labeled OPTICAL, IN and OUT. These connectors are used to transmit digital data among digital audio devices via an optical signal.
You can use this port for ADAT (8 channels) or for optical S/PDIF (stereo) I/O.
Note: Layla24 is only capable of transmitting or receiving one type of digital signal at a time. You must choose either ADAT optical or S/PDIF (optical or RCA); you cannot use both simultaneously. The Digital Mode Switch can be found in the Layla24 Console. For more information, refer to the section of the manual that discusses the console.
14
Audio connections – Layla24
Audio connections – Layla24
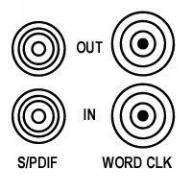
S/PDIF
Next to the ADAT connectors is a pair of connectors labeled S/PDIF, IN and OUT. These S/PDIF connectors are used to transmit digital data among digital audio devices via an electrical signal. S/PDIF data can use the full 24-bit sample width used internally on Layla24.
When connecting devices to the S/PDIF jacks on Layla24, the use of standard analog RCA audio cables is not recommended. For reliable S/PDIF operation, 75ohm coaxial (RG59) video cables are recommended.
Word Clock
Next to the S/PDIF ports are the Word Clock connectors. These connectors allow you to synchronize one Layla24 to another Layla24, Layla, Mona or to other digital audio devices.
The Word Clock I/O uses a BNC connector. As with the S/PDIF I/O, a shielded 75-ohm (RG-59) coaxial video cable should be used. BNC connectors are widely used in the electronics industry for both video and computer networking. However, computer networks use 50-ohm (RG-58) coaxial cables and not the 75ohm (RG-59) cable used by video. For reliable word clock operation, use only video grade cables with Layla24.
15
Audio connections – Layla24
Audio connections – Layla24
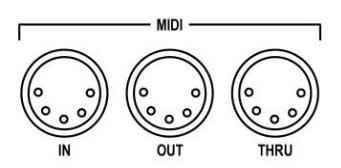
MIDI
The last set of connections to the Layla24 interface is for MIDI. The MIDI ports can be used for receiving MIDI time code (MTC), or sending MIDI signals from your digital audio/MIDI sequencing software to external sound modules, etc.
MIDI cabling is highly standardized and widely available.
16
Audio connections – Layla24
Audio connections - Mona
Connecting to Mona’s Rack-mount Audio Interface
The back panel of Mona’s rack-mount audio interface contains a wide variety of connections that allow great flexibility in the operation of Mona. To achieve the optimal performance with Mona, it is critical that the appropriate cabling and connectors are used.
Analog Inputs and Outputs
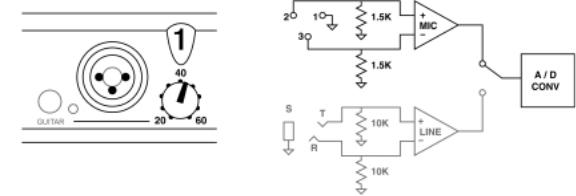
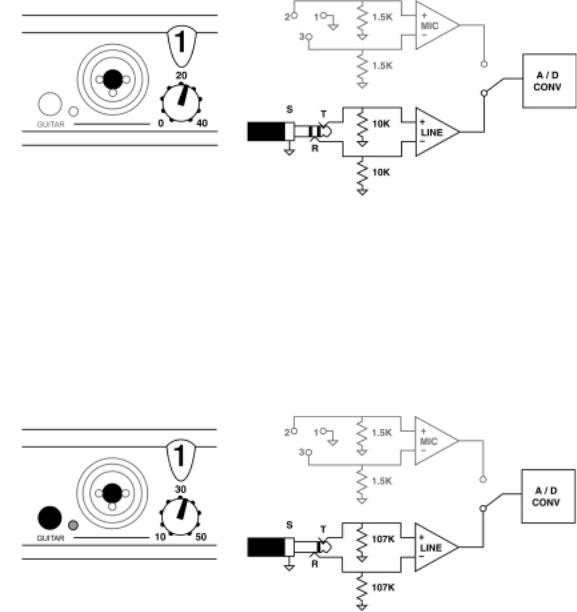
Mona has four analog inputs on the front panel, and six analog outputs on the back panel. The universal input connections can accept balanced or unbalanced signals via ¼” or XLR connectors. Since Mona has built-in preamps, you can just plug your microphone or guitar cable right into any of Mona’s analog inputs. No external preamp or mixer is needed!!
Mona’s “universal” inputs can be thought of as three inputs in one: a microphone input, a line input, and a guitar input.
Mona’s Mic Preamp Input (XLR, Impedance: 1.5K, Trim: 20
– 60dB)
To use a microphone with Mona, plug the microphone’s XLR cable into any of the analog inputs. Whenever an XLR cable is connected to an input, the microphone preamp is enabled and the gain range of the trim knob is set to range from +20 to +60dB. The input impedance of the mic preamps is 1.5K.
17
Audio connections - Mona
Audio connections - Mona
Mona provides 48 volts of phantom power for microphones that require it. To enable phantom power press the button labeled +48V (the LED next to it will light up) and phantom power will be provided to all microphone inputs.
Note: Phantom power will not be applied to any line level equipment or guitars plugged in using ¼” connectors.
Mona’s Line Input (1/4” TRS, Impedance: 10K, Trim: 0 –
40dB)
When a ¼” connector is plugged into Mona’s universal input jack, the microphone preamp is disconnected and a line input amplifier is inserted in its place. If the GUITAR switch is out, the line input provides a balanced connection (for TRS plugs) and the trim knob has a range of 0 to 40dB. The input impedance for linelevel signals is 10K. Full-scale input is 22dBu with the trim set to zero.
18
Audio connections - Mona

Audio connections - Mona
Mona’s Guitar Input (1/4” Plug, Impedance: 107K, Trim: 10 – 50dB)
An input impedance of 10K is too low to record non-active guitar pickups, so each input also has its own GUITAR switch. When the GUITAR switch is pushed in (green indicator lit), the input impedance is increased to 107K and the trim knob has a range of 10 to 50dB. The indicator will only light up if there is a ¼” connector plugged into the jack. This mode will still provide a balanced input when a TRS connector is inserted.
If you want to adjust the level of any input, just turn the knob for that input and watch the corresponding level meter on Mona’s front panel. The red bar at the top will light anytime the input signal is greater than –3dB (or within 3dB of clipping). The three yellow bars each represent a range of 3dB and the green bars each represent a range of 6dB.
For optimal audio quality, you should adjust the input trim (knob) so that your loudest recorded signal lights up some of the yellow bars, but not the red. If the signal level ever exceeds 0dB the signal will be “clipped” and you will hear a “pop” or “tick” in the recording. This is a very bad thing, and clipping should be avoided at all costs! Mona has enough headroom so that you can be conservative in this area and there is no need to push the input levels right up to the edge of clipping.
Mona’s front panel also has a ¼” headphone output jack with a corresponding volume knob which monitors analog outputs 1 and 2.
Each of Mona’s 6 outputs has one RCA and one XLR connector for your convenience. The RCA jack outputs a –10 dBV (unbalanced) signal, while the
19
Audio connections - Mona
Audio connections - Mona
XLR jack outputs a +4 dBu (balanced) signal. Both connectors are active at all times, so the output signal will always go out of both jacks.
The Computer Connector
Next to the analog inputs and outputs is a connector labeled COMPUTER. This connector is known as a DB-9, and is similar to the serial port on a PC. It is the point at which the audio interface connects to the Mona PCI card inside your computer.
A cable was supplied with your Mona for this purpose. This custom made cable is manufactured to certain specifications; if you need to replace it, you should only use a replacement cable from Echo.
20
Audio connections - Mona
Audio connections - Mona
ADAT/S/PDIF optical I/O
Next to the COMPUTER connector is a pair of connectors labeled OPTICAL, IN and OUT. These connectors are used to transmit digital data among digital audio devices via an optical signal.
You can use this port for ADAT (8 channels) or for optical S/PDIF (stereo) I/O.
Note: Mona is only capable of transmitting or receiving one type of digital signal at a time. You must choose either ADAT optical or S/PDIF (optical or RCA); you cannot use both simultaneously. Please refer to the Console section of this manual for more information.
21
Audio connections - Mona

Audio connections - Mona
S/PDIF
Next to the ADAT connectors is a pair of connectors labeled S/PDIF, IN and OUT. These S/PDIF connectors are used to transmit digital data among digital audio devices via an electrical signal. S/PDIF data can use the full 24-bit sample width used internally on Mona.
When connecting devices to the S/PDIF jacks on Mona, the use of standard analog RCA audio cables is not recommended. For reliable S/PDIF operation, 75ohm coaxial (RG59) video cables are recommended.
Word Clock
Next to the S/PDIF ports are the Word Clock connectors. These connectors allow you to synchronize one Mona to another Mona, Layla or Layla24 or to other digital audio devices.
The word clock I/O uses a BNC connector. As with the S/PDIF I/O, a shielded 75ohm (RG-59) coaxial video cable should be used. BNC connectors are widely used in the electronics industry for both video and computer networking. However, computer networks use 50-ohm (RG-58) coaxial cables and not the 75-ohm (RG59) cable used by video. For reliable word clock operation, use only video grade cables with Mona.
22
Audio connections - Mona
Loading...