


®
LAYLA 3G
®
GINA 3G
Owner’s Manual Version 1.0.1 for Windows
Important Safety Instructions
1.Read Instructions - Be sure to read all of the safety and operating instructions before operating this product.
2.Retain Instructions - The safety instructions and owner's manual should be retained for future reference.
3.Heed Warnings - All warnings on your Echo product and in the Owner's Manual should be followed.
4.Follow Instructions - All operating and use instructions should be followed.
5.Moisture - Water and moisture are detrimental to the continued good health of your Echo product. Do not install or operate your Echo product near sources of water or moisture such as sinks, damp basements, leaky roofs, etc.
6.Heat – Your Echo product should be situated away from sources of heat such as heaters or radiators.
7.Servicing - Do not attempt to service this unit yourself, as opening the case will expose you to hazardous voltage or other dangers. All servicing should be referred to qualified service personnel.
8.Damage Requiring Service - Unplug this unit and refer it to a qualified service technician when any of the following occur:
a)Objects have fallen or liquid has spilled into the unit
b)The product has been exposed to rain or water
c)The product does not operate normally or when a marked change in performance is noticed
d)The product has been dropped or damaged in any way
Registering your product online at http://www.echoaudio.com/support/register.php allows us to register key information so that we may handle problems faster and inform you of advance information on upgrades and other news. Thank you in advance for registering. We hope you enjoy your Echo product.
Limited Warranty
Echo Digital Audio Corporation warrants this product, when purchased at an Authorized Echo Dealer in the United States of America, to be free of defects in materials and manufacturing workmanship for a period of one year from the date of original purchase. During the warranty period Echo shall, at its option, either repair or replace any product that proves to be defective upon inspection by Echo. Final determination of warranty coverage lies solely with Echo. Echo reserves the right to update any unit returned for repair, and reserves the right to change or improve the design of the product at any time without notice.
This is your sole warranty. Echo does not authorize any third party, including any dealer or sales representative, to assume any liability on behalf of Echo or to make any warranty for Echo.
Service and repairs of Echo products are to be performed only at the factory (see below) unless otherwise authorized in advance by the Echo Service Department. Unauthorized service, repair or modification will void this warranty.
To obtain factory service:
Contact Echo Digital Audio Corporation at (805) 684-4593, 9AM to 4PM Monday through Friday (Pacific Time). If necessary, you will be given a return authorization number. Products returned without an RA number will be refused. Echo may, at its option, require proof of the original date of purchase in the form of a dated copy of the original authorized dealer’s invoice or sales receipt. Pack the product in its original shipping carton and attach a description of the problem along with your name and a phone number where Echo can contact you if necessary. Ship the product insured and freight prepaid to:
Echo Digital Audio Corporation
6450 Via Real Suite 1
Carpinteria, CA 93013
DISCLAIMER AND LIMITATION OF WARRANTY
Echo makes no other warranties, express, implied, or otherwise, regarding Echo products, and specifically disclaims any warranty for merchantability or fitness for a particular purpose. The exclusion of implied warranties is not permitted in some states and the exclusions specified herein may not apply to you. This warranty provides you with specific legal rights. There may be other rights that you have which vary from state to state.
In no event will Echo be liable for any lost profits, or for any consequential, direct or indirect damages, however caused and on any theory of liability, arising from this warranty and sale.
©2004 by Echo Digital Audio Corporation 6450 Via Real Suite 1
Carpinteria, CA 93013
Echo®, Layla®, Gina®, PureWave™, and SuperChannel™ are trademarks of Echo Digital Audio Corporation.
ADAT® is a registered trademark of Alesis Corporation.
Tracktion™ is a trademark of LOUD Technologies Inc.
Windows®, Windows Me®, Windows XP®, and Windows 2000® are registered trademarks of Microsoft, Inc.
INTRODUCTION.................................................................................................. |
7 |
WHAT YOU SHOULD HAVE RECEIVED IN THE BOX ............................................... |
7 |
SYSTEM REQUIREMENTS ....................................................................................... |
8 |
INSTALLATION ................................................................................................... |
9 |
LOG IN AS ADMINISTRATOR .................................................................................. |
9 |
DISABLE WINDOWS SYSTEM SOUNDS ................................................................... |
9 |
INSTALLING THE PCI CARD ................................................................................ |
10 |
CONNECTING TO THE AUDIO INTERFACE............................................................. |
12 |
INSTALLING TRACKTION ..................................................................................... |
18 |
LAUNCHING TRACKTION AND ASSIGNING INPUTS & OUTPUTS ........................... |
19 |
USING AUDIO SOFTWARE............................................................................. |
21 |
UNDERSTANDING WAVE DEVICES ...................................................................... |
21 |
DIGITAL MODE.................................................................................................... |
23 |
CONSOLE3 .......................................................................................................... |
24 |
RUNNING THE CONSOLE...................................................................................... |
24 |
CONSOLE WINDOW ............................................................................................. |
24 |
BUS SELECT ........................................................................................................ |
26 |
MASTER OUTPUT BUS CONTROL......................................................................... |
26 |
ANALOG INPUTS.................................................................................................. |
27 |
DIGITAL INPUTS .................................................................................................. |
28 |
PLAYBACK STRIPS............................................................................................... |
28 |
ADJUSTING PLAYBACK VOLUME......................................................................... |
29 |
INPUT CLOCK AND DIGITAL MODE SETTINGS ..................................................... |
29 |
SYNCHRONIZING MULTIPLE DEVICES ................................................................. |
30 |
CONSOLE SETTINGS ............................................................................................ |
33 |
Driver ............................................................................................................. |
33 |
Locking the Sample Rate................................................................................ |
34 |
Synchronize Wave Devices ............................................................................ |
34 |
Console Sessions............................................................................................ |
35 |
Digital I/O ...................................................................................................... |
36 |
GSIF ............................................................................................................... |
37 |
Surround......................................................................................................... |
38 |
About .............................................................................................................. |
39 |
CONSOLE HOT KEYS ........................................................................................... |
39 |
CONTACTING ECHO CUSTOMER SERVICE ............................................ |
40 |
CONTACTING MACKIE CUSTOMER SERVICE ....................................... |
40 |
APPENDIX A: GENERAL TROUBLESHOOTING GUIDE ........................ |
41 |
APPENDIX B: MULTI-CLIENT AUDIO FAQ............................................... |
46 |
APPENDIX C: WINDOWS DRIVER MODEL (WDM) FAQ ...................... |
49 |
APPENDIX D: AUDIO SOFTWARE GUIDE ................................................ |
52 |
APPENDIX E: PUREWAVE AND SUPERCHANNEL................................. |
54 |
APPENDIX F: SURROUND SOUND............................................................... |
64 |
APPENDIX G: AN INTRODUCTION TO DIGITAL RECORDING........... |
71 |
APPENDIX H: SPECIFICATIONS .................................................................. |
78 |
INDEX................................................................................................................... |
82 |
Introduction
Introduction
Thank you for choosing Echo Digital Audio. We think you’ll find your Echo product to be an extremely flexible, high-performance tool for your computerbased hard disk recording system.
What You Should Have Received in the Box
When you opened the box, you should have found the following:
•A PCI card wrapped in an anti-static cover
•An audio interface box
•Four mounting screws with collars (Layla3G only)
•Two removable rack-mount brackets (Layla3G only)
•An interface cable
Please note: The cable included with your Echo3G system is a shielded data cable that has been custom manufactured to exacting standards. Use of any other cable will substantially reduce the system’s overall audio quality and could damage the system.
•A CD-ROM containing:
•Windows Me/2000/XP Drivers
•Mac OS X Drivers
•PDF Owner’s Manual
•Tracktion multitrack recording, MIDI, editing, and sampling software for Windows ME/2000/XP & Mac OS X (10.2 & above)
•HTML Tracktion User’s Guide
.
• Quick Start Guide
7
Introduction
Introduction
System Requirements
In order to use Layla3G or Gina3G you’ll need the following:
•A desktop computer with one of the following:
•A genuine Intel Pentium III processor (or better) and a motherboard with a genuine Intel chipset OR
•A genuine AMD Athlon processor and a motherboard with an AMD, Via, or Nvidia chipset
•An empty PCI slot
•A minimum 256Mb of RAM (512Mb highly recommended)
•A fast, high-capacity IDE or SCSI hard disk drive
•Windows Me/2000/XP
•Peripheral audio equipment, such as a mixer, microphones, studio monitors, musical instruments, etc.
8
Introduction
Installation
Installation
Complete installation consists of logging in as an administrator, disabling Windows system sounds, installing the Windows drivers into your system, installing the PCI card, connecting the audio interface to the PCI card and to your other audio hardware, and installing Tracktion multitrack audio recording software.
Log In as Administrator
If you are using Windows 2000 or XP, you must be logged into your computer as an Administrator. You can either log in with the account called “Administrator” or with any other account that has administrative privileges. Otherwise, you will not be able to install the drivers.
Disable Windows System Sounds
We suggest that you turn off your Windows system sounds prior to installing your Echo product. Because most system sounds are sampled at very low sample rates, typically 11 to 22 KHz, each time they are played it will cause the sample rate clock on your Echo product to reset to the slower speed.
To turn off the system sounds, first go to the Windows “Control Panel,” which can be found from the “Start” button. On the control panel you will find an icon titled “Sounds” or “Sounds and Audio Devices”. After double clicking on this icon, you will see a window labeled “Sounds and Audio Devices Properties.” Click the “Sounds” tab and find the section labeled “Sound Scheme.” Click on the drop down box, and select the “No Sounds” option. Then, click the Ok button.
9
Installation
Installation
Installing the PCI Card
Once you have logged in as an administrator, and disabled the Windows system sounds, it is time to install the Echo3G PCI card into your computer.
1.Install the drivers. You should do this before inserting the PCI card. Insert the Echo Install CD-ROM into your machine. The Main Install Window should automatically appear. If it does not, simply go to “My Computer,” and doubleclick on your CD-ROM drive icon. Now, select “Install Windows Drivers,” and follow the on-screen directions.
2.Once you have installed the Windows driver, shut down Windows and turn your computer off.
IMPORTANT - Unplug your computer and detach all peripherals before proceeding with the following steps.
3.Remove your computer’s cover. This operation differs from computer to computer. Refer to your computer’s manual for a further explanation of this step if necessary.
4.Select the PCI slot into which you will install the card. You may use any available PCI slot in your computer for the card. Unscrew and remove the bracket covering the expansion slot where you would like to install your Echo product. Put the screw in a safe place, as you will need it later to complete the installation.
5.Insure that you have fully discharged all static electricity from your body before handling the card. This can be done through the use of a grounding strap or, more simply, by touching your bare hand to the metal casing of the computer’s power supply. (For this latter method to work, the computer must be plugged in, though not turned on.) After you’ve discharged your static, unplug the computer before proceeding to the next step.
6.Remove the card from its protective anti-static bag. Handle the card carefully by its edges, and insert it into the selected expansion slot. Insure that the card’s edge connector (the protruding edge with the gold leads) is seated firmly into the
10
Installation
Installation
slot. Centering the card over the slot and using a gentle rocking motion while pushing downward into the slot generally works well. Be careful not to force the card into the slot, or bend or twist it while it is being inserted, as this could result in the card being damaged.
7.Now use the screw that you removed earlier, from the protective back plate, to attach the metal bracket on the card to the computer’s rear panel.
8.Replace the computers cover, and secure it. Reattach its power supply cord and reconnect any peripherals that you may have removed prior to beginning the installation.
9.Locate the audio interface box and the interface cable. Securely mount the interface into your equipment rack (Layla3G only). If you will not be mounting the box in a rack, then be sure to place the interface box in a secure location.
Plug one end of the cable into the connector on the Echo PCI card that now protrudes through the back panel of your computer, and secure the cable using the built-in screws located on both sides of the connector. Attach the other end of the cable to the connector on the rear of the interface labeled “computer” and fasten the cable securely with the screws.
Caution: Never connect the audio interface box to the computer while the computer is turned on. This could damage the interface box or PCI card.
10.You can now attach external audio devices to the connectors on the audio interface box. Information on attaching external devices to the audio interface box may be found in the following section: “Connecting to the Audio Interface”.
11.Turn on your computer. Once Windows starts, it should find new hardware called “Echo3G” and begin to install the drivers. For most versions of Windows, this process is entirely automatic. For Windows XP, you should select the option “Install the software automatically,” and follow the on-screen directions.
Note: This version of the WDM driver has not been digitally signed by Microsoft; for Windows 2000 and XP, you will need to confirm that you want to install an unsigned driver.
11
Installation
Connecting to the Audio Interface
Connecting to the Audio Interface
The Layla3G and Gina3G audio interfaces contain a wide variety of connections that allow great flexibility in operation. For optimal performance, it is critical to use the appropriate cabling and connectors.
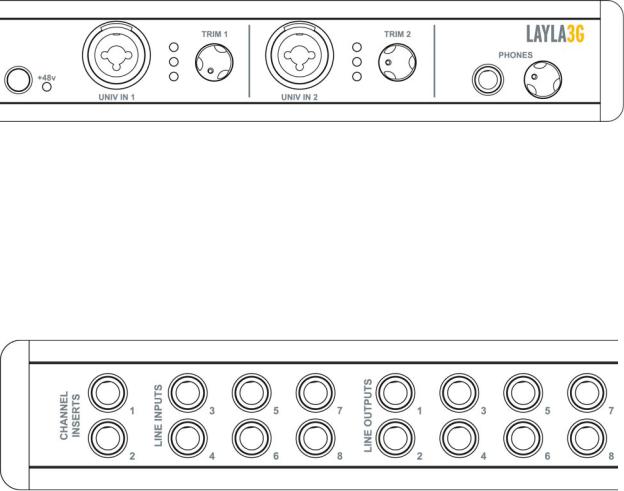
Analog Inputs and Outputs – Layla3G
Layla3G’s front panel has two universal inputs (#s 1 – 2) with meters and trim knobs, a phantom power switch and light (+48v), and an amber power indicator light. There is also a ¼” headphone output jack, with a corresponding volume knob, which monitors analog outputs 1 and 2.
Layla3G has six analog line inputs (#s 3 – 8) and eight analog line outputs on the rear panel. These analog inputs (#s 3 – 8) operate with an input impedance of 10Kohms. The input and output connections can be used with balanced or unbalanced cables via the ¼” connectors. By default, the inputs and outputs are set to receive or send a +4dBu signal. You can switch between +4dBu and –10dBV for each individual input and output via the console software (see section below). There are also two channel inserts on the rear panel where you can connect a serial effects device (compressor, EQ, etc.) for the universal inputs (#s 1 – 2).
12
Connecting to the Audio Interface
Connecting to the Audio Interface
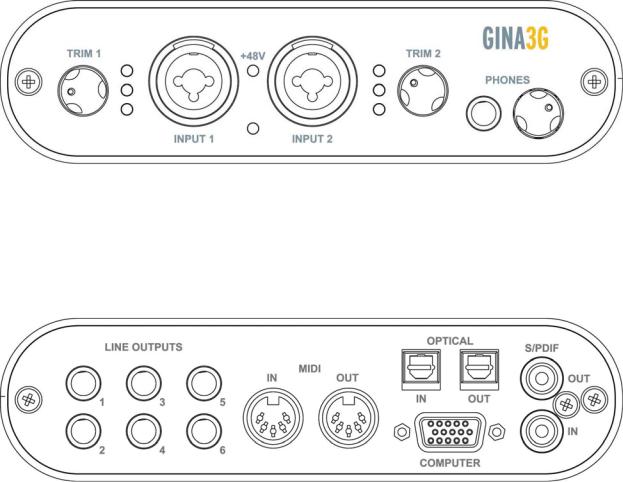
Analog Inputs and Outputs – Gina3G
Gina3G’s front panel has two universal inputs (#s 1 – 2) with meters and trim knobs, a green phantom power light (+48v), and an amber power indicator light. There is also a ¼” headphone output jack, with a corresponding volume knob, which monitors analog outputs 1 and 2.
Gina3G has six analog line outputs on the rear panel. The input and output connections can be used with balanced or unbalanced cables via the ¼” connectors. By default, the outputs are set to send a +4dBu signal. You can switch between +4dBu and –10dBV for each individual output via the console software (see section below).
Universal Inputs
The universal input connections can accept balanced or unbalanced signals via ¼” or XLR connectors. Since Layla3G and Gina3G have built-in preamps, you can just plug your microphone or guitar cable right into the universal input. No external preamp, direct box, or mixer is needed!!
13
Connecting to the Audio Interface
Connecting to the Audio Interface
To use a microphone, plug the microphone’s XLR cable into any of the universal inputs. Whenever an XLR cable is connected to a universal input, the microphone preamp is enabled and the gain range of the trim knob is set to range from +10 to +58dB. The input impedance of each microphone preamp is 1.5Kohms. Full-scale input is 9dBu with the trim set to minimum gain.
Layla3G and Gina3G provide 48 volts of phantom power for microphones that require it. To enable phantom power for Layla3G, press the button labeled +48v (the LED next to it will light up) and phantom power will be provided to all microphone inputs. Gina3G has a switch in the console software for this purpose.
Note: Phantom power will not be applied to any line level equipment or guitars plugged in using cables with ¼” connectors.
To record a guitar or line level signal, just plug a cable with a ¼” connector into one of the universal inputs. Whenever a ¼” cable is connected to a universal input, the guitar/line preamp is enabled and the gain range of the trim knob is set to range from 0 to +45 dB. The guitar/line preamp can support both guitar & line level signals. The input impedance of each guitar/line preamp is 102Kohms. Full-scale input is 18dBu with the trim set to minimum gain.
If you want to adjust the input level of a universal input, just turn the trim knob and watch the corresponding level meter. The red light at the top will light anytime the input signal is greater than –6.5dBFS (or within 6.5dB of clipping). The yellow light represents a signal greater than –12.5dBFS, and the green light represents a signal greater than –24.5dBFS.
For optimal audio quality, you should adjust the input trim knob so that your loudest recorded signal lights up the yellow light, but not the red. When the red meter light shines extra bright – you’ve clipped! If the signal level ever exceeds 0dBFS the signal will be “clipped” and you will hear a “pop” or “tick” in the recording. This is a very bad thing, and clipping should be avoided at all costs! There is enough headroom so that you can be conservative in this area, and there is no need to push the input levels right up to the edge of clipping.
14
Connecting to the Audio Interface
Connecting to the Audio Interface
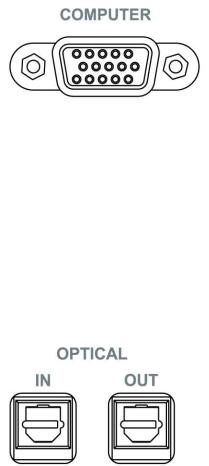
The Computer Connector
On the rear panel of the interface box is a connector labeled COMPUTER. It is the point at which the audio interface connects to the Echo3G PCI card inside your computer.
An Echo3G connector cable was supplied to you for this purpose. This custom made cable is manufactured to certain specifications; if you need to replace it, you should only use a replacement cable from Echo.
ADAT / S/PDIF Optical I/O
Next to the COMPUTER connector is a pair of connectors labeled OPTICAL, IN and OUT. These connectors are used to transmit digital audio data via an optical signal using special digital optical cables with Toslink connectors.
You can use this port for ADAT (8 channels) or for optical S/PDIF (stereo) I/O.
Note: Your Echo3G product is only capable of transmitting or receiving one type of digital signal at a time. You must choose either ADAT optical or S/PDIF (optical or RCA); you cannot use both simultaneously. This is set using the Digital Mode Switch, which can be found in the Echo Console. For more information, refer to the section of this manual that discusses the console software.
15
Connecting to the Audio Interface
Connecting to the Audio Interface
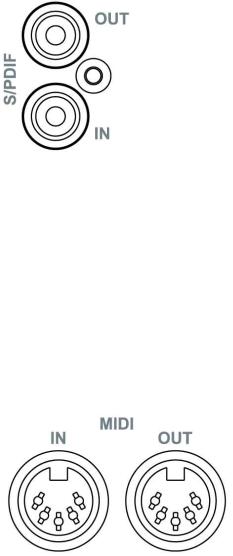
S/PDIF
Next to the Optical connectors is a pair of connectors labeled S/PDIF, IN and OUT. These S/PDIF connectors are used to transmit digital audio data between digital audio devices via an electrical signal.
When connecting devices to the S/PDIF jacks, the use of standard analog RCA audio cables is not recommended. For reliable S/PDIF operation, 75-ohm coaxial (RG59) video cables are recommended.
MIDI
Both Layla3G and Gina3G are equipped with MIDI I/O connectors. The MIDI ports can be used for receiving MIDI time code (MTC), or sending and receiving MIDI signals between your digital audio/MIDI sequencing software and external sound modules, keyboards, MIDI controllers, etc.
MIDI cabling is highly standardized and widely available.
16
Connecting to the Audio Interface

Connecting to the Audio Interface
Word Clock (Layla3G only)
Next to the S/PDIF ports on Layla3G’s back panel are the Word Clock connectors. These connectors allow you to synchronize one Layla3G to another Layla3G or to other digital audio devices equipped with a Word Clock connector.
The Word Clock I/O uses a BNC connector. As with the S/PDIF I/O, a shielded 75-ohm (RG-59) coaxial video cable should be used. BNC connectors have been widely used in the electronics industry for both video and computer networking. However, computer networks use 50-ohm (RG-58) coaxial cables and not the 75ohm (RG-59) cable used by video. For reliable word clock operation, use only video grade cables with Layla3G.
17
Connecting to the Audio Interface
Installing Tracktion
Installing Tracktion
Both Layla3G and Gina3G come bundled with the full version of Tracktion, audio multitrack recording, MIDI, editing, and sampling software.
Install Tracktion from the Echo3G CDROM
To install the software:
1.Insert the Echo3G Install CD-ROM
2.The Main Install Window should automatically pop up. If it doesn’t, go to “My Computer” and double-click on the CD-ROM icon.
3.From the Main Install Window, select “Install Tracktion.” Then, simply follow the Install Wizard.
Tracktion Setup will copy all of the necessary files to your hard drive. It will also add a program group called “Tracktion” to the “Program” menu available from the “Start” button menu.
Tracktion comes with an HTML “User’s Guide” that you can open from the “Help” button inside Tracktion. So, you’ll be able to get up and running with a minimum of hassles (hopefully none at all!). You can also access the Tracktion “User’s Guide” from the same program group in the “Start” menu.
Authorize your copy of Tracktion
Your copy of Tracktion will run in demo mode until you authorize it. Your Echo3G install CDROM came with a sticker that has an authorization code and a website address printed on it. Go to that website and follow the instructions to authorize your copy of Tracktion.
NOTE: DO NOT LOSE YOUR CODE!! Echo Digital Audio Corporation will not be responsible for lost Tracktion authorization codes.
18
Installing Tracktion
Installing Tracktion
Launching Tracktion and Assigning Inputs & Outputs
Now it’s time to launch the actual program and set a few options:
1.Locate the Tracktion program on the “Start” menu or on the desktop.
2.Select the program from the menu (or double click on the icon) to launch the program.
When Tracktion first runs, it takes you to the Projects page. Move the mouse pointer over various objects on the screen and you will notice that Tracktion uses pop-up help to tell you about the interface.
Note that whenever you click on something you will see any available details, controls or settings for it in the information windows at the bottom middle of the screen. You can learn a lot just by clicking on things and reading the pop-up help.
You can also access a quick start guide and a more detailed help document by clicking on the “help!” button in the bottom left corner and selecting “show the Tracktion help pages…” or by pressing the F12 key on your keyboard. The first thing you’ll want to do is set up Tracktion to play and record with your Echo product.
Audio Settings
1.Click the “Settings” tab at the top of the screen.
2.Select “Audio Devices” on the left.
3.Where it says “Wave device:” click on the drop down menu and select “ASIO Echo WDM”.
4.Now you should be able to see a list of the available audio devices for your Echo product. Go ahead and enable the inputs and outputs you want to use with Tracktion by clicking on the red X and waiting for it turn into a green checkmark.
19
Installing Tracktion
Installing Tracktion
NOTE 1: If you can’t find some of your Echo product’s inputs or outputs, that means they are currently being used by another software program. You will have to shut down Tracktion, and disable them from the other software program. Most commonly, this is because you selected one of your Echo products’ output devices as the default playback device for Windows. If this is the case, then you will need to change the default playback device from the “Sounds and Audio Devices” control panel in Windows.
NOTE 2: If you have several different Echo products and you want to use them simultaneously in Tracktion, you need to synchronize them first or else audio will not playback properly. Refer to “Synchronizing Multiple Devices” in the “Console3” section of this manual for more information.
5.Make sure one of your Echo product’s outputs is the “default wave output”, and that it is hooked up to some speakers or headphones. You can check this setting on the right side of the “Settings – Audio devices” screen of Tracktion.
6.Now you’re ready to play some music. Click on the “Projects” tab at the top of the screen and select one of the sample projects that come with Tracktion.
7.You will see a listing of all the files for that project in the large area to the right. Double-click on the file with the same name as the project. This will open the project.
8.Now click on the play button in the bottom right section of the screen and you’ll hear the sample project with your new Echo product.
9.Enjoy the music!!
There are more detailed instructions for Tracktion in the HTML “User’s Guide” which is available by hitting the F12 key while in Tracktion. You can also find hints and tips in the Tracktion user’s forums available through the Tracktion webpage here: http://www.mackie.com/products/tracktion/
This completes the installation of the hardware and software for Layla3G and Gina3G.
20
Installing Tracktion
Audio Software
Using Audio Software
Understanding Wave Devices
To audio software the Echo hardware appears initially as a group of stereo wave devices. (Using the SuperChannel feature will change this – for more info see Appendix E: PureWave and SuperChannel.) You can view the list of these devices either from within your audio software or from the Windows control panel. The items you see in the list will depend on which product you installed.
For playback devices, you should see: |
|
Layla3G |
Gina3G |
Layla3G 1/2 Analog Out |
Gina3G 1/2 Analog Out |
Layla3G 3/4 Analog Out |
Gina3G 3/4 Analog Out |
Layla3G 5/6 Analog Out |
Gina3G 5/6 Analog Out |
Layla3G 7/8 Analog Out |
Gina3G 1/2 Digital Out |
Layla3G 1/2 Digital Out |
Gina3G 3/4 Digital Out |
Layla3G 3/4 Digital Out |
Gina3G 5/6 Digital Out |
Layla3G 5/6 Digital Out |
Gina3G 7/8 Digital Out |
Layla3G 7/8 Digital Out |
|
21
Audio Software
Audio Software
And for recording: |
|
Layla3G |
Gina3G |
Layla3G 1/2 Analog In |
Gina3G 1/2 Analog In |
Layla3G 3/4 Analog In |
Gina3G 1/2 Digital In |
Layla3G 5/6 Analog In |
Gina3G 3/4 Digital In |
Layla3G 7/8 Analog In |
Gina3G 5/6 Digital In |
Layla3G 1/2 Digital In |
Gina3G 7/8 Digital In |
Layla3G 3/4 Digital In |
|
Layla3G 5/6 Digital In |
|
Layla3G 7/8 Digital In |
|
Please refer to the documentation for your audio software to find out how to assign inputs and outputs.
22
Audio Software
Audio Software
Digital Mode
Layla3G and Gina3G have a digital mode switch that lets you set how the hardware transmits and receives digital audio signals. The digital mode switch can be set to S/PDIF RCA, S/PDIF optical, or ADAT optical. We’ll use Layla3G for our examples below, but Gina3G works exactly the same.
The following is a table showing what the wave devices do for each digital mode:
Device |
S/PDIF RCA |
S/PDIF optical |
ADAT optical |
|
|
|
|
Layla3G 1/2 Digital |
S/PDIF |
S/PDIF |
ADAT 1/2 |
Layla3G 3/4 Digital |
not used |
not used |
ADAT 3/4 |
Layla3G 5/6 Digital |
not used |
not used |
ADAT 5/6 |
Layla3G 7/8 Digital |
not used |
not used |
ADAT 7/8 |
In other words, if you want to play or record using S/PDIF, set the hardware to either “S/PDIF RCA” or “S/PDIF optical” and configure your software to use “Layla3G 1/2 Digital”. Since S/PDIF is stereo (two channels), digital channels 3 – 8 are not used.
If you want to play or record using ADAT optical, set the hardware to “ADAT optical” mode and configure your software to use all of the digital channels.
Please refer to the Console section of the manual for more information on digital modes.
23
Audio Software
Console Software
Console3
A “virtual control surface” application called Console3 is installed with the driver. The console allows you to control the audio I/O and clocking functions of your Echo product, and it brings these controls to a single easy-to-use location. From the console you can control the output levels, select synchronization clocks, select the digital mode, and adjust input monitoring.
If you’re curious, the name “Console3” means that this is Echo’s third-generation design for a software console.
Running the Console
Once you have run the installer, you will find the console under your “Start” menu under the group “Echo Digital Audio.” Here, you have two options for running the console: “Show all Console windows” and “Start the tray icon.”
If you select “Start the tray icon,” a red “Echo” icon will be placed in your system tray. This is called the launcher. Double-clicking the launcher icon will display a console window for each Echo card in your system. If you only want to open a console window for one of your Echo cards, right-clicking the launcher icon will display a menu that lists the cards in your system. Select the card corresponding to the console you want to display.
If you select “Remove from tray,” the icon will vanish. All of your open console windows will close as well. If you want the launcher icon to appear automatically in the icon tray every time you start Windows, then select “Auto-start the tray icon.”
Console Window
The basic metaphor for the console interface is a digital mixing board, and it works in terms of output busses. An output bus is a stereo pair of outputs on your hardware. For example, analog outputs 1 and 2 are an output bus. The console window allows you to select an output bus and control what is mixed and sent to
24
Console Software

Console Software
that output bus. Audio played through the selected channels by an application, any analog input, and any digital input may be mixed to an output bus.
Screenshot of Layla3G Console3 main window – Gina3G will work similarly.
25
Console Software
 Loading...