


MDM300
INSTALLATION/OWNER'S MANUAL
CD Marine Receiver
MDM300 INSTALLATION
Preparation
Please read entire manual before installation.
Before You Start
•Disconnect negative battery terminal. Consult a qualified technician for instructions.
•Avoid installing the unit where it would be subject to high temperatures or where it would be subject to dust, dirt or excessive vibration.
Getting Started
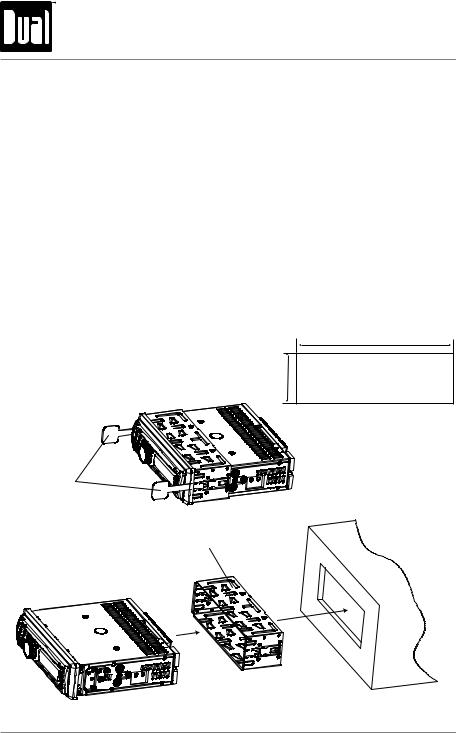
•Remove 2 transit screws located on top of the unit.
•Insert the supplied keys into the slots as shown, and slide the unit out of the mounting sleeve.
•Install mounting sleeve into opening, bending tabs to secure.
•Connect wiring harness and antenna. Consult a qualified technician if you are unsure.
•Test for correct operation and slide into the mounting sleeve to secure.
•Snap trim ring into place.
Mounting sleeve opening dimensions 7-11/64" x 2-3/32" (182 mm x 53 mm)
REMOVAL KEYS
MOUNTING SLEEVE
TYPICAL MOUNTING METHOD
2

MDM300 INSTALLATION
Wiring Diagram
FUSE
When replacing the fuse, make sure new fuse is the correct type and amperage.
Using an incorrect fuse could damage the radio. The MDM300 uses one 10 amp AGC fuse located in-line.
3
MDM300 OPERATION
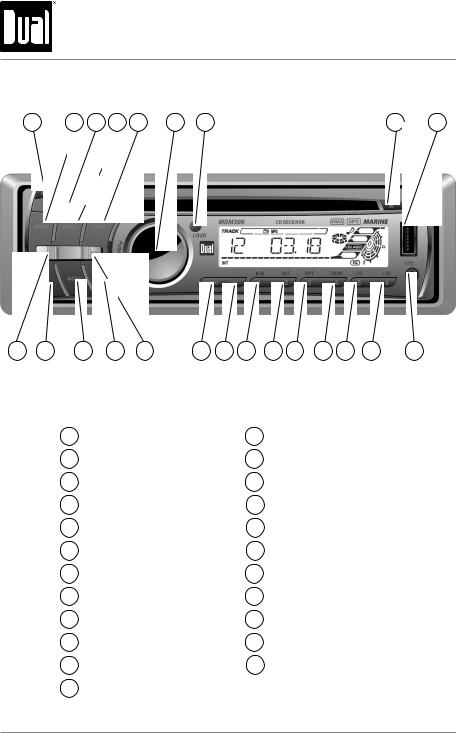
Control Locations - Receiver
1 |
2 |
3 |
4 |
5 |
6 |
7 |
8 |
9 |
23 |
22 |
21 |
20 |
19 |
18 |
17 |
16 |
15 |
14 |
13 |
12 |
11 |
10 |
1 |
Release |
13 |
Preset 4 / Random |
2 |
Mute |
14 |
Preset 3 / Repeat |
3 |
AMS |
15 |
Preset 2 / Intro |
4 |
Scan |
16 Preset 1 / Play / Pause |
|
5 |
Display |
17 |
Local / Distance |
6 |
Audio / Volume Knob |
18 |
Mono / Stereo |
7 |
Loudness |
19 |
Tune / Track Up |
8 |
Eject |
20 |
Band |
9 |
USB Input |
21 |
Mode |
10 |
Auxiliary Input |
22 |
Power |
11 |
Preset 6 / +10 Skip |
23 |
Tune / Track Down |
12 |
Preset 5 / -10 Skip |
|
|
4
MDM300 OPERATION
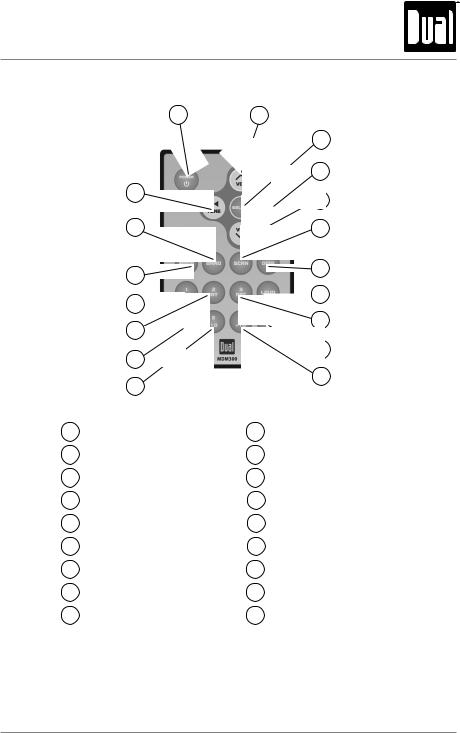
Control Locations - Remote
1 |
2 |
|
3 |
|
4 |
18 |
5 |
|
|
17 |
6 |
16 |
7 |
|
|
15 |
8 |
|
|
14 |
9 |
|
|
13 |
10 |
|
|
12 |
11 |
|
1 |
Power |
10 |
Mute |
2 |
Volume Up |
11 |
Preset 6 / +10 |
3 |
Select |
12 |
Preset 5 / -10 |
4 Tune / Track Up |
13 Preset 4 / Random |
||
5 |
Volume Down |
14 Preset 2 / Intro |
|
6 |
Scan |
15 Preset 1 / Play / Pause |
|
7 |
Display |
16 |
Mode |
8 |
Loudness |
17 |
Band |
9 |
Preset 3 / Repeat |
18 |
Tune / Track Down |
5

MDM300 OPERATION
General Operation
Faceplate Removal
Power On/Off
Mode
Auxiliary Input
Volume
Loudness
Display
Reset
Set the Clock
12/24-hour Clock
Setup Menu
Press RELEASE and pull away from the left side to remove. To re-install, insert right side of faceplate first then push left side to secure.
Press  or any other button (except EJECT) to turn the unit on. Press
  to turn the unit off.
Press MODE to select between AM/FM, CD player, auxiliary, USB and SD card. Modes of operation are shown in the display.
Note: CD, SD and USB modes will not appear unless a CD, SD Card or USB device is inserted.
The MDM300 a 3.5 mm auxiliary input port on the front panel of the unit for connecting an audio device, MP3 player, etc. Press MODE to select auxiliary input mode.
Adjust volume using volume knob (0-47).
Press LOUD to activate the Loudness function. Activating Loudness will enhance the bass and treble frequencies when listening to music at low volumes.
Press DISP to show the clock. During playback of MP3/WMA files, ID3 tag information, elapsed time, track number and file/folder names will automatically alternate on the display.
Press RESET upon initial installation or if abnormal operation occurs. Reset button is located behind the front panel.
With the unit on, press and hold DISP until the clock begins to flash, then release. Turn the volume knob to the right to adjust the hours or to the left to adjust the minutes.
The clock will display 12-hour AM/PM time in USA frequency spacing mode (PM 10.00). In European frequency spacing mode, the clock will display 24-hour time (22.00).
Press and hold the volume knob for more than 3 seconds to access the setup menu. Press volume knob momentarily to select between the menu functions and rotate the volume knob left/right to adjust or activate the desired function.
6

|
|
MDM300 OPERATION |
|
|
|
|
|
|
General Operation - Setup Menu |
||
|
|
|
|
Menu Function |
Options |
Action |
|
Equalizer |
DSP |
Toggles between the following equalization options: OFF, |
|
POP, ROCK, CLASS and FLAT). |
|||
|
|
||
Beep |
BEEP OFF |
Disables the confirmation beep. |
|
Confirmation |
BEEP ON |
Enables the confirmation beep. |
|
Seek Priority |
SEEK 1 |
Enables seek tuning priority. |
|
SEEK 2 |
Enables manual tuning priority. |
||
|
|||
|
VOL LAST |
Programs unit to always turn on at the last volume selected |
|
Programmable |
before it was turned off. |
||
|
|||
Turn On Volume |
VOL ADJ |
Programs unit to always turn on at a specific volume. Any |
|
|
volume level 1-47 can be selected. |
||
|
|
||
|
|
|
|
*Tuner |
FREQ USA |
Programs the unit to USA tuner spacing. |
|
(200kHz for FM and 10kHz for AM). |
|||
|
|||
Frequency |
|
|
|
|
Programs the unit to European tuner spacing. |
||
Spacing |
FREQ EUR |
||
(50kHz for FM and 9kHz for AM). |
|||
|
|||
|
|
||
|
|
|
|
*Tuner Frequency Spacing is only selectable from Tuner mode.
7

MDM300 OPERATION
General Operation
Audio Press AUDIO momentarily to select between Bass, Treble, Balance and Fader.
 BASS TREBLE
  BALANCE
  FADER
FADER
Bass Press AUDIO until BAS appears then rotate volume knob left/right to adjust ( -7 minimum / +7 maximum).
Treble Press AUDIO until TRE appears then rotate volume knob left/right to adjust ( -7 minimum / +7 maximum).
Balance Press AUDIO until BAL appears then rotate volume knob left/right to adjust (BAL 10L - BAL 10R).
BAL EVEN represents equal balance
Fader Press AUDIO until FAD appears then rotate volume knob left/right to adjust (FAD 10R - FAD 10F).
FAD EVEN represents equal fader
8
 Loading...