


 Loading...
Jaundice Meter JM-103
Instruction Manual
Incorrect use of the instrument may result in accidents, so follow the instruction manual to ensure correct and safe operation.
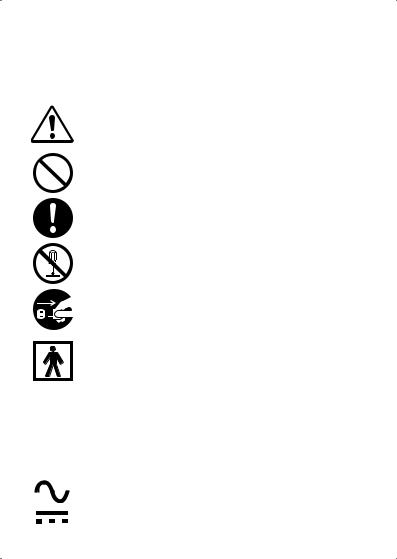
Safety Symbols
The following symbols are used in this manual and on the instrument to prevent accidents that may occur as a result of incorrect use of the instrument.
Denotes a sentence regarding a safety warning or note. Read the sentence carefully to ensure safe and correct use.
Denotes a prohibited operation.
The operation must never be performed.
Denotes an instruction.
The instruction must be strictly adhered to.
Denotes a prohibited operation.
Never disassemble the instrument.
Denotes an instruction.
Disconnect the AC power cord from the AC outlet.
This symbol indicates type BF Applied Part. The instrument provides a particular degree of protection against electric shock, particularly the leakage current and reliability of the protective earth connection with an F-TYPE APPLIED PART. F-TYPE APPLIED PART indicates applied part isolated from all other parts of the instrument to such a degree that the patient leakage current allowable in single fault condition is not exceeded when a voltage equal to 1.1 times the highest rated mains voltage is applied between the applied part and earth.
This symbol indicates alternating current (AC).
This symbol indicates direct current (DC).

Notes on this Manual
•Copying or reproduction of all or any part of the contents of this manual without KONICA MINOLTA SENSING's permission is strictly prohibited.
•The contents of this manual are subject to change without prior notice.
•Everyefforthasbeenmadeinthepreparationofthismanualtoensure the accuracy of its contents. However, should you have any questions or find any errors, please contact a KONICA MINOLTA SENSING authorized service facility.
•KONICA MINOLTA SENSING will not accept any responsibility for consequences arising from the use of the instrument.
Authorized Standards
For North America UL, cUL:
WITHRESPECTTOELECTRICALSHOCK,FIRE
AND MECHANICAL HAZARDS ONLYIN AC-
CORDANCE WITH UL 60601-1AND CAN/CSA C22.2 No. 601.1
For Europe
CE (Medical Device Directive):
This instrument complies with EN60601-1,
EN60601-1-2, and EN ISO13485, and EN
ISO14971.
1
SAFETY PRECAUTIONS
To ensure correct use of this instrument, read the following points carefully and adhere to them. After reading this manual, keep it in a safe place where it can be referred to anytime a question arises.
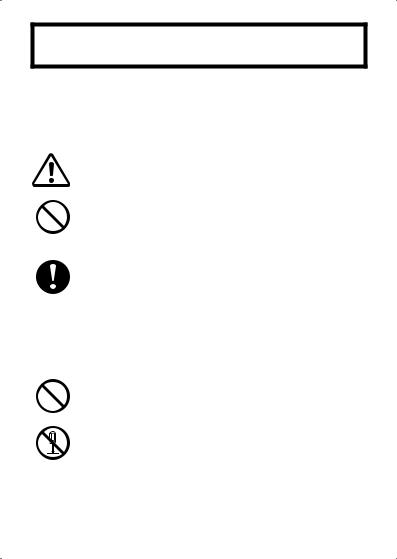
WARNING Failure to adhere to the following points may result in death or serious injury.
Do not use the instrument in areas where flammable or combustible gases (anesthetic gas, gasoline fumes etc.) are present. Doing so may result in a fire.
Always use the charger unit (JM-A30) and the AC adapter (JM-A31, including the power cord) that are supplied with the instrument, and connect the adapter to an AC outlet (100V, 50/60Hz). Using a charger unit and AC adapter other than those mentioned above or connecting to a voltage other than the one specified may result in damage to the instrument, charger or AC adapter, fire or electric shock.
Do not insert or disconnect the AC power cord’s plug with wet hands. Doing so may cause electric shock.
Do not disassemble or modify the instrument, Charger unit or AC adapter. Doing so may cause a fire or electric shock.
2

Take special care not to allow liquid or metal objects to enter the instrument or charger unit. This may cause a fire or electric shock. Should liquid or metal objects enter the instrument, turn the power OFF immediately, disconnect the AC adapter from the AC outlet, and contact the nearest KONICA MINOLTA SENSING authorized service facility.
The instrument, Charger unit and AC adapter should not be operated if they are damaged, or if smoke or odd smells occur. Doing so may result in a fire. In such situations, turn the power OFF immediately, disconnect the AC adapter from the AC outlet, and contact the nearest KONICA MINOLTA SENSING authorized service facility.
Failure to adhere to the following points CAUTION may result in injury or damage to the in-
strument or other property.
Never press the measuring probe when it is directed to the eyes. Doing so may cause eye damage.
Do not place the instrument on an unstable or sloping surface. Doing so may result in the instrument or Charger unit dropping or overturning, causing injury. When you carry the instrument, take care not to let it drop.
Make sure that the instrument is placed near the AC outlet and that the AC power cord’s plug can be easily connected and disconnected.
3

CONTENTS
SAFETY PRECAUTIONS …………………………………………… 2
Foreword ……………………………………………………………… 5
Contents of the package…………………………………………………… 7 Notes on Use ………………………………………………………………… 7 Notes on Storage …………………………………………………………… 9 Disposal Method …………………………………………………………… 9
Names of Parts …………………………………………………… 10
1)JM-103 main body ………………………………………………………10
2)Charger unit JM-A30 ……………………………………………………11
3)AC adapter JM-A31 ………………………………………………………11
Reading the Display …………………………………………………………12
Preparation ………………………………………………………… 13
1)Charging ……………………………………………………………………13
2)Inspecting …………………………………………………………………15
3)Attaching the Strap ………………………………………………………18
4)Selecting the Unit of Measurement ……………………………………19
Measurement ……………………………………………………… 21
Setting the Number of Average Measurements ………………………21
Measuring Procedure ………………………………………………………23
Removing from Charger ……………………………………………………23
Single Measurement ………………………………………………………24
Average Measurement (example using five times as the average)……25 Storing the Instrument………………………………………………………28
Trouble Shootings ………………………………………………… 29
Error Messages ………………………………………………………………29
Check Points before Repairing ……………………………………………31
Maintenance and Inspections ……………………………………………32
Cleaning ………………………………………………………………………32
Specifications ……………………………………………………… 33
Appendix …………………………………………………………… 35
EMC Guidance (electromagnetic emissions)…………………………………… 35
EMC Guidance (electromagnetic immunity) …………………………………… 36
Measuring Principle …………………………………………………………38
Clinical Test Result Report…………………………………………………40
4

Foreword
 Safety Notes
This instrument is designed for estimating total serum bilirubin concentration, that is necessary for the screening of jaundice in newborn infants. It must be used for newborn infants only.
Never press the measuring probe when it is directed to the eyes. Doing so may cause eye damage.
To prevent kernicterus in newborn infants, it is very important to detect jaundice in its early stages.
This hand-held jaundice meter allows a quick, non-invasive estimate of total serum bilirubin concentration, necessary for the control of jaundice in newborn infants.
Measurements are taken automatically by simply placing the instrument’s measuring probe against the forehead or sternum of the infant and pressing it gently, and the measured value is displayed.
This facilitates use of the instrument for infants who are still kept in incubators and provides suitable screening for jaundice. This will also help detect jaundice in its early stages.
This instrument considers the yellowness of the skin, which consists of epidermis, dermis and subcutaneous tissue as the optical density difference at two wavelengths, and it calculates the difference only for the subcutaneous tissue by measuring the difference between the two optical paths.
Foreword
5

Foreword
Hemolytic jaundice
Normally, in the case of hemolytic jaundice that appears before the age of three days, measurement of total serum bilirubin concentration must also be taken. (The correlation between the measured value taken by the instrument and total serum bilirubin concentration drops substantially due to physiologic factors.)
Precocious jaundice
If there is a possibility that the newborn infant is suffering from precocious jaundice (incompatible blood type, hemolytic jaundice), it is necessary to take frequent measurements or measure the total serum bilirubin concentration as well. (There is a possibility that bilirubin concentration in the subcutaneous tissue rises slower than the total serum bilirubin concentration.)
When the newborn infant is undergoing photo-therapy
During photo-therapy, the bilirubin concentration in the subcutaneous tissue under the area exposed to light decreases before the total serum bilirubin concentration does, so it is necessary to limit the use of this instrument only when photo-therapy equipment is used from the back of the patient or affix a light-blocking patch to the measuring point on the forehead or chest. (In areas exposed to light, there are some cases in which only the bilirubin concentration in the subcutaneous tissue decreases before the total serum bilirubin concentration improves. In addition, if the total serum bilirubin concentration increases again after therapy, there is a possibility that the bilirubin concentration in the subcutaneous tissue will increase later.)
Measuring point
Measurements must be taken on the forehead or sternum, where a sufficient amount of blood is circulated. (There is a chance that the bilirubin concentration in the subcutaneous tissue is low for areas with small amounts of blood and areas in which the subcutaneous tissue is subject to keratinization.)
6

Contents of the package
Before using the instrument, check to ensure that the following items are included in the package.
1) |
Jaundice Merer JM-103 |
× 1 |
2) |
Charger Unit JM-A30 |
× 1 |
3) |
AC Adapter JM-A31 |
× 1 |
4) |
Strap |
× 1 |
5) |
Instruction Manual |
× 1 |
Notes on Use
●This instrument should be used under the following operating conditions.
•Temperature of 0 to 40°C (32 to 104°F), relative humidity of 30 to 85%, with no condensation.
•Atmospheric pressure of 700 to 1060 hPa (altitude of -400 to 3000m).
●Whentakingmeasurements,placethemeasuring probe perpendicular to the measur-
ing point and then push it gently as shown
below. Placing the measuring probe at an 
 angle may result in fluctuation of measured
value.
●This instrument is a precision instrument, so it should not be dropped, exposed to shocks and strong vibrations, nor should heavy objects be placed on it. Failure to observe these cautions may cause breakdown.
●Do not use the instrument in areas where it may be exposed to rain or water since it is not splash/water-proof. Also take special care not to allow blood or other liquids to come in contact with the instrument.
Foreword
7

|
● Do not use the instrument on a point where there is excessive vibra- |
|
Foreword |
tion. In addition, to avoid excessive impact on the instrument, it should |
|
be handled gently. Failure to observe this may cause breakdown. |
||
|
||
|
● Accurate measurement data may not be obtained in the following |
|
|
cases. |
|
|
• When ambient light (e.g. panel light, fluorescent light, infrared heat |
|
|
lamp, direct sunlight) is too strong |
|
|
• When influenced electromagnetically by other electronic devices |
|
|
(e.g. near electrical appliances like TV, medial device) |
|
|
• When a mobile telephone is used during measurement |
|
|
● This instrument has a built-in battery. Do not disassemble the instru- |
|
|
ment to replace the battery. |
|
|
● Use the Charger unit (JM-A30) and AC adapter (JM-A31) that are |
|
|
supplied with the instrument. |
|
|
● The Charger unit (JM-A30) and AC adapter (JM-A31) are solely de- |
|
|
signed for use with the JM-103, so they must never be used with any |
|
|
other instrument. |
|
|
● This instrument emits intense light to take measurements. Measure- |
|
|
ments should only be taken of the forehead or sternum, and the in- |
|
|
strument should never be allowed to emit light directly into the eyes. |
|
|
● If the instrument gets dirty, wipe it with a dry cloth or a cloth moistened |
|
|
with mild, neutral detergent. (Never use a solvent such as thinner or |
|
|
benzene to clean the instrument, since it may dissolve its casing.) |
|
|
● The measuring probe should be cleaned by wiping with medicinal al- |
|
|
cohol before use. |
8
Notes on Storage
• |
Temperature of -10 to 60°C (14 to 140°F), relative humidity of 10 to |
Foreword |
● This instrument should be stored under the following storage condi- |
|
|
tions. |
|
|
|
95%, with no condensation. |
|
• |
Atmospheric pressure of 700 to 1060 hPa (altitude of -400 to |
|
|
3000m). |
|
● When storing the instrument: |
|
|
• Do not store the instrument in an area where it will be ex-posed to |
|
|
|
water. |
|
• Do not store the instrument in an area where direct sunlight, pres- |
|
|
|
sure, temperature, humidity, ventilation, sunlight, dust, strong mag- |
|
|
netic fields, and/or saline or sulphurous atmospheres may affect |
|
|
the instrument. |
|
• Do not store the instrument on an inclined surface or on a surface |
|
|
|
which may be subject to vibrations or physical shock. (Also avoid |
|
|
vibrations or physical shock during transportation.) |
|
• Do not store the instrument in areas where chemicals are stored or |
|
|
|
where gas may be emitted. |
|
• |
The instrument and its accessories should be cleaned thoroughly |
|
|
and stored properly to make sure that there will be no problems |
|
when they are used again. (For the cleaning method, refer to
“Cleaning” on page 32.)
Disposal Method
●The instrument has a built-in Ni-MH battery. Do not disassemble the instrument or remove the battery. To dispose of or replace the battery, contact the nearest KONICA MINOLTA SENSING authorized service facility.
●When disposing of the instrument or its accessories, local laws and regulations must be observed.
9

Foreword
Names of Parts
1) JM-103 main body
|
POWER switch |
||
|
•Slide this switch to turn the power ON/ |
||
|
OFF. |
||
READY lamp |
•Using this switch in combination with |
||
Lights up to indi- |
the RESET button allows you to switch |
||
to check mode and change the unit of |
|||
cate that the in- |
measurement. |
||
strument is ready |
|
|
|
for the next mea- |
|
Strap attach- |
|
surement. |
|
||
Display |
|
ment area |
|
|
Attach the strap. |
||
Displays the mea- |
|
|
|
sured value etc. |
|
|
|
For the method |
|
|
|
of reading the |
|
|
|
display, refer to |
|
|
|
“Reading the |
|
|
|
Display” on page |
|
|
|
12 |
|
|
|
Charger contact |
RESET button |
||
Used to connect the |
|||
•Deletes the currently displayed |
|||
Charger unit. |
|
measured value and prepares for |
|
Measuring probe |
|
the next measurement. |
|
Takes measurement |
|
•Using this switch in combination |
|
|
with the POWER switch allows |
||
when pressed against |
|
||
|
you to switch to check mode and |
||
the measuring point. |
|
||
|
change the unit of measurement. |
||
|
|
•In addition, holding this button |
|
|
|
down allows you to set the num- |
|
|
|
ber of average measurements to |
|
|
|
be performed. |
|
10

2) Charger unit JM-A30
Checker cover
To check the instrument, open this cover.
Standard checker values
The reference values for check mode are given.
Charger jack
Used to connect the main body.
Checker
Checks whether the instrument is operating correctly by taking measurement in check mode.
Charger lamp |
|
|
Lights up to indicate that |
DC jack |
|
the instrument is cur- |
Used to connect the AC adapter. |
|
rently charged. |
||
|
Foreword
3) AC adapter JM-A31
DC plug
Used to connect the charger’s DC jack.
AC Power cord’s plug
Connect into an AC outlet.
AC Power cord
11

Foreword
Reading the Display
The following items are displayed on the instrument display.
In the following drawing, all the items are lit for explanatory purposes. In actual operation, there are no cases where all of them are lit at the same time.
Optical path |
|
AVG |
|
|
|
||
When performing inspections |
|
Lights up |
during |
with the checker, this will be |
|
averaging |
mea- |
illuminated when the L value |
|
surement. |
|
is displayed (long optical path) |
|
|
|
and extinguished when the S |
|
|
|
value is displayed (short opti- |
|
|
|
cal path). |
|
|
|
|
|
|
|
Battery Indicate (Battery mark)
Battery mark blinks when the battery power is low.
For details on battery display, refer to “Battery Indication” on page 30.
Value
The measured values, and other information will be displayed.
Unit
Displays the unit of measurement. (mg/dL or μ mol/L)
12
Loading...