


Service Manual
Microwave Oven
Model: KOC-960P0A
DAEWOO ELECTRONICS CO., LTD.

PRECAUTIONS TO BE OBSERVED BEFORE AND DURING SERVICING TO AVOID POSSIBLE EXPOSURE TO EXCESSIVE MICROWAVE ENERGY
(a)Do not operate or allow the oven to be operated with the door open.
(b)Make the following safety checks on all ovens to be serviced before activating the magnetron or other microwave source, and make repairs as necessary: (1) Interlock operation, (2) proper door closing, (3) seal and sealing surfaces (arcing, wear, and other damage), (4) damage to or loosening of hinges and latches, (5) evidence of dropping or abuse.
(c)Before turning on microwave power for any service test or inspection within the microwave generating compartments, check the magnetron, wave guide or transmission line, and cavity for proper alignment, integrity, and connections.
(d)Any defective or misadjusted components in the interlock, monitor, door seal and microwave generation and transmission systems shall be repaired, replaced, or adjusted by procedures described in this manual before the oven is released to the owner.
(e)A microwave leakage check to verify compliance with the Federal Performance Standard should be performed on each oven prior to release to the owner.
TABLE OF CONTENTS
PROPER USE AND SERVICE PRECAUTIONS |
2 |
SPECIFICATIONS |
3 |
FEATURES |
4 |
CONTROL PANEL |
5 |
OPERATION |
7 |
HOW TO SET THE OVEN CONTROLS |
18 |
PROGRAMMING COMBINATIONS |
20 |
INTERLOCK MECHANISM FUNCTIONS AND ADJUSTMENTS |
21 |
PRECAUTIONS FOR DISASSEMBLY AND REPAIR |
23 |
DISASSEMBLY AND ASSEMBLY |
24 |
TROUBLE SHOOTING GUIDE |
33 |
MEASUREMENT |
41 |
COMPONENT TEST PROCEDURE |
43 |
WIRING DIAGRAM |
44 |
SCHEMATIC DIAGRAM |
45 |
EXPLODED VIEWS AND PARTS LIST |
48 |
PRINTED WIRING BOARD |
51 |
P.C.B. CIRCUIT DIAGRAM |
59 |
P.C.B. LOCATION NO. |
60 |
1

PROPER USE AND SERVICE PRECAUTIONS
1.For Safe Operation
Damage that allows the microwave energy (that cooks or heats the food) to escape will result in poor cooking and may cause serious bodily injury to the operator.
IF ANY OF THE FOLLOWING CONDITIONS EXIST, OPERATOR MUST NOT USE THE APPLIANCE. (Only a trained service personnel should make repairs.)
1)A broken door hinge.
2)A broken door viewing screen.
3)A broken front panel, oven cavity.
4)A loosened door lock.
5)A broken door lock.
The door gasket plate and oven cavity surface should be kept clean.
No grease, soil or spatter should be allowed to build up on these surfaces or inside the oven.
DO NOT ATTEMPT TO OPERATE THIS APPLIANCE WITH THE DOOR OPEN. The microwave oven has concealed switches to make sure the power is turned off when the door is opened. Do not attempt to defeat them.
DO NOT ATTEMPT TO SERVICE THIS APPLIANCE UNTIL YOU HAVE READ THIS SERVICE MANUAL.
2.Correct Installation.
1)This microwave oven weight 20kg (48.5 lbs.) and must be placed on a horizontal base strong enough to support this weight.
2)The oven should be placed as far from high temperature source and vapour as possible.
3)The power supply cord is about 1.8m (5.9ft) long. Earthing is required when connecting the power source.
4)Maximum power consumption of this oven is approximately 1.6Kw. It is suggested that the unit is operated on such power line (about 5 amperes) that can provide more power than this rating.
5)Object must not be placed on the top enclosure so as not to obstruct air flow for ventilation.
6)If the oven is operative prior to servicing, a microwave check should be performed prior to servicing the oven.
7)If any certified oven unit is found to have excessive emission level 5mV/cm2, the service person should
(a)inform the manufacturer, importer or assembler,
(b)repair the unit at no cost to the owner,
(c)attempt to ascertain the cause of the excessive leakage,
(d)tell the owner of the unit not to use the unit until the oven has been brought into compliance.
8)If the oven operates with the door open, the service person should tell the user not to operate the oven and contact the manufacturer and CDRH immediately.
@@@@@@@@e?@@@@@@@@e?@@@@@@@@?e@@@@@@@@e?@@@@@@@@?e@@@@@@@@e?@@@@@@@@?e@@@@@@@@e?@@@@@@@@?e@@@@@@@@e?@@@@@@@@?e@@@@@@@@e?@@@@@@@@?e@@@@@@@@e?@@@@@@@@?e@@@@@@@@e?@@@@@@@@?e@@@@@@@@e?@@@@@@@@?e@@@@@@@@e?@@@@@@@@?e@@@@@@@@e?@@@@@@@@?e@@@@@@@@e?@@@@@@@@?e@@@@@@@@e?@@@@@@@@?e@@@@@@@@e?@@@@@@@@?e@@@@@@@@e?@@@@@@@@?e@@@@@@@@e?@@@@@@@@?e@@@@@@@@e?@@@@@@@@?e@@@@@@@@e?@@@@@@@@?e@@@@@@@@e?@@@@@@@@?e@@@@@@@@e?@@@@@@@@?e@@@@@@@@e?@@@@@@@@?e@@@@@@@@e?@@@@@@@@
@@@@@@@@e?@@@@@@@@e?@@@@@@@@?e@@@@@@@@e?@@@@@@@@?e@@@@@@@@e?@@@@@@@@?e@@@@@@@@e?@@@@@@@@?e@@@@@@@@e?@@@@@@@@?e@@@@@@@@e?@@@@@@@@?e@@@@@@@@e?@@@@@@@@?e@@@@@@@@e?@@@@@@@@?e@@@@@@@@e?@@@@@@@@?e@@@@@@@@e?@@@@@@@@?e@@@@@@@@e?@@@@@@@@?e@@@@@@@@e?@@@@@@@@?e@@@@@@@@e?@@@@@@@@?e@@@@@@@@e?@@@@@@@@?e@@@@@@@@e?@@@@@@@@?e@@@@@@@@e?@@@@@@@@?e@@@@@@@@e?@@@@@@@@?e@@@@@@@@e?@@@@@@@@?e@@@@@@@@e?@@@@@@@@?e@@@@@@@@e?@@@@@@@@?e@@@@@@@@e?@@@@@@@@?e@@@@@@@@e?@@@@@@@@
@@h? |
@@ |
@@h? |
@@ |
@@h? |
@@ |
@@h? |
@@ |
@@h? |
@@ |
@@h? |
@@ |
|
CAUTION |
|
MICROWAVE RADIATION |
|
PERSONNEL SHOULD NOT BE EXPOSED TO THE MICROWAVE ENERGY WHICH MAY RADIATE FROM |
|
THE MAGNETRON OR OTHER MICROWAVE GENERATING DEVICE IF IT IS IMPROPERLY USED OR |
|
CONNECTED. ALL INPUT AND OUTPUT MICROWAVE CONNECTIONS. WAVEGUIDE, FLANGES AND |
|
GASKETS MUST BE SECURE. NEVER OPERATE THE DEVICE WITHOUT A MICROWAVE ENERGY |
|
ABSORBING LOAD ATTACHED. NEVER LOOK INTO AN OPEN WAVEGUIDE OR ANTENNA WHILE THE |
|
DEVICE IS ENERGIZED. |
@@g |
?@@ |
@@g |
?@@ |
@@g |
?@@ |
@@g |
?@@ |
@@g |
?@@ |
@@g |
?@@ |
@@@@@@@@ |
?@@@@@@@@?e@@@@@@@@e?@@@@@@@@?e@@@@@@@@e?@@@@@@@@?e@@@@@@@@e?@@@@@@@@?e@@@@@@@@e?@@@@@@@@?e@@@@@@@@e?@@@@@@@@?e@@@@@@@@e?@@@@@@@@?e@@@@@@@@e?@@@@@@@@?e@@@@@@@@e?@@@@@@@@?e@@@@@@@@e?@@@@@@@@?e@@@@@@@@e?@@@@@@@@?e@@@@@@@@e?@@@@@@@@?e@@@@@@@@e?@@@@@@@@?e@@@@@@@@e?@@@@@@@@?e@@@@@@@@e?@@@@@@@@?e@@@@@@@@e?@@@@@@@@?e@@@@@@@@e?@@@@@@@@?e@@@@@@@@e?@@@@@@@@?e@@@@@@@@e?@@@@@@@@?e@@@@@@@@e?@@@@@@@@?e@@@@@@@@e?@@@@@@@@?e@@@@@@@@e?@@@@@@@@ ?@@@@@@@@ |
2

SPECIFICATIONS
POWER SUPPLY |
|
120V ~ 60Hz |
|
|
|
|
|
|
|
|
|
POWER CONSUMPTION |
1,600 W |
|
|
|
|
|
|
MICROWAVE |
|
OUTPUT POWER |
1,000 W (IEC 705) |
|
|
|
|
|
|
|
|
FREQUENCY |
2,450 MHZ |
|
|
|
|
|
|
GRILL POWER CONSUMPTION |
1,400 W |
|
||
|
|
|
|
|
CONVECTION POWER CONSUMPTION |
1,400 W |
|
||
|
|
|
|
|
COMBINATION HEATING POWER CONSUMPTION |
1,600 W (Sequential) |
- |
||
|
|
|
||
OUTSIDE DIMENSIONS (W X H X D) |
526 (20.7) X 460 (18.1) X 345 (13.6) mm (inch) |
|||
|
|
|
||
CAVITY DIMENSIONS (W X H X D) |
335 (13.2) X 335 (13.2) X 260 (10.2) mm (inch) |
|||
|
|
|
|
|
NET WEIGHT |
|
Approx. 22 kg (48.5 Ibs.) |
|
|
|
|
|
|
|
TIMER |
|
99 minutes |
|
|
|
|
|
|
|
SELECT FUNCTION |
|
Microwave/Grill /Convection /Combi /Rotisserie (option) |
||
|
|
|
|
|
POWER SELECTIONS |
10 stages |
|
||
|
|
|
|
|
* Specifications subject to change without notice.
EXTERNAL VIEWS
320 |
345 |
385 |
239 |
526 |
460 |
Fig. 1 Front View |
Fig. 2 Side View |
3 |
|
FEATURES
3 |
|
4 |
5 |
6 |
2 |
|
|
|
|
|
|
|
|
7 |
|
|
|
|
11 |
1 |
9 |
8 |
|
|
8
 10
10
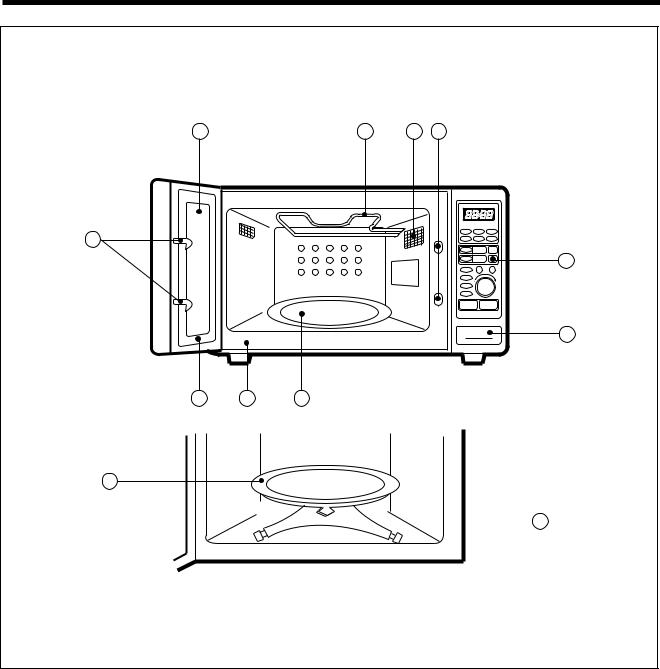
¤DOOR SEAL ƒ¡Door seal maintains the microwave within the oven cavity and prevents microwave leakage.
¤Ł DOOR HOOKƒ¡When door is closed, it will automatically lock shut. If door is opened while oven is operating, magnetron tube will immediately stop operating.
¤Ø DOOR SCREEN ƒ¡Allows viewing of food. Microwave cannot pass through perforations in screen.
¤Œ GRILL HEATER ƒ¡Turns on when grill and simultaneous cooking is selected.
¤º OVEN LAMP ƒ¡Automatically turns on during oven operating.
¤ SAFETY INTERLOCK SYSTEM
¤CONTROL PANEL
¤TURNTABLE TRAY ƒ¡Rotates during cooking and ensure even distribution of Microwaves. It can also be used as a cooking utensil.
¤OVEN FRONT PLATE
¤ROTATING BASE ƒ¡This fits over the shaft in the center of the oven’s cavity floor. This is to remain in the oven for all cooking. It should only be removed for cleaning.
¤æ DOOR OPENING BUTTONƒ¡To open the door, push the door opening button. When door is closed, it will automatically lock shut. If door is opened while oven is operating, magnetron tube will immediately stop operating.
4
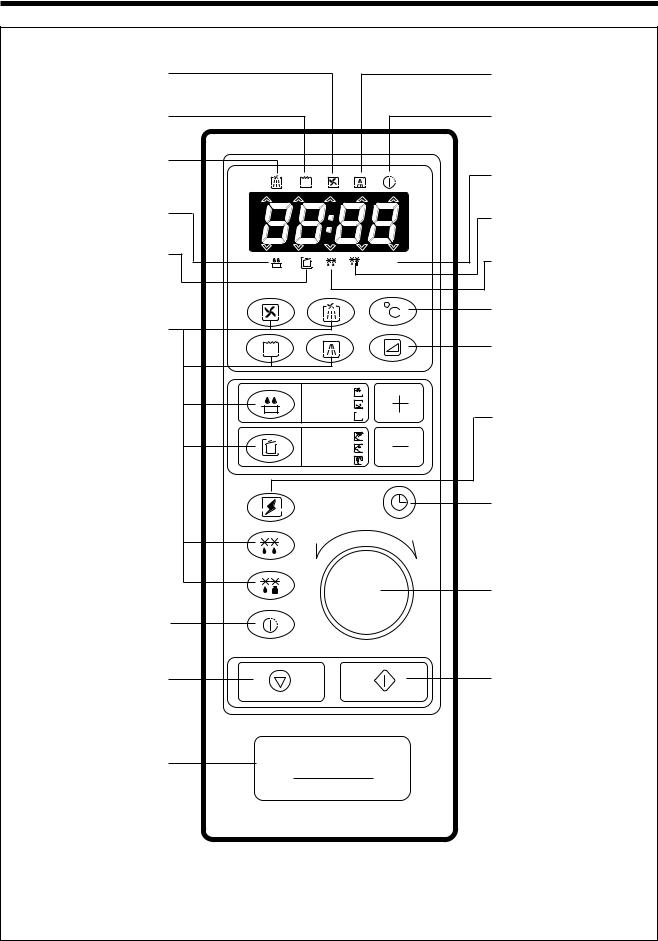
CONTROL PANEL
When blinking, the oven is operating in CONVECTION.
When blinking, the oven is operating in GRILL
When blinking, the oven is operating in COMBI COOKING.
When blinking, the oven is operating in AUTO REHEAT.
When blinking, the oven is operating in PROGRAM COOK.
Function Pads ƒ¡Used to select the desired oven operation.
 : MICROWAVE
 : GRILL
 : CONVECTION
 : COMBINATION
 : WEIGHT DEFROST
 : AUTO DEFROST

 : AUTO REHEAT
 : PROGRAM COOK
Auto start pad ƒ¡Used to set desired starting time.
Stop/Clear Pad ƒ¡Used to pause or clear all information manually put into the oven control panel except clock.
Push to open button used to open the door.
kg
1.( 1-4 cups)  2.(0.2-0.8kgs)
  3.(0.2-0.8kgs)
1.(0.7-1.3kgs) 2.(0.7-1.3kgs) 3.(0.7-1.5kgs)
When blinking, the oven is operating in MICROWAVE mode.
When blinking, the oven will automatically turn on at preset time.
When blinking, the oven is operating in weight input mode.
When blinking, the oven is operating in WEIGHT DEFROST.
When blinking, the oven is operating in AUTO DEFROST.
Temperature Pad ƒ¡Used to set desired temperature.
Power Level Pad ƒ¡Used to select the variable power level.
Speedy Cook Pad ƒ¡Used to set desired time.
(It is increased 30 seconds)
Clock Pad ƒ¡Used to set and recall the time of day.
Timer, temp knob ƒ¡Used to input the cooking time, weight or time of day.
Start Pad ƒ¡Used to start the selected cycle.
5

CONTROL PANEL (Rotisserie type)
When blinking, the oven is operating in CONVECTION.
When blinking, the oven is operating in GRILL
When blinking, the oven is operating in COMBI COOKING.
When blinking, the oven is operating in AUTO REHEAT.
When blinking, the oven is operating in PROGRAM COOK.
Function Pads ƒ¡Used to select the desired oven operation.
 : MICROWAVE
 : GRILL
 : CONVECTION
 : COMBINATION
 : WEIGHT DEFROST
 : AUTO DEFROST

 : AUTO REHEAT
 : PROGRAM COOK
ROTISSERIE Cook pad used to set desired rotisserie cooking.
Stop/Clear Pad ƒ¡Used to pause or clear all information manually put into the oven control panel except clock.
Push to open button used to open the door.
1.( 1-4 cups)  2.(0.2-0.8kgs)
  3.(0.2-0.8kgs)
1.(0.7-1.3kgs) 2.(0.7-1.3kgs) 3.(0.7-1.5kgs)
When blinking, the oven is operating in MICROWAVE mode.
When blinking, the oven will automatically turn on at preset time.
When lit, the oven is operating in ROTISSERIE.
When blinking, the oven is operating in WEIGHT DEFROST.
When blinking, the oven is operating in AUTO DEFROST.
Temperature Pad ƒ¡Used to set desired temperature.
Power Level Pad ƒ¡Used to select the variable power level.
Speedy Cook Pad ƒ¡Used to set desired time.
(It is increased 30 seconds)
Clock Pad ƒ¡Used to set and recall the time of day.
 Auto start pad ƒ¡Used to set desired starting time.
Timer, temp knob ƒ¡Used to input the cooking time, weight or time of day.
Start Pad ƒ¡Used to start the selected cycle.
6

OPERATION
TO STOP THE OVEN WHILE THE OVEN IS OPERATING
1.Press  (STOP / CLEAR) pad.
-The  (STOP) indicator starts blinking.
-You can restart the oven by touching  (START) pad.
-Touch  once more to erase all instruction except clock.
2.Open the door
-You can restart the oven by closing the door and touching  pad.
pad.
@@@@@@@@e?@@@@@@@@e?@@@@@@@@?e@@@@@@@@e?@@@@@@@@?e@@@@@@@@e?@@@@@@@@?e@@@@@@@@e?@@@@@@@@?e@@@@@@@@e?@@@@@@@@?e@@@@@@@@e?@@@@@@@@?e@@@@@@@@e?@@@@@@@@?e@@@@@@@@e?@@@@@@@@?e@@@@@@@@e?@@@@@@@@?e@@@@@@@@e?@@@@@@@@?e@@@@@@@@e?@@@@@@@@?e@@@@@@@@e?@@@@@@@@?e@@@@@@@@e?@@@@@@@@?e@@@@@@@@e?@@@@@@@@?e@@@@@@@@e?@@@@@@@@?e@@@@@@@@e?@@@@@@@@?e@@@@@@@@e?@@@@@@@@?e@@@@@@@@e?@@@@@@@@?e@@@@@@@@e?@@@@@@@@?e@@@@@@@@e?@@@@@@@@?e@@@@@@@@e?@@@@@@@@?e@@@@@@@@e?@@@@@@@@
@@@@@@@@e?@@@@@@@@e?@@@@@@@@?e@@@@@@@@e?@@@@@@@@?e@@@@@@@@e?@@@@@@@@?e@@@@@@@@e?@@@@@@@@?e@@@@@@@@e?@@@@@@@@?e@@@@@@@@e?@@@@@@@@?e@@@@@@@@e?@@@@@@@@?e@@@@@@@@e?@@@@@@@@?e@@@@@@@@e?@@@@@@@@?e@@@@@@@@e?@@@@@@@@?e@@@@@@@@e?@@@@@@@@?e@@@@@@@@e?@@@@@@@@?e@@@@@@@@e?@@@@@@@@?e@@@@@@@@e?@@@@@@@@?e@@@@@@@@e?@@@@@@@@?e@@@@@@@@e?@@@@@@@@?e@@@@@@@@e?@@@@@@@@?e@@@@@@@@e?@@@@@@@@?e@@@@@@@@e?@@@@@@@@?e@@@@@@@@e?@@@@@@@@?e@@@@@@@@e?@@@@@@@@?e@@@@@@@@e?@@@@@@@@
@@h? |
@@ |
@@h? |
@@ |
@@h? |
@@ |
@@h? |
@@ |
@@h? |
@@ |
@@h? |
@@ |
|
NOTE : Oven stops operating when door open. |
|
@@g |
|
?@@ |
@@g |
|
?@@ |
@@g |
|
?@@ |
@@g |
|
?@@ |
@@g |
|
?@@ |
@@g |
|
?@@ |
@@@@@@@@ |
?@@@@@@@@?e@@@@@@@@e?@@@@@@@@?e@@@@@@@@e?@@@@@@@@?e@@@@@@@@e?@@@@@@@@?e@@@@@@@@e?@@@@@@@@?e@@@@@@@@e?@@@@@@@@?e@@@@@@@@e?@@@@@@@@?e@@@@@@@@e?@@@@@@@@?e@@@@@@@@e?@@@@@@@@?e@@@@@@@@e?@@@@@@@@?e@@@@@@@@e?@@@@@@@@?e@@@@@@@@e?@@@@@@@@?e@@@@@@@@e?@@@@@@@@?e@@@@@@@@e?@@@@@@@@?e@@@@@@@@e?@@@@@@@@?e@@@@@@@@e?@@@@@@@@?e@@@@@@@@e?@@@@@@@@?e@@@@@@@@e?@@@@@@@@?e@@@@@@@@e?@@@@@@@@?e@@@@@@@@e?@@@@@@@@?e@@@@@@@@e?@@@@@@@@?e@@@@@@@@e?@@@@@@@@ |
?@@@@@@@@ |
ERASING INSTRUCTIONS
•Touch  (STOP/CLEAR) pad to erase all instructions you set previously.
•Opening the oven door during cooking dose not erase cooking instruction.
•If you touch  pad during operation, the cooking instructions is all erased.
7

HOW TO SET THE OVEN CONTROLS
Tips : • Be sure to read the cookbook’s introduction before operating the oven.
•Also remember to read this operating instruction for proper safety information and instruction before using the oven.
•See the cookbook for specific recipes.
•Prior to setting the controls, place one cup of water in the oven, in a heat-proof glass measuring cup, for testing purposes.
•When setting the controls, everytime a pad is pressed, a beep can be heard.
CLOCK
@@@@@@@@e?@@@@@@@@e?@@@@@@@@?e@@@@@@@@e?@@@@@@@@?e@@@@@@@@e?@@@@@@@@?e@@@@@@@@e?@@@@@@@@?e@@@@@@@@e?@@@@@@@@?e@@@@@@@@e?@@@@@@@@?e@@@@@@@@e?@@@@@@@@?e@@@@@@@@e?@@@@@@@@?e@@@@@@@@e?@@@@@@@@?e@@@@@@@@e?@@@@@@@@?e@@@@@@@@e?@@@@@@@@?e@@@@@@@@e?@@@@@@@@?e@@@@@@@@e?@@@@@@@@?e@@@@@@@@e?@@@@@@@@?e@@@@@@@@e?@@@@@@@@?e@@@@@@@@e?@@@@@@@@?e@@@@@@@@e?@@@@@@@@?e@@@@@@@@e?@@@@@@@@?e@@@@@@@@e?@@@@@@@@?e@@@@@@@@e?@@@@@@@@?e@@@@@@@@e?@@@@@@@@?e@@@@@@@@e?@@@@@@@@
@@@@@@@@e?@@@@@@@@e?@@@@@@@@?e@@@@@@@@e?@@@@@@@@?e@@@@@@@@e?@@@@@@@@?e@@@@@@@@e?@@@@@@@@?e@@@@@@@@e?@@@@@@@@?e@@@@@@@@e?@@@@@@@@?e@@@@@@@@e?@@@@@@@@?e@@@@@@@@e?@@@@@@@@?e@@@@@@@@e?@@@@@@@@?e@@@@@@@@e?@@@@@@@@?e@@@@@@@@e?@@@@@@@@?e@@@@@@@@e?@@@@@@@@?e@@@@@@@@e?@@@@@@@@?e@@@@@@@@e?@@@@@@@@?e@@@@@@@@e?@@@@@@@@?e@@@@@@@@e?@@@@@@@@?e@@@@@@@@e?@@@@@@@@?e@@@@@@@@e?@@@@@@@@?e@@@@@@@@e?@@@@@@@@?e@@@@@@@@e?@@@@@@@@?e@@@@@@@@e?@@@@@@@@?e@@@@@@@@e?@@@@@@@@
@@h? |
@@ |
@@h? |
@@ |
@@h? |
@@ |
@@h? |
@@ |
@@h? |
@@ |
@@h? |
@@ |
@@
@@
@@
@@ NOTE :
@@
@@
@@
@@
@@
@@
@@
@@
@@
@@
@@
@@
@@
@@
@@
@@
@@
@@
@@
@@
@@
@@
@@
@@
@@
@@
@@
@@
@@
@@
@@
@@
@@
@@
@@
@@
@@
@@
@@
@@
@@
@@
@@
@@
@@
@@
@@
@@
@@
@@
@@
@@
@@
@@
@@
@@
@@
@@
@@
@@
@@
@@
@@
@@
@@
@@
@@
@@
@@@@@@@@@@@@@@
@@
•This is a 12 hour clock.
•When the oven is plugged in, “0:00” appears in the display window.
•The two dots between the hour and minutes are the clock indicator lights. They will start to flash on and off.
•The time of day will be displayed at all times, except when the oven is operating.
•In the oven of a power failure or if the oven is unplugged, the clock will have to be reset for the proper time. Once power is restored or oven is plugged in, the display will show “0:00”.
•To reset the time of day, repeat the steps given below.
•To check the time of day while the oven is operating, touch the  (CLOCK) pad, then the time will be displayed for 3 seconds.
•When you turn TIMER KNOB, minutes are increased by to turn right and hours are increased as to turn left.
@@
@@
@@
@@
@@
@@
@@
@@
@@
@@
@@
@@
@@
@@
@@
@@
@@
@@
@@
@@
@@
@@
@@
@@
@@
@@
@@
@@
@@
@@
@@
@@
@@
@@
@@
@@
@@
@@
@@
@@
@@
@@
@@
@@
@@
@@
@@
@@
@@
@@
@@
@@
@@
@@
@@
@@
@@
@@
@@
@@
@@
@@
@@
@@
@@
@@
@@
@@
@@
@@
@@
@@
@@@@@@@@@@@@@@
@@
@@g |
|
?@@ |
@@g |
|
?@@ |
@@g |
|
?@@ |
@@g |
|
?@@ |
@@g |
|
?@@ |
@@g |
|
?@@ |
@@@@@@@@ |
?@@@@@@@@?e@@@@@@@@e?@@@@@@@@?e@@@@@@@@e?@@@@@@@@?e@@@@@@@@e?@@@@@@@@?e@@@@@@@@e?@@@@@@@@?e@@@@@@@@e?@@@@@@@@?e@@@@@@@@e?@@@@@@@@?e@@@@@@@@e?@@@@@@@@?e@@@@@@@@e?@@@@@@@@?e@@@@@@@@e?@@@@@@@@?e@@@@@@@@e?@@@@@@@@?e@@@@@@@@e?@@@@@@@@?e@@@@@@@@e?@@@@@@@@?e@@@@@@@@e?@@@@@@@@?e@@@@@@@@e?@@@@@@@@?e@@@@@@@@e?@@@@@@@@?e@@@@@@@@e?@@@@@@@@?e@@@@@@@@e?@@@@@@@@?e@@@@@@@@e?@@@@@@@@?e@@@@@@@@e?@@@@@@@@?e@@@@@@@@e?@@@@@@@@?e@@@@@@@@e?@@@@@@@@ |
?@@@@@@@@ |
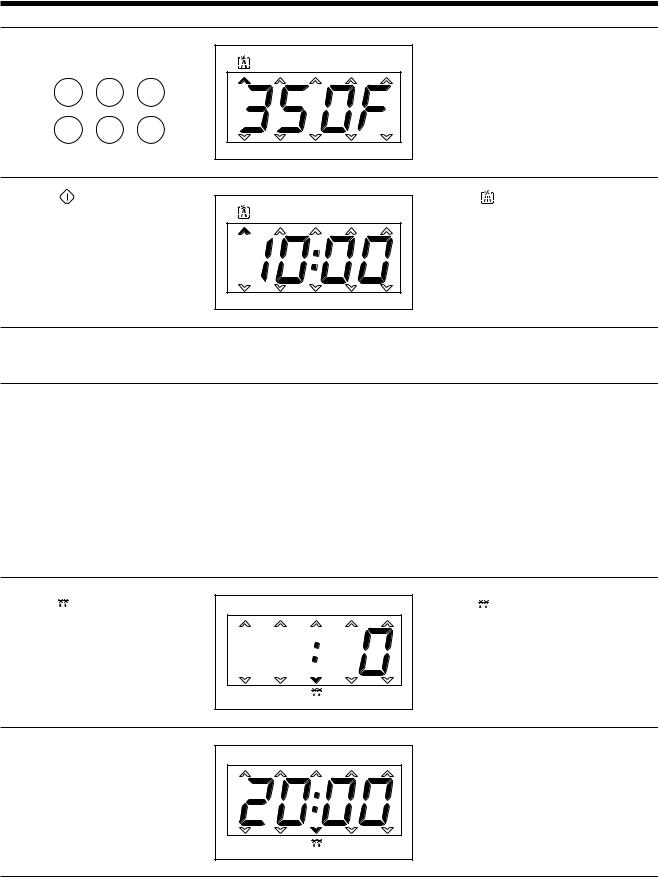
SETTING THE CONTROLS
1. Touch |
pad. |
The display will become blank except |
|
|
for the two indicator lights, and a 0 in |
|
|
the right side. |
@@@@@@@@e?@@@@@@@@e?@@@@@@@@?e@@@@@@@@e?@@@@@@@@?e@@@@@@@@e?@@@@@@@@?e@@@@@@@@e?@@@@@@@@?e@@@@@@@@e?@@@@@@@@?e@@@@@@@@e?@@@@@@@@?e@@@@@@@@e?@@@@@@@@?e@@@@@@@@e?@@@@@@@@?e@@@@@@@@e?@@@@@@@@?e@@@@@@@@e?@@@@@@@@?e@@@@@@@@e?@@@@@@@@?e@@@@@@@@e?@@@@@@@@?e@@@@@@@@e?@@@@@@@@?e@@@@@@@@e?@@@@@@@@?e@@@@@@@@e?@@@@@@@@?e@@@@@@@@e?@@@@@@@@?e@@@@@@@@e?@@@@@@@@?e@@@@@@@@e?@@@@@@@@?e@@@@@@@@e?@@@@@@@@?e@@@@@@@@e?@@@@@@@@?e@@@@@@@@e?@@@@@@@@?e@@@@@@@@e?@@@@@@@@
@@@@@@@@e?@@@@@@@@e?@@@@@@@@?e@@@@@@@@e?@@@@@@@@?e@@@@@@@@e?@@@@@@@@?e@@@@@@@@e?@@@@@@@@?e@@@@@@@@e?@@@@@@@@?e@@@@@@@@e?@@@@@@@@?e@@@@@@@@e?@@@@@@@@?e@@@@@@@@e?@@@@@@@@?e@@@@@@@@e?@@@@@@@@?e@@@@@@@@e?@@@@@@@@?e@@@@@@@@e?@@@@@@@@?e@@@@@@@@e?@@@@@@@@?e@@@@@@@@e?@@@@@@@@?e@@@@@@@@e?@@@@@@@@?e@@@@@@@@e?@@@@@@@@?e@@@@@@@@e?@@@@@@@@?e@@@@@@@@e?@@@@@@@@?e@@@@@@@@e?@@@@@@@@?e@@@@@@@@e?@@@@@@@@?e@@@@@@@@e?@@@@@@@@?e@@@@@@@@e?@@@@@@@@?e@@@@@@@@e?@@@@@@@@
@@h? |
@@ |
@@h? |
@@ |
@@h? |
@@ |
@@h? |
@@ |
@@h? |
@@ |
@@h? |
@@ |
NOTE : If you are not setting current time for 5 seconds, display return to old time.
@@g |
|
?@@ |
@@g |
|
?@@ |
@@g |
|
?@@ |
@@g |
|
?@@ |
@@g |
|
?@@ |
@@g |
|
?@@ |
@@@@@@@@ |
?@@@@@@@@?e@@@@@@@@e?@@@@@@@@?e@@@@@@@@e?@@@@@@@@?e@@@@@@@@e?@@@@@@@@?e@@@@@@@@e?@@@@@@@@?e@@@@@@@@e?@@@@@@@@?e@@@@@@@@e?@@@@@@@@?e@@@@@@@@e?@@@@@@@@?e@@@@@@@@e?@@@@@@@@?e@@@@@@@@e?@@@@@@@@?e@@@@@@@@e?@@@@@@@@?e@@@@@@@@e?@@@@@@@@?e@@@@@@@@e?@@@@@@@@?e@@@@@@@@e?@@@@@@@@?e@@@@@@@@e?@@@@@@@@?e@@@@@@@@e?@@@@@@@@?e@@@@@@@@e?@@@@@@@@?e@@@@@@@@e?@@@@@@@@?e@@@@@@@@e?@@@@@@@@?e@@@@@@@@e?@@@@@@@@?e@@@@@@@@e?@@@@@@@@?e@@@@@@@@e?@@@@@@@@ |
?@@@@@@@@ |
|
|
|
2. Turn the TIMER KNOB left for |
The display will show the numbers, “0” |
||
hour you want. |
to “23” you set. |
|
|
|
This example shows “10:00”. |
|
|
|
@@@@@@@@e?@@@@@@@@e?@@@@@@@@?e@@@@@@@@e?@@@@@@@@?e@@@@@@@@e?@@@@@@@@?e@@@@@@@@e?@@@@@@@@?e@@@@@@@@e?@@@@@@@@?e@@@@@@@@e?@@@@@@@@?e@@@@@@@@ |
||
|
@@@@@@@@e?@@@@@@@@e?@@@@@@@@?e@@@@@@@@e?@@@@@@@@?e@@@@@@@@e?@@@@@@@@?e@@@@@@@@e?@@@@@@@@?e@@@@@@@@e?@@@@@@@@?e@@@@@@@@e?@@@@@@@@?e@@@@@@@@ |
||
|
@@h? |
@@ |
|
|
@@h? |
@@ |
|
|
@@h? |
@@ |
|
|
@@h? |
@@ |
|
|
@@h? |
@@ |
|
|
@@h? |
@@ |
|
|
|
NOTE : The colon will continue |
|
|
@@g |
to stop blinking. |
?@@ |
|
@@g |
|
?@@ |
|
@@g |
|
?@@ |
|
@@g |
|
?@@ |
|
@@g |
|
?@@ |
|
@@g |
|
?@@ |
|
@@@@@@@@ |
?@@@@@@@@?e@@@@@@@@e?@@@@@@@@?e@@@@@@@@e?@@@@@@@@?e@@@@@@@@e?@@@@@@@@?e@@@@@@@@e?@@@@@@@@?e@@@@@@@@e?@@@@@@@@?e@@@@@@@@ |
?@@@@@@@@ |
|
@@@@@@@@ |
?@@@@@@@@?e@@@@@@@@e?@@@@@@@@?e@@@@@@@@e?@@@@@@@@?e@@@@@@@@e?@@@@@@@@?e@@@@@@@@e?@@@@@@@@?e@@@@@@@@e?@@@@@@@@?e@@@@@@@@ |
?@@@@@@@@ |
3. Turn the TIMER KNOB right for |
The display will show the numbers, |
|
|
minutes you want. |
“00” to “59”, you set. |
|
|
|
@@@@@@@@e?@@@@@@@@e?@@@@@@@@?e@@@@@@@@e?@@@@@@@@?e@@@@@@@@e?@@@@@@@@?e@@@@@@@@e?@@@@@@@@?e@@@@@@@@e?@@@@@@@@?e@@@@@@@@e?@@@@@@@@?e@@@@@@@@ |
||
|
@@@@@@@@e?@@@@@@@@e?@@@@@@@@?e@@@@@@@@e?@@@@@@@@?e@@@@@@@@e?@@@@@@@@?e@@@@@@@@e?@@@@@@@@?e@@@@@@@@e?@@@@@@@@?e@@@@@@@@e?@@@@@@@@?e@@@@@@@@ |
||
|
@@h? |
@@ |
|
|
@@h? |
@@ |
|
|
@@h? |
@@ |
|
|
@@h? |
@@ |
|
|
@@h? |
@@ |
|
|
@@h? |
@@ |
|
|
|
NOTE : The colon will continue |
|
|
@@g |
to stop blinking. |
?@@ |
|
@@g |
|
?@@ |
|
@@g |
|
?@@ |
|
@@g |
|
?@@ |
|
@@g |
|
?@@ |
|
@@g |
|
?@@ |
|
@@@@@@@@ |
?@@@@@@@@?e@@@@@@@@e?@@@@@@@@?e@@@@@@@@e?@@@@@@@@?e@@@@@@@@e?@@@@@@@@?e@@@@@@@@e?@@@@@@@@?e@@@@@@@@e?@@@@@@@@?e@@@@@@@@ |
?@@@@@@@@ |
|
@@@@@@@@ |
?@@@@@@@@?e@@@@@@@@e?@@@@@@@@?e@@@@@@@@e?@@@@@@@@?e@@@@@@@@e?@@@@@@@@?e@@@@@@@@e?@@@@@@@@?e@@@@@@@@e?@@@@@@@@?e@@@@@@@@ |
?@@@@@@@@ |
8
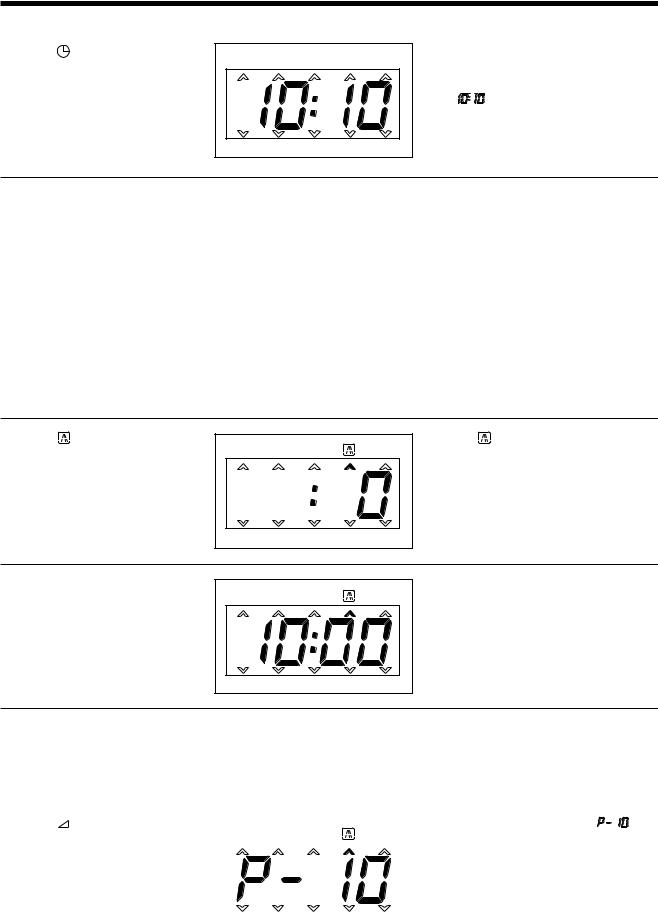
4. Touch |
pad. |
The display will show present time, |
|
|
|
and the colon starts blinking. |
|
|
|
This digital clock allows you to set to |
|
|
|
“ |
”. |
MICROWAVE
@@@@@@@@e?@@@@@@@@e?@@@@@@@@?e@@@@@@@@e?@@@@@@@@?e@@@@@@@@e?@@@@@@@@?e@@@@@@@@e?@@@@@@@@?e@@@@@@@@e?@@@@@@@@?e@@@@@@@@e?@@@@@@@@?e@@@@@@@@e?@@@@@@@@?e@@@@@@@@e?@@@@@@@@?e@@@@@@@@e?@@@@@@@@?e@@@@@@@@e?@@@@@@@@?e@@@@@@@@e?@@@@@@@@?e@@@@@@@@e?@@@@@@@@?e@@@@@@@@e?@@@@@@@@?e@@@@@@@@e?@@@@@@@@?e@@@@@@@@e?@@@@@@@@?e@@@@@@@@e?@@@@@@@@?e@@@@@@@@e?@@@@@@@@?e@@@@@@@@e?@@@@@@@@?e@@@@@@@@e?@@@@@@@@?e@@@@@@@@e?@@@@@@@@?e@@@@@@@@e?@@@@@@@@?e@@@@@@@@e?@@@@@@@@
@@@@@@@@e?@@@@@@@@e?@@@@@@@@?e@@@@@@@@e?@@@@@@@@?e@@@@@@@@e?@@@@@@@@?e@@@@@@@@e?@@@@@@@@?e@@@@@@@@e?@@@@@@@@?e@@@@@@@@e?@@@@@@@@?e@@@@@@@@e?@@@@@@@@?e@@@@@@@@e?@@@@@@@@?e@@@@@@@@e?@@@@@@@@?e@@@@@@@@e?@@@@@@@@?e@@@@@@@@e?@@@@@@@@?e@@@@@@@@e?@@@@@@@@?e@@@@@@@@e?@@@@@@@@?e@@@@@@@@e?@@@@@@@@?e@@@@@@@@e?@@@@@@@@?e@@@@@@@@e?@@@@@@@@?e@@@@@@@@e?@@@@@@@@?e@@@@@@@@e?@@@@@@@@?e@@@@@@@@e?@@@@@@@@?e@@@@@@@@e?@@@@@@@@?e@@@@@@@@e?@@@@@@@@?e@@@@@@@@e?@@@@@@@@ |
|
@@h? |
@@ |
@@h? |
@@ |
@@h? |
@@ |
@@h? |
@@ |
@@h? |
@@ |
@@h? |
@@ |
@@
@@
@@
@@ NOTE :
@@
@@
@@
@@
@@
@@
@@
@@
@@
@@
@@
@@
@@
@@
@@
@@
@@
@@
@@
@@
@@
@@
@@
@@
@@
@@
@@
@@
@@
@@
@@
@@
@@
@@
@@
@@
@@
@@
@@
@@
@@
@@
@@
@@
@@@@@@@@@@@@@@
@@
•To insure the best microwave and defrost results, be sure to start with a cool oven. Let the oven cool 15~20 minutes with the door slightly open.
•Power level is from 0 to 10.
•If you turn to right TIMER KNOB, time and power level are increased. If you turn to left TIMER KNOB, time and power level are decreased.
•It is displayed after an interval of 10 seconds from 10 seconds to 5 minutes, 30 seconds from 5 minutes to 10 minutes, 1 minutes from 10 minutes to 99 minutes.
@@
@@
@@
@@
@@
@@
@@
@@
@@
@@
@@
@@
@@
@@
@@
@@
@@
@@
@@
@@
@@
@@
@@
@@
@@
@@
@@
@@
@@
@@
@@
@@
@@
@@
@@
@@
@@
@@
@@
@@
@@
@@
@@
@@
@@
@@
@@
@@
@@@@@@@@@@@@@@
@@
@@g |
|
?@@ |
@@g |
|
?@@ |
@@g |
|
?@@ |
@@g |
|
?@@ |
@@g |
|
?@@ |
@@g |
|
?@@ |
@@@@@@@@ |
?@@@@@@@@?e@@@@@@@@e?@@@@@@@@?e@@@@@@@@e?@@@@@@@@?e@@@@@@@@e?@@@@@@@@?e@@@@@@@@e?@@@@@@@@?e@@@@@@@@e?@@@@@@@@?e@@@@@@@@e?@@@@@@@@?e@@@@@@@@e?@@@@@@@@?e@@@@@@@@e?@@@@@@@@?e@@@@@@@@e?@@@@@@@@?e@@@@@@@@e?@@@@@@@@?e@@@@@@@@e?@@@@@@@@?e@@@@@@@@e?@@@@@@@@?e@@@@@@@@e?@@@@@@@@?e@@@@@@@@e?@@@@@@@@?e@@@@@@@@e?@@@@@@@@?e@@@@@@@@e?@@@@@@@@?e@@@@@@@@e?@@@@@@@@?e@@@@@@@@e?@@@@@@@@?e@@@@@@@@e?@@@@@@@@?e@@@@@@@@e?@@@@@@@@?e@@@@@@@@e?@@@@@@@@ |
?@@@@@@@@ |
SETTING THE CONTROLS
1. Touch |
pad. |
The |
indicator will light. |
2.Turn the TIMER KNOB for the desired cooking time.
For example : 10 minutes
 will show in the display.
@@@@@@@@e?@@@@@@@@e?@@@@@@@@?e@@@@@@@@e?@@@@@@@@?e@@@@@@@@e?@@@@@@@@?e@@@@@@@@e?@@@@@@@@?e@@@@@@@@e?@@@@@@@@?e@@@@@@@@e?@@@@@@@@?e@@@@@@@@
@@@@@@@@e?@@@@@@@@e?@@@@@@@@?e@@@@@@@@e?@@@@@@@@?e@@@@@@@@e?@@@@@@@@?e@@@@@@@@e?@@@@@@@@?e@@@@@@@@e?@@@@@@@@?e@@@@@@@@e?@@@@@@@@?e@@@@@@@@
@@h? |
@@ |
|
@@h? |
@@ |
|
@@h? |
@@ |
|
@@h? |
@@ |
|
@@h? |
@@ |
|
@@h? |
@@ |
|
|
NOTE : Time can be set up to |
|
@@g |
99 minutes. |
?@@ |
@@g |
|
?@@ |
@@g |
|
?@@ |
@@g |
|
?@@ |
@@g |
|
?@@ |
@@g |
|
?@@ |
@@@@@@@@ |
?@@@@@@@@?e@@@@@@@@e?@@@@@@@@?e@@@@@@@@e?@@@@@@@@?e@@@@@@@@e?@@@@@@@@?e@@@@@@@@e?@@@@@@@@?e@@@@@@@@e?@@@@@@@@?e@@@@@@@@ |
?@@@@@@@@ |
@@@@@@@@ |
?@@@@@@@@?e@@@@@@@@e?@@@@@@@@?e@@@@@@@@e?@@@@@@@@?e@@@@@@@@e?@@@@@@@@?e@@@@@@@@e?@@@@@@@@?e@@@@@@@@e?@@@@@@@@?e@@@@@@@@ |
?@@@@@@@@ |
@@@@@@@@e?@@@@@@@@e?@@@@@@@@?e@@@@@@@@e?@@@@@@@@?e@@@@@@@@e?@@@@@@@@?e@@@@@@@@e?@@@@@@@@?e@@@@@@@@e?@@@@@@@@?e@@@@@@@@e?@@@@@@@@?e@@@@@@@@e?@@@@@@@@?e@@@@@@@@e?@@@@@@@@?e@@@@@@@@e?@@@@@@@@?e@@@@@@@@e?@@@@@@@@?e@@@@@@@@e?@@@@@@@@?e@@@@@@@@e?@@@@@@@@?e@@@@@@@@e?@@@@@@@@?e@@@@@@@@e?@@@@@@@@?e@@@@@@@@e?@@@@@@@@?e@@@@@@@@e?@@@@@@@@?e@@@@@@@@e?@@@@@@@@?e@@@@@@@@e?@@@@@@@@?e@@@@@@@@e?@@@@@@@@?e@@@@@@@@e?@@@@@@@@?e@@@@@@@@e?@@@@@@@@?e@@@@@@@@e?@@@@@@@@
@@@@@@@@e?@@@@@@@@e?@@@@@@@@?e@@@@@@@@e?@@@@@@@@?e@@@@@@@@e?@@@@@@@@?e@@@@@@@@e?@@@@@@@@?e@@@@@@@@e?@@@@@@@@?e@@@@@@@@e?@@@@@@@@?e@@@@@@@@e?@@@@@@@@?e@@@@@@@@e?@@@@@@@@?e@@@@@@@@e?@@@@@@@@?e@@@@@@@@e?@@@@@@@@?e@@@@@@@@e?@@@@@@@@?e@@@@@@@@e?@@@@@@@@?e@@@@@@@@e?@@@@@@@@?e@@@@@@@@e?@@@@@@@@?e@@@@@@@@e?@@@@@@@@?e@@@@@@@@e?@@@@@@@@?e@@@@@@@@e?@@@@@@@@?e@@@@@@@@e?@@@@@@@@?e@@@@@@@@e?@@@@@@@@?e@@@@@@@@e?@@@@@@@@?e@@@@@@@@e?@@@@@@@@?e@@@@@@@@e?@@@@@@@@
@@h? |
|
|
|
|
|
|
|
|
@@ |
|
@@h? |
|
|
|
|
|
|
|
|
@@ |
|
@@h? |
|
|
|
|
|
|
|
|
@@ |
|
@@h? |
|
|
|
|
|
|
|
|
@@ |
|
@@h? |
|
|
|
|
|
|
|
|
@@ |
|
@@h? |
|
|
|
|
|
|
|
|
@@ |
|
|
NOTE : •If step 3 and 4 are omitted, oven will cook at full power. |
|
|
|
|
|
||||
|
|
• To check the power level while the oven is operating, touch the POWER LEVEL pad and then the power |
|
|||||||
|
|
|
level will be displayed for 3 seconds. |
|
|
|
|
|
||
@@g |
|
|
|
|
|
|
|
|
|
?@@ |
@@g |
|
|
|
|
|
|
|
|
|
?@@ |
@@g |
|
|
|
|
|
|
|
|
|
?@@ |
@@g |
|
|
|
|
|
|
|
|
|
?@@ |
@@g |
|
|
|
|
|
|
|
|
|
?@@ |
@@g |
|
|
|
|
|
|
|
|
|
?@@ |
@@@@@@@@ |
?@@@@@@@@?e@@@@@@@@e?@@@@@@@@?e@@@@@@@@e?@@@@@@@@?e@@@@@@@@e?@@@@@@@@?e@@@@@@@@e?@@@@@@@@?e@@@@@@@@e?@@@@@@@@?e@@@@@@@@e?@@@@@@@@?e@@@@@@@@e?@@@@@@@@?e@@@@@@@@e?@@@@@@@@?e@@@@@@@@e?@@@@@@@@?e@@@@@@@@e?@@@@@@@@?e@@@@@@@@e?@@@@@@@@?e@@@@@@@@e?@@@@@@@@?e@@@@@@@@e?@@@@@@@@?e@@@@@@@@e?@@@@@@@@?e@@@@@@@@e?@@@@@@@@?e@@@@@@@@e?@@@@@@@@?e@@@@@@@@e?@@@@@@@@?e@@@@@@@@e?@@@@@@@@?e@@@@@@@@e?@@@@@@@@?e@@@@@@@@e?@@@@@@@@?e@@@@@@@@e?@@@@@@@@ |
?@@@@@@@@ |
||||||||
|
|
|
|
|
|
|
|
|
|
|
3. Touch |
|
pad. |
|
|
|
The display will be shown “ |
|
”. |
|
|
|
|
|
|
|
|
|||||
|
|
|
|
|
|
|
|
|
|
|
|
|
|
|
|
|
|
|
|
|
|
|
|
|
|
|
|
|
|
|
|
|
|
|
|
|
|
|
|
|
|
|
|
|
|
|
|
|
|
|
|
|
|
|
9
4. Turn the TIMER KNOB to |
The display will be shown what you |
select the desired microwave |
touched. |
power level |
This example will show “ P-6 ” |
For example : Power 6 |
|
5. Touch pad. |
The |
indicator light will starts |
|
blinking to show the oven is in the |
|
|
MICROWAVE mode. |
|
6.Three beeps will sound at the end of the cooking time. The indicator light will go off. The display panel will return to the time of day. The oven light will turn off and the turntable will stop turning.
@@@@@@@@e?@@@@@@@@e?@@@@@@@@?e@@@@@@@@e?@@@@@@@@?e@@@@@@@@e?@@@@@@@@?e@@@@@@@@e?@@@@@@@@?e@@@@@@@@e?@@@@@@@@?e@@@@@@@@e?@@@@@@@@?e@@@@@@@@e?@@@@@@@@?e@@@@@@@@e?@@@@@@@@?e@@@@@@@@e?@@@@@@@@?e@@@@@@@@e?@@@@@@@@?e@@@@@@@@e?@@@@@@@@?e@@@@@@@@e?@@@@@@@@?e@@@@@@@@e?@@@@@@@@?e@@@@@@@@e?@@@@@@@@?e@@@@@@@@e?@@@@@@@@?e@@@@@@@@e?@@@@@@@@?e@@@@@@@@e?@@@@@@@@?e@@@@@@@@e?@@@@@@@@?e@@@@@@@@e?@@@@@@@@?e@@@@@@@@e?@@@@@@@@?e@@@@@@@@e?@@@@@@@@?e@@@@@@@@e?@@@@@@@@
@@@@@@@@e?@@@@@@@@e?@@@@@@@@?e@@@@@@@@e?@@@@@@@@?e@@@@@@@@e?@@@@@@@@?e@@@@@@@@e?@@@@@@@@?e@@@@@@@@e?@@@@@@@@?e@@@@@@@@e?@@@@@@@@?e@@@@@@@@e?@@@@@@@@?e@@@@@@@@e?@@@@@@@@?e@@@@@@@@e?@@@@@@@@?e@@@@@@@@e?@@@@@@@@?e@@@@@@@@e?@@@@@@@@?e@@@@@@@@e?@@@@@@@@?e@@@@@@@@e?@@@@@@@@?e@@@@@@@@e?@@@@@@@@?e@@@@@@@@e?@@@@@@@@?e@@@@@@@@e?@@@@@@@@?e@@@@@@@@e?@@@@@@@@?e@@@@@@@@e?@@@@@@@@?e@@@@@@@@e?@@@@@@@@?e@@@@@@@@e?@@@@@@@@?e@@@@@@@@e?@@@@@@@@?e@@@@@@@@e?@@@@@@@@
@@h? |
@@ |
|
@@h? |
@@ |
|
@@h? |
@@ |
|
@@h? |
@@ |
|
@@h? |
@@ |
|
@@h? |
@@ |
|
|
NOTE : After the end of every cooking, if you don’t take out food, you will hear 3 beeps 4 times. |
|
|
However, if you open the door or press any pads, you don’t heard the sound. |
|
@@g |
|
?@@ |
@@g |
|
?@@ |
@@g |
|
?@@ |
@@g |
|
?@@ |
@@g |
|
?@@ |
@@g |
|
?@@ |
@@@@@@@@ |
?@@@@@@@@?e@@@@@@@@e?@@@@@@@@?e@@@@@@@@e?@@@@@@@@?e@@@@@@@@e?@@@@@@@@?e@@@@@@@@e?@@@@@@@@?e@@@@@@@@e?@@@@@@@@?e@@@@@@@@e?@@@@@@@@?e@@@@@@@@e?@@@@@@@@?e@@@@@@@@e?@@@@@@@@?e@@@@@@@@e?@@@@@@@@?e@@@@@@@@e?@@@@@@@@?e@@@@@@@@e?@@@@@@@@?e@@@@@@@@e?@@@@@@@@?e@@@@@@@@e?@@@@@@@@?e@@@@@@@@e?@@@@@@@@?e@@@@@@@@e?@@@@@@@@?e@@@@@@@@e?@@@@@@@@?e@@@@@@@@e?@@@@@@@@?e@@@@@@@@e?@@@@@@@@?e@@@@@@@@e?@@@@@@@@?e@@@@@@@@e?@@@@@@@@?e@@@@@@@@e?@@@@@@@@ ?@@@@@@@@ |
|
GRILL
@@@@@@@@e?@@@@@@@@e?@@@@@@@@?e@@@@@@@@e?@@@@@@@@?e@@@@@@@@e?@@@@@@@@?e@@@@@@@@e?@@@@@@@@?e@@@@@@@@e?@@@@@@@@?e@@@@@@@@e?@@@@@@@@?e@@@@@@@@e?@@@@@@@@?e@@@@@@@@e?@@@@@@@@?e@@@@@@@@e?@@@@@@@@?e@@@@@@@@e?@@@@@@@@?e@@@@@@@@e?@@@@@@@@?e@@@@@@@@e?@@@@@@@@?e@@@@@@@@e?@@@@@@@@?e@@@@@@@@e?@@@@@@@@?e@@@@@@@@e?@@@@@@@@?e@@@@@@@@e?@@@@@@@@?e@@@@@@@@e?@@@@@@@@?e@@@@@@@@e?@@@@@@@@?e@@@@@@@@e?@@@@@@@@?e@@@@@@@@e?@@@@@@@@?e@@@@@@@@e?@@@@@@@@?e@@@@@@@@e?@@@@@@@@
@@@@@@@@e?@@@@@@@@e?@@@@@@@@?e@@@@@@@@e?@@@@@@@@?e@@@@@@@@e?@@@@@@@@?e@@@@@@@@e?@@@@@@@@?e@@@@@@@@e?@@@@@@@@?e@@@@@@@@e?@@@@@@@@?e@@@@@@@@e?@@@@@@@@?e@@@@@@@@e?@@@@@@@@?e@@@@@@@@e?@@@@@@@@?e@@@@@@@@e?@@@@@@@@?e@@@@@@@@e?@@@@@@@@?e@@@@@@@@e?@@@@@@@@?e@@@@@@@@e?@@@@@@@@?e@@@@@@@@e?@@@@@@@@?e@@@@@@@@e?@@@@@@@@?e@@@@@@@@e?@@@@@@@@?e@@@@@@@@e?@@@@@@@@?e@@@@@@@@e?@@@@@@@@?e@@@@@@@@e?@@@@@@@@?e@@@@@@@@e?@@@@@@@@?e@@@@@@@@e?@@@@@@@@?e@@@@@@@@e?@@@@@@@@
@@h? |
@@ |
@@h? |
@@ |
@@h? |
@@ |
@@h? |
@@ |
@@h? |
@@ |
@@h? |
@@ |
NOTE : |
• The heating element is located in the top of the oven. |
•There is no pre-heating the oven for grilling. Place food inside the oven when setting the controls.
•The setting time is increased if you are to turn right the TIMER KNOB. The setting time is decreased if you are to turn left the TIMER KNOB.
•It is displayed after an interval of 10 seconds from 10 seconds to 5 minutes, 30 seconds from 5 minutes to
|
|
10 minutes, 1 minutes from 10 minutes to 60 minutes. |
|
|
|
|
@@g |
|
|
|
|
|
?@@ |
@@g |
|
|
|
|
|
?@@ |
@@g |
|
|
|
|
|
?@@ |
@@g |
|
|
|
|
|
?@@ |
@@g |
|
|
|
|
|
?@@ |
@@g |
|
|
|
|
|
?@@ |
@@@@@@@@ |
?@@@@@@@@?e@@@@@@@@e?@@@@@@@@?e@@@@@@@@e?@@@@@@@@?e@@@@@@@@e?@@@@@@@@?e@@@@@@@@e?@@@@@@@@?e@@@@@@@@e?@@@@@@@@?e@@@@@@@@e?@@@@@@@@?e@@@@@@@@e?@@@@@@@@?e@@@@@@@@e?@@@@@@@@?e@@@@@@@@e?@@@@@@@@?e@@@@@@@@e?@@@@@@@@?e@@@@@@@@e?@@@@@@@@?e@@@@@@@@e?@@@@@@@@?e@@@@@@@@e?@@@@@@@@?e@@@@@@@@e?@@@@@@@@?e@@@@@@@@e?@@@@@@@@?e@@@@@@@@e?@@@@@@@@?e@@@@@@@@e?@@@@@@@@?e@@@@@@@@e?@@@@@@@@?e@@@@@@@@e?@@@@@@@@?e@@@@@@@@e?@@@@@@@@?e@@@@@@@@e?@@@@@@@@ ?@@@@@@@@ |
|||||
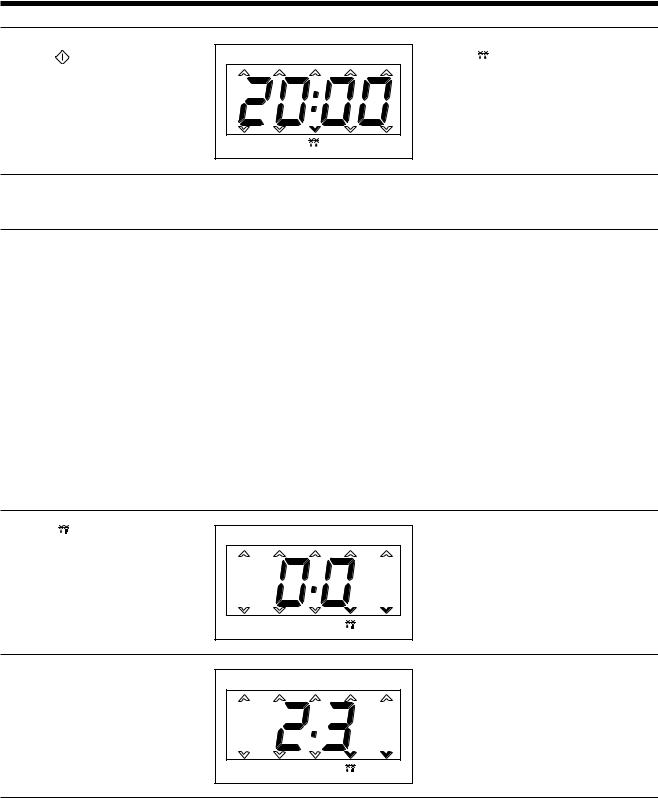
SETTING THE CONTROLS |
|
|
|
|||
|
|
|
|
|
|
|
1. Touch |
pad. |
|
|
The |
indicator will light. |
|
|
|
|
|
|
|
|
|
|
|
|
|
|
|
|
|
|
|
|
|
|
|
|
|
|
|
|
|
2.Turn the TIMER KNOB for the desired cooking time.
For example : 25 minutes

 will show in the display.
@@@@@@@@e?@@@@@@@@e?@@@@@@@@?e@@@@@@@@e?@@@@@@@@?e@@@@@@@@e?@@@@@@@@?e@@@@@@@@e?@@@@@@@@?e@@@@@@@@e?@@@@@@@@?e@@@@@@@@e?@@@@@@@@?e@@@@@@@@
@@@@@@@@e?@@@@@@@@e?@@@@@@@@?e@@@@@@@@e?@@@@@@@@?e@@@@@@@@e?@@@@@@@@?e@@@@@@@@e?@@@@@@@@?e@@@@@@@@e?@@@@@@@@?e@@@@@@@@e?@@@@@@@@?e@@@@@@@@
@@h? |
@@ |
|
@@h? |
@@ |
|
@@h? |
@@ |
|
@@h? |
@@ |
|
@@h? |
@@ |
|
@@h? |
@@ |
|
|
NOTE : Time can be set up to |
|
@@g |
60 minutes. |
?@@ |
@@g |
|
?@@ |
@@g |
|
?@@ |
@@g |
|
?@@ |
@@g |
|
?@@ |
@@g |
|
?@@ |
@@@@@@@@ |
?@@@@@@@@?e@@@@@@@@e?@@@@@@@@?e@@@@@@@@e?@@@@@@@@?e@@@@@@@@e?@@@@@@@@?e@@@@@@@@e?@@@@@@@@?e@@@@@@@@e?@@@@@@@@?e@@@@@@@@ |
?@@@@@@@@ |
@@@@@@@@ |
?@@@@@@@@?e@@@@@@@@e?@@@@@@@@?e@@@@@@@@e?@@@@@@@@?e@@@@@@@@e?@@@@@@@@?e@@@@@@@@e?@@@@@@@@?e@@@@@@@@e?@@@@@@@@?e@@@@@@@@ |
?@@@@@@@@ |
10
1. Touch |
pad. |
The |
indicator light will light. |
4.Three beeps will sound at the end of the cooking time. The indicator light will go off. The display panel will return to the time of day. The oven light will turn off and the turntable will stop turning.
TO SET COMBI COOKING
@@@@@@@@e?@@@@@@@@e?@@@@@@@@?e@@@@@@@@e?@@@@@@@@?e@@@@@@@@e?@@@@@@@@?e@@@@@@@@e?@@@@@@@@?e@@@@@@@@e?@@@@@@@@?e@@@@@@@@e?@@@@@@@@?e@@@@@@@@e?@@@@@@@@?e@@@@@@@@e?@@@@@@@@?e@@@@@@@@e?@@@@@@@@?e@@@@@@@@e?@@@@@@@@?e@@@@@@@@e?@@@@@@@@?e@@@@@@@@e?@@@@@@@@?e@@@@@@@@e?@@@@@@@@?e@@@@@@@@e?@@@@@@@@?e@@@@@@@@e?@@@@@@@@?e@@@@@@@@e?@@@@@@@@?e@@@@@@@@e?@@@@@@@@?e@@@@@@@@e?@@@@@@@@?e@@@@@@@@e?@@@@@@@@?e@@@@@@@@e?@@@@@@@@?e@@@@@@@@e?@@@@@@@@?e@@@@@@@@e?@@@@@@@@
@@@@@@@@e?@@@@@@@@e?@@@@@@@@?e@@@@@@@@e?@@@@@@@@?e@@@@@@@@e?@@@@@@@@?e@@@@@@@@e?@@@@@@@@?e@@@@@@@@e?@@@@@@@@?e@@@@@@@@e?@@@@@@@@?e@@@@@@@@e?@@@@@@@@?e@@@@@@@@e?@@@@@@@@?e@@@@@@@@e?@@@@@@@@?e@@@@@@@@e?@@@@@@@@?e@@@@@@@@e?@@@@@@@@?e@@@@@@@@e?@@@@@@@@?e@@@@@@@@e?@@@@@@@@?e@@@@@@@@e?@@@@@@@@?e@@@@@@@@e?@@@@@@@@?e@@@@@@@@e?@@@@@@@@?e@@@@@@@@e?@@@@@@@@?e@@@@@@@@e?@@@@@@@@?e@@@@@@@@e?@@@@@@@@?e@@@@@@@@e?@@@@@@@@?e@@@@@@@@e?@@@@@@@@?e@@@@@@@@e?@@@@@@@@
@@h? |
@@ |
@@h? |
@@ |
@@h? |
@@ |
@@h? |
@@ |
@@h? |
@@ |
@@h? |
@@ |
@@
@@
@@
@@ NOTE :
@@
@@
@@
@@
@@
@@
@@
@@
@@
@@
@@
@@
@@@@@@@@@@@@@@
@@
•Microwave and convection operate (sequentially) in this mode.
•This oven can be set to a minumum temperature of 100˚C (200˚F) and a maximum temperature of 250˚C (500˚F)
@@
@@
@@
@@
@@
@@
@@
@@
@@
@@
@@
@@
@@
@@
@@
@@
@@
@@@@@@@@@@@@
@@
@@g |
|
?@@ |
@@g |
|
?@@ |
@@g |
|
?@@ |
@@g |
|
?@@ |
@@g |
|
?@@ |
@@g |
|
?@@ |
@@@@@@@@ |
?@@@@@@@@?e@@@@@@@@e?@@@@@@@@?e@@@@@@@@e?@@@@@@@@?e@@@@@@@@e?@@@@@@@@?e@@@@@@@@e?@@@@@@@@?e@@@@@@@@e?@@@@@@@@?e@@@@@@@@e?@@@@@@@@?e@@@@@@@@e?@@@@@@@@?e@@@@@@@@e?@@@@@@@@?e@@@@@@@@e?@@@@@@@@?e@@@@@@@@e?@@@@@@@@?e@@@@@@@@e?@@@@@@@@?e@@@@@@@@e?@@@@@@@@?e@@@@@@@@e?@@@@@@@@?e@@@@@@@@e?@@@@@@@@?e@@@@@@@@e?@@@@@@@@?e@@@@@@@@e?@@@@@@@@?e@@@@@@@@e?@@@@@@@@?e@@@@@@@@e?@@@@@@@@?e@@@@@@@@e?@@@@@@@@?e@@@@@@@@e?@@@@@@@@?e@@@@@@@@e?@@@@@@@@ |
?@@@@@@@@ |
SETTING THE CONTROLS
1. Touch |
pad. |
The corresponding |
indicator will |
|
|
light on the display. |
|
2. Touch the TIMER KNOB for the |
|
will show in the display. |
|
desired cooking time. |
@@h? |
@@ |
|
|
@@@@@@@@e?@@@@@@@@e?@@@@@@@@?e@@@@@@@@e?@@@@@@@@?e@@@@@@@@e?@@@@@@@@?e@@@@@@@@e?@@@@@@@@?e@@@@@@@@e?@@@@@@@@?e@@@@@@@@e?@@@@@@@@?e@@@@@@@@ |
||
|
@@@@@@@@e?@@@@@@@@e?@@@@@@@@?e@@@@@@@@e?@@@@@@@@?e@@@@@@@@e?@@@@@@@@?e@@@@@@@@e?@@@@@@@@?e@@@@@@@@e?@@@@@@@@?e@@@@@@@@e?@@@@@@@@?e@@@@@@@@ |
||
|
@@h? |
@@ |
|
|
@@h? |
@@ |
|
|
@@h? |
@@ |
|
|
@@h? |
@@ |
|
|
@@h? |
@@ |
|
For example : 10 minutes |
|
NOTE : Time can be set up to |
|
@@g |
99 minutes. |
?@@ |
|
|
@@g |
|
?@@ |
|
@@g |
|
?@@ |
|
@@g |
|
?@@ |
|
@@g |
|
?@@ |
|
@@g |
|
?@@ |
|
@@@@@@@@ |
?@@@@@@@@?e@@@@@@@@e?@@@@@@@@?e@@@@@@@@e?@@@@@@@@?e@@@@@@@@e?@@@@@@@@?e@@@@@@@@e?@@@@@@@@?e@@@@@@@@e?@@@@@@@@?e@@@@@@@@ |
?@@@@@@@@ |
|
@@@@@@@@ |
?@@@@@@@@?e@@@@@@@@e?@@@@@@@@?e@@@@@@@@e?@@@@@@@@?e@@@@@@@@e?@@@@@@@@?e@@@@@@@@e?@@@@@@@@?e@@@@@@@@e?@@@@@@@@?e@@@@@@@@ |
?@@@@@@@@ |
3. Touch ˚C (˚F) pad. |
195˚C (350˚F) will show in the display |
Touch the TIMER KNOB for |
window. |
the desired temperature. |
|
11
For example : 195˚C (350˚F)
1 9 5
3 5 0
4. Touch |
pad. |
The |
indicator will starts blinking |
|
|
to show the oven is in the |
|
|
|
CONVECTION mode (for 10 minutes |
|
|
|
at 350˚F (195˚C)). |
|
5.Three beeps will sound at the end of the cooking time. The indicator light will go off. The display panel will return to the time of day. The oven light will turn off and the turntable will stop turning.
AUTO DEFROST
@@@@@@@@e?@@@@@@@@e?@@@@@@@@?e@@@@@@@@e?@@@@@@@@?e@@@@@@@@e?@@@@@@@@?e@@@@@@@@e?@@@@@@@@?e@@@@@@@@e?@@@@@@@@?e@@@@@@@@e?@@@@@@@@?e@@@@@@@@e?@@@@@@@@?e@@@@@@@@e?@@@@@@@@?e@@@@@@@@e?@@@@@@@@?e@@@@@@@@e?@@@@@@@@?e@@@@@@@@e?@@@@@@@@?e@@@@@@@@e?@@@@@@@@?e@@@@@@@@e?@@@@@@@@?e@@@@@@@@e?@@@@@@@@?e@@@@@@@@e?@@@@@@@@?e@@@@@@@@e?@@@@@@@@?e@@@@@@@@e?@@@@@@@@?e@@@@@@@@e?@@@@@@@@?e@@@@@@@@e?@@@@@@@@?e@@@@@@@@e?@@@@@@@@?e@@@@@@@@e?@@@@@@@@?e@@@@@@@@e?@@@@@@@@
@@@@@@@@e?@@@@@@@@e?@@@@@@@@?e@@@@@@@@e?@@@@@@@@?e@@@@@@@@e?@@@@@@@@?e@@@@@@@@e?@@@@@@@@?e@@@@@@@@e?@@@@@@@@?e@@@@@@@@e?@@@@@@@@?e@@@@@@@@e?@@@@@@@@?e@@@@@@@@e?@@@@@@@@?e@@@@@@@@e?@@@@@@@@?e@@@@@@@@e?@@@@@@@@?e@@@@@@@@e?@@@@@@@@?e@@@@@@@@e?@@@@@@@@?e@@@@@@@@e?@@@@@@@@?e@@@@@@@@e?@@@@@@@@?e@@@@@@@@e?@@@@@@@@?e@@@@@@@@e?@@@@@@@@?e@@@@@@@@e?@@@@@@@@?e@@@@@@@@e?@@@@@@@@?e@@@@@@@@e?@@@@@@@@?e@@@@@@@@e?@@@@@@@@?e@@@@@@@@e?@@@@@@@@?e@@@@@@@@e?@@@@@@@@
@@h? |
@@ |
@@h? |
@@ |
@@h? |
@@ |
@@h? |
@@ |
@@h? |
@@ |
@@h? |
@@ |
NOTE : • Auto defrost can use with combi cooking and microwave as 2-stage. If it use with microwave, you can set power level of microwave.
@@g |
|
?@@ |
@@g |
|
?@@ |
@@g |
|
?@@ |
@@g |
|
?@@ |
@@g |
|
?@@ |
@@g |
|
?@@ |
@@@@@@@@ |
?@@@@@@@@?e@@@@@@@@e?@@@@@@@@?e@@@@@@@@e?@@@@@@@@?e@@@@@@@@e?@@@@@@@@?e@@@@@@@@e?@@@@@@@@?e@@@@@@@@e?@@@@@@@@?e@@@@@@@@e?@@@@@@@@?e@@@@@@@@e?@@@@@@@@?e@@@@@@@@e?@@@@@@@@?e@@@@@@@@e?@@@@@@@@?e@@@@@@@@e?@@@@@@@@?e@@@@@@@@e?@@@@@@@@?e@@@@@@@@e?@@@@@@@@?e@@@@@@@@e?@@@@@@@@?e@@@@@@@@e?@@@@@@@@?e@@@@@@@@e?@@@@@@@@?e@@@@@@@@e?@@@@@@@@?e@@@@@@@@e?@@@@@@@@?e@@@@@@@@e?@@@@@@@@?e@@@@@@@@e?@@@@@@@@?e@@@@@@@@e?@@@@@@@@?e@@@@@@@@e?@@@@@@@@ |
?@@@@@@@@ |
SETTING THE CONTROLS
1. Touch |
pad. |
The |
indicator will light. |
2.Turn the TIMER KNOB for the desired defrosting time.
For example : 20 minutes
 will show in the display.
@@@@@@@@e?@@@@@@@@e?@@@@@@@@?e@@@@@@@@e?@@@@@@@@?e@@@@@@@@e?@@@@@@@@?e@@@@@@@@e?@@@@@@@@?e@@@@@@@@e?@@@@@@@@?e@@@@@@@@e?@@@@@@@@?e@@@@@@@@
@@@@@@@@e?@@@@@@@@e?@@@@@@@@?e@@@@@@@@e?@@@@@@@@?e@@@@@@@@e?@@@@@@@@?e@@@@@@@@e?@@@@@@@@?e@@@@@@@@e?@@@@@@@@?e@@@@@@@@e?@@@@@@@@?e@@@@@@@@
@@h? |
@@ |
|
@@h? |
@@ |
|
@@h? |
@@ |
|
@@h? |
@@ |
|
@@h? |
@@ |
|
@@h? |
@@ |
|
|
NOTE : Time can be set up to |
|
@@g |
99 minutes. |
?@@ |
@@g |
|
?@@ |
@@g |
|
?@@ |
@@g |
|
?@@ |
@@g |
|
?@@ |
@@g |
|
?@@ |
@@@@@@@@ |
?@@@@@@@@?e@@@@@@@@e?@@@@@@@@?e@@@@@@@@e?@@@@@@@@?e@@@@@@@@e?@@@@@@@@?e@@@@@@@@e?@@@@@@@@?e@@@@@@@@e?@@@@@@@@?e@@@@@@@@ |
?@@@@@@@@ |
@@@@@@@@ |
?@@@@@@@@?e@@@@@@@@e?@@@@@@@@?e@@@@@@@@e?@@@@@@@@?e@@@@@@@@e?@@@@@@@@?e@@@@@@@@e?@@@@@@@@?e@@@@@@@@e?@@@@@@@@?e@@@@@@@@ |
?@@@@@@@@ |
12
3. Touch pad. |
The indicator light will starts |
|
blinking to show the oven is in AUTO |
|
DEFROST mode. |
4.Three beeps will sound at the end of the cooking time. The indicator light will go off. The display panel will return to the time of day. The oven light will turn off and the turntable will stop turning.
@@@@@@@@e?@@@@@@@@e?@@@@@@@@?e@@@@@@@@e?@@@@@@@@?e@@@@@@@@e?@@@@@@@@?e@@@@@@@@e?@@@@@@@@?e@@@@@@@@e?@@@@@@@@?e@@@@@@@@e?@@@@@@@@?e@@@@@@@@e?@@@@@@@@?e@@@@@@@@e?@@@@@@@@?e@@@@@@@@e?@@@@@@@@?e@@@@@@@@e?@@@@@@@@?e@@@@@@@@e?@@@@@@@@?e@@@@@@@@e?@@@@@@@@?e@@@@@@@@e?@@@@@@@@?e@@@@@@@@e?@@@@@@@@?e@@@@@@@@e?@@@@@@@@?e@@@@@@@@e?@@@@@@@@?e@@@@@@@@e?@@@@@@@@?e@@@@@@@@e?@@@@@@@@?e@@@@@@@@e?@@@@@@@@?e@@@@@@@@e?@@@@@@@@?e@@@@@@@@e?@@@@@@@@?e@@@@@@@@e?@@@@@@@@
@@@@@@@@e?@@@@@@@@e?@@@@@@@@?e@@@@@@@@e?@@@@@@@@?e@@@@@@@@e?@@@@@@@@?e@@@@@@@@e?@@@@@@@@?e@@@@@@@@e?@@@@@@@@?e@@@@@@@@e?@@@@@@@@?e@@@@@@@@e?@@@@@@@@?e@@@@@@@@e?@@@@@@@@?e@@@@@@@@e?@@@@@@@@?e@@@@@@@@e?@@@@@@@@?e@@@@@@@@e?@@@@@@@@?e@@@@@@@@e?@@@@@@@@?e@@@@@@@@e?@@@@@@@@?e@@@@@@@@e?@@@@@@@@?e@@@@@@@@e?@@@@@@@@?e@@@@@@@@e?@@@@@@@@?e@@@@@@@@e?@@@@@@@@?e@@@@@@@@e?@@@@@@@@?e@@@@@@@@e?@@@@@@@@?e@@@@@@@@e?@@@@@@@@?e@@@@@@@@e?@@@@@@@@?e@@@@@@@@e?@@@@@@@@
@@h? |
@@ |
|
@@h? |
@@ |
|
@@h? |
@@ |
|
@@h? |
@@ |
|
@@h? |
@@ |
|
@@h? |
@@ |
|
|
NOTE : During the defrosting operation turn over after 3 beeps sound 4 times for completed defrosting. |
@@ |
@@@@@@@@@@@@@@@@ |
@@@@@@@@@@@@@@ |
|
@@g |
|
?@@ |
@@g |
|
?@@ |
@@g |
|
?@@ |
@@g |
|
?@@ |
@@g |
|
?@@ |
@@g |
|
?@@ |
@@@@@@@@ |
?@@@@@@@@?e@@@@@@@@e?@@@@@@@@?e@@@@@@@@e?@@@@@@@@?e@@@@@@@@e?@@@@@@@@?e@@@@@@@@e?@@@@@@@@?e@@@@@@@@e?@@@@@@@@?e@@@@@@@@e?@@@@@@@@?e@@@@@@@@e?@@@@@@@@?e@@@@@@@@e?@@@@@@@@?e@@@@@@@@e?@@@@@@@@?e@@@@@@@@e?@@@@@@@@?e@@@@@@@@e?@@@@@@@@?e@@@@@@@@e?@@@@@@@@?e@@@@@@@@e?@@@@@@@@?e@@@@@@@@e?@@@@@@@@?e@@@@@@@@e?@@@@@@@@?e@@@@@@@@e?@@@@@@@@?e@@@@@@@@e?@@@@@@@@?e@@@@@@@@e?@@@@@@@@?e@@@@@@@@e?@@@@@@@@?e@@@@@@@@e?@@@@@@@@?e@@@@@@@@e?@@@@@@@@ ?@@@@@@@@ |
|
WEIGHT DEFROST
@@@@@@@@e?@@@@@@@@e?@@@@@@@@?e@@@@@@@@e?@@@@@@@@?e@@@@@@@@e?@@@@@@@@?e@@@@@@@@e?@@@@@@@@?e@@@@@@@@e?@@@@@@@@?e@@@@@@@@e?@@@@@@@@?e@@@@@@@@e?@@@@@@@@?e@@@@@@@@e?@@@@@@@@?e@@@@@@@@e?@@@@@@@@?e@@@@@@@@e?@@@@@@@@?e@@@@@@@@e?@@@@@@@@?e@@@@@@@@e?@@@@@@@@?e@@@@@@@@e?@@@@@@@@?e@@@@@@@@e?@@@@@@@@?e@@@@@@@@e?@@@@@@@@?e@@@@@@@@e?@@@@@@@@?e@@@@@@@@e?@@@@@@@@?e@@@@@@@@e?@@@@@@@@?e@@@@@@@@e?@@@@@@@@?e@@@@@@@@e?@@@@@@@@?e@@@@@@@@e?@@@@@@@@?e@@@@@@@@e?@@@@@@@@
@@@@@@@@e?@@@@@@@@e?@@@@@@@@?e@@@@@@@@e?@@@@@@@@?e@@@@@@@@e?@@@@@@@@?e@@@@@@@@e?@@@@@@@@?e@@@@@@@@e?@@@@@@@@?e@@@@@@@@e?@@@@@@@@?e@@@@@@@@e?@@@@@@@@?e@@@@@@@@e?@@@@@@@@?e@@@@@@@@e?@@@@@@@@?e@@@@@@@@e?@@@@@@@@?e@@@@@@@@e?@@@@@@@@?e@@@@@@@@e?@@@@@@@@?e@@@@@@@@e?@@@@@@@@?e@@@@@@@@e?@@@@@@@@?e@@@@@@@@e?@@@@@@@@?e@@@@@@@@e?@@@@@@@@?e@@@@@@@@e?@@@@@@@@?e@@@@@@@@e?@@@@@@@@?e@@@@@@@@e?@@@@@@@@?e@@@@@@@@e?@@@@@@@@?e@@@@@@@@e?@@@@@@@@?e@@@@@@@@e?@@@@@@@@
@@h? |
@@ |
@@h? |
@@ |
@@h? |
@@ |
@@h? |
@@ |
@@h? |
@@ |
@@h? |
@@ |
@@
@@
@@
@@ NOTE :
@@
@@
@@
@@
@@
@@
@@
@@
@@
@@
@@
@@
@@
@@
@@
@@
@@
@@
@@
@@
@@@@@@@@@@@@
@@
@@
•WEIGHT DEFROST is used as step 3 and 4 of AUTO DEFROST.
•This digital weight allows you to set from 0.2kg to 3.0kg. If you are setting outover boundary, will sound 3 beeps.
•In rotisserie type, “kg” is changed “ ”, and indicator light is not blinking.
@@
@@
@@
@@
@@
@@
@@
@@
@@
@@
@@
@@
@@
@@
@@
@@
@@
@@
@@
@@
@@
@@
@@
@@
@@@@@@@@@@@@
@@
@@
@@g |
|
?@@ |
@@g |
|
?@@ |
@@g |
|
?@@ |
@@g |
|
?@@ |
@@g |
|
?@@ |
@@g |
|
?@@ |
@@@@@@@@ |
?@@@@@@@@?e@@@@@@@@e?@@@@@@@@?e@@@@@@@@e?@@@@@@@@?e@@@@@@@@e?@@@@@@@@?e@@@@@@@@e?@@@@@@@@?e@@@@@@@@e?@@@@@@@@?e@@@@@@@@e?@@@@@@@@?e@@@@@@@@e?@@@@@@@@?e@@@@@@@@e?@@@@@@@@?e@@@@@@@@e?@@@@@@@@?e@@@@@@@@e?@@@@@@@@?e@@@@@@@@e?@@@@@@@@?e@@@@@@@@e?@@@@@@@@?e@@@@@@@@e?@@@@@@@@?e@@@@@@@@e?@@@@@@@@?e@@@@@@@@e?@@@@@@@@?e@@@@@@@@e?@@@@@@@@?e@@@@@@@@e?@@@@@@@@?e@@@@@@@@e?@@@@@@@@?e@@@@@@@@e?@@@@@@@@?e@@@@@@@@e?@@@@@@@@?e@@@@@@@@e?@@@@@@@@ |
?@@@@@@@@ |
SETTING THE CONTROLS
1. Touch |
pad. |
|
kg |
The  indicator light will come on. The kg indicator light start blinking.
2. Turn the TIMER KNOB for the desired defrosting weight.
For example : 2.3kg
kg
The 

 will show in the display. This display represent 2.3kg.
13
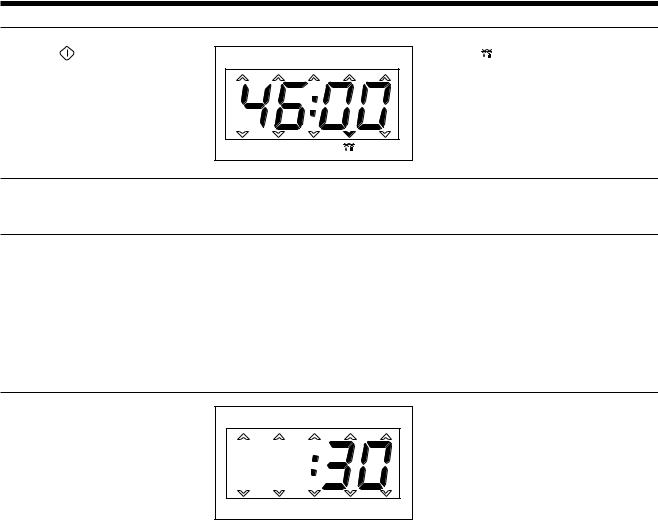
3. Touch |
pad. |
The |
indicator light will starts |
|
|
blinking to show the oven is in |
|
• Case only setting step |
WEIGHT DEFROST mode. |
||
1 and 2 |
|
|
|
4.Three beeps will sound at the end of the cooking time. The indicator light will go off. The display panel will return to the time of day. The oven light will turn off and the turntable will stop turning.
@@@@@@@@e?@@@@@@@@e?@@@@@@@@?e@@@@@@@@e?@@@@@@@@?e@@@@@@@@e?@@@@@@@@?e@@@@@@@@e?@@@@@@@@?e@@@@@@@@e?@@@@@@@@?e@@@@@@@@e?@@@@@@@@?e@@@@@@@@e?@@@@@@@@?e@@@@@@@@e?@@@@@@@@?e@@@@@@@@e?@@@@@@@@?e@@@@@@@@e?@@@@@@@@?e@@@@@@@@e?@@@@@@@@?e@@@@@@@@e?@@@@@@@@?e@@@@@@@@e?@@@@@@@@?e@@@@@@@@e?@@@@@@@@?e@@@@@@@@e?@@@@@@@@?e@@@@@@@@e?@@@@@@@@?e@@@@@@@@e?@@@@@@@@?e@@@@@@@@e?@@@@@@@@?e@@@@@@@@e?@@@@@@@@?e@@@@@@@@e?@@@@@@@@?e@@@@@@@@e?@@@@@@@@?e@@@@@@@@e?@@@@@@@@
@@@@@@@@e?@@@@@@@@e?@@@@@@@@?e@@@@@@@@e?@@@@@@@@?e@@@@@@@@e?@@@@@@@@?e@@@@@@@@e?@@@@@@@@?e@@@@@@@@e?@@@@@@@@?e@@@@@@@@e?@@@@@@@@?e@@@@@@@@e?@@@@@@@@?e@@@@@@@@e?@@@@@@@@?e@@@@@@@@e?@@@@@@@@?e@@@@@@@@e?@@@@@@@@?e@@@@@@@@e?@@@@@@@@?e@@@@@@@@e?@@@@@@@@?e@@@@@@@@e?@@@@@@@@?e@@@@@@@@e?@@@@@@@@?e@@@@@@@@e?@@@@@@@@?e@@@@@@@@e?@@@@@@@@?e@@@@@@@@e?@@@@@@@@?e@@@@@@@@e?@@@@@@@@?e@@@@@@@@e?@@@@@@@@?e@@@@@@@@e?@@@@@@@@?e@@@@@@@@e?@@@@@@@@?e@@@@@@@@e?@@@@@@@@
@@h? |
@@ |
@@h? |
@@ |
@@h? |
@@ |
@@h? |
@@ |
@@h? |
@@ |
@@h? |
@@ |
NOTE : During the defrosting operation turn over the food after 3 beeps sound 4 times continuously for completed defrosting.
@@g |
|
?@@ |
@@g |
|
?@@ |
@@g |
|
?@@ |
@@g |
|
?@@ |
@@g |
|
?@@ |
@@g |
|
?@@ |
@@@@@@@@ |
?@@@@@@@@?e@@@@@@@@e?@@@@@@@@?e@@@@@@@@e?@@@@@@@@?e@@@@@@@@e?@@@@@@@@?e@@@@@@@@e?@@@@@@@@?e@@@@@@@@e?@@@@@@@@?e@@@@@@@@e?@@@@@@@@?e@@@@@@@@e?@@@@@@@@?e@@@@@@@@e?@@@@@@@@?e@@@@@@@@e?@@@@@@@@?e@@@@@@@@e?@@@@@@@@?e@@@@@@@@e?@@@@@@@@?e@@@@@@@@e?@@@@@@@@?e@@@@@@@@e?@@@@@@@@?e@@@@@@@@e?@@@@@@@@?e@@@@@@@@e?@@@@@@@@?e@@@@@@@@e?@@@@@@@@?e@@@@@@@@e?@@@@@@@@?e@@@@@@@@e?@@@@@@@@?e@@@@@@@@e?@@@@@@@@?e@@@@@@@@e?@@@@@@@@?e@@@@@@@@e?@@@@@@@@ |
?@@@@@@@@ |
SPEEDY COOK
1. Touch  pad.
pad.
Whenever this pads is pushed, cooking time is increased 30
seconds.
If the time was setting, this oven is operated automatically after 1 second to microwave high power.
@@@@@@@@e?@@@@@@@@e?@@@@@@@@?e@@@@@@@@e?@@@@@@@@?e@@@@@@@@e?@@@@@@@@?e@@@@@@@@e?@@@@@@@@?e@@@@@@@@e?@@@@@@@@?e@@@@@@@@e?@@@@@@@@?e@@@@@@@@e?@@@@@@@@?e@@@@@@@@e?@@@@@@@@?e@@@@@@@@e?@@@@@@@@?e@@@@@@@@e?@@@@@@@@?e@@@@@@@@e?@@@@@@@@?e@@@@@@@@e?@@@@@@@@?e@@@@@@@@e?@@@@@@@@?e@@@@@@@@e?@@@@@@@@?e@@@@@@@@e?@@@@@@@@?e@@@@@@@@e?@@@@@@@@?e@@@@@@@@e?@@@@@@@@?e@@@@@@@@e?@@@@@@@@?e@@@@@@@@e?@@@@@@@@?e@@@@@@@@e?@@@@@@@@?e@@@@@@@@e?@@@@@@@@?e@@@@@@@@e?@@@@@@@@
@@@@@@@@e?@@@@@@@@e?@@@@@@@@?e@@@@@@@@e?@@@@@@@@?e@@@@@@@@e?@@@@@@@@?e@@@@@@@@e?@@@@@@@@?e@@@@@@@@e?@@@@@@@@?e@@@@@@@@e?@@@@@@@@?e@@@@@@@@e?@@@@@@@@?e@@@@@@@@e?@@@@@@@@?e@@@@@@@@e?@@@@@@@@?e@@@@@@@@e?@@@@@@@@?e@@@@@@@@e?@@@@@@@@?e@@@@@@@@e?@@@@@@@@?e@@@@@@@@e?@@@@@@@@?e@@@@@@@@e?@@@@@@@@?e@@@@@@@@e?@@@@@@@@?e@@@@@@@@e?@@@@@@@@?e@@@@@@@@e?@@@@@@@@?e@@@@@@@@e?@@@@@@@@?e@@@@@@@@e?@@@@@@@@?e@@@@@@@@e?@@@@@@@@?e@@@@@@@@e?@@@@@@@@?e@@@@@@@@e?@@@@@@@@
@@h? |
@@ |
|
@@h? |
@@ |
|
@@h? |
@@ |
|
@@h? |
@@ |
|
@@h? |
@@ |
|
@@h? |
@@ |
|
|
NOTE : This key is increased from 30 seconds to 5 minutes. |
|
|
If you are pressing more than about 0.5 seconds, the time is increased 30 seconds continuously. |
|
@@g |
|
?@@ |
@@g |
|
?@@ |
@@g |
|
?@@ |
@@g |
|
?@@ |
@@g |
|
?@@ |
@@g |
|
?@@ |
@@@@@@@@ |
?@@@@@@@@?e@@@@@@@@e?@@@@@@@@?e@@@@@@@@e?@@@@@@@@?e@@@@@@@@e?@@@@@@@@?e@@@@@@@@e?@@@@@@@@?e@@@@@@@@e?@@@@@@@@?e@@@@@@@@e?@@@@@@@@?e@@@@@@@@e?@@@@@@@@?e@@@@@@@@e?@@@@@@@@?e@@@@@@@@e?@@@@@@@@?e@@@@@@@@e?@@@@@@@@?e@@@@@@@@e?@@@@@@@@?e@@@@@@@@e?@@@@@@@@?e@@@@@@@@e?@@@@@@@@?e@@@@@@@@e?@@@@@@@@?e@@@@@@@@e?@@@@@@@@?e@@@@@@@@e?@@@@@@@@?e@@@@@@@@e?@@@@@@@@?e@@@@@@@@e?@@@@@@@@?e@@@@@@@@e?@@@@@@@@?e@@@@@@@@e?@@@@@@@@?e@@@@@@@@e?@@@@@@@@ ?@@@@@@@@ |
|
|
|
|
14
PROGRAM COOK
@@@@@@@@e?@@@@@@@@e?@@@@@@@@?e@@@@@@@@e?@@@@@@@@?e@@@@@@@@e?@@@@@@@@?e@@@@@@@@e?@@@@@@@@?e@@@@@@@@e?@@@@@@@@?e@@@@@@@@e?@@@@@@@@?e@@@@@@@@e?@@@@@@@@?e@@@@@@@@e?@@@@@@@@?e@@@@@@@@e?@@@@@@@@?e@@@@@@@@e?@@@@@@@@?e@@@@@@@@e?@@@@@@@@?e@@@@@@@@e?@@@@@@@@?e@@@@@@@@e?@@@@@@@@?e@@@@@@@@e?@@@@@@@@?e@@@@@@@@e?@@@@@@@@?e@@@@@@@@e?@@@@@@@@?e@@@@@@@@e?@@@@@@@@?e@@@@@@@@e?@@@@@@@@?e@@@@@@@@e?@@@@@@@@?e@@@@@@@@e?@@@@@@@@?e@@@@@@@@e?@@@@@@@@?e@@@@@@@@e?@@@@@@@@
@@@@@@@@e?@@@@@@@@e?@@@@@@@@?e@@@@@@@@e?@@@@@@@@?e@@@@@@@@e?@@@@@@@@?e@@@@@@@@e?@@@@@@@@?e@@@@@@@@e?@@@@@@@@?e@@@@@@@@e?@@@@@@@@?e@@@@@@@@e?@@@@@@@@?e@@@@@@@@e?@@@@@@@@?e@@@@@@@@e?@@@@@@@@?e@@@@@@@@e?@@@@@@@@?e@@@@@@@@e?@@@@@@@@?e@@@@@@@@e?@@@@@@@@?e@@@@@@@@e?@@@@@@@@?e@@@@@@@@e?@@@@@@@@?e@@@@@@@@e?@@@@@@@@?e@@@@@@@@e?@@@@@@@@?e@@@@@@@@e?@@@@@@@@?e@@@@@@@@e?@@@@@@@@?e@@@@@@@@e?@@@@@@@@?e@@@@@@@@e?@@@@@@@@?e@@@@@@@@e?@@@@@@@@?e@@@@@@@@e?@@@@@@@@
@@h? |
@@ |
|
@@h? |
@@ |
|
@@h? |
@@ |
|
@@h? |
@@ |
|
@@h? |
@@ |
|
@@h? |
@@ |
|
|
NOTE : • There is programed for cooking of three kinds (1~3). |
|
|
• You don’t have to worry about setting cooking times, power and function. |
|
@@g |
|
?@@ |
@@g |
|
?@@ |
@@g |
|
?@@ |
@@g |
|
?@@ |
@@g |
|
?@@ |
@@g |
|
?@@ |
@@@@@@@@ |
?@@@@@@@@?e@@@@@@@@e?@@@@@@@@?e@@@@@@@@e?@@@@@@@@?e@@@@@@@@e?@@@@@@@@?e@@@@@@@@e?@@@@@@@@?e@@@@@@@@e?@@@@@@@@?e@@@@@@@@e?@@@@@@@@?e@@@@@@@@e?@@@@@@@@?e@@@@@@@@e?@@@@@@@@?e@@@@@@@@e?@@@@@@@@?e@@@@@@@@e?@@@@@@@@?e@@@@@@@@e?@@@@@@@@?e@@@@@@@@e?@@@@@@@@?e@@@@@@@@e?@@@@@@@@?e@@@@@@@@e?@@@@@@@@?e@@@@@@@@e?@@@@@@@@?e@@@@@@@@e?@@@@@@@@?e@@@@@@@@e?@@@@@@@@?e@@@@@@@@e?@@@@@@@@?e@@@@@@@@e?@@@@@@@@?e@@@@@@@@e?@@@@@@@@?e@@@@@@@@e?@@@@@@@@ ?@@@@@@@@ |
|
SETTING THE CONTROLS
1. Touch |
pad. |
The |
indicator will light. |
|
|
“ |
” will show in the display. |
2. Select the desired cooking.
For example : roast pork Touch  pad once again.
“
 ” will show in the display.
@@@@@@@@e?@@@@@@@@e?@@@@@@@@?e@@@@@@@@e?@@@@@@@@?e@@@@@@@@e?@@@@@@@@?e@@@@@@@@e?@@@@@@@@?e@@@@@@@@e?@@@@@@@@?e@@@@@@@@e?@@@@@@@@?e@@@@@@@@
@@@@@@@@e?@@@@@@@@e?@@@@@@@@?e@@@@@@@@e?@@@@@@@@?e@@@@@@@@e?@@@@@@@@?e@@@@@@@@e?@@@@@@@@?e@@@@@@@@e?@@@@@@@@?e@@@@@@@@e?@@@@@@@@?e@@@@@@@@
@@h? |
@@ |
@@h? |
@@ |
@@h? |
@@ |
@@h? |
@@ |
@@h? |
@@ |
@@h? |
@@ |
NOTE : When this pad is push, number of program cook is increased one.
@@g |
|
?@@ |
@@g |
|
?@@ |
@@g |
|
?@@ |
@@g |
|
?@@ |
@@g |
|
?@@ |
@@g |
|
?@@ |
@@@@@@@@ |
?@@@@@@@@?e@@@@@@@@e?@@@@@@@@?e@@@@@@@@e?@@@@@@@@?e@@@@@@@@e?@@@@@@@@?e@@@@@@@@e?@@@@@@@@?e@@@@@@@@e?@@@@@@@@?e@@@@@@@@ |
?@@@@@@@@ |
@@@@@@@@ |
?@@@@@@@@?e@@@@@@@@e?@@@@@@@@?e@@@@@@@@e?@@@@@@@@?e@@@@@@@@e?@@@@@@@@?e@@@@@@@@e?@@@@@@@@?e@@@@@@@@e?@@@@@@@@?e@@@@@@@@ |
?@@@@@@@@ |
3. If you want to select other cooking, touch the  pad once again, until display your desired.
4. Turn the TIMER KNOB for the desired weight.
For example : 1.3 kg
kg
“  ” will show in the display.
@@@@@@@@e?@@@@@@@@e?@@@@@@@@?e@@@@@@@@e?@@@@@@@@?e@@@@@@@@e?@@@@@@@@?e@@@@@@@@e?@@@@@@@@?e@@@@@@@@e?@@@@@@@@?e@@@@@@@@e?@@@@@@@@?e@@@@@@@@
@@@@@@@@e?@@@@@@@@e?@@@@@@@@?e@@@@@@@@e?@@@@@@@@?e@@@@@@@@e?@@@@@@@@?e@@@@@@@@e?@@@@@@@@?e@@@@@@@@e?@@@@@@@@?e@@@@@@@@e?@@@@@@@@?e@@@@@@@@
@@h? |
@@ |
@@h? |
@@ |
@@h? |
@@ |
@@h? |
@@ |
@@h? |
@@ |
@@h? |
@@ |
NOTE : In rotisserie type, kg is changed  , and indicator light is not blinking.
@@g |
|
?@@ |
@@g |
|
?@@ |
@@g |
|
?@@ |
@@g |
|
?@@ |
@@g |
|
?@@ |
@@g |
|
?@@ |
@@@@@@@@ |
?@@@@@@@@?e@@@@@@@@e?@@@@@@@@?e@@@@@@@@e?@@@@@@@@?e@@@@@@@@e?@@@@@@@@?e@@@@@@@@e?@@@@@@@@?e@@@@@@@@e?@@@@@@@@?e@@@@@@@@ |
?@@@@@@@@ |
@@@@@@@@ |
?@@@@@@@@?e@@@@@@@@e?@@@@@@@@?e@@@@@@@@e?@@@@@@@@?e@@@@@@@@e?@@@@@@@@?e@@@@@@@@e?@@@@@@@@?e@@@@@@@@e?@@@@@@@@?e@@@@@@@@ |
?@@@@@@@@ |
This digital weight allows you to set from 0.7kg to 1.3kg whenever turn TIMER KNOB.
5.You can select power as press “+” pad or “-” pad.
Then display will indicated “H” or “L” at right side of display.
6. Touch |
pad. |
The oven will now start programmed |
|
|
|
cook for menu 2. The time of menu 2, |
|
|
|
roast pork, is 29 minutes. |
|
|
|
The |
indicator light starts blinking. |
16
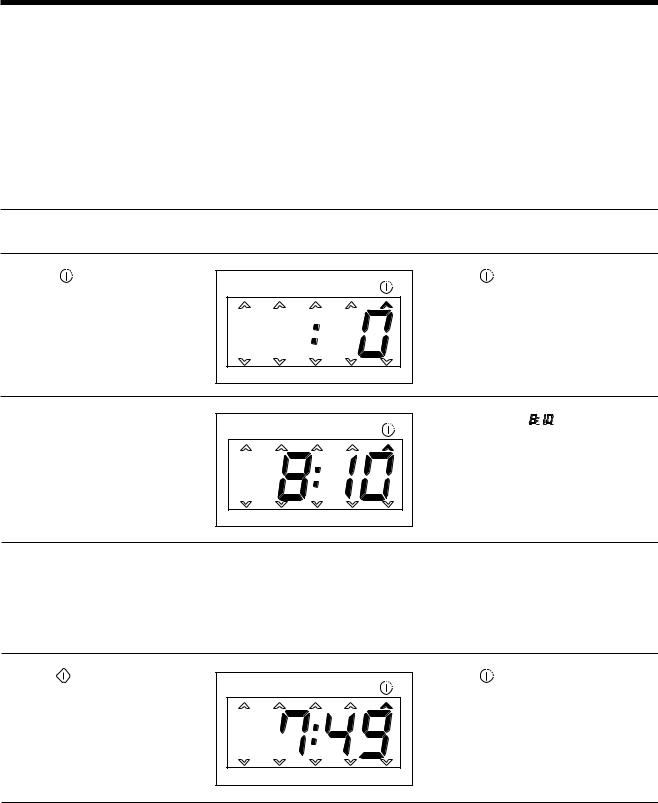
PRE-SET (AUTO START)
@@@@@@@@e?@@@@@@@@e?@@@@@@@@?e@@@@@@@@e?@@@@@@@@?e@@@@@@@@e?@@@@@@@@?e@@@@@@@@e?@@@@@@@@?e@@@@@@@@e?@@@@@@@@?e@@@@@@@@e?@@@@@@@@?e@@@@@@@@e?@@@@@@@@?e@@@@@@@@e?@@@@@@@@?e@@@@@@@@e?@@@@@@@@?e@@@@@@@@e?@@@@@@@@?e@@@@@@@@e?@@@@@@@@?e@@@@@@@@e?@@@@@@@@?e@@@@@@@@e?@@@@@@@@?e@@@@@@@@e?@@@@@@@@?e@@@@@@@@e?@@@@@@@@?e@@@@@@@@e?@@@@@@@@?e@@@@@@@@e?@@@@@@@@?e@@@@@@@@e?@@@@@@@@?e@@@@@@@@e?@@@@@@@@?e@@@@@@@@e?@@@@@@@@?e@@@@@@@@e?@@@@@@@@?e@@@@@@@@e?@@@@@@@@
@@@@@@@@e?@@@@@@@@e?@@@@@@@@?e@@@@@@@@e?@@@@@@@@?e@@@@@@@@e?@@@@@@@@?e@@@@@@@@e?@@@@@@@@?e@@@@@@@@e?@@@@@@@@?e@@@@@@@@e?@@@@@@@@?e@@@@@@@@e?@@@@@@@@?e@@@@@@@@e?@@@@@@@@?e@@@@@@@@e?@@@@@@@@?e@@@@@@@@e?@@@@@@@@?e@@@@@@@@e?@@@@@@@@?e@@@@@@@@e?@@@@@@@@?e@@@@@@@@e?@@@@@@@@?e@@@@@@@@e?@@@@@@@@?e@@@@@@@@e?@@@@@@@@?e@@@@@@@@e?@@@@@@@@?e@@@@@@@@e?@@@@@@@@?e@@@@@@@@e?@@@@@@@@?e@@@@@@@@e?@@@@@@@@?e@@@@@@@@e?@@@@@@@@?e@@@@@@@@e?@@@@@@@@?e@@@@@@@@e?@@@@@@@@
@@h? |
@@ |
@@h? |
@@ |
@@h? |
@@ |
@@h? |
@@ |
@@h? |
@@ |
@@h? |
@@ |
NOTE : • Auto start function allows you to set the oven to come on at a later time.
•The clock must be set before the auto start function can be set.
•Auto start function can set anytime during programing.
•Auto start function can be setted with MICROWAVE, GRILL, COMBI, AUTO DEFROST, WEIGHT
DEFROST, PROGRAM COOK or AUTO REHEAT function.
@@g |
|
?@@ |
@@g |
|
?@@ |
@@g |
|
?@@ |
@@g |
|
?@@ |
@@g |
|
?@@ |
@@g |
|
?@@ |
@@@@@@@@ |
?@@@@@@@@?e@@@@@@@@e?@@@@@@@@?e@@@@@@@@e?@@@@@@@@?e@@@@@@@@e?@@@@@@@@?e@@@@@@@@e?@@@@@@@@?e@@@@@@@@e?@@@@@@@@?e@@@@@@@@e?@@@@@@@@?e@@@@@@@@e?@@@@@@@@?e@@@@@@@@e?@@@@@@@@?e@@@@@@@@e?@@@@@@@@?e@@@@@@@@e?@@@@@@@@?e@@@@@@@@e?@@@@@@@@?e@@@@@@@@e?@@@@@@@@?e@@@@@@@@e?@@@@@@@@?e@@@@@@@@e?@@@@@@@@?e@@@@@@@@e?@@@@@@@@?e@@@@@@@@e?@@@@@@@@?e@@@@@@@@e?@@@@@@@@?e@@@@@@@@e?@@@@@@@@?e@@@@@@@@e?@@@@@@@@?e@@@@@@@@e?@@@@@@@@?e@@@@@@@@e?@@@@@@@@ |
?@@@@@@@@ |
SETTING THE CONTROLS
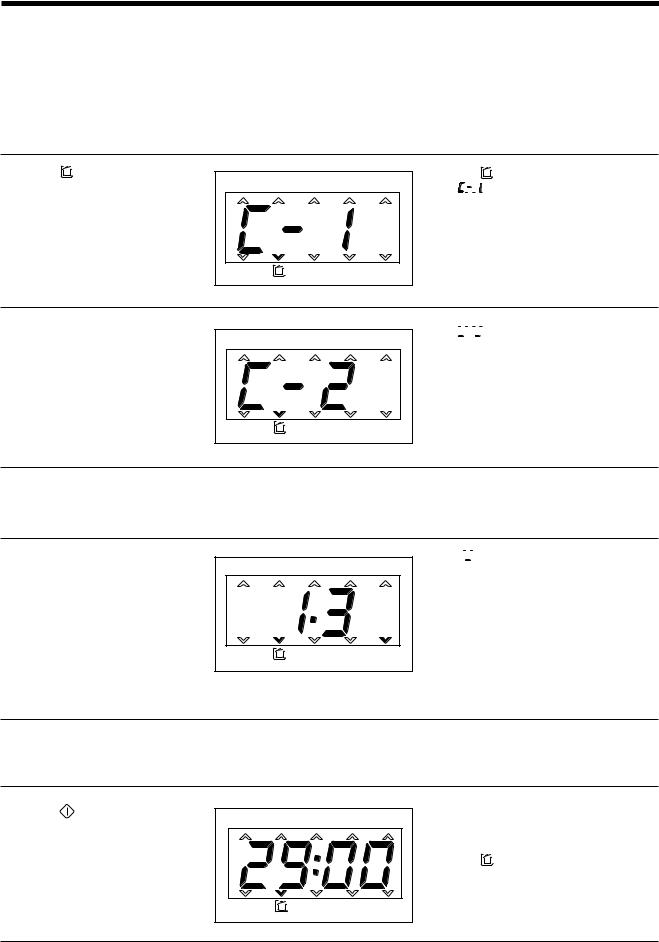
1. Set the clock-make sure it is set for the correct time of day.
2. |
Touch |
pad. |
The |
indicator will light. |
|
2. Turn the TIMER KNOB for the |
In the display, |
will be shown. |
|||
|
desired auto start operating |
|
|
|
|
|
time. |
|
|
|
|
|
For example : (8:10) |
|
|
|
|
4. Set the cooking program(s).
@@@@@@@@e?@@@@@@@@e?@@@@@@@@?e@@@@@@@@e?@@@@@@@@?e@@@@@@@@e?@@@@@@@@?e@@@@@@@@e?@@@@@@@@?e@@@@@@@@e?@@@@@@@@?e@@@@@@@@e?@@@@@@@@?e@@@@@@@@e?@@@@@@@@?e@@@@@@@@e?@@@@@@@@?e@@@@@@@@e?@@@@@@@@?e@@@@@@@@e?@@@@@@@@?e@@@@@@@@e?@@@@@@@@?e@@@@@@@@e?@@@@@@@@?e@@@@@@@@e?@@@@@@@@?e@@@@@@@@e?@@@@@@@@?e@@@@@@@@e?@@@@@@@@?e@@@@@@@@e?@@@@@@@@?e@@@@@@@@e?@@@@@@@@?e@@@@@@@@e?@@@@@@@@?e@@@@@@@@e?@@@@@@@@?e@@@@@@@@e?@@@@@@@@?e@@@@@@@@e?@@@@@@@@?e@@@@@@@@e?@@@@@@@@
@@@@@@@@e?@@@@@@@@e?@@@@@@@@?e@@@@@@@@e?@@@@@@@@?e@@@@@@@@e?@@@@@@@@?e@@@@@@@@e?@@@@@@@@?e@@@@@@@@e?@@@@@@@@?e@@@@@@@@e?@@@@@@@@?e@@@@@@@@e?@@@@@@@@?e@@@@@@@@e?@@@@@@@@?e@@@@@@@@e?@@@@@@@@?e@@@@@@@@e?@@@@@@@@?e@@@@@@@@e?@@@@@@@@?e@@@@@@@@e?@@@@@@@@?e@@@@@@@@e?@@@@@@@@?e@@@@@@@@e?@@@@@@@@?e@@@@@@@@e?@@@@@@@@?e@@@@@@@@e?@@@@@@@@?e@@@@@@@@e?@@@@@@@@?e@@@@@@@@e?@@@@@@@@?e@@@@@@@@e?@@@@@@@@?e@@@@@@@@e?@@@@@@@@?e@@@@@@@@e?@@@@@@@@?e@@@@@@@@e?@@@@@@@@
@@h? |
@@ |
@@h? |
@@ |
@@h? |
@@ |
@@h? |
@@ |
@@h? |
@@ |
@@h? |
@@ |
NOTE : • Set function-MICROWAVE, GRILL, COMBI, AUTO DEFROST, WEIGHT DEFROST, PROGRAM COOK or AUTO REHEAT-at this step.
@@g |
|
?@@ |
@@g |
|
?@@ |
@@g |
|
?@@ |
@@g |
|
?@@ |
@@g |
|
?@@ |
@@g |
|
?@@ |
@@@@@@@@ |
?@@@@@@@@?e@@@@@@@@e?@@@@@@@@?e@@@@@@@@e?@@@@@@@@?e@@@@@@@@e?@@@@@@@@?e@@@@@@@@e?@@@@@@@@?e@@@@@@@@e?@@@@@@@@?e@@@@@@@@e?@@@@@@@@?e@@@@@@@@e?@@@@@@@@?e@@@@@@@@e?@@@@@@@@?e@@@@@@@@e?@@@@@@@@?e@@@@@@@@e?@@@@@@@@?e@@@@@@@@e?@@@@@@@@?e@@@@@@@@e?@@@@@@@@?e@@@@@@@@e?@@@@@@@@?e@@@@@@@@e?@@@@@@@@?e@@@@@@@@e?@@@@@@@@?e@@@@@@@@e?@@@@@@@@?e@@@@@@@@e?@@@@@@@@?e@@@@@@@@e?@@@@@@@@?e@@@@@@@@e?@@@@@@@@?e@@@@@@@@e?@@@@@@@@?e@@@@@@@@e?@@@@@@@@ |
?@@@@@@@@ |
5. Touch |
pad. |
The |
indicator light will now flash. |
|
|
Indicator light setting for you will |
|
|
|
flash. |
|
|
|
Display is shown present time. (7:49) |
|
|
|
When the time of day reaches the |
|
|
|
auto start time, the oven will start to |
|
|
|
cooking with 1 beep. |
|
19
 Loading...