


KOC-9Q3T
MODEL NO.
KOC-9Q3T / KOC-9Q3TC
MICROWAVE
CONVECTION/GRILL OVEN
DESUK_KOC-9Q3T7R.indd 2 2014-10-07 오후 5:20:36

TABLE OF CONTENTS
About your microwave
Introduction ............................................................................................................................ 03
Before first use ........................................................................................................................ 04
Accessories ..............................................................................................................................05
Control panel ..........................................................................................................................06
Before operation
Setting the clock .....................................................................................................................08
Child lock and power save mode ........................................................................................... 09
Operation
Microwave cooking ................................................................................................................11
Grill cooking ............................................................................................................................12
Convection cooking(with pre-heat) ....................................................................................... 13
Convection cooking(traditional cooking) ..............................................................................14
Combination cooking .............................................................................................................15
Weight defrost mode .............................................................................................................16
Time defrost mode ...............................................................................................................17
Auto cook ................................................................................................................................ 18
Speedy cook ............................................................................................................................ 18
Dish warmer (for premium option model only) ..................................................................19
Warm ...................................................................................................................................... 20
Steam cleaning .......................................................................................................................20
Reminder mode(function to remind cooking complete) ....................................................20
Cooking techniques ............................................................................................................... 21
Defrosting guide .....................................................................................................................22
Cooking & reheating chart ....................................................................................................23
Vegetable chart ...................................................................................................................... 24
Safety........................................................................................................................................ 25
Cleaning .................................................................................................................................... 29
Trouble Shooting ...................................................................................................................... 32
Question and answer ............................................................................................................... 33
Technical data ........................................................................................................................... 34
Environmental information ...................................................................................................... 35
Recipe ...................................................................................................................................... 36
KOC-9Q3T / KOC-9Q3TC_2
DESUK_KOC-9Q3T7R.indd 2 2014-10-07 오후 5:20:36

ABOUT YOUR MICROWAVE
NTRODUCTION
I
»
You have chosen a Daewoo Combi- Microwave Oven.
Daewoo offers a variety of quality products that would make your life more
comfortable.
This Combi-Microwave Oven combines the properties of a microwave with those
of a traditional oven. The wide range of programmig options makes it possible to
choose your preparation method precisely.
Operation is easy even so.
The display provides information and helps you with setting.
Please read the user manual very carefully before starting to use the appliance.
Just for your information, the manual also serves as cooking recipy.
Enjoy cooking!
KOC-9Q3T / KOC-9Q3TC_3
DESUK_KOC-9Q3T7R.indd 3 2014-10-07 오후 5:20:36
ABOUT YOUR MICROWAVE
efore first use
»B
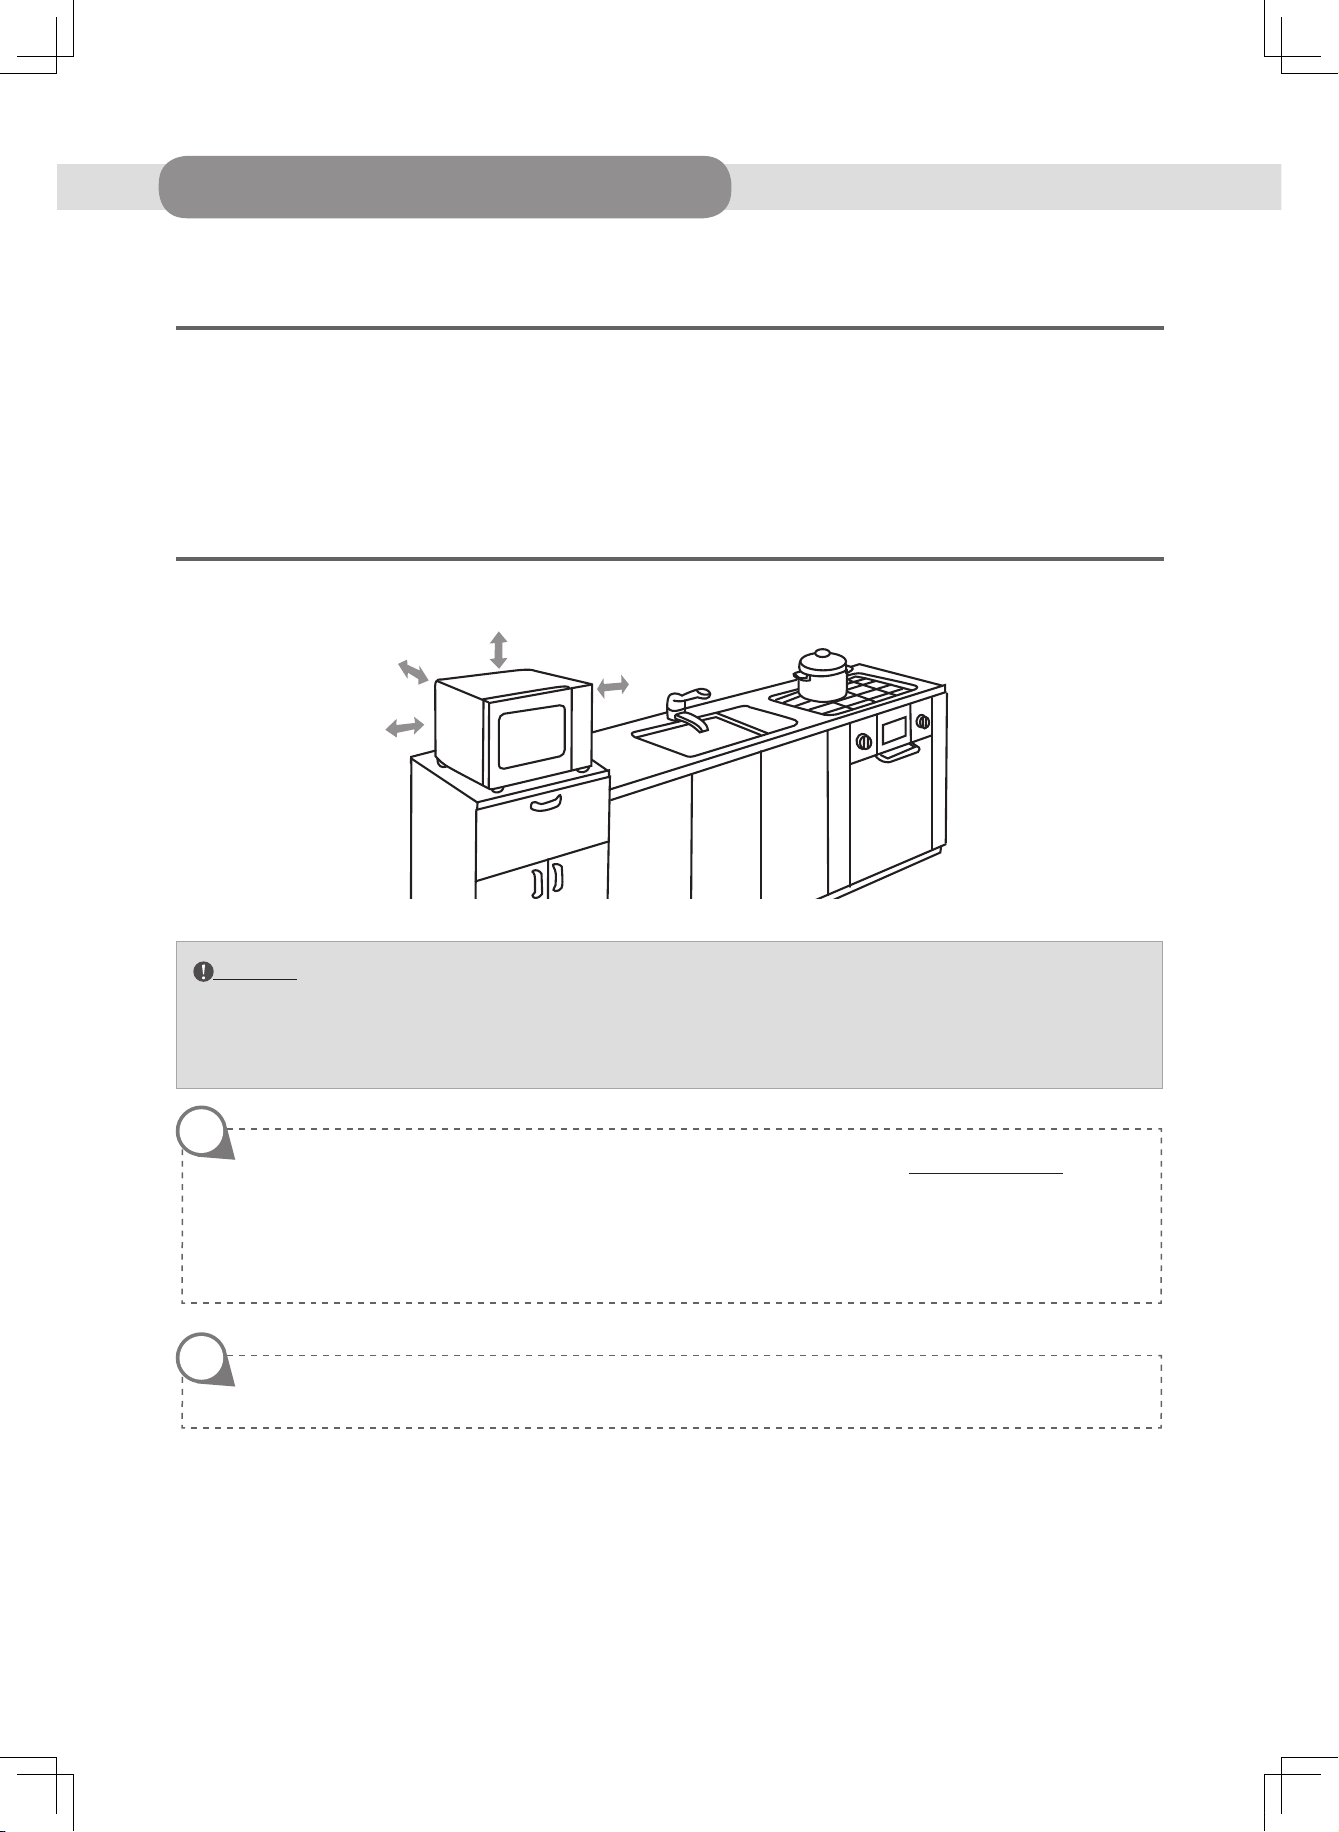
• Put the microwave on a solid, flat surface.
• Ensure that there is adequate ventilation around the microwave. Keep 30 cm of space free at the top. At the back and sides,
keep at least 7.5 cm free.
• Do not cover the ventilation openings.
• The adjustable feet may not be removed.
• Do not place the microwave in the vicinity of heat sources.
• Broadcasting and transmitting equipment such as radios and TVs can affect the working of the microwave.
• Remove the accessories from the microwave and clean them with a mild cleaning agent. Then put the frame back on the shaft.
30 cm
7.5 cm
7.5 cm
Please note
: Always use the microwave with the frame on the shaft together with a turntable!
Put a heat-resistant dish with 200 ml of water in the microwave. Turn the function dial and select ‘oven’. Set the time to 5 minutes and press the
Start button. This will remove any protective grease used during manufacture. When the 5 minutes are nished, allow the microwave to cool
down, and clean the microwave with warm water. The microwave is now ready for use.
NOTE
When you heat the microwave to a high temperature for the first time, you will notice a
Don’t worry, this is normal. If desired, switch on the cooker hood or open a window.
7.5 cm
‘new-oven smell’.
* The minimum height of free space necessary above the top surface
of the oven is minimum 170mm.
NOTE
Cabinet materials must be suitable to withstand temperatures up to 90˚C.
KOC-9Q3T / KOC-9Q3TC_4
DESUK_KOC-9Q3T7R.indd 4 2014-10-07 오후 5:20:36
ccessories
»A
③
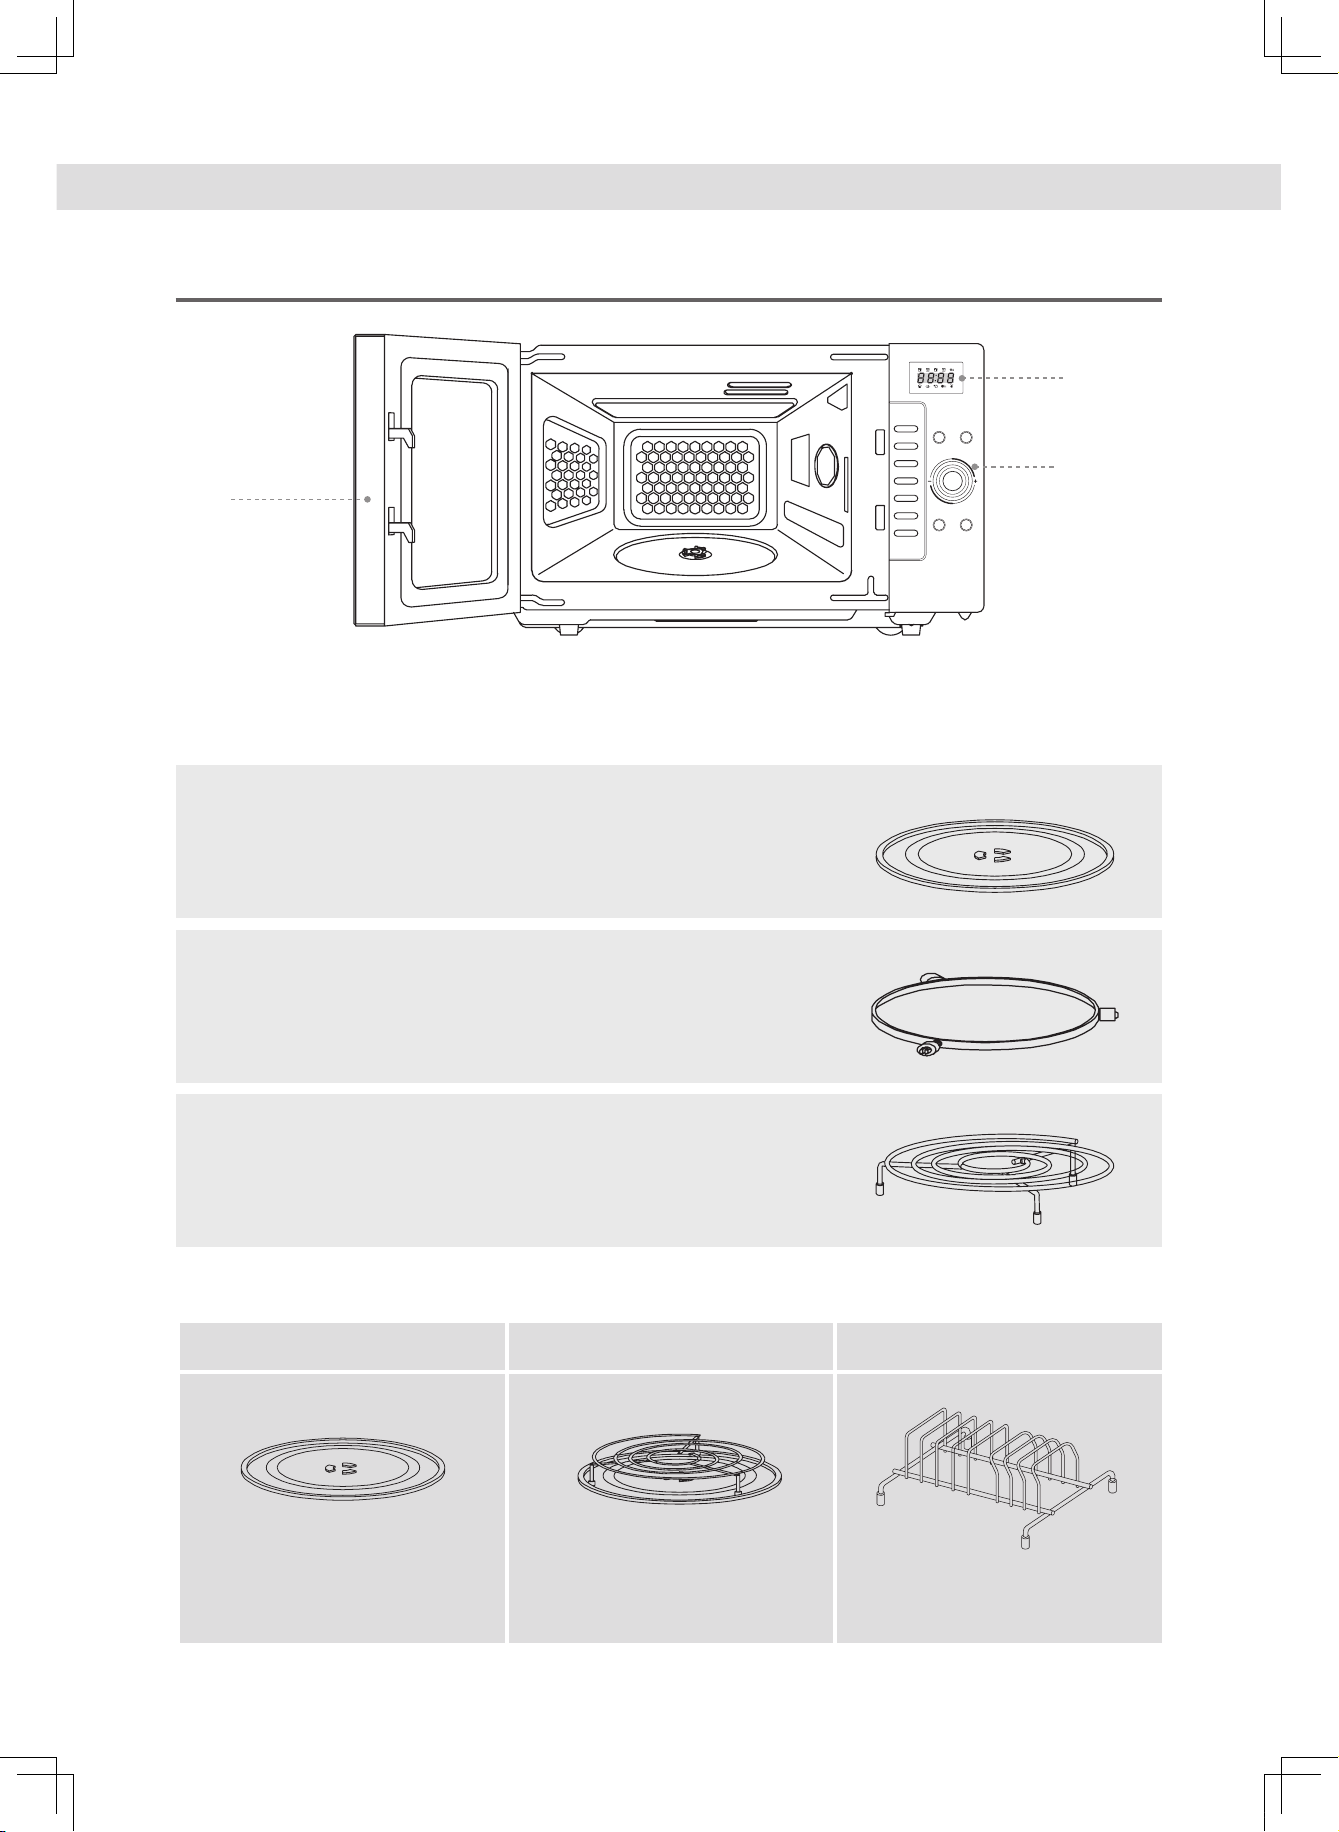
①
Display
②
Control panel
③
Door handle
1. Glass Turntable - Centre the tray on the roller guide when using the
microwave features. Place food or microwave-safe cookware directly on the
glass turntable.
NOTE : The Glass Turntable can be found attached to the left polystyrene packing
material in the carton.
①
②
2. Roller Guide - The roller guide must be in place when using the oven.
IMPORTANT : The roller guide must be placed at the centre of the oven
cavity.
3. Metal Rack - Centre the rack on the glass tray when using the grill cooking,
convection cooking, and auto cooking menus.
How to use the accessories of cooking
▶
Glass Turntable Metal rack
• Grill cooking
• Convection cooking
• Combination cooking
• All Cooking modes.
• Auto cooking menu 1~4. • Dish warming
Dish-Warm rack
(Premium option model only)
KOC-9Q3T / KOC-9Q3TC_5
DESUK_KOC-9Q3T7R.indd 5 2014-10-07 오후 5:20:37
ontrol panel
»C
KOC9Q3T
↘ DISPLAY WINDOW
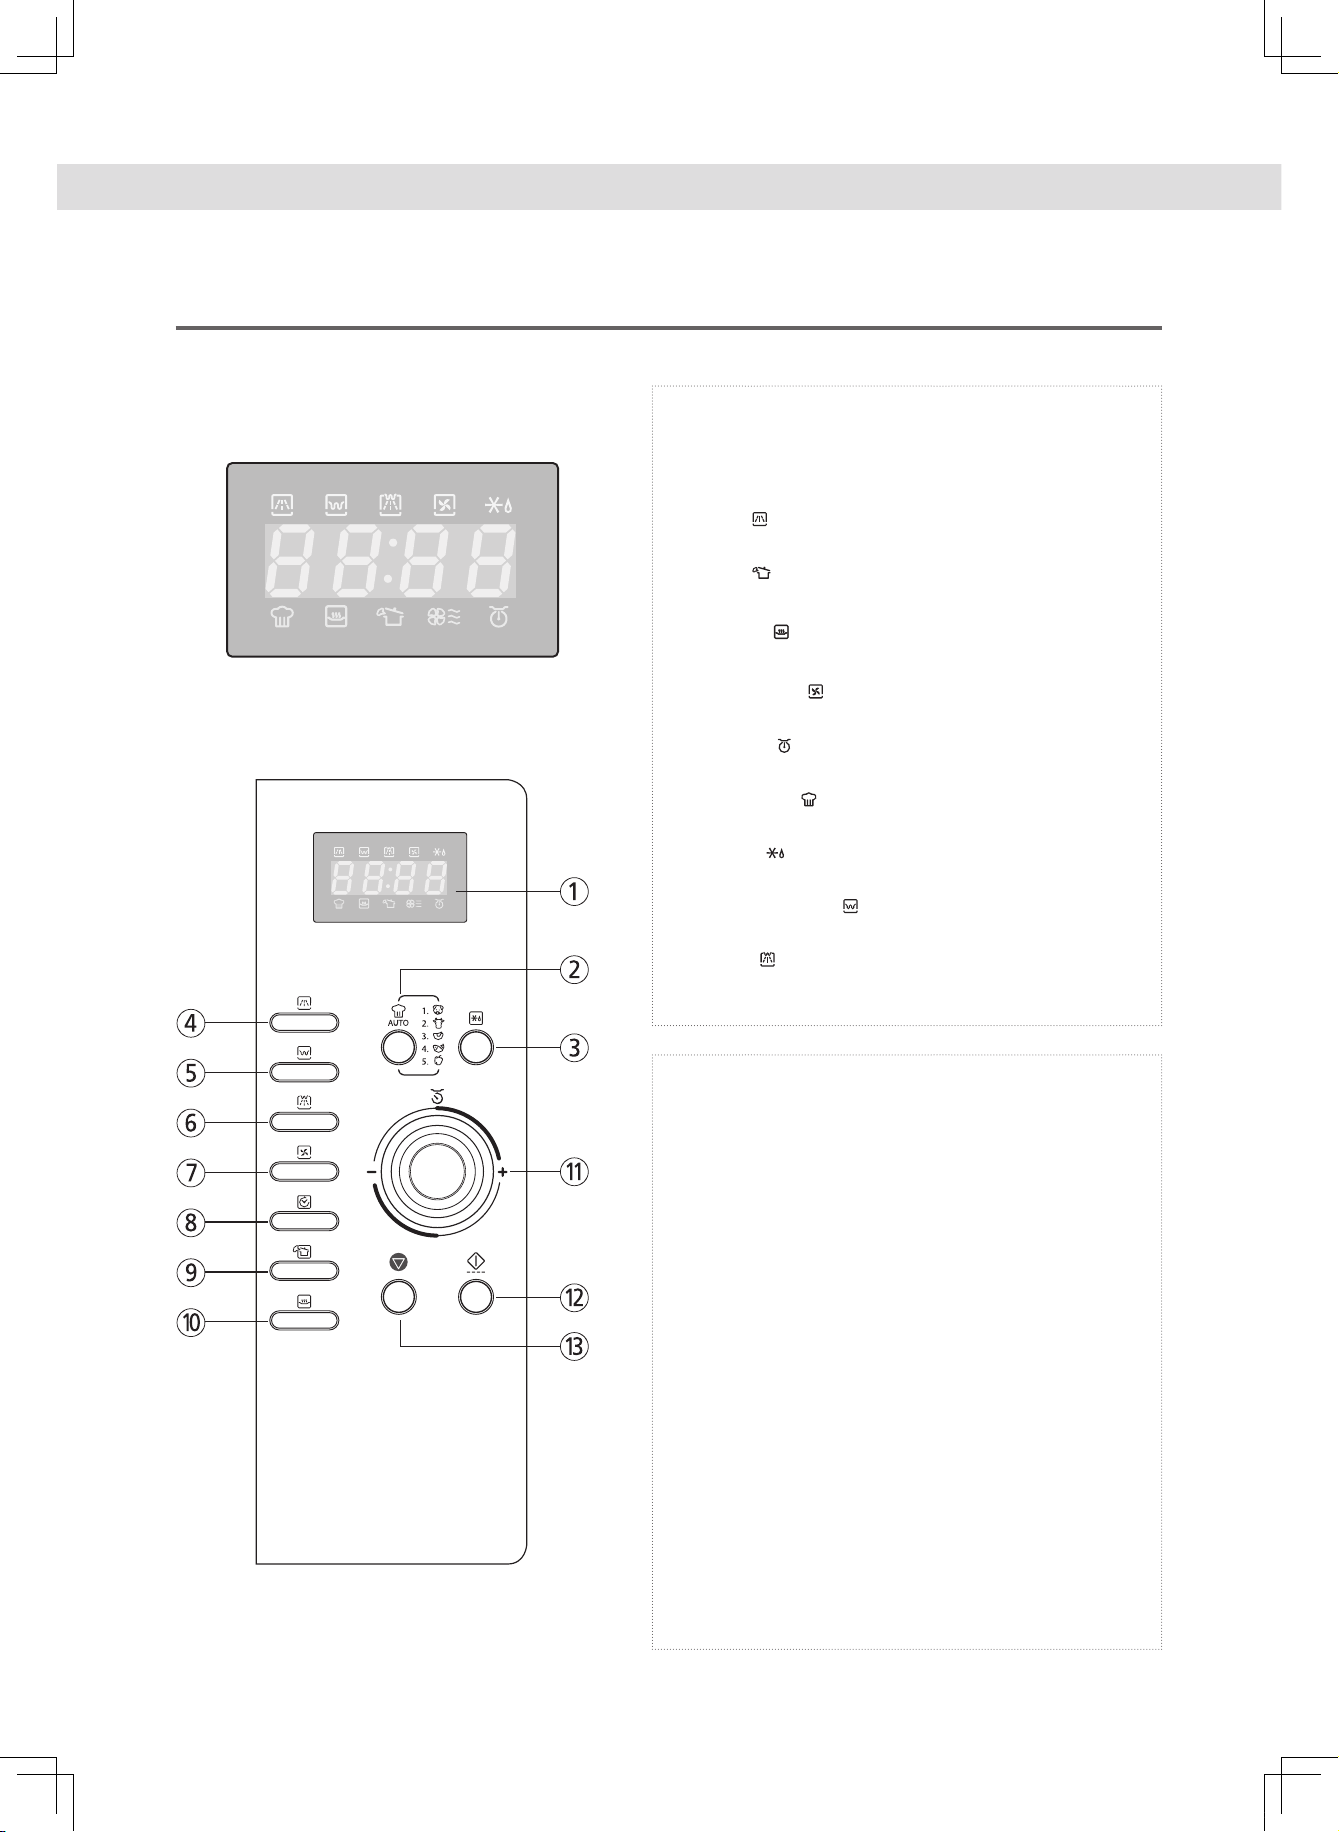
① Display : Cooking time, power level, program
indicators and present time are displayed.
MW ( ): When blinking, the oven is operating in
MICROWAVE COOK mode.
Grill ( ): When blinking, the oven is operating in
GRILL mode.
Combi ( ): When blinking, the oven is operating
in COMBI mode.
Convection ( ): When blinking, the oven is
operating in CONVECTION mode.
Defrost ( ): When blinking, the oven is operating in
DEFROST mode.
Auto-cook ( ): When blinking, the oven is
operating in AUTO COOK mode.
Warm ( ): When blinking, the oven is operating in
WARM mode.
Steam Cleaning ( ): When blinking, the oven is
operating in steam cleaning mode.
gram ( ): When blinking, the oven is operating in
weight input mode.
↘ BUTTONS
②
Auto cook : Used to cook or reheat.
③ Defrost : Used to defrost foods.
④ MW : Used to set power level of the microwave.
⑤ Grill : Used to select grill mode.
⑥ Combi : Used to select combi mode.
⑦ Convection : Used to select convection mode and
selected temp.
⑧ Clock : Used to set clock.
⑨ STEAM CLEANING : Used to clean the inside of the
oven
⑩ Warm : Used to keep the food warm.
⑪ Dial knob : Used to set time, weight and quantity.
⑫ START/SPEEDY COOK : Used to start a program or a
speedy start(each press adds 30 seconds of
microwave cooking time).
⑬ STOP/CLEAR : Used to stop the oven operation or to
delete the cooking data.
KOC-9Q3T / KOC-9Q3TC_6
DESUK_KOC-9Q3T7R.indd 6 2014-10-07 오후 5:20:37

ontrol panel
»C
KOC9Q3T
↘ DISPLAY WINDOW
① Display : Cooking time, power level, program
indicators and present time are displayed.
MW ( ): When blinking, the oven is operating in
MICROWAVE COOK mode.
Grill ( ): When blinking, the oven is operating in
GRILL mode.
Combi ( ): When blinking, the oven is operating
in COMBI mode.
Convection ( ): When blinking, the oven is
operating in CONVECTION mode.
Defrost ( ): When blinking, the oven is operating in
DEFROST mode.
Auto-cook ( ): When blinking, the oven is
operating in AUTO COOK mode.
Warm ( ): When blinking, the oven is operating in
WARM mode.
Steam Cleaning ( ): When blinking, the oven is
operating in steam cleaning mode.
gram ( ): When blinking, the oven is operating in
weight input mode.
↘ BUTTONS
②
Auto cook : Used to cook or reheat.
③ Defrost : Used to defrost foods.
④ MW : Used to set power level of the microwave.
⑤ Grill : Used to select grill mode.
⑥ Combi : Used to select combi mode.
⑦ Convection : Used to select convection mode and
selected temp.
⑧ Clock : Used to set clock.
⑨ STEAM CLEANING : Used to clean the inside of the
oven
⑩ Warm : Used to keep the food warm.
⑪ Dial knob : Used to set time, weight and quantity.
⑫ START/SPEEDY COOK : Used to start a program or a
speedy start(each press adds 30 seconds of
microwave cooking time).
⑬ STOP/CLEAR : Used to stop the oven operation or to
delete the cooking data.
KOC-9Q3T / KOC-9Q3TC_7
DESUK_KOC-9Q3T7R.indd 7 2014-10-07 오후 5:20:37
BEFORE OPERATION
ETTING THE CLOCK
»S
When your oven is plugged in, the display will show “ :0” and a tone will sound. If the AC power goes off and comes back on, the
display will show “:0”.
Your oven has a multiple(12hr/24hr) clock system. To set the clock, follow the procedure below.
Example : To set 5:30 AM in a 24hr clock system.
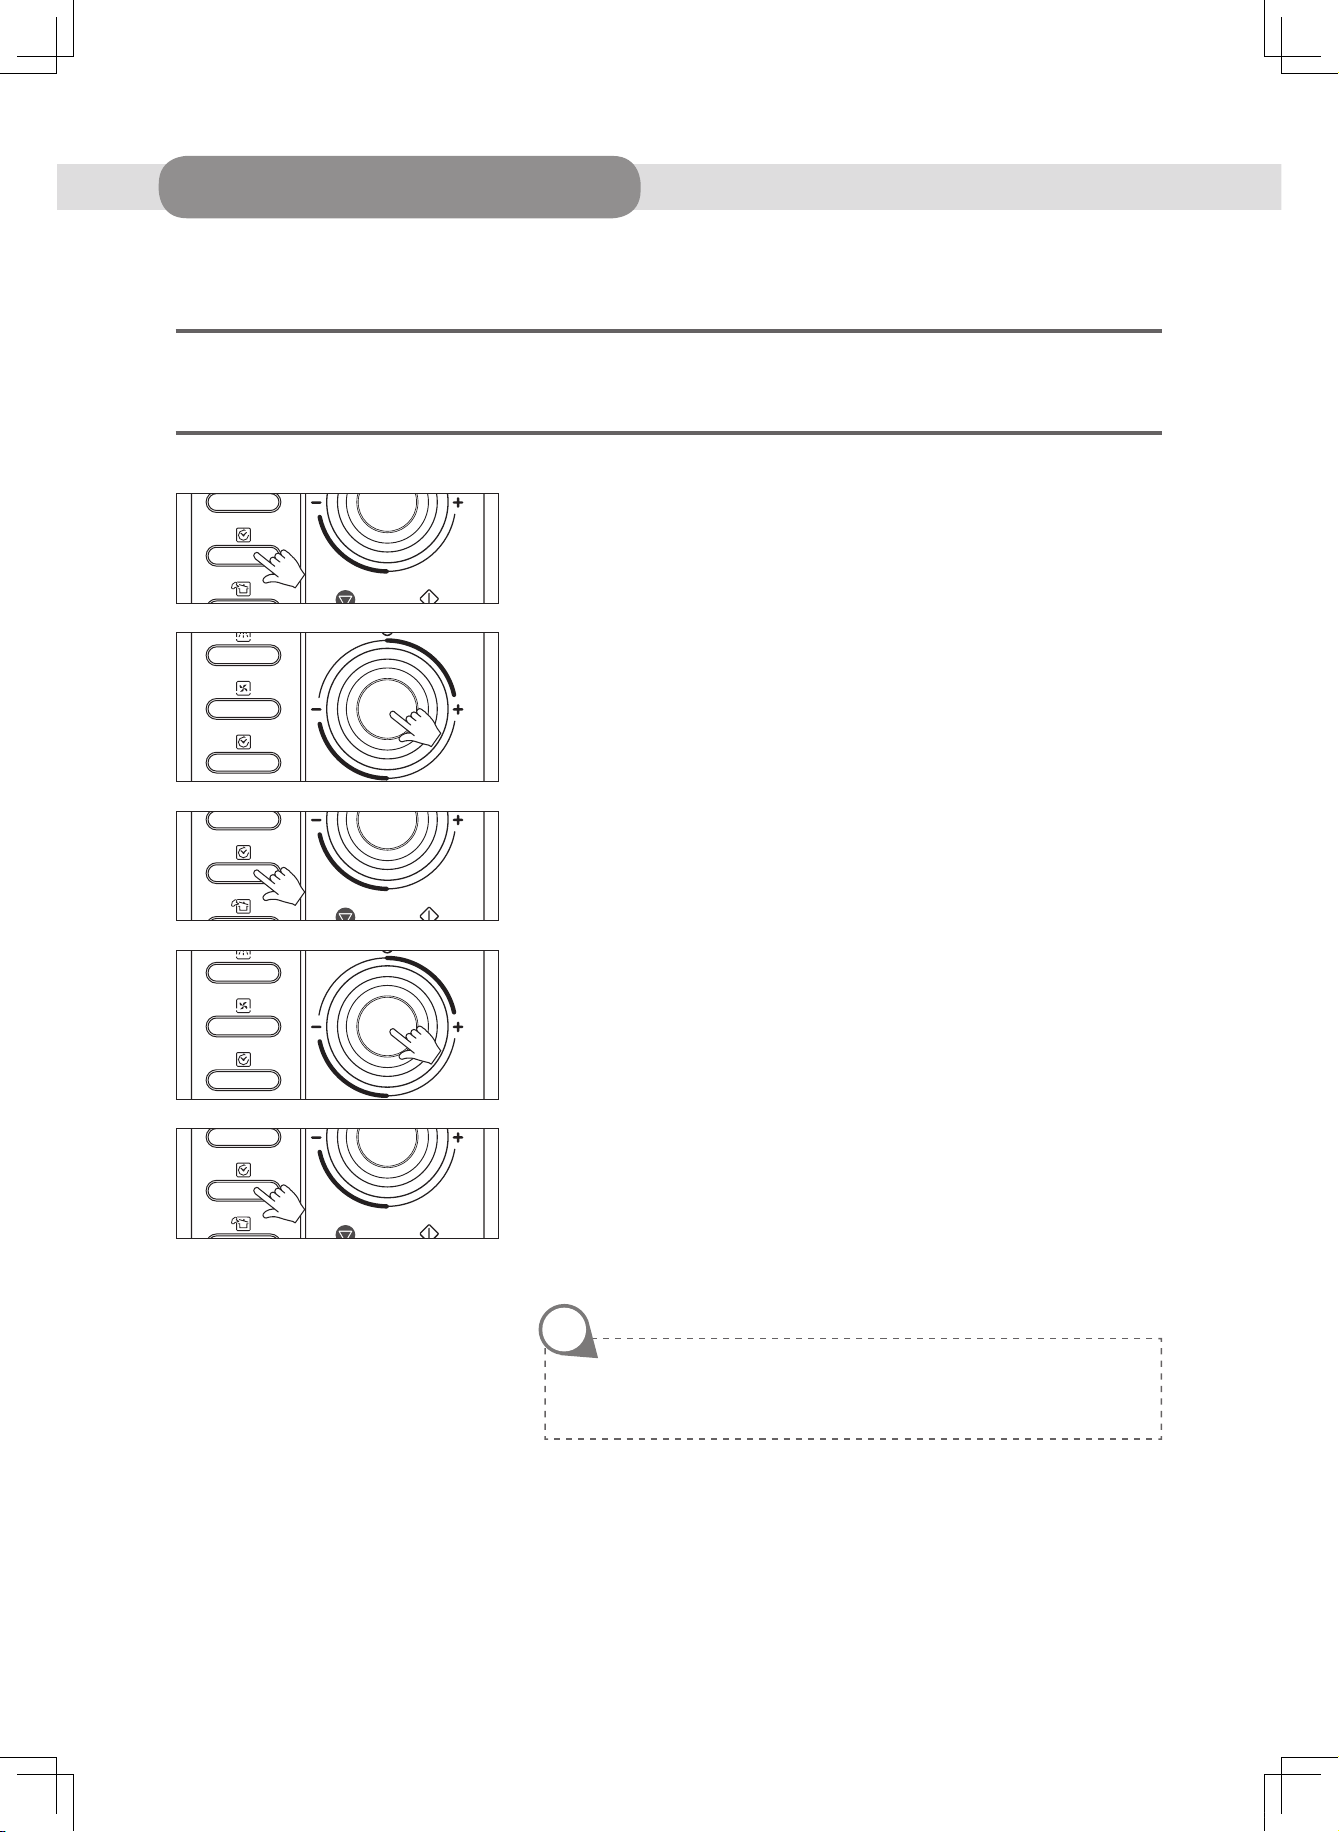
1. Press Clock button once.
The display will show “ 12H ”. This is a 12 hour clock system.
2. Press Clock button once more, the display shows “24H”.
This is a 24hour clock system. If you want 12hour clock system, omit this step.
3. Turn the dial knob to set the hour number “5:”.
The hour digit starts blinking, the colon will light.
4. Press Clock button. “5:00” shows in display.
The minute digit starts blinking, the colon and hour number will light.
5. Turn the dial knob until “5:30” shows in the display window.
6. Press Clock button. The colon starts blinking.
If you selected the 12hour clock system, this digital clock allows you to set the
time from 1:00 to 12:59.
If you selected the 24hour clock system, this digital clock allows you to set the
time from 0:00 to 23:59.
NOTE
You can check the current time while cooking is in progress by pressing the
Clock button.
KOC-9Q3T / KOC-9Q3TC_8
DESUK_KOC-9Q3T7R.indd 8 2014-10-07 오후 5:20:38
HILD LOCK AND POWER SAVE MODE
»C
Child lock : The Child Lock function helps to prevent accidents from children operating the oven without being monitored by the
parents.
Power save mode : This function is used for saving energy.
To set child lock
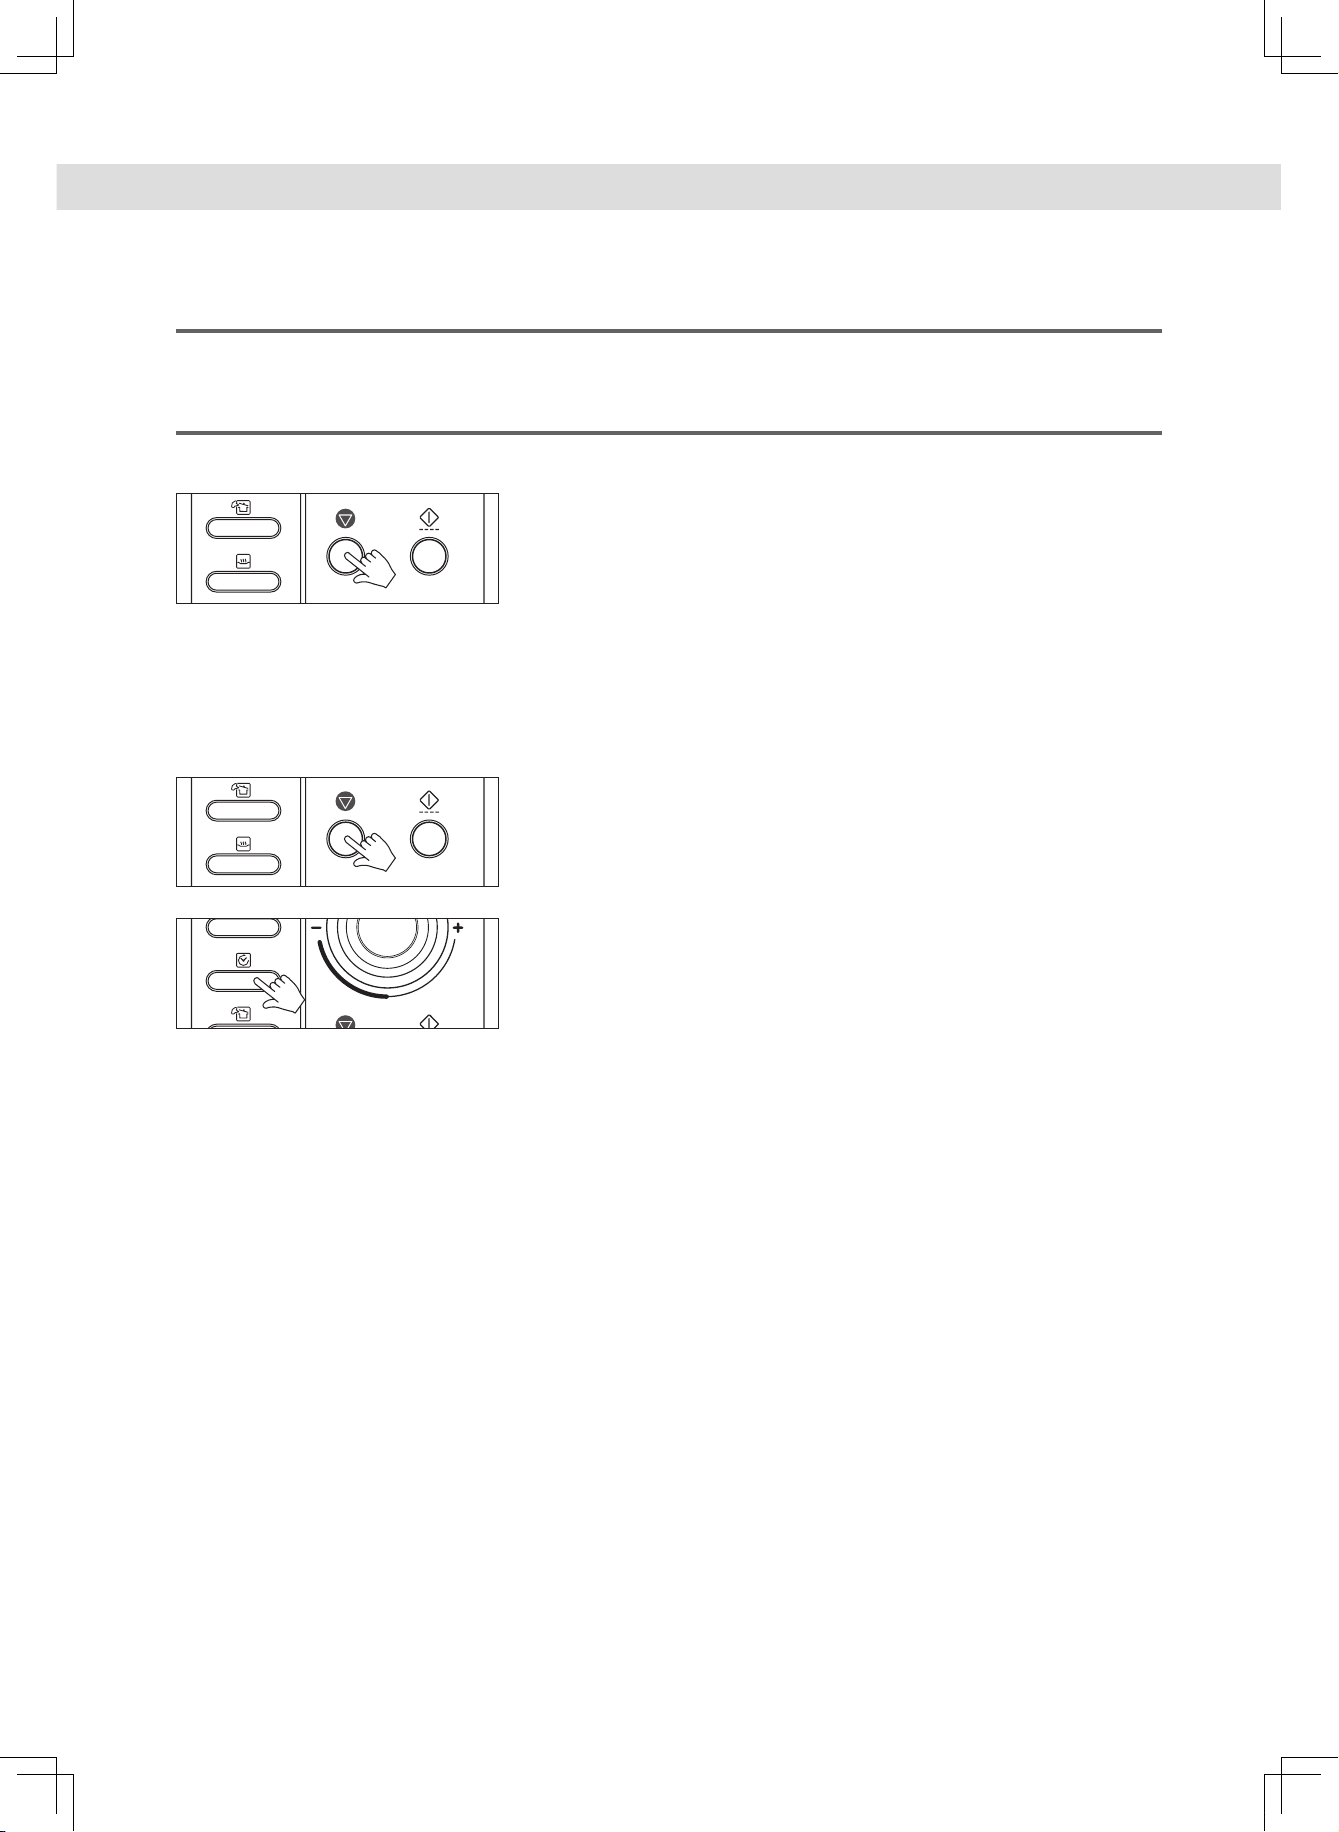
1. Press the STOP/CLEAR button.
“: 0” or clock appears in the display.
2. Press and hold the STOP/CLEAR button for 3 seconds.
A beep sounds and the display shows “ Loc ” for 3 seconds.
Now the oven cannot be operated.
3. To cancel child lock simply repeat procedure 2.
The oven will beep.
The oven is again available for normal use.
To set power save mode
1. Press the STOP/CLEAR button.
“: 0” or clock appears in the display.
2. Press and then hold the Clock button for 3 seconds.
The display will turn off and a beep sounds.
To operate the oven in power save mode, press any key or turn the knob.
Then “:0” or clock will be shown and the operation of all function keys will be
the same as in the normal mode.
But if there is no operation within 10 seconds in clear mode or while
manipulating the key, all the contents of display will disappear.
3. To cancel the power save mode, simply repeat the setting procedure.
The power save mode will be canceled and a beep sounds.
The oven is again available for normal use.
KOC-9Q3T / KOC-9Q3TC_9
DESUK_KOC-9Q3T7R.indd 9 2014-10-07 오후 5:20:38

OPERATION
TIPS
Please read this OPERATION section for the proper safety information and the operating instructions before using the oven.
Prior to setting the controls, place one cup of water in the oven, in a heat-proof glass measuring cup, for testing purposes.
The oven could be damaged if you operate the oven in microwave mode without anything in the cavity.
NOTE
When the cooking time has elapsed the oven beeps three times and "End" appears on the display. The glass turntable stops and
the oven-light turns off. The oven will continue to beep every one-minute until either the STOP/CLEAR button is pressed or the
door is opened. Opening the door while cook is in progress will cause the oven to stop and any displayed countdown will pause.
If the START/SPEEDY COOK button is pressed, the countdown will resume. If the STOP/CLEAR button is pressed, the cook will
cancel. The oven can display the set cooking time in 10 second steps (up to 5 minutes cooking time), in 30 second steps (up to 10
minutes cooking time), and in 1 minute steps (up to 60 minutes cooking time).
When the door is opened after cooking, the cooling fan may start to operate for 5 minutes to cool down the inside of oven.
(Display shows "cool" and " :0 or clock")
Also note that when the Cooling mode operates, lamp, tray, and fan runs at the same time and “cool” shows on the display.
KOC-9Q3T / KOC-9Q3TC_10
DESUK_KOC-9Q3T7R.indd 10 2014-10-07 오후 5:20:38
OPERATION
»M
This microwave cooking method allows you to cook food for a desired time. In addition to the maximum power level(100%),
you can select different microwave power from 9 other levels, 10% to 90% for the foods that require slower cooking.
If you have used the appliance for grilling, convection or combination cooking, let the oven cool down before using again.
Never switch the microwave oven on when it is empty.
ICROWAVE COOKING
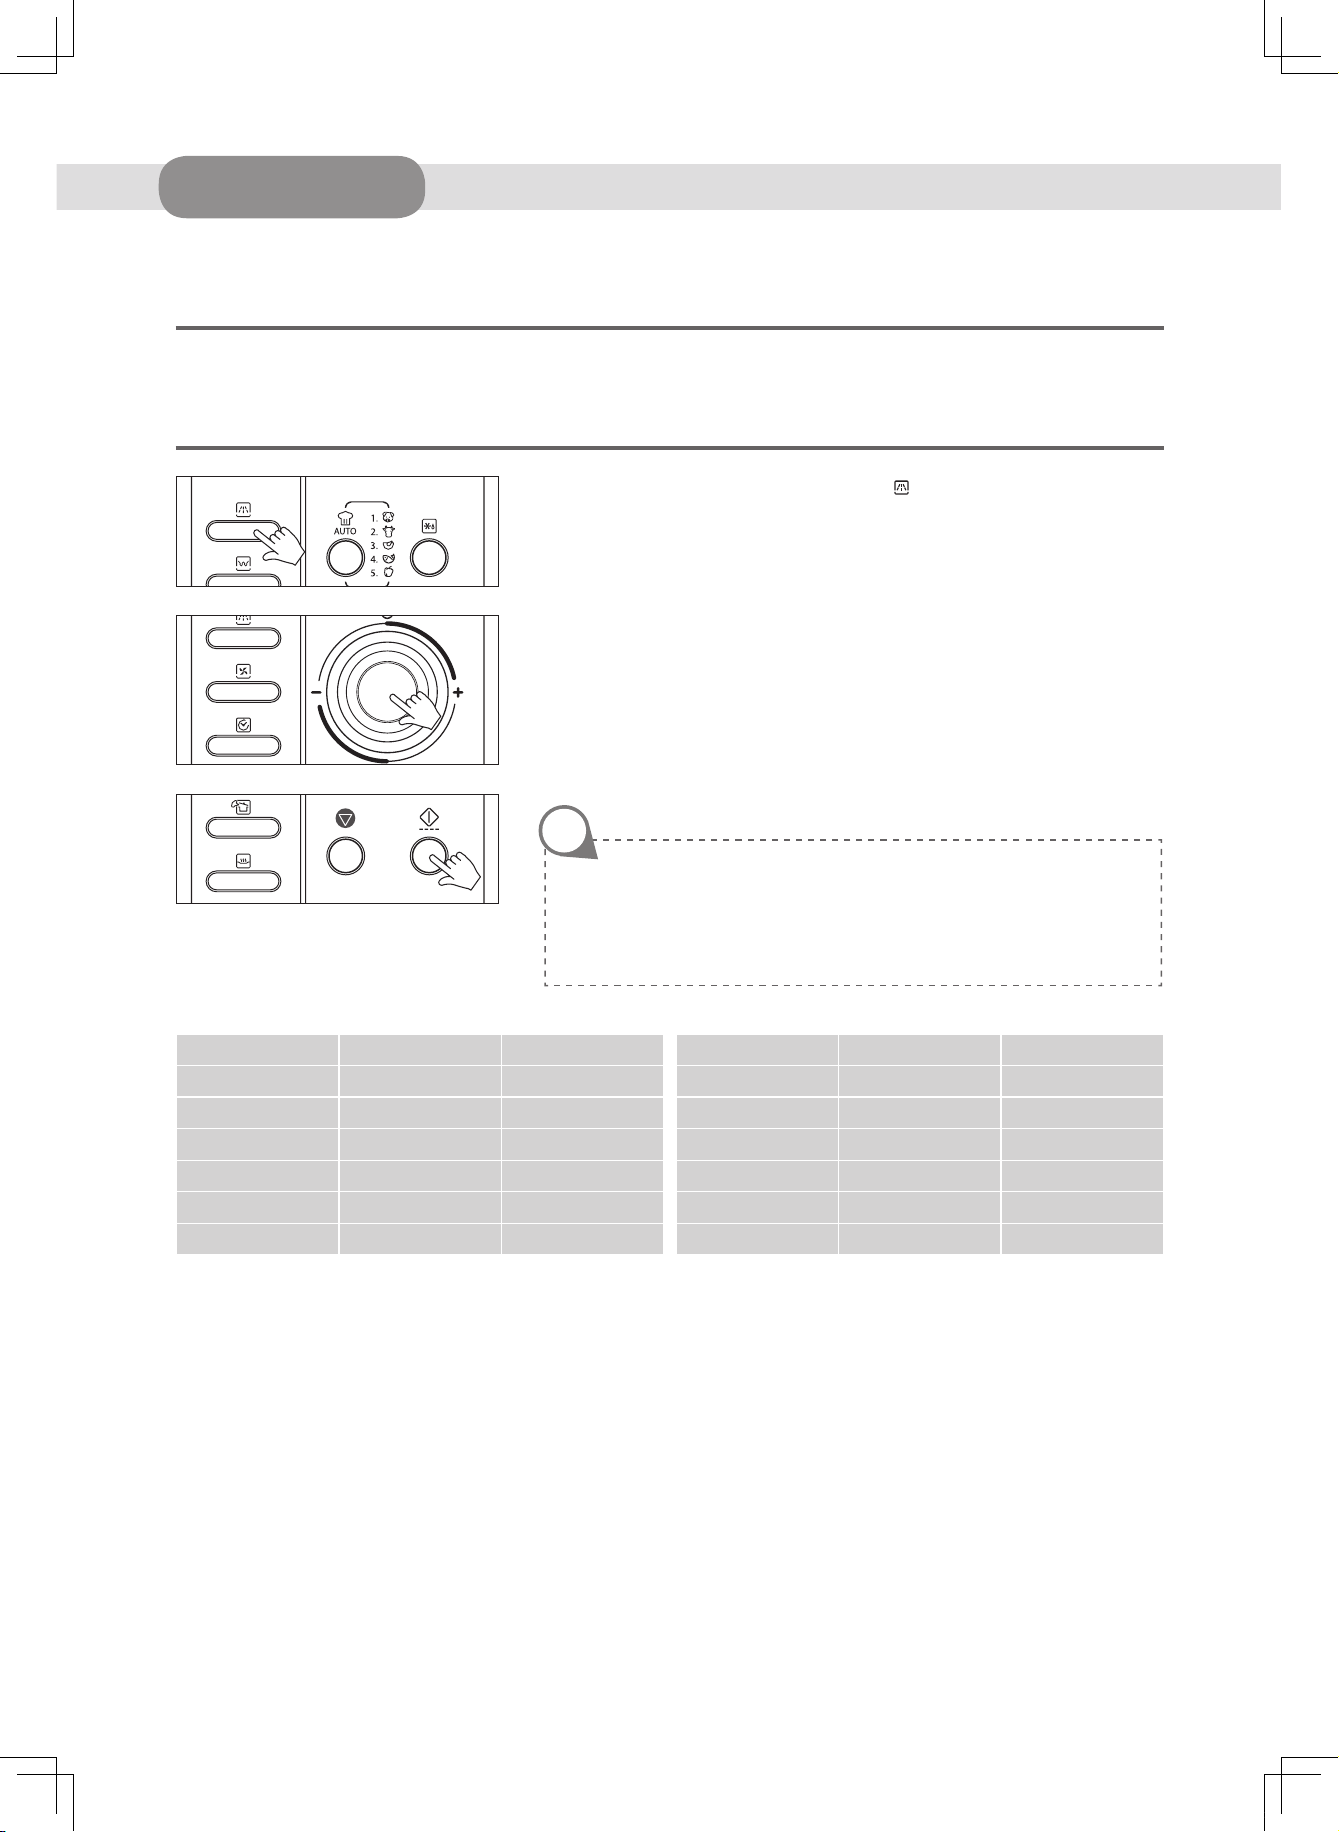
1. Press the MW button once. MW indicator ( ) lights.
“P-HI”(POWER HIGH) shows in display.
2. Select the appropriate power level by pressing the MW button again until the
corresponding percentage is displayed. Refer to the power level table below
for further details.
3. Turn the dial knob to set the cooking time.
For a cooking time of 5 minutes 30 seconds, turn the dial knob to set 5:30.
(up to 60 minutes can be set)
“5:30” shows in display.
4. Press the START/SPEEDY COOK button.
The oven light comes on and the turntable starts rotating.
Cooking starts and the time in the display will count down.
NOTE
The oven will automatically work on 100% microwave power if a cooking
time is entered without the power level previously being selected.
You can check the power level while cooking is in progress by pressing the
MW button.
Power level table
▶
Power level percentage Output
P-HI 100% 900W
P-90 90% 810W
P-80 80% 720W
P-70 70% 630W
P-60 60% 540W
Power level percentage Output
P-50 50% 450W
P-40 40% 360W
P-30 30% 270W
P-20 20% 180W
P-10 10% 90W
P-00 0% 0W
KOC-9Q3T / KOC-9Q3TC_11
DESUK_KOC-9Q3T7R.indd 11 2014-10-07 오후 5:20:38
OPERATION
RILL COOKING
»G
The Grill enables you to heat and make food to turn brown quickly without using microwave.
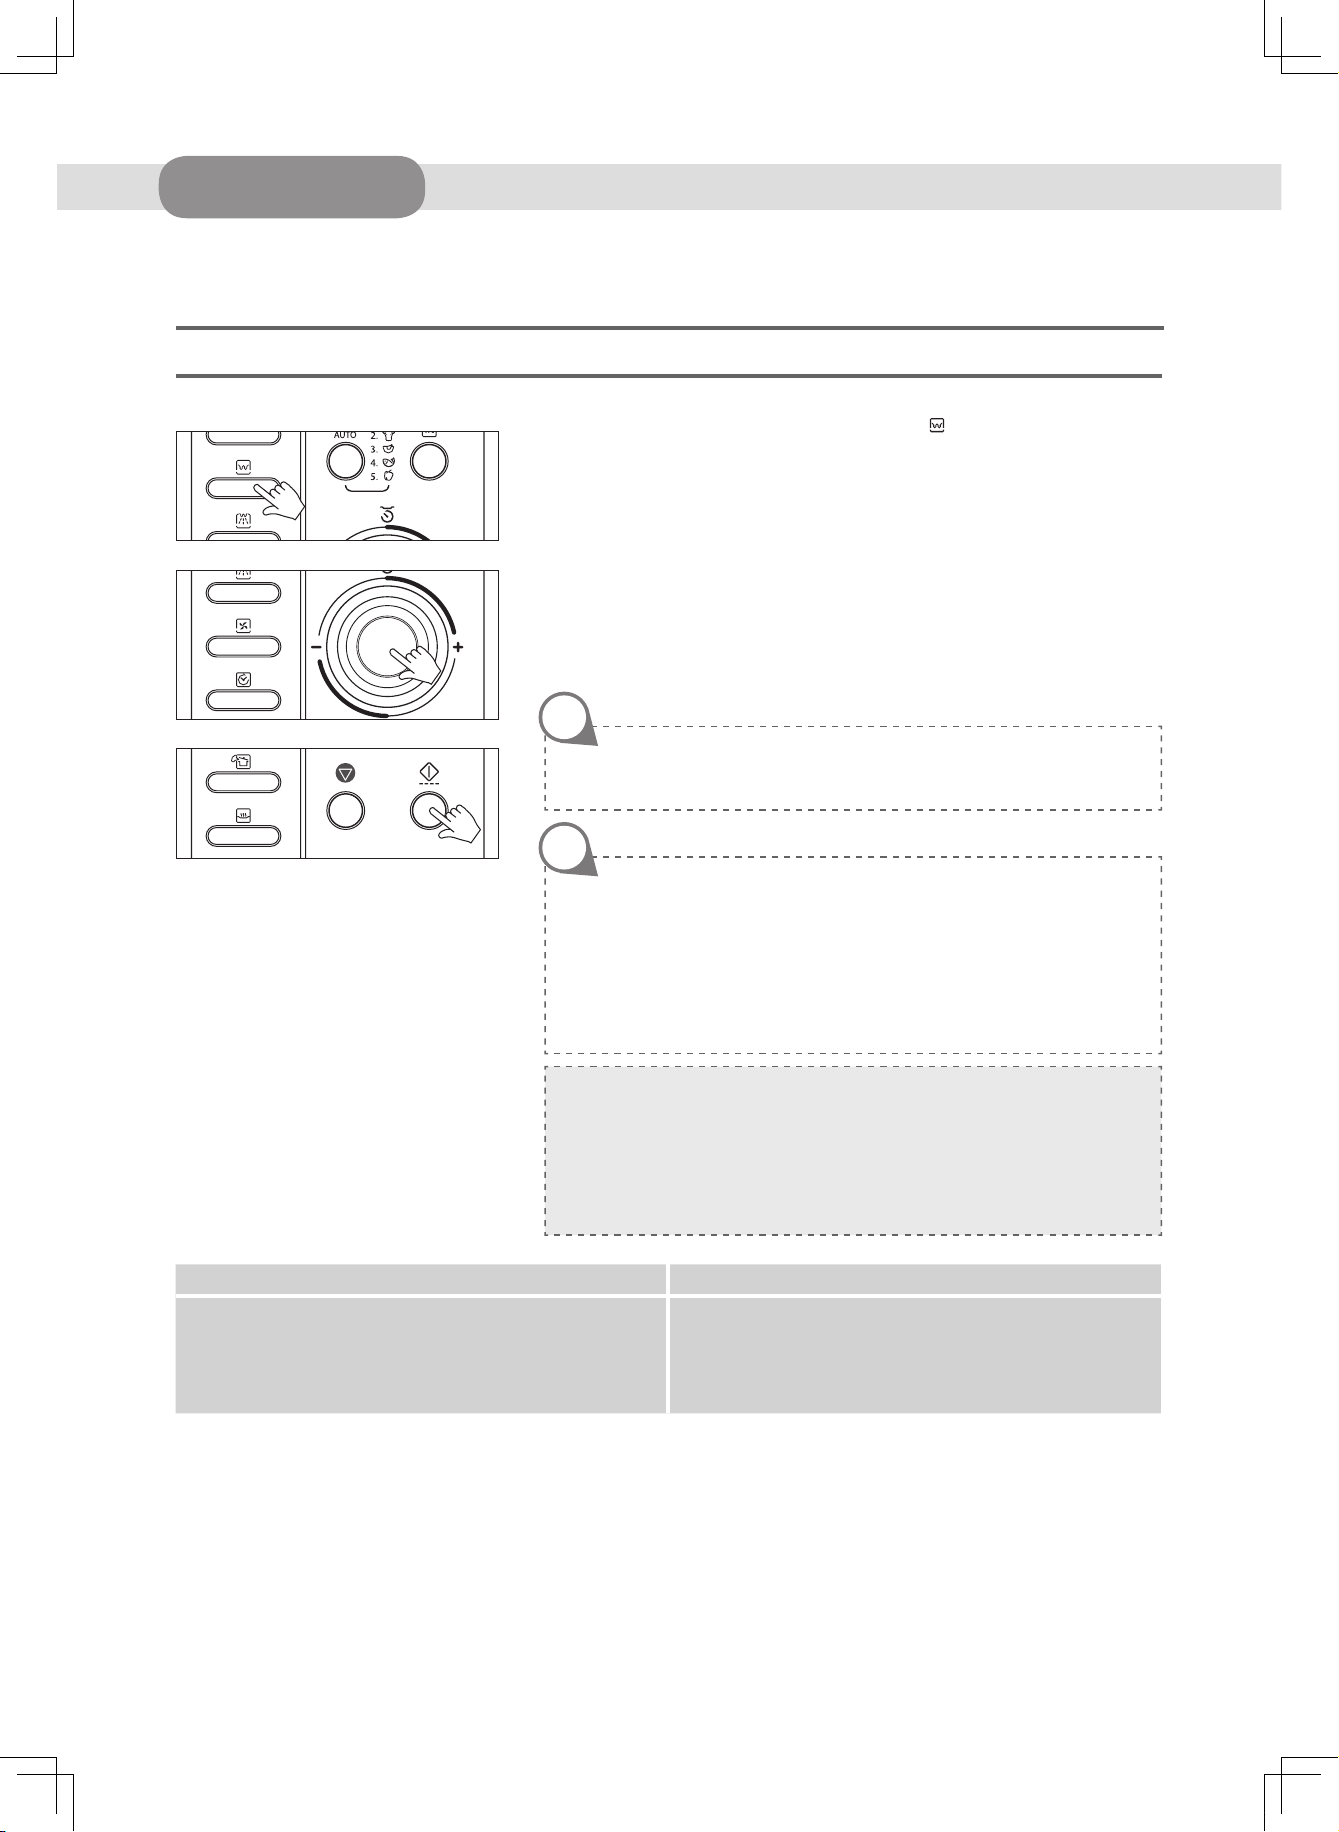
1. Press the Grill button once. The GRILL indicator ( )lights.
2. Turn the dial knob to set the grilling time.
For a grilling time of 11 minutes, turn the dial knob to set 11:00.
(up to 60 minutes can be set)
“11:00” shows in display.
3. Press the START/SPEEDY COOK button.
The oven light comes on and the turntable starts rotating.
Cooking starts and the time in the display will count down.
NOTE
The heating element is located on the top surface of the oven.
NOTE
Suggested use Cookware
This methods is ideal for toasting bread or muffins.
Remember the oven will be hot.
Place all food on low/high rack.
When using the grill heater for the first time, smoke and odour will be given
off. To avoid this happening when food is being cooked, turn the heater on
with a microwave safe bowl containing 200cc of water in the oven for 10
minutes and the odour will disappear from then on.
Grill food by placing it directly on the rack, in a flat dish or on a heat resistant
plate on the rack.
WARNING :
The temperature inside the oven and window is very high.
Do not touch the oven window and metallic interior of the oven when
taking food in and out.
Use thick oven gloves while handling food or accessories.
Use oven-proof cookware.
As there is no microwave energy being used you can place
metal tins directly onto the metal racks with no danger of
arcing.
KOC-9Q3T / KOC-9Q3TC_12
DESUK_KOC-9Q3T7R.indd 12 2014-10-07 오후 5:20:38
 Loading...