


DAEWOO DWF-5510, DWF-5511, DWF-5520, DWF-5521, DWF-6010 Service Manual
...Manual Service
.LTD ,.CO ELECTRONICS DAEWOO
Service Manual |
Auto Washer |
Model : DWF-5510/5511/5520/5521 |
6010/6011/6020/6021 |
DAEWOO ELECTRONICS CO., LTD. |
OVERSEAS SERVICE DEPT. |

AUTO WASHER |
AUTO WASHER |
AUTO WASHER |
AUTO WASHER |
AUTO WASHER |
AUTO WASHER |
AUTO WASHER |
AUTO WASHER |
AUTO WASH- |
||||||||||||||||||||
ER |
AUTO WASHER |
AUTO WASHER |
AUTO WASHER |
AUTO WASHER |
AUTO WASHER |
AUTO WASHER |
AUTO WASHER |
AUTO WASHER |
AUTO |
|||||||||||||||||||
WASHER |
AUTO |
WASHER |
AUTO |
WASHER |
AUTO |
WASHER |
AUTO |
WASHER |
AUTO |
WASHER |
AUTO |
WASHER |
AUTO |
WASHER |
AUTO |
WASHER |
||||||||||||
AUTO WASHER |
AUTO WASHER |
AUTO WASHER |
AUTO WASHER |
AUTO WASHER |
AUTO WASHER |
AUTO WASHER |
AUTO WASHER |
AUTO WASH- |
||||||||||||||||||||
ER |
AUTO WASHER |
AUTO WASHER |
AUTO WASHER |
AUTO WASHER |
AUTO WASHER |
AUTO WASHER |
AUTO WASHER |
AUTO WASHER |
AUTO |
|||||||||||||||||||
WASHER |
AUTO |
WASHER |
AUTO |
WASHER |
AUTO |
WASHER |
AUTO |
WASHER |
AUTO |
WASHER |
AUTO |
WASHER |
AUTO |
WASHER |
AUTO |
WASHER |
||||||||||||
WASHING MACHINE
Contents
1. SPECIFICATIONS |
2 |
2. STRUCTURE OF THE WASHING MACHINE |
3 |
3. FUNCTIONS OF THE CONTROL PANEL |
4 |
4. WASHING PROCEDURE AND COURSE SELECTION |
|
FULL AUTOMATIC COURSE |
5 |
RESERVED WASHING |
7 |
PARTIAL SELECTION AMONG WASH, RINSE OR SPIN |
7 |
5. DIRECTIONS FOR INSTALLATION AND USE |
|
INSTALLATION OF THE UNDER BASE COVER |
8 |
HOW TO INSTALL ON AN INCLINED PLACE |
8 |
HOW TO CONNECT THE INLET HOSE |
9 |
HOW TO CLEAN THE FILTER |
10 |
6. FEATURE AND TECHNICAL EXPLANATION |
|
FEATURE OF THE WASHING MACHINE |
11 |
WATER CURRENT TO ADJUST THE UNBALANCED LOAD |
11 |
AUTOMATIC WATER SUPPLY SYSTEM FOR BLANKET WASH |
11 |
PULSATOR SYSTEM |
12 |
AUTOMATIC DRAINING TIME ADJUSTMENT |
12 |
SOFTENER DISPENSER |
13 |
AUTOMATIC UNBALANCE ADJUSTMENT |
14 |
CIRCULATING-WATER COURSE AND LINT FILTER |
14 |
LINT FILTER |
15 |
RESIDUAL TIME DISPLAY |
15 |
DRAIN MOTOR |
15 |
GEAR MECHANISM ASS’Y |
16 |
PRINCIPLE OF BUBBLE GENERATOR |
16 |
FUNCTIONAL PRINCIPLE OF BUBBLE WASHING MACHINE |
17 |
7. DIRECTIONS FOR DISASSEMBLY AND ADJUSTMENT |
|
GEAR MECHANISM ASS’Y REPLACEMENT |
18 |
DRAIN MOTOR AND VALVE |
19 |
BRAKE ADJUSTMENT |
19 |
8. TROUBLE SHOOTING GUIDE |
|
CONCERNING WATER SUPPLY |
20 |
CONCERNING WASHING |
21 |
CONCERNING DRAINING |
22 |
CONCERNING SPINNING |
23 |
CONCERNING OPERATION |
24 |
9. PRESENTATION OF THE P.C.B ASS’Y |
25 |
APPENDIX |
|
WIRING DIAGRAM |
26 |
PARTS DIAGRAM & PARTS LIST |
30 |
CIRCUIT DIAGRAM |
39 |

1. SPECIFICATIONS
NO. |
ITEM |
|
DWF-5510 |
DWF-5511 |
DWF-5520 |
DWF-5521 |
DWF-6010 |
DWF-6011 |
DWF-6020 |
DWF-6021 |
|||||||
|
|
|
|
|
|
|
|
|
|
|
|
|
|
|
|
||
1 |
POWER SOURCE |
|
|
|
AVAILABLE IN ALL LOCAL AC VOLTAGE |
|
|
|
|
||||||||
|
|
|
|
|
|
|
|
|
|
|
|
|
|
|
|
|
|
2 |
POWER |
50Hz |
|
|
|
|
250W |
|
|
|
|
|
|||||
|
|
|
|
|
|
|
|
|
|
|
|
|
|
|
|
|
|
CONSUMPTION |
60Hz |
|
|
|
|
270W |
|
|
|
|
|
||||||
|
|
|
|
|
|
|
|
|
|
||||||||
|
|
|
|
|
|
|
|
|
|
|
|
|
|
|
|
|
|
3 |
MACHINE |
NET |
32 |
32.5 |
|
32.5 |
33 |
|
32.5 |
|
33 |
|
33 |
|
33.5 |
||
|
|
|
|
|
|
|
|
|
|
|
|
|
|
|
|
|
|
WEIGHT |
GROSS |
35 |
36 |
|
36 |
37 |
|
36 |
|
37 |
|
37 |
|
38 |
|||
|
|
|
|
|
|
||||||||||||
|
|
|
|
|
|
|
|
|
|
|
|
|
|||||
4 |
DIMENSION (WXHXD) |
532X855X542 |
532X920X542 |
532X887X542 |
532X952X542 |
532X855X542 |
532X920X542 |
532X887X542 |
532X952X542 |
||||||||
|
|
|
|
|
|
|
|
|
|
|
|
|
|
|
|
|
|
5 |
MATERIAL OF INTERNAL TUB |
|
|
PLASTIC |
|
|
|
|
STAINLESS STEEL |
|
|||||||
|
|
|
|
|
|
|
|
|
|
|
|
|
|
|
|
|
|
6 |
WASHING COURSE |
|
|
|
FULL AUTOMATIC 4 COURCE |
|
|
|
|
|
|||||||
|
|
|
(FUZZY, LIGHT, HEAVY, WOOL/SUIT) |
|
|
|
|
||||||||||
|
|
|
|
|
|
|
|
|
|
|
|
||||||
|
|
|
|
|
|
|
|
|
|
|
|
|
|
|
|
|
|
7 |
WATER LEVEL SELECTOR |
|
|
|
HIGH(55l), MID(45l), LOW(31l) |
|
|
|
|
|
|||||||
|
|
|
|
|
|
|
|
|
|
|
|
|
|
|
|
|
|
8 |
OPERATING WATER PRESSURE |
|
|
|
0.3kgf/cm2~8kgf/cm2 |
(2.94 N/cm2~78.4N/cm2) |
|
|
|
|
|||||||
|
|
|
|
|
|
|
|
|
|
|
|
|
|
|
|
|
|
9 |
MAXIMUM MASS OF TEXTILE |
|
|
5.5Kg |
|
|
|
|
|
6.0Kg |
|
||||||
|
|
|
|
|
|
|
|
|
|
|
|
|
|
|
|
|
|
|
REVOLUTION |
|
|
WASH |
|
|
|
125~145(50Hz), 130~150(60Hz) |
|
|
|
|
|
||||
|
|
|
|
|
|
|
|
|
|
|
|
|
|
|
|
|
|
10 |
|
|
SPIN |
|
|
|
710~725(50Hz), 760~785(60Hz) |
|
|
|
|
|
|||||
PER MINUTE |
|
|
|
|
|
|
|
|
|
|
|||||||
|
|
|
|
|
|
|
|
|
|
|
|
|
|
|
|
|
|
|
|
|
SUIT |
|
|
|
|
50(50Hz), 60(60Hz) |
|
|
|
|
|
||||
|
|
|
|
|
|
|
|
|
|
|
|
|
|||||
|
|
|
|
|
|
|
|
|
|
|
|
|
|
|
|||
11 |
DIRECTION INLET VALVE |
BACKWARD |
|
UPWARD |
|
BACKWARD |
|
UPWARD |
|||||||||
|
|
|
|
|
|
|
|
|
|
|
|
|
|
|
|||
12 |
WATER CONSUMPTION |
|
APPROX. 135l/CYCLE |
|
|
|
|
APPROX. 130l/CYCLE |
|
||||||||
|
|
|
|
|
|
|
|
|
|
|
|
|
|||||
13 |
PULSATOR |
|
PROVIDED WITH 6 SPOUTING HOLES FOR POWERFUL UPWARD WATER STREAM |
|
|||||||||||||
|
|
|
|
|
|
|
|
|
|
|
|
|
|
|
|
||
14 |
WATER LEVEL CONTROL |
|
|
|
|
ELECTRONICAL SENSOR |
|
|
|
|
|
||||||
|
|
|
|
|
|
|
|
|
|
|
|
|
|
|
|
||
15 |
ANTI NOISE PLATE |
|
|
|
|
OPTION |
|
|
|
|
|
||||||
|
|
|
|
|
|
|
|
|
|
|
|
|
|
|
|
||
16 |
GEAR MECHANISM ASS’Y |
|
|
|
|
SPUR GEAR |
|
|
|
|
|
||||||
|
|
|
|
|
|
|
|
|
|
|
|
|
|
|
|
|
|
17 |
LINT FILTER |
|
|
|
|
|
|
O |
|
|
|
|
|
||||
|
|
|
|
|
|
|
|
|
|
|
|
|
|
|
|
|
|
18 |
SOFTENER INLET |
|
|
|
|
|
O |
|
|
|
|
|
|||||
|
|
|
|
|
|
|
|
|
|
|
|
|
|
|
|
|
|
19 |
ALARM SIGNAL |
|
|
|
|
|
|
O |
|
|
|
|
|
||||
|
|
|
|
|
|
|
|
|
|
|
|
|
|
|
|
|
|
20 |
AUTO. WATER SUPPLY |
|
|
|
|
|
O |
|
|
|
|
|
|||||
|
|
|
|
|
|
|
|
|
|
|
|
|
|
|
|
||
21 |
FUNCTION FOR BUBBLE |
|
|
|
|
OPTION |
|
|
|
|
|
||||||
|
|
|
|
|
|
|
|
|
|
|
|
|
|
|
|
|
|
22 |
AUTO RE-FEED WATER |
|
|
|
|
|
O |
|
|
|
|
|
|||||
|
|
|
|
|
|
|
|
|
|
|
|
|
|
|
|
|
|
23 |
AUTO POWER OFF |
|
|
|
|
|
O |
|
|
|
|
|
|||||
|
|
|
|
|
|
|
|
|
|
|
|
|
|
|
|
|
|
2 SPECIFICATIONS

3. FUNCTIONS OF THE CONTROL PANEL
Control panel has micom sensor.
As the buttons are pressed, the lamps indicating the selection of your desired washing program will light up.
§èDWF-5510/5511/6010/6011
|
HIGH |
POWER |
MID |
LOW |
|
|
WATER |
|
LEVEL |
DAEWOO AUTOMATIC WASHER
 FUZZY
FUZZY
 LIGHT
LIGHT
 HEAVY
HEAVY  RES.
RES.  SUIT
SUIT
RES. |
COURSE |
 ADD
ADD
 WASH HOT START
/ HOLD
RINSE COLD  SPIN
SPIN
TEMP
PROCESS
§èDWF-5520/5521/6020/6021
|
HIGH |
POWER |
MID |
LOW |
|
|
WATER |
|
LEVEL |
DAEWOO AUTOMATIC WASHER
 FUZZY
FUZZY
 LIGHT
LIGHT
 HEAVY
HEAVY  RES.
RES.  SUIT
SUIT
RES. |
COURSE |
 ADD
ADD
 WASH HOT START
/ HOLD
RINSE COLD  SPIN
SPIN
TEMP
PROCESS
|
|
|
POWER |
|
|
|
|
Power Switch |
|
|
|
|
|
|
|
||
|
|
|
|
|
|
|
||
|
|
|
|
|
|
|
• Press this button to turn the power ON or OFF. |
|
|
|
|
|
|
|
|
|
|
|
|
|
|
|
|
|
|
|
|
|
|
|
|
|
|
|
|
|
|
|
|
|
|
|
|
|
|
|
|
|
|
|
|
|
Water Level Selector |
|
|
|
WATER |
|
|
|
|
|
|
|
|
LEVEL |
|
|
|
|
• This button is used to select the water level you want. |
|
|
|
|
|
|
|
|
|
|
|
|
|
|
|
|
|
|
|
|
|
|
|
|
|
|
Reservation Button |
|
|
|
|
|
|
|
|
• If you want to reserve the finishing time of washing, use this button. |
|
|
|
|
|
|
|
|
|
|
|
|
RES. |
|
|
|
|
As this button is pressed, digit in display increases by 1 hour at one press. |
|
|
|
|
|
|
|
• If current time is 8:00 am and you expect washing will be completed around 5:00 pm, press |
|
|
|
|
|
|
|
|
|
|
|
|
|
|
|
|
|
|
this nine times in order to display ‘9’. |
|
|
|
|
|
|
|
|
|
|
|
|
|
|
|
|
|
Course Selector |
|
|
|
|
|
|
|
|
|
|
|
COURSE |
|
|
|
• This button is used to select the washing course according to the type of wash loads. |
||
|
|
|
|
|
|
|
|
• Either WOOL or SUIT course is adopted to your washing machine. |
|
|
|
|
|
|
|
|
|
|
|
PROCESS |
|
|
|
Program Button |
||
|
|
|
|
|
||||
|
|
|
|
|
• With this button, you can create new programs by combinations of process. |
|||
|
|
|
|
|
|
|
|
|
|
|
|
|
|
|
|
|
|
|
|
|
|
|
|
|
|
Temperature Selector (Optional) |
|
|
|
|
|
|
|
|
|
|
|
|
TEMP |
|
|
|
|
• If your washer is connected to two water taps for cold water and hot water, you can select |
|
|
|
|
|
|
|
|
them. Without operation, cold water would be selected automatically. |
|
|
|
|
|
|
|
|
|
|
|
|
|
|
|
|
|
|
|
|
|
START |
|
|
|
|
Start/Hold |
|
|
|
|
|
|
|
||
|
|
|
|
|
|
|
||
|
/ |
|
|
|
|
• With this button, you can make your washer proceed your program, or stop temporarilly. |
||
|
|
HOLD |
|
|
And you can also release the temporary stop by pressing this. |
|||
|
|
|
|
|
|
|
|
|
|
|
|
|
|
|
|
|
|
4 CONTROL PANEL

§èRESERVED WASHING
1Set your program as the above procedure, remaining last step.
•Press the course selection button.
•Press the procedure selection button.
•But WOOL/SUIT course can not reservation.
2Press reservation button until the digital monitor displays the finishing time you want.
RES.
3 Press Start/Hold to start.
START / HOLD
§èPARTIAL SELECTION AMONG WASH, RINSE OR SPIN
step 1. Press power switch.
step 2. Press program button until the indicating lamps make the combinations you want.
If only spin lamp is turned on, that means you will operate your washer for spin only.
If rinse and spin lamp are turned on, that means you will operate your washer for rinse and spin.
If add lamp is turned on with other porcess lamps, that means the time of the corresponding porcess will increase by 1~2 minutes, that is, if add is on with wash, rinse and spin, the time of each precess will increase by 1~2 minutes. (Wash: add 2 min., Rinse: add 1 min., Spin: add 1 min.)
step 3. Press water level selector as your decision. step 4. Press Start/Hold to start.
1 Processing |
2 |
Selecting |
|
|
|
3 Selecting Course |
|
|
4 |
|
Pressing |
|
|||||||||
|
the Power |
|
Water level |
|
|
|
|
|
the Start/Hold |
|
|||||||||||
|
Switch |
|
|
|
|
|
|
|
|
|
|
|
|
|
|
Switch |
|
||||
|
|
|
|
|
|
|
|
|
|
|
|
|
|
|
|
|
|
|
|
|
|
|
|
|
|
|
|
|
|
|
|
|
Wash & Rinse |
|
§ |
ADD |
|
|
|
|
|
|
|
|
|
|
|
|
|
|
|
|
|
|
|
§ |
WASH |
|
|
|
|
|
|
|
|
|
|
|
|
|
|
|
|
|
|
|
& Spin |
|
§ |
RINSE |
|
|
|
|
|
|
|
|
|
|
|
|
|
|
|
|
|
|
|
|
§ |
SPIN |
|
|
|
|
|
|
|
|
|
|
|
|
|
|
|
|
|
|
|
|
|
|
|
|
|
|
|
|
|
|
|
|
|
|
|
|
|
|
|
|
Only Spin |
|
§ |
ADD |
|
|
|
|
|
|
|
|
|
|
|
|
|
|
|
|
|
|
|
§ |
WASH |
|
|
|
|
|
|
|
|
|
|
|
|
|
|
|
|
|
|
|
|
|
§ |
RINSE |
|
|
|
|
|
|
|
|
|
|
|
|
|
|
|
|
|
|
|
|
§ |
SPIN |
|
|
|
|
|
|
|
|
|
|
|
|
|
|
|
|
|
|
|
|
|
|
|
|
|
|
|
|
|
|
|
|
|
|
|
|
|
|
|
|
Add & Wash |
|
§ |
ADD |
|
|
|
|
|
|
|
|
|
|
|
|
|
|
|
|
|
|
|
§ |
WASH |
|
|
|
|
|
|
End of |
|
|
|
|
|
|
|
|
§ |
ADD |
|
|
§ |
RINSE |
|
|
|
|
|
|
|||
|
|
|
§ |
HIGH |
|
§ |
WASH |
|
|
§ |
SPIN |
|
|
|
|
|
|
Washing |
|||
|
|
|
§ |
MID |
|
§ |
RINSE |
|
|
|
|
|
|
|
|
|
|
|
|
||
|
|
|
|
|
|
|
|
|
|
|
|
|
|
||||||||
|
|
|
§ |
LOW |
|
§ |
SPIN |
|
|
§ |
ADD |
|
|
|
|
|
|
|
|||
|
|
|
|
|
|
|
|
|
|
|
Add & RInse |
|
§ |
WASH |
|
|
|
|
|
|
|
|
|
|
|
|
|
|
|
|
|
|
|
|
|
|
|||||||
|
|
|
|
|
|
|
|
|
|
|
|
|
|
|
|||||||
|
|
|
|
|
|
|
|
|
|
|
& Spin |
|
§ |
RINSE |
|
|
|
START |
|
|
|
|
|
|
|
|
|
|
|
|
|
|
|
|
§ |
SPIN |
|
|
|
|
|
|
|
|
POWER |
|
|
WATER |
|
|
|
PROCESS |
|
|
|
|
|
|
/ |
HOLD |
|
|
|||
|
|
|
|
|
|
|
|
|
|
|
|
|
|
|
|
|
|
|
|
||
|
|
|
|
|
|
|
|
|
|
|
Add & Spin |
|
§ |
ADD |
|
|
|
|
|
|
|
|
|
|
|
|
|
|
|
|
|
|
|
|
|
|
|
|
|
|
|||
|
|
|
|
|
|
|
|
|
|
|
|
|
|
|
|
|
|
||||
|
|
|
|
|
|
|
|
|
|
|
|
§ |
WASH |
|
|
|
|
|
|
It is Informed |
|
|
|
|
|
|
|
|
|
|
|
|
|
|
§ |
RINSE |
|
|
|
|
|
|
|
|
|
|
|
|
|
|
|
|
|
|
|
|
§ |
SPIN |
|
|
|
|
|
|
by buzzer. |
|
|
|
|
|
|
|
|
|
|
|
|
|
|
|
|
|
|
|
|
|
|
|
|
|
|
|
|
|
|
|
|
|
Add & Wash |
|
§ |
ADD |
|
|
|
|
|
|
|
|
|
|
|
|
|
|
|
|
|
|
|
§ |
WASH |
|
|
|
|
|
|
|
|
|
|
|
|
|
|
|
|
|
|
|
& Rinse & Spin |
|
§ |
RINSE |
|
|
|
|
|
|
|
|
|
|
|
|
|
|
|
|
|
|
|
|
§ |
SPIN |
|
|
|
|
|
|
|
|
|
|
|
|
|
|
|
|
|
|
|
|
|
|
|
|
|
|
|
|
|
|
|
|
|
|
|
|
|
|
|
|
Only Wash |
|
§ |
ADD |
|
|
|
|
|
|
|
|
|
|
|
|
|
|
|
|
|
|
|
§ |
WASH |
|
|
|
|
|
|
|
|
|
|
|
|
|
|
|
|
|
|
|
|
|
§ |
RINSE |
|
|
|
|
|
|
|
|
|
|
|
|
|
|
|
|
|
|
|
|
§ |
SPIN |
|
|
|
|
|
|
|
|
|
|
|
|
|
|
|
|
|
|
|
|
|
|
|
|
|
|
|
|
|
|
|
|
|
|
|
|
|
|
|
|
Rinse & Spin |
|
§ |
ADD |
|
|
|
|
|
|
|
|
|
|
|
|
|
|
|
|
|
|
|
§ |
WASH |
|
|
|
|
|
|
|
|
|
|
|
|
|
|
|
|
|
|
|
|
|
§ |
RINSE |
|
|
|
|
|
|
|
|
|
|
|
|
|
|
|
|
|
|
|
|
§ |
SPIN |
|
|
|
|
|
|
|
|
|
|
|
|
|
|
|
|
|
|
|
|
|
|
|
|
|
|
|
|
|
PROCEDURE 7

5. DIRECTIONS FOR INSTALLATION AND USE
INSTALLING PLACE
Install the washer on a horizontal solid floor. If the washer is installed on an unsuitable floor, it could make considerable noise and vibration.
10Cm
Keep the machine body more than 25cm apart from the wall surface. It will make easy cleaning the drain filter which is equipped at the back side of it. And if it comes into contract vibration may occur.
Never install in these places
¡The place where it would be exposed to direct sunlight.
¡The place nearby a heater or heat appliance.
¡The place where it would be supposed to be frozen in winter.
¡The kitchen with coal gas and a damp place like a bathroom.
§èINSTALLATION OF THE UNDER BASE COVER [OPTION]
-DWF-5510/5511/5010/6011
1Before installing your washer, remove the pad from the bottom of the cabinet. Then, separate under cover from rear side of cabinet by unscrewing and insert it into the base.
2Push the under-base cover into the end, which decrease the noise made by this washer.
SCREW
-DWF-5520/5521/6020/6021
1There is under-base cover in the tub of the washer. Put out and draw it in its proper site. (See picture)
2Push the under-base cover into the end, which decrease the noise made by this washer.
§èHOW TO INSTALL ON AN INCLINED PLACE
Horizon |
Check the Horizon |
1Setting |
2Status |
After controlling the height |
Check the position of tub above |
by turning the adjustable |
the center of the washer. |
leg, let the washer put |
|
down to the ground. |
|
NOTES
The openings must not be obstructed by carpeting when the washing machine is installed on a carpeted floor.
8 DIRECTIONS

6. FEATURE AND TECHNICAL EXPLANATION
FEATURE OF THE WASHING MACHINE
1The first air bubble washing system in the world.
2Quiet washing through the innovational low-noise design.
3The wash effectiveness is much more enhanced because of the air bubble washing system.
4The laundry detergent dissolves well in water because of the air bubble washing system.
5The adoption of the water currents to adjust the unbalanced load.
6One-touch operation system.
WATER CURRENT TO ADJUST THE UNBALANCED LOAD
It is a function to prevent eccentricity of the clothes after wash by rotating pulsator C.W and C.C.W for 35 seconds.(But, the SUIT course have no operation of the water currents to adjust the unbalnced load.)
EFFECT
It reduces vibration and noise effectively while spinning.
WATER FLOW
WASH |
|
|
DRAIN |
SPIN |
FILL |
RINSE 1 |
|
|
DRAIN |
SPIN |
FILL |
RINSE 2 |
|
|
DRAIN |
••• |
|
|
|
|
|
|
|||||||||||
|
|
|
|
|
|
|
|
|
|
|
|
|
|
|
|
|
|
|
|
|
|
|
|
|
|
|
|
|
|
|
|
|
|
|
|
|
|
|
|
|
|
|
|
|
|
|
|
|
|
|
|
|
|
|
|
|
|
|
|
|
|
|
|
|
|
|
|
|
|
|
|
|
|
|
|
|
|
|
|
|
|
|
|
|
MOTOR C.W
SINGAL C.C.W
TIME(SEC.) |
0.4 |
0.4 |
0.4 |
0.4 |
0.4 |
0.4 |
••••••• |
40 SEC. (About 25 Times)
* When the water level is “HIGH”
AUTOMATIC WATER SUPPLY SYSTEM FOR BLANKET WASH 
The water level would be lowered because the blanket absorbs water at the beginning of washing. Therefore, after 60 seconds, the operation is interrupted to check the water level, and then the water is supplied again until the selected water level is reached.
EXPLANATION 11
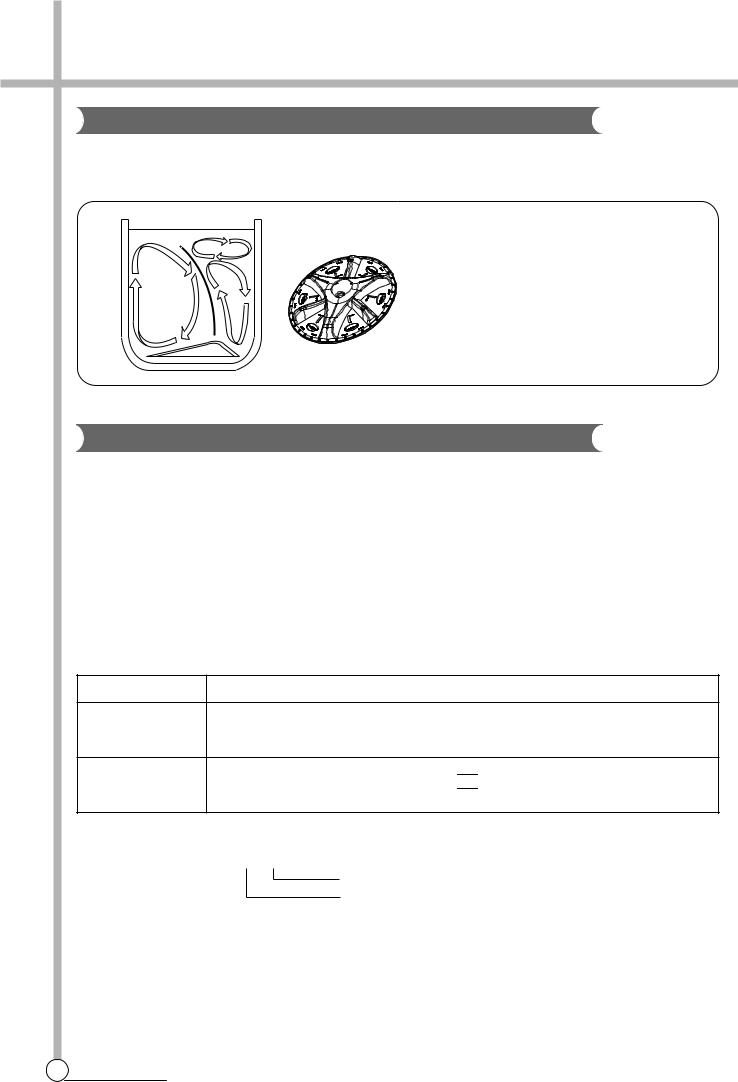
PULSATOR SYSTEM
When the pulsator is rotated C.W or C.C.W at a high speed, it makes the cyclone water flow from the asymmetrically designed pulsator as shown below.
Asymmetrically designed pulsator makes the cyclone water flow, which get rid of the washing dead zone to increase the washing effect and reduce the entanglement of laundry.
AUTOMATIC DRAINNING TIME ADJUSTMENT
This system adjusts the draining time automatically according to the draining condition.
Draining |
Good draining |
The washer begins spin process after drainage. |
|
|
|
||
Bad draining |
Draininig time is prolonged. |
||
condition |
|||
|
|
||
No draining |
Program is stopped and gives the alarm. |
||
|
|||
|
|
|
FUNCTIONAL PRINCIPLE
1 The micom can remember the time from the begining of drain to reset point when the pressure switch reaches to “OFF” point
Drain Time |
Movement of the Program |
Less than
Continue draining
10 minutes
More than
Program stops and gives the alarm with 


 blinked on display lamp.
10 minutes
2 In case of continuous draining, residual drain time is determined by micom. Draining time as a whole = D + 30
Residual drain time.
The time remembered by micom.
12 EXPLANATION

SOFTENER DISPENSER
This is the device to dispense the softener automatically by centrifugal force.
This is installed inside the auto-balancer.
FUNCTIONAL PRINCIPLE
1Softener stays in room (A) when poured into softener inlet.
2Softener moves from (A) to (B) by centrifugal force during intermittent spin process.
3Softener flows from (B) to (C) during rinse process next to intermittent spin.
4Softener moves from (C) to (D) by centrigfugal force during second intermittent spin.
After spin process is finished, the softener is added into the tub through softener outlet.
FLOW OF THE SOFTENER
|
|
|
|
|
|
Wash |
|
|
Intermittent |
|
Hold |
|
Intermittent |
|
Rinse |
|
Spin |
||||||||||
|
|
|
|
|
|
|
|
|
|
|
Spin |
|
|
|
|
|
|
Spin |
|
|
|
|
|
|
|||
|
|
|
|
|
|
|
|
|
|
|
|
|
|
|
|
|
|
|
|
|
|
|
|
|
|
|
|
|
Normal |
Centrifugal |
|
Flow in |
|
Centrifugal |
|
Flow in |
|
|
|
||||||||||||||||
|
|
|
|
|
|
|
|
force |
|
|
|
|
|
|
force |
|
|
|
|
|
|
||||||
|
Course |
(A) |
|
|
|
|
(B) |
|
|
(C) |
|
|
|
|
(D) |
|
|
|
|
|
|
||||||
|
|
|
|
|
|
|
|
|
|
|
|
|
|
|
|
|
|||||||||||
|
|
|
|
|
|
|
|
|
|
|
|
|
|
|
|
||||||||||||
|
|
|
|
|
|
|
|
|
|
|
|
|
|
|
|
|
|
|
|
|
|
|
|
|
|
|
|
FLOW OF THE SOFTENER INSIDE OF THE BALANCER |
|
|
|
|
|
|
|
|
|
|
|||||||||||||||||
|
|
|
|
|
|
|
|
|
|
|
|
|
|
|
|
|
|
|
|
|
|
|
|
|
|
|
|
|
Room inside |
|
A |
|
|
B |
|
|
C |
|
|
D |
|
|
|
|
|
|
|
|
|||||||
|
the balancer |
|
|
|
|
|
|
|
|
|
|
|
|
||||||||||||||
|
|
|
|
|
|
|
|
|
|
|
|
|
|
|
|
|
|
|
|
|
|
|
|
||||
|
|
|
|
|
|
|
|
|
|
|
|
|
|
|
|
|
|
|
|
|
|
|
|
|
|
|
|
|
Centrifugal force |
|
|
|
|
|
|
|
|
|
|
|
|
|
|
|
|
|
|
|
|
|
|
|
|||
|
Flowing by weight |
|
|
|
|
|
|
|
|
|
|
|
|
|
|
|
|
|
|
|
|
|
|
|
|
|
|
|
|
|
|
|
|
|
|
|
|
|
|
|
|
|
|
|
|
|
|
|
|
|
|
|
|
|
|
|
|
|
|
|
|
|
|
|
|
|
|
|
|
|
|
|
|
|
|
|
|
|
|
||||
|
|
|
|
|
|
|
|
|
|
|
|
|
|
|
|
|
|
|
|
|
|
|
|
|
|||
|
|
|
|
|
|
|
|
|
|
|
|
|
|
|
|
|
|
|
|
|
|
|
|
|
|
|
|
|
|
|
|
|
|
|
|
|
|
|
|
|
|
|
|
|
|
|
|
|
|
|
|
|
|
|
|

 NOTES Softener moves into the next room when r.p.m of the tub is more than 100 r.p.m.
HOW TO CHECK MOVEMENT
Pour a reasonable amount of “MILK” into softener dispenser and operate the washer with no load. In final rinse cycle, make sure that the milk is added into the tub through softener outlet.
Balancer
Softener
outlet
B 


 D
D
A 
 C
C 


Softener inlet
EXPLANATION 13
AUTOMATIC UNBALANCE ADJUSTMENT
This system is to prevent abnormal vibration during intermittent spin and spin process.
FUNCTIONAL PRINCIPLE
1When the lid is closed, the safety switch contact is “ON” position.
2In case that wash loads get uneven during spin, the outer tub hits the safety switch due to the serious vibration, and the spin process is interrupted.
3In case that P.C.B. ASS’Y gets “OFF” signal from the safety switch, spin process are stopped and rinse process is started automatically by P.C.B. ASS’Y.
4If the safety switch is operated due to the unbalance of the tub, the program is stopped and the alarm is given.
Contact of safety switch Lid closing
Lid opening
|
Contact lever A |
|
Position of |
Normal (ON) |
|
unbalanced load (OFF) |
||
|
NOTES
The alarm finished when you close the lid after opening it. Check the unbalance of the wash load and the installation condition.
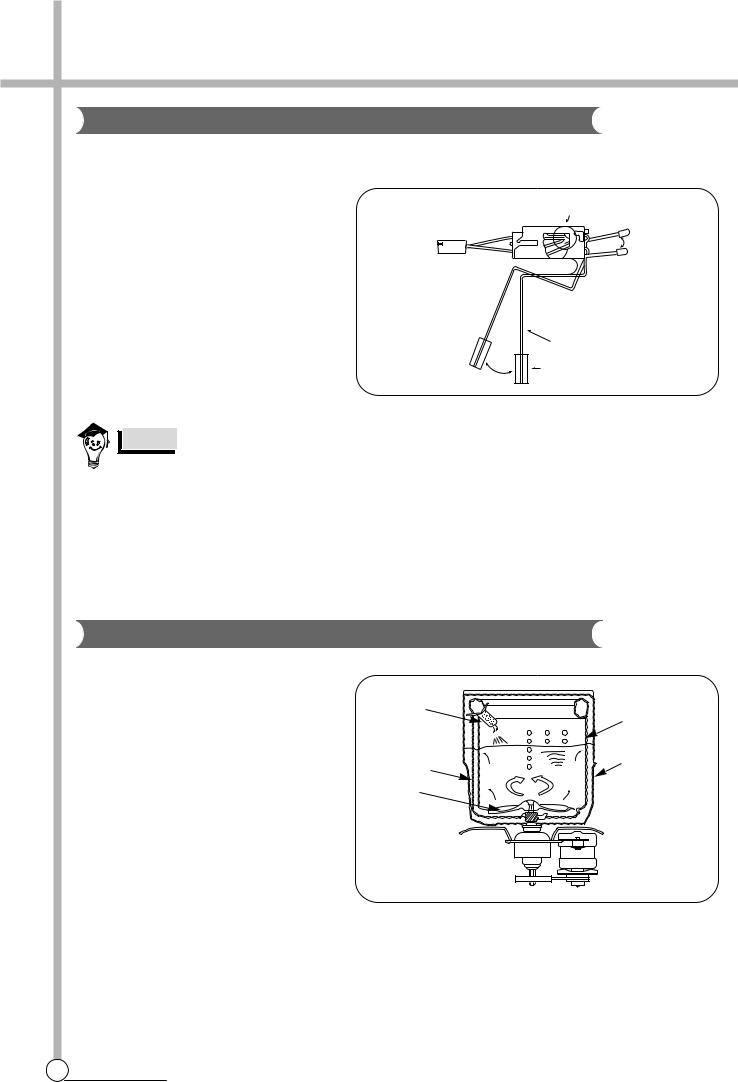
CIRCULATING-WATER COURSE AND LINT FILTER
CIRCULATING-WATER
The washing and rinsing effects have been improved by adopting the water system in which water in the tub is circulated in a designed pattern.
When the pulsator rotates during the washing or rinsing process, the water below the pulsator vanes creates a water currents as shown in figure.
The water is then discharged from the upper part of the tub through the water channel. About 40 L/min. water is circulated at the ‘high’ water level, standard wash load and standard water currents.
Filter |
Tub |
|
|
||
Water |
Outer tub |
|
channel |
||
|
||
Pulsator |
|
14 EXPLANATION
 Loading...