


 Loading...
S/M No. : WM500SE000
Service Manual
Washing Machine
Model: DWM-500M
DWM-501M
Caution
:In this Manual, some parts can be changed for improving, their performance without notice in the parts list. So, if you need the latest parts information,please refer to PPL(Parts Price List) in Service Information Center (http://svc.dwe.co.kr).
DAEWOO ELECTRONICS CO., LTD.
http : //svc.dwe.co.kr |
Aug. 1999 |


SPECIFICATIONS ............................................................................................................................... |
2 |
CAUTIONS ON THE OPERATION...................................................................................................... |
3 |
WIRING AND CIRCUIT DIAGRAM ..................................................................................................... |
5 |
PRINCIPLES OF OPERATION AND EXPLANATION OF FUNCTIONS............................................ |
8 |
HOW TO DISASSEMBLE.................................................................................................................... |
16 |
EXPLODED VIEWS AND RECOMMENDABLE PARTS .................................................................... |
19 |

SPECIFICATIONS
NO |
ITEM |
|
SPECIFICATIONS |
||
|
50HZ |
|
60H Z |
||
|
|
|
|
||
1 |
P O W E R S OU R C E |
|
Available in all local AC voltage |
||
|
|
|
|
|
|
2 |
P O W E R C ON S U M PTIO N |
N O N PU M P |
|
330W |
|
|
|
|
|
|
|
|
|
P U M P |
|
410W |
|
|
|
|
|
|
|
3 |
M A C HIN E W E IG HT |
N O N PU M P |
NE T : 17.0kg, |
PA C K E D U P : 18.5kg |
|
|
|
|
|
|
|
|
|
P U M P |
NE T : 18.0kg, |
PA C K E D U P : 19.5kg |
|
|
|
|
|
||
4 |
D IM EN S IO N |
|
680 x 406 x 857 (W xD xH , m m ) |
||
|
|
|
|
|
|
5 |
C A PA C ITY |
WA S H |
|
3.0 kg |
|
|
|
|
|
|
|
|
|
S P IN |
|
2.7 kg |
|
|
|
|
|
||
6 |
W AT ER LE VE L |
|
HIG H : 37 , LO W : 27 |
||
|
|
|
|||
7 |
O P E RATIN G WATE R P R E S SU R E |
0.3 ~ 3.0kgf/cm 2 ( 3.0 ~ 30.0 N /cm 2) |
|||
|
|
|
|
|
|
8 |
R O TATIN G S P E ED |
WA S H |
330 rpm |
|
340 rpm |
|
|
|
|
|
|
|
|
S P IN |
1,450 rpm |
|
1,700 rpm |
|
|
|
|
|
|
9 |
W AS H IN G TY P E |
|
P ulsator (Im peller) Type |
||
|
|
|
|
||
10 |
S P IN NIN G TY P E |
|
Centrifugally S eparated Type |
||
|
|
|
|
||
11 |
W AS H TIM E |
|
M ax. 15m in., M anual Operation |
||
|
|
|
|
||
12 |
S P IN TIM E |
|
M ax. 15m in., M anual Operation |
||
|
|
|
|
||
13 |
P U LSATO R |
|
6 W IN G S ( 200 m m ) |
||
|
|
|
|
|
|
14 |
W AT ER S U PP LY |
|
|
M A N UA L |
|
|
|
|
|
|
|
Explanation table for suffixes of model names
POWER SOURCE |
SUFFIX |
|
EXAM PLE |
|
|
NON PUMP |
|
PUMP |
|
||
|
|
|
|
||
A C 110V, 60H z |
T |
|
TP |
|
|
|
|
|
|
M odel nam e |
P U M P |
A C 220V, 60H z |
L |
|
LP |
||
|
|
|
|||
|
|
|
|
|
|
A C 110/220V, 50Hz |
D |
|
D P |
|
|
|
|
|
|
D W -X X X XN P |
|
A C 127/220V, 60H z |
S |
|
- |
|
|
|
|
|
|||
|
|
|
|
|
|
A C 220V, 50H z |
N |
|
N P |
|
|
|
|
|
|
P ow er soure |
|
A C 230~240V, 50H z |
M |
|
M P |
|
|
|
|
|
|
|
|
A C100V, 50/60H z |
J |
|
- |
|
|
|
|
|
|
|
|

CAUTIONS ON THE OPERATION
1. Installation
- Install the washer in the place easy of access to water, electrical pow er and drainage. - Install the washer on a firm and flat floor.
- Be sure that the washing machine must be grounded with the external grounding wire(option) or w ith the power cord and electric outlet of the house.
- Avoid installing the machine w here it can be exposed to rain or direct ray of the sun, that may cause trouble or discoloration. In case the machine has to be installed in such a place, provide a shield to protect m achine from rain or direct rays of the sun.
-In summ er or other periods when there is a great difference between the water temperature and the air temperature, drops of water may condense on the outside of the tub, and the floor might become wet from dripping; be careful of this.
-Please disconnect the power cord plug after washing.
2.Grounding
- Connect the grounding w ire(option) to a water faucet if the pipe is made of metal.
-Make sure that the power cord is unplugged during ground work.
-Be sure to wind grounding wire on a metal pipe like Fig1. (Do not connect the grounding wire end to a gas tube.)
-For maxim um security, attach the grounding wire to a copper plate or grounding rod and bury it at least 20cm in the ground like Fig2.
Fig. 1 |
Fig.2 |

CAUTIONS ON THE OPERATION
3.Caution on Use
-Do not use water which contains rust.
-Never put your hands into the tub during wash and rinse process.
-This unit is m ade of poly-propylene, use water below 50 .
-The opening must not be obstructed by carpeting when the washing machine is installed on a carpeted floor.
-Put the wet clothes into the spindryer drum , being sure that they must be well balanced.
-Place the safety cover horizontally on the top.
-Ensure that the spindryer drum completely stops before reaching in to rem ove the laundry.
Putting in the clothes
Distribute the clothes in the tub being sure that nothing is protruding out of the top.
Detergent Amount
If you use too much detergent. There will be an excessive amount of suds and rinsing may be insufficient: limit the
amount of detergent you use.
Pocket Check
Check the pockets of the laundry and remove contents that shouldn’t be washed before putting the laundry into the tub.
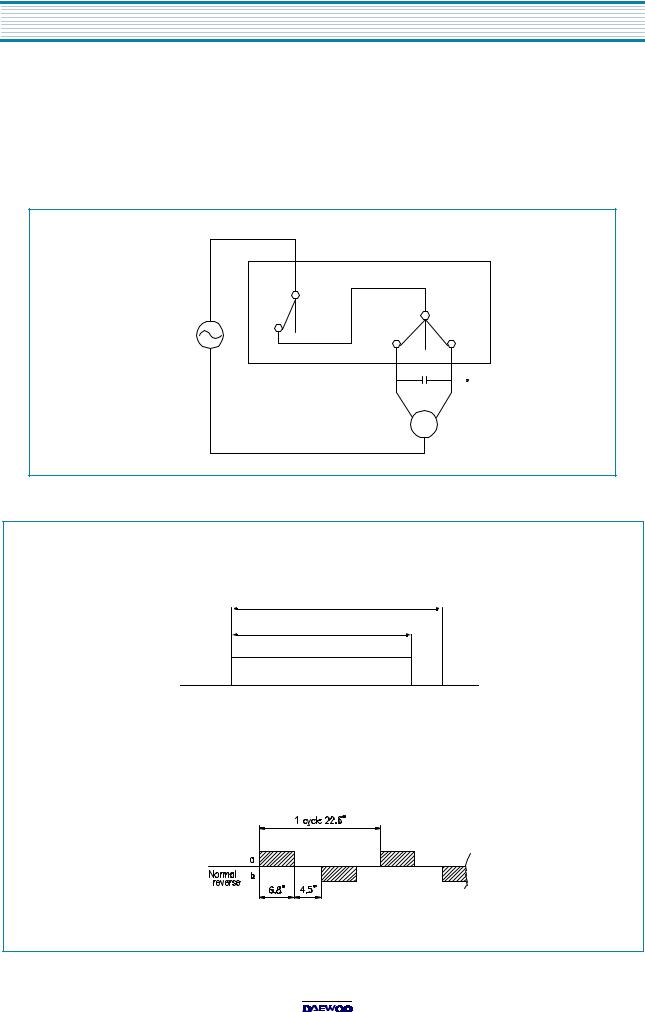
Acting Time Of Pulsator
W ash |
M ove |
Stop |
|
Action |
|||
|
|
||
|
|
|
|
Normal |
6.8” |
4.5” |
|
Reverse |
|||
|
|
||
|
|
|
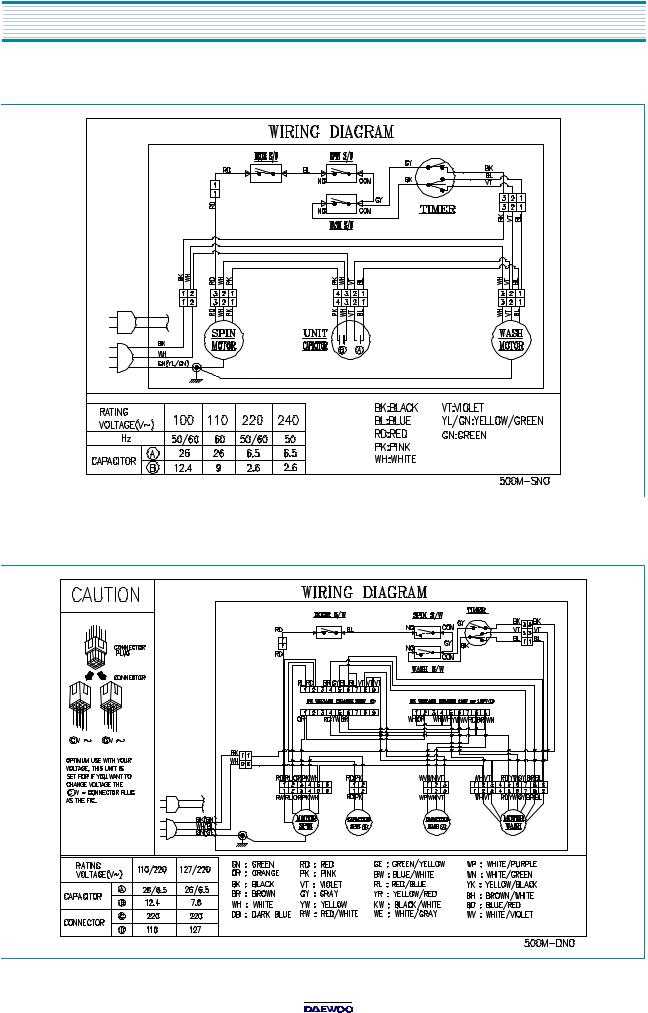
WIRING AND CIRCUIT DIAGRAM
1. SINGLE VOLTAGE NON PUMP MODEL
2. DUAL VOLTAGE NON PUMP MODEL
5

WIRING AND CIRCUIT DIAGRAM
3. SINGLE VOLTAGE PUMP MODEL
4. DUAL VOLTAGE PUMP MODEL
6
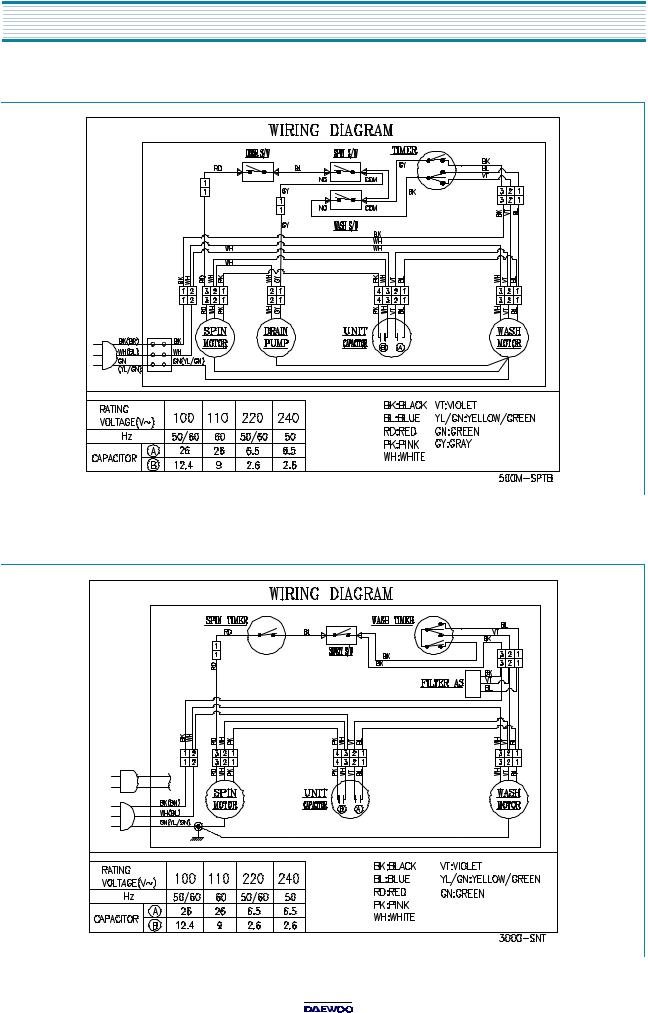
WIRING A ND C IRC UIT DIA G RA M
5. SINGLE VOLTAGE PUMP MODEL WITH TERMINAL BLOCK
6. SINGLE VOLTAGE NON PUMP MODEL(ONLY FOR JAPAN)
7
PRINCIPLES OF OPERATION AND EXPLANATION OF FUNCTIONS
TIMER WASH
-Function
The m ain switch(T1) remains ON during the washing time set by turning the timer knob.
At the same tim e, the internal switch(T2, T3) provides Power to wash motor alternately at assigned intervals.
Circuit Diagram
BLACK
T1
T2
AC(V) |
M AIN |
|
VIOLET |
|
BLUE |
|
M |
W ASH |
|
M OTO R |
|
|
|
309 (MAX SET)
900'' 12 0 (300 SET)
SET)
T1
Main
T2
Loading...