


COLOUR TELEVISION
INSTRUCTION MANUAL
MODEL No. DTE-28_
If you require any technical assistance or advice on this product, please contact your catalogue help-line number.

CONTENTS
Features on the television |
3 |
The remote control buttons Television mode, Teletext mode |
4 |
Setting up your television |
5 |
Safety and care, Make the connections |
5 |
Putting batteries in the remote control |
5 |
Supply power, Switch on |
5 |
Stand-by mode, switching off, Automatic power saving feature |
6 |
Tuning in the programmes (ATSS) |
7 |
Picture interference from other equipment |
8 |
Menus for controlling and setting up the television |
|
Picture controls, Sound controls |
9 |
The install menu - automatic tuning (ATSS), programme editing menu and |
|
manual tuning |
10 |
Manual tuning |
10 |
Current programme number, TV system selection by country, Tuning by broadcast or |
|
cable channel number, Fine tuning, Tuning by frequency, Channel name, Programme |
|
storage number Copying a programme to another number |
10~12 |
Editing programmes |
13 |
Move a channel, Delete a channel, Skip |
13 |
The features menu |
14 |
How to display the features menu, Language - for the on-screen menus, |
|
Picture format - normal or wide-screen, Child lock, Clock |
|
Wake time and wake-up programme number |
14 |
How to use the wake-up timer |
15 |
The sleep function |
16 |
The mode button |
16 |
Teletext |
17~18 |
The scart and AV sockets |
19 |
Selecting the scart channels, Video and RGB, S-video or S-VHS |
|
NTSC and tint control |
19 |
Automatic video switching, Equipment that can be connected. |
19 |
Connecting other equipment-about various combinations of equipment |
20 |
Using and caring for your television |
22 |
Position |
22 |
Use, Position, Moving the television ,coloured patches and magnetism |
22 |
Use, Position, Ventilation, Water and Moisture, Stands and supports, Cleaning, Good advice |
|
Electrical safety warnings |
22 |
Specifications 


 23
23
Notice
Although we have made every effort to make these instructions are correct, we cannot accept responsibility for errors and or missing information which are due to circumstances beyond our control.
2

Features on the television and the remote control
Features on the front of the television
•You can get to the controls on the front of the television by pushing the triangle at the top centre of the cover flap. The flap will fall open. Push the flap again to close it.
PR The channelVbutton increases the programme number and the channelWbutton decreases it. Vbutton makes the sound louder and the volume controlWbutton makes the sound
The headphone socket takes a 3.5mm diameter plug.
Warning! Prolonged listening through headphones at high volume may damage your hearing.
on the back of the television
AV1 |
AV2 |
ANT |
|
Aerial socket
Scart AV socket (1)
Scart AV socket (2)
3
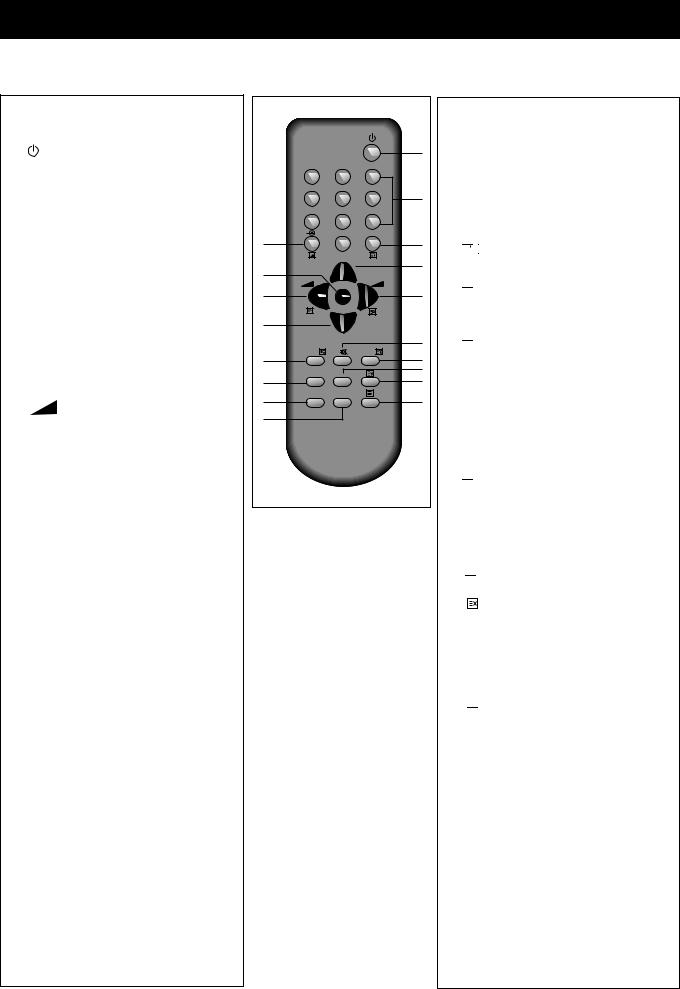
The remote control buttons
The remote control buttons |
|
|
|
|
|
|
Television mode |
|
|
|
|
|
|
1 |
The stand-by button switches |
|
|
|
|
1 |
|
the television on or puts it back on |
|
1 |
2 |
3 |
|
|
stand-by (page 6). |
|
4 |
5 |
6 |
2 |
2 |
The number buttons are mainly for |
|
||||
|
|
|
|
|||
|
|
|
|
|
||
|
changing channels. |
|
7 |
8 |
9 |
|
|
|
|
|
|||
3 |
NORMAL means this button |
4 |
|
0 |
NORMAL/OK |
3 |
|
selects different picture settings |
|
|
|
||
|
|
|
PR |
|
|
|
|
(page 9), OK means it confirms |
|
|
|
5 |
|
|
7 |
MENU |
|
|
||
|
choices in the on-screen menus or |
|
|
|
||
|
9 |
|
|
|
6 |
|
|
stores a setting (page 9). |
|
|
|
||
4 b This button selects audio and |
8 |
|
|
|
|
|
|
video (AV) inputs (page 19). |
|
|
|
|
|
|
|
|
PR |
|
10 |
|
5, |
8 The PR buttons change the |
|
|
|
||
12 |
SLEEP |
|
RECALL |
|
||
|
programme number up (button 5) |
|
11 |
|||
|
|
|
|
|||
|
|
|
|
|
14 |
|
|
or down (button 8) and select |
15 |
SKIP |
MOVE |
|
|
|
|
13 |
||||
|
controls in the on-screen menus. |
17 |
DELETE |
MODE |
|
16 |
6 |
The volume increase button |
|
|
|
||
18 |
|
|
|
|
||
|
makes sound louder or changes |
|
|
|
|
|
|
|
|
|
|
|
|
|
settings in the on-screen menu |
|
|
|
|
|
|
controls. |
|
|
|
|
|
7 |
The menu button displays on-screen |
|
|
|
|
|
|
menus for tuning in programmes |
|
|
|
|
|
|
and adjusting sound, picture and |
|
|
|
|
|
special feature controls (page 9).
9 The volume decrease button makes sound quieter or changes settings in the on-screen menu controls.
10 The mute button turns the sound on and off.
11The recall button turns the programme information display on and off.
12The SLEEP button sets the television to go on stand-by after a certain number
of minutes(see page 16).
14 MOVE, 15 SKIP and 17 DELETE buttons are for editing the programme list.
18 The MODE button allows you to choose the type of sound (see page 16).
Buttons 13 and 16 are only used for teletext
Teletext mode
Only the buttons listed below will work when the television is in teletext mode.
1Stand-by button.
2The number buttons are used to select teletext page numbers.
3


 The index button displays the teletext index page.
4

 The mix button shows the normal picture behind the text.
5Each press of this PR button increases the page number by one.
6

 The sub-page button is for selecting a particular sub-page.
7The MENU button switches between brightness and volume controls and fast text headings while you are reading teletext.
8Each press of this PR button decreases the page number by one.
9

 The hold button prevents the teletext page you are reading from changing.
10Sound mute button.
11

 The reveal button reveals and hides answers to quizzes.
12

 The size button changes the size of the text on the screen.
13The cancel button displays the normal picture but leaves teletext mode working.
14,15, 17 and 18 coloured buttons select from a list of headings which have the same colours as the buttons.
16  The teletext button switches between teletext and normal television modes.
See pages 17 and 18 about teletext.
4
Setting up your television
1 Please read the safety and care information at the back of this booklet before you connect this television to the electricity supply. Then follow steps 2 to 5 below.
2 Make the connections
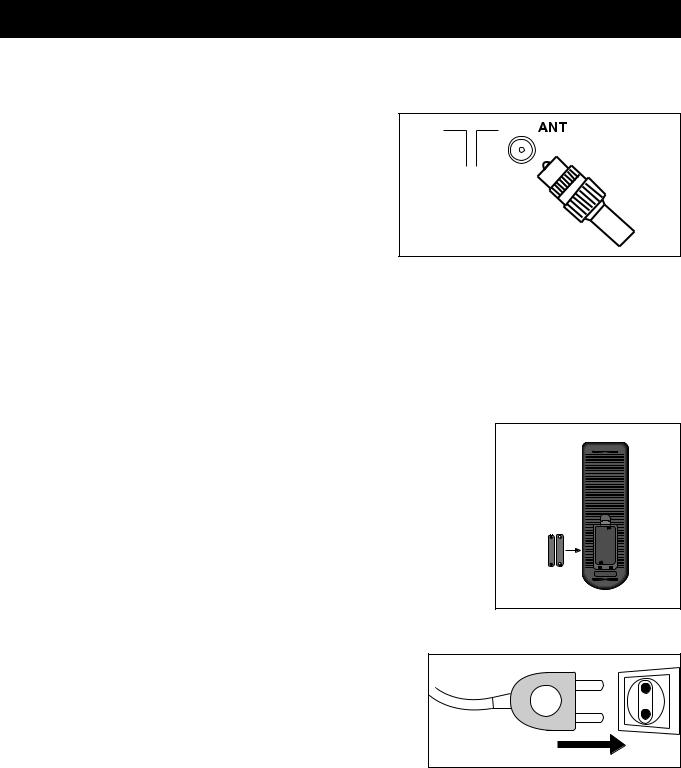
The aerial
Connect the aerial lead to the ANTg socket at the back of the television. You will need a good-quality aerial to receive teletext and nicam sound.
Other equipment
If you have a video recorder you will need to connect the aerial lead
to the video recorder and connect the aerial output lead from the video recorder to the television aerial socket. Information about connecting aerials and other equipment is given in 'Connecting other equipment' on page 21.
The scart AV sockets
This television has two special interconnecting sockets called 'scart' (AV). You don't have to use these straight away, but using scart cables gives you the best picture and sound quality and can cure some picture interference problems. And you will only get stereo sound from other equipment if it is connected with a stereo scart cable. If you have other equipment with scart sockets please read 'Connecting other equipment' on page 21.
3 Put the batteries in the remote control
Press the edge of the catch at the top of the battery cover towards the cover and lift off the cover.
Put in the two batteries that came with your television (size AAA or LR3).
Make sure that the (+) and (-) marks on the batteries agree with the (+) and (-) marks inside the battery compartment.
Replace the cover by engaging the two tabs at the bottom and pressing down the end with the catch until it clicks into place.
• Throw away old batteries carefully. Do not put them on a fire.
• When you are using the remote control, keep within thirty degrees and seven metres of the remote control sensor on the front of the television.
•Bright sunlight and some fluorescent light falling on the remote control sensor may stop the remote control from working properly.
4 Supply power
Plug your television into the mains supply (220 to 240 volts, 50Hz).
5 Switch the television on
Switch the television on with the main power button (ON/OFF) on the television. After a few moments the screen should light up.If it doesn’t, check the stand-by light on the front panel and if it is red press the stand-by button  once.
once.
You are now ready to tune in the broadcasts you can receive, but please read 'Stand-by mode' and 'Switching the television off' on the next page before you turn to 'Tuning in the programmes'.
5

Stand-by mode
Stand-by mode allows you to:
•turn the television on and off with the remote control;
•turn the television on with the wake-up timer; and
•turn the television off with the sleep timer.
When the television is on stand-by, the stand-by light comes on red. The television uses little power when it is on stand-by, but you should switch it off at the main power switch to save energy and be safe when you are leaving the television for a long time.
When the television is on stand-by you can switch it on by pressing any of the following buttons.
The stand-by button  .
.
One of the number buttons 0 to 9.
One of the PR buttons on the remote control.
The PRVor PRWbutton on the front panel of the television.
1 |
2 |
3 |
4 |
5 |
6 |
7 |
8 |
9 |
|
0 |
|
|
|
PR |
When you switch the television on, the stand-by light will change from red to green and after a few seconds the screen will light up. If you want to put the television back on stand-by, press the red stand-by button on the remote control again.
Switching the television off
Press the red stand-by  button on the remote control to put the television back on stand-by, or press the main power button to switch it off completely.
Automatic power-saving feature
If no signal is received through the aerial cable or from any external equipment, after about thirty minutes the television will automatically go on stand-by.
6

Tuning in the programmes
Before you start
1Make sure you have followed steps 1 to 5 under 'Setting up your television' and read 'Stand-by mode'.
2If you have a video recorder connected with the aerial lead, switch it on to produce a test picture, or play a video tape.
3If you have a satellite receiver (or any other piece of equipment as well as the video recorder) connected with the aerial lead, make sure that it is plugged in and that it is on stand-by.
4Switch on the television. If the screen does not light up, please check the previous sections 'Supply power', ‘Switch on the television’ and 'Stand-by mode'.
1 menu
PR
PR
Press the MENU button to make the picture, sound, features and install boxes appear on the screen.
•Whenever a menu is displayed, if you do not press a button within 30 seconds the menu will go off.
•If you find a menu asking you to set the on-screen menu language, press the volume increase button to change the setting (GB stands for Great Britain). Press the MENU button to finish.
PICTURE 
 SOUND
SOUND
FEATURES INSTALL
2 volume increase,
PR
PR
PR down
Press the volume increase button and then the PR down button to move the green highlight to 'INSTALL'.
PICTURE 
 SOUND
SOUND
FEATURES INSTALL
3 OK |
Press the OK button to display the INSTALL menu. |
|
INSTALL |
|
||
|
|
|
||||
|
|
ATSS |
GB |
|||
NORMAL/OK |
|
|
|
|
||
|
|
|
|
EDIT |
|
|
|
|
|
|
|
|
|
PR |
• Make sure the country listed against 'ATSS' is the SYSTEM |
GB |
||||
country you are in. |
|
|
CHANNEL |
C55 |
||
|
|
|
||||
|
If you need to change the country, press one of the |
|||||
|
FREQ |
743.25 |
||||
|
volume ( |
) buttons until the correct abbreviation |
||||
|
NAME |
BBC1 |
||||
|
shows. |
|
|
|
||
|
|
|
|
PROGRAM |
01 |
|
|
|
|
|
|
||
|
|
PR |
|
|
STORE TO |
01 |
|
|
|
|
|
|
|
PR |
|
|
|
|
VPosition |
CBAdjust |
|
|
|
|
|
W |
OK Access |
|
|
|
|
|
|
|
|
|
|
|
|
MENU Exit |
|
|
|
PR |
|
|
|
|
Country abbreviations |
|
|
|
|
|
|
PL - Poland |
|
H - Hungary |
CZ - Czecho |
Other |
|
|
7
 Loading...