


Epicure Range Cooking Guide
Family-Owned. American-Made.

Sizzling, delicious, restaurant-style flavor right out of your own range! Your new range offers the best of everything--an easy-to-control gas cooktop gives you great power from the hottest sear to the lowest simmer. Our patented gas flame broiler gives the perfect combination of moist and sear from broiled foods. And Dacor’s Exclusive 4-part Pure Convection™ System will give you beautifully browned, baked and roasted goods.
As you begin cooking on your new Dacor range, you’ll find that Pure Convection™ makes it easier and more efficient to get wonderful results. Meats will sear beautifully and stay succulently moist. Cookies and baked goods will rise and brown nicely, even if more than one rack is used at a time. Included in this guide are useful tips, easy-to-read charts, and over 30 of my favorite recipes. Also included are a few tried-and-true Dacor Family recipes from our founder and 1st chef, Stan Joseph.
This guide will help you maximize the use of your new Dacor range. It will help you decide which mode of cooking will give you the best results, and will also inspire you to create your own favorite recipes with excellent results. Creating, testing, and preparing this guide has been a personal and professional pleasure. I know you’ll be pleased with the results of your new range. Special thanks to my Assistant chef, Heather Kahn-Gisi.
Enjoy cooking on your new range and Bon Appetit!
Leslie L. Sassaman
Dacor Corporate Chef

T
Table of Contents
Quick Reference Guide . . . . . . . . . . . . . . . . . . . . . . . . . . . . . . . . . . . . . . . . . . . . . . . . . . . . . . . . . . . . . . . . . . . . . . . . . . 1 Selecting a Baking Mode . . . . . . . . . . . . . . . . . . . . . . . . . . . . . . . . . . . . . . . . . . . . . . . . . . . . . . . . . . . . . . . . . . . . . . . . 2 Pure ConvectionWhat It Means . . . . . . . . . . . . . . . . . . . . . . . . . . . . . . . . . . . . . . . . . . . . . . . . . . . . . . . . . . . . . . . . . 3 Baking Tips for Using Convection . . . . . . . . . . . . . . . . . . . . . . . . . . . . . . . . . . . . . . . . . . . . . . . . . . . . . . . . . . . . . . 4-5 ERD30 & ERD48 Notes . . . . . . . . . . . . . . . . . . . . . . . . . . . . . . . . . . . . . . . . . . . . . . . . . . . . . . . . . . . . . . . . . . . . . . . . . . . 5 Multi-rack Baking Tips . . . . . . . . . . . . . . . . . . . . . . . . . . . . . . . . . . . . . . . . . . . . . . . . . . . . . . . . . . . . . . . . . . . . . . . . . . 6 Roasting Tips . . . . . . . . . . . . . . . . . . . . . . . . . . . . . . . . . . . . . . . . . . . . . . . . . . . . . . . . . . . . . . . . . . . . . . . . . . . . . . . . . . . 7 Turkey Tips . . . . . . . . . . . . . . . . . . . . . . . . . . . . . . . . . . . . . . . . . . . . . . . . . . . . . . . . . . . . . . . . . . . . . . . . . . . . . . . . . . 8-10 Gas Infrared Broiling . . . . . . . . . . . . . . . . . . . . . . . . . . . . . . . . . . . . . . . . . . . . . . . . . . . . . . . . . . . . . . . . . . . . . . . . . . . 11 Cooking Charts:
Single Rack Baking Chart . . . . . . . . . . . . . . . . . . . . . . . . . . . . . . . . . . . . . . . . . . . . . . . . . . . . . . . . . . . . . . . . . . . .12-14 Multirack Baking Chart . . . . . . . . . . . . . . . . . . . . . . . . . . . . . . . . . . . . . . . . . . . . . . . . . . . . . . . . . . . . . . . . . . . . . . . . .15 Convection Roasting Charts for Meats, Poultry and Fish . . . . . . . . . . . . . . . . . . . . . . . . . . . . . . . . . . . . . . . . . . . . 16 Roasted Vegetable Guidelines Chart . . . . . . . . . . . . . . . . . . . . . . . . . . . . . . . . . . . . . . . . . . . . . . . . . . . . . . . . . . . . . 17 Gas Infrared Broiling Chart . . . . . . . . . . . . . . . . . . . . . . . . . . . . . . . . . . . . . . . . . . . . . . . . . . . . . . . . . . . . . . . . . . . . . . 18
Appetizers and Side Dishes
Oven Braised Shrimp Scampi . . . . . . . . . . . . . . . . . . . . . . . . . . . . . . . . . . . . . . . . . . . . . . . . . . . . . . . . . . . .20 Oven Roasted Tiny New Potatoes . . . . . . . . . . . . . . . . . . . . . . . . . . . . . . . . . . . . . . . . . . . . . . . . . . . . . . . . 20 Spinach Artichoke Dip . . . . . . . . . . . . . . . . . . . . . . . . . . . . . . . . . . . . . . . . . . . . . . . . . . . . . . . . . . . . . . . . . . 21 Baked Brie with Caramelized Onions . . . . . . . . . . . . . . . . . . . . . . . . . . . . . . . . . . . . . . . . . . . . . . . . . . . . . .21 Sage Stuffing . . . . . . . . . . . . . . . . . . . . . . . . . . . . . . . . . . . . . . . . . . . . . . . . . . . . . . . . . . . . . . . . . . . . . . . . . . 22 Teriyaki Shrimp Kabobs . . . . . . . . . . . . . . . . . . . . . . . . . . . . . . . . . . . . . . . . . . . . . . . . . . . . . . . . . . . . . . . . . 23 Grilled Asparagus . . . . . . . . . . . . . . . . . . . . . . . . . . . . . . . . . . . . . . . . . . . . . . . . . . . . . . . . . . . . . . . . . . . . . . 24 Thai Vegetable Stir Fry . . . . . . . . . . . . . . . . . . . . . . . . . . . . . . . . . . . . . . . . . . . . . . . . . . . . . . . . . . . . . . . . . . 24
Sauces, Stews and Soups
Stan Joseph’s Vinha D’Alhos . . . . . . . . . . . . . . . . . . . . . . . . . . . . . . . . . . . . . . . . . . . . . . . . . . . . . . . . . . . . 26
Osso Buco . . . . . . . . . . . . . . . . . . . . . . . . . . . . . . . . . . . . . . . . . . . . . . . . . . . . . . . . . . . . . . . . . . . . . . . . . . . . 27
Bordelaise Sauce . . . . . . . . . . . . . . . . . . . . . . . . . . . . . . . . . . . . . . . . . . . . . . . . . . . . . . . . . . . . . . . . . . . . . . .28
Chili Con Carne . . . . . . . . . . . . . . . . . . . . . . . . . . . . . . . . . . . . . . . . . . . . . . . . . . . . . . . . . . . . . . . . . . . . . . . . 28
Quick Breads and Yeast Breads
Mrs. Gleason’s Homemade Yeast Rolls . . . . . . . . . . . . . . . . . . . . . . . . . . . . . . . . . . . . . . . . . . . . . . . . . . . . 30
Lemon Blueberry Muffins . . . . . . . . . . . . . . . . . . . . . . . . . . . . . . . . . . . . . . . . . . . . . . . . . . . . . . . . . . . . . . . 30
Banana Bread . . . . . . . . . . . . . . . . . . . . . . . . . . . . . . . . . . . . . . . . . . . . . . . . . . . . . . . . . . . . . . . . . . . . . . . . . 31
Garlic Bread . . . . . . . . . . . . . . . . . . . . . . . . . . . . . . . . . . . . . . . . . . . . . . . . . . . . . . . . . . . . . . . . . . . . . . . . . . . 32
Hapa French Toast . . . . . . . . . . . . . . . . . . . . . . . . . . . . . . . . . . . . . . . . . . . . . . . . . . . . . . . . . . . . . . . . . . . . . 32
Honey Whole Wheat Bread . . . . . . . . . . . . . . . . . . . . . . . . . . . . . . . . . . . . . . . . . . . . . . . . . . . . . . . . . . . . . 33
Cracked Pepper Foccaccia . . . . . . . . . . . . . . . . . . . . . . . . . . . . . . . . . . . . . . . . . . . . . . . . . . . . . . . . . . . . . . 34
Main Entrees
Pure Convection™ Prime Rib Roast . . . . . . . . . . . . . . . . . . . . . . . . . . . . . . . . . . . . . . . . . . . . . . . . . . . . . . .36 Roasted Rosemary Lemon Chicken . . . . . . . . . . . . . . . . . . . . . . . . . . . . . . . . . . . . . . . . . . . . . . . . . . . . . . .36 Pure Convection™ Roasted Turkey . . . . . . . . . . . . . . . . . . . . . . . . . . . . . . . . . . . . . . . . . . . . . . . . . . . . . . 37 Curry Pork Tenderloin . . . . . . . . . . . . . . . . . . . . . . . . . . . . . . . . . . . . . . . . . . . . . . . . . . . . . . . . . . . . . . . . . . 38 Buffalo Chicken Pizza . . . . . . . . . . . . . . . . . . . . . . . . . . . . . . . . . . . . . . . . . . . . . . . . . . . . . . . . . . . . . . . . . . . 39 Hickory Smoked Steaks . . . . . . . . . . . . . . . . . . . . . . . . . . . . . . . . . . . . . . . . . . . . . . . . . . . . . . . . . . . . . . . . . 40
Leftover Grilled Turkey Parmesan Sandwiches . . . . . . . . . . . . . . . . . . . . . . . . . . . . . . . . . . . . . . . . . . . . 40
Salmon Fillets with Lemon Dill Buerre Blanc . . . . . . . . . . . . . . . . . . . . . . . . . . . . . . . . . . . . . . . . . . . . . . 41 Chicken Marsala . . . . . . . . . . . . . . . . . . . . . . . . . . . . . . . . . . . . . . . . . . . . . . . . . . . . . . . . . . . . . . . . . . . . . . . 42

Table of Contents
T
Desserts
Cream Cheese Pound Cake Using Timed Delay Feature . . . . . . . . . . . . . . . . . . . . . . . . . . . .44
Angelfood Cake . . . . . . . . . . . . . . . . . . . . . . . . . . . . . . . . . . . . . . . . . . . . . . . . . . . . . . . . . . . . . . . . . . . . . . . . 45
Lemon Lover’s Cookies . . . . . . . . . . . . . . . . . . . . . . . . . . . . . . . . . . . . . . . . . . . . . . . . . . . . . . . . . . . . . . . . . . 45
Sally’s Oatmeal Cookies . . . . . . . . . . . . . . . . . . . . . . . . . . . . . . . . . . . . . . . . . . . . . . . . . . . . . . . . . . . . . . . . . .46
Sally’s Grandmother’s Ginger Snap Cookies . . . . . . . . . . . . . . . . . . . . . . . . . . . . . . . . . . . . . . . . . . . . . . . . 46
Creamy Pumpkin Pie . . . . . . . . . . . . . . . . . . . . . . . . . . . . . . . . . . . . . . . . . . . . . . . . . . . . . . . . . . . . . . . . . . . . .47
Toasted Coconut Creme Brulee . . . . . . . . . . . . . . . . . . . . . . . . . . . . . . . . . . . . . . . . . . . . . . . . . . . . . . . . . . .48
Common Baking Problems and Solutions . . . . . . . . . . . . . . . . . . . . . . . . . . . . . . . . . . . . . . . . . . . . . . . . . . . . . . 49-50
Weights and Measures . . . . . . . . . . . . . . . . . . . . . . . . . . . . . . . . . . . . . . . . . . . . . . . . . . . . . . . . . . . . . . . . . . . . . . . . .51
Notes . . . . . . . . . . . . . . . . . . . . . . . . . . . . . . . . . . . . . . . . . . . . . . . . . . . . . . . . . . . . . . . . . . . . . . . . . . . . . . . . . . . . . . . . .52

QUICK REFERENCE GUIDE ERD30, ERD36, ERD48, ERD60 Q
TO SET THE CLOCK:
•Press CLOCK on control panel
•Press Up/Down arrows to reach correct time
(Note: “a.m.” and “p.m.” will show while you are setting the time but will not show when the time is displayed on the control panel).
TO BAKE, PURE CONVECTION, OR CONVECTION BAKE:
•Press desired cooking mode
•Press Up arrow to set temperature (oven automatically defaults to 350˚)
•Oven temperature begins counting from 135˚
•When oven is finished preheating, it will tone and you may put food in the oven
TO INCREASE/DECREASE OVEN TEMPERATURES:
•Press selected cooking mode
•Press Up or Down arrows to reach desired new temperature
TO BROIL OR CONVECTION BROIL:
•Press broil mode
•Press Up arrow to set temperature (“HI” equals 555˚).
•The Gas Broiler does not need to be preheated, but works best if you wait a couple of minutes before adding food.
•The electric broiler in the ERD48 companion oven works best if you allow it to preheat about 10 minutes.
TO SET TIMERS:
•Press TIMER 1 or TIMER 2
•Hold down Up arrow to desired time. It will count in seconds first, then scroll faster with more time.
•Release UP arrow, it will begin to count down.
•When time is up, the timer will tone.
•To stop the tone without shutting off the oven, press TIMER 1 or TIMER 2 once.
TO ADD MORE TIME TO THE TIMERS, OR CANCEL THE TIMER BEFORE THE TIME IS UP:
•Press appropriate TIMER 1 or TIMER 2 button.
•To add more time, press Up arrow to desired new time.
•To cancel timer before time is up, press appropriate timer button twice :00 will flash
TO TURN THE OVEN OFF:
• Press CANCEL/SECURE (this function will not turn the oven lights nor the timers off)
TO LOCK THE CONTROL PANEL:
•Press and hold CANCEL/SECURE for 6 seconds. You will hear one beep when activated and OFF will read on the control panel.
•This feature is useful when cleaning the control panel, or preventing accidentally turning the oven on.
TO UNLOCK THE CONTROL PANEL:
• Press and hold CANCEL/SECURE for 6 seconds. You will hear one beep and OFF will disappear from the control panel.
TO SET TIMED DELAY COOKING:
•Be sure the correct time of day is set (a.m. or p.m.)
•Adjust rack positions and set food into oven
•Press cooking mode
•Press Up or Down arrows to set temperature
•Press COOK TIMEthis will be the amount of time it takes to cook the food
•Press STOP TIMEthis will be the time you would like for the food to be DONE
•You must press STOP TIME in order for this method of cooking to work
•The convection fan and the cooling fan will go on after programming this feature, even if it does not start right away
TO SELF-CLEAN OVEN:
•Remove all oven racks and filter from the oven
•Press SELF CLEAN
•Press Up arrow to set desired amount of time- 2-4 hours
•Door will lock. After it unlatches and cools, wipe up ash with hot, soapy water
1
SELECTING A BAKING MODE
M
PURE CONVECTION
This mode uses the third element, located behind the baffle in the back of the oven cell. Air is circulated by the convection fan. This cooking mode will provide the most even heat from rack to rack. Use this mode to do any multi-rack baking, roasting, and complete meals. This mode is especially great for baked goods that are mostly exposed to the convection air in a shallow baking pan. Souffles, cakes, cookies, pastries and free-form yeast breads (such as French Bread) are a few examples. When using this mode for roasting, raise the food up on a “v-shaped” rack inside of a roasting pan. This will allow air to circulate around the roast, lock in juices, and give it a beautiful golden sear, while shortening the cooking time in most cases.
CONVECTION BAKE
This mode uses the bottom bake element and the fan in the back to circulate the air. There is a no direct heat from the top and no heat from the rear element. This mode is best for turkeys over 25 pounds, Earthenware-baked items, baking stone items, or dense items that need bottom heat in order to cook correctly. Lasagna, pizzas, pies, and loaf breads are best in this mode.
BAKE
This mode uses bottom heat only. There is no heat from the upper element and no heat from the third element. This mode is best for items baked in a water bath, such as creme brulee, or items that are completely covered. When using bake, use rack positions 1 or 2 to get the food as close to the heat source as possible. This will help the food bake closer to the stated times.
BROIL/GRILL
This mode uses the element located in the top of the oven cavity only. There is no need to preheat the broiler before using it. Foods should be placed 4-6 inches from the surface of the broiler for best results. Center the broiler pan lengthwise, then push it all the way to the back wall to get the correct broiling position. Smaller cuts of meat, cut vegetables, breads, and some desserts are best for broiling.
ERD48 COMPANION OVEN ONLY
CONVECTION BROIL
This mode uses the element located in the top of the oven cavity only and heat is circulated by the convection fan. It is an electric element, and needs a preheat of about 10 minutes in order to cook foods correctly. Center the broiler pan under the broiler for best results. Fish, vegetables, and garlic bread broil best on convection broil. Larger cuts of meat and poultry are best on Standard Broil.
2
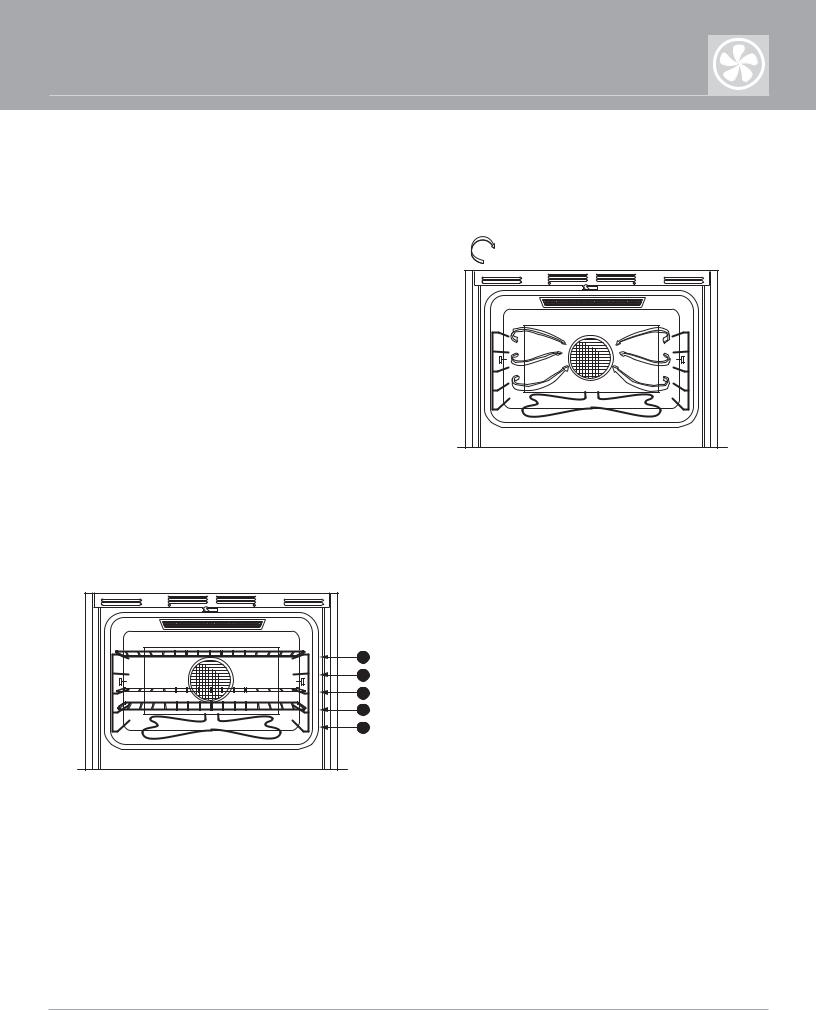
DACOR’S 4 - PART PURE CONVECTION™ SYSTEM
Dacor’s Pure Convection™, simply the very best convection system available today, is a total approach to cooking.
Use this cooking mode when preparing complete meals, and for single or multi-rack baking. Temperatures can be set, in five-degree increments, from 135-555˚F.
While many convection ovens simply heat air with two elements in the oven chamber, Dacor’s Pure Convection™ system utilizes a third heating element. It surrounds the convection fan, located outside the oven’s cooking area.
Additionally, a filter and baffle separate the food from the oven’s heat source. The filter purifies the heated air circulating throughout the oven, maintaining an extremely clean cooking environment. The baffle channels the heated air, circulated by the convection fan, evenly throughout the oven.
Direction of Air Flow
Figure 1 - Pure Convection™ Air Flow
Please refer to this drawing to ensure a recipe’s proper rack position. Rack positions are recommended throughout the book.
5 |
54 |
53 |
52 |
51 |
With Dacor’s Pure Convection™ cooking mode the rear heating element, mentioned earlier, is the oven’s heating source. The convection fan draws air from the oven chamber. It forces the air through the filter and across the hot con- vection-heating element. The heated air is directed through the convection baffle back into the oven chamber. The baffle then distributes the heated air evenly throughout the oven to insure uniform cooking results (See figure 1).
The externally heated air, constantly moving throughout the oven, allows many foods to cook in 10% less time and at temperatures 25˚ lower....saving you both time and energy.
Figure 2 - Oven Rack Positions
Dacor’s 4-Part Pure Convection™ system makes complete meal multi-rack cooking a natural, everyday occurrence. Foods will cook evenly, from one rack to another, while the system’s filter eliminates the transfer of food flavors/aroma from dish to dish. The filter also keeps your oven cleaner, longer.
3

Baking Tips for Using Convection
1.In all Dacor ovens, oven rack positions count up from the bottom, rack 1 is the bottom; rack 5 is the top.
2.Oven temperatures range from 135˚ - 555˚, and can be set at 5-degree increments.
3.Always allow the oven to preheat fully before adding food. For delicate baked items, it is very important to allow for a longer preheat to help stabilize the oven temperatures.
4.If using a recipe that requires a “cold oven start,” use the Timed Delay Feature. See recipe in How to Program Timed Delay Baking or the Use and Care manual for specific instructions.
5.When converting original single-rack recipes to convection recipes, reduce the oven temperature by 25 degrees. Keep in mind that hot air is circulating around the food in addition to its normal radiant heat. Foods will brown a lot faster than in conventional ovens, therefore the temperature would need to be reduced.
6.In most cases, your time will also decrease when using convection in single-rack baking. The larger and more dense a food is, the more time savings you will see.
7.When baking more than one rack of food at a time, however, there is larger cold mass going into the oven. Since the oven will take longer to recover temperature, there will be an increase in baking times for Multi-rack cooking.
8.The rack positions, temperatures and times in the baking, roasting and broiling charts are recommended. Each recipe has many variables involved from ingredients to technique and the actual times and temperatures may vary because of this.
9.Develop a habit of looking through the oven door window instead of opening the door to check food. This will prevent heat from escaping. In more delicate foods or in multi-racked food cooking, this could make a huge difference in the evenness of the baked goods. When the oven is completely full and every rack position is used, it has more mass. When heat is lost by opening the door, the element will come on to compensate for the loss. It will then take longer for the temperature to come back up to continue cooking the food.
10.Be familiar with your oven timers. These will help you keep an eye on your foods.
11.For best results, measure ingredients carefully and follow tested recipes. This is especially important in baked goods, which can be more temperamental than other foods.
12.To rise yeast breads in the oven, place the dough in a greased bowl inside of the oven. Cover it, and turn on the halogen lights. These lights will emit just enough heat to proof yeast breads. Alternately, turn the oven onto Standard Bake at 135˚, then before placing the dough in the oven, turn the oven off and turn the lights on. The insulation around the oven cell will retain heat and provide a draft-free environment to rise yeast breads.
RECOMMENDED BAKEWARE:
•If purchasing bakeware, there are two special pans required for convection cooking: low rimmed, light colored aluminum cookie sheets and a roasting pan with a “V- shaped” rack that fits inside. Almost any bakeware will work in this ovenjust be sure that if the dish is covered or a thicker, denser pan, use Convection Bake or Standard Bake.
•Use pan size and type recommended by the recipes.
•Shiny, reflective pans are best for cakes, quick breads, muffins, cookies, and pies. This will prevent the crust from browning too fast, as a darker finish may cause it to do so.
•Medium-gauge aluminum sheets with low sides are best in the convection modes so that the air is able to circulate fully around the food.
•Bake most frozen foods in their original foil containers, and place on a cookie sheet. Follow the package recommendations for baking.
4

Baking Tips for Using Convection
•When using glass bakeware, only lower the temperature by 25 degrees (Most glass cookware manufacturers also recommend lowering the temperature 25 degrees when using their products. It only needs to be lowered once).
PAN PLACEMENT TIPS:
•When placing pans on oven racks, make sure the long side of the pans run left to right and are parallel with the oven door.
•When using Standard Bake or Convection Bake mode, allow 2 inches of space around all sides of the pan to allow the heat to rise.
•When using the Convection modes, remember to keep the pans forward and away from the convection filter. This positioning ensures proper airflow throughout the oven chamber.
•Aluminum foil can be used on the oven racks to catch overspill and can also be used to cover foods during the baking process in any mode. DO NOT, however, line the bottom of the oven with aluminum foil. Remove foil, along with the oven racks, during self-cleaning.
E
ERD30/ERD48/ERD60 COMPANION OVEN NOTES
The ERD48 includes a companion oven-which is a fully featured, self-cleaning oven.
Following are a few notes about cooking with this oven:
•Since the oven’s capacity is much smaller, you may find that cook times are much faster. Items cook faster in this oven as far as roasting and baking.
•Follow the same guidelines as the large oven on selecting baking modes for best results.
•The broiler in this oven is electric. The broiler pan sent with the oven will fit with the shortest end front to back. To center it correctly, push it all the way to the back.
•Position the broiler pan 4-6 inches from the surface of the food to the surface of the broiler.
•Broil times will increase slightly with the electric broiler. It is also best to preheat the electric broiler for about 10 minutes for best results.
•The companion oven also offers Convection Broil. This mode works great for fish and broiled vegetables. It sears the fish beautifully without having to flip it, and vegetables will also sear quickly.
•Thicker cuts of steak or poultry should be cooked on Standard Broil. This will prevent the food from searing rare.
•Dacor’s ACS18 cookie sheets or a commercial half sheet pan, measuring 12 x 18” will fit in the ERD48 companion oven.
ERD30/ERD60 NOTES:
•A commercial sized sheet pan, measuring 18 x 25” will fit in the large cell of an ERD36 & ERD48. This type of pan will not fit in an ERD30/ERD60. Dacor’s ACS3030” cookie sheets should be used.
•The BTU’s in the broiler of an ERD30/ERD60 is slightly less than the ERD36 & ERD48. Broil times will slightly increase because of this.
•Baking and roasting times may slightly decrease due to the smaller oven capacity also.
5

B
Multi-Rack Baking Tips
1.Center the pans on the rack for best baking results.
2.Allow oven to preheat an additional 20-30 minutes after the preheat tone when Multi-rack baking delicate items, such as cookies and cakes. This will help the temperatures to stabilize while reducing the chance for heat loss when opening the oven door.
3.Load the oven as quickly as is safely possible. This will prevent heat loss due to the open door. Check foods using the oven lights and through the window.
4.Remove each pan as soon as food is done. All pans do not need to be removed from the oven at the same time.
5.When baking on two racks, use positions 2 and 4; 1 and 3 or 1 and 4. Use rack positions 1, 3, and 5 when baking on three racks.
6.Adapt a single-rack recipe to multiple-rack baking by increasing time to the baking process. More time is necessary because the additional cold mass in the oven causes longer temperature recovery time.
7.Always follow the “Bake Ware Selection” tips in your oven’s “Use and Care” manual.
6
Dacor Convection Oven Roasting Tips
1.Convert conventional Standard Bake recipes to Convection recipes by reducing the temperature 25 degrees and the cooking time by 10-15%.
2.Always roast meats fat-side up, on a roasting rack, in a shallow pan. Use a pan that fits the size of the food being prepared (use the broiler pan accompanying your Dacor oven.) No basting is required when the fat-side is up. It is not necessary to add water to the pan. Water causes a steam effect. “Roasting” is a dry-heat process.
3.Place poultry breast-side up in a shallow pan, on a rack, that fits the size of the food being cooked. Once again, you can use the broiler pan accompanying your oven. Brush poultry with melted butter, or oil, before roasting. This will help seal in juices and aid in the browning process of meats.
4.Tallsided pans are not recommended when roasting in convection. They interfere with the oven’s heated air circulation over the food. A rim of 2-3” is fine if the roast is raised up on a “V-shaped rack.” This will catch any juices and still allow air circulation around the roast.
5.When using a meat thermometer, insert the stem part of the thermometer halfway into the center of the roast’s thickest portion. For poultry, insert stem (between the body and leg) into the thickest part of the inner thigh. Avoid touching bone, fat or gristle with the probe’s tip (It will give you inaccurate readings). After taking an initial temperature reading, insert the probe a 1/2” further. Take another reading. If the temperature registers below the first reading, continue cooking until desired temperature is reached.
6.It is okay to remove meats from the oven when the temperature reads 5-10˚ F below the desired temperature. The meat continues to cook after being removed. This is called “carryover” cooking and can be utilized for 10-15 minutes in order to make carving easier and to help the meats retain their juices.
7.There is no need to foil tent or cover roasted meats in the Pure Convection™ mode. If this is your preferred method of roasting, however, use Standard Bake rather than Pure Convection™ or Convection Bake because the convection air will never reach the food and will not aid in roasting or searing.
8.Roasting times always vary according to the size, shape and quality of meats and poultry. Less tender cuts of meat are best prepared in Standard Bake and may require moist cooking techniques. Please follow your favorite cookbook’s recipes for these types of dishes.
9.Lining your roasting pan with foil makes for easy clean up.
7

T
Holiday Turkey Tips
The following are a few turkey tips that might come in handy during the holidays. As a good rule of thumb, plan on serving 1 pound of turkey per person. This will allow some extras for the big eaters and the fabulous turkey sandwiches for the days after the holidays.
WHAT’S THE LARGEST-SIZED BIRD THAT WILL FIT IN MY OVEN?
OVEN CELL SIZE |
TURKEY SIZE-IN POUNDS |
|
|
|
|
Large Cell-ERD30, ERD36, |
30+ |
|
ERD48, ERD60 |
||
|
||
Companion Oven-ERD48 |
17 |
|
|
|
PLANNING YOUR MEAL: A FEW POINTS TO REMEMBER
•Allow between 1 to 5 days for turkeys to defrost, depending on the size.
•One pound of turkey per person should be plenty.
•Follow recipe suggestions below.
•Time each side dish and the turkey to insure proper preparation, cook time, rest time, and carve time for each item. Plan out which item will be cooked first and which could be kept warm after cooking.
•Your Dacor oven has two timers that are extremely handy for large meals. Set them to remind you when to place the 2nd and 3rd dishes in the oven or on the cooktop.
PROPER THAWING OF YOUR TURKEY
Frozen turkeys may prevent bacteria from growing, but it does not kill them. Therefore, it is important to keep turkeys out of the Temperature Danger Zone40˚ – 140˚. Never defrost a turkey by placing it on the counter. It can cause foodborne illness.
THERE ARE TWO WAYS TO SAFELY DEFROST A TURKEY:
1.Under refrigeration. This requires adequate refrigerator space, advanced planning, and is the preferred method for defrosting a turkey. The turkey should be placed on the lowest possible shelf to prevent any juices from spilling into other foods. A high-rimmed pan ( 2-3”) is required to catch any juices. Defrost times will depend on the size of the bird. On average, it will take at least a day or two for the bird to be completely defrosted. Plan on defrosting and cooking within a two day time period.
2.Using a Large Sink and Running Water. The turkey may be defrosted by placing it in a sink full of running water or in a sink of water that will be changed every half hour. Ample room is needed for loose particles and overflow. Special care must be taken in cleaning and sanitizing every tool used in preparation of the turkey. Hot water and a bleachbased cleanser should be used to sanitize the sink and utensils used.
*Using Pure Convection. You may use Pure Convection at 135˚ to defrost a partially frozen turkey for same-day cooking. Place turkey on an oven cooking rack. It will take approximately 8-11 minutes per pound to defrost the turkey. This is not recommended with frozen solid turkeys as it will remain in the Temperature Danger Zone for too long.
8

T
Holiday Turkey Tips
UNSTUFFED TURKEYS
1.Place turkey on a roasting rack in a roasting pan. Use a roasting pan that allows the turkey to rest at least 3/4 above the sides of the pan. This allows the convection air to flow freely around the bird, giving it a nice, brown sear. It also helps to lock in the juices inside of the turkey, creating a moist, tasteful product.
2.Pre-heat the oven to 325˚- 350˚. Turkeys 8-25 pounds, use the Pure Convection™ mode. If it is over 25 pounds, use the Convection Bake mode. Larger turkeys simply need that bottom heat from Convection Bake in order to cook properly.
3.The best rack position for the turkey is either rack position 1 or 2. If you are roasting only one turkey, place the turkey with the rack facing side to side. If you are roasting 2 turkeys in one oven cell, two 10 x 13” pans with racks will fit front to back in the ERD30 and ERD60 ovens; or two 13 x 16” pans with racks will fit in the ERD36 and ERD48 large oven. The turkeys’ cavities should face the window.
4.The time it will take to cook will be approximately 10-12 minutes per pound for an unstuffed bird. Begin checking the internal temperatures with an instant-read thermometer about 20 minutes before the expected time of completion. Internal temperatures should read 170˚ in the breast, 180˚ in the thigh.
STUFFED TURKEYS
1.Follow the same baking instructions as above.
2.A turkey under 20 pounds and stuffed should be roasted on Pure Convection™. Anything over 20 pounds and stuffed should be roasted on Convection Bake, and baking times will increase to 14-15 minutes per pound.
3.Always take internal temperatures with an instant-read thermometer of both the turkey and the stuffing to insure safe serving. Please refer to the chart below for temperature information.
PRODUCT |
INTERNAL TEMPERATURE |
MINUTES PER POUND |
|
|
|
Turkey-Unstuffed |
180 in the thigh |
10-12 |
|
|
|
Turkey-Stuffed |
180 in the thigh |
14-15 |
|
|
|
Stuffing |
165 |
10-11 |
|
|
|
9

T
Holiday Turkey Tips
OTHER HELPFUL HINTS
1.Spray roasting rack and roasting pan with nonstick cooking spray. This will make cleaning up easier.
2.Rinse and pat dry the turkey with paper towels.
3.An olive oil rub helps seal in the juices and aids in browning the turkey. Please refer to the recipes in the following pages for ideas.
4 It is best to use fresh herbs in the olive oil rub, since dried herbs may brown too quickly.
5.For added flavor, slit the skin at the bottom of the breast to create a “pocket” between the skin and the breast. Insert the olive oil rub underneath the skin.
6.Chopped onions, carrots, celery, and whole herbs may be inserted into the cavity of the bird. This helps retain moisture while adding flavor to the turkey. These vegetables can be used to flavor homemade gravy after the turkey has reached its safe internal temperature.
7.Never discard turkey drippings. It adds flavor to stuffing, makes a great stock for soups and stews, and makes the best gravies and sauces to serve along with your turkey. If you must discard it, let it cool and scrape into the trash. Do not throw it down the sink, as it may clog drains.
8.If there are not enough drippings in the bottom of the pan to make your favorite gravy, keep in mind that they are still inside the turkey. You may need to compensate with additional stock or broth.
9.No basting is necessary when using the Pure Convection™ mode. If you are using a special sauce or marinade, however, you may want to baste it a couple of times during the cooking process. Do this during the last hour of cooking.
10.It is better to prepare stuffing on the side, instead of stuffing the turkey. Stuffing adds insulation, making it harder for the stuffing to reach a safe internal temperature of 165˚, while the turkey may register a much higher temperature, therefore producing a drier product. It also lengthens the cooking process. Since minimum internal temperatures cannot always be reached, we recommend cooking a separate casserole dish of stuffing.
11.It is acceptable to cover wings and legs that seem to be browning too quickly with foil. Keep in mind that Convection will brown a turkey quickly, which will help it to remain moist.
12.If you are completely covering a turkey in a roasting pan or using an oven roasting bag, convection is not necessary. Standard Bake is the best mode for this type of roasting, simply because the convection air is not able to reach the turkey.
13.Instead of doing one really large bird, try 2 mediumsized birds in one oven cell! In Dacor’s oven, you can place two 15 pound turkeys side-by-side on roasting racks. Think of it: four breasts, four legsit’s enough for 30 people! Another reason to try this is because the smaller the bird, the more tender it will be. And the time will remain the same for one bird- 10-12 minutes per pound! Your two birds at
15 pounds each will cook in about 2 hours!
14.Timed Delay CookingWe do not recommend using the time delay function on your oven to cook your turkey. It is hard to keep protein foods out of the Temperature Danger Zonefrom 40˚ – 140˚. In using timed delay, you are allowing a raw turkey to sit in the oven for an extended period of time, which allows bacteria to grow and a prospective foodborne illness to occur.
15.Most Important Tip of All: Be sure to clean and sanitize every utensil used in preparation of the turkey. This includes cutting boards, knives, kitchen sinks, and, most importantly, your hands. Hot water and a bleach-based cleanser should be used on utensils, and as- hot-as-you-can-stand-it water and antibacterial soap should be used on your hands.
10

GAS INFRARED BROILING
Broiling is a quick and flavorful way to prepare many foods. In broiling, the heat source radiates from above in the oven cell to cook foods with a dry and intense heat. This high heat keeps the juices inside the meat while browning the outside. Foods that can be broiled should be tender, should have some fat content to preserve moisture and flavor, and should be an individual portion size. Broiling in the oven is completed with the oven door completely shut. Keep in mind that it is normal and necessary for some smoke to be present to give the food a smoky, barbecued flavor. The broil temperatures and rack positions may be adjusted.
FOODS THAT CAN BE BROILED:
•Meats, such as beef, chicken, veal, lamb, and pork
•Sausages (Be sure to puncture the skin to prevent bursting)
•Bacon (broiled flat or rolled)
•Seafood (Both fish fillets and shellfish)
•Vegetables that are tender and have a high moisture content, such as onions, zucchini, squash, and peppers
•Garlic breads, toasts, etc.
Thin items should be cooked at high heat and as quickly as possible.
Medium thick items should be started on high heat to sear the food, then finished in a cooler part of the broiler/oven cell by dropping the rack position down or by lowering the temperature of the broiler.
Thick items should also be started on high heat to sear the food, then finished in the oven at a lower temperature.
Times and temperatures for broiling may vary due to desired doneness of the food. Foods will often have to be flipped half way through the broiling cycle.
TIPS FOR SUCCESSFUL BROILING:
1.The broiler needs only a few minutes to preheat. It will cycle on and off to maintain the temperature that you have selected. The element is on when a small red icon that shows “on” with a box around it appears on the control panel.
2.Bring foods to room temperature for about 15-20 minutes before broiling. Chilled foods will reduce the temperature under the broiler. The product will not brown/ sear as well.
3.To keep meat from curling, slit fatty edges.
4.Trim the outer layer of fat from steaks and chops.
5.Cuts of meat that are too thin (smaller than 1/4”) may dry up too quickly, while foods that are too thick (2” or larger) may only sear from the outside and remain raw in the center. Please refer to the above section that addresses thin/ thick.
6.For best results, thicker cuts of meat should be placed about 4” – 6” away from the broiler.
7.A 2-part broiler pan (provided with the unit) should always be used. This allows for fats to drip down into the pan below, reducing smoking and spattering. Using a sheet pan instead of the broiler pan may cause fats to be redirected into the heat, causing flare-ups.
8.Aluminum foil may be used on the bottom portion of the 2-part broiler pan only. If foil is used on the top slotted piece (grill), fats are not allowed to drain properly, resulting in flare-ups, smoking, and spattering.
9.It is best to use tongs to flip the food item half way through the cooking process. Piercing the meat with a fork allows juices to escape.
10.Meats can be brushed with oil or butter to maintain moisture and aid in the searing process.
11.To prevent sticking, lightly grease the broiler grill. Excess grease will result in heavy smoking.
12.Marinating meats, poultry and seafood is an excellent way to retain flavor in broiled foods.
13.Be sure to center the broiler pan underneath the broiler for maximum coverage-center the pan lengthwise, then push it all the way to the back.
14.Although the broiler is variable in temperature, it is easier to get better results by using appropriate rack positions. It is an intense heat, so it is easier to control by lowering rack positions.
11
SINGLE RACK BAKING CHART
Please keep in mind that these charts are simply a guide.
Ingredients, temperatures, and cooking method can all affect the timing of various foods.
You may need to vary the time and temperature due to your personal circumstances.
|
|
|
CONV TEMP |
STANDARD BAKE |
|
|
|
|
TIME & TEMP |
||
FOOD |
PAN SIZE |
MODE/RACK |
& |
||
USE RACK |
|||||
|
|
|
TIME |
||
|
|
|
POSITIOn 1 OR 2 |
||
|
|
|
|
||
|
|
|
350˚ |
Lowest rack position |
|
ANGEL FOOD CAKE |
10” tube pan |
Pure Conv-3 |
350˚ |
||
40-45 min |
|||||
|
|
|
45-50 Min |
||
|
|
|
|
||
|
|
|
|
|
|
BACON |
Jelly roll pan or half sheet |
Pure Conv-3 |
375˚ |
400˚ |
|
pan with rim |
20-25 min |
30-35 min |
|||
|
|
||||
|
|
|
|
|
|
BAGELS, AFTER BOILING |
Cookie sheet |
Pure Conv-3 |
425˚ |
450˚ |
|
15-18 min |
20 min |
||||
|
|
|
|||
|
|
|
|
|
|
|
|
|
350˚ |
375˚ |
|
BISCOTTI |
Cookie sheet |
Pure Conv-3 |
15 min, then 5 min per side |
30 min, then 5 min per side |
|
|
|
|
slice into 1/2” pieces |
slice into 1/2” pieces |
|
BISCUITS |
Cookie Sheet |
Pure Conv-3 |
350˚ |
375˚ |
|
20 min |
25 min |
||||
|
|
|
|||
|
|
|
|
|
|
BLIND-BAKED |
8”-9” pie dish- |
|
375˚ |
400˚ |
|
PIE CRUST |
Conv Bake-2 |
||||
glass or metal |
10-12 min |
12-14 min |
|||
(UNFILLED) |
|
||||
|
|
|
|
||
BLIND-BAKED TART |
10” tart pan |
Pure Conv-3 |
350˚ |
375˚ |
|
(UNFILLED) |
15 min |
20 min |
|||
|
|
||||
|
|
|
|
|
|
BREAKFAST CASSEROLE- |
9” x 13” |
Conv Bake-2 |
350˚ |
375˚ |
|
SAUSAGE AND EGG |
ceramic baking dish |
40-45 min |
50-55 min |
||
|
|||||
|
|
|
|
|
|
BROWNIES |
8”x 8” square pan |
Pure Conv-3 |
325˚ |
350˚ |
|
9”x 13” baking dish |
25-30 min |
35-40 min |
|||
|
|
||||
|
|
|
|
|
|
BUNDT CAKE |
8”-10” Bundt pan |
Conv Bake-2 |
325˚ |
350˚ |
|
50-55 min |
55-60 min |
||||
|
|
|
|||
|
|
|
|
|
|
CAKES-CHIFFON OR |
Jellyroll pan |
Pure Conv-3 |
350˚ |
375˚ |
|
SPONGE |
15 min |
20 min |
|||
|
|
||||
|
|
|
|
|
|
CAKES-CHIFFON OR |
10” Tube Pan |
Pure Conv-3 |
325˚ |
350˚ |
|
SPONGE |
35 min |
40 min |
|||
|
|
||||
|
|
|
|
|
|
CAKES-SPONGE, CHIFFON |
8” Round |
Pure Conv-3 |
350˚ |
375˚ |
|
9” x 13” Baking dish |
18-20 min |
20-25 min |
|||
|
|
||||
|
|
|
|
|
|
CHEESECAKE |
8”-10” springform |
Conv Bake-2 |
325˚ |
350˚ |
|
1 to 1 1/2 hours |
1 to 1 1/2 hours |
||||
|
|
|
|||
|
|
|
|
|
|
CHEESECAKE IN |
8”-10” springform |
Pure Conv & Conv Bake |
N/A |
350˚ |
|
on cookie sheet |
not rec |
1 to 1 1/2 hours |
|||
WATER BATH |
|
||||
|
|
|
|
||
|
|
|
|
|
|
CINNAMON ROLLS |
Cookie sheet |
Pure Conv-3 |
375˚ |
400˚ |
|
20-25 min |
25-30 min |
||||
|
|
|
|||
|
|
|
|
|
12

SINGLE RACK BAKING CHART
|
|
|
CONV TEMP |
STANDARD BAKE |
|
|
|
|
TIME & TEMP |
||
FOOD |
PAN SIZE |
MODE/RACK |
& |
||
USE RACK |
|||||
|
|
|
TIME |
||
|
|
|
POSITIOn 1 OR 2 |
||
|
|
|
|
||
COBBLER |
Baking dish |
Pure Conv-3 |
400˚ |
425˚ |
|
20-25 min |
30 Min |
||||
|
|
|
|||
|
|
|
|
|
|
COFFEE CAKES |
9” round pan |
Pure Conv-3 |
325˚ |
350˚ |
|
40-45 min |
45-50 min |
||||
|
|
|
|||
|
|
|
|
|
|
COOKIES (CHOC CHIP, SUGAR, |
Cookie sheet |
Pure Conv-3 |
325˚ or 350˚ |
375˚ |
|
OATMEAL RAISIN, PEANUT |
12-15 min |
15-20 min |
|||
BUTTER, ETC.)-FROZEN DOUGH |
|
|
|||
|
|
|
|
|
|
COOKIES (CHOC CHIP, SUGAR, |
|
|
325˚ or 350˚ |
375˚ |
|
OATMEAL RAISIN, PEANUT |
Cookie sheet |
Pure Conv-3 |
|||
BUTTER, ETC.) |
10-12 min |
12-14 min |
|||
|
|
||||
REFRIGERATED DOUGH |
|
|
|
|
|
CORNBREAD |
8”x 8” square pan |
Pure Conv-3 |
375˚ |
400˚ |
|
20-2 min |
25-3 min |
||||
|
|
|
|||
|
|
|
|
|
|
CREME BRULEE |
small ceramic baking dishes |
Std Bake-2 |
N/A |
350˚ |
|
IN WATER BATH |
on cookie sheet |
55-60 min |
|||
|
|
||||
|
|
|
|
|
|
CRISPS |
Baking dish |
Conv Bake-2 |
350˚ |
375˚ |
|
(APPLE, FRUIT, ETC.) |
40-45 min |
45 min |
|||
|
|
||||
|
|
|
|
|
|
CROISSANTS |
Cookie sheet |
Pure Conv-3 |
375˚ |
400˚ |
|
20-25 min |
25-30min |
||||
|
|
|
|||
|
|
|
|
|
|
CUPCAKES |
12cup muffin tin |
Pure Conv-3 |
350˚ |
375˚ |
|
20-25 min |
25-30 min |
||||
|
|
|
|||
|
|
|
|
|
|
DOUBLE CRUSTED |
9” pie dish |
Conv Bake-2 |
400˚ for 20 min |
425˚ for 20 min |
|
FRUIT-FILLED PIES |
350˚ for 30-40 min |
350˚ for 40-45 min |
|||
|
|
||||
|
|
|
|
|
|
ECLAIRS |
|
|
400˚ |
425˚ |
|
PROFITEROLES |
Cookie sheet |
Std Bake-2 |
|||
15-20min |
20-25 min |
||||
CREAM PUFFS |
|
|
|||
|
|
|
|
||
|
|
|
|
|
|
MACAROONS |
Cookie sheet |
Pure Conv-3 |
325˚ |
350˚ |
|
20-25 min |
25-30 min |
||||
|
|
|
|||
|
|
|
|
|
|
MEATBALLS, FROZEN |
Cookie sheet |
Pure Conv-3 |
350˚ |
375˚ |
|
20-25 min |
30-35 min |
||||
|
|
|
|||
|
|
|
|
|
|
MEATLOAF |
9”x 5” loaf pan |
Conv Bake-2 |
325˚ |
350˚ |
|
|
|
|
1 1/2 hrs |
1 1/2 hrs |
|
MERINGUE-COOKIES |
Cookie sheet |
Pure Conv & Conv Bake |
N/A |
200˚-250˚ |
|
not rec |
1 to 3 hours |
||||
|
|
|
|||
|
|
|
|
|
|
MERINGUE-PIE TOPPING |
On top of pie |
Pure Conv-3 |
350˚ |
375˚ |
|
12 min |
15 min |
||||
|
|
|
|||
|
|
|
|
|
13
 Loading...