

Page 1

SKIPPING ROPE SET
SKIPPING ROPE SET
Instructions for use
HOPPREP, SET
Bruksanvisning
SET DE CORDE À SAUTER
Notice d’utilisation
SPRINGSEIL-SET
Bedienungsanleitung
IAN 93591
HYPPYNARUSETTI
Käyttöohje
SJIPPETOV
Brugervejledning
SPRINGTOUWSET
Gebruiksaanwijzing
Page 2

Contents/Sisällysluettelo/Innehållsförteckning/Indholdsfortegnelse/
Table des matieres/Inhoudsopgave/
Contents ............................................................... 6
Technical data ..................................................... 6
Intended use ........................................................ 6
Safety notices ....................................................... 6
General training instructions .............................. 6
Assembly ............................................................. 7
Programming the countdown timer ................... 7
Battery warning .................................................. 7
Replacing the battery ......................................... 8
After training ....................................................... 8
Care and storage ............................................... 8
Instructions for disposal ...................................... 8
Battery disposal .................................................. 8
3 Years Warranty ............................................... 9
Toimituspakkaus ................................................ 10
Tekniset tiedot .................................................... 10
Määräystenmukainen käyttö ........................... 10
Turvaohjeet .........................................................10
Yleisiä harjoitusohjeita ..................................... 10
Asennus ............................................................. 11
Ajastimen säätäminen ...................................... 11
Pariston turvaohjeet .......................................... 11
Pariston vaihtaminen ......................................... 12
Harjoittelun jälkeen .......................................... 12
Hoito ja säilytys ................................................ 12
Hävittäminen ..................................................... 12
Paristojen hävittäminen .................................... 12
3 vuoden takuu ................................................. 13
Leveransomfattning ........................................... 14
Tekniska data .................................................... 14
Ändamålsenlig användning ............................. 14
Säkerhetsinformation ......................................... 14
Allmänna träningstips ....................................... 14
Montering .......................................................... 15
Inställning av nedräkningstimern ..................... 15
Varningshänvisningar för batterier .................. 15
Isättning av batterier ......................................... 16
Efter träningen ................................................... 16
Skötsel och förvaring ........................................ 16
Information om avfallshantering ...................... 16
Avfallshantering av batterier ........................... 16
3 års garanti ...................................................... 17
Contenu de la livraison .....................................22
Fiche technique ..................................................22
Usage prévu .......................................................22
Consignes de sécurité .......................................22
Recommandations générales ...........................22
Montage .............................................................23
Réglage du compte à rebours ..........................23
Précautions concernant les piles ..............23 - 24
Remplacement de la pile ..................................24
Après l‘entraînement .........................................24
Entretien et conservation ...................................24
Précisions concernant l‘élimination ..................24
Mesures d’élimination des piles .......................24
3 ans de garantie ..............................................25
Følger med leveringen ..................................... 18
Tekniske data .................................................... 18
Formålsbestemt anvendelse ............................. 18
Sikkerhedshenvisninger .....................................18
Generelle træningshenvisninger ...................... 18
Montage ............................................................ 19
Indstilling af countdown-tælleren .................... 19
Advarsel batterier ............................................. 19
Erstatning af batteri .......................................... 20
Efter træningen ................................................. 20
Pleje og opbevaring ......................................... 20
Henvisningerne til bortskaffelse ....................... 20
Forholdsregler til bortskaffelse af batterier ..... 20
3 års garanti ...................................................... 21
Omvang van de levering ..................................26
Technische gegevens .........................................26
Doelmatig gebruik .............................................26
Veiligheidsinstructies ..........................................26
Algemene trainingsinstructies ...........................26
Montage .............................................................27
Instellen van de countdown-teller .....................27
Waarschuwingsinstructies batterijen ........27 - 28
Batterij vervangen ............................................ 28
Na de training .................................................. 28
Verzorging en opbergen ................................. 28
Opmerking met betrekking
tot de verwijdering ........................................... 28
Verwijdering van de batterijen ........................ 28
3 jaar garantie .................................................. 29
2
Page 3

Lieferumfang ...................................................... 30
Technische Daten .............................................. 30
Bestimmungsgemäße Verwendung ................. 30
Sicherheitshinweise ............................................30
Allgemeine Trainingshinweise ......................... 30
Montage ............................................................ 31
Einstellen des Countdown-Zählers .................. 31
Warnhinweise Batterien ........................... 31 - 32
Batterie ersetzen ............................................... 32
Nach dem Training ........................................... 32
Pflege und Aufbewahrung ............................... 32
Hinweise zur Entsorgung ................................. 32
Entsorgungsmaßnahmen Batterien .................. 32
3 Jahre Garantie .............................................. 33
Inhaltsverzeichnis
3
Page 4
4 5 6 7
8
2 3
1
A
1
4 / 5
1
6 2
3
1
2
B
D
4
C
E
Page 5

F
5
Page 6
Congratulations!
With your purchase you have decided on a
high-quality product. Get to know the product
before you start to use it. Carefully read the
following operating instructions. Use the product
only as described and only for the given areas
of application. Keep these instructions safe.
When passing the product on to a third party,
always make sure that the documentation is
included.
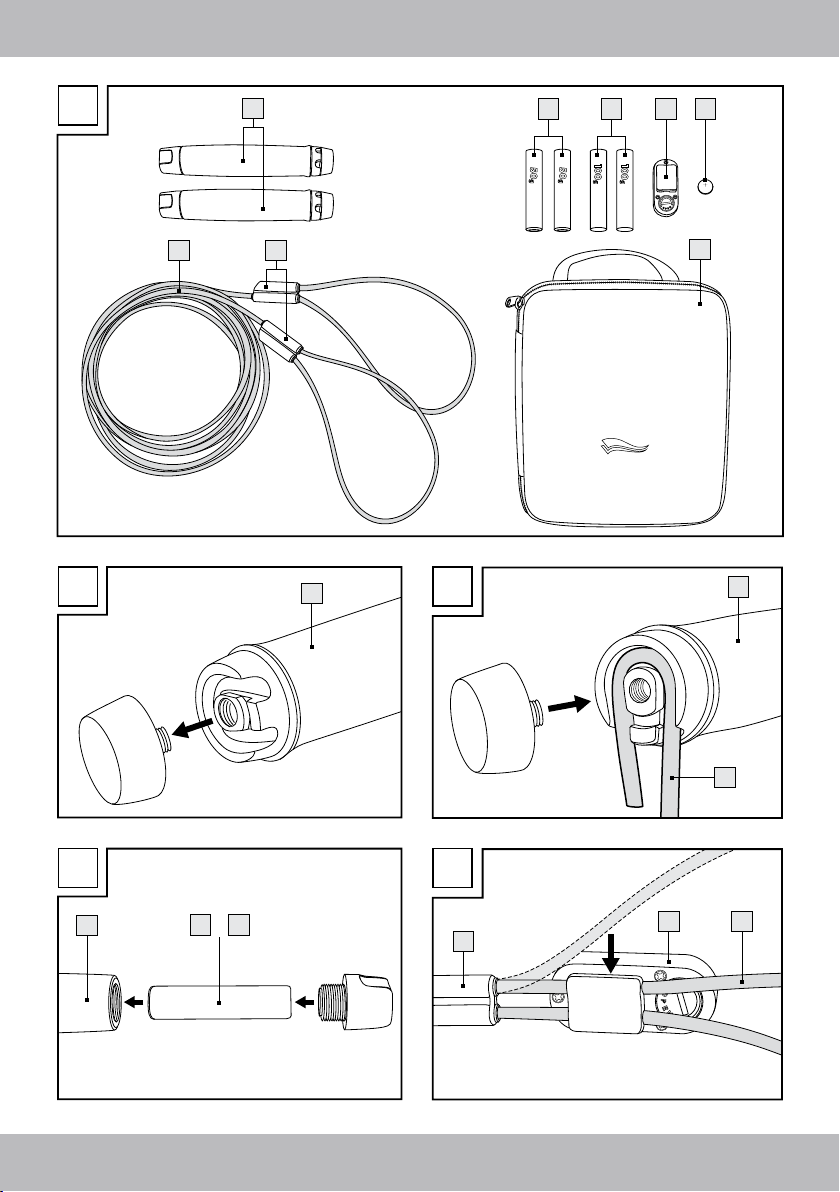
Contents (Fig. A)
2 x Handle (1)
1 x Skipping rope (2)
2 x Rope clamp (3)
2 x 50 g Handle weight (4)
2 x 100 g Handle weight (5)
1 x Countdown timer (6)
1 x Battery (7)
1 x Carrying case (8)
1 x Instructions for use
Technical data
Power supply: a
Dimensions: approx. Ø 5.0mm x L 300cm
Programmable exercise time: 1 – 60 minutes
Intended use
This product is solely intended as a jump rope.
It is not approved for any other use, e.g. as a
tow- or pull rope, or for abseiling.
Safety notices
• Only use this product for its intended use.
• This product is not a toy for small children.
Keep out of the reach of small children. Only
allow children to use this product under
supervision. Children could become entangled
in the rope and stumble or become strangled.
• To prevent damage to the health or minimise
potential risks, consult your physician before
beginning fitness training. This particularly
applies for impairments, e.g. pacemakers, or
during pregnancy.
• Stop exercising immediately if you experience
nausea, chest pain or other symptoms of illness
such as dizziness or shortness of breath. In this
event, seek immediate medical attention.
• Safe training requires ample space. Allow
sufficient distance to objects and other persons
whilst exercising to prevent injuries.
• Only train on a flat, non-slip surface.
• Never use this product near steps or ledges.
• Improper and excessive training can pose a
risk to your health.
• Roll up the ropes when not in use. Never hang
the ropes from a hook, etc.
• Only use the included weights to weigh down
the handles.
Caution – risk of property damage
• Never exert force on this product.
• Do not throw to the ground.
• Do not expose the product to heat or fire.
General training instructions
• Allow adequate time and be sure to include a
warm-up and cool-down period.
• Begin with easy exercises and slowly
increase your training.
• Do not train immediately following meals, if ill,
sick, fatigued, or other symptoms which may
be impacted by training.
6 GB/IE
Page 7
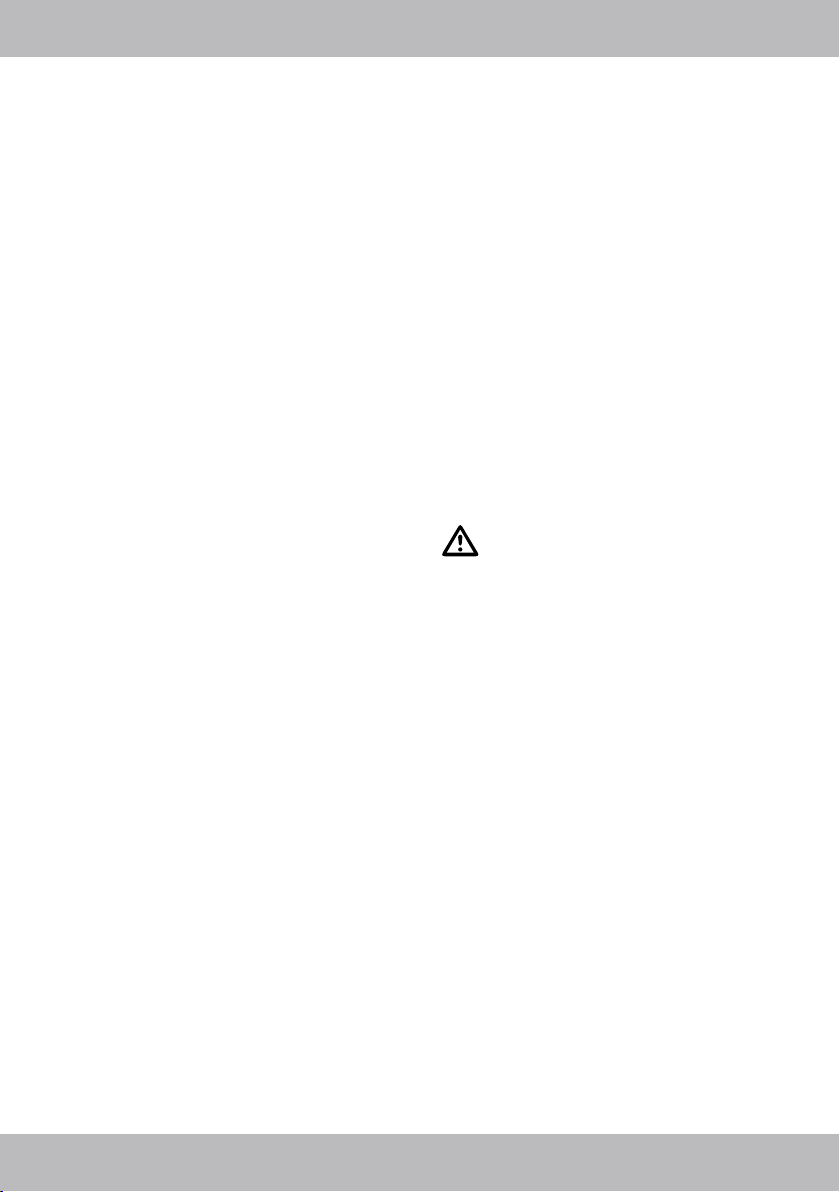
Assembly
• Remove both handles (1) and the rope (2)
from the carrying case (8).
• Loosen the screw at the top end of the handles
(Fig. B).
• Feed the rope into the handles as illustrated
(Fig. C).
• Important! When you insert the rope, ensure
the end of the rope always sits on the left hand
side in the handle (Fig. C).
• Tighten the screw on the handle so the rope is
secured when tugged.
• Secure the rope clamps (3) around each of
the rope lines so the rope ends are firmly
seated.
Correct rope length
• Check if the rope is the ideal length for you.
Both ends of the rope (incl. handles) should
reach from the feet to about the middle of the
chest (Fig. F).
• If the rope is not the ideal length for your
height, adjust the length.
• To shorten the jump rope, loosen the screws
at the upper end of the handle. Remove the
rope from the holder and lengthen the ends
of the rope, which extend over the handles. To
lengthen the jump rope, shorten these ends.
• Note! Be sure the rope clamps are equally
spaced from the handles to ensure an even
swing.
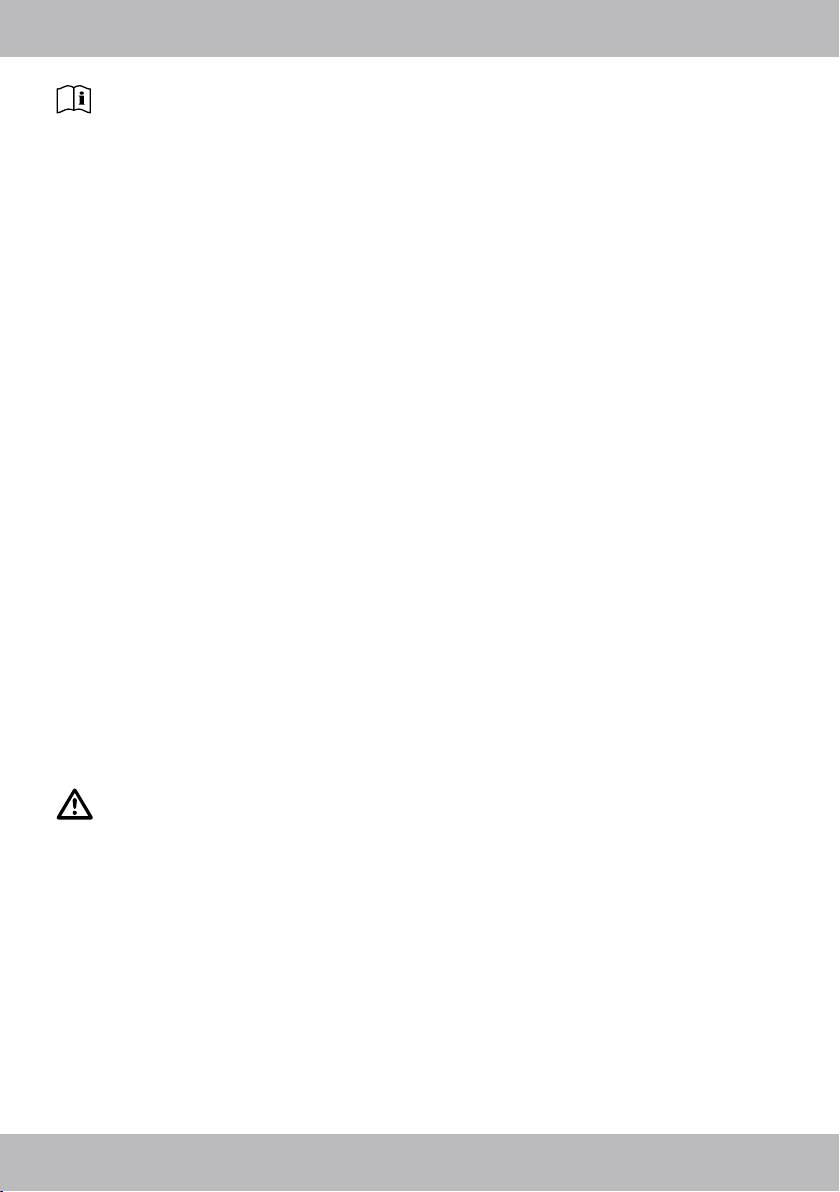
Inserting handle weights
• The jump rope set includes 2 handles weights
each of 50g (4) 100 g (5).
• You may train without adding weights, or
using 50/100g to each handle.
Note: When using the additional weights, be
sure to use the same weight on both handles.
1. Unscrew the end caps from the lower handle
end (Fig. D).
2. If applicable, remove the inserted weights
and replace with the lighter/heavier weights.
Both handles must always have the same
weight inserted.
3. Secure the end caps to the handles. Be sure
the end caps are tightly secured.
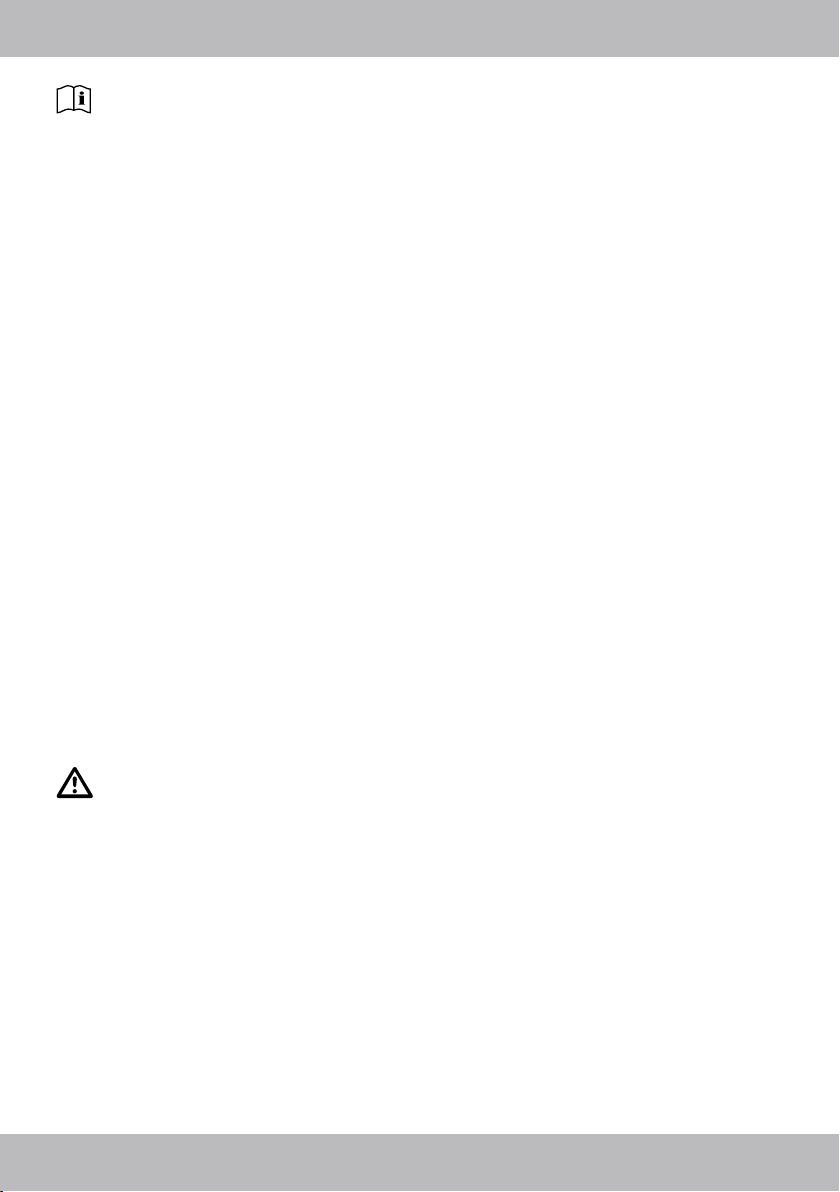
Countdown timer
Programming the countdown timer
The countdown timer (6) can be set for training
units of 1 to 60 minutes. Once the programmed
training period has ended you will hear a sound.
1. To start the timer press the orange button until
numbers appear in the display.
2. Hold the button for a few seconds to start the
countdown timer.
3. Once the programmed training time has
ended you will hear a sound.
4. To extend the training unit, only hold the
button briefly. The timer can be set for training
units up to 60 minutes.
Automatic shut-off: The product will automatically
shut off after 8 minutes to conserve battery (7)
power.
Attaching the countdown timers
See Fig. E.
Battery warning
• Only use the same brand and type batteries.
• Remove the battery once drained or for
extended periods of non-use.
• Warning! Never charge batteries or reactivate
with other means, open, throw into fire, or
short circuit.
• Always keep batteries out of the reach of
children.
• Never charge non-rechargeable batteries.
• Only charge rechargeable batteries under
adult supervision.
• Remove rechargeable batteries from the
product before charging.
• Never short circuit the terminals.
• Handle damaged or leaking batteries with
extreme care and promptly dispose of
according to regulations.
• If you come into contact with battery acid,
wash the affected area with water and soap.
If battery acid comes into contact with the eye,
flush with water and seek immediate medical
attention.
7GB/IE
Page 8

Replacing the battery
ATTENTION! Observe the following
instructions to prevent mechanical and
electrical damage.
Danger!
• Never touch leaked batteries without proper
protection!
• Leaking batteries mustn’t come into contact
with the eyes or mouth. In this event, seek
immediate medical attention.
If the display quality is failing, replace the battery with a new battery (button cell) LR44.
1. Turn the battery cover counter-clockwise and
turn over to remove the cover.
2. Slightly tap the timer against your palm. The
battery will fall out of the compartment.
3. Insert a new battery. Be sure to observe the
correct polarity. The plus terminal faces the
cover.
4. Insert the cover and turn clockwise.
After training
• Loosen the rope clamps from each end of the
jump rope.
• Loosen the screws at the end of the handles.
• Remove the rope from the handles.
• Roll up the rope and store all parts inside
the case.
Care and storage
Store this product out of the reach of children.
Roll up the ropes when not in use. Never hang
the ropes from a hook, etc., and never bend
the ropes. This could permanently damage the
ropes.
Regularly clean the jump rope set, preferably
after each use. Clean with a damp cloth and a
suitable cleaner. Never use harsh cleaners or
solvents. Dry the set with a dry cloth. Store the
set in a dry location at room temperature.
Instructions for disposal
Dispose of the product and all related components through an approved refuse disposal
company, or through your municipal waste management company. Please observe the current
applicable regulations. When in doubt, please
contact your waste management company for
environmentally-friendly disposal.
Battery disposal
Batteries do not belong in household
refuse! Return to the respective collection
sites or to the retailer where they were
purchased.
Batteries are marked with a crossedout refuse bin and the chemical symbols of the
toxins, namely “Cd” for cadmium, “Hg” for
mercury, and “Pb” for lead.
8 GB/IE
Page 9

3 Years Warranty
The product was produced with great care and
under constant supervision. You receive a threeyear warranty for this product from the date of
purchase. Please retain your receipt.
The warranty applies only to material and
workmanship and does not apply to misuse or
improper handling. Your statutory rights, especially the warranty rights, are not affected by this
warranty. With regard to complaints, please contact the following service hotline or contact us by
e-mail. Our service employees will advise as to
the subsequent procedure as quickly as possible.
We will be personally available to discuss the
situation with you.
Any repairs under the warranty, statutory guarantees or through goodwill do not extend the
warranty period. This also applies to replaced
and repaired parts. Repairs after the warranty
are subject to a charge.
IAN: 93591
Service Great Britain
Tel.: 0871 5000 720 (£ 0.10/Min.)
E-Mail: deltasport@lidl.co.uk
Service Ireland
Tel.: 1890 930 034
(0,08 EUR/Min., (peak))
(0,06 EUR/Min., (off peak))
E-Mail: deltasport@lidl.ie
You can also find spare parts for your product at:
www.delta-sport.com, category Service - Lidl Spare Parts
Service
9GB/IE
Page 10
Onnittelumme!
Olet hankkinut itsellesi korkealaatuisen tuotteen.
Tutustu tuotteeseen ennen ensimmäistä käyttöä.
Lue käyttöohje huolellisesti läpi. Käytä tuotetta
vain ohjeissa kuvatulla tavalla ja mainitussa
tarkoituksessa. Säilytä käyttöohje myöhempää
tarvetta varten. Jos annat tuotteen eteenpäin,
liitä käyttöohje tuotteen mukaan.
Toimituspakkaus (kuva A)
2 x kahva (1)
1 x hyppynaru (2)
2 x naruliitin (3)
2 x 50 g kahvapaino (4)
2 x 100 g kahvapaino (5)
1 x laskuri (6)
1 x paristo (7)
1 x säilytyskotelo (8)
1 x käyttöohje
Tekniset tiedot
Virtalähde: a
Mitat: n. Ø 5,0 mm x P 300 cm
Säädettävä harjoitusaika: 1 – 60 minuuttia
Määräystenmukainen käyttö
Tämä tuote on tarkoitettu vain hyppynaruksi.
Narua ei saa käyttää muuhun tarkoitukseen,
esimerkiksi hinaus- tai vetonaruna tai laskeutumiseen.
Turvaohjeet
• Käytä tuotetta vain määräystenmukaiseen
tarkoitukseen.
• Tämä tuote ei ole lasten leikkikalu; säilytä se
pikkulasten ulottumattomissa. Älä anna lasten
käyttää tuotetta ilman valvontaa. Lapset voivat
juuttua, kompastua tai kuristua naruun.
• Ehkäistäksesi terveysvahinkoja tai
minimoidaksesi mahdollisia riskejä, keskustele
lääkärisi kanssa ennen harjoittelun
aloittamista. Tämä koskee erityisesti
heikkokuntoisia, kuten henkilöitä, joilla on
sydämentahdistin, tai raskauden aikana.
• Lopeta harjoittelu välittömästi, jos koet
pahoinvointia, rintakipua tai muita
epämiellyttäviä oireita, kuten huimausta tai
hengenahdistusta. Hakeudu välittömästi
lääkärin vastaanotolle.
• Turvalliseen harjoitteluun tarvitset riittävästi
tilaa. Suorita harjoitukset niin kaukana
esineistä ja muista ihmisistä, jotta kukaan ei voi
loukkaantua.
• Harjoittele vain tasaisella, luistamattomalla
pinnalla.
• Älä käytä tuotetta portaiden tai korokkeiden
läheisyydessä.
• Vääränlainen ja liiallinen liikunta voi
vaarantaa terveytesi.
• Kääri naru kokoon, kun et käytä sitä. Älä
koskaan ripusta narua koukkuun tai muuhun
vastaavaan.
• Varusta kahvat vain setin mukana tulevilla
painoilla.
Varo esinevaurioita
• Älä käsittele tuotetta väkivalloin.
• Älä heitä sitä maahan.
• Suojaa tuote kuumuudelta tai tulelta.
Yleisiä harjoitusohjeita
• Varaa runsaasti aikaa ja ota huomioon
lämmittely ja venyttely.
• Aloita kevyillä harjoituksilla ja lisää hitaasti
harjoittelun tehoa.
• Älä harjoittele välittömästi ruokailun jälkeen,
kun olet vilustunut, pahoinvoiva tai väsynyt
tai sinulla on muita oireita, joita harjoittelu voi
pahentaa.
10
FI
Page 11

Asennus
• Poista molemmat kahvat (1) ja hyppynaru (2)
säilytyskotelosta (8).
• Löysää kahvojen yläosan ruuvi (Kuva B).
• Pujota hyppynaru kuvan mukaisesti kahvoihin
(Kuva C).
• Tärkeää! Kun asetat narun sisään, narunpään
täytyy sijaita aina vasemmalla puolella
kahvassa (Kuva C).
• Kiristä kahvan pään ruuvi siten, että hyppynaru
pysyy tiukasti kiinni myös vetäessä.
• Kiinnitä naruliittimet (3) ja narun säikeet siten,
että narun pää on tiukasti kiinni.
Narun sopiva pituus
• Tarkista, että narun pituus on sinulle sopiva.
Pituus on sopiva, kun narun molemmat päät
ulottuvat (kahvat mukaan lukien) jaloista noin
rinnan keskelle saakka (Kuva F).
• Jos narun pituus ei ole sopiva, säädä pituus
oikeaksi.
• Kun lyhennät hyppynarua irrota kahvojen
yläpäädyssä olevat ruuvit. Poista naru
liittimestä ja pidennä kahvojen yli meneviä
narunpäitä. Narua voit pidentää lyhentämällä
narunpäitä.
• Vinkki! Varmista, että naruliittimet ovat samalla
etäisyydellä kahvoista varmistaaksesi tasaisen
vauhdin.
Kahvapainojen asettaminen
• Hyppynarusettiin kuuluu 2 kahvapainoa,
joiden paino on 50 g (4) tai 100 g (5).
• Voit harjoitella ilman painoja tai 50 g tai
100 g per kahva.
Vinkki: Jos haluat harjoitella lisäpainojen
kanssa, varmista, että molemmissa kahvoissa on
yhtä painavat painot.
1. Kierrä kahvan alapään päätynuppia
(Kuva D).
2. Poista tarvittaessa asetetut painot ja korvaa ne
kevyemmillä tai raskaammilla painoilla.
Kahvoissa on oltava yhtä painavat painot.
3. Kierrä lopuksi kahvojen päädyt takaisin
paikoilleen. Varmista, että päädyt ovat tiukasti
kiinni.
Ajastin
Ajastimen säätäminen
Ajastimella (6) voit asettaa harjoittelun
pituudeksi 1-60 minuuttia. Kun asetettu
harjoituksen kesto päättyy, kuuluu äänimerkki.
1. Käynnistä ajastin pitämällä oranssia painiketta
pohjassa, kunnes näyttöön ilmestyy lukuja.
2. Pidä painiketta painettuna muutaman sekunnin
ajan käynnistääksesi ajastimen.
3. Kun asetettu harjoituksen kesto päättyy, kuuluu
äänimerkki.
4. Pidennä harjoitusaikaa painamalla painiketta
lyhyesti. Voit asettaa ajastimen harjoitusajaksi
enintään 60 minuuttia.
Automaattinen sammutus: 8 minuutin kuluttua laite sammuu itsestään paristojen säästämiseksi (7).
Ajastimen kiinnittäminen
Katso kuva E.
Pariston turvaohjeet
• Käytä vain saman valmistajan ja
samantyyppisiä paristoja.
• Poista paristo, kun se on tyhjä tai jos et käytä
tuotetta pitkään aikaan.
• Varoitus! Paristoja ei saa ladata tai aktivoida
muilla tavoin, purkaa, heittää tuleen tai
oikosulkea.
• Paristot on säilytettävä lasten ulottumattomissa.
• Kertakäyttöparistoja ei saa ladata.
• Ladattavat paristot saa ladata vain aikuisen
valvonnassa.
• Ladattavat paristot on poistettava tuotteesta
ennen latausta.
• Liittimiä ei saa oikosulkea.
• Käsittele vahingoittunutta tai vuotavaa paristoa
erittäin huolellisesti ja hävitä se välittömästi
määräysten mukaisesti.
• Jos joudut kosketuksiin paristohappojen
kanssa, pese iho saippualla ja vedellä. Jos
happoa joutuu silmiin, huuhtele vedellä ja
hakeudu välittömästi lääkärin hoitoon.
FI
11
Page 12

Pariston vaihtaminen
HUOMIO! Noudata seuraavia ohjeita
välttääksesi mekaaniset ja sähköiset
vauriot.
Vaara!
• Älä käsittele vanhentuneita paristoja koskaan
ilman asianmukaista suojaa!
• Vanhentuneet paristot eivät saa joutua silmiin
tai suuhun. Tällaisessa tapauksessa on
hakeuduttava välittömästi lääkärin hoitoon.
Jos näyttö himmenee, vaihda paristo uuteen
(nappiparisto) LR44.
1. Kierrä paristokotelon kantta vastapäivään ja
käännä ympäri, jotta voit poistaa kannen.
2. Napauta laskuria kevyesti kämmentä vasten.
Paristo putoaa pois lokerosta.
3. Aseta uusi paristo. Kiinnitä huomiota
napaisuuteen. Positiivinen napa on kohti
kantta.
4. Aseta kansi ja kierrä myötäpäivään.
Harjoittelun jälkeen
• Irrota naruliittimet narun molemmilta sivuilta.
• Löysää päiden ruuvit.
• Vedä naru pois kahvoista.
• Rullaa naru kokoon ja aseta setin kaikki
osat koteloon.
Hoito ja säilytys
Säilytä tuote lasten ulottumattomissa. Kääri naru
kokoon, kun et käytä sitä. Älä koskaan ripusta
narua koukkuun tai vastaavaan tai taita narua.
Tämä voisi aiheuttaa naruun pysyviä muutoksia.
Puhdista hyppynaru säännöllisesti, mieluiten
jokaisen käytön jälkeen. Käytä puhdistukseen
kosteaa liinaa ja sopivaa pesuainetta. Älä
käytä voimakkaita puhdistusaineita tai liuottimia.
Kuivaa lopuksi kuivalla pyyhkeellä. Säilytä setti
kuivassa, huoneenlämpöisessä paikassa.
Hävittäminen
Hävitä tuote ja kaikki sen osat jätehuoltoyrityksen tai kunnallisen jätehuollon kautta. Noudata
voimassa olevia määräyksiä. Jos olet epävarma,
kysy jätteenkäsittelylaitokselta ympäristöystävällisestä hävittämisestä.
Paristojen hävittäminen
Paristoja ei saa heittää roskiin! Palauta
keräyspisteeseen tai jälleenmyyjälle.
Paristoihin on merkitty yliviivattu jäteastia
ja haitallisten aineiden kemialliset
symbolit, eli „Cd“ kadmium, „ Hg“
elohopea ja „Pb“ lyijy.
12
FI
Page 13

3 vuoden takuu
Tämä tuote on valmistettu erityistä tarkkuutta
noudattaen ja jatkuvan tarkastuksen alaisena.
Tälle tuotteelle saat kolmen vuoden takuun ostopäivästä lähtien. Säilytä kassakuitti huolellisesti.
Takuu koskee ainoastaan materiaali- ja valmistusvirheitä ja raukeaa, jos tuotetta käytetään
vääränlaisesti tai ei määräysten mukaisesti.
Tämä takuu ei rajoita laissa määrättyjä oikeuksiasi, erikoisesti koskien takuu- ja reklamointioikeuksia.
Mahdollisissa reklamaatiotapauksissa ota meihin
yhteyttä soittamalla allaolevaan asiakaspalvelunumeroon tai lähettämällä viesti sähköpostitse.
Asiakaspalvelijamme sopivat kanssasi tarvittavista toimenpiteistä mitä pikimmin. Palvelemme
sinua joka tapauksessa henkilökohtaisesti.
Mahdolliset korjaukset, jotka on suoritettu
tämän takuun, laillisen reklamointioikeuden tai
harkintaoikeuden perusteella eivät pidennä
takuuaikaa. Tämä koskee myös vaihdettuja ja
korjattuja osia. Takuuajan päätyttyä suoritetut
korjaukset ovat maksullisia.
IAN: 93591
Huolto Suomi
Tel.: 010309 3582
E-Mail: deltasport@lidl.fi
Varaosia tuotteeseesi löydät myös osoitteesta:
www.delta-sport.com, välilehdestä Palvelu - Lidl varaosapalvelu
13
FI
Page 14

Grattis!
Med ditt köp har du bestämt dig för en högvärdig produkt. Lär känna produkten innan första
användningen. För detta ändamål bör du noga
läsa igenom efterföljande bruksanvisning.
Använd produkten endast i överensstämmelse
med beskrivningen och endast för nämnda
användningsändamål. Förvara denna manual
väl. Om du ger produkten vidare glöm inte att
samtidigt överlämna alla handlingar.
Leveransomfattning (bild A)
2 x handtag (1)
1 x hopprep (2)
2 x linlås (3)
2 x 50 g handtagsvikter (4)
2 x 100 g handtagsvikter (5)
1 x nedräkningstimer (6)
1 x batteri (7)
1 x fodral (8)
1 x bruksanvisning
Tekniska data
Energiförsörjning: a
Mått: ca Ø 5,0 mm x L 300 cm
Inställbar träningstid: 1 – 60 minuter
Ändamålsenlig användning
Denna artikel är endast lämplig att användas
som hopprep. Den är inte godkänd för andra
ändamål, t.ex. som bogser- eller draglina eller
för att fira ner personer eller föremål.
Säkerhetsinformation
• Använd redskapet uteslutande för det avsedda
ändamålet.
• Detta redskap är ingen leksak. Förvara den
utom räckhåll för barn. Barn får endast
använda redskapet under uppsikt. Barn kan
fastna i repet, snubbla eller strypas.
• För att förebygga hälsoskador eller minimera
bestående risker, bör du konsultera läkare
innan du börjar med träningen. Detta gäller
särskilt för personer som t.ex. har en
pacemaker eller för gravida kvinnor.
• Avsluta träningen omedelbart, om du mår illa,
får ont i bröstet eller om andra symptom
uppträder, t.ex. yrsel eller andningsnöd.
Konsultera i dessa fall omgående läkare.
• För en säker träning behöver du tillräckligt
med plats. Utför övningarna med tillräckligt
stort avstånd till föremål och andra personer,
så att ingen kan bli skadad.
• Träna endast på ett plant och halkfritt
underlag.
• Använd inte artikeln i närheten av trappor eller
avsatser.
• Icke fackmässig eller överdriven träning kan
vara hälsovådlig.
• Rulla ihop repen när de inte används. Häng
aldrig upp repen på en krok eller dylikt.
• Belasta handtagen endast med de vikter som
ingår i setet.
Se upp för materialskador
• Använd aldrig våld vid hantering av
redskapet.
• Kasta inte ner det på marken.
• Utsätt aldrig redskapet för värme eller eld.
Allmänna träningstips
• Ta dig tid och planera under alla
omständigheter in en uppvärmnings- och
återhämtningsfas.
• Börja med lätta övningar och öka
träningsintensiteten långsamt.
• Träna inte omedelbart efter måltider, vid
sjukdom, illamående eller andra indikatorer,
som kan påverkas av din träning.
14
SE
Page 15

Montering
• Ta ut de båda handtagen (1) och hopprepet
(2) ur fodralet (8).
• Lossa skruven längst uppe på handtagen
(bild B).
• För in repet i handtagen enligt illustrationen
(bild C).
• Viktigt! När du sätter i repet, måste repänden
alltid befinna sig till höger i handtaget
(bild C).
• Dra åt skruven på handtagets ände, så att
repet sitter fast även när man drar i det.
• Sätt fast linlåsen (3) på repen, så att repänden
sitter fast.
Den rätta replängden
• Kontrollera om repet har den för dig optimala
längden. Längden är endast optimal, när
båda repändarna (inkl. handtag) når från
fötterna till mitten på bröstkorgen (bild F).
• Korrigera längden om repet ännu inte har den
för dig optimala längden.
• För att göra hopprepet kortare lossar du på
skruvarna längst upp på handtagen. Ta loss
repet ur hållaren och förläng repändarna, som
sticker fram över handtagen. För att förlänga
kortar du repändarna.
• Hänvisning! Se till att linlåsen befinner sig på
samma avstånd från handtagen, för att
säkerställa en regelbunden fart.
Isättning av vikter i handtagen
• Till hopprep-setet hör vardera 2
handtagsvikter på 50 g (4) resp. 100 g (5).
• Du kan träna utan extra vikter eller med 50,
resp. 100 g, per handtag.
Hänvisning:
Om du vill träna med extra vikter, måste du se till
att båda handtagen förses med lika tunga vikter.
1. Skruva av ändlocken på nedre ändan på
handtagen (bild D).
2. Ta vid behov ut de vikter som befinner sig i
handtagen och byta ut dessa mot lättare resp.
tyngre vikter. Det måste alltid vara samma vikt
i båda handtagen.
3. Skruva åter på ändlocken på handtagen.
Säkerställ att båda ändlocken skruvats på
ordentligt.
Nedräkningstimer
Inställning av nedräkningstimern
Med nedräkningstimern (6) kan du ställa in en
träningstid mellan 1 och maximalt 60 minuter.
När den inställda träningstiden har gått ut hörs
en ljudsignal.
1. För att starta räkneverket trycker du så länge
på den orange färgade knappen, tills siffrorna
visas på displayen.
2. Håll knappen intryckt några sekunder för att
starta nedräkningen.
3. När den inställda träningstiden har gått ut
hörs en ljudsignal.
4. För att förlänga träningstiden, trycker du kort
på knappen. Du kan ställa in träningstiden på
upp till 60 minuter.
Avstängningsautomatik: Efter 8 minuter stänger
redskapet av sig automatiskt, för att spara
batteriet (7).
Montering av nedräkningstimern
Se bild E.
Varningshänvisningar för
batterier
• Använd endast batterier från samma tillverkare
och av samma typ.
• Ta bort batteriet när detta är förbrukat eller
produkten inte ska användas på ett tag.
• Varning! Batterier får inte laddas eller
reaktiveras på annat sätt, inte tas isär, kastas i
eld eller kortslutas.
• Batterier måste alltid förvaras utom räckhåll för
barn.
• Ej laddningsbara batterier får inte laddas upp.
• Laddningsbara batterier får endast laddas
under uppsikt av vuxen person.
• Laddningsbara batterier måste tas ut ur
artikeln innan de laddas.
• Kopplingsplintarna får ej kortslutas.
• Skadade eller läckande batterier hanteras
ytterst varsamt. Säkerställ en föreskriftsenlig
avfallshantering.
• Kommer du i kontakt med batterisyra, måste
drabbade ställen tvättas med tvål och vatten.
Får du batterisyra i ögat, måste det spolas
med vatten. Uppsök läkare omgående.
SE
15
Page 16

Isättning av batterier
OBS! Beakta följande anvisningar, för
att undvika mekaniska och elektriska
skador.
Fara!
• Ta aldrig i utgångna batterier utan
motsvarande skydd!
• Utgångna batterier får aldrig komma i kontakt
med ögon eller mun. I sådana fall måste
läkare uppsökas omedelbart.
Försämras kvaliteten på displayen, måste batteriet bytas ut mot ett nytt (knappcell) LR44.
1. Vrid batterifackets lock motsols och vänd på
det för att ta av locket.
2. Slå räkneverket lätt mot handflatan. Batteriet
faller ut ur facket.
3. Lägg i ett nytt batteri. Beakta rätt polaritet.
Pluspolen pekar mot locket.
4. Sätt fast locket och stäng det genom att vrida
medsols.
Efter träningen
• Lossa linlåsen från hopprepet på båda
sidorna.
• Lossa skruvarna på handtagens ändar.
• Dra ut repet ur handtagen.
• Rulla ihop repet och förvara alla setets
beståndsdelar i väskan.
Skötsel och förvaring
Förvara artikeln utom räckhåll för barn. Rulla
ihop repen när de inte används. Häng aldrig
upp repen på en krok eller liknande och vik
dem inte. Detta kan förorsaka bestående
deformationer på repen.
Rengör hopprep-setet regelbundet, helst efter
varje användning. För rengöring använd en
fuktig duk och ett lämpligt rengöringsmedel.
Använd aldrig aggressiva rengörings- eller
lösningsmedel. Torka därefter setet med en torr
duk. Förvara setet på en torr plats med
rumstemperatur.
Information om
avfallshantering
Lämna produkten och alla tillhörande komponenter till ett auktoriserat företag i branschen
eller på den kommunala avfallsanläggningen.
Beakta de aktuellt gällande föreskrifterna. Vid
behov inhämta information om miljövänlig avfallshantering på din lokala avfallsanläggning.
Avfallshantering av
batterier
Batterier får inte kastas i hushållsavfallet!
Återlämning till motsvarande återvin-
ningsstationer eller hos den återförsäljare
som sålt dem.
Batterier har markerats med en genomstruken
soptunna samt med den kemiska symbolen för
skadeämnet, nämligen „Cd“ för kadmium, „Hg“
för kvicksilver och „Pb“ för bly.
16
SE
Page 17

3 års garanti
Produkten är producerad med stor noggrannhet
och under ständig kontroll. Du får tre års garanti
på produkten från och med köpdatumet.
Spara ditt kassakvitto. Garantin gäller endast
för material- och fabrikationsfel och upphör
att gälla vid felaktig eller icke ändamålsenlig
användning. Dina lagliga rättigheter, i synnerhet
garantirätter, begränsas ej av denna garantin.
Vid eventuella reklamationer, vänd dig till nedanstående service-hotline eller maila oss. Våra
servicemedarbetare kommer att i samråd med
dig fastlägga den fortsatta handläggningen.
Du erhåller alltid en personlig konsultation.
Garantitiden förlängs ej på grund av reparationer som utförts på grund av garanti, lagstadgad
garanti eller kulans. Detta gäller även för utbytta
och reparerade delar. Reparationer som måste
utföras efter garantins utgång är kostnadspliktiga.
IAN: 93591
Service Sverige
Tel.: 0770 930739
E-Mail: deltasport@lidl.se
Service Suomi
Tel.: 010309 3582
E-Mail: deltasport@lidl.fi
Reservdelar till din produkt hittar du dessutom på:
www.delta-sport.com, under rubriken service - Reservdelsservice Lidl
SE
17
Page 18

Tillykke!
Med dit køb har du valgt et kvalitetsprodukt.
Gør dig fortrolig med produktet inden den første
ibrugtagning. Læs i denne forbindelse opmærksom den efterfølgende brugsvejledning. Brug
kun produktet som beskrevet og til de oplyste
formål. Gem denne vejledning godt. Hvis du
giver produktet videre til tredje, giv ligeledes alle
bilag med.
Følger med leveringen
(afbildning A)
2 x håndgreb (1)
1 x sjippetov (2)
2 x tovklemme (3)
2 x 50 g grebsvægt (4)
2 x 100 g grebsvægt (5)
1 x countdown-tæller (6)
1 x batteri (7)
1 x bære-etui (8)
1 x brugervejledning
Tekniske data
Energiforsyning: a
Mål: ca. Ø 5,0 mm x L 300 cm
Indstillelig træningstid: 1 – 60 minutter
Formålsbestemt anvendelse
Denne artikel er udelukkende egnet som sjippetov. Til enhver anden anvendelse, f.eks som
bugserings- eller trækketov samt til nedfiring er
det ikke tilladt.
Sikkerhedshenvisninger
• Anvend apparatet udelukkende til dets
formålsbestemte anvendelse.
• Dette apparat er ikke legetøj for småbørn;
opbevar det utilgængeligt for småbørn. Lad
børn kun bruge apparatet når de er under
opsyn. Børn kan blive viklet ind i tovet og
snuble eller blive kvalt.
• For at forebygge en sundhedsskade eller
minimere bestående risici, så afstem inden
med Deres læge inden De påbegynder fit
nesstræningen. Dette gælder især ved
indskrænkninger som f.eks. indbygget
hjerte-pacemaker eller ved graviditet.
• Afslut træningen omgående, når De føler tegn
på ildebefindende, brystsmerter eller andre
symptomer af ubehag, som svimmelfølelse
eller åndenød. Opsøg så omgående en læge.
• Til en sikker træning har De brug for
tilstrækkelig plads. Udfør øvelser med so
meget plads til genstande og andre personer,
så ikke nogen kan blive skadet.
• Træn kun på en flad og rutsjefast undergrund.
• Anvend artiklen ikke i nærheden af trapper
eller afsatser.
• Uhensigtsmæssig og for meget træning kan
udsætte Deres helbred for fare.
• Rul tovene op, når De ikke bruger dem. Hæng
tovene aldrig op på en hage eller lignende.
• Gør grebene kun tungere med de i sættet
medfølgende vægte.
Advarsel mod tingskader
• Anvend ingen vold i omgang med
apparaterne.
• Smid dem ikke på gulvet.
• Udsæt apparatet hverken for varme eller ild.
Generelle
træningshenvisninger
• Tag Dem nok tid og planlæg absolut en
opvarmnings- og afslapningsfase.
• Begynd med lette øvelser og øg Deres træning
langsomt.
• Træn ikke lige direkte efter måltider, ved syg
dom, ubehag, træthed eller andre indikatorer,
som kan have indflydelse på Deres træning.
18
DK
Page 19

Montage
• Tag begge håndgreb (1) og sjippetovet (2)
ud af bære-etuiet (8).
• Skruen ved enden af grebene foroven løsnes
(afbildning B).
• Før tovet som afbildet ind i grebene
(afbildning C).
• Vigtigt! Når De anbringer tovet, så skal
tovenden altid sidde til venstre i grebet
(afbildning C).
• Drej skruen fast ved grebets ende, så tovet
også sidder fast ved træk.
• Fastgør tovklemmerne (3) hver især omkring
tovstrengene, så tovenden sidder fast.
Den rigtige tovlængde
• Kontrollér om tovet har den optimale længde
for Dem. Dette er opnået, når begge tovender
(inkl. greb) går fra fødderne til omkring midten
af brystkassen (afbildning F).
• Skulle tovet endnu ikke have den optimale
længde for Dem, så korrigér længden.
• Til forkortelse af sjippetovet skal De løsne
skruerne ved enden foroven ved grebene.
Fjern tovet fra holderen og forlæng
tovenderne, som rager ud over grebene. Til
forlængelsen forkorter De tovenderne.
• Henvisning! Vær opmærksom på, at
tovklemmerne er lige langt væk fra grebene,
for at kunne garantere en jævn svingende
bevægelse.
Ilægning af grebsvægte
• Til sjippetov-sættet hører der hver især 2
grebsvægte á 50 g (4) henholdsvis 100 g (5).
• De kan træne uden ekstra vægte eller med
50, henholdsvis 100 g, på hvert greb.
Henvisning: Når De vil træne med ekstra
vægte, så vær opmærksom på, at begge greb
har lige tunge vægte.
1. Skru endekapperne fra grebet forneden af
(afbildning D).
2. I givet fald fjerner De de ilagte vægte og
bytter disse med lettere, henholdsvis tungere
vægte. I begge greb skal altid den samme
vægt være lagt i.
3. Skru endekapperne på grebene igen.
Kontrollér at endekapperne er skruet fast på.
Countdown-tæller
Indstilling af countdown-tælleren
Med countdown-tælleren (6) kan De indstille
træningstiden fra 1 til maksimal 60 minutter. Når
den indstillede træningstid er udløbet, så hører
De en signaltone.
1. For at starte tælleren trykker De så længe
på den orange taste, indtil ciffre dukker op på
displayet.
2. Hold tasten trykket i nogle sekunder for at
starte countdownen.
3. Når den indstillede træningstid er udløbet, så
hører De en signaltone.
4. For at forlænge træningstiden, så skal De kun
holde tasten kort trykket. De kan indstille
tælleren til en træningstid på op til 60 minutter.
Slukkeautomatik: efter 8 minutter slukker apparatet sig selv, for at skåne batteriet (7).
Anbringelse af countdown-tælleren
Se afbildning E.
Advarsel batterier
• Brug kun batterier fra samme producent og
samme type.
• Fjern batteriet, når dette er op brugt eller
produktet ikke er i brug i længere tid.
• Advarsel! Batterier må ikke oplades eller
reaktiveres med andre midler, ikke skilles ad,
smides i ild eller kortsluttes.
• Opbevar batterier altid udenfor børns
rækkevidde.
• Ikkegenopladelige batterier må ikke oplades.
• Genopladelige batterier må kun oplades
under opsyn af voksne.
• Genopladelige batterier skal tages ud af
artiklen inden de lades.
• Tilslutningsklemmerne må ikke kortsluttes.
• Håndtér et beskadiget eller udløbet batteri
forsigtigt og bortskaf dette omgående iht.
forskrifterne.
• Når De kommer i berøring med batterisyre,
så vask det berørte sted med vand og sæbe.
Kommer der batterisyre i Deres øje, så skyl
dette med vand og opsøg omgående læge.
DK
19
Page 20

Erstatning af batteri
ADVARSEL! Overhold de følgende
anvisninger, for at undgå mekaniske og
elektriske beskadigelser.
Fare!
• Rør aldrig ved batterier, som er udløbet, uden
tilsvarende beskyttelse!
• Udløbne batterier må aldrig komme i berøring
med øjne eller mund. Opsøg i sådan et
tilfælde venligst omgående en læge.
Når visnings-kvaliteten formindskes, så byt batteriet ud mod et nyt batteri (knapcelle) LR44.
1. Batterirumlåg drejes mod urets retning og
vendes, så De kan tage låget af.
2. Tæller slås let mod håndfladen. Batteriet
falder ud af rummet.
3. Nyt batteri lægges i. Vær opmærksom på den
rigtige polaritet. Pluspolen peger mod låget.
4. Låg sættes i og drejes i i urets retning.
Efter træningen
• På hver side af sjippetovet løsnes
tovklemmerne.
• Skruerne ved grebsenderne løsnes.
• Tovet trækkes ud af grebene.
• Rul tovet op og stuv alle sættets dele i tasken.
Pleje og opbevaring
Opbevar artiklen utilgængeligt for børn. Rul
tovene op, når De ikke brugerdem. Hæng
tovene aldrig op på en hage eller lignende og
knæk tovene ikke af. Dette kan medføre en varig
deformering af tovene.
Rengør sjippetov-sættet regelmæssigt; allebedst
efter hver benyttelse. Brug til rengøring en fugtig
klud og et egnet rengøringsmiddel. Brug aldrig
aggressive rengørings- eller opløsningsmidler
til rengøring. Tør efterfølgende sættet af med
en tør klud. Opbevar sættet på et tørt sted ved
rumtemperatur.
Henvisningerne til
bortskaffelse
Bortskaf produktet og alle tilhørende komponenter via en godkendt renovationsvirkomhed eller
via Deres kommunale renovationsvirksomhed.
Overhold de aktuelt gældende forskrifter. Informér Dem i tvivlstilfælde hos Deres renovationsvirksomhed omkring en miljøvenlig bortskaffelse.
Forholdsregler til
bortskaffelse af batterier
Batterier må ikke komme i husholdningsaffaldet! Tilbagelevering hos tilsvarende
opsamlingssteder eller hos forhandler,
som har solgt dem.
Batterier har mærkningen med en gennemkrydset affaldsspand samt det kemiske symbol for
skadestoffet, nemlig „Cd“ for cadmium, „Hg“ for
kviksølv og „Pb“ for bly.
20 DK
Page 21

3 års garanti
Produktet er fremstillet med største omhu og
under vedvarende kontrol. Der ydes en garanti
på tre år fra købsdatoen på dette produkt.
Opbevar venligst kvitteringen fra købet.
Garantien gælder kun for materiale- og
fabrikationsfejl og bortfalder ved misbrug eller
uhensigtsmæssig anvendelse. Deres lovpligtige
rettigheder, særligt garantikrav, begrænses ikke
af denne garanti.
Ved eventuelle klager bedes du henvende
dig til nedenstående service-hotline eller tage
kontakt til os via e-mail. Medarbejderne i vores
kundetjeneste vil så aftale den videre fremgangsmåde med dig. Vi vil under alle omstændigheder
rådgive dig personlig.
Garantiperioden forlænges ikke ved eventuelle reparationer inden for garantien eller ved
kulance. Dette gælder også for udskiftede
og reparerede dele. Efter udløb af garantien
er forefaldende reparationer forbundet med
omkostninger.
IAN: 93591
Service Danmark
Tel.: 32 710005
E-Mail: deltasport@lidl.dk
Reservedele til deres produkt finder De også under:
www.delta-sport.com, rubrik service - reservedelservice Lidl
21DK
Page 22

Félicitations !
Vous avez acquéri un produit de haute qualité.
Apprenez à connaître le produit avant sa première utilisation. Lisez pour cela attentivement le
mode d’emploi suivant. N’utilisez le produit que
comme décrit et pour les zones d’application
indiquées. Veuillez conserver ce mode d’emploi.
Transmettez tous les documents en cas de cessation du produit à une tierce personne.
Contenu de la livraison
(Fig. A)
2 x poignées (1)
1 x corde à sauter (2)
2 x serre-câbles (3)
2 x 50 g lest de poignée (4)
2 x 100 g lest de poignée (5)
1 x compte à rebours (6)
1 x pile (7)
1 x étui de transport (8)
1 x notice d’utilisation
Fiche technique
Approvisionnement en énergie : a
Cotes : ~∅Dimensions :
env. Ø 5,0 mm x L 300 cm
Temps d‘entraînement réglable : 1 – 60 minutes
Usage prévu
Cet article convient exclusivement pour un usage
en tant que corde à sauter. Il n’est pas autorisé
pour toute autre utilisation, notamment comme
câble de remorquage, câble de traction, ou
corde d‘escalade.
Consignes de sécurité
• Ne détournez pas l’appareil de son usage
initial.
• Cet appareil n’est pas un jouet pour enfants
en bas âge. Tenez-le donc hors de portée
des petits enfants. Ne laissez les enfants utiliser
l’appareil que sous surveillance. Les enfants
peuvent s’emmêler dans la corde, trébucher
ou s’étrangler.
• Pour prévenir tout effet néfaste sur la santé
ou réduire les risques existants, consultez votre
médecin traitant avant de commencer votre
entraînement fitness. Ceci vaut particulièrement
pour les personnes portant un stimulateur
cardiaque ou pour les femmes enceintes.
• Stoppez immédiatement votre entraînement si
vous ressentez les symptômes suivants :
nausées, douleurs dans la poitrine, ou autres
symptômes de malaise tels que vertiges,
suffocation. Consultez dans ce cas et sans
tarder un médecin.
• Pour un entraînement sécurisé, vous aurez
besoin de suffisamment de place. Prévoyez
pour vos exercices suffisamment d‘espace
entre vous et les objets et les autres personnes
présentes de manière à éviter toute blessure.
• Ne vous entraînez que sur un sol plat et
antidérapant.
• Abstenez-vous d’utiliser cet appareil à
proximité d‘escaliers ou de marches.
• Un entraînement inadapté ou excessif peut
mettre votre santé en danger.
• Enroulez la corde lorsque vous ne l’utilisez
pas. Ne l’accrochez jamais à un crochet ou à
toute pièce similaire.
• Lestez les poignées uniquement avec les poids
contenus dans le kit livré.
Attention aux dégâts matériels
•Evitez tout geste violent avec l’appareil.
• Ne le jetez pas au sol.
• Ne l’exposez ni à la chaleur ni au feu.
Recommandations générales
• Accordez-vous suffisamment de temps et
prévoyez toujours une phase d’échauffement
et de récupération.
• Commencez par des exercices faciles et
intensifiez lentement votre entraînement.
• Ne vous entraînez pas juste après les repas,
quand vous êtes malade, en cas de malaise,
de fatigue ou d’autres alertes que votre
entraînement pourrait aggraver.
22 FR/BE
Page 23

Montage
• Sortez les deux poignées (1) et la corde à
sauter (2) de l‘étui de transport (8).
• Dévissez la partie supérieure de la poignée
(Fig. B).
• Introduisez la corde dans la poignée comme
le montre l‘illustration (Fig. C).
• Important ! Lorsque vous mettez la corde en
place, l‘extrémité de corde doit toujours être
placée à gauche dans la poignée (Fig. C).
• Serrez bien la vis au bout de la poignée pour
que la corde reste bien en place même
tendue.
• Fixez les serre-câbles (3) autour des brins de
la corde pour que l’extrémité de la corde soit
bien maintenue.
Longueur de corde recommandée
• Contrôlez si la longueur de la corde est celle
qui vous convient. Tel est le cas lorsque les
deux extrémités (poignées comprises) vont des
pieds jusqu’au milieu du torse environ (Fig. F).
• Si vous estimez que la corde n’a pas encore la
longueur idéale, corrigez la longueur.
• Pour raccourcir la corde à sauter, desserrez
les vis sur l‘extrémité supérieure des poignées.
Retirez la corde du support et rallongez les
extrémités de corde dépassant des poignées.
Raccourcissez les extrémités de corde afin de
la rallonger.
• Attention ! Veillez d‘emblée à ce que les
serre-câbles soient éloignés des poignées afin
d‘assurer un mouvement régulier.
Pose des lests sur les poignées
• Le kit de corde à sauter contient 2 poids de
50 g (4) et 100 g (5) pour les poignées.
• Vous pouvez vous entraîner sans poids
supplémentaires ou avec des poids de 50 ou
100 g par poignée.
Conseil : si vous souhaitez vous entraîner avec
des poids supplémentaires, veillez à ce que les
deux poignées soient lestées du même poids.
1. Dévissez les embouts de la partie inférieure
des poignées (Fig. D).
2. Le cas échéant, enlevez les poids déjà en
place pour les remplacer par des plus légers
ou des plus lourds. Les deux poignées
doivent être lestées du même poids.
3. Revissez les embouts sur les poignées.
Assurez-vous que les embouts soient
fermement vissés
Compte à rebours
Réglage du compte à rebours
Le compte à rebours (6) vous permet de
programmer une durée d’entraînement de
1 à 60 minutes maximum. Lorsque la durée
d’entraînement est écoulée, un signal sonore est
émis.
1. Pour démarrer le compte à rebours, tenez
la touche orange appuyée jusqu’à ce que
des chiffres s‘affichent à l‘écran.
2. Tenez la touche appuyée quelques secondes
pour démarrer le compte à rebours.
3. Lorsque la durée prévue pour l‘entraînement
est écoulée, un signal sonore est émis.
4. Pour prolonger le temps d’entraînement,
tenez la touche appuyée brièvement. Vous
pouvez régler le compteur jusqu’à 60
minutes.
Arrêt automatique : Au bout de 8 minutes,
l’appareil s’arrête automatiquement pour économiser la pile (7).
Installation du compte à rebours
Voir Figure E.
Précautions concernant
les piles
• N’utilisez que des piles du même fabricant et
du même type.
• Ôtez la pile quand elle est usagée ou quand
elle n’a pas été utilisée pendant longtemps.
• Attention ! Les piles ne doivent pas être
chargées ou réactivées par d’autres moyens ;
elles ne doivent pas être démontées, jetées au
feu ou court-circuitées.
• Tenez les piles hors de portée des enfants.
• Ne rechargez pas des piles non
rechargeables.
• Ne rechargez des piles rechargeables qu’en
présence d’un adulte.
• Les piles rechargeables doivent être retirées
de l’appareil avant d’être chargées.
• Ne court-circuitez pas les bornes de
connexion.
23FR/BE
Page 24

• Soyez très prudents avec une pile
endommagée ou usagée et éliminez-la très
rapidement en suivant les consignes.
• Si vous entrez en contact avec l’acide de la
pile, lavez l’endroit touché à l’eau et au savon.
Si vous avez de l’acide dans l’œil, lavez-vous
l’œil à l’eau et consultez sans tarder un
médecin.
Remplacement de la pile
ATTENTION ! Suivez les consignes suivantes pour éviter des dégâts mécaniques ou électriques.
Danger !
• Ne touchez jamais les piles qui ont fuite sans
une protection correspondante !
• Les piles qui ont fuite ne doivent jamais entrer
en contact avec les yeux ou la bouche. Si tel
était le cas, consultez immédiatement un
médecin.
Si la qualité d‘affichage s‘affaiblit, échangez
cette pile contre une nouvelle (type bouton)
LR44.
1. Tournez le couvercle du compartiment à pile
dans le sens inverse des aiguilles d’une
montre et retournez le pour le retirer.
2. Donnez un léger coup au compteur avec la
main. La pile tombe de son compartiment.
3. Mettez une nouvelle pile. Veillez à respecter
la polarité. Le positif va dans le sens du
couvercle.
4. Repositionnez le couvercle et refermez le en
tournant dans le sens des aiguilles d’une
montre.
Après l‘entraînement
• Détachez les serre-câbles des deux côtés de la
corde à sauter.
• Desserrez les vis aux extrémités des poignées.
• Retirez la corde des poignées.
• Enroulez la corde et rangez tous les éléments
du kit dans l‘étui.
Entretien et conservation
Rangez le produit hors de portée des enfants.
Enroulez la corde quand vous ne l’utilisez pas.
Ne l’accrochez jamais à un crochet ou à toute
pièce similaire. Ne pliez pas la corde : vous
pourriez la déformer durablement. Nettoyez
régulièrement le kit de corde à sauter, idéalement après chaque utilisation. Utilisez pour le
nettoyage un chiffon humide et un produit de
nettoyage approprié. N’utilisez jamais de détergents ou solvants agressifs. Séchez le kit avec un
chiffon sec. Conservez le kit dans un endroit sec
à température ambiante.
Précisions concernant
l‘élimination
Eliminez le produit et tous ses composants via
une entreprise d’élimination agréée ou un point
de collecte communal. Respectez les réglementations en vigueur. En cas de doute, renseignezvous auprès de votre point de collecte pour que
cette élimination s‘effectue dans le respect de
l’environnement.
Mesures d’élimination
des piles
Ne jetez jamais les piles avec les ordures
ménagères ! Remettez-les aux points de
collecte correspondants ou retournez-les
au détaillant qui vous les a vendues.
Sur les piles figurent un symbole représentant
une poubelle barrée et le symbole chimique de
l’élément nocif : Cd, pour le cadmium, Hg, pour
le mercure, et Pb, pour le plomb.
24 FR/BE
Page 25

3 ans de garantie
Le produit a été fabriqué avec le plus grand soin
et sous un contrôle permanent. Vous avez sur ce
produit une garantie de trois ans à partir de la
date d’achat. Conservez le ticket de caisse.
La garantie est uniquement valable pour les
défauts de matériaux et de fabrication, elle perd
sa validité en cas de maniement incorrect ou non
conforme. Vos droits légaux, tout particulièrement les droits relatifs à la garantie, ne sont pas
limitées par cette garantie. En cas d‘éventuelles
réclamations, veuillez vous adresser à la hotline de garantie indiquée ci-dessous ou nous
contacter par e-mail. Nos employés du service
client vous indiqueront la marche à suivre le plus
rapidement possible. Nous vous renseignerons
personnellement dans tous les cas.
La période de garantie n‘est pas prolongée par
d’éventuelles réparations sous la garantie, les
garanties implicites ou le remboursement.
Ceci s‘applique également aux pièces remplacées et réparées. Les réparations nécessaires
sont à la charge de l’acheteur à la fin de la
période de garantie.
IAN : 93591
Service France
Tel. : 0800 919270
E-Mail : deltasport@lidl.fr
Service Belgique
Tel. : 070 270 171 (0,15 EUR/Min.)
E-Mail : deltasport@lidl.be
Veuillez trouver les pièces de rechange pour votre produit sur :
www.delta-sport.com, rubrique Service - Service des pièces de
rechange Lidl
25FR/BE
Page 26

Hartelijk gefeliciteerd!
Met de aankoop hebt u gekozen voor een
hoogwaardig product. Maak u daarom voor
de eerste ingebruikname vertrouwd met het
product. Lees hiervoor deze gebruiksaanwijzing
aandachtig door. Gebruik het product alleen
zoals beschreven en uitsluitend voor de aangegeven doeleinden. Bewaar de handleiding
zorgvuldig. Als u het product aan derden geeft,
dient u ook deze documenten te overhandigen.
Omvang van de levering
(afb. A)
2 x handvat (1)
1 x springtouw (2)
2 x touwklem (3)
2 x handvat met 50 g gewicht (4)
2 x handvat met 100 g gewicht (5)
1 x countdown-teller (6)
1 x batterij (7)
1 x draagetui (8)
1 x gebruiksaanwijzing
Technische gegevens
Energievoorziening: a
Afmetingen: ca. Ø 5,0 mm x L 300 cm
Instelbare trainingstijd: 1 – 60 minuten
Doelmatig gebruik
Dit product is uitsluitend bestemd als springtouw.
Voor ieder ander gebruik, bijv. als sleepkabel
of trekkabel alsook voor het afdalen, is het niet
toegelaten.
Veiligheidsinstructies
• Gebruik het product alleen voor zijn
gebruiksdoeleinde.
• Dit artikel is geen speelgoed voor kleine
kinderen; bewaar het buiten bereik van kleine
kinderen. Laat kinderen het product alleen
onder toezicht gebruiken. Kinderen kunnen
zich verstrikken in het touw en hierdoor
struikelen of zichzelf wurgen.
• Om schade aan de gezondheid te voorkomen
of bestaande risico‘s te minimaliseren, dient
u voor het begin van uw fitnesstraining eerst
met uw arts te praten. Dit geldt in het
bijzonder bij problemen zoals bijv. het dragen
van een pacemaker, of tijdens de
zwangerschap.
• Stop direct met trainen, als u tekenen van
misselijkheid, pijn op de borst of andere
symptomen van ongesteldheid, zoals een
gevoel van duizeligheid of kortademigheid,
bemerkt. Raadpleeg in dat geval direct een
arts.
• Voor een veilige training hebt u voldoende
plaats nodig. Voer de oefeningen met
voldoende afstand tot voorwerpen en andere
personen uit, zodat niemand gewond kan
raken.
• Train alleen op een vlakke en slipvaste
ondergrond.
• Gebruik het artikel niet in de buurt van
trappen of verhogingen.
• Onjuiste of overmatige training kan uw
gezondheid in gevaar brengen.
• Rol het touw op als u het niet gebruikt. Hang
het touw nooit aan een haak of iets dergelijks
op.
• Bezwaar de handvatten alleen met de in het
set inbegrepen gewichten.
Weer voorzichtig voor materiële
schade
• Gebruik geen geweld in de omgang met het
artikel.
• Gooi het niet op de vloer.
• Stel het artikel noch bloot aan hitte, noch aan
vuur.
Algemene trainingsinstructies
• Neem voldoende tijd en plan per sé een
warming up- en cooling down-fase in.
• Begin met eenvoudige oefeningen en
intensiveer uw training geleidelijk.
• Train niet direct na maaltijden, in geval van
ziekte, als u zich niet lekker voelt, vermoeid
bent of andere indicatoren, die door het
trainen kunnen worden beïnvloed.
26 NL/BE
Page 27

Montage
• Haal beide handvatten (1) en het springtouw
(2) uit het draagetui (8).
• Maak de schroef aan het bovenste uiteinde
van de handvatten los (afb. B).
• Steek het touw zoals weergegeven in de
handvatten (afb. C).
• Belangrijk! Als u het touw monteert, moet het
uiteinde van het touw altijd links in het handvat
zitten (afb. C).
• Draai de schroef aan het uiteinde van het
handvat vast, zodat het touw ook onder
spanning vast zit.
• Bevestig de touwklemmen (3) telkens om het
hele touw, zodat het uiteinde van het touw vast
zit.
De juiste lengte van het touw
• Controleer of het touw de optimale lengte
heeft voor u. Dit is het geval, als beide
uiteinden van het touw (incl. handvatten) van
de voeten tot ongeveer het midden van de
borst gaan (afb. F).
• Mocht het touw nog niet de optimale lengte
voor u hebben, dient u de lengte opnieuw in te
stellen.
• Om het touw korter te maken, dient u de
schroeven aan het bovenste uiteinde van de
handvatten los te maken. Verwijder het touw
uit de bevestiging en verleng de uiteinden van
het touw, die uit de handvatten uitsteken. Om
het touw te verlengen, verkort u het uiteinde
van het touw.
• Opmerking! Let erop, dat de touwklemmen op
dezelfde afstand van de handvatten zitten, om
een gelijkmatige zwier te waarborgen.
Plaatsen van de gewichten van de
handvatten
• Bij het sprintouwset horen 2 gewichten voor
de handvatten van 50 g (4) c.q. 100 g (5).
• U kunt zonder extra gewichten trainen of met
50, c.q. 100 g per handvat.
Opmerking: Als u met extra gewichten wilt
trainen, dient u erop te letten, dat beide handvatten hetzelfde gewicht hebben.
1. Schroef de doppen af van het onderste
uiteinde van de handvatten (afb. D).
2. Indien nodig haalt u de geplaatste
gewichten eruit en vervangt u deze door
lichtere, c.q. zwaardere gewichten. U moet
altijd hetzelfde gewicht in ieder handvat
plaatsen.
3. Schroef de doppen weer op de handvatten.
Zorg ervoor, dat de doppen stevig worden
vastgeschroefd.
Countdown-teller
Instellen van de countdown-teller
Met de countdown-teller (6) kunt u een trainingsduur van 1 tot maximaal 60 minuten instellen.
Als de ingestelde trainingsduur is afgelopen,
hoort u een geluid.
1. Voor het starten van de tellen drukt u zo lang
op de oranje knop, totdat cijfers op het
display verschijnen.
2. Houd de knop gedurende enkele seconden
ingedrukt, om de countdown te starten.
3. Als de ingestelde trainingsduur is afgelopen,
hoort u een geluid.
4. Om de trainingstijd te verlengen, houdt u
de knop slechts kort ingedrukt. U kunt de teller
op een trainingstijd van maximaal 60 minuten
instellen.
Automatische uitschakeling: Na 8 minuten schakelt het apparaat zelfstandig uit, om de batterij
(7) te ontzien.
Bevestigen van de countdown-teller
Zie afb. E.
Waarschuwingsinstructies
batterijen
• Gebruik uitsluitend batterijen van dezelfde
fabrikant en hetzelfde type.
• Verwijder de batterij, als deze ontladen is of
als het product gedurende een langere
periode niet wordt gebruikt.
• Waarschuwing! Batterijen mogen niet worden
opgeladen of op een andere manier
gereactiveerd worden, niet gedemonteerd, in
het vuur geworpen of kortgesloten worden.
• Bewaar de batterijen altijd buiten het bereik
van kinderen.
• Niet-oplaadbare batterijen mogen niet worden
opgeladen.
27NL/BE
Page 28

• Oplaadbare batterijen mogen alleen onder
toezicht van een volwassene worden geladen.
• Oplaadbare batterijen dienen uit het artikel
gehaald te worden, voordat ze worden
opgeladen.
• De aansluitpolen mogen niet kortgesloten
worden.
• Ga uiterst voorzichtig om met een
beschadigde of lekkende batterij en verwijder
deze direct op een correcte manier.
• Als u met batterijzuur in contact komt, dient u
de desbetreffende plek direct met water en
zeep afgewassen te worden. Als u batterijzuur
in de ogen krijgt, dient u dit met water uit te
spoelen en direct een arts te consulteren.
Batterij vervangen
ATTENTIE! Neem de volgende instructies
in acht, om mechanische en elektrische
beschadigingen te voorkomen.
Gevaar!
• Raak batterijen, die hebben gelekt,
nooit zonder correcte bescherming aan!
• Lekkende batterijen mogen nooit in contact
komen met ogen of mond. In een dergelijk
geval dient u direct een arts te consulteren.
Als de kwaliteit van de weergave verslechtert,
dient u de batterij door een nieuwe batterij (knoopcelbatterij) van het type LR44 te vervangen.
1. Draai het batterijvakdeksel tegen de klok in
en om, zodat u het deksel kunt verwijderen.
2. Teller zachtjes tegen uw handpalm slaan.
De batterij valt uit het vak.
3. Plaats de nieuwe batterij. Let op de juiste
polariteit. De pluspool wijst in richting van het
deksel.
4. Deksel terug plaatsen en met de klok mee
dicht draaien.
• Trek het touw uit de handvatten.
• Rol het touw op en berg het samen met de
andere onderdelen van het set op in de tas.
Verzorging en opbergen
Bewaar het artikel buiten het bereik van kinderen. Rol het touw op als u het niet gebruikt.
Hang het touw nooit aan een haak of iets dergelijks op en knik het touw niet. Dit kan blijvende
vervormingen van het touw veroorzaken.
Reinig het springtouwset regelmatig, het beste
na ieder gebruik. Gebruik voor het reinigen een
vochtige doek en een geschikt reinigingsmiddel.
Gebruik voor de reiniging nooit agressieve
reinigings- op oplosmiddelen. Droog het set
vervolgens met een droog doek af. Bewaar het
set op een droge plek op kamertemperatuur.
Opmerking met betrekking
tot de verwijdering
Verwijder het product en alle bijbehorende
componenten via een gecertificeerd afvalverwijderingsbedrijf of via uw gemeentelijke afvalverwijderaar. Houd hierbij rekening met de actueel
geldende voorschriften. Informeer u indien nodig
bij uw afvalverwijderaar voor de milieuvriendelijke verwijdering.
Verwijdering van de
batterijen
Batterijen mogen niet bij het huisvuil!
Geef de batterijen af bij een desbetref-
fend verzamelpunt of bij de winkel, waar
u ze hebt gekocht.
Batterijen zijn voorzien van een doorgestreepte
vuilnisbak alsook de chemische symbolen van
schadelijke stoffen, namelijk „Cd“ voor cadmium, „Hg“ voor kwik en „Pb“ voor lood.
Na de training
• Maak de touwklemmen aan iedere kant van
het springtouw los.
• Maak de schroeven aan het uiteinde van de
handvatten los.
28 NL/BE
Page 29

3 jaar garantie
Het product is geproduceerd met grote zorg en
onder voortdurende controle. U ontvangt een
garantie van drie jaar op dit product, vanaf de
datum van aankoop. Bewaar alstublieft uw aankoopbewijs. De garantie geldt alleen voor materiaal- en fabricagefouten en vervalt bij foutief of
oneigenlijk gebruik. Uw wettelijke rechten, met
name het garantierecht, worden niet beïnvloed
door deze garantie. In geval van reclamaties
dient u zich aan de beneden genoemde servicehotline te wenden of zich per e-mail met ons in
verbinding te zetten.
Onze servicemedewerkers zullen de verdere
handelswijze zo snel mogelijk met u afspreken.
Wij zullen u in ieder geval persoonlijk te woord
staan. De garantieperiode wordt na eventuele
reparaties en op basis van de garantie, wettelijke garantie of coulance niet verlengd. Dit geldt
ook voor vervangen en gerepareerde delen.
Na afloop van de garantieperiode dienen eventuele reparaties te worden betaald.
IAN: 93591
Service België
Tel.: 070 270 171 (0,15 EUR/Min.)
E-Mail: deltasport@lidl.be
Reserve-onderdelen voor uw product vindt u ook via:
www.delta-sport.com, rubriek Service - reserve-onderdelenservice Lidl
NL/BE
29
Page 30

Herzlichen Glückwunsch!
Mit Ihrem Kauf haben Sie sich für ein hochwertiges Produkt entschieden. Machen Sie sich vor
der ersten Verwendung mit dem Produkt vertraut.
Lesen Sie hierzu aufmerksam die nachfolgende
Bedienungsanleitung. Benutzen Sie das Produkt
nur wie beschrieben und für die angegebenen
Einsatzbereiche. Bewahren Sie diese Anleitung
gut auf. Händigen Sie alle Unterlagen bei Weitergabe des Produkts an Dritte ebenfalls mit aus.
Lieferumfang (Abb. A)
2 x Handgriff (1)
1 x Springseil (2)
2 x Seilklemme (3)
2 x 50 g Griffgewicht (4)
2 x 100 g Griffgewicht (5)
1 x Countdown-Zähler (6)
1 x Batterie (7)
1 x Trage-Etui (8)
1 x Bedienungsanleitung
Technische Daten
Energieversorgung: a
Maße: ca. Ø 5,0 mm x L 300 cm
Einstellbare Trainingszeit: 1 – 60 Minuten
Bestimmungsgemäße
Verwendung
Dieser Artikel ist ausschließlich als Springseil
geeignet. Für jede andere Nutzung, z.B. als
Abschlepp- oder Zugseil sowie zum Abseilen, ist
es nicht zugelassen.
Sicherheitshinweise
• Verwenden Sie das Gerät ausschließlich für
seinen bestimmungsgemäßen Zweck.
• Dieses Gerät ist kein Spielzeug für Kleinkinder;
bewahren Sie es für Kleinkinder unzugänglich
auf. Lassen Sie Kinder das Gerät nur unter
Aufsicht benutzen. Kinder könnten sich in dem
Seil verfangen und stolpern oder erdrosseln.
• Um einer Gesundheitsschädigung vorzu beugen oder bestehende Risiken zu mini mieren, stimmen Sie sich vor Beginn des
Fitnesstrainings mit Ihrem Arzt ab. Dies gilt
besonders bei Beeinträchtigungen wie z.B.
dem Tragen eines Herzschrittmachers, oder in
der Schwangerschaft.
• Beenden Sie das Training sofort, wenn Sie
Anzeichen von Übelkeit, Brustschmerzen oder
sonstige Symptome von Unwohlsein, wie
Schwindelgefühl oder Atemnot, verspüren.
Suchen Sie dann umgehend einen Arzt auf.
• Für ein sicheres Training benötigen Sie aus reichend Platz. Führen Sie Übungen mit so viel
Platz zu Gegenständen und anderen Personen
durch, dass niemand verletzt werden kann.
• Trainieren Sie nur auf einem flachen und
rutschfesten Untergrund.
• Verwenden Sie den Artikel nicht in der Nähe
von Treppen oder Absätzen.
• Unsachgemäßes und übermäßiges Training
kann Ihre Gesundheit gefährden.
• Rollen Sie die Seile auf, wenn Sie sie nicht be nutzen. Hängen Sie die Seile niemals an
einem Haken oder Ähnlichem auf.
• Beschweren Sie die Griffe nur mit den im Set
enthaltenen Gewichten.
Vorsicht vor Sachschäden
• Wenden Sie keinerlei Gewalt im Umgang mit
dem Gerät an.
• Werfen Sie es nicht zu Boden.
• Setzen Sie das Gerät weder Hitze noch Feuer
aus.
Allgemeine Trainingshinweise
• Nehmen Sie sich genügend Zeit und planen
Sie unbedingt eine Aufwärm- und Erholungs phase ein.
• Beginnen Sie mit leichten Übungen und
steigern Sie Ihr Training langsam.
• Trainieren Sie nicht unmittelbar nach Mahl zeiten, bei Erkrankung, Unwohlsein, Müdigkeit
oder anderen Indikatoren, durch die Ihr Trai ning beeinflusst werden könnte.
30
DE/AT/CH
Page 31

Montage
• Entnehmen Sie beide Handgriffe (1) und das
Springseil (2) aus dem Trage-Etui (8).
• Lösen Sie die Schraube am oberen Ende der
Griffe (Abb. B).
• Führen Sie das Seil wie abgebildet in die
Griffe (Abb. C).
• Wichtig! Wenn Sie das Seil einlegen, muss
das Seilende immer links im Griff sitzen
(Abb. C).
• Drehen Sie die Schraube am Griffende fest,
sodass das Seil auch unter Zug fest sitzt.
• Befestigen Sie die Seilklemmen (3) jeweils um
die Seilstränge, sodass das Seilende fest sitzt.
Die richtige Seillänge
• Prüfen Sie, ob das Seil die für Sie optimale
Länge hat. Dies ist erreicht, wenn beide Seil enden (inkl. Griffen) von den Füßen bis etwa
zu Mitte des Brustkorbs reichen (Abb. F).
• Sollte das Seil noch nicht die für Sie optimale
Länge haben, korrigieren Sie die Länge.
• Zum Verkürzen des Springseils lösen Sie
die Schrauben am oberen Ende der Griffe.
Entfernen Sie das Seil aus der Halterung und
verlängern Sie die Seilenden, die über die
Griffe hinausstehen. Zum Verlängern verkürzen
Sie die Seilenden.
• Hinweis! Achten Sie darauf, dass die Seil klemmen gleich weit von den Griffen entfernt
sind, um einen gleichmäßigen Schwung zu
gewährleisten.
Einlegen von Griffgewichten
• Zum Springseil-Set gehören je 2 Griffgewichte
von 50 g (4) bzw. 100 g (5).
• Sie können ohne Zusatzgewichte trainieren
oder mit 50 bzw. 100 g je Griff.
Hinweis: Wenn Sie mit Zusatzgewichten
trainieren wollen, achten Sie darauf, dass beide
Griffe gleich schwere Gewichte enthalten.
1. Schrauben Sie die Endkappen vom unteren
Griffende ab (Abb. D).
2. Ggf. entnehmen Sie die eingelegten Ge wichte und tauschen diese durch leichtere,
bzw. schwerere Gewichte aus. In beiden
Griffen muss immer das gleiche Gewicht
eingelegt sein.
3. Schrauben Sie die Endkappen wieder auf die
Griffe. Stellen Sie sicher, dass die Endkappen
festgeschraubt sind.
Countdown-Zähler
Einstellen des Countdown-Zählers
Mit dem Countdown-Zähler (6) können Sie eine
Trainingsdauer von 1 bis maximal 60 Minuten
einstellen. Wenn die eingestellte Trainingsdauer
abgelaufen ist, hören Sie einen Signalton.
1. Zum Starten des Zählers drücken Sie so
lange auf die orange Taste, bis Ziffern auf
dem Display erscheinen.
2. Halten Sie die Taste einige Sekunden lang
gedrückt, um den Countdown zu starten.
3. Wenn die eingestellte Trainingsdauer abge laufen ist, hören Sie einen Signalton.
4. Um die Trainingszeit zu verlängern, halten
Sie die Taste nur kurz gedrückt. Sie können
den Zähler auf eine Trainingszeit bis zu 60
Minuten einstellen.
Abschaltautomatik: Nach 8 Minuten stellt sich
das Gerät selbstständig aus, um die Batterie (7)
zu schonen.
Anbringen des Countdown-Zählers
Siehe Abb. E.
Warnhinweise Batterien
• Verwenden Sie nur Batterien vom gleichen
Hersteller und vom gleichen Typ.
• Entfernen Sie die Batterie, wenn diese ver braucht ist oder das Produkt längere Zeit nicht
verwendet wird.
• Warnung! Batterien dürfen nicht geladen oder
mit anderen Mitteln reaktiviert, nicht ausein ander genommen, ins Feuer geworfen oder
kurzgeschlossen werden.
• Bewahren Sie Batterien immer außerhalb der
Reichweite von Kindern auf.
• Nicht wiederaufladbare Batterien dürfen nicht
geladen werden.
• Aufladbare Batterien dürfen nur unter Aufsicht
Erwachsener geladen werden.
• Aufladbare Batterien sind aus dem Artikel
herauszunehmen, bevor sie geladen werden.
• Die Anschlussklemmen dürfen nicht kurzge schlossen werden.
DE/AT/CH
31
Page 32

• Gehen Sie mit einer beschädigten oder aus gelaufenen Batterie äußerst vorsichtig um und
entsorgen Sie diese umgehend vorschrifts mäßig.
• Wenn Sie mit Batteriesäure in Berührung
kommen, waschen Sie die betreffende Stelle
mit Wasser und Seife. Gelangt Batteriesäure
in Ihr Auge, spülen Sie es mit Wasser aus und
begeben Sie sich umgehend in ärztliche Be handlung.
Batterie ersetzen
ACHTUNG! Beachten Sie folgende Anweisungen, um mechanische und elektrische Beschädigungen zu vermeiden.
Gefahr!
• Fassen Sie Batterien, die ausgelaufen sind,
niemals ohne entsprechenden Schutz an!
• Ausgelaufene Batterien dürfen niemals mit
Augen oder Mund in Berührung kommen.
In einem solchen Fall suchen Sie bitte um gehend einen Arzt auf.
Wenn die Anzeige-Qualität nachlässt, tauschen
Sie die Batterie gegen eine neue Batterie (Knopfzelle) LR44 aus.
1. Batteriefachdeckel gegen den Uhrzeigersinn
drehen und umdrehen, sodass Sie den
Deckel abnehmen können.
2. Zähler leicht gegen die Handfläche schla gen. Die Batterie fällt aus dem Fach heraus.
3. Neue Batterie einlegen. Achten Sie auf die
richtige Polarität. Der Pluspol zeigt zum
Deckel.
4. Deckel einsetzen und mit dem Uhrzeigersinn
zudrehen.
Pflege und Aufbewahrung
Bewahren Sie den Artikel für Kinder unzugänglich auf. Rollen Sie die Seile auf, wenn Sie sie
nicht benutzen. Hängen Sie die Seile niemals an
einem Haken oder Ähnlichem auf und knicken
Sie die Seile nicht ab. Dies könnte eine dauerhafte Verformung der Seile nach sich ziehen.
Reinigen Sie das Springseil-Set regelmäßig, am
besten nach jeder Benutzung. Nutzen Sie zur
Reinigung ein feuchtes Tuch und ein geeignetes
Reinigungsmittel. Verwenden Sie zur Reinigung
niemals aggressive Reinigungs- oder Lösungsmittel. Trocknen Sie das Set anschließend mit einem
trockenen Tuch. Bewahren Sie das Set an einem
trockenen Ort bei Raumtemperatur auf.
Hinweise zur Entsorgung
Entsorgen Sie das Produkt und alle dazugehörigen Komponenten über einen zugelassenen
Entsorgungsbetrieb oder über Ihre kommunale
Entsorgungseinrichtung. Beachten Sie die aktuell
geltenden Vorschriften. Erkundigen Sie sich im
Zweifelsfall bei Ihrer Entsorgungseinrichtung
über eine umweltgerechte Entsorgung.
Entsorgungsmaßnahmen
Batterien
Batterien dürfen nicht in den Hausmüll
gelangen! Rückgabe bei entsprechenden
Sammelstellen oder beim Händler, der
sie verkauft hat.
Batterien sind mit einer durchgekreuzten Mülltonne sowie dem chemischen Symbol des Schadstoffes bezeichnet, nämlich „Cd“ für Cadmium,
„Hg“ für Quecksilber und „Pb“ für Blei.
Nach dem Training
• Lösen Sie auf jeder Seite die Seilklemmen vom
Springseil.
• Lösen Sie die Schrauben an den Griffenden.
• Ziehen Sie das Seil aus den Griffen heraus.
• Rollen Sie das Seil auf und verstauen Sie alle
Bestandteile des Sets in der Tasche.
32 DE/AT/CH
Page 33

3 Jahre Garantie
Das Produkt wurde mit großer Sorgfalt und unter
ständiger Kontrolle produziert. Sie erhalten auf
dieses Produkt drei Jahre Garantie ab Kaufdatum. Bitte bewahren Sie den Kassenbon auf.
Die Garantie gilt nur für Material- und Fabrikationsfehler und entfällt bei missbräuchlicher oder
unsachgemäßer Behandlung. Ihre gesetzlichen
Rechte, insbesondere die Gewährleistungsrechte, werden durch diese Garantie nicht
eingeschränkt. Bei etwaigen Beanstandungen,
wenden Sie sich bitte an die unten stehende
Service-Hotline oder setzen Sie sich per E-Mail
mit uns in Verbindung. Unsere Servicemitarbeiter
werden das weitere Vorgehen schnellstmöglich
mit Ihnen abstimmen. Wir werden Sie in jedem
Fall persönlich beraten.
Die Garantiezeit wird durch etwaige Reparaturen aufgrund der Garantie, gesetzlicher
Gewährleistung oder Kulanz nicht verlängert.
Dies gilt auch für ersetzte und reparierte Teile.
Nach Ablauf der Garantie anfallende Reparaturen sind kostenpflichtig.
IAN: 93591
Service Deutschland
Tel.: 0800-5435111
E-Mail: deltasport@lidl.de
Service Österreich
Tel.: 0820 201 222
(0,15 EUR/Min.)
E-Mail: deltasport@lidl.at
Service Schweiz
Tel.: 0842 665566
(0,08 CHF/Min.,
Mobilfunk max. 0,40 CHF/Min.)
E-Mail: deltasport@lidl.ch
Ersatzteile zu Ihrem Produkt finden Sie auch unter:
www.delta-sport.com, Rubrik Service - Ersatzteilservice Lidl
33DE/AT/CH
Page 34

34
Page 35

35
Page 36

DELTA-SPORT HANDELSKONTOR GMBH
Wragekamp 6 • D-22397 Hamburg
Version: 12/2013
Delta-Sport-Nr.: SP-1681
IAN 93591
 Loading...