


SUN LOUNGER
SUN LOUNGER |
Leżak plażowy |
|
Instructions for use |
Instrukcja obsługi |
|
Nyugágy |
|
|
|
|
|
Ležalnik za na plažo |
||
Használati útmutató |
Navodilo za uporabo |
|
Plážové lehátko |
Plážové ležadlo |
|
Návod k obsluze |
Návod na obsluhu |
|
Strandliege |
|
|
Bedienungsanleitung |
|
|
IAN 79733

A
B |
C |
D |
E |
F |
2
G
H
3
IMPORTANT: RETAIN FOR LATER REFERENCE; PLEASE READ CAREFULLY!
WAŻNE, PRZECHOWYWAĆ W CELU PÓŹNIEJSZEGO SKORZYSTANIA: PRZECZYTAĆ UWAŻNIE!
FONTOS! ŐRIZZE MEG KÉSŐBBI HASZNÁLATRA: FIGYELMESEN OLVASSA EL!
POMEMBNO, SHRANITE ZA KASNEJŠE REFERENCE: SKRBNO PREBERITE!
DŮLEŽITÉ, USCHOVEJTE PRO POZDĚJŠÍ ZHLÉDNUTÍ: ČTĚTE PEČLIVĚ!
DÔLEŽITÉ, USCHOVAJTE KVÔLI NESKORŠIEMU POUŽITIU: POZORNE PREČÍTAJTE!
WICHTIG, FÜR SPÄTERE BEZUGNAHME AUFBEWAHREN: SORGFÄLTIG LESEN!
4

Contents/Spis treści/Tartalomjegyzék/Kazalo/Obsah/Obsah/Inhaltsverzeichnis
Technical Details ................................................ |
6 |
Scope of Delivery ............................................... |
6 |
Intended Use ....................................................... |
6 |
Safety Notice ...................................................... |
6 |
Assembly ......................................................... |
6 - 7 |
Using as a Transport Aid .................................... |
7 |
Adjusting the Angle ............................................. |
7 |
Care, Storage, Maintenance ............................. |
7 |
Notes on disposal ............................................... |
7 |
3 Years Warranty ................................................ |
7 |
Műszaki adatok ................................................ |
10 |
A csomag tartalma ............................................ |
10 |
Rendeltetésszerű használat .............................. |
10 |
Biztonsági tudnivalók ........................................ |
10 |
Szerelés ....................................................... |
10 - 11 |
Használat szállító segédeszközként ................ |
11 |
A dőlésszög beállítása ..................................... |
11 |
Ápolás, tárolás és karbantartás ....................... |
11 |
Tudnivalók a hulladékkezelésről ...................... |
11 |
3 év garancia .................................................... |
11 |
Technická data .................................................. |
15 |
Obsah dodávky ................................................ |
15 |
Použití ke stanovenému účelu .......................... |
15 |
Bezpečnostní upozornění ................................. |
15 |
Montáž ....................................................... |
15 - 16 |
Použití jako pomůcka při přepravě .................. |
16 |
Nastavení úhlu sklonu opěradla ...................... |
16 |
Ošetřování, skladování a údržba .................... |
16 |
Pokyny k likvidaci .............................................. |
16 |
3 roky záruky .................................................... |
16 |
Technische Daten .............................................. |
19 |
Lieferumfang ...................................................... |
19 |
Bestimmungsgemäße Verwendung ................. |
19 |
Sicherheitshinweise ........................................... |
19 |
Montage .................................................... |
19 - 20 |
Verwendung als Transporthilfe ........................ |
20 |
Neigungswinkel verstellen ................................ |
20 |
Pflege, Lagerung, Wartung .............................. |
20 |
Hinweise zur Entsorgung .................................. |
20 |
3 Jahre Garantie ............................................... |
20 |
Dane techniczne ................................................. |
8 |
Zawartość ............................................................ |
8 |
Zastosowanie zgodne z przeznaczeniem |
........ 8 |
Wskazówki bezpieczeństwa ............................. |
8 |
Montaż ............................................................ |
8 - 9 |
Zastosowanie jako pomoc transportowa .......... |
9 |
Regulacja kąta nachylenia .................................. |
9 |
Pielęgnacja, przechowywanie i konserwacja ... 9 |
|
Uwagi odnośnie recyklingu ............................... |
9 |
3 lata gwarancji .................................................. |
9 |
Tehnični podatki ................................................ |
12 |
Obseg dobave .................................................. |
12 |
Predvidena uporaba ......................................... |
12 |
Varnostni napotki .............................................. |
12 |
Montaža .................................................... |
12 - 13 |
Uporaba kot pripomoček za prevažanje . |
...... 13 |
Nastavitev kota naklona ................................... |
13 |
Nega, skladiščenje, vzdrževanje .................... |
13 |
Napotki za odlaganje v smeti ......................... |
13 |
3 leta garancije .......................................... |
13 - 14 |
Technické údaje ................................................. |
17 |
Obsah ................................................................ |
17 |
Použitie podľa predpisov ................................. |
17 |
Bezpečnostné pokyny ....................................... |
17 |
Montáž ....................................................... |
17 - 18 |
Použitie ležadla na transport ........................... |
18 |
Nastavenie uhla sklonu .................................... |
18 |
Ošetrovanie, skladovanie, údržba .................. |
18 |
Pokyny na likvidáciu ......................................... |
18 |
3 roky záruka .................................................... |
18 |
5

 Congratulations!
With your purchase you have decided on a high-quality product. Get to know the product before you start to use it. Carefully read the following instructions for use. Use the product only as described and only for the given areas of application. Keep these instructions safe. When passing the product on to a third party, always make sure that the documentation is included.
Technical Details
Weight: approx. 4.3kg
Dimensions: approx. 146 x 64 x 92cm (L x W x H)
Max. load: 100kg
Max. loading capacity when used as a transport aid: 20kg
Scope of Delivery
1 – main frame 1x
2 – footrest frame 1x
3 – sunroof 1x
4 – wheels 2x
5 – rod 2x
6 – screw long 2x
7 – screw short 2x
8 – washer 2x
9 – cap nut 2x
10 – pin 2x
11 – spanner1x
1x instructions for use
Intended Use
The article is not designed for commercial use. The article is intended for use in the leisure and camping sector (outdoor area).
Safety Notice
 WARNING!
•Danger of suffocation for children!
•Never allow children to play with packaging materials when unsupervised.
 Danger of Injury!
•Do not place loads that exceed 100kg on the beach and transport stretcher.
•Check the article before initial use for damage or signs of wear and tear. Make sure that all connecting elements are sufficiently tightened. The article may only be used when in perfect condition!
•Tighten each individual screw before using the beach chair.
•Place the beach chair only on solid, even ground.
 Danger of Bruised Fingers!
•The beach chair may only be erected by adults. Take care not to trap your fingers when folding and unfolding the article.
Caution!
•Always supervise your children. The beach chair is not a toy or a climbing aid.
Make sure that nobody stands on the head or foot sections of the chair.
•The beach chair can also be used as a transport aid, although it is not designed for transporting people!
Assembly
Step 1: Assembling the Foot Frame Section
The lounger needs to be folded in order to make the assembly of the footrest frame easier. Pull the inside rods of the lower end of the main frame out by approximately 2cm. The holes on the inside rods must be in the same position as those on the footrest frame. The footrest frame
is then attached to the main frame (figure B). The connecting rod on the main frame is now attached to the footrest frame using the screw (6) (figure C).
6GB

Step 2: Wheel assembly
Push the pin (10) into the joint (figure D).
Ensure that the threaded hole on the pin is facing upwards. The pin should be inserted into the joint far enough that the threaded hole and the hole on the axle rod are above one another. Now fix the short screw (7) in the threaded hole (figure E). Now push the wheel onto the joint and fix it with the washer and the cap nut (figure F). Use the tool that is included for this purpose.
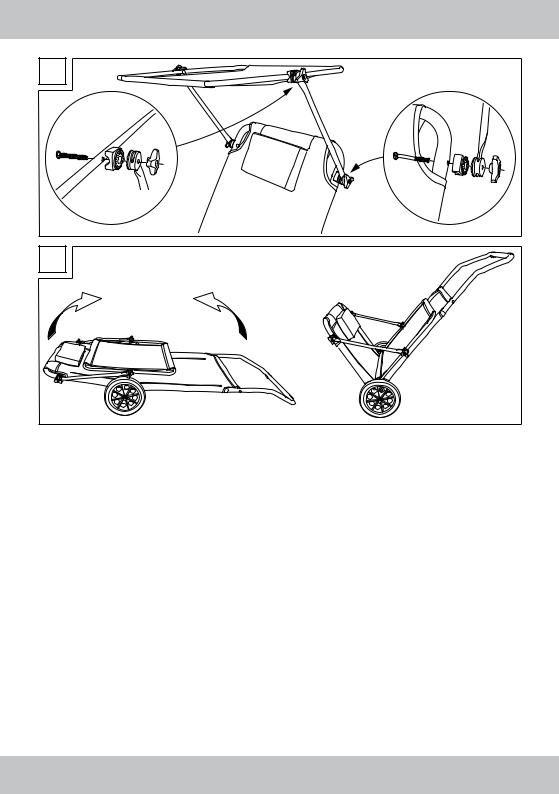
Step 3: Sunroof assembly
Release the pre-assembled locking screws and the sleeves from the rod. Push the longer screw out from the inside through the main frame.
Attach the sleeves and fix the rod with the locking screw (figure G). The sunroof is fixed in the same way with the shorter screw.
Using as a Transport Aid
To use the beach chair as a transport aid, fold the sun shade down so that it lies flat on the surface of the chair, and then raise the foot frame (figure H).
Adjusting the Angle
The back support angle can be individually adjusted. Fold the back support completely flat down onto the seat and then pull up horizontally. You will hear audible ratchet sounds as you pull it up, enabling you to select the angle of inclination in individual steps.
Care, Storage, Maintenance
When required, wipe the article with a damp cloth and a little mild cleaning agent if necessary. Dry the article thoroughly before you use
it again. Maintenance! Check the bolted connections regularly.
Notes on disposal
Please dispose of the product and packaging in an environmentally friendly manner, separating different materials for recycling as required!
Dispose of this item through an authorised disposal company or through your local waste disposal facilities - ask your local authority for information if further guidance is required. Ensure that you comply with all regulations currently in force.
3 Years Warranty
The product was produced with great care and under constant supervision. You receive a threeyear warranty for this product from the date of purchase. Please retain your receipt.
The warranty applies only to material and workmanship and does not apply to misuse or improper handling. Your statutory rights, especially the warranty rights, are not affected by this warranty.
With regard to complaints, please contact the following service hotline or contact us by e-mail. Our service employees will advise as to the subsequent procedure as quickly as possible. We will be personally available to discuss the situation with you.
Any repairs under the warranty, statutory guarantees or through goodwill do not extend the warranty period. This also applies to replaced and repaired parts. Repairs after the warranty are subject to a charge.
IAN: 79733
 Service Great Britain
Tel.: 0871 5000 720 (£ 0.10/Min.) E-Mail:deltasport@lidl.co.uk
You can also find spare parts for your product at: www.delta-sport.com, category Service - Lidl Spare Parts Service
GB 7

 Gratulujemy!
Przez Państwa zakup wybraliście produkt o wysokiej jakości. Przed pierwszym użyciem zapoznajcie się z produktem. W tym celu przeczytajcie następującą instrukcję obsługi.
Z produktu należy korzystać jedynie jak to zostało opisane i w podanych zakresach zastosowania. Zachować niniejszą instrukcję. W razie przekazania produktu osobom trzecim dołączyć do niego wszystkie dokumenty.
Dane techniczne
Waga: ok. 4,3 kg
Wymiary: ok. 146 x 64 x 92 cm (dł. x szer. x wys.)
Maks. obciążenie: 100 kg
Maksymalne obciążenie użytkowe jako pomoc transportowa: 20 kg
Zawartość
1 – stelaż główny 1 x
2 – rama główna 1 x
3 – daszek przeciwsłoneczny 1 x
4 – koła 2 x
5 – drążek 2 x
6 – śruba długa 2 x
7 – śruba krótka 2 x
8 – podkładka 2 x
9 – nakrętka kołpakowa 2 x
10 – trzpień 2 x
11 – klucz płaski 1 x
1 x instrukcja obsługi
Zastosowanie zgodne z przeznaczeniem
Artykuł nie jest przeznaczony do użytku komercyjnego. Artykuł został zaprojektowany do użytku rekreacyjnego i na polu kempingowym (na zewnątrz).
Wskazówki bezpieczeństwa
 OSTRZEŻENIE!
•Niebezpieczeństwo uduszenia dla dzieci!
•Dzieci nie pozostawiać bez nadzoru z materiałem opakowaniowym.
 Niebezpieczeństwo urazu!
•Leżak plażowy i transportowy obciążać maksymalnie 100 kg.
•Przed każdym użyciem należy sprawdzić artykuł czy nie jest uszkodzony lub zużyty. Zawsze należy sprawdzić pewne umocowanie wszystkich elementów łączących.
Z artykułu można korzystać jedynie gdy jest w nienagannym stanie!
•Przed zastosowaniem wszystkie elementy mocno skręcić.
•Leżak stawiać wyłącznie na mocnym, rów nym podłożu.
 Zagrożenie przytrzaśnięcia palców!
•Leżak może być montowany wyłącznie przez osoby dorosłe. Podczas rozkładania i składania uważać na miejsca przytrzaśnięcia.
Ostrożnie!
•Dzieci nie pozostawiać bez opieki. Leżak nie jest zabawką ani przyrządem do wspinania się. Należy uważać, aby nikt nie stawał na część nożną lub podgłówek.
•Leżak może być stosowany również jako pomoc transportowa. Leżak nie jest przeznaczony do transportu osób!
Montaż
Krok 1: Montaż ramy na stopy
W celu ułatwienia montażu ramy głównej, leżak powinien być złożony. Należy wysunąć drążki wewnętrzne przy dolnym końcu stelaża głównego na około 2 cm. Otwory drążków wewnętrznych muszą znajdować się w tej samej pozycji, co otwory ramy głównej. Następnie nakłada się ramę główną na stelaż główny (rys. B). Drążek łączący stelaża głównego mocuje się teraz przy pomocy śruby (6) do ramy głównej (rys. C).
8PL
 Loading...