

Page 1
http://qr.lidl.com/lese0jaC
RESISTANCE BANDS WITH PULLEY
RESISTANCE BANDS WITH PULLEY
Instructions for use
BENZI SUSPENDATE CU SCRIPETE PENTRU ANTRENAMENT
Instrucţiuni de utilizare
ΣΎΣΤΗΜΑ ΕΚΓΎΜΝΑΣΗΣ ΜΕ
ΙΜΑΝΤΕΣ
Οδηγιεσ χρησησ
TRAKE ZA VJEŽBANJE S
KOLUTOM ZA SKRETANJE
Uputa za korištenje
МУЛТИТРЕНАЖОР
Ръководство за обслужване
SCHLINGENTRAINER
MIT UMLENKROLLE
Gebrauchsanweisung
IAN 282677
1
Page 2
A
5
1
5 4 3 1
5a
6
8
1
7
2
9
10
Sangle de suspension
Slingtrainer
Delta-Sport-Nr.:
Schlingentrainer
STOP
Attention,
entraînement en cours !
Ne pas ouvrir la porte !
Let op training!
Deur niet openen!
Achtung Training!
Tür nicht önen!
6
3
4
5
B C
E
11
D
F
2
Page 3
1
2
2a
G
9
1
I
H
J
3
Page 4
K5N
L
M
4
Page 5
O
P
Page 6
Q
6
Page 7

7
Page 8
Contents / Sadržaj / Cuprins / Съдържание
Scope of delivery / Part names ...................... 10
Technical data .................................................... 10
Correct use ......................................................... 10
Safety notes ............................................... 10 - 11
Assembly instructions ........................................ 11
Shortening and lengthening
the sling trainer................................................... 12
Recommended length of the sling trainer ........ 12
Removing the pulley .......................................... 12
Attaching the pulley ........................................... 12
General training notes ..................................... 12
Warming up ...................................................... 13
Suggested exercises ................................. 13 - 15
Use the QR-code .............................................. 15
Stretching ........................................................... 15
Care and storage ............................................. 15
Notes on disposal ............................................ 15
3-year warranty ................................................ 16
Furnitura / Denumirea pieselor .................24
Date tehnice ...........................................24
Utilizare conform destinaţiei .....................24
Indicaţii de siguranţă ........................24 - 25
Indicaţii de montaj / Montaj..............25 - 26
Scurtarea şi prelungirea
sforii de antrenament ...............................26
Lungimea recomandată a
sforii de antrenament ...............................26
Îndepărtarea scripetelui ..................... 27
Atașarea scripetelui ........................... 27
Indicații generale privind
antrenamentul ................................... 27
Încălzirea ......................................... 27
Sugestii privind exercițiile ............ 27 - 30
Utilizarea codului QR ........................ 30
Întindere ...........................................30
Îngrijirea și depozitarea ..................... 30
Indicații privind eliminarea ................. 31
3 ani garanție .................................. 31
Opseg isporuke / Oznaka dijelova ................ 17
Tehnički podaci .................................................. 17
Namjenska uporaba .........................................17
Sigurnosne napomene ...............................17 - 18
Napomene kod postavljanja / montaža 18 - 19
Skraćivanje i produljivanje suspenzijske
trake ................................................................19
Preporučena duljina suspenzijske trake za
vježbanje ............................................................ 19
Skidanje kotačića ............................................. 19
Postavljanje kotačića ................................ 19 - 20
Opće upute za vježbanje ................................ 20
Zagrijavanje ...................................................... 20
Predložene vježbe .................................... 20 - 22
Korištenje QR-koda .......................................... 22
Istezanje .....................................................22 - 23
Njega i skladištenje .......................................... 23
Upute za zbrinjavanje ...................................... 23
3 godine jamstva .............................................. 23
Обем на доставката/ описание на частите 32
Технически данни ........................................... 32
Употреба по предназначение ....................... 32
Указания за безопасност ....................... 32 - 33
Указания за закрепването/монтажа ....33 - 34
Скъсяване и удължаване на
мултитренажора ..............................................34
Препоръчителна дължина на
мултитренажора ..............................................34
Сваляне на направляващата ролка ............. 35
Поставяне на направляващата ролка ......... 35
Общи указания за тренировка ..................... 35
Загряване ......................................................... 35
Примерни упражнения .......................... 35 - 38
Използване на QR-кода ................................. 38
Разтягане ............................................................38
Поддръжка, съхранение ................................ 38
Указания за отстраняване
като отпадък ..................................................... 39
3 години гаранция .................................. 39 - 41
8
Page 9
Πινακας περιεχομενων / Inhaltsverzeichnis
Παραδοτέος εξοπλισμός /
Περιγραφή εξαρτημάτων ................................... 42
Τεχνικά χαρακτηριστικά ..................................... 42
Προβλεπόμενη χρήση ....................................... 42
Υποδείξεις ασφαλείας ............................... 42 - 43
Υποδείξεις τοποθέτησης /
Συναρμολόγηση ........................................ 43 - 44
Κόντεμα και επιμήκυνση του συστήματος
προπόνησης με ιμάντες ..................................... 44
Προτεινόμενο μήκος του συστήματος
προπόνησης με ιμάντες ............................. 44 - 45
Αφαίρεση τροχαλίας αναστροφής .................. 45
Τοποθέτηση τροχαλίας αναστροφής .............. 45
Γενικές υποδείξεις προπόνησης ...................... 45
Προθέρμανση ................................................... 45
Προτεινόμενες ασκήσεις ........................... 45 - 48
Χρήση κωδικού QR ........................................... 48
Διατάσεις ............................................................48
Συντήρηση και αποθήκευση ............................. 48
Υποδείξεις απόρριψης ..................................... 48
3 έτη εγγύηση .................................................... 49
Lieferumfang / Teilebezeichnung ....................50
Technische Daten ...............................................50
Bestimmungsgemäße Verwendung ..................50
Sicherheitshinweise ....................................50 - 51
Aufbauhinweise / Montage .....................51 - 52
Schlingentrainer verkürzen
und verlängern ...................................................52
Empfohlene Länge des Schlingentrainers ........52
Umlenkrolle entfernen ............................... 52 - 53
Umlenkrolle anbringen ...................................... 53
Allgemeine Trainingshinweise ......................... 53
Aufwärmen ........................................................ 53
Übungsvorschläge .................................... 53 - 56
QR-Code verwenden ....................................... 56
Dehnen .............................................................. 56
Pflege und Lagerung .........................................56
Hinweise zur Entsorgung ..................................56
3 Jahre Garantie ....................................... 56 - 57
9
Page 10
Congratulations!
With your purchase you have decided on a
high-quality product. Get to know the product
before you start to use it.
Carefully read the following instructions
for use.
Use the product only as described and only
for the given areas of application. Keep these
instructions safe. When passing the product
on to a third party, always make sure that the
documentation is included.
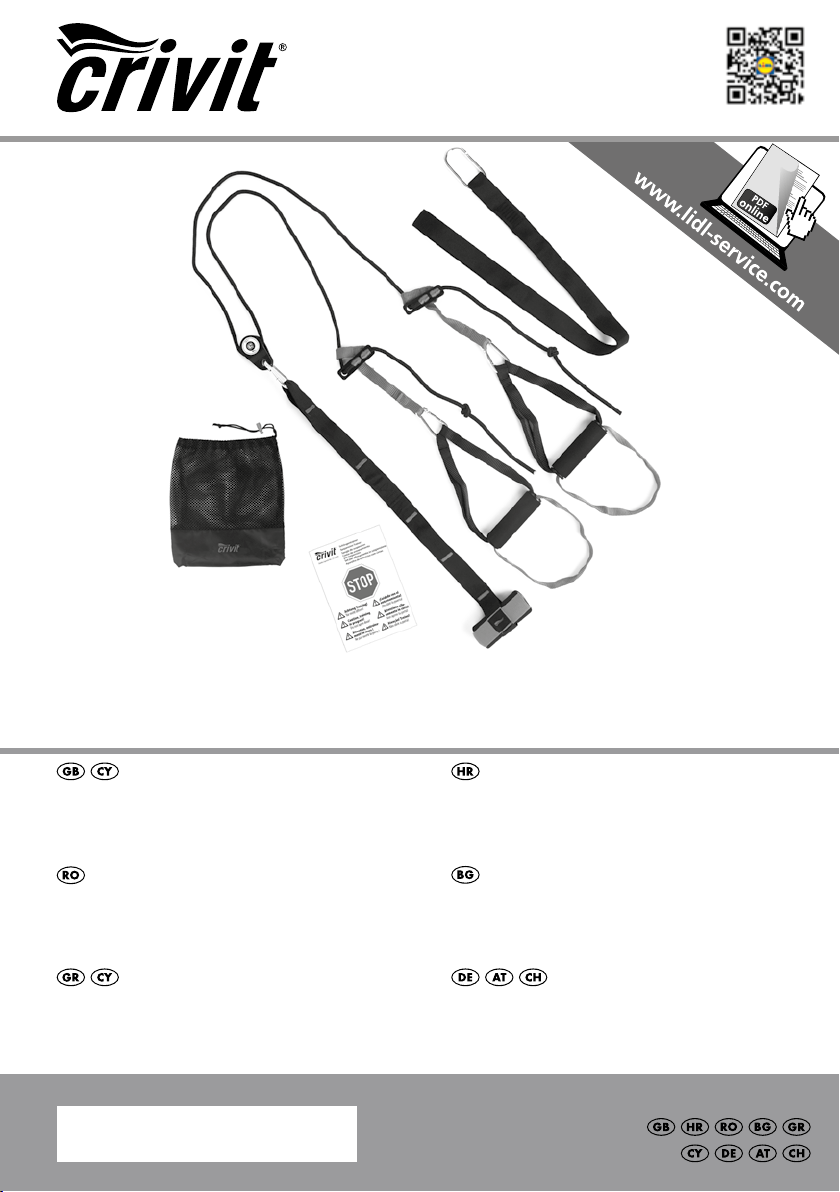
Scope of delivery/
Part names (figure A)
1 x Instructions for use
1 x Resistance Bands with Pulley
(1) Belt strap with anchor loops
(2) Door anchor
(3) Snap hook
(4) Pulley
(5) Rope
(6) Adjustment clasp
(7) Handles
(8) Foot loop
(9) Extension belt
(10) Door notice
(11) Storage bag
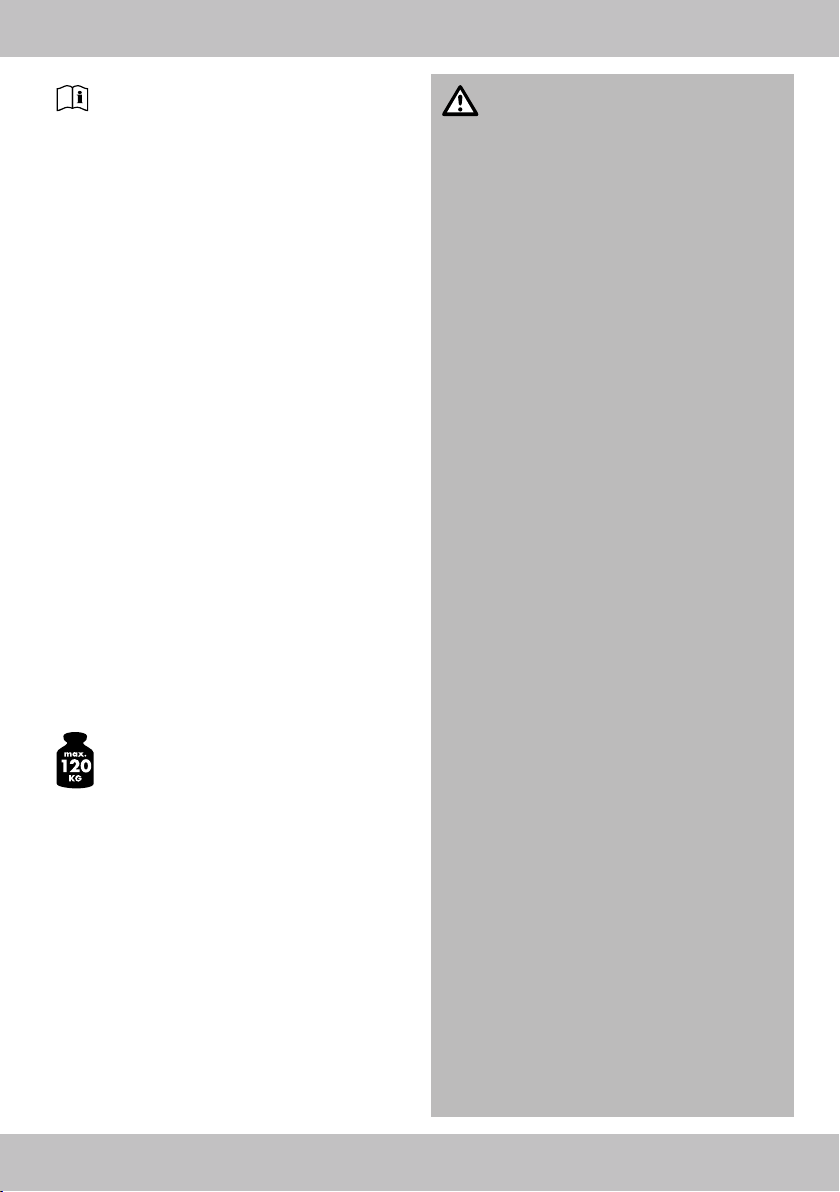
Technical data
Maximum weight of user: 120kg
Correct use
This article was developed as a piece of training
equipment that can be used to train your whole
body. The sling trainer was designed for private
use, and it is not suitable for medical and commercial use.
This article has been designed for both indoor
and outdoor use and may only be attached to
doors with the included door anchor or on rods,
branches, hooks, or similar using the additional
snap hook.
Safety notes
Risk of injury!
• Consult with your doctor before you begin
training. Make sure that you are in suitable
health for the training.
• Do not use the article if you are injured or if
your health is impaired.
• This article is designed for a maximum body
weight of 120kg. Do not use the article if
your body weight is higher than this.
• Always remember to warm up before training
and train in accordance with your current
abilities. Serious injury can occur if you exert
yourself too much and overtrain. Cease trai ning immediately if you experience discom fort, weakness, or fatigue and consult a
doctor.
• Keep the operating instructions and exercise
descriptions to hand at all times.
• Pregnant women should only train with the
article following consultation with their doctor.
• The article may only be used by one person
at a time.
• This article is not suitable for therapeutic
training.
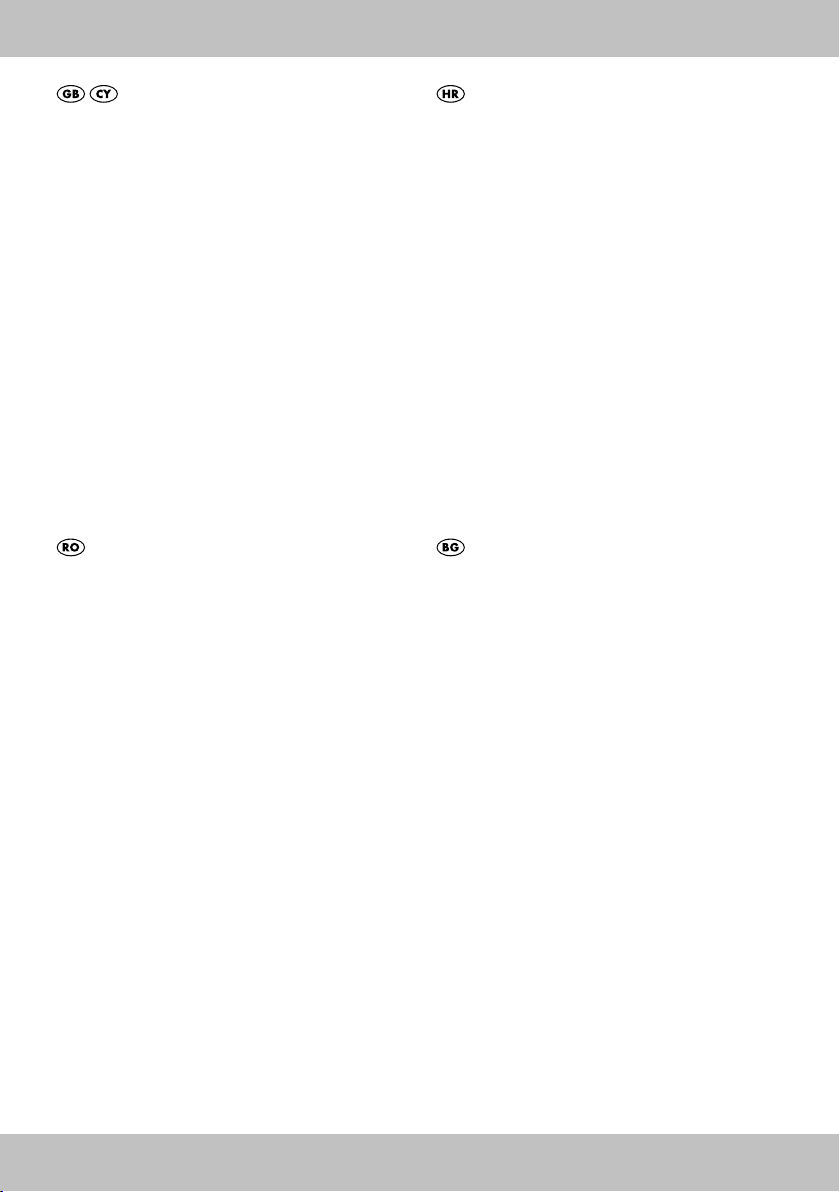
• Keep an area of approx. 0.6m around the
training area on all sides (figure Q).
• Only train on a flat and non-slip surface.
• Do not use the article in the vicinity of stairs or
steps.
• Cease training immediately if you feel dizzy,
experience palpitations etc. and consult with a
doctor immediately.
• The article must be assembled by an adult in
order to avoid injuries through incorrect hand ling. Make sure you only use the article once
it has been fully assembled.
• Do not train if you are tired or lack concentra tion. Do not train immediately after eating.
Wait for approximately 2 hours after meals
before training.
• Ventilate the training room sufficiently but
avoid draughts.
• Drink sufficient liquids during training.
• Never wrap the article around your head,
neck, or chest. Risk of strangulation!
10
GB/CY
Page 11
• Do not use the article for other purposes (e.g.
as a tow or pulling rope or similar).
• Caution! Only attach the suspension
trainer to doors.
• Warning! Risk of injury! Only attach
the suspension trainer to doors that
open outwards (away from you)!
Never mount the suspension trainer
on doors that open inwards (towards
you). The door could pull open, which
could lead to serious injury!
• Warning! Risk of injury! Always lock
the door to which you have attached
the suspension trainer!
• Caution! Always use the included
door sign while you are training.
Make sure that it located on the other
side of the door and that it is legible.
Particular caution –
Risk of injury for children!
• Keep the packaging materials away from
children. There is a risk of suffocation!
• The article is not suitable for use as a toy and
must be stored out of the reach of children
while not in use. Children may not be within
reach of the article during training to eliminate
the risk of injury.
• Instruct children specifically that the article is
not a toy.
• Inspect the article regularly for damage and
wear. Cease use of the product if damage is
found.
Beware of damage to property
• Never drop the suspension trainer or allow it
to spring back against the door. Otherwise
the door may be damaged.
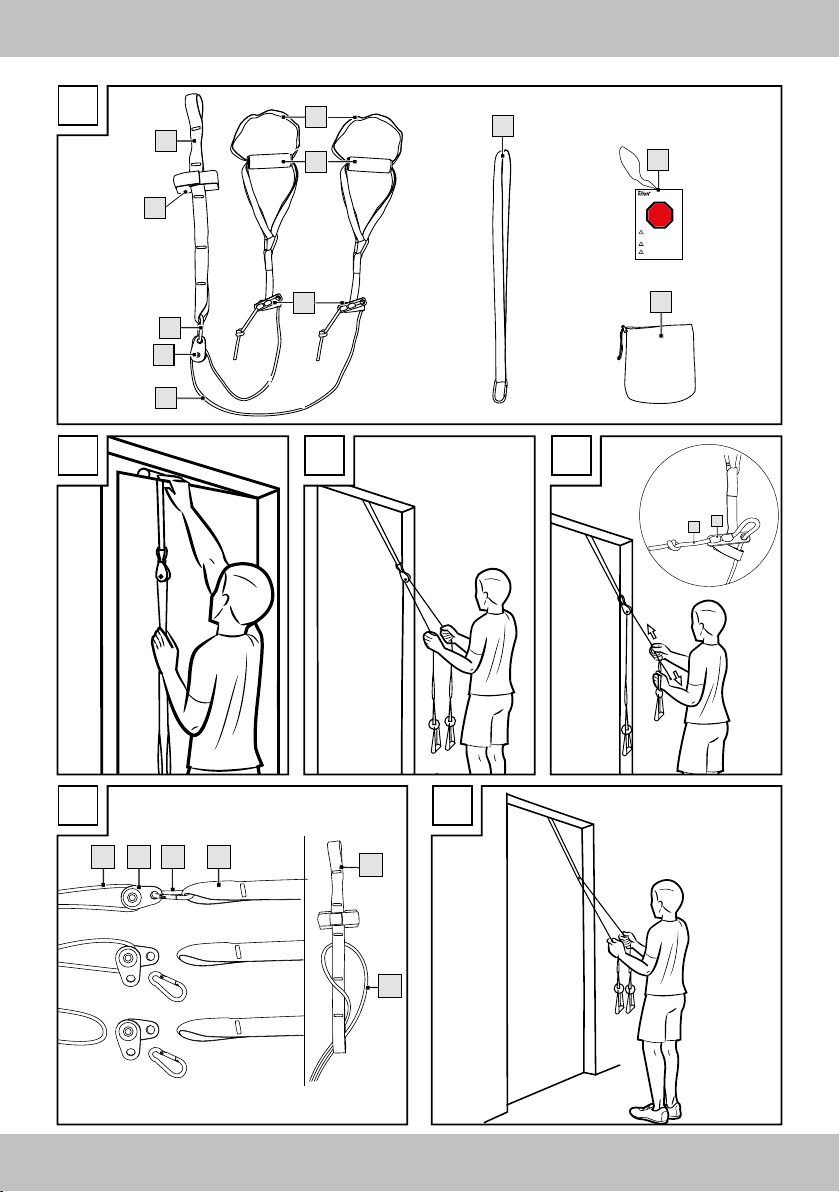
Assembly instructions
• Select a training area with dimensions of
approx. 3.00 x 1.80m (L x W).
• Attach the sling trainer at a height between
1.80 and 2.30m.
• Only train on a level, non-slip surface.
• Only mount the sling trainer on doors that
open outwards (i.e. away from you) (figure B).
• Lay the anchor over the top of the door in the
centre (figure B).
• Lock the door securely.
•
Caution! Risk of injury!
Always lock the door!
• Always use the included door notice
(10)!
• Please ensure that the door to which you
attach the door anchor (2) is stable, robust,
and can carry your body weight, and that the
door anchor is securely fastened. To test this
pull hard on the rope (5) a few times
(figure C).
Risks from wear
• The article may only be used when in perfect
condition. Examine the article for damage
and wear before each use. The safety of the
suspension trainer can only be guaranteed if it
is examined regularly for damage and wear.
• Only use original replacement parts.
• Protect the article from extreme temperatures,
sun, and moisture. Incorrect storage and use
of the article can lead to premature wear and
possible breakage of the structure, which
could result in injury.
• Do not attach the article to areas with sharp
edges, e.g. door hinges. Nylon will tear if it
scrapes along sharp edges.
• Do not saw! Sawing movements lead to
premature wear.
Assembly/use of the additional
snap hook
Use the extension belt (9) to attach the suspension trainer to rods, tree branches, or hooks (figure
H). Remove the door anchor (2) from the belt
strap (1) for this purpose.
Warning! Always test the load-bearing
capacity of the attachment points in order to
make sure that there are sufficient safety margins. There is a risk of serious injury if this is not
adhered to.
11GB/CY
Page 12
Shortening and lengthening
the sling trainer
Note! Before adjustment always ensure
that the rope (5) is not twisted!
Shortening
1. Hold the end of the rope (5a) in one hand
and pull the adjustment clasp (6) with your
other hand towards the attachment point
(figure D).
2. Repeat the process for the other handle (7).
Lengthening
1. Hold the end of the rope (5a) in one hand
and pull the adjustment clasp (6) with your
other hand towards the handle (7) (figure D).
2. Repeat the process for the other handle (7).
Moving the anchor point
If the suspension trainer is fundamentally too
long then you can move the anchor point.
1. To do this, open the hook-and-loop fastener
(2a) on the door anchor (2) and remove the
anchor from the belt strap (1) (figure G).
2. Position it in one of the lower loops and then
secure the door anchor to the loop with the
hook-and-loop fastener (figure G).
Caution! Position the door anchors (2) only
in the anchor loops!
Caution! Risk of injury!
Never simply wrap the belt strap (1) around
the door anchor (2) to shorten it. The belt strap
could come loose!
Recommended length
of the sling trainer
Adjust the length of the sling trainer for
each exercise as described below:
Length of sling trainer: short
Shorten the sling trainer as much as possible.
Length of sling trainer: medium length
Adjust the sling trainer to a medium length by
fixing the black adjustment loops to the blue
double markings that are sewn onto the middle
of the band
Length of sling trainer: knee height
Adjust the sling trainer so that the handles are
just below your knees.
Length of sling trainer: long
Pull the bands on the sling trainer out fully so that
the handles are approximately 7cm above the
floor.
Removing the pulley
You can remove the pulley (4) from the suspension trainer or attach the rope (5) directly to the
belt strap (1) (figure E).
1. Release the snap hook (3) from the belt strap
(1).
2. Unhook the snap hook from the pulley (4).
3. Remove the rope (5) from the pulley.
4. Double the rope so that it forms a loop.
5. Thread the loop through the last anchor loop
on the belt strap (1).
6. Pull the loop over the entire belt strap and pull
the loop tight to form a knot.
Important: Please ensure that the ropes
are of equal length. Check this by holding the handles next to one another
(figure F).
Attaching the pulley
Attach the pulley as described in figure E, just in
the reverse order.
1. Release the rope (5) from the belt strap (1).
2. Lay the rope over the roller (4) and position
the holes in the roller above one another.
3. Insert the snap hook (3) through both holes in
the roller and attach this to the belt strap.
General training notes
Training process
• Wear comfortable sport clothing and trainers.
• Warm up well before each training session
and end each training session gradually.
• Take sufficiently long breaks between the
exercises and drink enough.
• As a beginner do not train too intensely.
Slowly increase your training intensity.
• Carry out all the exercises steadily, not with
sudden movements or too quickly.
• Be sure to breathe regularly. Breathe out with
effort and breathe in on recovery.
• Ensure a correct body position during the
exercises.
12
GB/CY
Page 13

Warming up
Take sufficient time before each training session
to warm up. The following includes descriptions
of some simple exercises for this purpose. Repeat
these exercises 2 to 3 times each.
Neck muscles
1. Turn your head slowly to the left and to the
right. Repeat this movement 4-5 times.
2. Circle your head slowly, first in one direction
and then in the other.
Arms and shoulders
1. Clasp your hands behind your back and pull
them carefully upwards. If you bend your
upper body forwards at the same time all the
muscles are warmed up optimally.
2. Circle both your shoulders forwards at the
same time and then change direction after
one minute.
3. Pull your shoulders up to your ears and let
your shoulders fall again.
4. Circle your right and left arms alternately
forwards and then after one minute
backwards.
Important: Don’t forget to continue
breathing steadily throughout!
Suggested exercises
Some of the many possible exercises are
described in the following:
Note: In some exercises you have the option
of training with or without a pulley. If you wish
to train without a pulley then you need to attach
the rope directly to the belt strap. For more
information about this, please see the section
‘removing the pulley’.
Caution! Always wear non-slip sports
shoes!
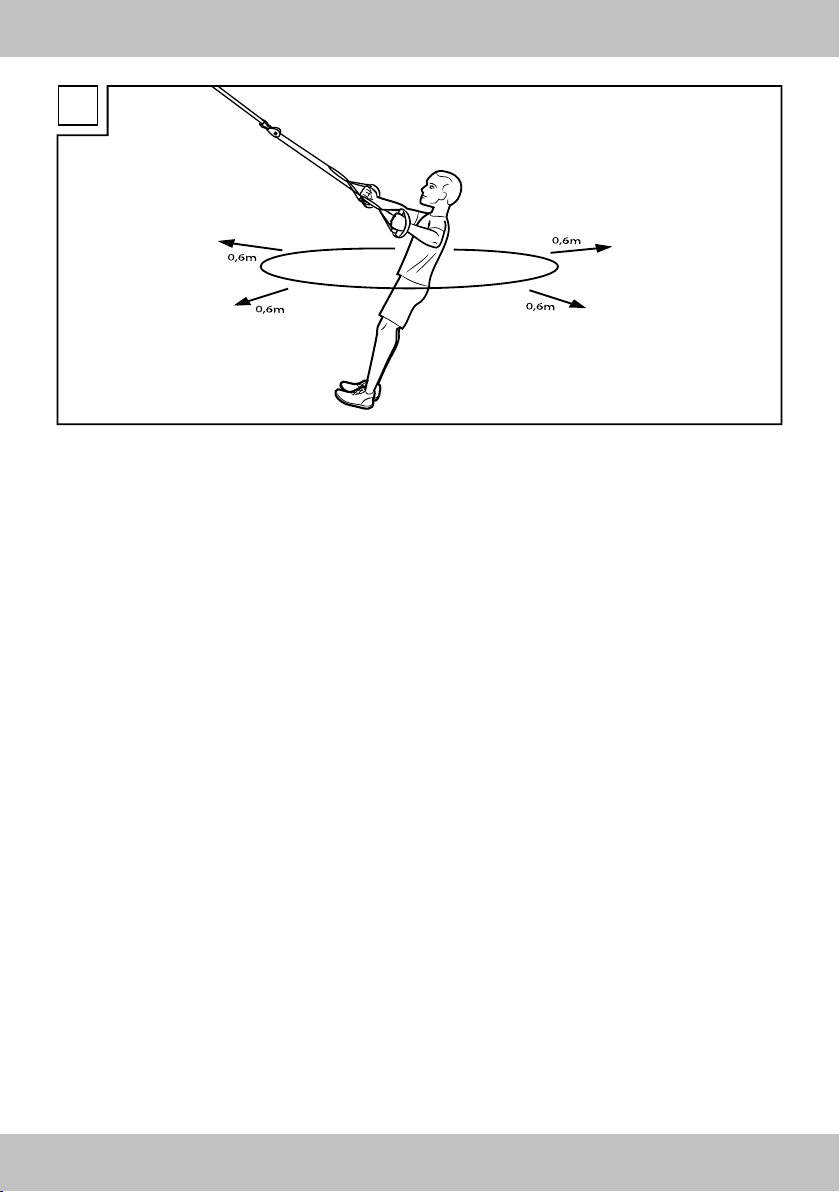
Leg curls (figure I)
Length of suspension trainer: knee height
With or without pulley
Starting position:
1. Lie down, facing upwards, and place your
heels in the foot loops.
Note: Push the plastic handles upwards for a
more comfortable foot position.
2. Your arms are at your sides.
End position:
3. Tense your stomach muscles.
4. Pull your heels up to your pelvis.
5. Slowly return to the starting position.
6. Repeat the exercise 10 times.
Important: Press your heels into the
foot loops during the entire movement.
Increase the intensity by lifting your
pelvis during the exercise.
Crunch (figure J)
Length of suspension trainer: knee height
With or without pulley
Starting position:
1. Place your feel into the foot loops with your
toes facing downwards.
Note: Push the plastic handles upwards for a
more comfortable foot position.
2. Take a plank position supporting yourself on
your hands.
End position:
3. Tense your buttock and stomach muscles.
4. Pull your knees into your chest.
5. Move back into the starting position.
6. Repeat the exercise 15 times.
Important: Make sure you keep your
body tensed and retain good posture.
Most plank exercises on the floor are
easier if you support yourself on your
lower arms.
If you support yourself on your hands
with your arms extended then the
exercise becomes more difficult.
Hip lifts (figure K)
Length of suspension trainer: knee height
With or without pulley
Starting position:
1. Lie on your back with your heels in the foot
loops.
2. Your arms are at your sides and your palms
flat on the floor.
End position:
3. Tense your core muscles.
4. Lift your pelvis off the ground by pressing your
heels into the foot loops.
5. Lower your pelvis again half way.
6. Repeat the exercise 15 times.
GB/CY
13
Page 14

Important: Make sure you keep your
body tensed and retain good posture.
Most floor exercises become more
difficult the further away you are from
the attachment point (and vice versa).
Side plank (figure L)
Length of suspension trainer: knee height
With or without pulley
Starting position:
1. Lie on your left hip and support yourself on
your lower left arm with your toes in the foot
loops under the attachment point.
2. Your legs are offset with the upper leg in front.
End position:
3. Tense your buttock and stomach muscles.
4. Lift your pelvis into a plank position and hold
for 10 seconds.
5. Return to the starting position.
6. Repeat the exercise 10 times on each side.
Important: Increase the intensity by
supporting your free arm on your hip or
extending it upwards.
Cycling in a press-up position
(figure M)
Length of suspension trainer: knee height
With pulley
Starting position:
1. Position your feet in the foot loops with your
toes pointing to the floor.
2. Take up a plank position with your arms
extended.
3. Pull one knee into your chest and extend the
other straight out behind you.
End position:
4. Tense your arm, stomach, and buttock
muscles.
5. Carry out circular movements by alternately
pulling one leg towards your chest and
extending the other straight out backwards.
6. Keep your upper body tensed and try to lift
the extended leg to buttock height.
7. Repeat the exercise 20 times.
Important: Keep your body tensed and
your posture straight.
To reduce the difficulty of the exercise
you can support yourself on the floor
on your lower arms. This exercise
strengthens your stomach and buttock
muscles.
One-sided press-ups (figure N)
Length of the suspension trainer: knee height
With pulley
Starting position:
1. Stand up straight facing away from the
attachment point.
2. Stand with your feet hip-width apart and hold
both handles with your arms extended.
3. Shift your weight forwards until you are at a
reasonable angle of resistance. Only the balls
of your feet are in contact with the floor.
End position:
4. Tense your arm, stomach, and buttock
muscles.
5. Pull one arm in to your body at an angle of
90 degrees, keeping your straight posture.
6. Return to the starting position by extending
your bent arm again.
7. Carry out the exercise 10 times on each side.
8. Repeat the exercise with the other arm.
Important: Please ensure that you keep
your whole body straight. This exercise
strengthens the muscles in your chest,
shoulders, and torso.
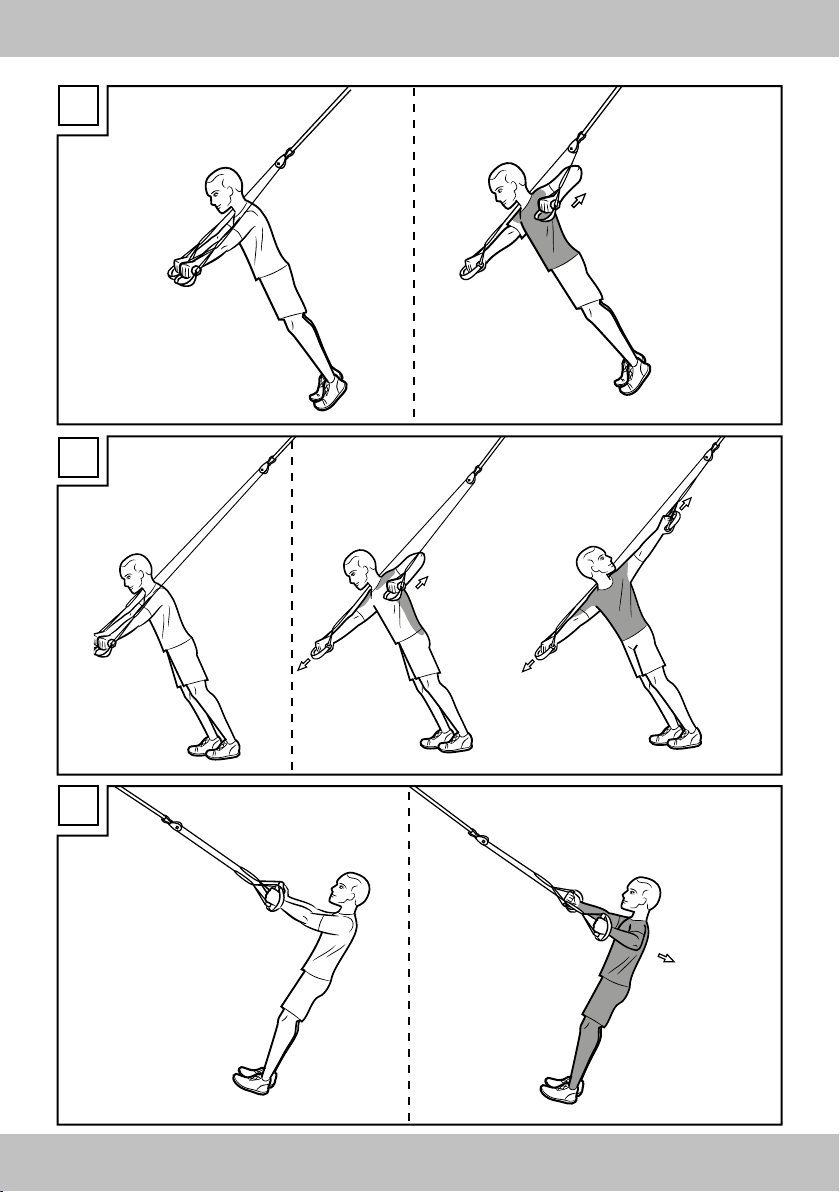
Arm press (figure O)
Length of suspension trainer: medium
With pulley
Starting position:
1. Stand up straight, facing away from the
attachment point.
2. Stand with your feet hip-width apart and hold
both handles with your arms extended.
3. Shift your weight forwards until you are at a
reasonable resistance angle.
End position:
4. Tense your arm, stomach, and buttock
muscles.
5. Pull your left arm into a 90-degree angle to
your body while simultaneously extending
your right arm further forwards.
14
GB/CY
Page 15

6. Turn your upper body to the left and move
your left arm past your body in order to
extend it out backwards. Look at your left
hand with your arms open wide. Keep your
body tensed.
7. Return to the starting position by bending your
left arm and leading it past your body.
8. Repeat the exercise with your other arm.
9. Carry out the exercise 10 times on each side.
Important: Please ensure that you keep
your whole body extended.
This exercise strengthens your chest,
back, shoulder, and torso muscles.
One-sided chest pull (figure P)
Length of the suspension trainer: medium
With pulley
Starting position:
1. Stand up straight, looking in the direction of
the attachment point.
2. Stand with your feet hip-width apart and your
body extended.
3. Hold both handles with extended arms and
your palms facing one another.
4. Shift your weight backwards until you are at
a reasonable resistance angle. Only your
heels are touching the floor and your toes are
pointing upwards.
End position:
5. Tense your arm, stomach, and buttock
muscles.
6. Pull one arm to an angle of 90 degrees to
your body, keeping your posture straight.
7. Return to the starting position by extending
your bent arm out again.
8. Carry out the exercise 15 times on each side.
9. Repeat the exercise with the other arm.
Important: Make sure you keep your
whole body extended.
Use the QR-code
You can watch the exercises
described here as a video using the
QR-code.
You will need a QR-code scanning
app on your phone or tablet to do
this.
1. Start the QR-code scanning app.
2. Hold your phone or tablet and use it to scan
the QR-code provided.
Stretching
Take sufficient time after each training session
to stretch. The following illustrates some simple
exercises for this purpose.
You should carry out the relevant exercises 3
times on each side for 5 seconds.
Neck muscles
1. Stand in a relaxed position. Pull your head
gently to one side with one hand, first to the
left and then to the right.
This exercise stretches the sides of your neck.
Arms and shoulders
1. Stand up straight with your knees slightly bent.
2. Bend your right arm behind your head until
your right hand is between your shoulder
blades.
3. Hold your right elbow with your left hand and
pull it backwards.
4. Change sides and repeat the exercise.
Leg muscles
1. Stand upright and lift one foot off the floor.
2. Circle it slowly, first in one direction then in the
other.
3. Change foot after a while.
Important: Make sure that your thighs
are parallel to one another. Push your
hips forwards, keeping your upper
body upright.
Care and storage
Always store the article in a dry, clean and
temperature-controlled place.
Notes on disposal
Dispose of the article and all associated components through an authorised disposal operation
or via your municipal administration. Follow the
current, valid regulations. If in doubt ask at your
disposal facility about environmentally friendly
disposal.
GB/CY
15
Page 16

3-year warranty
The product was produced with great care and
under constant supervision. You receive a threeyear warranty for this product from the date of
purchase. Please retain your receipt.
The warranty applies only to material and
workmanship and does not apply to misuse or
improper handling. Your statutory rights, especially the warranty rights, are not affected by this
warranty.
With regard to complaints, please contact the
following service hotline or contact us by e-mail.
Our service employees will advise as to the
subsequent procedure as quickly as possible.
We will be personally available to discuss the
situation with you.
Any repairs under the warranty, statutory guarantees or through goodwill do not extend the
warranty period. This also applies to replaced
and repaired parts.
Repairs after the warranty are subject to a
charge.
IAN: 282677
Service Great Britain
Tel.: 0871 5000 720
(£ 0.10/Min.)
E-Mail: deltasport@lidl.co.uk
Service Cyprus
Tel.: 8009 4409
E-Mail: deltasport@lidl.com.cy
You can also find spare parts for your product at:
www.delta-sport.com, category Service - Lidl Spare Parts
Service
16
GB/CY
Page 17
Srdačno vam čestitamo!
S vašom kupnjom ste odabrali vrlo kvalitetan
proizvod. Upoznajte se sa proizvodom prije
prve upotrebe.
Pročitajte pažljivo slijedeće upute za
korištenje.
Koristite proizvod samo kako je opisano i za
navedenu namjenu. Sačuvajte dobro ove upute.
Priložite bezuvjetno i ove informacije, ako proizvod dajete drugoj osobi.
Opseg isporuke /
Oznaka dijelova (sl. A)
1 x Upute za uporabu
1 x Trake za vježbanje s kolutom za skretanje
(1) pojas s omčom za učvršćenje
(2) sidro za vrata
(3) karabiner
(4) kotačić
(5) uže
(6) kopča za namještanje
(7) ručka
(8) omča za stopalo
(9) remen za produljenje
(10) pločica s upozorenjem za vrata
(11) vrećica za čuvanje
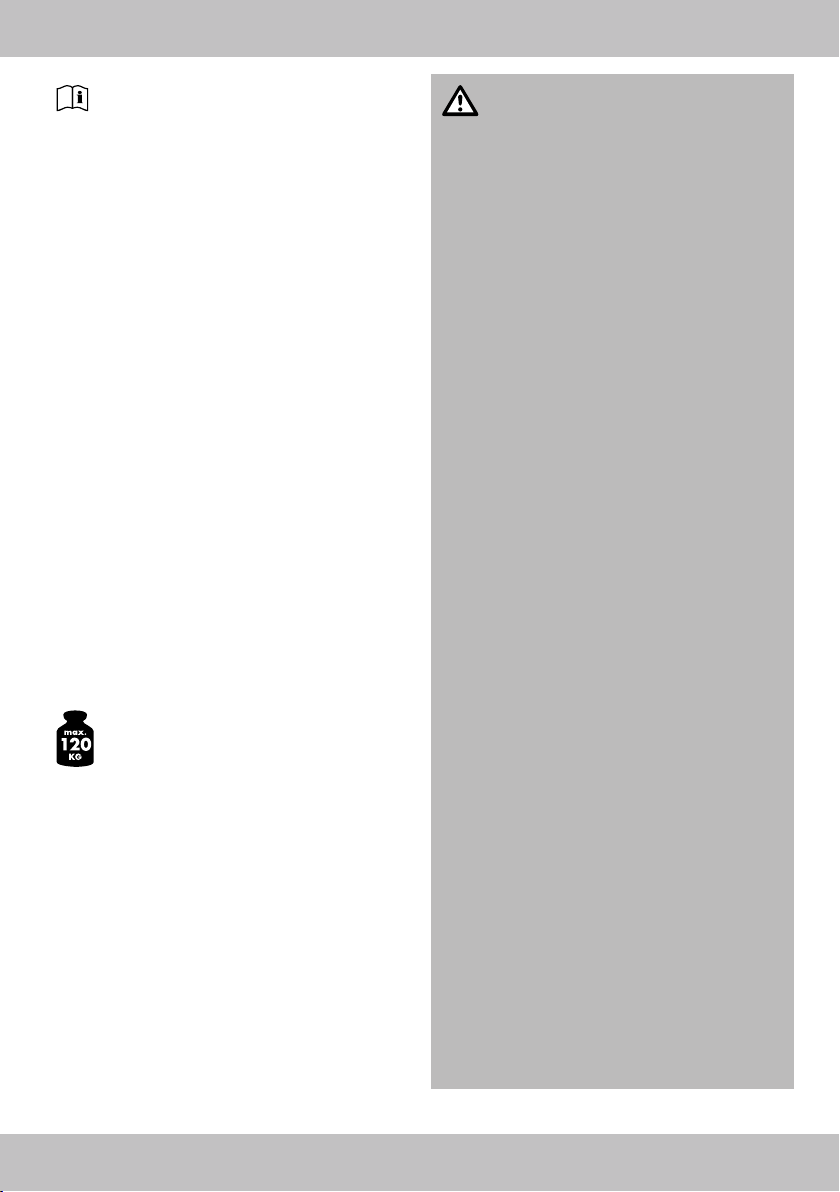
Tehnički podaci
Maks. težina korisnika: 120 kg
Namjenska uporaba
Ovaj proizvod je razvijen kao sprava za
vježbanje, pomoću koje možete vježbati
cijelo tijelo. Suspenzijska traka za vježbanje je
koncipirana za korištenje u privatne svrhe i nije
prikladna za korištenje u medicinske i komercijalne svrhe.
Suspenzijska je traka koncipirana za uporabu
u unutarnjem i vanjskom prostoru i smije se
pričvrstiti isključivo na vrata s isporučenim sidrom
za vrata te pomoću dodatnog karabinera na
šipke, grane stabala, kuke i slično.
Sigurnosne napomene
Opasnost od ozljeda!
• Savjetujte se sa svojim liječnikom prije nego
započnete s vježbanjem. Uvjerite se da ste
zdravstveno sposobni za vježbanje.
• Nemojte koristiti proizvod ako ste ozlijeđeni ili
ugroženog zdravlja.
• Ovaj proizvod je dimenzioniran za maksimal
nu tjelesnu težinu od 120 kg. Nemojte koristiti
proizvod ako je Vaša težina veća od toga.
• Vodite računa da se prije vježbanja trebate
zagrijati i vježbajte u skladu sa svojom trenut nom kondicijom. U slučaju prevelikog napre zanja i pretjeranog vježbanja prijete Vam
teške ozljede. U slučaju poteškoća, osjećaja
slabosti ili umora odmah prekinite s
vježbanjem i posavjetujte se s liječnikom.
• Držite upute za uporabu s predlošcima za
vježbanje uvijek nadohvat ruke.
• Trudnice bi trebale izvoditi ove vježbe samo u
dogovoru sa svojim liječnikom.
• Proizvod uvijek smije koristiti samo jedna
osoba.
• Ovaj proizvod nije predviđen za korištenje u
terapeutske svrhe.
• Oko zone vježbanja morate osigurati slobod
no područje prema svim stranama od cca.
0,6 m (sl. Q).
• Vježbajte samo na ravnoj i protukliznoj podlo zi.
• Nemojte koristiti proizvod u blizini stepenica i
podesta.
• Smjesta prekinite vježbanje ako osjećate
nesvjesticu, lupanje srca i dr. te odmah
potražite liječnika.
• Proizvod smije montirati samo odrasla osoba
kako bi se izbjegle ozljede uslijed nestručnog
rukovanja. Vodite računa da koristite proizvod
tek nakon što je u potpunosti montiran.
• Nemojte vježbati ako ste umorni ili dekoncen
trirani. Nemojte vježbati neposredno nakon
jela. Pričekajte s vježbanjem cca. 2 sata.
• Dostatno prozračite prostor za vježbanje, ali
izbjegavajte propuh.
• Za vrijeme vježbanja pijte dovoljno tekućine.
17HR
Page 18
• Nikada nemojte omotati proizvod oko glave,
vrata ili prsiju jer postoji opasnost od davljen ja!
• Nemojte koristiti proizvod u druge svrhe (kao
npr. zatezno uže, uže za tegljenje ili slično).
• Pozor! Suspenzijske trake pričvrstite
isključivo na vrata!
• Upozorenje! Opasnost od ozljeda!
Suspenzijske trake pričvrstite
isključivo na vrata koja se otvaraju
prema van (od Vas)! Suspenzijske
trake nikada nemojte pričvrstiti na
vrata koja se otvaraju prema unutra
(prema Vama)! Vrata bi se mogla
otvoriti, što bi moglo prouzročiti teške
ozljede!
• Upozorenje! Opasnost od ozljeda!
Uvijek zaključajte vrata na koja
pričvršćujete suspenzijske trake!
• Pozor! Dok vježbate uvijek koristite
isporučenu pločicu za vrata s upozo renjem! Vodite računa da je dobro
vidljiva i da se nalazi na drugoj strani
vrata.
Poseban oprez – opasnost od
ozljede za djecu!
• Držite djecu dalje od ambalažnog materijala
jer postoji opasnost od gušenja!
• Proizvod nije namijenjen za korištenje kao
igračka i kada se ne koristi mora se spremiti
tako da je nedostupan za djecu. Za vrijeme
vježbanja djeca ne smiju biti u dosegu sprave
za vježbanje kako bi se isključila opasnost od
ozljeda.
• Posebno upozorite djecu da ova sprava nije
igračka.
Opasnosti uslijed trošenja
proizvoda
• Proizvod se smije koristiti samo u besprijekor nom stanju. Prije svake uporabe provjerite je li
proizvod oštećen ili istrošen. Sigurnost suspen zijskih traka se može osigurati samo ako ih
redovito provjeravate glede oštećenja i
istrošenosti.
• Koristite isključivo originalne rezervne dije love.
• Zaštitite proizvod od ekstremnih temperatura,
sunca i vlage. Nepravilno skladištenje i
korištenje proizvoda mogu dovesti do njego vog preranog trošenja i mogućeg pucanja, što
za posljedicu može imati ozljede.
• Nemojte pričvrstiti proizvod na mjesta s oštrim
rubovima, npr. šarke za vrata, jer najlon puca
kada grebe o oštre rubove.
• Nemojte izvoditi pokrete piljenja s trakom!
Pokreti piljenja vode ka preranom trošenju
proizvoda.
• Redovito provjeravajte je li proizvod oštećen
ili istrošen. U slučaju oštećenja ne smijete više
koristiti proizvod.
Oprez od materijalnih šteta
• Nikada nemojte pustiti da suspenzijske trake
jednostavno padnu na pod odnosno povratno
udare o vrata. U protivnom može doći do
oštećenja vrata.
Napomene kod postavljanja/
montaža
• Izaberite područje za vježbanje veličine
cca. 3,00 x 1,80 m (D x Š).
• Pričvrstite suspenzijsku traku za vježbanje na
visini između 1,80 i 2,30 m.
• Vježbajte samo na ravnoj i protukliznoj podlo zi.
• Suspenzijsku traku montirajte isključivo na
vrata koja se otvaraju prema van (od Vas
prema van) (sl. B).
• Postavite sidro na sredinu vrata (sl. B).
• Čvrsto zaključajte vrata.
• Pozor! Opasnost od ozljeda!
Uvijek zaključajte vrata!
• Koristite uvijek isporučenu pločicu s
upozorenjem za vrata (10)!
• Osigurajte da su vrata na koja učvršćujete
sidro (2) stabilna i robusna, da mogu nositi
Vašu tjelesnu težinu i da sidro čvrsto sjedi.
Za provjeru nekoliko puta čvrsto povucite uže
(5) (sl. C).
18
HR
Page 19

Montaža/korištenje dodatnog
karabinera
Pomoću remena za produljenje (9) trake za
vježbanje možete montirati na šipke, grane
drveta ili kuke (sl. H). U tu svrhu uklonite sidro za
vrata (2) iz pojasa (1).
Upozorenje! Uvijek provjerite nosivost
točki učvršćenja kako biste osigurali dovoljnu
sigurnosnu rezervu. U slučaju da to ne učinite
postoji opasnost od teških ozljeda.
Skraćivanje i produljivanje
suspenzijske trake
Napomena: prije namještanja duljine
svaki put provjerite da uže (5) nije
uvrnuto!
Skraćivanje
1. Čvrsto držite jednom rukom kraj užeta (5a), a
drugom rukom povucite kopču za namještanje
(6) u smjeru točke učvršćenja (sl. D).
2. Ponovite postupak za drugu ručku (7).
Produljenje
1. Čvrsto držite jednom rukom kraj užeta (5a), a
drugom rukom povucite kopču za namještanje
(6) u smjeru ručke (7) (sl. D).
2. Ponovite postupak za drugu ručku (7).
Premještanje točke sidrenja
Ako su trake za vježbanje načelno predugačke,
možete premjestiti točku sidrenja.
1. U tu svrhu otvorite zatvarač na čičak (2a) na
sidru za vrata (2) i izvadite sidro iz pojasa (1)
(sl. G).
2. Stavite ga u jednu od donjih omči i zatim
osigurajte sidro zatvaračem na čičak na omči
(sl. G).
Pozor! Postavite sidro za vrata (2) isključivo
u omče za sidrenje!
Pozor! Opasnost od ozljeda!
Nikada nemojte radi skraćivanja omotati pojas
(1) oko sidra za vrata (2). Pojas se može
odvezati!
Preporučena duljina
suspenzijske trake za
vježbanje
Namjestite duljinu suspenzijske trake
za vježbanje za svaku vježbu kao što je
dolje opisano:
Duljina suspenzijske trake: kratka
Skratite suspenzijsku traku što je više moguće.
Duljina suspenzijske trake: srednja duljina
Namjestite suspenzijsku traku na srednju duljinu
tako da crne omče za namještanje duljine
pričvrstite za plave dvostruke oznake koje su
ušivene u sredinu trake.
Duljina suspenzijske trake: visina koljena
Namjestite suspenzijsku traku za vježbanje tako
da se ručke nalaze na visini malo ispod Vaših
koljena.
Duljina suspenzijske trake: dugačka
Izvucite pojaseve suspenzijske trake do kraja,
tako da ručke vise cca. 7 cm iznad poda.
Skidanje kotačića
Imate mogućnost ukloniti kotačić (4) iz traka za
vježbanje ili uže učvrstiti (5) izravno na pojas
(1) (sl. E).
1. Skinite karabiner (3) s pojasa (1).
2. Otkačite karabiner iz kotačića (4).
3. Skinite uže (5) s kotačića.
4. Omotajte uže dvostruko, tako da nastane
omča.
5. Provucite omču kroz posljednju sidrenu omču
pojasa (1).
6. Navucite omču preko cijelog pojasa i čvrsto
povucite omču tako da nastane čvor.
Važno: vodite računa da je uže iste duljine. Provjerite to tako da ručke držite
jednu pored druge (sl. F).
19HR
Page 20

Postavljanje kotačića
Postavite kotačić obrnutim redoslijedom, kako je
opisano na slici E.
1. Skinite uže (5) s pojasa (1).
2. Postavite uže preko kotačića (4) i postavite
rupe kotačića jednu iznad druge.
3. Utaknite karabiner (3) kroz obje rupe
kotačića i pričvrstite ga na pojas.
Opće upute za vježbanje
Tijek vježbanja
• Nosite udobnu sportsku odjeću i tenisice.
• Zagrijte se prije svakog vježbanja i završite
vježbanje postupno.
• Između vježbi pravite dovoljno dugačke
stanke i pijte dovoljno tekućine.
• Kao početnik nikada ne vježbajte s prevelikim
opterećenjem. Polako povećajte intenzitet
vježbanja.
• Izvodite sve vježbe ravnomjerno, bez trzaja i
polako.
• Pazite na ravnomjerno disanje. Kod
naprezanja izdahnite i kod opuštanja
udahnite.
• Pazite na pravilno držanje tijela za vrijeme
vježbanja.
Zagrijavanje
Prije svakog vježbanja uzmite si dovoljno
vremena za zagrijavanje. U nastavku ćemo
Vam opisati nekoliko jednostavnih vježbi za
zagrijavanje. Dotične vježbe trebali biste
ponoviti 2 do 3 puta.
Mišići vrata
1. Polako okrenite glavu ulijevo i udesno.
Ponovite ovu kretnju 4-5 puta.
2. Lagano kružite glavom najprije u jednom, a
zatim u drugom smjeru.
Ruke i ramena
1. Prekrižite ruke iza leđa i povucite ih pažljivo
prema gore. Ako pritom nagnete gornji dio
tijela prema naprijed, svi će se mišići
optimalno zagrijati.
2. Kružite s oba ramena istodobno prema
naprijed i promijenite smjer nakon jedne
minute.
3. Povucite ramena u smjeru ušiju i zatim ih opet
spustite.
4. Kružite naizmjenično lijevom i desnom rukom
prema naprijed i nakon jedne minute prema
natrag.
Važno: ne zaboravite pritom i dalje
mirno disati!
Predložene vježbe
U nastavku ćemo Vam pokazati neke od velikog
broja mogućih vježbi.
Napomena: kod nekih vježbi možete birati
hoćete li vježbati sa ili bez kotačića. Ako
želite vježbati bez kotačića, morate pričvrstiti
uže izravno na pojas. Više informacija o tome
pročitajte u odlomku „Skidanje kotačića“.
Pozor! Obavezno nosite protukliznu
sportsku obuću!
Savijanje noge (sl. I)
Duljina suspenzijske trake: dugačka
Sa ili bez kotačića
Početni položaj:
1. Lezite s licem prema gore i stavite pete u
omče za stopala.
Napomena: za udobniji položaj stopala
gurnite plastične ručke prema gore.
2. Ruke leže bočno pored tijela.
Završni položaj:
3. Zategnite trbušne mišiće.
4. Povucite pete prema zdjelici.
5. Polako se vratite u početni položaj.
6. Ponovite vježbu 10 puta.
Važno: za sve vrijeme kretanja čvrsto
pritisnite pete u omče za stopala.
Pojačajte intenzitet vježbanja tako da
podignete zdjelicu za vrijeme izvođenja
vježbe.
20
HR
Page 21

Trbušnjak (sl. J)
Duljina suspenzijske trake: dugačka
Sa ili bez kotačića
Početni položaj:
1. Umetnite stopala s prstima prema dolje u
omče za stopala.
Napomena: za udobniji položaj stopala
gurnite plastične ručke prema gore.
2. Zauzmite položaj daske na šakama.
Završni položaj:
3. Zategnite mišiće stražnjice i trbuha.
4. Povucite koljena prema prsima.
5. Odite u početni položaj.
6. Ponovite vježbu 15 puta.
Važno: pazite da tijelo bude napeto i
zauzmite dobar položaj tijela. Većina
vježbi u položaju daske na podu su
lakše kada se poduprete podlakticama.
Oslonite li se s ispruženim rukama na
šake, povećava se stupanj zahtjevnosti.
Podizanje kukova (sl. K)
Duljina suspenzijske trake: dugačka
Sa ili bez kotačića
Početni položaj:
1. Lezite u leđnom položaju s petama u omčama
za stopala.
2. Ruke su bočno pored tijela, dlanovi ravno na
podu.
Završni položaj:
3. Napnite trup.
4. Podignite zdjelicu od poda tako da pritisnete
petama u omče za stopala.
5. Ponovno spustite zdjelicu na pola visine.
6. Ponovite vježbu 15 puta.
Važno: pazite da tijelo bude napeto i
zauzmite dobar položaj tijela.
Većina vježbi na podu su utoliko teže,
što ste više udaljeni od točke učvršćenja
(i obratno).
Bočna daska (sl. L)
Duljina suspenzijske trake: dugačka
Sa ili bez kotačića
Početni položaj:
1. Lezite na lijevi kuk i oslonjeni na donju lijevu
ruku, s nožnim prstima u omčama ispod točke
učvršćenja.
2. Noge su pomaknute, gornja je naprijed.
Završni položaj:
3. Zategnite mišiće stražnjice i trbuha.
4. Podignite zdjelicu u položaj daske i držite je
tako 10 sekundi.
5. Vratite se opet u početni položaj.
6. Ponovite vježbu nakon 10 ponavljanja na
drugoj strani
Važno: povećajte intenzitet tako da
slobodnu ruku oslonite na kuk ili je
ispružite prema gore.
Vožnja bicikla u položaju skleka
(sl. M)
Duljina suspenzijske trake: visina koljena
S kotačićem
Početni položaj:
1. Smjestite stopala s prstima prema podu u
omče za stopala.
2. Zauzmite položaj daske s ispruženim rukama.
3. Povucite jedno koljeno ka prsima i ispružite
drugo ravno prema natrag.
Završni položaj:
4. Zategnite mišiće ruku, trbuha i stražnjice.
5. Izvodite kružne pokrete, tako da naizmjence
povučete jednu nogu ka prsima, a drugu
ispružite ravno prema natrag.
6. Napnite gornji dio tijela i pokušajte ispruženu
nogu podići u visinu stražnjice.
7. Ponovite vježbu 20 puta.
Važno: pazite da tijelo bude napeto
i zauzmite ravan položaj tijela. Kako
biste vježbu učinili manje napornom,
naslonite se podlakticama na pod. Ova
vježba jača mišiće trbuha i stražnjice.
HR
21
Page 22

Jednostrani sklek (sl. N)
Duljina suspenzijske trake: visina koljena
S kotačićem
Početni položaj:
1. Stanite uspravno, pogleda usmjerenog od
točke učvršćenja.
2. Stanite u širini kukova i držite obje ručke s
ispruženim rukama.
3. Premjestite težinu prema naprijed dok ne
dođete u odgovarajući kut otpora. Stopala
dodiruju pod još samo gornjim dijelom.
Završni položaj:
4. Zategnite mišiće ruku, trbuha i stražnjice.
5. Povucite jednu ruku pod kutom od 90
stupnjeva prema tijelu, pritom sačuvajte ravno
držanje.
6. Vratite se natrag u početni položaj tako da
ponovno ispružite savijenu ruku.
7. Izvedite vježbu po svakoj strani 10 puta.
8. Ponovite ovu vježbu s drugom rukom.
Važno: vodite računa da istegnete cijelo
tijelo. S ovom vježbom jačate mišiće
prsiju, ramena i trupa.
Potezanje snagom (sl. O)
Duljina suspenzijske trake: srednja duljina
S kotačićem
Početni položaj:
1. Stanite uspravno, pogleda usmjerenog od
točke učvršćenja.
2. Stanite u širini kukova i držite obje ručke s
ispruženim rukama.
3. Premjestite težinu prema naprijed dok ne
dođete u odgovarajući kut otpora.
Završni položaj:
4. Zategnite mišiće ruku, trbuha i stražnjice.
5. Povucite lijevu ruku pod kutom od 90
stupnjeva prema tijelu. Istodobno ispružite
desnu ruku dalje naprijed.
6. Okrenite gornji dio tijela ulijevo i provucite
lijevu ruku uz tijelo kako biste je ispružili
prema natrag. Pogled Vam je usmjeren na
lijevu šaku, a ruke su široko otvorene.
Zadržite pritom tijelo napetim.
7. Vratite se u početni položaj tako da savijete
lijevu ruku i provučete je uz tijelo.
8. Ponovite ovu vježbu s drugom rukom.
9. Izvedite vježbu po svakoj strani 10 puta.
Važno: vodite računa da istegnete cijelo
tijelo. S ovom vježbom jačate mišiće
prsiju, leđa, ramena i trupa.
Jednostrano istezanje prsiju (sl. P)
Duljina suspenzijske trake: srednja duljina
S kotačićem
Početni položaj:
1. Stanite uspravno, pogleda uprtog u smjeru
točke učvršćenja traka.
2. Stanite stopalima u širini kukova, tijelo je
ispruženo.
3. Držite obje ručke s ispruženim rukama,
dlanovi su okrenuti jedan prema drugom.
4. Premjestite težinu prema natrag dok ne
dođete u odgovarajući kut otpora. Samo pete
dodiruju pod, vrhovi nožnih prstiju pokazuju
prema gore.
Završni položaj:
5. Zategnite mišiće ruku, trbuha i stražnjice.
6. Povucite jednu ruku pod kutom od 90
stupnjeva prema tijelu, pritom sačuvajte ravno
držanje.
7. Odite natrag u početni položaj tako da
ponovno ispružite savijenu ruku.
8. Izvedite vježbu po svakoj strani 15 puta.
9. Ponovite ovu vježbu s drugom rukom.
Važno: vodite računa da istegnete cijelo
tijelo.
Korištenje QR-koda
Imate mogućnost putem QR-koda
ovdje opisane vježbe pogledati u
obliku video-filma.
U tu svrhu vam je za mobitel/tablet
potreban App QR-kod.
1. Aktivirajte App QR-kod.
2. Držite mobitel/tablet i skenirajte njime
QR-kod.
Istezanje
Nakon svakog vježbanja uzmite si dovoljno
vremena za istezanje. U nastavku ćemo
Vam opisati nekoliko jednostavnih vježbi za
zagrijavanje. Ove vježbe trebali biste izvoditi
triput po svakoj strani u trajanju od 5 sekundi.
22
HR
Page 23

Mišići vrata
1. Stanite opušteno. Nježno povucite glavu
jednom rukom najprije ulijevo, a zatim
udesno. Ovom se vježbom istežu obje strane
vrata.
Ruke i ramena
1. Stanite uspravno, koljena su lagano savijena.
2. Provucite desnu ruku iza glave, dok ne dođe u
položaj između lopatica.
3. Lijevom rukom uhvatite desni lakat i povucite
ga prema natrag.
4. Promijenite stranu i ponovite vježbu.
Mišići nogu
1. Stanite uspravno i podignite jedno stopalo od
poda.
2. Lagano kružite stopalom najprije u jednom, a
zatim u drugom smjeru.
3. Nakon nekog vremena promijenite stopalo.
Važno: vodite računa da natkoljenice
ostanu paralelno jedna uz drugu.
Gurnite pritom zdjelicu prema naprijed,
a gornji dio tijela ostaje uspravljen.
Njega i skladištenje
Suh i čist proizvod skladištite u grijanom prostoru.
Upute za zbrinjavanje
Zbrinite proizvod i sve pripadajuće komponente
u pogonu za zbrinjavanje ili putem općinske
komunalne uprave. Poštujte propise koji su trenutno na snazi. U slučaju nedoumice raspitajte
se kod svoje komunalne uprave o ekološkom
zbrinjavanju.
U slučaju reklamacija obratite se na ispod navedeni kontakt servisne službe ili nam pošaljite
e-mail. Naši djelatnici će što je moguće brže s
Vama dogovoriti daljnju proceduru. U svakom
slučaju savjetovat ćemo Vas osobno.
Jamstveni period se ne produžuje u slučaju
popravka koji se izvedu na temelju zakonskog
jamstva ili kulantnosti. To vrijedi isto i za izmijenjene i popravljene dijelove.
Nakon isteka jamstva za izvršene popravke se
uzima novčana naknada.
IAN: 282677
Servis Hrvatska
Tel.: 0800 777 999
E-Mail: deltasport@lidl.hr
Rezervne dijelove za Vaš proizvod naći ćete i na:
www.delta-sport.com, rubrika servis – servis rezervnih dijelova
Lidl
3 godine jamstva
Proizvod je izrađen uz veliku brižljivost i pod
stalnom kontrolom. Za ovaj proizvod dobivate tri
godine jamstva od kupovnog datuma. Molimo,
račun dobro pospremite. Jamstvo važi samo
za greške na materijalu ili greške nastale kod
proizvodnje i prestaje važiti kod zloupotrebe ili
nestručnog rukovanja.
Vaša zakonska prava neće biti ograničena zbog
ovog jamstva, naročito pravo na jamčenje.
HR
23
Page 24

Felicitări! Cu această achiziție ați
ales un produs de calitate. Înainte de utilizare trebuie să vă familiarizați cu produsul
dumneavoastră. Citițiinstrucțiunilede
utilizarecuatenție.Utilizați produsul conform descrierii și în scopurile de
utilizare descrise. Transmiteți această
documentație mai departe la înstrăinarea
produsului unei alte persoane.
Furnitura/
Denumireapieselor(g.A)
1 x Instrucţiuni de utilizare
1 x Benzi suspendate cu scripete pentru
antrenament
(1) Chingă cu buclă de ancorare
(2) Ancoră pentru ușă
(3) Carabinieră
(4) Scripete
(5) Coardă
(6) Cataramă de ajustare
(7) Mâner
(8) Chingi pentru glezne
(9) Centură de extensie
(10) Indicator de atenționare pentru
ușă
(11) Sac de depozitare
Date tehnice
Greutatea maximă a utilizatorului:
120 kg
Utilizareconform
destinaţiei
Acest articol a fost conceput ca un instrument de antrenament, cu care vă puteţi
antrena întregul corp. Sfoara de antrenament a fost concepută pentru utilizare în
domeniul privat şi nu este adecvată pentru
scopuri medicale sau comerciale.
Articolul a fost conceput pentru utilizarea
în spații interioare și exterioare și trebuie
montat doar pe ușile cu ancoră inclusă
precum și pe bare sau crengi ale copacilor,
cârlige sau ceva asemănător, cu ajutorul
carabinei suplimentare.
Indicațiiprivind
siguranța
Pericolderănire!
• Consultați medicul înainte de a începe
antrenamentul. Asigurați-vă că sunteți
apt din punct de vedere medical pentru
antrenament.
• Nu utilizați articolul dacă sunteți rănit
sau limitat din punct de vedere al
sănătății.
• Acest articol este prevăzut pentru o
greutate corporală de 120 kg.
Nu utilizați articolul dacă depășiți
această greutate.
• Nu uitați să efectuați încălzirea întot deauna înainte de antrenament și să vă
antrenați corespunzător capacității dvs.
actuale. În cazul unui efort prea mare
și al antrenării în exces, există riscul unor
leziuni severe. În caz de dureri, senzație
de slăbiciune sau oboseală, întrerupeți
antrenamentul imediat și consultați medi cul.
• Păstrați întotdeauna la îndemână
instrucțiunile de utilizare împreună cu
exercițiile.
• Femeile însărcinate vor efectua antrena
mentul numai după consultarea medicu lui.
• Articolul va folosit întotdeauna de către
o singură persoană o dată.
• Articolul nu este folosit în scopuri tera peutice.
• În jurul zonei de antrenare trebuie să
existe un spațiu liber de cca 0,6 m în
toate părțile (g. Q).
• Antrenați-vă numai pe o suprafață plană
și antiderapantă.
• Nu utilizați articolul în apropierea
scărilor și pragurilor.
• Opriţi imediat antrenamentul dacă aveţi
ameţeli, simțiți palpitații la inimă etc. și
consultați imediat un medic.
• Articolul trebuie montat numai de către
un adult pentru a preveni leziunile
apărute ca urmare a manipulării
necorespunzătoare.
24 RO
Page 25

Aveți grijă să utilizați articolul abia după
montajul complet.
• Nu vă antrenați dacă sunteți obosit sau
nu sunteți concentrat. Nu vă antrenați
imediat după mese. Așteptați cca 2 ore
până să începeți antrenamentul.
• Aerisiți sucient spațiul de antrenament,
dar evitați curentul.
• Beți suciente lichide în timpul antrena mentului.
• Nu înfășurați niciodată articolul în jurul
capului, gâtului sau pieptului. Pericol de
strangulare!
• Nu utilizați articolul în alte scopuri (de
ex. pe post de cablu de ancorare, cablu
de remorcare sau similar).
•Atenție!Fixațidispozitivulde
antrenareculațuriexclusivde
uși!
•Avertizare!Pericolderănire!
Fixațidispozitivuldeantrenarecu
lațuriexclusivdeușicaresede schidspreexterior(dinspredvs.)!
Montațidispozitivuldeantrenare
culațuriexclusivdeușicarese
deschidspreinterior(înspredvs.).
Ușas-arputeaîntoarce,ceeace
poateducelaleziunigrave!
•Avertizare!Pericolderănire!
Închidețiîntotdeaunaușadecare
xațidispozitivuldeantrenarecu
lațuri!
•Atenție!Utilizațiîntotdeaunain dicatoruldeatenționarepentru
ușăinclusînpachetuldelivrare!
Avețigrijăsăpoatăcititșisăse
aepecealaltăparteaușii.
Atențiesporită-pericolde
rănirepentrucopii!
• Țineți copiii la distanță de materialul de
ambalare. Există pericolul de asxiere!
• Articolul nu poate folosit ca jucărie, iar
în cazul în care nu este utilizat, trebuie
depozitat într-un loc inaccesibil copiilor.
În timpul antrenării, copiii nu trebuie să
se ae în raza de acțiune a articolului,
pentru a exclude pericolele de rănire.
• Specicați-le copiilor faptul că articolul
nu reprezintă o jucărie.
Pericoledincauzauzurii
• Articolul trebuie utilizat numai în stare
perfectă de funcţionare. Vericați artico lul înainte de ecare utilizare cu privire
la deteriorări sau uzură.
Siguranța aparatului de antrenament cu
corzi poate asigurată numai dacă
acesta este vericat periodic în ceea ce
privește deteriorările și uzura.
• Utilizați exclusiv piese de schimb origi nale.
• Protejați articolul împotriva temperaturilor
ridicate, soarelui și umidității.
Depozitarea și utilizarea
necorespunzătoare a articolului pot duce
la uzura prematură și la posibile rupturi
ale structurii acestuia, ceea ce poate
cauza leziuni.
• Nu xați articolul de locuri cu margini
ascuțite, de ex. balamale pentru uși.
Nailonul se rupe dacă se atinge de
margini ascuțite.
• A nu se tăia cu ferăstrăul! Mișcările
ferăstrăului duc la uzura prematură.
• Vericați periodic articolul în vederea
depistării deteriorărilor sau uzurii.
În caz de deteriorări, produsul nu va mai
folosit.
Precauțieîmpotrivadaunelor
materiale
• Nu permiteți căderea aparatului de
antrenament cu corzi, resp. ricoșarea
acestuia în ușă. În caz contrar, se poate
ajunge la deteriorarea ușii.
Indicaţiidemontaj/Montaj
• Alegeţi o zonă de antrenament de
cca 3,00 x 1,80 m (L x l).
• Fixaţi sfoara de antrenament la o
înălţime între 1,80 şi 2,30 m.
• Antrenaţi-vă doar pe o suprafaţă dreaptă
şi antiderapantă.
• Montaţi sfoara de antrenament exclusiv
de uşile care se deschid în exterior
(în partea opusă dumneavoastră) (g. B).
25RO
Page 26

• Aşezaţi ancora sus pe mijlocul uşii
(g. B).
• Închideţi bine uşa.
•
Atenţie!Pericolde
accidentare!Încuiaţiîntotdeauna
uşa!
•Utilizațiîntotdeaunaindicatorul
deatenționarepentruușăfurni zat(10)!
• Asigurați-vă că ușa pe care xați ancora
pentru ușă (2) este stabilă și robustă, că
susține greutatea dumneavoastră
corporală și că ancora stă xă.
Pentru a verica, trageți de câteva ori
ferm de coardă (5) (g. C).
Montarea/Utilizareacarabinei
suplimentare
Cu ajutorul centurii de extensie (9) se poate
monta aparatul de antrenament cu corzi pe
stâlpi, crengi de copaci sau cârlige (g. H).
În acest scop îndepărtați ancora pentru ușă
(2) din chinga cu buclă de ancorare (1).
Avertizare!Vericați întotdeauna
sarcina nominală a punctelor de asamblare
pentru a asigura existența măsurilor de
siguranță. În caz contrar, există pericolul
accidentărilor grave.
Scurtareaşiprelungirea
sforiideantrenament
Indicație!Înaintedeajustare,
asigurați-văcănuesterăsucită
coarda(5)!
Scurtarea
1. Țineți bine cu o mână capătul corzii (5a)
și trageți cu cealaltă mână catarama de
ajustare (6) în direcția punctului de xare
(g. D).
2. Repetați procedeul pentru celălalt mâner
(7).
Prelungirea
1. Țineți bine cu o mână capătul corzii (5a)
și trageți cu cealaltă mână catarama de
ajustare (6) în direcția mânerului (7)
(g. D).
26 RO
2. Repetați procedeul pentru celălalt mâner
(7).
Deplasareapunctuluide
ancorare
Dacă aparatul de antrenament cu corzi
este prea lung, puteți muta punctul de
ancorare.
1. Deschideți în acest scop închizătoarea
cu scai (2a) a ancorei pentru ușă (2) și
scoateți ancora din chinga cu buclă de
ancorare (1) (g. G).
2. Poziționați ancora într-una dintre buclele
inferioare și asigurați apoi ancora de
ușă prin intermediul închizătorii cu scai
de pe buclă (g. G).
Atenție! Poziționați ancora pentru ușă
(2) exclusiv în bucla de ancorare!
Atenție! Pericol de vătămare!
Niciodată să nu înfășurați chinga cu buclă
de ancorare (1) în jurul ancorei pentru ușă
(2) în vederea scurtării. Chinga cu buclă
de ancorare se poate slăbi!
Lungimearecomandatăa
sforiideantrenament
Reglaţilungimeasforiide
antrenamentpentruecare
exerciţiuaşacumestedescrismai
jos:
Lungime sfoară de antrenament: Scurtă
Scurtaţi sfoara de antrenament atât de
scurt cât este posibil.
Lungime sfoară de antrenament:
Lungime medie
Reglați aparatul de antrenament cu corzi
la o lungime medie, xând buclele negre
de ajustare pe semnele duble de culoare
albastră, cusute la mijlocul benzii.
Lungime sfoară de antrenament:
Lungime până la genunchi
Reglaţi sfoara de antrenament astfel încât
mânerele pe înălţime să se ae puţin sub
genunchii dumneavoastră.
Lungime sfoară de antrenament: Lungă
Scoateţi benzile sforii de antrenament
complet, astfel încât mânerele să atârne
cca 7 cm deasupra solului.
Page 27

Îndepărtareascripetelui
Aveți posibilitatea de a îndepărta scripetele(4) de pe aparatul de antrenament cu
corzi sau de a xa coarda (5) direct pe
chinga cu buclă de ancorare (1) (g. E).
1. Slăbiţi carabiniera (3) de pe chinga cu
buclă de ancorare (1).
2. Scoateți carabiniera din scripete (4).
3. Îndepărtați coarda (5) din scripete.
4. Introduceți coarda dublă, astfel încât să
rezulte o buclă.
5. Introduceți bucla prin ultima buclă de
ancorare a chingii (1).
6. Trageți bucla prin întreaga chingă și
strângeți bucla, astfel încât să rezulte un
nod.
Important:Avețigrijăsăeegală
coarda.Vericați-oținândmânerele
unullângăcelălalt(g.F).
Atașareascripetelui
Atașați scripetele conform descrierii din
gura E, în ordine inversă.
1. Slăbiţi coarda (5) de pe chinga cu buclă
de ancorare (1).
2. Așezați coarda peste scripete (4) și
poziționați oriciile scripetelui unul
peste celălalt.
3. Introduceți carabiniera (3) prin ambele
oricii ale scripetelui și xați-o pe
chingă.
Indicațiigeneraleprivind
antrenamentul
Proceduradeantrenament
• Purtați îmbrăcăminte și încălțăminte sport
confortabilă.
• Încălziți-vă înainte de ecare antrenament
și efectuați antrenamentul spre sfârşit din
ce în ce mai uşor.
• Între exerciții, faceți pauze sucient de
lungi și beți suciente lichide.
• Ca începător, nu vă antrenați niciodată
cu o sarcină prea mare. Creșteți încet
intensitatea antrenamentului.
• Efectuați toate exercițiile în mod uniform,
nu sacadat și rapid.
• Acordați atenție respirației uniforme.
Expirați la depunerea efortului și inspirați
la revenire.
• Acordați atenție poziției corecte a
corpului în timpul efectuării exercițiilor.
Încălzirea
Acordați sucient timp încălzirii înainte
de ecare antrenament. În continuare,
vă prezentăm câteva exerciții simple în
acest scop. Trebuie să repetați respectivele
exerciții de 2 până la 3 ori.
Mușchiicefei
1. Întoarceţi încet capul spre stânga și spre dr eapta. Repetați această mișcare de 4-5 ori.
2. Rotiți apoi capul încet, mai întâi într-o
direcție, apoi în cealaltă.
Brațeșiumeri
1. Împreunați-vă palmele în spate și trageți le cu grijă în sus. Dacă înclinați în
acelaşi timp și trunchiul în față, toți
mușchii se încălzesc în mod optim.
2. Rotiți simultan ambii umeri în față și după
un minut schimbați direcția.
3. Trageți apoi umerii în direcția urechilor și
lăsaţi apoi umerii din nou să cadă.
4. Rotiți alternativ brațul stâng și drept în
față și după un minut în spate.
Important:Nuuitațisăcontinuați
sărespirațiliniștit!
Sugestiiprivindexercițiile
În cele ce urmează vă sunt prezentate
câteva din mai multe exerciții.
Indicație: La unele exerciții, puteți alege
să vă antrenați cu sau fără scripete.
Dacă doriți să vă antrenați fără scripete,
trebuie să xați coarda direct pe chinga cu
buclă de ancorare. Informații detaliate în
acest scop găsiți în capitolul „Îndepărtarea
scripetelui”.
Atenție!Purtațiobligatoriu
încălțămintesportantiderapantă!
27RO
Page 28

Exercițiudeîndoireapiciorului
(g.K)
Lungimea aparatului de antrenament cu
corzi: la înălțimea genunchilor
Cu sau fără scripete
Pozițieinițială:
1. Așezați-vă orizontal, cu fața în sus și
puneți călcâiele în curelele pentru tălpi.
Indicație:Pentru a asigura o poziție
mai confortabilă a tălpii, împingeți
mânerele din material plastic în sus.
2. Brațele stau lateral pe lângă corp.
Pozițienală:
3. Încordați musculatura abdomenului.
4. Trageți călcâiele spre bazin.
5. Reveniți încet în poziția inițială.
6. Repetați exercițiul de 10 ori.
Important:întimpulefectuării
întregiimișcări,apăsațicălcâiele
încurelelepentrutălpi.Amplicați
intensitatearidicândbazinulîn
timpulexercițiului.
Crunch(g.L)
Lungimea aparatului de antrenament cu
corzi: la înălțimea genunchilor
Cu sau fără scripete
Pozițieinițială:
1. Așezați tălpile cu degetele în jos, în
curelele pentru tălpi.
Indicație: Pentru a asigura o poziție
mai confortabilă a tălpii, împingeți
mânerele din material plastic în sus.
2. Așezați-vă cu palmele pe podea.
Pozițienală:
3. Încordați musculatura feselor și a
abdomenului.
4. Trageți genunchii înspre piept.
5. Reveniți în poziția inițială.
6. Repetați exercițiul de 15 ori.
Important:acordațiatențiesporită
încordăriicorpuluișimenținerii
pozițieicorecteacorpului.
Majoritateaexercițiilorefectuate
pepodeasuntmaiușoaredacăvă
sprijinițipeantebrațe.
Sprijinindu-văpepalme,cubrațele
întinse,graduldedicultateeste
sporit.
Ridicareașoldurilor(g.M)
Lungimea aparatului de antrenament cu
corzi: la înălțimea genunchilor
Cu sau fără scripete
Pozițieinițială:
1. Așezați-vă culcat pe spate, cu călcâiele
în curelele pentru tălpi.
2. Brațele se aă așezate lateral, pe lângă
corp, iar palmele sunt pe podea.
Pozițienală:
3. Încordați trunchiul.
4. Ridicați bazinul de pe podea, apăsând
călcâiele în curelele pentru tălpi.
5. Coborâți din nou bazinul la jumătatea
înălțimii.
6. Repetați exercițiul de 15 ori.
Important:acordațiatenție
încordăriicorpuluișipozițieicorecte
acorpului.Majoritateaexercițiilor
pepodeasuntmaidicilecucâtvă
aațimaidepartedepunctulde
xare(șiinvers).
Poziţiascândurălaterală
(g.N)
Lungimea aparatului de antrenament cu
corzi: la înălțimea genunchilor
Cu sau fără scripete
Pozițieinițială:
1. Așezați-vă pe șoldul stâng și sprijinit
pe brațul inferior, stâng, cu degetele
picioarelor în curelele pentru tălpi, sub
punctul de xare.
2. Picioarele sunt echilibrate, cel superior
este în față.
Pozițienală:
3. Încordați musculatura feselor și a
abdomenului.
4. Ridicați bazinul într-o poziție pe podea și
mențineți-l timp de 10 secunde.
5. Reveniți în poziția inițială.
6. Repetați exercițiul după 10 repetări pe
partea cealaltă
28 RO
Page 29

Important:creștețiintensitatea
sprijinindbrațulliberpeșoldsau
întinzându-lînsus.
Bicicletaînpozițiedeotare
(g.M)
Lungimea aparatului de antrenament cu
corzi: la înălțimea genunchilor
Cu scripete
Pozițieinițială:
1. Așezați tălpile în chingile pentru glezne,
cu degetele spre podea.
2. Așezați-vă în poziție de scândură, cu
brațele întinse.
3. Trageți un genunchi spre piept și
întindeți-l pe celălalt drept în spate.
Pozițienală:
4. Încordați musculatura brațelor,
abdomenului și a feselor.
5. Efectuați mișcări circulare, trăgând
alternativ un picior la piept și întinzându-l
pe celălalt drept în spate.
6. Menţineți trunchiul încordat și încercați
să ridicați piciorul întins la nivelul feselor.
7. Repetați exercițiul de 20 ori.
Important:acordațiatenție
încordăriicorpuluișipoziției
drepteacorpului.Pentruareduce
graduldedicultatealexercițiului,
sprijiniți-văcuantebrațelepe
podea.Acestexercițiuîntărește
musculaturaabdomenuluișia
feselor.
Flotareunilaterală(g.N)
Lungimea aparatului de antrenament cu
corzi: la înălțimea genunchilor
Cu scripete
Pozițieinițială:
1. Stați drept, cu privirea departe de
punctul de xare.
2. Stați în picioare, pe lățimea șoldurilor și
țineți ambele mânere cu brațele întinse.
3. Puneți greutatea dumneavoastră în
față, până când vă aați într-un unghi de
rezistență adecvat. Tălpile ating podeaua
doar cu arcada plantară.
Pozițienală:
4. Încordați musculatura brațelor,
abdomenului și a feselor.
5. Trageți un braț în unghi de 90 de grade
față de corp, menținându-vă în același
timp poziția dreaptă.
6. Reveniți în poziția inițială, întinzând din
nou brațul îndoit.
7. Efectuați exercițiul de 10 ori pe ecare
parte.
8. Repetați exercițiul cu celălalt braț.
Important:avețigrijăsămențineți
întregcorpulîntins.
Cuajutorulacestuiexercițiutoniați
musculaturapieptului,aumerilorși
atrunchiului.
Extensii(g.O)
Lungimea aparatului de antrenament cu
corzi: lungime medie
Cu scripete
Pozițieinițială:
1. Stați drept, cu privirea departe de
punctul de xare.
2. Stați în picioare, pe lățimea șoldurilor și
țineți ambele mânere cu brațele întinse.
3. Puneți greutatea dumneavoastră în
față, până când vă aați într-un unghi
de rezistență adecvat.
Pozițienală:
4. Încordați musculatura brațelor, a
abdomenului și feselor.
5. Trageți brațul stâng în unghi de 90 de
grade față de corp; în același timp,
întindeți brațul drept mai mult în față.
6. Rotiți trunchiul spre stânga și treceți
brațul stâng pe lângă corp pentru a-l
întinde în spate. Privirea dumneavoastră
este orientată spre mâna stângă, brațele
sunt larg deschise. Mențineți în acest
timp corpul încordat.
7. Reveniți în poziția inițială, îndoind brațul
stâng și trecându-l pe lângă corp.
8. Repetați exercițiul cu celălalt braț.
9. Efectuați exercițiul de 10 ori pe ecare
parte.
29RO
Page 30

Important:avețigrijăsămențineți
întregcorpulîntins.
Cuajutorulacestuiexercițiutoniați
musculaturapieptului,aspatelui,a
umerilorșiatrunchiului.
Extensiiunilateralepentrupiept
(g.P)
Lungimea aparatului de antrenament cu
corzi: lungime medie
Cu scripete
Pozițieinițială:
1. Stați drept, privirea este orientată în
direcția punctului de xare.
2. Tălpile se aă la lățimea șoldurilor,
corpul este întins.
3. Țineți ambele mânere cu brațele întinse,
palmele sunt față în față.
4. Puneți greutatea dumneavoastră în
spate, până când vă aați într-un unghi
de rezistență adecvat. Numai călcâiele
ating podeaua, vârfurile degetelor sunt
orientate în sus.
Pozițienală:
5. Încordați musculatura brațelor,
abdomenului și a feselor.
6. Trageți un braț în unghi de 90 de grade
față de corp, menținându-vă în același
timp în poziție dreaptă.
7. Reveniți în poziția inițială, întinzând din
nou brațul îndoit.
8. Efectuați exercițiul de 15 ori pe ecare
parte.
9. Repetați exercițiul cu celălalt braț.
Important:avețigrijăsămențineți
întregcorpulîntins.
UtilizareacoduluiQR
Cu ajutorul codului QR aveți
posibilitatea să vizionați
exercițiile descrise aici sub
formă de video.
Pentru aceasta aveți nevoie de
o aplicație pentru codul QR
pentru telefonul dumneavoastră
mobil.
1. Porniți aplicația pentru codul QR.
2. Mențineți și scanați cu telefonul / tableta
dumneavoastră codul QR specicat.
Întindere
Acordați sucient timp întinderii după
ecare antrenament. În continuare vă
prezentăm câteva exerciții simple în acest
scop. Trebuie să efectuați respectivele
exerciții de câte 3 ori pe ecare parte,
timp de 5 de secunde.
Mușchiicefei
1. Staţi în picioare relaxat. Trageți capul
cu mâna ușor, mai întâi spre stânga,
apoi spre dreapta. Prin acest exercițiu
se întind părțile laterale ale gâtului
dumneavoastră.
Brațeșiumeri
1. Stați în picioare drept, articulațiile
genunchilor sunt ușor îndoite.
2. Duceți brațul drept în spatele capului
până când palma dreaptă se aă între
omoplați.
3. Prindeți cu palma stângă cotul drept și
trageți-l în spate.
4. Schimbați părțile și repetați exercițiul.
Musculaturapicioarelor
1. Așezați-vă în poziție dreaptă și ridicați
laba piciorului de pe podea.
2. Rotiți laba piciorului încet, mai întâi într-o
direcție, apoi în cealaltă.
3. Schimbați piciorul după un timp.
Important:Avețigrijălacoapse
sărămânăparaleleunalângă
alta.Împingețibazinulsprefațăși
menținețitrunchiulvertical.
Îngrijireașidepozitarea
Depozitaţi articolul într-o încăpere uscată şi
curată, la o temperatură moderată.
30 RO
Page 31

Indicațiiprivindeliminarea
Eliminați articolul și toate componentele
sale prin intermediul unei întreprinderi de
salubrizare autorizate sau al administrației
locale.
Respectați reglementările în vigoare. În caz
de neclarități, informați-vă la centrul dvs.
local de colectare în ceea ce privește eliminarea conformă cu mediul înconjurător.
3anigaranție
Acest articol a fost produs cu o atenție
mare și un control atent. Pentru acest articol
primiți o garanție de trei ani de la data
achiziționării. Vă rugăm să păstrați bonul
de casă.
Garanția este valabilă doar pentru defectele materiale și din fabrică și este anulată
în cazul utilizării necorespunzătoare sau
defectuoase. Drepturile dumneavoastră
legale, în special drepturile de garanșie
nu sunt limitate prin intermediul acestei
garanții.
Pentru orice reclamaţii vă rugăm să ne
contactaţi la linia noastră telefonică
Service-Hotline, menţionată mai jos sau
adresaţi-ne un e-mail. Angajaţii noştri
de service vor coordona împreună cu
dumneavoastră cât mai repede posibil,
procedura de urmat. Vă vom consilia în
orice caz, personal.
Perioada garanției nu se poate prelungi
datorită reparațiilor realizate în perioada
garanției, a garanției legale sau a unui
comportament culant. Acest lucru este valabil și pentru piesele înlocuite sau reparate.
După expirarea perioadei de garanție
toate reparațiile necesare se realizează
contra cost.
IAN: 282677
Service România
Tel.: 0800896637
E-Mail: deltasport@lidl.ro
Piesele de schimb pentru produsul dumneavoastră le
găsiți pe: www.delta-sport.com, Rubrica Service- Piese
de schimb Lidl
31RO
Page 32

Поздравления!
С покупката си Вие избрахте един
висококачествен продукт. Преди първата
употреба се запознайте с продукта.
За целта прочетете внимателно
следващото ръководство за употреба.
Използвайте продукта само съобразно
описанието и за посочените области на
приложение. Съхранявайте грижливо
ръководството. При предоставяне на продукта
на трето лице му предайте също и цялата
документация.
Обем на доставката/
описание на частите (фиг. A)
1 x Инструкция за употреба
1 x Мултитренажор
(1) Лента с примки за скоба за врата
(2) Скоба за врата
(3) Карабинер
(4) Направляваща ролка
(5) Въже
(6) Катарама
(7) Ръкохватка
(8) Ремък за крака
(9) Лента за удължаване
(10) Указателна табела за врата
(11) Чанта за съхранение
Технически данни
Максимално натоварване: 120 кг
Употреба по
предназначение
Този продукт е конструиран като спортен
уред, с който можете да тренирате цялото
си тяло. Мултитренажорът е предназначен за
употреба в домашни условия и не е подходящ
за медицински и професионални цели.
Продуктът е предназначен за употреба както
на закрито, така и на открито, и трябва да
се закрепва само на врати с включената
в доставката скоба за врата, както и на
лостове, клони на дървета, куки и др. с
допълнителен карабинер.
Указания за безопасност
Внимание! Опасност от
нараняване!
• Консултирайте се със своя лекар, преди да
започнете тренировката. Уверете се, че сте
в подходящо за упражненията
здравословно състояние.
• Не използвайте продукта, ако сте контузени
или имате здравословни проблеми.
• Този продукт е предназначен за
максимално телесно тегло от 120 кг.
Не използвайте продукта, ако Вашето
телесно тегло е по-голямо.
• Не забравяйте да разгреете преди
тренировката и тренирайте в съответствие с
физическите си възможности в момента.
При твърде големи натоварвания и
претрениране има опасност от тежки
контузии. В случай на оплаквания, чувство
на слабост или умора незабавно
прекъснете тренировката и се
консултирайте с лекар.
• Съхранявайте инструкцията за употреба с
практическите упражнения винаги под
ръка.
• Бременни трябва да провеждат тренировка
само след консултация със своя лекар.
• Продуктът може да си използва само от
едно лице по едно и също време.
• Продуктът не е подходящ за терапевтични
цели.
• Около зоната за тренировка трябва да има
приблизително 0,6 м свободно
пространство от всички страни (фиг. Q).
• Винаги тренирайте върху равна и
нехлъзгава повърхност.
• Не използвайте продукта в близост до
стълбища или стълбищни площадки.
• Ако се почувствате замаяни, получите
сърцебиене и т.н., веднага спрете
тренировката и незабавно се
консултирайте с лекар.
• Продуктът трябва да бъде монтиран само
от възрастен, за да се избегнат наранявания
от неправилна употреба. Обърнете
внимание на това, да използвате продукта
само след цялостния му монтаж.
32
BG
Page 33

• Не тренирайте, когато сте изморени или
разконцентрирани. Не тренирайте
непосредствено след хранене. Изчакайте с
началото на тренировката около 2 часа.
• Проветрете достатъчно помещението за
тренировка, но избягвайте течение.
• По време на тренировка пийте достатъчно
течности.
• Никога не усуквайте продукта около
главата, шията или гърдите. Опасност от
задушаване!
• Не използвайте продукта за други цели
(напр. като въже за пристягане, теглене или
подобни).
• Внимание! Закрепвайте
мултитренажора само на врати!
• Предупреждение! Опасност от
нараняване! Закрепвайте
мултитренажора само на
врати, които се отварят навън
спрямо Вас! Никога не монтирайте
мултитренажора на врати, които
се отварят навътре (към Вас).
Вратата би могла да се отвори,
което може да доведе до сериозни
наранявания!
• Предупреждение! Опасност от
нараняване! Винаги заключвайте
вратата, на която закрепвате
мултитренажора!
• Внимание! Докато тренирате,
винаги използвайте включената
в доставката указателна табела
за врата! Уверете се, че табелата
е поставена от другата страна
на вратата така, че да бъде лесно
прочетена.
Особено внимание – Опасност
от нараняване на деца!
• Дръжте децата далеч от опаковъчния
материал. Има опасност от задушаване!
• Продуктът не е подходящ да се използва
като средство за игра, и когато не се
употребява, трябва да се съхранява на
място, недостъпно за деца.
По време на тренировката деца не трябва
да са в зоната на употреба на продукта, за
да се избегне рискът от нараняване.
• Обърнете внимание на децата най-вече на
това, че продуктът не е играчка.
Опасности поради износване
• Продуктът може да се използва само в
безупречно състояние. Проверявайте
продукта преди всяка употреба за
повреди или износване. Безопасността на
мултитренажора може да бъде
гарантирана само, ако се проверява
редовно за повреди и износване.
• Използвайте само оригинални резервни
части.
• Пазете продукта от екстремни температури,
слънце и влага. Неправилното съхранение
и употреба на продукта могат да доведат
до преждевременно износване и
евентуални напуквания по конструкцията,
което може да причини наранявания.
• Не закрепвайте продукта на места с остри
ръбове, напр. панти на врати. Найлонът се
разкъсва, ако се трие в остри ръбове.
• Не протривайте! Триенето напред-назад
води до преждевременно износване.
• Редовно проверявайте продукта за повреди
или износване. При повреди не
използвайте повече продукта.
Внимание за причиняването на
материални щети
• Никога не оставяйте мултитренажора
свободно да падне или да се върне бързо
към вратата. В противен случай това може
да доведе до повреди по вратата.
Указания за закрепването/
монтажа
• Изберете пространство за тренировка
приблизително 3,00 x 1,80 м (дължина x
ширина).
• Закрепете мултитренажора на височина
от 1,80 до 2,30 м.
• Тренирайте само върху равна и нехлъзгава
основа.
• Монтирайте мултитренажора само на
врати, които се отварят навън спрямо Вас
(фиг. B).
33BG
Page 34

• Поставете скобата в средата отгоре на
вратата (фиг. B).
• Заключете вратата.
Внимание! Опасност от
•
нараняване! Винаги заключвайте
вратата!
• Винаги използвайте включената
в доставката указателна табела за
врата (10)!
• Уверете се, че вратата, на която закрепвате
скобата (2) е стабилна и здрава, ще
издържи телесното Ви тегло и скобата е
здраво закрепена. За да проверите,
дръпнете силно въжето (5) няколко пъти
(фиг. C).
Монтаж/Използване на
допълнителния карабинер
С лентата за удължаване (9) мултитренажорът
може да се монтира на лостове, клони на
дървета или куки (фиг. H). За целта свалете
скобата за врата (2) от лентата (1).
Предупреждение! Винаги
проверявайте товароносимостта на точките
на монтиране, за да гарантирате, че са
налице достатъчни резерви за безопасност.
Неспазването на това може да доведе до
сериозни наранявания.
Скъсяване и удължаване на
мултитренажора
Указание! Преди настройката винаги
се уверявайте, че въжето (5) не е
усукано!
Скъсяване
1. Хванете с едната ръка края на въжето (5a)
и с другата ръка дръпнете катарамата (6)
по посока на точката за закрепване
(фиг. D).
2. Повторете процеса с другата ръкохватка
(7).
Удължаване
1. Хванете с едната ръка края на въжето (5a)
и с другата ръка дръпнете катарамата (6)
по посока на ръкохватката (7) (фиг. D).
2. Повторете процеса с другата ръкохватка
(7).
Настройка на позицията на
скобата
Ако мултитренажорът по принцип е твърде
дълъг, можете да преместите позицията на
скобата.
1. За целта разлепете залепващата лента (2a)
на скобата за врата (2) и извадете скобата
от лентата (1) (фиг. G).
2. Поставете я в една от долните примки и
след това подсигурете скобата за врата
чрез залепващата лента към примката
(фиг. G).
Внимание! Поставяйте скобата за врата
(2) само в примките за скобата!
Внимание! Опасност от нараняване!
За скъсяване никога не навивайте лентата (1)
просто около скобата за врата (2). Лентата
може да се развие!
Препоръчителна дължина
на мултитренажора
Настройте дължината на
мултитренажора за всяко
упражнение, както е описано
по-долу:
Дължина на мултитренажора: къса
Скъсете мултитренажора толкова, колкото е
възможно.
Дължина на мултитренажора: средна
Настройте мултитренажора на средна
дължина, като фиксирате черните ремъци
за настройка на двойните оцветени в синьо
маркировки, които са пришити по средата на
лентата.
Дължина на мултитренажора: на височината
на коленете
Регулирайте мултитренажора така, че
ръкохватките да са на височина малко под
коленете Ви.
Дължина на мултитренажора: дълга
Издърпайте напълно лентите на
мултитренажора така, че ръкохватките да
висят на около 7 см от пода.
34
BG
Page 35

Сваляне на направляващата
ролка
Имате възможност да свалите
направляващата ролка (4) от
мултитренажора или да закрепите въжето (5)
директно към лентата (1) (фиг. E).
1. Свалете карабинера (3) от лентата (1).
2. Откачете карабинера от шарнирната
ролка (4).
3. Свалете въжето (5) от шарнирната ролка.
4. Поставете въжето прегънато на две така, че
да се образува примка.
5. Промушете тази примка през последната
примка за скобата на лентата (1).
6. Издърпайте примката през цялата лента и
затегнете примката така, че да се образува
възел.
Важно: Уверете се, че въжето е с
еднаква дължина. Проверете го като
задържите ръкохватките една до
друга (фиг. F).
Поставяне на
направляващата ролка
Поставете направляващата ролка в обратен
ред, както е показано на фигура Е.
1. Развържете въжето (5) от лентата (1).
2. Прокарайте въжето през шарнирната
ролка (4) и поставете отворите на
шарнирната ролка един върху друг.
3. Прокарайте карабинера (3) през двата
отвора на шарнирната ролка и го
закрепете към лентата.
Общи указания за
тренировка
Ход на тренировката
• Носете удобно спортно облекло и спортни
обувки.
• Разгрейте се добре преди тренировка и
завършете тренировката постепенно.
• Между упражненията правете достатъчно
дълги паузи и пийте достатъчно течности.
• Като начинаещ никога не тренирайте с
високо натоварване. Бавно увеличавайте
интензивността на тренировката.
• Изпълнявайте всички упражнения
равномерно, а не рязко и бързо.
• Обърнете внимание на равномерното
дишане. При усилие издишвайте и при
отпускане вдишвайте.
• Докато изпълнявате упражненията, внима вайте за правилната позиция на тялото.
Загряване
Преди всяка тренировка отделете достатъчно
време за загряване. По-долу Ви описваме
няколко прости упражнения. Трябва да
повторите съответното упражнение от 2 до 3
пъти.
Мускулатура на тила
1. Завъртете главата си бавно наляво и
надясно. Повторете това движение 4-5
пъти.
2. Бавно правете кръгове с глава
първоначално в едната, а след това в
другата посока.
Ръце и рамене
1. Хванете ръцете си зад гърба и внимателно
ги изтеглете нагоре. Ако при това наведете
горната част на тялото напред, всички
мускули се загряват оптимално.
2. Правете кръгове напред с двете си рамена
едновременно и след една минута сменете
посоката.
3. Изтеглете раменете си по посока на ушите
и отново оставете раменете да паднат.
4. Като редувате лявата и дясната си ръка,
правете кръгове напред и след една минута
назад.
Важно: Не забравяйте да продължите
да дишате спокойно!
Примерни упражнения
По-долу Ви представяме няколко от многото
упражнения.
Указание: При някои от упражненията
Вие имате избор да тренирате със или
без направляваща ролка. Ако желаете да
тренирате без направляваща ролка, трябва
да закрепите въжето директно върху лентата.
Моля, потърсете повече информация за това в
раздела „Сваляне на направляващата ролка“.
BG
35
Page 36

Внимание! Задължително носете
неплъзгащи се спортни обувки!
Сгъване на краката (фиг. K)
Дължина на мултитренажора: на височината
на коленете
Със или без направляваща ролка
Изходно положение:
1. Легнете с лице нагоре и поставете петите
си в ремъците за краката.
Указание: За по-удобна позиция на
краката плъзнете пластмасовите дръжки
нагоре.
2. Ръцете лежат отстрани до тялото.
Крайно положение:
3. Стегнете мускулатурата на корема.
4. Изтеглете петите към таза.
5. Бавно се върнете отново в изходно
положение.
6. Повторете упражнението 10 пъти.
Важно: По време на цялото движение
постоянно натискайте петите в
ремъците за краката. Повишете
интензивността, като повдигате таза
по време на упражнението.
Коремни преси (фиг. L)
Дължина на мултитренажора: на височината
на коленете
Със или без направляваща ролка
Изходно положение:
1. Поставете краката си в ремъците за
краката с пръстите надолу.
Указание: За по-удобна позиция на
краката плъзнете пластмасовите дръжки
нагоре.
2. Заемете с ръце позиция за лицева опора.
Крайно положение:
3. Стегнете мускулатурата на седалището и
корема.
4. Сгънете коленете към гърдите.
5. Върнете се отново в изходно положение.
6. Повторете упражнението 15 пъти.
Важно: Внимавайте за стягането и
стойката на тялото си.
Повечето лицеви опори на пода са
по-лесни, когато се подпирате на
предмишниците си. Опрете се на
дланите си с изпънати ръце, това
увеличава нивото на трудност.
Повдигане на седалището (фиг. M)
Дължина на мултитренажора: на височината
на коленете
Със или без направляваща ролка
Изходно положение:
1. Легнете по гръб, с пети поставени в
ремъците за краката.
2. Ръцете лежат отстрани до тялото, дланите
са опрени на пода.
Крайно положение:
3. Стегнете торса.
4. Повдигнете седалището от пода, докато
натискате петите в ремъците за краката.
5. Спуснете отново седалището до
половината височина.
6. Повторете упражнението 15 пъти.
Важно: Внимавайте за стягането
и стойката на тялото си. Повечето
упражнения, изпълнявани на пода,
стават все по-трудни, колкото подалеч се намирате от точката за
закрепване (и обратно).
Странична лицева опора (фиг. N)
Дължина на мултитренажора: на височината
на коленете
Със или без направляваща ролка
Изходно положение:
1. Застанете полегнали на лявото бедро, като
сте опрени на долната част на лявата ръка,
пръстите на краката са в ремъците за
краката под точката на закрепване.
2. Краката са разменени – горният е напред.
Крайно положение:
3. Стегнете мускулатурата на седалището и
корема.
4. Повдигнете седалището в позиция за
лицева опора и задръжте 10 секунди.
5. Върнете се отново в изходно положение.
6. След 10 повторения повторете
упражнението на другата страна.
Важно: Повишете интензивността,
като поставите свободната ръка на
хълбока или я изпънете нагоре.
36
BG
Page 37

Каране на колело от лицева
опора (фиг. M)
Дължина на мултитренажора: на височината
на коленете
С направляваща ролка
Изходно положение:
1. Поставете стъпалата в ремъците за краката,
с пръстите сочещи към пода.
2. Заемете позиция за планк с изпънати ръце.
3. Изтеглете едното коляно към гърдите и
изпънете другото право назад.
Крайно положение:
4. Стегнете мускулатурата на ръцете, корема
и седалището.
5. Изпълнете кръгови движения, като с
редуване изтегляте единия крак към гърдите
и изпъвате другия право назад.
6. Дръжте горната част на тялото стегната и
се опитайте да повдигате съответния
изпънат крак до височината на седалището.
7. Повторете упражнението 20 пъти.
Важно: Внимавайте да държите
тялото си стегнато и позицията на
тялото да бъде изправена. За да
се намалите степента на трудност
на упражнението, се опрете с
предмишниците на пода.
Това упражнение укрепва
мускулатурата на корема и
седалището.
Едностранна лицева опора
(фиг. N)
Дължина на мултитренажора: на височината
на коленете
С направляваща ролка
Изходно положение:
1. Застанете изправени, погледът е насочен
в противоположна посока на точката на
закрепване.
2. Застанете с разтворени на ширината на
ханша крака и хванете двете ръкохватки с
изпънати ръце.
3. Пренесете тежестта си напред, докато
заемете съответния ъгъл на съпротивление.
Стъпалата докосват пода само с
възглавничките.
Крайно положение:
4. Стегнете мускулатурата на ръцете, корема
и седалището.
5. Изтеглете едната ръка под ъгъл от 90
градуса спрямо тялото, като запазите при
това изправената си позиция.
6. Върнете се обратно в изходно положение,
като изпънете отново сгънатата ръка.
7. Изпълнете упражнението по 10 пъти за
всяка страна.
8. Повторете упражнението с другата ръка.
Важно: Внимавайте да държите
цялото си тяло стегнато. С това
упражнение укрепвате мускулатурата на гърдите, раменете и торса.
Силова тяга (фиг. O)
Дължина на мултитренажора: средна
дължина
С направляваща ролка
Изходно положение:
1. Застанете изправени, погледът е насочен
в противоположна посока на точката на
закрепване.
2. Застанете с разтворени на ширината на
ханша крака и хванете двете ръкохватки с
изпънати ръце.
3. Пренесете тежестта си напред, докато
заемете съответния ъгъл на съпротивление.
Крайно положение:
4. Стегнете мускулатурата на ръцете, корема
и седалището.
5. Изтеглете лявата ръка под ъгъл от 90
градуса спрямо тялото, като едновременно
с това изпънете отново дясната ръка
напред.
6. Завъртете горната част на тялото наляво и
отведете лявата ръка покрай тялото, като я
изпънете назад. Погледът Ви сочи към
лявата Ви ръка, ръцете Ви са широко
разтворени. При това дръжте тялото
стегнато.
7. Върнете се обратно в изходно положение,
като сгънете лявата ръка и я придвижите
покрай тялото.
8. Повторете упражнението с другата ръка.
9. Изпълнете упражнението по 10 пъти за
всяка страна.
BG
37
Page 38

Важно: Внимавайте да държите
цялото си тяло стегнато.
С това упражнение укрепвате
мускулатурата на гърдите, гърба,
раменете и торса.
Едностранна гръдна тяга (фиг. P)
Дължина на мултитренажора: средна
дължина
С направляваща ролка
Изходно положение:
1. Застанете изправени, погледът е насочен
към точката на закрепване.
2. Стъпалата са на ширината на ханша,
тялото Ви е изпънато.
3. Хванете двете ръкохватки с изпънати ръце,
дланите са обърнати една към друга.
4. Пренесете тежестта си назад, докато
заемете съответния ъгъл на съпротивление.
Само петите докосват пода, върховете на
пръстите сочат нагоре.
Крайно положение:
5. Стегнете мускулатурата на ръцете, корема
и седалището.
6. Изтеглете едната ръка под ъгъл от 90
градуса спрямо тялото, запазвайки при
това изправената си позиция.
7. Върнете се обратно в изходно положение,
като изпънете отново сгънатата ръка.
8. Изпълнете упражнението по 15 пъти за
всяка страна.
9. Повторете упражнението с другата ръка.
Важно: Внимавайте да държите
цялото си тяло стегнато.
Използване на QR-кода
Имате възможност да гледате
описаните тук упражненията като
видео чрез QR-кода. За целта Ви
е необходимо приложение за
четене на QR-код за Вашия
мобилен телефон или таблет.
1. Стартирайте приложението за четене на
QR-код.
2. Задръжте и сканирайте представения
QR-код с Вашия мобилен телефон или
таблет.
Разтягане
След всяка тренировка отделете достатъчно
време за разтягане. По-долу Ви показваме
няколко прости упражнения. Трябва да
изпълнявате съответните упражнения по 3 пъти
за всяка страна по 5 секунди.
Мускулатура на тила
1. Застанете отпуснати. Дръпнете главата си
плавно с едната ръка първо наляво, после
надясно. С това упражнение се разтягат
двете страни на врата.
Ръце и рамене
1. Застанете изправени, коленете са леко
сгънати.
2. Придвижете дясната ръка зад главата,
докато дясната длан застане между
лопатките.
3. С лявата длан хванете десния лакът и го
издърпайте назад.
4. Сменете страната и повторете
упражнението.
Ръце и рамене
1. Застанете изправени, коленете са леко
сгънати.
2. Придвижете дясната ръка зад главата,
докато дясната длан застане между
лопатките.
Мускулатура на краката
1. Застанете изправени и повдигнете едното
стъпало от пода.
2. Бавно правете кръгове първо в едната, след
това и в другата посока.
3. След известно време сменете стъпалото.
Важно: Внимавайте бедрата Ви да
останат успоредни едно до друго.
Придвижете седалището напред,
горната част на тялото остава
изправена.
Поддръжка, съхранение
Винаги съхранявайте продукта чист и сух в
помещение с постоянна температура.
38
BG
Page 39

Указания за отстраняване
като отпадък
Отстранявайте като отпадък продукта и
всички негови компоненти чрез оторизирана
фирма за отстраняване на отпадъци или
общинските съоръжения за отпадъци.
Съблюдавайте действащите предписания.
В случай на колебание се информирайте
в службата за отстраняване на отпадъците
за екологосъобразното отстраняване на
продукта.
3 години гаранция
Продуктът е произведен с голямо старание и
под постоянен контрол. За настоящия продукт
Вие получавате 3 години гаранция от датата
на закупуване. Моля, съхранявайте касовия
бон.
Гаранцията важи само дефекти на
материала и производствени дефекти и
отпада при злоупотреба или неправилно
използване. Законовите Ви права, найвече гаранционните Ви права остават
незасегнати от тази гаранция. При евентуални
рекламации се обадете на посочената
по-долу гореща сервизна линия, моля или
се свържете с нас по електронната поща.
Нашите сервизни сътрудници ще съгласуват
с Вас възможно най-бързо по-нататъшния
начин на действие. При всички случаи ще
Ви консултираме лично. Гаранционният срок
не се удължава при евентуални ремонти
в резултат на гаранцията, законовите
гаранционни права или възстановяване. Това
важи и за подменените и ремонтирани части.
След изтичане на гаранционния срок всички
ремонти се заплащат.
Гаранция
Уважаеми клиенти,
за този уред получавате 3 години гаранция
от датата на покупката. В случай на
несъответствие на продукта с договора за
продажба Вие имате законно право да
предявите рекламация пред продавача на
продукта при условията и в сроковете,
определени в чл.112-115* от Закона за
защита на потребителите.
Вашите права, произтичащи от посочените
разпоредби, не се ограничават от нашата
по-долу представена търговска гаранция и
независимо от нея продавачът на продукта
отговаря за липсата на съответствие на
потребителската стока с договора за
продажба съгласно Закона за защита на
потребителите.
Гаранционни условия
Гаранционният срок започва да тече от датата
на покупката. Пазете добре оригиналната
касова бележка. Този документ е необходим
като доказателство за покупката.
Ако в рамките на три години от датата на
закупуване на този продукт се появи дефект
на материала или производствен дефект,
продуктът ще бъде безплатно ремонтиран
или заменен – по наш избор. Гаранцията
предполага в рамките на тригодишния
гаранционен срок да се представят
дефектният уред и касовата бележка
(касовият бон) и писмено да се обясни в
какво се състои дефектът и кога е възникнал.
Ако дефектът е покрит от нашата гаранция,
Вие ще получите обратно ремонтирания
или нов продукт. С ремонта или смяната на
продукта не започва да тече нов гаранционен
срок.
Гаранционен срок и законови
претенции при дефекти
Гаранционната услуга не удължава
гаранционния срок. Това важи също и за
сменените и ремонтирани части.
За евентуално наличните повреди и дефекти
още при покупката трябва да се съобщи
веднага след разопаковането. Евентуалните
ремонти след изтичане на гаранционния срок
са срещу заплащане.
Обхват на гаранцията
Уредът е произведен грижливо според
строгите изисквания за качество и
добросъвестно изпитан преди доставка.
Гаранцията важи за дефекти на материала
или производствени дефекти. Гаранцията
не обхваща частите на продукта, които
подлежат на нормално износване, поради
което могат да бъдат разглеждани като бързо
39BG
Page 40

износващи се части (например филтри или
приставки) или повредите на чупливи части
(например прекъсвачи, батерии или такива
произведени от стъкло). Гаранцията отпада,
ако уредът е повреден поради неправилно
използване или в резултат на неосъществяване
на техническа поддръжка. За правилната
употреба на продукта трябва точно да се
спазват всички указания в упътването за
обслужване. Предназначение и действия,
които не се препоръчват от упътването за
експлоатация или за които то предупреждава,
трябва задължително да се избягват.
Продуктът е предназначен само за частна, а
не за стопанска употреба. При злоупотреба
и неправилно третиране, употреба на сила и
при интервенции,
които не са извършени от клона на нашия
оторизиран сервиз, гаранцията отпада.
Процедура при гаранционен
случай
За да се гарантира бърза обработка на
Вашия случай, следвайте следните указания:
• За всички запитвания подгответе касовата
бележка и идентификационния номер
(IAN 282677) като доказателство за
покупката.
• Вземете артикулния номер от фабричната
табелка.
• При възникване на функционални или
други дефекти първо се свържете по
телефона или чрез имейл с долупосочения
сервизен отдел. След това ще получите
допълнителна информация за уреждането
на Вашата рекламация.
• След съгласуване с нашия сервиз можете
да изпратите дефектния продукт на
посочения Ви адрес на сервиза безплатно
за Вас, като приложите касовата бележка
(касовия бон) и посочите в какво се състои
дефектът и кога е възникнал.
За да се избегнат проблеми с приемането
и допълнителни разходи, задължително
използвайте само адреса, който Ви е
посочен. Осигурете изпращането да
не е като експресен товар или като друг
специален товар.
Изпратете уреда заедно с всички
принадлежности, доставени при покупката,
и осигурете достатъчно сигурна
транспортна опаковка.
Ремонтен сервиз /
извънгаранционно обслужване
Ремонти извън гаранцията можете да
възложите на клона на нашия сервиз срещу
заплащане.
Той с удоволствие ще Ви направи
предварителна калкулация.
Можем да обработваме само уреди, които
са достатъчно опаковани и изпратени с
платени транспортни разходи.
Внимание: Изпратете Вашия уред на клона
на нашия сервиз почистен и с указание за
дефекта.
Уредите, изпратени с неплатени транспортни
разходи – с наложен платеж, като експресен
или друг специален товар – не се приемат.
Ние ще извършим безплатно изхвърлянето на
изпратените от Вас дефектни уреди.
Сервизно обслужване
България
Тел.: 00800 111 4920
Е-мейл: deltasport@lidl.bg
IAN 282677
Вносител
Моля, обърнете внимание, че следващият
адрес не е адрес на сервиза. Първо се
свържете с горепосочения сервизен център.
ДЕЛТА-СПОРТ ХАНДЕЛСКОНТОР ГМБХ
Врагекамп 6
DE-22397 Хамбург
Германия
* Чл. 112. (1) При несъответствие на потребителската
стока с договора за продажба потребителят има право
да предяви рекламация, като поиска от продавача да
приведе стоката в съответствие с договора за продажба.
В този случай потребителят може да избира между
извършване на ремонт на стоката или замяната й с нова,
освен ако това е невъзможно или избраният от него начин
за обезщетение е непропорционален в сравнение с другия.
(2) Смята се, че даден начин за обезщетяване на
потребителя е непропорционален, ако неговото използване
налага разходи на продавача, които в сравнение с другия
начин на обезщетяване са неразумни, като се вземат
предвид:
40 BG
Page 41

1. стойността на потребителската стока, ако
нямаше липса на несъответствие;
2. значимостта на несъответствието;
3. възможността да се предложи на
потребителя друг начин на обезщетяване,
който не е свързан със значителни
неудобства за него.
Чл. 113. (1) Когато потребителската стока не съответства
на договора за продажба, продавачът е длъжен да я
приведе в съответствие с договора за продажба.
(2) Привеждането на потребителската стока в съответствие
с договора за продажба трябва да се извърши в рамките
на един месец, считано от предявяването на рекламацията
от потребителя.
(3) След изтичането на срока по ал. 2 потребителят има
право да развали договора и да му бъде възстановена
заплатената сума или да иска намаляване на цената на
потребителската стока съгласно чл. 114 .
(4) Привеждането на потребителската стока в съответствие
с договора за продажба е безплатно за потребителя. Той
не дължи разходи за експедиране на потребителската
стока или за материали и труд, свързани с ремонта й, и не
трябва да понася значителни неудобства.
(5) Потребителят може да иска и обезщетение за
претърпените вследствие на несъответствието вреди.
Чл. 114. (1) При несъответствие на потребителската
стока с договора за продажба и когато потребителят не
е удовлетворен от решаването на рекламацията по чл.
113 , той има право на избор между една от следните
възможности:
1. разваляне на договора и възстановяване на
заплатената от него сума;
2. намаляване на цената.
(2) Потребителят не може да претендира за възстановяване
на заплатената сума или за намаляване цената на стоката,
когато търговецът се съгласи да бъде извършена замяна на
потребителската стока с нова или да се поправи стоката
в рамките на един месец от предявяване на рекламацията
от потребителя.
(3) Търговецът е длъжен да удовлетвори искане за
разваляне на договора и да възстанови заплатената от
потребителя сума, когато след като е удовлетворил три
рекламации на потребителя чрез извършване на ремонт
на една и съща стока, в рамките на срока на гаранцията
по чл. 115, е налице следваща поява на несъответствие на
стоката с договора за продажба.
(4) (Предишна ал. 3 - ДВ, бр. 61 от 2014 г., в сила от
25.07.2014 г.) Потребителят не може да претендира
за разваляне на договора, ако несъответствието на
потребителската стока с договора е незначително.
Чл. 115. (1) Потребителят може да упражни правото си по
този раздел в срок до две години, считано от доставянето
на потребителската стока.
(2) Срокът по ал. 1 спира да тече през времето,
необходимо за поправката или замяната на
потребителската стока или за постигане на споразумение
между продавача и потребителя за решаване на спора.
(3) Упражняването на правото на потребителя по ал. 1 не
е обвързано с никакъв друг срок за предявяване на иск,
различен от срока по ал. 1.
IAN: 282677
Сервизно обслужване България
Тел.: 00800 111 4920
Е-мейл: deltasport@lidl.bg
Резервни части за този продукт ще намерите и тук:
www.delta-sport.com, Рубрика Сервиз - Сервиз за резервни
части Lidl
41BG
Page 42

Συγχαρητήρια! Με την αγορά σας
διαλέξατε ένα προϊόν υψηλής ποιότητας.
Εξοικειωθείτε με το προϊόν πριν την πρώτη χρήση.
Διαβάστε για αυτό προσεκτικά τις
ακόλουθες οδηγίες χρήσης.
Χρησιμοποιείτε το προϊόν μόνο όπως
περιγράφεται και για το δεδομένο εύρος
εφαρμογής. Αποθηκεύστε αυτές τις οδηγίες
προσεκτικά. Παραδώστε όλα τα έγγραφα αμέσως
σε παράδοση του προϊόντος σε τρίτους.
Παραδοτέος εξοπλισμός /
Περιγραφή εξαρτημάτων
(Εικ. A)
1 x Οδηγίες χρήσης
1 x Σύστημα εκγύμνασης με ιμάντες
(1) Ιμάντας με θηλιές
(2) Άγκιστρο πόρτας
(3) Κρίκος
(4) Τροχαλία αναστροφής
(5) Σκοινί
(6) Πόρπη ρύθμισης
(7) Χειρολαβή
(8) Θηλιά για τα πόδια
(9) Ζώνη προέκτασης
(10) Πινακίδα σήμανσης για την πόρτα
(11) Σάκος φύλαξης
Τεχνικά χαρακτηριστικά
Μέγ. βάρος χρήστη: 120 κιλά
Προβλεπόμενη χρήση
Το παρόν προϊόν είναι σχεδιασμένο ως
όργανο γυμναστικής, με το οποίο μπορείτε να
γυμνάσετε ολόκληρο το σώμα σας. Το σύστημα
προπόνησης με ιμάντες έχει σχεδιαστεί για
ιδιωτική χρήση και δεν είναι κατάλληλο για
ιατρικούς και επαγγελματικούς σκοπούς.
Το προϊόν έχει σχεδιαστεί για χρήση τόσο σε
εσωτερικούς όσο και σε εξωτερικούς χώρους
και επιτρέπεται να στερεώνεται αποκλειστικά σε
πόρτες με το παραδιδόμενο άγκιστρο πόρτας,
όπως και σε ράβδους, κλαδιά, άγκιστρα και
άλλα παρόμοια με τον πρόσθετο κρίκο.
Ύποδείξεις ασφαλείας
Κίνδυνος τραυματισμού!
• Συμβουλευτείτε το γιατρό σας, προτού
ξεκινήσετε την προπόνηση. Βεβαιωθείτε ότι η
υγεία σας, σάς επιτρέπει την προπόνηση.
• Μη χρησιμοποιείτε το προϊόν εάν έχετε
τραυματιστεί ή παρουσιάζετε άλλου είδους
προβλήματα υγείας.
• Το παρόν προϊόν έχει σχεδιαστεί για μέγιστο
σωματικό βάρος 120 κιλών.
Μη χρησιμοποιείτε το προϊόν, εάν το σωματικό
σας βάρος υπερβαίνει αυτά τα κιλά.
• Να θυμάστε, ότι πρέπει πάντα να
προθερμαίνεστε πριν την προπόνηση και να
γυμνάζεστε αναλόγως της ικανότητας
απόδοσής σας. Σε περίπτωση υπερβολικής
προσπάθειας και προπόνησης, υπάρχει
κίνδυνος σοβαρών τραυματισμών.
Σε περίπτωση ενοχλήσεων, αισθήματος
αδυναμίας ή κόπωσης, διακόψτε αμέσως την
προπόνηση και επικοινωνήστε με το γιατρό
σας.
• Φυλάτε πάντα τις οδηγίες χρήσης με τις
ασκήσεις σε προσβάσιμο σημείο.
• Οι έγκυες πρέπει να έχουν την έγκριση του
γιατρού τους για την προπόνηση.
• Το προϊόν δεν επιτρέπεται να χρησιμοποιείται
ταυτόχρονα από περισσότερα του ενός άτομα.
• Το προϊόν δεν είναι κατάλληλο για
θεραπευτικούς σκοπούς.
• Γύρω από το χώρο εκγύμνασης, πρέπει να
υπάρχει ελεύθερος χώρος περ. 0,6 μ. από
όλες τις πλευρές (Εικ. Q).
• Να προπονείστε μόνο σε επίπεδο και
αντιολισθητικό δάπεδο.
• Μη χρησιμοποιείτε το προϊόν κοντά σε σκάλες
ή πλατύσκαλα.
• Τερματίζετε αμέσως την προπόνηση, σε
περίπτωση που αισθανθείτε ζάλη, ταχυκαρδία,
κτλ., και αναζητήστε άμεσα ιατρική συμβουλή.
• Η συναρμολόγηση του προϊόντος επιτρέπεται
να γίνεται μόνο από έναν ενήλικα, ώστε να
αποφεύγονται τραυματισμοί λόγω μη ορθής
χρήσης. Να χρησιμοποιείτε το προϊόν μόνο
αφού ολοκληρωθεί η συναρμολόγηση.
42 GR/CY
Page 43

• Μην προπονείστε εάν είστε κουρασμένοι ή
μη συγκεντρωμένοι. Μην προπονείστε αμέσως
μετά τα γεύματα. Περιμένετε περ. 2 ώρες,
προτού ξεκινήσετε να γυμνάζεστε.
• Να αερίζετε καλά το χώρο προπόνησης,
αποφεύγοντας τα ρεύματα.
• Να πίνετε αρκετές ποσότητες υγρών κατά την
προπόνηση.
• Μην τυλίγετε ποτέ το προϊόν γύρω από το
κεφάλι, το λαιμό ή το στήθος. Κίνδυνος
στραγγαλισμού!
• Μη χρησιμοποιείτε το προϊόν για άλλους
σκοπούς (π.χ. ως σκοινί για άπλωμα, σκοινί
ρυμούλκησης ή άλλα παρόμοια).
• Προσοχή! Στερεώνετε το σύστημα
προπόνησης με ιμάντες μόνο σε
πόρτες!
• Προειδοποίηση! Κίνδυνος
τραυματισμού! Στερεώνετε το σύστημα
προπόνησης με ιμάντες μόνο σε
πόρτες που ανοίγουν προς τα έξω
(μακριά από εσάς)! Μην τοποθετείτε
ποτέ το σύστημα προπόνησης με
ιμάντες σε πόρτες που ανοίγουν
προς τα μέσα (προς τα εσάς).
Η πόρτα θα μπορούσε να ανοίξει και
να προκληθούν σοβαροί
τραυματισμοί!
• Προειδοποίηση! Κίνδυνος
τραυματισμού! Κλειδώνετε πάντα
την πόρτα, στην οποία στερεώνετε το
σύστημα προπόνησης με ιμάντες!
• Προσοχή! Κατά τη διάρκεια της
προπόνησης, χρησιμοποιείτε πάντα
την επισυναπτόμενη πινακίδα
σήμανσης για την πόρτα!
Η πινακίδα αυτή πρέπει να βρίσκεται
σε ευανάγνωστη κατάσταση στην
άλλη πλευρά της πόρτας.
Ιδιαίτερη προσοχή – Κίνδυνος
τραυματισμού για τα παιδιά!
• Κρατάτε τα παιδιά μακριά από το υλικό
συσκευασίας. Υπάρχει κίνδυνος ασφυξίας!
• Το προϊόν δεν είναι κατάλληλο για παιχνίδι
και, σε περίπτωση μη χρήσης, πρέπει να
φυλάσσεται σε μέρος μη προσβάσιμο για τα
παιδιά.
Κατά τη διάρκεια της προπόνησης, τα παιδιά
δεν επιτρέπεται να βρίσκονται κοντά στο
προϊόν, ώστε να αποκλείονται τραυματισμοί.
• Επισημαίνετε στα παιδιά ότι το προϊόν δεν
είναι παιχνίδι.
Κίνδυνοι λόγω φθοράς
• Το προϊόν επιτρέπεται να χρησιμοποιείται μόνο
σε άψογη κατάσταση. Πριν από κάθε χρήση,
ελέγχετε το προϊόν για τυχόν βλάβες
ή φθορές. Η ασφάλεια του συστήματος
προπόνησης με ιμάντες διασφαλίζεται μόνο
όταν ελέγχεται τακτικά για πιθανές βλάβες και
φθορά.
• Χρησιμοποιείτε αποκλειστικά αυθεντικά
ανταλλακτικά.
• Προστατεύετε το προϊόν από ακραίες
θερμοκρασίες, ήλιο και υγρασία.
Η μη ορθή αποθήκευση και χρήση του
προϊόντος μπορούν να οδηγήσουν σε
πρόωρη φθορά και πιθανές θραύσεις στην
κατασκευή, με κίνδυνο τραυματισμών.
• Μη στερεώνετε το προϊόν σε σημεία με
αιχμηρές ακμές, π.χ. μεντεσέδες. Το νάιλον
σκίζεται όταν ξυστεί σε αιχμηρές ακμές.
• Μην πριονίζετε το προϊόν! Οι κινήσεις
πριονίσματος προκαλούν πρόωρη φθορά.
• Ελέγχετε τακτικά το προϊόν για τυχόν βλάβες ή
φθορές. Σε περίπτωση βλαβών, μη συνεχίζετε
να χρησιμοποιείτε το προϊόν.
Προσοχή για τυχόν υλικές ζημιές
• Μην αφήνετε το σύστημα προπόνησης με
ιμάντες απλά να πέφτει ή να αναπηδάει με
δύναμη προς την πόρτα. Σε αντίθετη
περίπτωση, μπορεί να προκληθούν ζημιές στην
πόρτα.
Ύποδείξεις τοποθέτησης/
Συναρμολόγηση
• Επιλέγετε ένα χώρο προπόνησης περ.
3,00 x 1,80 μ. (Μ x Π).
• Στερεώνετε το σύστημα προπόνησης με ιμάντες
σε ύψος μεταξύ 1,80 έως 2,30 μ.
• Να προπονείστε μόνο σε επίπεδο και
αντιολισθητικό δάπεδο.
43GR/CY
Page 44

• Συναρμολογείτε το σύστημα προπόνησης με
ιμάντες μόνο σε πόρτες που ανοίγουν προς τα
έξω (μακριά από εσάς) (Εικ. Β).
• Τοποθετείτε το άγκιστρο στο κέντρο επάνω από
την πόρτα (Εικ. B).
• Κλείνετε την πόρτα καλά.
•
Προσοχή! Κίνδυνος
τραυματισμού!
Κλειδώνετε πάντα την πόρτα!
• Χρησιμοποιείτε πάντα την
επισυναπτόμενη πινακίδα σήμανσης
για την πόρτα (10)!
• Βεβαιώνεστε ότι η πόρτα, στην οποία
στερεώνετε το άγκιστρο (2), είναι σταθερή και
ανθεκτική, αντέχει το βάρος του σώματός σας
και το άγκιστρο εδράζεται σταθερά. Για να
το ελέγξετε, τραβήξτε μερικές φορές σταθερά
το σκοινί (5) (Εικ. C).
Τοποθέτηση/χρήση του πρόσθετου
κρίκου
Με τη ζώνη προέκτασης (9) το σύστημα με
ιμάντες μπορεί να τοποθετηθεί σε μπάρες,
κλαδιά ή άγκιστρα (Εικ. H). Για το σκοπό αυτό,
αφαιρέστε το άγκιστρο της πόρτας (2) από τον
ιμάντα (1).
Προειδοποίηση! Ελέγχετε πάντα την
αντοχή των σημείων τοποθέτησης, για να
είστε σίγουροι ότι χρησιμοποιείτε το προϊόν
με ασφάλεια. Σε αντίθετη περίπτωση, υπάρχει
κίνδυνος σοβαρών τραυματισμών.
Κόντεμα και επιμήκυνση του
συστήματος προπόνησης με
ιμάντες
Ύπόδειξη! Πριν την προσαρμογή,
βεβαιώνεστε πάντα ότι το σκοινί (5) δεν
έχει συστραφεί!
Κόντεμα
1. Με το ένα χέρι κρατήστε σταθερό το άκρο του
σκοινιού (5a) και με το άλλο χέρι τραβήξτε την
πόρπη ρύθμισης (6) προς την κατεύθυνση του
σημείου στερέωσης (Εικ. D).
2. Επαναλάβετε τη διαδικασία και για την άλλη
χειρολαβή (7).
Επιμήκυνση
1. Με το ένα χέρι κρατήστε σταθερό το άκρο του
σκοινιού (5a) και με το άλλο χέρι τραβήξτε την
πόρπη ρύθμισης (6) προς την κατεύθυνση της
χειρολαβής (7) (Εικ. D).
2. Επαναλάβετε τη διαδικασία και για την άλλη
χειρολαβή (7).
Μετατόπιση του σημείου του
άγκιστρου
Εάν το σύστημα με ιμάντες είναι βασικά πολύ
μακρύ, μπορείτε να μετατοπίσετε το σημείου του
άγκιστρου.
1. Για το σκοπό αυτό, ανοίξτε το βέλκρο (2a)
του άγκιστρου της πόρτας (2) και βγάλτε το
άγκιστρο από τον ιμάντα (1) (Εικ. G).
2. Τοποθετήστε το σε μία από τις πιο κάτω θηλιές
και στερεώστε το στη συνέχεια στη θηλιά με το
βέλκρο (Εικ. G).
Προσοχή! Τοποθετείτε το άγκιστρο της
πόρτας (2) αποκλειστικά στις σχετικές θηλιές!
Προσοχή! Κίνδυνος τραυματισμού!
Μην τυλίγετε ποτέ τον ιμάντα (1) γύρω από το
άγκιστρο της πόρτας για να κοντύνετε απλά (2).
Ο ιμάντας μπορεί να λυθεί!
Προτεινόμενο μήκος του
συστήματος προπόνησης με
ιμάντες
Ρυθμίζετε το μήκος του συστήματος
προπόνησης με ιμάντες για κάθε
άσκηση όπως περιγράφεται παρακάτω:
Μήκος συστήματος προπόνησης με ιμάντες:
Κοντό
Κοντύνετε όσο το δυνατόν περισσότερο το
σύστημα με ιμάντες.
Μήκος συστήματος προπόνησης με ιμάντες:
Μεσαίο
Ρυθμίστε το σύστημα με ιμάντες στο μεσαίο
μήκος, στερεώνοντας τις μαύρες θηλιές
προσαρμογής στις μπλε διπλές σημάνσεις που
είναι ραμμένες στο κέντρο του ιμάντα.
Μήκος συστήματος προπόνησης με ιμάντες:
Στο ύψος των γονάτων
Ρυθμίστε το σύστημα με ιμάντες έτσι ώστε οι
χειρολαβές να βρίσκονται σε ύψος λίγο κάτω
από το γόνατό σας.
44 GR/CY
Page 45

Μήκος συστήματος προπόνησης με ιμάντες:
Μακρύ
Ανοίξτε καλά τους ιμάντες του συστήματος με
ιμάντες, ώστε οι χειρολαβές να κρέμονται περ. 7
εκ. από το έδαφος.
Αφαίρεση τροχαλίας
αναστροφής
Έχετε τη δυνατότητα αφαίρεσης της τροχαλίας
αναστροφής (4) από το σύστημα προπόνησης
με ιμάντες ή στερέωσης του σκοινιού (5)
απευθείας στον ιμάντα (1) (Εικ. E).
1. Λασκάρετε τον κρίκο (3) από τον ιμάντα (1).
2. Ξεπιάστε τον κρίκο από την τροχαλία (4).
3. Βγάλτε το σκοινί (5) από την τροχαλία.
4. Τοποθετήστε το σκοινί διπλό, ώστε να
σχηματιστεί μία θηλιά.
5. Περάστε τη θηλιά μέσα από την τελευταία
θηλιά του άγκιστρου του ιμάντα (1).
6. Τραβήξτε τη θηλιά επάνω από όλο τον ιμάντα
και τραβήξτε τη σταθερά, ώστε να σχηματιστεί
ένας κόμπος.
Σημαντικό: Το σκοινί πρέπει να έχει το
ίδιο μήκος. Ελέγξτε το, κρατώντας τις
χειρολαβές τη μία δίπλα στην άλλη
(Εικ. F).
Τοποθέτηση τροχαλίας
αναστροφής
Τοποθετήστε την τροχαλία αναστροφής με την
αντίθετη σειρά, όπως περιγράφεται στην
Εικόνα E.
1. Λασκάρετε το σκοινί (5) από τον ιμάντα (1).
2. Βάλτε το σκοινί επάνω από την τροχαλία (4)
και τοποθετήστε τις οπές της τροχαλίας τη μία
επάνω στην άλλη.
3. Περάστε τον κρίκο (3) μέσα από τις δύο οπές
της τροχαλίας και στερεώστε τον στον ιμάντα.
Γενικές υποδείξεις προπόνησης
Προπόνηση
• Φοράτε άνετα αθλητικά ρούχα και αθλητικά
παπούτσια.
• Προθερμαίνεστε πριν από κάθε προπόνηση
και χαλαρώνετε σταδιακά.
• Μεταξύ των ασκήσεων, κάνετε αρκετά
διαλείμματα και πίνετε αρκετά υγρά.
• Εάν είστε αρχάριοι, μην καταπονείστε έντονα.
Αυξάνετε την ένταση της προπόνησης σιγά σιγά.
• Εκτελείτε όλες τις εργασίες ομοιόμορφα, όχι
απότομα και γρήγορα.
• Φροντίζετε για ομοιόμορφη αναπνοή.
Εκπνέετε κατά την προσπάθεια και εισπνέετε
χαλαρώνοντας.
• Φροντίζετε για μία ορθή στάση του σώματος
κατά τις ασκήσεις.
Προθέρμανση
Πριν από κάθε προπόνηση, να αφιερώνετε
αρκετό χρόνο για προθέρμανση. Ακολουθούν
ορισμένες απλές ασκήσεις. Θα πρέπει να
επαναλαμβάνετε την κάθε άσκηση 2 έως 3
φορές.
Αυχενικοί μύες
1. Γυρίστε το κεφάλι σας αργά προς τα αριστερά
και προς τα δεξιά. Επαναλάβετε αυτήν την
κίνηση 4-5 φορές.
2. Κάνετε αργές κυκλικές κινήσεις με το κεφάλι,
αρχικά προς τη μία και στη συνέχεια προς την
άλλη κατεύθυνση.
Χέρια και ώμοι
1. Σταυρώστε τα χέρια σας πίσω από την πλάτη
και τραβήξτε τα προσεκτικά προς τα επάνω.
Εάν, παράλληλα, φέρετε ελαφρώς μπροστά
τον κορμό, όλοι οι μύες προθερμαίνονται
άψογα.
2. Κάνετε κυκλικές κινήσεις προς τα εμπρός και
με τους δύο ώμους σας ταυτόχρονα και μετά
από ένα λεπτό αλλάξτε τη φορά.
3. Τραβήξτε τους ώμους σας προς τα αυτιά και
αφήστε τους να πέσουν ξανά κάτω.
4. Κάνετε εναλλάξ κυκλικές κινήσεις μπροστά με
το αριστερό και το δεξί χέρι και μετά από ένα
λεπτό προς τα πίσω.
Σημαντικό: Να μην ξεχνάτε τις
αναπνοές!
Προτεινόμενες ασκήσεις
Παρακάτω περιγράφονται ορισμένες από τις
πολλές ασκήσεις.
Ύπόδειξη: Σε ορισμένες ασκήσεις έχετε
τη δυνατότητα να προπονηθείτε με ή χωρίς
τροχαλία αναστροφής.
45GR/CY
Page 46

Εάν θέλετε να προπονηθείτε χωρίς τροχαλία
αναστροφής, πρέπει να στερεώσετε το
σκοινί απευθείας στον ιμάντα. Περισσότερες
πληροφορίες σχετικά θα βρείτε στο Κεφάλαιο
„Αφαίρεση τροχαλίας αναστροφής“.
Προσοχή! Φοράτε οπωσδήποτε
αντιολισθητικά αθλητικά παπούτσια!
Λύγισμα των ποδιών (Εικ. K)
Μήκος συστήματος προπόνησης με ιμάντες:
Στο ύψος των γονάτων
Με ή χωρίς τροχαλία αναστροφής
Αρχική θέση:
1. Ξαπλώστε με το πρόσωπο προς τα επάνω και
βάλτε τις φτέρνες στα άγκιστρα των ποδιών.
Ύπόδειξη: Για καλύτερη στήριξη των ποδιών,
σπρώξτε τις πλαστικές λαβές προς τα επάνω.
2. Τα χέρια βρίσκονται στο πλάι, δίπλα στο
σώμα.
Τελική θέση:
3. Σφίξτε τους κοιλιακούς.
4. Τραβήξτε τις φτέρνες προς τη λεκάνη.
5. Επιστρέψτε ξανά αργά στην αρχική θέση.
6. Επαναλάβετε την άσκηση 10 φορές.
Σημαντικό: Κατά τη διάρκεια όλης της
κίνησης, πιέζετε σταθερά τις φτέρνες
στα άγκιστρα των ποδιών. Αυξήστε την
ένταση, ανασηκώνοντας τη λεκάνη κατά
τη διάρκεια της άσκησης.
Ροκανίσματα (Εικ. L)
Μήκος συστήματος προπόνησης με ιμάντες:
Στο ύψος των γονάτων
Με ή χωρίς τροχαλία αναστροφής
Αρχική θέση:
1. Βάλτε τα πόδια στα άγκιστρα των ποδιών με τα
δάχτυλα προς τα κάτω.
Ύπόδειξη: Για καλύτερη στήριξη των ποδιών,
σπρώξτε τις πλαστικές λαβές προς τα επάνω.
2. Φέρτε το σώμα σας σε μία ευθεία και
στηριχτείτε στα χέρια.
Τελική θέση:
3. Σφίξτε τους γλουτούς και τους κοιλιακούς.
4. Τραβήξτε το γόνατο προς το στήθος.
5. Επιστρέψτε στην αρχική θέση.
6. Επαναλάβετε την άσκηση 15 φορές.
Σημαντικό: Φροντίζετε για ένταση στο
σώμα και σωστή στάση. Οι περισσότερες
ασκήσεις ευθυγράμμισης του σώματος
είναι ευκολότερες στο έδαφος, όταν
στηρίζεστε στους αντιβραχίονές σας.
Όταν στηρίζεστε με τεντωμένα χέρια
στις παλάμες σας, αυξάνεται ο βαθμός
δυσκολίας.
Ανασήκωμα γοφών (Εικ. M)
Μήκος συστήματος προπόνησης με ιμάντες:
Στο ύψος των γονάτων
Με ή χωρίς τροχαλία αναστροφής
Αρχική θέση:
1. Ξαπλώστε στην πλάτη σας με τις φτέρνες στα
άγκιστρα των ποδιών.
2. Τα χέρια βρίσκονται στο πλάι, δίπλα στο
σώμα, οι παλάμες επίπεδα στο έδαφος.
Τελική θέση:
3. Σφίξτε τον κορμό.
4. Σηκώστε τη λεκάνη από το έδαφος, πιέζοντας
τις φτέρνες στα άγκιστρα των ποδιών.
5. Κατεβάστε πάλι τη λεκάνη στο μισό ύψος.
6. Επαναλάβετε την άσκηση 15 φορές.
Σημαντικό: Φροντίζετε για ένταση στο
σώμα και σωστή στάση. Όσο μακρύτερα
βρίσκεστε από το σημείο στερέωσης,
τόσο δυσκολότερες είναι οι περισσότερες
ασκήσεις εδάφους (και αντίστροφα).
Σανίδα στο πλάι (Εικ. N)
Μήκος συστήματος προπόνησης με ιμάντες:
Στο ύψος των γονάτων
Με ή χωρίς τροχαλία αναστροφής
Αρχική θέση:
1. Ξαπλώστε στον αριστερό γοφό στηριζόμενοι
στο κάτω αριστερό χέρι, με τα δάχτυλα στα
άγκιστρα των ποδιών κάτω από το σημείο
στερέωσης.
2. Τα πόδια είναι μετατοπισμένα, το επάνω πόδι
βρίσκεται μπροστά.
Τελική θέση:
3. Σφίξτε τους γλουτούς και τους κοιλιακούς.
4. Σηκώστε τη λεκάνη στην ευθεία και κρατηθείτε
σε αυτή τη θέση για 10 δευτερόλεπτα.
5. Επιστρέψτε ξανά στην αρχική θέση.
6. Επαναλάβετε την άσκηση μετά από 10
επαναλήψεις από την άλλη πλευρά.
46 GR/CY
Page 47

Σημαντικό: Αυξήστε την ένταση,
στηρίζοντας το ελεύθερο χέρι στο γοφό
ή τεντώνοντάς το προς τα επάνω.
Ποδήλατο σε κάμψη (Εικ. M)
Μήκος συστήματος προπόνησης με ιμάντες:
Στο ύψος των γονάτων
Με τροχαλία αναστροφής
Αρχική θέση:
1. Βάλτε τα πόδια στα άγκιστρα των ποδιών με τα
δάχτυλα στο έδαφος.
2. Σταθείτε σανίδα με τεντωμένα χέρια.
3. Τραβήξτε το ένα γόνατο προς το στήθος και
τεντώστε το άλλο ευθεία πίσω.
Τελική θέση:
4. Σφίξτε τα χέρια, τους κοιλιακούς, καθώς και
τους γλουτούς.
5. Κάντε κυκλικές κινήσεις, τραβώντας εναλλάξ
ένα πόδι προς το στήθος και τεντώνοντας το
άλλο ευθεία πίσω.
6. Κρατήστε την ένταση στον κορμό και
προσπαθήστε το πόδι που είναι κάθε φορά
τεντωμένο να το σηκώνετε στο ύψος των
γλουτών.
7. Επαναλάβετε την άσκηση 20 φορές.
Σημαντικό: Φροντίζετε για ένταση στο
σώμα και ευθεία στάση. Για να μειώσετε
το βαθμό δυσκολίας της άσκησης,
στηριχθείτε με τους αντιβραχίονες στο
έδαφος. Αυτή η άσκηση δυναμώνει τους
μυς της κοιλιάς και των γλουτών.
Σανίδα στη μία πλευρά (Εικ. N)
Μήκος συστήματος προπόνησης με ιμάντες:
Στο ύψος των γονάτων
Με τροχαλία αναστροφής
Αρχική θέση:
1. Σταθείτε όρθιοι κοιτώντας μακριά από το
σημείο στερέωσης.
2. Σταθείτε με τα πόδια στο άνοιγμα της λεκάνης
και κρατήστε τις δύο χειρολαβές με τεντωμένα
χέρια.
3. Μετατοπίστε το βάρος σας μπροστά, έως ότου
να βρίσκεστε σε μία εύλογη γωνία αντίστασης.
Τα πόδια αγγίζουν το έδαφος μόνο με τα
πέλματα.
Τελική θέση:
4. Σφίξτε τα χέρια, τους κοιλιακούς, καθώς και
τους γλουτούς.
5. Τραβήξτε το ένα χέρι σε γωνία 90 μοιρών
προς το σώμα, διατηρώντας την ευθεία στάση.
6. Επιστρέψτε στην αρχική θέση τεντώνοντας
ξανά το λυγισμένο χέρι.
7. Επαναλάβετε την άσκηση 10 φορές για κάθε
πλευρά.
8. Επαναλάβετε την άσκηση με το άλλο χέρι.
Σημαντικό: Φροντίζετε όλο το σώμα να
μένει τεντωμένο. Με αυτήν την άσκηση
δυναμώνουν οι μυς του στήθους, των
ώμων και του κορμού.
Τράβηγμα με δύναμη (Εικ. O)
Μήκος συστήματος προπόνησης με ιμάντες:
Μεσαίο
Με τροχαλία αναστροφής
Αρχική θέση:
1. Σταθείτε όρθιοι κοιτώντας μακριά από το
σημείο στερέωσης.
2. Σταθείτε με τα πόδια στο άνοιγμα της λεκάνης
και κρατήστε τις δύο χειρολαβές με τεντωμένα
χέρια.
3. Μετατοπίστε το βάρος σας μπροστά, έως ότου
να βρίσκεστε σε μία εύλογη γωνία αντίστασης.
Τελική θέση:
4. Σφίξτε τα χέρια, τους κοιλιακούς, καθώς και
τους γλουτούς.
5. Τραβήξτε το αριστερό χέρι σε γωνία 90
μοιρών προς το σώμα τεντώνοντας παράλληλα
το δεξί χέρι μπροστά.
6. Γυρίστε τον κορμό αριστερά και περάστε το
αριστερό χέρι από το σώμα, ώστε να το
τεντώσετε πίσω. Το βλέμμα σας είναι στραμμένο
στο αριστερό χέρι, ενώ τα χέρια σας είναι
ανοιχτά. Διατηρήστε την ένταση στο σώμα.
7. Επιστρέψτε στην αρχική θέση λυγίζοντας το
αριστερό χέρι και περνώντας το από το σώμα.
8. Επαναλάβετε την άσκηση με το άλλο χέρι.
9. Επαναλάβετε την άσκηση 10 φορές για κάθε
πλευρά.
Σημαντικό: Φροντίζετε όλο το σώμα να
μένει τεντωμένο. Με αυτήν την άσκηση
δυναμώνουν οι μυς του στήθους, της
πλάτης, των ώμων και του κορμού.
47GR/CY
Page 48

Τράβηγμα στήθους από τη μία
πλευρά (Εικ. P)
Μήκος συστήματος προπόνησης με ιμάντες:
Μεσαίο
Με τροχαλία αναστροφής
Αρχική θέση:
1. Σταθείτε με ίσιο το σώμα κοιτώντας προς την
κατεύθυνση του σημείου στερέωσης.
2. Τα πόδια είναι στο άνοιγμα της λεκάνης, ενώ
το σώμα είναι τεντωμένο.
3. Κρατήστε τις δύο χειρολαβές με τεντωμένα
χέρια. Οι παλάμες είναι στραμμένες η μία
προς την άλλη.
4. Μετατοπίστε το βάρος σας πίσω, έως ότου να
βρίσκεστε σε μία εύλογη γωνία αντίστασης.
Μόνο οι φτέρνες αγγίζουν το έδαφος, ενώ οι
μύτες δείχνουν προς τα πάνω.
Τελική θέση:
5. Σφίξτε τα χέρια, τους κοιλιακούς, καθώς και
τους γλουτούς.
6. Τραβήξτε το ένα χέρι σε γωνία 90 μοιρών
προς το σώμα, διατηρώντας την ευθεία στάση.
7. Επιστρέψτε στην αρχική θέση τεντώνοντας
ξανά το λυγισμένο χέρι.
8. Επαναλάβετε την άσκηση 15 φορές για κάθε
πλευρά.
9. Επαναλάβετε την άσκηση με το άλλο χέρι.
Σημαντικό: Φροντίζετε όλο το σώμα να
μένει τεντωμένο.
Χρήση κωδικού QR
Μέσω του κωδικού QR έχετε τη
δυνατότητα, να δείτε τις ασκήσεις
που περιγράφονται εδώ ως βίντεο.
Για το σκοπό αυτό, χρειάζεστε έναν
κωδικό App QR για το κινητό/το
tablet σας.
1. Εκκινήστε τον κωδικό App QR.
2. Κρατήστε και σκανάρετε με το κινητό/το tablet
σας τον κωδικό QR.
Διατάσεις
Μετά από κάθε προπόνηση, να αφιερώνετε
αρκετό χρόνο για διατάσεις. Ακολουθούν
ορισμένες απλές ασκήσεις.
Θα πρέπει να επαναλαμβάνετε κάθε άσκηση 3
φορές ανά πλευρά για 5 δευτερόλεπτα.
Αυχενικοί μύες
1. Σταθείτε όρθιοι και χαλαροί. Τραβήξτε το
κεφάλι σας απαλά με το ένα χέρι πρώτα προς
τα αριστερά και στη συνέχεια προς τα δεξιά.
Έτσι, διατείνονται οι πλευρές του λαιμού σας.
Χέρια και ώμοι
1. Σταθείτε όρθιοι με τα γόνατα ελαφρώς
λυγισμένα.
2. Περάστε το δεξί χέρι πίσω από το κεφάλι,
μέχρι να φτάσει ανάμεσα στις ωμοπλάτες.
3. Πιάστε με το αριστερό χέρι τον δεξί αγκώνα
και τραβήξτε τον προς τα πίσω.
4. Αλλάξτε πλευρά και επαναλάβετε την άσκηση.
Μύες ποδιών
1. Σταθείτε ευθεία και σηκώστε ένα πόδι από το
έδαφος.
2. Κάνετε αργές κυκλικές κινήσεις αρχικά
προς τη μία και στη συνέχεια προς την άλλη
κατεύθυνση.
3. Μετά από λίγο, αλλάξτε πόδι.
Σημαντικό: Οι μηροί σας πρέπει να
παραμένουν παράλληλα ο ένας δίπλα
στον άλλο. Σπρώξτε, ταυτόχρονα, τη
λεκάνη προς τα μπροστά, ενώ ο κορμός
παραμένει ευθυγραμμισμένος.
Συντήρηση και αποθήκευση
Αποθηκεύετε το προϊόν πάντοτε στεγνό και
καθαρό, σε ήπιο θερμοκρασιακά χώρο.
Ύποδείξεις απόρριψης
Διαθέτετε το προϊόν και όλα τα εξαρτήματά του
σε μια αρμόδια επιχείρηση διάθεσης ή στις
τοπικές εγκαταστάσεις διάθεσης απορριμμάτων.
Τηρείτε τις εκάστοτε ισχύουσες διατάξεις. Σε
περίπτωση αμφιβολιών, ενημερωθείτε από τις
τοπικές εγκαταστάσεις διάθεσης [απορριμμάτων]
για φιλική προς το περιβάλλον διάθεση.
48 GR/CY
Page 49

3 έτη εγγύηση
Το προϊόν κατασκευάστηκε με την μεγαλύτερη
φροντίδα και υπό συνεχή έλεγχο. Λαμβάνετε
για αυτό το προϊόν τρία έτη εγγύηση από την
ημερομηνία αγοράς. Παρακαλούμε διαφυλάξτε
την απόδειξη ταμείου.
Η εγγύηση ισχύει μόνο για σφάλματα υλικού
και κατασκευής και εκπίπτει σε εσφαλμένη ή
εκτός προδιαγραφών χειρισμού. Τα νόμιμα σας
δικαιώματα, ιδιαίτερα τα δικαιώματα εγγύησης,
δεν περιορίζονται μέσω αυτής της εγγύησης.
Σε πιθανές απαιτήσεις, απευθυνθείτε
παρακαλούμε στην παρακάτω Γραμμή
Εξυπηρέτησης ή επικοινωνήστε μαζί μας μέσω
email. Οι συνεργάτες μας εξυπηρέτησης θα
καθορίσουν μαζί σας τις περαιτέρω ενέργειες
το συντομότερο δυνατόν. Θα λάβετε σε κάθε
περίπτωση προσωπική συμβουλή.
Με την αντικατάσταση της συσκευής, σύμφωνα
με το NOMO 2251/1994, ξεκινάει εκ νέου
η περίοδος της εγγύησης. Μετά την λήξη της
εγγύησης προκύπτουσες επισκευές είναι με
κόστος.
IAN: 282677
Σέρβις Ελλάδα
Tel.: 801 5000 019
(0,03 EUR/Min.)
E-Mail: deltasport@lidl.gr
Σέρβις Κύπρος
Tel.: 8009 4409
E-Mail: deltasport@lidl.com.cy
Ανταλλακτικά για το προϊόν σας μπορείτε να βρείτε επίσης στο:
www.delta-sport.com, Τμήμα Σέρβις - Υπηρεσία Ανταλλακτικών
Lidl
49GR/CY
Page 50

Herzlichen Glückwunsch!
Mit Ihrem Kauf haben Sie sich für einen hochwertigen Artikel entschieden. Machen Sie sich
vor der ersten Verwendung mit dem Artikel
vertraut.
Lesen Sie hierzu aufmerksam die nachfolgende Gebrauchsanleitung.
Benutzen Sie den Artikel nur wie beschrieben
und für die angegebenen Einsatzbereiche.
Bewahren Sie diese Anleitung gut auf.
Händigen Sie alle Unterlagen bei Weitergabe
des Artikels an Dritte ebenfalls mit aus.
Lieferumfang/
Teilebezeichnung (Abb. A)
1 x Gebrauchsanleitung
1 x Schlingentrainer mit Umlenkrolle
(1) Gurtband mit Ankerschlaufen
(2) Tür-Anker
(3) Karabiner
(4) Umlenkrolle
(5) Seil
(6) Verstellschnalle
(7) Handgriff
(8) Fußschlaufe
(9) Verlängerungsgurt
(10) Tür-Hinweisschild
(11) Aufbewahrungsbeutel
Technische Daten
Maximale Belastung: 120 kg
Bestimmungsgemäße
Verwendung
Dieser Artikel wurde als Trainingsinstrument entwickelt, mit dem Sie Ihren ganzen Körper trainieren können. Der Schlingentrainer ist für den Einsatz im privaten Bereich konzipiert und ist für
medizinische sowie gewerbliche Zwecke nicht
geeignet.
Der Artikel wurde sowohl für den Gebrauch im
Innenraum als auch im Außenbereich konzipiert
und darf ausschließlich an Türen mit dem mitgelieferten Tür-Anker befestigt werden als auch
an Stangen, Baumästen, Haken u.ä. mit dem
zusätzlichen Karabiner.
Sicherheitshinweise
Verletzungsgefahr!
• Konsultieren Sie Ihren Arzt, bevor Sie mit dem
Training beginnen. Stellen Sie sicher, dass Sie
für das Training gesundheitlich geeignet sind.
• Verwenden Sie den Artikel nicht, wenn Sie
verletzt oder gesundheitlich eingeschränkt
sind.
• Dieser Artikel ist für ein maximales Körperge wicht von 120 kg ausgelegt. Verwenden Sie
den Artikel nicht, wenn Ihr Körpergewicht
darüber liegt.
• Denken Sie daran, sich vor dem Training
immer aufzuwärmen und trainieren Sie Ihrer
aktuellen Leistungsfähigkeit entsprechend.
Bei zu hoher Anstrengung und Übertraining
drohen schwere Verletzungen.
Bei Beschwerden, Schwächegefühl oder
Müdigkeit brechen Sie das Training sofort ab
und kontaktieren Sie einen Arzt.
• Bewahren Sie die Gebrauchsanleitung mit
den Übungsvorschlägen stets griffbereit auf.
• Schwangere sollten das Training nur nach
Absprache mit ihrem Arzt durchführen.
• Der Artikel darf immer nur von einer Person
zur Zeit benutzt werden.
• Der Artikel ist nicht für therapeutische Zwecke
geeignet.
• Um den Trainingsbereich muss ein Freibereich
von ca. 0,6 m zu allen Seiten vorhanden sein
(Abb. Q).
• Trainieren Sie nur auf einem flachen und
rutschfesten Untergrund.
• Verwenden Sie den Artikel nicht in der Nähe
von Treppen oder Absätzen.
• Beenden Sie das Training sofort, wenn Sie
sich schwindelig fühlen, Herzrasen verspüren
etc., und konsultieren Sie sofort einen Arzt.
• Der Artikel darf nur von einem Erwachsenen
montiert werden, um Verletzungen durch un sachgemäße Handhabung zu vermeiden.
50
DE/AT/CH
Page 51

Achten Sie darauf, den Artikel erst nach voll ständiger Montage zu verwenden.
• Trainieren Sie nicht, wenn Sie müde oder un konzentriert sind. Trainieren sie nicht unmittel bar nach Mahlzeiten. Warten Sie ca. 2 Stun den mit dem Trainingsbeginn.
• Lüften Sie den Trainingsraum ausreichend,
aber vermeiden Sie Zugluft.
• Trinken Sie während des Trainings ausrei chend.
• Wickeln Sie den Artikel niemals um Kopf, Hals
oder Brust. Strangulationsgefahr!
• Benutzen Sie den Artikel nicht für andere
Zwecke (z.B. als Spannseil, Abschleppseil
oder Ähnliches).
• Achtung! Den Schlingentrainer
ausschließlich an Türen befestigen!
• Warnung! Verletzungsgefahr!
Befestigen Sie den Schlingentrainer
ausschließlich an Türen, die nach
außen (von Ihnen weg) öffnen!
Montieren Sie den Schlingentrainer
niemals an Türen, die nach innen
(zu Ihnen hin) öffnen. Die Tür könnte
sich aufziehen, was zu schweren
Verletzungen führen kann!
• Warnung! Verletzungsgefahr!
Schließen Sie die Tür, an der Sie den
Schlingentrainer befestigen, immer
ab!
• Achtung! Nutzen Sie, während Sie
trainieren, immer das mitgelieferte
Tür-Hinweisschild! Achten Sie darauf,
dass es sich gut lesbar auf der
anderen Seite der Tür befindet.
Besondere Vorsicht –
Verletzungsgefahr für Kinder!
• Halten Sie Kinder von Verpackungsmaterial
fern. Es besteht Erstickungsgefahr!
• Der Artikel ist nicht als Spielgerät geeignet
und muss bei Nichtgebrauch unzugänglich
für Kinder gelagert werden. Kinder dürfen
sich während des Trainings nicht in Reichweite
des Artikels befinden, um Verletzungsgefahren
auszuschließen.
• Weisen Sie Kinder insbesondere darauf hin,
dass der Artikel kein Spielzeug ist.
Gefahren durch Verschleiß
• Der Artikel darf nur in einwandfreiem Zustand
verwendet werden. Prüfen Sie den Artikel
vor jedem Gebrauch auf Beschädigungen
oder Abnutzungen.
Die Sicherheit des Schlingentrainers kann nur
gewährleistet werden, wenn er regelmäßig
auf Schäden und Verschleiß geprüft wird.
• Verwenden Sie ausschließlich Original Ersatzteile.
• Schützen Sie den Artikel vor extremen Tem peraturen, Sonne und Feuchtigkeit.
Unsachgemäße Lagerung und Verwendung
des Artikels können zu vorzeitigem Verschleiß
und möglichen Brüchen in der Konstruktion
führen, was Verletzungen zur Folge haben
kann.
• Befestigen Sie den Artikel nicht an Stellen
mit scharfen Kanten, z. B. Türscharnieren.
Nylon reißt, wenn es an scharfen Kanten
schabt.
• Nicht sägen! Sägebewegungen führen zu
vorzeitigem Verschleiß.
• Untersuchen Sie den Artikel regelmäßig auf
Beschädigungen oder Abnutzungen.
Bei Beschädigungen dürfen Sie das Produkt
nicht mehr verwenden.
Vorsicht vor Sachschäden
• Lassen Sie den Schlingentrainer niemals ein fach fallen bzw. gegen die Tür zurückschnel len. Andernfalls kann es zu Beschädigungen
an der Tür kommen.
Aufbauhinweise/Montage
• Wählen Sie einen Trainingsbereich von
ca. 3,00 x 1,80 m (L x B).
• Befestigen Sie den Schlingentrainer in einer
Höhe zwischen 1,80 und 2,30 m.
• Trainieren Sie nur auf einem flachen und
rutschfesten Untergrund.
• Montieren Sie den Schlingentrainer aus schließlich an Türen, die nach außen (von
Ihnen weg) öffnen (Abb. B).
• Legen Sie den Anker mittig über die Tür
(Abb. B).
• Verschließen Sie die Tür fest.
51DE/AT/CH
Page 52

•
Achtung! Verletzungsgefahr!
Schließen Sie die Tür immer ab!
• Nutzen Sie immer das mitgelieferte
Tür-Hinweisschild (10)!
• Stellen Sie sicher, dass die Tür, an der Sie den
Tür-Anker (2) befestigen, stabil und robust ist,
Ihr Körpergewicht trägt und der Tür-Anker fest
sitzt. Zum Überprüfen ziehen Sie ein paar Mal
fest an dem Seil (5) (Abb. C).
Montage/Verwendung des
Verlängerungsgurtes
Mit dem Verlängerungsgurt (9) kann der Schlingentrainer an Stangen, Baumästen oder Haken
montiert werden (Abb. H). Entfernen Sie dazu
den Tür-Anker (2) aus dem Gurtband (1).
Warnung! Überprüfen Sie immer die
Traglast der Montagepunkte, um sicherzustellen,
dass ausreichend Sicherheitsreserven vorhanden
sind. Bei Nichtbeachtung besteht die Gefahr von
schweren Verletzungen.
Schlingentrainer verkürzen
und verlängern
Hinweis! Vergewissern Sie sich vor dem
Anpassen immer, dass das Seil (5) nicht
verdreht ist!
Verkürzen
1. Halten Sie mit einer Hand das Ende des Seils
(5a) fest und ziehen Sie mit der anderen
Hand die Verstellschnalle (6) in Richtung des
Befestigungspunktes (Abb. D).
2. Wiederholen Sie den Vorgang für den ande ren Handgriff (7).
Verlängern
1. Halten Sie mit einer Hand das Ende des Seils
(5a) fest und ziehen sie mit der anderen Hand
die Verstellschnalle (6) in Richtung Handgriff
(7) (Abb. D).
2. Wiederholen Sie den Vorgang für den ande ren Handgriff (7).
Ankerpunkt versetzen
Sollte der Schlingentrainer grundsätzlich
zu lang sein, können Sie den Ankerpunkt versetzen.
1. Öffnen Sie dazu den Klettverschluss (2a) des
Tür-Ankers (2) und entnehmen Sie den Anker
aus dem Gurtband (1) (Abb. G).
2. Positionieren Sie ihn in einer der unteren
Schlaufen und sichern Sie den Tür-Anker an schließend durch den Klettverschluss an der
Schlaufe (Abb. G).
Achtung! Positionieren Sie den Tür-Anker (2)
ausschließlich in den Ankerschlaufen!
Achtung! Verletzungsgefahr!
Wickeln Sie niemals das Gurtband (1)
zum Verkürzen einfach um den Tür-Anker (2)
herum. Das Gurtband kann sich lösen!
Empfohlene Länge des
Schlingentrainers
Stellen Sie die Länge des Schlingentrainers für jede Übung wie unten
beschrieben ein:
Länge Schlingentrainer: Kurz
Verkürzen Sie den Schlingentrainer so kurz wie
möglich.
Länge Schlingentrainer: Mittlere Länge
Stellen Sie den Schlingentrainer auf die Hälfte
der Seillänge ein.
Länge Schlingentrainer: Kniehöhe
Stellen Sie den Schlingentrainer so ein, dass sich
die Handgriffe in der Höhe kurz unterhalb Ihrer
Knie befinden.
Länge Schlingentrainer: Lang
Ziehen Sie das Seil des Schlingentrainers
vollständig aus, sodass die Handgriffe ca. 7 cm
über dem Boden hängen.
Umlenkrolle entfernen
Sie haben die Möglichkeit die Umlenkrolle (4)
vom Schlingentrainer zu entfernen oder und das
Seil (5) direkt an das Gurtband (1) zu befestigen (Abb. E).
1. Lösen Sie den Karabiner (3) vom
Gurtband (1).
2. Haken Sie den Karabiner aus der
Gelenkrolle (4).
3. Entfernen Sie das Seil (5) aus der Gelenkrolle.
4. Legen Sie sich das Seil doppelt, sodass eine
Schlaufe entsteht.
52
DE/AT/CH
Page 53

5. Fädeln Sie die Schlaufe durch die letzte
Ankerschlaufe des Gurtbandes (1).
6. Ziehen Sie die Schlaufe über das gesamte
Gurtband und ziehen Sie die Schlaufe fest,
sodass ein Knoten entsteht.
Wichtig: Achten Sie darauf, dass das
Seil gleich lang ist. Überprüfen Sie dies,
in dem Sie die Handgriffe nebeneinander halten (Abb. F).
Umlenkrolle anbringen
Bringen Sie die Umlenkrolle, wie in Abbildung E
beschrieben, in umgekehrter Reihenfolge an.
1. Lösen Sie das Seil (5) vom Gurtband (1).
2. Legen Sie das Seil über die Gelenkrolle (4)
und positionieren Sie die Löcher der Gelen krolle übereinander.
3. Stecken Sie den Karabiner (3) durch die
beiden Löcher der Gelenkrolle und befestigen
Sie diesen am Gurtband.
Allgemeine Trainingshinweise
Trainingsablauf
• Tragen Sie bequeme Sportbekleidung.
• Wärmen Sie sich vor jedem Training auf und
lassen Sie das Training allmählich abklingen.
• Machen Sie zwischen den Übungen aus reichend lange Pausen und trinken Sie genug.
• Trainieren Sie als Anfänger nie mit einer zu
hohen Belastung. Steigern Sie die Trainings intensität langsam.
• Führen Sie alle Übungen gleichmäßig, nicht
ruckartig und schnell durch.
• Achten Sie auf eine gleichmäßige Atmung.
Bei Anstrengung ausatmen und bei Entlastung
einatmen.
• Achten Sie auf eine korrekte Körperhaltung
während der Übungsdurchführung.
Aufwärmen
Nehmen Sie sich vor jedem Training ausreichend
Zeit zum Aufwärmen. Im Folgenden beschreiben
wir Ihnen hierzu einige einfache Übungen.
Sie sollten die jeweiligen Übungen jeweils zweibis dreimal wiederholen.
Nackenmuskulatur
1. Drehen Sie Ihren Kopf langsam nach links und
nach rechts. Wiederholen Sie diese
Bewegung vier- bis fünfmal.
2. Kreisen Sie langsam den Kopf zunächst in
eine, dann in die andere Richtung.
Arme und Schultern
1. Verschränken Sie Ihre Hände hinter dem
Rücken und ziehen Sie sie vorsichtig nach
oben.
Wenn Sie dabei den Oberkörper nach vorne
beugen, werden alle Muskeln optimal aufge wärmt.
2. Kreisen Sie Ihre Schultern beide gleichzeitig
nach vorne und wechseln Sie nach einer
Minute die Richtung.
3. Ziehen Sie Ihre Schultern Richtung Ohren und
lassen Sie die Schultern wieder fallen.
4. Kreisen Sie abwechselnd Ihren linken und
rechten Arm vorwärts und nach einer Minute
rückwärts.
Wichtig: Vergessen Sie dabei nicht,
ruhig weiter zu atmen!
Übungsvorschläge
Im Folgenden werden Ihnen einige von vielen
Übungen dargestellt.
Hinweis: Bei einigen Übungen haben Sie die
Wahl, mit oder ohne Umlenkrolle zu trainieren.
Wenn Sie ohne Umlenkrolle trainieren möchten,
müssen Sie das Seil direkt an das Gurtband
befestigen. Nähere Informationen dazu
entnehmen Sie bitte dem Abschnitt „Umlenkrolle
entfernen“.
Achtung! Tragen Sie unbedingt rutschfeste Turnschuhe!
Beinbeuge (Abb. I)
Länge Schlingentrainer: Kniehöhe
Mit oder ohne Umlenkrolle
Ausgangsposition:
1. Liegen Sie mit dem Gesicht nach oben und
platzieren Sie die Fersen in den Fußschlaufen.
Hinweis: Für eine bequemere Fußhaltung
schieben Sie die Kunststoffgriffe nach oben.
2. Die Arme liegen seitlich neben dem Körper.
DE/AT/CH
53
Page 54

Endposition:
3. Spannen Sie die Bauchmuskulatur an.
4. Ziehen Sie die Fersen zum Becken.
5. Gehen Sie langsam wieder in die Ausgangs position zurück.
6. Wiederholen Sie die Übung 10-mal.
Wichtig: Drücken Sie die
Fersen während des gesamten
Bewegungsablaufs fest in die
Fußschlaufen. Verstärken Sie die
Intensität, indem Sie während der
Übung das Becken anheben.
Crunch (Abb. J)
Länge Schlingentrainer: Kniehöhe
Mit oder ohne Umlenkrolle
Ausgangsposition:
1. Platzieren Sie die Füße mit den Zehen nach
unten in den Fußschlaufen.
Hinweis: Für eine bequemere Fußhaltung
schieben Sie die Kunststoffgriffe nach oben.
2. Nehmen Sie die Brettposition auf den Händen
ein.
Endposition:
3. Spannen Sie die Gesäß- und Bauchmuskulatur
an.
4. Ziehen Sie die Knie zur Brust.
5. Begeben Sie sich in die Ausgangsposition
zurück.
6. Wiederholen Sie die Übung 15-mal.
Wichtig: Achten Sie auf Ihre
Körperspannung und eine gute
Körperhaltung. Die meisten
Brettübungen auf dem Boden sind
leichter, wenn Sie sich mit Ihren
Unterarmen abstützen. Stützen Sie
sich mit ausgestreckten Armen auf
Ihren Händen ab, erhöht das den
Schwierigkeitsgrad.
Hüftheben (Abb. K)
Länge Schlingentrainer: Kniehöhe
Mit oder ohne Umlenkrolle
Ausgangsposition:
1. Liegen Sie in Rückenlage mit den Fersen in
den Fußschlaufen.
2. Die Arme liegen seitlich neben dem Körper,
Handflächen flach auf dem Boden.
Endposition:
3. Spannen Sie den Rumpf an.
4. Heben Sie das Becken vom Boden an, indem
Sie die Fersen in die Fußschlaufen drücken.
5. Senken Sie das Becken wieder auf halbe
Höhe ab.
6. Wiederholen Sie die Übung 15-mal.
Wichtig: Achten Sie auf Ihre Körperspannung und eine gute Körperhaltung.
Die meisten Bodenübungen werden
umso schwieriger, je weiter weg Sie
sich vom Befestigungspunkt befinden
(und umgekehrt).
Seitliches Brett (Abb. L)
Länge Schlingentrainer: Kniehöhe
Mit oder ohne Umlenkrolle
Ausgangsposition:
1. Legen Sie sich auf die linke Hüfte und den
unteren linken Arm gestützt, mit den Zehen in
den Fußschlaufen unter dem Befestigungs punkt.
2. Beine sind versetzt, das obere ist vorn.
Endposition:
3. Spannen Sie die Gesäß- und Bauchmuskulatur
an.
4. Heben Sie das Becken in eine Brettposition
und halten Sie sie 10 Sekunden.
5. Gehen Sie wieder in die Ausgangsposition
zurück.
6. Wiederholen Sie die Übung nach 10
Wiederholungen auf der anderen Seite
Wichtig: Erhöhen Sie die Intensität,
indem Sie den freien Arm an der Hüfte
abstützen oder ihn nach oben strecken.
Radfahren im Liegestütz (Abb. M)
Länge Schlingentrainer: Kniehöhe
Mit Umlenkrolle
Ausgangsposition:
1. Platzieren Sie die Füße mit den Zehen zum
Boden in den Fußschlaufen.
2. Nehmen Sie die Brettposition mit
ausgestreckten Armen ein.
3. Ziehen Sie ein Knie zur Brust und strecken Sie
das andere gerade nach hinten aus.
54
DE/AT/CH
Page 55

Endposition:
4. Spannen Sie die Arm-, Bauch- und
Gesäßmuskulatur an.
5. Führen Sie kreisende Bewegungen aus, indem
Sie abwechselnd ein Bein zur Brust ziehen
und das andere gerade nach hinten
ausstrecken.
6. Halten Sie Ihren Oberkörper unter
Anspannung und versuchen Sie das jeweils
gestreckte Bein auf Gesäßhöhe anzuheben.
7. Wiederholen Sie die Übung 20-mal.
Wichtig: Achten Sie auf Ihre
Körperspannung und eine
gerade Körperhaltung. Um den
Schwierigkeitsgrad der Übung zu
verringern, stützen Sie sich mit den
Unterarmen am Boden ab. Diese Übung
stärkt die Bauch- und Gesäßmuskulatur.
Einseitiger Liegestütz (Abb. N)
Länge Schlingentrainer: Kniehöhe
Mit Umlenkrolle
Ausgangsposition:
1. Stellen Sie sich aufrecht hin, Sie blicken vom
Befestigungspunkt weg.
2. Stehen Sie hüftbreit und halten Sie beide
Handgriffe mit gestreckten Armen.
3. Verlagern Sie ihr Gewicht nach vorne bis Sie
sich in einem angemessenen Widerstands winkel befinden. Die Füße haben nur noch mit
den Fußballen Kontakt zum Boden.
Endposition:
4. Spannen Sie die Arm-, Bauch und
Gesäßmuskulatur an.
5. Ziehen Sie einen Arm im 90 Grad Winkel
zum Körper, bewahren Sie dabei ihre gerade
Haltung.
6. Gehen Sie in die Ausgangsposition zurück,
indem Sie den gebeugten Arm erneut
strecken.
7. Führen Sie die Übung pro Seite 10-mal aus.
8. Wiederholen Sie die Übung mit dem anderen
Arm.
Wichtig: Achten Sie darauf, den gesamten Körper gestreckt zu halten.
Mit dieser Übung kräftigen Sie die
Muskula-tur der Brust, der Schultern
und des Rumpfes.
Kraftzug (Abb. O)
Länge Schlingentrainer: Mittlere Länge
Mit Umlenkrolle
Ausgangsposition:
1. Stellen Sie sich aufrecht hin, Sie blicken vom
Befestigungspunkt weg.
2. Stehen Sie hüftbreit und halten Sie beide
Handgriffe mit gestreckten Armen.
3. Verlagern Sie ihr Gewicht nach vorne bis Sie
sich in einem angemessenen
Widerstandswinkel befinden.
Endposition:
4. Spanne Sie die Arm-, Bauch- und
Gesäßmuskulatur an.
5. Ziehen Sie den linken Arm im 90 Grad
Winkel zum Körper, gleichzeitig strecken Sie
den rechten Arm weiter nach vorne.
6. Drehen Sie den Oberkörper nach links und
führen Sie den linken Arm am Körper vorbei
um ihn nach hinten auszustrecken. Ihr Blick
richtet sich auf ihre linke Hand, ihre Arme
sind weit geöffnet. Bewahren Sie dabei ihre
Körperspannung.
7. Gehen Sie in die Ausgangsposition zurück,
indem Sie den linken Arm beugen und am
Körper vorbeiführen.
8. Wiederholen Sie die Übung mit dem anderen
Arm.
9. Führen Sie die Übung pro Seite 10-mal aus.
Wichtig: Achten Sie darauf, den
gesamten Körper gestreckt zu halten.
Mit dieser Übung kräftigen Sie die
Muskulatur der Brust, des Rückens, der
Schultern und des Rumpfes.
Einseitiger Brustzug (Abb. P)
Länge Schlingentrainer: Mittlere Länge
Mit Umlenkrolle
Ausgangsposition:
1. Stellen Sie sich aufrecht hin, Sie blicken in die
Richtung des Befestigungspunkts.
2. Die Füße stehen hüftbreit, ihr Körper ist
gestreckt.
3. Halten Sie beide Handgriffe mit gestreckten
Armen, die Handflächen sind einander
zugewandt.
DE/AT/CH
55
Page 56

4. Verlagern Sie ihr Gewicht nach hinten bis Sie
sich in einem angemessenen
Widerstandswinkel befinden. Nur die Fersen
berühren den Boden, die Zehenspitzen zeigen
nach oben.
Endposition:
5. Spannen Sie die Arm-, Bauch- und
Gesäßmuskeln an.
6. Ziehen Sie einen Arm im 90 Grad Winkel
zum Körper, bewahren Sie dabei ihre gerade
Haltung.
7. Begeben Sie sich in die Ausgangsposition
zurück, indem Sie den gebeugten Arm erneut
strecken.
8. Führen Sie die Übung pro Seite 15-mal aus.
9. Wiederholen Sie die Übung mit dem anderen
Arm.
Wichtig: Achten Sie darauf, den
gesamten Körper gestreckt zu halten.
2. Führen Sie den rechten Arm hinter den Kopf,
bis die rechte Hand zwischen den Schulter blättern liegt.
3. Greifen Sie mit der linken Hand den rechten
Ellenbogen und ziehen Sie diesen nach
hinten.
4. Wechseln Sie die Seiten und wiederholen Sie
die Übung.
Beinmuskulatur
1. Stellen Sie sich aufrecht hin und heben Sie
einen Fuß vom Boden.
2. Kreisen Sie ihn langsam erst in die eine, dann
in die andere Richtung.
3. Wechseln Sie nach einer Weile den Fuß.
Wichtig: Achten Sie darauf, dass Ihre
Oberschenkel parallel nebeneinander
bleiben. Das Becken schieben Sie dabei
nach vorne, der Oberkörper bleibt
aufgerichtet.
QR-Code verwenden
Sie haben die Möglichkeit, per
QR-Code die hier beschriebenen
Übungen als Video anzuschauen.
Dafür benötigen Sie für Ihr Handy/
Tablet eine App QR-Code.
1. Starten Sie die App QR-Code.
2. Halten und scannen Sie mit Ihrem Handy/
Tablet den aufgeführten QR-Code.
Dehnen
Nehmen Sie sich nach jedem Training ausreichend Zeit zum Dehnen. Im Folgenden
beschreiben wir Ihnen hierzu einige einfache
Übungen.
Sie sollten die jeweiligen Übungen jeweils 3-mal
pro Seite à 5 Sekunden ausführen.
Nackenmuskulatur
1. Stellen Sie sich entspannt hin. Ziehen Sie Ihren
Kopf mit einer Hand sanft zuerst nach links,
dann nach rechts. Durch diese Übung werden
die Seiten Ihres Halses gedehnt.
Arme und Schultern
1. Stellen Sie sich aufrecht hin, die Kniegelenke
sind leicht gebeugt.
Pflege und Lagerung
Den Artikel immer trocken und sauber in einem
temperierten Raum lagern.
Hinweise zur Entsorgung
Entsorgen Sie den Artikel und die Verpackungsmaterialien entsprechend aktueller örtlicher
Vorschriften. Verpackungsmaterialien wie z.B.
Folienbeutel gehören nicht in Kinderhände.
Bewahren Sie das Verpackungsmaterial für
Kinder unerreichbar auf.
3 Jahre Garantie
Der Artikel wurde mit großer Sorgfalt und unter
ständiger Kontrolle produziert. Sie erhalten auf
diesen Artikel drei Jahre Garantie ab Kaufdatum.
Bitte bewahren Sie den Kassenbon auf.
Die Garantie gilt nur für Material- und Fabrikationsfehler und entfällt bei missbräuchlicher oder
unsachgemäßer Behandlung. Ihre gesetzlichen
Rechte, insbesondere die Gewährleistungsrechte, werden durch diese Garantie nicht
eingeschränkt. Bei etwaigen Beanstandungen
wenden Sie sich bitte an die unten stehende
Service-Hotline oder setzen Sie sich per E-Mail
mit uns in Verbindung.
56
DE/AT/CH
Page 57

Unsere Servicemitarbeiter werden das weitere
Vorgehen schnellstmöglich mit Ihnen abstimmen.
Wir werden Sie in jedem Fall persönlich beraten.
Die Garantiezeit wird durch etwaige Reparaturen aufgrund der Garantie, gesetzlicher
Gewährleistung oder Kulanz nicht verlängert.
Dies gilt auch für ersetzte und reparierte Teile.
Nach Ablauf der Garantie anfallende Reparaturen sind kostenpflichtig.
IAN: 282677
Service Deutschland
Tel.: 0800-5435111
E-Mail: deltasport@lidl.de
Service Österreich
Tel.: 0820 201 222
(0,15 EUR/Min.)
E-Mail: deltasport@lidl.at
Service Schweiz
Tel.: 0842 665566
(0,08 CHF/Min.,
Mobilfunk max. 0,40 CHF/Min.)
E-Mail: deltasport@lidl.ch
Ersatzteile zu Ihrem Artikel finden Sie auch unter:
www.delta-sport.com, Rubrik Service - Ersatzteilservice Lidl
57DE/AT/CH
Page 58

585960
Page 59

Page 60

DELTA-SPORT HANDELSKONTOR GMBH
Wragekamp 6 • D-22397 Hamburg
Version: 02/2017
Delta-Sport-Nr.: ST-2985
IAN 282677
 Loading...