

Page 1
Page 2

Corel® VideoStudio® 2018
User Guide
Including VideoStudio Pro and VideoStudio Ultimate
Page 3

Contents
Quick start . . . . . . . . . . . . . . . . . . . . . . . . . . . . . . . . . . . . . . . . . . . . . . . . . . . . . . 1
Welcome . . . . . . . . . . . . . . . . . . . . . . . . . . . . . . . . . . . . . . . . . . . . . . . . . . . . . . 7
What’s new in Corel VideoStudio 2018? . . . . . . . . . . . . . . . . . . . . . . . . . . . . . . . . . . . . . . . . 7
System requirements . . . . . . . . . . . . . . . . . . . . . . . . . . . . . . . . . . . . . . . . . . . . . . . . . . . . . . . 10
Supported file formats . . . . . . . . . . . . . . . . . . . . . . . . . . . . . . . . . . . . . . . . . . . . . . . . . . . . . . 11
Hardware acceleration . . . . . . . . . . . . . . . . . . . . . . . . . . . . . . . . . . . . . . . . . . . . . . . . . . . . . . 12
Preparing for video editing . . . . . . . . . . . . . . . . . . . . . . . . . . . . . . . . . . . . . . . . . . . . . . . . . . 12
Installing and uninstalling the application . . . . . . . . . . . . . . . . . . . . . . . . . . . . . . . . . . . . . 13
Starting and quitting the application . . . . . . . . . . . . . . . . . . . . . . . . . . . . . . . . . . . . . . . . . 14
Updating the application . . . . . . . . . . . . . . . . . . . . . . . . . . . . . . . . . . . . . . . . . . . . . . . . . . . . 14
Corel Support Services . . . . . . . . . . . . . . . . . . . . . . . . . . . . . . . . . . . . . . . . . . . . . . . . . . . . . . 14
About Corel . . . . . . . . . . . . . . . . . . . . . . . . . . . . . . . . . . . . . . . . . . . . . . . . . . . . . . . . . . . . . . . 14
Learning resources . . . . . . . . . . . . . . . . . . . . . . . . . . . . . . . . . . . . . . . . . . . . . 15
Documentation conventions. . . . . . . . . . . . . . . . . . . . . . . . . . . . . . . . . . . . . . . . . . . . . . . . . 15
Using the Help system . . . . . . . . . . . . . . . . . . . . . . . . . . . . . . . . . . . . . . . . . . . . . . . . . . . . . . 15
Corel VideoStudio 2018 User Guide PDF . . . . . . . . . . . . . . . . . . . . . . . . . . . . . . . . . . . . . . 16
Understanding VideoStudio terminology. . . . . . . . . . . . . . . . . . . . . . . . . . . . . . . . . . . . . . 16
Learning with video tutorials. . . . . . . . . . . . . . . . . . . . . . . . . . . . . . . . . . . . . . . . . . . . . . . . . 16
Using Web-based resources . . . . . . . . . . . . . . . . . . . . . . . . . . . . . . . . . . . . . . . . . . . . . . . . . 17
Workspace tour. . . . . . . . . . . . . . . . . . . . . . . . . . . . . . . . . . . . . . . . . . . . . . . . 19
Exploring the workspaces . . . . . . . . . . . . . . . . . . . . . . . . . . . . . . . . . . . . . . . . . . . . . . . . . . . 19
Switching between workspaces . . . . . . . . . . . . . . . . . . . . . . . . . . . . . . . . . . . . . . . . . . . . . . 22
The Welcome book. . . . . . . . . . . . . . . . . . . . . . . . . . . . . . . . . . . . . . . . . . . . . . . . . . . . . . . . . 23
Using the Player panel . . . . . . . . . . . . . . . . . . . . . . . . . . . . . . . . . . . . . . . . . . . . . . . . . . . . . . 23
Using the toolbar . . . . . . . . . . . . . . . . . . . . . . . . . . . . . . . . . . . . . . . . . . . . . . . . . . . . . . . . . . 26
Customizing the workspace . . . . . . . . . . . . . . . . . . . . . . . . . . . . . . . . . . . . . . . . . . . . . . . . . 27
Changing the application language. . . . . . . . . . . . . . . . . . . . . . . . . . . . . . . . . . . . . . . . . . . 29
Capture and import . . . . . . . . . . . . . . . . . . . . . . . . . . . . . . . . . . . . . . . . . . . . 31
Contents i
Page 4

Using the Options panel in the Capture workspace . . . . . . . . . . . . . . . . . . . . . . . . . . . . . 31
Capturing videos and photos . . . . . . . . . . . . . . . . . . . . . . . . . . . . . . . . . . . . . . . . . . . . . . . . 31
Capturing digital video (DV) . . . . . . . . . . . . . . . . . . . . . . . . . . . . . . . . . . . . . . . . . . . . . . . . . 34
Using DV Quick Scan . . . . . . . . . . . . . . . . . . . . . . . . . . . . . . . . . . . . . . . . . . . . . . . . . . . . . . . 34
Capturing analog video . . . . . . . . . . . . . . . . . . . . . . . . . . . . . . . . . . . . . . . . . . . . . . . . . . . . . 35
Importing from digital media . . . . . . . . . . . . . . . . . . . . . . . . . . . . . . . . . . . . . . . . . . . . . . . . 35
Scanning and splitting scenes. . . . . . . . . . . . . . . . . . . . . . . . . . . . . . . . . . . . . . . . . . . . . . . . 36
Project basics. . . . . . . . . . . . . . . . . . . . . . . . . . . . . . . . . . . . . . . . . . . . . . . . . . 39
Creating new projects and opening projects . . . . . . . . . . . . . . . . . . . . . . . . . . . . . . . . . . . 39
Setting project properties . . . . . . . . . . . . . . . . . . . . . . . . . . . . . . . . . . . . . . . . . . . . . . . . . . . 40
Creating custom profiles . . . . . . . . . . . . . . . . . . . . . . . . . . . . . . . . . . . . . . . . . . . . . . . . . . . . 41
Using Smart Proxy for a faster, smoother editing experience. . . . . . . . . . . . . . . . . . . . . 42
Previewing your project or clips . . . . . . . . . . . . . . . . . . . . . . . . . . . . . . . . . . . . . . . . . . . . . . 42
Undoing and redoing actions . . . . . . . . . . . . . . . . . . . . . . . . . . . . . . . . . . . . . . . . . . . . . . . . 43
Showing and hiding grid lines . . . . . . . . . . . . . . . . . . . . . . . . . . . . . . . . . . . . . . . . . . . . . . . 44
Saving projects . . . . . . . . . . . . . . . . . . . . . . . . . . . . . . . . . . . . . . . . . . . . . . . . . . . . . . . . . . . . 44
Saving projects by using Smart Package . . . . . . . . . . . . . . . . . . . . . . . . . . . . . . . . . . . . . . 45
Adding cues and chapters . . . . . . . . . . . . . . . . . . . . . . . . . . . . . . . . . . . . . . . . . . . . . . . . . . . 45
Templates . . . . . . . . . . . . . . . . . . . . . . . . . . . . . . . . . . . . . . . . . . . . . . . . . . . . 49
Using Instant Project templates . . . . . . . . . . . . . . . . . . . . . . . . . . . . . . . . . . . . . . . . . . . . . . 49
Split screen video templates . . . . . . . . . . . . . . . . . . . . . . . . . . . . . . . . . . . . . . . . . . . . . . . . . 50
Organize and find media . . . . . . . . . . . . . . . . . . . . . . . . . . . . . . . . . . . . . . . . 53
Using the Library . . . . . . . . . . . . . . . . . . . . . . . . . . . . . . . . . . . . . . . . . . . . . . . . . . . . . . . . . . . 53
Sorting, viewing, and filtering clips in the Library . . . . . . . . . . . . . . . . . . . . . . . . . . . . . . . 55
Resizing thumbnails . . . . . . . . . . . . . . . . . . . . . . . . . . . . . . . . . . . . . . . . . . . . . . . . . . . . . . . . 57
Tagging files as 3D . . . . . . . . . . . . . . . . . . . . . . . . . . . . . . . . . . . . . . . . . . . . . . . . . . . . . . . . . 57
Timeline . . . . . . . . . . . . . . . . . . . . . . . . . . . . . . . . . . . . . . . . . . . . . . . . . . . . . . 59
Switching between Timeline views. . . . . . . . . . . . . . . . . . . . . . . . . . . . . . . . . . . . . . . . . . . . 59
Showing and hiding tracks . . . . . . . . . . . . . . . . . . . . . . . . . . . . . . . . . . . . . . . . . . . . . . . . . . 61
Adding and swapping tracks. . . . . . . . . . . . . . . . . . . . . . . . . . . . . . . . . . . . . . . . . . . . . . . . . 61
ii Corel VideoStudio
Page 5

Renaming tracks . . . . . . . . . . . . . . . . . . . . . . . . . . . . . . . . . . . . . . . . . . . . . . . . . . . . . . . . . . . 63
Adjusting track height . . . . . . . . . . . . . . . . . . . . . . . . . . . . . . . . . . . . . . . . . . . . . . . . . . . . . . 63
Grouping and ungrouping . . . . . . . . . . . . . . . . . . . . . . . . . . . . . . . . . . . . . . . . . . . . . . . . . . 64
Using Ripple Editing . . . . . . . . . . . . . . . . . . . . . . . . . . . . . . . . . . . . . . . . . . . . . . . . . . . . . . . . 64
Edit media. . . . . . . . . . . . . . . . . . . . . . . . . . . . . . . . . . . . . . . . . . . . . . . . . . . . 67
Using the Options panel in the Edit workspace. . . . . . . . . . . . . . . . . . . . . . . . . . . . . . . . . 67
Converting multiple files . . . . . . . . . . . . . . . . . . . . . . . . . . . . . . . . . . . . . . . . . . . . . . . . . . . . 69
Adding video clips . . . . . . . . . . . . . . . . . . . . . . . . . . . . . . . . . . . . . . . . . . . . . . . . . . . . . . . . . 70
Adding photos. . . . . . . . . . . . . . . . . . . . . . . . . . . . . . . . . . . . . . . . . . . . . . . . . . . . . . . . . . . . . 70
Rotate a video or photo. . . . . . . . . . . . . . . . . . . . . . . . . . . . . . . . . . . . . . . . . . . . . . . . . . . . . 71
Crop a video or photo . . . . . . . . . . . . . . . . . . . . . . . . . . . . . . . . . . . . . . . . . . . . . . . . . . . . . . 72
Resizing/scaling a video or photo . . . . . . . . . . . . . . . . . . . . . . . . . . . . . . . . . . . . . . . . . . . . 72
Time remapping . . . . . . . . . . . . . . . . . . . . . . . . . . . . . . . . . . . . . . . . . . . . . . . . . . . . . . . . . . . 73
Modifying video playback speed . . . . . . . . . . . . . . . . . . . . . . . . . . . . . . . . . . . . . . . . . . . . . 75
Using Freeze Frame . . . . . . . . . . . . . . . . . . . . . . . . . . . . . . . . . . . . . . . . . . . . . . . . . . . . . . . . 77
Replacing media clips. . . . . . . . . . . . . . . . . . . . . . . . . . . . . . . . . . . . . . . . . . . . . . . . . . . . . . . 78
Trimming a clip . . . . . . . . . . . . . . . . . . . . . . . . . . . . . . . . . . . . . . . . . . . . . . . . . . . . . . . . . . . . 79
Using Split by Scene . . . . . . . . . . . . . . . . . . . . . . . . . . . . . . . . . . . . . . . . . . . . . . . . . . . . . . . . 81
Trimming video into multiple clips . . . . . . . . . . . . . . . . . . . . . . . . . . . . . . . . . . . . . . . . . . . 81
Saving trimmed clips . . . . . . . . . . . . . . . . . . . . . . . . . . . . . . . . . . . . . . . . . . . . . . . . . . . . . . . 83
Taking a snapshot from a video clip . . . . . . . . . . . . . . . . . . . . . . . . . . . . . . . . . . . . . . . . . . 83
Adjusting the color and tone of clips . . . . . . . . . . . . . . . . . . . . . . . . . . . . . . . . . . . . . . . . . 84
Adjusting white balance. . . . . . . . . . . . . . . . . . . . . . . . . . . . . . . . . . . . . . . . . . . . . . . . . . . . . 84
Lens Correction . . . . . . . . . . . . . . . . . . . . . . . . . . . . . . . . . . . . . . . . . . . . . . . . . . . . . . . . . . . . 86
Pan and zoom for video and photos . . . . . . . . . . . . . . . . . . . . . . . . . . . . . . . . . . . . . . . . . . 87
Working with the Mask Creator . . . . . . . . . . . . . . . . . . . . . . . . . . . . . . . . . . . . . . . . . . . . . . 89
Track transparency . . . . . . . . . . . . . . . . . . . . . . . . . . . . . . . . . . . . . . . . . . . . . . . . . . . . . . . . . 93
360 video . . . . . . . . . . . . . . . . . . . . . . . . . . . . . . . . . . . . . . . . . . . . . . . . . . . . . . . . . . . . . . . . . 95
Audio . . . . . . . . . . . . . . . . . . . . . . . . . . . . . . . . . . . . . . . . . . . . . . . . . . . . . . . . 99
Adding audio files . . . . . . . . . . . . . . . . . . . . . . . . . . . . . . . . . . . . . . . . . . . . . . . . . . . . . . . . . . 99
Using Audio Ducking to automatically adjust volume . . . . . . . . . . . . . . . . . . . . . . . . . . 100
Contents iii
Page 6

Splitting an audio track from a video clip. . . . . . . . . . . . . . . . . . . . . . . . . . . . . . . . . . . . . 102
Using Auto Music . . . . . . . . . . . . . . . . . . . . . . . . . . . . . . . . . . . . . . . . . . . . . . . . . . . . . . . . . 102
Balancing the volume of multiple clips with Normalize Audio . . . . . . . . . . . . . . . . . . . 103
Adjusting clip volume. . . . . . . . . . . . . . . . . . . . . . . . . . . . . . . . . . . . . . . . . . . . . . . . . . . . . . 103
Trimming and cutting audio clips . . . . . . . . . . . . . . . . . . . . . . . . . . . . . . . . . . . . . . . . . . . 103
Stretching audio duration . . . . . . . . . . . . . . . . . . . . . . . . . . . . . . . . . . . . . . . . . . . . . . . . . . 104
Applying fade-in/out . . . . . . . . . . . . . . . . . . . . . . . . . . . . . . . . . . . . . . . . . . . . . . . . . . . . . . 105
Using the Sound Mixer. . . . . . . . . . . . . . . . . . . . . . . . . . . . . . . . . . . . . . . . . . . . . . . . . . . . . 105
Adjusting stereo channels . . . . . . . . . . . . . . . . . . . . . . . . . . . . . . . . . . . . . . . . . . . . . . . . . . 105
Using the Surround Sound Mixer. . . . . . . . . . . . . . . . . . . . . . . . . . . . . . . . . . . . . . . . . . . . 106
Mixing Surround Sound. . . . . . . . . . . . . . . . . . . . . . . . . . . . . . . . . . . . . . . . . . . . . . . . . . . . 106
Duplicating an audio channel . . . . . . . . . . . . . . . . . . . . . . . . . . . . . . . . . . . . . . . . . . . . . . . 107
Applying audio filters . . . . . . . . . . . . . . . . . . . . . . . . . . . . . . . . . . . . . . . . . . . . . . . . . . . . . . 107
Titles and subtitles . . . . . . . . . . . . . . . . . . . . . . . . . . . . . . . . . . . . . . . . . . . . 109
Using the Title Safe area . . . . . . . . . . . . . . . . . . . . . . . . . . . . . . . . . . . . . . . . . . . . . . . . . . . 109
Adding titles using the Library . . . . . . . . . . . . . . . . . . . . . . . . . . . . . . . . . . . . . . . . . . . . . . 109
Adding titles with the Subtitle Editor. . . . . . . . . . . . . . . . . . . . . . . . . . . . . . . . . . . . . . . . . 110
Formatting text . . . . . . . . . . . . . . . . . . . . . . . . . . . . . . . . . . . . . . . . . . . . . . . . . . . . . . . . . . . 113
Applying text effects and animation . . . . . . . . . . . . . . . . . . . . . . . . . . . . . . . . . . . . . . . . . 116
Converting titles to image and animation files . . . . . . . . . . . . . . . . . . . . . . . . . . . . . . . . 117
3D Title Editor . . . . . . . . . . . . . . . . . . . . . . . . . . . . . . . . . . . . . . . . . . . . . . . . . 119
3D Title Editor workspace . . . . . . . . . . . . . . . . . . . . . . . . . . . . . . . . . . . . . . . . . . . . . . . . . . 119
Creating and editing 3D titles. . . . . . . . . . . . . . . . . . . . . . . . . . . . . . . . . . . . . . . . . . . . . . . 120
Transitions . . . . . . . . . . . . . . . . . . . . . . . . . . . . . . . . . . . . . . . . . . . . . . . . . . . 123
Adding transitions. . . . . . . . . . . . . . . . . . . . . . . . . . . . . . . . . . . . . . . . . . . . . . . . . . . . . . . . . 123
Saving and deleting transitions . . . . . . . . . . . . . . . . . . . . . . . . . . . . . . . . . . . . . . . . . . . . . 125
Graphics . . . . . . . . . . . . . . . . . . . . . . . . . . . . . . . . . . . . . . . . . . . . . . . . . . . . . 127
Adding color clips . . . . . . . . . . . . . . . . . . . . . . . . . . . . . . . . . . . . . . . . . . . . . . . . . . . . . . . . . 127
Adding color patterns . . . . . . . . . . . . . . . . . . . . . . . . . . . . . . . . . . . . . . . . . . . . . . . . . . . . . 127
Adding backgrounds . . . . . . . . . . . . . . . . . . . . . . . . . . . . . . . . . . . . . . . . . . . . . . . . . . . . . . 128
iv Corel VideoStudio
Page 7

Adding objects or frames . . . . . . . . . . . . . . . . . . . . . . . . . . . . . . . . . . . . . . . . . . . . . . . . . . 128
Adding Flash animations . . . . . . . . . . . . . . . . . . . . . . . . . . . . . . . . . . . . . . . . . . . . . . . . . . . 129
Customizing objects, frames, and animations . . . . . . . . . . . . . . . . . . . . . . . . . . . . . . . . . 129
Video filters . . . . . . . . . . . . . . . . . . . . . . . . . . . . . . . . . . . . . . . . . . . . . . . . . . . 131
Applying filters. . . . . . . . . . . . . . . . . . . . . . . . . . . . . . . . . . . . . . . . . . . . . . . . . . . . . . . . . . . . 131
Marking filters as favorites . . . . . . . . . . . . . . . . . . . . . . . . . . . . . . . . . . . . . . . . . . . . . . . . . 132
Applying multiple filters. . . . . . . . . . . . . . . . . . . . . . . . . . . . . . . . . . . . . . . . . . . . . . . . . . . . 132
Customizing filters . . . . . . . . . . . . . . . . . . . . . . . . . . . . . . . . . . . . . . . . . . . . . . . . . . . . . . . . 133
Overlay clips . . . . . . . . . . . . . . . . . . . . . . . . . . . . . . . . . . . . . . . . . . . . . . . . . 135
Adding clips to overlay tracks. . . . . . . . . . . . . . . . . . . . . . . . . . . . . . . . . . . . . . . . . . . . . . . 135
Adjusting overlay clips . . . . . . . . . . . . . . . . . . . . . . . . . . . . . . . . . . . . . . . . . . . . . . . . . . . . . 135
Combining Overlay clips to create an Ultra HD (4K) video . . . . . . . . . . . . . . . . . . . . . . 137
Applying motion to an overlay clip . . . . . . . . . . . . . . . . . . . . . . . . . . . . . . . . . . . . . . . . . . 137
Adjusting the overall transparency of overlay clips . . . . . . . . . . . . . . . . . . . . . . . . . . . . 138
Adding borders to overlay clips . . . . . . . . . . . . . . . . . . . . . . . . . . . . . . . . . . . . . . . . . . . . . 138
Blending overlay clips with the background . . . . . . . . . . . . . . . . . . . . . . . . . . . . . . . . . . 139
Adding a mask frame . . . . . . . . . . . . . . . . . . . . . . . . . . . . . . . . . . . . . . . . . . . . . . . . . . . . . . 141
Using video masks with overlay clips . . . . . . . . . . . . . . . . . . . . . . . . . . . . . . . . . . . . . . . . 141
Motion tracking . . . . . . . . . . . . . . . . . . . . . . . . . . . . . . . . . . . . . . . . . . . . . . 143
Tracking motion of video objects. . . . . . . . . . . . . . . . . . . . . . . . . . . . . . . . . . . . . . . . . . . . 143
Matching motion to a tracking path . . . . . . . . . . . . . . . . . . . . . . . . . . . . . . . . . . . . . . . . . 147
Customizing motion . . . . . . . . . . . . . . . . . . . . . . . . . . . . . . . . . . . . . . . . . . . . . . . . . . . . . . . 151
Tracking paths. . . . . . . . . . . . . . . . . . . . . . . . . . . . . . . . . . . . . . . . . . . . . . . . 155
Adjusting tracking paths . . . . . . . . . . . . . . . . . . . . . . . . . . . . . . . . . . . . . . . . . . . . . . . . . . . 155
Using objects on tracking paths . . . . . . . . . . . . . . . . . . . . . . . . . . . . . . . . . . . . . . . . . . . . . 157
Using the Path Library . . . . . . . . . . . . . . . . . . . . . . . . . . . . . . . . . . . . . . . . . . . . . . . . . . . . . 159
Painting Creator . . . . . . . . . . . . . . . . . . . . . . . . . . . . . . . . . . . . . . . . . . . . . . . 161
Working with Painter Creator . . . . . . . . . . . . . . . . . . . . . . . . . . . . . . . . . . . . . . . . . . . . . . . 161
Switching between Painting Creator modes . . . . . . . . . . . . . . . . . . . . . . . . . . . . . . . . . . 163
Contents v
Page 8

Creating images and animations . . . . . . . . . . . . . . . . . . . . . . . . . . . . . . . . . . . . . . . . . . . . 164
Live screen capture. . . . . . . . . . . . . . . . . . . . . . . . . . . . . . . . . . . . . . . . . . . . 167
Starting a screen capture project . . . . . . . . . . . . . . . . . . . . . . . . . . . . . . . . . . . . . . . . . . . . 167
Recording your screen . . . . . . . . . . . . . . . . . . . . . . . . . . . . . . . . . . . . . . . . . . . . . . . . . . . . . 168
FastFlick . . . . . . . . . . . . . . . . . . . . . . . . . . . . . . . . . . . . . . . . . . . . . . . . . . . . . . 171
Creating a FastFlick project . . . . . . . . . . . . . . . . . . . . . . . . . . . . . . . . . . . . . . . . . . . . . . . . . 171
Selecting a template (FastFlick) . . . . . . . . . . . . . . . . . . . . . . . . . . . . . . . . . . . . . . . . . . . . . 171
Adding media clips (FastFlick). . . . . . . . . . . . . . . . . . . . . . . . . . . . . . . . . . . . . . . . . . . . . . . 172
Editing titles (FastFlick). . . . . . . . . . . . . . . . . . . . . . . . . . . . . . . . . . . . . . . . . . . . . . . . . . . . . 172
Adding music (FastFlick) . . . . . . . . . . . . . . . . . . . . . . . . . . . . . . . . . . . . . . . . . . . . . . . . . . . 173
Applying Pan & Zoom effects (FastFlick) . . . . . . . . . . . . . . . . . . . . . . . . . . . . . . . . . . . . . 174
Setting movie duration (FastFlick) . . . . . . . . . . . . . . . . . . . . . . . . . . . . . . . . . . . . . . . . . . . 174
Saving to video files for computer playback (FastFlick) . . . . . . . . . . . . . . . . . . . . . . . . . 175
Uploading to the Web (FastFlick) . . . . . . . . . . . . . . . . . . . . . . . . . . . . . . . . . . . . . . . . . . . . 175
Editing your movie in VideoStudio (FastFlick) . . . . . . . . . . . . . . . . . . . . . . . . . . . . . . . . . 176
Making FastFlick templates. . . . . . . . . . . . . . . . . . . . . . . . . . . . . . . . . . . . . 177
Terminology for FastFlick templates . . . . . . . . . . . . . . . . . . . . . . . . . . . . . . . . . . . . . . . . . 177
Rules for creating FastFlick templates . . . . . . . . . . . . . . . . . . . . . . . . . . . . . . . . . . . . . . . . 178
Creating FastFlick templates . . . . . . . . . . . . . . . . . . . . . . . . . . . . . . . . . . . . . . . . . . . . . . . . 179
Stop motion animation . . . . . . . . . . . . . . . . . . . . . . . . . . . . . . . . . . . . . . . . . 181
How to create a stop motion project . . . . . . . . . . . . . . . . . . . . . . . . . . . . . . . . . . . . . . . . 181
Stop motion settings . . . . . . . . . . . . . . . . . . . . . . . . . . . . . . . . . . . . . . . . . . . . . . . . . . . . . . 182
Opening and importing files for stop motion . . . . . . . . . . . . . . . . . . . . . . . . . . . . . . . . . 183
Using the DSLR Enlarge Mode . . . . . . . . . . . . . . . . . . . . . . . . . . . . . . . . . . . . . . . . . . . . . . 183
Multi-Camera editing. . . . . . . . . . . . . . . . . . . . . . . . . . . . . . . . . . . . . . . . . . 185
The Multi-Camera Editor workspace . . . . . . . . . . . . . . . . . . . . . . . . . . . . . . . . . . . . . . . . . 185
Basic steps in multi-camera editing . . . . . . . . . . . . . . . . . . . . . . . . . . . . . . . . . . . . . . . . . . 187
Importing video and audio clips into the Multi-Camera Editor . . . . . . . . . . . . . . . . . . 188
Synchronizing video and audio clips in multi-camera projects . . . . . . . . . . . . . . . . . . 188
vi Corel VideoStudio
Page 9

Choosing an audio source for your multi-camera project. . . . . . . . . . . . . . . . . . . . . . . 189
Editing multiple clips to create a multi-camera compilation. . . . . . . . . . . . . . . . . . . . . 190
Adding picture-in-picture (PIP) in the Multi-Camera Editor . . . . . . . . . . . . . . . . . . . . . 192
Managing multi-camera source files . . . . . . . . . . . . . . . . . . . . . . . . . . . . . . . . . . . . . . . . . 193
Saving and exporting your multi-camera project . . . . . . . . . . . . . . . . . . . . . . . . . . . . . . 193
Using Smart Proxy with the Multi-Camera Editor . . . . . . . . . . . . . . . . . . . . . . . . . . . . . . 194
Save and share . . . . . . . . . . . . . . . . . . . . . . . . . . . . . . . . . . . . . . . . . . . . . . . 195
Choosing a sharing option . . . . . . . . . . . . . . . . . . . . . . . . . . . . . . . . . . . . . . . . . . . . . . . . . 195
Saving to video files for computer playback . . . . . . . . . . . . . . . . . . . . . . . . . . . . . . . . . . 196
Saving to video files for mobile devices . . . . . . . . . . . . . . . . . . . . . . . . . . . . . . . . . . . . . . 197
Saving HTML5 video files. . . . . . . . . . . . . . . . . . . . . . . . . . . . . . . . . . . . . . . . . . . . . . . . . . . 198
Uploading to the Web . . . . . . . . . . . . . . . . . . . . . . . . . . . . . . . . . . . . . . . . . . . . . . . . . . . . . 199
Creating 3D video files . . . . . . . . . . . . . . . . . . . . . . . . . . . . . . . . . . . . . . . . . . . . . . . . . . . . . 201
Creating video files from part of a project (trimmed). . . . . . . . . . . . . . . . . . . . . . . . . . . 202
Creating sound files . . . . . . . . . . . . . . . . . . . . . . . . . . . . . . . . . . . . . . . . . . . . . . . . . . . . . . . 202
Working with custom profiles in the Share workspace . . . . . . . . . . . . . . . . . . . . . . . . . 203
Burn discs. . . . . . . . . . . . . . . . . . . . . . . . . . . . . . . . . . . . . . . . . . . . . . . . . . . . 205
Saving a project to disc . . . . . . . . . . . . . . . . . . . . . . . . . . . . . . . . . . . . . . . . . . . . . . . . . . . . 205
Assembling files. . . . . . . . . . . . . . . . . . . . . . . . . . . . . . . . . . . . . . . . . . . . . . . . . . . . . . . . . . . 207
Adding and editing chapters. . . . . . . . . . . . . . . . . . . . . . . . . . . . . . . . . . . . . . . . . . . . . . . . 208
Editing a menu template . . . . . . . . . . . . . . . . . . . . . . . . . . . . . . . . . . . . . . . . . . . . . . . . . . . 210
Creating advanced menus. . . . . . . . . . . . . . . . . . . . . . . . . . . . . . . . . . . . . . . . . . . . . . . . . . 212
Previewing your movie and menu before burning . . . . . . . . . . . . . . . . . . . . . . . . . . . . . 213
Burning your project onto a disc . . . . . . . . . . . . . . . . . . . . . . . . . . . . . . . . . . . . . . . . . . . . 214
Copying a disc image file. . . . . . . . . . . . . . . . . . . . . . . . . . . . . . . . . . . . . . . . . . . . . . . . . . . 216
Creating disc labels. . . . . . . . . . . . . . . . . . . . . . . . . . . . . . . . . . . . . . . . . . . . . . . . . . . . . . . . 216
Glossary . . . . . . . . . . . . . . . . . . . . . . . . . . . . . . . . . . . . . . . . . . . . . . . . . . . . . 219
Shortcuts . . . . . . . . . . . . . . . . . . . . . . . . . . . . . . . . . . . . . . . . . . . . . . . . . . . . 225
Menu command shortcuts . . . . . . . . . . . . . . . . . . . . . . . . . . . . . . . . . . . . . . . . . . . . . . . . . 225
Workspace shortcuts . . . . . . . . . . . . . . . . . . . . . . . . . . . . . . . . . . . . . . . . . . . . . . . . . . . . . . 225
Contents vii
Page 10

Navigation area shortcuts . . . . . . . . . . . . . . . . . . . . . . . . . . . . . . . . . . . . . . . . . . . . . . . . . . 225
Timeline shortcuts. . . . . . . . . . . . . . . . . . . . . . . . . . . . . . . . . . . . . . . . . . . . . . . . . . . . . . . . . 226
Multi-trim Video shortcuts . . . . . . . . . . . . . . . . . . . . . . . . . . . . . . . . . . . . . . . . . . . . . . . . . 227
Layout settings shortcuts. . . . . . . . . . . . . . . . . . . . . . . . . . . . . . . . . . . . . . . . . . . . . . . . . . . 227
Screen capture shortcuts . . . . . . . . . . . . . . . . . . . . . . . . . . . . . . . . . . . . . . . . . . . . . . . . . . . 227
Other Shortcuts . . . . . . . . . . . . . . . . . . . . . . . . . . . . . . . . . . . . . . . . . . . . . . . . . . . . . . . . . . . 227
DV-to-DVD Wizard . . . . . . . . . . . . . . . . . . . . . . . . . . . . . . . . . . . . . . . . . . . . 229
Scanning for scenes . . . . . . . . . . . . . . . . . . . . . . . . . . . . . . . . . . . . . . . . . . . . . . . . . . . . . . . 229
Applying templates and burning to DVDs . . . . . . . . . . . . . . . . . . . . . . . . . . . . . . . . . . . . 230
viii Corel VideoStudio
Page 11

Quick start
If you want to dive into Corel VideoStudio right away, this tutorial will walk you through the
key tasks. In this tutorial, you’ll learn how to:
• Import video clips to the Library
• Add your clips and photos
• Review and trim your video clips
• Add titles
• Apply transitions
• Add music
• Save and share
The same basic steps can be applied to create a photo slideshow or any multimedia
presentation that includes photos, video clips, and music.
For a quick movie, try the FastFlick. For more information, see “FastFlick” on page 171.
For more details about starting movie projects, see “Project basics” on page 39.
Import video clips to the Library
Let’s start with the most common situation—the shoot is done and you’ve transferred your
vide o clips and photos from your camera to your comp uter. We can open Corel VideoStudio,
and jump directly to the Edit workspace and the Library.
The Library is the source for all your media, including video clips, photos, and music. It also
houses templates, transitions, effects, and a variety of other media assets that you can use in
your projects.
Quick start 1
Page 12
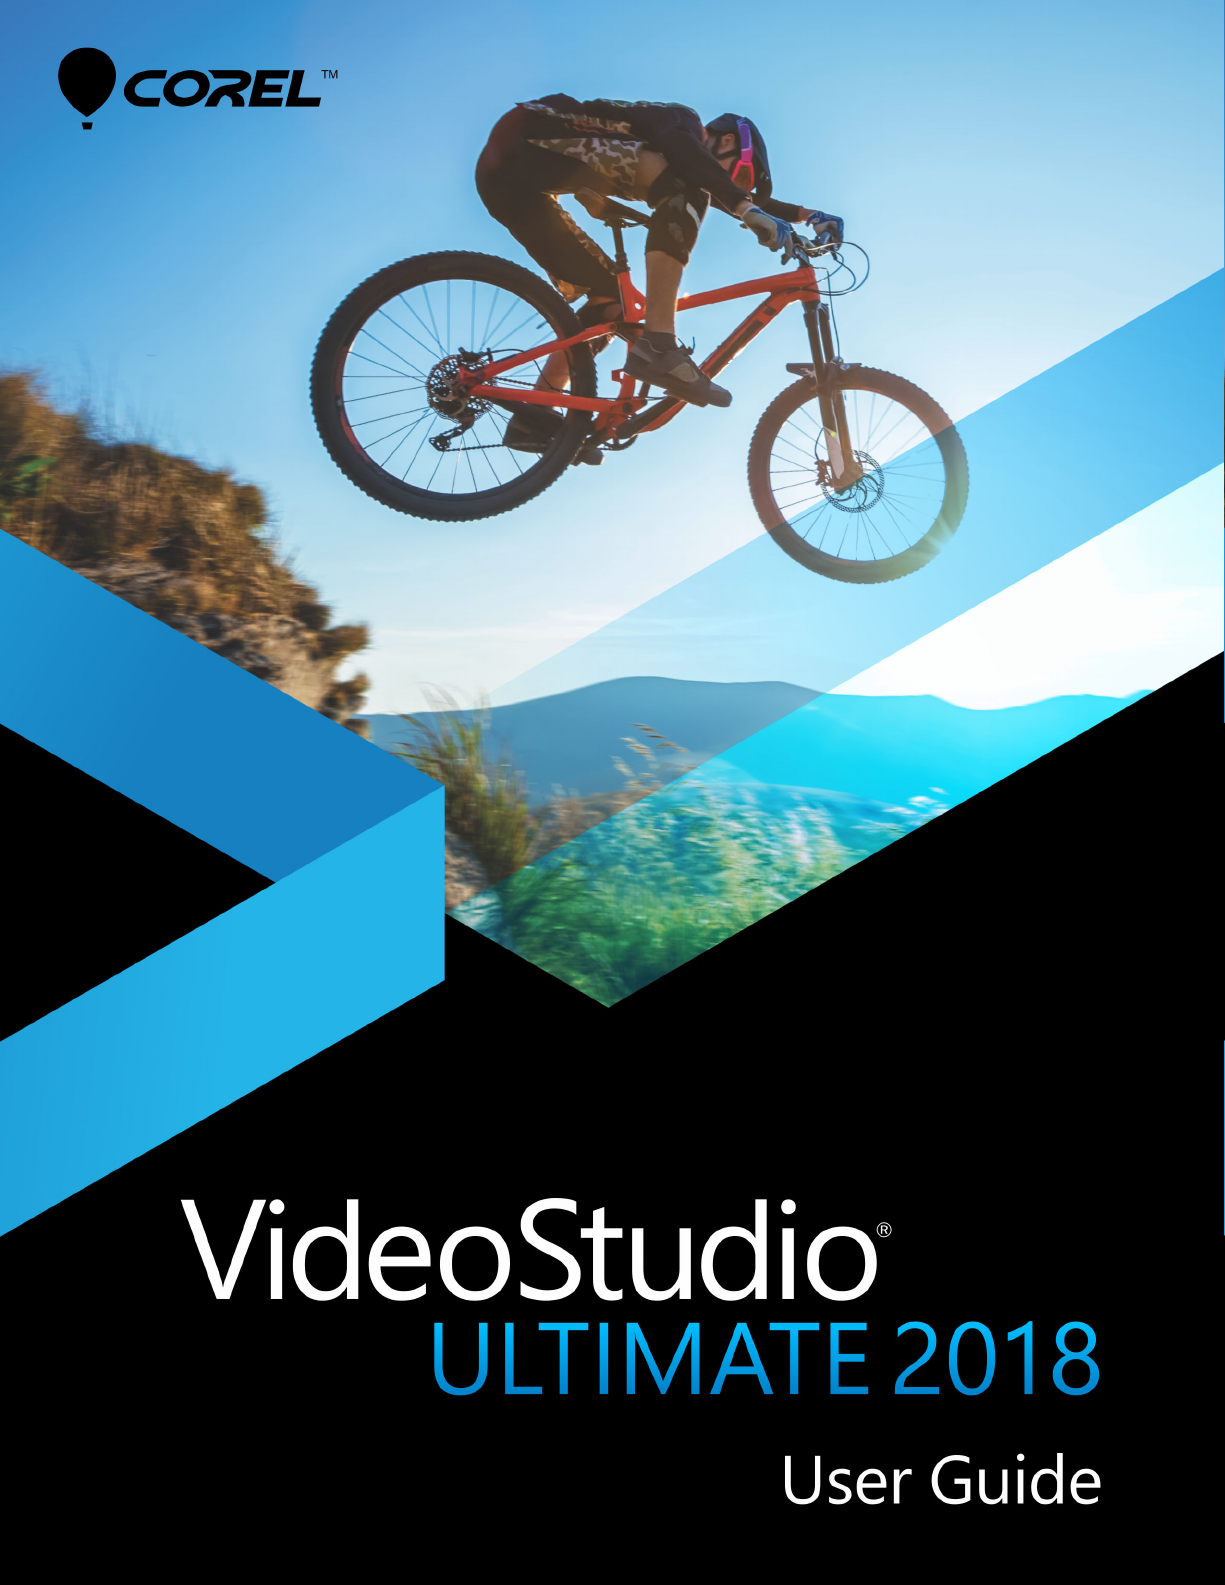
1 Click the Edit tab at the top of the application window to open the Edit
workspace. The Library panel appears in the upper right corner of the application.
2 Create a folder for your project to keep all your videos together by clicking the Add a
new folder button .
3 Type a name for the folder.
4 At the top of the Library, click the Import Media Files button , select the video clips
and photos that you want to use, and click Open.
Note that the buttons at the top of the Library can be enabled and disabled to filter the
thumbnails by video, photos, and music. If you don’t see the media you expect to see, check
the state of these media buttons.
Add your clips and photos
Adding clips and photos to a video project is as easy as dragging thumbnails for the video
clips and photos that you want to use from the Library to the Timeline.
If you’re looking for a way to get polished
results quickly, you can use an Instant Project
template. For more information, see “Using Instant Project templates” on page 49.
2 Corel VideoStudio
Page 13

Review and trim your video clips
21
The key to a successful video is to keep it short enough to hold your viewer’s interest. Let’s
review and trim the video clips.
1 In the Edit workspace, click a video clip in the Timeline.
2 In the Navigation area of the Player panel, click Clip, and click the Play button.
3 After you review the clip, drag the orange Tri m Marker from the original starting
position to the new starting position. The Scrubber moves to the selected frame and this
frame displays in the Preview Window.
1. Trim Marker (one on each end). 2. Scrubber.
4 Now drag the second Trim Mar ker from the original end position to the new end
position.
5 Click Play.
Note: Changes made to files imported into the Library do not affect the original files.
You can also trim video clips in the Timeline itself by dragging the end handles of a clip.
Quick start 3
Page 14
Want to edit a section in the middle? Try Multi-Trim Video. For more information, see
“Trimming video into multiple clips” on page 81.
Add titles
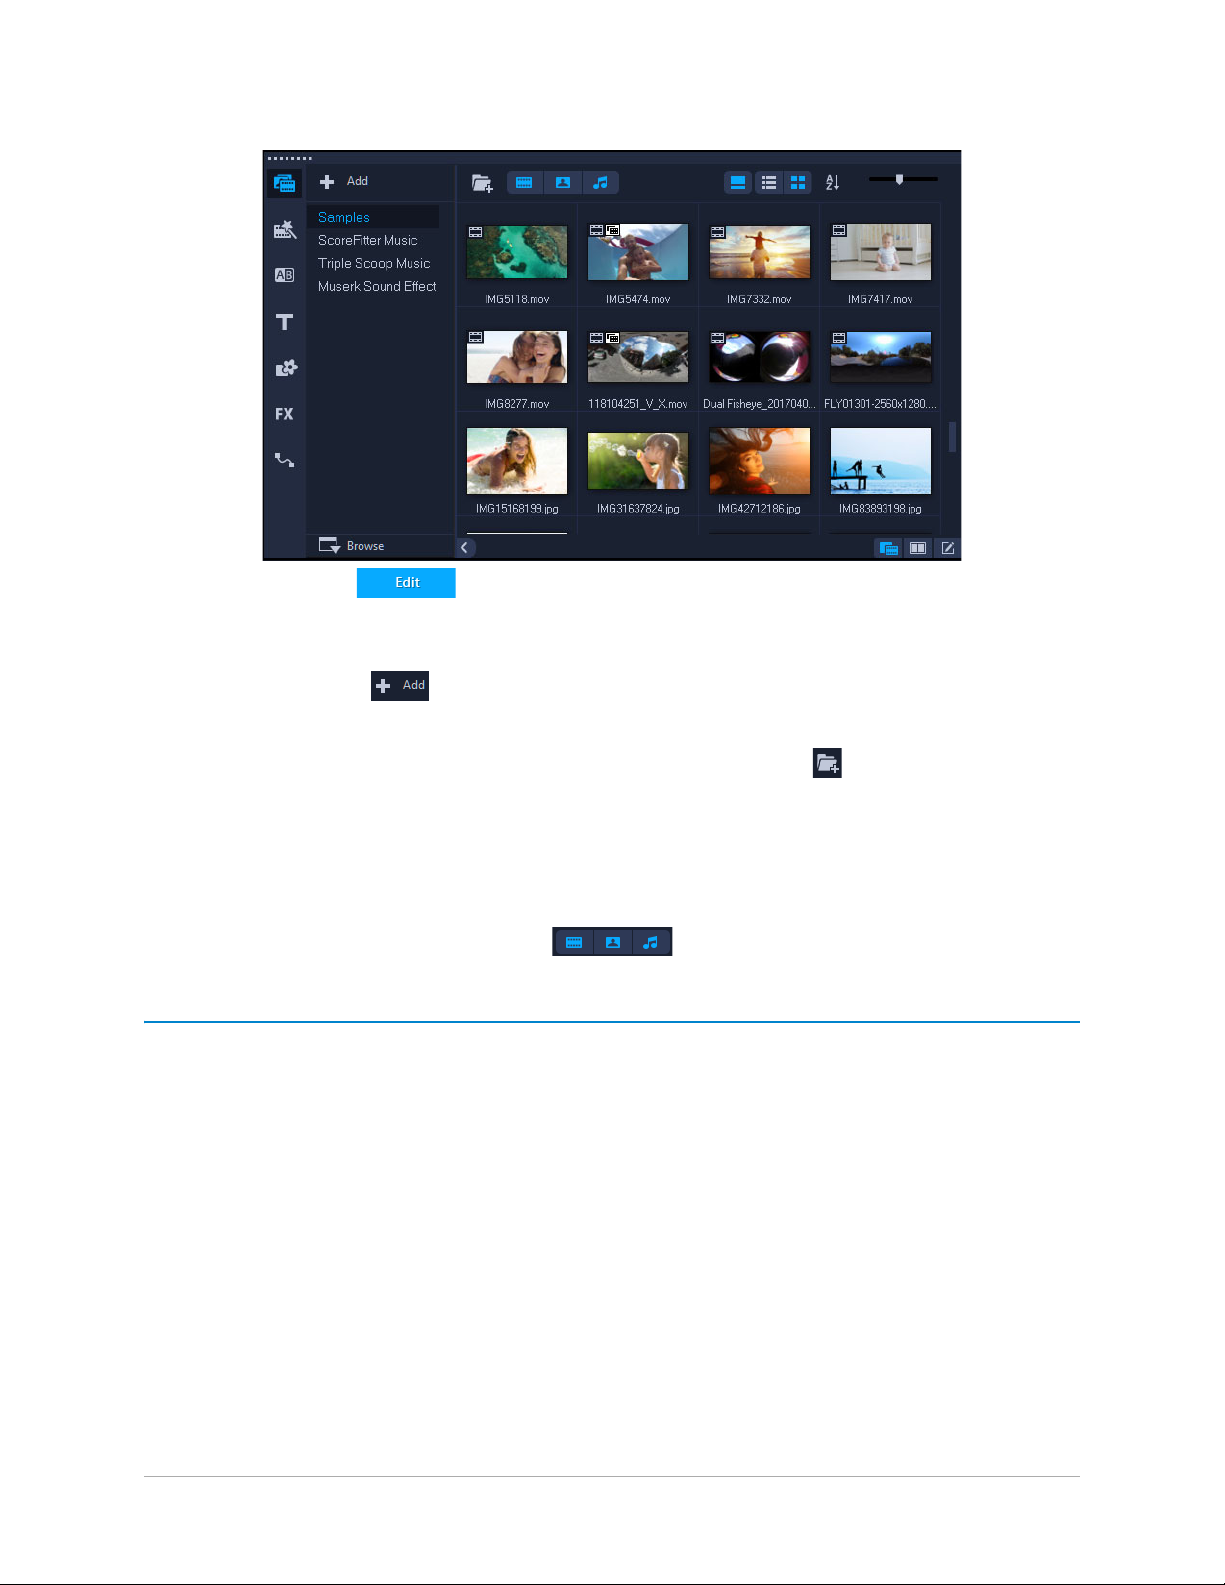
Now let’s add a title.
1 Drag the Scrubber to the position you want.
2 Click the Title button to the left of the Library thumbnails.
3 You can type directly in the Preview Window, but the easiest way to get a professional-
looking title, is to drag one of the title thumbnails from the Library to the Title track in
the Timeline.
4 You can drag the title to any position in the Title track and adjust the duration of the title
by dragging the end handles of the clip.
5 To edit the title text, double-click the title clip in the Timeline, in the Preview Window,
select the text and type new text. Keep the text inside the box that displays near the
edges of the Preview Window (called the Title Safe area).
6 The Options panel displays to the right of the Library thumbnails. On the Edit page of
the Options panel, use any of the controls to format your title text. For example, you can
align the text and change the font, size, and color.
4 Corel VideoStudio
Page 15
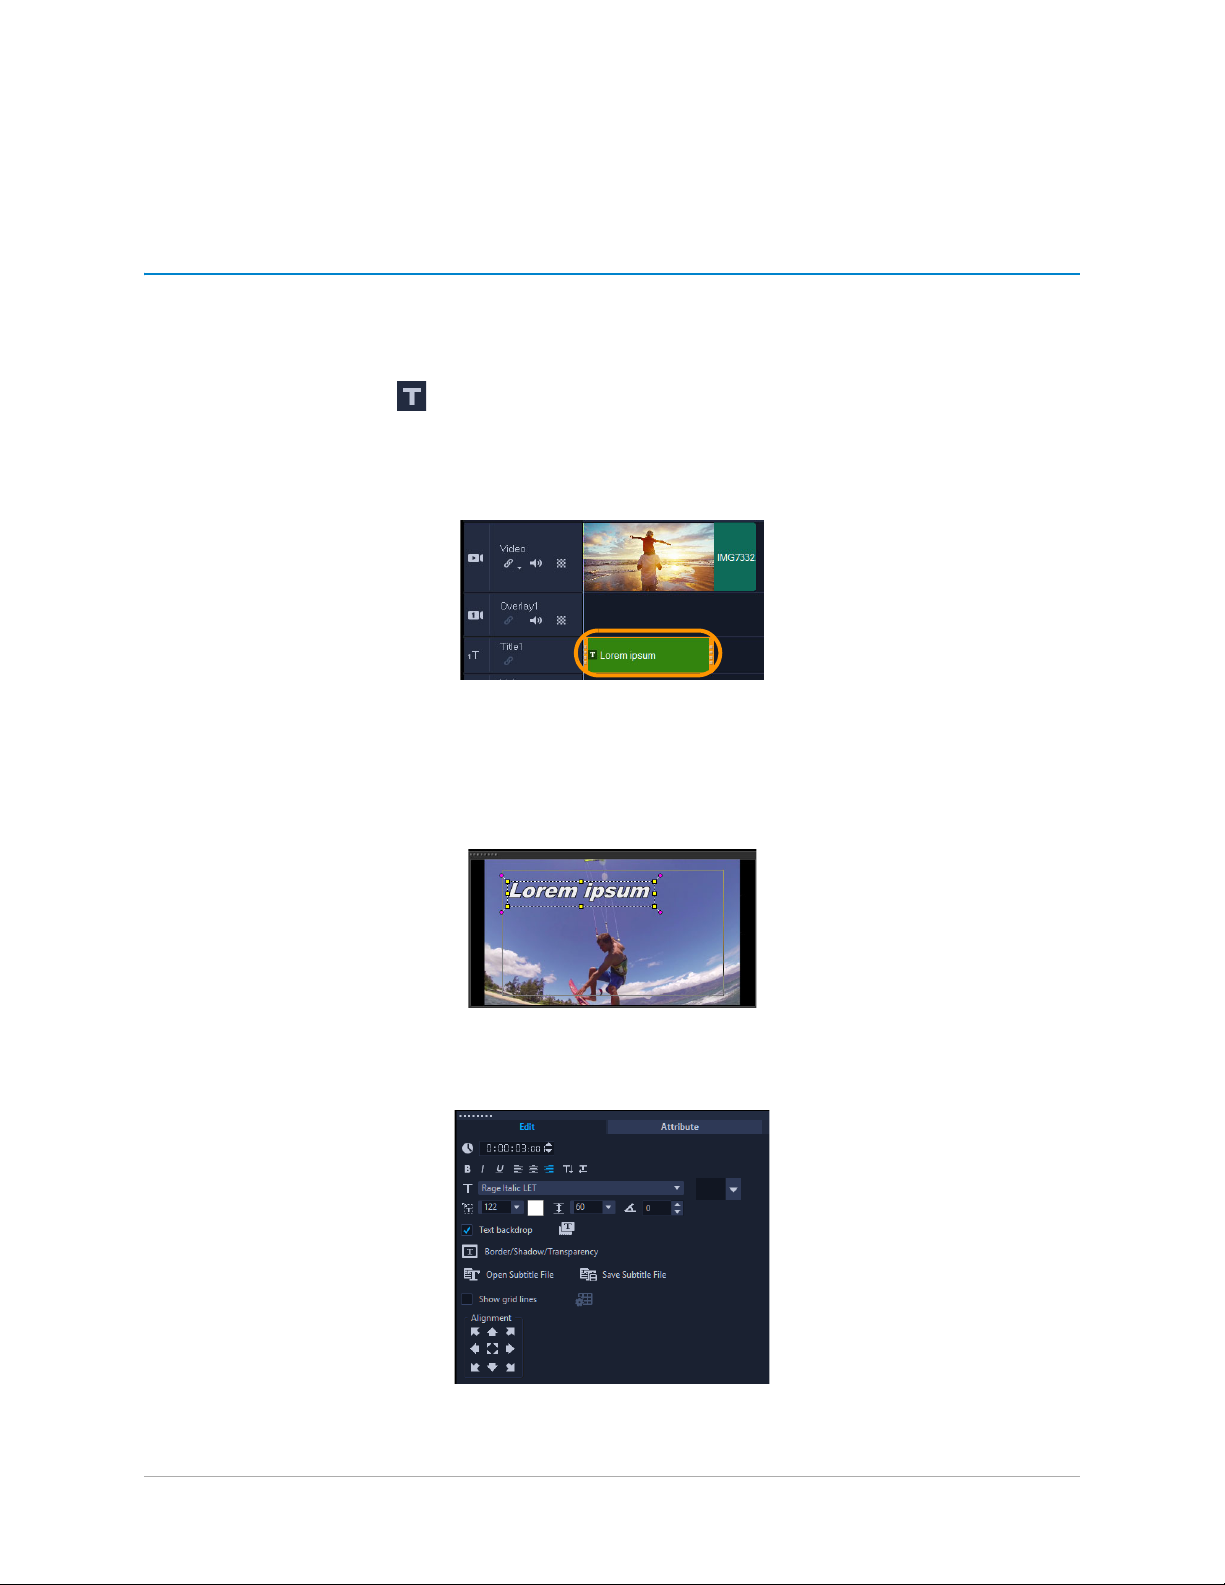
Apply transitions
You can add transitions between clips or between photos. Transitions can be used to fade in
or fade out or to dissolve one photo into the next. There are many transition options to
choose from.
1 In the Library, click the Transition button .
2 Click the Gallery drop-list at the top of the Library, and choose All if you want to see
what is available.
3 Drag the thumbnail for the transition you want to the Timeline and place it between two
clips or photos.
If you want to apply the same transition between all clips and photos in the track, in the
Library, right-click the transition thumbnail, and choose Apply current effect to video
track. You will be warned about replacing any existing transitions.
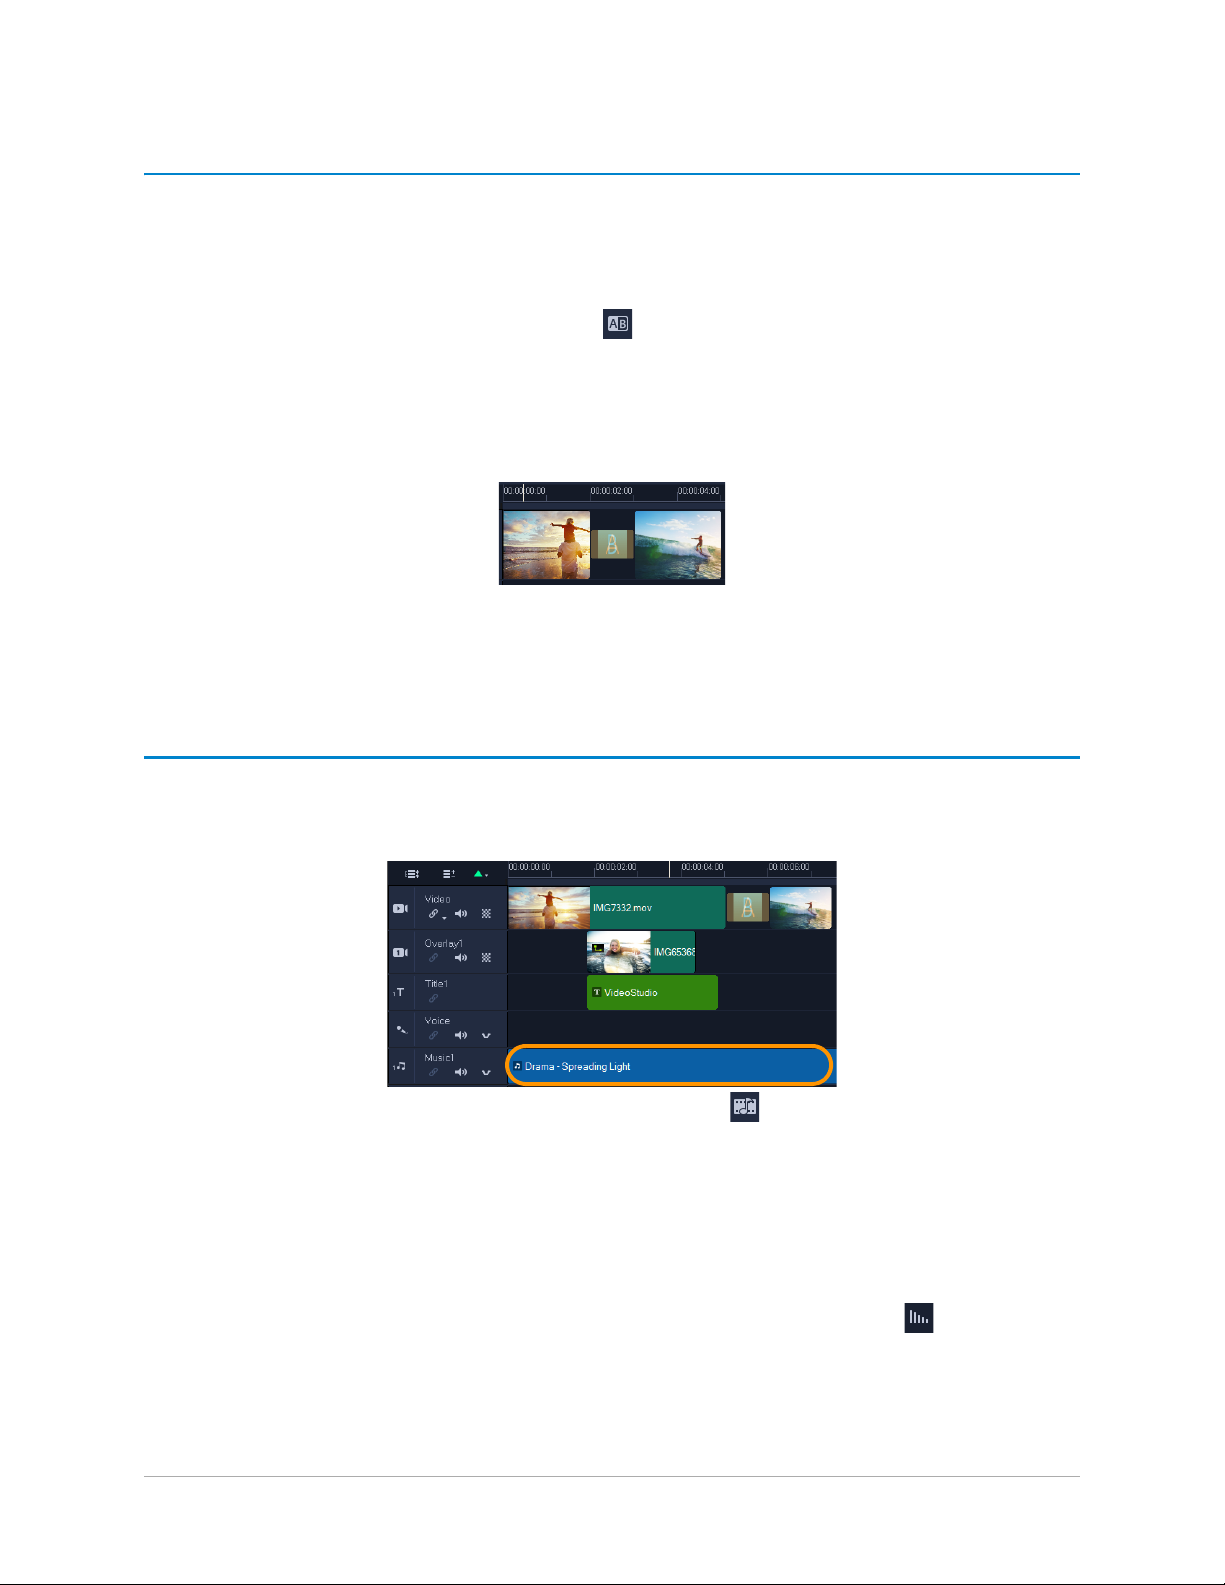
Add music
You can add songs from your computer by dragging a music file from the Library to the
Music track. You can also use Auto Music to choose royalty-free music to your project.
1 On the Timeline toolbar, click the Auto Music button .
1 In the Auto Music area that displays in the Options panel, experiment with different
choices in the drop-lists and click Play selected Song to listen to the selection.
2 To add your selection to the Timeline, click Add to Timeline.
3 The music is added to the Music track, and as with other clips, you can drag it to a new
position in the Timeline and trim it by dragging the end handles.
4 To fade the music at the end of your project, click the Fade-out button in the Auto
Music area.
Note that with any audio clips, or video clips that include sound,
of the clips. For more information about adjusting audio, see “Audio” on page 99.
Quick start 5
you can control the volume
Page 16

Save and share
When you’re finished with your project, you can save it and share it in a variety of ways. For
this tutorial, we’ll upload it directly to the Web.
Before sharing, it’s important to save a version of your project to the native *.vsp format. This
will give you maximum flexibility if you choose to edit your project later or if you want to
output it to a different format.
1 Click the Share tab to view the Share workspace.
2 Click File > Save, choose a location from the Save in box, and type a name in the File
name box.
3 To share your video on the Web, click the Web button , then click YouTube,
Facebook, Flickr, or Vimeo, and click Log In to sign in to your account or to create an
account. After you sign in and approve the link between Corel VideoStudio and the
account, choose the settings you want for your video upload and click Start.
6 Corel VideoStudio
Page 17

Welcome
Welcome to Corel® VideoStudio®, the surprisingly creative video-editing software that lets
you produce impressive video projects, regardless of your skill level. Corel VideoStudio
provides a complete set of tools for capturing, editing, and sharing your video, slideshow,
and multimedia projects.
The availability of features depends on the version of the software that you have. For
more information, please see www.videostudiopro.com/compare.
This section contains the following topics:
• What’s new in Corel VideoStudio 2018?
• System requirements
• Hardware acceleration
• Preparing for video editing
• Installing and uninstalling the application
• Starting and quitting the application
• Updating the application
• Corel Support Services
• About Corel
What’s new in Corel VideoStudio 2018?
New creative features as well as enhancements to favorite features means that you can create
stunning videos faster in Corel VideoStudio. The key updates are listed below.
New! Video editing shortcuts
In VideoStudio 2018, we’ve enhanced the tools you use most often! Easily crop, resize, and
position your media directly in the preview pane. Snap your media in place with new Smart
Guide alignment tools. The entire toolkit is faster and easier to access.
New! Streamlined Timeline editing
The updated Timeline puts common editing controls at your fingertips and lets you
customize the toolbar, providing instant access to the tools you love to use. Mute tracks
directly on the timeline and preview edits as you make any adjustments. Focus in on your
edits and adjust the height of your timeline tracks with brand new controls. Making custom
motions? You can now edit with new full screen editing windows to get even closer to the
action.
Welcome 7
Page 18

New! Lens Correction tools
VideoStudio 2018 introduces new Lens Correction to quickly remove wide-angle camera
distortion, better known as a fisheye effect. Sometimes this is your preferred outtake from a
lively GoPro session, but other times it’s nice to have a quick way to remove the distortion.
VideoStudio adds new and intuitive controls to make this easy, freeing you up to focus on
the fun parts of video editing. For more information, see “Lens Correction” on page 86.
New to Ultimate! Split screen video and Template Creator
The creative possibilities with Split Screen video are limitless. Show multiple video streams
on screen simultaneously and create impressive videos to share the highlights from a recent
trip, event, or activity. Split the screen to add two video frames or create custom picture-inpicture effects. Drag and drop your videos into a range of templates, or create your own with
the Split Screen Template Creator—exclusive to Ultimate. For more information, see
“Templates” on page 49.
New to Ultimate! 3D Title Editor and motion titles
Add fun effects and create eye-catching titles with new 3D motion titles in VideoStudio
Ultimate 2018. Choose from built-in presets and templates for an immediate result or dive in
deeper and create custom motion titles with the new 3D Title Editor! Control textures,
lighting, motion, and more to create that dramatic cinematic opening you want to see. For
more information, see “3D Title Editor” on page 119.
New! Pan and Zoom controls
Take your audience on an adventure as you zoom into action or pan across the scene.
VideoStudio Ultimate 2018 adds more flexibility with new pan and zoom controls. Begin with
elegant presets to move across your video or zoom into your picture for the closeup it
deserves! Go beyond traditional keyframe editing—we’ve added new tools that enable you
to make adjustments to your pan and zoom motions as the video plays. For more
information, see
“Pan and zoom for video and photos” on page 87.
Enhanced! 360° Video editing
Import your 360° video and start editing! Trim your footage, then add music, titles, and
effects in no time. New to VideoStudio 2018, preview your 360° video as you would on your
device. Navigate the new 360° video player, then export your 360° video to playback on your
virtual reality headset, upload directly to YouTube 360, or convert to standard video format
to control the angles seen. VideoStudio supports 360° equirectangular and spherical video
formats, and with expanded support for a wider selection of popular 360 video cameras. For
more information, see
“360 video” on page 95.
8 Corel VideoStudio
Page 19

New! Premium effects from NewBlueFX (Ultimate)
Create a stunning title in seconds using the brand-new NewBlue Titler Pro 5 inside
VideoStudio Ultimate 2018! Apply on e of more than 100 anim ated templates, then customize
the text, colors, and more for a powerful result. With video stabilization tools, color effects,
and other engaging extras, VideoStudio Ultimate has what you need to take your video to
the next level.
Enhanced! Stop motion animation
VideoStudio provides you with the controls you need to sync with your camera and capture
frames automatically. Preview and manage each frame captured with transparent layers to
show you your last frame captured and use the new overlay grid controls to help gauge
distance between each subtle movement. VideoStudio 2018 adds support for even more
Canon cameras and introduces support for Nikon cameras. Just plug in your camera and
start capturing images—Stop Motion will do the rest! For more information, see “Stop
motion animation” on page 181.
New! Chapter and cue points
Get right to the heart of your story in no time! VideoStudio 2018 has added the ability to add
cue points to your timeline to make editing so much simpler and to quickly reference points
of interest. Thinking of burning your next project to disc? Do it! Now plan your chapters right
inside the timeline. Just drop chapter markers as you edit, and when you export to disc, the
chapter points will be automatically identified. This is an incredible time-saving feature and
will expedite the process of building your menus. Better yet, enable hotkeys to set chapter
markers or cue points as the video plays. For more information, see “Adding cues and
chapters” on page 45.
Enhanced! Speed and performance
Edit smoother and render faster in VideoStudio 2018! VideoStudio is now optimized for the
latest video hardware acceleration technologies from Intel and nVidia, which improves
efficiencies and dramatically speeds up rendering to popular file formats. Enjoy faster and
smoother 4K editing and playback thanks to the innovative Smart Proxy technology. Your
original high resolution files are preserved for export, but you are able to work with smaller
files to improve speed and performance.
New! Formats and support
VideoStudio continues to track with the latest file formats and associated support. We’ve
added XAVC-s authoring to SD card, so you can export your video for playback directly on
your camera. If you’re interested in creating a Stop Motion animation, we’ve now added
suppor t for Nikon cameras and expan ded our suppor t for even more Canon cameras. As 360
video grows in popularity, we continue to add support for the latest cameras and formats.
Welcome 9
Page 20

Even import your footage from your mobile device and edit portrait videos without adding
irritating black bars!
New! Tutorials and learning materials
Get help when you need it—right inside the VideoStudio Welcome Book—with new tutorials
for VideoStudio 2018. Explore a wide range of helpful and inspirational tutorials designed for
both new and advanced users. Search for keywords and topics you want to learn more about
in the help files, or join the VideoStudio community and ask a question to learn from other
users with more hands-on experience.
System requirements
For optimal performance of Corel VideoStudio, make sure that your system meets the
recommended specifications. Note that some formats and features require specific hardware
or software (as indicated).
• Internet connection required for installation, registration and updates. Registration
required for product use.
• Windows 10, Windows 8, Windows 7, 64-bit OS highly recommended
• Intel Core i3 or AMD A4 3.0 GHz or higher
• Intel Core i5 or i7 1.06 GHz or higher required for AVCHD & Intel Quick Sync Video
support
• Intel Core i7 or AMD Athlon A10 or higher for UHD, Multi-Camera or 360° video
• 4 GB of RAM or higher, 8+GB highly recommended for UHD, Multi-Camera, or 360°
video
• Minimum 256 MB VRAM, 512 MB or higher recommended for hardware decoding
acceleration
• HEVC (H.265) support requires Windows 10, supporting PC hardware or graphics card
and Microsoft HEVC video extension installed
• Program available for installation in 32 or 64-bit. Some features only available in 64-bit
(3D Title Editor, NewBlue Titler Pro, Boris Title Studio)
• Minimum display resolution: 1024 x 768
• Windows-compatible sound card
• Minimum 8 GB HDD space for full installation
• Digital download option available if DVD-ROM drive not available for installation
Accessories
• DVD burner for creating DVD and AVCHD discs
10 Corel VideoStudio
Page 21

Input Options
• Capture from DV, HDV and Digital8 camcorders or VCRs (requires a FireWire port)
• Capture from analog camcorders with compatible analog capture card
• Capture from USB capture devices, PC cameras, webcams
• Import from AVCHD and other file-based camcorders, digital still cameras, mobile
devices and discs
Product specifications are subject to change without notice or obligation.
For more details, visit: www.videostudiopro.com
Supported file formats
The supported file formats are listed below. Please review release notes for any updates to
supported files or visit www.videostudiopro.com for the latest list in the system requirements
section.
Import Formats
• Video: AVI, DivX*, DV, DVR-MS, HDV, HEVC (H.265), M2T, M2TS, M4V, MKV, MOD, MOV
(H.264), MPEG-1/-2/-4, MXF**, SWF*, TOD, UIS, UISX, WebM, WMV, XAVC, XAVC S, 3GP,
Non-encrypted DVD titles
• Audio: AAC, Aiff, AMR, AU, CDA, M4A, MOV, MP3, MP4, MPA, OGG, WAV, WMA
• Image: CLP, CUR, DCS, DCX, EPS, FAX, FPX, GIF87a, ICO, IFF, IMG, JP2, JPC, JPG, MAC,
MPO, MSP, PBM, PCT, PCX, PGM, PIC, PNG, PPM, PSD, PSPImage, PXR, RAS, SCI, SCT,
SHG, TGA, TIF/TIFF, UFO, UFP, WBM, WBMP, WMF, 001, Camera RAW
Export Formats
• Video: AVCHD, DV, HDV, AVI, MPEG-1/-2/-4, UIS, UISX, M2T, WebM, 3GP, HEVC (H.265),
WMV
• Device: Apple iPod/iPhone/iPad/TV, Sony PSP/PS3/PS4, Nintendo Wii, Microsoft Xbox
compatible formats
• Audio: AC3, M4A, OGG, WAV, WMA
• Image: BMP, JPG
Blu-ray Support
• Requires purchase of a separate plug-in from within the product
• Requires Blu-ray Disc reader and/or burner
Welcome 11
Page 22

* DivX & SWF: DivX codec for DivX and Flash player for SWF are required to enable these
formats.
**VideoStudio Ultimate only
Hardware acceleration
Depending on your hardware specifications, Corel VideoStudio lets you optimize the
performance of your system by optimizing hardware acceleration.
Hardware decoder and encoder acceleration is supported only by Windows Vista and
later versions of the Windows operating system software and requires at least 512 MB
of VRAM.
To change hardware acceleration settings
1 Select Settings > Preferences [F6].
2 Click the Performance tab and select the following options under Editing Process and
File Creation:
• Enable Hardware Decoder acceleration — enhances editing performance and
improves clip and project playback by using video graphics acceleration technologies
of the computer’s available hardware
• Enable Hardware Encoder acceleration — improves the rendering time required for
producing your movies
Note: For optimum performance, VGA cards must support DXVA2 VLD mode with
Vertex and Pixel Shader 2.0 or later.
If you want the program to automatically detect the hardware acceleration capabilities
of your system and determine the optimum settings, select all hardware acceleration
options in Performance Optimization, including Enable hardware acceleration
optimization.
If the feature is not supported by your system, some hardware acceleration options will
be grayed out.
Preparing for video editing
Video editing tasks require a lot of computer resources. Your computer must be properly set
up to ensure successful capturing and smooth video editing. Below are some tips on how to
prepare and optimize your computer before you launch Corel VideoStudio.
• It is recommended that you close other applications when working with
Corel VideoStudio. To avoid interruptions while cap
automatically launched software.
turing, it is best to turn off any
12 Corel VideoStudio
Page 23

• If you have two hard drives in your system, it is recommended that you install
Corel VideoStudio to your system drive (usually C:) and store captured videos on your
other drive.
• It is recommended that you store video files on a dedicated hard drive.
• Increase the Paging File (Swap File) size to twice your amount of RAM.
When you are in Corel VideoStudio, you can choose settings that let you balance the quality
of the playback and the speed of the application. For example, is your playback fast but
fuzzy? Or is your playback too slow? The tips below can help you find the right settings in
Corel VideoStudio.
• Clearer, higher quality playback is available if your computer system meets or exceeds
the recommended system requirements. You can work with HD projects and you can
preview your project in HD. For more information, see “Setting project properties” on
page 40 and “Previewing your project or clips” on page 42.
• To speed up less powerful systems, consider using Smart Proxy and review the hardware
acceleration options. For more information, see “Using Smart Proxy for a faster,
smoother editing experience” on page 42 and “Hardware acceleration” on page 12.
Installing and uninstalling the application
You can install Corel VideoStudio from a disc or from installation files that you download.
To install Corel VideoStudio
1 Close any open applications.
2 Insert the DVD in the DVD drive or double-click the associated .exe file that you
downloaded.
If the disc-initiated setup does not start automatically, navigate to the DVD drive on your
computer, and double-click Setup.exe.
3 Follow the instructions on your screen.
Note: In addition to Corel VideoStudio, you might be prompted to install supporting
Windows extensions and third-party programs and drivers.
To uninstall Corel VideoStudio
1 Open the Windows Control Panel.
2 In the Programs category, click the Uninstall a program link.
3 In the Programs and Features window, click Corel VideoStudio 2018 in the list of
applications.
4 Click Uninstall/Change.
5 Follow the instructions on your screen.
Welcome 13
Page 24

Starting and quitting the application
You ca n st a rt Corel VideoStudio from the Windows desktop or Start menu, and quit the
program from the application window.
To start the application
•From the Windows Start menu or Start screen, choose Corel VideoStudio 2018.
To quit the application
• Click the Close button in the upper-right corner of the application window.
Updating the application
You can check for and install product updates. Updates provide important new information
about your application.
To update the application
•Choose Help > Check for Updates.
Corel Support Services
Corel Support Services can provide you with prompt and accurate information about
product features, specifications, pricing, availability, services, and technical support options.
For the most current information on available support and professional services for your
Corel product, please visit www.corel.com/support.
About Corel
Corel is one of the world's top software companies, boasting some of the industry's bestknown graphics, productivity and digital media products. We've built a reputation for giving
customers more choice, and delivering solutions that are easy to learn and use. Our mission
is simple: help people achieve new levels of creativity and productivity.
Corel's product lines include CorelDRAW® Graphics Suite, Corel® Painter®, Corel®PaintShop®
Pro, Corel® VideoStudio®, MindManager®, Pinnacle Studio™, ReviverSoft®, Roxio Creator®,
®
Roxio
Toast™ and WinZip®. For more information on Corel, please visit www.corel.com.
14 Corel VideoStudio
Page 25
Learning resources
You can learn how to use Corel VideoStudio in various ways: by searching the Help or the
user guide, by accessing video tutorials in the Welcome tab, or by exploring the Corel
website (www.corel.com).
This section contains the following topics:
• Documentation conventions
• Using the Help system
• Corel VideoStudio 2018 User Guide PDF
• Understanding VideoStudio terminology
• Learning with video tutorials
• Using Web-based resources
Documentation conventions
The following table describes important conventions used in the Help.
Convention Description Example
Menu >Menu
command
drop-list A list of options that drops down when a
A menu item followed by a menu
command
user clicks a down arrow button
A note containing information that is
important to the preceding steps. It may
describe conditions under which the
procedure can be performed.
A tip containing suggestions for
performing the preceding steps. It may
present alternatives to the steps, or other
benefits and uses of the procedure.
Click Settings > Preferences > Edit.
Select a profile from the Profile drop-list.
Enable Flatten audio and background
video if your browser can only support a
single track for audio and video.
For best results, use a tripod when you
shoot photos and videos that you want
to use in your stop motion animation
project.
Using the Help system
The Help that is available from within the program is the most comprehensive source of
information for Corel
You can choose a topic from the Contents page, or use the Search page to search for specif ic
words and phrases. You can also print topics from the Help.
VideoStudio. The Help system provides two ways to find information.
An Internet connection is required to view the Help. If you work offline on a regular basis,
you can download a PDF copy of the information (Help > User Guide (PDF)).
Learning resources 15
Page 26

To use the Help system
1 Do one of the following:
• Click Help > Help topics.
• Press F1.
2 In the Help window, click one of the following tabs:
• Contents — lets you browse through topics in the Help
• Search — lets you search the full text of the Help for a particular word or phrase
(enclosed in quotation marks). For example, if you are looking for information about a
specific tool or command, you can type the name of the tool or command, such as
Trimming, to display a list of relevant topics.
Corel VideoStudio 2018 User Guide PDF
You can view the Corel VideoStudio 2018 User Guide PDF online or you can download it to
your computer or tablet. At any time, you can print the pages you want. You can f ind the PDF
in Help menu (Help > User Guide (PDF)).
Understanding VideoStudio terminology
Learn more about the language of video editing. We created a list of the most common
video editing terms used in Corel VideoStudio to help you out. What is a scrubber and what
does rendering mean? Find out by reading the “Glossary” on page 219.
Learning with video tutorials
The Welcome tab includes access to learning material, such as video tutorials (English only
for some video content), as well as free and paid content to help you expand your project
options in VideoStudio.
The Welcome book is accessed from the Welcome tab. Click Tutorials to explore the
collection of video tutorials. For more information, see “The Welcome book” on page 23.
You ca n al so v is it www.youtube.com/VideoStudioPro for more tutorials.
To open the Discovery Center window
•Choose Help Video Tutorials.
16 Corel VideoStudio
Page 27

Using Web-based resources
From the Corel VideoStudio Help menu and the Corel website, you can access a number of
Web pages dedicated to customer support and communities. You can find resources such
as tutorials, tips, newsgroups, downloads, and other online resources.
To access Corel VideoStudio Web resources
• Use your Internet browser to go to www.videostudiopro.com/learn for tutorials,
community forums, and other resources
• Visit VideoStudio Facebook postings: https://www.facebook.com/corelvideostudio
Learning resources 17
Page 28

18 Corel VideoStudio
Page 29

Workspace tour
Corel VideoStudio has three workspaces: Capture, Edit, and Share. These workspaces are
based on the key steps in the video-editing process. The customizable workspaces let you
rearrange the panels to suit your preferences and ensure that you have everything you need
at a glance.
This section presents the following topics:
• Exploring the workspaces
• Switching between workspaces
• The Welcome book
• Using the Player panel
• Using the toolbar
• Customizing the workspace
Exploring the workspaces
Corel VideoStudio Pro consists of three main workspaces, and a Welcome tab.
•Capture
•Edit
• Share
Each workspace contains specific tools and controls to help you accomplish the task at hand
quickly and efficiently.
For more information about the Welcome tab, see “The Welcome book” on page 23.
You can customize the size and position of the elements on your screen for full control of
your editing environment. For information about using a custom workspace layout, see
“Customizing the workspace” on page 27.
The Capture workspace
Media clips can be recorded or imported directly to your computer's hard drive. This step
allows you to capture and import video, photo, and audio clips.
Workspace tour 19
Page 30
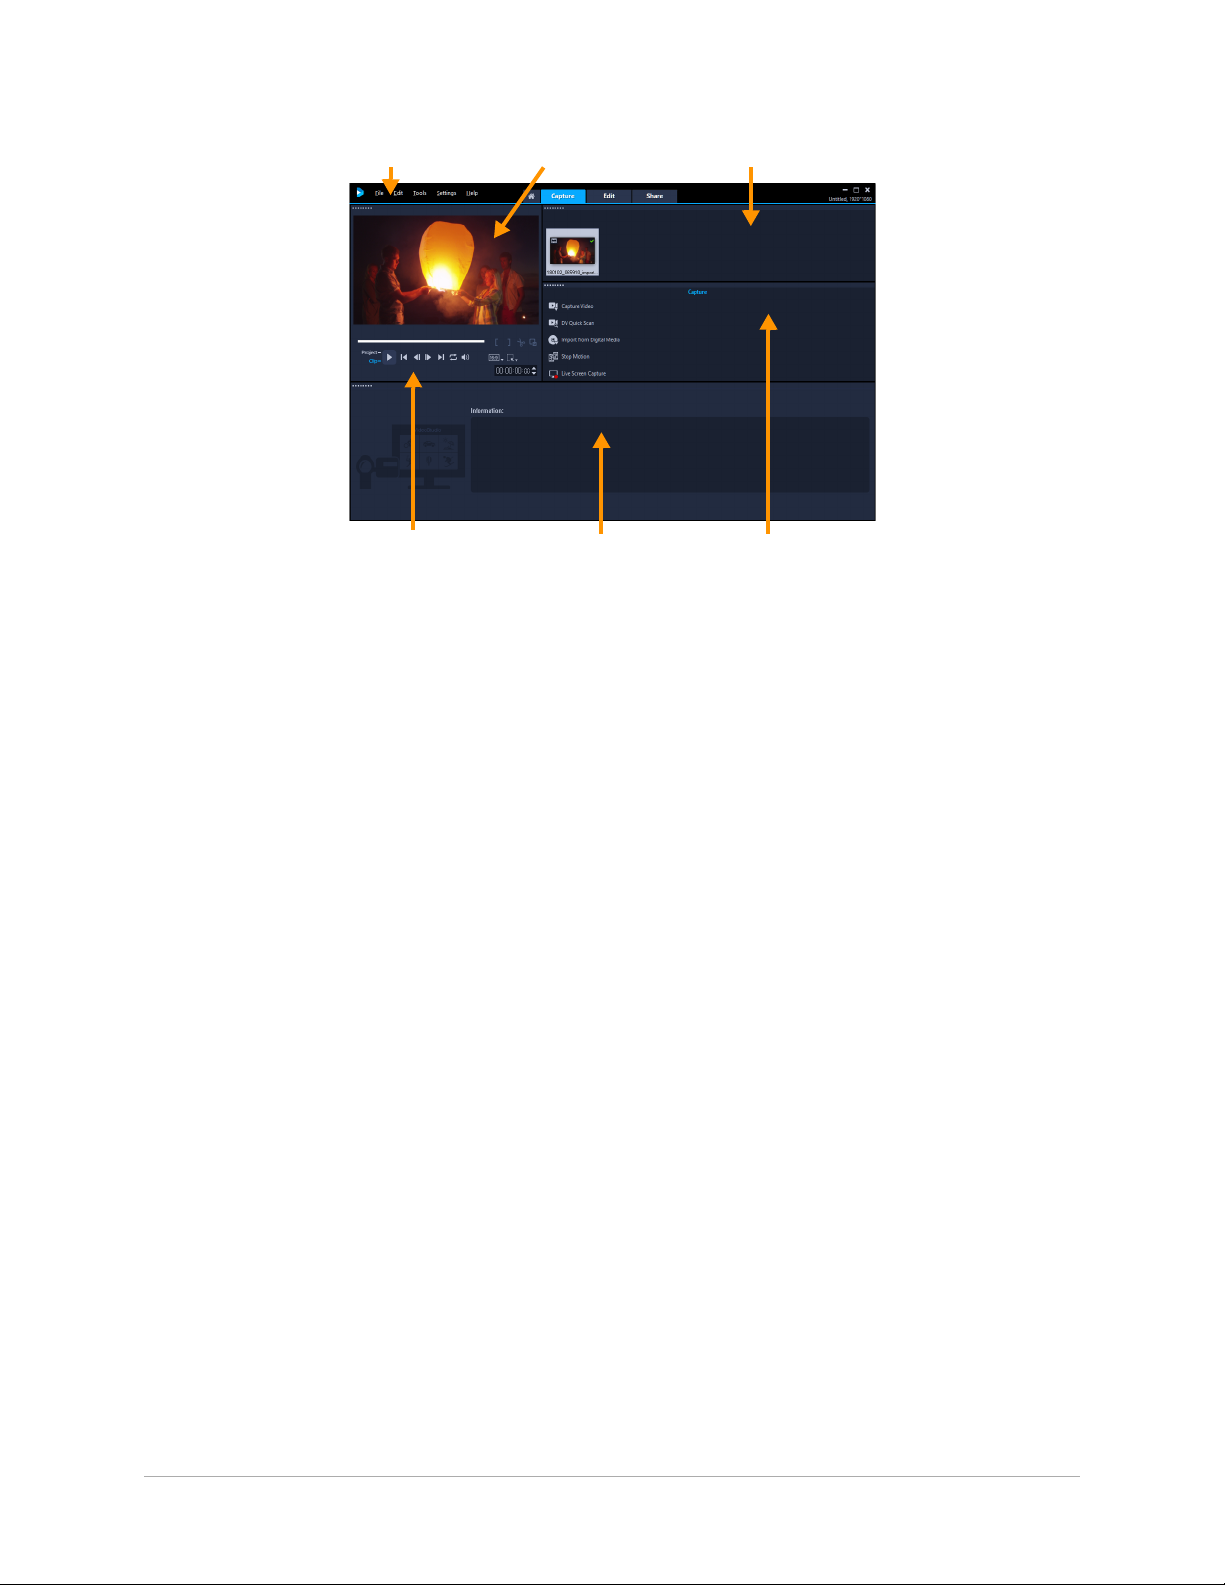
The Capture workspace consists of the following components:
1
23
456
1. Menu bar — provides various commands for customizing Corel VideoStudio, opening and
saving movie projects, working with individual clips, and more.
2. Preview Window — shows the current video being played in the Player panel.
3. Library panel — a storage depot for captured media clips.
4. Navigation area — provides buttons for playback and for precision trimming in the Player
panel.
5. Information panel — lets you view information about the files you are working with.
6. Capture Options — displays different media capture and import methods.
The Edit workspace
When you open Corel VideoStudio Pro, the Edit workspace appears as your default
workspace. The Edit workspace and the Timeline are the heart of Corel VideoStudio Pro,
where you can arrange, edit, trim, and add effects to your video clips.
20 Corel VideoStudio
Page 31

The Edit workspace consists of the following components:
12 3
4
6
5
1. Menu bar — provides various commands for customizing Corel VideoStudio, opening and
saving movie projects, working with individual clips, and more.
2. Preview Window — shows the current video being played in the Player panel and lets you
edit objects interactively.
3. Library panel — a storage depot for everything you need to create a movie, including
sample video, photo, and music clips, and your imported clips. It also includes templates,
transitions, titles, graphics, filters, and paths. The Options panel shares space with the
Library panel.
4. Navigation area — provides buttons for playback and for precision trimming in the Player
panel.
5. Toolbar — lets you choose from a variety of functions related to content in the Timeline.
6. Timeline panel — The Timeline is where you assemble the media clips for your video
project. For more information, see
“Timeline” on page 59.
The Share workspace
The Share workspace lets you save and share your finished movie.
Workspace tour 21
Page 32

The Share workspace consists of the following components:
12 3
5
6
4
1. Menu bar — provides various commands for customizing Corel VideoStudio, opening and
saving movie projects, working with individual clips, and more.
2. Preview Window — shows the current video being played in the Player panel.
3. Category selection area — lets you choose between Computer, Device, Web, Disc, and
3D movies output categories. For HTML5 projects, you can choose HTML5 and Corel
VideoStudio project.
4. Format area — provides a selection of file formats, profiles, and descriptions. For Web
sharing, it displays the settings for your account.
5. Navigation area — provides buttons for playback and for precision trimming in the Player
panel.
6. Information area — lets you view the information about the output location and provides
an estimate of the file size.
Switching between workspaces
Corel VideoStudio simplifies the process of creating movies by organizing the controls you
need into three workspaces that
correspond to the different steps in the video-editing process.
Media clips can be recorded or imported directly to your computer's hard
drive in the Capture workspace. This workspace allows you to capture
and import video, photo, and audio clips.
The Edit
Corel VideoStudio, where you can arrange, edit, trim and add effects to
your video clips.
The Share workspace lets you save and share your movie. You can save
your video file, burn it to a disc, or upload it to the Web.
workspace includes the Timeline. This is the heart of
22 Corel VideoStudio
Page 33

To switch between workspaces
1
2
• At the top of the application window, click one of the following tabs:
• Capture
• Edit
• Share
The Welcome book
The Welcome book is accessed from the Welcome tab.
In the Welcome book, you’ll find
• Video tutorials
• Content offerings (free and paid)
• Update information
• Information about other resources
Review the Welcome book regularly to see what’s new.
The Welcome book is set as the default tab when you open the application. You can adjust
your default startup page in Settings > Preferences, and on the Ge ne ra l tab, choose a
Default startup page. Note that the Welcome book page might still display on startup if
important updates are available.
Using the Player panel
The Player panel consists of the Preview window and the Navigation area, which provides
buttons for playback and for precision trimming of clips. Use the controls in the Navigation
area to move around a selected clip or your project. Use the Trim Marke r s and Scrubber to
edit your clips. In the
or HDV camcorder.
Capture workspace, this panel also acts as the device control for a DV
Workspace tour 23
The Player panel consists of the 1. Preview Window and the 2. Navigation area
Page 34

The preview window in the Player panel is where you can interactively edit your project. The
type of edits depend on the content and tool that you select.
Smart guides
Smart guides are alignment lines that show automatically when you select and move objects
in the preview window. For example, if you move text in the preview window, Smart guides
help you identify the project center or edge, or the alignment relative to other objects.
Smart guides appear as red dashed lines to help you align the selected object in the
Preview window.
The Navigation area
The table below describes the controls available in the Navigation area.
Part Description
Scrubber Lets you scrub through the project or clip.
Trim Markers Lets you drag the scrubbers to set a preview range in
the project or to trim a clip.
Project/Clip mode Specifies a preview of the entire project or of a
selected clip.
Play Plays, pauses, or resumes the current project or a
selected clip.
Home Returns to the starting segment or cue.
Previous Moves to the previous frame.
Next Moves to the next frame.
End Moves to the end segment or cue.
Repeat Loops playback.
System Volume Lets you adjust the volume of your computer's
speakers by dragging a slider.
24 Corel VideoStudio
Page 35

Part Description
HD Preview and 360
Preview drop-list
Change project aspect
ratio
Resize/Crop
Timecode Lets you jump directly to a part of your project or
Enlarge Preview
Window
Split Clip Splits the selected clip. Position the Scrubber to
Mark-in and Mark-out Sets a preview range in the project, or sets the start
Lets you preview clips or projects in high definition
(HD) or 360 degree (360).
Lets you change the aspect ratio (updates the
project settings).
Lets you access
(resize or distort).
selected clip by specifying the exact timecode.
Increases the size of the Preview Window.
where you want the clip to be split, and then click
this button.
and end points for trimming a clip.
Crop mode and Scale mode
The Play button in the Navigation area serves two purposes: for playback of your entire
project or a selected clip.
To preview projects or clips
• Click Project or Clip, then click Play.
While working on your project, you will want to preview your work frequently to see how
your project is progressing. Instant Playback allows you to quickly preview changes in your
project. Playback quality will be dependent on your computer’s resources.
You may choose to play only a part of your project. The selected range of frames to
preview is referred to as the preview range, and it is marked as a colored bar in the
Ruler P
anel.
To play the trimmed range only
1 Use the Trim Markers or the Mark-in/out buttons to select the preview range.
2 To preview the selected range, select what you want to preview (Project or Clip), then
click Play. To preview the entire clip, hold [Shift], then click Play.
Workspace tour 25
Page 36

Using the toolbar
The toolbar provides easy access to many editing commands. You can change your project
view, zoom in and out on the Timeline, and launch different tools that can help you edit
efficiently. You can customize the toolbar by showing or hiding tools.
Part Description
Storyboard View Displays your media thumbnails in chronological order.
Timeline View Lets you perform frame-accurate editing of your clips on
separate tracks, add and position other elements such as titles,
overlays, voice-over and music.
Customize Toolbar Lets you hide or show individual toolbar tools.
Undo Undoes the last action.
Redo Repeats the last action that was undone.
Record/Capture
Option
Sound Mixer Launches the Surround Sound Mixer and the multitrack Audio
Auto Music Launches the Auto Music Options Panel for adding background
Track Motion Launches the Track Motion dialog box, which lets you create
Subtitle Editor Launches the Subtitle Editor dialog box, which lets you detect
Multi-Camera Editor Launches the Multi-Camera Editor and imports any of the
Time Remapping Launches the Time Remapping dialog box, which lets you use
Mask Creator Launches the Mask Creator dialog box, which lets you create
Pan and Zoom
3D Title Editor
Shows the Record/Capture Option panel, where you can capture
videos, import files, record voice-overs and take snapshots.
Timeline, which lets you customize your audio settings.
music to your project in a variety of styles and moods. You can
set the music to match the duration of your project.
tracking paths of particular elements in selected video clips.
and organize segments to easily add titles in selected video clips.
selected media.
speed controls to slow down, speed up, reverse, or freeze frames
in a video clip.
video and still masks.
Split Screen Template
Creator
Zoom in and Zoom
out
26 Corel VideoStudio
Lets you adjust your view of the Timeline by using the zoom
slider and buttons.
Page 37

Part Description
1
2
3
Fit Project in Timeline
Window
Project Duration Shows the total duration of the project.
Adjusts your project view to fit the entire span of your Timeline.
To hide or show tools on the Timeline toolbar
1 In the Timeline, click the Customize Toolbar button .
2 In the Customize Toolbar window, click the check boxes beside the tools to show (check
mark) or hide (no check mark) tools on the toolbar.
Customizing the workspace
The new workspace is designed to provide you with a better editing experien ce. You can now
customize the size of the program window and change the size and position of the elements
on your screen for full control of your editing environment.
Each panel behaves like an independent window that can be modified according to your
editing preferences. This is very useful when you are using large displays or dual monitors.
The main panels are:
1. Player panel — Contains the Preview Window and Navigation area.
2. Timeline panel — Contains the Toolbar and Timeline.
3. Library panel — Contains the media library and shares space with the Options panel.
To hide or show the Library and Options panel
• In the lower right corner of the Library panel, click one of the following buttons :
• Show Library panel
Workspace tour 27
Page 38

• Show Library and Options panel
• Show Options panel
To m ove a pa nel
• Double-click the top-left corner of the Player Panel, Timeline Panel or Library Panel.
When the panel is active, you can minimize, maximize, or resize each panel.
You can also drag the panel outside the main application window into the second
display area for dual-monitor setups.
To customize the size of the program window
• You can do one of the following:
• Click the Restore button and drag the ends of the program window to the desired
size.
• Click the Maximize button for full screen editing.
To d ock a pane l
1 Click and hold an active panel.
The docking guide appears.
2 Drag your mouse over the docking guide and choose a docking position to snap the
panel in place.
To save a custom workspace layout
• Click Settings > Layout Settings > Save to and click a Custom option.
To load a custom workspace layout
• Click Settings > Layout Settings > Switch to and choose Default or one of the custom
settings you have saved.
28 Corel VideoStudio
Page 39

To know more about hotkey combinations assigned for each preset, see “Layout settings
shortcuts” on page 227.
You can also change the layout settings from the UI Layout tab in Settings >
Preferences.
To set program preferences
• Click Settings > Preferences or press F6 to launch the Preferences dialog box.
Changing the application language
You can change the application language of VideoStudio.
Note: If the language does not display as expected after you make the change in
VideoStudio, check the following in Windows:
• Verify that the language you want to display is added in the Windows language settings
(Windows Control Panel > Clock, Language, and Region > Add a language).
• For non-Unicode text, change the system locale.
To change the display language
• Click Settings > Display Language, and choose the language you want from the
submenu.
Workspace tour 29
Page 40

30 Corel VideoStudio
Page 41

Capture and import
Corel VideoStudio lets you capture or import video from DVD-video, AVCHD and BDMV
discs including camcorders that record on memory cards, internal memory of discs, DV or
HDV camcorders, mobile devices, as well as analog and digital TV capture devices.
This section contains the following topics:
• Using the Options panel in the Capture workspace
• Capturing videos and photos
• Capturing digital video (DV)
• Using DV Quick Scan
• Capturing analog video
• Importing from digital media
• Scanning and splitting scenes
Using the Options panel in the Capture workspace
In the Capture workspace, Corel VideoStudio displays the Library and the capture Options
panel where different media capture and import methods are available.
The table below discusses the options in the Capture workspace.
Click Capture Video to import video footage and photos from your camcorder to your
computer.
Click DV Quick Scan to scan your DV tape and select the scenes.
Click Import from Digital Media to add media clips from a DVD-Video, AVCHD, BDMV
formatted disc or from your hard drive. This feature also allows you to import video
directly from AVCHD, Blu-ray Disc or DVD camcorders.
Click Stop Motion to create instant stop motion animations using captured images from
your photos and video capture devices.
Click Screen Capture to create screen capture videos that capture all computer actions
and elements shown on your screen.
Capturing videos and photos
The steps on how to capture are similar for all types of camcorders except for the available
capture settings in the Capture Video Options panel that can be selected for each type of
source.
The Capture Video Options panel consists of the following components:
Capture and import 31
Page 42

• Duration — Sets the length of time for the capture.
• Source — Displays the detected capture device and lists other capture devices installed
on your computer.
• Format — Gives you a list of options where you select a file format for saving your
captured video.
• File name — Allows you to specify a prefix for captured files.
• Capture folder — Allows you to specify a location for captured files.
• Split by scene — Automatically separates captured video into several files based on
changes in shooting date and time.
• Capture to library — Choose or create a Library folder where you want your video to
be saved.
• Options — Displays a menu allowing you to modify your capture settings.
• Capture Video — Transfers video from your source to your hard drive.
• Take a Snapshot — Captures the displayed video frame as a photo.
To capture video clips and photos from your camcorder
1 Connect your camcorder to your computer and turn on the device. Set it to Play (or VTR
/ VCR) mode.
2 In Capture Options Panel, click Capture Video.
3 Select your capture device from the Source drop-list.
4 Select a file format from the Format drop-list. In the Capture folder box, type a folder
location or mark the Capture to library check box and choose a folder from the droplist.
Note: Click Options to customize capture settings specific to your video device.
5 Scan your video to search the part for capture.
Note: If you are capturing video from a DV or HDV camcorder, use the Navigation area
to play your video tape.
6 Click Capture Video, when your video for capture is already on cue. Click Stop Capture
or press [Esc] to stop capturing.
7 To capture a photo from the video footage, pause the video on the desired frame then
click Take a Snapshot.
Note: When your camcorder is in Record mode (usually named CAMERA or MOVIE),
you can capture live video.
Note: The available settings in the Video properties dialog box vary, depending on the
capture file format that you have chosen.
To capture videos and photos using a DSLR
1 Connect your DSLR to your computer and turn on the device.
32 Corel VideoStudio
Page 43

2 Click Capture Video and select your device from the Source drop-list.
3 Specify a folder location for your saved files by clicking the Capture Folder button .
4 Click Capture Video to start recording. Click Stop Capture or press [Esc] to stop
capturing.
5 To capture a photo while the DSLR is connected to the computer, click Take a snapshot.
To capture video from an HDV camcorder
1 Connect your HDV camcorder to your computer’s IEEE-1394 port using the IEEE-1394
cable.
2 Turn on your camcorder and switch it to Play/Edit mode and make sure that your HDV
camcorder is switched to HDV mode.
Note: For Sony HDV camcorders, flip open the LCD screen and see if HDVout I-Link is
on the LCD screen to check if the camera is set to HDV mode. If you see DVout I-Link,
press P-MENU at the lower right of the screen. In the menu, press MENU > STANDARD
SET > VCR HDV/DV and press HDV.
3 In the Capture workspace, click Capture Video .
To capture DVB-T video
1 In the Capture workspace, click Capture Video .
Note: Before capturing, ensure that the DVB-T source is connected via a compatible
capture card installed on your computer.
2 Select Digital TV Source from the Source drop-list.
3 Click Options and select Video Properties. The Video properties dialog box will
appear.
4 In the Input Source tab, select TV from the Input source drop-list. Click OK.
5 In Channel List, click Start Scan to start scanning for channels.
Note: DVB-T channels are not automatically scanned. Make sure to manually scan the
channels first before capturing.
6 Click Capture Video.
7 Click Yes when prompted if you want to start capturing and automatically r
DVB-T video.
8 Follow the remaining steps as described in the procedure for capturing videos.
ecovering
To capture TV footage
1 Select your TV tuner device from the Source drop-list.
2 Click Options > Video Properties to open the Video properties dialog box. If needed,
adjust the settings accordingly.
Capture and import 33
Page 44

Click the Tuner Information tab to choose Antenna or Cable, scan available channels in
your region, and more.
3 In the Channel box, specify the channel number from which to capture.
To capture video in MPEG-2 format
1 In Source, choose your video source.
2 Specify or browse for the destination folder where you want your clips to be stored in
Capture folder.
3 Click Options and select Video properties. In the dialog box that opens, select a profile
in the Current Profile drop-list.
4 Click OK.
5 Click Capture Video to start capturing and Stop Capture to end your capturing session.
Your media clip will be stored as MPEG-2 format in the folder you specified.
Capturing digital video (DV)
To capture Digital Video (DV) in its native format, select DV from the Format list in the
Options Panel. This saves the captured video as a DV AVI file (.avi).
You can also use the DV Quick Scan option to capture DV video DV AVI Type-1 and
Type-2.
When capturing DV, click Options in the Options Panel and select Video properties to open
a menu. In the Current Profile, choose whether to capture DV as DV Type-1 or DV Type-2.
Using DV Quick Scan
Use this option to scan a DV device for scenes to import. You can add the date and time of
your video.
For more information on this feature, see “DV-to-DVD Wizard” on page 229.
To add the date and time of your video
1 After scanning your DV tape, click Next.
This will then display the Import Settings dialog box.
2 Select Insert to Timeline and choose Add video date information as title.
Note: If you want the shooting date to appear for the duration of the video, select
Entire video. If you only want a portion of the video, select Duration and specify the
number of seconds.
34 Corel VideoStudio
Page 45

Capturing analog video
When footage is captured from analog sources such as VHS, S-VHS, Video-8, or Hi8
camcorders/VCRs, it is converted to a digital format that can be read and stored by the
computer. Before capturing, choose the desired file format to use for saving the captured
video in the Options Panel’s Format list.
To specify the type of video source you are capturing from
1 In the Capture workspace, click Options and select Video properties.
2 In the dialog box that opens, you can customize the following capture settings:
• In the Input Source tab, choose whether you are capturing NTSC, PAL, or SECAM video
and select the Input source (TV, Composite, or S-Video).
• In the Color Manager tab, you can fine tune the video source to ensure good quality
captures.
• In the Template tab, choose the frame size and compression method to use for saving
the captured video.
Importing from digital media
You can import DVD, AVCHD, BDMV video and photos from a disc, hard drive, memory card
and digital camcorders.
To import digital media
1 In the Capture workspace, click Import from Digital Media.
2 Click Select Import Source Folders and browse for folders that contain your digital
media and click
3 Click Start and the Import from Digital Media dialog box appears.
OK.
Capture and import 35
Page 46

4 Choose the media clips you want to import and click Start import. All imported videos
will be added to the thumbnail list in the Library.
To enable timecode retrieval for AVCHD
1 In the Capture workspace, click Import from Digital Media.
2 Select the file location from the Select Import Source Folders list and click Start.
3 Choose the media clips you want to import and click Start import to launch Import
Settings.
4 In Import Destination, select Insert to Timeline or select Add video date information
as title
5 Choose Entire video to import the timecode of the video file as a title spanning the
entire duration of the video. Choose Duration to import the timecode as a title within a
specified duration. Click
Note: You can apply the same settings to all the videos that you import and hide the
Import Settings dialog box by marking the Apply this setting and never ask me again
check box. You can also choose to enable the same check box on the Capture tab of the
Program preferences dialog box. For more information, see “Customizing the
workspace” on page 27.
.
OK to apply the settings.
Scanning and splitting scenes
A single DV tape may contain video that was captured at different times. Corel VideoStudio
automatically detects these segments and saves them as separate files.
36 Corel VideoStudio
Page 47

To find scenes in your video
•Drag the Shuttle Slider to move forward and back through the footage at variable
speeds.
To use Split by scene
1 In the Capture workspace, click Capture Video.
2 Enable Split by scene on the Capture Video Options Panel. Corel VideoStudio will
automatically look for the scenes according to their shooting date and time and capture
them as separate files.
Capture and import 37
Page 48

38 Corel VideoStudio
Page 49

Project basics
Corel VideoStudio combines the video, titles, sounds, and effects in a process called
rendering. Project settings determine how your movie project is rendered when you preview
it. The output video can then be played back on your computer, burned to disc, or uploaded
to the Internet.
This section contains the following topics:
• Creating new projects and opening projects
• Setting project properties
• Creating custom profiles
• Using Smart Proxy for a faster, smoother editing experience
• Previewing your project or clips
• Undoing and redoing actions
• Showing and hiding grid lines
• Saving projects
• Saving projects by using Smart Package
• Adding cues and chapters
Creating new projects and opening projects
When you start Corel VideoStudio, it automatically opens a new project and lets you start
creating your movie. New projects are always based on the default settings of the
application. You can also create HTML5 projects that you can post on the Web.
You can open previously saved projects and if you’d like to combine several projects, you can
add previously saved projects to a new project.
To create a new project
• Click File >New Project [Ctrl + N].
To create a new HTML5 project
• Click File > New HTML5 Project [Ctrl + M].
To create a new FastFlick project
1 Click Tools > FastFlick.
Project basics 39
Page 50

2 From the FastFlick window, click Menu > New Project.
For more information, see “FastFlick” on page 171.
To open an existing project
• Click File > Open Project [Ctrl + O].
To add an existing project to a new project
1 In the Library, click the Media button .
2 Drag a pr
If the file isn’t in the Library, click the Import Media Files button, navigate to a project
file (stored in My Projects folder by default), select the file, and click Open.
All tracks, media, and elements o
Before you import a project (VSP file) to the Library, ensure that all links in the project
are working. Projects with linking issues cannot be added to existing projects.
If you want to flatten the project to add it to a specific track, press and hold the Shift
key before you release the mouse button.
oject file (.vsp) from the Library to the Timeline.
f the project appear in the Timeline.
Setting project properties
Project Properties serve as your template for your movie projects. The project settings in
the Project Properties dialog box determine the appearance and quality of a project when
it is previewed on-screen.
The project properties are based on a profile. You can use an exis
custom profile. For more information about custom profiles, see “Creating custom profiles”
on page 41.
ting profile or create a
To modify project properties
1 Click Settings > Project Properties.
2 Choose the appropriate setting options in the Project Properties dialog box.
3 Click OK.
When customizing project settings, it is recommended that you make the settings the
same as the attributes of the video footage that will be captured to avoid distorting the
video images and can help prevent jumping frames. However, preview performance
40 Corel VideoStudio
Page 51

might decrease for projects with high resolution files, depending on the system
specifications.
Creating custom profiles
Profiles contain settings that define how to create the final movie file. By using the preset
profiles provided by Corel VideoStudio or by creating and saving your own profiles in the
Movie Profile Manager, you can have multiple versions of your final movie. For example,
you can create profiles that provide high-quality output for DVD and video recording, and
you can create profiles that output to smaller, lower-quality files ideal for Web streaming and
e-mail distribution.
You can also choose profiles and create custom profiles in the Share workspace before you
output your movie project. For more information, see “Working with custom profiles in the
Share workspace” on page 203.
To create custom profiles
1 Click Settings > Movie Profile Manager. The Movie Profile Manager dialog box opens.
2 Click the Computer or 3D tab.
3 From the Format drop-list, choose a file format.
4 Click New.
5 In the New Profile Options dialog box, click the Corel VideoStudio tab, and type a name
in the Profile name box.
6 Click the Gene ra l tab, and choose the settings you want.
Note: Additional tabs and settings are available depending on the type of format you
choose.
7 Click OK.
To choose a custom profile for your project
1 Click Settings > Movie Profile Manager. The Movie Profile Manager dialog box opens.
2 Click the Computer or 3D tab.
3 From the Format drop-list, choose a file format.
4 In the Profile area, choose Personal Profiles from the drop-list.
Previously saved custom profiles are listed in the box below the drop-list.
5 Click the profile you want, and click Close.
Project basics 41
Page 52

Using Smart Proxy for a faster, smoother editing experience
The main purpose of Smart Proxy is to provide a more fluid editing and previewing
experience when working with large, high resolution video files.
Smart Proxy creates lower resolution working copies of larger source files. These smaller
files are called “proxy” files. Using proxy files speeds up editing of high resolution projects
(for example, projects that have HDV and AVCHD source files).
Proxy files are source-dependent rather than project-dependent. In other words, proxy files
can be shared among different projects.
When you render a video project, the original, high-quality video source files are used.
You can use the Smart Proxy Manager to e n a ble or disable Smart Proxy, change the default
resolution threshold that enables Smart Proxy, and access the Smart Proxy File Manager
and Smart Proxy Queue Manager to manage existing and future proxy files.
Smart Proxy can be set and adjusted in the VideoStudio workspaces or in the Multi-Camera
Editor.
To enable or disable Smart Proxy
• Click the Settings menu or button (Multi-Camera Editor) > Smart Proxy Manager
> Enable Smart Proxy.
Note: The Smart Proxy feature is enabled by default if the computer’s hardware can
support the feature.
To set the resolution threshold and location for Smart Proxy files
1 Select Settings > Smart Proxy Manager > Settings.
2 In the Smart Proxy dialog box, set a resolution threshold for the creation of proxy files
and choose a proxy folder.
To manage proxy files
1 Select Settings > Smart Proxy Manager, and choose one of the following options:
• Smart Proxy File Manager — Lists the source and proxy files. You can use this
manager to delete proxy files you no longer need.
• Smart Proxy Queue Manager — Lists source files for which proxy files will be
generated (according to the current settings)
Previewing your project or clips
The Play button in the Navigation area of the Player panel serves two purposes:
42 Corel VideoStudio
Page 53

• Playback your entire project
• Playback a selected clip
While working on your project, you will want to preview your work frequently to see how
your project is progressing. Instant Playback allows you to quickly preview changes in your
project. Playback quality depends on your computer’s resources.
You may choose to play only a part of your project. The selected range of frames to preview
is referred to as the preview range, and it is marked as a colored bar on the Ruler Panel.
If you have a high definition project (HD), you can enable HD Preview so that you can
preview your project with a clearer, higher quality result. The speed depends on your system.
To preview a project or clip
1 In the Navigation area of the Player panel, click Project or Clip.
2 Click Play.
Note: For Clip, only the currently selected clip plays.
If you want to preview a high def inition project in full HD, enable the HD Preview button.
To play part of a project or clip
1 Use the Trim Markers or the Mark-in/out buttons to select the preview range.
2 With the preview range selected, in the Navigation area of the Player panel, click Project
or Clip.
3 Click Play.
Undoing and redoing actions
You can undo or redo the last set of actions that you performed while working on your
movie.
To undo the last action
• Click the Undo button on the Toolbar.
Project basics 43
Page 54

To redo the last undone action
• Click the Redo button on the Toolba r.
You can adjust the number of undo levels in the Preferences dialog box.
You can also use the ke
actions respectively.
yboard shortcuts [Ctrl + Z] and [Ctrl + Y] to undo and redo
Showing and hiding grid lines
You can use grid lines to guide you when repositioning or resizing photos and videos. You
can also use grid lines to line up titles in your movie.
To show grid lines
1 In the Edit workspace, double-click a clip to display the Options Panel.
2 Click the Effect tab.
3 Check Show grid lines.
Click the Grid line options button to adjust grid line settings.
Saving projects
You can save projects so that you can edit or complete them later. To protect your work, you
can enable automatic saving at regular intervals.
To save your project
• Click File > Save [Ctrl + S].
Note: Corel VideoStudio project files are saved in *.vsp file format. HTML5 video
projects are saved in *.vsh file format.
44 Corel VideoStudio
Page 55

To automatically save your work
1 Click Settings > Preferences and click the Genera l tab.
2 Choose Automatic save interval: and specify the time interval between saves.
Note: This setting is set at 10 minutes by default.
Save your project frequently to av
oid accidental loss of work.
Saving projects by using Smart Package
Packaging a video project is useful if you want to back up your work or transfer your f iles for
sharing or for editing in a laptop or another computer. You can also package your project as
a zipped folder or prepare them for online storage using WinZip’s file compression
technology that is integrated into the Smart Package feature.
To save projects by using Smart Package
1 Click File > Smart Package and choose to pack your project as a folder or Zip file.
2 Specify the Folder path, Project folder name and Project file name.
If you want to include tracker or disc settings, enable the corresponding check box.
3 Click OK.
You need to save your project before you use Smart Package.
Adding cues and chapters
Adding cues and chapters helps you to navigate through a project and allows you to place
comments on your Timeline. These cue and chapter marks are used mainly as project guides
or disc menu chap
Cue points serve as markers that help in lining up media clips in a project. Chapter points
specify disc menu chapters or hyperlinks.
ters and interactive links in HTML5 projects.
To add project cues
1 Click the Chapter/Cue Menu arrow (small grey triangle).
2 Click Cue Point.
Project basics 45
Page 56

3 Drag the cursor to where you want to add a cue point and click the bar below the
Cue points
Add/Remove Cue Point
Chapter points
Timeline ruler. Notice that a blue arrow icon is added.
4 To edit a cue point, click the Chapter/Cue Menu arrow, and click Cue Point Manager.
You can add, delete, rename, and navigate (Go To) cue points.
To remove chapters and cues, drag the markers outside the Timeline ruler and release
the mouse button. You can also drag the Timeline ruler to a chapter or cue point and
click Add/Remove Chapter Point or Add/Remove Cue Point (the green or blue
triangle to the left of the Chapter/Cue Menu arrow).
To add chapters
1 Click the Chapter/Cue Menu arrow (small grey triangle).
2 Click Chapter Point.
3 Drag the cursor where you want to add a chapter and click the bar below the Timeline
ruler. Notice that a green arrow icon appears to indicate chapter points in your movie.
If you want to reposition the chap
4 To edit a chapter, click the Chapter/Cue Menu arrow, and click Chapter Point Manager.
You can add, delete, rename, and navigate (Go To) chapter points.
ter point, drag it to the position you want.
To remove chapters and cues, drag the markers outside the Timeline ruler and release
the mouse button. You can also drag the Timeline ruler to a chapter or cue point and
cl
ick Add/Remove Chapter Point or Add/Remove Cue Point (the green or blue
triangle to the left of the Chapter/Cue Menu arrow).
46 Corel VideoStudio
Page 57

You can also drag the Timeline slider to the desired chapter point position in your
project. Click the Add/Remove Chapter Point.
Project basics 47
Page 58

48 Corel VideoStudio
Page 59

Templates
Templates let you fast track your projects. You can use ready-made templates, or you can
create your own.
This section contains the following topics:
• Using Instant Project templates
• Split screen video templates
Using Instant Project templates
Instant Project templates let you fast-track the movie creation process by providing you with
pre-assembled movie projects. Simply exchange the placeholder clips and photos with your
own media and you’re done. They are also a great way to learn about the components of a
movie project.
You can use one template for the entire movie, or you can add more than one template. For
example, you can use different templates for the start, middle, and end of your movie. You
can even create and save custom templates. For example, if you are creating a series of
videos, you can create a template so that all the videos have a consistent style.
To open an Instant Project template
1 In the Edit workspace, click the Instant Project button in the Library panel.
2 Click a template category from the folders that appear (not Split Screen).
3 To preview a template, click the template thumbnail, and click the Play in the Player
panel.
4 Right-click the template thumbnail and choose the point of insertion in the Timeline
between Add at the beginning and Add at the end.
The template is added to the Timeline.
Templates 49
Page 60

You can also add a template to your project by dragging the thumbnail to the
Timeline.
To replace clips, photos, and music in an Instant Project template
1 Drag a clip, photo, or music track from the Library to the appropriate placeholder clip,
photo, or music track.
2 Press [Ctrl] and release the mouse button.
To create an Instant Project template
1 Open the video project that you want to save as a template.
2 Click File > Export as template > Instant Project Template.
3 Click Yes when prompted to save your project.
4 Enter a File name, Subject and Description.
5 Browse for the folder where you want to save your template and click Save.
6 In the Export project as template dialog box, move the slider to display the thumbnail
that you want to use for the template.
7 Specify the path and folder name. Choose the category from the drop-list where you
want to keep your template.
Template details will also be displayed.
8 Click OK.
To import project templates
1 Click Import a project template and browse for the *.vpt file that you want to import.
2 Click Open.
Split screen video templates
You can easily create a split screen video to play multiple videos in a preset or customized
template.
50 Corel VideoStudio
Page 61

You can use a template to create a split screen video project or create your own split
screen template.
Before you start
• Ensure that the video clips you want to use are imported to the Library and easy to
access from a project bin or collection.
• Preview the video clips you want to use so that you have an idea what shapes will suit the
content that you want to focus on. For example, if the main action is vertical, it won’t fit a
horizontal shape very well.
To choose and fill a split screen template
1 In the Edit workspace, click the Instant Project button in the Library panel.
2 Click Split Screen in the list of folders that appear.
3 Drag the thumbnail for the template that you want to use into the Timeline.
4 Drag a video or photo from the Library to the appropriate placeholder, and press Ctrl to
replace the placeholder.
5 In the Player panel, click the Resize/Crop drop-down , and click the Scale mode
button . Do any of the following:
• Resize the selected clip by dragging the sizing orange nodes t
window.
• Position the clip by dragging it in the preview window.
6 In the Timeline, click another track to adjust the other clips in the template.
hat appear in the preview
To create a split screen template
1 On the Timeline toolbar, click the Split Screen Template Creator button .
2 In the Template Editor, choose a tool from the Splitting Tools panel, and drag in the
editor window to split the area into different clip zones.
Templates 51
Page 62

A number appears in each clip zone.
If you want to add a shape, in the Graphics area, click a shape and drag in the editor
window.
3 To adjust the lines and shapes, in the Splitting Tools panel, choose the corresponding
Select tool
You can drag the lines and shapes t
, and select the element that you want to edit in the editor window.
o reposition them and resize them. You can also
adjust the Rotation, Border Width, and Border Color in the Properties area.
4 If you want to save content with your template (for example, an image or video that will
be part of the template), navigate to the content you want to add and drag the
corresponding thumbnail to the number you want in the drop zone.
Note: To replace the content, drag different content to the drop zone.
Note: Sizing and positioning of content can be done in the Timeline after you close the
Templa te Cre ato r window.
5 When your template is complete, click the Export as template button to save your
template. Your template is saved in the Library to the Instant Project category, Split
Screen folder.
6 Click OK to return to the Timeline.
7 Add and
52 Corel VideoStudio
edit the clips as you would with an existing template.
Page 63

Organize and find media
Organize the media clips in the Library so you can access assets for your projects with ease
and speed. You can also import a Library to restore media files and other librar y information.
This section contains the following topics:
• Using the Library
• Sorting, viewing, and filtering clips in the Library
• Resizing thumbnails
• Tagging files as 3D
Using the Library
The Library is a storage depot for everything you need to create a movie: video clips, photos,
audio files, instant project templates, transitions, titles, filters, graphics, and tracking paths.
Create a custom library for your project. You can select, add, and delete media in the Library.
If the media files are moved from their original location, you can automatically restore the
links. Remember to export the library to create a backup on the hard drive or an external
storage device. You can then import the library at a later time.
After completing a project, you can reset the Library to restore the default media clips. The
files you added will be deleted from the Library, but not from their original location. You can
always choose to re-import your media files into the Library.
Organize and find media 53
Page 64

Right-click a clip in the Library to view the clip's properties as well as copy, delete, or
split clips by scene.
You can also trim a clip in the Library by using dragging the Scrubber in the Player
panel to set the Mark-in/Mark-out points.
Library files that you use in a project are identified by a green check mark in the upper
right corner of the thumbnail.
For information about supported media formats, see “Supported file formats” on page 11.
To select media in the Library
•In the Library, do one of the following:
• Select one media file — click a thumbnail.
• Select multiple media files — press and hold [Ctrl], and then click the thumbnails you
want.
• Select a sequence of media files — click the f irst thumbnail in the sequence, press and
hold [Shift], and then click the last thumbnail in the sequence.
• Select a grouping of media files — drag your pointer across the thumbnails that you
want to select.
To add media clips to the Library
1 Click Add to create a new library folder where you want to store your media clips.
Note: Y
or to keep all clips that belong to a project in a single folder.
2 Click the Import Media Files button to locate your files.
3 Select the files you want to import.
4 Click Open.
ou can create custom folders to separate your personal clips from sample clips
Click Browse to open the File Explorer where you can drag and drop files to the
Library.
To delete media clips from the Library
1 In the Library, select a clip and press [Delete].
54 Corel VideoStudio
Page 65

Or, right-click the clip in the Library and click Delete.
Note: While the clips are referenced in the Library, they actually remain in their original
location, so when you delete a clip from the Library, only the reference is deleted. You
can still access the actual file in the location where it is stored.
2 When pr
ompted, confirm that you want to delete the thumbnail from the Library.
To automatically locate and restore links to media files
• Click File > Relink.
A message appears that notifies you about the number of clips that are successfully
relinked.
Note: If the links to some clips are not restored, you can restore them manually by
browsing for the corresponding file on your computer.
To export a library
1 Click Settings > Library Manager > Export library and specify a folder location where
you want to save your Library.
2 Click OK.
This action creates a backup of the virtual media file information of your current library
in the directory you specify.
To import a Library
1 Click on Settings > Library Manager > Import Library and find the folder that you
want to import.
2 Click OK.
To reset the Library
• Click Settings > Library Manager > Reset Library.
This action restores the Library to the default settings and deletes all user added files.
Sorting, viewing, and filtering clips in the Library
There are different ways to sort, view, and filter your media clips in the Library:
• Sort media by properties such as name, file type, date, and resolu
• View media as thumbnails or as a list that includes details about
• Filter media by hiding or showing media by type—photos, videos, and audio
tion.
the files.
Organize and find media 55
Page 66

To sort media clips
• Click the Sort clips in the Library button , and select a Sort by property in the menu.
To change the media clips view
• Click the List view button to display your media clips in a list that includes file
properties, or click the Thumbnail view button to display thumbnails.
If you want to sort the media clips in List view, click a property title, such as Name, Type,
or Date.
You can also click the Show/Hide title button to show or hide the file names of the
media clips.
List view shows properties such as file name, media type, date, duration, resolution,
frames per second (FPS), and codecs.
To show or hide media clips
• Click one or more of the following buttons:
• Show / Hide Videos
• Show / Hide Photos
• Show / Hide Audio Files
To change the Library panel view
• You can use the icons in the Library panel to display Instant Project templates,
transitions, titles, graphics, filters, and tracking paths.
56 Corel VideoStudio
Page 67

Resizing thumbnails
Thumbnail size
slider
Corel VideoStudio allows you to adjust the size of thumbnails for easier access to the
different media clips in the Library.
To adjust thumbnail size
• Move the slider to the left or right to decrease or increase thumbnail size.
Tagging files as 3D
In Corel VideoStudio, MVC and MPO clips are automatically detected and tagged as 3D
during import. You can also tag 2D clips to simulate the 3D effect when you render the
project as a 3D movie. Tagged 3D media clips are marked with
to enable the 3D media clip for 3D editing.
The Left-Right format for side-by-side 3D is a popular choice for delivering content and is
used mostly in media clips imported or captured from 3D video cameras. The Right-Left
option is used mostly in media clips acquired from the Web.
3D for easy identification and
To tag video and photo clips as 3D
1 Right-click 3D files imported into the Library or the Timeline and choose Tag as 3 D
from the right-click menu. The 3D Settings dialog box is displayed.
Organize and find media 57
Page 68

2 Choose one of the following options to set the correct format for 3D content:
• 2D — the default setting if the selected clip is not recognized as 3D.
• Side-by-side — delivers 3D content by splitting the horizontal resolution of each frame
for the left and right eye. Side-by-side 3D is widely used by cable channels for
delivering content for 3D ready TV sets because of lower bandwidth usage. Choose
between the Left-Right and Right-Left formats.
• Over-Under — delivers 3D content by splitting the vertical resolution of each frame for
the left and right eye. The higher count of horizontal pixels makes this option more
suitable for displaying panning motion. Choose between the Left-Right and Right-Left
formats.
• Multiview Video Coding (MVC) — generates a high-definition two-view
(stereoscopic) video or a multi-view 3D video.
• Multi-view image — delivers high-quality stereoscopic images such as Multi-Picture
Object (MPO) files that are shot using 3D cameras.
3 Click OK.
The thumbnail of the media clip in the Library and Timeline now has the 3D tag.
58 Corel VideoStudio
Page 69

Timeline
The Timeline is where you assemble the media clips for your video project.
This section contains the following topics:
• Switching between Timeline views
• Showing and hiding tracks
• Adding and swapping tracks
• Adjusting track height
• Grouping and ungrouping
• Using Ripple Editing
Switching between Timeline views
Two types of views are available in the Timeline: Storyboard View and Timeline View.
Storyboard View
The fastest and simplest way to organize photos and video clips in a project is to use the
Storyboard View. Each thumbnail in the storyboard represents a photo, video clip, or a
transition. Thumbnails are shown in the order in which they appear in your project, and you
can drag thumbnails to rearrange them. The duration of each clip is shown at the bottom of
each thumbnail. In addition, you can insert transitions between video clips, and you can trim
a selected video clip in the Preview Window.
Corel VideoStudio Storyboard View
Timeline View
Timeline View gives you the most comprehensive display of the elements in your movie
project. It divides a project into separate tracks for video, overlay, title, voice, and music.
Timeline 59
Page 70

Corel VideoStudio Timeline View
5
6
3
11
13
14
15
142
12
9
10
7
8
Part Description
1 — Show All Visible Tracks Displays all tracks in your project.
2 — Track Manager Lets you manage the tracks visible in the Timeline.
3 — Add / Remove Chapter or Cue Lets you set chapter or cue points in your movie.
4 — Timeline ruler Helps you determine clip and project length by displaying the
project's timecode increments in hours:minutes:seconds:frames.
5 — Track button Shows / Hides individual tracks.
6 — Enable / Disable Ripple Editing When enabled, clips maintain their relative positions when a clip is
added to the track. For more information, see “Using Ripple Editing”
on page 64.
7 — Mute/Unmute Lets you mute or unmute the audio for the track.
8 — Track Transparency Opens Track Transparency mode. See “Track transparency” on
page 93.
9 — Automatically scroll Timeline Enables or disables scrolling along the Timeline when you preview a
clip that extends beyond the current view.
10 — Scroll controls Lets you move around your project by using the left and right
buttons or dragging the Scroll Bar.
11 — Video Track Contains videos, photos, graphics, and transitions. Note that in
HTML 5 mode, you can also have a Background Track.
12 — Overlay Tracks Contains overlay clips, which can be video, photo, graphic, or color
clips. Note the HTML 5 projects also have overlay tracks.
13 — Title Track Contains title clips.
60 Corel VideoStudio
Page 71

Part Description
14 — Voice Track Contains voice-over clips.
15 — Music Track Contains music clips from audio files.
You can use the mouse wheel to scroll through the Timeline.
Right-click on any track button and choose Select all media to select all media clips
that are in the track.
When the pointer is at the Zoom controls or Timeline ruler, you can use the mouse
wheel to zoom in and out of the Timeline.
To switch between Storyboard View and Timeline View
• Click the buttons at the left side of the Toolbar.
Showing and hiding tracks
You can show or hide tracks. When tracks are hidden, they do not show during playback or
when you render your video. Selectively showing or hiding tracks lets you see the effect of
each track in a project without having to delete and reimport media clips repeatedly.
To show or hide tracks
• Click the Track button of the track that you want to show or hide.
The track is dimmed in the Timeline when it is hidden.
Adding and swapping tracks
The Track Mana g er allows you to take more control of the Timeline. You can have up to 20
Overlay tracks, two Title tracks, and eight Music tracks.
In an HTML5 project, you can have up to three Background tracks,
tracks, and three Music tracks.
There is only one Video track and one Voice track.
You can also insert and delete additional overlay, title, and music tracks, as well as swap
overlay tracks directly in the Timeline.
18 Overlay tr acks, two T itle
Timeline 61
Page 72

To add tracks with the Track Manager
1 Click Track Manager on the Toolbar.
2 Specify the number of tracks you want to display from the drop-down list for each track.
Click Set as Default to save current settings as defaults for all new projects.
You can also reduce the number of optional tracks that you have added by adjusting
the Track Manager settings
To insert or delete tracks in the Timeline
1 In the Timeline, right-click a track button for a track type that you want to insert or
delete, and choose one of the following menu commands:
• Insert Track Above — Inserts a track above the selected track
• Insert Track Below — Inserts a track below the selected track
• Delete Track — Removes the track from the Timeline
A track of the same type is inserted or the selected track is removed.
The menu items listed above appear only if the action is permitted. For example, Delete
Track is not available if you have not added optional tracks in the project. Similarly, if
you already have the maximum number of tracks for the selected track type, the insert
track menu commands do not display.
To s wa p Ove rl ay tr acks
1 Right-click on an Overlay track button and select Swap Tracks.
2 Choose the corr
esponding Overlay track that you want to swap.
All media in the selected Overlay tracks swap.
This feature only works if you are working on projects with multiple Overlay Tracks.
62 Corel VideoStudio
Page 73

Renaming tracks
You can rename tracks to give them meaningful names to help you organize your project.
To rename a track
1 In the Timeline, click the name of the track listed in the track header.
2 When the insert text cursor appears, type a new name for the track.
Adjusting track height
You can adjust the height of individual tracks. For example, you can increase the height of
the track that you are working on to make the content more visible. For example, if you have
the Sound Mixer mode enabled, a wider track lets you more easily view the waveform and
adjust sound level nodes.
The height of the blue track at the bottom has been increased.
To adjust track height
1 In the Timeline, position the pointer along the bottom edge of the track that you want to
adjust.
2 When the double arrow displays, drag to increase or decrease the track height.
Note: There is a minimum track height.
The scroll bar along the right edge of the Timeline becomes active if the tracks exceed
the space available in the Timeline panel.
Timeline 63
Page 74

Grouping and ungrouping
You can group and ungroup items that are in the timeline. For example, you can select
multiple clips or photos from one or more tracks and group them so that you can move them
all at the same time or apply an effect to the group. You can ungroup the elements at any
time.
How can you tell if an item is part of a group?
When you click an item that is grouped in the Timeline, all items in the group appear
highlighted (orange outline).
When you click a grouped item in the Timeline, all items in the group appear
highlighted (orange outline).
To group items in the Timeline
1 In the Edit workspace, ensure that the items you want to group have been added to the
Timeline.
2 Hold Shift, and in the Timeline, click all the items that you want to group.
3 Right-click a selected item and choose Group from the context-menu.
To ungroup items in the Timeline
1 In the Timeline, right-click one of the grouped items and choose Ungroup from the
context-menu.
Using Ripple Editing
Use Ripple Editing to maintain the original synchronization of tracks when inserting or
deleting clips.
For example, if you add a 10-second clip at the beginning of the video, all the other clips
moves to the right by 10 seconds. This makes editing more efficient by keeping all tracks
synchronized.
64 Corel VideoStudio
Page 75

Original Timeline
Timeline after a clip is inserted in the Video Track with Ripple Editing disabled. Only the
clips on the Video Track are moved when a new clip is inserted.
Timeline after a clip is inserted in the Video Track with Ripple Editing enabled on some
tracks. Clips on the tracks with Ripple Editing enabled move when a new clip is inserted
to maintain original synchronization.
To insert clips in Ripple Editing mode
1 Click the Enable/Disable Ripple Editing button to activate the panel.
2 Click beside each track where you want to apply Ripple Editing.
3 Drag a clip to insert from the Library to the desired position on the Timeline. As soon as
the new clip is in place, all clips where Ripple Editing is applied will shift accordingly while
maintaining their track positions relative to one another.
Note: Ripple Editing also works when you remove clips.
Timeline 65
Page 76

66 Corel VideoStudio
Page 77

Edit media
Videos clips, photos and audio clips are the foundation of your project and manipulating
them is the most important skill you can master.
This section contains the following topics:
• Using the Options panel in the Edit workspace
• Converting multiple files
• Adding video clips
• Adding photos
• Rotate a video or photo
• Crop a video or photo
• Resizing/scaling a video or photo
• Time remapping
• Modifying video playback speed
• Using Freeze Frame
• Replacing media clips
• Trimming a clip
• Using Split by Scene
• Trimming video into multiple clips
• Saving trimmed clips
• Taking a snapshot from a video clip
• Adjusting the color and tone of clips
• Adjusting white balance
• Pan and zoom for video and photos
• Working with the Mask Creator
• Track transparency
• 360 video
Using the Options panel in the Edit workspace
The Options panel in the Edit workspace allows you to modify the media, transitions, titles,
graphics, animation, and filters that you add to the Timeline. The controls available depend
on the type of media that you select and whether the media is in an overlay track or the main
video track.
Edit media 67
Page 78

Edit tab
• Duration — Displays the duration of the selected clip in hours:minutes:seconds:frames.
You can trim the selected clip by changing the clip duration.
• Clip volume — Allows you to adjust the volume of the audio segment of your video.
• Mute — Silences the audio segment of your video without deleting it.
• Fade-in/out — Gradually increases/decreases the volume of the clip for a smooth
transition. Select Settings > Preferences > Edit to set the fade-in/out duration.
• Rotate — Rotates the video clip.
• Reverse video — Plays the video backward.
• Speed/Time-lapse — Allows you to adjust the playback speed of your clip and apply
Time-lapse and Strobe effects.
• Variable Speed — Allows you to adjust the playback speed of a clip at different intervals.
• Split Audio — Allows you to separate the audio from a video file and place it on the
Voice Track.
• Split by Scene — Splits a captured DV AVI file based on the shooting date and time, or
the changes in video content (i.e., motion change, camera shifting, brightness change,
etc.).
• Multi-Trim Video — Allows you to choose desired segments from a video file and
extract them.
• Resampling Option — Allows you to set the aspect ratio for the video.
Correction tab
• Color Correction — Allows you to adjust the hue, saturation, brightness, contrast, and
gamma of the video clip. You can also adjust the White balance of the video or photo
clip or make auto tone adjustments.
• Lens Correction — Lets you access presets and controls for correcting distortion caused
capturing footage with a wide-angle lens.
68 Corel VideoStudio
Page 79

Effect tab
• Mask & Chroma Key — Allows you to apply overlay options such as mask, chroma key,
and transparency.
• Replace last filter — Allows the last filter applied to a clip to be replaced when you drag
a new filter onto the clip. Clear this option if you want to add multiple filters to your clips.
• Applied filters — Lists the video filters that were applied to a clip. Click or to
arrange the order of the filters; click to remove a filter.
• Presets — Provides various filter presets. Choose a preset from the drop-list.
• Customize Filter — Allows you to define the behavior of the filter throughout the clip.
• Audio Filter — Lets you apply a filter to enhance audio. For example, you can amplify,
add an echo, adjust pitch, or choose from different leveling options.
• Alignment Options — Allows you to adjust object position in preview window. Set the
option through the Alignment Options pop-up menu.
• Show grid lines — Select to display the grid lines. Click to open a dialog box where
you can specify settings for the grid lines.
• Direction/Style — Allows you to set the direction and style of entry/exit of the clip. This
can be set to static, top/bottom, left/right, top-left/top-right, bottom-left/bottom-right.
As for the style, you can set direction of entry/exit of clips through: Rotate before/after
pause duration and Fade in/out motion effect.
• Advanced Motion — Opens the Customize Motion dialog box which allows you to
customize the motion of overlays and titles. For more information, see “Customizing
motion” on page 151.
Note that audio clips in the Voice and Music tracks have different options. For more
information, see “Audio” on page 99.
Converting multiple files
Batch Convert allows you to convert a large number of files to another format in sequence.
You can also create a profile for performing batch conversions. This allows you to save the
batch conversion settings and apply them to future batch conversions.
To run a Batch Convert
1 Click File > Batch Convert.
2 Click Add and then choose the files you want to convert.
3 Select an output folder in Save in folder.
4 In Save as type, choose your desired output type.
If you want to set more advanced saving
5 Click Convert.
Edit media 69
options, click the Options button.
Page 80

The result is shown in the Task Report dialog box. Click OK to finish.
To create a Batch Convert profile
1 Click File > Batch Convert.
2 In the Batch Convert dialog box, choose the settings that y
3 Click the Profile button and choose Add Profile.
4 In the Add Template dialog box, type a name for the profile.
You can apply a Batch Convert profile by clicking the Profile button and choosing the
profile that you want to apply.
You delete a Batch Convert profile by clicking the Profile button, choosing Delete
Profile, and choosing the profile that you want to delete.
ou want to save as a profile.
Adding video clips
There are several ways of inserting video clips to the Timeline:
• Select a clip in the Library and drag it to the Video Track or Overlay Track. Multiple clips
can be selected by pressing [Shift].
• Right-click a clip in the Library and select Insert To: Video Track or Insert To: Overlay
Track.
• Select one or more video files in Windows Explorer and drag them to the Video Track or
Overlay Track.
• To insert a clip from a file folder directly to the Video Track or Overlay Track, right-click
the Timeline, select Insert Video and locate the video to use.
3D media clips are supported in Corel VideoStudio. You can tag 3D media clips so that
they can be easily identif ied and edited with 3D editing features. For more information,
see “Tagging files as 3D” on page 57.
Aside from video files, you can also add video from DVD formatted discs.
Adding photos
Photo clips are added to the Video Track the same way as video clips. Before you start adding
photos to your project, determine the photo size that you want for all your photos. By
default, Corel VideoStudio adjusts the size to keep the photo’s aspect ratio.
70 Corel VideoStudio
Page 81

Corel PaintShop Pro PSPIMAGE files (*.pspimage) are supported in Corel VideoStudio.
PSPIMAGE files that are imported into the Library have a multiple layer indicator, so you can
distinguish them from other types of media clips.
To make all inserted photos the same size as the frame size of your project
1 Click Settings > Preferences > Edit.
2 Change the Image resampling option default to Fit to project size.
To import PSPIMAGE files into the Timeline
1 Right-click a clip in the Library.
2 Click Insert To and select the track where you want to add your media clip.
3 Choose one of the following options:
• Layers - lets you include the layers of a file into separate tracks
• Flatten - lets you insert a flattened image into a single track
You can also drag the file directly into the Timeline and the program will automatically
add the layers to separate tracks. To insert a flattened image, hold down [Shift] and
drag the file.
Rotate a video or photo
You can rotate video clips and photos to change the orientation of a video. For example, you
can rotate a video that you have captured on your phone in portrait orientation to convert
it to landscape orientation or you can flip an upside-down video.
How to rotate a video clip or photo
1 In the Timeline, click a video clip or photo.
2 In the Options panel, click the Edit tab, and click Rotate Left or Rotate Right until
the orientation you want dis
plays in the Preview panel.
Edit media 71
Page 82

Crop a video or photo
You can crop a vide o or photo so t h at only the area you select appears during playback. Note
that cropping is not destructive—it does not affect the original video or photo. You can
change the crop area in your project file at any time.
How to crop a video
1 In the Timeline, click a video or photo.
2 In the Player panel, click the Resize/Crop drop-down and choose the Crop tool .
3 In the preview window, do any of the following:
• Size: Drag the sizing handles on the crop rectangle to set the crop area. Drag a corner
handle to maintain the aspect ratio.
• Position: With your pointer inside the crop rectangle, drag the crop area to a new
position.
Resizing/scaling a video or photo
You can resize/scale a video or photo interactively so that you can see a background or to
create a picture-in-picture effect. You can also distort a video or photo. For example, you can
creative a sense of perspective by skewing
In Scale mode, you can resize the video by dragging an orange node. Drag the green
nodes to distort the image. For example, you can use distortion to create a sense of
perspective.
72 Corel VideoStudio
Page 83

To resize/scale a video or photo
1 In the Timeline, click a video or photo.
2 In the Player panel, click the Resize/Crop drop-down and choose the Scale mode
tool .
3 In the preview window, do any of the following:
• Size/Scale: Drag the orange sizing nodes on the corners of the sizing rectangle t
adjust the size. To compress or stretch the video or photo, drag an orange side node.
• Distort: Drag an orange side node to compress or stretch the video or photo
green node to skew the video or photo.
o
or drag a
Time remapping
Play with speed with easy-to-use controls that let you add slow motion or high speed effects,
freeze the action, or reverse and replay scenes in your video. All the tools you need for speed
effects have been consolidated in one place.
The Time Remapping dialog box includes familiar playback and trim controls, as well as a
thumbnail area that displays each change made with the speed controls.
The Time Remapping dialog box
Edit media 73
Page 84

To change the playback speed, freeze, or reverse video footage
1 In the Timeline view (Edit workspace), right-click the clip you want to work with, and
choose Time Remapping from the context menu.
2 In the Time Remapping window, scrub through the video to figure out where you want
to change the speed of playback, reverse the action, or add one or more freeze frames.
3 Click the Play button or drag the scrubber to the position you want, and click the
Mark In button
want to work with. A white line indicat
Note: The
playback controls let you navigate the original version of the clip (even if it is
and Mark Out button to choose a segment of the clip that you
es a marked segment of the clip.
trimmed in the Timeline).
4 Do any o
f the following:
• Click the Speed button , and drag the slider to set the speed for the selected
segment. Dragging to the right increases the speed; dragging to the left slows the
speed.
If you want to gradually apply the speed change, you can mark the Ease in and Ease
out check boxes.
Note: The audio is removed when you change the speed of a clip.
• Click the Reverse button , and type a repetition value in the time(s).
5 To freeze a frame, click any point along the timeline that doesn’t have a white line
(cannot freeze a frame in a section that has been reversed or has had the speed
changed), click the Freeze Frame button , and type the number of seconds for the
frame duration.
6 To verify the changes you’ve applied, review the thumbnails that appear below the
playback controls. An icon in the upper left corner of the thumbnails indicates which type
of speed control has been applied (note that speed change uses different icons—a turtle
to indicate slow motion; a rabbit to indicate faster speed).
Click the Play the time remapping result button to play the result.
If you want to remove a segment or freeze a frame, click the corresponding thumbnail,
and click the Remove selected clips button
7 Click OK to return to the Edit workspace.
74 Corel VideoStudio
Page 85

Modifying video playback speed
You can modify the playback speed of your videos. Set your video in slow motion to
emphasize a movement, or set it to play at lightning speed and give your movie a comical
air. You can also use this feature to achieve time-lapse and strobe effects on your videos and
photos.
You can also make quick and basic speed adjustments in the Time Remapping dialog box.
For more information, see
To adjust the speed and time-lapse attributes of your video clip
1 In the Timeline, select a video clip.
2 In the Options panel, click Speed/Time-lapse on the Edit tab.
3 In New clip duration, specify a set duration for your video clip.
Note: If you want to maintain the original duration of your clip, do not change the
original value.
4 In Frame Frequency, specify the number of frames to be removed at regular intervals
during video playback.
Note: A higher value entered in Frame Frequency will produce a more noticeable time-
lapse effect on your video. Otherwise, maintain the value at 0 to retain all frames in your
video clip.
5 Drag the Speed slider according to your preferences (i.e., slow, normal or fast), or enter a
value.
Note: The higher the value you set, the faster the playback of your clip. (Values range
from 10-1000%).
6 Click Preview to view the results of your settings.
7 Click OK.
To apply Time-lapse/Strobe effects on your photos
1 Click File > Insert Media File to Timeline > Insert Photo for Time-lapse/Strobe.
Edit media 75
Page 86

2 Browse for the photos you want to include in your project and click Open.
Note: It is recommended to choose a series of photos taken in succession with your
DSLR.
3 Specify the number of frames to be retained and removed in Keep and Drop.
Note: For example, you enter a value of 1 in Keep and 3 in Drop. This means that it will
follow the interval to retain one frame and remove three frames for the set of photos
selected.
4 In Frame duration, specify the exposure time for each frame.
5 Use the playback controls to preview the effect of the frame settings on your photos.
6 Click OK.
If the value of Frame Frequency is more than 1 and clip duration is the same, Strobe
effect will be produced. If the value of Frame Frequency is more than 1 and clip
duration is shortened, Time-lapse effect will be produced.
Hold [Shift] then drag the end of the clip on the Timeline to change the playback
speed.
The black arrow means you are trimming or extending the clip,
while the white arrow
means that you are changing the playback speed.
76 Corel VideoStudio
Page 87

To adjust the variable speed attributes of your video clip
1 In the Timeline, select a video clip.
2 In the Options panel, click Variable Speed on the Edit tab.
3 Drag the Scrubber to the points where you want to add key frames.
4 Click Add key frame to set the frame as a key frame in the clip. You can change the
playback speed at each key frame.
5 To increase or decrease the speed, click the buttons or enter a value in Speed.
You can also drag the slider from Slow to Normal or Fast.
6 Click the Play button to preview the effect.
7 Click OK when finished.
You can add variety to your project by modifying the playback speed of a clip at
different intervals.
Setting the variable speed removes the audio of the video clip.
To reverse video playback
• Click Reverse video in the Options Panel.
Using Freeze Frame
You ca n use Freeze Frame to showc ase a specif ic frame in your video by extending the length
of time that frame displays. For example, you can use Freeze Frame to showcase the video
frame where a goal is scored in a sporting event or use it to showcase a smile or reaction
that you’ve captured.
Edit media 77
Page 88

When you apply Freeze Frame to a video clip, the clip is automatically split at the freeze point
and the frame you choose is inserted as an image file (BMP) and displayed onscreen for the
duration that you set.
To apply Freeze Frame
1 In the Timeline, select the video clip that has a frame you want to freeze.
2 Scrub to the frame you want to use. The selected frame displays in the Preview window.
Note: The Previous and Next buttons in the Navigation panel let you navigate a clip
frame-by-frame to find the frame you want.
3 Click Edit menu > Freeze Frame.
4 In the Freeze Frame dialog box, set the Duration.
Note: If you want to suspend audio on other tracks during the freeze, enable the Split
Audio check box. This splits and suspends all audio-related tracks (voice, music, video
overlays) for the duration of the freeze.
5 Click OK.
Replacing media clips
Media clips in the Timeline can be replaced in their current position. When you replace a
clip, the attributes of the original clip are applied to the new clip.
78 Corel VideoStudio
Page 89

To replace a clip
1 In the Timeline, right-click the media clips you want to replace.
2 Choose Replace clip from the right-click menu.
The Replace/relink clip dialog box appears.
3 Browse for the replacement media clips and click Open.
The clip in the Timeline is automatically replaced.
The duration of the replacement clip must be equal to or longer than the duration of
the original clip.
Hold [Shift] and click multiple clips to select two or more clips in the Timeline and
repeat the process for replacing multiple clips. The number of replacement clips must
match the number of clips that you selected in the Timeline.
You can also drag a video clip from the Library to the Timeline and hold the [Ctrl] key
to automatically snap on a clip to be replaced.
Trimming a clip
The best part of editing your movie on your computer is the ease with which you can split
and trim your clips with frame accuracy.
To split a clip into two
1 In Storyboard View or Timeline View, select the clip you want to split.
2 Drag the Scrubber to the point where you want to split the clip.
Note: Click
3 Click to split the clip into two clips. To remove one of these clips, select the unwanted
clip and press [Delete].
or to set the cutting point more precisely.
To trim a clip with the Trim markers using Single Clip Trimmer
1 In the Library, right-click on a video clip and choose Single Clip Trim to launch the
Single Clip Trim dialog box.
2 Click and drag the Trim markers to set the Mark-in/Mark-out points on the clip.
3 For more precise trimming, click on a Trim mar ker, hold it, and use the left or right arrow
keys on your keyboard to trim one frame at a time. The Mark-in/Mark-out points can
also be set by pressing [F3] and [F4], respectively.
Edit media 79
Page 90

4 To preview the trimmed clip only, press [Shift + Space] or hold [Shift] and click the Play
Trim markers
Mark-in/
Mark-out
button.
Note: You can also use zoom controls to display each frame of your video on the
Timeline and trim one frame at a time. The Scroll Bar makes navigating through your
project quicker and easier. A wheel mouse can also be used to scroll, and to zoom by
pressing [Ctrl].
To trim a clip directly on the Timeline
1 In the Timeline, select a clip.
2 Drag the Trim markers on either side of the clip to change its length. The Preview
Window reflects the position of the Trim marker in the clip.
Note: Instant timecode tip is a feature of Corel VideoStudio that allows you to add clips
with a specific timecode. It appears while trimming and inserting overlapping clips on
the Timeline, enabling you to make adjustments based on the timecode shown. For
example, the instant timecode tip appears with the format 00:00:17.05 (03:00 - 00).
00:00:17.05 indicates the current timecode where the selected clip is located. The (03:00 -
00) start-end range represents the duration of one overlapping clip with the previous clip
and another overlapping with the next clip.
To trim a clip using the Duration box
1 In the Timeline, select a clip.
2 In the Options panel, click the timecode in the Duration box on the Edit tab.
3 Enter the desired clip length.
80 Corel VideoStudio
Page 91

Note: Changes made in the video Duration box only affect the Mark-out point. The
Mark-in point remains unchanged.
Using Split by Scene
Use the Split by Scene feature in the Edit workspace to detect different scenes in a video file
and automatically break it down into several clip files.
The way Corel VideoStudio detects scenes depends on the type of video file. In a captured
DV AVI file, scenes can be detected in two ways:
• DV Recording Time Scan detects scenes according to their shooting date and time.
• Frame Content detects content changes, such as motion change, camera shifting,
brightness change, etc., and splits them into separate files.
In an MPEG-1 or MPEG-2 file, scenes can only be detected based on content changes (i.e.,
by Frame Content).
To use Split by Scene on a DV AVI or MPEG file
1 In the Edit workspace, select a captured DV AVI file or an MPEG file on the Timeline.
2 Click Options and click the Split by Scene button in the Options panel. This will
open the Scenes dialog box.
3 Choose your preferred scan method (DV Recording Time Scan or Frame Content).
4 Click Options. In the Scene Scanning Sensitivity dialog box, drag the slider to set the
Sensitivity level. A higher value means more precision in the scene detection.
5 Click OK.
6 Click Scan. Corel VideoStudio then scans through the video file and lists all the detected
scenes.
You may merge some of the detected scenes into a single clip. Simply select all the
scenes that you want t
indicates how many scenes are merged into that particular clip. Click Split to undo any
Join actions that you have done.
7 Click OK to split the video.
o join together then click Join. The plus sign (+) and a number
Trimming video into multiple clips
The Multi-trim Video feature is another method for breaking down a clip into multiple
segments. While Split by Scene is automatically done by the program, Multi-trim Video gives
you complete control over the clips you wish to extract, making it even easier to include only
the scenes you want.
Edit media 81
Page 92

Part Description
12 3 4
1 — Timeline zoom Drag up and down to sub-divide a video clip into frames per second.
2 — AccuCut Timeline Scan a video clip frame by frame for accurate mark-in and mark-out
positions.
3 — Playback Speed Control Preview the clip at different playback speeds.
4 — Jog Wheel Use to scroll to different parts of the clip.
To trim a video file into multiple clips
1 In the Timeline of the Edit workspace, select the clip that you want to trim.
2 Double click the clip to open the Options panel.
3 Click Multi-Trim Video.
4 View the whole clip first by clicking Play to determine how you want to mark segments
in the Multi-Trim Video dialog box.
5 Choose the number o
f frames to display by dragging the Timeline zoom. You can
choose to display the smallest subdivision of one frame per second.
6 Drag the Scrubber until you get to the part of the video that you want to use as the
beginning frame of the first segment. Click Set Mark-in button .
7 Drag the Scrubber again, this time, to the point where you want the segment to end.
Click Set Mark-out button
.
8 Do steps 4 and 5 repeatedly until you have marked all the segments you want keep or
remove.
82 Corel VideoStudio
Page 93

Note: To mark segments in and out, you can press [F3] and [F4] while playing the video.
You can also click the Invert Selection button or press [Alt+I] to toggle between
marking segments that you want to retain or marking segments that you want taken out
from the clip.
Quick search interval allows you to set a fixed interval between frames and browse
through the movie using the set value.
9 Click OK when finished. The video segments that you kept are then inserted onto the
Timeline.
Navigation controls in the Multi-trim Video dialog box
Reverses or advances through the video in fixed increments. By default, these
buttons move up or down through the video in increments of 15 seconds.
Plays a preview of the final trimmed video.
Plays the video file. Hold [Shift] then click to play only the selected segments.
Moves to the start or end frame of a trimmed segment.
Moves to the previous/next frame in the video.
Repeats playback of video
Saving trimmed clips
Frequently, when you make changes (i.e., after auto-splitting clips using Split by Scene,
extracting clips using Multi-trim Video, or manually trimming clips), you may wish to make a
permanent change to the clip and save the edited file. Corel VideoStudio gives you a margin
of safety since it saves the trimmed video to a new file and does not alter the original file.
To save a trimmed clip
1 In the Storyboard View, Timeline View, or the Library, select a trimmed clip.
2 Click File > Save Trimmed Video.
Taking a snapshot from a video clip
You can take a photo snapshot in the Edit workspace by selecting a specific frame on the
Timeline and saving it as an image file.
Edit media 83
Page 94

To capture photos in the Edit workspace
1 Click Settings > Preferences > Capture.
Choose Bitmap or JPEG as the Snapshot format.
Note: If you select JPEG, set the Snapshot quality.
2 Click OK.
3 In the Timeline, select a video clip in your project.
4 Drag the Scrubber to the frame you want to capture.
5 Click Edit > Take a Sna ps ho t . The photo snapshot is automatically added to the Library
and saved to your working folder.
Adjusting the color and tone of clips
Corel VideoStudio lets you improve the appearance of a video or image clip by adjusting its
current properties.
To adjust color and brightness
1 In the Timeline of the Edit workspace, select a video or image clip.
2 In the Options panel, click the Correction tab, and drag the sliders to adjust the Hue,
Saturation, Brightness, Contrast or Gamma of the clip.
3 Watch the Preview to see how the new settings affect the image.
Note: Double-click the appropriate slider to reset the original color setting of the clip.
To adjust the tone quality of your video or image clips
1 In the Timeline of the Edit workspace, select a video or image clip.
2 In the Options panel, click the Correction tab, and click Auto Tone Adjustment.
Note: You can indicate if you want the clip as Brightest, Brighter, Normal, Darker or
Darkest by clicking the Auto Tone Adjustment drop-list.
Adjusting white balance
White balance restores the natural color temperature of an image by removing unwanted
color casts due to conflicting light sources and incorrect camera settings.
For example, an object illuminated with incandescent lights may turn out too reddish or
yellowish in an image or video clip. To successfully achieve a natural look, you need to
identify a reference point in your image which represents the color white. Corel
gives you different options in selecting the white point:
VideoStudio
• Auto — Automatically chooses a white point that is well-matched with the overall color
of your image.
84 Corel VideoStudio
Page 95

• Pick Color — Allows you to manually select the white point in the image. Use the
Eyedropper Tool to pick a reference area that should be white or neutral gray.
• White balance presets — Automatically selects the white point by matching specific
light conditions or scenarios.
• Temper at ure — Allows you to specify color temperature of light sources in Kelvin (K).
Lower values indicate Tungsten, Fluorescent and Daylight scenarios while Cloudy, Shade
and Overcast fall under high color temperature.
To adjust White balance
1 In the Timeline or Library of the Edit workspace, select a video or image clip.
2 In the Options panel, click the Correction tab.
3 Check the White Balance option box.
4 Determine how you want to identify the white point. Choose among the different
options (Auto, Pick Color, White Balance presets (lighting icons) or Temperatu re).
5 If you have selected Pick color, choose Show preview to display a preview area in the
Options Panel.
6 When you drag your cursor to the Preview area, it will change to an eyedropper icon.
7 Click to identify a reference point in your image which represents the color white.
8 Watch the Preview Window to see how the new settings affect the image.
Edit media 85
Page 96

Lens Correction
Wide-angle lenses, often used in video action cameras, are great for capturing a wide scene,
but they cause distortion in the video footage. Lens Correction has presets (for some GoPro
cameras, for example) and manual controls that let you reduce distortion.
Distortion (left) can be reduced (right) by using Lens Correction.
To correct wide-angle lens distortion
1 In the Timeline, double-click a clip with lens distortion, and in the Options panel, click
Correction, and open the Lens Correction section.
2 In the Select preset drop-down menu at the top, choose a preset.
The preview of the correction applies to the entire clip.
Advanced users can manually adjust the settings to correct distortion.
Note: To reset the clip to the original settings, choose Default from the Select preset
drop-down menu.
86 Corel VideoStudio
Page 97

Pan and zoom for video and photos
You can apply a pan and zoom effect to your photos and video clips. For example, you can
choose to start playing a video clip with a the full frame in view, and gradually zoom in to
show a specific subject in the video, then pan to show other subjects in the video. Conversely,
you can start with a close-up of a subject in your video, and gradually zoom out to show the
full scene. You can also create a static zoom that does not change as the video plays. For
example, a static zoom can be applied to draw attention to the main action in a video that
was originally set to capture a wide area, for example, a scene captured with a tripod.
Pan and Zoom is a great tool to use with 4K video because you can pan and zoom across
your 4K video source and still get an HD result.
Whether it’s a quick pan and zoom effect, or a customized result that requires key frame
precision, the Pan and Zoom window provides you with the tools you need.
There are three editing modes for Pan and Zoom:
• Static: Maintains the zoom level that you set throughout the video.
• Animated: Lets you use crosshairs to adjust pan and zoom key frames precisely.
• On the Fly: Lets you adjust pan and zoom settings interactively while the video plays.
Pan and Zoom: Settings and controls
The following settings and controls are available in the Pan and Zoom window. The
availability of controls depends on what is currently selected and the
For information about common key frame, playback, and preview controls, see
filters” on page 133.
• Edit Mode: Choose between the Static, Animated or On the Fly editing modes.
• Preset Size: Choose a preset for HD, 2K, 4K, and more.
• Stay within source boundary: Ensures that the boundary of the project is used as the
boundary for the pan and zoom effect (the effect will not extend beyond project edge).
• Position: A one-click way to position the marquee in one of nine common alignment
options.
Edit Mode you choose.
“Customizing
Edit media 87
Page 98

• Ease in: Starts slower and gradually brings the pan and zoom effect up to full video
speed.
• Grid lines: Displays a grid that helps you align the marquee.
• Grid size: Specifies grid line spacing according to the number of divisions you set.
• Snap to grid: Aligns marquee to closest grid line automatically.
• Background color: Specifies the color of the background if marquee extends beyond
the boundary of the media.
• Ver tical: Specifies the y-axis position (top to bottom).
• Horizontal: Specifies the x-axis position (left to right).
• Rotation: Specifies the angle of the marquee in degrees.
• Zoom ratio: Specifies the zoom level by adjusting the size of the marquee.
• Transparency: Specifies the opacity of the photo or video at the selected key frame.
To set a constant zoom level for a photo or video
1 In the Timeline, select a photo or video clip and click the Pan and Zoom button on
the Timeline toolbar.
The Pan and Zoom window opens.
2 In the Edit Mode drop-down, choose Static.
3 In the Preset Size drop-down, choose a preset (such as HD if you’re zooming in on a 4K
video), or in the Original pane of the preview window, use the marquee to set the zoom
area and position.
To apply a pan and zoom effect to a video while it plays
1 In the Timeline, select a video clip and click the Pan and Zoom button on the
Timeline toolbar.
The Pan and Zoom window opens.
2 In the Edit Mode drop-down, choose On the Fly.
3 In the Original pane (on the upper left side of the window), adjust the starting size and
position o
4 Click the Play button.
5 As the video plays, reposition and resize the marquee as you want. Key frames are added
automatically for each change you make.
6 Fine tune the results by using the key frames and adjusting the settings.
7 Click OK to return to the Edit workspace.
f the marquee. The result displays in the Preview pane on the right.
88 Corel VideoStudio
Page 99

To apply a pan and zoom effect to a photo or with key frames
1 In the Timeline, select a video clip and click the Pan and Zoom button on the
Timeline toolbar.
The Pan and Zoom window opens.
2 In the Edit Mode drop-down, choose Animated.
3 Ensure that the Start key frame (first key frame) is selected in the effect timeline (appears
as a red diamond).
If the Start key frame is not selected, click it.
4 In the Original pane, click to set the position of the marquee.
A red crosshair displays to represent the currently selected key
set the Zoom ratio and any other settings you want.
5 In the eff
6 Click the Play button to preview the effect.
7 Double-click the timeline to add any additional key frames, and repeat step 4.
8 Click OK to apply effect and return to the main workspace.
ect timeline, click the End key frame (last key frame), and repeat step 4.
frame. Use the controls to
Working with the Mask Creator
You can create and edit masks in VideoStudio Ultimate that let you apply an effect to selected
areas. The Mask Creator helps you apply a mask by using a brush or shape tools. You can
also invert a mask to swap the selected and unselected areas.
In the Mask Creator, a highlight and a blue bounding box indicate the mask area.
Edit media 89
Page 100

You can choose from two mask types: Video and Still. A Video mask is designed to move
and change according to the movement in the video as it plays. A Still mask remains static
(does not change) as the video plays and it can be applied to an image.
Video masks use Detect movement options to help match the mask to the movement of
the selected object or background. Note that the Edge tolerance settings affect the edge
detection of the mask as it plays. You can choose to detect the movement from frame-toframe, from the current position to end of video, and from the current position to a specified
timecode.
Editing options, such as copy, paste, and move, let you customize and fine-tune a video
mask.
You can save your mask so that you can use it with other projects. When you exit the Mask
Creator, the mask appears as a mask clip on a track below the corresponding source clip.
Masks appear in a track below their corresponding clip and can be identified by a mask
icon and an elliptical vignette thumbnail.
Saved masks can be imported to the list of overlay options. For more information about
using mask frames and video masks with overlays, see “Adding a mask frame” on page 141
and “Using video masks with overlay clips” on page 141.
Mask Creator tools and options
You can use the following Masking tools:
• Mask Brush
slider.
• Smart Mask Brush — Lets you draw a freehand mask that uses edge-detection to
make it easier to select distinct objects. Can be adjusted with th
tolerance sliders.
• Rectangle tool — Lets you apply a rectangular mask. For video masks, edgedetection adjusts the edges for subsequent frames.
• Ellipse tool — Lets you apply an elliptical mask. For video masks, edge-detection
adjusts the edges for subsequent frames.
• Eraser — Lets you erase the mask. Can be adjusted with the Brush size slider.
• Smart Eraser
select distinct objects. Can be adjusted with the Brush size and Edge tolerance sliders.In
addition to the Brush size slider, you can use the Edge tolerance slider.
— Lets you draw a freehand mask. Can be adjusted with the Brush size
e Brush size and Edge
— Lets you erase the mask using edge-detection to make it easier to
• Clear Mask — Removes the mask completely.
90 Corel VideoStudio
 Loading...