

Page 1

USER GUIDE
Page 2

Page 3

Table of contents
Welcome to Corel Snapfire Plus . . . . . . . . . . . . . . . . . . . . . . . 1
Starting and exiting Corel Snapfire Plus . . . . . . . . . . . . . . . . . . . . 2
Registering Corel products . . . . . . . . . . . . . . . . . . . . . . . . . . . . . . 2
Updating Corel products. . . . . . . . . . . . . . . . . . . . . . . . . . . . . . . . 3
Uninstalling Corel Snapfire Plus. . . . . . . . . . . . . . . . . . . . . . . . . . . 3
Corel Support Services . . . . . . . . . . . . . . . . . . . . . . . . . . . . . . . . . 3
About Corel Corporation. . . . . . . . . . . . . . . . . . . . . . . . . . . . . . . . 4
Learning how to use the program . . . . . . . . . . . . . . . . . . . . . . 5
Documentation conventions . . . . . . . . . . . . . . . . . . . . . . . . . . . . . 5
Using the Help system. . . . . . . . . . . . . . . . . . . . . . . . . . . . . . . . . . 6
Downloading photos. . . . . . . . . . . . . . . . . . . . . . . . . . . . . . . . . 9
Using the Corel Photo Downloader. . . . . . . . . . . . . . . . . . . . . . . . 9
Choosing options for the Corel Photo Downloader . . . . . . . . . . 10
Working with folders . . . . . . . . . . . . . . . . . . . . . . . . . . . . . . . . 13
Browsing and renaming folders. . . . . . . . . . . . . . . . . . . . . . . . . . 13
Adding and removing folders . . . . . . . . . . . . . . . . . . . . . . . . . . . 14
Working with photos . . . . . . . . . . . . . . . . . . . . . . . . . . . . . . . . 15
Opening and closing photos . . . . . . . . . . . . . . . . . . . . . . . . . . . . 15
Panning and zooming . . . . . . . . . . . . . . . . . . . . . . . . . . . . . . . . . 16
Sorting photos. . . . . . . . . . . . . . . . . . . . . . . . . . . . . . . . . . . . . . . 17
Selecting photos . . . . . . . . . . . . . . . . . . . . . . . . . . . . . . . . . . . . . 18
Moving photos between folders . . . . . . . . . . . . . . . . . . . . . . . . . 18
Saving photos . . . . . . . . . . . . . . . . . . . . . . . . . . . . . . . . . . . . . . . 20
Renaming photos. . . . . . . . . . . . . . . . . . . . . . . . . . . . . . . . . . . . . 21
Deleting photos. . . . . . . . . . . . . . . . . . . . . . . . . . . . . . . . . . . . . . 21
Table of contents i
Page 4

Using photo trays . . . . . . . . . . . . . . . . . . . . . . . . . . . . . . . . . . 23
Adding and removing photo trays. . . . . . . . . . . . . . . . . . . . . . . . 23
Adding photos to photo trays . . . . . . . . . . . . . . . . . . . . . . . . . . . 24
Removing photos from photo trays. . . . . . . . . . . . . . . . . . . . . . . 24
Renaming photo trays . . . . . . . . . . . . . . . . . . . . . . . . . . . . . . . . . 24
Sharing your photos . . . . . . . . . . . . . . . . . . . . . . . . . . . . . . . . 27
Sending e-mail. . . . . . . . . . . . . . . . . . . . . . . . . . . . . . . . . . . . . . . 27
Printing your photos . . . . . . . . . . . . . . . . . . . . . . . . . . . . . . . . . . 29
Changing printer settings . . . . . . . . . . . . . . . . . . . . . . . . . . . . . . 29
Ordering prints . . . . . . . . . . . . . . . . . . . . . . . . . . . . . . . . . . . . . . 30
Finding your photos . . . . . . . . . . . . . . . . . . . . . . . . . . . . . . . . 33
Searching for photos. . . . . . . . . . . . . . . . . . . . . . . . . . . . . . . . . . 33
Saving your search criteria . . . . . . . . . . . . . . . . . . . . . . . . . . . . . 34
Finding photos by using the Calendar. . . . . . . . . . . . . . . . . . . . . 35
Finding tagged photos. . . . . . . . . . . . . . . . . . . . . . . . . . . . . . . . . 35
Reviewing your photos . . . . . . . . . . . . . . . . . . . . . . . . . . . . . 37
Using Quick Review. . . . . . . . . . . . . . . . . . . . . . . . . . . . . . . . . . . 37
Choosing Quick Review settings . . . . . . . . . . . . . . . . . . . . . . . . . 38
Saving and sharing reviews as Snapfire Shows . . . . . . . . . . . . . . 39
Changing photo information. . . . . . . . . . . . . . . . . . . . . . . . . 41
Changing the recorded date that a photo was taken . . . . . . . . . 41
Applying photo ratings . . . . . . . . . . . . . . . . . . . . . . . . . . . . . . . . 42
Tagging photos . . . . . . . . . . . . . . . . . . . . . . . . . . . . . . . . . . . . . . 42
Adding captions to photos . . . . . . . . . . . . . . . . . . . . . . . . . . . . . 43
Changing advanced photo information. . . . . . . . . . . . . . . . . . . . 43
Protecting your photos. . . . . . . . . . . . . . . . . . . . . . . . . . . . . . 45
Using the PhotoSafe Backup system . . . . . . . . . . . . . . . . . . . . . . 45
Using Quick Disc . . . . . . . . . . . . . . . . . . . . . . . . . . . . . . . . . . . . . 46
ii Table of contents
Page 5

Enhancing your photos. . . . . . . . . . . . . . . . . . . . . . . . . . . . . . 49
Starting Corel Paint Shop Pro Photo to fix photos . . . . . . . . . . . 49
Using Photo Doctor. . . . . . . . . . . . . . . . . . . . . . . . . . . . . . . . . . . 50
Applying basic photo corrections . . . . . . . . . . . . . . . . . . . . . . . . 51
Removing red-eye . . . . . . . . . . . . . . . . . . . . . . . . . . . . . . . . . . . . 53
Applying cosmetic corrections . . . . . . . . . . . . . . . . . . . . . . . . . . 54
Cropping photos . . . . . . . . . . . . . . . . . . . . . . . . . . . . . . . . . . . . . 56
Rotating photos. . . . . . . . . . . . . . . . . . . . . . . . . . . . . . . . . . . . . . 57
Straightening photos. . . . . . . . . . . . . . . . . . . . . . . . . . . . . . . . . . 58
Applying effects. . . . . . . . . . . . . . . . . . . . . . . . . . . . . . . . . . . . . . 59
Adding text to photos . . . . . . . . . . . . . . . . . . . . . . . . . . . . . . . . . 61
Resizing photos. . . . . . . . . . . . . . . . . . . . . . . . . . . . . . . . . . . . . . 62
Working with Snapfire Shows . . . . . . . . . . . . . . . . . . . . . . . . . 65
Adding photos and videos to Snapfire Shows. . . . . . . . . . . . . . . 65
Playing Snapfire Shows . . . . . . . . . . . . . . . . . . . . . . . . . . . . . . . . 66
Choosing settings for Snapfire Shows. . . . . . . . . . . . . . . . . . . . . 67
Choosing slide settings . . . . . . . . . . . . . . . . . . . . . . . . . . . . . . . . 68
Saving Snapfire Shows. . . . . . . . . . . . . . . . . . . . . . . . . . . . . . . . . 68
Working with videos . . . . . . . . . . . . . . . . . . . . . . . . . . . . . . . . 71
Playing videos . . . . . . . . . . . . . . . . . . . . . . . . . . . . . . . . . . . . . . . 71
Choosing frames to use as video thumbnails . . . . . . . . . . . . . . . 72
Extracting frames from videos. . . . . . . . . . . . . . . . . . . . . . . . . . . 73
Trimming videos . . . . . . . . . . . . . . . . . . . . . . . . . . . . . . . . . . . . . 74
Creating projects . . . . . . . . . . . . . . . . . . . . . . . . . . . . . . . . . . 75
Creating collages. . . . . . . . . . . . . . . . . . . . . . . . . . . . . . . . . . . . . 75
Creating greeting cards. . . . . . . . . . . . . . . . . . . . . . . . . . . . . . . . 77
Creating calendars. . . . . . . . . . . . . . . . . . . . . . . . . . . . . . . . . . . . 78
Creating album pages . . . . . . . . . . . . . . . . . . . . . . . . . . . . . . . . . 80
Creating certificates. . . . . . . . . . . . . . . . . . . . . . . . . . . . . . . . . . . 82
Creating magazine covers . . . . . . . . . . . . . . . . . . . . . . . . . . . . . . 84
Table of contents iii
Page 6

Choosing program preferences . . . . . . . . . . . . . . . . . . . . . . 87
Resetting program warning messages. . . . . . . . . . . . . . . . . . . . . 87
Choosing file format associations . . . . . . . . . . . . . . . . . . . . . . . . 87
Choosing thumbnail preferences. . . . . . . . . . . . . . . . . . . . . . . . . 89
Choosing multimedia preferences. . . . . . . . . . . . . . . . . . . . . . . . 90
iv Table of contents
Page 7

Welcome to Corel Snapfire Plus
Corel® Snapfire™ Pl us is the smart alternative to traditional digital
camera software. With automatic downloads, quick photo fixes,
straightforward organization and sharing options, and an array of
creative project templates, Corel Snapfi re Plus mak es it fun an d easy to
do more with your photos. With drag-and-drop simplicity, you can
quickly create impressive photo projects and slide shows that are sure
to entertain your friends and family.
Corel Snapfire Plus offers more advanced, yet easy-to-use, features for
editing your photos and videos, as well as all the basic organization and
sharing options of Corel Snapfire. In addition, Cor el Sn apfire Plus
provides more options for crea ting unique Snapfire Shows and includes
additional project templates and the PhotoSafe™ Backup system.
Corel Snapfire Plus provides the convenient Message Center, which
guides users to the outstanding features available to them. The
Message Center also automatically delivers quick tips, photo ideas, and
tutorials, as well as product news and special offers.
What is Corel Snapfire Plus SE?
Corel Snapfire Plus SE is a preview product that allows you to use all of
its features for a limited time. After the preview period, some features
will no longer be available. When you’re ready to upgrade, you can
simply click the Buy Now button on the toolbar.
In this section, you’ll learn about
• starting and exiting Corel Snapfire Plus
• registering Corel products
• updating Corel products
• uninstalling Corel Snapfire Plus
Welcome to Corel Snapfire Plus 1
Page 8

• Corel® Support Services™
• Corel Corporation
Starting and exiting Corel Snapfire Plus
You can start Corel Snapfire Plus from the Windows® taskbar and exit
the program from the File menu.
To start Corel Snapfire Plus
• On the Windows taskbar , cl ick Start
Plus
! Corel Snapfire Plus.
If your operating system is Windows 2000, click Start
Corel Snapfire Plus
To exit Corel Snapfire Plus
• Choose File
! Corel Snapfire Plus.
! Exit.
! All Programs ! Corel Snapfire
! Progr a m s !
Registering Corel products
Registering Corel products is important to ensure that you receive
timely access to the latest product updates as well as valuable
information about product releases.
Registration also gives you access to free downloads, articles, tips and
tricks, and special offers. You can register the pr ogram when you install
it, or you can register at a later date.
You can register the program in one of the following ways:
• online — If you are connected to the Internet when you install the
Corel graphics application, you can launch the online registration. If
no Internet connection is detected, you are presented with a list of
options.
• by phone — You can call the Corel Customer Service Center nearest
you.
For more information about registering a Corel product, visit
www.corel.com/support/register.
2 Corel Snapfire Plus User Guide
Page 9

Updating Corel products
You can check online for updates to Corel and other software products.
When product updates become available, you can choose to have them
downloaded and installed automatically . You can also set how often the
Update Manager searches for product updates.
To update Corel products
1 Choose Help
2 Follow the instructions on your screen.
! Check for Updates.
Uninstalling Corel Snapfire Plus
You can use the Windows Control Panel to uninstall Cor el Snapfire Plus.
To uninstall Corel Snapfire Plus
1 On the Windows taskbar, click Start
If your operating system is Windows 2000, click Start
Control Panel.
2 Double-click the Add/Remove Programs icon.
3 In the Add or Remove Programs dialog box, choose Corel Snapfire
Plus from the list, and click Remove.
4 Follow the InstallShield® wizard instructions.
! Control Panel.
! Settings !
Corel Support Services
Corel’s warranty support is designed to help customers with technical
issues related to installation and product defects, including crashes and
errors caused by Corel software. Corel Support Services can provide
you with prompt and accurate information about product features,
specifications, pricing, availability, services, and technical support. For
the most current information on available support and professional
services for your Corel product, please visit www.corel.com/support.
Welcome to Corel Snapfire Plus 3
Page 10

Personal Telephone Support
Many customers choose to speak directly to a Corel support technician
over the telephone. Live person-to-person support on a toll-free line is
available as a paid service and is designed for individual, small business,
academic, trial version, and OEM users.
A support incident is the resolution of one technical question, problem,
or issue, regardless of the number of telephone calls required to resolve
it. Support includes assistance with understanding how features work
and how they are applied to a sample document; troubleshooting
technical issues and documents; installation, configuration, and setup
on standalone computers; and migration from one software version to
another. Please note that support does not include how to implement
features within your files.
About Corel Corporation
Corel is a leading global packaged software company with an estimated
installed base of more than 40 million users. The company provides
high-quality, affordable, and easy-to-use productivity, graphics, and
digital imaging software and enjoys a favorable market position among
value-conscious consumers and small businesses. Corel’s product
portfolio features well-established, globally recognized brands,
including CorelDRAW® Graphics Suite, Corel® WordPerfect® Office,
WinZip®, Corel® Paint Shop Pro®, and Corel® Painter™.
Headquartered in Ottawa, Canada, Corel Corporation is traded on The
NASDAQ Stock Market® under the symbol CREL and on the Toronto
Stock Exchange under the symbol CRE. For more information, please
visit www.corel.com.
4 Corel Snapfire Plus User Guide
Page 11

Learning how to use the program
You can learn how to use the program in various ways: by reading the
user guide PDF located on the CD, by accessing the Help, or by
exploring the resources on the Core l Web site (www.corel.com), which
include tutorials, movies, and training videos.
You can also receive the latest information about the software by
checking the readme.html file installed in the program directory.
In this section, you’ll learn about
• documentation conventions
• using the Help system
Documentation conventions
The following table describes important conventions used in the user
guide and Help.
Convention Description Example
Menu ! Menu
command
drop-list A list of options that
mark and unmark Terms that refer to
Learning how to use the program 5
A menu item followed
by a menu command
drops down when a user
clicks a down arrow
button
enabling or disabling
check boxes by clicking
them
Choose File ! Open.
Choose an option from
the Selection Type drop-
list on the property bar.
To preserve the current
print size, mark the
Maintain original print
size check box.
Page 12

Convention Description Example
Enter The Enter key on your
keyboard
A note containing
information that is
important to the
preceding steps. It may
describe conditions
under which the
procedure can be
performed.
A tip containing
suggestions for
performing the
preceding steps. It may
present alternatives to
the steps, or other
benefits and uses of the
procedure.
Type a new folder name
in the box, and press
Enter.
To protect the original
version of your photo,
you can save the file
with a different filename
by using the Save As
button on the toolbar.
You can also right-click
in the photo and select
Delete.
Using the Help system
The Help is the most comprehensive sour ce of information for the
program. The Help topics dialog box provides three ways to find
information. You can choose a topic from the Contents page, use the
Index page to search for a specific topic, or use the Search page to
search for specific words and phrases. You can also print topics from the
Help.
To use the Help system
1 Click Help
! Help topics.
2 Click one of the following tabs:
• Contents — lets you browse through topics in the Help
6 Corel Snapfire Plus User Guide
Page 13

• Index — lets you use the keywords from the index to find a topic.
For example, if you want to add a caption to a photo, but are not
sure which feature to use, type caption.
• Search — lets you search the full text of the Help for a particular
word or phrase. For example, if you are looking for information
about a specific tool or command, you can type the name of the
tool or command to display a list of relevant topics. To search for
a phrase, type the phrase, and enclose it with quotation marks
(for example, type “Photo Fix”).
• Favorites — lets you create a list of Help topics that you can
easily access. You can remove and add Help topics at any time.
You can also
Print a specific Help topic Open a Help topic, click the frame
you want to print, and click Print.
View Help for a dialog box Click Help at the bottom of the
dialog box.
Access information and
troubleshooting tips on the Corel
Web site
Learning how to use the program 7
Click Support in the upper-right
corner of the Help window.
Page 14

8 Corel Snapfire Plus User Guide
Page 15

Downloading photos
The Corel Photo Downloader offers the quickest and easiest way to
transfer photos from your digital camera to your computer. Just plug in
your camera, or insert a memory card into your card reader, and
perform a quick one-time setup. After that, the Corel Photo
Downloader will start automatically every time you plug in your
camera or insert a memory card into your card reader.
You can even set the Corel Photo Downloader to rotate photos, or to
clear memory card space by deleting photos that have already been
downloaded.
In this section, you’ll learn about
• using the Corel Photo Downloader
• choosing options for the Corel Photo Downloader
Using the Corel Photo Downloader
The Corel Photo Downloader (located in your system tray) is activated
when you insert a CD containing photos into your computer, or when
you plug your camera or media card into your computer. Your photos
are automatically downloaded and are opened with the program. The
first time you start the program, you are prompted to choose settings
for the Corel Photo Downloader.
Downloading photos 9
Page 16

To use the Corel Photo Downloader with a camera or card reader
1 Connect the camera or card reader to the computer by using a USB
cable.
The Corel Photo Downloader window appears.
2 Mark the Use Corel Photo Downloader to transfer photos check
box.
3 Choose one of the following options, and click OK.
• Always start downloading automatically
• Display this prompt each time
To use the Corel Photo Downloader with a photo CD
1 Insert a CD into the CD drive.
2 Mark the Use Corel Photo Downloader to view photos check box.
3 Choose one of the following options, and click OK.
• Always start viewing automatically
• Display this prompt each time
Choosing options for the Corel Photo Downloader
Y ou can change the detection settings for your camera, card reader, and
CDs. You can set up the program to download all photos from your
camera or card reader or to download only the photos that you select.
You can also choose to open the program when you insert a CD that
contains photos.
By default, the program creates a subfolder in the year-month-day date
format in the My Pictures folder, and it automatically rotates your
photos to the proper orientation. In addition, the Corel Photo
Downloader downloads only the new photos in your camera, so you
don’t waste space on your hard drive with multiple copies of the same
photo. You can change the default options if you want.
10 Corel Snapfire Plus User Guide
Page 17

To choose or specify options for the Corel Photo Downloader
1 In your system tray, right-click the Corel Photo Downloader
icon, and choose Options.
2 T o activate the Corel Photo Downloader when you connect a camera
or insert a memory card into the card reader, mark the Detect
Cameras and Card Readers check box, and select one of the
following options:
• Always start downloading photos automatically — opens
Corel Snapfire and displays the Download Photos dialog box
• Prompt me each time to choose what to do — displays the Corel
Photo Downloader each time you connect your camera or insert a
memory card into the card reader
3 To activate the Corel Photo Downloader when you insert a photo
CD into a drive, mark the Detect Photo CDs check box, and select
one of the following options:
• Always start viewing photos automatically — opens the program
and displays the photos on the CD
• Prompt me each time to choose what to do — displays the Corel
Photo Downloader each time you insert a CD into the CD drive of
your computer
4 To start the Corel Photo Downloader when you turn on your
computer, mark the Load Corel Photo Downloader when my
computer starts up check box.
5 Click OK.
To choose options for downloading
1 In your system tray, right-click the Corel Photo Downloader
icon, and choose Options to open the Corel Photo Downloader
Options dialog box.
2 Click the Download Options button to open the Download Options
dialog box.
3 Perform one or more tasks from the following table, and click OK.
Downloading photos 11
Page 18

To Do the following
Change the default folder to which
photos are automatically
downloaded
Specify the naming format for
folders as the download date
Enter a folder name whenever you
download photos from your camera
Automatically rotate photos when
you download them
Avoid downloading previously
downloaded photos from your
camera
Automatically erase the photos in
the camera after downloading them
Click Browse, and select a new
folder.
Mark the Create Subfolder using
check box, and choose Download
date.
Mark the Create Subfolder using
check box, and choose Custom
Folder Name from the drop-list.
Mark the Automatically rotate
photos check box.
Mark the Download only new
photos check box.
Mark the Erase photos on camera
after download check box.
12 Corel Snapfire Plus User Guide
Page 19

Working with folders
You can use the program to browse the folders on your computer. You
can rename, add, and remove folders from your folder list.
In this section, you’ll learn about
• browsing and renaming folders
• adding and removing folders
Browsing and renaming folders
Y ou can view the photos contai ned in folders on your computer . You can
also add and remove viewable folders so that you see only the folders
that you want to view while you are using the program. You can also
change a folder name.
To browse folders
1 In the task panel, select Home, and click Find Photos.
2 Click Folders to expand the list of folders, and click a folder to view
thumbnails of the photos it contains.
To view all photos contained in the folders in the folder list, click
All photos.
To rename a folder
1 In the task panel, select Home, and click Find Photos.
2 Right-click the folder that you want to rename, and choose Rename
Folder.
3 Type the new folder name in the box, and press Enter.
Working with folders 13
Page 20

You can view a folder in Windows Explorer by right-clicking it
and choosing Reveal in Explorer.
Adding and removing folders
By default, the program displays the folders contained in the My
Pictures and Share Pictures folders. If you want to view other folders,
you can add them to the folder list. You can also remove folders from
the list.
To add a folder to the folder list
1 In the task panel, select Home, choose Find Photos, and click the
plus sign (+) next to Folders to expand the folder tree.
2 Click View More Folders to open the Browse for Folder dialog box.
3 Choose a folder from the directory tree, and click OK to add the
folder to the folder list.
If you add a folder that contains subfolders, the subfolders are also
added to the folder list.
You can create new folders by clicking the Make New Folder
button in the Browse For Folder dialog box.
To remove a folder from the folder list
1 In the task panel, select Home, and click Find Photos.
2 Click the plus sign (+) next to a folder to expand the folder tree.
3 Right-click the folder that you want to remove from the list, and
choose Remove from List.
You can view a folder in Windows Explorer by right-clicking the
folder and choosing Reveal in Explorer.
14 Corel Snapfire Plus User Guide
Page 21

Working with photos
After opening photos, you can pan them and zoom in and out of them.
You can also sort and select photos, move photos between folders, and
save, rename, delete, and rotate photos.
In this section, you’ll learn about
• opening and closing photos
• panning and zooming
• sorting photos
• selecting photos
• moving photos between folders
• saving photos
• renaming photos
•deleting photos
Opening and closing photos
The program provides several ways to open and close photos. You can
open photos by double-clicking a thumbnail or by using the File menu.
You can close photos and folders by using the File menu or by clicking
the Close button in the upper-right corner of the photo or folder
window.
To open a photo in a folder
1 In the task panel, select Home, and click Find Photos.
2 Click a folder to display thumbnails of the photos in the folder.
To expand the folder tree, click the plus sign (+) next to a folder.
3 Click a folder to display thumbnails of the photos in the folder.
Working with photos 15
Page 22

4 Double-click the thumbnail of the photo that you want to open in
Enhance mode.
To open a photo from the File menu
1 Choose File
! Open to display the Open dialog box.
2 Choose the location of the folder from the Look in drop-list.
3 Click Open to open the folder.
4 Double-click the thumbnail of the photo you want to open.
You can also open projects and show by using the File menu.
*
To close a photo or folder
•Click the Close button in the upper-right corner of the photo or
folder window.
Panning and zooming
You can adjust your view of a photo by panning or zooming. Panning
lets you view hidden areas of large photos. Zooming in or out increases
or decreases the viewable size of a photo.
To pan a photo
• When a photo is larger than the viewable area, drag the hand
within a photo to view hidden areas.
If the entire photo is viewable within the phot o window, then the
photo cannot be panned.
To zoom in or out
• On the toolbar, drag the Zoom slider to the left to zoom out, or to
the right to zoom in.
You can also
View the photo at full size Click the Normal Viewing
button on the toolbar.
16 Corel Snapfire Plus User Guide
Page 23

You can also
Fit the photo to the window Click the Fit Image to Window
button on the toolbar.
Use a mouse wheel for zooming Roll the mouse wheel forward to
zoom in, or backward to zoom out.
You can also access the zoom controls from the View menu.
Sorting photos
To find photos more easily, you can sort a folder’s thumbnails by
filename, folder and filename, date modified, date taken, file size, file
format, or rating.
To sort thumbnails of photos
1 In the task panel, choose Home, and click the Sort by button on the
toolbar.
2 Choose one of the following options:
• Filename — sorts thumbnails alphabetically by photo name
• Folder & Filename — sorts thumbnails alphabetically by folder
and filename
• Date Modified — sorts thumbnails by the date on which the
photo was last modified
• Date Taken — sorts thumbnails by the date on which the photo
was taken
• File Size — sorts thumbnails by file size (in kilobytes), from
smallest to largest
• Format — sorts thumbnails alphabetically by filename extension
(.jpg, .tif, and so on)
• Rating — sorts thumbnails by photo rating
Working with photos 17
Page 24

You can also sort photos by using the View menu.
Selecting photos
You can select one photo, all photos, multiple photos, or a sequence of
photos.
To select a photo
• From the Organizer, or from a photo tray, click the thumbnail of the
photo you want to select.
You can also
Select all photos Choose Edit ! Select All, or press
Ctrl + A.
Select multiple photos Hold down Ctrl, and click the
thumbnails of the photos you want
to select.
Select multiple photos in a sequence Hold down Shift, click the first
photo in the sequence, and then
click the last photo in the sequence.
Moving photos between folders
You can move or copy photos into other folders or programs. You can
either cut and paste, which removes photos from one folder and inserts
them into another folder , or you can copy and paste, which retains the
photos in the original folder and places copies of them in the new
folder.
You can also drag a photo directly into a document in another
application, such as a word-processing application.
To move photos to a different folder
1 In the task panel, select Home, and click Find Photos.
18 Corel Snapfire Plus User Guide
Page 25

2 Click the plus sign (+) next to a folder to expand the folder tree.
3 Click the folder containing the photos that you want to move.
4 While holding down the Shift key, select the photos, and drag them
to the destination folder.
The original photos are removed from the original folder and placed
in the destination folder.
To copy photos to a different folder
1 In the task panel, select Home, and click Find Photos.
2 Click the plus sign (+) next to a folder to expand the folder tree.
3 Click the folder containing the photos that you want to copy.
4 Select the photos that you want to copy, and drag the selected
photos from the first folder to the second folder.
The original photos stay in the first folder and are copied to the
second folder.
To copy a photo to another open application
1 Open the application to which you want to copy a photo.
2 Return to Corel Snapfire, and open the folder or removable media
containing the photo that you want to copy.
3 In the task panel, select Home, and click Find Photos.
4 Click the plus sign (+) next to a folder to expand the folder tree.
5 Click the folder containing the photos that you want to copy to
another application.
6 Select the thumbnail of the photo that you want to copy, and then
drag the thumbnail into the other open application.
Note: If the other application is not visible on the screen, drag the
photo to the application icon on the Windows task bar (at the
bottom of the screen), wait for the second application window to
appear, and then continue dragging to place the photo where you
want it in the second application window.
When you drag the photo into the other application, the cursor
indicates the locations where you can drop the photo.
Working with photos 19
Page 26

You can cancel the copying action by pressing Esc before
releasing the mouse button.
Saving photos
Y ou can save a photo, or save it to a differ ent filename or location. If you
modify a photo and do not save it, you are prompted to save it when
you try to close the photo or open another photo.
To save a photo to the same filename and location
• Choose File
location.
The original photo is overwritten by the modified photo.
To save a photo to a different filename or location
1 Click the Save As button to open the Save Photo dialog box.
2 From the Save in drop-list, choose the folder in which you want to
save the photo.
3 Type a name for the file in the File name box.
4 Choose a file format from the Save as type drop-list.
5 From the Quality drop-list, select one of the following options:
• Low (Highest Compression)
• Medium
• High
• Best (Lowest Compression)
Note: Photo compression settings are not available for all file types.
6 Click Save to save the photo to the new filename or folder location.
! Save to save the photo to the same filename and
By saving the photo to a different filename or location, you
preserve the original photo file.
You can also open the Save Photo dialog box by choosing File
Save As.
20 Corel Snapfire Plus User Guide
!
Page 27

Renaming photos
You can change the name of your photos and replace the cr yptic
filenames assigned by your digital camera with more meaningful ones
that clearly indicate the content of your photos.
To rename a photo
1 Open the folder containing the photo that you want to r ena me, and
select the thumbnail of that photo.
2 Choose Edit
3 Type the new photo name in the Enter the new file name box, and
click OK.
You can also rename a photo by right-clicking the thumbnail and
choosing Rename.
! Rename to open the Rename File dialog box.
Deleting photos
You can delete photos and permanently remove them from your
computer. When you delete photos, they are moved into the Windows
Recycle Bin.
To delete photos
1 Select the photo or photos that you want to delete.
Note: In the Enhance mode, you can select only one photo at a
time. Use the Home mode if you want to select and delete more
than one photo at the same time.
2 Click the Delete button in the toolbar.
3 In the Confirm File Delete dialog box, click Yes to move the photo to
the Recycle Bin.
Note: The next time that you empty the Recycle Bin, the photo is
removed from your computer’s hard disk.
You can also delete photos by choosing Edit
clicking and choosing Delete.
Working with photos 21
! Delete, or by right-
Page 28

22 Corel Snapfire Plus User Guide
Page 29

Using photo trays
You can use photo trays to gather photos from various folders so that
you can e-mail or print your photos, use your photos to create a
project, or upload your photos to a photo-sharing service. You can also
add, remove, and rename photo trays.
In this section, you’ll learn about
• adding and removing photo trays
• adding photos to photo trays
• removing photos from photo trays
• renaming photo trays
Adding and removing photo trays
You can add additional photo trays to help you sort your photos. You
can create a photo tray for the photos that you want to enhance, share,
or use to create a project. You can also remove photo trays.
To add a photo tray
1 Click the Add Photo Tray
open the Add Photo Tray dialog box.
2 Type a name for the new tray in the Name field, and click OK.
button on the Photo Tray toolbar to
You can also add a new tray by clicking the Photo Tray Menu
button and selecting Add Photo Tray.
To remove a photo tray
1 Select the photo tray that you want to remove.
Note: Removing a photo tray does not delete the photos in the tray.
2 Click the Remove Photo Tray
Using photo trays 23
button on the Photo Tray toolbar.
Page 30

You can also remove a tray by clicking the Photo Tray Menu
button and selecting Remove Photo Tray.
Adding photos to photo trays
You can drag photos into a tray or use the File menu to add photos.
To add photos to a photo tray
1 Select the photo tray to which you want to add photos.
2 Drag the photos to the photo tray.
You can also add photos to a photo tray by choosing File
to Photo Tray.
! Add
Removing photos from photo trays
You can remove photos from photo trays. Removing photos from a
photo tray does not delete them from your computer.
To remove photos from a photo tray
1 Click the name of the photo tray from which you want to remove
photos.
2 Click the Photo Tray Menu
Photo Tray.
button, and select Remove from
Renaming photo trays
After you have created several photo trays, you can rename them and
create categories for them.
To rename a photo tray
1 Select the photo tray that you want to rename.
2 Click the Photo Tray Menu
Tray to open the Rename Photo Tray dialog box.
3 Type a new name for the photo tray in the Name field, and click OK.
button, and select Rename Photo
24 Corel Snapfire Plus User Guide
Page 31

Using photo trays 25
Page 32

26 Corel Snapfire Plus User Guide
Page 33

Sharing your photos
It is easy to share your photos and videos with others. You can embed
your photos in the body of an e-mail message to ensure that your
recipients can immediately view them, or you c an send your ph otos as
attachments. You can also choose a size for the photos you’re sending.
In this section, you’ll learn about
•sending e-mail
• printing your photos
• changing printer settings
•ordering prints
Sending e-mail
You have the following options when you e-mail digital photos, videos,
and shows:
• Snapfire Show — automatically creates a Snapfire Show of all
selected photos and attaches it to the e-mail message
• Embedded Photos — lets you embed photos so that they appear in
the body of your e-mail message. The person who receives your email can see the photos immediately on opening the message.
Embedded photos appear only in e-mail that uses the HTML
message format. If you know that your recipient uses plain text or
Rich Text Format (RTF), you must use the Attachments option.
Note: If your default e-mail application does not support the
extended MAPI standard (such as Microsoft® Outlook®), the
option to embed photos is not available.
• Attachments (original file format) — lets you send photos, videos,
or shows as file attachments. Each item is attached as an individual
Sharing your photos 27
Page 34

file, and the e-mail recipient can choose how they want to view the
photos and videos. All photos are sent in the JPEG file format.
To e-mail photos, videos, or Snapfire Shows
1 Select the photos, videos, or Snapfire Shows that you want to e-
mail.
Note: You can select photos from either the thumbnail view or a
photo tray.
2 In the task panel, select Home, and click Share as E-mail to open
the E-mail dialog box.
Note: You can also click the Share button in a photo tray to open
the E-mail dialog box.
3 In the E-mail As group box, choose one of the fol lowing options:
• Snapfire Show — creates a Snapfire Show file from the photos
you have selected. You can name the Snapfire Show by typing a
name in the Snapfire Show name box.
• Embedded photos — displays photos in the body of your e-mail
message
• Attachments (original file format) — sends items as individual
file attachments
4 In the Maximum photo size drop-list, select a maximum size at
which to send your photos. The total size of your e-mail is displayed
beside the preview.
Note: You can select the maximum photo size only when sending
embedded or attached photos.
5 Click OK to apply the settings and launch your e-mail program.
Some e-mail providers limit the size of e-mail messages, which
could prevent messages larger than 2 MB from being sent or
received. You can reduce the size of the e-mail message by
selecting fewer photos.
28 Corel Snapfire Plus User Guide
Page 35

To select your default e-mail application, open Internet
Explorer®, choose Tools
tab, and select your e-mail client from the E-mail drop-list.
! Internet Options, click the Programs
Printing your photos
It it easy to print individual or multiple photos on the same page,
because the program automatically detects your default printer, paper,
and ink settings.
The settings you specify are recorded in the program’s memory, which
is especially useful if you always use the same printer and the same type
of paper when you print. These settings do not affect your computer’s
default printer settings.
To print your photos
1 Select the photos that you want to print.
Note: You can select photos from either the thumbnail view or a
photo tray.
2 In the task panel, select Home, and click Print to open the Print
dialog box.
3 Select a layout from the Available layouts list.
4 Type a number in the Number of times to use each picture field.
5 Click Print.
You can use the Forward
page preview to view each page.
and Back buttons below the
Changing printer settings
Y ou may need to change your printer settings if you have more than one
printer, if you want to change the printed appearance of your photos,
or if you install a new photo printer.
The settings that you specify are recorded in the program’s memory,
which is especially useful if you always use the same printer and the
Sharing your photos 29
Page 36

same type of paper when you print. These settings do not affect your
computer’s default printer settings.
To change your printer settings
1 In the task panel, select Home, and click Print to open the Print
dialog box.
2 Click the Change Printer Settings button to open the Change
Printer Settings dialog box.
3 Select your printer from the list of available printers, and c lick Next.
4 Select the paper type from the list, and click Next.
5 Select the paper size, and click Next.
6 Click Properties to open the Properties dialog box for your printer.
7 Adjust any settings that you want to change, and click OK to return
to the Change Printer Settings dialog box.
8 Click Next, and then click Finish to close the Change Printer
Settings dialog box.
9 Click Print to print selected photos, or click Cancel to close the
Print dialog box.
Ordering prints
You can upload your photos to a photo-sharing service. Photo-sharing
services allow you to upload your photos, store them online, and order
high-quality photographic prints.
Before you can use a photo-sharing service, you must sign up. Signing
up is free, and it gives you space for storing, printing, and sharing your
photos.
As the program is updated, support for additional photo-sharing
services may be included. Photo-sharing may not be available in all
regions.
To order prints from a photo-sh aring service
1 Select the photos that you want to print.
30 Corel Snapfire Plus User Guide
Page 37

Note: You can select photos from either the thumbnail view or a
photo tray.
2 In the task panel, select Home, and click Order Prints to open the
Order Prints dialog box.
3 In the Select a Service group box, choose a photo-sharing service,
and click Upload.
4 Enter your login information, and click Next to open the Photo
Upload dialog box.
Note: If you have not yet created an account with a photo-sharing
service, click the Create New Account link, and follow the
instructions for signing up.
5 Enter a name for your album in the Name of Online Album field,
and click Next to upload your photos to the photo-sharing service.
When your upload is complete, you can visit the photo-sharing
service site to order your prints.
Sharing your photos 31
Page 38

32 Corel Snapfire Plus User Guide
Page 39

Finding your photos
You can find your valuable photos through various methods. You can
find them by using the basic search or advanced search tools, by using
the Calendar, or by viewing tagged photos.
In this section, you’ll learn about
• searching for photos
• saving your search criteria
• finding photos by using the Calendar
• finding tagged photos
Searching for photos
You can find your photos by typing a search word in the basic search
field or by using photo information with the advanced search feature.
To search for photos quickly
• In the top toolbar, type a word in the search field.
Photos matching your search word are displayed in the program
window.
To search for photos by using photo information
1 Click the Search
dialog box.
2 In the Find photos that match group box, select one of the
following options:
• All — searches for photos that match all of the selected rules
• Any
— searches for photos that match any of the selected rules
3 In the Find group box, select your search rules from the drop-lists.
button on the toolbar to open the Search
Finding your photos 33
Page 40

To add additional rule fields, click Add Rule. To r emove the last rule,
click Remove Rule.
4 Click Search to view the matching thumbnails.
You can save the search criteria by clicking Save in the Search
dialog box.
Saving your search criteria
If you have created a complex set of search criteria, you can save it to
avoid having to reenter it if you want to repeat the search.
To save your search criteria
1 In the task panel, select Home, and click Find Photos.
2 Click the plus sign (+) next to Saved Search to expand the folder
tree, and click Add to open the Search dialog box.
3 In the Find photos that match group box, select one of the
following options:
• All — searches for photos that match all of the selected rules
• Any
— searches for photos that match any of the selected rules
4 In the Find group box, select your search rules from the drop-lists.
To add additional rule fields, click Add Rule. To r emove the last rule,
click Remove Rule.
5 Click Save to open the Save Search dialog box.
6 Enter a name for the search criteria in the Search Name field, and
click Save.
The saved search appears in the Saved Search folder tree.
To search for photos by using a saved search
1 In the task panel, select Home, and click Find Photos.
2 Click the plus sign (+) next to Saved Search to expand the folder
tree, and click the name of the saved search to view the photos that
match the search criteria.
34 Corel Snapfire Plus User Guide
Page 41

Finding photos by using the Calendar
You can use the Calendar to browse for photos taken on a specific date
or within a date range. Highlighted dates on the Calendar indicate that
photos were taken on that date.
To find photos by using the Calendar
1 In the task panel, choose Home, select Find Photos, and click
Calendar to open the Calendar Search dialog box.
2 Choose one of the following options:
• To find photos taken today , click the Today
• To find photos taken on a specific date, use the Previous (Year/
Month) and
month and year, and select a date.
• To find photos taken within a specific month, use the Previous
(Year/Month) and
the month and year.
• To find photos taken within a date range, use the Previous
and Next buttons to select the month and year, press Shift,
click the first date in the range, and then click the last date in the
range.
• To find photos taken on multiple dates not in sequence, use the
Previous and Next buttons to select the month and
year, press Ctrl, and click the dates.
Next (Month/Year) buttons to select the
Next (Month/Year) buttons to select
button.
Finding tagged photos
If you have tagged your photos, you can quickly find and display
thumbnails of the tagged photos.
To view tagged photos
1 In the task panel, select Home, and click Tags.
2 Click a tag to display the photos associated with the selected tag.
Finding your photos 35
Page 42

36 Corel Snapfire Plus User Guide
Page 43

Reviewing your photos
You can use Quick Review to view a series of photos in full-screen
mode and apply Quick Fix, add photo information, rotate or delete
photos, or add them to photo trays. You can even choose show
settings, and save and send the review by e-mail as a Snapfire Show.
In this section, you’ll learn about
•using Quick Review
• choosing Quick Review settings
• saving and sharing reviews as Snapfire Shows
Using Quick Review
You can view photos in full-screen mode by using Quick Review. While
reviewing your photos, you can use the toolbar buttons to rotate
photos, add captions and ratings to photos, use Quick Fix, add photos
to a photo tray, or delete photos. You can also choose settings for the
review, save the review as a Snapfire Show, and share the show with
others by sending it via e-mail.
To use Quick Review
1 In the task panel, select Home, select the photos that you want to
review, and click Quick Review.
2 Use the buttons on the toolbar , and perform one or more tasks fro m
the following table.
To Do the following
View the previous photo Click the Step back one slide
button.
Reviewing your photos 37
Page 44
To Do the following
Pause and play the review Click the Pause button or the
Play button.
View the next photos Click the Next button.
Turn off audio Click the Toggle Sound button.
Add photo information Click the Pause button, and th en
click the Show Slide Info button.
Delete a photo Click the Pause button, and then
click the Delete button.
Rotate a photo Click the Pause button, and the n
click the Rotate Right or Rotate
Left button.
Apply photo corrections Click the Pause button, and th en
click the Quick Fix button.
Add or remove a photo from a photo
tray
Exit review Click the Exit button, or press
Click the Pause button, and the n
click the Photo Tray toggle
button.
Esc.
Choosing Quick Review settings
Y ou ca n choose review settings, transitions, and a soundtrack that plays
during the review.
If you add a soundtrack to a review, it replaces the audio associated
with any video file included in the review.
To choose Quick Review settings
1 In the task panel, select Home, select the photos that you want to
review, and click Quick Review.
38 Corel Snapfire Plus User Guide
Page 45

2 Click the Pause button on the toolbar, and then click the View
Show Settings button to open the Show Settings dialog box.
3 In the Slide Settings group box, choose one or more of the
following:
• Duration — sets the number of seconds to display each photo
• Transitions — determines the transition style between photos
• Include captions — displays the photo caption below the photo
in the review
• Include motion effects — displays the motion effect applied to
the review
4 In the Soundtrack group box, choose one or more of the following
options:
• Include Soundtrack — plays the selected soundtrack
• Browse — lets you select a soundtrack
• Synchronize — calculates the per-photo display time so that the
review ends when the audio is done playing. This option applies
only when you have selected a soundtrack.
5 Click OK.
Saving and sharing reviews as Snapfire Shows
You can save the review as a Snapfire Show and share it with others by
sending it as an e-mail attachment.
To save a review as a Snapfire Show
1 While reviewing photos, click the Pause
and then click the Save as Snapfire Show
Save As dialog box.
2 From the Save in drop-list, select the folder where you want to save
the show.
3 In the File Name field, type a name for the Snapfire Show, and click
Save.
Reviewing your photos 39
button on the toolbar,
button to open the
Page 46

To share a Snapfire Show
1 While reviewing photos, click the Pause
button.
2 Click the Share as E-mail button to automatically open a message in
your e-mail application and attach the Snapfire Show.
40 Corel Snapfire Plus User Guide
Page 47

Changing photo information
You can view, add, and edit information about a photo, such as the
date the photo was taken. You can also apply photo ratings, add tags
and captions to your photos, and change advanced photo information.
Adding and updating photo information helps you organize and locate
your photos.
In this section, you’ll learn about
• changing the recorded date that a photo was taken
• applying photo ratings
• tagging photos
• adding captions to photos
• changing advanced photo information
Changing the recorded date that a photo was taken
You can change the recorded time and date that a photo was taken.
To change the recorded date that a photo was taken
1 In the task panel, choose Home, select a photo, and click View
Photo Info to open the General Info panel.
2 Click the Edit Date
box.
3 Select a new date from the Date drop-list.
4 Select a time from the Time drop-list, click OK, and then click the
Apply button.
button to open the Adjust Date Taken dialog
Changing photo information 41
Page 48

Applying photo ratings
You can apply ratings to your photos and identify your favorite photos.
A one-star rating is the lowest, and a five-star rating is the highest.
Ratings appear on the photo thumbnail if you have chosen to display
ratings in your thumbnail preferences. You can also search for photos
by rating.
To choose photo ratings
1 In the task panel, choose Home, select a photo, and click View
Photo Info to open the General Info panel.
2 In the Rating field, select the number of stars to apply the rating,
and click the Apply button.
Note: A one-star rating is the lowest, and a five-star rating is the
highest.
Tagging photos
Y ou can categorize and organize your photos by assigning tags to them.
After you assign tags, you can use them to quickly find your photos. Y ou
can also edit or delete existing tags.
To create a tag
1 In the task panel, select Home, choose Find Photos, and click Add
Tags to open the Add Tag dialog box.
2 In the Tag field, type the tag name, and click OK.
To assign tags to photos
1 In the task panel, select Home, click Find Photos, and choose Tags.
2 Select the photos to which you want to assign tags.
3 Do one of the following:
• Drag the photos onto an existing tag.
• In the task panel, choose Home, and click View Photo Info to
open the General Info panel. Then, type the tag name in the Tags
field, and click the Apply button.
42 Corel Snapfire Plus User Guide
Page 49

To edit or delete a tag
1 In the task panel, select Home, and click Find Photos.
2 Select the tag that you want to edit or delete.
3 Perform a task from the following table.
To Do the following
Rename an existing tag Right-click the tag, and choose
Rename. Type a new name for the
tag, and press Enter.
Delete a tag from the list Right-click the tag, and choose
Delete.
Adding captions to photos
You can add captions to photos. The captions are displayed when you
play a Snapfire Show.
To add a caption to a photo
1 In the task panel, choose Home, select a photo, and click View
Photo Info to open the General Info panel.
2 In the Caption field, enter comments about the photo, and click the
Apply button.
Changing advanced photo information
If your camera supports the Exchangeable Image File Format (EXIF)
standard, it can record the t ime and date the photo was taken, along
with the exposure information (ISO, shutter speed, and aperture) and
other camera details in the header of each photo file. This information
is displayed in the Details area on the General Info panel.
The information about a photo, or metadata, is embedded in the image
file, and it includes such items as the photo’s title, description, date
taken, and keywords. Because the information is embedded, it can still
Changing photo information 43
Page 50

be viewed when you open the photo in other applications or transfer it
to a different computer.
To change advanced photo information
1 In the task panel, choose Home, select a photo, and click View
Photo Info to open the General Info panel.
2 Click the Advanced Info button to show the Metadata group box.
3 Change the values, and click the Apply button.
Note: Not all photo information values can be changed.
44 Corel Snapfire Plus User Guide
Page 51

Protecting your photos
To protect your photos from computer mishaps, you can use the
PhotoSafe Backup system or Quick Disc to back them up on a CD or
DVD.
In this section, you’ll learn about
• using the PhotoSafe Backup system
• using Quick Disc
Using the PhotoSafe Backup system
You can use the PhotoSafe Backup system to back up all of your photos
to a CD or DVD. Archiving prevents the loss of your valuable photos
from hard-drive failure or other computer mishaps, such as viruses. One
backup CD can contain up to 700 MB of data, and a DVD can contain up
to 4.7 GB of data.
To back up photos on a CD or DVD
1 Insert a blank CD or DVD into your burner.
Note: If a dialog box appears and asks what you want Windows to
do, click Cancel.
2 In the task panel, select Home, and click PhotoSafe Backup to open
the PhotoSafe Backup dialog box.
3 Choose one of the following options:
• All photos not yet backed up — backs up only the cataloged
photos that have not yet been backed up. This option is
recommended if you have previously backed up some photos.
• All photos — backs up all photos, including previously backed up
photos
4 Type a label o f up to 14 characters in the Disc label field.
Protecting your photos 45
Page 52

5 Click Burn.
You can also
Change the write speed Choose the appropriate wr it e speed
for the media in the Speed field.
Make more than one copy of the
CD or DVD
Specify the number of copies in the
Copies field.
If you insert a disc in your burner before starting the backup
process, the program analyzes the disc and recommends a
speed. If you have problems using the recommended speed, you
can choose a slower speed, if available.
The burn process could take some time to complete. If you
cancel it, you cannot reuse the CD.
Using Quick Disc
If you have a CD or DVD burner (CD-R/W or DVD-R/W drive), you can use
the Quick Disc feature to quickly and easily burn selected photos,
videos, or Snapfire Shows to a CD or DVD. When you use a CD or DVD
burner, the files are copied from your computer to a CD or DVD. This is
useful when you want to share your photos and videos or take your
photos to a store to order prints.
To burn photos to a CD or DVD
1 Insert a disc into your CD or DVD burner.
Note: If a dialog box appears and asks what you want Windows to
do, click Cancel.
2 Select the photos that you want to burn to CD or DVD.
3 In the task panel, select Home, and choose Quick Disc.
4 Perform one or more tasks from the following table, and click Burn.
46 Corel Snapfire Plus User Guide
Page 53

To Do the following
Change the disc label Type a name for the disc in the Disc
Label field.
Select the burner Select the CD/DVD-RW drive from
the Drive drop-list.
Change the write speed for the
media
Select the appropriate write speed
for the media from the Speed droplist.
Create more than one copy of the
disc
Close the disc to prevent additional
files from being burned to it
Select the number of discs you want
to create in the Copies field.
Mark the Finalize disc check box.
Note: This option is available only
for CD media.
If you have problems burning at the recommended speed,
change the burn speed to a lower setting, if available.
Protecting your photos 47
Page 54

48 Corel Snapfire Plus User Guide
Page 55

Enhancing your photos
Corel Snapfire Plus contains several tools for enhancing your photos.
The Quick Fix tool lets you quickly correct common problems. You can
also correct red-eye in one click, straighten crooked photos, make
cosmetic corrections, and crop, rotate, and resize photos. In addition,
you can add text, paint with Picture Tubes™, and add picture frames.
In this section, you’ll learn about
• starting Corel Paint Shop Pro Photo to fix photos
• using Photo Doctor
• applying basic photo corrections
•removing red-eye
• applying cosmetic corrections
• cropping photos
• rotating photos
• straightening photos
• applying effects
• adding text to photos
• resizing photos
Starting Corel Paint Shop Pro Photo to fix photos
If Corel Paint Shop Pro Photo is installed on your computer, you can
quickly start it and use its advanced photo-correction tools.
To start Corel Paint Shop Pro Photo to fix photos
• Choose File
Enhancing your photos 49
! Open with ! Open with Paint Shop Pro.
Page 56

You can also start Corel Paint Shop Pro Photo while in Home and
Enhance modes, by clicking Edit with Paint Shop Pro.
Using Photo Doctor
It’s not always easy to know which photos can be improved or how to
improve them. Photo Doctor helps solve this problem by automatically
analyzing your photos and identifying which ones could benefit from a
Quick Fix adjustment to such elements as the color or brightness.
When you open a photo in Enhance mode, Photo Doctor analyzes your
photo. If your photo could benefit from an adjustment, an information
icon is displayed next to Quick Fix in the task panel. When you hover
over the icon, a message appears with recommendations for fixing the
photo.
To apply Photo Doctor recommendations
• In Enhance mode, when an information icon appears next to
Quick Fix in the task panel, click Quick Fix.
Note: You can display the Photo Doctor message by placing your
cursor over the information icon. You can close the message by
clicking the Close button in the top corner of the message box.
50 Corel Snapfire Plus User Guide
Page 57

Applying basic photo corrections
The Quick Fix command applies a predetermined set of color balancing
and sharpening corrections to your photo. If you want the option of
controlling the amount of these same corrections, you can use the
Photo Fix command.
You can use the Quick Fix and Photo Fix commands to
improve the exposure and color balance of photos quickly
and easily.
To fix a photo in one step
1 Double-click the photo to open it in Enhance mode.
2 In the task panel, click Quick Fix.
To view before and after versions of your photo, click the Undo
and Redo buttons on the toolbar.
To use Photo Fix
1 Double-click the photo to open it in Enhance mode.
2 In the task panel, click Photo Fix to open the Photo Fix dialog box.
Enhancing your photos 51
Page 58

The upper-left pane shows the original photo. The upper-right pane
shows the photo with the initial set of adjustments applied.
3 Perform one or more tasks from the following table, and click OK.
To Do the following
Brighten or darken the photo Drag the Brightness slider to the
right to increase brig h tness, or to
the left to decrease brightness.
Increase or decrease contrast Drag the Contrast slider to the right
to increase contrast, or to the left to
decrease contrast.
Increase or decrease warmth Drag the Warmth slider to the right
to make the photo warmer, or to the
left to make the photo cooler.
Increase or decrease saturation Drag the Saturation slider to the
right to make the colors more
vibrant, or to the left to make the
colors less vibrant.
Sharpen the edges of the photo Drag the Focus control to the right
to increase focus, or to the left to
decrease focus.
You can reset all controls to their initial valu es by clic king the
Reset to Default
52 Corel Snapfire Plus User Guide
button.
Page 59
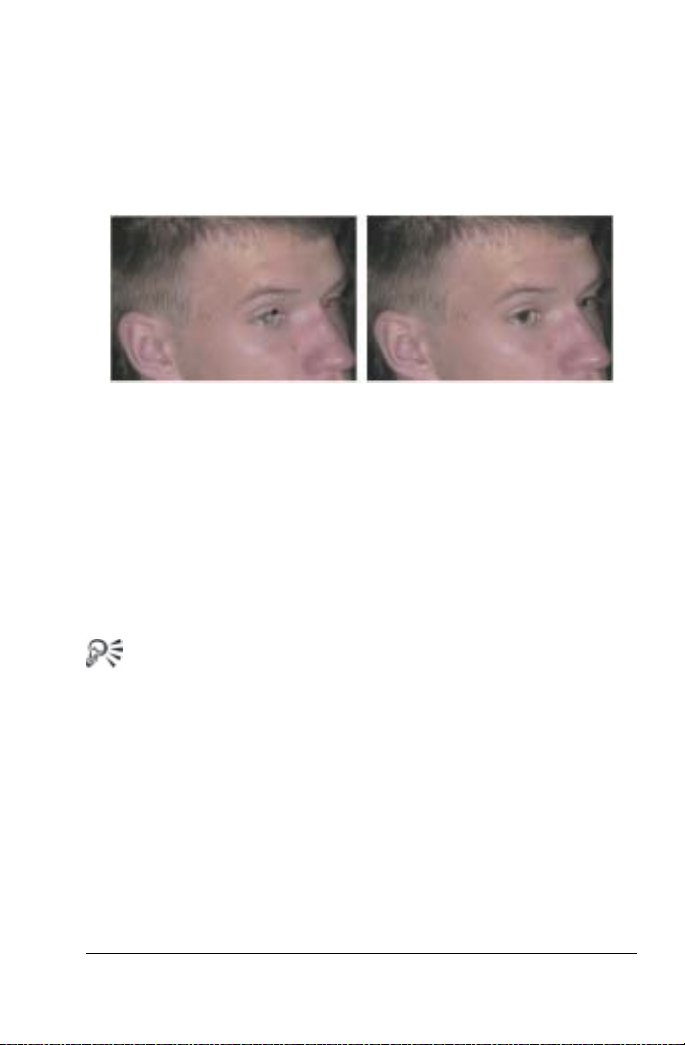
Removing red-eye
Red-eye is a common problem in photos. Red-eye occurs when light
from the camera’s flash that reflects off the retina of a photo subject is
then captured in the photo.
The Red Eye tool replaces the red color in the subject’s pupil
with a dark gray color to restore a natural look.
To remove red-eye
1 Double-click the photo to open it in Enhance mode.
2 In the task panel, click Fix Red Eye.
3 In the task panel, adjust the Size control so that the pointer is
slightly larger than the eye needing correction.
4 Point directly over the eye, and click.
You can zoom in on the photo, if necessary, to use the Red Eye
tool more easily.
Enhancing your photos 53
Page 60
Applying cosmetic corrections
Using the Makeover tool, you can quickly apply the following cosmetic
corrections to the subjects in your photos:
• Blemish Fixer — removes blemishes
• Toothbrush — whitens teeth
• Suntan — applies a suntan
You can quickly remove blemishes, whiten teeth, apply a
suntan, and smooth wrinkles.
To remove facial blemishes
1 Double-click the photo to open it in Enhance mode.
2 In the task panel, select Makeover, and click the Blemish Fixer
button.
The pointer changes to concentric circles.
3 In the task panel, do the following:
• Adjust the Size control to the smallest size that allows the inner
circle to enclose the blemis h.
The outer circle is used for the material that covers the blemish.
• Adjust the Strength control.
Values range from 1 to 100. Higher values apply more of the
54 Corel Snapfire Plus User Guide
Page 61

source material (enclosed in the outer circle) to the blemish area
(enclosed in the inner circle).
4 Point and click directly over the blemish.
You can zoom in on the photo, if necessary, for better control of
the Makeover tool.
To whiten teeth
1 Double-click the photo to open it in Enhance mode.
2 In the task panel, select Makeover, and click the Toothbrush
button.
3 Type or set a value in the Strength control.
4 Point and click directly over the teeth.
If the teeth are separated or partially obscured, you may need to
apply this tool to each tooth individually.
The Toothbrush mode of the Makeover tool works only on color
photos.
You can zoom in on the photo, if necessary, for better control of
the Makeover tool.
To apply a suntan
1 Double-click the photo to open it in Enhance mode.
2 In the task panel, select Makeover, and click the Suntan button.
3 Type or set a value in the Size control.
4 Carefully drag over the skin you want to tan.
Enhancing your photos 55
Page 62
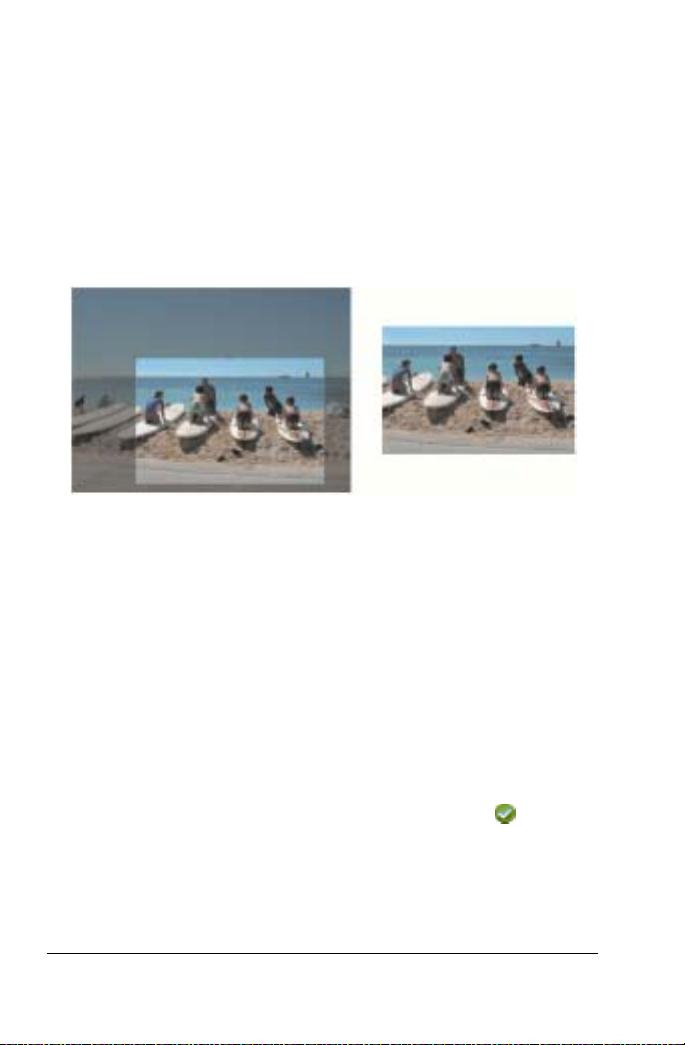
Cropping photos
You can remove unwanted portions of a photo to create stronger
compositions or to change the focus. Cropping can reduce the amount
of hard drive memory required for the editing process. Also, by
eliminating extraneous areas of color, cropping can improve color
corrections. If a photo requires both cr opping and color correction, you
should crop the photo first and then apply the color correction.
You can remove unwanted portions of a photo to create a
stronger composition or to change the focus.
To crop a photo
1 Double-click the photo to open it in Enhance mode.
Note: To protect the original version of your photo, you can save
the file with a different filename by choosing File
2 In the task panel, click Crop.
3 Define the crop area by dragging any of the handles on the crop
area rectangle.
You can drag any of the handles to adjust the crop area
4 When you’re ready to crop the photos, click the Apply button in
the task panel or on the floating toolbar.
! Save As.
.
56 Corel Snapfire Plus User Guide
Page 63

You can also
Select a preset crop size Choose an option from the Presets
drop-list in the task panel or on the
floating toolbar.
Rotate the crop rectangle Click the Rotate Crop Rectangle
button in the task panel or on the
floating toolbar.
Move the entire crop rectangle Drag inside the crop area.
Constrain the crop area to its
current proportions
Clear the crop area and start over Right-click anywhere in the photos.
Mark the Maintain aspect ratio
check box on the task panel. This
option is available only for custom-
defined crop rectangles.
Rotating photos
When you are enhancing or organizing a photo, you can change its
orientation by rotating it 90 degrees to the left or right. While
organizing your photos, you can rotate multiple photos at one time.
You can rotate JPEG images with lossless rotation and retain all
of the original image data.
To rotate a photo
• In either the Home or Enhance mode, select a photo and click one
of the Rotate buttons:
• Rotate Right — rotates the photo 90 degrees clockwise
• Rotate Left — rotates the photo 90 degrees counterclockwise
To rotate multiple photos
1 In the task panel, select Home.
2 Select the photo or photos that you want to rotate.
Enhancing your photos 57
Page 64

3 In the task panel, click one of the Rotate buttons:
• Rotate Right — rotates the photo 90 degrees clockwise
• Rotate Left — rotates the photo 90 degrees counter clockwise
Straightening photos
You can easily straighten crooked photos by specifying a line along an
image feature that you want to correct. The photo is then rotated so
that it aligns vertically or horizontally along the line you specify . Y ou can
use this technique when a photo has a strong vertical or horizontal
feature, such as a building or horizon.
The Straighten tool lets you draw a line by using reference
points within a photo. You can then use the line to straighten
the photo.
To straighten a photo
1 Double-click the photo to open it in Enhance mode.
2 In the task panel, click Straighten.
A straightening bar with end handles appears on the photo.
3 Drag each handle of the straightening bar to align it with the part of
the photo that you want to straighten.
4 Click the Apply button.
58 Corel Snapfire Plus User Guide
Page 65

You can also double-click the photo to apply the command.
Applying effects
You can make a color photo look like a black-and-white photo by
converting it to shades of gray (grayscale), or yo u can use the Sepia tool
to apply a warm brown tone to a photo, which gives it a 19th-century
look.
You can add picture frames to your images to provide an eye-catching
final touch. You can choose from square or oval frames, modern or
classic styles, mats or photo edges, or a variety of other styles.
You can use the Picture Tube tool to paint with a collection of objects.
For example, you can add butterflies and beetles to a picnic setting, fill
an aquarium with fish, or frame a picture with holly.
To apply a black-and-white effect
1 Double-click the photo to open it in Enhance mode.
Note: To protect the original version of your photo, you can save
the file with a different filename by using the Save As button on the
toolbar.
2 In the task panel, click Black and White.
To apply a sepia effect
1 Double-click the photo to open it in Enhance mode.
Note: To protect the original version of your photo, you can save
the file with a different filename by using the Save As button on the
toolbar.
2 In the task panel, click Sepia.
To paint with the Picture Tube tool
1 Double-click the photo to open it in Enhance mode.
Note: To protect the original version of your photo, you can save
the file with a different filename by using the Save As button on the
toolbar.
Enhancing your photos 59
Page 66

2 In the task panel, click Add Picture Tubes, and select a picture tube
from the Pictur e Tube drop-list.
3 If necessary, adjust the following:
• Size — determines the percentage (10% to 250%) for reducing or
enlarging each image in the picture tube and scaling the step
• Spacing — determines the distance in pixels (1 to 500) between
the centers of each picture tube cell that you paint
4 In the image window, click to paint with one picture tube image, or
drag to paint with multiple picture tube images.
To add a picture frame
1 Double-click the photo to open it in Enhance mode.
Note: To protect the original version of your photo, you can save
the file with a different filename by using the Save As button on the
toolbar.
2 In the task panel, click Add Picture Frame, and choose a frame from
the drop-list.
3 Choose one of the following options:
• Frame inside of the image — resizes the frame to fit within the
image canvas
• Frame outside of the image — increases the canvas size to
accommodate the frame
4 Click OK.
If the width and height differ by a considerable amount, the
frame appears thicker along the shorter sides.
60 Corel Snapfire Plus User Guide
Page 67
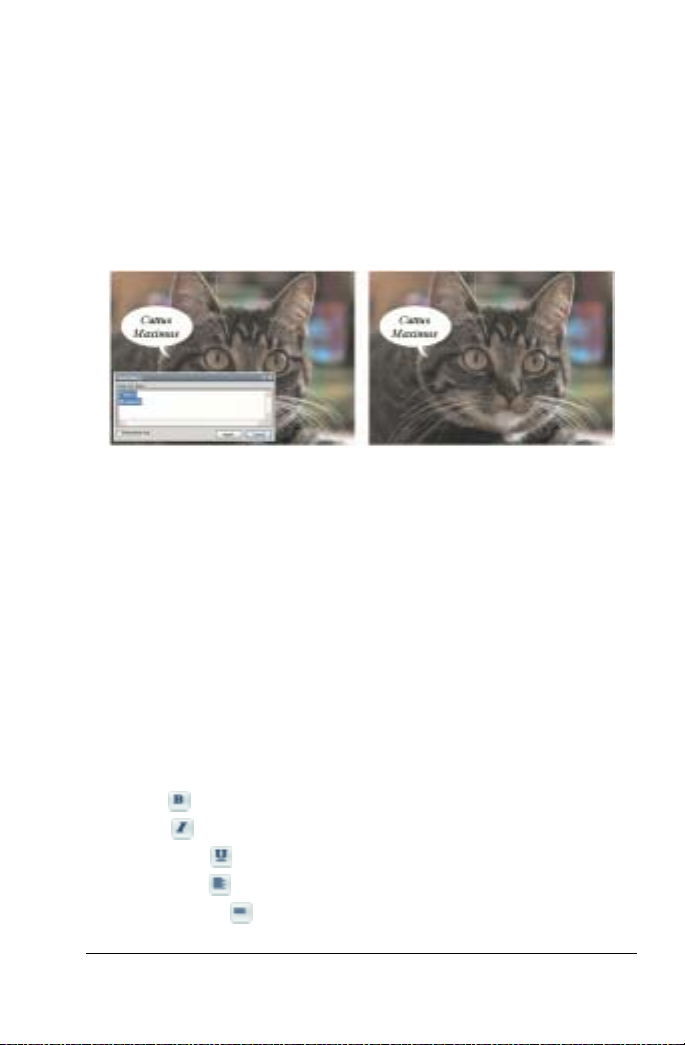
Adding text to photos
The Text tool lets you add text to a photo. The text is “painted” onto
the photo and is not included in text searches.
The text cannot be removed from the photo after you save it, so it is
recommended that you save the photo to a different filename to
preserve the original.
You can add text to your photos.
To add text to a photo
1 Double-click the photo to open it in Enhance mode.
Note: To protect the original version of your photo, you can save
the file with a different filename by choosing File
2 In the task panel, scroll down, and click Text to open the Text Entry
dialog box.
3 Choose a font from the Font drop-list.
4 Choose a font size from the Size drop-list.
5 Select a direction for the text from the Text Flow drop-list.
6 Click any of the following buttons to format your text:
• Bold — applies bold formatting to text
• Italic — applies italic formatting to text
• Underline — underlines text
• Align Left — aligns text to the left
• Align Center — centers multiple lines of text
! Save As.
Enhancing your photos 61
Page 68

• Align Right — aligns text to the right
7 Click the Color box, choose a color for your text, and click OK.
8 Click on the area of the photo where you want to add text, and type
the text in the Text Entry dialog box.
You can preview the text you typed on the photo.
9 Click Apply.
If you want to change the text attributes, select the text and then
choose new text attributes.
Resizing photos
Y ou can use the R esize command to change the actual pixel dimensions
of photos without changing their composition. When the size of a
photo is increased, pixels (the individual grid cells that mak e up a digital
photo) are added to create the enlarged photo.
Resizing photos may reduce their sharpness, especially when photo
size is decreased. It is therefore a good idea to preserve a copy of the
original photo by saving the new photo with a new filename.
Guidelines for resizing
• Do not increase the photo size by more than 25 percent.
• Resize a photo only once. Each time you resize the photo, some
data is lost, which can cause the photo to become blurry. If your
first resizing of the photo is not correct, undo the change, and try
again.
• Correct and retouch photos before resizing.
To resize a photo
1 Double-click the photo to open it in Enhance mode.
2 Choose Edit
3 Mark the Resample using check box, and select a resampling type
from the drop-list.
62 Corel Snapfire Plus User Guide
! Resize Photo to open the Resize dialog box.
Page 69

• Smart Size — chooses the best algorithm based on the new pixel
dimensions you set
• Bicubic — minimizes the jaggedness that often results from
expanded, irregular, or complex photos
• Bilinear — uses the two nearest pixels around each existing pix el
to determine the appearance of newly created pixels
• Pixel Resize — duplicates or removes pixels to achieve the
selected width and height of the photo (recommended for hardedged photos and simple graphics)
• Weighted Average — uses a weighted-average color value of
neighboring pixels to determine the appearance of newly created
pixels (useful for reducing photorealistic, irregular, or c o mpl ex
photos)
4 In the Pixel Dimensions group box, type or set new values in the
Width and Height controls. From the drop-list, choose whether to
enter values in pixels or as a percentage of the original size.
5 Click OK.
It is recommended that you constrain the new photo dimensions
to the photo’s current proportions by marking the Lock aspect
ratio check box. Changing the aspect ratio distorts the image by
stretching or contracting it in one dimension more than the
other.
You can keep the image’s current print size by marking the
Maintain original print size check box.
To change the photo resolution and print size
1 Double-click the photo to open it in Enhance mode.
2 Choose Edit
! Resize Photo.
3 Unmark the Resample using check box.
4 In the Print Size group box, do one of the following:
Enhancing your photos 63
Page 70

• Type or set values in the Width and Height controls.
• Type or set a value in the Resolution control.
You can choose units of measurement from the drop-lists next to
the Width, Height, and Resolution controls.
5 Click OK.
64 Corel Snapfire Plus User Guide
Page 71

Working with Snapfire Shows
You can create Snapfire Shows — multimedia shows that can include
photos, motion effects, video, and soundtracks.
You can use your photos to make movie files whi ch you c an share with
others. Y ou can also choose options that contr ol how the Snapfire Show
is viewed and played.
In this section, you’ll learn about
• adding photos and videos to Snapfire Shows
•playing Snapfire Shows
• choosing settings for Snapfire Shows
• choosing slide settings
• saving Snapfire Shows
Adding photos and videos to Snapfire Shows
When you create a Snapfire Show, you move photos or videos from a
photo tray to the Storyboard. The Storyboard holds all the items that
will be in the Snapfire Show . You can add, delete, and move items in the
Storyboard.
To add photos and videos to a Snapfire Show
1 Drag the photos and videos that you want to add to a Snapfire
Show into a photo tray.
2 In the task panel, choose Show , and drag photos or videos from the
photo tray to the Storyboard.
Working with Snapfire Shows 65
Page 72
You can also add all items in your photo tray to the Storyboard
by clicking the Photo T ray Menu
button and selecting Add All
to Storyboard.
Playing Snapfire Shows
You can control playback of the Snapfire Show by using the buttons in
the Snapfire Show viewer. You can also play the Snapfire Shows in fullscreen mode.
To play a Snapfire Show
1 In the task panel, choose Show, and drag photos or videos from a
photo tray to the Storyboard.
2 Use the playback controls on the Snapfire Show toolbar, and
perform a task from the following table.
To Do the following
Review the full Snapfire Show Click the Full Show button in the
Snapfire Show window.
Review only the slide transition and
motion effects
Play the show in full-screen mode Click the Play show full screen
Play and pause the show Click the Play or Pause button
Rewind the show Click the Rewind to Start button
View the previous and next slides in
the show
66 Corel Snapfire Plus User Guide
Select the slide in the Storyboard,
and click the Slide button from
the Snapfire Show window.
button in the Snapfire Show
window.
in the Snapfire Show window.
in the Snapfire Show window.
Click the Back One Slide or
Forward One Slide button in the
Snapfire Show window.
Page 73

Choosing settings for Snapfire Shows
Y ou can include captions and soundtracks in Snapfire Shows and control
how the audio files are played.
To choose settings for a Snapfire Show
1 In the task panel, choose Show, and click View Show Settings.
2 Choose any of the following options:
• To display the photo captions that you have typed in the General
Info panel, mark the Include Captions check box. You can add
captions to slides by clicking Show Slide Information in the Show
task panel.
• To add a soundtrack that plays when you view the Snapfire Show,
click the Add button to access the Open dialog box, select an
audio file (.mp3, .wav, or .wma), and click Open. If your Snapfire
Show includes a video clip, the clip's audio will be replaced by the
soundtrack you choose.
• T o synchronize the length of the Snapfire Show with the length of
the audio so that the Snapfire Show ends when the soundtrack
stops playing, click the Synchronize button. This option applies
only when you have selected a soundtrack and clicked
Soundtrack.
You can also
Remove an audio file from the
Snapfire Show
Change the order in which the audio
files play
Working with Snapfire Shows 67
Select the audio file that you want to
remove, and click the Remove
button.
Select an audio file, and drag it to a
different location.
Page 74

Choosing slide settings
You can choose the duration, transition, and motion effects that apply
to specific photos in your Snapfire Show.
To choose slide settings
1 In the task panel, choose Show, and select a slide from the
Storyboard.
Note: You can apply the slide settings to multiple photos by
selecting a group of photos in the Storyboard.
2 In the task panel, click View Show Settings.
3 To add motion effects that pan and zoom in the slide, mark the
Include motion effects check box, and choose from the following
options:
• Automatic — applies the start and end positions automatically
• Adjust start position — lets you adjust the start position of the
motion effect rectangle by dragging and resizing the rectangle
• Adjust end position — lets you adjust the end position of the
motion effect rectangle by dragging and resizing the rectangle
4 In the Duration field, select the number of seconds that you want
the selected slide to display in the Snapfire Show.
5 To select a slide transition, choose a transition style from the
Transition drop-list.
Saving Snapfire Shows
After you create a Snapfire Show and choose its settings, you can save
it and share it with others, or change it later. You can also save the
Snapfire Show as a video file.
To save a Snapfire Show
1 In the task panel, choose Show, and click Save as Snapfire Show to
open the Save As dialog box.
2 From the Save in drop-list, select the folder in which you want to
save the Snapfire Show.
68 Corel Snapfire Plus User Guide
Page 75

3 In the File name field, type the name for the Snapfire Show, and
click Save.
You can save your show with the .SnapfireShowProject filename
extension so that you can edit it at a later time. Choose File
!
Save As, and enter a name for the show in the File name field.
Then, select Snapfire Show from the Save as Type drop-list, and
click the Save button.
To share your Snapfire Show with others, click Share as Snapfire
Show in the Show task panel to automatically attach the Snapfire
Show to an e-mail message in your e-mail application.
To save a Snapfire Show as a video
1 In the task panel, choose Show, and click Save as Video to open the
Save As dialog box.
2 From the Save in drop-list, select the folder in which you want to
save the video.
3 In the File name field, type a name for the video, and click Save.
You can save your show with the .CorelProject filename
extension so that you can edit it at a later time. Choose File
!
Save As, and enter a name for the show in the File name field.
Then, select Corel Project from the Save as Type drop-list, and
click the Save button.
Working with Snapfire Shows 69
Page 76

70 Corel Snapfire Plus User Guide
Page 77

Working with videos
You can preview your video clips from a video thumbnail, or you can
play your videos in Show mode or full-screen mode. You can also trim
the video, select a frame to display as the video thumbnail, or extract a
video frame to use as a photo.
In this section, you’ll learn about
•playing videos
• choosing frames to use as video thumbnails
• extracting frames from videos
• trimming videos
Playing videos
You can preview your video files (with .avi, .mov, .mp4, or .mpeg
filename extensions) from thumbnails. Y ou can also play videos in Show
mode or in full-screen mode.
Example of a video thumbnail
Working with videos 71
Page 78

To preview a video from a thumbnail
1 In the task panel, select Home, choose Find Photos, and select a
folder that contains video files.
2 Select the thumbnail of the video file, and press the Play
on the thumbnail.
To play a video file in Show mode
1 In the task panel, select Home, choose Find Photos, and select a
folder that contains video files.
2 Drag the thumbnail of the video into a photo tray.
3 In the task panel, select Show, drag the video thumbnail into the
Storyboard, and press the Play
You can also
Play the video in full-screen mode Click the Play show full screen
Pause the video Click the Pause button on the
Rewind the video Click the Rewind to Sta rt button
button on the video toolbar.
button on the video toolbar.
video toolbar.
on the video toolbar.
button
Choosing frames to use as video thumbnails
A single frame in your video is displayed as the video thumbnail. If you
want to choose a frame that better depicts your video, you can select a
different frame from the vi deo file to use as the video thumbnail.
72 Corel Snapfire Plus User Guide
Page 79

To choose a frame to use as the video thumbnail
1 In the task panel, select Home, choose Find Photos, and select a
folder that contains a video file.
Note: You can also select a video file contained in a photo tray.
2 Select the thumbnail for the video file, and press the Play
on the thumbnail.
3 Click the Pause
frame you want to use as the video thumbnail.
4 Click the Set as Thumbnail
button on the thumbnail to stop the video at the
button on the thumbnail.
button
Extracting frames from videos
You can extract a frame from a video file and save it as a photo.
To extract a frame from a video
1 In the task panel, select Home, choose Find Photos, and select a
folder that contains a video file.
Note: You can also select a video file contained in a photo tray.
2 Select the thumbnail for the video file, and press the Play
on the thumbnail.
3 Click the Pause button on the thumbnail to stop the video on
the frame that you want to use as the video thumbnail.
4 Click the Save Frame as Photo
the Save As dialog box.
5 From the Save in drop-list, select the folder in which you want to
save the frame as a photo.
6 In the File name field, type a name for the photo, and click Save.
button on the thumbnail to open
button
Working with videos 73
Page 80

Trimming videos
You can trim a video to make the video shorter , or to remove unwanted
areas of the video.
To trim a video
1 In the task panel, select Home, choose Find Photos, and select a
folder that contains a video file.
2 Drag the thumbnail of the video to a photo tray.
3 In the task panel, select Show, and drag the video thumbnail into
the Storyboard.
4 In the Storyboard, click the video thumbnail to select it.
5 Set the start point for the video by dragging the Set Start handle to
the right.
6 Set the end point for the video by dragging the Set End handle to
the left.
If you want to view the trimmed video, you can drag the center
Review handle from the left to the right.
To save the trimmed video, click Save as Video in the task panel
to open the Save As dialog box.
74 Corel Snapfire Plus User Guide
Page 81

Creating projects
You can create projects to share with others. You can create album
pages to use in scrapbooking, make greeting cards, and create custom
calendars, collages, magazine covers, and certificates.
In this section, you’ll learn about
• creating collages
• creating greeting cards
• creating calendars
• creating album pages
• creating certificates
• creating magazine covers
Creating collages
The program includes many templates that you can use to make
collages with your photos.
To create a collage
1 Drag the photos for your collage into a photo tray.
2 In the task panel, select Create, and click Collage.
3 In the task panel, click Select Layout, and choose a layout for your
collage.
4 Drag photos from the photo tray into the cells of the layout.
5 Arrange photos in the cells by selecting a cell and using any of the
following options or controls:
• Fill Frame — enlarges the photo to fill the cell
• Fit to Frame — fits the entire photo in the cell
Creating projects 75
Page 82

• Rotate Right or Rotate Left buttons — changes the photo
orientation
• Zoom Tool — increases or decreases the size of the photo in the
cell
• Pan Tool — moves the photo in the cell to show hidden areas
You can also
Open an existing project Click the Open Project button
on the toolbar.
Create a new project Click the New Project button on
the toolbar.
Add additional pages Click the Add Page button on the
toolbar.
View a preview of the selected page Click the View Preview button
on the toolbar.
Change the page view Click the View Multipage button
on the toolbar.
Change the page orientation Click the View Page Horizontal
or View Page Vertical button on
the toolbar.
Save your project Click the Save button on the
toolbar.
The pages are saved in the Corel
Project File (.SnapfireProject) format.
Print your project Click the Print button on the
toolbar.
For the best print results, use a photo-quality printer and paper,
and adjust the printer to use the highest quality settings.
76 Corel Snapfire Plus User Guide
Page 83

Creating greeting cards
Y ou can use one of the many template layouts available to create special
cards that contain your own photos and greetings. Just select a greeting
card layout, drag pictures into the cells, add text, and print.
To create a greeting card
1 Drag the photos for your greeting card into a photo tray.
2 In the task panel, select Create, and click Greeting Card.
3 In the task panel, click Select Layout, and choose a layout for your
greeting card.
4 Drag photos from the photo tray into the cells of the layout.
5 Arrange photos in the cells by selecting a cell and using any of the
following options or controls:
• Fill Frame — enlarges the photo to fill the cell
• Fit to Frame — fits the entire photo in the cell
• Rotate Right or Rotate Left buttons — changes the photo
orientation
• Zoom Tool — increases or decreases the size of the photo in the
cell
• Pan Tool — moves the photo in the cell to show hidden areas
6 Click in a text cell, and type your message in the Text field on the
task panel.
7 To change the text format, select the text, and apply any of the
following controls:
• Bold — applies bold formatting to text
• Italic — applies italic formatting to text
• Underline — underlines text
• Size drop-list — changes the text size
• Color box — changes the text color or lets you create a custom
color
• Left
, Center , or Right — aligns text
, Middle , or Bottom — aligns text margins
• Top
Creating projects 77
Page 84

You can also
Open an existing project Click the Open Project button
on the toolbar.
Create a new project Click the New Project button on
the toolbar.
Add additional pages Click the Add Page button on the
toolbar.
View a preview of the selected page Click the View Preview button
on the toolbar.
Change the page view Click the View Multipage button
on the toolbar.
Change the page orientation Click the View Page Horizontal
or View Page Vertical button on
the toolbar.
Save your project Click the Save button on the
toolbar.
The pages are saved in the Snapfire
Project File (.SnapfireProject) format.
Print your project Click the Print button on the
toolbar.
For the best print results, use a photo-quality printer and paper,
and adjust the printer to use the highest quality settings.
Creating calendars
You can share your memories with others by creating a calendar that
contains your own photos.
To create a calendar
1 Drag the photos for your calendar into a photo tray.
78 Corel Snapfire Plus User Guide
Page 85

2 In the task panel, select Create, and click Calendar to open the
Choose a month and year dialog box.
3 Select a month from the Month drop-list and a year from the Year
drop-list, and click OK.
4 In the task panel, click Select Layout, and choose a layout for your
calendar.
5 Drag photos from the photo tray into the cells of the layout.
6 Arrange photos in the cells by selecting a cell and using any of the
following options or controls:
• Fill Frame — enlarges the photo to fill the cell
• Fit to Frame — fits the entire photo in the cell
• Rotate Right or Rotate Left buttons — changes the photo
orientation
• Zoom Tool — increases or decreases the size of the photo in the
cell
• Pan Tool — moves the photo in the cell to show hidden areas
You can also
Open an existing project Click the Open Project button
on the toolbar.
Create a new project Click the New Project button on
the toolbar.
Add additional pages Click the Add Page button on the
toolbar.
View a preview of the selected page Click the View Preview button
on the toolbar.
Change the page view Click the View Multipage button
on the toolbar.
Change the page orientation Click the View Page Horizontal
or View Page Vertical button on
the toolbar.
Creating projects 79
Page 86

You can also
Save your project Click the Save button on the
toolbar.
The pages are saved in the Snapfire
Project File (.SnapfireProject) format.
Print your project Click the Print button on the
toolbar.
For the best print results, use a photo-quality printer and paper,
and adjust the printer to use the highest quality settings.
Creating album pages
You can create an album page by using one of the many available
template layouts. Just select an album page layout, drag pictures into
the cells, add text, and then print. You’ll quickly have an array of album
pages that you can use for scrapbooking, framing, or sharing with
others.
To create an album page
1 Drag the photos for your album page into a photo tray.
2 In the task panel, select Create, and click Horizontal Album Page,
Square Album Page, or Vertical Album Page.
3 In the task panel, click Select Layout, and choose a layout for your
album page.
4 Drag photos from the photo tray into the cells of the layout.
5 Arrange photos in the cells by selecting a cell and using any of the
following options or controls:
• Fill Frame — enlarges the photo to fill the cell
• Fit to Frame — fits the entire photo in the cell
• Rotate Right or Rotate Left buttons — changes the photo
orientation
80 Corel Snapfire Plus User Guide
Page 87

• Zoom Tool — increases or decreases the size of the photo in the
cell
• Pan Tool — moves the photo in the cell to show hidden areas
6 Click in a text cell, and type your message in the Text field on the
task panel.
7 To change the text format, select the text, and apply any of the
following controls:
• Bold — applies bold formatting to text
• Italic — applies italic formatting to text
• Underline — underlines text
• Size drop-list — changes the text size
• Color box — changes the text color or lets you create a custom
color
• Left
, Center , or Right — aligns text
, Middle , or Bottom — aligns text margins
• Top
You can also
Open an existing project Click the Open Project button
on the toolbar.
Create a new project Click the New Project button on
the toolbar.
Add additional pages Click the Add Page button on the
toolbar.
View a preview of the selected page Click the View Preview button
on the toolbar.
Change the page view Click the View Multipage button
on the toolbar.
Change the page orientation Click the View Page Horizontal
or View Page Vertical button on
the toolbar.
Creating projects 81
Page 88

You can also
Save your project Click the Save button on the
toolbar.
The pages are saved in the Snapfire
Project File (.SnapfireProject) format.
Print your project Click the Print button on the
toolbar.
For the best print results, use a photo-quality printer and paper,
and adjust the printer to use the highest quality settings.
Creating certificates
You can show your appreciation for others by creating special
certificates and awards.
To create a certificate
1 Drag the photos for your certificate into a photo tray.
2 In the task panel, select Create, and click Certificate.
3 In the task panel, click Select Layout, and choose a layout for your
certificate.
4 Drag photos from the photo tray into the cells of the layout.
5 Arrange photos in the cells by selecting a cell and using any of the
following options or controls:
• Fill Frame — enlarges the photo to fill the cell
• Fit to Frame — fits the entire photo in the cell
• Rotate Right or Rotate Left buttons — changes the photo
orientation
• Zoom Tool — increases or decreases the size of the photo in the
cell
• Pan Tool — moves the photo in the cell to show hidden areas
6 Click in a text cell, and type your message in the Text field on the
task panel.
82 Corel Snapfire Plus User Guide
Page 89

7 To change the text format, select the text, and apply any of the
following controls:
• Bold — applies bold formatting to text
• Italic — applies italic formatting to text
• Underline — underlines text
• Size drop-list — changes the text size
• Color box — changes the text color or lets you create a custom
color
• Left
, Center , or Right — aligns text
• Top
, Middle , or Bottom — aligns text margins
You can also
Open an existing project Click the Open Project button
on the toolbar.
Create a new project Click the New Project button on
the toolbar.
Add additional pages Click the Add Page button on the
toolbar.
View a preview of the selected page Click the View Preview button
on the toolbar.
Change the page view Click the View Multipage button
on the toolbar.
Change the page orientation Click the View Page Horizontal
or View Page Vertical button on
the toolbar.
Save your project Click the Save button on the
toolbar.
The pages are saved in the Snapfire
Project File (.SnapfireProject) format.
Print your project Click the Print button on the
toolbar.
Creating projects 83
Page 90

For best print results, use a photo-quality printer and paper, and
adjust the printer to use the highest quality settings.
Creating magazine covers
You can create magazine covers that feature your photos.
To create a magazine cover
1 Drag the photos for your magazine cover into a photo tray.
2 In the task panel, select Create, and click Magazine Cover.
3 In the task panel, click Select Layout, and choose a layout for your
magazine cover.
4 Drag photos from the photo tray into the cells of the layout.
5 Arrange photos in the cells by selecting a cell and using any of the
following options or controls:
• Fill Frame — enlarges the photo to fill the cell
• Fit to Frame — fits the entire photo in the cell
• Rotate Right or Rotate Left buttons — changes the photo
orientation
• Zoom Tool — increases or decreases the size of the photo in the
cell
• Pan Tool — moves the photo in the cell to show hidden areas
6 Click in a text cell, and type your message in the Text field on the
task panel.
7 To change the text format, select the text, and apply any of the
following controls:
• Bold — applies bold formatting to text
• Italic — applies italic formatting to text
• Underline — underlines text
• Size drop-list — changes the text size
• Color box — changes the text color or lets you create a custom
color
84 Corel Snapfire Plus User Guide
Page 91

• Left , Center , or Right — aligns text
• Top
, Middle , or Bottom — aligns text margins
You can also
Open an existing project Click the Open Project button
on the toolbar.
Create a new project Click the New Project button on
the toolbar.
Add additional pages Click the Add Page button on the
toolbar.
View a preview of the selected page Click the View Preview button
on the toolbar.
Change the page view Click the View Multipage button
on the toolbar.
Change the page orientation Click the View Page Horizontal
or View Page Vertical button on
the toolbar.
Save your project Click the Save button on the
toolbar.
The pages are saved in the Snapfire
Project File (.SnapfireProject) format.
Print your project Click the Print button on the
toolbar.
For the best print results, use a photo-quality printer and paper,
and adjust the printer to use the highest quality settings.
Creating projects 85
Page 92

86 Corel Snapfire Plus User Guide
Page 93

Choosing program preferences
Using the Preferences dialog box, you can control advanced program
features, such as options for file format association, thumbnails, and
multimedia. You can also reset program warning messages.
In this section, you’ll learn about
• resetting program warning messages
• choosing file format associations
• choosing thumbnail preferences
• choosing multimedia preferences
Resetting program warning messages
If you have disabled warning messages by choosing not to show the
message again, you can reset the warning messages so that they are
displayed.
To reset program warning messages
1 Choose File
2 In the General group box, click Reset W a rnings, and clic k OK.
! Preferences to open the Preferences dialog box.
Choosing file format associations
You can have certain file formats (such as JPEG) automatically open in
the program when you double-click the icons on the Windows desktop.
The associated files display the program icon.
File format associations control how the program interacts with many
types of file formats. Changes in file format extensions do not take
effect until the next time you start the program.
Choosing program preferences 87
Page 94

To choose file format associations
1 Choose File
! Preferences to open the Preferences dialog box.
2 In the General group box, click File Associations to open the File
Format Associations dialog box.
3 Mark one of the following check boxes:
• T o associate all listed formats that are not alr eady associated with
other applications, click the Select Unused button.
• To associate no file formats with the program, click the Remove
All button.
4 Click OK.
You can also
Associate all listed formats Click Select All.
Associate all listed formats that are
not already associated with other
applications
Associate no file formats with the
program
Click Select Unused.
Click Remove All.
To set file extensions
1 Choose File
! Preferences to open the Preferences dialog box.
2 In the General group box, click the File Associations button to open
the File Format Associations dialog box.
3 Mark the file format check boxes that contain the extensions you
want to set, and click OK.
You can also
Add a file extension Click Extensions in the File Format
Association dialog box. Click Add in
the Extensions dialog box, type in
the new extension, and click OK.
88 Corel Snapfire Plus User Guide
Page 95

You can also
Delete a file extension Click Extensions in the File Format
Association dialog box. In the
Extensions dialog box, select the
extension from the list, and click
Delete.
Reset a format to its default
extension
Make an extension the preferred
choice
Click Extensions in the File Format
Association dialog box. In the
Extensions dialog box, select the
extension from the list, and click
Reset.
Click Extensions in the File Format
Association dialog box. In the
Extensions dialog box, select the
extension, and click Preferred.
Choosing thumbnail preferences
You can choose whether to display photo ratings and filenames on the
photo thumbnails. You can also change how the thumbnails appear in
Organize mode.
To choose thumbnail preferences
1 Choose File
2 In the Organizer group box, perform one or more tasks from the
following table, and click OK.
To Do the following
Display thumbnails in a column Mark the Display variable with
! Preferences to open the Preferences dialog box.
thumbnail images check box.
Show photo ratings on thumbnails Mark the Show ratings with
thumbnail images check box.
Choosing program preferences 89
Page 96

To Do the following
Show photo filenames on
thumbnails
Mark the Show file name with
thumbnail images check box.
Choosing multimedia preferences
You can change the default output size of an exported video. You can
specify whether you plan to play the video from a DVD, the Web, or on
a high-definition television.
If your exported video fails to play, you can select a different video or
audio compression method.
To choose multimedia preferences
1 Choose File
2 In the Multimedia group box, perform one or more tasks from the
following table, and click OK.
To Do the following
Change the video size Choose a new size from the Video
Change the video compression Choose a new compressor from the
Change the audio compression Choose a new compressor from the
! Preferences to open the Preferences dialog box.
Size drop-list.
Video Compressor drop-list.
Audio Compressor drop-list.
90 Corel Snapfire Plus User Guide
Page 97

Index
A
album pages . . . . . . . . . . . . . . 80
creating . . . . . . . . . . . . . . . . . 80
aligning text . . . . . . . . . . . . . . . 61
application settings
See program preferences
associating file formats . . . . . 87
attaching files to e-mail . . . . . 28
audio
adding to Snapfire Shows . . . 67
compressing . . . . . . . . . . . . . 90
awards . . . . . . . . . . . . . . . . . . . 82
B
backing up photos . . . . . . . . . 45
with PhotoSafe Backup . . . . . 45
black-and-white effect . . . . . 59
blemishes, removing facial . . 54
brightening photos . . . . . . . . . 52
browsing folders . . . . . . . . . . . 13
burning files
with Quick Disc . . . . . . . . . . . 46
C
Calendar
finding photos with . . . . . . . 35
calendars . . . . . . . . . . . . . . . . . 78
creating . . . . . . . . . . . . . . . . . 78
cameras
erasing photos from . . . . . . . 12
using Corel Photo Downloader
with . . . . . . . . . . . . . . . . . 10
captions, photo
adding . . . . . . . . . . . . . . . . . . 43
displaying . . . . . . . . . . . . . . . 67
card readers
using Corel Photo Downloader
with . . . . . . . . . . . . . . . . . 10
cards, greeting . . . . . . . . . . . . 77
CDs
backing up photos to . . . . . . 45
burning files to . . . . . . . . . . . 46
using Corel Photo Downloader
with . . . . . . . . . . . . . . . . . . 10
certificates . . . . . . . . . . . . . . . . 82
creating . . . . . . . . . . . . . . . . . 82
closing
Corel Snapfire Plus . . . . . . . . . 2
folders . . . . . . . . . . . . . . . . . . 16
photos . . . . . . . . . . . . . . . . . . 15
collages . . . . . . . . . . . . . . . . . . 75
creating . . . . . . . . . . . . . . . . . 75
compression
audio . . . . . . . . . . . . . . . . . . . 90
video . . . . . . . . . . . . . . . . . . . 90
contrast, adjusting . . . . . . . . . 52
copying photos
into folders . . . . . . . . . . . . . . 19
into other open applications 19
Corel Corporation . . . . . . . . . . 4
Index 91
Page 98

Corel Paint Shop Pro Photo
opening to fix photos . . . . . . 49
Corel Photo Downloader . . . . .9
choosing options for . . . . . . . 10
using with cameras or
card readers . . . . . . . . . . . 10
using with photo CDs . . . . . . 10
Corel products
registering . . . . . . . . . . . . . . . . 2
updating . . . . . . . . . . . . . . . . . 3
Corel Snapfire Plus SE . . . . . . . . 1
Corel Support Services . . . . . . . 3
correcting photos . . . . . . . . . .49
See also fixing photos
with basic techniques . . . . . .51
in Corel Paint Shop Pro Photo 49
with cosmetic techniques . . . 54
with Photo Doctor . . . . . . . . . 50
cosmetic corrections . . . . . . . 54
covers, magazine . . . . . . . . . . 84
cropping photos . . . . . . . . . . . 56
customer support . . . . . . . . . . . 3
D
darkening photos . . . . . . . . . . 52
date modified
sorting photos by . . . . . . . . . 17
date taken
changing . . . . . . . . . . . . . . . .41
sorting photos by . . . . . . . . . 17
deleting photos . . . . . . . . . . . .21
from camera upon download 12
from photo trays . . . . . . . . . .24
dialog boxes
viewing Help for . . . . . . . . . . . 7
documentation conventions . .5
downloading photos . . . . . . . . 9
avoiding duplication when . . 12
choosing options for . . . . . . . 11
with Corel Photo Downloader . 9
duration
setting for slides . . . . . . . . . . 68
DVDs
backing up photos to . . . . . . 45
burning files to . . . . . . . . . . . 46
E
edges, sharpening . . . . . . . . . 52
effects . . . . . . . . . . . . . . . . . . . . 59
black-and-white . . . . . . . . . . . 59
picture frame . . . . . . . . . . . . . 60
Picture Tube tool . . . . . . . . . . 59
sepia . . . . . . . . . . . . . . . . . . . 59
e-mail . . . . . . . . . . . . . . . . . 27–28
e-mail application
specifying default . . . . . . . . . 28
embedding photos in e-mail 28
enhancing photos . . . . . . . . . . 49
exiting . . . . . . . . . . . . . . . . . . . . . 2
extensions, file . . . . . . . . . . . . . 88
extracting video frames . . . . . 73
F
facial blemishes, removing . . 54
file extensions, setting . . . . . .88
92 Corel Snapfire Plus User Guide
Page 99

file formats
choosing associations . . . . . . 87
sorting photos by . . . . . . . . . 17
File menu
opening photos from . . . . . . 16
file size
sorting photos by . . . . . . . . . 17
filenames
saving photos to different . . . 20
saving photos to same . . . . . 20
sorting photos by . . . . . . . . . 17
files
burning with Quick Disc . . . . 46
finding photos . . . . . . . . . . . . . 33
by sorting thumbnails . . . . . . 17
with Calendar . . . . . . . . . . . . 35
with tags . . . . . . . . . . . . . . . . 35
fitting photos to windows . . . . 17
fixing photos . . . . . . . . . . . . . . 49
See also correcting photos
in Corel Paint Shop Pro Photo 49
in one step . . . . . . . . . . . . . . 51
with Photo Doctor . . . . . . . . 50
folder list . . . . . . . . . . . . . . . . . . 14
adding photos to . . . . . . . . . 14
removing folders from . . . . . 14
folders . . . . . . . . . . . . . . . . . . . . 13
adding to folder list . . . . . . . 14
browsing . . . . . . . . . . . . . . . . 13
changing default for
downloads . . . . . . . . . . . . . 12
closing . . . . . . . . . . . . . . . . . . 16
copying photos into . . . . . . . 19
moving photos between . . . . 18
naming for downloads . . . . . 12
opening photos in . . . . . . . . . 15
removing listed . . . . . . . . . . . 14
renaming . . . . . . . . . . . . . . . . 13
saving photos to different . . 20
saving photos to same . . . . . 20
sorting photos by . . . . . . . . . 17
specifying naming format for
downloads . . . . . . . . . . . . 12
formatting text . . . . . . . . . . . . . 61
frames, picture
adding . . . . . . . . . . . . . . . . . . 60
frames, video
choosing as thumbnails . . . . 72
extracting . . . . . . . . . . . . . . . 73
G
greeting cards . . . . . . . . . . . . . 77
creating . . . . . . . . . . . . . . . . . 77
H
Help system . . . . . . . . . . . . . . . . 5
using . . . . . . . . . . . . . . . . . . . . 6
I
information, photo
See photo information
L
learning . . . . . . . . . . . . . . . . . . . 5
lightening photos . . . . . . . . . . 52
listing folders . . . . . . . . . . . . . . 14
Index 93
Page 100

M
magazine covers . . . . . . . . . . 84
creating . . . . . . . . . . . . . . . . . 84
Makeover tool . . . . . . . . . . . . . 54
Message Center . . . . . . . . . . . .1
messages, warning
resetting . . . . . . . . . . . . . . . . 87
metadata . . . . . . . . . . . . . . . . . 43
changing . . . . . . . . . . . . . . . .44
montages . . . . . . . . . . . . . . . . . 75
mouse wheel
zooming with . . . . . . . . . . . . 17
moving photos . . . . . . . . . . . . . 18
between folders . . . . . . . . . . .18
multimedia preferences . . . . 90
O
one-step photo fixes . . . . . . . . 51
opening
Corel Paint Shop Pro Photo . .49
Corel Snapfire Plus . . . . . . . . . 2
photos . . . . . . . . . . . . . . . . . .15
ordering prints . . . . . . . . . . . . . 30
Organizer
selecting photos from . . . . . . 18
P
pages, album . . . . . . . . . . . . .80
painting with Picture Tubes . .59
panning . . . . . . . . . . . . . . . . . .16
photos . . . . . . . . . . . . . . . . . .16
Snapfire Show slides . . . . . . . 68
photo corrections
See correcting photos
Photo Doctor . . . . . . . . . . . . . . 50
applying recommendations . . 50
Photo Fix . . . . . . . . . . . . . . . . . . 51
using . . . . . . . . . . . . . . . . . . . 51
photo information
advanced . . . . . . . . . . . . . . . . 43
captions . . . . . . . . . . . . . . . . .43
changing . . . . . . . . . . . . . . . .41
photo ratings . . . . . . . . . . . . . 42
recorded date . . . . . . . . . . . . 41
searching for photos with . . . 33
tags . . . . . . . . . . . . . . . . . . . . 42
photo ratings . . . . . . . . . . . . . . 42
choosing . . . . . . . . . . . . . . . . 42
sorting photos by . . . . . . . . . 17
photo trays . . . . . . . . . . . . . . . . 23
adding . . . . . . . . . . . . . . . . . . 23
adding contents to
Storyboard . . . . . . . . . . . . 65
adding photos to . . . . . . . . . . 24
removing . . . . . . . . . . . . . . . . 23
removing photos from . . . . . 24
renaming . . . . . . . . . . . . . . . . 24
selecting photos from . . . . . . 18
PhotoSafe Backup . . . . . . . . . 45
using . . . . . . . . . . . . . . . . . . . 45
photo-sharing services
ordering prints from . . . . . . .30
picture frames
adding . . . . . . . . . . . . . . . . . . 60
Picture Tube tool
painting with . . . . . . . . . . . . . 59
94 Corel Snapfire Plus User Guide
 Loading...