

Page 1
User Guide
Co re
Page 2

Copyright © 2014 Corel Corporation. All rights reserved.
Corel® PHOTO-PAINT™ X7 User Guide
Protected by one or more of the following United States Patents and their foreign counterparts: 6195100; 6552725; 6657739; 6825859;
6959422; 7086006; 7207047; 7256793; 7515752; 7640500; 6731309; 7827483; 8397176.
Product specifications, pricing, packaging, technical support and information (“specifications”) refer to the retail English version only. The
specifications for all other versions (including other language versions) may vary.
Information is provided by Corel on an “as is” basis, without any other warranties or conditions, express or implied, including, but not limited
to, warranties of merchantable quality, satisfactory quality, merchantability or fitness for a particular purpose, or those arising by law, statute,
usage of trade, course of dealing or otherwise. The entire risk as to the results of the information provided or its use is assumed by you. Corel
shall have no liability to you or any other person or entity for any indirect, incidental, special, or consequential damages whatsoever, including,
but not limited to, loss of revenue or profit, lost or damaged data or other commercial or economic loss, even if Corel has been advised of the
possibility of such damages, or they are foreseeable. Corel is also not liable for any claims made by any third party. Corel's maximum aggregate
liability to you shall not exceed the costs paid by you to purchase the materials. Some states/countries do not allow exclusions or limitations of
liability for consequential or incidental damages, so the above limitations may not apply to you.
Corel, the Corel logo, the Corel balloon, CorelDRAW, Corel DESIGNER, Corel PHOTO-PAINT, ConceptShare, Corel CONNECT, Corel CAPTURE,
Knowledge Base, Corel PaintShop Pro, Corel Painter, PowerClip, Corel VideoStudio, and WordPerfect are trademarks or registered trademarks
of Corel Corporation and/or its subsidiaries in Canada, the U.S., and/or other countries. Other product, font, and company names and logos
may be trademarks or registered trademarks of their respective companies.
230124
Page 3

Contents
Getting started...................................................................................................................................................................................... 1
Installing CorelDRAW Graphics Suite...................................................................................................................................................... 3
System requirements.........................................................................................................................................................................3
Preparing for installation.................................................................................................................................................................. 3
Installing CorelDRAW Graphics Suite applications............................................................................................................................. 4
Installation options........................................................................................................................................................................... 4
Modifying and repairing installations................................................................................................................................................6
Uninstalling CorelDRAW Graphics Suite............................................................................................................................................ 6
Frequently Asked Questions..............................................................................................................................................................6
Corel memberships and services............................................................................................................................................................. 9
CorelDRAW memberships................................................................................................................................................................. 9
Using your account........................................................................................................................................................................ 10
Updating Corel products................................................................................................................................................................ 10
Corel Support Services.................................................................................................................................................................... 10
About Corel....................................................................................................................................................................................11
What’s new in CorelDRAWGraphics SuiteX7?.................................................................................................................................... 13
Get up and running easily..............................................................................................................................................................13
Work faster and more efficiently.................................................................................................................................................... 16
Design with creativity and confidence............................................................................................................................................ 20
Share and expand your experience................................................................................................................................................. 24
Finding out what was new in previous versions............................................................................................................................. 25
Learning resources................................................................................................................................................................................27
Getting help................................................................................................................................................................................... 27
Using the Help and tooltips........................................................................................................................................................... 28
Quick Start Guide........................................................................................................................................................................... 29
Insights from the Experts................................................................................................................................................................29
Video learning resources.................................................................................................................................................................29
Using Hints.....................................................................................................................................................................................30
Welcome screen............................................................................................................................................................................. 30
Contents | 1
Page 4

Tips and Tricks................................................................................................................................................................................31
Macro programming guide............................................................................................................................................................ 31
Network deployment guide............................................................................................................................................................ 31
Web-based resources......................................................................................................................................................................31
Customized training and integration resources...............................................................................................................................32
Starting and setting up........................................................................................................................................................................ 33
Starting and quitting Corel PHOTO-PAINT...................................................................................................................................... 33
Changing languages....................................................................................................................................................................... 33
Changing startup settings...............................................................................................................................................................34
Corel PHOTO-PAINT workspace tour..................................................................................................................................................... 35
Corel PHOTO-PAINT terms.............................................................................................................................................................. 35
Corel PHOTO-PAINT application window........................................................................................................................................ 36
Choosing a workspace....................................................................................................................................................................38
Toolbars..........................................................................................................................................................................................39
Toolbox...........................................................................................................................................................................................41
Property bar....................................................................................................................................................................................48
Dockers...........................................................................................................................................................................................48
Color palette...................................................................................................................................................................................50
Status bar.......................................................................................................................................................................................50
Setting options..................................................................................................................................................................................... 51
Changing workspace options..........................................................................................................................................................51
Disabling warning messages...........................................................................................................................................................52
Bringing images into Corel PHOTO-PAINT.............................................................................................................................................53
Opening images............................................................................................................................................................................. 53
Importing files................................................................................................................................................................................ 54
Scanning images............................................................................................................................................................................ 57
Creating images..............................................................................................................................................................................57
Working with multiple images........................................................................................................................................................59
Working with vector graphics.........................................................................................................................................................59
Displaying images and image information............................................................................................................................................61
Viewing images.............................................................................................................................................................................. 61
2 | Corel PHOTO-PAINT X7 User Guide
Page 5

Zooming.........................................................................................................................................................................................63
Viewing image information............................................................................................................................................................ 64
Refreshing the image window........................................................................................................................................................ 64
Detecting and embedding Digimarc watermarks............................................................................................................................ 65
Using the guidelines, grid, and rulers................................................................................................................................................... 67
Setting up guidelines......................................................................................................................................................................67
Setting up the grid.........................................................................................................................................................................70
Setting up the rulers...................................................................................................................................................................... 71
Undoing, redoing, repeating, and fading actions................................................................................................................................. 75
Undoing and redoing actions......................................................................................................................................................... 75
Reverting to an earlier image state................................................................................................................................................. 76
Repeating and fading actions......................................................................................................................................................... 77
Saving and closing............................................................................................................................................................................... 79
Saving images................................................................................................................................................................................ 79
Exporting images to other file formats........................................................................................................................................... 81
Working with locked files............................................................................................................................................................... 82
Closing images............................................................................................................................................................................... 82
Finding and managing content............................................................................................................................................................ 83
Exploring Corel CONNECT...............................................................................................................................................................83
Accessing content...........................................................................................................................................................................88
Browsing and searching for content...............................................................................................................................................90
Viewing content............................................................................................................................................................................. 92
Using content.................................................................................................................................................................................93
Installing fonts................................................................................................................................................................................95
Managing content.......................................................................................................................................................................... 95
Syncing trays with OneDrive........................................................................................................................................................... 96
Content types................................................................................................................................................................................. 98
Collaborating...................................................................................................................................................................................... 101
Using ConceptShare..................................................................................................................................................................... 101
Editing images................................................................................................................................................................................... 103
Contents | 3
Page 6

Changing image dimensions, resolution, and paper size.................................................................................................................... 105
Changing image dimensions.........................................................................................................................................................105
Changing image resolution...........................................................................................................................................................106
Changing paper size..................................................................................................................................................................... 107
Cropping, stitching, scaling, and changing orientation....................................................................................................................... 109
Cropping images.......................................................................................................................................................................... 109
Stitching images together.............................................................................................................................................................111
Scaling images by using Smart Carver.......................................................................................................................................... 112
Straightening images.................................................................................................................................................................... 114
Rotating and flipping images....................................................................................................................................................... 116
Retouching......................................................................................................................................................................................... 119
Improving scanned images........................................................................................................................................................... 119
Removing red-eye......................................................................................................................................................................... 120
Removing dust and scratch marks................................................................................................................................................ 121
Cloning image areas..................................................................................................................................................................... 123
Sharpening images....................................................................................................................................................................... 125
Removing artifacts and noise from JPEG images...........................................................................................................................126
Erasing image areas......................................................................................................................................................................126
Smearing, smudging, and blending colors....................................................................................................................................128
Adjusting color and tone....................................................................................................................................................................131
Using the Image Adjustment Lab................................................................................................................................................. 131
Using individual color-adjustment effects and tools...................................................................................................................... 135
Exploring adjustment filters.......................................................................................................................................................... 139
Working with color channels........................................................................................................................................................ 143
Working with lenses........................................................................................................................................................................... 147
Creating lenses............................................................................................................................................................................. 147
Editing lenses............................................................................................................................................................................... 150
Combining lenses with the image background............................................................................................................................. 152
Reshaping image areas....................................................................................................................................................................... 153
Smearing image areas.................................................................................................................................................................. 153
Adding twirl effects...................................................................................................................................................................... 154
4 | Corel PHOTO-PAINT X7 User Guide
Page 7

Reshaping image areas by pulling or pushing away pixels............................................................................................................ 155
Color, fills, and transparencies...........................................................................................................................................................157
Working with color............................................................................................................................................................................ 159
Understanding color models.........................................................................................................................................................159
Understanding color depth...........................................................................................................................................................161
Choosing colors............................................................................................................................................................................ 161
Using the Image palette............................................................................................................................................................... 168
Creating and editing custom color palettes.................................................................................................................................. 169
Organizing and displaying color palettes...................................................................................................................................... 172
Displaying or hiding color palettes in the Palette libraries............................................................................................................. 173
Setting the properties of color palettes........................................................................................................................................ 174
Using spot color channels............................................................................................................................................................ 175
Changing color modes....................................................................................................................................................................... 179
Changing the color mode of images............................................................................................................................................ 179
Converting images to the black-and-white color mode.................................................................................................................181
Converting images to the paletted color mode.............................................................................................................................181
Converting images to the duotone color mode............................................................................................................................ 183
Using color management................................................................................................................................................................... 185
Understanding color management............................................................................................................................................... 185
Getting started with color management in Corel PHOTO-PAINT....................................................................................................189
Installing, loading, and embedding color profiles......................................................................................................................... 190
Assigning color profiles................................................................................................................................................................ 191
Converting colors to other color profiles...................................................................................................................................... 192
Choosing color-conversion settings............................................................................................................................................... 193
Soft proofing................................................................................................................................................................................ 193
Working with color management presets.....................................................................................................................................196
Working with color management policies.....................................................................................................................................196
Managing colors when opening documents.................................................................................................................................198
Managing colors when importing and pasting files...................................................................................................................... 198
Managing colors for print............................................................................................................................................................ 199
Contents | 5
Page 8

Using a safe CMYK workflow....................................................................................................................................................... 199
Managing colors for online viewing............................................................................................................................................. 200
Filling images......................................................................................................................................................................................201
Applying uniform fills................................................................................................................................................................... 201
Applying fountain fills.................................................................................................................................................................. 202
Applying bitmap pattern fills........................................................................................................................................................ 205
Applying texture fills.....................................................................................................................................................................207
Applying transparency patterns to fills..........................................................................................................................................208
Working with transparency.................................................................................................................................................................209
Applying uniform transparency.....................................................................................................................................................209
Applying fountain transparency.................................................................................................................................................... 210
Applying bitmap pattern transparency..........................................................................................................................................212
Applying texture transparency...................................................................................................................................................... 213
Applying transparency by using brushstrokes............................................................................................................................... 214
Making selected colors in objects transparent.............................................................................................................................. 215
Blending objects........................................................................................................................................................................... 215
Managing and sharing fills and transparencies...................................................................................................................................217
Managing fills and transparencies................................................................................................................................................ 217
Saving and sharing fills and transparencies.................................................................................................................................. 219
Masks and paths............................................................................................................................................................................... 221
Working with masks...........................................................................................................................................................................223
Distinguishing protected and editable areas................................................................................................................................. 223
Defining editable areas................................................................................................................................................................. 225
Defining editable areas by using color information.......................................................................................................................229
Expanding and contracting editable areas.................................................................................................................................... 231
Inverting and removing masks......................................................................................................................................................234
Moving and aligning editable areas..............................................................................................................................................234
Transforming editable areas.......................................................................................................................................................... 236
Adjusting the edges of editable areas.......................................................................................................................................... 238
Adjusting the transparency of masks............................................................................................................................................ 240
Cutting out images.......................................................................................................................................................................241
6 | Corel PHOTO-PAINT X7 User Guide
Page 9

Using paths to define image areas..................................................................................................................................................... 245
Creating paths.............................................................................................................................................................................. 245
Managing paths........................................................................................................................................................................... 247
Shaping paths.............................................................................................................................................................................. 249
Adding and deleting path nodes.................................................................................................................................................. 250
Joining and breaking paths.......................................................................................................................................................... 251
Changing node types................................................................................................................................................................... 252
Applying brushstrokes to paths.................................................................................................................................................... 253
Working with clipping paths........................................................................................................................................................ 254
Managing multiple masks with alpha channels.................................................................................................................................. 257
Creating and editing alpha channels............................................................................................................................................ 257
Saving masks and alpha channels................................................................................................................................................ 258
Loading masks and alpha channels.............................................................................................................................................. 259
Managing alpha channels.............................................................................................................................................................260
Painting and special effects............................................................................................................................................................... 263
Drawing and painting........................................................................................................................................................................ 265
Drawing shapes and lines.............................................................................................................................................................265
Applying brushstrokes.................................................................................................................................................................. 268
Spraying images........................................................................................................................................................................... 272
Painting symmetrical patterns and orbits...................................................................................................................................... 274
Repeating brushstrokes.................................................................................................................................................................276
Creating custom brushes.............................................................................................................................................................. 276
Using a pressure-sensitive pen...................................................................................................................................................... 278
Understanding merge modes....................................................................................................................................................... 280
Applying special effects...................................................................................................................................................................... 283
Working with special effects.........................................................................................................................................................283
Applying preset styles................................................................................................................................................................... 285
Applying color and tone effects................................................................................................................................................... 285
Special effects categories.............................................................................................................................................................. 286
Applying Bevel effects...................................................................................................................................................................293
Contents | 7
Page 10

Applying the Bokeh Blur effect..................................................................................................................................................... 293
Applying Lens Flare effects........................................................................................................................................................... 295
Applying Lighting effects.............................................................................................................................................................. 295
Adding photo frames................................................................................................................................................................... 296
Gallery of special effects............................................................................................................................................................... 297
Managing plug-ins....................................................................................................................................................................... 306
Objects...............................................................................................................................................................................................309
Working with objects......................................................................................................................................................................... 311
Creating objects............................................................................................................................................................................312
Changing object properties...........................................................................................................................................................313
Selecting objects...........................................................................................................................................................................314
Moving, copying, and deleting objects......................................................................................................................................... 315
Displaying and arranging objects..................................................................................................................................................317
Aligning and distributing objects..................................................................................................................................................318
Using alignment guides................................................................................................................................................................ 320
Locking objects.............................................................................................................................................................................322
Grouping and combining objects................................................................................................................................................. 322
Choosing a merge mode for grouped objects.............................................................................................................................. 324
Working with clipping groups...................................................................................................................................................... 325
Modifying objects............................................................................................................................................................................... 327
Transforming objects.................................................................................................................................................................... 327
Cropping objects.......................................................................................................................................................................... 331
Changing the edges of objects..................................................................................................................................................... 331
Adding drop shadows to objects..................................................................................................................................................334
Using clip masks...........................................................................................................................................................................336
Protecting the area around an object........................................................................................................................................... 338
Linking and embedding objects..........................................................................................................................................................339
Inserting linked or embedded objects into another application.....................................................................................................339
Editing linked or embedded objects............................................................................................................................................. 340
Text.....................................................................................................................................................................................................341
8 | Corel PHOTO-PAINT X7 User Guide
Page 11

Creating and formatting text.............................................................................................................................................................. 343
Adding and selecting text.............................................................................................................................................................343
Adding color to text..................................................................................................................................................................... 344
Formatting text.............................................................................................................................................................................346
Working with OpenType features..................................................................................................................................................347
Inserting special characters, symbols, and glyphs..........................................................................................................................351
Kerning, shifting, and rotating text...............................................................................................................................................354
Aligning text.................................................................................................................................................................................354
Adjusting line, character, and word spacing................................................................................................................................. 355
Anti-aliasing text...........................................................................................................................................................................355
Fitting text to a path....................................................................................................................................................................356
Previewing fonts........................................................................................................................................................................... 357
Choosing fonts with Font Playground...........................................................................................................................................358
Identifying fonts........................................................................................................................................................................... 360
Working with legacy text..............................................................................................................................................................360
Working with text in different languages........................................................................................................................................... 361
Modifying encoding settings to display text correctly................................................................................................................... 361
Working with Asian and Middle Eastern text................................................................................................................................362
OpenType support for Asian text.................................................................................................................................................. 363
Web images and movies................................................................................................................................................................... 365
Creating and editing movies...............................................................................................................................................................367
Opening and playing movies........................................................................................................................................................ 367
Creating movies............................................................................................................................................................................368
Modifying frame sequence and frame display time...................................................................................................................... 370
Saving movies...............................................................................................................................................................................372
Creating images for the web..............................................................................................................................................................375
Exporting images for the web...................................................................................................................................................... 375
Saving and applying web presets................................................................................................................................................. 380
Creating palette-based images with transparent colors and backgrounds..................................................................................... 381
Creating image maps................................................................................................................................................................... 382
Contents | 9
Page 12

Slicing images...............................................................................................................................................................................383
Creating and editing rollovers.......................................................................................................................................................386
E-mailing images.......................................................................................................................................................................... 389
Printing.............................................................................................................................................................................................. 391
Printing basics.................................................................................................................................................................................... 393
Printing your work........................................................................................................................................................................393
Laying out print jobs.................................................................................................................................................................... 394
Previewing print jobs.................................................................................................................................................................... 395
Applying print styles..................................................................................................................................................................... 396
Fine-tuning print jobs................................................................................................................................................................... 397
Printing colors accurately.............................................................................................................................................................. 397
Printing to a PostScript printer..................................................................................................................................................... 399
Viewing preflight summaries........................................................................................................................................................ 401
Preparing files for print service providers............................................................................................................................................ 403
Preparing a print job for a print service provider.......................................................................................................................... 403
Working with imposition layouts.................................................................................................................................................. 404
Printing printers’ marks................................................................................................................................................................ 406
Printing color separations............................................................................................................................................................. 408
Working with color trapping and overprinting............................................................................................................................. 409
Printing to film............................................................................................................................................................................. 410
Working with a print service provider...........................................................................................................................................410
File formats........................................................................................................................................................................................413
Exporting to PDF................................................................................................................................................................................ 415
Exporting documents as PDF files................................................................................................................................................. 415
Including hyperlinks, bookmarks, and thumbnails in PDF files.......................................................................................................417
Reducing the size of PDF files...................................................................................................................................................... 418
Specifying an encoding format for PDF files................................................................................................................................. 419
Specifying color management options for exporting PDF files.......................................................................................................419
Setting security options for PDF files............................................................................................................................................ 420
Optimizing PDF files..................................................................................................................................................................... 421
10 | Corel PHOTO-PAINT X7 User Guide
Page 13

Viewing preflight summaries for PDF files.................................................................................................................................... 422
Preparing PDF files for a print provider.........................................................................................................................................422
Working with office productivity applications.....................................................................................................................................425
Exporting files to office productivity applications.......................................................................................................................... 425
Adding objects to documents...................................................................................................................................................... 425
Working with RAW camera files......................................................................................................................................................... 427
Using RAW camera files............................................................................................................................................................... 427
Bringing RAW camera files into Corel PHOTO-PAINT.....................................................................................................................428
Adjusting the color and tone of RAW camera files.......................................................................................................................430
Sharpening and reducing noise in RAW camera files.................................................................................................................... 432
Previewing RAW camera files and obtaining image information................................................................................................... 433
Supported file formats........................................................................................................................................................................435
Adobe Illustrator (AI).................................................................................................................................................................... 436
Windows Bitmap (BMP)................................................................................................................................................................436
OS/2 Bitmap (BMP).......................................................................................................................................................................437
Computer Graphics Metafile (CGM)..............................................................................................................................................437
CorelDRAW (CDR)......................................................................................................................................................................... 438
Corel Presentation Exchange (CMX).............................................................................................................................................. 438
Corel PHOTO-PAINT (CPT)............................................................................................................................................................. 438
Cursor Resource (CUR).................................................................................................................................................................. 439
AutoCAD Drawing Database (DWG) and AutoCAD Drawing Interchange Format (DXF).................................................................439
Encapsulated PostScript (EPS)....................................................................................................................................................... 440
PostScript (PS or PRN)...................................................................................................................................................................442
GIF................................................................................................................................................................................................443
JPEG (JPG).................................................................................................................................................................................... 444
JPEG 2000 (JP2)........................................................................................................................................................................... 444
Kodak Photo CD Image (PCD).......................................................................................................................................................446
PICT (PCT)..................................................................................................................................................................................... 447
PaintBrush (PCX)........................................................................................................................................................................... 447
Adobe Portable Document Format (PDF)...................................................................................................................................... 448
Contents | 11
Page 14

HPGL Plotter File (PLT).................................................................................................................................................................. 448
Portable Network Graphics (PNG)................................................................................................................................................. 449
Adobe Photoshop (PSD)............................................................................................................................................................... 450
Corel Painter (RIF)......................................................................................................................................................................... 451
TARGA (TGA)................................................................................................................................................................................452
TIFF...............................................................................................................................................................................................453
Corel Paint Shop Pro (PSP)............................................................................................................................................................453
WordPerfect Graphic (WPG)..........................................................................................................................................................454
RAW camera file formats..............................................................................................................................................................454
Wavelet Compressed Bitmap (WI).................................................................................................................................................454
Windows Metafile Format (WMF).................................................................................................................................................454
Additional file formats.................................................................................................................................................................. 455
Recommended formats for importing graphics.............................................................................................................................455
Recommended formats for exporting graphics............................................................................................................................. 456
Customizing and automating............................................................................................................................................................ 457
Customizing Corel PHOTO-PAINT........................................................................................................................................................459
Creating workspaces.....................................................................................................................................................................459
Customizing keyboard shortcuts................................................................................................................................................... 461
Customizing menus...................................................................................................................................................................... 462
Customizing toolbars....................................................................................................................................................................463
Customizing the toolbox.............................................................................................................................................................. 466
Customizing the property bar.......................................................................................................................................................466
Customizing the status bar...........................................................................................................................................................467
Customizing filters........................................................................................................................................................................ 468
Customizing file associations........................................................................................................................................................ 469
Using macros and scripts to automate tasks...................................................................................................................................... 471
Working with macros................................................................................................................................................................... 471
Working with scripts.................................................................................................................................................................... 476
Reference........................................................................................................................................................................................... 481
Corel PHOTO-PAINT for Adobe Photoshop users.................................................................................................................................483
12 | Corel PHOTO-PAINT X7 User Guide
Page 15

Comparing terminology................................................................................................................................................................ 483
Comparing tools...........................................................................................................................................................................484
Glossary.............................................................................................................................................................................................. 487
Contents | 13
Page 16

14 | Corel PHOTO-PAINT X7 User Guide
Page 17

Getting started
Installing CorelDRAW Graphics Suite....................................................................................................................................................... 3
Corel memberships and services.............................................................................................................................................................. 9
What’s new in CorelDRAWGraphics SuiteX7?...................................................................................................................................... 13
Learning resources................................................................................................................................................................................. 27
Starting and setting up......................................................................................................................................................................... 33
Corel PHOTO-PAINT workspace tour...................................................................................................................................................... 35
Setting options...................................................................................................................................................................................... 51
Bringing images into Corel PHOTO-PAINT..............................................................................................................................................53
Displaying images and image information............................................................................................................................................. 61
Using the guidelines, grid, and rulers....................................................................................................................................................67
Undoing, redoing, repeating, and fading actions.................................................................................................................................. 75
Saving and closing.................................................................................................................................................................................79
Finding and managing content............................................................................................................................................................. 83
Collaborating....................................................................................................................................................................................... 101
Getting started | 1
Page 18

2 | Corel PHOTO-PAINT X7 User Guide
Page 19

Installing CorelDRAW Graphics Suite
This section contains the following topics:
• “System requirements” (page 3)
• “Preparing for installation” (page 3)
• “Installing CorelDRAW Graphics Suite applications” (page 4)
• “Installation options” (page 4)
• “Modifying and repairing installations” (page 6)
• “Uninstalling CorelDRAW Graphics Suite” (page 6)
• “Frequently Asked Questions” (page 6)
System requirements
The following list includes the minimum system requirements. Note that for optimum performance, you need more RAM and hard disc
space than indicated in the list.
• Operating system with latest service pack: Windows 8 (32-bit or 64-bit Editions) or Windows 7 (32-bit or 64-bit Editions)
• Intel Core 2 Duo or AMD Athlon 64
• 2 GB RAM
• 1 GB hard disk space
Electronic software downloads (ESD) require more space to allow for the download, the uncompressed setup files, and the actual
installation, which includes copies the source files as well.
• Mouse or tablet
• 1280 x 768 screen resolution or greater
• DVD drive
• Microsoft Internet Explorer 8 or later
If the Microsoft .NET Framework is not available on your computer, it will be installed during product installation.
Preparing for installation
• Make sure that your system’s date and time are set correctly.
• Close all applications, including all virus detection programs and applications that are open in the system tray or on the Windows
taskbar. Not doing so may increase the installation time and interfere with the installation.
Installing CorelDRAW Graphics Suite | 3
Page 20

• Log in as an administrator.
• Make sure that you have enough free disk space available on the drive where you want to install the application.
• Delete the contents of the system’s TEMP folders to avoid file and memory conflicts. To navigate to the Temp folders, type %temp% in
the Search box on the Windows 7 Start menu or the Windows 8 desktop.
• Install CorelDRAW® Graphics Suite X7 in its own directory to avoid conflicts with previous versions.
Installing CorelDRAW Graphics Suite applications
The installation wizard makes it easy to install CorelDRAW Graphics Suite applications and components. You can choose a typical installation
to quickly install the suite, or you can customize the installation by choosing different options.
To install CorelDRAW Graphics Suite applications
1 Close all applications, including all virus detection programs.
2 Insert the DVD in the DVD drive.
(Windows 7 and Windows 8) If the installation wizard does not start automatically, browse to the root of the DVD, you must locate
setup.exe on the DVD, and double-click the file. Be sure to navigate to the folder that corresponds to the version of your operating
system: 64-Bit or 32-Bit.
3 Scroll down to read the license agreement, and then click I accept.
4 Click Next.
5 Type your name in the User name text box.
6 Type your serial number in the Serial number text box.
The serial number is not case-sensitive, and the dashes are optional.
7 Click Next.
8 Follow the instructions for installing the software.
Installation options
You can choose between two types of installations:
• Typicalinstallation — automatically installs the main programs and utilities of the suite to a default location in the Program Files folder.
If later you need a component that is not installed, you can modify your installation.
• Custominstallation — lets you choose additional features, exclude components that you don’t need, and specify where to install the
suite. For example, you can install desktop shortcuts or install Ghostscript for better handling of imported EPS and PDF files.
Programs
The following table lists the programs that are installed by default. To exclude a program from the installation, you must choose Custom
installation.
Program Description
CorelDRAW®
Corel® PHOTO-PAINT™
Corel® CONNECT™
Corel® CAPTURE™
An intuitive and versatile graphics application for creating highquality vector illustrations, logo designs, and page layouts
A complete image-editing application that lets you retouch and
enhance photos as well as create original bitmap illustrations and
paintings
An application that provides easy access to content such as clipart,
photos, and fonts
An easy-to-use application for capturing images from your
computer screen
4 | Corel PHOTO-PAINT X7 User Guide
Page 21

Program Description
Bitstream Font Navigator An application for browsing, organizing, and managing fonts
Program features and utilities
The following table lists the program features that you can install. Not all components are available in all versions of the software.
Feature or utility Description Notes
Writing Tools Include Spell Checker, Thesaurus, and
Grammatik in various languages to help you
proofread and edit documents
Duplexing Wizard Lets you configure a printer for two-sided
printing
Microsoft Visual Basic for Applications 7.1 A subset of the Microsoft Visual Basic
(VB) programming environment, which is
suitable for beginners.
Microsoft Visual Studio Tools for
Applications (VSTA)
A built-in program environment that allows
developers and other programming experts
to use VSTA for creating the most advanced
macro projects
Writing tools in the language of the
operating system are required and installed
by default. For example, the English writing
tools are installed by default on an English
operating system.
To install additional languages, you must
choose Custom installation, or modify your
installation later.
Requires Custom installation
You can use VBA to create basic macros
for personal use, but you can also use it to
create more advanced macro projects.
To use VSTA with CorelDRAW Graphics
Suite, you must have your own copy of
Microsoft Visual Studio 2012 or later
installed.
If you install Microsoft Visual Studio after
installing CorelDRAW Graphics Suite,
you must re-install the VSTA feature by
modifying your CorelDRAW Graphics Suite
installation. For more information, see “To
modify or repair a CorelDRAW Graphics
Suite X7 installation” on page 6.
Windows Shell Extension Lets you view thumbnails of native Corel
files such as CorelDRAW (CDR), Corel
PHOTO-PAINT (CPT), and pattern fill (FILL)
files.
GPL Ghostscript Highly recommended if you import EPS
and PDF files in your documents. This
feature lets you isolate and use individual
elements of imported EPS files rather than
only header images. It also improves the
import of PDF files generated by third-party
applications.
Additional options
The following table lists additional installation options.
If you have a previous version of
CorelDRAW Graphics Suite installed, this
option does not appear in the installation
wizard.
Requires Custom installation
Installing CorelDRAW Graphics Suite | 5
Page 22

Option Description Notes
Language packs Let you use the programs and Help in two
or more languages
Allow product updates Automatically downloads product updates
and asks you before installing them
Install desktop shortcuts Adds product icons to your desktop for easy
access
Copy installation files Lets you maintain and update the software
without using the installation disc
This option is included only with
multilingual versions of the software and
requires Custom installation.
Included with the Typical installation
Included with the Typical installation for trial
versions of the product, this option requires
Custom installation for all other versions.
Included with the Typical installation
Modifying and repairing installations
You can also use the installation wizard to do the following:
• modify the current installation by adding or deleting components
• repair the current installation by fixing errors such as missing or corrupt files as well as inaccurate shortcuts and registry entries
To modify or repair a CorelDRAW Graphics Suite X7 installation
1 Close all applications.
2 On the Windows Control Panel, click Uninstall a program.
3 Double-click CorelDRAW Graphics Suite on the Uninstall or change a program page.
4 Enable the Modify option or the Repair option in the wizard that appears, and follow the instructions.
Components that are already installed do not appear in the wizard, or their check boxes appear disabled.
Certain features, such as Copy installation files and Install desktop shortcuts, cannot be added by modifying your installation.
Uninstalling CorelDRAW Graphics Suite
You can uninstall CorelDRAW Graphics Suite from the Control Panel.
To uninstall CorelDRAW Graphics Suite
1 On the Windows Control Panel, click Uninstall a program.
2 Double-click CorelDRAW Graphics Suite on the Uninstall or change a program page.
3 Enable the Remove option in the wizard that appears, and follow the instructions.
To completely uninstall the product by removing user files, such as presets, user-created fills, and customized files, enable the Remove
user files check box.
Any additional components and applications that you installed with the suite, such as the CorelDRAW Graphics Suite X7 - Windows
Shell Extension or Microsoft Visual Studio Tools for Applications (VSTA), must be uninstalled separately.
Frequently Asked Questions
If your question is not included in the list below, visit Corel® Support Services, and search the Corel® Knowledge Base.
6 | Corel PHOTO-PAINT X7 User Guide
Page 23

• “I am upgrading my version of the software. Do I need to uninstall the previous version?” (page 7)
• “What is the difference between an upgrade and an update?” (page 7)
• “What if I lost my serial number and need to reinstall the software?” (page 7)
• “What is the difference between Typical and Custom installation? Which type of installation is suitable for me?” (page 7)
• “How do I deploy CorelDRAW Graphics Suite to my organization’s network?” (page 7)
I am upgrading my version of the software. Do I need to uninstall the previous version?
No, you don’t need to uninstall the previous version. By default, the new version is installed to a separate folder, which ensures that you
can work with both versions. Do not change the installation folder to install the upgrade and the previous version to the same folder.
What is the difference between an upgrade and an update?
An upgrade lets you install the latest major version of the software. After a major version is released, updates usually follow to offer
defect fixes, performance and stability improvements as well as new features for premium members. Updates have the name of the
major version with a number appended — for example, .1. By default, the application notifies you when a product update is available,
but you can also check for updates by clicking Help Updates.
What if I lost my serial number and need to reinstall the software?
For download versions, check the email you received from Corel when you purchased the product.
If you are a standard or a premium member, check your My accounts page on corel.com.
If you purchased a box, check the cover of the installation disk.
What is the difference between Typical and Custom installation? Which type of installation is suitable for me?
See “Installation options” on page 4.
How do I deploy CorelDRAW Graphics Suite to my organization’s network?
If you purchased multiple licenses of CorelDRAW Graphics Suite, you have the option of deploying the applications to your organization’s
network. The
CorelDRAW Graphics Suite X7
Deployment Guide provides more information about network installations. To purchase a
volume license of the software and obtain its deployment guide, please contact Corel Support Services.
Installing CorelDRAW Graphics Suite | 7
Page 24

8 | Corel PHOTO-PAINT X7 User Guide
Page 25

Corel memberships and services
This section contains the following topics:
• “CorelDRAW memberships” (page 9)
• “Using your account” (page 10)
• “Updating Corel products” (page 10)
• “Corel Support Services” (page 10)
• “About Corel” (page 11)
CorelDRAW memberships
CorelDRAW memberships provide cloud-based access to product updates, digital content, new product features, and online services. Two
membership options are available: Standard and Premium.
CorelDRAW Standard Membership
Included with your product purchase, this free membership provides access to:
• performance and stability updates
• online library of content such as clipart, photos, templates, and pattern fills
• extensive online selection of fonts
CorelDRAW Premium Membership
This paid membership lets you enrich your product experience with:
• exclusive online content such as clipart, photos, and pattern fills
• exclusive online selection of professional fonts
• early access to new features and services as they become available
• upgrades to the latest versions of CorelDRAW Graphics Suite
Signing up and signing in
To sign up for a membership and take full advantage of its benefits, you must have a corel.com account and sign in. The Sign in/Sign out
button shows your sign-in and membership status.
Corel memberships and services | 9
Page 26

Button state Indicates that...
You have not signed in.
You have signed in as a standard member.
You have signed in as a premium member.
Using your account
You can check your account settings from within CorelDRAW and Corel PHOTO-PAINT at any time, and you can download any utilities or
applications provided with your membership from your Accounts page.
To become a member
1
Click Help About CorelDRAW memberships.
2 Follow the instructions.
If you don’t have a corel.com account, you must create one first.
To sign in
•
Click Help Sign in.
To check your corel.com account
•
In CorelDRAW or Corel PHOTO-PAINT, click Help Account settings.
Updating Corel products
During product installation, you can choose the option to download product updates and service packs. After installing the product, you can
view information about product updates by clicking Help Updates.
By default, you are automatically notified when product updates and news become available. In addition, with the default installation, the
application automatically downloads new product updates and asks you for permission to install them. However, you can change the update
settings at any time.
To change the update settings
1
Click Help Welcome screen.
2 Click Settings at the top of the Updates page.
3 In the Update settings window, enable or disable either of the following check boxes:
•
Notify me of available product updates, news, and tutorials.
•
Automatically download product updates and ask me before installing.
Corel Support Services
Corel Support Services can provide you with prompt and accurate information about product features, specifications, pricing, availability,
services, and technical support. For the most current information on support services available for your Corel product, please visit
www.corel.com/support.
10 | Corel PHOTO-PAINT X7 User Guide
Page 27

About Corel
Corel is one of the world’s top software companies providing some of the industry’s best-known graphics, productivity and digital media
products. Boasting the most comprehensive portfolio of innovative software, we’ve built a reputation for delivering solutions that are easy
to learn and use, helping people achieve new levels of creativity and productivity. The industry has responded with hundreds of awards for
innovation, design and value.
Used by millions of people around the world, our product lines include CorelDRAW Graphics Suite, Corel® Painter®, Corel® PaintShop®
Pro, Corel® VideoStudio® and Corel® WordPerfect® Office. For more information on Corel, please visit www.corel.com.
Corel memberships and services | 11
Page 28

12 | Corel PHOTO-PAINT X7 User Guide
Page 29
What’s new in CorelDRAWGraphics SuiteX7?
The new and enhanced features of CorelDRAW Graphics Suite X7 are described in the following topics:
• “Get up and running easily” (page 13)
• “Work faster and more efficiently” (page 16)
• “Design with creativity and confidence” (page 20)
• “Share and expand your experience” (page 24)
For information about features and tools that were introduced or improved in earlier versions of CorelDRAW Graphics Suite, see “Finding out
what was new in previous versions” on page 25.
Get up and running easily
From a redesigned Welcome screen and workspaces that suit your needs to a wealth of content such as clipart and photos, CorelDRAW
Graphics Suite X7 helps you to get started and become productive quickly.
New! Welcome Screen navigation
The Welcome Screen has been completely redesigned, making it easier to navigate and discover the abundance of available resources,
including Workspace selection, What’s New, a Gallery of inspiring user creations, application updates, Tips and Tricks, video tutorials,
CorelDRAW.com, as well as Membership and Subscription information.
New! Workspace selection
The revamped Welcome Screen now includes a Workspace tab, which lets you choose from a variety of workspaces that were designed for
different proficiency levels and specific tasks.
New! Workspaces
A variety of tailor-made, workflow-specific workspaces have been introduced to help new users get accustomed to the suite faster and
easier. We’ve worked with professional industry experts who use the suite routinely to arrange tools and features for specific tasks, such as
page layout and illustration. For more information, see “Choosing a workspace” on page 38.
What’s new in CorelDRAWGraphics SuiteX7? | 13
Page 30
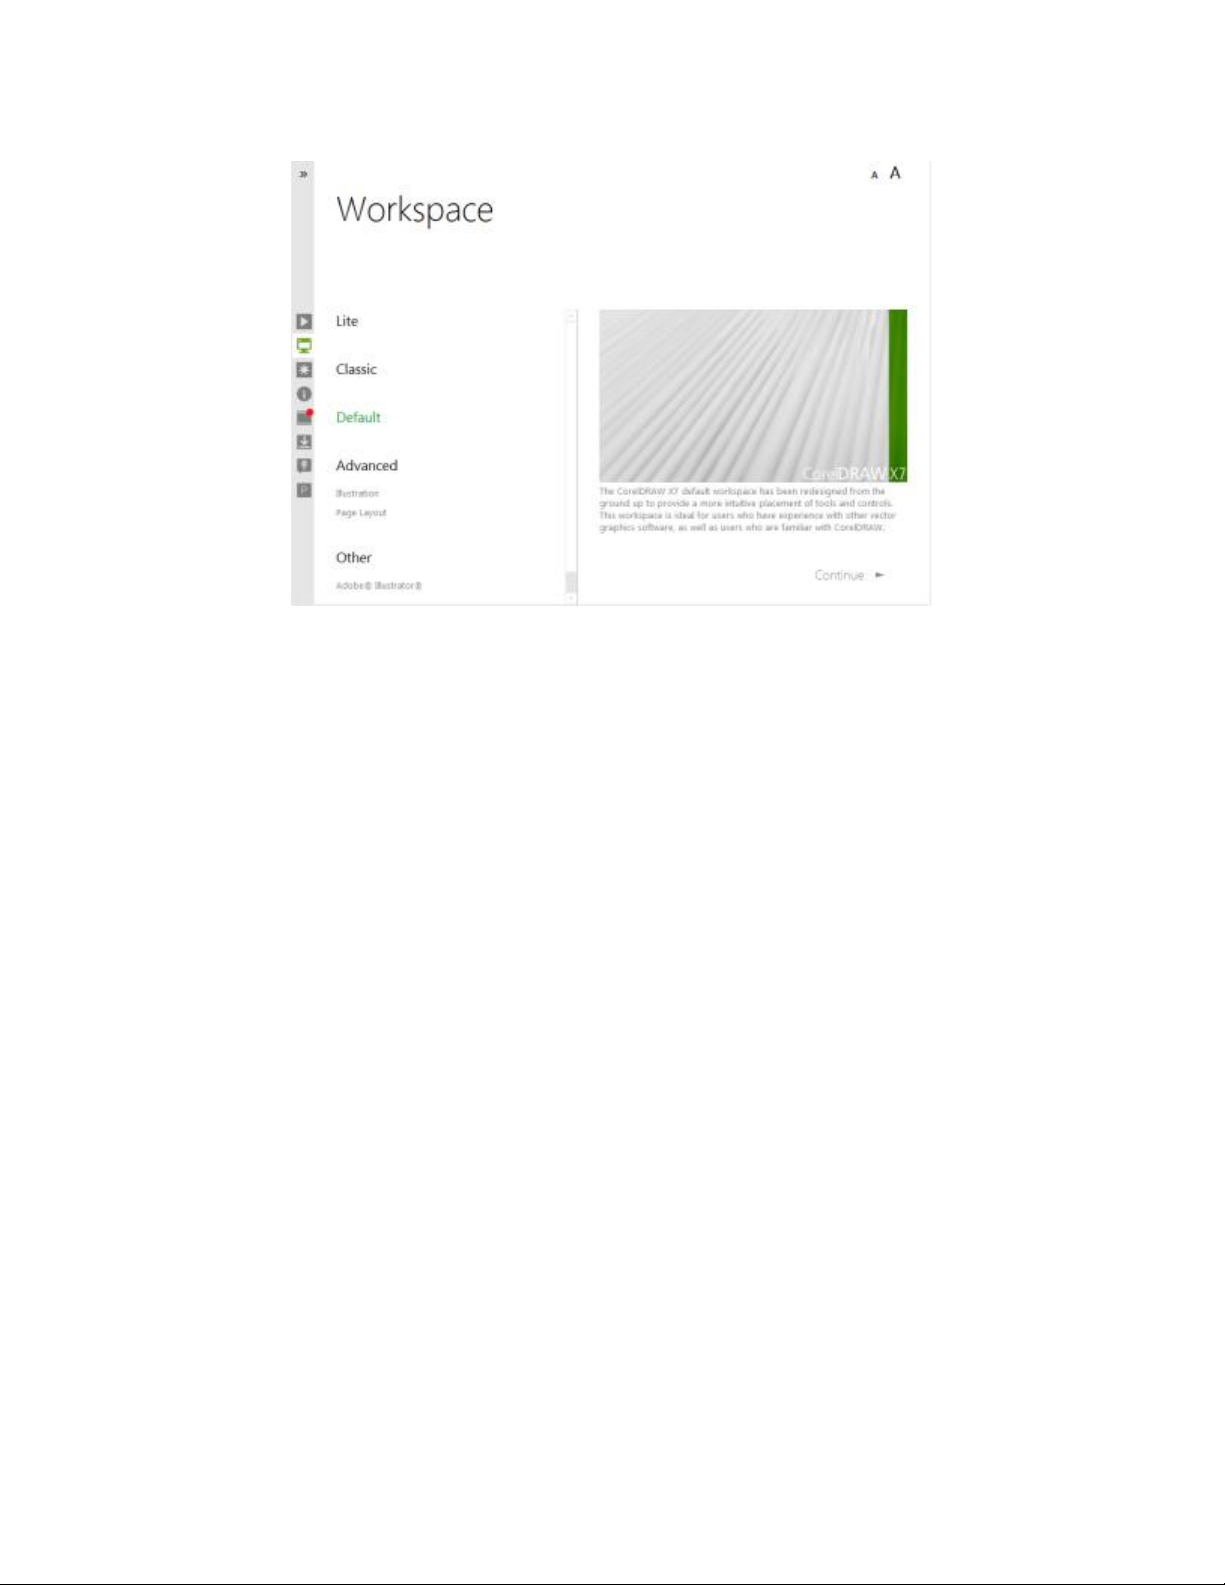
You can choose from a variety of workspaces.
New! Lite workspaces
Designed to help new users get acclimated to the suite more quickly, new Lite workspaces for both CorelDRAW X7 and Corel PHOTO-PAINT
X7 provide exploration-friendly, scaled-down options in the toolboxes and property bars. The Lite workspaces were designed to make each
application’s most commonly used tools more readily accessible and easier to find.
New! Default workspaces and Classic
The new default workspaces for CorelDRAW X7 and Corel PHOTO-PAINT X7 have been refashioned to offer a more intuitive and efficient
configuration of tools, menus, status bar, property bars, and dialog boxes. Plus, the classic workspaces are still included for longtime users
who may prefer the suite’s legacy appearance.
New! Advanced workspaces
With CorelDRAW X7, the new Page Layout and Illustration workspaces have been designed in consultation with industry professionals to
better expose specific application functionality. For example, the Illustration workspace provides a toolbox loaded with drawing tools and a
readily accessible Color Styles docker.
New! Simple customization
The toolbox, dockers, and property bars contain handy new Quick customize buttons which will help you tailor the interface to suit your
workflow. Available in both CorelDRAW X7 and Corel PHOTO-PAINT X7, these buttons offer a faster and more convenient way to add
dockers to your workspace, add or remove tools from the toolbox, and add or remove items from a property bar.
For more information, see “Customizing the toolbox” on page 466 and “To add or remove a toolbar item on the property bar” on page
467.
New! Font embedding
You can now embed fonts when you save CorelDRAW documents so that shared recipients can view, print, and edit the document exactly
as designed. This is especially useful when sending a CorelDRAW file to a print shop, ensuring that the document can be viewed and printed
accurately.
CorelDRAW X7 respects any restrictions encoded with each font, so a font must support embedding to be saved with the document. While
some fonts cannot be embedded, most will support embedding for either print and preview, or for editing.
14 | Corel PHOTO-PAINT X7 User Guide
Page 31

New! Lens corrections
The new Correct lens distortion slider in the Straighten image dialog box helps you preview and adjust your image to quickly and easily
remove pincushion and barrel distortions. Pincushion distortions make photos appear pinched in from the center, while barrel distortions
make photos appear pushed out from the center. By dragging the slider to the right, you can reduce pincushion distortions; conversely,
dragging the slider to the left will reduce barrel distortions. There’s also a customizable grid for the preview window that you can use to
help realign the distortion.
For more information, see “Correcting camera lens distortions” on page 115.
New! Multi-Seat license
You can now purchase a single serial number for use by several registered users, which includes access to Corel membership benefits such as
online content and application updates.
New! Overflow buttons
For tablet and mobile device users, new overflow buttons have been added to the toolbox, property bar, dockers, and color palettes to
indicate the presence of additional controls that do not fit within the workspace. You simply click an overflow button to instantly access the
hidden tools or controls.
New & Enhanced! Content
CorelDRAW Graphics Suite X7 includes a wealth of project-ready content that you can use to enhance your artwork. The suite’s content
library includes:
• more than 13,000 high-quality clipart images
• 2,000 photos
• more than 600 professionally designed templates
• more than 1,200 objects
• 75 interactive text frames
• 75 interactive PowerClip™ frames
• more than 100 image lists
• more than 400 Artistic Media
• 75 content-ready photo frames
• more than 1000 fonts
• more than 400 pattern fills
You can access a wealth of content.
What’s new in CorelDRAWGraphics SuiteX7? | 15
Page 32

Work faster and more efficiently
Become more efficient and productive by taking advantage of a wide array of new and enhanced features — from fills, transparencies, brush
selection, and text enhancements to improved multiple document and automation workflows.
New & Enhanced! Fountain fills
You can now create elliptical and rectangular fountain fills, apply transparency to individual fill color nodes, repeat a fill within a filled object,
adjust a fill’s angle of rotation, and smooth the blend transition of a fountain fill.
With CorelDRAW X7, you can apply and adjust fountain fills more quickly, accurately, and creatively by using the new interactive controls in
the Object properties docker. In Corel PHOTO-PAINT X7, the enhanced Edit fill dialog box provides quick access to all available controls for
adjusting fountain fills.
For more information, see “Applying fountain fills” on page 202.
New & Enhanced! Vector and bitmap pattern fills
With CorelDRAW X7, you can efficiently preview, apply, and interactively transform both vector pattern and bitmap pattern fills by using
the enhanced controls in the Object properties docker. You can also save personally created or modified fills, and the new FILL format is
supported by Patterns™, a new iOS app that makes it easy to create bitmap patterns from photos.
Examples of pattern fills
New! Edit Fill dialog box
In both CorelDRAW X7 and Corel PHOTO-PAINT X7, the new Edit fill dialog box gives you more efficient access to all available controls for
uniform, fountain, vector pattern, bitmap pattern, two-color pattern, texture, and PostScript fills. With CorelDRAW X7, the Edit fill dialog
box also provides a real-time preview as you make adjustments.
New & Enhanced! Custom fills
Both CorelDRAW X7 and Corel PHOTO-PAINT X7 introduce new options that make it easy to save and share your custom fills. With
CorelDRAW, the Save as new button appears in the Object properties docker and the Edit fill dialog box. The button also appears in the
Edit fill dialog box in Corel PHOTO-PAINT. Plus, the new FILL format preserves and exposes all fill settings, making it quick and simple to
modify both saved fills and fills downloaded from the Content Exchange.
For more information, see “Saving and sharing fills and transparencies” on page 219.
New! Fill picker
With both CorelDRAW X7 and Corel PHOTO-PAINT X7, a new Fill picker makes searching, previewing, and selecting fills quick and easy. The
Fill picker also provides access to both locally stored fills and those available in the Content Exchange.
16 | Corel PHOTO-PAINT X7 User Guide
Page 33

The new Fill picker makes searching, previewing, and selecting fills quick and easy.
New! Fill creation
In CorelDRAW X7, you can now instantly create new bitmap pattern and vector pattern fills from selected objects in your workspace. When
you click the New from document button in the Object properties docker, the cursor changes to the Crop tool so that you can define an
area of your workspace to use as a pattern.
Enhanced! Transparency
Transparency settings have been added to the Object properties docker in CorelDRAW X7, making it faster and easier to apply and adjust
object transparency. New options help you to quickly specify whether transparency is applied to an object’s outline, fill, or both. Plus, you
can instantly save transparency settings as a style to enable effortless reuse of your favorite effects. For more information, see “Working with
transparency” on page 209.
It is faster and easier to apply and adjust object transparency.
What’s new in CorelDRAWGraphics SuiteX7? | 17
Page 34

New! Outline Position
With CorelDRAW X7, the new Outline Position options help you create objects with more precise sizes. The Outside outline, Centered
outline, and Inside outline buttons let you specify whether an outline is positioned inside the object, outside the object, or an equal
combination of both. By positioning an outline inside an object, you can more easily create layouts with specific sizes because the outline
will be rendered within the object’s original measurements.
Enhanced! Object Properties docker
With CorelDRAW X7, the redesigned Object properties docker has a new tab option that can help new users gain efficiency by reducing
congestion. The Scroll/Tab mode button sets the docker to present only one group of formatting controls at a time, making it easier to focus
on the task at hand.
New! Brush picker
With Corel PHOTO-PAINT X7, the new Brush picker helps you find the brush you’re seeking by combining all brush categories and brush
types in one location. Available for the Paint, Effect , and Clone tools, the new Brush picker provides nib and brush stroke previews as you
hover over each preset. It also stores the settings for the last five brushes you’ve used, which makes it easier to reuse a favorite combination.
The new Brush picker helps you find and choose brushes.
New! Microsoft Visual Studio Tools for Applications 2012
The inclusion of Microsoft Visual Studio Tools for Applications 2012 provides access to the latest development tools, making it easy for
developers to create VSTA automations for all applications in the suite.
New! Font Playground
In CorelDRAW X7 and Corel PHOTO-PAINT X7, the new Font Playground docker introduces an easier way to browse, experiment with, and
choose the perfect font. You can easily add sample text to view its appearance in different fonts, and a handy Zoom slider lets you quickly
18 | Corel PHOTO-PAINT X7 User Guide
Page 35

adjust the size of sample text. With a single click, you can also choose whether the sample text appears as a single line, multiple lines, or a
cascading series of increased sizes.
The Font Playground also provides access to advanced features within OpenType fonts. If a text sample uses an OpenType font, you simply
select the text to display the Interactive OpenType arrow and then choose which features to apply. For more information, see “Choosing
fonts with Font Playground” on page 358.
Font Playground lets you experiment with and preview fonts easily so that you can choose the perfect font for your project.
Enhanced! Special characters, symbols, and glyphs
The revamped Insert character docker presents all characters, symbols, and glyphs associated with a selected font, making it easier than
ever to find these items and then insert them into your documents. Available in both CorelDRAW X7 and Corel PHOTO-PAINT X7, the docker
includes a filtering option that lets you display only the character subsets that you want. For example, you can choose to display only the
Cyrillic characters and symbols for a selected font. For more information, see “Inserting special characters, symbols, and glyphs” on page
351.
New! Object Styles previews
A new pop-up now appears when you hover over a style in the Object styles docker, offering a quick preview of the style before it’s applied.
New! Welcome Screen - content notification
The redesigned Welcome Screen now provides update notifications directly in the navigation pane, so that you will be immediately informed
of any available new content. This makes it easier to stay current with CorelDRAW Graphics Suite application updates, content, learning
resources, and more.
New! Welcome Screen docking
You can now keep the Welcome Screen open as a docked tab in the workspace or as a separate floating window, providing constant access
to its wealth of versatile resources.
New! Multiple document interface
You can now work with multiple documents in a tabbed view, which helps you stay organized and quickly switch between several active
documents. For more information, see “Working with multiple images” on page 59.
New! Undocking documents
When working with multiple documents, you can now drag a document outside of the application window to undock it, which is especially
useful for dual-monitor workflows.
What’s new in CorelDRAWGraphics SuiteX7? | 19
Page 36

New! Support for high-resolution monitors
The suite’s applications have been optimized for high DPI resolutions, ensuring that user interface elements appear crisp and legible when
displayed on high-resolution monitors.
Design with creativity and confidence
New and enhanced features such as Liquid tools, special effects, alignment and dynamic guides, and QR codes help you design with
creativity and confidence.
New! Liquid tools
In Corel PHOTO-PAINT X7, four new, pressure-sensitive Liquid tools — Smear , Attract , Repel , and Twirl — offer fresh creative options for
retouching photos. You can use these tools to reshape specific image areas to produce unique artistic effects. Each tool responds to the
pressure of your digital pen or stylus, and provides options that help you control the intensity of the effect.
With the Liquid smear tool, you can push pixels around an image area to produce distortion effects. You can set the size of the brush nib,
specify the amount of the effect to apply, and choose between a rounded or pointy smear. The Liquid twirl tool produces twirl effects from
image areas. You can set the size of the brush nib, the speed of the twirl effect, and the direction of the twirl from the center of the brush.
The Liquid attract and Liquid repel tools pull pixels toward or push pixels away from an image area. You can set the size of the brush nib
and the speed at which the pixels move.
For more information, see “Reshaping image areas by pulling or pushing away pixels” on page 155.
With the new Liquid tools, you can retouch photos and create unique artistic effects.
New! Align and Distribute docker
The new Align and distribute docker provides quick and easy access to all available alignment options so that you can position objects with
precision. Docking the alignment options keeps the drawing window uncluttered, so you can instantly view the effects of any align and
distribute modifications. There are also new options that you can use to align and distribute objects from the edge of their outlines. Plus,
you can align objects with a reference point by specifying its exact x and y coordinates. For more information, see “Aligning and distributing
objects” on page 318.
New! Finding complementary colors
With new harmony rules, you can snap all colors in a color harmony to a rule-based system, which lets you modify those colors while
preserving the color harmony. You can also use harmony rules to create a new color harmony from scratch. There are six harmony rules that
produce five-color harmonies based on a selected color swatch.
20 | Corel PHOTO-PAINT X7 User Guide
Page 37

Enhanced! Color Styles docker
The enhanced Color styles docker makes it easier to view, arrange, and edit color styles and color harmonies. You can now specify the
brightness value for a color, and constrain the Harmony Editor’s selector ring which preserves saturation and hue while you adjust the color.
The Color styles docker now offers convenient view options, including Hint view which provides a visual indication of all document objects
that use a specific color style, and Page sorter, which displays thumbnails of all pages in a document and previews changes as you adjust
colors. You can also click View Page sorter to access thumbnails of all pages in a document, with live previews of changes you make to the
document’s color styles.
Hint view helps you identify objects that use specific color styles.
New! OpenType support for Asian text
While working with Asian text, you can now use advanced OpenType typography features, such as widths, forms, vertical metrics, kana
glyph alternatives, and vertical alternates and rotation. For more information, see “OpenType support for Asian text” on page 363.
New! Alignment and Dynamic Guides docker
You can use the new Alignment and Dynamic Guides docker to access and modify the configuration of these guides more quickly. With
alignment guides, the new Intelligent Spacing guides make it easier to precisely position objects with the same spacing as nearby objects.
Plus, the new Intelligent Dimensioning guides help you scale or rotate an object in relation to the dimensions or rotation angle of nearby
objects.
What’s new in CorelDRAWGraphics SuiteX7? | 21
Page 38

Intelligent Dimensioning displays indicators when an object is rotated to
the same angle (top) or scaled to same size as the closest object (bottom).
Intelligent Spacing displays indicators when an object is equidistant between two
other objects (left) or has the same spacing as the closest onscreen objects (right).
New! Guidelines docker
With the new Guidelines docker in both CorelDRAW X7 and Corel PHOTO-PAINT X7, it’s never been easier to add, manage, and modify
guidelines. You can position guidelines with precision by using x and y coordinates, alter the line style and color, set objects and editable
areas to snap to guidelines, and lock guidelines to avoid accidental changes. Plus, you can set up angled guidelines and specify their angle of
rotation. For more information, see “Setting up guidelines” on page 67.
New! Alignment Guides
The new alignment guides in Corel PHOTO-PAINT X7 help you position objects more quickly, appearing on the fly with suggested alignments
to other nearby objects. You can use the new Alignment guides docker to view, set up, and modify alignment guides. And with new margin
alignment guides, you can now specify inset and offset values when aligning an object relative to another object. For more information, see
“Using alignment guides” on page 320.
22 | Corel PHOTO-PAINT X7 User Guide
Page 39

New! QR codes
With CorelDRAW X7, you can now create unique, artistic, and scalable QR codes by adding text, colors, and images. Popular in consumer
advertising and packaging, QR codes give smartphone users quick access to a brand’s website which can offer additional product
information. The Object properties docker makes it easy to customize a QR code, and you can create a style that saves a fixed appearance
for the QR code to enable quick and easy reuse.
You can change the shape, outline width, color, and fill type of the QR code pixels, change the background color and fill type, and more. You
can also choose which information to include in the QR code, such as URL, email address, phone number, SMS, Contact, Calendar event,
and Geo location. There’s also a Validate option, which analyzes the QR code to ensure it can be read by QR code readers, smartphones, and
scanners.
New! Smoothing objects
CorelDRAW X7 provides a new Smooth tool that you can use to remove jagged edges and reduce nodes in curve objects. You can control
the smoothing effect by varying the size of the brush nib, the speed at which the effect is applied, and by using the pressure of your digital
pen or stylus.
New! Special effects
Corel PHOTO-PAINT X7 introduces new camera effects, such as Bokeh blur, Colorize, Sepia Toning, and Time Machine to help you recreate
historic photographic styles and give your images unique visual appearances.
With the Bokeh blur effect, you can define an area of focus and leave the rest of the image out of focus. You can create a duotone image by
using the Colorize effect to replace all colors in an image with a single hue. The Sepia Toning effect simulates a photo taken with sepia film,
which is similar to grayscale except with brown tones. And with the Time Machine, you can choose from seven historic photography styles
ranging from 1839 to the 1960s. For more information, see “Applying the Bokeh Blur effect” on page 293 and “Camera special effects”
on page 288.
Examples of special effects. From left to right: Original image, Sepia Toning, Time Machine, Colorize.
New! Unsharp Mask Lens
With Corel PHOTO-PAINT X7, the new Unsharp Mask Lens helps you sharpen photos without having to apply the effect directly to an object.
This lens increases the contrast of adjacent pixels while preserving both high- and low-frequency details, like edges and large structures. You
can have the lens cover the entire image, or you can create a lens from an editable area that you define. Plus, you can easily edit the lens by
adding or removing areas, and by adjusting the lens transparency. For more information about lenses, see “Creating lenses” on page 147.
New! Planar Mask tool
You can use the new Planar mask tool in Corel PHOTO-PAINT X7 to define a feathered editable area along parallel lines. When combined
with a blur effect, you can simulate depth of field, giving focus to a particular object while blurring areas outside the planar mask. You can
modify the effect of the planar mask by moving or rotating the lines, and you can also use mask modes with the Planar mask tool. For more
information, see “To define an editable area by using the Planar Mask tool” on page 227.
What’s new in CorelDRAWGraphics SuiteX7? | 23
Page 40

Example of a planar mask in combination with a blur effect
New! Interactive brushstroke transparency and feathering
With Corel PHOTO-PAINT X7, you can now use modifier keys to interactively adjust the transparency and feathering of brushstrokes. This
lets you apply transparency and feathering on the fly, and works with the Eraser, Red-eye removal, Clone, Touch-up brush, Paint, Effect,
Image sprayer, Undo brush, and Replace color brush tools.
Share and expand your experience
Access and share assets, and learn from a community of CorelDRAW Graphics Suite users.
New! Content Exchange
The new Content Exchange is an online repository that integrates with Corel CONNECT and the suite’s applications, making it quick and
effortless to access and share vector fills, bitmap fills, and fountain fills with a community of other users. For more information, see “Using
the Content Exchange” on page 88.
New! Sharing fountain and pattern fills
You can now save personal fountain, vector pattern, and bitmap pattern fills and share them in the new Content Exchange, an online
repository of community content that can be downloaded and is accessible to anyone with a corel.com account. You can also instantly share
personally created or modified bitmap pattern fills to the new Patterns iOS app. For more information, see “Saving and sharing fills and
transparencies” on page 219.
24 | Corel PHOTO-PAINT X7 User Guide
Page 41

You can share your custom pattern fills in the new Content Exchange.
New! Content Exchange - Vote up and Vote down
A pop-up appears when you click an asset in the Content Exchange, which gives you the opportunity to vote up or vote down the asset. You
can sort assets in the Content Exchange based on the results of user voting.
New! Content Exchange - Favorites
You can instantly set any asset that catches your eye in the Content Exchange as a favorite, which is a quick and convenient way to keep a
list of content that you might want to download later.
New! Syncing trays with Microsoft OneDrive
You can now sync Corel CONNECT trays with Microsoft OneDrive, which provides cloud-based access to your tray contents on other
computers or mobile devices.
Finding out what was new in previous versions
You can easily identify what features have been improved or introduced since the last version of CorelDRAW Graphics Suite that you used.
To find out what was new in previous versions of CorelDRAWGraphicsSuite
•
Click Help Highlight what’s new, and click one of the following commands:
• Since version X6— highlights menu commands and tools for features introduced or improved in version X7
• Since version X5 — highlights menu commands and tools for features introduced or improved in version X6 and X7
• No highlight — removes highlighting from menu commands and tools in the toolbox
What’s new in CorelDRAWGraphics SuiteX7? | 25
Page 42

26 | Corel PHOTO-PAINT X7 User Guide
Page 43

Learning resources
You can learn to use the product in various ways: by reading the Quick Start Guide; by accessing the Help, Hints, and tooltips, by viewing
video tutorials; and by exploring the resources on the Corel website (www.corel.com). On the website, you can access tips, additional
tutorials, and training and integration resources. You can also check the Readme file (readme.html ), which is installed with the software.
This section contains the following topics:
• “Getting help” (page 27)
• “Using the Help and tooltips” (page 28)
• “Quick Start Guide” (page 29)
• “Insights from the Experts” (page 29)
• “Video learning resources” (page 29)
• “Using Hints” (page 30)
• “Welcome screen” (page 30)
• “Tips and Tricks” (page 31)
• “Macro programming guide” (page 31)
• “Network deployment guide” (page 31)
• “Web-based resources” (page 31)
• “Customized training and integration resources” (page 32)
Getting help
Various learning resources are available. The following table can help you decide what learning resources to consult when you need
assistance. You can access more information about some resources by clicking the corresponding links.
To See
Start learning the applications “Video learning resources” (page 29)
“Quick Start Guide” (page 29)
Learn about new and enhanced features “Video learning resources” (page 29)
Obtain additional information about product tools and features Help
“Web-based resources” (page 31)
“Using Hints” (page 30)
Learning resources | 27
Page 44

To See
Advance your knowledge of the suite by learning from graphics
design experts
“Insights from the Experts” (page 29)
“Web-based resources” (page 31)
Learn to automate tasks by using macros “Macro programming guide” (page 31)
Find information about deploying the suite on a network “Network deployment guide” (page 31)
Find information about customized training and workflow solutions “Customized training and integration resources” (page 32)
Find specific information about the latest version of the suite Readme file, which is accessible from the installation wizard
Using the Help and tooltips
The Help provides comprehensive information about product features from within the application. If you are connected to the Internet, the
application displays the web-based Help, which contains the latest updates. If no Internet connection is available, the application displays
the local Help, which was copied to your computer during product installation.
You can browse through the entire list of topics, look up tools and topics in the index, or search for specific words. You can also access the
Corel Knowledge Base on the Corel website and other online resources from the Help window.
Tooltips provide helpful information about application controls when you position the pointer over icons, buttons, and other user interface
elements.
Documentation conventions
The following table describes important conventions used in the documentation.
Convention Description Examples
Menu Menu command
A menu item and menu command that you
Click File Open.
need to click in sequence
A note contains important information
that is relevant to the preceding steps. It
may describe conditions under which the
procedure can be performed.
A compound blend cannot be copied or
cloned.
If you click the Equal margins button, you
must specify values in the Top/left margin
boxes.
A tip contains suggestions for performing
the preceding steps. It may present
alternatives to the steps, or other benefits or
uses of the procedure.
Trimming an object can reduce the drawing
file size.
You can change the number of swatches in
the color grid by dragging the Size slider.
To use the Help
1
Click Help Product Help.
2 Click one of the following tabs:
• Contents — lets you browse through topics in the Help. To open a topic, click the topic heading in the left pane.
• Index — lets you use the index to find a topic
• Search — lets you search the full text of the Help for a particular word or phrase
You can also
View context-sensitive Help from within a dialog box Click the Help button in the dialog box.
28 | Corel PHOTO-PAINT X7 User Guide
Page 45

You can also
Print a specific Help topic Open a Help topic, click the page that you want to print, and click
Print at the top of the Help window.
You can also access the Help by pressing F1 .
You can also access the Help from the Welcome screen.
To search the Help
1
Click Help Product Help.
2 Click the Search tab, and type a word or phrase in the search box.
For example, if you are looking for information about the RGB color mode, you can type “RGB” to display a list of relevant topics. To
search for a phrase, type the phrase, and enclose it in quotation marks (for example, type “dynamic guides” or “color mode”).
3 Choose a topic from the list that appears.
If your search results do not include any relevant topics, check whether you spelled the search word or phrase correctly. Note that
the English Help uses American spelling (for example, “color,” “favorite,” “center,” and “rasterize”), so searching for British spellings
(“colour,” “favourite,” “centre,” and “rasterise”) produces no results.
Quick Start Guide
The Quick Start Guide can help you get started quickly with the suite by introducing you to useful tools and features.
The Quick Start Guide is available in PDF format.
To access the Quick Start Guide
•
Click Help Quick Start Guide.
Insights from the Experts
The Insights from the Experts is a series of tutorials by graphic design professionals who use CorelDRAW Graphics Suite in their everyday
work. You can access the tutorialsas individual PDF files directly from the Help menu.
To access Insights from the Experts
•
Click Help Insights from the Experts.
Video learning resources
Two types of video learning resources are available: short videos and video tutorials.
The short videos show you how to complete basic tasks such as drawing, shaping, and coloring objects in CorelDRAW, or masking and
cropping in Corel PHOTO-PAINT. The videos do not have sound, but they include captions that provide useful tips and help you understand
the features that are shown. The length of a short video does not exceed two minutes.
The video tutorials introduce you to the refreshed application interface, and new and enhanced features such as fills and transparencies,
Content Exchange, Font Playground, alignment tools, QR codes, photo effects, and more. Whether you are a new or long-time user, you will
find useful demos and tips to boost your productivity and expand your experience. The video tutorials include audio and captions.
To access a short video
1 In the Hints docker, click the Videos tab.
Learning resources | 29
Page 46

If the Hints docker is not open, click Window Dockers Hints.
2 Click a video thumbnail.
You can also
Pause a video Click the Pause button on the control bar.
Display full screen Click the Full screen button in the lower-right corner of the video
window.
Jump to a specific frame in the video Point to the bottom of the video window, and click the progress
bar.
To access a video tutorial
1
Click Help Video tutorials.
2 Click a title in the Videos pane.
Using Hints
Hints provide information about tools in the toolbox from within the application. When you click a tool, a hint appears, telling you how to
use the tool. If you need additional information about a tool, you can access a relevant Help topic by clicking the Help button in the upperright corner of the Hints docker.
Hints are displayed in the Hints docker on the right side of the application window, but you can hide them when you no longer need them.
For information about working with dockers, see “Dockers” on page 48.
To use Hints
To Do the following
Display or hide Hints
Click Help Hints.
When the Hints command is enabled, the Hints docker appears
and provides information about the active tool in the toolbox.
Display information about a tool Click the tool, or perform an action with a tool that is already
active.
Get additional information about the active tool
Click the Help button
in the upper-right corner of the Hints
docker.
Navigate to previously viewed topics Click the Back and Forward buttons at the bottom of the Hints
docker.
Welcome screen
The Welcome screen gives you easy access to application resources and lets you quickly complete common tasks, such as opening files and
starting files from templates. You can also find out about the new features in CorelDRAW Graphics Suite X7 and get inspired by graphic
designs featured on the Gallery page. In addition, you can access videos and tips, receive the latest product updates, and check your
membership or subscription.
The Welcome screen appears when you start CorelDRAW or Corel PHOTO-PAINT. You can also access the Welcome screen after starting the
application.
30 | Corel PHOTO-PAINT X7 User Guide
Page 47

To access the Welcome screen
•
Click Help Welcome screen.
To view and access the available resources, click the buttons on the left side of the Welcome screen.
Tips and Tricks
Quick tips highlight useful tools and shortcuts, and give you a starting point for exploring some of the CorelDRAW Graphics Suite features.
To access Tips and Tricks
1
Click Help Welcome screen.
The Welcome screen appears.
2
Click the Need Help? button , and click Tips & tricks.
Macro programming guide
The CorelDRAW Graphics Suite X7 Macro Programming Guide provides a streamlined instructional approach to programming macros
for CorelDRAW Graphics Suite X7. You can use either Microsoft Visual Basic for Applications (VBA) or Microsoft Visual Studio Tools for
Applications (VSTA) to create macros that automate tasks and provide customized solutions for CorelDRAW and Corel PHOTO-PAINT.
To access the macro programming guide
•
On the Windows Start menu, click Start All Programs CorelDRAW Graphics Suite X7 Documentation Macro Programming Guide
PDF.
Network deployment guide
The CorelDRAW Graphics Suite X7 Deployment Guide is a step-by-step resource for deploying CorelDRAW Graphics Suite X7 to a network.
This guide is provided to customers who purchase a volume (“multi-seat”) license of CorelDRAW Graphics Suite X7 for their organization. To
purchase a volume license of the software and obtain its deployment guide, please contact Corel Support Services.
Web-based resources
The following web-based resources can help you get the most out of CorelDRAW Graphics Suite:
• Corel Knowledge Base — articles written by the Corel Technical Support Services Team in response to questions by CorelDRAW Graphics
Suite users
• CorelDRAW.com community — an online environment to share your experience with the product, ask questions, and receive help and
suggestions from other users
• Tips and tricks on the Corel website— valuable information provided by the Corel Documentation Team to help you take full advantage
of product features
• Tutorials on the Corel website— in-depth tutorials in which CorelDRAW Graphics Suite experts share their knowledge and techniques
• Third-party resources — print and online resources that provide additional information about CorelDRAW Graphics Suite tools and
features, as well as various areas of graphic design
An active Internet connection is required to access web-based resources.
Learning resources | 31
Page 48

Customized training and integration resources
Corel Corporation has training partnerships with other firms.
Corel customized training
Corel Training Specialists can provide you with customized training, tailored to your work environment, to help you get the most out of
the Corel software that you’ve installed. These experts will help you develop a curriculum that is practical and relevant to the needs of your
organization. For more information, please visit www.corel.com/customizedtraining.
Corel Training Partners
A Corel Training Partner (CTP) is an independent, officially accredited local organization that provides training and training resources for
Corel products. CTPs are located worldwide for your convenience. Please visit www.corel.com/trainingpartners to find a partner near you.
Corel Technology Partners
Corel Technology Partners are businesses that embed Corel technology in their products, develop plug-in applications for Corel software,
or integrate standalone applications into Corel technology solutions. This comprehensive program is designed especially for developers and
consultants. It includes the components that are necessary to design, develop, test, and market custom solutions related to Corel products.
For more information about Corel Technology Partners, please email Corel Corporation at techpartner@corel.com.
32 | Corel PHOTO-PAINT X7 User Guide
Page 49

Starting and setting up
This section contains the following topics:
• “Starting and quitting Corel PHOTO-PAINT” (page 33)
• “Changing languages” (page 33)
• “Changing startup settings” (page 34)
Starting and quitting Corel PHOTO-PAINT
You can start Corel PHOTO-PAINT from the Windows taskbar and end a Corel PHOTO-PAINT session from the application window.
To start and quit Corel PHOTO-PAINT
To Do the following
Start Corel PHOTO-PAINT Do one of the following:
• (Windows 7) From the Windows taskbar, click
Start Programs CorelDRAW Graphics SuiteX7 Corel
PHOTO-PAINT.
• (Windows 8) Click the Corel PHOTO-PAINT tile on your
desktop.
Quit Corel PHOTO-PAINT
Click File Exit.
Changing languages
If an application has been installed in more than one language, you can change the language of the user interface and Help at any time.
To change the language of the user interface and Help
1
Click Tools Options .
2 In the list of categories, click Global.
3 Choose a language from the Select the language for the user interface list box.
Starting and setting up | 33
Page 50

If you want to change the language of the user interface and Help when you start the application, enable the Ask me the next time the
software starts check box.
4 Restart the application.
Changing startup settings
You can specify the startup settings for Corel PHOTO-PAINT, which control how the application appears when it’s opened. For example, you
can start the application with the Welcome screen open or a new blank document.
To change startup settings
1
Click Tools Options .
2 In the Workspace list of categories, click General.
3 In the Getting Started area, choose an option from the On start-up list box.
If you want to hide the Create a new image dialog box when starting images, disable the Show new image dialog box check box.
34 | Corel PHOTO-PAINT X7 User Guide
Page 51

Corel PHOTO-PAINT workspace tour
Becoming familiar with the terminology and workspace of Corel PHOTO-PAINT will help you follow the concepts and procedures found in
the user guide and in the Help.
This section contains the following topics:
• “Corel PHOTO-PAINT terms” (page 35)
• “Corel PHOTO-PAINT application window” (page 36)
• “Choosing a workspace” (page 38)
• “Toolbars” (page 39)
• “Toolbox” (page 41)
• “Property bar” (page 48)
• “Dockers” (page 48)
• “Color palette” (page 50)
• “Status bar” (page 50)
Corel PHOTO-PAINT terms
Before you get started in Corel PHOTO-PAINT, you should understand the following terms.
Term Description
Channel An 8-bit grayscale image that stores color or mask information for
an image
Editable area An editable area of a mask allows paint and effects to be applied to
a selected area of an image
Image A file you open or create in Corel PHOTO-PAINT
Lens An object layer that protects part or all of an image when you
perform color and tonal corrections
Mask A mask can be applied to an image during image editing to define
protected areas and editable areas
Object An independent bitmap that is layered above the background
image
Corel PHOTO-PAINT workspace tour | 35
Page 52

Term Description
Path A series of line and curve segments connected by adjustable
endpoints called nodes
Thumbnails A miniature, low-resolution version of an image
For more terms and definitions, see the “Glossary” on page 487.
Corel PHOTO-PAINT application window
The Corel PHOTO-PAINT application window contains elements that help you access the tools and commands you need to view and edit
images. Application commands are accessible through the menu bar, toolbox, property bar, toolbars, or dockers.
The application window appears below.
36 | Corel PHOTO-PAINT X7 User Guide
Page 53

Circled numbers correspond to the numbers in the following table,
which describes the main components of the application window.
Part Description
1. Toolbox A bar that contains tools for editing, creating, and viewing images.
The toolbox also contains the color control area, which lets you
select colors and fills.
2 Document tab A tab displays for each open document to allow you to quickly
move between documents
3. Title bar The area on the image window displaying the title of the image
4. Property bar A detachable bar containing commands that change according to
the active tool
Corel PHOTO-PAINT workspace tour | 37
Page 54

Part Description
5. Menu bar The area containing drop-down menus with commands grouped
by category
6. Toolbar (standard) A bar that contains shortcuts to some menus and other basic
commands, such as opening, saving, and printing
7. Image window The area in which the image appears. Although more than one
image window can be open at the same time, you can apply
commands to the active image window only.
8. Status bar An area that displays image information, system information, and
tips
9. Navigator A button that lets you view a thumbnail of the entire image so that
you can focus the image window on a specific area. The Navigator
is available only when the total image cannot be viewed in the
image window.
10. Docker A window that provides access to additional commands and image
information. Some dockers provide a visual display area. The Hints
and Object manager dockers are displayed by default.
11. Color palette A dockable bar that contains color swatches
You can customize many of the elements in the application window to suit your workflow. For information about customizing Corel PHOTOPAINT, see “Customizing Corel PHOTO-PAINT” on page 459.
To adjust the contrast of the application workspace, click Tools Customization , and in the Appearance area, choose a setting from
the Contrast list box.
Choosing a workspace
Corel PHOTO-PAINT includes a collection of workspaces that are designed to help you increase your productivity. A workspace is a
configuration of settings that specifies how the various command bars, commands, and buttons are arranged when you open the
application. Their purpose is to make more accessible the tools that you use most often. You can choose a workspace from the Welcome
Screen that displays when you first launch the application or you can switch to a different workspace from within the application.
The following table describes the available workspaces.
Workspace Description
Lite This workspace makes Corel PHOTO-PAINT’s most commonly used
tools and features more accessible. If you are new to Corel PHOTOPAINT, the Lite workspace is ideal for getting started.
Default This workspace has been redesigned to provide a more intuitive
placement of tools and controls. If you have experience using Corel
PHOTO-PAINT, or another photo-editing application, the default
workspace is a good choice.
Help topics are based on the Default workspace.
Classic The Classic workspace is almost identical to the default Corel
PHOTO-PAINT X6 workspace. It is best suited for experienced Corel
PHOTO-PAINT users who are looking for a seamless transition to
38 | Corel PHOTO-PAINT X7 User Guide
Page 55

Workspace Description
a modern yet familiar environment in Corel PHOTO-PAINT X7.
Many elements of the workspace have been optimized for a more
streamlined workflow.
Adobe Photoshop Simulates the Adobe Photoshop workspace by positioning the Corel
PHOTO-PAINT features where you would find the equivalent feature
in Adobe Photoshop. This workspace is useful if you recently
switched from Adobe Photoshop to Corel PHOTO-PAINT and you
are not familiar with the Corel PHOTO-PAINT workspace.
If you have a unique workflow, you can create a custom workspace that is optimized for your specific needs. For more information, see
“Creating workspaces” on page 459.
To choose a workspace
•
Click Window Workspace, and choose one of the available workspaces.
You can also choose a workspace from the Welcome Screen or by clicking Tools Customization , clicking Workspace in the list of
categories, and then enabling the check box beside a workspace in the Workspace list.
Toolbars
Toolbars consist of buttons that are shortcuts to menu commands. The standard toolbar consists of commonly used commands. The table
below outlines the buttons on the standard toolbar.
Press this button To
Start a new image
Open an image
Save an image
Print an image
Cut selected objects to the Clipboard
Copy selected objects to the Clipboard
Paste the Clipboard contents into an image
Undo the last action
Redo the last action
Display the Connect docker and search for content such as clipart,
photos, fonts, and more
Corel PHOTO-PAINT workspace tour | 39
Page 56

Press this button To
Import an image
Export an image
Change the zoom level
Display a full-screen preview
Show or hide rulers
Show or hide guidelines
Show or hide the image slicing grid
Show or hide the mask marquee
Show or hide the object marquee
Invert a mask
Clear a mask
Open the Welcome Screen
Open the Options dialog box
Start Corel applications
In addition to the standard toolbar, Corel PHOTO-PAINT has toolbars for specific kinds of tasks. For example, if you frequently work with
masks, you can display the Mask/object toolbar. Unlike the contents of a property bar, the contents of a toolbar remain the same.
For information about moving and re-sizing toolbars, and changing which toolbars display by default, see “To customize toolbar position
and display” on page 464. You can also create a custom toolbar to include the tools and commands you use most often.For information
about creating custom toolbars, see “Customizing toolbars” on page 463.
To hide or display a toolbar
•
Click Window Toolbars, and click a toolbar.
A check mark next to a toolbar name indicates that the toolbar is displayed in the image window.
40 | Corel PHOTO-PAINT X7 User Guide
Page 57

Toolbox
The toolbox contains tools for editing, creating, and viewing images. Some of the tools are visible by default, while others are grouped in
flyouts. Flyouts open to display a set of related tools.
A small flyout arrow in the bottom-right corner of a toolbox button indicates a flyout. The last tool used in a flyout displays in the toolbox.
You can access the tools in a flyout by clicking the small black arrow that appears in the bottom, right corner of a toolbox button. After you
open one flyout, you can easily scan the contents of other flyouts by hovering over any of the toolbox buttons that have flyout arrows.
Flyouts function like toolbars when you drag them away from the toolbox. This lets you view all the related tools while you work.
In the default workspace, clicking the flyout arrow on the Clone tool opens the Touch up flyout.
In addition to the tools, the color control area appears in the toolbox. The color control area lets you choose colors and fills.
You can hide and display the toolbox by clicking Window Toolbars Toolbox.
To hide or display tools in the toolbox, click the Quick customize button , and enable or disable the corresponding check boxes.
For more information, see “Customizing the toolbox” on page 466.
The following tables provide descriptions of the tools and the color control area.
Tools
Pick tools
The Object pick tool lets you select,
position, and transform objects.
The Mask transform tool lets you position,
size, and transform editable areas.
Corel PHOTO-PAINT workspace tour | 41
Page 58

Mask tools
The Rectangle mask tool lets you define
rectangle editable areas.
The Ellipse mask tool lets you define
elliptical editable areas.
The Magic wand mask tool lets you
define irregularly shaped editable areas
that include the first-clicked pixel and all
adjacent pixels of similar color.
The Lasso mask tool lets you define
editable areas that are irregular in shape
and surrounded by pixels of similar colors.
42 | Corel PHOTO-PAINT X7 User Guide
The Magnetic mask tool lets you snap the
mask marquee to the edges of areas that
contrast in color with their surroundings.
The Freehand mask tool lets you define
irregularly shaped or polygonal editable
areas.
Page 59

Crop tool
The Brush mask tool lets you define an
editable area by brushing an area as if you
were painting.
The Planar mask tool lets you create
feathered masks that are defined by parallel
lines.
The Crop tool lets you trim images and
straighten crooked images.
The Image slicing tool lets you cut a large
image into smaller sections to be used in a
webpage.
Zoom tools
The Zoom tool lets you change the
magnification level in the image window.
The Pan tool lets you drag image areas
into view when the image is larger than its
window.
Corel PHOTO-PAINT workspace tour | 43
Page 60

Touch-up tools
Liquid tools
The Clone tool lets you duplicate part of an
image and apply it to another part of the
same image or to another image.
The Red-eye removal tool lets you remove
the red-eye effect from the eyes of subjects
in photos.
The Touch-up brush tool lets you remove
imperfections, such as tears, scratch marks,
and wrinkles, from an image by blending its
textures and colors.
The Liquid smear tool lets you create an
effect similar to dragging wet paint.
44 | Corel PHOTO-PAINT X7 User Guide
The Liquid twirl tool lets you create swirls
from specific image areas.
The Liquid attract tool lets you reshape
image areas by pulling pixels towards the
brush center.
The Liquid repel tool lets you reshape
image areas by pushing pixels away from
the brush center.
Page 61

Effect tool
Text tool
Brush tools
The Effect tool lets you perform local color
and tonal corrections on the image.
The Text tool lets you add text to your
image and edit existing text.
The Paint tool lets you paint on an image
by using the foreground color.
The Image sprayer tool lets you load one
or more images and paint them on your
image.
The Undo brush tool lets you restore image
areas to how they looked before your last
brushstroke.
The Replace color brush tool lets you
replace the foreground color in your image
with the background color.
Corel PHOTO-PAINT workspace tour | 45
Page 62

Shape tools
The Rectangle tool lets you draw square or
rectangular shapes.
The Ellipse tool lets you draw circular or
elliptical shapes.
The Polygon tool lets you draw polygons.
The Line tool lets you draw single or joined
straight-line segments using the foreground
color.
Eraser tool
The Path tool lets you create and edit paths.
The Eraser tool lets you erase image areas
or object areas to reveal the object or
background underneath.
46 | Corel PHOTO-PAINT X7 User Guide
Page 63

Interactive/Transparency tools
The Drop shadow tool lets you add
shadows to objects.
The Object transparency tool lets you
gradually fade the colors of objects to reveal
image areas underneath.
The Color transparency tool lets you make
pixels with a specific color value in an object
transparent.
The Object transparency brush tool lets
you brush areas on an object to make them
more transparent.
Eyedropper tool
Fill tools
The Eyedropper tool lets you choose colors
from an image.
The Fill tool lets you fill areas with one of
four fill types: uniform, fountain, bitmap,
and texture.
Corel PHOTO-PAINT workspace tour | 47
Page 64

Color control area
The Interactive fill tool lets you apply a
gradient fill to the entire image, object, or
selection.
The Foreground color swatch displays the
current foreground color, which applies to
all paint tools and text.
The Background color swatch displays the
current background color, which is shown
when you erase portions of the background
or increase the paper size.
The arrow lets you swap the foreground
color and background color.
The Fill color swatch displays the current
fill color, which applies to the shape and fill
tools.
You can change the foreground,
background, or fill color by double-clicking
the respective color swatch.
The Reset color icon lets you return to the
default colors — black as foreground and
fill colors, and white as a background color.
Property bar
The property bar displays commonly used commands that are relevant to the active tool. Unlike toolbars, the contents of the property bar
change depending on which tool is active. For example, when you use the Text tool, the contents of the property bar change to display textrelated settings such as font type, font size, and alignment. You can also
To hide or display tools on the property bar, click the Quick customize button , and enable or disable the corresponding check
boxes. For more information, see “Customizing the property bar” on page 466.
Dockers
Dockers display the same types of controls as a dialog box, such as command buttons, options, and list boxes. Unlike most dialog boxes, you
can keep dockers open while working on a document, so you can readily access the commands to experiment with different effects. Dockers
have features similar to palettes in other graphics programs.
48 | Corel PHOTO-PAINT X7 User Guide
Page 65

Dockers can be either docked or floating. A docked docker is attached to the edge of the application window, a toolbar, or a palette. A
floating docker is not attached to a workspace element. If you open several dockers, they usually appear nested, with only one docker fully
displayed. You can quickly display a docker hidden from view by clicking the docker’s tab.
You can move dockers, and you can collapse dockers to save screen space.
An example of a docker is the Object manager docker. The Object manager docker displays thumbnails of
the image background and each object layer, as well as command buttons and options related to objects.
To open or close a docker
•
Click Window Dockers, and click a docker.
Corel PHOTO-PAINT workspace tour | 49
Page 66

To open or close dockers, you can also click the Quick customize button on the right side of a docker, and enable or disable the
corresponding check boxes.
You can also close a docker by clicking the X button on its title bar. Clicking the X button on the title bar closes all nested dockers in a
group. To close only a specific docker, click the X button on the docker’s tab.
To move dockers
To move Do the following
A docker Drag the docker’s tab to a new location.
Multiple nested dockers Drag the title bar of the active docker to a
new location.
To dock a floating docker
• Drag the docker’s title bar or tab to an edge of the drawing window and position the pointer along the edge. When a grey preview of
the docker’s position appears, release the mouse button.
To collapse a docker
•
Click the Collapse docker button on the docker’s title bar.
To expand a collapsed docker, click its tab.
Color palette
A color palette is a collection of color swatches. You can choose foreground, background, and fill colors by using the default color palette,
which contains RGB colors. For more information about choosing colors, see “Choosing colors” on page 161.
Status bar
The status bar displays information about the image, system memory, and the active tool. It also displays information about the document
color and the color proofing status. You can change the type of information that is displayed to help you with your current task. For
example, if you are working with images that have different dimensions, you can display the dimension of the current image.
You can also customize the status bar by adding command buttons. For information about customizing the status bar, see “Customizing the
status bar” on page 467.
To change the type of information displayed on the status bar
•
Click the arrow on the status bar, and click one of the following:
•
File size
•
Current tool
•
Document dimensions
•
Document color information
•
Memory
50 | Corel PHOTO-PAINT X7 User Guide
Page 67

Setting options
You can change a variety of settings in Corel PHOTO-PAINT according to your preferences.
This section contains the following topics:
• “Changing workspace options” (page 51)
• “Disabling warning messages” (page 52)
Changing workspace options
In Corel PHOTO-PAINT, you can change the default workspace settings according to your preferences.
There are two types of workspace options — general and display. General options let you specify settings, such as unit of measure, cursor
type, dialog box position.
You can also set the nudge and super nudge values. The nudge value defines the distance (in pixels) that you can move an object, editable
area or guideline using arrow keys. The super nudge value is a multiple of the value.
Display options let you specify settings such as the color of paths, the mask tint color, the color of guidelines, transparency grid patterns, as
well as the threshold settings for the mask and object marquees.
To set general options
1
Click Tools Options .
2 In the Workspace list of categories, click General.
3 Specify the settings you want.
To set display options
1
Click Tools Options .
2 In the Workspace list of categories, click Display.
3 Specify the settings you want.
Setting options | 51
Page 68

Disabling warning messages
You may encounter warning messages while working in Corel PHOTO-PAINT. Warning messages explain the consequences of an action you
are about to perform, and inform you of permanent changes that might result from that action. Although the warnings are helpful, you can
disable them so you don’t have to view them after you become familiar with the software. Avoid disabling warning messages until you are
comfortable with the application and familiar with the results of the commands you use.
To disable warning messages
1
Click Tools Options .
2 In the Workspace list of categories, click Warnings.
3 Disable one or more of the check boxes.
52 | Corel PHOTO-PAINT X7 User Guide
Page 69

Bringing images into Corel PHOTO-PAINT
You can bring images into Corel PHOTO-PAINT in a variety of ways.
This section contains the following topics:
• “Opening images” (page 53)
• “Importing files” (page 54)
• “Scanning images” (page 57)
• “Creating images” (page 57)
• “Working with multiple images” (page 59)
• “Working with vector graphics” (page 59)
For information about bringing RAW camera files into Corel PHOTO-PAINT, see “Bringing RAW camera files into Corel PHOTO-PAINT” on
page 428.
Opening images
You can open most bitmaps in Corel PHOTO-PAINT. Each image you open appears in its own image window.
You can also import images. Importing allows you to add a new image to the active image window. For more information, see “Importing
files” on page 54.
You can use the clipart and photos that are included on the Corel DVD. If you are using Windows 7 or Windows 8, you can search for
images by different criteria, such as filename, title, subject, author, keyword, comment, and other properties attached to the file. For more
information about searching for files with Windows 7 or Windows 8, see the Windows Help. You can also browse and search for content by
using Corel CONNECT. For more information, see “Exploring Corel CONNECT” on page 83.
Opening earlier versions of multilingual files
You can open or import an image from version 11 or earlier of Corel PHOTO-PAINT that contains text in a language different from the
language of your operating system. To do this, you can use code page settings to ensure that object names and notes saved with the image
are displayed correctly in the Object manager docker. To ensure that text is correctly displayed in the image window, you need to use
encoding settings. For more information, see “Modifying encoding settings to display text correctly” on page 361.
To open an image
1
Click File Open.
2 Locate the folder where the file is stored.
Bringing images into Corel PHOTO-PAINT | 53
Page 70

3 Click a filename.
If necessary, you can search for an image by using the search box. You can search by filename, title, subject, author, keyword, or
comment.
4 Click Open.
You can also
Detect a watermark Enable the Check for watermark check box.
This option is not available for all file formats.
Remove unwanted areas from an image as you open it In the Open list box, click Crop and load.
Decrease the dimensions of an image as you open it In the Open list box, click Resample and load.
Search for an image (Windows 7 and Windows 8) Type a word or phrase in the search box.
The search box looks for files only in the current folder and
subfolders. To search for an image in another location, you must
first navigate to the folder where the image is stored.
Access a previous version of a file (Windows 7 and Windows 8) Right-click a file, and click Restore previous versions.
You can access a previous version of a file only if System Protection
is turned on.
For detailed information about accessing previous versions of files,
see the Windows Help.
Display object names and notes correctly in an image that was
created in an earlier version of Corel PHOTO-PAINT
Choose the corresponding option from the Select code page list
box.
This option is not available for all file formats.
You can also open an image by clicking the Open button on the standard toolbar. If the standard toolbar is not displayed, click
Window Toolbars Standard.
To insert a file into an active image
• Drag the image or sound file to the image window.
You can also open a file in a new image window by dragging the file to the application window.
Importing files
Corel PHOTO-PAINT provides filters that convert files from one format to another when you import them. You can import a file and place it
in the active application window as an object. The imported file becomes part of the active image. You can also bring in a file by opening it
in a new application window.
You can use the import filter’s default settings or choose the settings you want when you import the file. You can also save a file’s
embedded International Color Consortium (ICC) profile to a local color folder.
While importing a bitmap, you can resample it to change the number of pixels, eliminate unusable detail, and reduce the file size. You can
also crop a bitmap to select only the exact area and size of the image you want to import.
54 | Corel PHOTO-PAINT X7 User Guide
Page 71

You can import the clipart and photos that are included on the Corel DVD. If you are using Windows 7 or Windows 8, you can search for
images by different criteria, such as filename, title, subject, author, keyword, comment, and other properties attached to the file. For more
information about searching for files with Windows 7 or Windows 8, see the Windows Help. You can also browse and search for content by
using Corel CONNECT. For more information, see “Exploring Corel CONNECT” on page 83.
You can also export Corel PHOTO-PAINT images to a variety of file formats. The file format that you choose depends on how you want to use
the image in the future. For more information about exporting files, see “Exporting images to other file formats” on page 81.
For information about specific file formats, see “Supported file formats” on page 435.
To import a file into an active image
1
Click File Import.
2 Locate the folder where the file is stored.
3 Choose a file format from the list box next to the File name box.
If you are not sure about the format of the file you want to import, choose All file formats.
4 Click a filename.
If the file contains text in a language different from the language of your operating system, choose the corresponding option from the
Code page list box to ensure that notes and object names are displayed correctly. This option is not available for all file formats.
5 Click Import.
6 Click the image window.
You can also
Save the embedded International Color Consortium (ICC) profile Enable the Extract embedded ICC profile check box to save the
ICC profile to the color folder in which the application is installed.
Check for watermark or copyright information Enable the Check for watermark check box.
Use the filter’s default settings without opening its dialog box Enable the Do not show filter dialog check box.
Select the page to import when importing multi-page TIFF
documents
In the Import TIFF dialog box, enable an option in the Select the
page(s) to import area.
In Corel PHOTO-PAINT, you can open only one page of a multi-page
TIFF at a time.
Search for an image (Windows 7 and Windows 8) Type a word or phrase in the search box.
The search box looks for files only in the current folder and
subfolders. To search for an image in another location, you must
first navigate to the folder where the image is stored.
The Import an Image from Disk dialog box displays the size of the file you want to import and any annotations associated with the
file.
You can also import a file by opening it in a new application window. For more information about opening a file in a new application
window, see “To open an image” on page 53.
To resample an image while importing
1
Click File Import.
2 Choose the folder where the file is stored.
Bringing images into Corel PHOTO-PAINT | 55
Page 72

(Windows 7 and Windows 8) If necessary, you can search for an image by using the search box. You can search for such things as
filename, title, subject, author, keyword, or comment, bitmap names, object names, and so on.
3 Choose a file format from the list box that is beside the File name box (Windows 7 and Windows 8).
If you are not sure about what file format the file is, choose All file formats.
4 Click the filename.
5 Click Import, and click Resample and load.
6 In the Resample image dialog box, type values in any of the following boxes:
• Width — specifies the width of the graphic in a chosen unit of measurement or as a percentage of its original width
• Height — specifies the height of the graphic in a chosen unit of measurement or as a percentage of its original height
7 In the Resolution section, type values in any of the following boxes:
• Horizontal — lets you specify the horizontal resolution of the graphic in pixels or dots per inch (dpi)
• Vertical — lets you specify the vertical resolution of the graphic in pixels or dots per inch (dpi)
8 Click the image window.
You can also
Maintain the width-to-height ratio of the image Enable the Maintain aspect ratio check box.
Change the units of measurement Choose a unit type from the Units list box.
Maintain equal horizontal and vertical resolution values
Enable the Identical values check box.
automatically
If a dialog box for the import format opens, specify the options you want. For detailed information about file formats, see
“Supported file formats” on page 435.
You cannot increase the resolution of a file when importing.
You can also import a file by opening it in a new application window. For more information about opening a file in a new application
window, see “To open an image” on page 53.
To crop an image while importing
1
Click File Import.
2 Choose the folder where the file is stored.
(Windows 7 and Windows 8) If necessary, you can search for an image by using the search box. You can search for such things as
filename, title, subject, author, keyword, or comment, bitmap names, object names, and so on.
3 Choose a file format from the list box that is beside the File name box.
If you are not sure about what file format the file is, choose All file formats.
4 Click the filename.
5 Click Import, and click Crop and load.
6 Type values in any of the following boxes:
• Top — specifies the area to remove from the top of the graphic
• Left — specifies the area to remove from the left edge of the graphic
• Width — specifies the width of the graphic you want to keep
• Height — specifies the height of the graphic you want to keep
7 Click the image window.
When you import 16-color bitmaps, they are automatically converted to 256-color.
56 | Corel PHOTO-PAINT X7 User Guide
Page 73

You can also resize an image by dragging the selection box in the preview window.
You can change the units of measurement by choosing a unit type from the Units list box, in the Crop image dialog box.
Scanning images
You can scan images in Corel PHOTO-PAINT. Corel PHOTO-PAINT supports scanners that use Microsoft Windows Image Acquisition (WIA),
which provides a standard interface for scanning images.
If your scanner does not support WIA, but has a compatible TWAIN driver, you may be able to use this driver for scanning. TWAIN is
supported by both the 32-bit and 64-bit versions of Corel PHOTO-PAINT. However, note that there are very few 64-bit TWAIN drivers
available.
The software interfaces and options vary. For information about using your scanner’s software, see the manufacturer’s documentation.
For more detailed information about bringing in RAW camera files, see “Bringing RAW camera files into Corel PHOTO-PAINT” on page
428.
To scan an image
1
Click File Acquire image, and click one of the following commands:
• Select WIA source — for a scanner that uses a WIA driver
• Select TWAIN source— for a scanner that uses a TWAIN driver
A command appears disabled if a compatible WIA or TWAIN scanner driver is not installed.
2 Choose a scanner from the dialog box that appears.
3 Click Select.
4
Click File Acquire image Acquire.
5 Preview the image, and select the area that you want to scan.
WIA, in combination with some scanners, supports scanning of multiple areas to separate files.
6 Click Scan.
On your scanner’s interface, this button may have a different name, such as OK or Send.
Creating images
You can produce original artwork by creating an image from scratch, or by duplicating an existing image. When creating an image from
scratch, Corel PHOTO-PAINT lets you specify various image and color management settings. You can choose from a list of preset settings,
which are based on how you intend to use the image. For example, you can choose the Web option if you are creating an image for the
Internet or the Photos option if you are creating a photo. However, if the preset settings are not suitable for the image that you want to
create, you can also choose custom settings and store them for future use.
In addition, you can create an image by using data copied to the Clipboard from another image window or another application.
When you create an image from scratch, you can specify the size of the image, its background color, and the color mode you want to use.
You can also choose the image resolution, or the number of pixels per unit of measure.
To create an image from scratch
1 Do one of the following:
• On the Welcome Page, click New document.
•
In the application window, click File New.
2 Type a filename in the Name text box.
Bringing images into Corel PHOTO-PAINT | 57
Page 74

3 From the Preset destination list box, choose an output destination for the image:
• Web — applies settings for creating images that are destined for the Internet
• Photos — applies settings for creating images that are photos
• Default CMYK — applies settings for creating images that are destined for commercial printing
You can also
Change the unit of measurement for the image Choose a unit of measurement from the Units list box.
Change the image size Choose a image size for the image from the Size list box or type
values in the Width and Height boxes.
Change the image orientation Click one of the following image orientation buttons:
•
Portrait
•
Landscape
Change the background color of the image Open the Background color picker, and click on a color.
Change the color mode for the image Choose a color mode from the Color mode list box.
Set the resolution for the image Choose a resolution from the Resolution list box.
Choose a rendering intent that corresponds to the final output of
the image
Choose a rendering intent from the Rendering intent list box.
For more information about rendering intents, see “What is a
rendering intent?” on page 187.
Choose a color profile that corresponds with the selected color
Choose a color profile from the corresponding color profile list box.
mode
Create multiple frames for a movie within your file Type a value in the Number of frames box.
Reset the default settings of the Create a new image dialog box From the Preset destination list box, choose PHOTO-PAINT
default.
If you do not want to show the Create a new image dialog box and prefer to use the default settings to create new images, enable
the Do not show this dialog again check box.
You can restore the Create a new image dialog box when starting images by clicking Tools Options , then choosing Workspace
General from the list of categories, and enabling the Show new image dialog check box.
To create a custom preset
1
In the application window, click File New.
2 From the Create a new image dialog box, choose the settings that you want to store as a preset destination.
3 Click the Add destination button.
4 In the Add destination dialog box, type a name for the new destination preset in the text box.
Higher image resolution results in a larger file size.
58 | Corel PHOTO-PAINT X7 User Guide
Page 75

You can delete a destination preset by choosing the preset name from the Preset destination list box, and then clicking the Remove
destination button.
You can specify a custom page size by choosing Custom from the Size list box and typing values in the Width and Height boxes.
You can also create an image by clicking the New button on the standard toolbar. If the standard toolbar is not displayed, click
Window Toolbars Standard.
To create an image from a duplicate
1
Click Image Duplicate.
2 Type a filename in the As box.
If you want to combine the objects and background in the new image, enable the Merge objects with background check box.
To create an image by using the Clipboard contents
•
Click File New from Clipboard.
Working with multiple images
Multiple images can be opened in a single image window, making it easy to handle many images simultaneously. You can access each open
image from its tab at the top of the image window, and you can start new images.
Open images appear docked, but you can undock any image you want and drag it inside or outside the application window.
To handle multiple images
To Do the following
Switch to another open image At the top of the image window, click the tab that has the filename
you want.
Start another image
Undock an image Drag the image tab to a new position inside or outside the
Click the New button to the right of the last document tab.
application window.
Working with vector graphics
In Corel PHOTO-PAINT, you work with bitmaps, also called raster images. Bitmaps are composed of tiny squares called pixels; each pixel is
mapped to a location in an image, and has numerical color values. The location and color value data is stored as bits — hence the name
bitmaps.
Vector graphics are made up of lines, curves, objects, and fills that are all calculated mathematically. Although you cannot work with vector
graphics in Corel PHOTO-PAINT, you can convert vector graphics to bitmaps as you open or import them. This conversion process is called
rasterization. You can also copy vector graphics from CorelDRAW and paste them into Corel PHOTO-PAINT.
Vector graphics usually have a smaller file size than bitmaps, so expect file size to increase when you convert vector graphics to bitmaps.
Bringing images into Corel PHOTO-PAINT | 59
Page 76

The top illustration is a vector graphic consisting of lines, objects, and fills. The bottom version is a bitmap made up of pixels.
To open a vector graphic
1
Click File Open.
2 Choose the folder where the file is stored.
3 From the Files of type list box, choose the vector file format of the file you want to import.
4 Click the filename.
5 Click Open.
6 In the Convert to bitmap dialog box, specify the settings you want.
You can copy a vector graphic in CorelDRAW and paste it into Corel PHOTO-PAINT by clicking File New from clipboard.
To import a vector graphic
1
Click File Import.
You can also click the Import button on the toolbar.
2 Choose the folder where the file is stored.
3 From the Files of type list box, choose the vector file format of the file you want to import.
4 Click the filename.
5 Click Open.
6 Click in the image window.
7 In the Convert to bitmap dialog box, specify the settings you want.
You can copy a vector graphic in CorelDRAW and paste it into Corel PHOTO-PAINT by clicking File New from clipboard.
60 | Corel PHOTO-PAINT X7 User Guide
Page 77

Displaying images and image information
You can change the appearance of windows and the magnification level of an image. Changing the magnification level allows you to view
specific image areas and makes image editing easier. You can also obtain relevant image information, such as color model information, as
you edit an image.
Corel PHOTO-PAINT includes the ImageBridge plugin from Digimarc, which allows you to embed and detect digital watermarks in images.
These watermarks contain copyright and authorship information, but they do not interfere significantly with the visual quality of images.
This section contains the following topics:
• “Viewing images” (page 61)
• “Zooming” (page 63)
• “Viewing image information” (page 64)
• “Refreshing the image window” (page 64)
• “Detecting and embedding Digimarc watermarks” (page 65)
Viewing images
Images can be viewed in a number of different ways. You can hide windows, the toolbox and the toolbars, leaving only the menu bar
and the image windows visible. You can view a large representation of an image in a full-screen preview. The image is editable when the
windows are hidden, but you cannot change the image while using the full-screen preview. You can also maximize or restore the work area.
You can view image areas that fall outside the image window. For example, when you are working at a high magnification level or with large
images, you can pan or jump to a different image area without having to adjust the magnification level. You can use the Quick Pan mode to
switch from any active tool to the Pan tool.
Displaying images and image information | 61
Page 78

You can select the image area to be displayed in the image window by using the Navigator pop-up.
To hide windows, the toolbox, and toolbars
•
Click Window Hide windows.
If you want to return to normal view, right-click in the workspace, and click Show windows.
To maximize or restore the work area
•
Click Window Maximize work area.
To restore the work area, click Window Maximize work area again.
To view a full-screen preview of an image
•
Click View Full-screen preview.
If you want to return to normal view, press any key or click the screen.
To view an image area that falls outside the image window
To Do the following
Pan to another area of the image
In the toolbox, click the Pan tool . Drag the image until the area
you want to view appears in the image window.
Switch to the QuickPan mode Click any tool in the toolbox, and start using it. Hold down the
middle mouse button or wheel, and drag in the image window.
Jump to another area of the image
Click the Navigator pop-up at the lower-right corner of the
image window. Drag the rectangle to the area of the image you
want to view.
You can pan around an image by clicking the Pan tool and pressing the Arrow keys.
You can also pan around an image using the scroll bars in the image window.
While moving the wheel on a mouse or another input device, you can scroll vertically by pressing Alt or horizontally by pressing Ctrl.
62 | Corel PHOTO-PAINT X7 User Guide
Page 79

Image areas that fall outside the image window can be dragged into view by using the Pan tool. This photo has been
dragged from its original position (top left) toward the right (top right). The inset (bottom) shows the entire image.
To establish the default setting for the mouse wheel
1
Click Tools Options .
2 In the list of categories, click Workspace, and click Display.
3 To specify the default action of the mouse wheel, choose Zoom or Scroll from the Default action for mouse wheel menu.
4 Click OK.
Zooming
By default, images are displayed at 100% magnification; however, you can zoom in to get a closer look at image detail or zoom out to view
a larger portion of the image. You can also specify the magnification level at which images open.
To zoom
•
In the toolbox, click the Zoom tool .
To Do the following
Zoom in Click the image where you want to magnify it.
Zoom in to a specific area Drag across the area you want to magnify.
Zoom out Right-click in the image window.
Switch between the current and previous zoom levels
Click the Zoom to previous button on the property bar.
Zoom in or out by a preset level Choose a magnification level from the Zoom list box on the
property bar.
You can also zoom in to or out from the image by using a mouse wheel.
To set the magnification level at which images are opened
1
Click Tools Options .
2 In the Workspace list of categories, click General.
Choose a magnification level from the Opening zoom list box.
The magnification level that you choose is used the next time you open an image.
Displaying images and image information | 63
Page 80

Viewing image information
You can view image properties, such as name, file format, and file size. If an image is loaded from a digital camera, you can also view EXIF
information about the image, such as the date and time the photo was taken, the exposure, and flash settings.
You can view information about image areas, such as pointer coordinates, as you work. You can view the changes in the x-coordinate (X)
or the y-coordinate (Y) as you move the pointer in the image window. You can also make note of the angle (A) and distance (D) that the
pointer moves in the image window as you draw a shape or define an editable area. In addition, you can obtain statistics related to the xand y-coordinates of the center position (C) and the radius (R) when you create or select a circular editable area or shape.
You can also view color information for an image area that corresponds to the pointer position. By default, the RGB, Hex, and CMYK values
are displayed. You can choose to display color information in two color models at once. For example, you can view both the grayscale and
RGB values of a particular image area. For information about color modes and color models, see “Changing color modes” on page 179
and “Working with color” on page 159.
To view image information
•
Click File Document properties.
To view information about image areas
•
Click Window Dockers Info.
You can also
Choose a new color model
Change the units of measurement used to display image
information
By default, the Image info palette lists the RGB, Hex, and CMYK values from top to bottom.
You can also view color mode information by clicking the Eyedropper tool and pointing to an image area.
Click the top flyout arrow , choose a color level, and click a
color model.
Click the bottom flyout arrow, and click a unit of measurement.
Refreshing the image window
You can refresh the image window at any time. For example, you may find this option useful when displaying large images.
To refresh the image window
•
Click Window Refresh window.
You can also refresh the image window by pressing Ctrl + W .
64 | Corel PHOTO-PAINT X7 User Guide
Page 81

Detecting and embedding Digimarc watermarks
A Digimarc watermark embeds copyright details, contact information, and image attributes in an image. A watermark makes subtle changes
to the brightness of pixels in an image. These changes cannot be readily seen; however following image processing, you might notice
changes in the brightness of some pixels. Digimarc watermarks aren’t affected by normal editing, printing, and scanning.
The detecting and embedding of Digimarc watermarks is not supported by the 64-bit version of CorelDRAW Graphics Suite.
Detecting watermarks
When you open an image in Corel PHOTO-PAINT, you can check for a watermark. If a watermark is present, a copyright symbol displays on
the title bar. You can find information about the watermarked image by reading the embedded message and by linking to the contact profile
in the Digimarc database.
Embedding watermarks
In Corel PHOTO-PAINT, you can also embed Digimarc watermarks in images. First, you must obtain a unique Creator ID by subscribing to
Digimarc’s online service. The Creator ID includes contact details, such as name, phone number, address, e-mail and web addresses.
Once you have a Creator ID, you can embed a watermark in an image. You can specify the copyright year, image attributes, and the
durability of a watermark. You can also specify the target output method for an image, such as print or web.
Digimarc watermarks do not prevent unauthorized image use or copyright infringement. But the watermarks do communicate copyright
claims. They also provide contact information for those who want to use or license an image.
For more information about Digimarc, see www.digimarc.com.
To detect a watermark
1
Click Effects Digimarc Read watermark.
2 Click Web lookup to view the webpage with contact details, or call the Digimarc fax-back service at the listed fax number.
This feature is not supported by the 64-bit version of CorelDRAW Graphics Suite.
You can also detect a watermark by enabling the Check for watermark option when you open or import an image.
To get a Creator ID
1
Click Effects Digimarc Embed watermark.
2 Click Personalize.
3 In the Personalize creator ID dialog box, click Register, and follow the instructions on the Digimarc website.
4 In the Personalize creator ID dialog box, type your Creator ID in the Creator ID box.
To embed a watermark
1
Click Effects Digimarc Embed watermark.
2 In the Copyright year(s) box, type a year or years.
You cannot type a year before 1922 or after the current year. Separate the years with commas.
3 In the Image attributes area, enable the check boxes for the applicable attributes.
4 Choose an option from the Target output list box.
Monitor and Web require a DPI setting of less than 200, while Print requires a dpi setting of 300 or higher.
5 Type a value in the Watermark durability box.
Displaying images and image information | 65
Page 82

Higher values increase the persistence of the watermark.
If you want to confirm the information available to viewers when they detect the watermark, enable the Verify check box.
This feature is not supported by the 64-bit version of CorelDRAW Graphics Suite.
Combine all objects with the background before adding a watermark. For more information about combining objects with the
background, see “Grouping and combining objects” on page 322.
66 | Corel PHOTO-PAINT X7 User Guide
Page 83

Using the guidelines, grid, and rulers
The guidelines, grid, and rulers let you position and size images, objects, and editable areas.
This section contains the following topics:
• “Setting up guidelines” (page 67)
• “Setting up the grid” (page 70)
• “Setting up the rulers” (page 71)
Setting up guidelines
Guidelines are vertical or horizontal lines that you can add anywhere in the image window to help you measure, align, and position image
components. The guidelines use the same units of measure as the rulers. When you save an image in the Corel PHOTO-PAINT application,
the guidelines are saved too.
You can display or hide the guidelines. You can also add, remove, move, and lock guidelines in the image window. You can add angled
guidelines and rotate existing guidelines.
You can have objects and editable areas snap to guidelines, so that when you move an object or editable area to a guideline, the object or
editable area automatically aligns to that guideline. You can set the sensitivity of this feature so that the object or editable area snaps when
you move within a specific number of pixels of a guideline.
You can change the color and line style of the guidelines to make them stand out against the image background. By default, when you
select a guideline, it turns red. When you deselect a guideline, it turns blue.
To display or hide the guidelines
•
Click View Show guidelines.
A check mark beside the menu command indicates that the guidelines are displayed.
You can also display or hide the guidelines by clicking Window Dockers Guidelines and clicking the Show guidelines button .
Using the guidelines, grid, and rulers | 67
Page 84

Guidelines displayed
To add a horizontal or vertical guideline
1
Click Window Dockers Guidelines.
2 Choose one of the following options from the Guideline type list box:
•
Horizontal
•
Vertical
3 Specify the location of the guideline in the x or y box.
4 Click Add.
You can also add a guideline by dragging from the horizontal or vertical ruler to the image window.
To add an angled guideline
1
Click Window Dockers Guidelines.
2 Choose Angled from the Guideline type list box
3 Specify the location of the guideline in the x and y boxes.
4 Type a value in Angle of rotation box.
5 Click Add.
To remove a guideline
1
Click Window Dockers Guidelines.
2 Choose a guideline from the list.
You can choose multiple guidelines by holding down Ctrl as you click.
3
Click the Delete guideline button .
You can also remove individual guidelines by dragging them off the image window.
To move a guideline
1
In the toolbox, click the Object pick tool .
2 Drag a guideline to a new position in the image window.
68 | Corel PHOTO-PAINT X7 User Guide
Page 85

You can also move a guideline by nudging it.
To move a guideline by specifying x and y coordinates, click Window Dockers Guidelines. Select the guideline, type values in the x
and y boxes, and click Modify.
To rotate a guideline
1
In the toolbox, click the Pick tool .
2 Perform a task from the following table.
To Do the following
Rotate a guideline Click the guideline twice, and then rotate the guideline when
rotation handles appear.
You can also rotate a guideline by choosing Angled from the
Guideline type list box, typing a value in the Angle of rotation
box, and clicking Modify.
Rotate multiple guidelines Hold down Shift, select the guidelines, click a selected guideline
again, and rotate the guidelines when the rotation handles appear.
The center of rotation is determined by the last guideline you
selected.
Rotate a guideline by a specific value Click the guideline twice to display the rotation handles, and type a
value in the Angle of rotation box on the property bar.
You can also rotate multiple guidelines by a specific value.
Rotate a guideline in 15º increments Click the guideline twice to display the rotation handles, hold down
Ctrl, and rotate the guideline.
You can also rotate multiple guidelines in 15º increments.
Change the pivot point Drag the guideline’s center of rotation to a new location or type a
value in the Center of rotation box on the property bar.
To lock or unlock the guidelines
•
Click View Lock guidelines.
A check mark displays beside the menu command to indicate the guideline is locked.
You can also lock a guideline by clicking Window Dockers Guidelines and clicking the Lock guideline button .
To have objects and editable areas snap to the guidelines
•
Click View Snap to Guidelines.
You can also set objects and editable areas to snap to a guideline by clicking Window Dockers Guidelines and clicking the Snap to
guideline button .
Using the guidelines, grid, and rulers | 69
Page 86

To set the snap sensitivity of the guidelines
1
Click Tools Options .
2 In the Workspace list of categories, click Display.
3 Type a value in the Guideline snap tolerance (pixels) box.
To set the line style and color of a guideline
1
Click Window Dockers Guidelines.
2 Open the Guideline color picker, and choose a color.
3 Open the Guideline style picker, and choose a line style.
Changing the line style or color affects all existing guidelines and any subsequent guidelines that you add.
Setting up the grid
The grid is a series of non-printing intersecting lines that are superimposed on an image to help you align and position objects accurately.
You can display or hide the grid at any time.
You can have objects and editable areas align automatically with the gridlines. You can customize the look of the grid by changing the grid
display and grid spacing. The grid display allows you to change the grid lines to dots or change the grid color. The spacing allows you to
set the distance between the grid lines. The spacing options are based on the unit of measure for the ruler. For example, if the ruler unit of
measure is set to inches, the spacing options are based on inches.
If the ruler unit of measure is set to pixels, you have additional options for customizing the look of the grid. For the pixel grid, you can
specify the color and opacity of the grid.
For more precise pixel editing at maximum zoom level, you can display a grid around each pixel.
To display or hide the grid
•
Click View Show grid.
A check mark beside the menu command indicates that the grid is displayed.
The grid displayed.
To have objects and editable areas snap to the grid
•
Click View Snap to Grid.
70 | Corel PHOTO-PAINT X7 User Guide
Page 87

To set the spacing of the gridlines
1
Click Tools Options .
2 In the Document list of categories, click Grid.
3 In the Document grid area, type a value in the Horizontal box.
If you want to change the grid spacing intervals or the number of lines displayed per unit of measure, choose an option from the list
box. The options are based on the unit of measure used for the ruler.
4 Type a value in the Vertical box.
To change the color and style of the grid
1
Click Tools Options .
2 In the Workspace list of categories, click Display.
3 Open the Grid color picker, and click a color.
4 Click one of the following Grid style buttons:
•
Solid line
•
Dashed line
•
Dots
You can also create a custom grid color by clicking More in the Grid color picker.
To change the color and style of the pixel grid
1
Click Tools Options .
2 In the Document list of categories, click Grid.
3 In the Pixel grid area, open the Color picker, and click a color.
4 Move the Opacity slider to the right to increase the opacity of the grid.
To display a pixel grid at the maximum zoom level
1
Click Tools Options .
2 In the Document list of categories, click Grid.
3 In the Pixel grid area, enable the Show pixel grid at 800% and higher zoom check box.
Setting up the rulers
The on-screen rulers provide a visual reference to help you size and position images, objects, and editable areas. You can display or hide the
rulers at any time. As you move the pointer in the image window, marks on the rulers indicate its position. You can also customize the rulers’
zero mark position and specify a unit of measure for the current document.
You can move the rulers anywhere in the image window; however, by default they appear along the top and left sides of the image window.
Calibrating the rulers ensures the distances on the screen match real-world distances.
To display or hide the rulers
•
Click View Show rulers.
A check mark beside the menu command indicates that the rulers are displayed.
Using the guidelines, grid, and rulers | 71
Page 88

The rulers displayed.
To display the rulers by default
1
Click Tools Options .
2 In the Workspace list of categories, click Display.
3 Enable the Show rulers by default check box.
To customize the rulers
1
Click Tools Options .
2 In the Document list of categories, click Ruler.
3 In the Units area, choose a unit of measure from the following list boxes:
•
Horizontal
•
Vertical
If you want to use the same unit of measure for both the horizontal and vertical rulers, enable the Same units for horizontal and
vertical rulers check box.
4 In the Origin area, type values in the following boxes:
•
Horizontal
•
Vertical
The origin value indicates the distance, in the units of measure you specify, between the zero mark of the ruler and the point of origin of
the ruler. For example, an origin value of 4 for the horizontal ruler moves the zero mark of that ruler four units away from the origin —
the point where the ruler begins.
5 Type a value in the Tick divisions box.
If you want to display fractions on the rulers, enable the Show fractions check box.
To move a ruler
• Hold down Shift, and drag a ruler to a new position.
You can also
Return the rulers to their original positions Hold down Shift, and double-click a ruler.
Move both rulers at the same time Hold down Shift, and drag the intersection point of the two rulers.
To calibrate the rulers
1
Click Tools Options.
2 In the Document list of categories, click Ruler.
72 | Corel PHOTO-PAINT X7 User Guide
Page 89

3 Click Calibrate rulers.
4 Hold a clear plastic ruler next to the horizontal and vertical rulers displayed on your screen.
5 Type values in the following boxes so that one inch on each ruler corresponds exactly to one inch on the plastic ruler:
• Horizontal
• Vertical
Using the guidelines, grid, and rulers | 73
Page 90

74 | Corel PHOTO-PAINT X7 User Guide
Page 91

Undoing, redoing, repeating, and fading actions
Corel PHOTO-PAINT lets you undo, redo, repeat, and fade actions. You can also restore an image or part of an image to a previously saved
version.
This section contains the following topics:
• “Undoing and redoing actions” (page 75)
• “Reverting to an earlier image state” (page 76)
• “Repeating and fading actions” (page 77)
Undoing and redoing actions
Corel PHOTO-PAINT lets you undo actions you apply to an image, starting with the most recent action. If you don’t like the result of undoing
actions, you can redo them. You can undo or redo actions applied to an image, such as a brushstroke, an effect, or a transformation;
however, you cannot undo or redo actions applied to the workspace, such as changing preferences.
The undo settings can be customized, allowing you to increase or decrease the number of actions you can undo and redo.
Keep in mind that the higher the number of actions in the undo list, the more memory is required to maintain the undo list. You can free
memory by permanently clearing all actions from the undo list.
You can also restore parts of an image by erasing the last action. For more information, see “Erasing image areas” on page 126.
Left to right: Original image; cropped image; undoing the cropping action restores the dimensions of the image.
Undoing, redoing, repeating, and fading actions | 75
Page 92

To undo or redo actions
To Do the following
Undo the last action
Redo the last action
Click Edit Undo [last action].
Click Edit Redo [last action].
Undo or redo a series of actions In the Undo manager docker, choose an action from the list. All
actions listed below the action you choose will be undone. If the
Undo manager docker is not open, click Edit Undo manager or
Window Dockers Undo manager.
Remove all actions in the Undo manager docker to free memory
Click Edit Purge Undo list.
When you undo a series of actions, the action you choose and all actions listed below it are undone.
When you redo a series of actions, the action you choose and all actions listed between it and the last undone action are redone.
To customize undo settings
1
Click Tools Options .
2 In the Workspace list of categories, click General.
3 In the Memory area, type a value in the Undo levels box.
You can specify up to 99 undo levels; however, the number of undo levels affects the size of the swap disk. Reduce the number of
undo levels if you find that your computer is not operating at the speed you want.
Reverting to an earlier image state
As you create or edit an image, you can revert to its last-saved version to remove all the changes you made since you saved the image. If you
want to remove only some changes, you can restore specific image areas to the way they look in the last-saved version of the image.
You can also create a checkpoint to save the current image temporarily, so that later you can return the image to that state if necessary.
You can also create a workspace that lets you save automatically using a checkpoint. For more information, see “To specify auto-save
settings” on page 80.
To revert to the last saved version of an image
•
Click File Revert to saved.
You can also revert to the last saved image by clicking the Revert to last saved button in the Undo manager docker.
To restore image areas
1
In the toolbox, click the Clone tool .
2
On the property bar, open the Brush picker, choose the Clone from saved brush category , and choose a preset brush type.
3 Drag in the image window.
76 | Corel PHOTO-PAINT X7 User Guide
Page 93

If you are creating an image from scratch, you must save it before using the Clone from saved tool. For more information about
saving images, see “Saving and closing” on page 79.
To create or return to a checkpoint
To Do the following
Create a checkpoint
Return to a checkpoint
Click Edit Checkpoint.
Click Edit Restore to checkpoint.
Repeating and fading actions
You can repeat or fade actions. When you repeat an action, it is reapplied to the image, producing a stronger visual effect. When you fade
an action, it is gradually removed. You can also use a merge mode to modify the fade effects. For more information about merge modes, see
“Understanding merge modes” on page 280.
You can repeat the last action to intensify the effect. The image on the left is the original, a wind
effect is applied to the image in the middle, and the effect is repeated in the image on the right.
You can fade the last action by a specified amount. The original image is on the
left, the center image is blurred, and the blur effect is faded in the right image.
Undoing, redoing, repeating, and fading actions | 77
Page 94

To repeat or fade actions
To Do the following
Repeat the last action
Fade the last action
To repeat or fade an action, you must first apply an action, such as an effect, a brushstroke, or a transformation, to an image. Actions
performed on the work area, such as changing preferences, cannot be repeated or faded.
When you have maximized the settings for a special effect, you can repeat the effect to exaggerate it. For more information about
special effects, see “Applying special effects” on page 283.
Click Edit Repeat [last action].
Click Edit Fade last command. Move the Percent slider to set the
fade level. If you want to modify the fade effect, choose a merge
mode from the Merge list box.
78 | Corel PHOTO-PAINT X7 User Guide
Page 95

Saving and closing
In Corel PHOTO-PAINT, you can save your work as you create an image and before you close it. You can also save images to many different
file formats.
This section contains the following topics:
• “Saving images” (page 79)
• “Exporting images to other file formats” (page 81)
• “Working with locked files” (page 82)
• “Closing images” (page 82)
Saving images
You can save an image to preserve it. You can also save images automatically at regular intervals and save backup copies of the file.
Saving images
When you save an image, you can specify a file format, a file name, and a folder where you want to save the file. Images are automatically
saved using the currently selected file format, name, and location. The default format is the native Corel PHOTO-PAINT (CPT) file format.
Saving to the Corel PHOTO-PAINT (CPT) file format retains all image properties — objects, the most recently created mask, alpha channels,
grids, guidelines, and color information — so you can edit them later.
You can attach information (metadata) such as comments and notes (Windows 8 and Windows 7) to images so that you can find them and
organize them more easily.
You can also export an image to another file format. For more information, see “Exporting images to other file formats” on page 81.
Auto-saving and backing up images
You can specify auto-save settings to save an image automatically at regular intervals as you work. You can choose to save an image
temporarily at a particular stage in its development, or you can overwrite the last version of the image.
Specifying backup settings lets you create a copy of an image each time you save. A backup copy is stored in the folder you choose.
You can also create a checkpoint to save a snapshot of the current image temporarily, so that you can return the image to that state if
necessary. For more information about checkpoints, see “To create or return to a checkpoint” on page 77.
Saving and closing | 79
Page 96

To save an image
1
Click File Save as.
2 Choose the folder where you want to save the file.
3 Choose a file format from the Save as type list box.
4 Type a file name in the File name list box.
The file extension for the file format you choose is appended to the file name automatically, but can be removed.
5 Enable any of the following active check boxes:
• Selected only — saves only the editable areas defined in your image, when there are no active and selected objects. If there are no
editable areas, this option saves only the active and selected objects.
• Do not show filter dialog — suppresses dialog boxes that provide advanced exporting options
6 Click Save.
You can also
Compress a file Choose a compression type from the Compression type list box.
Specify information about a file Type any comments you want in the Comments box.
The Compression type list box is available only when you are
saving an image to a file format that can be compressed.
If you don’t see this option, drag the lower-right corner to increase
the size of the dialog box and display options hidden from view.
When you save an image containing objects to a file format that does not support objects, you can continue working on the original
file (which still contains the objects) in the image window. The image and its objects can still be saved to the Corel PHOTO-PAINT
(CPT) format.
You can also save an image by clicking the Save button on the standard toolbar.
You can view notes in the Notes box in the Open dialog box when you open an image, or in the Import dialog box when you import
an image. Some file formats do not let you save annotations with an image.
To specify auto-save settings
1
Click Tools Options .
2 In the Workspace list of categories, click Save.
3 Enable the Auto-save every check box, and type a value in the box beside it.
The value you type specifies the number of minutes between auto-saves.
4 Enable one of the following options:
• Save to checkpoint — saves a temporarily copy of the image in its current state without overwriting the version that has been saved
to disk
• Save to file — overwrites the last version of the file that you saved to disk
If you want a message displayed at every auto-save, enable the Warn me before saving check box.
When you save the image or quit Corel PHOTO-PAINT, the checkpoint version of the image is lost.
80 | Corel PHOTO-PAINT X7 User Guide
Page 97

To specify backup settings
1
Click Tools Options .
2 In the Workspace list of categories, click Save.
3 Enable the Make backup on save check box.
If you want to change the folder where backup copies are saved, enable the Back-up to check box, and click Browse to specify a folder.
To edit document properties
1
Click File Document properties.
2 In the Document properties dialog box, enter words or phrases for any of the following: Title, Subject, Keywords, Notes, or Author.
To specify a rating, choose a rating from the Rating list box.
3 Click OK.
Exporting images to other file formats
You can export Corel PHOTO-PAINT images to a variety of file formats. When you export an image, the original image is left open in the
image window in the existing file format.
The file format you choose depends on how you want to use the image in the future. If you export an image to a file format other than
Corel PHOTO-PAINT (CPT), you may lose some image properties; each file format has its own idiosyncrasies and appropriate use. For
example, if you want to work on an image in another image-editing application, you can export it to the Adobe Photoshop (PSD) file format.
You retain many image properties, such as objects and masks, so you can continue to edit the image. If you want to share an image, the
Tagged Image File Format (TIFF) or the Windows bitmap (BMP) file format are suitable because they are standard formats; images in these
formats can be opened in most image viewers and most image-editing and desktop-publishing applications.
You can also export a file so that it is optimized for office productivity applications, such as Microsoft Office or Corel WordPerfect Office.
You can also export images to web-compatible formats, such as the JPEG or GIF file formats. For more information, see “Exporting images
for the web” on page 375.
For more information about supported file formats, see “Supported file formats” on page 435.
To export an image to another file format
1
Click File Export.
2 Choose the folder where you want to save the file.
3 Choose a file format from the Save as type list box.
4 Type a file name in the File name list box.
The file extension for the file format you choose is appended to the file name automatically, but it can be removed.
5 Enable any of the following active check boxes:
• Selected only — saves only the editable areas defined in the image, when there are no active and selected objects. If there are no
editable areas, this option saves only the active and selected objects.
• Do not show filter dialog — suppresses dialog boxes that provide advanced exporting options
6 Click Save.
You can also
Compress a file Choose a compression type from the Compression type list box.
The Compression type list box is available only when you are
saving an image to a file format that can be compressed.
Saving and closing | 81
Page 98

You can also
Specify information about a file Type any comments you want in the Comments box.
If a dialog box for the export format opens, specify the options you want. For detailed information about file formats, see “Supported
file formats” on page 435.
To export an image to Microsoft Office or Corel WordPerfect Office
1
Click File Export for Office.
2 From the Export to list box, choose one of the following:
•
Microsoft Office
•
WordPerfect Office
3 Click OK.
4 Locate the folder in which you want to save the file.
5 Type a file name in the File name list box.
6 Click Save.
Images are exported at 96 dots per inch (dpi) with color management settings unchanged.
Layers in an image are flattened when the image is exported to Microsoft Office or Corel WordPerfect Office.
Working with locked files
In a corporate environment you may open a locked file that is already being edited by another user. You can save changes that you make to
a locked file in one of the following ways:
•
If the other user has modified the file or still has the file open, you must save the file with a new name by clicking File Save As.
•
If the other user has closed the file without modifying it, you can save the changes by clicking File Save.
Closing images
You can close one open image or many open images at any time. If you close images without saving them, your work is lost.
To close an image
To Do the following
Close one open image
Close all open images
If you are unable to close a file, you may have a task, such as printing or saving, in progress or it has failed. Please refer to the status
bar to view the status of a task.
Click File Close or Window Close Window.
Click File Close all or Window Close all.
82 | Corel PHOTO-PAINT X7 User Guide
Page 99

Finding and managing content
Corel PHOTO-PAINT lets you access, search and browse the Content Exchange, a collection of clipart, photos, fonts, frames, patterns, and
image lists. In addition, you can find content located on your computer, local network, or the website of an online content provider. When
you find the content that you need, you can import it into your document, open it in its associated application, or collect it in a tray for
future reference.
Corel PHOTO-PAINT is fully integrated with the search capabilities that are offered by Windows 7 and Windows 8. By default, the application
searches all locations that Windows Search is configured to index. For information about modifying indexing options in Windows Search,
see the Windows Help. Windows Search is available as a free download from the Microsoft Download Center. For more information, visit
http://www.microsoft.com/windows/desktopsearch/downloads/default.mspx. If you are using another third-party computer indexing and
search tool (for example, Google Desktop) or you don’t have Windows Search installed, the application has limited search capabilities and
lets you search only by filename.
This section contains the following topics:
• “Exploring Corel CONNECT” (page 83)
• “Accessing content” (page 88)
• “Browsing and searching for content” (page 90)
• “Viewing content” (page 92)
• “Using content” (page 93)
• “Installing fonts” (page 95)
• “Managing content” (page 95)
• “Syncing trays with OneDrive” (page 96)
• “Content types” (page 98)
Exploring Corel CONNECT
You can browse and search for content by using Corel CONNECT. Corel CONNECT is available both as a standalone utility and as a docker.
You can choose whichever mode better suits your workflow.
The image below shows the main components of the Corel CONNECT utility:
Finding and managing content | 83
Page 100

Part Description
1. Libraries pane Lets you access content provided by Corel and Corel partners
2. Favorite folders pane Provides quick access to frequently used folders
3. Folders pane Displays a representation of the file structure available on your
computer
4. Tray pane Lets you collect files from one or more folders
5. Zoom slider Lets you adjust the size of thumbnails in the viewing pane
6. Viewing pane Lets you view thumbnails of content files
7. Helpand options button Lets you open a menu of commands that allow you to access Help,
configure content libraries, set preferences, and view version and
license information
84 | Corel PHOTO-PAINT X7 User Guide
 Loading...