


A |
B |
|
|
K |
K |
A |
|
J |
J |
M |
|
|
C |
G |
H |
D V |
U |
V |
|
|
T |
|
Q |
R |
|
P |
P |
|
|
|
N |
B |
I |
L |
L |
J |
J |
|
E |
F |
D |
|
1 |
C |
S |
|
|
|
|
Q |
|
|
|
O |
N |
2
3 |
4A |
4B |
4C |
5 |
6 |
3

7A |
7B |
8 |
9A |
9B |
9C |
9D |
9E |
9F |
10 |
11A |
11B |
4
11C |
12 |
13 |
14 |
15 |
16A |
16B |
17 |
18 |
19A |
19B |
19C |
5
20A |
20B |
21A |
21B |
21C |
21D |
21E |
22A |
22B |
23A |
23B |
23C |
6

24A |
24B |
24C |
25A |
25B |
25C |
7
 MYAMAKI COMPLETE
Il marsupio Myamaki Complete è stato progettato in modo tale da rispettare sempre l’ergonomia del bambino e per soddisfare al meglio le sue esigenze evolutive e di comfort è dotato di riduttore multifunzione, utilizzabile in svariate configurazioni.
ISTRUZIONI D’USO
IMPORTANTE! LEGGERE ATTENTAMENTE E CONSERVARE PER FUTURO RIFERIMENTO.
ATTENZIONE: PER EVITARE PERICOLO DI SOFFOCAMENTO PRIMA DELL’USO RIMUOVERE QUALSIASI IMBALLAGGIO IN PLASTICA CHE DOVREBBE ESSERE DISTRUTTO O CONSERVATO LONTANO DAI BAMBINI.
AVVERTENZE |
|
|
|
•ATTENZIONE: |
Assicurarsi che |
||
gli |
utilizzatori |
del |
marsupio |
siano |
a conoscenza |
dell’esatto |
|
funzionamento |
dello |
stesso. Non |
|
consentire a nessuno di utilizzare il prodotto se non ha letto e compreso pienamente le avvertenze e le istruzioni.
•Assicurarsichetuttigliutentiabbiano le necessarie capacità fisiche per utilizzare questo prodotto.
•ATTENZIONE:Ilmancatorispettodelle seguenti istruzioni può compromettere la sicurezza del vostro bambino.
•ATTENZIONE: Fare attenzione quando ci si piega o china in avanti o lateralmente.
•ATTENZIONE: Non usare il marsupio durante l’attività sportiva.
•ATTENZIONE: Il vostro equilibrio può essere compromesso dal movimento vostro e del bambino.
•ATTENZIONE: Indossare sempre il marsupio prima di alloggiare il bambino al suo interno.
•ATTENZIONE: Quando si usa il marsupio, non sganciare mai la cintura girovita prima di aver tolto il bambino.
•ATTENZIONE: Prestare attenzione nell’utilizzo del marsupio in ambiente domestico (es. fonti di calore o maneggiando bevande calde).
•ATTENZIONE: Durante l’utilizzo del marsupio controllare il bambino.
•ATTENZIONE: Fascia utilizzo: dalla nascita, fino a 15 Kg.
•Sistemato il bambino all’interno del marsupio controllare attentamente che i regolatori di ampiezza del girovita e del girogambe siano regolati in maniera corretta, eventualmente agire sugli stessi fino a portarli alla giusta tensione.
•Per i neonati sottopeso e bambini con prescrizioni mediche, chiedere il parere di un pediatra prima di utilizzare il prodotto.
• Il bambino fino a quando non
è in grado di tenere il proprio capo sollevato e le spalle verticali, indicativamente fino al 6° mese d’età, deve essere trasportato rivolto verso colui che lo porta “Fronte Mamma”.
8
• Il bambino, dal momento in cui
è in grado di tenere il proprio capo sollevato e le spalle verticali, indicativamente dal 6° mese d’età, può essere trasportato sul fianco o sulla schiena del genitore
•ATTENZIONE: Non lasciare mai il bambino incustodito all’interno del marsupio quando questo non è indossato.
•Utilizzare il marsupio solamente quando si è in piedi o si cammina.
•Ricordarsi che il bambino, all’interno del marsupio, reagirà ai cambiamenti climatici prima di chi lo trasporta.
•Prima dell’uso, assicurarsi che le cinghie siano posizionate e regolate correttamente e che le fibbie siano agganciate.
•Non utilizzare il marsupio con più di un bambino alla volta.
•Verificare sempre la presenza di spazio attorno al viso del bambino sufficiente a fornire una buona quantità di aria.
•Non usare il marsupio se alcune parti sono rotte, strappate o mancanti.
•Nonapplicarealmarsupioaccessori, parti di ricambio o componenti non forniti dal costruttore.
•Questo marsupio deve essere utilizzato esclusivamente da un adulto.
•Il marsupio non può essere usato per il trasporto in auto.
•Il marsupio non può essere usato mentre si guida o si è passeggero di un motoveicolo
•Ilmarsupiononpuòessereutilizzato quando si cucina o si eseguono lavori di pulizia, per non esporre a
fonti di calore o sostanze chimiche per evitare il rischio di esposizione a fonti di calore o sostanze chimiche.
UTILIZZO FRONTE MAMMA E UTILIZZO SUL FIANCO
•ATTENZIONE: fare attenzione quando ci si piega o china in avanti
o lateralmente;
• E’ consigliabile sedersi mentre si svolgono le operazioni per alloggiare il bambino all’interno del marsupio e per togliere il bambino dal marsupio.
UTILIZZO IN TERZA POSIZIONE (SULLA SCHIENA DEL GENITORE)
•Non portare sulla schiena bambini di età inferiore ai 6 mesi o comunque non in grado di stare seduti da soli
•Controllare regolarmente che il bambino sia comodo e sicuro, specialmente portandolo sulla schiena.
COMPONENTI MARSUPIO (fig. LATO A e fig. LATO B)
A.Schienale marsupio
B.Spallacci
C.Seduta marsupio
D.Bottoni riduttore marsupio (se incluso)
E.Mutansella
F.Fascia addominale
G.Fibbia con nastro per regolazione fascia addominale
H.Elastico blocca fibbia
I.Asole e bottoni per la regolazione della mutansella
J.Fibbie con nastro per regolazione spallacci
K.Fibbia sterno/scapolare con nastro elastico
L.Asole per aggancio riduttore (se incluso)
M.Soffietto autoregolante
COMPONENTI RIDUTTORE-COPERTINA (fig. LATO C e fig. LATO D)
N.Bottoncini automatici
O.Bottoncini automatici
P.Bottoncini automatici
Q.Nastro regolatore con bottoncini automatici
R.Bottoncino automatico
S.Bottoni elasticati
T.Tasca con cerniera
U.Cappuccio
V.Bottoni elasticati del cappuccio
9
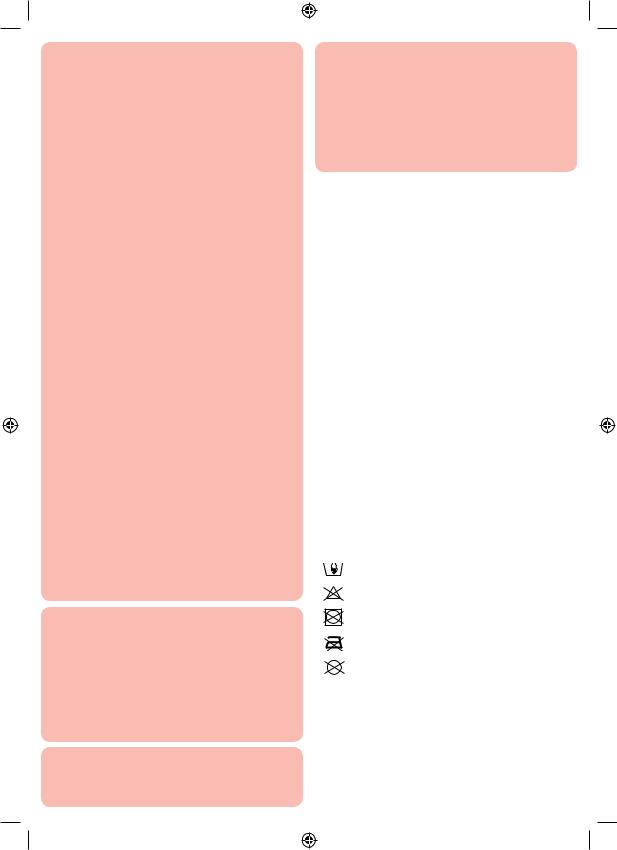
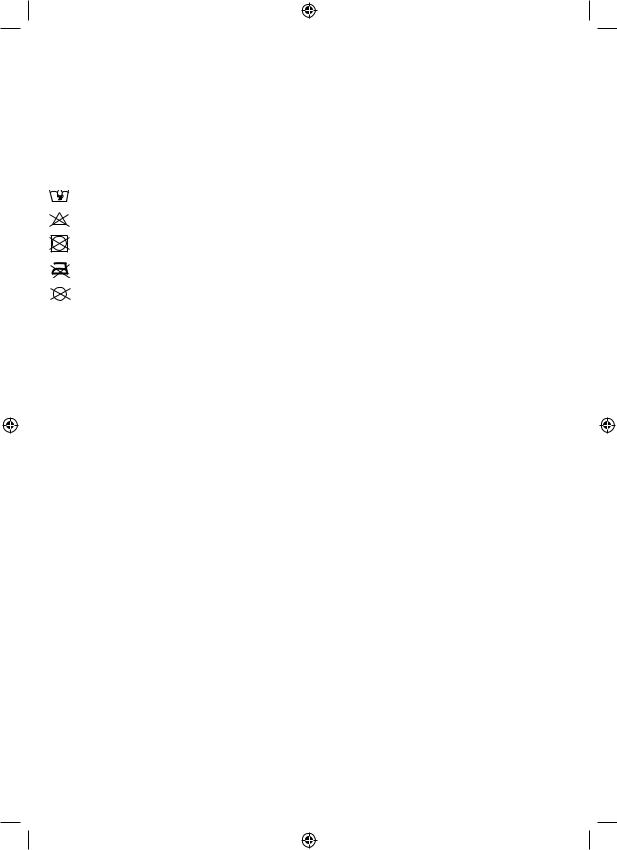
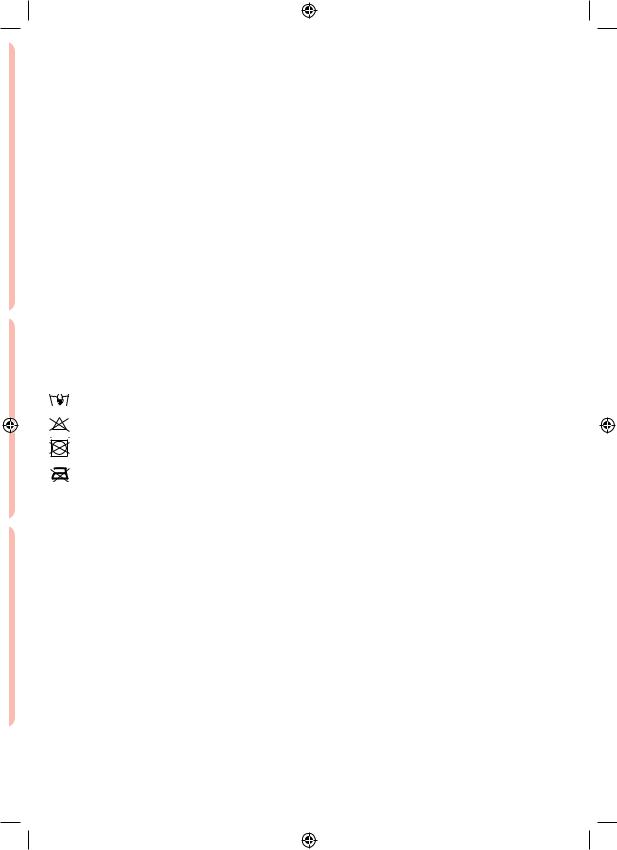
CONSIGLI PER LA PULIZIA E LA MANUTENZIONE PULIZIA
Attenersi alle istruzioni riportate sull’etichetta di lavaggio. Dopo ogni lavaggio controllare la consistenza del tessuto e delle cuciture.
Lavare a mano in acqua fredda
Non candeggiare
Non asciugare meccanicamente
Non stirare
Non lavare a secco
MANUTENZIONE
Controllare periodicamente il marsupio per verificare eventuali scuciture, danneggiamenti o parti mancanti, in tal caso non utilizzare il prodotto.
TRASPORTO FRONTALE - FRONTE MAMMA
Per il trasporto del bambino all’interno del marsupio in posizione fronte-mamma è consigliabile l’utilizzo del riduttore multifunzione che può essere utilizzato in due configurazioni differenti a seconda dell’età del bambino.
•0-1 mese: la funzione del riduttore è quella di avvolgere il bambino mantenendolo in posizione rannicchiata sia quando si trova all’interno del marsupio, sia durante le operazioni di inserimento e rimozione dal marsupio stesso
•1m+: la funzione del riduttore è quella di proteggere maggiormente e donare maggior comfort al bambino.
L’utilizzo del riduttore permette di sostenere il bambino, donare comfort e avvolgere la spina dorsale curva del
bambino sostenendo testa e collo.
ATTENZIONE: indossare sempre il marsupio prima di alloggiare il bambino.
TRASPORTO FRONTALE – FRONTE MAMMA (0-1 MESE)
COME INDOSSARE IL MARSUPIO CON IL RIDUTTORE
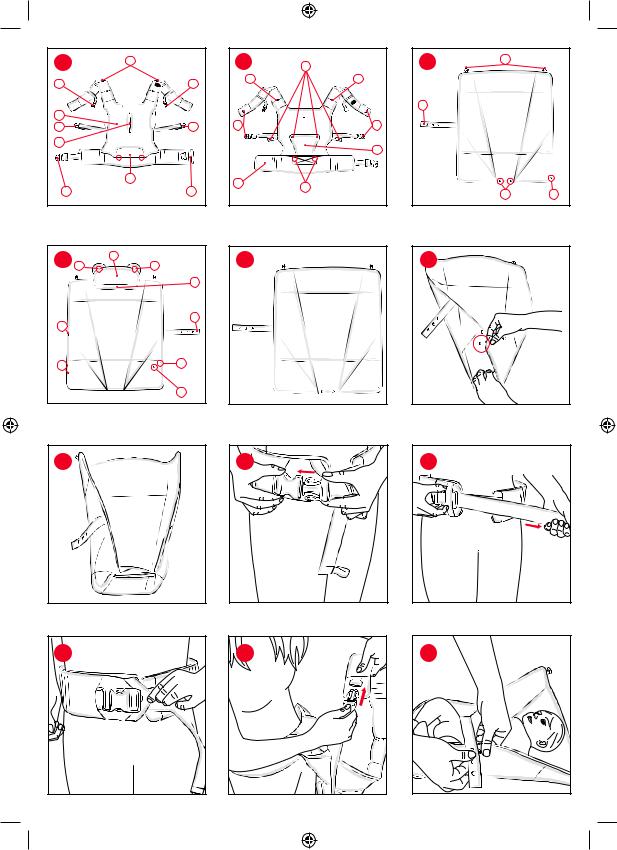
1.Stendere il riduttore multifunzione su un piano con il lato C rivolto verso l’alto (fig. 1)
2.Ripiegare i bordi inferiori del riduttore e allacciare tra loro i bottoncini automatici N cerchiati come indicato in figura 2.
3.Ripiegare la base ottenuta, facendo corrispondere i
bottoncini automatici O con i bottoncini automatici
P e agganciare. Verificare che il risultato così ottenuto corrisponda a quello mostrato in figura 3
4. A questo punto, allacciare la fascia addominale F del marsupio agendo sulle rispettive fibbie (fig. 4A) e regolarne
la larghezza utilizzando la fibbia G (fig. 4B).
ATTENZIONE: bloccare la fibbia facendola passare all’interno dell’elastico H (fig. 4C).
5.Agganciare entrambi gli spallacci agendo sulle fibbie J (fig. 5).
6.Inserire il bambino all’interno del riduttore in posizione rannicchiata e assicurarsi di allacciare il nastro regolatore
Q con il corrispettivo bottoncino R nella misura che più si adatta alla corporatura del bambino (fig. 6)
7. Fare utilizzo di un piano per favorire l’inserimento del riduttore e del bambino all’interno del marsupio. Appoggiare quindi il riduttore contenente il bambino sul corpo del marsupio disteso sul piano (fig. 7A) e vincolare i
bottoni elasticati S posti sulla parte superiore del riduttore con le asole L poste sugli spallacci del marsupio (fig. 7B)
8.Controllare che il bambino sia ben adagiato sulla seduta del marsupio e fissare la mutansella E tramite gli appositi bottoni F, regolandola nella posizione più adatta alla
corporatura del bambino affinché la stessa non sia mai né
troppo larga né troppo stretta (fig. 8)
ATTENZIONE: È consigliabile svolgere le operazioni di alloggiamento del bambino all’interno del marsupio sedendosi o utilizzando una superficie piana e stabile, in modo da gestire eventuali movimenti improvvisi del
bambino.
ATTENZIONE: Sostenere saldamente il bambino mentre si
svolgono queste operazioni.
ATTENZIONE: Prima di inserire il bambino nel marsupio verificare di aver eseguito correttamente le operazioni precedenti.
9.Indossare il marsupio infilando gli spallacci B (fig. 9A), successivamente allacciare e regolare la fibbia sterno/ scapolare (fig. 9B) e completare la vestizione del marsupio regolando gli spallacci (fig. 9C). La parte di nastro in eccesso può essere ridotta arrotolandola su se stessa e fissandola attraverso l’apposito elastico (fig. 9D). In alternativa è possibile allacciare la fibbia sterno/scapolare prima di indossare gli spallacci (fig. 9E) e successivamente infilare gli spallacci facendo passare la fibbia sterno/scapolare dietro
la testa (fig. 9F) e procedere alla sua regolazione. ATTENZIONE: Accertarsi che le gambe del bambino siano
rannicchiate e che la mutansella sia ben ancorata.
10. Il riduttore è dotato di un pratico cappuccio che permette una maggiore protezione del bambino dagli agenti atmosferici e durante la nanna.
Per l’utilizzo del cappuccio, aprire la zip posta sul lato D del riduttore, estrarre il cappuccio e ancorare i bottoni elasticatiV presenti sul lato superiore del cappuccio alle asole L presenti
sul lato A del marsupio, come mostrato in figura 10. ATTENZIONE: questo utilizzo è consentito solo con
bambino compreso tra 0 e 1 mese
ATTENZIONE: questo utilizzo è consentito solo quando il marsupio è in configurazione fronte-mamma
COME TOGLIERE IL BAMBINO DAL MARSUPIO ATTENZIONE: è consigliabile sedersi mentre si svolgono le
operazioni per togliere il bambino dal marsupio .
11.Sostenendo saldamente il bambino, sganciare la fibbia sterno/scapolare K (fig. 11A), sfilare gli spallacci B (fig. 11B) e svincolare i bottoni della mutansella dalle apposite asole (fig. 11C) prima di rimuovere il bambino.
12.Per non disturbare il bambino e mantenere il suo comfort, si consiglia di rimuovere il bambino dal marsupio ancora
all’interno del riduttore.
Per procedere alla rimozione del bambino, svincolare i bottoni elasticati S del riduttore dalle asole L poste sugli spallacci (fig.
12) e rimuovere il riduttore con il bambino dal marsupio.
Solo successivamente sganciare la fibbia addominale. ATTENZIONE: Sostenere saldamente il bambino mentre si
svolgono queste operazioni.
ATTENZIONE: Prima di togliere il bambino dal marsupio verificare di aver eseguito correttamente le operazioni precedenti.
È comunque possibile l’utilizzo del marsupio senza il riduttore, anche per i bambini di 0 mesi, svolgendo le operazioni descritte precedentemente (ad esclusione delle parti relative
10
al riduttore stesso). Il marsupio infatti è stato studiato in modo tale da rispettare sempre l’ergonomia del bambino.
L’utilizzo del riduttore è tuttavia sempre consigliato poiché permette di sostenere il bambino e di donare comfort, avvolge la spina dorsale curva del bambino sostenendo la testa e il collo.
TRASPORTO FRONTALE – FRONTE MAMMA (1m+)
COME INDOSSARE IL MARSUPIO CON IL RIDUTTORE
Allacciare la fascia addominale F del marsupio agendo sulle rispettive fibbie (fig. 4A) e regolarne la larghezza utilizzando
la fibbia G (fig. 4B).
ATTENZIONE: bloccare la fibbia facendola passare all’interno dell’elastico H (fig. 4C).
Agganciare entrambi gli spallacci agendo sulle fibbie J (fig. 5).
13.Fare utilizzo di un piano per favorire l’inserimento del riduttoreedelbambinoall’internodelmarsupio.Stendere quindi il riduttore multifunzione sul marsupio facendo attenzione di mantenere il lato C del riduttore rivolto verso l’alto (fig. 13).
14.Vincolare i bottoni elasticati S posti sulla parte superiore del riduttore con le asole L poste sugli spallacci del marsupio (fig. 14).
15.Agganciare i bottoncini automatici O presenti sulla parte inferiore del riduttore con i bottoncini automatici D presenti sulla seduta del marsupio (fig. 15).
16.Adagiare il bambino sulla seduta (fig. 16A) e fissare la mutansella E tramite gli appositi bottoni F, regolandola nella posizione più adatta alla corporatura del bambino
affinché la stessa non sia mai né troppo larga né troppo
stretta (fig. 16B).
ATTENZIONE: È consigliabile svolgere le operazioni di alloggiamento del bambino all’interno del marsupio sedendosi o utilizzando una superficie piana e stabile, in modo da gestire eventuali movimenti improvvisi del
bambino.
ATTENZIONE: Sostenere saldamente il bambino mentre si
svolgono queste operazioni.
ATTENZIONE: Prima di inserire il bambino nel marsupio verificare di aver eseguito correttamente le operazioni precedenti.
Indossare il marsupio infilando gli spallacci B (fig. 9A), successivamente allacciare e regolare la fibbia sterno/ scapolare (fig. 9B) e completare la vestizione del marsupio regolando gli spallacci (fig. 9C). La parte di nastro in eccesso può essere ridotta arrotolandola su se stessa e fissandola attraverso l’apposito elastico (fig. 9D).
In alternativa è possibile allacciare la fibbia sterno/scapolare prima di indossare gli spallacci (fig. 9E) e successivamente infilare gli spallacci facendo passare la fibbia sterno/ scapolare dietro la testa (fig. 9F) e procedere alla sua
.regolazione.
ATTENZIONE: Accertarsi che le gambe del bambino siano a cavalcioni della seduta e inserite all’interno della mutansella.
Il riduttore è dotato di un pratico cappuccio che permette una maggiore protezione del bambino dagli agenti atmosferici e durante la nanna.
Per l’utilizzo del cappuccio, aprire la zip posta sul lato D del riduttore, estrarre il cappuccio e ancorare i bottoni elasticatiV presenti sul lato superiore del cappuccio alle asole L presenti sul lato A del marsupio, come mostrato in figura 10.
COME TOGLIERE IL BAMBINO DAL MARSUPIO ATTENZIONE: è consigliabile sedersi mentre si svolgono le
operazioni per togliere il bambino dal marsupio .
•Sostenendo saldamente il bambino, sganciare la fibbia sterno/scapolare K (fig. 11A), sfilare gli spallacci B (fig. 11B) e
svincolare i bottoni della mutansella dalle apposite asole (fig.
11C) prima di rimuovere il bambino. Solo successivamente
sganciare la fibbia addominale.
ATTENZIONE: Sostenere saldamente il bambino mentre si
svolgono queste operazioni.
ATTENZIONE: Prima di togliere il bambino dal marsupio verificare di aver eseguito correttamente le operazioni precedenti.
È comunque possibile l’utilizzo del marsupio senza il riduttore, svolgendo le operazioni descritte precedentemente (ad esclusione delle parti relative al riduttore stesso). Il marsupio infatti è stato studiato in modo tale da rispettare sempre l’ergonomia del bambino.
L’utilizzo del riduttore è tuttavia sempre consigliato poiché permette di sostenere il bambino e di donare comfort, aiuta lo sviluppo salutare delle anche e avvolge la spina dorsale curva del bambino sostenendo la testa e il collo.
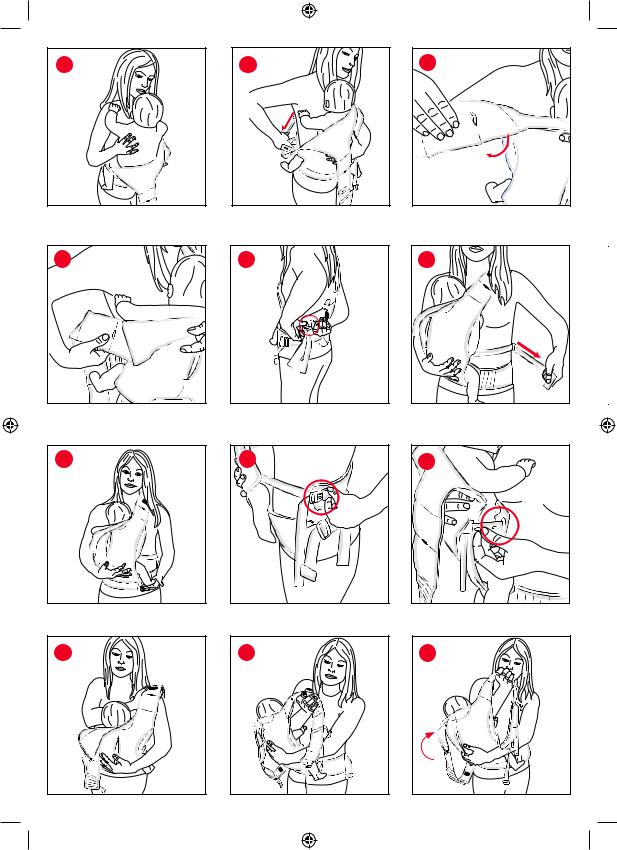
TRASPORTO LATERALE – SULL’ANCA
Il bambino, dal momento in cui è in grado di tenere il proprio capo sollevato e le spalle verticali, indicativamente dal 6° mese d’età, può essere trasportato in posizione laterale – sull’anca.
Il marsupio può essere posizionato sia sul fianco destro che su quello sinistro del genitore, a seconda della preferenza dello stesso.
Di seguito verrà illustrato il procedimento per l’alloggio sul fianco destro. Per l’alloggio sul fianco sinistro ripetere le
operazioni specularmente.
ATTENZIONE: indossare sempre il marsupio prima di alloggiare il bambino.
COME INDOSSARE IL MARSUPIO
Agganciare la fascia addominale F agendo sulle rispettive fibbie (fig. 4A) e regolarne la larghezza agendo sulla fibbia G
(fig. 4B).
ATTENZIONE: bloccare la fibbia facendola passare all’interno dell’elastico H (fig. 4C).
17.Ruotare la fascia addominale posizionando la seduta in prossimità del fianco destro (fig. 17).
18.Fissare la mutansella agganciando il bottone sinistro (fig. 18) all’apposita asola, lasciando libero l’altro lato per poter successivamente alloggiare il bambino.
19.Agganciare lo spallaccio sinistro con la fibbia del nastro destro (fig. 19A), creando un incrocio. Indossare l’anello così creato facendolo passare al di sopra della testa (fig.
19B) in modo che, in posizione finale, appoggi sulla spalla sinistra (fig. 19C).
COME ALLOGGIARE IL BAMBINO ALL’INTERNO DEL MARSUPIO
20.Posizionare il bambino all’interno del marsupio (fig. 20A) e, sorreggendolo con la mano sinistra, regolare lo spallaccio già indossato con la mano destra (fig. 20B). Procedere successivamente con la chiusura della mutansella.
21.Per una migliore vestibilità del marsupio, ruotare lo spallaccio destro su sé stesso (fig. 21A) facendogli compiere un giro completo e facendolo passare sotto l’ascella
11
(fig.21B). Procedere con il fissaggio dello stesso con le fibbie del nastro sinistro (fig. 21C) e procedere con la regolazione dello spallaccio (fig. 21D). Assicurarsi che il marsupio sia posizionato correttamente come in figura 21E.
COME TOGLIERE IL BAMBINO DAL MARSUPIO ATTENZIONE: è consigliabile sedersi mentre si svolgono le
operazioni per togliere il bambino dal marsupio.
22.Sostenendo saldamente il bambino, liberare lo spallaccio che passa sotto l’ascella (fig. 22A) e svincolare i bottoni della mutansella (fig. 22B) prima di rimuovere il bambino.
Solo successivamente sganciare la fibbia addominale
rimuovendola dall’elastico di fissaggio.
ATTENZIONE: Sostenere saldamente il bambino mentre si
svolgono queste operazioni.
ATTENZIONE: Prima di togliere il bambino dal marsupio verificare di aver eseguito correttamente le operazioni precedenti.
POSIZIONE SULLA SCHIENA DEL GENITORE CON UTILIZZO DEL RIDUTTORE MULTIFUNZIONE ATTENZIONE: indossare sempre il marsupio prima di
alloggiare il bambino.
COME INDOSSARE IL MARSUPIO CON IL RIDUTTORE
Allacciare la fascia addominale F del marsupio agendo sulle rispettive fibbie (fig. 4A) e regolarne la larghezza utilizzando
la fibbia G (fig. 4B).
ATTENZIONE: bloccare la fibbia facendola passare all’interno dell’elastico H (fig. 4C).
Agganciare entrambi gli spallacci agendo sulle fibbie J (fig. 5). Fare utilizzo di un piano per favorire l’inserimento del riduttore e del bambino all’interno del marsupio. Stendere quindi il riduttore multifunzione sul marsupio facendo attenzione di mantenere il lato C del riduttore rivolto verso l’alto (fig. 13).
Vincolare i bottoni elasticati S posti sulla parte superiore del riduttore con le asole L poste sugli spallacci del marsupio (fig. 14). Agganciare i bottoncini automatici O presenti sulla parte inferiore del riduttore con i bottoncini automatici D presenti sulla seduta del marsupio (fig. 15).
COME ALLOGGIARE IL BAMBINO ALL’INTERNO DEL MARSUPIO
Seguendo le indicazioni sotto riportate, è possibile inserire il bambino nel marsupio per l’utilizzo della posizione di trasporto (sulla schiena del genitore) senza l’aiuto di un
secondo adulto.
ATTENZIONE: E’ consigliabile sedersi mentre si svolgono le operazioni per alloggiare il bambino all’interno del marsupio, in modo da poter gestire eventuali movimenti improvvisi del
bambino.
ATTENZIONE: Sostenere saldamente il bambino mentre si
svolgono queste operazioni.
ATTENZIONE: Prima di inserire il bambino nel marsupio verificare di aver eseguito correttamente le operazioni precedenti.
Adagiare il bambino sulla seduta (fig. 16A) e fissare la mutansella
E tramite gli appositi bottoni F, regolandola nella posizione più adatta alla corporatura del bambino affinché la stessa non sia mai né troppo larga né troppo stretta (fig. 16B).
Indossare il marsupio infilando gli spallacci B (fig. 9A).
Il riduttore è dotato di un pratico cappuccio che permette una maggiore protezione del bambino dagli agenti atmosferici e
durante la nanna.
Per l’utilizzo del cappuccio, aprire la zip posta sul lato D del riduttore, estrarre il cappuccio e ancorare i bottoni elasticatiV presenti sul lato superiore del cappuccio alle asole L presenti sul lato A del marsupio, come mostrato in figura 10.
POSIZIONAMENTO DEL BAMBINO SULLA SCHIENA
23.Sfilare il braccio destro dallo spallaccio e, passandolo nella parte interna del marsupio, prendere con la stessa mano lo spallaccio opposto (fig. 23A), avendo cura di afferrarlo saldamente.Sfilareancheilbracciosinistrodallospallaccio e con questo sorreggere esternamente il bambino nel marsupio (fig. 23B). Infilare il braccio destro, con cui si tiene lo spallaccio sinistro, nello spallaccio stesso (fig. 23C) e iniziare a ruotare il marsupio. Il marsupio, agganciato alla fascia addominale, ruoterà insieme all’imbragatura e si posizionerà correttamente sulla schiena.
24.Per completare l’operazione, infilare il secondo braccio nello spallaccio libero (fig. 24A), in modo che il peso del marsupio si scarichi uniformemente sulla schiena e sulle spalle. Chiudere la fibbia sterno/scapolare L sullo sterno (fig.24B) e regolare tutti i nastri del marsupio (fig. 24C).
COME TOGLIERE IL BAMBINO DAL MARSUPIO
25.Sganciare la fibbia sterno/scapolare (fig. 25A), sfilare uno dei due spallacci e sostenendo saldamente il bambino, sfilare anche il secondo spallaccio; far ruotare l’imbragatura fino a portare il bambino in posizione frontale (fig. 25B). A questo punto, infilare nuovamente gli spallacci (fig. 25C) per riportarsi nella posizione iniziale.
ATTENZIONE: Sostenere saldamente il bambino mentre si
svolgono queste operazioni.
ATTENZIONE: Prima di togliere il bambino dal marsupio verificare di aver eseguito correttamente le operazioni precedenti.
È comunque possibile l’utilizzo del marsupio senza il riduttore, svolgendo le operazioni descritte precedentemente (ad esclusione delle parti relative al riduttore stesso).
GARANZIA
Il prodotto è garantito contro ogni difetto di conformità in normali condizioni di utilizzo secondo quanto previsto dalle istruzioni d’uso.
La garanzia non sarà applicata, dunque, in caso di danni derivanti da un uso improprio, usura o eventi accidentali. Per la durata della garanzia sui difetti di conformità si rinvia alle specifiche previsioni delle normative nazionali applicabili nel paese d’acquisto, dove previste.
12
 MYAMAKI COMPLETE
The Myamaki Complete baby carrier has been designed to always ensure ergonomics for your child and to best meet their growth and comfort needs, it is provided with a multipurpose reducer cushion that can be used in different configurations.
INSTRUCTIONS FOR USE
IMPORTANT! READ CAREFULLY AND KEEP
FOR FUTURE
REFERENCE.
WARNING: TO AVOID RISK OF SUFFOCATION REMOVE ANY PLASTIC PACKAGING BEFORE USE THAT SHOULD BE DESTROYED OR KEPT AWAY FROM CHILDREN.
WARNINGS
•WARNING: Ensure that the person using the baby carrier knows how to use it safely. Do not allow anyone to use the product if they have not read and understood all warnings and instructions.
•Make sure that all users have the necessary physical skills to use this product.
•WARNING: Failure to respect these instructions may compromise your child’s safety.
•WARNING:Takecarewhenbending or leaning forward or sideways.
•WARNING: This carrier is not suitable for use during sporting activities.
•WARNING: Your balance may
be adversely affected by your movement and that of your child.
•WARNING: Always fit the baby carrier onto your shoulders before putting your child in.
•WARNING: When using the baby carrier never release the waist strap before removing the child.
•WARNING: Take care when using the baby carrier in the domestic environment (e.g. sources of heat or while handling hot beverages).
•WARNING: Check on your child when using the baby carrier.
•WARNING:Rangeofuse:frombirth to 15 kg.
•After placing the child within the baby carrier, check carefully that the width adjusters around the child’s waist and legs are set to the correct position. If needed, adjust them until they are tensioned correctly.
•For infants and underweight children with medical prescriptions, seek the advice of a doctor before using the product.
•Babies must be transported parent facinguntiltheyareabletokeeptheir head straight and their shoulders in a vertical position (approximately up to 6 months of age).
•When your child is able to keep their head up and their shoulders in a vertical position, approximately from six months of age, they can be transported to their parents’ back or side.
•WARNING: Never leave the child unattended inside the baby carrier when you are not wearing it.
•Use the baby carrier only when standing or walking.
13
•Keep in mind that the child transported in the baby carrier will react to any climatic changes differently to the person carrying the child before.
•Before use, check that the straps are fitted and adjusted correctly, and that the buckles are safely fastened into position.
•Do not place more than one child at a time in the baby carrier.
•Always ensure that the child has sufficient space around their face to breathe properly.
•Do not use the baby carrier if any parts are damaged, torn or missing.
• Do not fit to the baby carrier any accessories, spare parts or components not supplied or approved by the manufacturer.
•This baby carrier must only be used by an adult.
•Do not use the baby carrier to transport the child in the car.
•Do not use the baby carrier while driving or on a motorcycle.
•Do not use the baby carrier while cooking or cleaning to avoid exposure to sources of heat or chemicals.
PARENT FACING USE AND USE ON SIDE
•WARNING:Takecarewhenbending or leaning forward or sideways.
•It is recommended that you place and remove the child from the baby carrier while sitting.
THIRD POSITION (ON THE PARENT'S BACK)
•Do not carry on your back children less than 6 months' of age or unable to sit up unassisted.
•Regularly check that the child is comfortable and safe, especially if carried on your back.
BABY CARRIER COMPONENTS (Figure SIDE A and fig. SIDE B)
A.Baby carrier backrest
B.Shoulder straps
C.Baby carrier seat
D.Baby carrier reducer cushion buttons (if included)
E.Padded saddle
F.Belly belt adjusting strap
G.Buckle with belly belt adjusting strap
H.Buckle fastening elastic
I.Holes and snaps to adjust the padded saddle
J.Buckles with shoulder adjusting strap
K.Breastbone/scapular buckle with elastic strap
L.Holes for fastening reducer cushion (if included)
M.Self-adjusting bellows
REDUCER-BLANKET COMPONENTS (Figure SIDE C and
Figure SIDE D)
N.Poppers
O.Poppers
P.Poppers
Q.Adjusting strap with poppers
R.Popper
S.Elastic buttons
T.Pocket with zipper
U.Hood
V.Hood elastic buttons
TIPS FOR CLEANING AND MAINTENANCE CLEANING
Please refer to the care label. After each washing check that the fabric and seams are not worn or damaged.
Hand wash
Do not bleach
Do not tumble dry
Do not iron
Do not dry clean
MAINTENANCE
Check the seams and baby carrier regularly to ensure that they are not worn or damaged and that no part is missing. If any part is worn or missing, do not use the product.
FRONT TRANSPORT - PARENT FACING
To transport the child parent-facing in the baby carrier, it is advisable to use the multi-purpose reducer cushion that can be used in two different configurations depending on the
14
child's age.
•0-1 months: the reducer cushion's function is that of comforting the child, keeping them in a crouched position both when they are inside the carrier and when they are fitted into it.
•1m+: the reducer cushion's function is that of providing greater protection and comfort for the child.
Using the reducer cushion supports the child, providing them with a greater level of comfort and support to the curve of their
spine, supporting the head and the neck at the same time. WARNING: always fit the baby carrier onto your shoulders
before putting your child in it.
FRONTTRANSPORT – PARENT FACING (0-1 MONTHS)
HOW TO WEAR THE BABY CARRIER WITH THE REDUCER CUSHION
1.Lay the multi-purpose reducer cushion on a flat surface with the C side facing upwards (Figure 1)
2.Fold the lower borders of the reducer and fasten the N poppers with one another as shown in Figure 2.
3.Fold the base thus obtained, coupling the O poppers with the P poppers and fastening them. Check that the result corresponds to the one shown in Figure 3
4.At this point fasten the F belly strap of the baby carrier using the relevant buckles (Figure 4A) adjust the width
acting on the G buckle (Figure 4B).
WARNING: fasten the buckle by passing it inside the H elastic band (Figure 4C).
5.Fasten both straps by connecting on the J buckles (Figure 5).
6.Place the child into the reducer cushion in a crouched position and make sure you fasten the Q adjustment strap with the corresponding R button to the most appropriate position for the baby's size (Figure 6)
7.Use a flat surface to facilitate fitting the reducer cushion and the baby into the baby carrier. Then, place the reducer cushion containing the baby onto the body of the baby carrier that is laid on the surface (Figure 7A) and fasten the
S elastic buttons on the reducer cushion's upper side with the L holes located on the baby carrier's shoulder straps (Figure 7B)
8.Check that the child securely lies on the baby carrier's seat and fasten the E padded saddle using the appropriate
F buttons, adjusting it to the position best suited to the
child's size, so that it is never too broad nor too narrow
(Figure 8).
WARNING: We recommend carrying out placing the child into the baby carrier when seated or using a flat, level surface so that you are able to control any sudden movements of the
child.
WARNING: Hold your child safely while carrying out these
operations.
WARNING: Before fitting the child in the baby carrier, make sure that you have completed the previous steps correctly.
9.Put on the baby carrier starting from the shoulder straps B (fig. 9A), then fasten and adjust the breastbone/scapular buckle (Figure 9B) and complete putting the baby carrier on by adjusting the shoulder straps (Figure 9C). The excess length of strap can be shortened by rolling it and fastening through the relevant elastic (Figure 9D). As an alternative, it is possible to fasten the breastbone/shoulder buckle before putting on the shoulder straps (fig. 9E) and then put on the shoulder straps making the breastbone/shoulder
buckle pass behind your head (fig. 9F) and then adjust it. WARNING: Make sure that the child's legs are crouched and
that the padded saddle is securely fastened.
10. The reducer cushion is equipped with a handy hood that enables the baby to be better protected from the elements during sleep.
To use the hood, open the zip on the D side of the reducer cushion, remove the hood and fasten theV elastic buttons on the upper side of the hood to the L holes on the A side of the
baby carrier, as shown in Figure 10.
WARNING: This type of use is only allowed with a baby aged
between 0 to 1 months.
WARNING: This type of use is only allowed when the baby carrier is in a parent-facing configuration.
HOW TO REMOVE THE CHILD FROM THE BABY CARRIER WARNING: it is a good idea to sit down to remove your the
child from the baby carrier.
11. While supporting the child securely, fasten the K breastbone/scapular buckle (Figure 11A), remove the B shoulder straps (Figure 11B) and open the buttons of the padded saddle from the slots (Figure 11C) before removing the child.
12. In order to not disturb the child and ensure its ongoing comfort, it is advisable to remove it from the baby carrier whilst it is still inside the reducer cushion.
To remove the child, unfasten the baby carrier's S elastic buttons from the L holes on the shoulder straps (Figure 12) and remove the reducer cushion with the child from the baby carrier.
Open the belly buckle only once this step is completed. WARNING: Hold your child safely while carrying out these
operations.
WARNING: Before removing the child from the baby carrier, make sure that you have completed the previous steps correctly.
The baby carrier, however, may be used without the reducer cushion also for children of 0 months of age, carrying out the steps described above (except those pertaining to the aforementioned reducer cushion). The baby carrier, as a matter of fact, has been designed to always ensure ergonomics for your child.
Using the reducer cushion, however, is always advisable because it supports the child, provides them with a greater level of comfort and supports the curve of their spine, supporting the head and the neck at the same time.
FRONT TRANSPORT – PARENT FACING (1m+)
HOW TO WEAR THE BABY CARRIER WITH THE REDUCER CUSHION
Fasten the F belly strap of the baby carrier using the relevant buckles (Figure 4A) adjust the width acting on the G buckle
(Figure 4B).
WARNING: fasten the buckle by passing it inside the H elastic band (Figure 4C).
Fasten both straps by connecting on the J buckles (Figure 5).
13.Use a flat surface to facilitate fitting the reducer cushion and the baby into the baby carrier. Then, position the multi-function reducer cushion onto the baby carrier, making sure you keep the C side of the reducer cushion facing upwards (Figure 13).
14.Fasten the S elastic buttons on the upper side of the
15

reducer cushion with the L holes on the baby carrier's shoulder straps (Figure 14).
15.Fasten the O poppers on the lower part of the reducer cushion with the D poppers on the baby carrier's seat (Figure 15).
16.Lay the child on the seat (Figure 16A) and fasten the E padded saddle using the appropriate F buttons, and adjust to the position best suited to the child's body, so
that the same is never too broad nor too narrow (Figure
16B).
WARNING: We recommend carrying out placing the child into the baby carrier when seated or using a flat, level surface so that you are able to control sudden movements of the
child.
WARNING: Hold your child safely while carrying out these
operations.
WARNING: Before fitting the child in the baby carrier, make sure that you have completed the previous steps correctly. Put on the baby carrier starting from the shoulder straps B (fig. 9A), then fasten and adjust the breastbone/scapular buckle (Figure 9B) and complete putting the baby carrier on by adjusting the shoulder straps (Figure 9C). The excess length of strap can be shortened by rolling it and fastening through the relevant elastic (Figure 9D). As an alternative, it is possible to fasten the breastbone/shoulder buckle before putting on the shoulder straps (fig. 9E) and then put on the shoulder straps making the breastbone/shoulder buckle pass
behind your head (fig. 9F) and then adjust it.
WARNING: Make sure that the child's legs are astride the seat and inserted inside the padded saddle.
The reducer cushion is equipped with a handy hood that enables the baby to be better protected from the elements during sleep.
To use the hood, open the zip on the D side of the reducer cushion, remove the hood and fasten theV elastic buttons on the upper side of the hood to the L holes on the A side of the baby carrier, as shown in Figure 10.
HOW TO REMOVE THE CHILD FROM THE BABY CARRIER WARNING: it is a good idea to sit down to remove the child
from the baby carrier.
•Whilesupportingthechildsecurely,fastentheKbreastbone/ scapular buckle (Figure 11A), remove the B shoulder straps (Figure 11B) and open the buttons of the padded saddle
from the slots (Figure 11C) before removing the child. Open
the belly buckle only once this step is completed. WARNING: Hold your child safely while carrying out these
operations.
WARNING: Before removing the child from the baby carrier, make sure that you have completed the previous steps correctly.
The baby carrier, however, may also be used without the reducer cushion, carrying out the steps described above (except those pertaining to the aforementioned reducer cushion). The baby carrier, as a matter of fact, has been designed to always ensure ergonomics for your child.
Using the reducer cushion, however, is always advised because it supports the child, providing them with a greater level comfort, supporting the healthy development of hip bones and the correct curve of their spine, supporting the head and the neck at the same time.
SIDE - HIP TRANSPORT
When the child, approximately at six months of age would be able to keep both head straight and shoulders in vertical position, can be carried on the side - hip.
The baby carrier can be positioned either on the parent’s right or left side as s/he prefers.
The procedure for carrying the child on the right side is illustratedbelow.Repeatthesamestepsinmirror-likemanner
for the left side.
WARNING: always fit the baby carrier onto your shoulders before putting your child in.
HOW TO WEAR THE BABY CARRIER
Fasten the F belly belt acting on the relevant buckles (Figure
4A), and adjust the width acting on the G buckle (Figure 4B). WARNING: fasten the buckle by passing it inside the H
elastic band (Figure 4C).
17.Turn the belly strap by positing the seat on the right side (Figure 17).
18.Fasten the padded saddle by fastening the left button (Figure 18) in the relevant hole leaving the other side free to fit the child later on.
19.Fasten the left shoulder strap with the buckle of the right strap (Figure 19A), crossing it. Pass your head through the ring (Figure 19B) so that, once in final position, it rests on the left shoulder (Figure 19C).
HOW TO PLACE THE CHILD INSIDE THE BABY CARRIER
20.Place the child in the baby carrier (Figure 20A) and, supporting fitted with your left hand, adjust the shoulder strap already fitted using your right hand (Figure 20B). Then close the padded saddle.
21.For improved wear and comfort of the baby carrier, rotate the right shoulder strap fully on its axis (Figure 21A) and let it slide below your armpit (Figure 21B). Then, fasten the shoulder straps with the buckles of the left belt (Figure 21C) and adjust the shoulder strap (Figure 21D). Make sure that the baby carrier is positioned correctly as shown in Figure
21E.
HOW TO REMOVE THE CHILD FROM THE BABY CARRIER WARNING: it is a good idea to sit down to remove the child
from the baby carrier.
22.While supporting the child securely, free the shoulder strap that goes below the armpit (Figure 22A) and open the buttons of the padded saddle (Figure 22B) before removing the child. Open the belly buckle only once
this step is completed by removing it from the fastening
elastic.
WARNING: Hold your child safely while carrying out these
operations.
WARNING: Before removing the child from the baby carrier, make sure that you have completed the previous steps correctly.
POSITION ON THE PARENT'S BACK USING THE MULTIPURPOSE REDUCER CUSHION
WARNING: always fit the baby carrier onto your shoulders before putting your child in.
HOW TO WEAR THE BABY CARRIER WITH THE REDUCER CUSHION
Fasten the F belly strap of the baby carrier using the relevant buckles (Figure 4A) adjust the width acting on the G buckle
16

(Figure 4B).
WARNING: fasten the buckle by passing it inside the H elastic band (Figure 4C).
Fasten both straps by acting on the J buckles (Figure 5).
Use a flat surface to facilitate fitting the reducer cushion and the baby into the baby carrier. Then, position the multifunction reducer cushion onto the baby carrier, making sure you keep the C side of the reducer cushion facing upwards (Figure 13).
Fasten the S elastic buttons on the upper side of the reducer cushion with the L holes on the baby carrier's shoulder straps (Figure 14).
Fasten the O poppers on the lower part of the reducer cushion with the D poppers on the baby carrier's seat (Figure 15).
HOW TO PLACE THE CHILD INSIDE THE BABY CARRIER
Following the instructions below, you can place your child in the baby carrier for the use of the transport position (on the parent's back) without the help of
another adult.
WARNING: It is recommended to place the child in the baby carrier while sitting. In this way you can prevent any sudden
movements of the child.
WARNING: Hold your child safely while carrying out these
operations.
WARNING: Before fitting the child in the baby carrier, make sure that you have completed the previous steps correctly.
Lay the child on the seat (Figure 16A) and fasten the E padded saddle using the appropriate F buttons, and adjust to the position best suited to the child's body, so that the padded saddle is never too broad nor too narrow (Figure 16B).
Put on the baby carrier starting from the B shoulder straps (Figure 9A).
The reducer cushion is equipped with a handy hood that enables the baby to be better protected from the elements during the sleep.
To use the hood, open the zip on the D side of the reducer cushion, remove the hood and fasten theV elastic buttons on the upper side of the hood to the L holes on the A side of the baby carrier, as shown in Figure 10.
POSITIONING THE CHILD ON THE PARENT'S BACK
23.Pull the right arm from the shoulder strap and, passing it through the inside of the baby carrier, grasp the opposite shoulder strap with the same hand (Figure 23A), making sure to hold it securely. Pull the left arm from the shoulder strap as well and externally support your child in the baby carrier carrycot (Figure 23B). Put your right arm, which is holding the left shoulder strap, into the same shoulder strap (Figure 23C) and start to rotate the baby carrier. The baby carrier, attached to the belly strap, will turn with the harness and will be positioned correctly on the back.
24.To complete the operation, slide the second arm into the free shoulder strap (Figure 24A), so that the weight of the baby carrier is distributed evenly over the back and shoulders. Close the breastbone/scapular buckle L on the breastbone (Figure 24B) and adjust all belts of the baby carrier (Figure 24C).
HOW TO REMOVE THE CHILD FROM THE BABY CARRIER
25.Unfasten the breastbone/scapular buckle (Figure 25A), remove one of the two shoulder straps and, holding the
baby firmly, also remove the second shoulder strap; rotate the harness to bring the child in the front position (Figure 25B). At this point, wear the shoulder straps again (Figure
25C) to move back to the initial position.
WARNING: Hold your child safely while carrying out these
operations.
WARNING: Before removing the child from the baby carrier, make sure that you have completed the previous steps correctly.
The baby carrier, however, may also be used without the reducer cushion, carrying out the steps described above (except those pertaining to the aforementioned reducer cushion).
WARRANTY
The product is guaranteed against any conformity defect in normal conditions of use as provided for by the instructions for use.
The warranty shall not therefore apply in the case of damages caused by improper use, wear or accidental events.
For the duration of warranty on conformity defects please refer to the specific provisions of national laws applicable in the country of purchase, where provided.
17
 MYAMAKI COMPLETE
Conçu pour respecter en permanence l'ergonomie de l'enfant et pour répondre de la meilleure façon possible à ses besoins évolutifs et de confort, le porte-bébé Myamaki Complete est muni d'un réducteur multifonction utilisable dans différentes configurations.
NOTICE D’EMPLOI
IMPORTANT ! À LIRE
ATTENTIVEMENT ET À CONSERVER POUR RÉFÉRENCE ULTÉRIEURE.
AVERTISSEMENT : POUR ÉVITER TOUT RISQUE D'ÉTOUFFEMENT, AVANT L'UTILISATION ÔTER L'EMBALLAGE EN PLASTIQUE QUI DEVRA ÊTRE DÉTRUIT OU CONSERVÉ LOIN DES ENFANTS.
AVERTISSEMENTS
•AVERTISSEMENT : s’assurer que les utilisateurs du porte-bébé connaissent le fonctionnement exact de ce dernier. Ne permettre à personne d'utiliser le produit sans avoir lu auparavant et intégralement compris les avertissements et les instructions.
•S'assurerquetouslesutilisateursont les capacités physiques nécessaires pour utiliser ce produit.
•AVERTISSEMENT : le non-respect des instructions suivantes peut compromettre la sécurité de votre enfant.
•AVERTISSEMENT:Faites attention
lorsque vous vous penchez en avant ou sur le côté.
•AVERTISSEMENT : Ne pas utiliser le porte-bébé durant la pratique d’activités sportives.
•AVERTISSEMENT : votre équilibre peut être affecté par tout mouvement de votre part ou de l’enfant.
•AVERTISSEMENT : toujours endosser le porte-bébé avant d’y positionner l'enfant.
•AVERTISSEMENT:quandonutilise le porte-bébé, ne jamais détacher la ceinture abdominale avant d'avoir ôté l'enfant.
•AVERTISSEMENT : être prudent lors de l’utilisation du porte-bébé
àla maison (ex. en présence de sources de chaleur ou lors de la manipulation de boissons chaudes).
•AVERTISSEMENT : surveiller toujours l'enfant pendant l'utilisation du porte-bébé.
•AVERTISSEMENT : plage d’utilisation : de la naissance à 15 kg.
•Unefoisl’enfantinstallédansleportebébé, contrôler attentivement si les réglages en largeur du tour de taille et du tour de jambes sont adaptés
àla morphologie de l’enfant. Le cas échéant, modifier les réglages jusqu'à l’obtention de la tension correcte.
•Pour les nouveau-nés prématurés et les bébés suivis médicalement, demander conseil à votre pédiatre avant d'utiliser le produit.
•Toujours porter l'enfant tourné vers l’adulte qui le porte (mode « Face aux parents »), tant qu’il ne tient pas sa tête et ne maintient pas ses
18
épaules verticales (jusqu’au 6ème mois environ).
•Lorsque l'enfant est capable de tenir sa tête et de maintenir ses épaules verticales, à partir du 6ème mois environ, il est alors possible de le porter sur le côté ou sur le dos de l'adulte.
•AVERTISSEMENT:ne jamais laisser l’enfant sans surveillance dans le porte-bébé quand celui-ci n’est pas endossé.
•Le porte-bébé ne peut être utilisé que par un adulte debout ou se promenant.
•Dans le porte-bébé, l’enfant réagit aux changements climatiques avant la
personne qui le porte.
• Avant l’utilisation, s’assurer que les lanières de réglage sont correctement mises en place et réglées et que les boucles sont accrochées.
•Ne pas porter plus d’un enfant à la fois.
•S’assurer que l’enfant dispose d’un espace suffisant autour du visage pour lui permettre de respirer correctement.
•Ne pas utiliser le porte-bébé lorsque certaines parties sont perdues, manquantes ou endommagées.
•Ne pas ajouter d’accessoires sur le porte-bébé, de pièces de rechange ou d’éléments non fournis par le constructeur.
•Ce porte-bébé doit uniquement être utilisé par un adulte.
•Le porte-bébé ne peut pas être utilisé pour le transport en voiture.
•Le produit ne peut pas être utilisé
quand on conduit un véhicule ou si l'on en est le passager.
•Le produit ne peut pas être utilisé quand on cuisine ou que l'on fait le ménage, pour ne pas exposer l'enfant à des sources de chaleur ou à des produits chimiques.
UTILISATION FACE AUX PARENTS ET UTILISATION SUR LE CÔTÉ
•AVERTISSEMENT : faire attention lorsqu'on se penche en avant ou sur le côté ;
•Pour positionner et enlever l’enfant du porte-bébé, il est préférable d’être assis.
UTILISATION DANS LA TROISIÈME POSITION (SUR LE DOS D'UN ADULTE)
•Ne pas porter sur le dos des enfants
âgés de moins de 6 mois ou en tout cas incapables de se tenir assis tout seuls.
•Contrôler régulièrement si l'enfant est dans une position confortable et sûre, en particulier lorsqu'il est porté sur le dos.
COMPOSANTSDUPORTE-BÉBÉ(fig.CÔTÉAetfig.CÔTÉB)
A.Dossier porte-bébé
B.Épaulières
C.Assise porte-bébé
D.Boutons réducteur porte-bébé (si inclus)
E.Assise rembourrée
F.Ceinture abdominale
G.Boucle avec bande d'ajustement de la ceinture abdominale
H.Élastique de blocage boucle
I.Boutonnières et boutons d'ajustage de l'assise rembourrée
J.Boucles avec bande d'ajustage des épaulières
K.Boucle sternum/omoplate avec bande élastique
L.Boutonnières d'accrochage réducteur (si inclus)
M.Soufflet auto-réglable
COMPOSANTS DU RÉDUCTEUR-COUVERTURE (fig. CÔTÉ C et fig. CÔTÉ D)
N.Boutons pression
O.Boutons pression
P.Boutons pression
19
Q.Ruban d’ajustement avec boutons pression
R.Bouton pression
S.Boutons élastiques
T.Poche à fermeture
U.Capuche
V.Boutons élastiques de la capuche
CONSEILS DE NETTOYAGE ET D’ENTRETIEN NETTOYAGE
Suivre les instructions indiquées sur l’étiquette de lavage.
Après chaque lavage, contrôler l’état du tissu et des coutures.
Laver à la main à l’eau froide
Ne pas blanchir
Ne pas sécher en machine
Ne pas repasser
Ne pas laver à sec
ENTRETIEN
Contrôler régulièrement le porte-bébé pour vérifier si certaines parties sont décousues, déchirées, abîmées ou manquantes. Si tel est le cas, ne pas utiliser le porte-bébé.
PORTAGE VENTRAL - FACE AUX PARENTS
Pour le portage de l'enfant dans le porte-bébé face aux parents, il est conseillé d'utiliser le réducteur multifonction qui peut être employé dans deux différentes configurations en fonction de l'âge de l'enfant.
•0-1 mois : la fonction du réducteur est d'envelopper l'enfant en le maintenant en position accroupie aussi bien lorsqu'il se trouve dans le porte-bébé que durant les opérations d'introduction et de retrait de l'enfant du porte-bébé.
•1m+: la fonction du réducteur est de protéger davantage et
d'offrir un plus grand confort à l'enfant.
L’utilisation du réducteur permet de soutenir l'enfant, d'apporter du confort et d'envelopper sa colonne vertébrale
arrondie en soutenant sa tête et son cou. AVERTISSEMENT : toujours endosser le porte-bébé avant
d’y positionner l'enfant.
PORTAGEVENTRAL - FACE AUX PARENTS (0-1 MOIS)
COMMENT ENDOSSER LE PORTE-BÉBÉ AVEC LE RÉDUCTEUR
1.étaler le réducteur multifonction sur un plan, le côté C tourné vers le haut (fig. 1)
2.Replier les bords inférieurs du réducteur et attacher les boutons pression N encerclés comme l'illustre la figure 2.
3.Replier la base obtenue en faisant coïncider les boutons pression O avec les boutons pression P et les attacher.
Vérifier que le résultat ainsi obtenu correspond bien à l'illustration de la figure 3
4.Attacher la ceinture abdominale F du porte-bébé en
agissant sur les boucles respectives (fig. 4A) et ajuster sa
largeur en utilisant la boucle G (fig. 4B). AVERTISSEMENT : bloquer la boucle en la faisant passer à
l'intérieur de l'élastique H (fig. 4C).
5.Accrocher les deux épaulières en agissant sur les boucles J (fig. 5).
6.Installer l’enfant dans le réducteur en position accroupie
et veiller à attacher le ruban d’ajustement Q à l’aide du bouton R correspondant à la mesure qui s’adapte le mieux
à la corpulence de l’enfant (fig. 6).
7.Utiliser une surface plane pour favoriser l'introduction du réducteur et de l'enfant dans le porte-bébé. Poser ensuite le réducteur contenant l'enfant sur le corps du porte-bébé étalé sur la surface plane (fig. 7A) et attacher les boutons élastiques S situéssurlapartiesupérieureduréducteuraveclesboutonnières L situées sur les épaulières du porte-bébé (fig. 7B).
8.Contrôler que l'enfant est correctement positionné sur l'assise du porte-bébé, puis fixer l'assise rembourrée E à l'aide des boutons F prévus à cet effet et l'ajuster dans la position la plus appropriée à la corpulence de l'enfant afin qu'elle ne soit jamais ni trop large ni trop serrée (fig. 8).
AVERTISSEMENT : Il est conseillé d'effectuer les opérations d'installation de l'enfant dans le porte-bébé après s'être assis ou en utilisant une surface plane et stable, de manière à gérer
d'éventuels mouvements imprévus de l'enfant.
AVERTISSEMENT : Soutenir fermement le bébé pendant
ces opérations.
AVERTISSEMENT : avant d'introduire l'enfant dans le portebébé, vérifier que toutes les opérations précédentes ont été effectuées correctement.
9.Endosser le porte-bébé en enfilant les épaulières B (fig.
9A), puis accrocher et ajuster la boucle sternum/omoplate (fig. 9B) et compléter la mise en place du porte-bébé en ajustant les épaulières (fig. 9C). La partie de ruban en excès peut être réduite en l'enroulant sur elle-même et en la fixant au moyen de l'élastique prévu à cet effet (fig. 9D). Autrement, il est possible d’attacher la boucle de poitrine/
épaule avant d’endosser les couvre-harnais (fig. 9E) puis enfiler les couvre-harnais en faisant passer la boucle de
poitrine/épaule derrière la tête (fig. 9F) et l’ajuster.
AVERTISSEMENT : S'assurer que les jambes de l'enfant sont repliées et que l'assise rembourrée est bien fixée.
10. Le réducteur est muni d'une capuche pratique qui permet de protéger l'enfant contre les agents atmosphériques et pendant son sommeil.
Pour utiliser la capuche, ouvrir la fermeture éclair située sur le côté D du réducteur, extraire la capuche et attacher les boutons élastiques V situés sur le côté supérieur de la capuche aux boutonnières L présentes sur le côté A du porte-
bébé, comme l'illustre la figure 10.
AVERTISSEMENT : cette utilisation n'est consentie que si
l'enfant est âgé de 0 à 1 mois
AVERTISSEMENT : cette utilisation n'est consentie que si le porte-bébé est en configuration face aux parents
COMMENT ÔTER L’ENFANT DU PORTE-BÉBÉ AVERTISSEMENT : pour enlever l’enfant du porte-bébé, il
est préférable d’être assis.
11.En tenant fermement l'enfant, décrocher la boucle sternum/omoplate K (fig. 11A), dégager les épaulières B (fig. 11B) et décrocher les boutons de l'assise rembourrée des boutonnières prévues à cet effet (fig. 11C) avant d'ôter l'enfant.
12.Pour ne pas gêner l'enfant et préserver son confort, il est
conseillé d'ôter l'enfant du porte-bébé avec le réducteur.
Pour ôter l'enfant, détacher les boutons élastiques S du réducteur des boutonnières L situées sur les épaulières (fig. 12) et enlever le réducteur avec l'enfant du porte-bébé.
Ne décrocher la boucle abdominale qu'après ces opérations.
AVERTISSEMENT : Soutenir fermement le bébé pendant
20
u
S
ces opérations.
AVERTISSEMENT : avant d'ôter l'enfant du porte-bébé, vérifier que toutes les opérations précédentes ont été effectuées correctement.
Il est cependant possible d'utiliser le porte-bébé sans réducteur, même pour les enfants de 0 mois, en effectuant les opérations décrites précédemment (excepté les parties relatives au réducteur). En effet, le porte-bébé a été conçu de manière à respecter en permanence l'ergonomie de l'enfant. L’utilisation du réducteur est toutefois toujours conseillée car celui-ci permet de soutenir l'enfant, d'apporter du confort et d'envelopper sa colonne vertébrale arrondie en soutenant sa tête et son cou.
PORTAGE VENTRAL - FACE AUX PARENTS (1m+)
COMMENT ENDOSSER LE PORTE-BÉBÉ AVEC LE RÉDUCTEUR
Attacher la ceinture abdominale F du porte-bébé en agissant sur les boucles respectives (fig. 4A) et ajuster sa largeur en
utilisant la boucle G (fig. 4B).
AVERTISSEMENT : bloquer la boucle en la faisant passer à l'intérieur de l'élastique H (fig. 4C).
Accrocher les deux épaulières en agissant sur les boucles J (fig. 5).
13.Utiliser une surface plane pour favoriser l'introduction du réducteur et de l'enfant dans le porte-bébé. Étaler ensuite le réducteur multifonction sur le porte-bébé en faisant attention à ce que le côté C du réducteur soit tourné vers le haut (fig. 13).
14.Attacher les boutons élastiques S situés sur la partie supérieure du réducteur avec les boutonnières L situées sur les épaulières du porte-bébé (fig. 14)
15.Attacher les boutons pression O situés sur la partie inférieure du réducteur avec les boutons automatiques D présents sur l'assise du porte-bébé (fig. 15).
16.Installer l'enfant sur l'assise (fig. 16A) puis fixer l'assise rembourrée E à l'aide des boutons F prévus à cet effet et l'ajuster dans la position la plus appropriée à la corpulence de l'enfant afin qu'elle ne soit jamais ni trop large ni trop
serrée (fig. 16B).
AVERTISSEMENT : Il est conseillé d'effectuer les opérations d'installation de l'enfant dans le porte-bébé après s'être assis ou en utilisant une surface plane et stable, de manière à gérer
d'éventuels mouvements imprévus de l'enfant.
AVERTISSEMENT : Soutenir fermement le bébé pendant
ces opérations.
AVERTISSEMENT : avant d'introduire l'enfant dans le portebébé, vérifier que toutes les opérations précédentes ont été effectuées correctement.
Endosser le porte-bébé en enfilant les épaulières B (fig. 9A), puis accrocher et ajuster la boucle sternum/omoplate (fig. 9B) et compléter la mise en place du porte-bébé en ajustant les épaulières (fig. 9C). La partie de ruban en excès peut être réduite en l'enroulant sur elle-même et en la fixant au moyen de l'élastique prévu à cet effet (fig. 9D). Autrement, il est possible d’attacher la boucle de poitrine/épaule avant d’endosser les couvre-harnais (fig. 9E) puis enfiler les couvreharnais en faisant passer la boucle de poitrine/épaule derrière
la tête (fig. 9F) et l’ajuster.
AVERTISSEMENT : s'assurer que les jambes de l'enfant sont de part et d'autre de l'assise et introduites dans l'assise rembourrée.
Le réducteur est muni d'une capuche pratique qui permet
de protéger l'enfant contre les agents atmosphériques et pendant son sommeil.
Pour utiliser la capuche, ouvrir la fermeture éclair située sur le côté D du réducteur, extraire la capuche et attacher les boutons élastiques V situés sur le côté supérieur de la capuche aux boutonnières L présentes sur le côté A du portebébé, comme l'illustre la figure 10.
COMMENT ÔTER L’ENFANT DU PORTE-BÉBÉ AVERTISSEMENT : pour enlever l’enfant du porte-bébé, il
est préférable d’être assis.
•En tenant fermement l'enfant, décrocher la boucle sternum/ omoplate K (fig. 11A), dégager les épaulières B (fig. 11B) et décrocher les boutons de l'assise rembourrée des boutonnières prévues à cet effet (fig. 11C) avant d'ôter l'enfant. Ne décrocher la boucle abdominale qu'après ces
opérations.
AVERTISSEMENT : Soutenir fermement le bébé pendant
ces opérations.
AVERTISSEMENT : avant d'ôter l'enfant du porte-bébé, vérifier que toutes les opérations précédentes ont été effectuées correctement.
Il est cependant possible d'utiliser le porte-bébé sans réducteur en effectuant les opérations décrites précédemment (excepté les parties relatives au réducteur).
En effet, le porte-bébé a été conçu de manière à respecter en permanence l'ergonomie de l'enfant.
L’utilisation du réducteur est toutefois toujours conseillée car celui-ci permet de soutenir l'enfant et d'apporter du confort, il favorise le développement correct de ses hanches et enveloppe sa colonne vertébrale arrondie en soutenant sa tête et son cou.
PORTAGE LATÉRAL - SUR LA HANCHE
Lorsque l'enfant est capable de tenir sa tête et de maintenir ses épaules verticales, au 6ème mois environ, il est alors possible de le porter latéralement - sur la hanche.
Le porte-bébé peut être positionné aussi bien sur le côté droit que sur le côté gauche de l'adulte, selon la préférence de ce dernier.
La |
procédure |
d'installation |
de l'enfant sur le côté droit |
est |
illustrée |
ci-après. Pour |
l'installation de l'enfant sur |
le côté gauche, répéter la séquence d'opérations mais
spéculairement.
AVERTISSEMENT : toujours endosser le porte-bébé avant d’y positionner l'enfant.
COMMENT ENDOSSER LE PORTE-BÉBÉ
Accrocher la ceinture abdominale F en agissant sur les boucles respectives (fig. 4A) et ajuster sa largeur en agissant
sur la boucle G (fig. 4B).
AVERTISSEMENT : bloquer la boucle en la faisant passer à l'intérieur de l'élastique H (fig. 4C).
17.Tourner la ceinture abdominale et positionner l’assise près de la hanche droite (fig. 17).
18.Fixer l'assise rembourrée en attachant le bouton gauche (fig. 18) dans la boutonnière prévue à cet effet, en laissant l'autre côté libre pour pouvoir ensuite installer l'enfant.
19.Accrocher l'épaulière gauche à la boucle du ruban droit
(fig. 19A) de manière à créer un croisement. Endosser l'écharpe ainsi créée en la faisant passer au-dessus de la tête (fig. 19B) de sorte que dans la position finale elle soit appuyée contre l'épaule gauche (fig. 19C).
21
COMMENTPOSITIONNERL’ENFANTDANSLEPORTE-BÉBÉ
20.Positionner l'enfant dans le porte-bébé (fig. 20A) et, en le tenant de la main gauche, ajuster l'épaulière déjà endossée de la main droite (fig. 20B). Fermer ensuite l'assise rembourrée.
21.Pour un meilleur ajustement du porte-bébé, tourner l'épaulière droite sur elle-même (fig. 21A) en lui faisant faire un tour complet et en la faisant passer sous l'aisselle (fig. 21B). Fixer l'épaulière au moyen des boucles du ruban gauche (fig. 21C) et l'ajuster (fig. 21D). S'assurer que le porte-bébé est correctement positionné comme l'illustre la figure 21E.
COMMENT ÔTER L’ENFANT DU PORTE-BÉBÉ AVERTISSEMENT : pour enlever l’enfant du porte-bébé, il
est préférable d’être assis.
22.En tenant fermement l'enfant, libérer l'épaulière qui passe sous l'aisselle (fig. 22A) et détacher les boutons de l'assise rembourrée (fig. 22B) avant d'ôter l'enfant.
Après seulement, décrocher la boucle abdominale en la
dégageant de l'élastique de fixation.
AVERTISSEMENT : Soutenir fermement le bébé pendant
ces opérations.
AVERTISSEMENT : avant d'ôter l'enfant du porte-bébé, vérifier que toutes les opérations précédentes ont été effectuées correctement.
POSITION SUR LE DOS DE L'ADULTE AVEC UTILISATION DU RÉDUCTEUR MULTIFONCTION
AVERTISSEMENT : toujours endosser le porte-bébé avant d’y positionner l'enfant.
COMMENT ENDOSSER LE PORTE-BÉBÉ AVEC LE RÉDUCTEUR
Attacher la ceinture abdominale F du porte-bébé en agissant sur les boucles respectives (fig. 4A) et ajuster sa largeur en
utilisant la boucle G (fig. 4B).
AVERTISSEMENT : bloquer la boucle en la faisant passer à l'intérieur de l'élastique H (fig. 4C).
Accrocher les deux épaulières en agissant sur les boucles J (fig. 5).
Utiliser une surface plane pour favoriser l'introduction du réducteur et de l'enfant dans le porte-bébé. Étaler ensuite le réducteur multifonction sur le porte-bébé en faisant attention à ce que le côté C du réducteur soit tourné vers le haut (fig. 13).
Attacher les boutons élastiques S situés sur la partie supérieure du réducteur avec les boutonnières L situées sur les épaulières du porte-bébé (fig. 14)
Attacher les boutons pression O situés sur la partie inférieure du réducteur avec les boutons automatiques D présents sur l'assise du porte-bébé (fig. 15).
COMMENTPOSITIONNERL’ENFANTDANSLEPORTE-BÉBÉ
En suivant les indications reportées ci-dessous, il est possible d'installer l'enfant dans le porte-bébé pour l'utilisation de la position de portage (sur le dos de l'adulte) sans l'aide d'un
deuxième adulte.
AVERTISSEMENT : Il est conseillé de s'asseoir pour effectuer les opérations de positionnement de l'enfant dans le portebébé, de manière à pouvoir gérer d'éventuels mouvements
imprévus de l'enfant.
AVERTISSEMENT : Soutenir fermement le bébé pendant ces opérations.
AVERTISSEMENT : avant d'introduire l'enfant dans le portebébé, vérifier que toutes les opérations précédentes ont été effectuées correctement.
Installer l'enfant sur l'assise (fig. 16A) puis fixer l'assise rembourrée E à l'aide des boutons F prévus à cet effet et l'ajuster dans la position la plus appropriée à la corpulence de l'enfant afin qu'elle ne soit jamais ni trop large ni trop serrée (fig. 16B).
Endosser le porte-bébé en enfilant les épaulières B (fig. 9A).
Le réducteur est muni d'une capuche pratique qui permet de protéger l'enfant contre les agents atmosphériques et pendant son sommeil.
Pour utiliser la capuche, ouvrir la fermeture éclair située sur le côté D du réducteur, extraire la capuche et attacher les boutons élastiques V situés sur le côté supérieur de la capuche aux boutonnières L présentes sur le côté A du portebébé, comme l'illustre la figure 10.
POSITIONNEMENT DE L'ENFANT SUR LE DOS
23.Dégager le bras droit de l'épaulière et, en passant par l'intérieur du porte-bébé, prendre de la même main l'épaulière opposée (fig. 23A), en ayant soin de la saisir fermement. Dégager aussi le bras gauche de l'épaulière et
àl'aide de celle-ci tenir de l'extérieur l'enfant dans le portebébé (fig. 23B). Enfiler le bras droit, qui tient l'épaulière gauche, dans cette dernière (fig. 23C) et commencer
àtourner le porte-bébé. Le porte-bébé, accroché à la ceinture abdominale, tournera avec le harnais et se positionnera correctement sur le dos.
24.Pour compléter l'opération, enfiler le second bras dans l'épaulière libre (fig. 24A), de manière à ce que le poids du porte-bébé se décharge uniformément sur le dos et sur les épaules. Accrocher la boucle sternum/omoplate L sur le sternum (fig.24B) et ajuster tous les rubans du portebébé (fig. 24C).
COMMENT ÔTER L’ENFANT DU PORTE-BÉBÉ
25.Décrocher la boucle sternum/omoplate (fig. 25A), dégager l'une des deux épaulières en tenant fermement l'enfant, dégager aussi la seconde épaulière ; faire tourner le harnais jusqu'à placer l'enfant en position frontale (fig.
25B). Enfiler alors à nouveau les épaulières (fig. 25C) pour retrouver la position initiale.
AVERTISSEMENT : Soutenir fermement le bébé pendant
ces opérations.
AVERTISSEMENT : avant d'ôter l'enfant du porte-bébé, vérifier que toutes les opérations précédentes ont été effectuées correctement.
Il est cependant possible d'utiliser le porte-bébé sans réducteur en effectuant les opérations décrites précédemment (excepté les parties relatives au réducteur).
GARANTIE
Le produit est garanti contre les défauts de conformité dans des conditions normales d'utilisation selon les indications prévues par la notice d'emploi.
La garantie ne sera donc pas appliquée en cas de dommages dérivant d'un usage inapproprié, de l'usure ou d'événements accidentels.
En ce qui concerne la durée de la garantie contre les défauts de conformité, consulter les conditions prévues par les normes nationales applicables, le cas échéant, dans le pays d'achat.
22
t
s
 MYAMAKI COMPLETE
Die Babytrage Myamaki Complete wurde so entworfen, dass die Ergonomie des Kindes stets beachtet wird. Um die Bedürfnisse des Kindes im Hinblick auf Entwicklung und Komfort bestmöglich zu unterstützen, ist sie mit einem multifunktionalen Verkleinerer ausgestattet, der in verschiedenen Konfigurationen eingesetzt werden kann.
GEBRAUCHSANLEITUNG
WARNUNG!
BITTE SORGFÄLTIG LESEN UND
FÜR SPÄTERES
NACHLESEN
UNBEDINGT AUFBEWAHREN.
WARNUNG:VORDEMGEBRAUCH EVENTUELLE POLYBEUTEL UND ALLE ELEMENTE, DIE TEIL DER PRODUKTVERPACKUNG SIND, ABNEHMEN UND ENTSORGEN SOWIE VON KINDERN FERNHALTEN.
SICHERHEITSHINWEISE
•WARNUNG: Vergewissern Sie sich, dass auch andere Benutzer über die richtige Funktion der Babytrage Kenntnis haben. Das Produkt darf nur von Personen verwendet werden, die die Hinweise und die Gebrauchsanleitung vollständig gelesen und verstanden haben.
•VergewissernSiesich,dasssämtliche
Benutzer die für den Gebrauch dieses Produktes erforderlichen körperlichen Fähigkeiten haben.
•WARNUNG: Die Nichtbeachtung
der folgenden Anweisungen kann die
SicherheitIhresKindesbeeinträchtigen.
•WARNUNG: Seien Sie vorsichtig, wenn Sie sich bücken bzw. nach vorne oder zur Seite beugen;
•WARNUNG: Diese Trage ist nicht zur Verwendung bei sportlichen
Aktivitäten geeignet.
•WARNUNG: Ihr Gleichgewicht könnte durch Ihre Bewegungen oder die des Kindes beeinträchtigt werden.
•WARNUNG: Bevor Sie das Kind hineinlegen, müssen Sie die
Babytrage übergezogen haben.
•WARNUNG: Öffnen Sie, wenn Sie die Babytrage verwenden, niemals den Beckengurt, bevor Sie das Kind herausgenommen haben.
•WARNUNG: Seien Sie bei der Verwendung der Babytrage zu
Hause besonders vorsichtig (z.B. Hitzequellen oder beim Trinken von heißen Getränken).
•WARNUNG:Achten Sie auf Ihr Kind, währendSiedieBabytragebenutzen.
•WARNUNG: Verwendungsalter: von der Geburt bis 15 kg.
•Nachdem Sie das Kind in die
Babytrage gesetzt haben,
vergewissern Sie sich stets, dass der Innenumfang des Sitzteils und die Öffnungen der Beinchen der Größe Ihres Kindes angepasst sind. Wenn notwendig, betätigen
Sie die dafür vorgesehenen Verstellvorrichtungen.
•Für untergewichtige Neugeborene und Kinder in medizinischer
Behandlung bitten Sie vor dem Gebrauch einen Kinderarzt um Rat.
•Solange das Kind noch nicht in der
23
Lage ist, selbständig seinen Kopf aufrecht und die Schultern gerade zu halten, also normalerweise bis ca. zum 6. Lebensmonat, muss es mit Blickrichtung zum Elternteil/
Benutzer getragen werden.
• Für Kinder ab ca. dem 6.
Lebensmonat, die in der Lage sind, selbständig den Kopf aufrecht und die Schultern gerade zu halten, ist der Transport an der Seite oder auf dem Rücken des Elternteils/
Benutzers möglich.
•WARNUNG: Lassen Sie Ihr Kind nie unbeaufsichtigt in der Babytrage, wenn diese nicht am Körper getragen wird
•VerwendenSiedieBabytragenurim Stehen oder Laufen.
•Denken Sie bitte daran, dass das Kind in der Babytrage einen plötzlichen Temperaturwechsel viel früher als der tragende Erwachsene wahrnimmt und ggf. darunter leidet.
•Vergewissern Sie sich vor dem
Gebrauch, dass die Gurte korrekt positioniert und eingestellt und die Gurtschlösser eingehakt sind.
•Die Babytrage jeweils mit nur einem
Kind verwenden.
•Prüfen Sie stets, dass das Gesicht des Kindes genügend freien Raum hat und die Atmung keinesfalls beeinträchtigt wird.
•Verwenden Sie die Babytrage nicht mehr, wenn Teile beschädigt sind oder fehlen.
•Nur Ersatzteile oder Komponenten verwenden, die vom Hersteller geliefert sind.
•Diese Babytrage darf nur von einem
Erwachsenen verwendet werden.
•DieBabytragenichtfürdenTransport mit dem Auto verwenden.
•DieBabytragedarfnichtbeimLenken eines motorisierten Fahrzeugs, oder wenn man Beifahrer ist, verwendet werden.
•Die Babytrage darf nicht beim
Kochen oder bei der Ausführung von Reinigungsarbeiten getragen werden, damit die von Hitzequellen oder chemischen Stoffen ausgehende Gefahr vermieden wird.
VERWENDUNG MIT BLICKRICHTUNG ZUM ELTERNTEIL UND VERWENDUNG AN DER SEITE
•WARNUNG: Seien Sie vorsichtig, wenn Sie sich bücken bzw. nach vorne oder zur Seite beugen;
• Es wird empfohlen, |
sich |
zu |
setzen, während man |
das |
Kind |
in die Babytrage setzt oder es herausnimmt.
VERWENDUNG IN DRITTER POSITION (AUF DEM RÜCKEN DES BENUTZERS)
•Kinder unter dem 6. Lebensmonat oder diejenigen, die nicht alleine aufrecht sitzen können, nicht auf dem
Rücken tragen.
•KontrollierenSieregelmäßig,dassdas
Kind bequem und sicher positioniert ist, vor allem, wenn Sie es auf dem Rücken tragen.
BESTANDTEILE DER BABYTRAGE (Abb. SEITE A und Abb. SEITE B)
A.Rückenlehne der Babytrage
B.Schultergurte
C.Sitzfläche der Babytrage
D.Knöpfe fürVerkleinerer der Babytrage (falls inkludiert)
24
,
t
E.Sitzhose
F.Bauchgurt
G.Schnalle mit Band zur Einstellung des Bauchgurtes
H.Haltegummi für Schnalle
I.Knopflöcher und Knöpfe zum Einstellen der Sitzhose
J.Schnallen mit Band zum Einstellen der Schultergurte
K.Schnalle für Brustbein/Schulterblatt mit Gummiband
L.Knopflöcher zum Einhaken des Verkleinerers (falls inkludiert)
M.Anpassungsfalte
BESTANDTEILE DES MULTIFUNKTIONALEN VERKLEINERERS (Abb. SEITE C und Abb. SEITE D)
N.Druckknöpfe
O.Druckknöpfe
P.Druckknöpfe
Q.Einstellband mit Druckknöpfen
R.Druckknopf
S.Knöpfe mit Gummiband
T.Reißverschlusstasche
U.Kapuze
V.Knöpfe mit Gummiband an der Kapuze
TIPPS FÜR DIE PFLEGE UND WARTUNG REINIGUNG
Beachten Sie bitte die Angaben auf dem Pflegeetikett. Kontrollieren Sie nach jeder Wäsche die Konsistenz des
Bezugsstoffs und der Nähte.
Handwäsche in kaltem Wasser
Nicht bleichen
Nicht im Trockner trocknen
Nicht bügeln
 Keine chemische Reinigung möglich
PFLEGE
Prüfen Sie die Babytrage regelmäßig auf eventuell aufgetrennte Nähte, Beschädigungen oder fehlende Teile. Bei Beschädigungen jeglicher Art darf das Produkt nicht mehr verwendet werden.
BEFÖRDERUNG VORNE - BLICKRICHTUNG ZUM ELTERNTEIL
Für die Beförderung des Kindes in der Babytrage in der
PositionmitBlickrichtungzumElternteilwirddieVerwendung des multifunktionalen Verkleinerers empfohlen, der je nach
Alter des Kindes in zwei verschiedenen Konfigurationen eingesetzt werden kann.
•0-1 Monat: Die Funktion des Verkleinerers besteht darin, das Kind zu umhüllen. Es wird sowohl in hockender Stellung gehalten, wenn es sich in der Babytrage befindet, als auch während des Hineinlegens in und Herausnehmens aus der Babytrage.
•1m+: Die Funktion des Verkleinerers besteht darin, das Kind besser zu schützen und bequem zu positionieren.
Die Verwendung des Verkleinerers stützt das Kind zusätzlich und erhöht den Komfort. Der Verkleinerer umhüllt die
gerundete Wirbelsäule des Kindes und stützt Kopf und Hals.
WARNUNG: Bevor Sie das Kind hineinlegen, müssen Sie die
Babytrage übergezogen haben.
BEFÖRDERUNG VORNE - BLICKRICHTUNG ZUM ELTERNTEIL (0-1 MONAT)
SO WIRD DIE BABYTRAGE MIT DEM VERKLEINERER ANGELEGT
1.Breiten Sie den multifunktionalen Verkleinerer auf einer ebenen Oberfläche aus. Die Seite C weist dabei nach oben
(Abb. 1)
2.Schlagen Sie die unteren Kanten des Verkleinerers zusammen und drücken Sie die eingekreisten Druckknöpfe
N ineinander, wie in Abbildung 2 dargestellt.
3.Schlagen Sie die erhaltene Grundfläche um. Richten Sie die Druckknöpfe O auf die Druckknöpfe P aus und drücken Sie diese ineinander. Prüfen Sie, ob das so erhaltene Ergebnis dem in Abbildung 3 dargestellten entspricht.
4.Schließen Sie nun den Bauchgurt F der Babytrage mit den entsprechenden Schnallen (Abb. 4A) und stellen Sie die
Breite mit der Schnalle G ein (Abb. 4B).
WARNUNG: Sichern Sie die Schnalle, indem Sie diese durch den Gummi H führen (Abb. 4C).
5.SchließenSiebeideSchultergurtemitdenSchnallenJ(Abb.5).
6.LegenSiedasKindinhockenderStellungindenVerkleinerer und vergewissern Sie sich, dass Sie das Einstellband Q mit dem Maß am entsprechenden Knopf R festmachen, das am besten zum Körperbau des Kindes passt (Abb. 6)
7.Verwenden Sie eine ebene Fläche, um das Einsetzen des Verkleinerers und das Hineinlegen des Kindes in die Babytrage zu vereinfachen. Legen Sie dann den Verkleinerer mit dem Kind auf den Mittelteil der auf der
Oberfläche ausgebreiteten Babytrage (Abb. 7A). Befestigen
Sie Knöpfe mit Gummiband S, die sich auf dem Oberteil des Verkleinerers befinden, in den Knopflöchern L auf den Schultergurten der Babytrage (Abb. 7B)
8.Kontrollieren Sie, dass das Kind gut auf der Sitzfläche der Babytrage aufliegt und befestigen Sie dann mithilfe der entsprechenden Knöpfe F die Sitzhose E. Stellen Sie diese in der für den Körperbau des Kindes geeignetsten Position
ein, damit sie nie zu weit oder zu eng ist (Abb. 8).
WARNUNG: Das Kind sollte im Sitzen oder unter
Zuhilfenahme einer ebenen und stabilen Fläche in die Babytrage gelegt werden, um auf etwaige plötzliche
Bewegungen des Kindes reagieren zu können.
WARNUNG: Halten Sie das Kind dabei gut fest.
WARNUNG: Bevor das Kind in die Babytrage gelegt wird, prüfen, dass alle vorhergehenden Schritte richtig ausgeführt wurden.
9.Die Babytrage anlegen. In die Schultergurte B (Abb. 9A) schlüpfen, anschließend die Schnalle für Brustbein/ Schulterblatt schließen und einstellen (Abb. 9B). Abschließend die Schultergurte einstellen (Abb. 9C). Der
überstehende Teil des Bandes kann aufgewickelt werden und mit dem vorgesehenen Gummi befestigt werden (Abb.
9D). Alternativ ist es möglich, die Brustbein-/Schulterschnalle festzuschnallen, bevor man die Schultergurte anlegt (Abb. 9E), daraufhin die Schultergurte einfügen, indem man die
Brustbein-/Schulterschnalle hinter dem Kopf entlang führt
(Abb. 9F) und sie einstellen.
WARNUNG: Vergewissern Sie sich, dass die Beine des Kindes angehockt sind und die Sitzhose gut festgemacht ist.
10.Der Verkleinerer ist mit einer praktischen Kapuze ausgestattet, um das Kind besser vor der Witterung und
25

während des Schlafens zu schützen.
Öffnen Sie zum Verwenden der Kapuze den Reißverschluss auf der Seite D des Verkleinerers. Ziehen Sie die Kapuze heraus und verbinden Sie die Knöpfe mit Gummiband V auf der Oberseite der Kapuze mit den Knopflöchern L auf der
Seite A der Babytrage, wie in Abbildung 10 gezeigt. WARNUNG: DieseVerwendung ist nur bei Kindern zwischen
0 und 1 Monat zulässig.
WARNUNG: Diese Verwendung ist nur zulässig, wenn sich die Babytrage in der Konfiguration Blickrichtung zum
Elternteil befindet.
DAS KIND AUS DER BABYTRAGE NEHMEN
WARNUNG: Man sollte sitzen, während man das Kind aus der Babytrage nimmt.
11.Halten Sie das Kind gut fest, öffnen Sie die Schnalle für Brustbein/Schulterblatt K (Abb. 11A), die Schultergurte B abstreifen (Abb. 11B) und die Knöpfe der Sitzhose aus den entsprechenden Knopflöchern lösen (Abb. 11C), bevor das Kind herausgenommen wird.
12.UmdasKindnichtzustörenundfürseineBequemlichkeit wird empfohlen, dass das Kind sich noch im Innern des
Verkleinerers befindet, wenn es aus der Babytrage
herausgenommen wird.
Zum Herausnehmen des Kindes die Knöpfe mit Gummiband
S des Verkleinerers aus den Knopflöchern L auf den Schultergurten lösen (Abb. 12) und den Verkleinerer samt
Kind aus der Babytrage entfernen.
Erst dann den Bauchgurt lösen.
WARNUNG: Halten Sie das Kind dabei gut fest.
WARNUNG: Bevor das Kind aus der Babytrage genommen wird, prüfen, dass alle vorhergehenden Schritte richtig ausgeführt wurden.
In jedem Fall kann die Babytrage auch bei Kindern ab der
Geburt ohne Verkleinerer verwendet werden. Dazu die zuvor beschriebenen Schritte befolgen (ausgenommen die Teile bezüglich des Verkleinerers). Die Babytrage wurde so entworfen, dass die Ergonomie des Kindes stets beachtet wird. Die Verwendung des Verkleinerers wird dennoch stets empfohlen, da er erlaubt das Kind zu stützen und seinen
Komfort zu erhöhen. Er umhüllt die gerundeteWirbelsäule des
Kindes und stützt dabei Kopf und Hals.
BEFÖRDERUNG VORNE - BLICKRICHTUNG ZUM
ELTERNTEIL (1m+)
SO WIRD DIE BABYTRAGE MIT DEM VERKLEINERER ANGELEGT
Schließen Sie den Bauchgurt F der Babytrage mit den entsprechendenSchnallen(Abb.4A)undstellenSiedieBreite
mit der Schnalle G ein (Abb. 4B).
WARNUNG: Sichern Sie die Schnalle, indem Sie diese durch den Gummi H führen (Abb. 4C).
Schließen Sie beide Schultergurte mit den Schnallen J (Abb. 5).
13.Verwenden Sie eine ebene Fläche, um das Einsetzen des Verkleinerers und das Hineinlegen des Kindes in die Babytrage zu vereinfachen. Breiten Sie dann den multifunktionalen Verkleinerer auf der Babytrage aus. Geben Sie acht, dass die Seite C des Verkleinerers nach oben weist (Abb. 13).
14.BefestigenSieKnöpfemitGummibandS,diesichaufdem Oberteil des Verkleinerers befinden, in den Knopflöchern L auf den Schultergurten der Babytrage (Abb. 14).
15.Drücken Sie die Druckknöpfe O auf dem Unterteil des Verkleinerers in die Druckknöpfe D auf der Sitzfläche der
Babytrage (Abb. 15).
16.Legen Sie das Kind auf die Sitzfläche (Abb. 16A) und befestigen Sie dann mithilfe der entsprechenden Knöpfe
F die Sitzhose E. Stellen Sie diese in der für den Körperbau des Kindes geeignetsten Position ein, damit sie nie zu weit
oder zu eng ist (Abb. 16B).
WARNUNG: Das Kind sollte im Sitzen oder unter
Zuhilfenahme einer ebenen und stabilen Fläche in die Babytrage gelegt werden, um auf etwaige plötzliche
Bewegungen des Kindes reagieren zu können.
WARNUNG: Halten Sie das Kind dabei gut fest.
WARNUNG: Bevor das Kind in die Babytrage gelegt wird, prüfen, dass alle vorhergehenden Schritte richtig ausgeführt wurden.
Die Babytrage anlegen. In die Schultergurte B (Abb. 9A) schlüpfen, anschließend die Schnalle für Brustbein/ Schulterblatt schließen und einstellen (Abb. 9B). Abschließend die Schultergurte einstellen (Abb. 9C). Der
überstehende Teil des Bandes kann aufgewickelt werden und mit dem vorgesehenen Gummi befestigt werden (Abb.
9D). Alternativ ist es möglich, die Brustbein-/Schulterschnalle festzuschnallen, bevor man die Schultergurte anlegt (Abb. 9E), daraufhin die Schultergurte einfügen, indem man die Brustbein-/Schulterschnalle hinter dem Kopf entlang führt (Abb.
9F) und sie einstellen.
WARNUNG: Stellen Sie sicher, dass das Kind rittlings auf dem Sitz sitzt und seine Beine in der Sitzhose stecken.
DerVerkleinereristmiteinerpraktischenKapuzeausgestattet, um das Kind besser vor der Witterung und während des
Schlafens zu schützen.
Öffnen Sie zum Verwenden der Kapuze den Reißverschluss auf der Seite D des Verkleinerers. Ziehen Sie die Kapuze heraus und verbinden Sie die Knöpfe mit Gummiband V auf der Oberseite der Kapuze mit den Knopflöchern L auf der
Seite A der Babytrage, wie in Abbildung 10 gezeigt.
DAS KIND AUS DER BABYTRAGE NEHMEN
WARNUNG: Man sollte sitzen, während man das Kind aus der Babytrage nimmt.
•Halten Sie das Kind gut fest, öffnen Sie die Schnalle für Brustbein/Schulterblatt K (Abb. 11A), die Schultergurte B abstreifen (Abb. 11B) und die Knöpfe der Sitzhose aus den
entsprechenden Knopflöchern lösen (Abb. 11C), bevor das
Kind herausgenommen wird. Erst dann den Bauchgurt lösen. WARNUNG: Halten Sie das Kind dabei gut fest.
WARNUNG: Bevor das Kind aus der Babytrage genommen wird, prüfen, dass alle vorhergehenden Schritte richtig ausgeführt wurden.
InjedemFallkanndieBabytrageohneVerkleinererverwendet werden. Dazu die zuvor beschriebenen Schritte befolgen (ausgenommen die Teile bezüglich des Verkleinerers). Die Babytrage wurde so entworfen, dass die Ergonomie des
Kindes stets beachtet wird.
Die Verwendung des Verkleinerers wird dennoch stets empfohlen, da er erlaubt das Kind zu stützen und seinen
Komfort zu erhöhen. Er unterstützt die gesunde Entwicklung der Hüften, umhüllt die gerundete Wirbelsäule des Kindes und stützt dabei Kopf und Hals.
SEITLICHER TRANSPORT – AUF DER HÜFTE
Der Transport in seitlicher Position - auf der Hüfte ist für Kinder ab
26
ca.dem6.Lebensmonatgeeignet,dieinderLagesind,selbständig den Kopf aufrecht und die Schultern gerade zu halten.
Die Babytrage kann sowohl auf der rechten als auch auf der linken Hüfte des Benutzers positioniert werden, je nachVorliebe. Nachstehend wird die Vorgehensweise für die Anbringung auf der rechten Hüfte beschrieben. Für die Anbringung auf
der linken Hüfte die Schritte spiegelbildlich ausführen. WARNUNG: Bevor Sie das Kind hineinlegen, müssen Sie die
Babytrage übergezogen haben.
SO WIRD DIE BABYTRAGE ANGELEGT
Schließen Sie den Bauchgurt F mit den entsprechenden Schnallen (Abb. 4A) und stellen Sie die Breite mit der Schnalle
G ein (Abb. 4B).
WARNUNG: Sichern Sie die Schnalle, indem Sie diese durch den Gummi H führen (Abb. 4C).
17.Drehen Sie den Bauchgurt und positionieren Sie die Sitzfläche in der Nähe der rechten Hüfte (Abb. 17).
18.Zum Befestigen der Sitzhose den linken Knopf (Abb. 18) an der entsprechenden Öse einhaken. Die andere Seite frei lassen, damit anschließend das Kind hineingelegt werden kann.
19.Den linken Schultergurt in die Schnalle des rechten Bandes
. einhaken (Abb. 19A) und eine Überkreuzung herstellen.
Den so geschaffenen Ring über den Kopf streifen und
. hineinschlüpfen (Abb. 19B), so dass er in der endgültigen
Stellung auf der linken Schulter ruht (Abb. 19C).
SO WIRD DAS KIND IN DIE BABYTRAGE GESETZT
20. Das Kind in die Babytrage hineinlegen (Abb. 20A) und mit der linken Hand festhalten. Den bereits angelegten
Schultergurt mit der rechten Hand einstellen (Abb. 20B). Anschließend die Sitzhose schließen.
21.Für eine bessere Passform der Babytrage den rechten
Schultergurt nach außen drehen (Abb. 21A) einmal rundherum führen und unter der Achsel durchführen
(Abb.21B). Befestigen Sie ihn dann mit den Schnallen des linken Bandes (Abb. 21C) und stellen Sie dann den Schultergurt ein (Abb. 21D). Vergewissern Sie sich, dass die Babytrage korrekt wie in Abbildung 21E positioniert ist.
rDAS KIND AUS DER BABYTRAGE NEHMEN
WARNUNG: Man sollte sitzen, während man das Kind aus der Babytrage nimmt.
22.Halten Sie das Kind gut fest und lösen Sie den unter der
. Achsel durchgeführten Schultergurt (Abb. 22A). Lösen Sie die Knöpfe der Sitzhose (Abb. 22B), bevor Sie das Kind herausnehmen. Erst dann den Bauchgurt lösen und aus
dem Befestigungsgummi nehmen.
WARNUNG: Halten Sie das Kind dabei gut fest.
WARNUNG: Bevor das Kind aus der Babytrage genommen wird, prüfen, dass alle vorhergehenden Schritte richtig ausgeführt wurden.
POSITION AUF |
DEM |
RÜCKEN DES BENUTZERS |
MIT VERWENDUNG |
DES MULTIFUNKTIONALEN |
|
VERKLEINERERS |
|
|
WARNUNG: Bevor Sie das Kind hineinlegen, müssen Sie die
Babytrage übergezogen haben.
SO WIRD DIE BABYTRAGE MIT DEM VERKLEINERER ANGELEGT
Schließen Sie den Bauchgurt F der Babytrage mit den
entsprechendenSchnallen(Abb.4A)undstellenSiedieBreite
mit der Schnalle G ein (Abb. 4B).
WARNUNG: Sichern Sie die Schnalle, indem Sie diese durch den Gummi H führen (Abb. 4C).
Schließen Sie beide Schultergurte mit den Schnallen J (Abb. 5). Verwenden Sie eine ebene Fläche, um das Einsetzen des VerkleinerersunddasHineinlegendesKindesindieBabytrage zu vereinfachen. Breiten Sie dann den multifunktionalen Verkleinerer auf der Babytrage aus. Geben Sie acht, dass die Seite C desVerkleinerers nach oben weist (Abb. 13).
Befestigen Sie Knöpfe mit Gummiband S, die sich auf dem Oberteil des Verkleinerers befinden, in den Knopflöchern L auf den Schultergurten der Babytrage (Abb. 14).
Drücken Sie die Druckknöpfe O auf dem Unterteil des Verkleinerers in die Druckknöpfe D auf der Sitzfläche der
Babytrage (Abb. 15).
SO WIRD DAS KIND IN DIE BABYTRAGE GESETZT
Befolgen Sie die untenstehenden Anweisungen, um das Kind zur Verwendung in der Transportposition (auf dem Rücken des Benutzers) ohne die Hilfe eines
weiteren Erwachsenen in die Babytrage zu setzen. WARNUNG: Das Kind sollte im Sitzen in die Babytrage
gesetzt werden, um auf evtl. plötzliche Bewegungen des
Kindes reagieren zu können.
WARNUNG: Halten Sie das Kind dabei gut fest.
WARNUNG: Bevor das Kind in die Babytrage gelegt wird, prüfen, dass alle vorhergehenden Schritte richtig ausgeführt wurden.
Legen Sie das Kind auf die Sitzfläche (Abb. 16A) und befestigen Sie dann mithilfe der entsprechenden Knöpfe F die Sitzhose E. Stellen Sie diese in der für den Körperbau des Kindes geeignetsten Position ein, damit sie nie zu weit oder zu eng ist (Abb. 16B).
Die Babytrage anlegen, indem Sie in die Schultergurte B schlüpfen (Abb. 9A).
DerVerkleinereristmiteinerpraktischenKapuzeausgestattet, um das Kind besser vor der Witterung und während des
Schlafens zu schützen.
Öffnen Sie zum Verwenden der Kapuze den Reißverschluss auf der Seite D des Verkleinerers. Ziehen Sie die Kapuze heraus und verbinden Sie die Knöpfe mit Gummiband V auf der Oberseite der Kapuze mit den Knopflöchern L auf der
Seite A der Babytrage, wie in Abbildung 10 gezeigt.
POSITIONIEREN DES KINDES AUF DEM RÜCKEN
23.Ziehen Sie den rechten Arm aus dem Schultergurt und führen Sie ihn in den inneren Teil der Babytrage. Nehmen Sie mit demselben Arm den gegenüberliegenden Schultergurt (Abb. 23A) in die Hand und halten ihn gut fest.ZiehenSieauchdenlinkenArmausdemSchultergurt und halten Sie mit diesem Arm von außen das Kind in der Babytrage gut fest (Abb. 23B). Stecken Sie den rechten Arm,mitdemSiedenlinkenSchultergurthalten,indiesen hinein (Abb. 23C) und drehen Sie die Babytrage. Die am
Bauchgurt befestigte Babytrage dreht sich zusammen mit dem Gurtsystem und positioniert sich auf dem Rücken.
24.Stecken Sie nun den zweiten Arm in den freien Schultergurt (Abb. 24A), so dass sich das Gewicht der Babytrage gleichmäßig auf dem Rücken und den Schultern verteilt. Die Schnalle für Brustbein/Schulterblatt
L am Brustbein schließen (Abb.24B) und alle Bänder der Babytrage einstellen (Abb. 24C).
27
DAS KIND AUS DER BABYTRAGE NEHMEN
25.Öffnen Sie die Schnalle für Brustbein/Schulterblatt (Abb. 25A), ziehen Sie einen der beiden Schultergurte herunter und halten Sie dabei das Kind gut fest, ziehen Sie dann auch den zweiten Schultergurt herunter; drehen Sie das Gurtsystem herum, bis sich das Kind in frontaler Position befindet (Abb. 25B). Legen Sie nun erneut die Schultergurte an (Abb. 25C), um wieder in die
Ausgangsposition zu gelangen.
WARNUNG: Halten Sie das Kind dabei gut fest.
WARNUNG: Bevor das Kind aus der Babytrage genommen wird, prüfen, dass alle vorhergehenden Schritte richtig ausgeführt wurden.
InjedemFallkanndieBabytrageohneVerkleinererverwendet werden. Dazu die zuvor beschriebenen Schritte befolgen (ausgenommen dieTeile bezüglich desVerkleinerers).
GARANTIE
Die Garantie gilt bei allen Konformitätsfehlern, die trotz normalerGebrauchsbedingungen(gemäßdenVorgabender
Gebrauchsanleitung) auftreten.
Die Garantie ist verwirkt bei unsachgemäßem Gebrauch,
Abnutzung oder bei persönlichen Unglücksfällen.
Bezüglich der Garantiedauer für Konformitätsfehler verweisen wir auf die nationalen Rechtsvorschriften des Kauflandes.
28
 Loading...