Carrier 38QRF-40KMQ, 38QRF-40QNQ, 38HDF-40KMC Owner's Manual

Infrared Remote
40KMC------301 |
40KMQ------ |
301 |
OWNER’ S MANUAL

Infrared Remote
Owner’ s manual
This control system only operates with 40KMC------301 and 40KMQ------301 Cassette indoor units.
For installation instructions of this unit, refer to the relevant manuals.
Contents |
|
|
Page |
General information .................................................................................... |
2 |
Display of selected functions ...................................................................... |
3 |
Use of the remote control............................................................................ |
4-6 |
Troubleshooting .......................................................................................... |
7 |
ENGLISH
GB - 1

Infrared Remote
General information
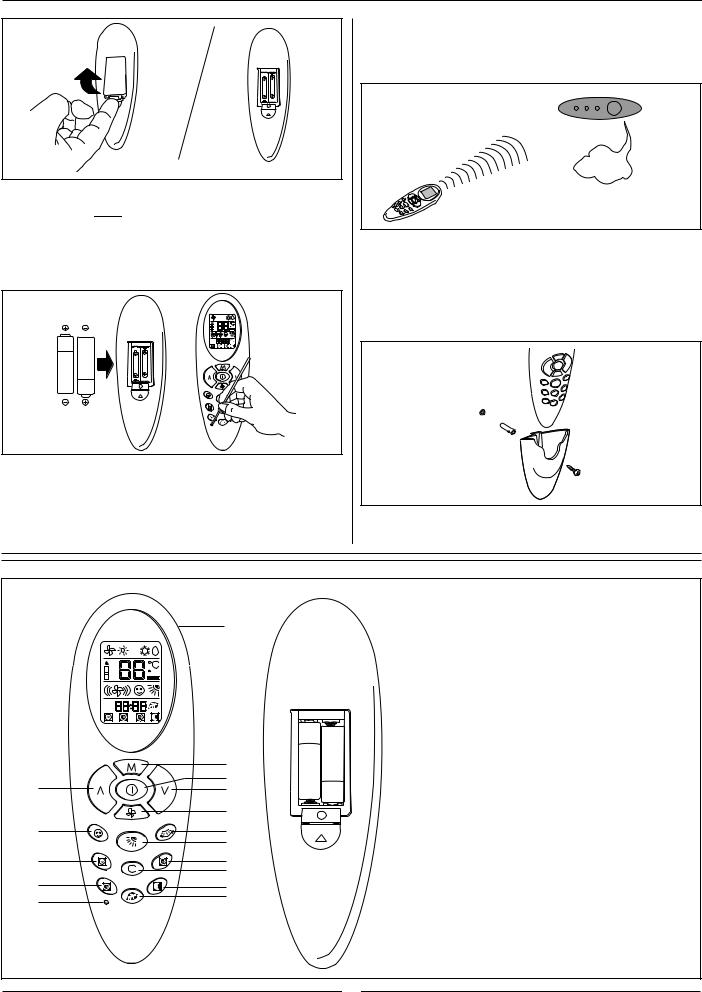
The remote control operates with two 1.5 V non re-chargeable batteries.
When the symbol 
 appears in the display, this indicates that the batteries are exhausted.
How to insert batteries:
Open embedded cover. Remove the cover of the battery compartment at the back of the remote control by pressing the tab toward inside, in the direction of the arrow.
 A
A
A 1
F
B 2
AM
PM
•Remove the used batteries and insert new batteries.
The remote control uses two alkaline batteries (1.5 V, LR03x2).
•Press the reset button “O” with a sharp object to reset the remote control.
•Do not use used batteries or batteries of different types, as this may cause the unit to malfunction.
•The average battery life during normal use is approximately one
year. The remote control used batteries must be disposed of according to the standards in force.
•If the air conditioner does not operate normally after replacing the batteries, remove the batteries, refit them and press the reset button “O” again after 5 seconds.
BEEP
The maximum operating range for the remote control is approx. 5 m. No obstructions such as curtains or plants should be between control and unit.
Direct sun on the unit receiver may interfere with good signal reception. The control must be directed toward the unit receiver when pressing the buttons of the desired functions. An acoustical acknowledgement sound (beep) will indicate that signal has been received.
•A mounting bracket for the remote control is supplied with the unit. Install the mounting bracket on the wall where the remote signal can be easily received from the remote.
Display readout
A. Mode selection button
|
A |
B. |
ON/OFF button |
|
|
|
|||
A |
1 |
|
|
|
B |
F |
C. |
Increase temperature button |
|
2 |
||||
|
|
|||
AM |
|
D. |
Decrease temperature button |
|
PM |
|
|
|
|
|
|
E. |
Fan speed selection button |
|
|
|
F. |
Set / select personal setting button |
|
|
A |
G. |
Vertical louver button (not used) |
|
C |
B |
H. |
Horizontal louver button |
|
D |
||||
|
E |
I. |
ON timer button |
|
F |
G |
J. |
DAILY timer button (Everyday) |
|
|
H |
K. |
Cancel / clock set button |
|
I |
J |
|||
|
K |
L. |
OFF timer button |
|
L |
M |
|||
|
|
|||
O |
N |
M. |
Sleep timer button (night) |
|
|
|
|
||
|
|
N. |
Ionizer button (not used) |
|
|
|
O. |
Reset button |
GB - 2
 Loading...