


 Loading...
Canon PowerShot A1000 IS Gray, PowerShot A40, PowerShot A470 Gray, PowerShot E1, PowerShot Pro 1 Instruction Manual for Macintosh
...Software Guide
for Macintosh
•ImageBrowser
•PhotoStitch
Special Features |
|
|
|
|
|
|
|
Transfer Images and Movies |
P |
|
|
Y |
|||
|
O |
|
|
|
C |
|
|
Insert Text |
Save Still Images |
Edit Movies |
|
From Movies
ABC
A
Print Images |
Attach Images to Email |
|
|
Plus many other useful features
|
Table of Contents |
How to Use this Manual |
1 |
|
|
|
|
|
|
|
|
|
|
|
|
|
|
|
|
|
|
|
|
|
|
|
|
|
|
Things to |
|
Mastering |
|
More Advanced |
|
Appendices |
Remember |
|
the Basics |
|
Techniques |
|
|
|
|
|
|
|||
|
|
|
|
|
|
|
|
|
|
|
|
|
|
About this Manual
Notation Conventions
The contents of this manual are classified according to the following symbols.
 IMPORTANT
•The “Important” sections contain operating precautions or important topics. Ensure that you read them.
HINT |
•The “Hint” sections contain procedural suggestions and tips for your convenience. Read them as necessary.
Y • This manual uses Mac OS X v10.5 screenPshots and procedures in the explanations.
The screen shots and proceduresOmay appear slightly different if you are using
another version of Mac OS.
• The displayed screens and procedures may also differ slightly from the examples depending uponCthe camera or printer model in use.
• The explanations in this guide are based on the premise that a Canon compact digital camera will be used with the software.
• Some functions may not be available depending on the camera model.
Word Searches
This document is provided as an Adobe Reader document. Use Adobe Reader’s Search functions to find specific words or phrases that you recall but cannot find. To access this function, in Adobe Reader click the [Edit] menu and select the [Search] option.
If you are using Adobe Reader 8 or later, you can also perform searches with the [Find] function right on the toolbar.
Input search text here
|
Table of Contents |
2 |
|
|
|
|
|
|
|
|
|
|
|
|
|
|
|
|
|
|
|
|
|
Things to |
|
Mastering |
|
More Advanced |
|
Appendices |
Remember |
|
the Basics |
|
Techniques |
|
|
|
|
|
|
|||
|
|
|
|
|
|
|
|
|
|
|
|
|
|
Precautions for Connecting the Camera to the Computer
•When connecting the camera to the computer with an interface cable, make sure to connect the cable directly to the computer’s USB port. The connection may not operate correctly if you attach the camera to the computer via a USB hub.
•The connection may not operate correctly if you are using other USB devices, excluding USB mice or keyboards, at the same time as the camera. If this occurs, disconnect the other devices from the computer and try reconnecting the camera.
•Do not connect two or more cameras at the same time to the same computer. The connections may not operate correctly.
•Do not allow the computer to go into sleep (standby) mode while a camera is connected via the USB interface cable. If this does happen, do not disconnect the interface cable. Try to awaken the computer with the camera in the connected state. Some computers will not
awaken properly if you disconnect the camera while they are in sleep (standby) mode. Please refer to your computer manual for instructions regardingYthe sleep (standby) mode.
•Do not disconnect the camera from the computer if CameraWindow is displayed on the screen. PIMPORTANT
•You are recommended to use an AC adapter (sold separately) when connecting to a computer. Ensure that you use fully charged batteries if you cannot use an AC adapter.
•See the Camera User Guide for procedures on connecting the camera to the computer. OC
|
Table of Contents |
3 |
|
|
|
|
|
|
|
|
|
|
|
|
|
|
|
|
|
|
|
|
|

Things to |
|
Mastering |
|
More Advanced |
|
Appendices |
Remember |
|
the Basics |
|
Techniques |
|
|
|
|
|
|
|||
|
|
|
|
|
|
|
|
|
|
|
|
|
|
Table of Contents |
|
|
|
|
About this Manual.................................................................................................................... |
|
|
|
2 |
Precautions for Connecting the Camera to the Computer.................................................... |
3 |
|||
Things to Remember............................................................................................ |
|
|
|
6 |
The Two ImageBrowser Windows........................................................................................... |
|
|
6 |
|
Windows That Communicate With the Camera and Manage Images......................................... |
6 |
|||
Browser Window...................................................................................................................... |
|
|
|
7 |
How to Display the Browser Window............................................................................................ |
|
7 |
||
Names of the Browser Window Parts............................................................................................ |
|
7 |
||
How to Perform Tasks............................................................................................................... |
|
|
|
8 |
Selecting and Using Functions........................................................................................................ |
|
|
8 |
|
Mastering the Basics............................................................................................. |
|
|
|
9 |
Transferring Images.................................................................................................................. |
|
|
|
9 |
Transferring Images by Connecting the Camera to a Computer.................................................. |
9 |
|||
Printing.................................................................................................................................... |
|
|
|
12 |
|
|
P |
|
|
Printing a Single Image on a Single |
age.................................................................................... |
|
12 |
|
Index Print...................................................................................................................................... |
|
|
|
14 |
How to Use CameraWindow.................................................................................................. |
|
Y |
16 |
|
|
O |
|
|
|
First Menu Screen to Open........................................................................................................... |
|
|
16 |
|
Image Transfer Screen................................................................................................................... |
|
|
|
17 |
C |
|
|
|
|
Organize Images Screen................................................................................................................ |
|
|
|
18 |
How to Use the Browser Window......................................................................................... |
|
|
19 |
|
Browser Window........................................................................................................................... |
|
|
|
19 |
Display Modes................................................................................................................................ |
|
|
|
20 |
Display Control Panel.................................................................................................................... |
|
|
|
20 |
Browser Area Tasks........................................................................................................................ |
|
|
|
21 |
File Information Window.............................................................................................................. |
|
|
22 |
|
Viewer (View Image) Window...................................................................................................... |
|
|
23 |
|
More Advanced Techniques............................................................................... |
|
|
24 |
|
Editing Images......................................................................................................................... |
|
|
|
24 |
Trimming–Cropping a Portion of an Image................................................................................. |
|
24 |
||
Color/Brightness Adjustment........................................................................................................ |
|
|
24 |
|
Red Eye Correction........................................................................................................................ |
|
|
|
25 |
Inserting Text................................................................................................................................. |
|
|
|
25 |
Correcting Levels........................................................................................................................... |
|
|
|
26 |
Correcting Tone Curves................................................................................................................. |
|
|
|
26 |
Adjusting Sharpness–Emphasizing Outlines................................................................................ |
|
27 |
||
Auto Adjustment........................................................................................................................... |
|
|
|
27 |
Using Other Editing Software...................................................................................................... |
|
|
28 |
|
Attaching Sounds.......................................................................................................................... |
|
|
|
29 |
Creating Panoramic Images–PhotoStitch ................................................................................... |
|
30 |
||
Editing Movies............................................................................................................................... |
|
|
|
31 |
Converting RAW Images–Digital Photo Professional.................................................................. |
32 |
|||
4

Things to |
|
Mastering |
|
More Advanced |
|
Appendices |
Remember |
|
the Basics |
|
Techniques |
|
|
|
|
|
|
|||
|
|
|
|
|
|
|
|
|
|
|
|
|
|
Exporting................................................................................................................................. |
|
|
|
34 |
Changing Image (Stills) Sizes and Types....................................................................................... |
|
34 |
||
Exporting Shooting Information.................................................................................................. |
|
|
34 |
|
Creating Computer Screen Saver Images..................................................................................... |
|
35 |
||
Creating Computer Wallpaper Images........................................................................................ |
|
35 |
||
Extracting Stills from Movies........................................................................................................ |
|
|
36 |
|
Uploading Movies to YouTube............................................................................................... |
|
|
37 |
|
Uploading to YouTube.................................................................................................................. |
|
|
|
37 |
Email........................................................................................................................................ |
|
|
|
38 |
Attaching Images to Email............................................................................................................ |
|
|
38 |
|
Slide Shows............................................................................................................................. |
|
|
|
39 |
Viewing Images in Slide Shows.................................................................................................... |
|
|
39 |
|
Image Management................................................................................................................ |
|
|
|
40 |
Changing File Names in Batches .................................................................................................. |
|
|
40 |
|
Sorting Images into Folders by Shooting Date............................................................................ |
|
40 |
||
Classifying Images Into Star Ratings Folders................................................................................ |
|
41 |
||
|
|
|
Y |
|
Configuring Image Information Settings.............................................................................. |
|
42 |
||
Setting Star Ratings....................................................................................................................... |
|
|
|
42 |
Inserting Comments...................................................................................................................... |
|
|
|
42 |
Assigning Keywords...................................................................................................................... |
|
|
|
43 |
Searching, Filtering and Sorting Images............................................................................... |
|
44 |
||
|
O |
|
|
|
Searching Images........................................................................................................................... |
|
|
|
44 |
Filtering Images............................................................................................................................. |
|
P |
45 |
|
C |
|
|
|
|
Sorting Images............................................................................................................................... |
|
|
|
45 |
Comparing Images.................................................................................................................. |
|
|
|
46 |
Comparing Multiple Images......................................................................................................... |
|
|
46 |
|
My Camera Settings................................................................................................................ |
|
|
|
47 |
Changing the Shutter Sound and Start-Up Image...................................................................... |
47 |
|||
Transferring Images................................................................................................................ |
|
|
|
49 |
Transferring Images to a Camera................................................................................................. |
|
|
49 |
|
CANON iMAGE GATEWAY..................................................................................................... |
|
|
50 |
|
About CANON iMAGE GATEWAY (for U.S.A. customers only)................................................... |
50 |
|||
Registering..................................................................................................................................... |
|
|
|
50 |
Available Services.......................................................................................................................... |
|
|
|
51 |
Preference Settings................................................................................................................. |
|
|
|
52 |
Customizing ImageBrowser.......................................................................................................... |
|
|
52 |
|
Appendices.......................................................................................................... |
|
|
|
53 |
List of Available Functions..................................................................................................... |
|
|
53 |
|
Supported Image Types.......................................................................................................... |
|
|
|
55 |
Uninstalling the Software...................................................................................................... |
|
|
56 |
|
Memory Card Folder Structure............................................................................................... |
|
|
57 |
|
Troubleshooting...................................................................................................................... |
|
|
|
58 |
5

Things to |
Mastering |
|
More Advanced |
|
Appendices |
Remember |
the Basics |
|
Techniques |
|
|
|
|
|
|||
|
|
|
|
|
|
The Two ImageBrowser Windows
Windows That Communicate With the Camera and Manage Images
The following two windows are the main ones used for ImageBrowser procedures.
Transfer window, which opens when a camera is connected.
CameraWindow
You can transfer all or a selectionPof images fromYthe connected camera.
CameraWindow closes and theOscreen changes after the images are transferred from the camera.
OrganizingCwindow for transferred images.
Browser Window
Click this icon in the Dock.
Double-click an image.
You can view, edit and print the images in the computer.
The Viewer Window that appears when you view an image.
HINT |
Use the Help Function
The  (Help) button or Help menu is available in most CameraWindow and ImageBrowser windows. It is there for when you are unsure how to proceed.
|
Table of Contents |
6 |
|
|
|
|
|
|
|
|
|
|
|
|
|
|
|
|
|
|
|
|
|
Things to |
Mastering |
|
More Advanced |
|
Appendices |
Remember |
the Basics |
|
Techniques |
|
|
|
|
|
|||
|
|
|
|
|
|
Browser Window
How to Display the Browser Window
Browser Window will appear after the camera images are transferred and CameraWindow closes. You can also display it by clicking the ImageBrowser icon in the Dock (the bar at the bottom of the desktop).
•If the ImageBrowser icon is not displayed in the Dock, double-click the [Applications] folder, followed by the [Canon Utilities] folder, [ImageBrowser] folder and the [ImageBrowser] icon.
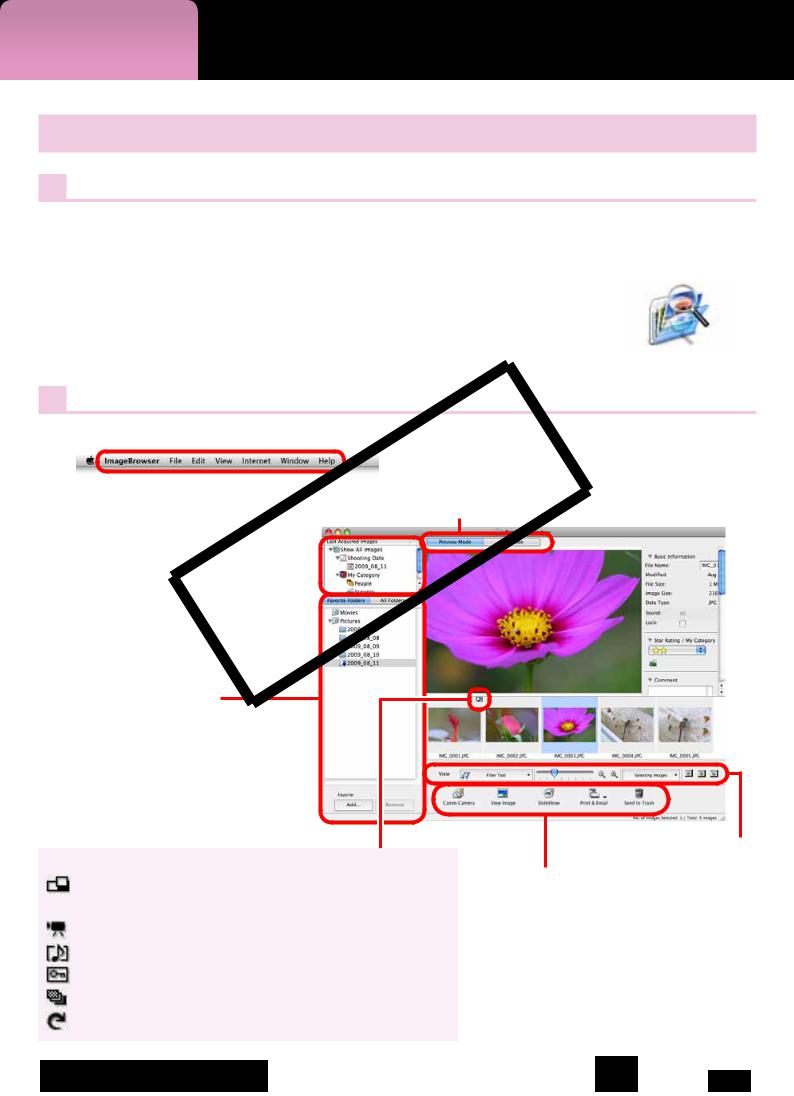
Names of the Browser Window Parts
|
|
|
|
|
|
|
Browser Area |
|
|
|
|
|
|
|
|
Icons that indicate image properties |
|
|
|
|
|
|
|
|
||
|
|
|
|
|
|
|
display around thumbnail images, as |
|
|
|
|
|
Display Modes |
shown on the bottom left. |
|||
Menu Bar |
|
Y |
|
|||||
|
Last Acquired Images |
|
|
P |
|
|
|
|
|
|
|
|
|
|
|||
|
|
|
|
|
|
|
|
|
|
Displays the last images |
|
|
|
|
|
||
|
O |
|
|
|||||
|
C |
|
|
|
|
|
||
transferred.
Folder Area
Selects a folder to display.
Properties Icon (Displays image properties)
: Image recorded using the camera’s Stitch Assist mode
 : RAW image
: Movie
: Image with sound memo attached
: Protected image
: Image recorded using the camera’s AEB function : Rotated image (rotated in display only)
Display Control Panel
Control Panel
|
Table of Contents |
7 |
|
|
|
|
|
|
|
|
|
|
|
|
|
|
|
|
|
|
|
|
|
Things to |
Mastering |
|
More Advanced |
|
Appendices |
Remember |
the Basics |
|
Techniques |
|
|
|
|
|
|||
|
|
|
|
|
|
How to Perform Tasks
Selecting and Using Functions
Many ImageBrowser functions can be accessed by selecting them from the Control Panel and following the instructions in the guidance section of the new window. For further details on the functions, refer to “List of Available Functions” in the appendix.
1 Select a function from the Control Panel or a menu.
Y
P
O
C
|
|
Follow the instructions |
|
2 |
|||
to perform the task. |
|||
|
Table of Contents |
8 |
|
|
|
|
|
|
|
|
|
|
|
|
|
|
|
|
|
|
|
|
|
Things to |
Mastering |
More Advanced |
|
Appendices |
Remember |
the Basics |
Techniques |
|
|
|
|
|||
|
|
|
|
|
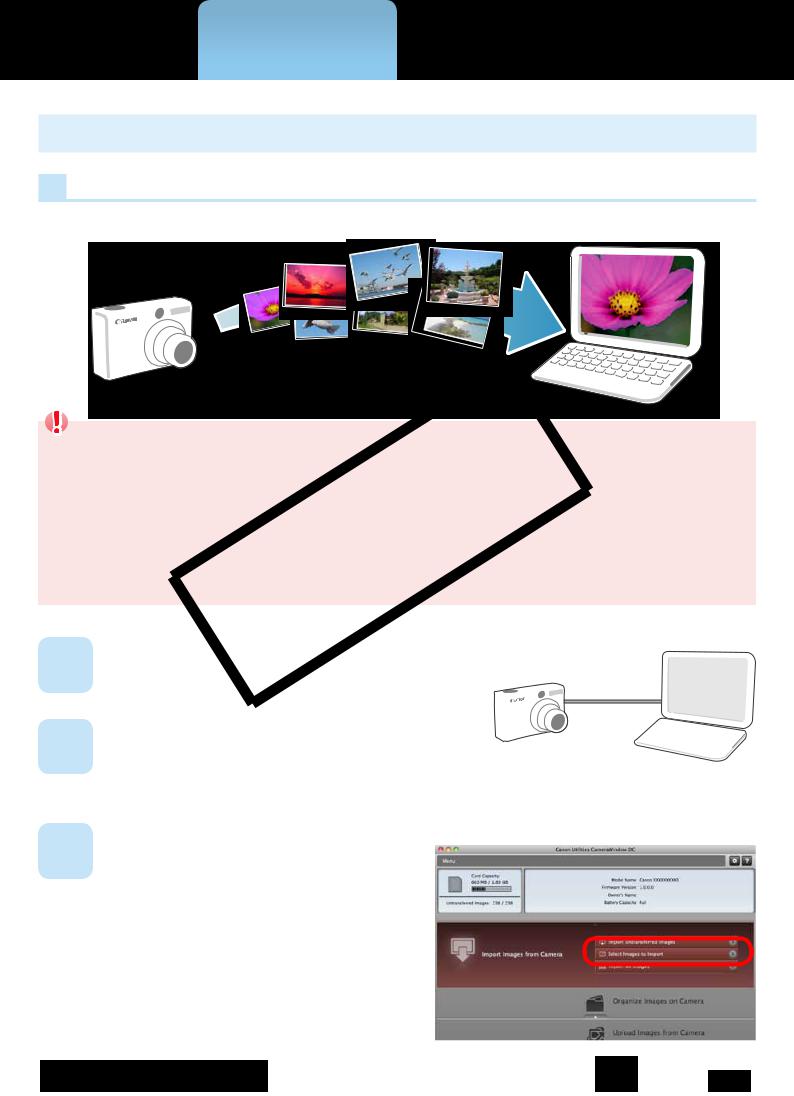
Transferring Images
Transferring Images by Connecting the Camera to a Computer
Transfer the camera images to the computer.
IMPORTANT
•The instructions in this software manual assumeYthat you have correctly installed the software. See the Camera User Guide for software installation procedures.
•For details on how to connect thePcamera to a computer, refer to the Camera
User Guide. Please also refer to “Precautions for Connecting the Camera to the Computer”. O
•If CameraWindow fails to open when you connect the camera, click the [CameraWindow] icon in the Dock (the bar at the bottom of the desktop).
1ConnectCthe camera to the computer with the supplied interface cable.
2Turn on the camera power, set it to 
 playback mode and prepare it to
communicate with the computer.
3 |
Click [Import Images from |
CameraWindow (Menu Screen) |
|
||
Camera] and then click [Import |
|
Untransferred Images].
Only images that have not yet been transferred will start to transfer.
|
Table of Contents |
9 |
|
|
|
|
|
|
|
|
|
|
|
|
|
|
|
|
|
|
|
|
|
Things to |
Mastering |
More Advanced |
|
Appendices |
Remember |
the Basics |
Techniques |
|
|
|
|
|||
|
|
|
|
|
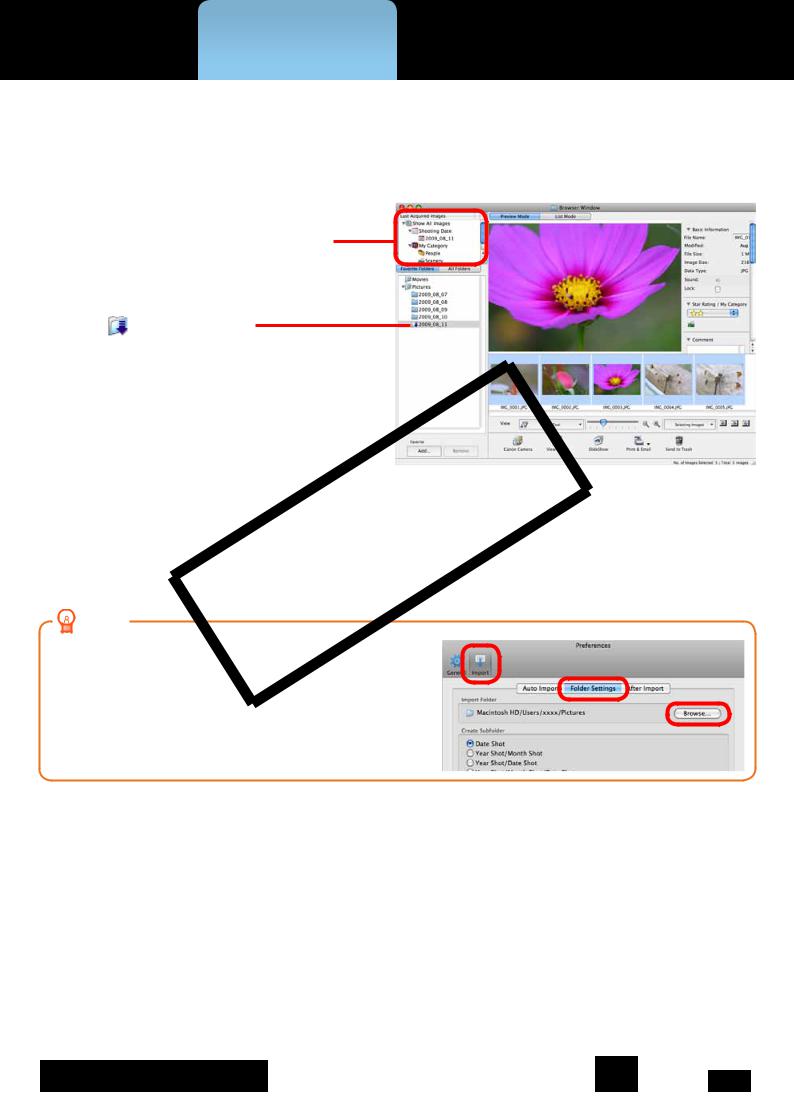
After you click [OK] in the dialog that indicates the transfer is complete and close the CameraWindow screen, the transferred images will display in the Browser Window.
You can select the newly transferred images by their shooting dates or My Category (select models only) classification.
: Folders containing newly acquired images
|
|
Y |
|
|
P |
|
• Images from memory cards with large numbers of images (more than 1,000) may not transfer |
|
|
correctly. If this happens, please use a memory card reader to transfer. For details on transferring |
|
|
images from a memory card reader, refer to “Transferring Images Using a Memory Card Reader”. |
|
|
• Movie files take time to transfer since the files are large. |
|
|
|
C |
|
HINT |
O |
|
||
|
||
Changing the Transfer Destination Folder
The default settings save transferred images into the [Pictures] folder. To change the destination folder, click the  button shown on the right in Step 3 as described on the previous page, then click the [Import] button. In [Folder Settings], click [Browse] to complete settings in the screen currently displayed.
|
Table of Contents |
10 |
|
|
|
|
|
|
|
|
|
|
|
|
|
|
|
|
|
|
|
|
|
Things to |
Mastering |
More Advanced |
|
Appendices |
Remember |
the Basics |
Techniques |
|
|
|
|
|||
|
|
|
|
|
HINT |
Select Images to Import
To transfer only a selection of images from the camera, click [Import Images from Camera] in CameraWindow (menu screen), then select images in the image transfer screen, and click the  (Import) button. For details, refer to “Image Transfer Screen”.
Import All Images
To transfer all images on the camera, click [Import Images from Camera] in
CameraWindow (menu screen) then, [Import All Images].
Automatically Transferring Images on |
|
Y |
|
ImageBrowser Start-Up |
|
||
|
|
||
To automatically transfer images when |
P |
||
CameraWindow starts up, click the button |
|||
|
|
||
shown on the right in CameraWindow |
|
|
|
(menu screen), then click the [Import] |
|
|
|
O |
|
||
button, and [Auto Import]. Add a checkmark |
|
|
|
to [Start importing images automatically |
|
|
|
when this software is launched.]. |
|
|
|
C |
|
|
|
Transferring Images Using a Memory ard Reader |
|
||
ImageBrowser will start when you insert a memory card into the memory card reader, and display the following window. Use this window to perform the transferring procedures.
Transfers all images.
Allows you to select and transfer images.
Prints images.
 Configures the transfer folder and other settings.
|
Table of Contents |
11 |
|
|
|
|
|
|
|
|
|
|
|
|
|
|
|
|
|
|
|
|
|
Things to |
Mastering |
More Advanced |
|
Appendices |
Remember |
the Basics |
Techniques |
|
|
|
|
|||
|
|
|
|
|
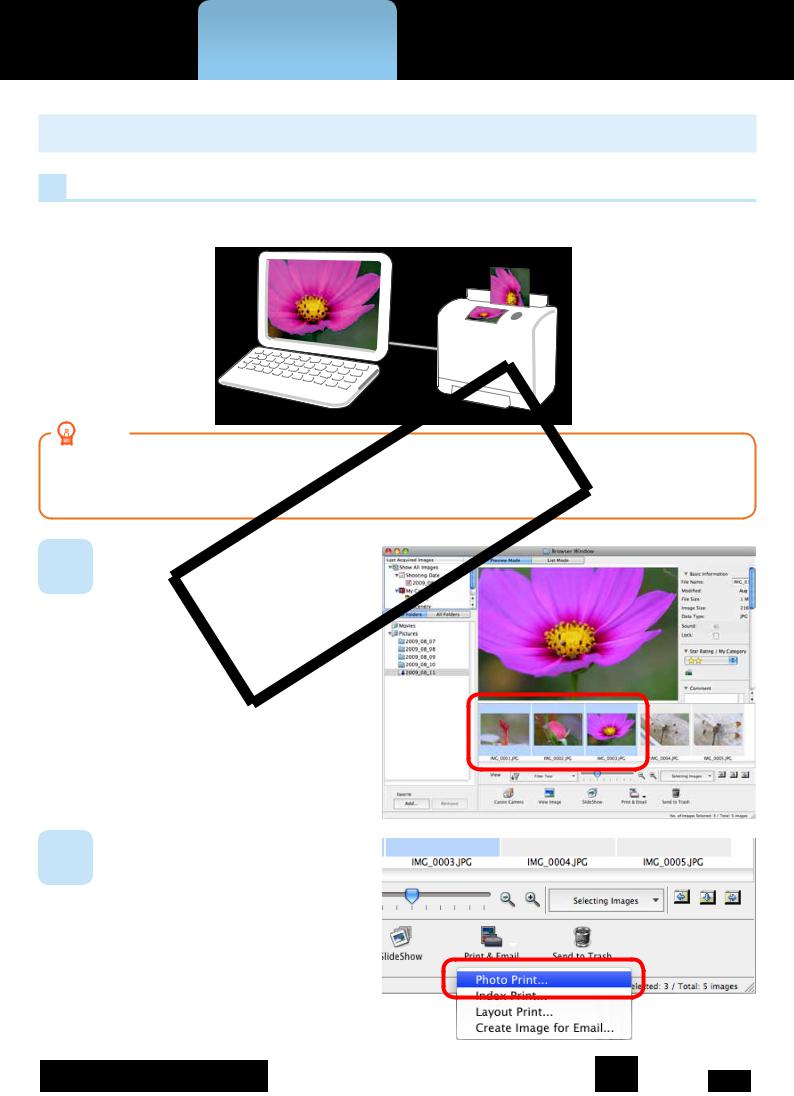
Printing
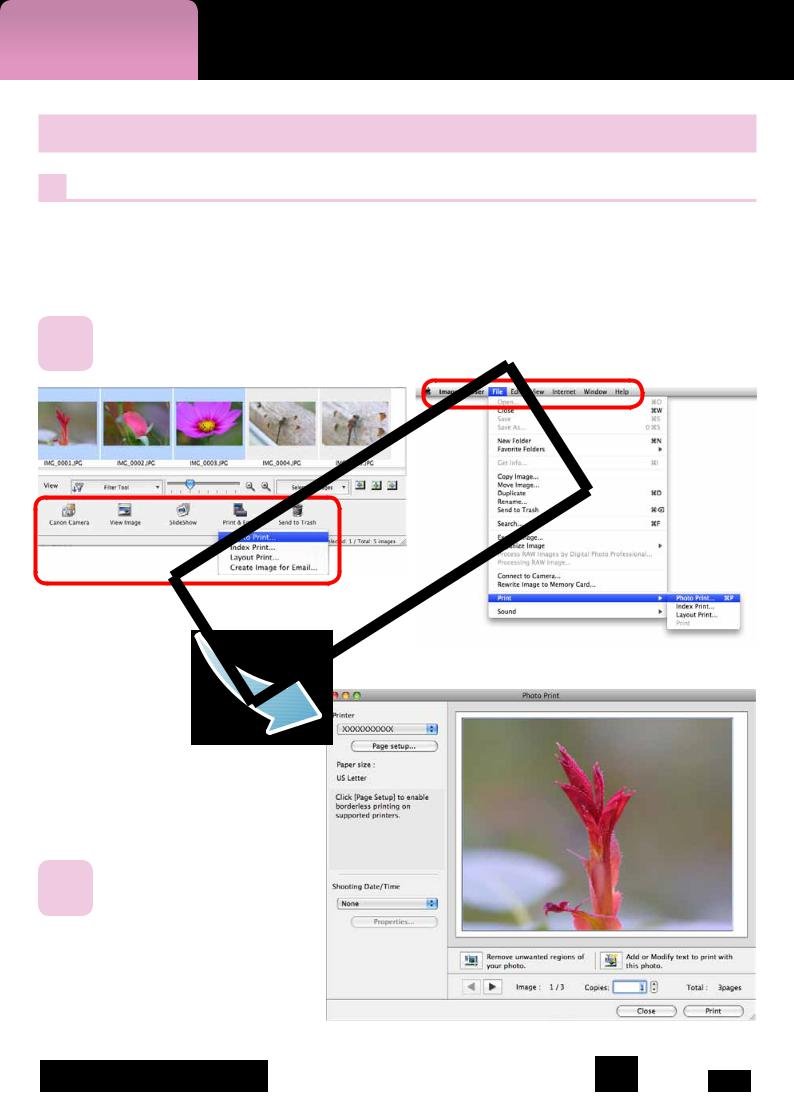
Printing a Single Image on a Single Page
Prints one image per page.
HINT |
Y |
|
|
Printing Movies |
P |
Movies cannot be printed, but you can extract still images from movies, and print them after they have been saved. For details on how to save still images from movies, refer to “Extracting Stills from Movies”.
1 |
O |
|
Select images for printing. |
|
C |
2 |
Click [Print & Email], and |
[Photo Print]. |
|
Table of Contents |
12 |
|
|
|
|
|
|
|
|
|
|
|
|
|
|
|
|
|
|
|
|
|
Things to |
Mastering |
More Advanced |
|
Appendices |
Remember |
the Basics |
Techniques |
|
|
|
|
|||
|
|
|
|
|
3
4
5
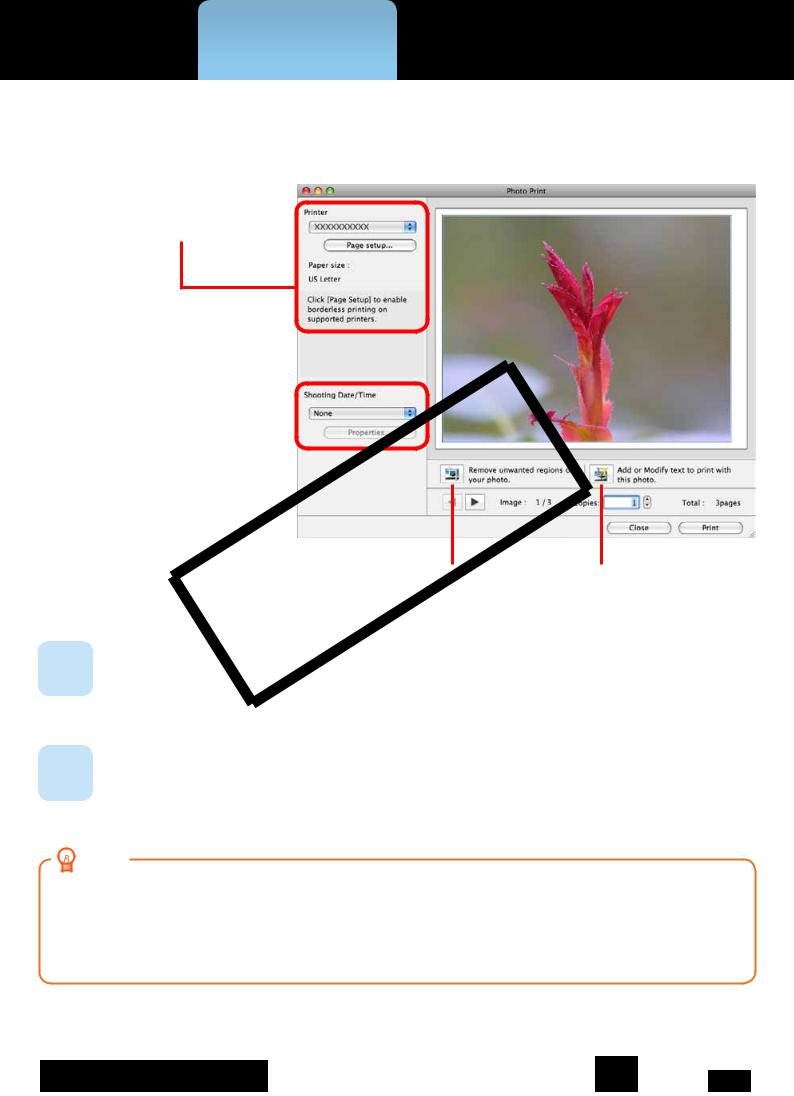
 Set the categories as desired.
Sets the printer, paper size and borderless printing settings.
Sets the shooting |
|
|
|
|
|
|
|
|
|
date/time imprint |
|
|
|
Y |
settings. |
|
|
|
|
|
|
|
|
|
|
|
|
P |
|
|
O |
Click here to |
||
C |
|
|
||
crop and print a portion of an image.
Click [Print].
Print window will display.
Click here to insert text onto an image and print.
Click [Print].
Printing will start.
HINT |
Laying Out and Printing
You can also select multiple images, add captions and print freely composed layouts on a single page. Click [Print & Email] in the Control Panel and select [Layout Print]. The shooting date will automatically appear when you perform a layout print if you click the [ImageBrowser] menu, followed by [Preferences] and [Layout Print], and place a check mark beside [Shooting Date].
|
Table of Contents |
13 |
|
|
|
|
|
|
|
|
|
|
|
|
|
|
|
|
|
|
|
|
|

Things to |
Mastering |
More Advanced |
|
Appendices |
Remember |
the Basics |
Techniques |
|
|
|
|
|||
|
|
|
|
|
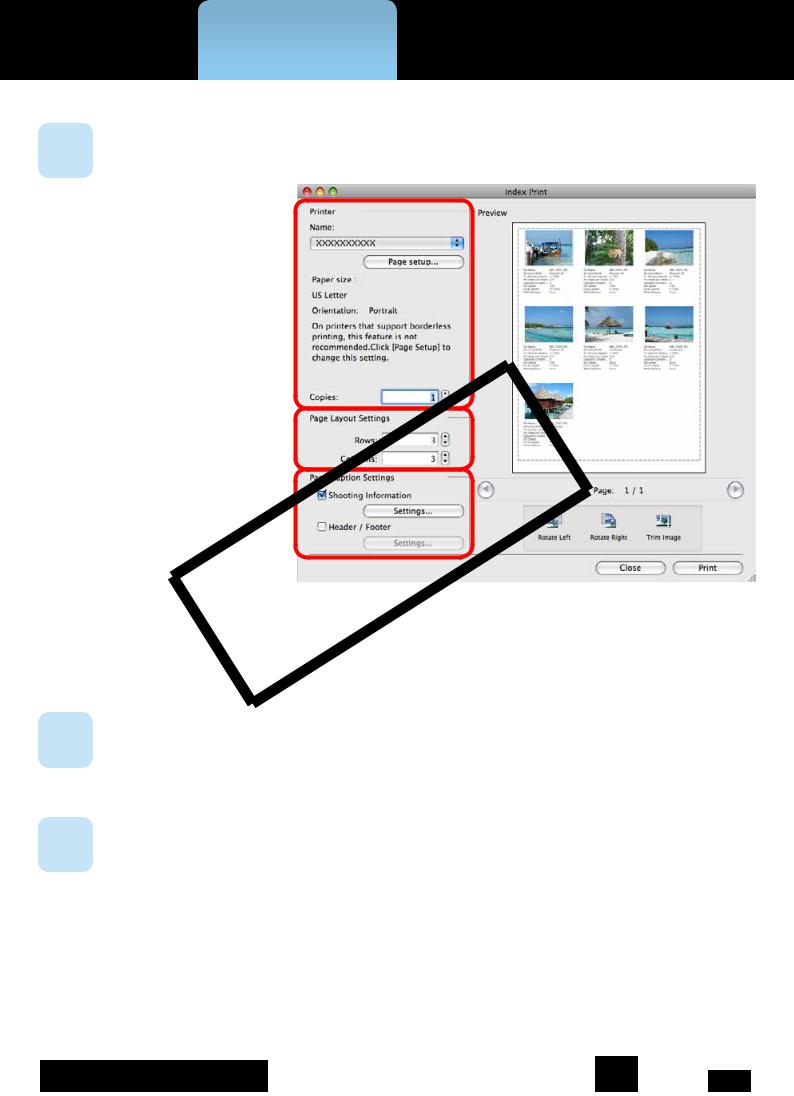
Index Print
Prints an index of the images.
1
Select images for printing. |
Y |
|
P |
O |
|
C |
|
2 |
Click [Print & Email], and |
[Index Print]. |
|
Table of Contents |
14 |
|
|
|
|
|
|
|
|
|
|
|
|
|
|
|
|
|
|
|
|
|
Things to |
Mastering |
More Advanced |
|
Appendices |
Remember |
the Basics |
Techniques |
|
|
|
|
|||
|
|
|
|
|
3 |
Set the categories as desired. |
Select an image to rotate or trim. |
|||
|
|||||
|
Sets the printer, paper |
|
|
|
|
|
|
|
|
|
|
|
|
|
|
||
|
size and number of |
|
|
||
|
|
|
|||
|
print copies settings. |
|
|
||
Sets the number of |
|
|
|
|
Y |
|||
|
|
|
|
|||||
rows or columns. |
|
|
|
|||||
|
|
|
P |
|
|
|
||
Configures the printing of |
|
|
|
|
|
|
||
|
|
|
|
|
|
|
||
the shooting information, |
O |
|
|
|
||||
comments, headers, |
|
|
|
|||||
|
|
|
|
|
|
|
||
footers or page numbers. |
|
|
|
|
|
|
|
|
|
|
|
|
|
|
|
||
C |
|
|
|
|
||||
|
Rotates selected |
|
||||||
|
|
|
|
|
|
|
||
|
|
|
|
|
|
images. |
|
|
|
|
|
|
|
|
|
|
|
|
|
|
|
|
|
Click here to crop a portion of the |
||
|
|
|
|
|
|
selected image and print it. |
||
4
5
Click [Print].
Print window will display.
Click [Print].
Printing will start.
|
Table of Contents |
15 |
|
|
|
|
|
|
|
|
|
|
|
|
|
|
|
|
|
|
|
|
|
Things to |
Mastering |
More Advanced |
|
Appendices |
Remember |
the Basics |
Techniques |
|
|
|
|
|||
|
|
|
|
|
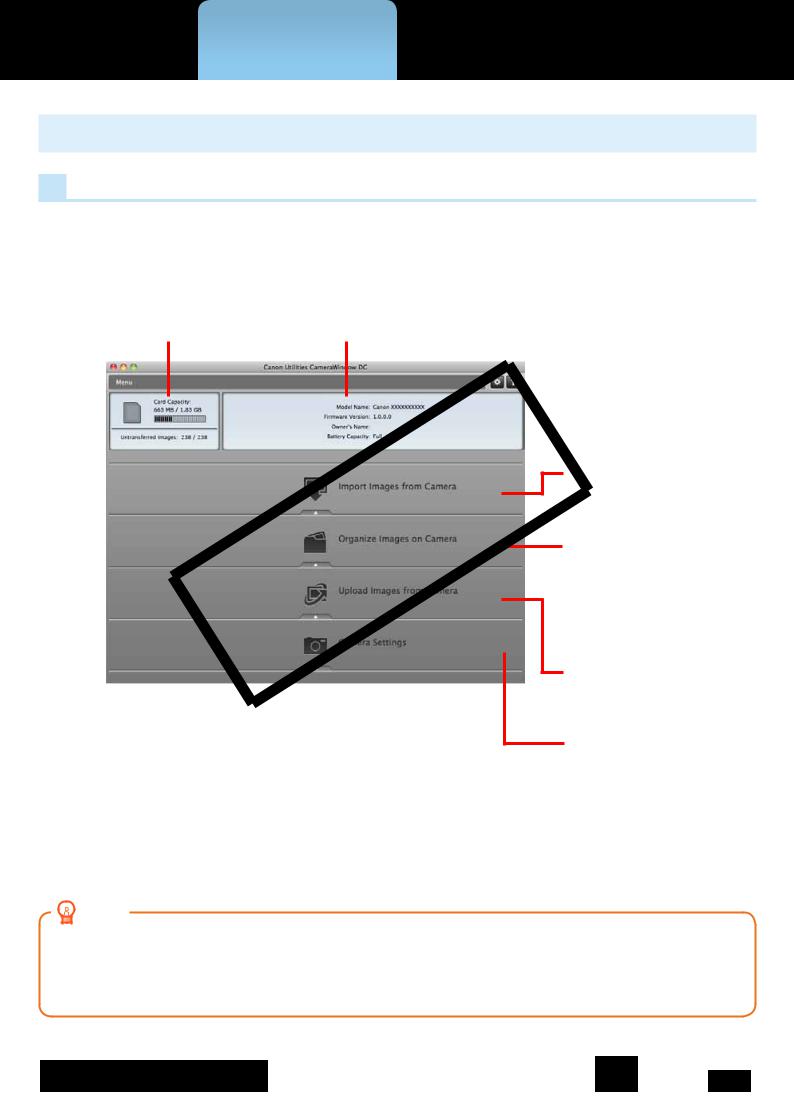
How to Use CameraWindow
First Menu Screen to Open
This screen appears when the camera is connected to your computer.
Click each button to display the available options.
Displays in-camera |
|
memory card |
|
information. |
Displays camera information. |
Y P O C
Starts operations for transferring images from the camera to your computer.
Starts operations for protecting, rotating, and deleting images on the camera. Also transfers images from your computer to the camera.
Starts operations for uploading movies on the camera to web services.
Starts operations for setting the camera start-up screen, start-up sound, and various camera sounds. For details, refer to “My Camera Settings” in “More Advanced Techniques”. This menu may not appear depending on your camera model.
HINT |
Customizing CameraWindow Functions
If you click the  button as shown in the upper right of the screen, you can customize various functions to make CameraWindow easier to use. You can change the automatic transfer settings, the start-up screen that appears when starting CameraWindow, and the transfer destination folder.
|
Table of Contents |
16 |
|
|
|
|
|
|
|
|
|
|
|
|
|
|
|
|
|
|
|
|
|

Things to |
Mastering |
More Advanced |
|
Appendices |
Remember |
the Basics |
Techniques |
|
|
|
|
|||
|
|
|
|
|
Image Transfer Screen
This screen appears when you click [Import Images from Camera] on the Menu screen, then click [Select Images to Import]. Select the image you want to transfer and click the  button to transfer the image to your computer.
Viewer Window (thumbnail display) |
Turns the shooting date and folder name below the |
|||||||||||||||||||
Closes CameraWindow. |
|
|
|
|
|
|
|
thumbnails on and off (when in thumbnail display). |
||||||||||||
|
|
|
|
|
|
|
|
|
|
|
|
|
|
|
||||||
|
|
|
Returns to the Menu screen. |
|
|
|
|
|
|
|
|
|
|
|
|
|
Changes thumbnail size |
|||
|
|
|
|
|
|
|
|
|
|
|
|
|
|
|
|
|||||
|
|
|
|
|
|
|
|
|
|
|
|
|
|
|
||||||
|
|
|
|
|
|
|
|
|
|
|
|
|
|
|
|
(when in thumbnail display). |
||||
|
|
|
|
|
|
|
|
|
|
|
|
|
|
|
|
|
|
|
||
|
|
|
|
|
|
|
|
|
|
|
|
|
|
|
|
|
|
|||
|
|
|
|
|
|
|
|
|
|
|
|
|
|
|
|
|
|
|
Switches between window display |
|
|
|
|
|
|
|
|
|
|
|
|
|
|
|
|
|
|
|
|
||
|
|
|
|
|
|
|
|
|
|
|
|
|
|
|
|
|
|
|
||
|
|
|
|
|
|
|
|
|
|
|
|
|
|
|
|
|
|
|||
|
|
|
|
|
|
|
|
|
|
|
|
|
|
|
|
|
|
|||
|
|
|
|
|
|
|
|
|
|
|
|
|
|
|
|
|
|
|
modes. |
|
|
|
|
|
|
|
|
|
|
|
|
|
|
Y |
Thumbnail display |
||||||
|
|
|
|
|
|
|
|
|
|
|
|
|
|
|
|
|
|
|
|
|
|
|
|
|
|
|
|
|
|
P |
|
|
Preview display |
||||||||
|
|
|
|
|
|
|
|
|
|
|
Full screen display |
|||||||||
|
|
|
|
|
|
|
|
|
|
|
|
|
|
|
|
|
|
|
|
|
|
|
|
|
|
|
|
|
|
|
|
|
|
|
|
|
|
|
|
Double-clicking an image switches |
|
|
|
|
|
|
|
|
|
|
|
|
|
|
|
|
|
|
|
|
to preview display when a single |
|
|
|
|
|
|
|
|
|
|
|
|
|
|
|
|
|
|
|
|
image is selected. |
|
|
|
|
|
C |
|
|
|
|
|
|
|
|
||||||||
|
|
|
|
|
|
O |
|
|
|
|
|
|
This mark appears on images that |
|||||||
|
|
|
|
|
|
|
|
|
|
|
|
|||||||||
|
|
|
|
|
|
|
|
|
|
|
|
|
|
|
|
|
|
|
have not yet been transferred. |
|
|
|
|
|
|
|
|
|
|
|
|
|
|
|
|
|
|
|
|||
|
|
|
|
|
|
|
|
|
|
|
|
|
|
|
|
|
|
|
|
Transfers the image chosen |
|
|
|
|
|
|
|
|
|
|
|
|
|
|
|
|
|
|
|
|
|
|
|
|
|
|
|
|
|
|
|
|
|
|
|
|
|
|
|
|
|
in Viewer Window to your |
Images |
|
on the camera |
|
|
|
|
|
|
|
|
|
|
|
|
|
|
|
computer. |
||
|
|
|
|
|
|
|
|
|
|
|
|
|
|
|
|
|||||
|
|
|
|
|
|
|
|
|
|
|
|
|
|
|
|
Cancels image selection. |
||||
|
|
|
|
|
|
|
|
|
|
|
|
|
|
|
||||||
that match the selected |
|
|
|
|
|
|
|
|
|
|
|
|
|
|
|
|
||||
filter display in the area |
|
|
|
|
|
|
|
|
|
|
|
|
|
|
|
Selects all images. |
||||
to the right. |
|
|
|
|
|
|
|
|
|
|
|
|
|
|
|
|||||
|
|
|
|
|
|
|
|
|
|
|
|
|
|
|
|
|
|
|
|
|
|
|
|
|
Rotates chosen images |
|
|
|
The background of chosen images turns blue. |
||||||||||||
|
|
|
|
90° to the left or right. |
|
|
|
|||||||||||||
|
|
|
|
|
|
|
|
|
|
|
|
|
|
|
|
|
|
|
||
 IMPORTANT
• The functions (buttons) that display will differ depending on the camera model.
|
Table of Contents |
17 |
|
|
|
|
|
|
|
|
|
|
|
|
|
|
|
|
|
|
|
|
|
Things to |
Mastering |
More Advanced |
|
Appendices |
Remember |
the Basics |
Techniques |
|
|
|
|
|||
|
|
|
|
|
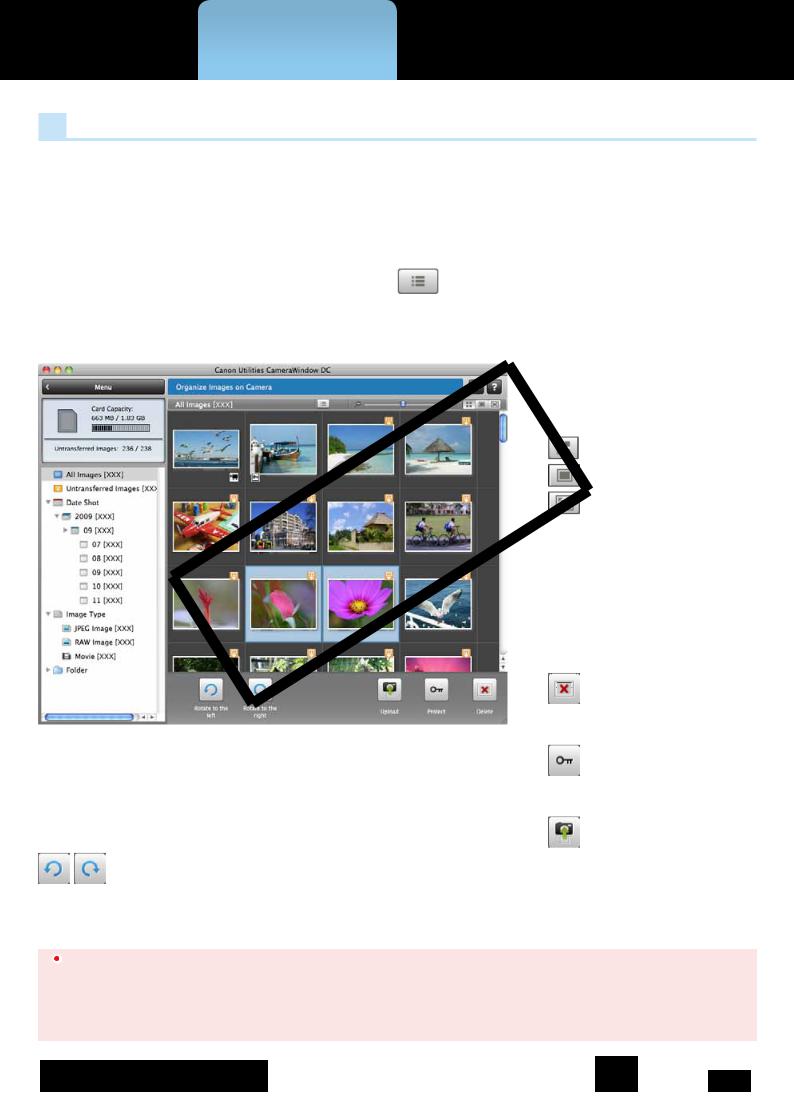
Organize Images Screen
This screen appears when you click [Organize Images on Camera] on the Menu screen, then click [Organize Images]. Clicking a folder on the left will display all images within the folder as thumbnails (small images) on the right of the screen.
Viewer Window (thumbnail display) |
|
|
|
|
|
Turns the shooting date and folder name below the |
||||||||||||
Closes CameraWindow. |
|
|
|
|
|
thumbnails on and off (when in thumbnail display). |
||||||||||||
|
|
|
|
|
|
|
|
|
|
|
|
|
||||||
|
|
Returns to the Menu screen. |
|
|
|
|
|
|
|
|
|
|
|
Changes thumbnail size |
||||
|
|
|
|
|
|
|
|
|
|
|
|
|
||||||
|
|
|
|
|
|
|
|
|
|
|
|
|||||||
|
|
|
|
|
|
|
|
|
|
|
|
|
(when in thumbnail display). |
|||||
|
|
|
|
|
|
|
|
|
|
|
|
|
|
|
|
|
||
|
|
|
|
|
|
|
|
|
|
|
|
|
|
|
|
|||
|
|
|
|
|
|
|
|
|
|
|
|
|
|
|
|
|
Switches between window display |
|
|
|
|
|
|
|
|
|
|
|
|
|
|
|
|
|
|
||
|
|
|
|
|
|
|
|
|
|
|
|
|
|
|
|
|
||
|
|
|
|
|
|
|
|
|
|
|
|
|
|
|
|
|||
|
|
|
|
|
|
|
|
|
|
|
|
|
|
|
|
|||
|
|
|
|
|
|
|
|
|
|
|
|
|
|
|
|
|
modes. |
|
|
|
|
|
|
|
|
|
|
|
Y |
Thumbnail display |
|||||||
|
|
|
|
|
|
|
|
|
|
|
|
|
|
|
|
|
|
|
|
|
|
|
|
|
|
P |
|
|
Preview display |
||||||||
|
|
|
|
|
|
|
|
|
Full screen display |
|||||||||
|
|
|
|
|
|
|
|
|
|
|
|
|
|
|
|
|
|
|
|
|
|
|
|
|
|
|
|
|
|
|
|
|
|
|
|
Double-clicking an image switches |
|
|
|
|
|
|
|
|
|
|
|
|
|
|
|
|
|
|
to preview display when a single |
|
|
|
|
|
|
|
|
|
|
|
|
|
|
|
|
|
|
image is selected. |
|
|
|
|
C |
|
|
|
|
|
|
|
|
|
||||||
|
|
|
|
O |
|
|
|
|
|
|
|
This mark appears on images that |
||||||
|
|
|
|
|
|
|
|
|
|
|||||||||
|
|
|
|
|
|
|
|
|
|
|
|
|
|
|
|
|
have not yet been transferred. |
|
|
|
|
|
|
|
|
|
|
|
|
|
|
|
|
|
|
||
|
|
|
|
|
|
|
|
|
|
|
|
|
|
|
|
|
|
Deletes the image chosen |
|
|
|
|
|
|
|
|
|
|
|
|
|
|
|
|
|
|
|
|
|
|
|
|
|
|
|
|
|
|
|
|
|
|
|
|
|
in Viewer Window. |
|
|
|
|
|
|
|
|
|
|
|
|
|
|
|
|
|
|
Protects/cancels protection |
|
|
|
|
|
|
|
|
|
|
|
|
|
|
|
|
|
|
|
Images on the camera |
|
|
|
|
|
|
|
|
|
|
|
|
|
|
||||
|
|
|
|
|
|
|
|
|
|
|
|
|
|
for the image chosen in |
||||
that match the selected |
|
|
|
|
|
|
|
|
|
|
|
|
|
|
||||
|
|
|
|
|
|
|
|
|
|
|
|
|
|
Viewer Window. |
||||
filter display in the area |
|
|
|
|
|
|
|
|
|
|
|
|
|
|
||||
|
|
|
|
|
|
|
|
|
|
|
|
|
|
|
||||
to the right. |
|
|
|
|
|
|
|
|
|
|
|
|
|
|
Transfers images on your |
|||
|
|
|
|
|
|
|
|
|
|
|
|
|
|
|
|
|
|
|
|
|
|
|
|
|
|
|
|
|
|
|
|
|
|
|
|
|
computer to the camera. |
|
|
|
|
|
|
|
|
|
|
|
|
|
|
|
|
|
|
|
|
|
|
Rotates chosen images |
|
|
|
|
|
|
|
|
|
|
|
|
|
|
|
|
|
|
90° to the left or right. |
|
|
The background of chosen images turns blue. |
||||||||||||
|
|
|
|
|
||||||||||||||
 IMPORTANT
• The functions (buttons) that display will differ depending on the camera model.
• Clicking the  (Delete) button will delete the image from the camera. Exercise adequate caution, as you cannot retrieve the deleted images.
|
Table of Contents |
18 |
|
|
|
|
|
|
|
|
|
|
|
|
|
|
|
|
|
|
|
|
|
Loading...