


Not For Resale – Free Download at http://www.joe-chan.com/manuals
Not For Resale – Free Download at http://www.joe-chan.com/manuals
INTRODUCTION
Congratulations! You are now the owner of the most exciting and advanced camera on the market. Canon has good reason to have unbounded confidence and pride in the A-1. Embodied in this camera are the qualities of the finest SLR cameras and into it went the most sophisticated electronics technology available in the world today. Incorporating at least 20 novel technologies never before used in a camera, your A-1 is capable of operating in five distinct AE modes–all with an incredibly high degree of precision, reliability and ease of operation. A simple flick of a single switch will put you in any one of the AE modes. Simple manual operation is also possible. With its many AE functions, the A-1 is not only the perfect tool in the hands of a professional but easy enough to operate even for novices. Even
the A-1's system accessories are integrated into its pulse-controlled, digital computer system so that you can enjoy AE flash and motorized AE photography. In the A-1, Canon finally offers you a multifunctional AE camera that actually gives you more creative freedom through more control.
You will find that your A-1 has many unusual features. For the fullest understanding of and benefit from your A-1, please read this instruction booklet - carefully as you familiarize yourself with the camera. For the convenience of nonexperts, we have included as many photographic hints and facts as space allowed. We at Canon hope your new A-1 will open to you a whole new world of photography, whether as profession or avocation.
–2–
Not For Resale – Free Download at http://www.joe-chan.com/manuals
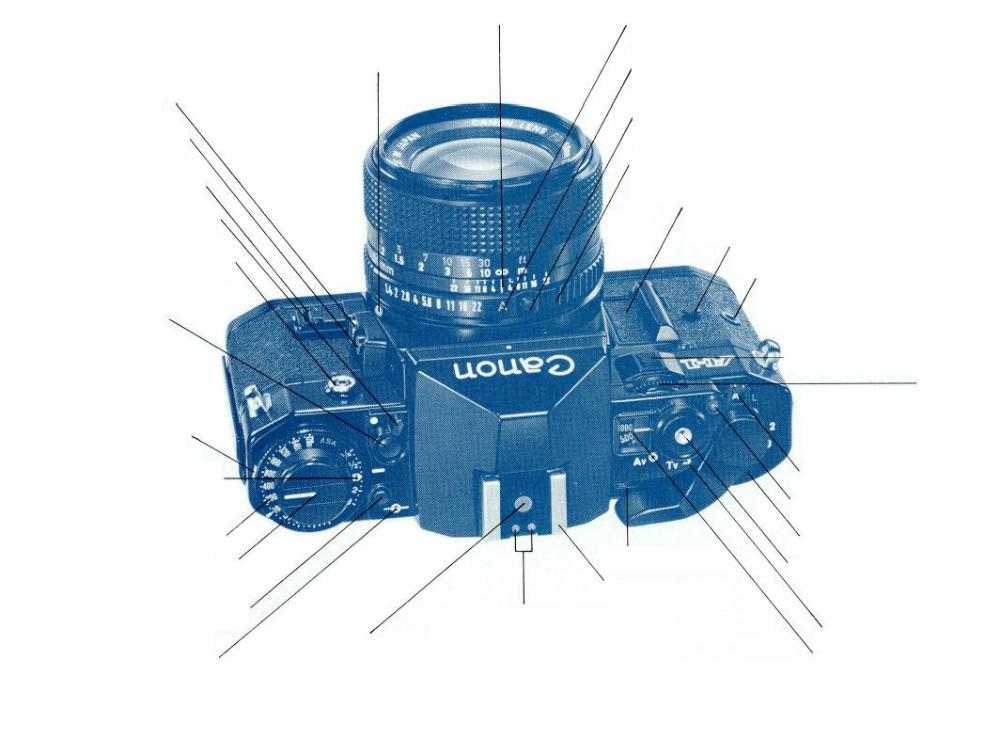
Focusing Index Mark with Depth-of-Field Scale |
Focusing Ring |
Mount Positioning Point |
|
|
“A” Mark |
Exposure Preview
Switch
Exposure Memory
Switch
Stop-Down Lever
Viewfinder Display Lever
PC Socket
Battery Check Button
ASA Lock Button
Exposure Compensation
Scale
ASA Film Speed Scale Film Rewind Knob with Crank
Exposure Compensation
Lock Button
Film Plane Indicator
AE Lock Pin
Aperture Ring
Battery Chamber Cover/Finger Grip
Positioning Pin For Action Grip
Mounting Socket
for Action Grip
AT Dial Guard
AT Dial
|
Main Switch |
|
Battery Check/ |
|
Self-timer LED |
|
Multiple Exposure Lever |
Frame Counter |
|
|
Shutter Release Button |
Accessory Shoe |
(with Cable Release |
Automatic Flash Contacts |
Socket) |
|
AE Mode Selector |
Flash Synchronization Contact |
|
|
AE Mode Window |
Fold out both front and back nomenclature pages for easy reference while reading the instructions
Not For Resale – Free Download at http://www.joe-chan.com/manuals
TABLE OF CONTENTS |
|
Main Features ............................................................ |
5 |
Pictorial Outline for General Use of |
|
the Camera ................................................................ |
8 |
Setting the Camera for the Five AE |
|
Modes and Manual Override ................................... |
10 |
Preliminary Preparations ......................................... |
12 |
Handling the Lens ................................................... |
13 |
NORMAL PROCEDURES ................................... |
18 |
Loading the Battery ................................................. |
19 |
Checking the Battery ............................................... |
20 |
Film Advance and Shutter Release .......................... |
22 |
Holding the Camera ................................................. |
25 |
Loading the Film ..................................................... |
26 |
Setting the ASA Film Speed .................................... |
28 |
The Basics of Exposure ........................................... |
30 |
AE Photography ...................................................... |
32 |
Setting the Lens for AE Photography ...................... |
33 |
AE Mode Selector ................................................... |
34 |
AT Dial ................................................................... |
35 |
Shutter Speed Scale on the AT Dial ........................ |
36 |
Aperture Scale on the AT Dial ................................ |
37 |
Shutter Priority vs. |
|
Aperture Priority ..................................................... |
40 |
Programmed AE ...................................................... |
45 |
Meter and AE Coupling Ranges .............................. |
46 |
Metering at Low Light Levels ................................. |
47 |
Viewfinder ............................................................... |
49 |
Viewing and Focusing ............................................. |
49 |
Optional Viewing Aids ............................................ |
50 |
Previewing the Exposure ......................................... |
52 |
Cancelling the Viewfinder Display .......................... |
53 |
Numerals and Characters Composing |
|
Digital Readout in Viewfinder ................................. |
54 |
Incorrect Exposure Warnings ................................... |
55 |
Double-Check Before Shooting ............................... |
57 |
Shutter Release ........................................................ |
58 |
Rewinding the Film .................................................. |
58 |
Frame Counter ......................................................... |
59 |
SPECIALIZED PROCEDURES .......................... |
60 |
Stopped-down AE Photography ............................... |
61 |
Manual Override ...................................................... |
65 |
Self-Timer ................................................................ |
66 |
Exposure Compensation .......................................... |
69 |
Multiple Exposures .................................................. |
73 |
Film Plane Indicator ................................................. |
75 |
Distance Scale .......................................................... |
75 |
Infrared Index Mark ................................................. |
75 |
Checking the Depth of Field .................................... |
76 |
Lens Signal Coupling ............................................... |
78 |
Unusable Lenses ...................................................... |
79 |
Automatic Diaphragm Control ................................. |
80 |
Manual Diaphragm Control ..................................... |
80 |
Flash Photography with the A-1 ............................... |
83 |
Motorized Film Winding ......................................... |
89 |
Data Back A ............................................................. |
90 |
Various Accessories for Close-ups and |
|
Photomacrography ................................................... |
90 |
Proper Care of the Camera ....................................... |
95 |
Using the Camera in Extremely Cold |
|
Conditions ................................................................ |
96 |
Specifications .......................................... |
97 |

Not For Resale – Free Download at http://www.joe-chan.com/manuals
MAIN FEATURES
Quality from the Inside Out
The extraordinary qualities of the A-1 start with its design. It is the first camera in the world in which all information, both input and output, is in the form of pulse signals, enabling it to be the first camera with a digital, rather than an analog, computer. It is the first camera to have a Pure-Integrated Injection Logic (Pure-PL), the most advanced type of logic circuitry yet produced by the electronics industry, which is so highly integrated that it is capable of processing many times the information possible with simple IC's. It is also the first camera in the world to have a program unit with programmable logic array (PLA) which makes sure that the camera receives all information and in correct order. In practical terms, all of this complex electronics circuitry boils down to the first camera which is capable of extremely precise and reliable automatic exposure in five different modes but which remains remarkably compact and easy to operate.
The use of such advanced technology is not limited to design alone. Building on the special 'production technology system it established with the design of the AE-1,
Canon has extended its use of computers and automation from automatic production of the main parts to at least partial automation in all facets of production including processing, assembly and inspection. In this contribution to a new system of camera manufacture, Canon is able to offer greater precision at less expense.
Other benefits deriving from the design concept of the A-1 include greatly improved stability against great temperature changes and remarkably improved meter response. The A-1 will set AE exposure only a split second before shutter release.
Despite all of this electronic circuitry which would reasonably require a great deal of power, the A-1 requires only one small battery which normally lasts about one year. Every part of the A-1, from its sequence circuitry, where the power is sequentially switched on and off, to its Pure-I2 L and combination magnet, is designed to conserve power.
Five AE Modes and Manual Override
Besides five AE modes which cover all forms of photography, easy override of the A-1's
–5–
Not For Resale – Free Download at http://www.joe-chan.com/manuals
AE functions is also possible.
Shutter priority AE is especially useful in action photography, aperture priority AE in still photography. The programmed AE mode, in which the camera controls both aperture and shutter speed for correct exposure, is good for general use and is the easiest mode for beginners. These three AE modes along with exclusive flash AE, are performed with an FD lens set at “A” for all the benefits of full aperture metering. Stopped-down AE, in which the shutter speed is automatically set, allows automatic exposure with non-FD lenses and accessories and is a big advantage in close-ups and photomicrography. And since all AE inputs have been consolidated into the AE mode selector and the AT dial, the operation of only these two controls suffices to set the camera for any one of the five AE modes.
For complete control for exposure correction or special effects, manual operation is a simple matter of moving the FD lens aperture ring from the “A” mark while the shutter speed is set on the AT dial. The A-1 will even provide you with an exposure readout as a basis for your exposure adjustment.
Exposure Compensation
Along with the wide selection of AE modes,
the A-1 has two controls for wide-range exposure compensation. These are the exposure compensation dial for stepped exposure correction between ±2 f/stops and an exposure memory switch for temporary correction. For special techniques such as lowand high-key shots, contre-jour photography, multiple exposures and flash photography, you pros will find quick response in the A-1. Even in AE, you have complete control over the image results.
Field-of-view-only Viewfinder
This viewfinder is one of the A-1's most unusual features. In the classic sense of the word, this bright viewfinder shows only the field of view for easiest focusing and composing.
Using any one of three ways to take an exposure preview, you will activate a compact LED digital readout which clearly conveys shutter speed, aperture, flash and manual operation signals, a bulb indication, improper exposure warnings and a malfunction warning. The viewfinder readout is below and out of the way of the field of view, and the LED's are clearly legible with no need for extra illumination even in very bad light.
–6–
Not For Resale – Free Download at http://www.joe-chan.com/manuals
Wide Metering Range
With its extensive film sensitivity range (ASA 6-12800) and 16 shutter speeds (1/1000-30 sec.), the A-1 offers a wide AE metering range from EV18 (f/16, 1/1000 sec.) all the way down to EV-2 (f/1.4, 8 sec.) with ASA 100 film and an f/1.4 speed lens.
Provided that you can even focus your subject in the viewfinder in a very dark situation, it is most likely that you will be able to meter it as well, even in an AE mode. This is especially advantageous in such dimly-lit situations as those in night scenes and photomacrography.
Other Special Features
Add to these features the A-1's single-lever multiple exposure operation and its twointerval self-timer with an LED warning. Switching one small lever before winding the film sets the A-1 for a multiple exposure. The film and even the frame counter remain stationary for unlimited multiple exposures. You can set the self-timer for a time-lag of either two or ten seconds during which an easily visible LED flashes. Flashing frequency increases as a warning prior to shutter release.
Finally, seemingly small features, but big advantages in photography, include the A-1's
detachable action grip, its 120°-stroke film advance lever with a 30 stand-off, its eyepiece shutter and its shutter button lock (main switch).
The System
Beginning with accessories which are integral parts of the A-1 system, Canon offers the Speedlite 199A and the Motor Drive MA. Either the specified Canon Speedlite 577G, 533G, 199A, 188A, 177A, 155A or 133A can be mounted on the A-1 for AE flash photography with automatic setting of shutter speed and aperture. With the Motor Drive MA, continuous shooting at up to five frames per second is possible, and the A-1 also accepts the Power Winders A and A2. Like the AE-1, the A-1 can also use the Data Back A, a date imprinting mechanism that will couple to both power winder and Speedlite. Plus, you have your choice of accessories from Canon's extensive SLR system. From its famous, high resolution FD lenses to its complete line of systemized accessories for close-ups, photomacrography and photomicrography, Canon offers highquality equipment for all photographic fields.
–7–

Not For Resale – Free Download at http://www.joe-chan.com/manuals
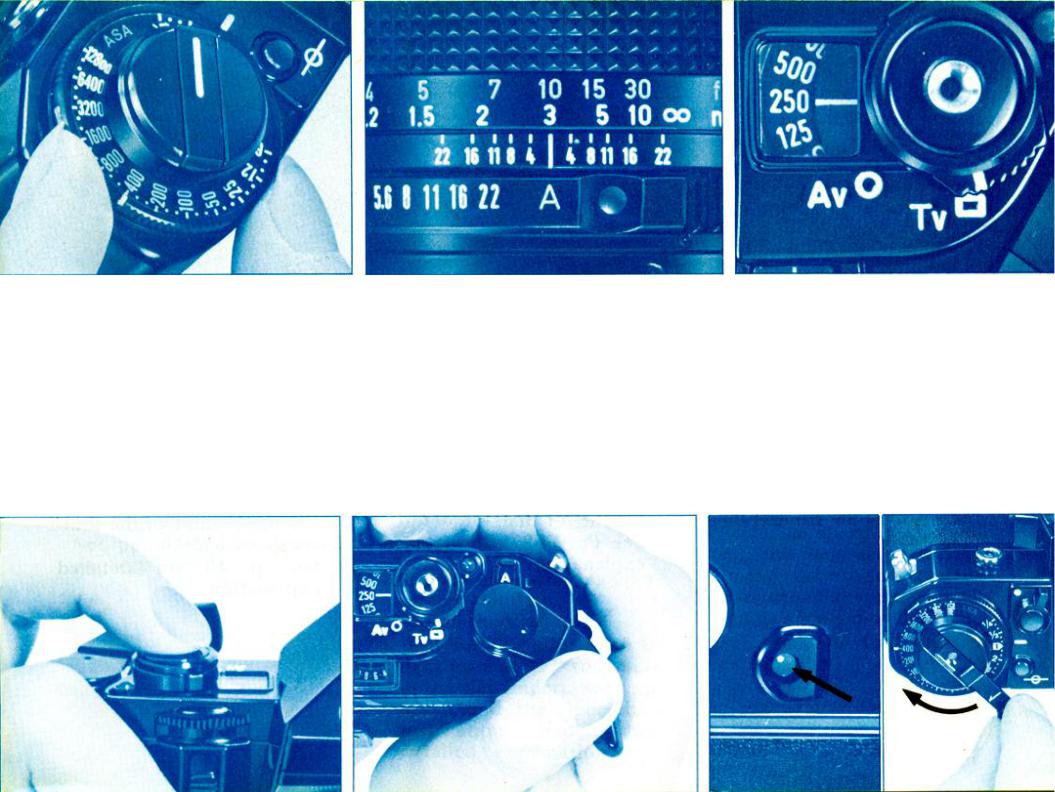
Load the battery. |
Turn the main switch to the |
|
Load the film and advance |
|
“A” position and check the |
|
it to the first frame. |
1 |
2 power level. |
3 |
|
PICTORIAL OUTLINE FOR GENERAL USE OF THE CAMERA
7 |
Look into the viewfinder. |
8 |
Check the exposure. |
|
Compose the picture and focus. |
|
|
|
|
Flashes to indicate |
|
|
|
overexposure |
|
Out of Focus |
In Focus |
Flashes to indicate |
|
|
underexposure |
Not For Resale – Free Download at http://www.joe-chan.com/manuals
Set the ASA film speed. |
Set the aperture ring of the |
|
Select the AE mode. |
|
lens to the “A” mark (for |
|
(Turn the AT dial). |
4 |
5 AE photography). |
6 |
|
|
|
|
|
|
|
9 |
|
10 |
|
11 |
|
|
Press the shutter |
|
Advance the film to the next |
Rewind the film after |
|
|
button gently. |
|
frame. |
all frames are exposed. |
|
Not For Resale – Free Download at http://www.joe-chan.com/manuals
SETTING THE CAMERA FOR THE FIVE AE MODES AND MANUAL OVERRIDE
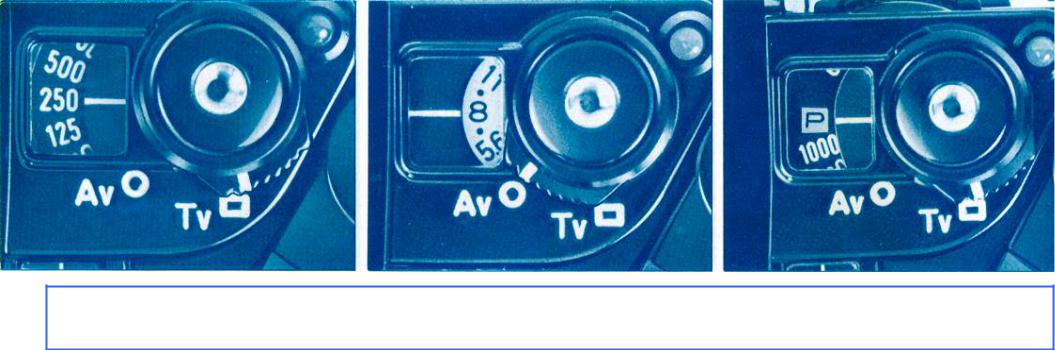
Shutter Priority AE
1.Make sure the lens aperture ring is set to the “A” mark.
2.Switch the AE mode selector to TV.
3.Select a shutter speed by turning the AT dial.
See pp. 34-36 for detailed explanation.
Aperture Priority AE
1.Make sure the aperture ring of the lens is set to the “A” mark.
2.Switch the AE mode selector to Av.
3.Select an aperture by turning the AT dial.
See pp. 34-37 for detailed explanation.
Programmed AE
1.Make sure the aperture ring of the lens is set to the “A” mark.
2.Switch the AE mode selector to TV.
3.Turn the AT dial to “P” at the upper limit of the shutter speed scale.
See p. 45 for detailed explanation.
–10–
Not For Resale – Free Download at http://www.joe-chan.com/manuals
Stopped-down AE
1.Disengage the lens aperture ring from the “A” mark (necessary only on FD lens).
2.Fold and push in the stopdown lever.
3.Set the aperture by turning the lens aperture ring.
See pp. 61-62 for detailed explanation.
AE Flash
1. Insert |
the |
Speedlite |
577G's |
or 533G's sensor |
|
unit or the 199A, 188A, 177A, 155A or 133A into the A-1's accessory shoe.
2.Set the ASA film speed on the flash.
3.Make sure the lens aperture ring is set to “A”.
4.Set the auto working aperture on the flash.
5.Switch the flash on.
6.Wait for the pilot lamp to light up and “F” to appear in the viewfinder. See pp. 83-85 and the Speedlite's instruction booklet for detailed explanation.
Manual Override
1.Disengage the lens aperture ring from the “A” mark (necessary only on FD lens).
2.Switch the AE mode selector to TV.
3.Select a shutter speed by turning the AT dial.
4.Select an aperture by turning the lens aperture ring (using the camera-selected aperture in the digital readout as a basis if so desired).
See p. 65 for detailed explanation.
Not For Resale – Free Download at http://www.joe-chan.com/manuals
PRELIMINARY PREPARATIONS
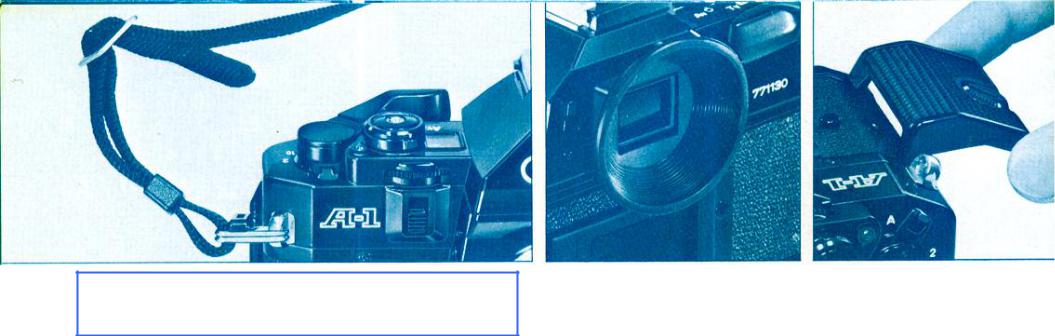
Neckstrap
Thread the tips of the neckstrap through the corresponding rings on the camera so that the tips are on the inside. Then adjust the neckstrap to the length most comfortable for you.
Plastic Insert
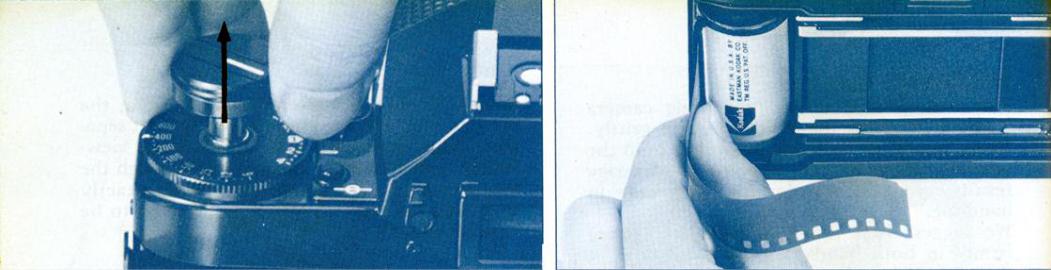
Pull up the film rewind knob to open the camera's back cover. Remove the plastic insert, which is attached to the pressure plate, and snap the back cover shut. The insert is no longer necessary and may be thrown away.
Eyecup 4S
This is an accessory eyecup which snaps into the eyepiece grooves. Its use is not mandatory, but viewing with it may be more comfortable, and it helps block extraneous light from entering the viewfinder.
Action Grip
The A-1 has a handy, built-in finger grip, but to make camera holding all the easier, it comes with a detachable action grip as well. Before attaching the grip, load the battery into the camera. Then, using a coin, screw the grip into the action grip mounting socket guided by the positioning pin on the front of the camera body.
–12–
Not For Resale – Free Download at http://www.joe-chan.com/manuals
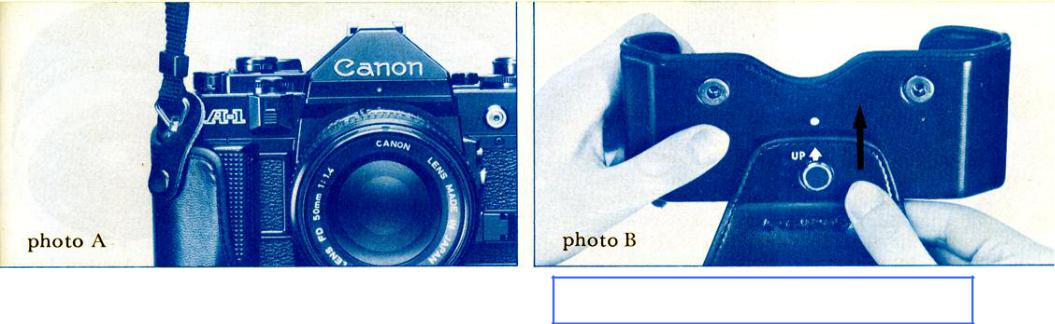
Semi-hard Case
To protect the camera, particularly when carrying, it, insert it into its semi-hard case as indicated in the photo A. You can easily shoot pictures even with the camera in the semi-hard case by turning the top cover down. If you wish to remove the top cover, turn it down, slide it straight up in the direction of the arrow and pull it out as indicated in the photo B. To replace the cover, insert its hook into the corresponding hole on the case and pull it straight down. For closing the top cover, the lens' focusing ring should be turned to infinity (I).
HANDLING THE LENS
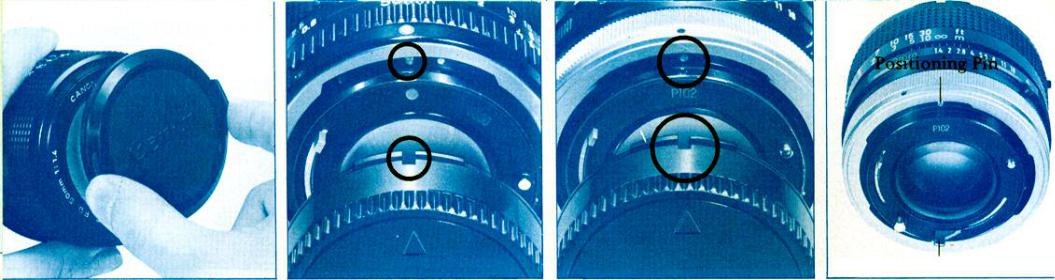
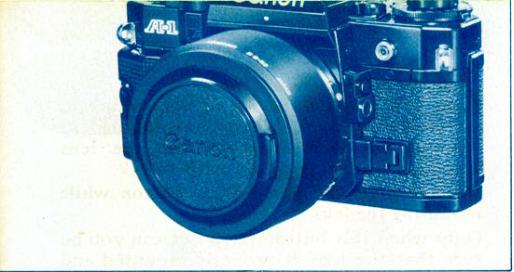
Lens Cap and Rear Dust Cap
The front and rear lens caps should always be on the lens when the lens is not on the camera. For protection when the lens is mounted on the camera but not in use, please see to it that the front lens cap is attached.
Lens Cap
Most Canon lenses are provided with a clipon front lens cap which is easily attached and removed from the front of the lens by pressing in the tabs on both sides of the cap. This type of cap may also be attached to a Canon filter screwed into the lens.
–13–
Not For Resale – Free Download at http://www.joe-chan.com/manuals
Positioning Pin
Automatic Aperture Lever
Rear Dust Cap
The rear dust cap must be removed before mounting the lens.
Operation with an FD lens which lacks a chrome Breech-lock mount ring:
The rear dust cap for this type of lens has serrated edges. Do not mount a rear dust cap which lacks the serrated edges.
Removal from lens
1.Turn the cap counterclockwise until it stops.
2.Pull the cap out.
Reattachment
1.Align the arrow on the cap with the red dot at the rear of the lens.
2.In that position, apply slight pressure to
the cap and turn it clockwise until it is
tight.
Operation with an FD lens which has a chrome Breech-lock mount ring or with an FL lens:
Removal from Lens
1.Turn the lens' mount ring clockwise until it stops.
2.Pull the cap out.
Once the rear cap is removed, the Breechlock mount ring is locked so that it cannot be turned. (The diaphragm blades are also locked and will not move even if the aperture ring is rotated.)
–14–
Not For Resale – Free Download at http://www.joe-chan.com/manuals
Reattachment
1.Make sure the mount ring is locked so that it cannot be turned.
2. Align the arrow on the cap with the red dot on the mount ring.
3.In that position, push lightly down on the cap and turn the mount ring counterclockwise until it is tight.
Lens Hood
When shooting into bright light, light rays entering the lens may form defects on the image called ghost and flare. Attaching a hood onto the lens helps to prevent this. Bayonet-mount hoods are available as optional accessories for most Canon lenses. Please use only that hood which is specified for the lens concerned. This type of hood fits into the bayonet mount at the front of the lens where it is fixed by turning until it is tight. Some hoods for wide-angle lenses require proper positioning before mounting. Align the red dot on this type of hood with the notch in the bayonet mount at the front of the lens. Then lightly push the hood into the mount and turn it until it is tight. When not in use, the hood can be mounted in reverse on a standard or some wide-angle lenses, in which case even the hood will fit perfectly into the camera's case.
–15–

Not For Resale – Free Download at http://www.joe-chan.com/manuals
Mounting on the Camera and Dismounting
Pre-Mounting Checklist
1.Make sure the camera's stop-down lever is not locked for stopped-down metering (see p. 61). If it is, a red warning dot will appear beside the coupling lever inside the camera body.
2.Make sure the automatic aperture lever at the rear of an FD lens is not set for manual diaphragm control (see p. 80).
3.Before mounting an FD lens, make sure the film advance lever has been completely advanced.
4.Remove the lens' rear dust cap.
5.Remove the camera's body cap.
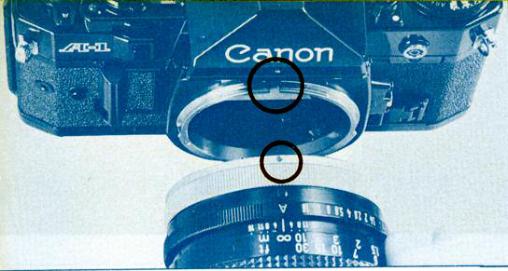
In the case of an FD lens which lacks a chrome Breech-lock mount ring:
Mounting
1.Align the projecting red mount position-
ing point on the lens with the red dot –16–
above the camera mount.
2.In this position, apply slight pressure to the lens, and simply rotate the whole lens clockwise until it stops and the lens release button pops out with a click.
Do not press the lens release button while mounting the lens.
Only when this button pops out can you be sure that the lens is properly mounted and that it will function properly. It is also possible to mount this type of lens when it is not perfectly aligned with this camera. To facilitate mounting when it is very dark or when you are in a great hurry, the mount positioning point is rounded. Simply find this point with your finger and align it as closely as possible with the red dot on the camera. Turn the lens slightly back and forth while applying slight pressure until it drops into position and continue with step 2 above. Excessive sloppiness will make mounting impossible; take care to be as accurate as possible.
Dismounting
1.Turn the lens counterclockwise until it stops while pressing the lens release button.
2.Pull the lens out.
When the lens is dismounted, the diaphragm blades are locked in a half-closed position and will not move even if you turn the lens aperture ring.
Not For Resale – Free Download at http://www.joe-chan.com/manuals
In the case of an FD lens which has a chrome Breech-lock mount ring or of an FL lens:
Mounting
1.Make sure the Breech-lock ring is locked so that it cannot be turned. It will not mount onto the camera otherwise.
2.Align the red dot of the Breech-lock ring with the red dot on the camera body above the camera mount.
3.In this position, fit the rear of the lens into the camera body and turn the Breech-lock ring clockwise until it is tight.
Dismounting
1.Turn the Breech-lock ring counterclockwise until it stops.
2.Pull the lens out from the camera body.
When removing a lens, take special care not to damage the protruding pins and levers on the rear. With the exception of the Fisheye 7.5mm lens, always put a lens down with the rear facing up.
Whenever you mount an FD lens on the A-1, its maximum aperture is automatically transmitted to the camera's AE circuit. Even if you switch to an FD lens of a different maximum aperture, the mounting procedure is the same as that described above and requires no adjustment.
All five AE modes are possible with an FD lens. See SETTING THE LENS FOR AE PHOTOGRAPHY. Of the five AE modes, only stopped-down AE is possible with an FL lens.
–17–

Not For Resale – Free Download at http://www.joe-chan.com/manuals
Normal Procedures
Not For Resale – Free Download at http://www.joe-chan.com/manuals
Loading the Battery
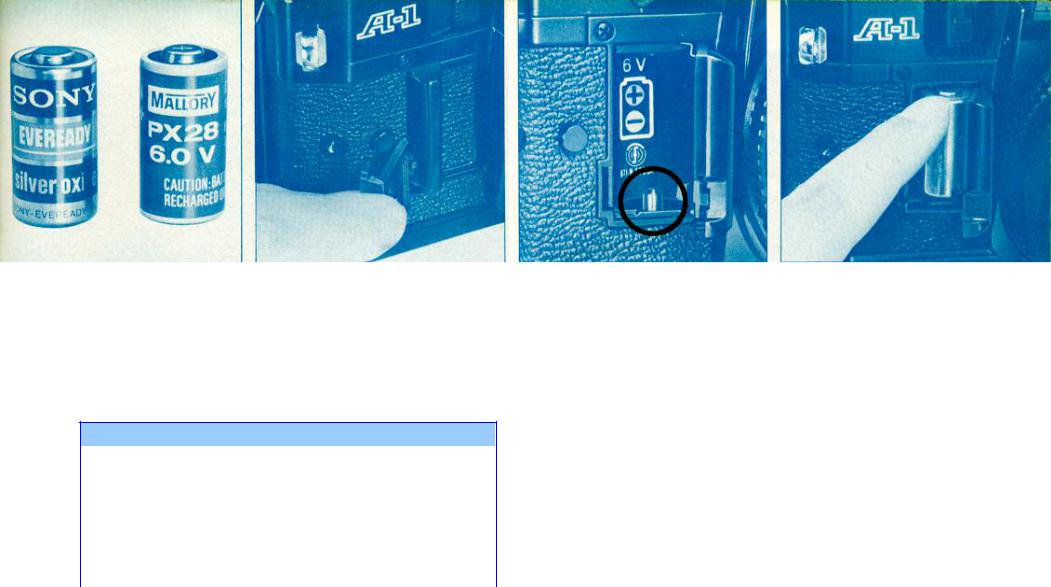
This camera will not function unless a battery is loaded. Use one brand-new silver oxide or alkaline-manganese battery as specified in the table below or an equivalent battery of another brand.
Usable Batteries
Silver Oxide |
Eveready (UCAR) |
Battery (6V) |
No. 544 |
|
JIS4G13 |
|
Mallory PX 28 |
|
|
Alkaline-manganese |
Eveready (UCAR) |
Battery (6V) |
No. 537 |
|
|
It can be loaded and unloaded more easily before the lens is mounted, and, of course, if the action grip is attached, it must be removed while loading. You should always
wipe the battery poles with a clean, |
dry |
cloth before insertion to prevent any |
cor- |
rosion and damage to the camera due to dirt or fingerprints.
To load the battery:
1. Apply either a fingernail or the eyepiece protective cover, which is inserted into the accessory shoe of the camera, into the groove of the battery chamber cover and lift lightly so that the cover flips up.
2. Following the diagram on the inside of the battery chamber, load the battery negative pole first, pushing it downwards in the chamber. Make sure the poles are facing in the correct directions. Incorrect loading can lead to possible corrosion and damage to the battery terminals besides causing the battery to discharge very quickly.
To unload the battery, simply tip the positive end forwards and pull it out from the top. The battery should be removed if the camera is not to be used for an excessively long period of time.
–19–
Not For Resale – Free Download at http://www.joe-chan.com/manuals
Checking the Battery
Life of the battery in normal use is approximately one year. Using the camera frequently at low shutter speeds, at the “B” setting or in extremely cold conditions takes more battery power and requires replacing the battery more often.
The battery requires checking under the following circumstances:
1.When a new battery is loaded.
2.If the shutter will not function when the main switch is at “A”.
3. When |
long exposures are frequently |
made. |
|
4.When the camera is used very frequently.
5.When the camera is used after it has been stored for an excessively long period of time.
6.When the camera is used in extremely cold
conditions.
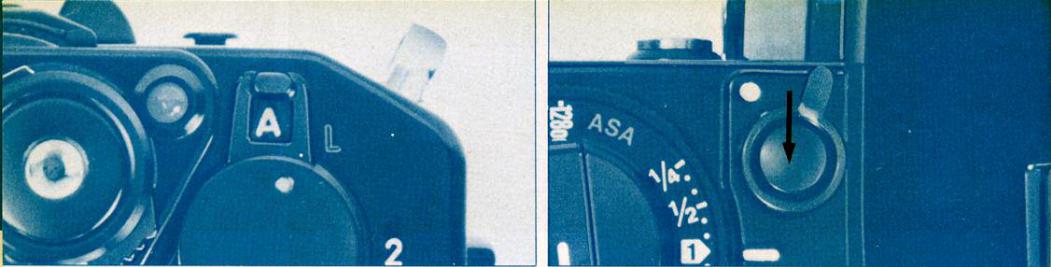
To check the power level of the battery, first set the main switch to the “A” position. It
cannot be checked in the “L” position. Then press the battery check button on the top of the camera for two to three seconds. If, while pressing the battery check button, the LED on the top of the camera blinks on and off rapidly, battery power is sufficient. If it blinks only slowly, twice per second, for instance, or not at all, the power level is insufficient and the battery should be replaced. It should also be replaced if the flashing frequency changes during the few seconds the check button is depressed, indicating the battery is near exhaustion.
It is a good idea to carry a spare battery when you expect to use the camera continuously for a long time, such as on a vacation, when you plan to take a number of time exposures on bulb, or when the camera is to be used in very cold conditions.
–20–
Not For Resale – Free Download at http://www.joe-chan.com/manuals
The battery check button also serves to cancel the self-timer or to cancel the shutter in long exposures. The circuit is cancelled the moment you press the button, and the second shutter curtain will close when your finger is removed from the button. The shutter will not be released if you press the shutter button while pressing the battery check button.
Getting a Feel for Your A-1
Now that the battery is loaded, your A-1 will function. Before loading the film or doing anything else, play with it a little. Operate the shutter button. and the film advance lever until they feel like natural extensions of your fingers.
Shoot and develop at least one roll of film with a new camera before using it on a shooting expedition or on a trip to make sure you know how to operate it properly.
–21–
Not For Resale – Free Download at http://www.joe-chan.com/manuals
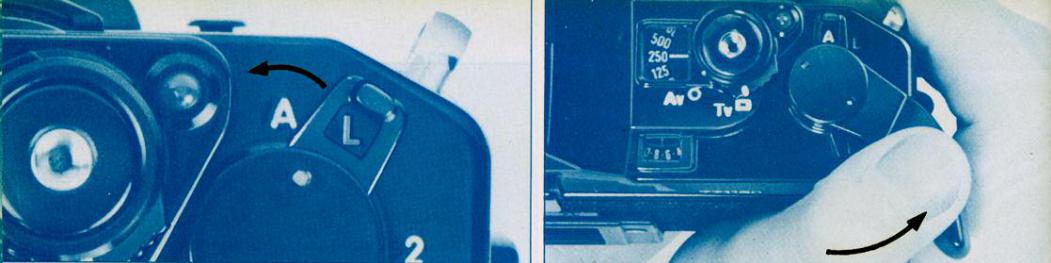
Film Advance and Shutter Release
At the base of the film advance lever is the main switch of the camera. When it is at the “L” (LOCK) setting, all active circuits are turned off and the shutter button is locked to prevent unintentional shutter release. This switch should always be in the “L” position to prevent battery consumption and film wastage when the camera is not in use, such as when it is in a camera case.
When the main switch is set at “A”, the shutter button can be operated. The shutter button serves to activate both the AE meter and shutter operation. Since it is electromagnetic, it requires only gentle pressure for both a very smooth shutter release as well as immediate meter response when shooting in quick succession. Pressing the shutter button lightly only halfway gives a meter reading preview inside the viewfinder. When you press it gently all the way, the mirror flips up, the diaphragm closes down and the
shutter releases. After shutter release, the mirror and diaphragm automatically reset and the film advance lever is ready to be advanced.
With the tip of your thumb, lightly push the film advance lever away from the camera body to its 30 stand-off position. Now it can be easily operated with the tip of your thumb. Push it all the way to the right in a single, short 120 throw to wind the film, cock the shutter and prepare the diaphragm and mirror for the next shutter release all in one motion. Or you can advance the lever in several short strokes. Each winding will also advance the number in the frame counter, indicating the number of pictures taken.
–22–
Not For Resale – Free Download at http://www.joe-chan.com/manuals
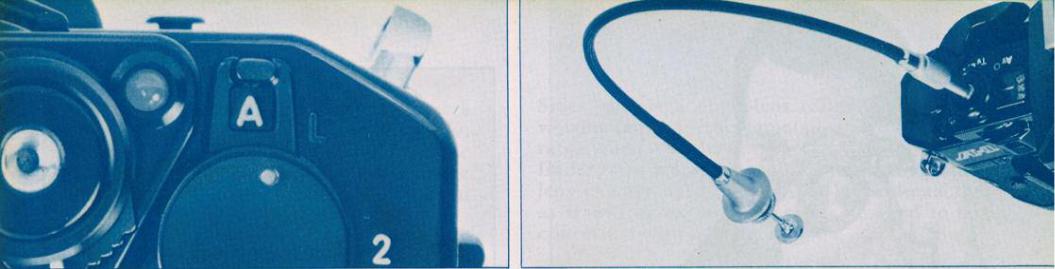
Attaching a Cable Release
A cable release is a device which, used in conjunction with a tripod, allows the shutter to be held open for long exposures without your ever having to touch either camera or shutter button directly. This is especially useful for reducing the chances of blurred images in copy work, photomacrography and photomicrography.
The A-1 is provided with a socket for a cable release in the center of the shutter button. The cable release simply screws into this socket. The main switch must also be at the
“A” setting.
–23–

Not For Resale – Free Download at http://www.joe-chan.com/manuals
–24–
Not For Resale – Free Download at http://www.joe-chan.com/manuals
Holding the Camera
The best precaution in preventing camera shake is to press the shutter button gently. Never punch it. It is also helpful to hold the camera properly, not only for good image results but also for comfort and ease in handling.
We suggest first that you hold the camera firmly in both hands, the tip of your right thumb on the film advance lever, the right index finger on the shutter button and the other right fingers on the finger grip. For best balance and easy focusing, the left thumb and index finger should be under the lens barrel. Press both elbows firmly against your body when holding the camera in a horizontal position, at least one elbow in a vertical position. Press the camera firmly to your cheek or forehead. Spread your feet slightly apart with one a little ahead of the other. Don't tense up. Now release the shutter button gently as you exhale.
It is always advisable to lean against a steady support, such as a wall or a tree, if any is available. Use a tripod and a cable release with a telephoto lens or when shooting at a shutter speed of 1/30 sec. or slower.
If the tripod screw of your tripod is quite long, be especially careful not to forcefully screw it all the way in beyond the limit of the camera's tripod socket.
Since this is a single-lens reflex camera, the viewing lens and the camera lens are not separate. When you look into the camera's viewfinder, you are seeing your subject through the lens exactly as the lens “sees” it and exactly as it will be exposed. There is no need to be concerned with parallax.
–25–
Not For Resale – Free Download at http://www.joe-chan.com/manuals
Film Loading
The Canon A-1 accepts color or black and white film in standard 35mm cartridges. When loading and unloading film, avoid direct sunlight and take care not to touch the shutter curtain, the film trails or the pressure plate.
To load the film, first fold out the rewind crank and sharply pull up the rewind knob. The camera's back cover will pop open. Put the cartridge into the film cartridge chamber so that the protruding part of the spool is on the bottom and push down and rotate the rewind knob until it drops into its fullyseated position. Now pull the film leader across the camera and insert the tip up to at least the first perforation of the film into any slot of the multi-slot take-up spool. Advance the film once, making sure the film sprocket holes are engaged with the teeth of the film transport sprocket.
Check to see that the cartridge is in a fully-seated position and that the film is taut. If there is film slack, gently turn the rewind crank clockwise until it stops. Snap the back cover shut. Gently turn the rewind crank in the direction of the arrow to take up film slack and then fold the rewind crank back in.
Switch the AE mode selector to TV and turn the AT dial to a fast shutter speed. Now make two blank shots, turning the film advance lever and releasing the shutter, so that the frame counter advances from “S” to “0”. While doing this, keep an eye on the rewind knob. If it rotates, the film is properly loaded. If it does not rotate, chances are that the film is sagging or the film perforations are not properly engaged in the take-up spool and film transport sprocket. If the rewind knob still does not rotate once you have gently turned the
–26–

Not For Resale – Free Download at http://www.joe-chan.com/manuals
rewind crank clockwise to take up film slack, open the back cover and reload the film.
The A-1 can also be loaded with bulk film in which case the tip of the film should be trimmed as illustrated below before it is loaded into the camera.
Before loading the film, remove the plastic insert from the pressure plate, and throw it away.
–27–
Not For Resale – Free Download at http://www.joe-chan.com/manuals
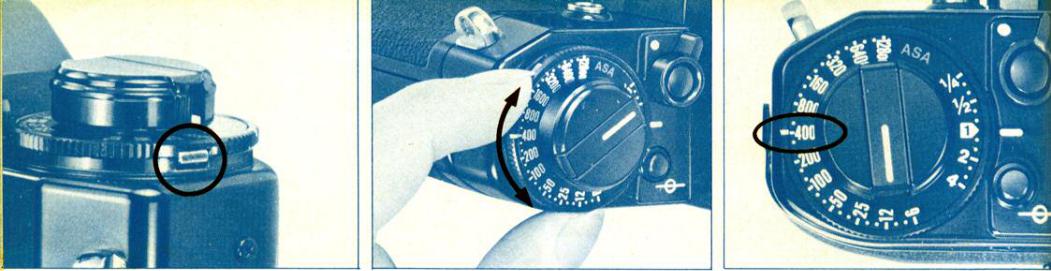
Setting the ASA Film Speed
The ASA is a numerical rating of a film's sensitivity to light. The higher the ASA rating, the faster the film and the more sensitive it is to a given amount of light as compared to a film of a lower ASA rating. In other words, the higher the ASA rating, the less light you need to expose the film. When buying film, choose one with an ASA rating appropriate for the lighting conditions. The film manufacturer's recommended ASA rating can be found on the film packaging or data sheet.
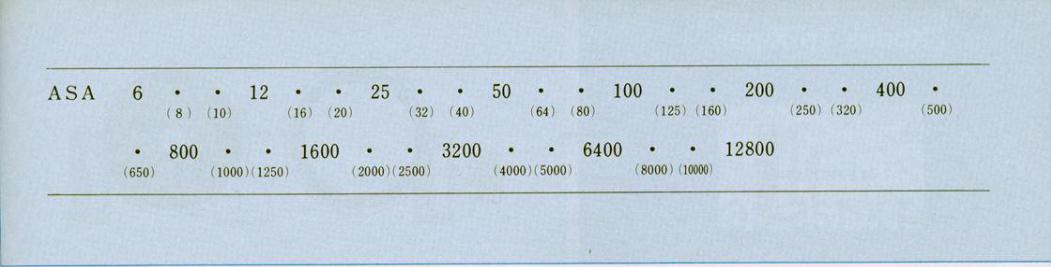
Since the ASA film speed is one of the essential factors in determining proper exposure, it is very important that it be correctly set on the camera. The table on the opposite page shows the ASA ratings which can be set on the A-1. Figures in parentheses are intermediate film speeds which are indicated by dots on the ASA dial. To set the
ASA, press in the ASA film speed dial lock button with your fingernail and turn the outer knurled edge of the dial until the desired film speed rating is aligned with the film speed index. The dial cannot be turned lower than ASA 6 or higher than ASA 12800.
There is an exposure compensation scale on the ASA film speed setting dial. The function of this scale will be explained later, but at this point, please note that this scale should be set at “1” for normal AE photography.
–28–
Not For Resale – Free Download at http://www.joe-chan.com/manuals
The choice of film is an important part of photography, and you have a wide variety to choose from. Films differ in a number of ways including ASA rating, exposure latitude, color rendition and color temperature among other variables. Some, such as infrared film, require the use of certain filters. Depending on the type of film, a color temperature conversion filter may be necessary under certain lighting conditions. And, of course, you have the basic choice between two types of color film: color negative film (for prints) and color reversal (slide) film. Film can be purchased either in cartridge form with varying numbers of frames or in bulk form. Either type can be loaded in the A-1. Although bulk film is a little more complicated to handle since it must be cut to the desired number of frames and handled in complete darkness, there are simple devices for this purpose on the
market and it is cheaper than cartridge film. For more information concerning film, please refer to a book on photography or ask your local film dealer, and please pay careful attention to the film data sheet.
Aside from those instances when a specific filter is required, filters can also be used to emphasize certain colors for more clarity or special effects. Canon offers a wide variety of filters for both black and white and color films. It also offers a gelatin filter holder which can hold up to three filters at a time and can be attached to various diameter lenses by means of adapters. Since the A-1 has a through-the-lens meter, there is no need to make any exposure correction with filter factors when a filter is attached.
–29–

Not For Resale – Free Download at http://www.joe-chan.com/manuals
Memo Holder
The back cover of this camera is provided with a memo holder. Once you have loaded the film and set the ASA, it is very useful to tear off the end of the film box and insert it into this memo holder as a constant reminder of the type of film in use. Add other information as you like.
–30–
The Basics of Exposure
This section contains some terms and definitions which will be used throughout this instruction booklet.
The amount of exposure is a matter not only of the amount of light allowed to strike the film but also of the amount of time the light is allowed to strike the film. The camera has two mechanisms to control exposure, the diaphragm and the shutter. The diaphragm consists of blades which open and close to certain size openings called apertures. The size of the aperture determines the amount of light which will fall on the film. The various size apertures are indicated by a set series of numbers called f/stops or f/numbers. Each f/stop represents some amount of light that is allowed to pass through the lens. The smaller numbers are called large f/stops while the larger numbers are called small f/stops. This is because the larger numbers represent smaller apertures and allow less light to pass
 Loading...