


 Loading...
Canon Inkjet Printer
Impresora de inyección de tinta Canon 


 series
ENGLISH
ESPAÑOL
Getting Started
Read Me First
Guía de inicio
Léame en primer lugar
Make sure to read this manual before using the printer. Please keep it in hand for future reference.
Asegúrese de leer este manual antes de utilizar la impresora. Consérvelo a mano para utilizarlo como referencia en el futuro.
|
|
|
|
|
|
|
■ Contents |
|
■ Contenido |
|
|
||
|
|
|
||||
1 |
Preparation P.5 |
|
1 |
Preparación P.5 |
|
|
2 |
Install the Ink Tanks |
P.9 |
2 |
Instalación de los depósitos de tinta |
P.9 |
|
3 |
Install the Print Head |
P.13 |
3 |
Instalación del cabezal de impresión |
P.13 |
|
4 |
Software Installation |
P.18 |
4 |
Instalación del software |
P.18 |
|
5 |
Load Paper P.29 |
|
5 |
Carga del papel P.29 |
|
|
6 |
Application Software |
P.30 |
6 |
Software de aplicación |
P.30 |
|
|
|
|
|
|
|
|
|
|
|
|
|
|
|
|
|
|
|
|
|
|
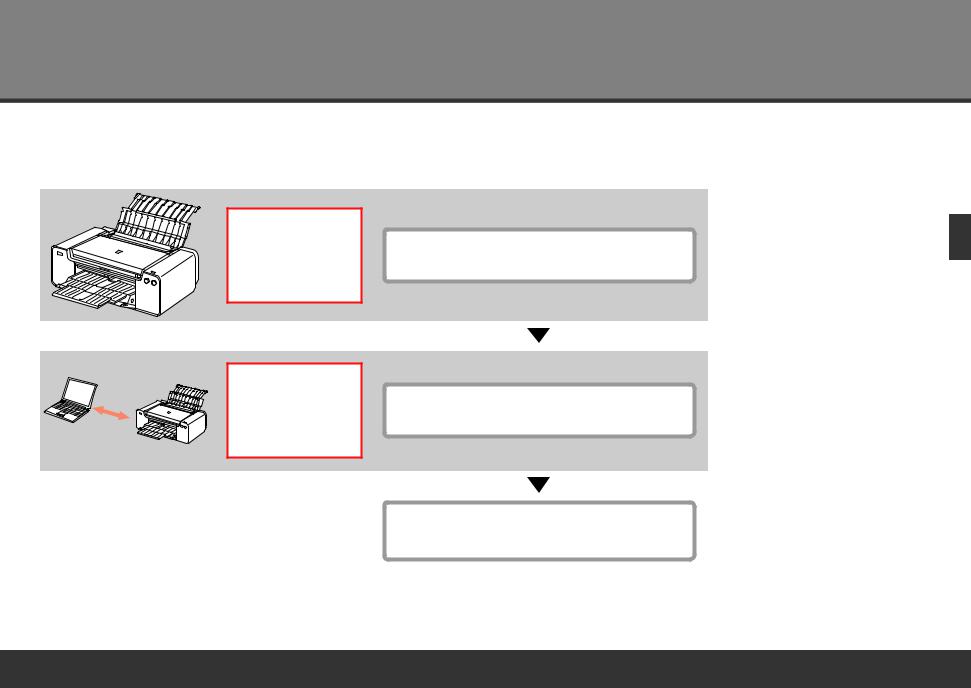
■Printer Installation Flow
■Flujo de instalación de la impresora
40
Printer Preparation Minutes (approx.) Preparación de la impresora Minutos (aprox.)
20
Software Installation
Minutes (approx.) Instalación del software
Minutos (aprox.)
Installation Complete
Instalación finalizada
■ Symbols Used in This Document
Prohibited actions.
Instructions including important information.
•In this guide, Windows 8 operating system is referred to as Windows 8 and Windows 7 SP1 as Windows 7.
•In this guide, the screens are based on Windows 7 and Mac OS X v.10.8.
Unless noted otherwise, the screens are those of Windows 7.
•Microsoft is a registered trademark of Microsoft Corporation.
•Windows is a trademark or registered trademark of Microsoft Corporation in the U.S. and/or other countries.
•Windows Vista is a trademark or registered trademark of Microsoft Corporation in the U.S. and/or other countries.
•Internet Explorer is a trademark or registered trademark of Microsoft Corporation in the U.S. and/or other countries.
•Mac, Mac OS, AirPort, Safari, Bonjour, iPad, iPhone and iPod touch are trademarks of Apple Inc., registered in the U.S. and other countries. AirPrint and the AirPrint logo are trademarks of Apple Inc.
•Adobe, Photoshop, Photoshop Elements, Lightroom, Adobe RGB and Adobe RGB (1998) are either registered trademarks or trademarks of Adobe Systems Incorporated in the United States and/or other countries.
■ Símbolos utilizados en este documento
Acciones prohibidas.
Instrucciones que incluyen información importante.
•En esta guía, para referirse al sistema operativo Windows 8 se utiliza el término Windows 8 y para Windows 7 SP1 se utiliza el término Windows 7.
•Las pantallas de esta guía se basan en Windows 7 y Mac OS X v.10.8. A menos que se indique lo contrario, las pantallas serán de Windows 7.
•Microsoft es una marca comercial registrada de Microsoft Corporation.
•Windows es una marca comercial o una marca comercial registrada de Microsoft Corporation en EE.UU. y en otros países.
•Windows Vista es una marca comercial o una marca comercial registrada de Microsoft Corporation en EE.UU. y en otros países.
•Internet Explorer es una marca comercial o una marca comercial registrada de Microsoft Corporation en EE.UU. y en otros países.
•Mac, Mac OS, AirPort, Safari, Bonjour, iPad, iPhone e iPod touch son marcas comerciales de Apple Inc., registradas en EE. UU. y otros países. AirPrint y el logotipo de AirPrint son marcas comerciales de Apple Inc.
•Adobe, Photoshop, Photoshop Elements, Lightroom, Adobe RGB y Adobe RGB (1998) son marcas comerciales registradas o marcas comerciales de Adobe Systems Incorporated en Estados Unidos y en otros países.

|
|
|
|
|
|
|
|
|
|
|
■ |
Printed |
Manual |
■ |
On-screen |
Manual and Online Manual |
|||||
■ |
Manual |
impreso |
■ |
Manual en |
pantalla y Manual en línea |
|||||
|
|
|
|
|
|
|
|
|
|
|
|
|
|
|
|
|
|
|
|
|
|
|
|
|
|
|
|
|
|
|
|
|
|
|
|
|
|
|
|
|
|
|
|
|
|
|
|
|
|
|
|
|
|
|
|
|
|
|
|
|
|
|
|
|
|
|
|
|
|
|
|
|
|
|
|
|
|
|
|
|
|
|
|
|
|
|
|
|
|
|
|
|
|
|
|
|
|
|
|
|
|
|
|
|
|
|
|
|
|
|
|
|
|
|
|
|
|
|
|
|
•Getting Started
(this manual)
• Guía de inicio
(este manual)

■Devices Required for Wired Connection
■Dispositivos necesarios para la conexión
por cable
When using the printer over a wired connection, a commercial network device (router, etc.) and Ethernet cable are required.
Cuando la impresora se utilice mediante una conexión por cable, se necesitará un dispositivo de red comercial (router, etc.) y un cable Ethernet.
Router, etc. |
Ethernet cable |
Router, etc. |
Cable Ethernet |
■Choosing a Location
■Elección del emplazamiento
10 inches (25 cm)
10 pulgadas (25 cm)
 14 inches (35 cm) 14 pulgadas (35 cm)
•Place the printer on a flat surface.
•Do not place any object in front of the printer.
•To open the Paper Support and Paper Output Tray, keep a space of 14 inches (35 cm) in front of the printer and a space of 10 inches (25 cm) behind it.
•When installing the printer, lift and move it with the help of another person.
•Coloque la impresora sobre una superficie plana.
•No coloque ningún objeto delante de la impresora.
•Para abrir el soporte del papel y la bandeja de salida del papel, deje un espacio libre de 14 pulgadas (35 cm) delante de la impresora y un espacio de 10 pulgadas (25 cm) detrás de ella.
•Cuando instale la impresora, levántela y muévala con la ayuda de otra persona.

1 |
Preparation |
1 |
2 |
3 |
4 |
5 |
6 |
|||||||||
Preparación |
|
|
|
|
|
|
|
|
|
|
|
|
|
|
||
|
|
|
|
|
|
|
|
|
|
|
|
|
|
|
|
|
|
|
|
|
|
|
|
|
|
|
|
|
|
|
|
|
|
• Do not install the printer where an object may fall on it. In addition, do not place any object on the top of the printer. It may fall into the printer when opening covers, resulting in malfunction.
• No instale la impresora donde le pueda caer algún objeto. Además, no coloque ningún objeto encima de la impresora. Podría caer dentro de la impresora al abrir la cubierta y provocar fallos en el funcionamiento.
1 |
Make sure all the following items are supplied. |
1. Print Head |
2. Ink tanks (12: LGY, PBK, DGY, M, PC, GY, MBK, Y, R, PM, C, CO)
3. Manuals
4. 8 cm disc adapter
5. Disc tray
6. Power cord
7. Setup CD-ROM
8. Matte Photo Paper MP-101 (for Automatic Print Head Alignment)
9. Other documents
 • A USB cable is necessary to connect the printer with your computer (USB connection only).
Compruebe que no falta ninguno de los elementos siguientes.
1.Cabezal de impresión
2.Depósitos de tinta (12: LGY, PBK, DGY, M, PC, GY, MBK, Y, R, PM, C, CO)
3.Manuales
4.Adaptador de disco de 8 cm
5.Bandeja de disco
6.Cable de alimentación
7.CD-ROM de instalación (Setup CD-ROM)
8.Papel Fotográfico Mate (Matte Photo Paper) MP-101
(para la alineación automática del cabezal de impresión)
9.Otros documentos
 • Se necesita un cable USB para conectar la impresora al ordenador (solo mediante conexión USB).
1
2 3
A
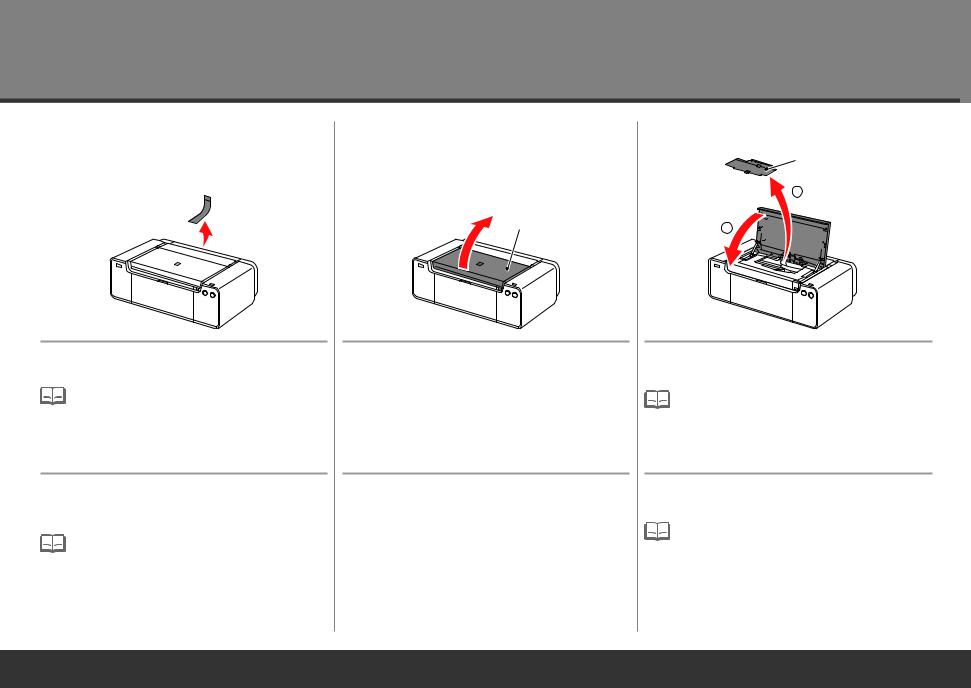
Remove all orange tape and protective materials Open the Top Cover (A). from the inside and outside of the printer.
 • The tape and protective materials may differ in shape and position from those shown here.
Retire todas las cintas naranja y todos los |
Abra la tapa superior (A). |
materiales protectores del interior y el exterior |
|
de la impresora. |
|
 • La forma y la posición de la cinta y los materiales protectores pueden variar respecto a las que se muestran aquí.
4 B
1
2
1.Remove the Head Cover (B).
2.Close the Top Cover.
 • The Head Cover is to be installed during the printer installation.
1.Retire la cubierta del cabezal (B).
2.Cierre la tapa superior.
 • La cubierta del cabezal debe instalarse durante la instalación de la impresora.
1 2 3 4 5 6
5 |
6 |
7 |
|
|
C |
D
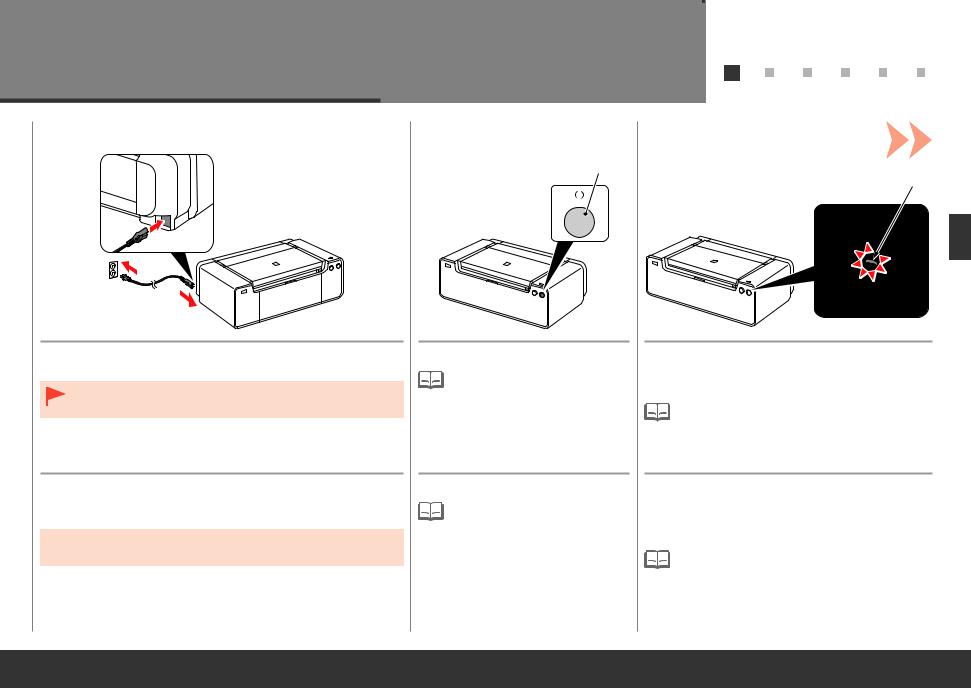
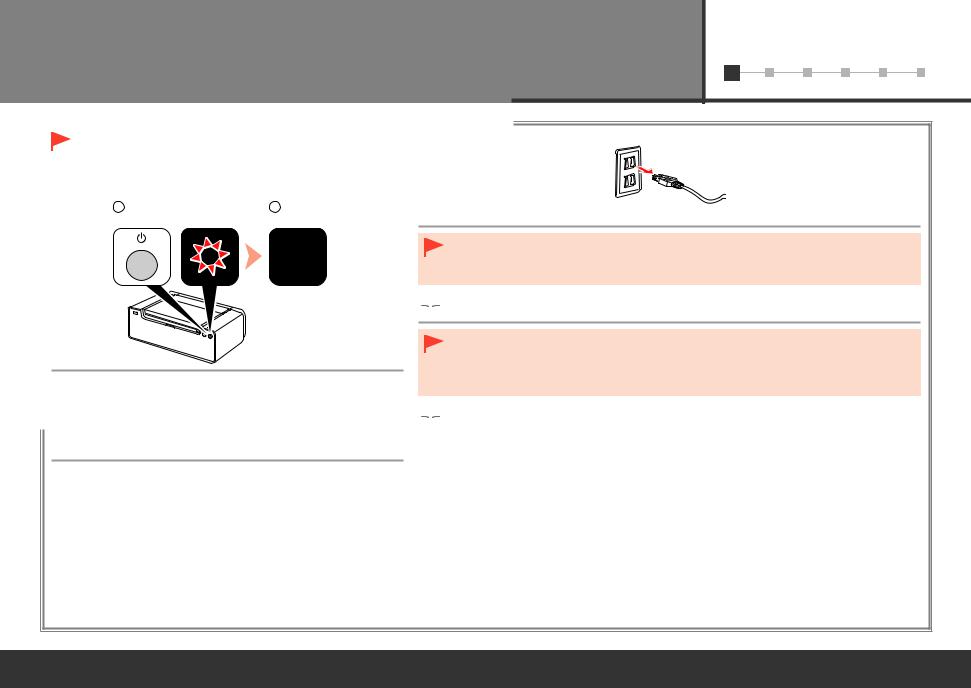
Insert the power cord into the connector on the left side at the back of the printer and into the wall outlet firmly.
•Do NOT connect the USB cable or Ethernet cable at this stage.
Introduzca firmemente el cable de alimentación en el conector situado a la izquierda de la parte posterior de la impresora y a la toma de corriente.
 • NO conecte el cable USB o Ethernet en este momento.
Press the ON button (C).
 • It takes about 5 seconds for the ON button to work after the power cord is plugged in.
Pulse el botón ACTIVADO (ON) (C).
 • Una vez conectado el cable de corriente, el botón ACTIVADO (ON) tarda unos 5 segundos en ponerse en funcionamiento.
Wait for about 2 minutes until the POWER lamp
(white) (D) stops flashing and stays lit, then proceed to the next step.
 • The printer may make some operating noises. This is normal operation.
Espere unos 2 minutos hasta que la luz de encendido (POWER) (blanca) (D) deje de parpadear y permanezca iluminada y,
a continuación, continúe con el paso siguiente.
 • La impresora puede producir algunos ruidos durante el funcionamiento. Esto es parte del funcionamiento normal.
1 |
1 |
2 |
3 |
4 |
5 |
6 |
|
When it is necessary to turn off the printer Cuando sea necesario desconectar la impresora
1 |
2 |
Be sure to follow the procedure below.
1.Press the ON button to turn off the printer.
2.Make sure that the POWER lamp is not lit.
Operating noise may continue for up to 60 seconds until the printer turns off.
Asegúrese de seguir el procedimiento que se explica a continuación.
1.Pulse el botón ACTIVADO (ON) para desconectar la impresora.
2.Asegúrese de que la luz de encendido (POWER) no está iluminada.
Hasta que la impresora se apague, 60 segundos como máximo, se puede seguir escuchando el ruido de funcionamiento.
•Before removing the power plug, make sure that the POWER lamp is not lit. Removing the power plug while the POWER lamp is lit or flashing may cause drying and clogging of the Print Head, resulting in poor printing.
 • The specification of the power cord differs for each country or region.
•Antes de retirar el cable de alimentación, asegúrese de que la luz de encendido (POWER) no esté iluminada. Si se retira el cable de alimentación mientras la luz de encendido (POWER) está encendida o parpadea, el cabezal de impresión se puede secar y obstruir, teniendo como resultado una impresión de mala calidad.
 • Las especificaciones del cable de alimentación varían según el país o la región de uso.
2 |
Install the Ink Tanks |
|
1 2 3 4 5 6 |
||||||||||||
Instalación de los depósitos de tinta |
|
|
|
|
|
|
|
|
|
|
|
|
|
|
|
|
|
|
|
|
|
|
|
|
|
|
|
|
|
|
|
1 |
|
2 |
|
|
|
|
|
|
|
|
|
|
|
|
|
A
C
B
Press the Tank Cover Open button (A).
The left and right Tank Covers (B) open.
Make sure the Top Cover (C) is closed.
Pulse el botón Abrir cubierta del cartucho (Tank Cover Open) (A).
Las cubiertas del cartucho izquierda y derecha (B) se abren. Asegúrese de que la tapa superior (C) esté cerrada.
Before removing the ink tank from its package, shake it 5 to 6 times horizontally.
•Handle the ink tanks carefully. Do not drop or apply excessive pressure to them.
•Be sure to use the supplied ink tanks.
Antes de retirar el depósito de tinta de su envoltorio, agítelo 5 o 6 veces en horizontal.
•Maneje los depósitos de tinta con cuidado. No los tire ni aplique demasiada presión sobre ellos.
•Asegúrese de utilizar los depósitos de tinta suministrados.
Loading...