


COPY
This manual is for the EOS-1D C installed with firmware version 1.1.0 or later.
Read this manual together with the EOS-1D X Instruction Manual (firmware version 1.2.0 or later) and EOS-1D X Wired LAN Instruction Manual.
The “Software Start Guide” is included at the end of this manual.
E
INSTRUCTION MANUAL

Introduction
Based on the top-of-the-line EOS-1D X, the EOS-1D C is a digital SLR camera with enhanced movie shooting functions.
Its advanced movie shooting functions include a full-frame (approx. 36 x 24 mm) CMOS sensor with approx. 18.1 effective megapixels to create beautiful and impressive background blur effects, high ISO speeds for low-light shooting, 4K (4096 x 2160 pixels) movie recording, Full HD 60p/50p, Super 35mm Crop, Canon Log gamma, and uncompressed movie output via HDMI.
Other diverse features include a wide range of shooting functions optimized for professional shooting, a compact and lightweight body for highly mobile movie making, high reliability even in harsh environments, a highly expandable camera system, and adaptability to diverse workflows.
Refer to This Manual while Using the Camera to Further Familiarize Yourself with the Camera
With a digital camera, you can immediately view the image you have captured. While reading thisCOPYmanual, take a few test shots and see how they come out. You can then better understand the camera.
To avoid botched pictures and accidents, first read the “Safety Warnings” (p.88, 89) and “Handling Precautions” (p.8, 9).
Testing the Camera Before Use and Liability
After shooting, play images back and check whether they have been properly recorded. If the camera or memory card is faulty and the images cannot be recorded or downloaded to a computer, Canon cannot be held liable for any loss or inconvenience caused.
Copyrights
Copyright laws in your country may prohibit the use of your recorded images of people and certain subjects for anything but private enjoyment. Also be aware that certain public performances, exhibitions, etc., may prohibit photography even for private enjoyment.
CF Card
In this manual, “card” refers to a CF card. The CF card (for recording images) is not included. Please purchase it separately.
2
Instruction Manuals
The EOS-1D C comes with three manuals: 1. EOS-1D C Instruction Manual (this booklet), 2. EOS-1D X Instruction Manual, and 3. EOS-1D X Wired LAN Instruction Manual.
For movie shooting, refer to 1. For basic operations, still photo shooting, playback functions, wired LAN functions, and other information not in 1, see manuals 2 and 3 as they are basically common with those of the EOS-1D X.
Camera and Wired LAN Instruction Manuals
Movie shooting |
Basic operations, still |
Wired LAN |
|
photo shooting, playback |
functions |
|
functions, etc. |
|


1. EOS-1D C Instruction |
2. EOS-1D X |
3. EOS-1D X |
Manual (this booklet) |
Instruction Manual |
Wired LAN |
|
(Firmware version 1.2.0 or later) |
Instruction Manual |
COPY |
|
|
Software Instruction Manual |
|
|
Software
Instruction Manual
(CD-ROM)
The Software Instruction Manuals are included on the CD-ROM as PDF files.
See pages 93 to 96 for an overview of the software programs, installation procedure on a personal computer, and how to view the Software Instruction Manual CD-ROM.
 The software that comes with the EOS-1D C differs from that of the EOS-1D X. See “Software Start Guide” on pages 93 to 96.
3

Item Check List
Before starting, check that all the following items have been included with your camera. If anything is missing, contact your dealer.
Camera |
Eyecup Eg |
Battery Pack |
Battery Charger |
|
LP-E4N |
LC-E4N |
|
(with body cap and |
|
(with protective cover) (with protective covers) |
|
battery compartment cap) |
|
|
|
Wide Strap L7 |
Interface Cable |
Stereo AV Cable |
|
|
IFC-200U |
AVC-DC400ST |
|
Cable Protector |
EOS DIGITAL Solution Disk |
Software Instruction |
|
and Clamp |
COPY(Software) |
Manual |
|
(1)EOS-1D C Instruction Manual (this booklet)
(2)EOS-1D X Instruction Manual
(3)EOS-1D X Wired LAN Instruction Manual
(1) |
(2) |
(3) |
*Attach Eyecup Eg to the viewfinder eyepiece.
*Be careful not to lose any of the above items.
Wired LAN
To set up a wired LAN using the Ethernet RJ-45 terminal, refer to the separate “Wired LAN Instruction Manual”.
4

Conventions Used in this Manual 
Icons in this Manual
<6> |
: Indicates the Main Dial. |
|
<5> |
: Indicates the Quick Control Dial. |
|
<9> |
: Indicates the Multi-controller. |
|
<0> |
: Indicates the Setting button. |
|
0, 9, 7, 8 : Indicates that the corresponding function remains active for 4 sec., 6 sec., 10 sec., or 16 sec. respectively after you let go of the button.
*In this manual, the icons and markings indicating the camera’s buttons, dials, and settings correspond to the icons and markings on the camera and on the LCD monitor.
3: Indicates a function that can be changed by pressing the <M> button and changing the setting.
(p.**)
(zp.**)
:Reference page number for more information in this manual. COPY
:Reference page number in the EOS-1D X Instruction Manual.
:Warning to prevent shooting problems.
:Supplemental information.
:Tips or advice for better shooting.
:Problem-solving advice.
Basic Assumptions
It is assumed that an EF lens is used with the camera.
All operations explained in this manual assume that the power switch is already set to <1>.
It is assumed that all the menu settings and Custom Functions are set to their defaults.
The illustrations in this manual show the camera attached with the EF50mm f/1.4 USM lens as an example.
For cautions regarding the use of EF Cinema (CN-E) lenses, see pages 17 and 29.
5

Contents |
|
Introduction |
2 |
Instruction Manuals .......................................................................... |
3 |
Item Check List................................................................................. |
4 |
Conventions Used in this Manual..................................................... |
5 |
Handling Precautions ....................................................................... |
8 |
Nomenclature ................................................................................. |
10 |
Using the Cable Protector and Clamp ......................................... |
14 |
1 Shooting and Playing Movies |
15 |
kPreparing to Shoot Movies....................................................... |
16 |
kShooting Movies....................................................................... |
18 |
Autoexposure Shooting ............................................................... |
18 |
COPY |
|
Shutter-priority AE ....................................................................... |
19 |
Aperture-priority AE ..................................................................... |
20 |
Manual Exposure Shooting.......................................................... |
23 |
Shooting Still Photos.................................................................... |
31 |
Shooting Function Settings ............................................................ |
33 |
Setting the Movie-recording Size ................................................... |
34 |
Setting the Sound Recording ......................................................... |
39 |
Silent Control.................................................................................. |
42 |
Setting the Canon Log Gamma...................................................... |
43 |
Setting the Time Code.................................................................... |
47 |
3Menu Function Settings........................................................ |
51 |
kPlaying Movies ......................................................................... |
57 |
B: Shooting Information Display................................................ |
60 |
6

|
|
Contents |
2 |
Reference |
61 |
|
Differences with the EOS-1D X Instruction Manual |
........................62 |
|
System Map .................................................................................... |
66 |
|
Menu Settings ................................................................................. |
68 |
|
Troubleshooting Guide.................................................................... |
70 |
|
Specifications.................................................................................. |
76 |
|
Safety Warnings.............................................................................. |
88 |
3 |
Software Start Guide |
93 |
|
Software Start Guide....................................................................... |
94 |
|
Index ............................................................................................... |
97 |
|
COPY |
|
7

Handling Precautions
Camera Care
This camera is a precision instrument. Do not drop it or subject it to physical shock.
The camera is not waterproof and cannot be used underwater. If you accidentally drop the camera into water, promptly consult your nearest Canon Service Center. Wipe off any water droplets with a dry cloth. If the camera has been exposed to salty air, wipe it with a well-wrung wet cloth. Never leave the camera near anything having a strong magnetic field such as a magnet or electric motor. Also avoid using or leaving the camera near anything emitting strong radio waves such as a large antenna. Strong magnetic fields can cause camera misoperation or destroy image data.
Do not leave the camera in excessive heat such as in a car in direct sunlight. High temperatures can cause the camera to malfunction.
The camera contains precision electronic circuitry. Never attempt to disassemble the camera yourself.
Do not block the mirror operation with your finger, etc. Doing so may cause a malfunction.
Use a blower to blow away dust on the lens, viewfinder, reflex mirror, and focusing screen. Do notCOPYuse cleaners that contain organic solvents to clean
the camera body or lens. For stubborn dirt, take the camera to the nearest Canon Service Center.
Do not touch the camera’s electrical contacts with your fingers. This is to prevent the contacts from corroding. Corroded contacts can cause camera misoperation.
If the camera is suddenly brought in from the cold into a warm room, condensation may form on the camera and internal parts. To prevent condensation, first put the camera in a sealed plastic bag and let it adjust to the warmer temperature before taking it out of the bag.
If condensation forms on the camera, do not use the camera. This is to avoid damaging the camera. If there is condensation, remove the lens, card and battery from the camera, and wait until the condensation has evaporated before using the camera.
If the camera will not be used for an extended period, remove the battery and store the camera in a cool, dry, well-ventilated location. Even while the camera is in storage, press the shutter button a few times once in a while to check that the camera is still working.
Avoid storing the camera where there are corrosive chemicals such as a darkroom or chemical lab.
If the camera has not been used for an extended period, test all its functions before using it. If you have not used the camera for some time or if there is an important shoot coming up, have the camera checked by your Canon dealer or check the camera yourself and make sure it is working properly.
8

Handling Precautions
LCD Panel and LCD Monitor
Although the LCD monitor is manufactured with very high precision technology with over 99.99% effective pixels, there may be a few dead pixels among the remaining 0.01% or less pixels. Dead pixels displaying only black or red, etc., are not a malfunction. They do not affect the images recorded. If the LCD monitor is left on for a prolonged period, screen burn-in may occur where you see remnants of what was displayed. However, this is only temporary and will disappear when the camera is left unused for a few days. The LCD monitor display may seem slow in low temperatures, or look black in high temperatures. It will return to normal at room temperature.
Cards
To protect the card and its recorded data, note the following:
Do not drop, bend, or wet the card. Do not subject it to excessive force, physical shock, or vibration.
Do not store or use the card near anything having a strong magnetic field such as a TV set, speakers, or magnet. Also avoid places prone to having static electricity.
Do not leave the card in direct sunlight or near a heat source. Store the card in a case.
Do not store the card in hot, dusty, or humid locations.
Lens
After detaching the lens from the camera, put down the |
Contacts |
|
lens with the rear end up and attach the lens caps to |
||
|
||
avoid scratching the lensCOPYsurface and electrical contacts. |
|
Cautions During Prolonged Use
If you use continuous shooting, Live View shooting, or movie shooting for a prolonged period, the camera may become hot. Although this is not a malfunction, holding the hot camera for a long period can cause slight skin burns.
9

Nomenclature
Lens mount index |
Mirror |
|
Depth-of-field preview button |
Movie microphone |
|
Multi-function button 2 |
||
(p.39) |
||
Self-timer lamp |
Lens lock pin |
|
|
||
Shutter button (p.18) |
|
|
|
Lens release |
|
|
button |
|
|
Lens mount |
Grip |
|
|
|
COPY |
Contacts |
Vertical-grip |
|
|
Multi-function |
|
|
button 2 |
|
Vertical-grip |
|
|
depth-of-field |
|
|
preview button |
Vertical-grip on/off |
Tripod socket |
|
switch |
||
<B> Vertical-grip |
|
|
AF area selection mode/ |
|
|
Multi-function/ |
Body number |
|
Multi-spot metering button |
|
|
Vertical-grip Main Dial (p.19)
Vertical-grip shutter button (p.18)
Hand strap mount
Accessory alignment hole
Body cap
10
Nomenclature
<B> White balance selection button
<U> LCD panel illumination button
Hot shoe
Flash-sync contacts
Eyecup
<O> Exposure compensation/ Aperture button
<B> AF area selection mode/Multi-function/ Multi-spot metering button
<i> ISO speed setting button (p.23)
<6> Main Dial
Strap mount
COPY |
<9> |
Multi-controller |
|
<0> Setting |
|
button |
|
|
|
|
<5> Quick |
|
Control Dial |
LCD monitor |
(p.18) |
<Q> Quick Control button |
<9> Vertical-grip |
Multi-controller |
Touch pad (p.42) Power/Multi function lock switch
<p> Vertical-grip AF start button (p.28)
<A> Vertical-grip AE lock button (p.22)
<S> Vertical-grip
AF point selection button
*Parts without reference page numbers are explained in the EOS-1D X Instruction Manual.
11

Nomenclature
<V> Focal plane mark
<Q> Metering mode selection/Flash exposure compensation button
Top LCD panel
<A> Live View shooting/ Movie shooting button (p.16)
<W> Shooting |
<p> |
mode selection button |
AF start button |
(p.18) |
(p.28) |
<o> |
|
<A> AE lock |
|
button (p.22) |
|
AF mode selection/ |
|
|
Drive mode selection |
|
|
button |
|
<S> AF point |
<h> AEB setting |
|
selection button |
|
|
|
button |
|
|
System |
|
|
extension |
|
|
mounting hole |
COPY |
|
|
Eyepiece |
|
|
|
shutter lever |
|
|
Speaker (p.58) |
Battery release |
Viewfinder eyepiece |
|
|
|
|
handle |
Dioptric adjustment knob |
|
Battery |
Rear LCD panel |
|
Battery compartment cap
*For the nomenclature of the top LCD panel, rear LCD panel, Battery Pack LPE4N, and Battery Charger LC-E4N, see zpages 24 to 28.
12

Nomenclature
<M> Menu button |
<B> Info button (p.57) |
|
|
|
|
Card slot 1
Strap mount
Card slot 2
Card slot cover
Terminal cover |
Card 1 eject |
|
button |
Card 2 eject |
button |
<Y> |
|
|
|
Network |
|
|
Access lamp |
lamp |
|
|
|
|
|
|
|
<x> Playback |
|
|
Card slot cover |
|
|
release handle |
|
button (p.57) |
|
Voice memo microphone |
|
<H> Card/ |
|
||
COPY |
|
||
|
|
||
Image size selection |
<J/K> Protect/Voice memo button |
||
button |
|
||
<u> Index/Magnify/ |
|
|
|
Reduce button |
|
<L> Erase button |
|
System extension terminal 
<Y> External microphone
IN terminal (p.39)
<F> Remote control terminal 
 (N3 type)
<n> Headphone terminal (p.41)


 <F> Ethernet RJ-45 terminal
 <Z> HDMI mini OUT terminal (p.49, 53, 54)
 <q/C> Audio/video OUT/
  Digital terminal
Cable clamp screw hole (p.14)
13

Using the Cable Protector and Clamp
With a Canon HDMI cable (sold separately):
1 |
2 |
Cable protector |
Interface cable |
|
HDMI cable (sold separately) |
||
|
||
3 |
4 |
COPY |
|
Cable clamp |
|
With a third party HDMI cable (commercially available): |
|
1 |
2 |
3 |
4 |
If the plug of a third-party HDMI cable can fit into the Cable protector, using the Cable protector is recommended.
14

Shooting and Playing
Movies
The live image displayed on the camera’s LCD monitor can be recorded asCOPYa movie to the card. The movie recording format will be M V.
This chapter assumes that an EF lens is used with the camera. If you use an EF Cinema (CN-E) lens, see the cautions on pages 17 and 29, and start movie shooting.
15

kPreparing to Shoot Movies 
Set the camera so it can record the live image displayed on the LCD monitor as a movie. To shoot still photos, see page 31.
1 Check the [Movies] setting.
Select the [z4] tab and check that [LV z/kset.] is set to [Movies].
If it is set to [Disable] or [Stills], select [Movies], then press <0>. “LV” stands for Live View.
2 Set [Movie rec. size].
For details on [Movie rec. size], see
COPYpage 34.
Display the image.
3 |
Press the <A> button. |
|
|
|
X The image will appear on the LCD |
|
monitor. |
|
In the <a> shooting mode, turn the |
|
<6> or <5> dial to adjust the |
|
brightness. |
|
A semi-transparent or black mask will |
|
appear on the top/bottom or left/right. |
|
The image area surrounded by the |
|
masking will be recorded as the movie. |
Notes on Movie Shooting are on page 27.
For information related to card operation confirmation, refer to Canon Web site, etc.
16
kPreparing to Shoot Movies
EF Cinema (CN-E) Lenses
With EF Cinema single focal length lenses, you can shoot at all movierecording quality settings. If you use an EF Cinema zoom lens, you can shoot movies only with ISuper 35mm Crop. (Since the image circle is small, the image periphery will be dark if you shoot a movie in HA BCquality or still photo.)
Cards that Can Record Movies
Use a large-capacity card with a fast writing/reading speed (required card performance) as shown in the table. First, shoot a few test movies to see if movies can be recorded accurately with a movie-recording size you set (p.34).
Image Size |
Frame Rate |
Movie Recording/ |
Required Card |
|
Compression Method |
Performance |
|||
|
|
|||
H |
5/4 |
JMotion JPEG |
UDMA7 |
|
100 MB/sec. or faster |
||||
|
|
|
||
I |
6/5/4 |
|
20 MB/sec. or faster |
|
A |
6/5/4 |
X |
|
|
B |
87 |
MPEG-4 AVC/H.264 |
10 MB/sec. or faster |
|
|
/ |
|
||
C |
6/5COPY |
|
||
I |
6/5/4 |
|
30 MB/sec. or faster |
|
A |
8/7 |
W |
60 MB/sec. or faster |
|
654 |
MPEG-4 AVC/H.264 |
|
||
|
|
|||
|
/ / |
|
30 MB/sec. or faster |
|
B |
8/7 |
|
||
|
|
|||
If you use a slow-writing card when shooting movies, the movie may not be recorded properly. Also, if you play back a movie on a card with a slow reading speed, the movie may not play back properly.
If you want to shoot still photos while shooting a movie, you will need an even faster card.
To check the card’s writing/reading speed, refer to the card manufacturer’s Web site.
To optimize the card’s performance, format the card before shooting movies. For card-formatting cautions, see zpage 55.
17

kShooting Movies
Autoexposure Shooting
When the shooting mode is set to <d> or <BULB>, autoexposure control will take effect to suit the scene’s current brightness. Autoexposure control will be the same for <d> and <BULB>.
1Set the shooting mode to <d/
BULB>.
Press the <W> button and turn the <6> or <5> dial to select <d> or <BULB>.
Recording movie
Movie microphone
2 Focus the subject.
Before shooting a movie, focus with AF or manual focus (zp.213 to 220).
COPYWhen you press the shutter button halfway, the camera will focus with the current AF mode.
3 Shoot the movie.
Press the shutter button completely (or press the <B> button) to start shooting a movie.
XWhile the movie is being shot, the “o” mark will be displayed on the upper right of the screen.
Press the shutter button completely (or press the <B> button) again to
stop shooting the movie.
 If Canon Log gamma is set, AF is not possible. If H, I, or A:8/7is set, AF is not possible in the fmode.
18

kShooting Movies
Shutter-priority AE
When the shooting mode is <s>, you can manually set the shutter speed for movie shooting. The ISO speed and aperture will be set automatically to suit the brightness and obtain a standard exposure.
|
1 |
Set the shooting mode to <s>. |
|
|
|
Press the <W> button and turn |
|
|
|
the <6> or <5> dial to select |
|
|
|
<s>. |
|
|
2 Set the desired shutter speed. |
||
|
|
While looking at the LCD monitor, |
|
|
|
turn the <6> dial. The settable |
|
|
COPY3 |
|
|
|
|
shutter speeds depend on the frame |
|
|
|
rate <9>. |
|
Shutter speed |
|
• 654 : 1/4000 sec. - 1/30 sec. |
|
|
• 87 |
: 1/4000 sec. - 1/60 sec. |
|
|
|
||
Focus and shoot the movie.
The procedure is the same as steps 2 and 3 for “Autoexposure Shooting” (p.18).
Changing the shutter speed during movie shooting is not recommended since the changes in the exposure will be recorded.
When shooting a movie of a moving subject, a shutter speed of 1/30 sec. to 1/125 sec. is recommended. The faster the shutter speed, the less smooth the subject’s movement will look.
If you change the shutter speed while shooting under fluorescent or LED lighting, image flicker may be recorded.
19
kShooting Movies
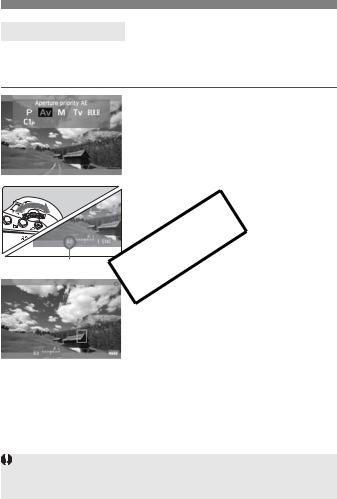
Aperture-priority AE
When the shooting mode is <f>, you can manually set the aperture for movie shooting. The ISO speed and shutter speed will be set automatically to suit the brightness and obtain a standard exposure.
|
1 |
Set the shooting mode to <f>. |
|
|
Press the <W> button and turn |
|
|
the <6> or <5> dial to select |
|
|
<f>. |
|
2 Set the desired aperture. |
|
|
|
While looking at the LCD monitor, |
|
|
turn the <6> dial. |
Aperture |
COPY |
|
|
|
|
3 Focus and shoot the movie.
The procedure is the same as steps 2 and 3 for “Autoexposure Shooting” (p.18).
Changing the aperture during movie shooting is not recommended since changes in the exposure, due to the drive of the lens aperture, will be recorded.
20
kShooting Movies
ISO speed in the d, s, f, and BULB modes
The ISO speed will be set automatically within ISO 100 - 25600. Under [z2: ISO speed settings], if [ISO speed range]’s [Maximum] setting (zp.130) is set to [51200/H] in the d, s, and BULB modes, the automatic ISO speed setting range’s maximum will be expanded to H (equivalent to ISO 51200). Note that even if you set [Maximum] to [51200], the maximum will remain at ISO 25600 and will not be expanded.
If [z2: Highlight tone priority] is set to [Enable] (zp.154), the ISO speed will be ISO 200 - 25600.
Under [z2: ISO speed settings], [Auto ISO range] and [Min. shutter spd.] cannot be set (zp.131, 132) for movie shooting. Also, [ISO speed range] cannot be set in the smode.
COPY
If [ISO speed range]’s [Minimum] is set to [L (50)] and you switch from still photo shooting to movie shooting, the automatic ISO speed setting range’s minimum for movie shooting will be ISO 100. It cannot be expanded to ISO 50.
21

kShooting Movies
Notes for Autoexposure, Shutter-priority AE, and Aperture-priority AE
You can lock the exposure (AE lock) by pressing the <A> button (zp.181). After applying AE lock during movie shooting, you can cancel it by pressing the <S> button. (AE lock setting is retained until you press <S>.)
If you set the power switch to <1> and turn the <5> dial, you can set the exposure compensation.
Pressing the shutter button halfway displays the ISO speed and shutter speed on the screen’s bottom. This is the exposure setting for taking a still photo (p.26). The exposure setting for movie shooting is not displayed. Note that the exposure setting for movie shooting may differ from that for still photo shooting.
Using an EX-series Speedlite (Sold Separately) Equipped
with an LED Light |
COPY |
|
This camera is compatible with the function turning on the LED light automatically in low-light conditions during movie shooting in d, s, for BULB mode. For details, refer to the Speedlite’s instruction manual.
22

kShooting Movies
Manual Exposure Shooting
You can manually set the shutter speed, aperture, and ISO speed for movie shooting.
Shutter speed
Aperture
1 |
Set the shooting mode to <a>. |
|
|
||
|
Press the <W> button and turn the |
|
|
<6> or <5> dial to select <a>. |
|
2 Set the ISO speed. |
|
|
|
Press the <i> button. |
|
|
X The ISO speed setting screen will |
|
|
appear on the LCD monitor. |
|
|
Turn the <6> or <5> dial to set the |
|
|
ISO speed. |
|
|
For details on the ISO speed, see the |
|
COPY |
|
|
|
next page. |
|
3 Set the shutter speed and aperture.
Press the shutter button halfway and check the exposure level indicator. To set the shutter speed, turn the <6> dial. The settable shutter speeds depend on the frame rate <9>.
•654 : 1/4000 sec. - 1/30 sec.
•87 : 1/4000 sec. - 1/60 sec. To set the aperture, turn the <5> dial. If you cannot set the shutter speed or aperture, set the power switch to <1>, then turn the <6> or <5> dial.
4 Focus and shoot the movie.
The procedure is the same as steps 2 and 3 for “Autoexposure Shooting” (p.18).
23

kShooting Movies
ISO speed during manual-exposure shooting
ISO 400 is set by default.
You can set the ISO speed manually within ISO 100 - 25600 in 1/3- stop increments. Under [z2: ISO speed settings], if [ISO speed range]’s [Maximum] is set to [51200/H], the manual ISO speed setting range’s maximum will be expanded to H (equivalent to ISO 51200). Note that even if you set [Maximum] to [51200], the maximum will remain at ISO 25600 and not be expanded. Setting [Maximum] to [H1 (102400)] or [H2 (204800)] will enable the setting range to be expanded up to ISO 102400/204800.
With [Auto] (A), the ISO speed will be set automatically within ISO 100 - 25600.
If [z2: Highlight tone priority] is set to [Enable] (zp.154), you can set the ISO speed within ISO 200 - 25600 (depending on the [ISO speed range] setting).
Under [ 2: ISO speed settings], [Auto ISO range] and [Min.
shutter spd.] cannot be set (zp.131, 132) for movie shooting.
z COPY
24

kShooting Movies
Since shooting a movie at ISO 32000/40000/51200 may result in substantial noise, these speeds are designated as expanded ISO speeds (displayed as [H]).
If [ISO speed range]’s [Minimum] is set to [L (50)] and you switch from still photo shooting to movie shooting, the manual ISO speed setting range’s minimum for movie shooting will be ISO 100. It cannot be expanded to ISO 50.
Changing the shutter speed or aperture, or zooming the lens during movie shooting, is not recommended since the changes in the exposure, or noise at high ISO speeds, may be recorded.
When shooting a movie of a moving subject, a shutter speed of 1/30 sec. to 1/125 sec. is recommended. The faster the shutter speed, the less smooth the subject’s movement will look.
If you change the shutter speed while shooting under fluorescent or LED lighting, image flicker may be recorded.
If ISO Auto is set,COPYyou can press the <A> button to lock the ISO speed. When you press the <A> button and then recompose the picture, you
can see the exposure level difference on the exposure level indicator (zp.25, 26) compared to when you first pressed the <A> button. By pressing the <B> button, you can display the histogram.
25

kShooting Movies
Information Display
Each time you press the <B> button, the information display will change.
AF mode |
|
|
|
|
|
|
|
|
|
|
|
|
|
|
|
|
|
|
|
|
|
|
|
Canon Log gamma/Picture Style |
|||||||||||||||||||
•d: Live mode |
|
|
|
|
|
|
|
|
|
|
|
|
|
|
|
|
|
|
|
|
|
|
|
|
|
||||||||||||||||||
•c : Face detection |
|
|
|
|
|
|
|
|
|
|
Time code |
|
|
|
|
||||||||||||||||||||||||||||
Live mode |
|
|
|
|
|
|
|
|
|
|
|
|
AF point (Live mode) |
||||||||||||||||||||||||||||||
•f:Quick mode |
|
|
|
|
|
|
|
|
|
|
|
|
|
||||||||||||||||||||||||||||||
|
|
|
|
|
|
|
|
|
|
|
|
|
|
|
|
|
|
|
|
|
|
|
|
|
|||||||||||||||||||
Shooting mode |
|
|
|
|
|
|
|
|
|
|
|
|
|
|
|
|
|
|
|
|
|
|
|
|
|
|
|
|
|
|
|
|
|
|
|
||||||||
|
|
|
|
|
|
|
|
|
|
|
|
|
|
|
|
|
|
|
|
|
|
|
|
|
|
|
|
|
|||||||||||||||
Drive mode |
|
|
|
|
|
|
|
|
|
|
|
|
|
|
|
|
|
|
|
|
|
|
|
|
|
|
|
|
|
|
|
|
|
|
|
|
|
|
Recording movie |
||||
|
|
|
|
|
|
|
|
|
|
|
|
|
|
|
|
|
|
|
|
|
|
|
|
|
|
|
|
|
|||||||||||||||
|
|
|
|
|
|
|
|
|
|
|
|
|
|
|
|
|
|
|
|
|
|
|
|
|
|
|
|
|
|
|
|
|
|||||||||||
White balance |
|
|
|
|
|
|
|
|
|
|
|
|
|
|
|
|
|
|
|
|
|
|
|
|
|
|
|
|
|
|
|
|
|
|
|
Digital compass |
|||||||
Auto Lighting |
|
|
|
|
|
|
|
|
|
|
|
|
|
|
|
|
|
|
|
|
|
|
|
|
|
|
|
|
|
|
|
|
|
|
|
|
|
|
|
|
|
||
|
|
|
|
|
|
|
|
|
|
|
|
|
|
|
|
|
|
|
|
|
|
|
|
|
|
|
|
|
|
|
|
|
|
|
|
|
|
|
|
|
|||
Optimizer |
|
|
|
|
|
|
|
|
|
|
|
|
|
|
|
|
|
|
|
|
|
|
|
|
|
|
|
|
|
|
|
|
|
|
|
|
View Assist |
||||||
Movie recording |
|
|
|
|
|
|
|
|
|
|
|
|
|
|
|
|
|
|
|
|
|
|
|
|
|
|
|
|
|
|
|
|
|
|
|
|
|
|
Magnification/ |
||||
|
|
|
|
|
|
|
|
|
|
|
|
|
|
|
|
|
|
|
|
|
|
|
|
|
|
|
|
|
|
|
|
|
|
|
|
|
|
||||||
|
|
|
|
|
|
|
|
|
|
|
|
|
|
|
|
|
|
|
|
|
|
|
|
|
|
|
Magnifying position |
||||||||||||||||
|
|
|
|
|
|
|
|
|
|
|
|
|
|
|
|
|
|
|
|
|
|
|
|
|
|||||||||||||||||||
|
size |
|
|
|
|
|
|
|
|
|
|
|
|
|
|
|
|
|
|
|
|
|
|
|
|
|
|
|
|
||||||||||||||
|
|
|
|
|
|
|
|
|
|
|
|
|
|
|
|
|
|
|
|
|
|
|
|
|
|
|
|
|
|
|
|
|
|||||||||||
|
|
|
|
|
|
|
|
|
|
|
|
|
|
|
|
|
|
|
COPY |
|
|
|
|
|
|
Battery check |
|||||||||||||||||
Sound-recording |
|
|
|
|
|
|
|
|
|
|
|
|
|
|
|
|
|
|
|
|
|
|
|
|
|||||||||||||||||||
|
|
|
|
|
|
|
|
|
|
|
|
|
|
|
|
|
|
|
|
|
|
|
|
|
|
|
|
|
|||||||||||||||
level:Manual |
|
|
|
|
|
|
|
|
|
|
|
|
|
|
|
|
|
|
|
|
|
|
|
|
Shooting mode |
||||||||||||||||||
|
AE lock |
|
|
|
|
|
|
|
|
|
|
|
|
|
|
|
|
|
|
|
|
|
|
|
|
|
|
|
|
|
|
|
|
||||||||||
|
|
|
|
|
|
|
|
|
|
|
|
|
|
|
|
|
|
|
|
|
|
|
|
|
|
|
|
|
|
|
|
|
|||||||||||
|
|
|
|
|
|
|
|
|
|
|
|
|
|
|
|
|
|
|
|
|
|
|
|
|
|
|
|
|
L:Autoexposure |
||||||||||||||
|
Frame rate |
|
|
|
|
|
|
|
|
|
|
|
|
|
|
|
|
|
|
|
|
|
|
|
|
|
|
|
|||||||||||||||
|
|
|
|
|
|
|
|
|
|
|
|
|
|
|
|
|
|
|
|
|
|
|
|
|
|
|
|
: Shutter-priority AE |
|||||||||||||||
|
|
|
|
|
|
|
|
|
|
|
|
|
|
|
|
|
|
|
|
|
|
|
|
|
|
|
|||||||||||||||||
Shutter speed |
|
|
|
|
|
|
|
|
|
|
|
|
|
|
|
|
|
|
|
|
|
|
|
|
|
|
|
|
: Aperture-priority AE |
||||||||||||||
|
|
|
|
|
|
|
|
|
|
|
|
|
|
|
|
|
|
|
|
|
|
|
|
|
K:Manual exposure |
||||||||||||||||||
|
|
|
|
|
|
|
|
|
|
|
|
|
|
|
|
|
|
|
|
|
|
|
|
||||||||||||||||||||
Movie recording/ |
|
|
|
|
|
|
|
|
|
|
|
|
|
|
|
|
|
|
|
Highlight tone priority |
|||||||||||||||||||||||
|
|
|
|
|
|
|
|
|
|
|
|
|
|
|
|
|
|
||||||||||||||||||||||||||
|
|
|
|
|
|
|
|
|
|
|
|
|
|
|
|
|
|
|
|||||||||||||||||||||||||
compression method |
|
|
|
|
|
|
|
|
|
|
|
|
|
|
|
ISO speed |
|||||||||||||||||||||||||||
|
|
|
|
|
|
|
|
|
|
|
|
|
|
|
|||||||||||||||||||||||||||||
|
|
|
|
|
|
|
Aperture |
|
|
|
|
|
|
|
|
|
|
|
|
Possible shots |
|||||||||||||||||||||||
|
|
|
|
|
|
|
|
|
|
|
|
|
|
|
|
||||||||||||||||||||||||||||
Sound-recording level meter |
|
|
|
|
|
|
Exposure level |
|
|
|
|
||||||||||||||||||||||||||||||||
|
|
|
|
|
|
|
|
|
|
||||||||||||||||||||||||||||||||||
|
|
|
|
Movie shooting remaining time*/ |
|||||||||||||||||||||||||||||||||||||||
|
|
|
|
|
|
|
|
|
|
|
|
|
|
|
|
|
|
|
|
|
|
|
|
|
|
|
|||||||||||||||||
|
|
|
|
|
|
|
|
|
|
|
|
|
|
|
|
|
|
|
|
|
|
|
|
|
|
|
|||||||||||||||||
|
|
|
|
|
|
|
|
|
|
|
|
|
|
|
|
|
|
|
|
|
|
|
|
|
|
|
Elapsed time |
|
|
|
|
||||||||||||
* Applies to a single movie clip.
You can display the electronic level by pressing the <B> button (zp.62). If the AF mode is set to [uLive mode] or if the camera is connected to a TV set with an HDMI cable (zp.273), the electronic level is not displayed. If there is no card in the camera, the movie shooting remaining time will be displayed in red.
When movie shooting starts, the movie shooting remaining time will change to the elapsed time.
26

kShooting Movies
Notes on Movie Shooting
The camera cannot autofocus continuously like a camcorder.
If you use AF during movie shooting, the focus may become greatly blurred momentarily and the exposure may change.
If you use a USM lens and perform AF while shooting a movie in low light, horizontal noise stripes may be recorded. With certain lenses having an electronic focusing ring, horizontal noise stripes may be recorded even when you focus manually (MF).
Zooming the lens during movie shooting is not recommended. Zooming the lens can cause changes in the exposure regardless of whether the lens’ maximum aperture changes or not. Exposure changes may be recorded as a result.
During movie shooting, do not point the lens toward the sun. The sun’s heat can damage the camera’s internal components.
Under [51: Record func+card/folder sel.], even if [Record func.] is set to [Rec. to multiple] (zp.118), the movie cannot be recorded to both
multiple] is set, the movie will be recorded to the card which is set for [Playback].
If <Q> is set and the ISO speed or aperture changes during movie shooting, the white balance may also change.
If you shoot a movie under fluorescent or LED lighting, the movie may flicker.
Card 1 <f> andCOPYCard 2 <g>. If [Rec. separately] or [Rec. to
When you shoot at high ISO speeds, color tone may be changed depending on the movie-recording size settings.
When you press the <u> button, the “x5” or “x10” figure displayed on the screen’s bottom right indicates the magnification based on 35mm full-frame sensor size.
Cautions for movie shooting are on pages 55 and 56.
If necessary, also see “Live View Shooting Cautions” on pages 221 and 222 in the EOS-1D X Instruction Manual.
27

kShooting Movies
Notes on Movie Shooting
Movie-related settings are under the [z4] and [z5] tabs (p.51). A movie file is recorded each time you shoot a movie. If the file size
exceeds 4 GB for a single movie shoot (single clip), a new file will be created.
The movie image’s field of view is approx. 100% (with movie recording size set to [A]).
You can also focus the image by pressing the <p> button.
To focus during movie shooting, press the <p> button. You cannot focus by pressing the shutter button.
Sizes of AF points and a magnification frame displayed in information display (p.26) depend on the movie-recording size setting (p.34). Monaural sound is recorded by the camera’s built-in microphone (p.18). By connecting a stereo microphone (commercially available) equipped with a 3.5 mm mini plug to the camera’s external microphone IN terminal (p.13), stereo sound recording is possible.
By connecting stereoCOPYheadphones (commercially available) equipped with a 3.5 mm mini plug to the camera’s headphone terminal (p.13), you can listen to the sound during movie shooting.
The focus preset function is possible for movie shooting when using a (super) telephoto lens equipped with the focus preset mode marketed since the second half of 2011.
With a fully-charged Battery Pack LP-E4N, the total movie shooting time (with Hshooting) will be as follows: approx. 1 hr. 25 min. at room temperature (23°C/73°F), and approx. 1 hr. 15 min. at low temperature (0°C/32°F).
28

kShooting Movies
 Cautions for Using EF Cinema (CN-E) Lenses
EF Cinema lenses with PL mount are not supported.
EF Cinema lenses require the aperture to be adjusted manually. Therefore, they are not suitable for autoexposure shooting (p.18) and shutter-priority AE shooting (p.19) for which the aperture is set automatically to suit the brightness.
If the EF Cinema lens is not fitted with a function for sending information to the camera, the aperture will be indicated as “00.” Also, the lens name and other information will not be recorded in the Exif information.
If the EF Cinema lens can send information to the camera, the aperture will be displayed as the f/number (not as the TNo.).
The color tone of movies shot with EF lenses and EF Cinema lenses is different. Compared to EF lenses, EF Cinema lenses tend to make movies look slightly more yellow.
When you shoot a still photo using an EF Cinema lens, lens aberration correction (peripheral illumination correction and chromatic aberration correction) is not COPYapplied.
Additional cautions regarding the use of EF Cinema lenses may be announced on the Canon Web site, etc.
29

kShooting Movies
Final Image Simulation
The final image simulation is a function that allows you to see the effects of the Picture Style, white balance, etc., on the image. During movie shooting, the image displayed will automatically reflect the effects of the settings listed below.
Final image simulation for movies
Picture Style
*All settings such as sharpness, contrast, color saturation, and color tone will be reflected.
Canon Log gamma (without View Assist)
* Sharpness, saturation, and hue will be reflected.
White balance
White balance correction
Exposure |
COPY |
|
Depth of field |
||
|
Auto Lighting Optimizer
Peripheral illumination correction
Chromatic aberration correction
Highlight tone priority
Even when Canon Log gamma (p. 43) is set, function settings other than the Picture Style will be reflected in the final image simulation.
30
 Loading...