


MANUAL INSTRUCTION
E
|
|
|
|
|
|
|
|
|
|
|
|
|
|
|
|
|
|
|
|
|
|
|
|
|
|
|
|
|
|
|
|
|
|
|
|
|
|
|
|
|
|
|
|
|
|
|
|
|
|
|
|
|
|
|
|
|
|
|
|
|
|
|
|
|
|
|
|
|
|
|
|
|
|
|
|
|
|
|
|
|
|
|
|
|
|
|
|
|
|
|
|
|
|
|
|
|
|
|
|
|
|
|
|
|
|
|
|
|
|
|
|
|
|
|
|
|
● |
This manual is for the EOS 5D Mark III installed with firmware |
|
E |
|||||||||
INSTRUCTION |
||||||||||||
|
version 1.2.0 or later. |
|||||||||||
● |
The “Software Start Guide” is included at the end of this manual. |
MANUAL |
||||||||||

Introduction
The EOS 5D Mark III is a digital single-lens reflex camera featuring a fine-detail, full-frame (approx. 36 x 24 mm) CMOS sensor with approx. 22.3 effective megapixels, DIGIC 5+, approx. 100% viewfinder coverage, high-precision and high-speed 61-point AF, approx. 6 fps continuous shooting, Live View shooting, and Full High-Definition (Full HD) movie shooting.
Before Starting to Shoot, Be Sure to Read the Following
To avoid botched pictures and accidents, first read the “Safety Precautions” (p.389-391) and “Handling Precautions” (p.14-15).
Refer to This Manual while Using the Camera to Further Familiarize Yourself with the Camera
While reading this manual, take a few test shots and see how they come out. You can then better understand the camera.
Testing the Camera Before Use and Liability
After shooting, play images back and check whether they have been properly recorded. If the camera or memory card is faulty and the images cannot be recorded or downloaded to a computer, Canon cannot be held liable for any loss or inconvenience caused.
Copyrights
Copyright laws in your country may prohibit the use of your recorded images of people and certain subjects for anything but private enjoyment. Also be aware that certain public performances, exhibitions, etc., may prohibit photography even for private enjoyment.
Memory Cards
In this manual, “CF card” refers to CompactFlash cards and “SD card” refers to SD/SDHC/SDXC cards. “Card” refers to all memory cards used to record images or movies. The camera does not come with a card for recording images/movies. Please purchase it separately.
2
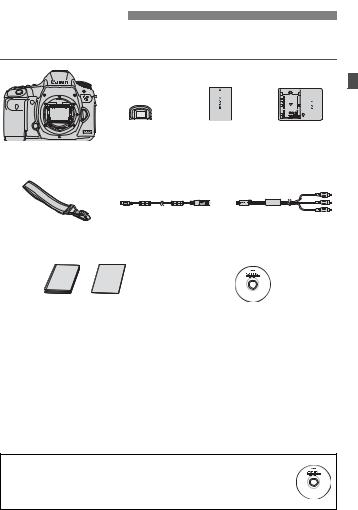
Item Check List
Before starting, check that all the following items have been included with your camera. If anything is missing, contact your dealer.
Eyecup Eg |
Battery Pack |
Battery Charger |
Camera |
LP-E6 |
LC-E6/LC-E6E* |
(with body cap) |
(with protective cover) |
|
Wide Strap |
Interface Cable |
Stereo AV Cable |
|
|
IFC-200U |
AVC-DC400ST |
|
(1) |
(2) |
|
|
(1) Camera Instruction Manual |
EOS DIGITAL Solution Disk |
||
(this booklet) |
|
(Software/Software Instruction Manuals) |
|
(2)Pocket Guide
*Battery Charger LC-E6 or LC-E6E is provided. (The LC-E6E comes with a power cord.)
Attach Eyecup Eg to the viewfinder eyepiece.
If you purchased a Lens Kit, check that the lens is included. Depending on the Lens Kit type, a lens instruction manual may also be included.
Be careful not to lose any of the above items.
Software Instruction Manuals
The Software Instruction Manuals are included on the EOS DIGITAL Solution Disk as PDF files. See page 396 for instructions to look up information in the Software Instruction Manuals.
3

Conventions Used in this Manual 
Icons in this Manual
<6> |
: Indicates the Main Dial. |
<5> |
: Indicates the Quick Control Dial. |
<9> |
: Indicates the Multi-controller. |
<0> |
: Indicates the Setting button. |
0, 9, 7, 8 : Indicates that the corresponding function remains active for 4 sec., 6 sec., 10 sec., or 16 sec. respectively after you let go of the button.
*In this manual, the icons and markings indicating the camera’s buttons, dials, and settings correspond to the icons and markings on the camera and on the LCD monitor.
3: Indicates a function that can be changed by pressing the <M> button and changing the setting.
M: When shown at the upper right of a page, it indicates that the function is available only when the Mode Dial is set to d, s, f, a, or F.
*The respective function cannot be used in the <A> (Scene Intelligent Auto) mode.
(p.**) : Reference page numbers for more information.
: Warning to prevent shooting problems.
: Supplemental information.
: Tips or advice for better shooting. : Problem-solving advice.
Basic Assumptions
All operations explained in this manual assume that the power switch has been set to <1> and the <R> switch has been set to the left (Multi function lock released) (p.34, 47).
It is assumed that all the menu settings and Custom Functions are set to their defaults.
The illustrations in this manual show the camera attached with the EF50mm f/1.4 USM or EF24-105mm f/4L IS USM lens as an example.
4

Chapters
For first-time DSLR users, Chapters 1 and 2 explain the camera’s basic operations and shooting procedures.
|
Introduction |
2 |
|
|
|
||
|
|
|
|
1 |
Getting Started |
27 |
|
|
|||
|
|
||
2 |
Basic Shooting |
63 |
|
|
|||
|
|
||
3 |
Setting the AF and Drive Modes |
69 |
|
|
|||
|
|
||
4 |
Image Settings |
117 |
|
|
|||
|
|
||
5 |
Advanced Operations |
161 |
|
|
|||
|
|
||
6 |
Flash Photography |
189 |
|
|
|||
|
|
||
7 |
Shooting with the LCD Monitor (Live View Shooting) |
199 |
|
|
|||
|
|
||
8 |
Shooting Movies |
219 |
|
|
|||
|
|
||
9 |
Image Playback |
249 |
|
|
|||
|
|
||
10 |
Post-Processing Images |
287 |
|
|
|||
|
|
||
11 |
Sensor Cleaning |
295 |
|
|
|||
|
|
||
12 |
Printing Images and Transferring Images to a Computer |
301 |
|
|
|||
|
|
||
13 |
Customizing the Camera |
319 |
|
|
|||
|
|
||
14 |
Reference |
341 |
|
|
|||
|
|
||
15 |
Software Start Guide |
393 |
|
|
|||
|
|
5

Contents |
|
Introduction |
2 |
Item Check List................................................................................. |
3 |
Conventions Used in this Manual..................................................... |
4 |
Chapters........................................................................................... |
5 |
Index to Features ........................................................................... |
12 |
Handling Precautions ..................................................................... |
14 |
Quick Start Guide ........................................................................... |
16 |
Nomenclature ................................................................................. |
18 |
1 Getting Started |
27 |
Charging the Battery ...................................................................... |
28 |
Installing and Removing the Battery............................................... |
30 |
Installing and Removing the Card .................................................. |
31 |
Turning on the Power ..................................................................... |
34 |
Setting the Date, Time, and Zone .................................................. |
36 |
Selecting the Interface Language................................................... |
38 |
Attaching and Detaching a Lens .................................................... |
39 |
About the Lens Image Stabilizer .................................................... |
42 |
Basic Operation.............................................................................. |
43 |
QQuick Control for Shooting Functions ....................................... |
49 |
3Menu Operations.................................................................. |
51 |
Before You Start............................................................................. |
53 |
Formatting the Card..................................................................... |
53 |
Setting the Power-off Time/Auto Power Off ................................. |
55 |
Setting the Image Review Time................................................... |
55 |
Reverting the Camera to the Default Settings ............................. |
56 |
Displaying the Grid and Electronic Level........................................ |
59 |
Feature Guide............................................................................ |
61 |
6

|
Contents |
|
2 |
Basic Shooting |
63 |
|
AFully Automatic Shooting (Scene Intelligent Auto) ................... |
64 |
|
AFull Auto Techniques (Scene Intelligent Auto) ......................... |
67 |
3 |
Setting the AF and Drive Modes |
69 |
|
f: Selecting the AF Mode ............................................................ |
70 |
|
SSelecting the AF Area............................................................... |
72 |
|
AF Area Selection Modes ............................................................... |
75 |
|
About the AF Sensor....................................................................... |
78 |
|
Lenses and Usable AF Points......................................................... |
79 |
|
Selecting AI Servo AF Characteristics (For a Subject) ................... |
87 |
|
Customizing AF Functions .............................................................. |
96 |
|
Fine Adjustment of AF’s Point of Focus (AF Microadjustment) .... |
106 |
|
When Autofocus Fails ................................................................... |
112 |
|
MF: Manual Focusing................................................................. |
113 |
|
iSelecting the Drive Mode........................................................ |
114 |
|
jUsing the Self-timer ................................................................. |
115 |
4 |
Image Settings |
117 |
|
Selecting the Card for Recording and Playback ........................... |
118 |
|
Setting the Image-Recording Quality ............................................ |
121 |
|
i: Setting the ISO Speed........................................................... |
126 |
|
ASelecting a Picture Style....................................................... |
131 |
|
ACustomizing a Picture Style.................................................. |
134 |
|
ARegistering a Picture Style ................................................... |
137 |
|
B: Setting the White Balance.................................................... |
139 |
|
OCustom White Balance ........................................................ |
140 |
|
PSetting the Color Temperature ............................................ |
141 |
|
uWhite Balance Correction ........................................................ |
142 |
|
Correcting the Brightness and Contrast Automatically (Auto Lighting Optimizer) .. |
144 |
7

Contents |
|
|
|
Noise Reduction Settings ............................................................. |
145 |
|
Highlight Tone Priority .................................................................. |
148 |
|
Lens Peripheral Illumination / Chromatic Aberration Correction........ |
149 |
|
Creating and Selecting a Folder................................................... |
152 |
|
Changing the File Name............................................................... |
154 |
|
File Numbering Methods .............................................................. |
156 |
|
Setting Copyright Information....................................................... |
158 |
|
Setting the Color Space ............................................................... |
160 |
5 |
Advanced Operations |
161 |
|
d: Program AE ........................................................................... |
162 |
|
s: Shutter-Priority AE................................................................ |
164 |
|
f: Aperture-Priority AE ............................................................. |
166 |
|
Depth of Field Preview............................................................... |
167 |
|
a: Manual Exposure ................................................................... |
168 |
|
qSelecting the Metering Mode.................................................. |
169 |
|
Setting Exposure Compensation.................................................. |
171 |
|
hAuto Exposure Bracketing (AEB)........................................... |
172 |
|
AAE Lock................................................................................... |
173 |
|
F: Bulb Exposures....................................................................... |
174 |
|
w: HDR (High Dynamic Range) Shooting .............................. |
175 |
|
PMultiple Exposures ................................................................. |
179 |
|
2Mirror Lockup ........................................................................ |
186 |
|
Using the Eyepiece Cover............................................................ |
187 |
|
FUsing a Remote Switch ............................................................ |
187 |
|
RRemote Control Shooting .......................................................... |
188 |
6 |
Flash Photography |
189 |
|
DFlash Photography ................................................................... |
190 |
|
Setting the Flash .......................................................................... |
193 |
8

|
|
Contents |
7 |
Shooting with the LCD Monitor (Live View Shooting) |
199 |
|
AShooting with the LCD Monitor............................................... |
200 |
|
Shooting Function Settings ........................................................... |
204 |
|
Menu Function Settings ................................................................ |
205 |
|
Using AF to Focus ........................................................................ |
209 |
|
Focusing Manually ........................................................................ |
216 |
8 |
Shooting Movies |
219 |
|
kShooting Movies ..................................................................... |
220 |
|
Autoexposure Shooting.............................................................. |
220 |
|
Shutter-priority AE...................................................................... |
221 |
|
Aperture-priority AE.................................................................... |
222 |
|
Manual Exposure Shooting ........................................................ |
225 |
|
Shooting Still Photos .................................................................. |
230 |
|
Shooting Function Settings ........................................................... |
232 |
|
Setting the Movie-Recording Size................................................. |
233 |
|
Setting the Sound Recording ........................................................ |
236 |
|
Silent Control ................................................................................ |
238 |
|
Setting the Time Code .................................................................. |
239 |
|
Menu Function Settings ................................................................ |
243 |
9 |
Image Playback |
249 |
|
xImage Playback ...................................................................... |
250 |
|
B: Shooting Information Display............................................. |
252 |
|
H ISearching for Images Quickly........................................... |
255 |
|
uMagnified View ........................................................................ |
257 |
|
XComparing Images (Two-image Display)................................ |
259 |
|
bRotating the Image .................................................................. |
260 |
|
Setting Ratings.............................................................................. |
261 |
|
QQuick Control During Playback ............................................... |
263 |
9

Contents |
|
|
|
kEnjoying Movies ..................................................................... |
265 |
|
kPlaying Movies ....................................................................... |
267 |
|
XEditing the Movie’s First and Last Scenes .............................. |
269 |
|
Slide Show (Auto Playback) ......................................................... |
271 |
|
Viewing the Images on TV ........................................................... |
274 |
|
KProtecting Images................................................................... |
278 |
|
aCopying Images ...................................................................... |
280 |
|
LErasing Images........................................................................ |
283 |
|
Changing Image Playback Settings ............................................. |
285 |
|
Adjusting the LCD Monitor Brightness....................................... |
285 |
|
Auto Rotation of Vertical Images ............................................... |
286 |
10 |
Post-Processing Images |
287 |
|
RProcessing RAW Images with the Camera .......................... |
288 |
|
SResize..................................................................................... |
293 |
11 |
Sensor Cleaning |
295 |
|
fAutomatic Sensor Cleaning .................................................. |
296 |
|
Appending Dust Delete Data........................................................ |
297 |
|
Manual Sensor Cleaning .............................................................. |
299 |
12 |
Printing Images and Transferring Images to a Computer |
301 |
|
Preparing to Print ......................................................................... |
302 |
|
wPrinting.................................................................................... |
304 |
|
Trimming the Image................................................................... |
309 |
|
W Digital Print Order Format (DPOF) ......................................... |
311 |
|
W Direct Printing with DPOF....................................................... |
314 |
|
dTransferring Images to a Personal Computer........................ |
315 |
10
|
|
Contents |
13 |
Customizing the Camera |
319 |
|
Custom Functions ......................................................................... |
320 |
|
Custom Function Settings............................................................. |
321 |
|
C.Fn1: Exposure ........................................................................ |
321 |
|
C.Fn2: Disp./Operation .............................................................. |
324 |
|
C.Fn3: Others............................................................................. |
326 |
|
82: Custom Controls .................................................................. |
327 |
|
Registering My Menu .................................................................... |
337 |
|
wRegister Custom Shooting Modes .......................................... |
338 |
14 |
Reference |
341 |
|
BButton Functions................................................................. |
342 |
|
Checking the Battery Information.................................................. |
344 |
|
Using a Household Power Outlet.................................................. |
348 |
|
Replacing the Date/Time Battery .................................................. |
349 |
|
Using Eye-Fi Cards....................................................................... |
350 |
|
Function Availability Table According to Shooting Mode .............. |
352 |
|
Menu Settings ............................................................................... |
354 |
|
System Map .................................................................................. |
362 |
|
Troubleshooting Guide.................................................................. |
364 |
|
Error Codes................................................................................... |
377 |
|
Specifications................................................................................ |
378 |
|
Safety Precautions........................................................................ |
389 |
15 |
Software Start Guide |
393 |
|
Software Start Guide..................................................................... |
394 |
|
Index ............................................................................................. |
397 |
11

Index to Features
Power
Charging the battery |
Î p.28 |
Battery check |
Î p.35 |
Battery information check |
Î p.344 |
Power outlet |
Î p.348 |
Auto power off |
Î p.55 |
Card
Format |
Î p.53 |
Select card |
Î p.118 |
Release shutter without card Î p.32 |
|
Lens
Attaching/Detaching |
Î p.39 |
Zoom |
Î p.40 |
Image Stabilizer |
Î p.42 |
Basic Settings
Language |
Î p.38 |
Date/Time/Zone |
Î p.36 |
Beeper |
Î p.354 |
Copyright information |
Î p.158 |
Clear all camera settings Î p.56 |
|
Viewfinder
Dioptric adjustment |
Î p.43 |
Eyepiece cover |
Î p.187 |
Grid display |
Î p.59 |
Electronic level |
Î p.59 |
LCD Monitor
Brightness adjustment |
Î p.285 |
Electronic level |
Î p.60 |
Feature guide |
Î p.61 |
AF
AF mode |
Î p.70 |
AF area selection mode |
Î p.72 |
AF point selection |
Î p.74 |
AI Servo AF characteristics |
Î p.87 |
AF Custom Functions |
Î p.96 |
AF Microadjustment |
Î p.106 |
Manual focusing |
Î p.113 |
Metering
Metering mode |
Î p.169 |
Drive
Drive mode |
Î p.114 |
Self-timer |
Î p.115 |
Maximum burst |
Î p.125 |
Recording Images
Record func. |
Î p.118 |
Create/select a folder |
Î p.152 |
File name |
Î p.154 |
File No. |
Î p.156 |
Image Quality
Image-recording quality |
Î p.121 |
ISO speed |
Î p.126 |
Picture Style |
Î p.131 |
White balance |
Î p.139 |
Auto Lighting Optimizer |
Î p.144 |
Noise reduction for high |
|
ISO speeds |
Î p.145 |
Noise reduction for long |
|
exposures |
Î p.146 |
Highlight tone priority |
Î p.148 |
Peripheral illumination |
|
correction |
Î p.149 |
12

Index to Features
Chromatic aberration |
|
correction |
Î p.150 |
Color space |
Î p.160 |
Shooting
Shooting mode |
Î p.24 |
HDR |
Î p.175 |
Multiple exposures |
Î p.179 |
Mirror lockup |
Î p.186 |
Depth-of-field preview |
Î p.167 |
Remote control |
Î p.188 |
Quick Control |
Î p.49 |
Exposure Adjustment
Exposure compensation Î p.171
AEB |
Î p.172 |
AE lock |
Î p.173 |
Safety shift |
Î p.323 |
Flash
External flash |
Î p.189 |
External flash function |
|
settings |
Î p.193 |
External Speedlite |
|
Custom Functions |
Î p.198 |
Live View Shooting
Live View shooting |
Î p.199 |
Focusing |
Î p.209 |
Aspect ratio |
Î p.206 |
Movie Shooting
Movie shooting |
Î p.219 |
Movie recording size |
Î p.233 |
Sound recording |
Î p.236 |
Time code |
Î p.239 |
HDMI output |
Î p.245 |
Still photo shooting |
Î p.230 |
Playback
Image review time |
Î p.55 |
Single image display |
Î p.250 |
Shooting information display Î p.252
Index display |
Î p.255 |
Image browsing (Jump display) Î p.256
Magnified view |
Î p.257 |
Two-image display |
Î p.259 |
Image rotate |
Î p.260 |
Rating |
Î p.261 |
Movie playback |
Î p.267 |
Slide show |
Î p.271 |
Viewing images on TV |
Î p.274 |
Protect |
Î p.278 |
Copying |
Î p.280 |
Erase |
Î p.283 |
Image Editing
RAW image processing |
Î p.288 |
Resize |
Î p.293 |
Printing and Transferring Images
PictBridge |
Î p.302 |
Print Order (DPOF) |
Î p.311 |
Image transfer |
Î p.315 |
Customization
Custom Functions (C.Fn) Î p.320
Custom Controls |
Î p.327 |
My Menu |
Î p.337 |
Custom shooting mode |
Î p.338 |
Sensor Cleaning and Dust Reduction
Sensor cleaning |
Î p.296 |
Append Dust Delete Data Î p.297
13

Handling Precautions
Camera Care
This camera is a precision instrument. Do not drop it or subject it to physical shock.
The camera is not waterproof and cannot be used underwater. If you accidentally drop the camera into water, promptly consult your nearest Canon Service Center. Wipe off any water droplets with a dry cloth. If the camera has been exposed to salty air, wipe it with a well-wrung wet cloth. Never leave the camera near anything having a strong magnetic field such as a magnet or electric motor. Also avoid using or leaving the camera near anything emitting strong radio waves such as a large antenna. Strong magnetic fields can cause camera misoperation or destroy image data.
Do not leave the camera in excessive heat such as in a car in direct sunlight. High temperatures can cause the camera to malfunction.
The camera contains precision electronic circuitry. Never attempt to disassemble the camera yourself.
Do not block the mirror operation with your finger, etc. Doing so may cause a malfunction.
Use a blower to blow away dust on the lens, viewfinder, reflex mirror, and focusing screen. Do not use cleaners that contain organic solvents to clean the camera body or lens. For stubborn dirt, take the camera to the nearest Canon Service Center.
Do not touch the camera’s electrical contacts with your fingers. This is to prevent the contacts from corroding. Corroded contacts can cause camera misoperation.
If the camera is suddenly brought in from the cold into a warm room, condensation may form on the camera and internal parts. To prevent condensation, first put the camera in a sealed plastic bag and let it adjust to the warmer temperature before taking it out of the bag.
If condensation forms on the camera, do not use the camera. This is to avoid damaging the camera. If there is condensation, remove the lens, card and battery from the camera, and wait until the condensation has evaporated before using the camera.
If the camera will not be used for an extended period, remove the battery and store the camera in a cool, dry, well-ventilated location. Even while the camera is in storage, press the shutter button a few times once in a while to check that the camera is still working.
Avoid storing the camera where there are corrosive chemicals such as a darkroom or chemical lab.
If the camera has not been used for an extended period, test all its functions before using it. If you have not used the camera for some time or if there is an important shoot coming up, have the camera checked by your Canon dealer or check the camera yourself and make sure it is working properly.
14

Handling Precautions
LCD Panel and LCD Monitor
Although the LCD monitor is manufactured with very high precision technology with over 99.99% effective pixels, there may be a few dead pixels among the remaining 0.01% or less pixels. Dead pixels displaying only black or red, etc., are not a malfunction. They do not affect the images recorded. If the LCD monitor is left on for a prolonged period, screen burn-in may occur where you see remnants of what was displayed. However, this is only temporary and will disappear when the camera is left unused for a few days. In low or high temperatures, the LCD monitor display may seem slow or it may look black. It will return to normal at room temperature.
Cards
To protect the card and its recorded data, note the following:
Do not drop, bend, or wet the card. Do not subject it to excessive force, physical shock, or vibration.
Do not touch the card’s electronic contacts with your fingers or anything metallic.
Do not store or use the card near anything having a strong magnetic field such as a TV set, speakers, or magnet. Also avoid places prone to having static electricity.
Do not leave the card in direct sunlight or near a heat source. Store the card in a case.
Do not store the card in hot, dusty, or humid locations.
Lens
After detaching the lens from the camera, attach the lens |
Contacts |
caps and put down the lens with the rear end up to avoid |
|
scratching the lens surface and electrical contacts. |
|
Cautions During Prolonged Use
If you use continuous shooting, Live View shooting, or movie shooting for a prolonged period, the camera may become hot. Although this is not a malfunction, holding the hot camera for a long period can cause slight skin burns.
15
Quick Start Guide
1 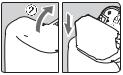
2 

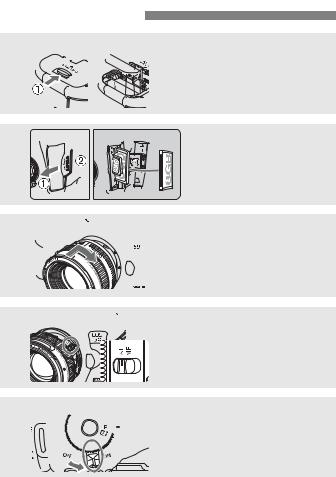
Insert the battery (p.30).
To charge the battery, see page 28.
Insert a card (p.31).
The camera-front side slot is for a CF card, and the camera-back side slot is for an SD card.
3 
4 
5 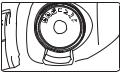
Attach the lens (p.39).
Align it with the red dot.
Set the lens focus mode switch to <f> (p.39).
Set the power switch to <1>
(p.34).
16

|
Quick Start Guide |
6 |
While holding down the center |
of the Mode Dial, set it to <A> |
|
|
(Scene Intelligent Auto) (p.64). |
|
All the necessary camera settings |
|
will be set automatically. |
7 |
Focus the subject (p.44). |
Look through the viewfinder and |
|
|
aim the viewfinder center over the |
|
subject. |
|
Press the shutter button halfway, |
|
and the camera will focus the |
|
subject. |
8 |
Take the picture (p.44). |
Press the shutter button completely |
to take the picture.
9 |
Review the picture (p.55).
The captured image will be displayed for 2 sec. on the LCD monitor.
To display the image again, press the <x> button (p.250).
To shoot while looking at the LCD monitor, see “Live View Shooting” (p.199).
To view the images captured so far, see “Image Playback” (p.250). To delete an image, see “Erasing Images” (p.283).
17
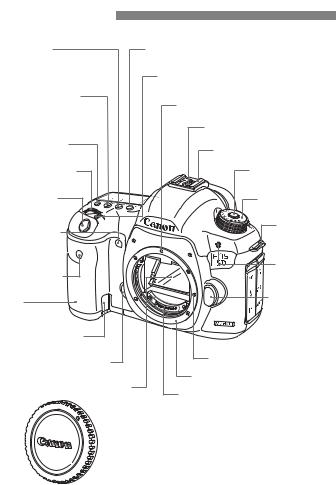
Nomenclature
<o> |
<n> Metering mode selection/ |
|
AF mode selection/ |
White balance selection button (p.169/139) |
|
Drive mode selection button |
<B> AF area selection mode/ |
|
(p.70/114) |
||
|
Multi-function button (p.73/190) |
|
<m> ISO speed |
Lens mount index (p.39) |
|
setting/Flash exposure |
||
compensation button |
|
|
(p.126/190) |
Flash-sync contacts |
|
<U> LCD panel |
Hot shoe (p.190) |
|
illumination button (p.48) |
||
|
||
<6> Main Dial |
Mode Dial lock release |
|
(p.45) |
button (p.45) |
Shutter button |
Mode Dial (p.24) |
(p.44) |
|
Self-timer lamp |
Strap mount |
|
(p.27) |
||
(p.115) |
|
|
|
Microphone |
|
Remote control |
(p.236) |
|
|
||
sensor (p.188) |
|
|
Grip |
Lens release |
|
button (p.40) |
||
(Battery |
||
|
||
compartment) |
|
|
DC coupler cord hole |
|
|
(p.348) |
|
|
Depth-of-field preview button |
Lens lock pin |
|
|
||
(p.167) |
Lens mount |
|
|
||
Mirror (p.186, 299) |
Contacts (p.15) |
|
|
Body cap (p.39)
18
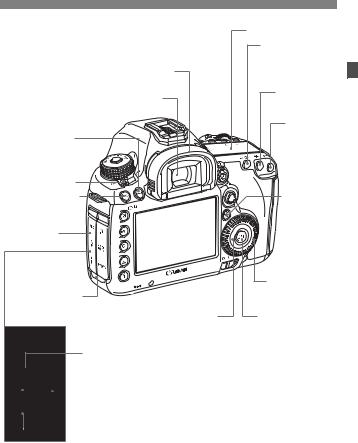
Nomenclature
|
|
LCD panel (p.21, 22) |
|
|
<p> |
|
|
AF start button |
|
Eyecup (p.187) |
(p.44, 70, 201, 228) |
|
|
|
|
Viewfinder eyepiece |
<A> AE lock |
|
button (p.173) |
|
|
|
|
|
|
<S> |
<B> Info button |
|
AF point |
|
selection |
|
(p.60, 61, 202, 227, |
|
|
|
button (p.72) |
|
250, 342) |
|
|
|
|
Power switch (p.34) |
|
<M> Menu button |
<Q> Quick |
(p.51) |
Control button |
|
(p.49) |
Terminal cover |
|
|
<5> Quick |
Date/time |
Control Dial (p.46) |
|
|
battery (p.349) |
<0> Setting |
Touch pad (p.46) |
|
|
button (p.51) |
<Y> External microphone IN terminal (p.237) 
 <n> Headphone terminal (p.237)


 <D> PC terminal (p.191)
 <q/C> Audio/video OUT/Digital terminal (p.277/302, 315)

 <D> HDMI mini OUT terminal (p.274)
 <F> Remote control terminal (N3 type) (p.187)
19

Nomenclature
Dioptric adjustment knob (p.43)
<b/m> Creative Photo/
Comparative playback (Two-image display)/ Direct print button (p.131, 175, 179/259/ 307)
<c> Rating button (p.261, 279)
<u> Index/ Magnify/Reduce button (p.255/257)
<x> Playback button (p.250)
<L> Erase button (p.283)
Speaker
Light sensor (p.285)
LCD monitor (p.285)
Tripod socket
SD card slot (p.31)
CF card slot (p.31)
<V> Focal plane mark
<A/k>
Live View shooting/ Movie shooting switch (p.199/219)
<0> Start/Stop button (p.200, 220)
<9> Multi-controller (p.47)
Strap mount (p.27)
Card slot cover (p.31)


 Battery compartment cover release lever (p.30)
Battery compartment cover (p.30)
Access lamp (p.33)
Multi function lock switch (p.47)
CF card ejection button (p.33) 
20
Nomenclature
LCD Panel
Shutter speed
FE lock (FEL)
Busy (buSY)
Multi function lock warning (L)
No card warning (Card)
Error code (Err)
Cleaning image sensor (CLn)
White balance (p.139) Q Auto
W Daylight
E Shade
R Cloudy
Y Tungsten light
U White fluorescent light
I Flash
OCustom
PColor temperature
<u> White balance correction (p.142)
<r> GPS device-connected icon
<N> Auto Lighting Optimizer (p.144)
<2> Mirror lockup (p.186)
<0> Monochrome shooting (p.133)
Aperture
AF point selection
([---- --] AF, SEL [ ], SEL AF) AF point registration
([---- --] HP, SEL [ ], SEL HP) Card warning (Card 1/2/1.2)
Possible shots
Self-timer countdown
Bulb exposure time
Card full warning (Full)
Card error warning (Err)
Error No.
Remaining images to record
AF mode (p.70)
X
One-Shot AF


 9
9
AI Focus AF
Z
AI Servo AF
4 L
Manual focus Drive mode (p.114) u Single shooting
oHigh-speed continuous shooting
iLow-speed continuous shooting
B Silent single shooting
MSilent continuous shooting
Q10-sec. Self-timer/ Remote control
k2-sec. Self-timer/
Remote control
<w> HDR shooting (p.175) <P> Multiple-exposure shooting (p.179)
The display will show only the settings currently applied.
21

Nomenclature
<f> CF card indicator
<J> CF card selection icon
ISO speed (p.126)
<g> ISO speed (p.126)
<A> Highlight tone priority (p.148)
Exposure level indicator
Exposure compensation amount (p.171) AEB range (p.172)
Flash exposure compensation amount (p.190)
Image-recording quality (p.121)
3Large
4Medium
aSmall 1
bSmall 2 (Fine)
cSmall 3 (Fine) 1 RAW
41 Medium RAW
61 Small RAW
<J> SD card selection icon
<g> SD card indicator
<h> AEB (p.172)
Metering mode (p.169)
qEvaluative metering
wPartial metering
rSpot metering
eCenter-weighted average metering
Battery check (p.35)
<y> Flash exposure compensation (p.190)
22
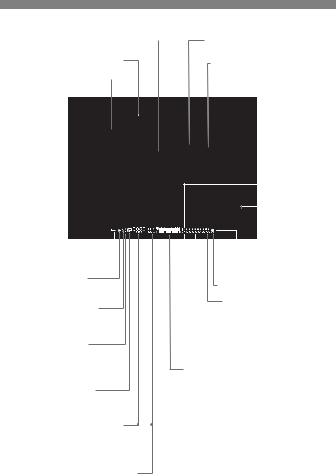
Nomenclature
Viewfinder Information
Spot metering circle (p.170) |
|
Area AF frame (p.73) |
|
||
|
|
||||
Focusing screen |
|
<S> Single AF point |
|
||
Grid (p.59) |
|
|
|
<O> Spot AF (single point) (p.75) |
|
|
|
|
|
|
|
|
|
|
|
||
|
|
|
|
|
|
|
|
|
|
|
|
|
|
|
|
|
|
|
|
|
|
<g> ISO speed |
|
|
|
|
|
|
|
|
|
|
|
|
|
|
|
|
|
|
|
|
|
|
|
|
|
|
|
|
|
|
|
|
|
|
|
|
|
|
|
|
|
|
|
|
|
|
|
|
|
|
|
|
|
|
|
|
|
|
|
|
|
|
|
|
|
|
|
|
|
|
|
|
|
|
|
|
|
|
|
|
|
|
|
|
|
|
|
|
|
|
|
|
|
|
|
|
|
|
|
|
|
|
|
|
|
|
|
|
|
|
|
|
|
||
|
|
|
|
|
|
|
|
|
|
|
|
|
|
|
|
|
|
|
|
|
|
(p.126) |
|
|
|
|
|
|
|
|
|
|
|
|
|
|
|
|
|
|
|
|
|||
|
|
|
|
|
|
|
|
|
|
|
|
|
|
|
|
|
|
|
|
|
|
<h> Warning |
|
|
|
|
|
|
|
|
|
|
|
|
|
|
|
|
|
|
|
|
|
|
|
|
|
|
|
|
|
|
|
|
|
|
|
|
|
|
|
|
|
|
|
|
|
symbol |
|
|
|
|
|
|
|
|
|
|
|
|
|
|
|
|
|
|
|
|
|
|
(p.324) |
<z> Battery check |
|
|
|
|
|
|
|
|
|
|
|
|
|
|
|
|
<o> Focus |
|||||
|
|
|
|
|
|
|
|
|
|
|
|
|
|
|
|
|||||||
|
|
|
|
|
|
|
|
|
|
|
|
|
|
|
confirmation light |
|||||||
(p.35) |
|
|
|
|
|
|
|
|
|
|
|
|
|
|||||||||
|
|
|
|
|
|
|
|
|
|
|
|
|
(p.64) |
|||||||||
<A> AE lock (p.173) / |
|
|
|
|
|
|
|
|
|
|
|
|
|
|||||||||
|
|
|
|
|
|
<e> AF status indicator (p.64) |
||||||||||||||||
AEB in-progress (p.172) |
|
|
|
|
|
|
||||||||||||||||
|
|
|
|
|
|
|
|
|
|
|
|
|
|
|||||||||
<D> Flash-ready (p.190) |
|
|
|
|
|
|
Max. burst (p.125) |
|||||||||||||||
|
|
|
|
|
|
Number of remaining multiple |
||||||||||||||||
Improper FE lock warning |
|
|
|
|
|
|
exposures (p.181) |
|||||||||||||||
<d> FE lock (p.190) / |
|
|
|
|
ISO speed (p.126) |
|||||||||||||||||
|
|
|
|
|||||||||||||||||||
|
|
|
<A> Highlight tone priority (p.148) |
|||||||||||||||||||
FEB in-progress (p.197) |
|
|
|
|||||||||||||||||||
|
|
|
||||||||||||||||||||
<e> High-speed sync (p.196) |
|
Exposure level indicator |
||||||||||||||||||||
|
|
|
|
|
|
|
|
|
|
|||||||||||||
|
|
|
|
|
|
|
|
|
|
Exposure compensation amount (p.171) |
||||||||||||
<y> Flash exposure |
|
AEB range (p.172) |
||||||||||||||||||||
|
Flash exposure compensation amount |
|||||||||||||||||||||
compensation (p.190) |
|
|||||||||||||||||||||
|
(p.190) |
|||||||||||||||||||||
|
|
|
|
|
|
|
|
|
|
|||||||||||||
Shutter speed (p.164) |
|
AF point selection |
||||||||||||||||||||
|
||||||||||||||||||||||
FE lock (FEL) |
- - - |
|
|
|
|
|
|
|
|
|
|
|
|
|
||||||||
([- - -] AF, SEL [ ], SEL AF) |
||||||||||||||||||||||
Busy (buSY) |
AF point registration |
|||||||||||||||||||||
Multi function lock warning (L) |
- - - |
|
|
|
|
|
|
|
|
|
|
|
|
|
||||||||
([- - -] HP, SEL [ ], SEL HP) |
||||||||||||||||||||||
|
Aperture (p.166) |
Card warning (Card 1/2/1.2) |
||||||||||||||||||||
|
|
|
|
|
|
|
|
|
|
|
|
|
|
|
||||||||
The display will show only the settings currently applied.
23

Nomenclature
Mode Dial
Turn the Mode Dial while holding down the Mode Dial center (Mode Dial lock release button).
F : Bulb (p.174) |
a : Manual exposure (p.168) |
f: Aperture-priority AE (p.166) |
s: Shutter-priority AE (p.164) |
d : Program AE (p.162) |
A :Scene Intelligent Auto (p.64) |
Custom shooting modes |
You can register the shooting mode (d/s/f/a/F), AF mode, |
menu settings, etc., to w, x, yMode Dial settings and shoot |
(p.338). |
24
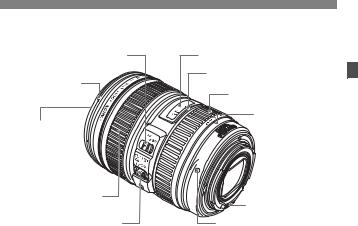
|
Nomenclature |
EF24-105mm f/4L IS USM lens |
|
Focus mode switch (p.39) |
Distance scale |
Hood mount |
Infrared index |
|
|
(p.41) |
Zoom ring (p.40) |
|
|
|
Zoom position index |
77 mm filter thread |
(p.40) |
(front of lens) |
|
Focusing ring (p.113, 216)
Contacts (p.15)
Image Stabilizer switch (p.42) |
Lens mount index (p.39) |
25
Nomenclature
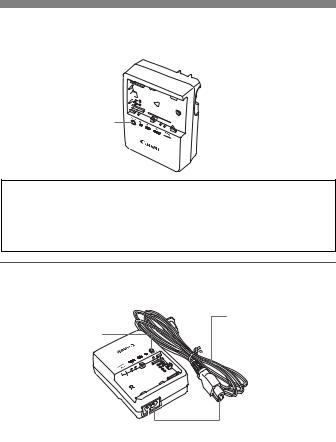
Battery Charger LC-E6
Charger for Battery Pack LP-E6/LP-E6N (p.28).

 Power plug
Battery pack slot 
Charge lamp
IMPORTANT SAFETY INSTRUCTIONS-SAVE THESE INSTRUCTIONS. DANGER-TO REDUCE THE RISK OF FIRE OR ELECTRIC SHOCK, CAREFULLY FOLLOW THESE INSTRUCTIONS.
For connection to a supply not in the U.S.A., use an attachment plug adapter of the proper configuration for the power outlet, if needed.
Battery Charger LC-E6E
Charger for Battery Pack LP-E6/LP-E6N (p.28).
Power cord
Charge lamp
Battery pack slot 

 Power cord socket
26
1
Getting Started
This chapter explains preparatory steps before you start shooting and basic camera operations.
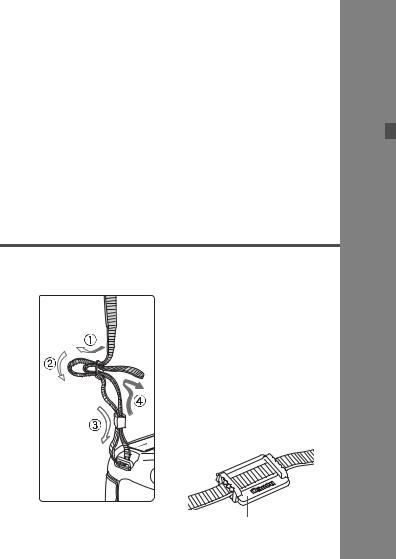
Attaching the Strap
Pass the end of the strap through the camera’s strap mount eyelet from the bottom. Then pass it through the strap’s buckle as shown in the illustration. Pull the strap to take up any slack and make sure the strap will not loosen from the buckle.
The eyepiece cover is also attached to the strap (p.187).
Eyepiece cover
27
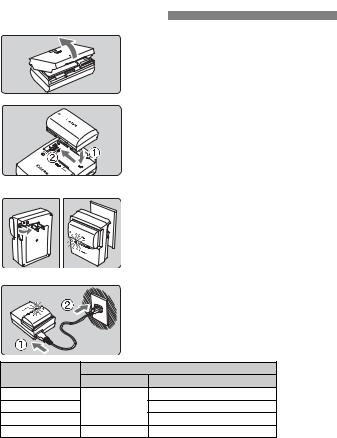
Charging the Battery
|
1 |
Remove the protective cover. |
|
|
|
Detach the protective cover provided |
|
|
|
with the battery. |
|
|
2 Attach the battery. |
||
|
|
As shown in the illustration, attach the |
|
|
|
battery securely to the charger. |
|
|
|
To detach the battery, follow the |
|
|
|
above procedure in reverse. |
|
LC-E6 |
3 Recharge the battery. |
||
|
|
For LC-E6 |
|
|
|
As shown by the arrow, flip out the |
|
|
|
battery charger’s prongs and insert |
|
|
|
the prongs into a power outlet. |
|
LC-E6E |
|
For LC-E6E |
|
|
Connect the power cord to the |
||
|
|
charger and insert the plug into the |
|
|
|
power outlet. |
|
|
|
X Recharging starts automatically and |
|
|
|
the charge lamp blinks in orange. |
|
Charge Level |
|
Charge Lamp |
|
Color |
Indicator |
||
|
|||
0 - 49% |
|
Blinks once per second |
|
50 - 74% |
Orange |
Blinks twice per second |
|
75% or higher |
|
Blinks three times per second |
|
Fully charged |
Green |
Lights up |
|
It takes approx. 2.5 hours to fully recharge a completely exhausted battery at 23°C / 73°F. The time required to recharge the battery depends on the ambient temperature and the battery’s charge level.
For safety reasons, recharging in low temperatures (5°C - 10°C / 41°F - 50°F) will take longer (up to 4 hours).
28
Charging the Battery


 Tips for Using the Battery and Charger
Upon purchase, the battery is not fully charged.
Recharge the battery before using.
Recharge the battery on the day before or on the day it is to be used.
Even during storage, a charged battery will gradually drain and lose its capacity.
After recharging the battery, detach it and disconnect the charger from the power outlet.
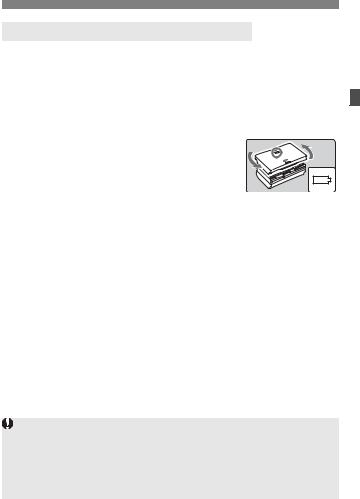
You can attach the cover in a different
orientation to indicate whether the battery
has been recharged or not.
If the battery has been recharged, attach the cover so that the battery-shaped hole < 
 > is
> is
aligned over the blue sticker on the battery. If the battery is exhausted, attach the cover in the opposite orientation.
When not using the camera, remove the battery.
If the battery is left in the camera for a prolonged period, a small amount of power current is released, resulting in excess discharge and shorter battery life. Store the battery with the protective cover attached. Storing the battery after it is fully charged can lower the battery’s performance.
The battery charger can also be used in foreign countries.
The battery charger is compatible with a 100 V AC to 240 V AC 50/60 Hz power source. If necessary, attach a commercially-available plug adapter for the respective country or region. Do not attach any portable voltage transformer to the battery charger. Doing so can damage the battery charger.
If the battery becomes exhausted quickly even after being fully charged, the battery has reached the end of its service life.
Check the battery’s recharge performance (p.344) and purchase a new battery.
After disconnecting the charger’s power plug, do not touch the prongs for at least 10 sec.
If the battery’s remaining capacity (p.344) is 94% or higher, the battery will not be recharged.
The charger cannot charge any battery other than Battery Pack LP-E6/ LP-E6N.
29
Installing and Removing the Battery 
Load a fully-charged Battery Pack LP-E6 (or LP-E6N) into the camera.
The camera’s viewfinder becomes bright when a battery is installed, and darkens when the battery is removed.
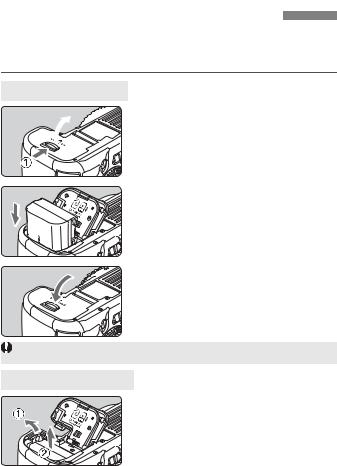
Installing the Battery


 1
1
2
Open the cover.
Slide the lever as shown by the arrows and open the cover.
Insert the battery.
Insert the end with the battery contacts.
Insert the battery until it locks in place.
 3 Close the cover.
Press the cover until it snaps shut.
Only Battery Pack LP-E6/LP-E6N can be used.
Removing the Battery
Open the cover and remove the battery.
Press the battery release lever as shown
by the arrow and remove the battery. To prevent short circuiting of the
battery contacts, be sure to attach the protective cover (provided, p.29) to the battery.
30
 Loading...