


|
|
|
|
|
installation, start-up, |
350MAV |
|
|
|
|
|
and operating instructions |
Series D |
|
|
|
|
|
DELUXE 4-WAY MULTIPOISE |
|
|
|
|
|
|
FIXED-CAPACITY DIRECT-VENT |
|
|
|
|
|
|
||
|
|
|
|
|
CONDENSING GAS FURNACE |
|
|
|
|
|
|
||
|
|
|
|
|
||
|
|
|
|
|
|
|
|
|
|
|
|
Cancels: II 350M-40-7 |
II 350M-40-8 |
|
|
|
|
|
|
12-96 |
® |
ama |
CANADIAN GAS ASSOCIATION
A PP R O VED
R
A93040 |
|
NOTE: Read the entire instruction manual before starting the |
|
installation. |
|
This symbol → indicates a change since the last issue. |
|
Index |
Page |
DIMENSIONAL DRAWING........................................................ |
2 |
SAFETY CONSIDERATIONS ..................................................... |
3 |
Clearances to Combustibles...................................................... |
3 |
ELECTROSTATIC DISCHARGE (ESD) PRECAUTIONS |
....3-4 |
INTRODUCTION .......................................................................... |
4 |
APPLICATIONS ...................................................................... |
4-11 |
General ...................................................................................... |
4 |
Upflow Applications.............................................................. |
4-7 |
Downflow Applications......................................................... |
7-8 |
Horizontal Left (Supply-Air Discharge) Applications ......... |
8-9 |
Horizontal Right (Supply-Air Discharge) Applications ..... |
9-11 |
LOCATION ............................................................................ |
11-12 |
General............................................................................... |
11-12 |
Furnace Location Relative to Cooling Equipment ................ |
12 |
Hazardous Locations............................................................... |
12 |
INSTALLATION.................................................................... |
13-17 |
Leveling Legs (If Desired) ..................................................... |
13 |
Installation In Upflow and Downflow Applications ........ |
13-15 |
Installation In Horizontal Applications .................................. |
15 |
Filter Arrangement.................................................................. |
16 |
Bottom Closure Panel............................................................. |
16 |
Gas Piping............................................................................... |
17 |
ELECTRICAL CONNECTIONS ........................................... |
17-21 |
115-v Wiring...................................................................... |
17-18 |
24-v Wiring............................................................................. |
18 |
Wiring Diagram ...................................................................... |
19 |
Accessories ........................................................................ |
20-21 |
DIRECT VENTING ............................................................... |
21-29 |
Removal of Existing Furnaces from |
|
Common Vent Systems..................................................... |
21 |
Combustion-Air and Vent Piping ..................................... |
21-27 |
Concentric Vent and Combustion-Air Termination |
|
Kit Installation.............................................................. |
27-29 |
Multiventing and Vent Termination....................................... |
29 |
CONDENSATE DRAIN ........................................................ |
29-31 |
General .................................................................................... |
29 |
Application .............................................................................. |
29 |
Condensate Drain Protection............................................. |
29-31 |
Ð1Ð
As an ENERGY STARSM Partner, Bryant/Day & Night has determined that this product meets the ENERGY STAR guidelines for energy efficiency.
CERTIFICATION OF MANUFACTURING SITE
AIRFLOW
UPFLOW
HORIZONTAL |
HORIZONTAL |
LEFT |
RIGHT |
DOWNFLOW |
|
AIRFLOW |
|
|
AIRFLOW |
AIRFLOW |
|
|
A93041 |
Fig. 1ÐMultipoise Orientations |
|
SEQUENCE OF OPERATION.............................................. |
31-33 |
Heating Mode .................................................................... |
31-32 |
Cooling Mode ......................................................................... |
32 |
Continuous Blower Mode....................................................... |
32 |
Heat Pump Mode .................................................................... |
32 |
Component Test................................................................. |
32-33 |
START-UP PROCEDURES .................................................. |
33-41 |
General .................................................................................... |
33 |
Prime Condensate Trap With Water ...................................... |
33 |
Purge Gas Lines...................................................................... |
34 |
Adjustments ....................................................................... |
34-41 |
Set Gas Input Rate ............................................................ |
34-40 |
Set Temperature Rise ........................................................ |
40-41 |
Adjust Blower Off Delay (Heat Mode) ................................. |
41 |
Set Thermostat Heat Anticipator............................................ |
41 |
CHECK SAFETY CONTROLS.................................................. |
41 |
Check Primary Limit Control................................................. |
41 |
Check Pressure Switch ........................................................... |
41 |
CHECKLIST........................................................................... |
41-42 |

|
|
26 15⁄16" |
|
|
|
|
|
|
|
26 1⁄4" |
|
|
|
AIRFLOW |
|
|
|
24 1⁄2" |
|
|
|
||
|
|
|
|
|
|
||
|
|
22 5⁄16" |
|
|
|
A |
|
|
|
|
|
|
|
||
|
|
2-IN. COMBUSTION- |
|
|
13/16" |
D |
|
|
|
CONDENSATE DRAIN |
|
|
|||
|
|
AIR CONN |
|
OUTLET |
|||
|
|
|
TRAP LOCATION |
|
|
||
|
|
|
|
|
|
||
|
|
|
(DOWNFLOW & |
|
|
|
|
|
|
|
HORIZONTAL LEFT) |
|
|
||
|
|
|
7⁄8-IN. DIA |
|
|
|
|
|
|
1⁄2-IN. DIA |
POWER CONN |
|
|
|
|
|
|
GAS CONN |
|
|
|
|
|
|
|
2-IN. VENT CONN |
|
|
|
|
|
|
|
|
|
|
33 1⁄4" |
|
|
|
|
|
|
|
TYP |
|
|
|
|
1 |
|
|
32 5⁄8" |
|
|
|
|
⁄2-IN. DIA THERMOSTAT |
|
|
TYP |
|
|
|
|
ENTRY |
|
|
|
||
|
|
7⁄8-IN. DIA |
|
30 13⁄16" |
|
||
|
|
22 11⁄16" |
|
|
|
||
|
|
|
ACCESSORY |
|
29 11⁄16" |
|
|
|
|
|
POWER ENTRY |
|
27 5⁄8" TYP |
|
|
|
|
|
CONDENSATE |
|
|
||
|
|
|
|
|
|
||
|
|
|
DRAIN TRAP |
|
27 9⁄16" |
|
|
|
|
|
LOCATION |
|
TYP |
|
|
|
|
|
(ALTERNATE |
24 |
1⁄2" |
|
|
|
|
|
UPFLOW) |
|
|||
|
14 1⁄2" |
SIDE INLET |
|
|
|
||
|
17 5⁄16" |
|
|
||||
|
TYP |
|
|
|
|||
|
|
|
|
|
|
||
|
|
|
9 7⁄16" |
|
|
|
|
|
|
|
TYP |
|
|
|
|
Ð2Ð |
11⁄4" |
|
|
|
|
INLET |
|
|
CONDENSATE |
|
|
|
|||
1" |
23 1⁄4" TYP |
|
11/16" |
E |
|||
DRAIN LOCATION |
|||||||
|
SIDE INLET |
|
|
||||
|
(UPFLOW) |
|
|
|
|||
|
|
|
|
|
|
||
|
|
26 15⁄16" TYP |
|
|
|
|
|
|
|
28 1⁄2" |
|
|
|
26 15⁄16" |
|
|
|
26 1⁄4" |
|
|
|
22 5⁄16" |
|
13/16" |
9⁄16" |
19" |
13⁄16" |
|
TYP |
|
5⁄8" |
|
|
OUTLET |
|
|
|
|
|
CONDENSATE DRAIN |
2-IN. COMBUSTION- |
|
|
|
TRAP LOCATION |
|
|
|
AIR CONN |
|
|
|
(DOWNFLOW & |
5⁄16" |
|
HORIZONTAL RIGHT) |
1⁄2-IN. DIA |
|
|
|
OR ALTERNATE |
|
|
1⁄2-IN. DIA GAS CONN |
GAS CONN |
|
|
|
|
7⁄8-IN. DIA |
|
|
|
POWER CONN |
|
|
|
1⁄2-IN. DIA |
|
|
|
THERMOSTAT ENTRY |
|
|
30 1⁄2" |
2-IN. VENT CONN |
39 7⁄8" |
|
|
|
|
|
|
22 11⁄16" |
|
|
18 1⁄4" |
SIDE INLET |
|
|
|
|
|
|
|
|
1" |
|
CONDENSATE |
22 1⁄4" TYP |
7⁄16" |
11/16" |
DRAIN LOCATION |
||
|
(UPFLOW) |
24 3⁄16" |
11⁄16" |
|
DIMPLE LOCATORS |
||
|
BOTTOM INLET |
|
|
|
FOR HORIZONTAL |
|
|
|
HANGING |
|
|
NOTES: Minimum return-air opening at furnace:
1. For 800 CFM--16-In. round or 14 1/2 x 12-In. rectangle.
2. For 1200 CFM--20-In. round or 14 1/2 x 19 1/2-In. rectangle. 3. For 1600 CFM--22-In. round or 14 1/2 x 23 1/4-In. rectangle.
4. For airflow requirements above 1800 CFM, use both side inlets, a combination of 1 side inlet and the bottom, or the bottom only.
A93023
DIMENSIONS (IN.)
UNIT SIZE |
A |
D |
E |
024040 |
17-1/2 |
15-7/8 |
16 |
036040 |
17-1/2 |
15-7/8 |
16 |
024060 |
17-1/2 |
15-7/8 |
16 |
036060 |
17-1/2 |
15-7/8 |
16 |
048060 |
17-1/2 |
15-7/8 |
16 |
036080 |
17-1/2 |
15-7/8 |
16 |
048080 |
17-1/2 |
15-7/8 |
16 |
060080 |
21 |
19-3/8 |
19-1/2 |
048100 |
21 |
19-3/8 |
19-1/2 |
060100 |
21 |
19-3/8 |
19-1/2 |
060120 |
24-1/2 |
22-7/8 |
23 |
060140 |
24-1/2 |
22-7/8 |
23 |
Fig. 2ÐDimensional Drawing
SAFETY CONSIDERATIONS
Installing and servicing heating equipment can be hazardous due to gas and electrical components. Only trained and qualified personnel should install, repair, or service heating equipment. Untrained personnel can perform basic maintenance functions such as cleaning and replacing air filters. All other operations must be performed by trained service personnel. When working on heating equipment, observe precautions in literature, on tags, and on labels attached to or shipped with unit and other safety precautions that may apply.
→Follow all safety codes. In the United States, follow all safety codes including the National Fuel Gas Code (NFGC) NFPA No. 54-1996/ANSI Z223.1-1996 and the Installation Standards, Warm Air Heating and Air Conditioning Systems (NFPA 90B) ANSI/NFPA 90B. In Canada, refer to the current edition of the National Standard of Canada CAN/CGA-B149.1- and .2-M95 Natural Gas and Propane Installation Codes (NSCNGPIC). Wear safety glasses and work gloves. Have fire extinguisher available during start-up and adjustment procedures and service calls.
Recognize safety information. This is the safety-alert symbol . When you see this symbol on unit or in instructions and manuals, be alert to potential for personal injury.
Understand the signal words DANGER, WARNING, and CAUTION. These words are used with the safety-alert symbol. DANGER identifies most serious hazards which will result in severe personal injury or death. WARNING signifies hazards which could result in personal injury or death. CAUTION is used to identify unsafe practices which would result in minor personal injury or product and property damage. NOTE is used to highlight suggestions which will result in enhanced installation, reliability, or operation.
ELECTROSTATIC DISCHARGE (ESD) PRECAUTIONS
CAUTION: Electrostatic discharge can affect electronic components. Take precautions during furnace installation and servicing to protect the furnace electronic control. Precautions will prevent electrostatic discharges from personnel and hand tools which are held during the procedure. These precautions will help to avoid exposing the control to electrostatic discharge by putting the furnace, the control, and the person at the same electrostatic potential.
1.Disconnect all power to the furnace. DO NOT TOUCH THE CONTROL OR ANY WIRE CONNECTED TO THE CONTROL PRIOR TO DISCHARGING YOUR BODY'S ELECTROSTATIC CHARGE TO GROUND.
2.Firmly touch a clean, unpainted, metal surface of the furnace chassis which is close to the control. Tools held in a person's hand during grounding will be satisfactorily discharged.
3.After touching the chassis you may proceed to service the control or connecting wires as long as you do nothing that recharges your body with static electricity (for example; DO NOT move or shuffle your feet, DO NOT touch ungrounded objects, etc.).
4.If you touch ungrounded objects (recharge your body with static electricity), firmly touch furnace again before touching control or wires.
5.Use this procedure for installed and uninstalled (ungrounded) furnaces.
This forced air furnace is equipped for use with natural gas at altitudes 0 - 10,000 ft (0 - 3,050m), except 140 size Furnaces are only approved for altitudes 0 - 7,000 ft. (0 - 2,135m).
An accessory kit, supplied by the manufacturer, shall be used to convert to propane gas use or may be required for some natural gas applications.
This direct-vent, forced-air furnace is for indoor installation in a building constructed on site or in a manufactured (mobile) home when using factory authorized kit, see rating plate.
This furnace may be installed on combustible flooring in alcove or closet at minimum clearance from combustible material.
This appliance requires a special venting system. Refer to the installation instructions for parts list and method of installation. This furnace is for use with schedule-40 PVC, PVC-DWV, or ABS-DWV pipe, and must not be vented in common with other gas-fired appliances. Construction through which vent/air intake pipes may be installed is maximum 24 inches (600 mm), minimum 3/4 inches (19 mm) thickness (including roofing materials).
MINIMUM INCHES CLEARANCE TO COMBUSTIBLE CONSTRUCTION
TOP / PLENUM |
BOTTOM |
SIDES |
BACK |
|
FRONT |
VENT |
INSTALLATION |
|
|
|
|
|
|
|
|
|
|
|
1 |
0 |
0 |
0 †† |
|
3* |
0 |
UPFLOW |
|
|
|
||||||
|
1 |
† |
0 |
0 †† |
|
3* |
0 |
DOWNFLOW |
|
|
|
||||||
|
1 |
0 Ø |
1§ |
0 †† |
|
3* |
0 |
HORIZONTAL |
|
|
|
||||||
† |
For Installation on combustible floors only when installed on special base No. KGASB0201ALL, |
|||||||
|
Coil Assembly, Part No. CD5 or CK5, or Coil Casing, Part No. KCAKC. |
|
||||||
§ |
Clearance shown is for air inlet and air outlet end. |
|
|
|
||||
|
Horizontal position: Line contact is permissible only between lines formed by intersections |
|||||||
of top and two sides of furnace jacket, and building joists, studs, or framing.
Ø120 and 140 size Furnaces require 1 inch bottom clearance to combustible materials.
*Minimum front clearance for service 30 inches (762mm).
†† 140 size Furnaces require 1 inch back clearance to combustible materials.
323855-101 REV. A (LIT)
A96313
→ Fig. 3ÐClearances to Combustibles
Ð3Ð
6.Before removing a new control from its container, discharge your body's electrostatic charge to ground to protect the control from damage. If the control is to be installed in a furnace, follow items 1 through 5 before bringing the control or yourself into contact with the furnace. Put all used AND new controls into containers before touching ungrounded objects.
7.An ESD service kit (available from commercial sources) may also be used to prevent ESD damage.
INTRODUCTION
→The model 350MAV, Series D Furnaces are available in sizes 40,000 through 138,000 Btuh input capacities.
→The 350MAV Multipoise Condensing Gas-Fired Furnaces are A.G.A./C.G.A. certified for natural and propane gases and for installation in alcoves, attics, basements, closets, utility rooms, crawlspaces, and garages. The furnace is factory-shipped for use with natural gas. An A.G.A./C.G.A. listed gas conversion kit is required to convert furnace for use with propane gas. The 350MAV 040 through 120 size units are A.G.A./C.G.A. approved for use in manufactured (mobile) homes when factory accessory conversion kit is used. The 140 size unit is NOT approved for use in manufactured (mobile) homes. These furnaces are suitable for installation in a residence built on site or a manufactured residence completed at final site. The design of this furnace line is NOT A.G.A./C.G.A. certified for installation in recreation vehicles or outdoors.
→These furnaces SHALL NOT be installed directly on carpeting, tile, or any other combustible material other than wood flooring. In downflow installations, factory accessory floor base MUST be used when installed on combustible materials and wood flooring. Special base is not required when this furnace is installed on manufacturer's Coil Assembly Part No. CD5 or CK5, or when Coil Box Part No. KCAKC is used.
These furnaces are shipped with the drain and pressure tubes connected for UPFLOW applications. Minor modifications are required when used in DOWNFLOW, HORIZONTAL RIGHT, or HORIZONTAL LEFT (supply-air discharge direction) applications as shown in Fig. 1. See details in Applications section.
These furnaces are shipped with the following materials to assist in proper furnace installation. These materials are shipped in the main blower compartment.
Installer Packet includes: |
|
Installation, Start-Up, and Operating Instructions |
|
Service and Maintenance Instructions |
|
User's Information Manual |
|
Warranty Certificate |
|
Loose Parts Bag includes: |
Quantity |
Pressure tube extension |
1 |
Collector box or condensate trap extension tube |
1 |
Inducer housing drain tube |
1 |
1/2-in. CPVC street elbow |
2 |
Drain tube coupling |
1 |
Drain tube coupling grommet |
1 |
Vent and combustion-air pipe support |
2 |
Combustion-air pipe perforated disk assembly |
1 |
Vent Pipe Extension |
1* |
* ONLY supplied with some furnaces.
Before installing the furnace in the United States, refer to the current edition of the NFGC and the NFPA 90B. For further information, the NFGC and the NFPA 90B are available from National Fire Protection Association Inc., Batterymarch Park, Quincy, MA 02269; American Gas Association, 1515 Wilson Boulevard, Arlington, VA 22209; or from Literature Distribution. Before installing the furnace in Canada, refer to the current edition of the NSCNGPIC. Contact Standards Department of Canadian Gas Association, 55 Scarsdale Road, Don Mills, Ontario, Canada M3B 2R3.
Ð4Ð
Installations must comply with regulations of serving gas supplier and local building, heating, plumbing, or other codes in effect in area in which installation is made. In absence of local codes, installation must conform with NFGC.
Canadian installations must be made in accordance with NSCNGPIC and all authorities having jurisdiction.
These instructions cover minimum requirements for a safe installation and conform to existing national standards and safety codes. In some instances, these instructions exceed certain local codes and ordinances, especially those that may not have kept pace with changing residential construction practices. We require these instructions as a minimum for a safe installation.
CAUTION: Application of this furnace should be indoors with special attention given to vent sizing and material, gas input rate, air temperature rise, unit leveling, and unit sizing. Improper installation or misapplication of furnace can require excessive servicing or cause premature component failure.
WARNING: Improper installation, adjustment, alteration, service, maintenance, or use can cause carbon monoxide poisoning, explosion, fire, electrical shock, or other conditions which may cause personal injury or property damage. Consult a qualified installer, service agency, local gas supplier, or your distributor or branch for information or assistance. The qualified installer or agency must use only factory-authorized and listed kits or accessories when modifying this product. Failure to follow this warning could result in electrical shock, fire, personal injury, or death.
For accessory installation details, refer to applicable installation literature.
APPLICATIONS
I.GENERAL
Some assembly and modifications are required for furnaces installed in any of the 4 applications shown in Fig. 1. All drain and pressure tubes are connected as shown in Fig. 5. See appropriate application instructions for these procedures.
II.UPFLOW APPLICATIONS
An upflow furnace application is where furnace blower is located below combustion and controls section of furnace, and conditioned air is discharged upwards.
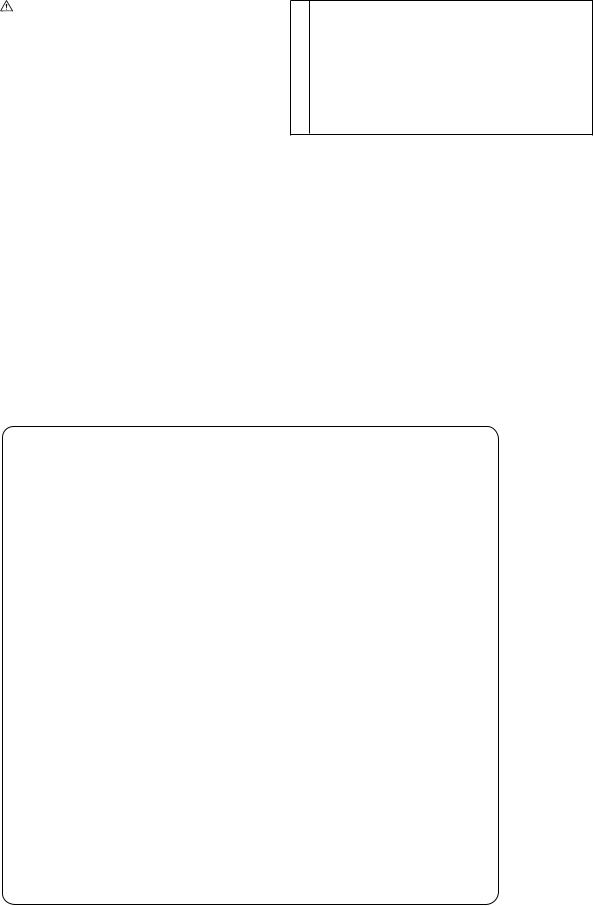
A. Condensate Trap Location (Factory-Shipped
Orientation)
The condensate trap is factory installed in the blower shelf and factory connected for UPFLOW applications. A factory-supplied tube is used to extend the condensate trap drain connection to the desired furnace side for field drain attachment. See Condensate Trap Tubing (Factory-Shipped Orientation) section for drain tube extension details.
B. Condensate Trap Tubing (Factory-Shipped Orientation)
NOTE: See Fig. 5 or tube routing label on main furnace door to confirm location of these tubes.
1.Collector Box Drain, Inducer Housing Drain, Relief Port, and Pressure Switch Tubes
These tubes should be factory attached to condensate trap and pressure switch ready for use in UPFLOW applications. These tubes can be identified by their connection location
BLOWER SHELF |
FURNACE |
CONDENSATE |
|
DOOR |
|
|
TRAP |
|
CONDENSATE |
|
|
|
|
|
TRAP (INSIDE) |
|
FURNACE |
|
|
|
|
|
SIDE |
4 78
|
FIELD |
26 1 4 |
11 2 |
|
DRAIN |
|
|
ALTERNATE DRAIN |
CONN |
|
|
TUBE LOCATION |
SIDE VIEW |
FRONT VIEW |
|
CONDENSATE TRAP |
|||
|
|
||
DRAIN TUBE LOCATION |
DOWNFLOW AND ALTERNATE |
||
UPFLOW APPLICATIONS |
|||
EXTERNAL UPFLOW APPLICATIONS |
|||
|
SLOT FOR SCREW |
|
|
|
HORIZONTAL |
|
|
|
APPLICATION |
|
|
|
(OPTIONAL) |
|
|
|
11 2 |
|
|
|
3 4 |
|
|
|
|
71 8 |
|
|
13 4 |
|
|
|
WIRE TIE |
7 8 |
|
|
21 4 |
||
|
GUIDES |
||
|
(WHEN USED) |
|
|
|
FRONT VIEW |
SIDE VIEW |
|
Fig. 4ÐCondensate Trap
FURNACE
DOOR FURNACE
SIDE
4 |
|
|
5 3 4 |
|
5 3 4 |
|
4 |
|
26 1 4 |
3 |
4 |
FIELD |
|
|
|
|
|
DRAIN |
|
|
CONN |
|
|
END VIEW |
FRONT VIEW |
|
HORIZONTAL
APPLICATIONS
1⁄4 OD
COLLECTOR BOX TO TRAP RELIEF PORT
1⁄2 OD
INDUCER HOUSING DRAIN CONNECTION
5⁄8 OD COLLECTOR BOX
DRAIN CONNECTION
SCREW HOLE FOR UPFLOW OR DOWNFLOW APPLICATIONS (OPTIONAL)
1⁄2-IN. PVC OR CPVC
A93026
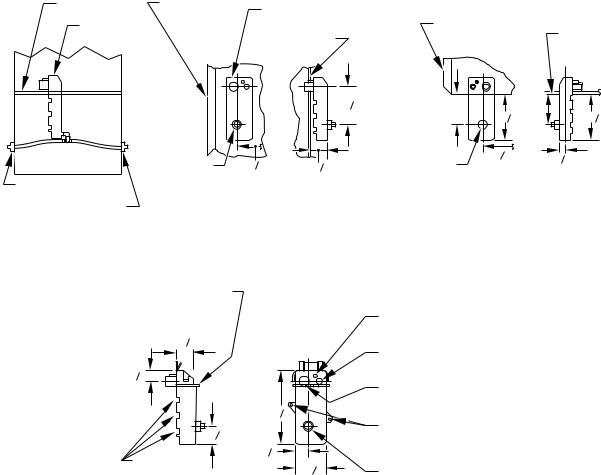
and also by a color label on each tube. These tubes are identified as follows: collector box drain tube (blue label), inducer housing drain tube (violet label or molded), relief port tube (green label), and pressure switch tube (pink label).
2.Condensate Trap Drain Tube
The condensate trap drain connection must be extended for field attachment by doing the following:
a.Determine location of field drain connection. (See Fig. 2 or 5.)
NOTE: If internal filter is used, drain tube should be located to opposite side of casing of return duct attachment to assist in filter removal.
b.Remove and discard casing drain hole plug button from desired side.
c.Install drain tube coupling grommet (factory-supplied in loose parts bag) in selected casing hole.
d.Slide drain tube coupling (factory-supplied in loose parts bag) through grommet ensuring long end of coupling faces blower.
e.Cement 2 factory-supplied 1/2-in. street CPVC elbows to the rigid drain tube connection on the condensate trap. (See Fig. 5.) These elbows must be cemented together and cemented to condensate trap drain connection.
NOTE: Failure to use CPVC elbows may allow drain to kink and prevent draining.
Ð5Ð
f.Connect larger diameter drain tube and clamp (factorysupplied in loose parts bag) to condensate trap and clamp securely.
g.Route tube to coupling and cut to appropriate length.
h.Attach tube to coupling and clamp securely.
C. Condensate Trap Location (Alternate Upflow
Orientation)
An alternate location for the condensate trap is the left-hand side of casing. (See Fig. 2 and 6.)
NOTE: If the alternate left-hand side of casing location is used, the factory-connected drain and relief port tubes must be disconnected and modified for attachment. See Condensate Trap Tubing (Alternate Upflow Orientation) section for tubing attachment.
To relocate condensate trap to the left-hand side, perform the following:
1.Remove 3 tubes connected to condensate trap.
2.Remove trap from blower shelf by gently pushing tabs inward and rotating trap.
3.Remove casing hole filler cap from casing hole. (See Fig. 2 or 6.)
4.Install casing hole filler cap into blower shelf hole where trap was removed.
5.Install condensate trap into left-hand side casing hole by inserting tube connection stubs through casing hole and rotating until tabs snap into locking position.

PLUG |
|
CAP |
|
COLLECTOR BOX |
|
DRAIN TUBE (BLUE |
|
& WHITE STRIPED) |
|
COLLECTOR BOX |
|
TUBE (PINK) |
|
COLLECTOR BOX |
|
TUBE (GREEN) |
|
INDUCER HOUSING |
|
(MOLDED) DRAIN |
|
TUBE (BEHIND |
|
COLLECTOR BOX |
|
DRAIN TUBE) |
|
COLLECTOR BOX |
|
DRAIN TUBE (BLUE) |
CONDENSATE |
|
|
|
TRAP |
FIELD-INSTALLED |
|
FACTORY-SUPPLIED |
|
DRAIN TUBE |
|
COUPLING (LEFT |
|
DRAIN OPTION) |
|
FIELD-INSTALLED
FACTORY-SUPPLIED
DRAIN TUBE
FIELD-INSTALLED |
FIELD-INSTALLED |
FACTORY-SUPPLIED |
FACTORY-SUPPLIED |
1⁄2-IN. CPVC STREET |
DRAIN TUBE |
ELBOWS (2) FOR |
COUPLING (RIGHT |
LEFT DRAIN OPTION |
DRAIN OPTION) |
A96194
Fig. 5ÐFactory-Shipped Upflow Tube Configuration (Shown With Blower Access Panel Removed)
D. Condensate Trap Tubing (Alternate Upflow
Orientation)
NOTE: See Fig. 6 or tube routing label on main furnace door to confirm location of these tubes.
1. Collector Box Drain Tube
Connect collector box drain tube (blue label) to condensate trap.
NOTE: On 17-1/2-in. wide furnaces ONLY, cut tube between corrugated sections to prevent kinks from occurring.
2.Inducer Housing Drain Tube
a.Remove and discard LOWER (molded) inducer housing drain tube which was previously connected to condensate trap.
b.Use inducer housing drain extension tube (violet label and factory-supplied in loose parts bag) to connect LOWER inducer housing drain connection to the condensate trap.
c.Determine appropriate length, cut, and connect tube.
d.Clamp tube to prevent any condensate leakage.
3.Relief Port Tube
a.Connect relief port tube (green label) to condensate trap.
→b. Extend this tube (if required) by splicing to small diameter tube (factory-supplied in loose parts bag).
c.Determine appropriate length, cut, and connect tube.
Ð6Ð
PLUG
CAP
COLLECTOR BOX DRAIN TUBE (BLUE & WHITE STRIPED)
COLLECTOR BOX
TUBE (PINK)
COLLECTOR BOX
TUBE (GREEN)
COLLECTOR BOX
DRAIN TUBE (BLUE)
CONDENSATE 
TRAP
INDUCER HOUSING DRAIN TUBE (VIOLET)
A96195
Fig. 6ÐAlternate Upflow Tube Configuration and Trap Location
E.Condensate Trap Field Drain Attachment
Refer to Condensate Drain section for recommendations and procedures.
F. Pressure Switch Tubing
The LOWER collector box pressure tube (pink label) is factory connected to the pressure switch and should not require any modification.
NOTE: See Fig. 5 or 6 or tube routing label on main furnace door to check for proper connections.
G. Upper Collector Box and Inducer Housing (Unused)
Drain Connections
UPPER COLLECTOR BOX DRAIN CONNECTION
Attached to the UPPER collector box drain connection is a factory-installed corrugated, plugged tube (blue and white striped label). This tube is plugged to prevent condensate leakage in this application. Ensure this tube is plugged.
NOTE: See Fig. 5 or 6 or tube routing label on main furnace door to check for proper connections.
UPPER INDUCER HOUSING DRAIN CONNECTION
Attached to the UPPER (unused) inducer housing drain connection is a cap and clamp. This cap is used to prevent condensate leakage in this application. Ensure this connection is capped.
NOTE: See Fig. 5 or 6 or tube routing label on main furnace door to check for proper connections.
H. Condensate Trap Freeze Protection |
|
c. Connect |
LOWER collector box drain connection to |
|||||||
Refer to Condensate Drain Protection section for recommenda- |
|
condensate trap. |
|
|
|
|
||||
tions and procedures. |
|
|
(1.) |
Condensate Trap Located on Left Side of Casing |
||||||
|
|
|
|
|||||||
III. |
DOWNFLOW APPLICATIONS |
|
|
|
(a.) Connect LOWER collector box |
drain |
tube |
|||
|
|
|
|
|
||||||
A downflow furnace application is where furnace blower is located |
|
|
|
(blue and white striped label) to condensate |
||||||
above combustion and controls section of furnace, and conditioned |
|
|
|
trap. Tube does not need to be cut. |
|
|
||||
air is discharged downwards. |
|
|
|
(b.) |
Clamp tube to prevent any condensate leakage. |
|||||
A. |
Condensate Trap Location |
|
|
|
||||||
|
|
(2.) |
Condensate Trap Located on Right Side of Casing |
|||||||
The condensate trap must be removed from the factory-installed |
|
|||||||||
|
|
(a.) |
Install drain tube coupling (factory-supplied in |
|||||||
blower shelf location and relocated in selected application location |
|
|
||||||||
|
|
|
loose parts bag) into collector box drain tube |
|||||||
as shown in Fig. 2, 7, or 8. |
|
|
|
|
||||||
|
|
|
|
(blue and white striped label) which was pre- |
||||||
To |
relocate condensate trap from the |
blower shelf to desired |
|
|
|
|||||
|
|
|
viously plugged. |
|
|
|
||||
location, perform the following: |
|
|
|
|
|
|
|
|||
|
|
|
(b.) Connect larger diameter drain tube (factory- |
|||||||
|
1. Remove 3 tubes connected to condensate trap. |
|
|
|||||||
|
|
|
|
supplied |
in loose parts bag) |
to |
drain |
tube |
||
|
2. Remove trap from blower shelf |
by gently pushing tabs |
|
|
|
|||||
|
|
|
|
coupling, |
extending collector |
box |
drain |
tube |
||
|
inward and rotating trap. |
|
|
|
|
|||||
|
|
|
|
|
for connection to condensate trap. |
|
|
|||
|
3. Remove casing hole filler cap from casing hole. (See Fig. 2, |
→ |
|
|
|
|
||||
|
|
(c.) |
Route extended collector box |
drain tube di- |
||||||
|
7, or 8.) |
|
|
|||||||
|
|
|
|
|
rectly from collector box drain to condensate |
|||||
|
4. Install casing hole filler cap into blower shelf hole where |
|
|
|
||||||
|
|
|
|
trap as shown in Fig. 8. |
|
|
|
|||
|
trap was removed. |
|
|
|
|
|
|
|
||
|
|
|
|
(d.) |
Determine appropriate length and cut. |
|
||||
|
5. Install condensate trap into desired casing hole by inserting |
|
|
|
||||||
|
|
|
(e.) |
Connect to condensate trap. |
|
|
|
|||
|
tube connection stubs through casing hole and rotating until |
|
|
|
|
|
||||
|
tabs snap into locking position. |
|
|
|
(f.) |
Clamp tube to prevent any condensate leakage. |
||||
|
|
|
|
|
||||||
B.Condensate Trap Tubing
NOTE: See Fig. 7 or 8 or tube routing label on main furnace door to check for proper connections.
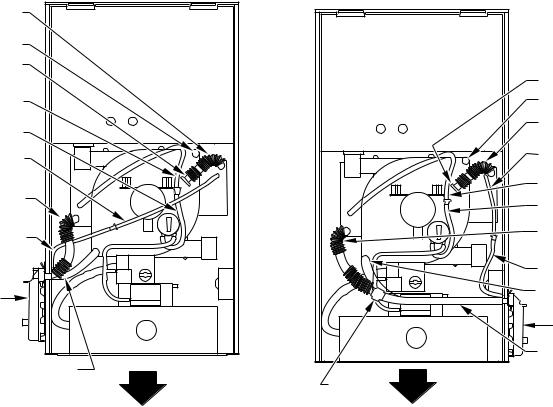
1.Collector Box Drain Tube
a.Remove factory-installed plug from LOWER collector box drain tube (blue and white striped label).
b.Install removed clamp and plug into UPPER collector box drain tube (blue label) which was connected to condensate trap.
2.Inducer Housing Drain Tube
a.Remove factory-installed cap and clamp from LOWER inducer housing drain connection.
b.Remove and discard UPPER (molded) inducer housing drain tube which was previously connected to condensate trap.
c.Install cap and clamp on UPPER inducer housing drain connection where molded drain tube was removed.
COLLECTOR BOX |
DRAIN TUBE (BLUE) |
CAP |
PLUG |
COLLECTOR BOX |
TUBE (GREEN) |
COLLECTOR BOX |
EXTENSION TUBE |
COLLECTOR BOX |
TUBE (PINK) |
COLLECTOR BOX |
DRAIN TUBE (BLUE |
& WHITE STRIPED) |
COLLECTOR BOX |
EXTENSION TUBE |
CONDENSATE |
TRAP |
INDUCER HOUSING
DRAIN TUBE (VIOLET)
A96196
Fig. 7ÐDownflow Tube Configuration (Left-Hand Trap Installation)
Ð7Ð
PLUG |
CAP |
COLLECTOR BOX |
DRAIN TUBE (BLUE) |
COLLECTOR BOX |
TUBE (PINK) |
COLLECTOR BOX |
TUBE (GREEN) |
COLLECTOR BOX |
EXTENSION TUBE |
COLLECTOR BOX |
DRAIN TUBE (BLUE |
& WHITE STRIPED) |
COLLECTOR BOX |
EXTENSION TUBE |
INDUCER HOUSING |
DRAIN TUBE |
(VIOLET) |
CONDENSATE |
TRAP |
COLLECTOR BOX |
EXTENSION |
DRAIN TUBE |
DRAIN TUBE |
COUPLING |
A96197 |
Fig. 8ÐDownflow Tube Configuration (Right-Hand Trap Installation)
d.Use inducer housing drain tube (violet label and factorysupplied in loose parts bag) to connect LOWER inducer housing drain connection to the condensate trap.
e.Connect inducer housing drain connection to condensate trap.
(1.) |
Condensate Trap Located on Left Side of Casing |
|
|
(a.) |
Determine appropriate length and cut. |
|
(b.) |
Connect tube to condensate trap. |
|
(c.) |
Clamp tube to prevent any condensate leakage. |
(2.) |
Condensate Trap Located on Right Side of Casing |
|
→ |
(a.) |
Route inducer housing drain tube (violet label) |
|
|
directly from inducer housing to condensate |
|
|
trap as shown in Fig. 8. |
|
(b.) |
Determine appropriate length and cut. |
|
(c.) |
Connect tube to condensate trap. |
|
(d.) |
Clamp tube to prevent any condensate leakage. |
3.Relief Port Tube
Refer to Pressure Switch Tubing section for connection procedure.
C.Condensate Trap Field Drain Attachment
Refer to Condensate Drain section for recommendations and procedures.
D.Pressure Switch Tubing
One collector box pressure tube (pink label) is factory connected to the pressure switch for use when furnace is installed in UPFLOW applications. This tube MUST be disconnected and used for the condensate trap relief port tube. The other collector box pressure tube (green label) which was factory connected to the condensate trap relief port connection MUST be connected to the pressure switch in DOWNFLOW or HORIZONTAL RIGHT applications.
NOTE: See Fig. 7 or 8 or tube routing label on main furnace door to check for proper connections.
Relocate tubes as described below.
1.Disconnect collector box pressure tube (pink label) attached to pressure switch.
→2. Extend collector box pressure tube (green label) which was previously connected to condensate trap relief port connection by splicing to small diameter tube (factory-supplied in loose parts bag).
3.Connect collector box pressure tube (green label) to pressure switch connection labeled COLLECTOR BOX.
→4. Extend collector box pressure tube (pink label) which was previously connected to pressure switch by splicing to remaining small diameter tube (factory-supplied in loose parts bag).
5.Route this extended tube (pink label) to condensate trap relief port connection.
6.Determine appropriate length, cut, and connect tube.
7.Clamp tube to relief port connection.
E. Condensate Trap Freeze Protection
Refer to Condensate Drain Protection section for recommendations and procedures.
IV. HORIZONTAL LEFT (SUPPLY-AIR DISCHARGE) APPLICATIONS
A horizontal left furnace application is where furnace blower is located to the right of combustion and controls section of furnace, and conditioned air is discharged to the left.
PLUG |
|
|
|
CAP |
COLLECTOR BOX EXTENSION TUBE |
|
|
|
AUXILIARY "J" BOX |
|
COLLECTOR BOX |
RELOCATED HERE |
|
DRAIN TUBE |
|
|
(BLUE AND WHITE STRIPED) |
CONDENSATE |
COLLECTOR BOX |
|
TRAP |
||
TUBE (GREEN) |
||
|
||
COLLECTOR |
INDUCER HOUSING |
|
DRAIN TUBE (VIOLET) |
||
BOX EXTENSION |
COLLECTOR BOX |
|
DRAIN TUBE |
||
|
DRAIN TUBE (BLUE) |
COLLECTOR BOX
EXTENSION TUBE
DRAIN TUBE COUPLING
COLLECTOR BOX TUBE (PINK)
A96198
Fig. 9ÐHorizontal Left Tube Configuration
Ð8Ð
CAUTION: Local codes may require a drain pan under entire furnace and condensate trap when a condensing furnace is used in an attic application or over a finished ceiling.
NOTE: In Canada, installations shall be in accordance with current NSCNGPIC and/or local codes.
NOTE: The auxiliary junction box (J-Box) MUST be relocated to opposite side of furnace casing. (See Fig. 9.) See Electrical Connection section for J-Box relocation.
A.Condensate Trap Location
The condensate trap must be removed from the factory-installed blower shelf location and relocated in selected application location as shown in Fig. 2 or 9.
To relocate condensate trap from the blower shelf to desired location, perform the following:
1.Remove 3 tubes connected to condensate trap.
2.Remove trap from blower shelf by gently pushing tabs inward and rotating trap.
3.Remove casing hole filler cap from casing hole. (See Fig. 2 or 9.)
4.Install casing hole filler cap into blower shelf hole where trap was removed.
5.Install condensate trap into casing hole by inserting tube connection stubs through casing hole and rotating until tabs snap into locking position.
B.Condensate Trap Tubing
NOTE: See Fig. 9 or tube routing label on main furnace door to check for proper connections.
1.Collector Box Drain Tube
a.Install drain tube coupling (factory-supplied in loose parts bag) into collector box drain tube (blue label) which was previously connected to condensate trap.
b.Connect large diameter drain tube and clamp (factorysupplied in loose parts bag) to drain tube coupling, extending collector box drain tube.
c.Route extended tube (blue label) to condensate trap and cut to appropriate length.
d.Clamp tube to prevent any condensate leakage.
2.Inducer Housing Drain Tube
a.Remove and discard LOWER (molded) inducer housing drain tube which was previously connected to condensate trap.
b.Use inducer housing drain extension tube (violet label and factory-supplied in loose parts bag) to connect LOWER inducer housing drain connection to the condensate trap.
c.Determine appropriate length, cut, and connect tube.
d.Clamp tube to prevent any condensate leakage.
3.Relief Port Tube
→a. Extend collector box tube (green label) which was previously connected to the condensate trap by splicing to small diameter tube (factory-supplied in loose parts bag).
b.Route extended collector box pressure tube to relief port connection on the condensate trap.
c.Determine appropriate length, cut, and connect tube.
d.Clamp tube to prevent any condensate leakage.
Ð9Ð
C. Condensate Trap Field Drain Attachment
Refer to Condensate Drain section for recommendations and procedures.
D. Pressure Switch Tubing
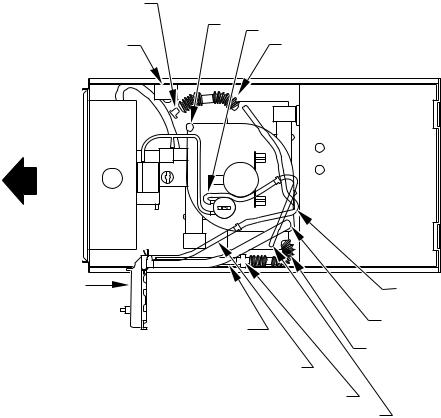
The LOWER collector box pressure tube (pink label) is factory connected to the pressure switch for use when furnace is installed in UPFLOW applications. This tube MUST be disconnected, extended, rerouted, and then reconnected to the pressure switch in HORIZONTAL LEFT applications.
NOTE: See Fig. 9 or tube routing label on main furnace door to check for proper connections.
Modify tube as described below.
1.Disconnect collector box pressure tube (pink label) attached to pressure switch.
2.Use smaller diameter tube (factory-supplied in loose parts bag) to extend tube disconnected in item 1.
3.Route extended tube:
a.Behind inducer housing.
b.Between blower shelf and inducer housing.
c.Behind inducer motor bracket.
d.Between inducer motor and pressure switch.
4.Determine appropriate length, cut, and reconnect tube to pressure switch connection labeled COLLECTOR BOX.
E.Condensate Trap Freeze Protection
Refer to Condensate Drain Protection section for recommendations and procedures.
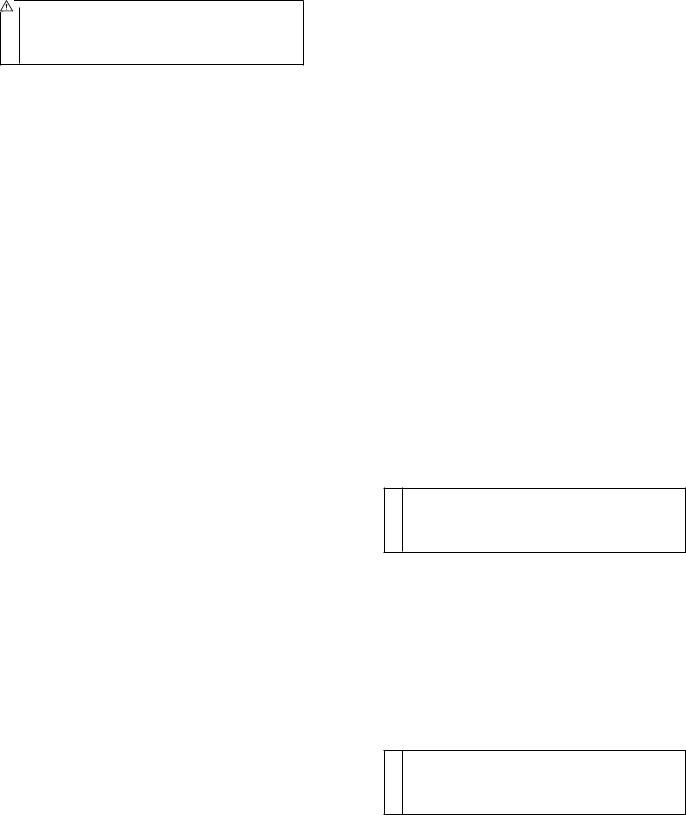
F.Construct a Working Platform
Construct working platform where all required furnace clearances are met. (See Fig. 3 and 10.)
CAUTION: The condensate trap MUST be installed below furnace. See Fig. 4 for dimensions. The drain connection to condensate trap must also be properly sloped to an open drain.
NOTE: Combustion-air and vent pipes are restricted to a minimum length of 5 ft. (See Table 6.)
NOTE: A 12-in. minimum offset pipe section is recommended with short (5 to 8 ft) vent systems. This recommendation is to reduce excessive condensate droplets from exiting the vent pipe. (See Fig. 10 or 29.)
V. HORIZONTAL RIGHT (SUPPLY-AIR DISCHARGE) APPLICATIONS
A horizontal right furnace application is where furnace blower is located to the left of combustion and controls section of furnace, and conditioned air is discharged to the right.
CAUTION: Local codes may require a drain pan under entire furnace and condensate trap when a condensing furnace is used in attic application or over a finished ceiling.
NOTE: In Canada, installations shall be in accordance with current NSCNGPIC Installation Codes and/or local codes.
A.Condensate Trap Location
The condensate trap must be removed from the factory-installed blower shelf location and relocated in selected application location as shown in Fig. 2 or 11.
To relocate condensate trap from the blower shelf to desired location, perform the following:
COMBUSTION – AIR
INTAKE
 VENT
VENT
5 3⁄4²
MANUAL
SHUTOFF
GAS VALVE
SEDIMENT
TRAP
CONDENSATE
TRAP
A 12-IN. MIN HORIZONTAL PIPE SECTION IS RECOMMENDED WITH SHORT (5 TO 8 FT) VENT SYSTEMS TO REDUCE EXCESSIVE CONDENSATE DROPLETS FROM
30² MIN EXITING THE VENT PIPE. WORK AREA
ACCESS OPENING
FOR TRAP
DRAIN
NOTE: LOCAL CODES MAY REQUIRE A DRAIN PAN UNDER THE
FURNACE AND CONDENSATE TRAP WHEN A CONDENSING
FURNACE IS INSTALLED ABOVE FINISHED CEILINGS.
A93031
Fig. 10ÐAttic Location and Working Platform
1.Remove 3 tubes connected to condensate trap.
2.Remove trap from blower shelf by gently pushing tabs inward and rotating trap.
3.Remove casing hole filler cap from casing hole. (See Fig. 2 or 11.)
4.Install casing hole filler cap into blower shelf hole where trap was removed.
5.Install condensate trap into casing hole by inserting tube connection stubs through casing hole and rotating until tabs snap into locking position.
B.Condensate Trap Tubing
NOTE: See Fig. 11 or tube routing label on main furnace door to check for proper connections.
1.Collector Box Drain Tube
a.Remove factory-installed plug from LOWER collector box drain tube (blue and white striped label).
b.Install removed clamp and plug into UPPER collector box drain tube (blue label) which was previously connected to condensate trap.
c.Connect LOWER collector box drain tube (blue and white striped label) to condensate trap. Tube does not need to be cut.
d.Clamp tube to prevent any condensate leakage.
2.Inducer Housing Drain Tube
a.Remove factory-installed cap and clamp from LOWER inducer housing drain connection.
b.Remove and discard UPPER (molded) inducer housing drain tube which was previously connected to condensate trap.
Ð10Ð
c.Install cap and clamp on UPPER inducer housing drain connection where molded drain tube was removed.
d.Use inducer housing drain extension tube (violet label and factory-supplied in loose parts bag) to connect LOWER inducer housing drain connection to condensate trap.
e.Determine appropriate length, cut, and connect tube to condensate trap.
f.Clamp tube to prevent any condensate leakage.
3.Relief Port Tube
Refer to Pressure Switch Tubing section for connection procedure.
C. Condensate Trap Field Drain Attachment
Refer to Condensate Drain section for recommendations and procedures.
D. Pressure Switch Tubing
One collector box pressure tube (pink label) is factory connected to the pressure switch for use when furnace is installed in UPFLOW applications. This tube MUST be disconnected and used for the condensate trap relief port tube. The other collector box pressure tube (green label) which was factory connected to the condensate trap relief port connection MUST be connected to the pressure switch in DOWNFLOW or HORIZONTAL RIGHT applications.
NOTE: See Fig. 11 or tube routing label on main furnace door to check for proper connections.
Relocate tubes as described below.
1.Disconnect collector box pressure tube (pink label) attached to pressure switch.
CAP |
COLLECTOR BOX DRAIN TUBE (BLUE) |
|
COLLECTOR BOX TUBE (GREEN) |
||
|
PLUG
COLLECTOR BOX EXTENSION TUBE
COLLECTOR BOX TUBE (PINK)
CONDENSATE |
TRAP |
COLLECTOR BOX DRAIN TUBE |
(BLUE AND WHITE STRIPED) |
|
INDUCER HOUSING |
|
|
DRAIN TUBE (VIOLET) |
|
|
COLLECTOR BOX |
|
|
EXTENSION TUBE |
|
|
|
A96199 |
→ |
Fig. 11ÐHorizontal Right Tube Configuration |
|
2. Extend collector box pressure tube (green label) which was |
LOCATION |
|
|
previously connected to condensate trap relief port connec- |
|
|
tion by splicing to small diameter tube (factory-supplied in |
I. GENERAL |
|
loose parts bag). |
|
|
When a furnace is installed so that supply ducts carry air to areas |
|
|
3. Route extended collector box pressure tube behind inducer |
|
|
outside the space containing the furnace, return air must also be |
|
|
motor bracket then between inducer motor and pressure |
|
|
handled by ducts sealed to furnace casing. The ducts terminate |
|
|
switch. |
|
|
outside the space containing the furnace to ensure there will not be |
|
|
4. Connect collector box pressure tube (green label) to pres- |
|
|
a negative pressure condition within equipment room or space. |
|
|
sure switch connection labeled COLLECTOR BOX. |
|
|
Furnace may be located in a confined space without special |
|
|
|
|
|
5. Use remaining smaller diameter tube (factory-supplied in |
provisions for dilution or ventilation air. This furnace must be |
|
loose parts bag) to extend collector box pressure tube (pink |
installed so electrical components are protected from water. |
|
label) which was previously connected to pressure switch. |
|
6.Route this extended tube (pink label) to condensate trap relief port connection.
7. Determine appropriate length, cut, and connect tube.
8. Clamp tube to relief port connection.
E. Condensate Trap Freeze Protection
Refer to Condensate Drain Protection section for recommenda- |
LEVEL |
|
(0²) |
|
|
|
|
|
|
|
|||||
|
|
|
|
|
|
|
|
||||||||
tions and procedures. |
|
|
|
|
FRONT |
|
|
|
|
FRONT |
|
||||
|
|
|
|
|
|
TO |
LEVEL (0²) |
|
|
||||||
F. Construct a Working Platform |
|
|
|
|
|||||||||||
1⁄2² MAX |
|
TO |
|
|
|
||||||||||
|
|
|
|
|
|
|
|
|
|
||||||
Construct working platform where all required furnace clearances |
|
|
|
|
1⁄2² MAX |
|
|
|
|||||||
are met. (See Fig. 3 and 10.) |
|
|
|
UPFLOW OR DOWNFLOW |
|
HORIZONTAL |
|||||||||
|
|
|
|
|
|
|
|||||||||
|
|
|
|
|
|
|
|
|
|
|
|
|
|
||
|
|
CAUTION: The condensate trap MUST be installed |
|
|
|
|
|
|
|
|
|
|
A93025 |
||
|
|
below furnace. See Fig. |
4 for |
dimensions. The drain |
|
|
|
|
|
|
|
|
|
|
|
|
|
|
NOTE: For proper furnace operation, install furnace so that it is |
||||||||||||
|
|
connection to condensate |
trap |
must also be properly |
|
||||||||||
|
|
|
level or pitched forward within 1/2 in. to ensure proper condensate |
||||||||||||
|
|
sloped to an open drain. |
|
|
|
||||||||||
|
|
|
|
|
drainage from secondary heat exchangers. |
|
|
|
|||||||
|
|
|
|
|
|
|
|
|
|||||||
NOTE: Combustion-air and vent pipes are restricted to a mini- |
|
|
|
||||||||||||
|
|
|
|
|
|
|
|
|
|
||||||
mum length of 5 ft. (See Table 6.) |
|
|
Locate furnace as close to |
center of air |
|
distribution system as |
|||||||||
NOTE: A 12-in. minimum offset pipe section is recommended |
|
||||||||||||||
possible. |
|
|
|
|
|
|
|
||||||||
with short (5 to 8 ft) vent systems. This recommendation is to |
|
|
|
|
|
|
|
||||||||
|
|
|
|
|
|
|
|
|
|
||||||
reduce excessive condensate droplets from exiting the vent pipe. |
Locate furnace so combustion-air pipe maximum lengths are not |
||||||||||||||
(See Fig. 10 or 29.) |
|
|
|
exceeded. Refer to Table 6. |
|
|
|
|
|
|
|||||
|
|
|
|
|
|
Ð11Ð |
|
|
|
|
|
|
|
|
|

FRONT
°F °F
RETURN
AIR
MAX 85°F MIN 55°F
A93042
NOTE: These furnaces are designed for a minimum continuous return-air temperature of 60°F or intermittent operation down to 55°F such as when used with a night setback thermostat. Return-air temperature must not exceed a maximum of 85°F. Failure to follow these return-air temperature limits may affect reliability of heat exchangers, motors, and controls.
FRONT
B A C K
BACK
FRONT
A93043
WARNING: Do not install furnace on its back. Safety control operation will be adversely affected. Never connect return-air ducts to back of furnace. Failure to follow this warning could result in fire, personal injury, or death.
CAUTION: If these furnaces are used during construction when adhesives, sealers, and/or new carpets are being installed, make sure all combustion and circulating air requirements are followed. If operation of furnace is required during construction, use clean outside air for combustion and ventilation. Compounds of chlorine and fluorine, when burned with combustion air, form acids which will cause corrosion of heat exchangers. Some of these compounds are found in paneling, dry wall adhesives, paints, thinners, masonry cleaning materials, and many other solvents commonly used in construction process.
Excessive exposure to contaminated combustion air will result in safety and performance related problems.
32°F MINIMUM INSTALLED AMBIENT OR FREEZE PROTECTION REQUIRED
A93058
CAUTION: If these furnaces are installed in an unconditioned space where ambient temperatures may be 32°F or lower, freeze protection measures must be taken.
Provide ample space for servicing and cleaning. Always comply with minimum fire protection clearances shown on unit's clearance to combustibles label. (See Fig. 3.) Locate furnace where available electric power and gas supplies meet specifications on furnace rating plate.
II. FURNACE LOCATION RELATIVE TO COOLING EQUIPMENT
The cooling coil must be installed parallel with or on downstream side of furnace to avoid condensation in heat exchanger. When installed parallel with a furnace, dampers or other means used to control flow of air must prevent chilled air from entering furnace. If dampers are manually operated, they must be equipped with a means to prevent operation of either unit unless damper is in full-heat or full-cool position.
III.HAZARDOUS LOCATIONS
18-IN. MINIMUM
TO BURNERS
A93044
WARNING: When furnace is installed in a residential garage, it must be installed so that burners and ignition sources are located a minimum of 18 in. above floor. The furnace must be located or protected to avoid physical damage by vehicles. When furnace is installed in a public garage, airplane hangar, or other building having a hazardous atmosphere, unit must be installed in accordance with requirements of National Fire Protection Association, Inc.
Ð12Ð
INSTALLATION
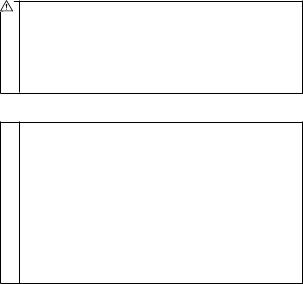
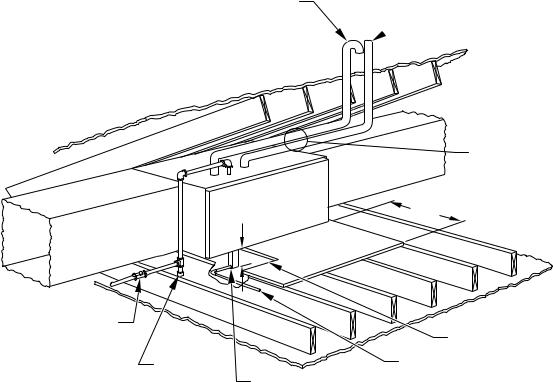
I.LEVELING LEGS (IF DESIRED)
When furnace is used in upflow position with side inlet(s), leveling legs may be desired. (See Fig. 12.) Install field-supplied, corrosion-resistant 5/16-in. machine bolts and nuts.
5⁄16²
5⁄16²
1 3⁄4²
1 3⁄4²
5⁄16²
5⁄16²
1 3⁄4²
1 3⁄4²
A89014
Fig. 12ÐLeveling Legs
NOTE: The maximum length of bolt should not exceed 1-1/2 in.
1.Position furnace on its back. Locate and drill a 5/16-in. diameter hole in each bottom corner of furnace. (See Fig. 12.) Holes in bottom closure panel may be used as guide locations.
2.For each hole, install nut on bolt and then install bolt and nut in hole. (Install flat washer if desired.)
3.Install another nut on other side of furnace base. (Install flat washer if desired.)
4.Adjust outside nut to provide desired height, and tighten inside nut to secure arrangement.
NOTE: Bottom closure must be used when leveling legs are used. See Bottom Closure Panel section.
→II. INSTALLATION IN UPFLOW OR DOWNFLOW APPLICATIONS
NOTE: For downflow applications, this furnace is approved for use on combustible flooring when special base (available from manufacturer) Part No. KGASB0201ALL is used. Special base in not required when this furnace is installed on manufacturer's Coil Assembly Part No. CD5 or CK5, or Coil Box Part No. KCAKC is used.
1.Determine application being installed from Table 1.
2.Construct hole in floor per dimensions specified in Table 1 and Fig. 13.
3.Construct plenum to dimensions specified in Table 1 and Fig. 13.
4.If downflow subbase (KGASB) is used, install as shown in Fig. 14.
If Coil Assembly Part No. CD5 or CK5 or Coil Box Part No. KCAKC is used, install as shown in Fig. 15.
NOTE: Remove furnace perforated, discharge duct flanges when they interfere with mating flanges on coil on downflow subbase. To remove furnace perforated, discharge duct flange, use wide duct pliers or duct flange tool to bend flange back and forth until it breaks off. Be careful of sharp edges. (See Fig. 16.)
WARNING: Do not bend duct flanges inward as shown in Fig. 16. This will affect airflow across heat exchangers and may cause limit cycling or premature heat exchanger failure. Remove duct flange completely or bend it inward a minimum of 210° as shown in Fig. 16.
NOTE: For 140 size unit when installed in downflow orientation, cut the white jumper wire off between terminals PL1-6 and PL1-9. Refer to Fig. 24 for location of jumper. Cut jumper close to connector and remove wire to avoid a short circuit.
Ð13Ð
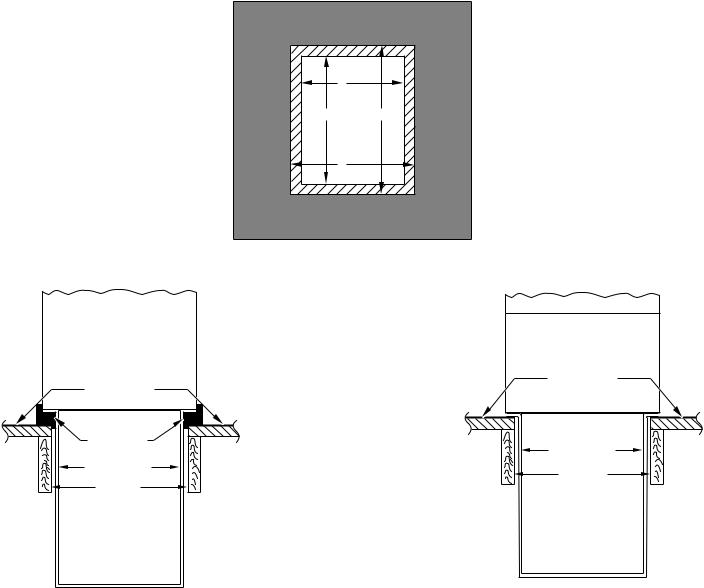
|
A |
|
PLENUM |
|
OPENING |
B |
D |
|
FLOOR |
|
OPENING |
|
C |
|
A96283 |
|
|
Fig. 13ÐFloor and Plenum Opening Dimensions |
|
FURNACE |
FURNACE |
|
(OR COIL CASING |
CD5 OR CK5 |
|
WHEN USED) |
||
|
COIL ASSEMBLY |
|
|
OR KCAKC |
|
|
COIL BOX |
|
|
COMBUSTIBLE |
|
COMBUSTIBLE |
FLOORING |
|
FLOORING |
|
|
DOWNFLOW |
SHEET METAL |
|
SUBBASE |
||
PLENUM |
||
SHEET METAL |
||
FLOOR |
||
PLENUM |
||
FLOOR |
OPENING |
|
|
||
OPENING |
|
|
|
A96284 |
A96285
Fig. 14ÐFurnace, Plenum, and Subbase
Installed on a Combustible Floor
TABLE 1ÐOPENING DIMENSIONS (IN.)
Fig. 15ÐFurnace, Plenum, and Coil Assembly or Coil Box Installed on a Combustible Floor
FURNACE |
|
PLENUM OPENING |
FLOOR OPENING |
|||
CASING |
APPLICATION |
|
|
|
|
|
A |
B |
C |
D |
|||
WIDTH |
|
|||||
|
Upflow Applications |
16 |
24-1/8 |
16-5/8 |
24-3/4 |
|
|
|
|
|
|
|
|
|
Downflow Applications on Non-Combustible Flooring |
15-7/8 |
19 |
16-1/2 |
19-5/8 |
|
|
|
|
|
|
|
|
17-1/2 |
Downflow Applications on Combustible Flooring Using KGASB Subbase |
15-1/8 |
19 |
16-3/4 |
20-3/8 |
|
Furnace with or without CD5 or CK5 Coil Assembly or KCAKC Coil Box |
||||||
|
|
|
|
|
||
|
Downflow Applications on Combustible Flooring NOT Using KGASB Subbase |
15-1/2 |
19 |
16-1/2 |
20 |
|
|
Furnace with CD5 or CK5 Coil Assembly or KCAKC Coil Box |
|||||
|
|
|
|
|
||
|
Upflow Applications |
19-1/2 |
24-1/8 |
20-1/8 |
24-3/4 |
|
|
Downflow Applications on Non-Combustible Flooring |
19-3/8 |
19 |
20 |
19-5/8 |
|
21 |
Downflow Applications on Combustible Flooring Using KGASB Subbase |
18-5/8 |
19 |
20-1/4 |
20-3/8 |
|
Furnace with or without CD5 or CK5 Coil Assembly or KCAKC Coil Box |
||||||
|
|
|
|
|
||
|
Downflow Applications on Combustible Flooring NOT Using KGASB Subbase |
19 |
19 |
20 |
20 |
|
|
Furnace with CD5 or CK5 Coil Assembly or KCAKC Coil Box |
|||||
|
|
|
|
|
||
|
Upflow Applications |
23 |
24-1/8 |
23-5/8 |
24-3/4 |
|
|
Downflow Applications on Non-Combustible Flooring |
22-7/8 |
19 |
23-1/2 |
19-5/8 |
|
24-1/2 |
Downflow Applications on Combustible Flooring Using KGASB Subbase |
22-1/8 |
19 |
23-3/4 |
20-3/8 |
|
Furnace with or without CD5 or CK5 Coil Assembly or KCAKC Coil Box |
||||||
|
|
|
|
|
||
|
Downflow Applications on Combustible Flooring NOT Using KGASB Subbase |
22-1/2 |
19 |
23-1/2 |
20 |
|
|
Furnace with CD5 or CK5 Coil Assembly or KCAKC Coil Box |
|||||
|
|
|
|
|
||
Ð14Ð
 Loading...