


Zone Perfect Plus
Zoning
Systems
USER’S
INFORMATION
MANUAL
A96447
NOTE TO
INSTALLER: This manual must be
left with the equipment user.
Introduction
Congratulations! As the owner of Bryant’s Zone Perfect Plus zoning system, you have made a commitment to improving your indoor comfort. Zone Perfect Plus allows your heating and cooling system to follow your schedule and provide greater comfort in areas which are difficult to heat or cool. Here’s how it works: Your Bryant dealer has divided your home or business into zones which are controlled separately. Instead of setting one temperature for the entire house or business, you can select a different temperature for each of your zones. With the help of your dealer, and by following the easy, step-by-step instructions in this guide, you will begin to enjoy the benefits of your Zone Perfect Plus system.
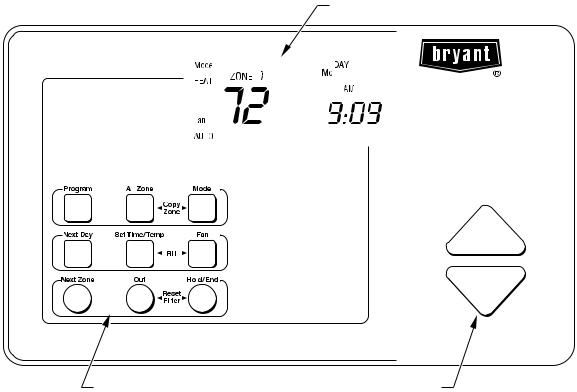
LCD DISPLAY
|
|
|
|
|
|
|
|
|
|
|
|
|
|
|
|
|
|
|
|
|
|
|
|
|
|
|
|
|
|
|
|
|
|
|
|
|
|
|
|
|
|
|
|
|
|
|
|
|
|
|
|
|
|
|
|
|
|
|
|
|
|
|
|
|
|
|
|
|
|
|
|
|
|
|
|
|
|
|
|
|
|
|
|
|
|
|
|
|
|
|
|
|
|
|
|
|
|
|
|
|
|
|
|
|
|
|
|
|
|
|
|
|
|
|
|
|
|
|
|
|
|
|
|
|
|
|
|
|
|
|
|
|
|
|
|
|
|
|
|
|
|
|
|
|
|
|
|
|
|
|
|
|
|
|
|
|
|
|
|
|
|
|
|
|
|
|
|
|
|
|
|
|
|
|
|
|
|
|
|
|
|
|
|
|
|
|
|
|
|
|
|
|
|
|
|
|
|
|
|
|
|
|
|
|
|
|
|
|
|
|
|
|
|
|
|
|
|
|
|
|
|
|
|
|
|
|
|
|
|
|
|
|
|
|
|
|
|
|
|
|
|
|
|
|
|
|
|
|
|
|
|
|
|
|
|
|
|
|
|
|
|
|
|
|
|
KEYPAD |
UP & DOWN BUTTONS |
||||||||||||||||||
A98154
—2—
Table of Contents
Introduction. . . . . . . . . . . . . . . . . . . . . . . . . . . . . . . . . . . . . . . . . . . . . . . . . . . . . . . . . . . . . . . . . . . . . . . . . . . . . . . . . . . . . . . 2
Quick Start . . . . . . . . . . . . . . . . . . . . . . . . . . . . . . . . . . . . . . . . . . . . . . . . . . . . . . . . . . . . . . . . . . . . . . . . . . . . . . . . . . . . . . . 3
Planning Your Comfort Schedule. . . . . . . . . . . . . . . . . . . . . . . . . . . . . . . . . . . . . . . . . . . . . . . . . . . . . . . . . . . . . . . . . . . . . . 4
Comfort Charts . . . . . . . . . . . . . . . . . . . . . . . . . . . . . . . . . . . . . . . . . . . . . . . . . . . . . . . . . . . . . . . . . . . . . . . . . . . . . . . . . . 5–6
Programming Your Comfort Schedule. . . . . . . . . . . . . . . . . . . . . . . . . . . . . . . . . . . . . . . . . . . . . . . . . . . . . . . . . . . . . . . 7–11
Using Your System. . . . . . . . . . . . . . . . . . . . . . . . . . . . . . . . . . . . . . . . . . . . . . . . . . . . . . . . . . . . . . . . . . . . . . . . . . . . . 12–15
Overriding the Program Settings . . . . . . . . . . . . . . . . . . . . . . . . . . . . . . . . . . . . . . . . . . . . . . . . . . . . . . . . . . . . . . . . . . . . . 16
Controlling Your Indoor Humidity. . . . . . . . . . . . . . . . . . . . . . . . . . . . . . . . . . . . . . . . . . . . . . . . . . . . . . . . . . . . . . . . . 17–20
Using Your Smart Sensors . . . . . . . . . . . . . . . . . . . . . . . . . . . . . . . . . . . . . . . . . . . . . . . . . . . . . . . . . . . . . . . . . . . . . . . . . . .21
Frequently Asked Questions. . . . . . . . . . . . . . . . . . . . . . . . . . . . . . . . . . . . . . . . . . . . . . . . . . . . . . . . . . . . . . . . . . . . . . . . . 22
Comfort Chart . . . . . . . . . . . . . . . . . . . . . . . . . . . . . . . . . . . . . . . . . . . . . . . . . . . . . . . . . . . . . . . . . . . . . . . . . . . . . . . . . . . . .23
Quick Start
The quick start procedure, as outlined below, allows you to begin using your system before you learn all the details of system operation. This setup may be done by you or your dealer. For the best comfort and energy-saving results, we recommend that you read through this owner’s guide and design the system to match your schedule and your comfort requirements.
To begin enjoying the benefits of your Zone Perfect Plus zoning system, locate the user interface and follow the steps outlined below.
Set the current day and time as follows:
1.Press the Next Day button until the current day of the week is shown.
2.Press the Set Time/Temp button until the TIME icon flashes.
3.Press the up or down buttons until the desired time is shown, making sure that the AM or PM time is correct.
4.Press the End key to exit.
Set the system as follows:
1.Press the Mode button to select Heat or Cool.
2.Press the up or down button until the desired temperature is displayed.
3.Press the Hold button.
4.Press the All Zone button if this desired temperature is needed for every zone. Otherwise press the Next Zone button, and follow steps 2 and 3 for each zone.
—3—
Planning Your Comfort Schedule
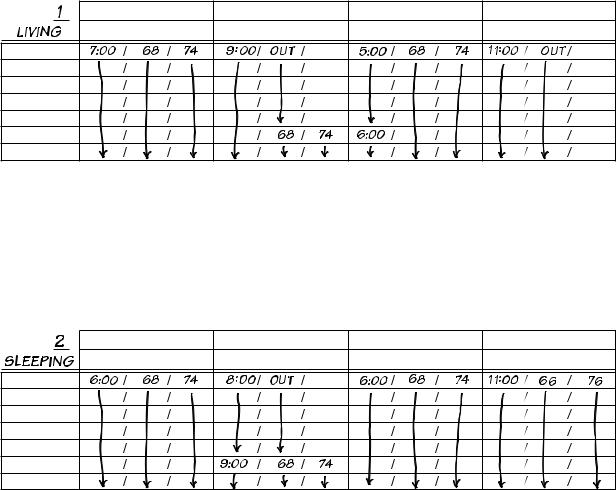
To give you an idea of how to use your new Zone Perfect Plus system, let’s take the example of a 2-zone house that has been divided into a living area (Zone #1 — family room, kitchen, etc.) and a sleeping area (Zone #2 — bedrooms).
For Zone #1, first decide what time each of the 4 periods begin for each day of the week. In this example, the living areas are occupied during the weekday from 7:00–9:00 AM and from 5:00–11:00 PM where the desired heating temperature for winter operation is 68° and the desired cooling temperature for summer operation is 74°. During the other periods of the day, this zone is unoccupied and coded as “OUT,” and will not be conditioned unless the temperature drops below 60° or rises above 85° in that zone during that time.
ZONE # |
Wake |
Day |
Evening |
Sleep |
|
Time / Heat°/ Cool° |
Time / Heat°/ Cool° |
Time / Heat°/ Cool° |
Time / Heat°/ Cool° |
Monday |
|
|
|
|
Tuesday |
|
|
|
|
Wednesday
Thursday
Friday
Saturday
Sunday
A96438
For Zone #2, the sleeping areas are unoccupied during the day, and the temperatures are set back during the night.
ZONE # |
Wake |
Day |
Evening |
Sleep |
|
Time / Heat°/ Cool° |
Time / Heat°/ Cool° |
Time / Heat°/ Cool° |
Time / Heat°/ Cool° |
Monday |
|
|
|
|
Tuesday |
|
|
|
|
Wednesday
Thursday
Friday
Saturday
Sunday
A96439
In this example, the weekend pattern changes to reflect that the living areas (ZONE #1) are in use during the day. Comfort Charts on the follow pages will allow you to track the conditions in your home or business. Take a few minutes to complete a schedule for each of your zones.
—4—
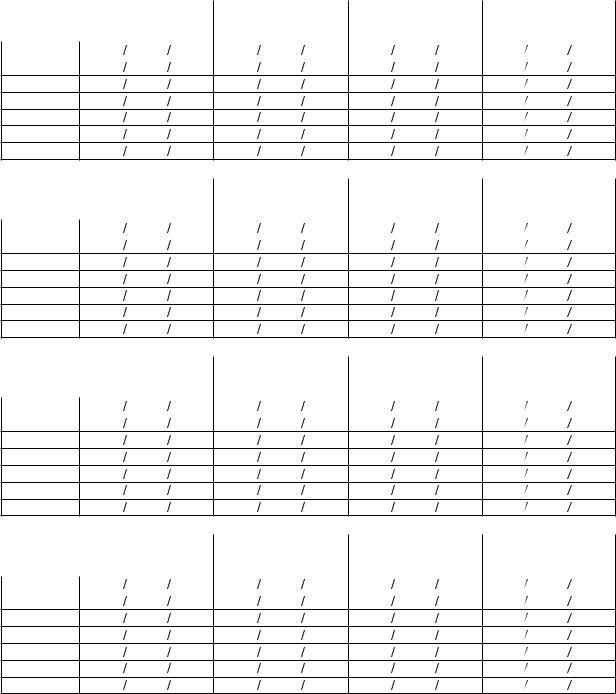
COMFORT CHART
ZONE # |
Wake |
Day |
Evening |
Sleep |
||
|
|
|
Time / Heat°/ Cool° |
Time / Heat°/ Cool° |
Time / Heat°/ Cool° |
Time / Heat°/ Cool° |
|
|
|
|
|
|
|
Monday |
|
|
|
|
||
Tuesday |
|
|
|
|
||
Wednesday
Thursday
Friday
Saturday
Sunday
ZONE # |
Wake |
Day |
Evening |
Sleep |
||
|
|
|
Time / Heat°/ Cool° |
Time / Heat°/ Cool° |
Time / Heat°/ Cool° |
Time / Heat°/ Cool° |
|
|
|
|
|
|
|
Monday |
|
|
|
|
||
Tuesday |
|
|
|
|
||
Wednesday
Thursday
Friday
Saturday
Sunday
ZONE # |
Wake |
Day |
Evening |
Sleep |
||
|
|
|
Time / Heat°/ Cool° |
Time / Heat°/ Cool° |
Time / Heat°/ Cool° |
Time / Heat°/ Cool° |
|
|
|
|
|
|
|
Monday |
|
|
|
|
||
Tuesday |
|
|
|
|
||
Wednesday
Thursday
Friday
Saturday
Sunday
ZONE # |
Wake |
Day |
Evening |
Sleep |
||
|
|
|
Time / Heat°/ Cool° |
Time / Heat°/ Cool° |
Time / Heat°/ Cool° |
Time / Heat°/ Cool° |
|
|
|
|
|
|
|
Monday |
|
|
|
|
||
Tuesday |
|
|
|
|
||
Wednesday
Thursday
Friday
Saturday
Sunday
A96440
NOTE: The OUT function may be used for any periods that are not occupied. Desired temperatures do not need to be set and are displayed as “--”.
—5—

COMFORT CHART
ZONE # |
Wake |
Day |
Evening |
Sleep |
||
|
|
|
Time / Heat°/ Cool° |
Time / Heat°/ Cool° |
Time / Heat°/ Cool° |
Time / Heat°/ Cool° |
|
|
|
|
|
|
|
Monday |
|
|
|
|
||
Tuesday |
|
|
|
|
||
Wednesday
Thursday
Friday
Saturday
Sunday
ZONE # |
Wake |
Day |
Evening |
Sleep |
||
|
|
|
Time / Heat°/ Cool° |
Time / Heat°/ Cool° |
Time / Heat°/ Cool° |
Time / Heat°/ Cool° |
|
|
|
|
|
|
|
Monday |
|
|
|
|
||
Tuesday |
|
|
|
|
||
Wednesday
Thursday
Friday
Saturday
Sunday
ZONE # |
Wake |
Day |
Evening |
Sleep |
||
|
|
|
Time / Heat°/ Cool° |
Time / Heat°/ Cool° |
Time / Heat°/ Cool° |
Time / Heat°/ Cool° |
|
|
|
|
|
|
|
Monday |
|
|
|
|
||
Tuesday |
|
|
|
|
||
Wednesday
Thursday
Friday
Saturday
Sunday
ZONE # |
Wake |
Day |
Evening |
Sleep |
||
|
|
|
Time / Heat°/ Cool° |
Time / Heat°/ Cool° |
Time / Heat°/ Cool° |
Time / Heat°/ Cool° |
|
|
|
|
|
|
|
Monday |
|
|
|
|
||
Tuesday |
|
|
|
|
||
Wednesday
Thursday
Friday
Saturday
Sunday
A96441
NOTE: The OUT function may be used for any periods that are not occupied. Desired temperatures do not need to be set and are displayed as “--”.
—6—
Programming Your Comfort Schedule
Now that you have completed your own comfort chart you are ready to start programming with the convenient user interface.
The label on the back cover of this owner’s manual is provided to write in the numbers and descriptions of each zone. The label can then be removed from the back cover and affixed to the inside of the user interface door.
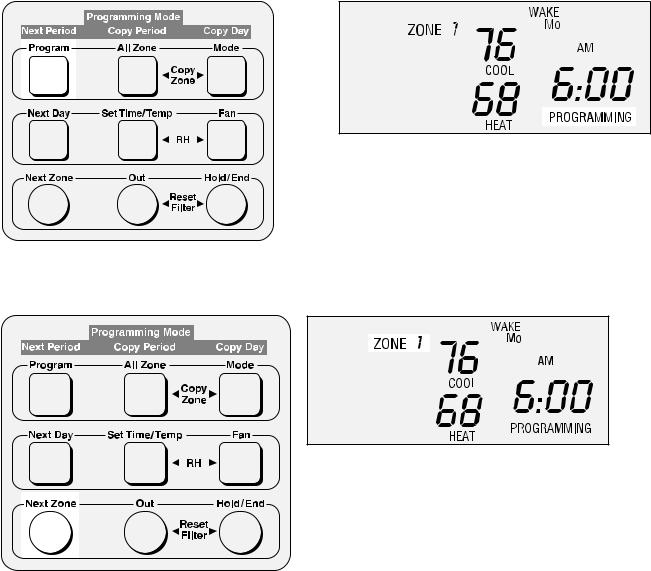
During the programming process you will enter the starting time, the desired heating and cooling temperatures for each time period, the day, and the zone. To assist you, pictures of the keypad and LCD display are provided for each step. The button or combination of buttons that are pressed along with the corresponding section of the display that will be affected are highlighted in each picture. This will quickly show you when you have performed the step correctly.
If you followed our quick start procedure, you will need to proceed as follows before moving on to Step 1 of programming your system:
1.If the All Zone function was used to set one temperature for all zones, press the All Zone button to release the All Zone function.
2.Press the Hold button to release the Hold function.
3.If All Zone was not used, you may need to remove the Hold function from each zone. Press the Next Zone button to move to the next zone, then press the Hold button to release the Hold function. Continue through all zones.
You are now ready to begin programming.
Step 1
Press the Program button.
A98155
Step 2
Press the Next Zone button until Zone 1 appears on the LCD display.
A98156
—7—

Step 3
Press the Next Day button until Monday (Mo) is displayed.
A98157
Step 4
Press the Next Period button until the WAKE period is displayed.
A98158
Step 5
Press the Set Time/Temp button until the TIME icon is flashing.
A98159
—8—
 Loading...