


SE-270D
Easy Thread Cassette System
Operation Manual
CPS5XV[Y
GETTING READY
SEWING BASICS
UTILITY STITCHES
EMBROIDERY
APPENDIX
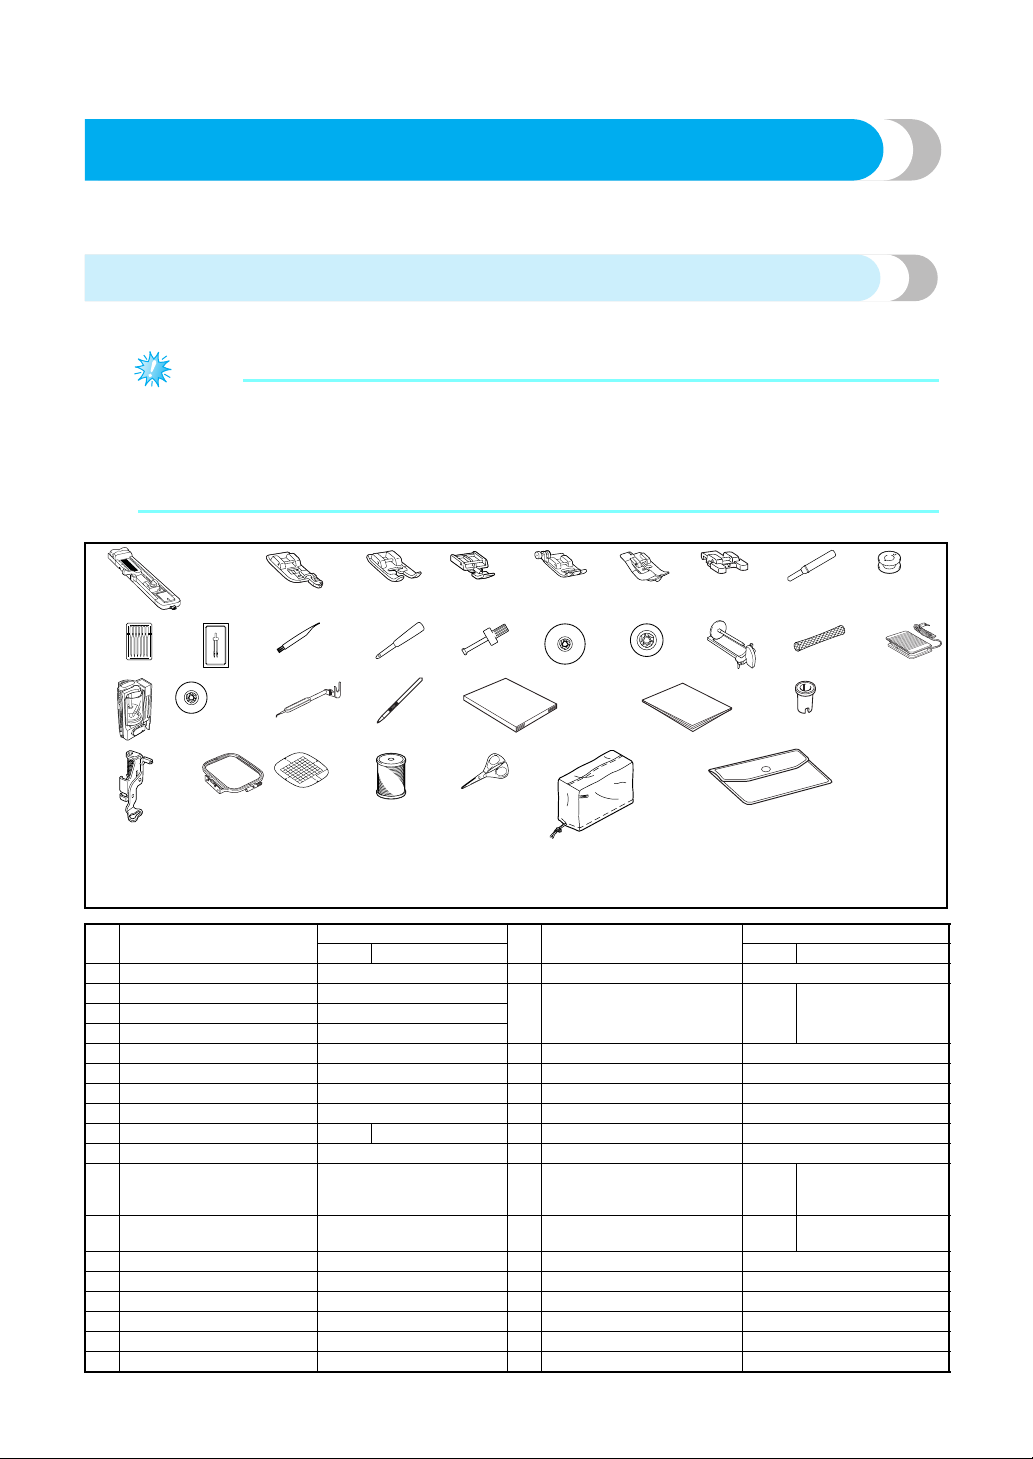
Cover A
Included Accessories
After opening the box, check that the following accessories are included. If any item is missing or
damaged, contact your retailer.
Accessories
Note
(For U.S.A. only)
z Foot controller: Model N5V
This foot controller can be used on this machine model SE-270D.
z The screw of the presser foot holder is available through your authorized dealer.
(Part code: XA4813-051)
1. 2. 3. 4.
5.
6. 7.
8.
9.
10.* 11. 12. 13. 14. 15. 16. 17. 18. 19.
20.
21. 22.
23.
24. 25.
26. 27. 28. 29.
30.
31.
*75/11 2 needles
90/14 2 needles
90/14 2 needles: Ball point needle (gold colored)
No. Part Name
Part Code
No. Part Name
Part Code
U.S.A. Others U.S.A. Others
1 Buttonhole foot "A" XC2691-021 19 Foot controller XC6651-121
2 Overcasting foot "G" XC3098-051
20
Thread cassette set
(on machine)
SA250 TC1:XC4716-0233 Monogramming foot "N" X53840-351
4 Zipper foot "I" X59370-051
5 Zigzag foot "J" (on machine) XC3021-051 21 Needle-changing tool XC4551-020
6 Blind stitch foot "R" XC4051-051 22 Touch pen XA9940-021
7 Button fitting foot "M" X59375-151 23 Operation manual XC8545-021
8 Seam ripper X54243-001 24 Quick reference guide XC8556-021
9 Bobbin (4) SA156 SFB:XA5539-151 25 Spool cap (special) XA5752-021
10 Needle set X58358-051 26 Embroidery foot "Q" XC3829-021
11 Twin needle X59296-151 27
Embroidery set (medium)
H 10 cm X W 10 cm
(H 4 inch X W 4 inch)
SA432 EF62:XA6628-002
12 Cleaning brush X59476-051 28
Embroidery bobbin thread
(white)
SA-
EBT
EBT-CE:X81164-001
13 Eyelet punch 135783-001 29 Scissors XC1807-121
14 Screwdriver XC4237-021 30 Soft cover XC4842-022
15 Spool cap (large) 130012-054 31 Accessory bag XC4487-021
16 Spool cap (small) 130013-154
17 Extra spool pin XC3834-021
18 Spool net XA5523-050

Cover B
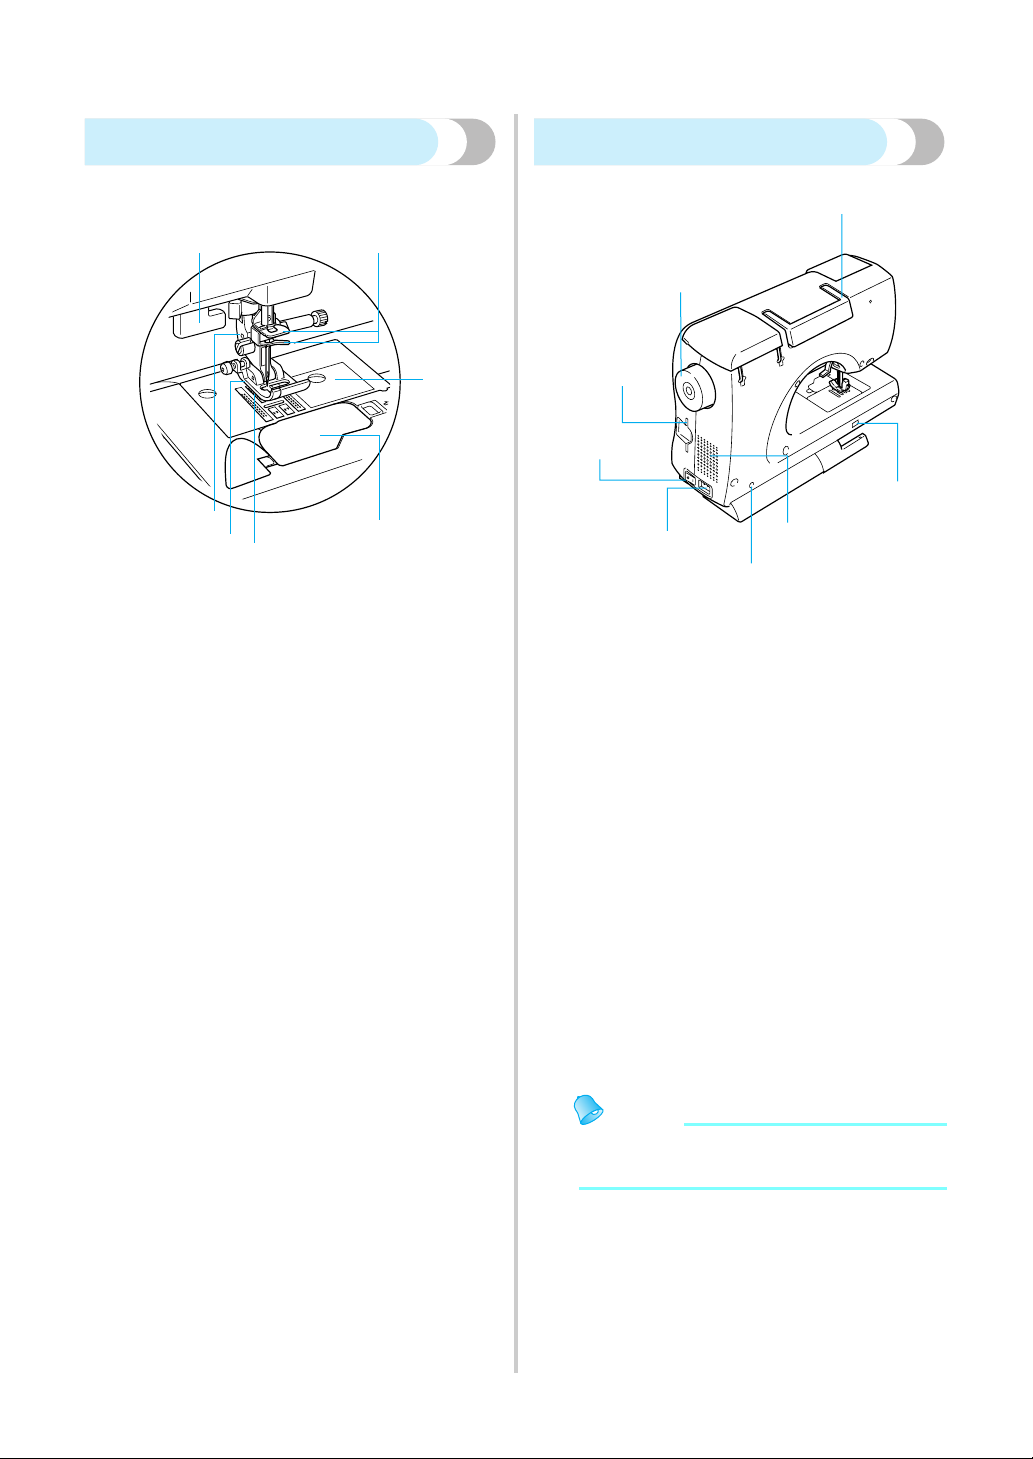
Names of Machine Parts and Their Functions
The names of the various parts of the sewing machine and their functions are described below. Before
using the sewing machine, carefully read these descriptions to learn the names of the machine parts.
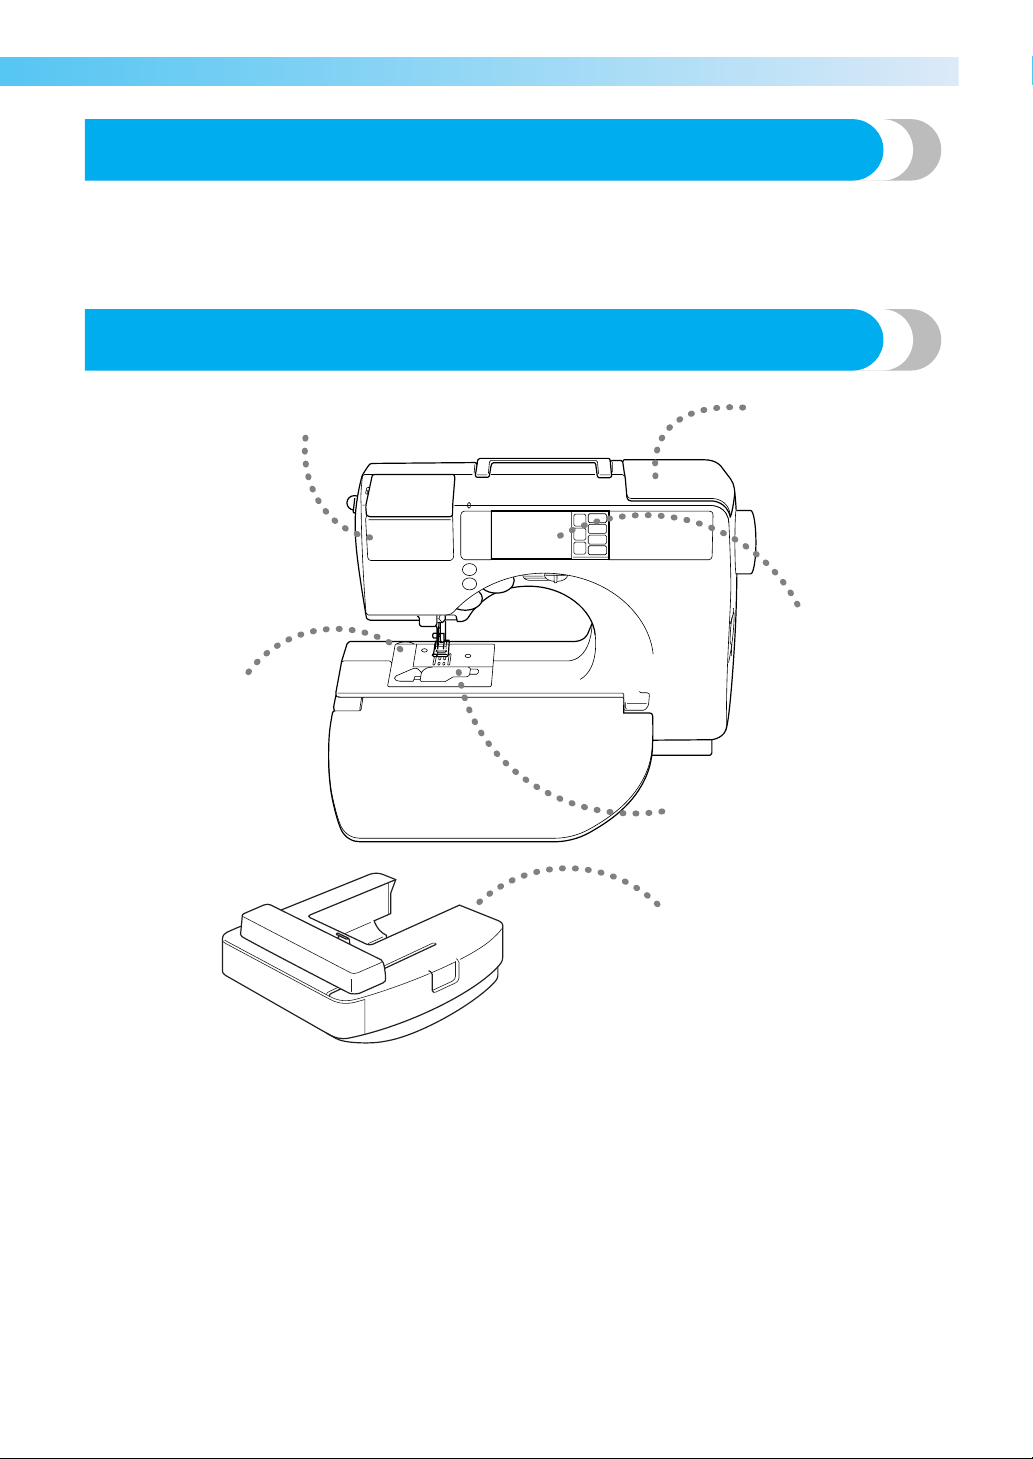
Front view
a Thread cassette compartment cover
b Thread cassette compartment
Insert a thread cassette into the thread cassette
compartment.
c Thread cassette eject lever
Press this lever to eject the installed thread cassette.
d Thread tension dial
Use the thread tension dial to adjust the tension of the
upper thread.
e Thread cutter
Pass the threads through the thread cutter to cut them.
f Arm
Plug in the connector for the embroidery unit.
g Embroidery unit connector slot
Plug in the connector for the embroidery unit.
h Flap
Use the flap to create a table. When the sewing
machine is not being used, store the machine with the
flap folded up. Remove the flap to sew cylindrical
pieces such as sleeve cuffs.
i Sliding leg
Pull out the sliding leg during free-arm sewing.
j Operation buttons
Use the operation buttons to start the sewing machine
and raise and lower the needle. (page Cover D)
k Operation panel
Select a stitch from those that appear in the operation
panel. (page Cover E)
l Bobbin winder
Use the bobbin winder when winding the bobbin.
m Bobbin thread spool pin
Place the spool of thread for the bobbin onto this spool
pin in order to wind the bobbin.
n Bobbin storage compartment
Store the bobbins designed specifically for this sewing
machine in this compartment.
o Bobbin winder cover
Open this cover when winding the bobbin.
p Thread guide for bobbin winding
Pass the thread around this thread guide when winding
the bobbin thread.
2
1
3
4
5
6
8
7
F
E
D
C
B
A
0
9
Cover C
Needle and presser foot section
a Buttonhole lever
Lower the buttonhole lever when sewing buttonholes
and bar tacks.
b Needle bar thread hooks
Pass the upper thread through the needle bar thread
hooks.
c Needle plate
The needle plate is marked with guides for sewing
straight seams.
d Bobbin cover/Shuttle
Remove the bobbin cover, and then insert the bobbin
into the shuttle.
e Feed dogs
The feed dogs feed the fabric in the sewing direction.
f Presser foot
The presser foot applies pressure consistently on the
fabric as the sewing takes place. Attach the appropriate
presser foot for the selected stitching.
g Presser foot holder
The presser foot is installed onto the presser foot holder.
Right-side/rear view
a Handle
Carry the sewing machine by its handle when
transporting the machine.
b Balance wheel
Turn the balance wheel toward you to raise and lower
the needle to sew one stitch.
c Embroidery card slot
Insert the embroidery card.
d Main power switch
Use the main power switch to turn the sewing machine
on and off.
e Power supply jack
Insert the plug on the power supply cord into the power
supply jack.
f Foot controller jack
Insert the plug on the end of the foot controller cable
into the foot controller jack.
g Air vent
The air vent allows the air surrounding the motor to be
exchanged. Do not cover the air vent while the sewing
machine is being used.
h Feed dog position switch
Use the feed dog position switch to lower the feed dogs.
Memo
z Refer to Cover B, C, D or E pages while you
are learning to use your machine.
12
3
4
5
6
7
1
2
4
6
3
7
5
8
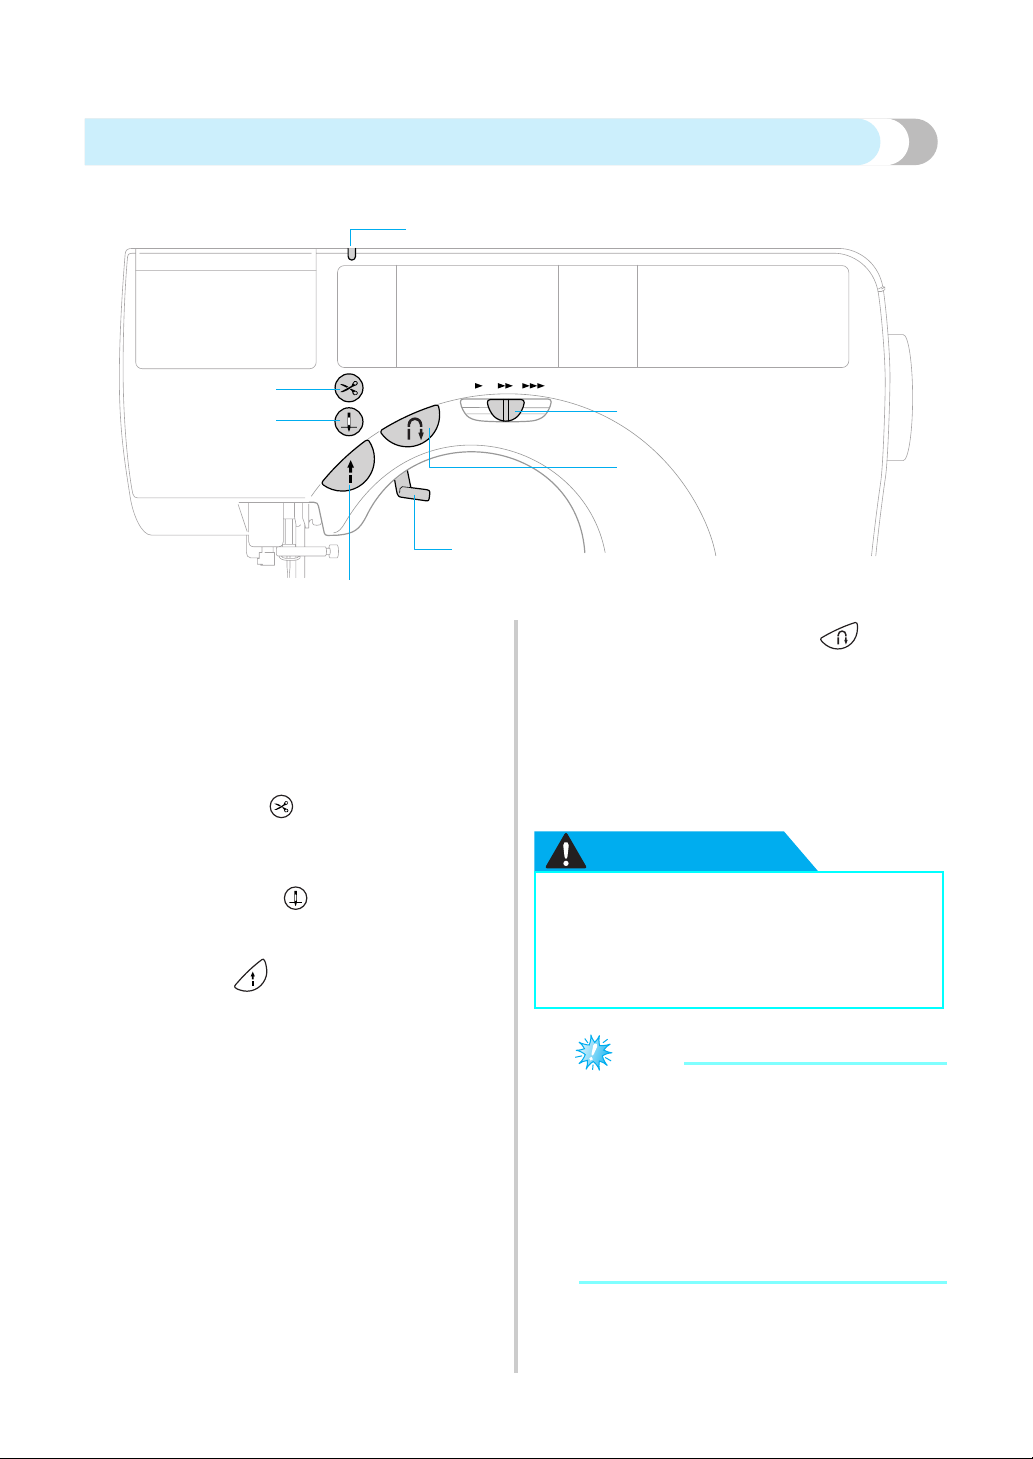
Cover D
Operation buttons
The operation buttons help you to easily perform various basic sewing machine operations.
a Thread cassette indicator
The indicator lights up or goes off depending on the
condition of the sewing machine.
b Thread cutter button
Press the thread cutter button after sewing is stopped to
cut both the upper and the bobbin threads. For details,
refer to "Cutting the thread" (page 50).
c Needle position button
Press the needle position button to raise or lower the
needle. Pressing the button twice sews one stitch.
d Start/stop button
Press the start/stop button to start or stop sewing. The
machine sews at a slow speed at the beginning of
sewing while the button is depressed. When sewing is
stopped, the needle is lowered in the fabric. For details,
refer to "Starting to sew" (page 47).
e Presser foot lever
Raise and lower the presser foot lever to raise and lower
the presser foot.
f Reverse/reinforcement stitch button
Press the reverse/reinforcement stitch button to sew
reverse stitches or reinforcement stitches. Reverse
stitches are sewn by keeping the button pressed down to
sew in the opposite direction. Reinforcement stitches
are sewn by sewing 3 to 5 stitches on top of each other.
For details, refer to "Securing the stitching" (page 49).
g Sewing speed controller
Slide the sewing speed controller to adjust the sewing
speed.
CAUTION
Note
z Do not press the thread cutter button if there
is no fabric under the presser foot or while
the machine is sewing, otherwise damage to
the machine may occur.
z When cutting thread thicker than #30, nylon
thread or other special threads, use the
thread cutter on the side of the machine. For
details, refer to "Cutting the thread" (page
50).
7
2
3
6
4
5
1
Green: A thread cassette can be inserted.
Red: A thread cassette cannot be inserted.
Off: The sewing machine has been turned
off or a thread cassette is already
inserted.
● Do not press the thread cutter button
after the threads have already been cut,
otherwise the needle may break, the
threads may become tangled or damage
to the machine may occur.
Cover E
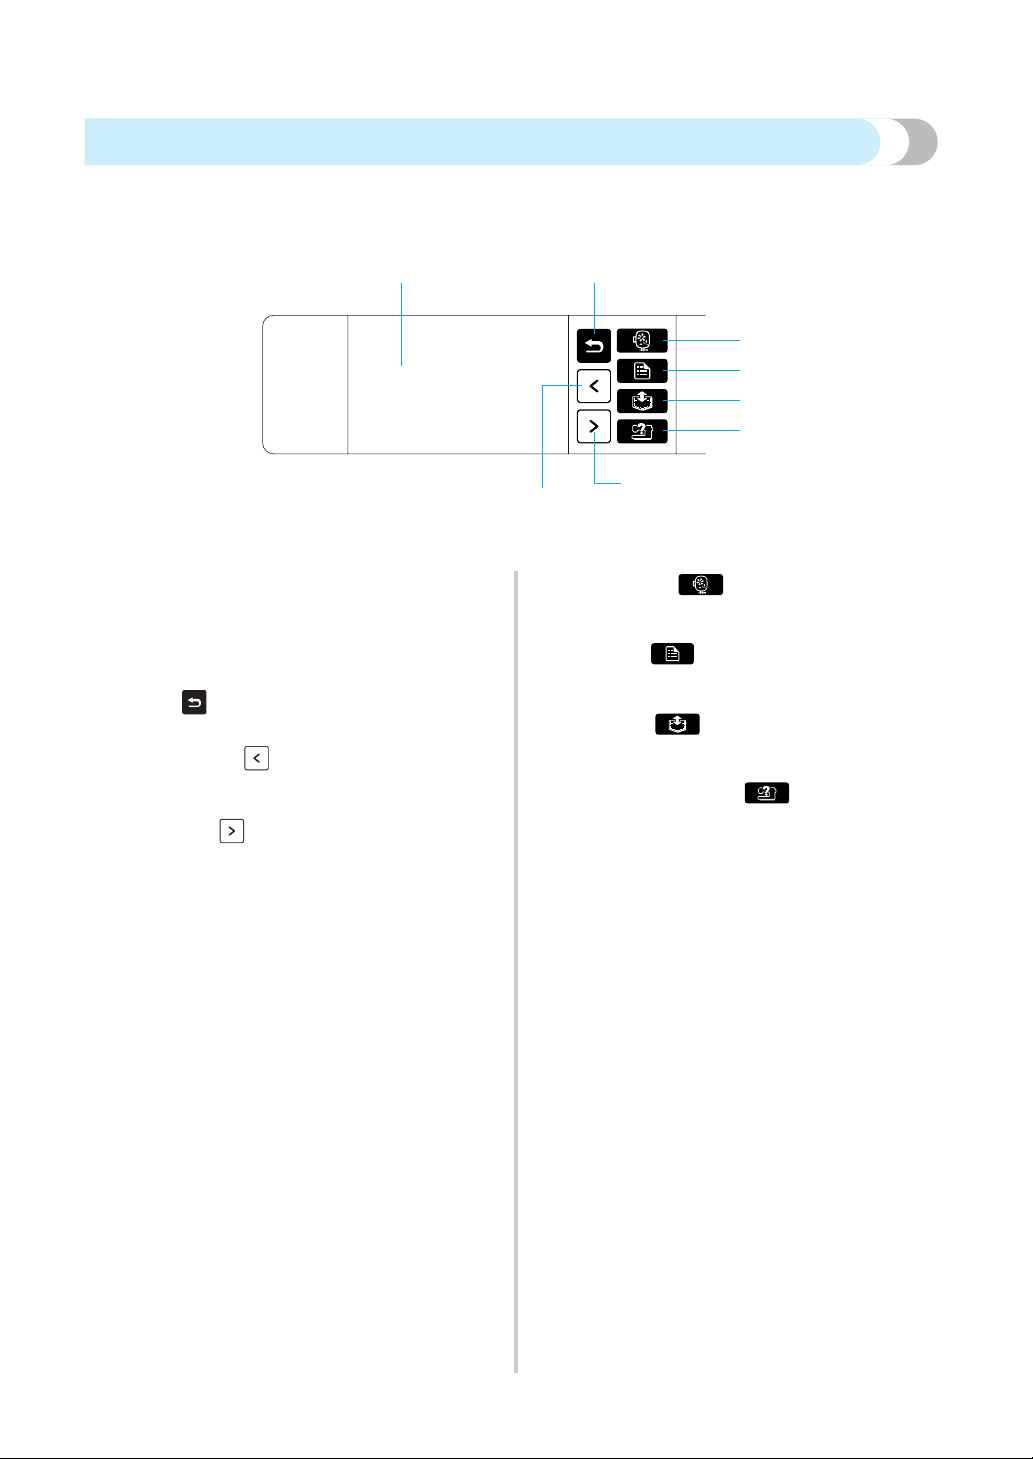
Operation panel
The front operation panel has an LCD (liquid crystal display) and operation keys.
a LCD (liquid crystal display) (touch panel)
Selected pattern settings and messages are displayed.
Touch the keys displayed on the LCD to perform
operations.
For details, refer to "LCD (liquid crystal display)
operation" (page 12).
b Back key
Press to return to the previous LCD display.
c Previous page key
Displays the previous screen when there are items that
are not displayed on the LCD.
d Next page key
Displays the next screen when there are items that are
not displayed on the LCD.
e Embroidery key
When it is in embroidery, press to return to the initial
embroidery screen.
f Settings key
Press to set the needle stop position, the buzzer sound,
and more.
g Memory key
Press to enter character embroidery into the sewing
machine memory.
h Sewing machine help key
Press to get help on using the sewing machine.
Displays simple explanations of setting upper thread /
bobbin winding / setting bobbin thread / needle
replacement / embroidery unit attachment / embroidery
frame attachment / embroidery foot attachment / presser
foot replacement.
1
5
7
6
2
8
3
4
1
— — — — — — — — — — — — — — — — — — — — — — — — — — — — — — — — — — — — — — — — — — — — — — — — — — — — — — — — — — Introduction
Introduction
Thank you for purchasing this sewing machine. Before using this sewing machine, carefully read the
"Important Safety Instructions" (page 5), and then study this manual for the correct operation of the various
functions. In addition, after you have finished reading this manual, store it where it can quickly be
accessed for future reference.
Sewing Machine Features
a Thread cassette
Easily thread the upper thread by loading a spool of thread into the thread cassette. Then, simply insert the thread cassette
into the compartment to thread the needle. (page 22)
b Simple bobbin-winding
The bobbin can quickly and easily be wound with thread. (page 16)
c Built-in stitches
You can select from the built-in stitches available, including utility stitches and decorative stitches. (page 64)
d One-touch lower threading
You can start sewing without pulling up the bobbin thread. (page 19)
e Automatic thread cutting
The thread can be cut automatically after sewing. (page 57)
f Embroidery
You can embroider built-in embroidery patterns, characters, framed decorations, and designs from optional embroidery
cards. (page 111)
6
4
3
2
1
5

2
— — — — — — — — — — — — — — — — — — — — — — — — — — — — — — — — — — — — — — — — — — — — — — — — — — —
Contents
Included Accessories ............................................................................................... Cover A
Accessories ............................................................................................................................................ Cover A
Names of Machine Parts and Their Functions ......................................................... Cover B
Front view...............................................................................................................................................Cover B
Needle and presser foot section ............................................................................................................ Cover C
Right-side/rear view .............................................................................................................................. Cover C
Operation buttons..................................................................................................................................Cover D
Operation panel......................................................................................................................................Cover E
Introduction ........................................................................................................................1
Sewing Machine Features ....................................................................................................1
Important Safety Instructions ..............................................................................................5
GETTING READY 9
Turning the Machine On/Off............................................................................................. 10
Power supply precautions ...............................................................................................................................10
Turning on the machine.................................................................................................................................. 11
Turning off the machine..................................................................................................................................11
LCD (liquid crystal display) operation ............................................................................... 12
Viewing the LCD.............................................................................................................................................12
Changing the Machine Settings ....................................................................................................................... 13
Checking machine operating procedures ........................................................................................................15
Winding/Installing the Bobbin........................................................................................... 16
Bobbin precautions .........................................................................................................................................16
Winding the bobbin ........................................................................................................................................16
Installing the bobbin .......................................................................................................................................19
Upper Threading ...............................................................................................................21
About the spool of thread ................................................................................................................................21
Loading the spool into the thread cassette .......................................................................................................22
Threading the needle ...................................................................................................................................... 25
Using the extra spool pin ................................................................................................................................27
Thread the needle manually (without using the needle threader) .....................................................................28
Using the twin needle ..................................................................................................................................... 29
Pulling up the bobbin thread...........................................................................................................................31
Replacing the Needle ........................................................................................................33
Needle precautions.........................................................................................................................................33
Needle types and their uses............................................................................................................................. 34
Checking the needle .......................................................................................................................................35
Replacing the needle.......................................................................................................................................35
Replacing the Presser Foot ................................................................................................38
Presser foot precautions ..................................................................................................................................38
Replacing the presser foot...............................................................................................................................38
Removing the presser foot holder.................................................................................................................... 40
Sewing Cylindrical Pieces.................................................................................................. 41
Free-arm sewing..............................................................................................................................................41
SEWING BASICS 43
Sewing............................................................................................................................... 44
General sewing procedure .............................................................................................................................. 44
Selecting stitching ...........................................................................................................................................45
Positioning the fabric ......................................................................................................................................46
Starting to sew.................................................................................................................................................47
Securing the stitching......................................................................................................................................49
Cutting the thread ...........................................................................................................................................50

3
— — — — — — — — — — — — — — — — — — — — — — — — — — — — — — — — — — — — — — — — — — — — — — — — — — — —
Adjusting the Thread Tension ............................................................................................ 52
Thread tension ................................................................................................................................................52
Changing the upper thread tension..................................................................................................................53
Adjusting the Stitch Width and Length .............................................................................. 54
Adjusting the stitch width................................................................................................................................ 54
Adjusting the stitch length ...............................................................................................................................55
Useful Functions................................................................................................................56
Automatically sewing reverse/reinforcement stitches.......................................................................................56
Automatically cutting the thread .....................................................................................................................57
Mirroring stitches ............................................................................................................................................58
Useful Sewing Tips ............................................................................................................ 59
Trial sewing ....................................................................................................................................................59
Changing the sewing direction........................................................................................................................59
Sewing curves.................................................................................................................................................59
Sewing thick fabrics ........................................................................................................................................60
Sewing thin fabrics..........................................................................................................................................60
Sewing stretch fabrics......................................................................................................................................60
Sewing an even seam allowance..................................................................................................................... 61
UTILITY STITCHES 63
Stitch Settings.................................................................................................................... 64
Utility stitches .................................................................................................................................................64
Overcasting Stitches .......................................................................................................... 69
Sewing overcasting stitches using overcasting foot "G" ....................................................................................69
Sewing overcasting stitches using zigzag foot "J" ............................................................................................. 70
Sewing overcasting stitches using the optional side cutter ...............................................................................71
Basic Stitching ................................................................................................................... 73
Basting............................................................................................................................................................73
Basic stitching.................................................................................................................................................73
Blind Hem Stitching ..........................................................................................................75
Buttonhole Stitching .......................................................................................................... 77
Buttonhole sewing ..........................................................................................................................................78
Button sewing .................................................................................................................................................82
Zipper Insertion................................................................................................................. 84
Inserting a centered zipper ..............................................................................................................................84
Inserting a side zipper .....................................................................................................................................86
Sewing Stretch Fabrics and Elastic Tape ............................................................................ 89
Stretch stitching...............................................................................................................................................89
Elastic attaching ..............................................................................................................................................89
Appliqué, Patchwork and Quilt Stitching ..........................................................................91
Appliqué stitching ...........................................................................................................................................91
Patchwork (crazy quilt) stitching ..................................................................................................................... 93
Piecing............................................................................................................................................................93
Quilting ..........................................................................................................................................................94
Free-motion quilting........................................................................................................................................96
Satin stitching..................................................................................................................................................97
Reinforcement Stitching .................................................................................................... 98
Triple stretch stitching.....................................................................................................................................98
Bar tack stitching.............................................................................................................................................98
Darning......................................................................................................................................................... 100
Eyelet Stitching ................................................................................................................ 102
Decorative Stitching ........................................................................................................ 103
Fagoting........................................................................................................................................................104
Scallop stitching............................................................................................................................................105
Smocking......................................................................................................................................................105
Shell tuck stitching ........................................................................................................................................106
Joining ..........................................................................................................................................................107
Heirloom stitching ........................................................................................................................................108

4
— — — — — — — — — — — — — — — — — — — — — — — — — — — — — — — — — — — — — — — — — — — — — — — — — — —
EMBROIDERY 111
Embroidering neatly ........................................................................................................112
What to prepare............................................................................................................................................112
Embroidery step by step ................................................................................................................................114
Attaching the embroidery foot ........................................................................................ 115
Attaching the embroidery foot....................................................................................................................... 115
Removing the embroidery foot ...................................................................................................................... 117
Attaching the embroidery unit ........................................................................................118
Embroidery unit precautions ......................................................................................................................... 118
Attaching the embroidery unit....................................................................................................................... 118
Removing the embroidery unit ...................................................................................................................... 120
Preparing the fabric.........................................................................................................122
Attaching a stabilizer material to the fabric ................................................................................................... 122
Setting the fabric in the embroidery frame.....................................................................................................123
Attaching the embroidery frame .....................................................................................126
Attaching the embroidery frame .................................................................................................................... 126
Removing the embroidery frame ................................................................................................................... 127
Selecting embroidery patterns......................................................................................... 128
Copyright Information .................................................................................................................................. 128
Embroidery pattern types...............................................................................................................................128
LCD (liquid crystal display) operation ...........................................................................................................129
Selecting characters ......................................................................................................................................130
Selecting embroidery patterns ....................................................................................................................... 131
Selecting a frame pattern............................................................................................................................... 132
Using an embroidery card ............................................................................................................................133
Embroidering................................................................................................................... 134
Embroidering a pattern.................................................................................................................................. 134
Appliquéing .................................................................................................................................................136
Convenient Functions ...................................................................................................... 138
Adjusting the layout......................................................................................................................................138
Storing characters..........................................................................................................................................139
Adjusting the thread tension.......................................................................................................................... 141
Resewing ......................................................................................................................................................141
Thread runs out partway through a design.....................................................................................................142
Stopping while embroidering ........................................................................................................................142
APPENDIX 145
Maintenance.................................................................................................................... 146
Cleaning the machine surface .......................................................................................................................146
Cleaning the shuttle ......................................................................................................................................146
Troubleshooting ..............................................................................................................148
Error messages ..............................................................................................................................................153
Nothing appears in the LCD.......................................................................................................................... 155
Operation beep.............................................................................................................................................155
Cancelling the operation beep ......................................................................................................................156
Index ................................................................................................................................157

5
— — — — — — — — — — — — — — — — — — — — — — — — — — — — — — — — — — — — — — — — — — — — — — — — — — — —
Important Safety Instructions
When using this machine, basic safety precautions should always be taken, including the following:
Read all instructions before using.
DANGER - To reduce the risk of electric shock:
1. The machine should never be left unattended while plugged in. Always unplug the machine from
the electrical outlet immediately after using and before cleaning.
WARNING - To reduce the risk of burns, fire, electric shock, or injury to persons:
1. Do not allow this machine to be used as a toy. Close attention is necessary when the machine is
used by or near children.
2. Use this machine only for its intended use as described in this manual. Use only accessories
recommended by the manufacturer as contained in this manual.
3. Never operate this machine if it has a damaged cord or plug, if it is not working properly, if it has
been dropped or damaged, or dropped into water. Return the machine to the nearest authorized
dealer or service center for examination, repair, electrical or mechanical adjustment.
4. Never operate the machine with any air openings blocked. Keep ventilation openings of the
machine and foot control free from the accumulation of lint, dust, and loose cloth.
5. Never drop or insert any object into any opening.
6. Do not use outdoors.
7. Do not operate where aerosol (spray) products are being used or where oxygen is being
administered.
8. To disconnect, turn the main switch to the symbol " " position which represents off, then
remove plug from outlet.
9. Do not unplug by pulling on cord. To unplug, grasp the plug, not the cord.
10.Keep fingers away from all moving parts. Special care is required around the machine needle.
11.Always use the proper needle plate. The wrong plate can cause the needle to break.
12.Do not use bent needles.
13.Do not pull or push fabric while stitching. It may deflect the needle causing it to break.
14.Switch the machine to the symbol " " position when making any adjustments in the needle
area, such as threading needle, changing needle, threading bobbin, or changing presser foot, and
the like.
15.Always unplug the machine from the electrical outlet when removing covers, lubricating, or
when making any other user servicing adjustments mentioned in the instruction manual.
16.This sewing machine is not intended for use by young children or infirm persons without
supervision.
17.Young children should be supervised to ensure that they do not play with this machine.
18.If the Light unit is damaged, it must be replaced by authorized dealer.
SAVE THESE INSTRUCTIONS
This machine is intended for household use.

6
— — — — — — — — — — — — — — — — — — — — — — — — — — — — — — — — — — — — — — — — — — — — — — — — — — —
FOR USERS IN THE UK, EIRE, MALTA AND CYPRUS ONLY
If this machine is fitted with a three-pin non-rewireable BS plug then please read the following.
IMPORTANT
If the available socket outlet is not suitable for the plug supplied with this equipment, it should be cut
off and an appropriate three-pin plug fitted. With alternative plugs an approved fuse must be fitted in
the plug.
NOTE
The plug served from the main lead must be destroyed as a plug with bared flexible cords is
hazardous if engaged in a live socket outlet. In the event of replacing the plug fuse, use a fuse
approved by ASTA to BS 1362, i.e. carrying the mark, rating as marked on plug.
Always replace the fuse cover, never use plugs with the fuse cover omitted.
WARNING
DO NOT CONNECT EITHER WIRE TO THE EARTH TERMINAL WHICH IS MARKED WITH THE
LETTER ‘E’, BY THE EARTH SYMBOL OR COLOURED GREEN OR GREEN AND YELLOW.
The wires in this main lead are colored in accordance with the following code:
As the colors of the wiring in the main lead of this appliance may not correspond with the colored
markings identifying the terminals in your plug, proceed as follows.
The wire which is colored blue must be connected to the terminal which is marked with the letter
‘N’ or colored black or blue.
The wire which is colored brown must be connected to the terminal which is marked with the letter
‘L’ or colored red or brown.
Blue Neutral
Brown Live

7
— — — — — — — — — — — — — — — — — — — — — — — — — — — — — — — — — — — — — — — — — — — — — — — — — — — —
CONGRATULATIONS ON CHOOSING OUR MACHINE
Your machine is one of the most advanced computerized household sewing machines. To fully
enjoy all the features, we suggest that you study the manual before using the machine.
PLEASE READ BEFORE USING THIS MACHINE
For safe operation
1. Be sure to keep your eye on the needle while sewing. Do not touch the balance wheel, thread
take-up lever, needle, or other moving parts.
2. Remember to turn off the power switch and unplug the cord when:
• Operation is completed
• Replacing or removing the needle or any other parts
• A power failure occurs during use
• Maintaining the machine
• Leaving the machine unattended
3. Do not store anything on the foot controller.
4. Plug the machine directly into the wall. Do not use extension cords.
For a longer service life
1. When storing this machine, avoid direct sunlight and high humidity locations. Do not use or store
the machine near a space heater, iron, halogen lamp, or other hot objects.
2. Use only neutral soaps or detergents to clean the case. Benzene, thinner, and scouring powders
can damage the case and machine, and should never be used.
3. Do not drop or hit the machine.
4. Always consult the operation manual when replacing or installing any assemblies, the presser
feet, needle, or other parts to assure correct installation.
For repair or adjustment
In the event a malfunction occurs or adjustment is required, first follow the troubleshooting table in
the back of the operation manual to inspect and adjust the machine yourself. If the problem persists,
please consult your local authorized Brother dealer.
For additional product information and updates, visit our web site at www.brother.com

8

1 GETTING READY
The various preparations required before starting to sew are described in this chapter.
Turning the Machine On/Off .................................................................................. 10
LCD (liquid crystal display) operation .....................................................................12
Winding/Installing the Bobbin.................................................................................16
Upper Threading ..................................................................................................... 21
Replacing the Needle ..............................................................................................33
Replacing the Presser Foot ......................................................................................38
Sewing Cylindrical Pieces........................................................................................41

GETTING READY — — — — — — — — — — — — — — — — — — — — — — — — — — — — — — — — — — — — — — — — — — — —
10
Turning the Machine On/Off
This section explains how to turn the sewing machine on and off.
Power supply precautions
Be sure to observe the following precautions concerning the power supply.
WARNING
CAUTION
● Use only regular household electricity for the power source. Using other power sources may
result in fire, electric shock, or damage to the machine.
● Turn off the main power and remove the plug in the following circumstances:
• When you are away from the machine
• After using the machine
• When the power fails during use
• When the machine does not operate correctly due to a bad connection or a disconnection
• During electrical storms
● Do not use extension cords or multi-plug adapters with many other appliances plugged in to
them. Fire or electric shock may result.
● Do not touch the plug with wet hands. Electric shock may result.
● When unplugging the machine, always turn off the main power first. Always grasp the plug to
remove it from the outlet. Pulling on the cord may damage the cord, or lead to fire or electric
shock.
● Do not allow the power cord to be cut, damaged, modified, forcefully bent, pulled, twisted,
or bundled. Do not place heavy objects on the cord. Do not subject the cord to heat. These
things may damage the cord and cause fire or electric shock. If the cord or plug is damaged,
take the machine to your authorized dealer for repairs before continuing use.
● Unplug the power cord if the machine is not to be used for a long period of time. Otherwise a
fire may result.
Turning the Machine On/Off 11
1
— — — — — — — — — — — — — — — — — — — — — — — — — — — — — — — — — — — — — — — — — — — — — — — — — — — —
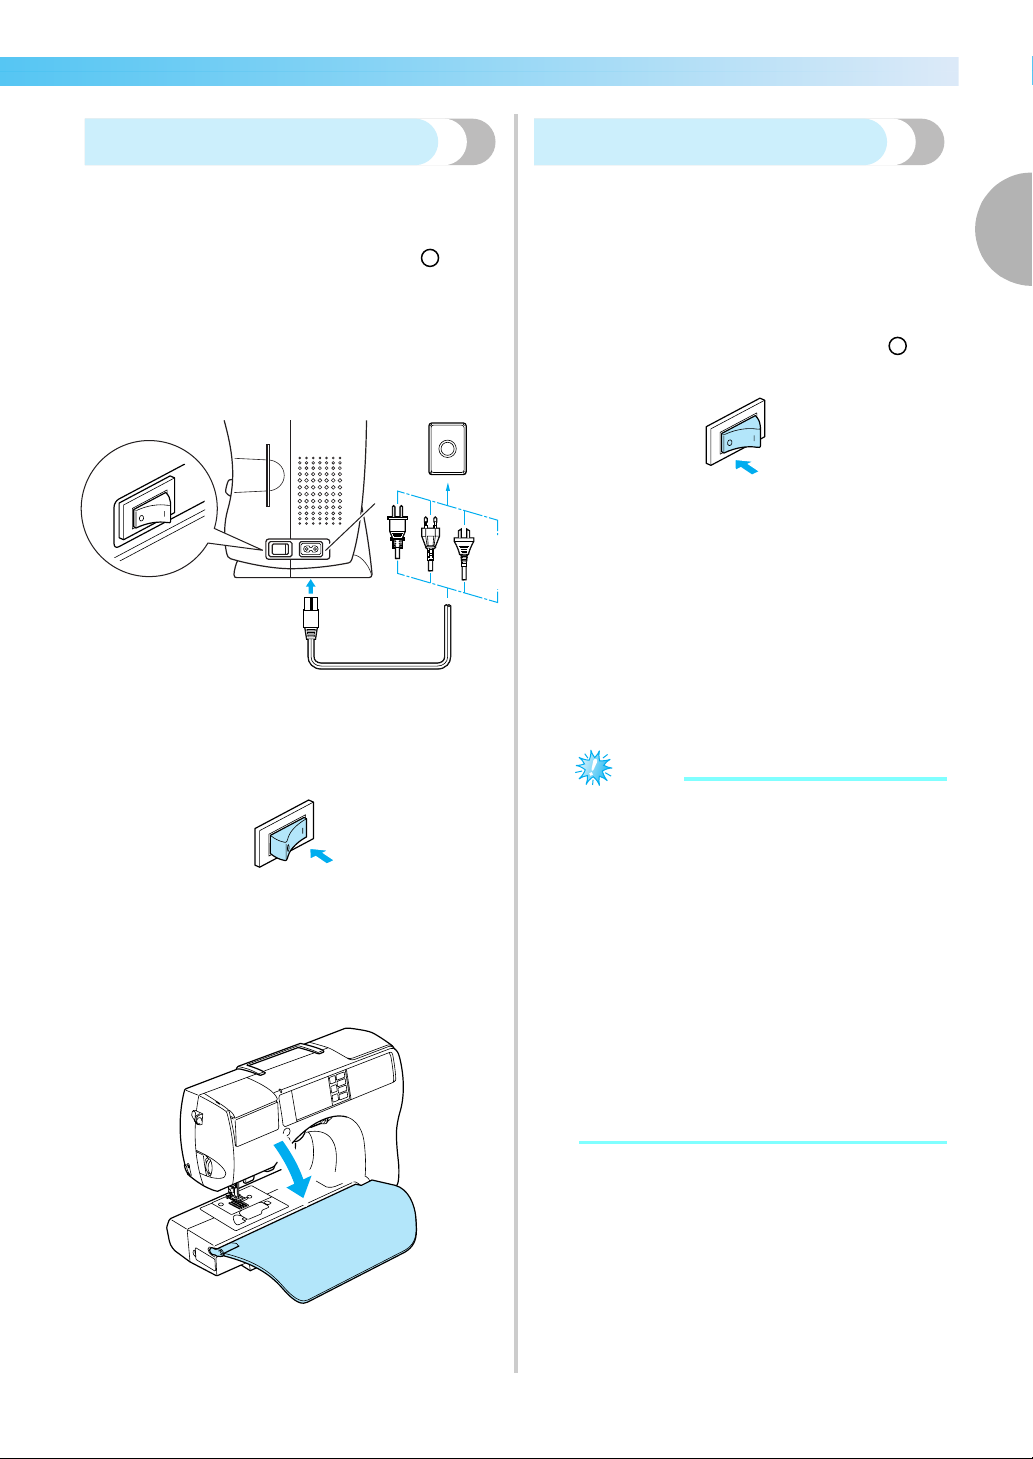
Turning on the machine
Prepare the included power cord.
a
Make sure that the sewing machine is turned
off (the main power switch is set to " "), and
then plug the power supply cord into the
power supply jack on the right side of the
machine.
b
Insert the plug of the power supply cord into a
household electrical outlet.
a Power supply jack
c
Press the right side of the main power switch
on the right side of the machine (set it to "|").
X The sewing lamp comes on when the
machine is turned on.
d
Fold the flap at the front of the sewing
machine down toward you.
Turning off the machine
When you are finished using the sewing machine,
turn it off. In addition, before transporting the sewing
machine to another location, be sure to turn it off.
a
Make sure that the machine is not sewing.
b
Press the left side of the main power switch on
the right side of the machine (set it to " ").
X The sewing lamp goes off when the machine
is turned off.
c
Unplug the power supply cord from the
electrical outlet.
Grasp the plug when unplugging the power
supply cord.
d
Unplug the power supply cord from the power
supply jack.
Note
z If a power outage occurs while the sewing
machine is being operated, turn off the
sewing machine and unplug the power
supply cord. When restarting the sewing
machine, follow the necessary procedure to
correctly operate the machine.
(For U.S.A. only)
z This appliance has a polarized plug (one
blade wider than the other). To reduce the
risk of electrical shock, this plug is intended
to fit in a polarized outlet only one way. If
the plug does not fit fully in the outlet,
reverse the plug. If it still does not fit, contact
a qualified electrician to install the proper
outlet. Do not modify the plug in any way.
1
GETTING READY — — — — — — — — — — — — — — — — — — — — — — — — — — — — — — — — — — — — — — — — — — — —
12
LCD (liquid crystal display) operation
Selected stitch, pattern settings and messages are displayed on the LCD (liquid crystal display) on the front
of the sewing machine.
Viewing the LCD
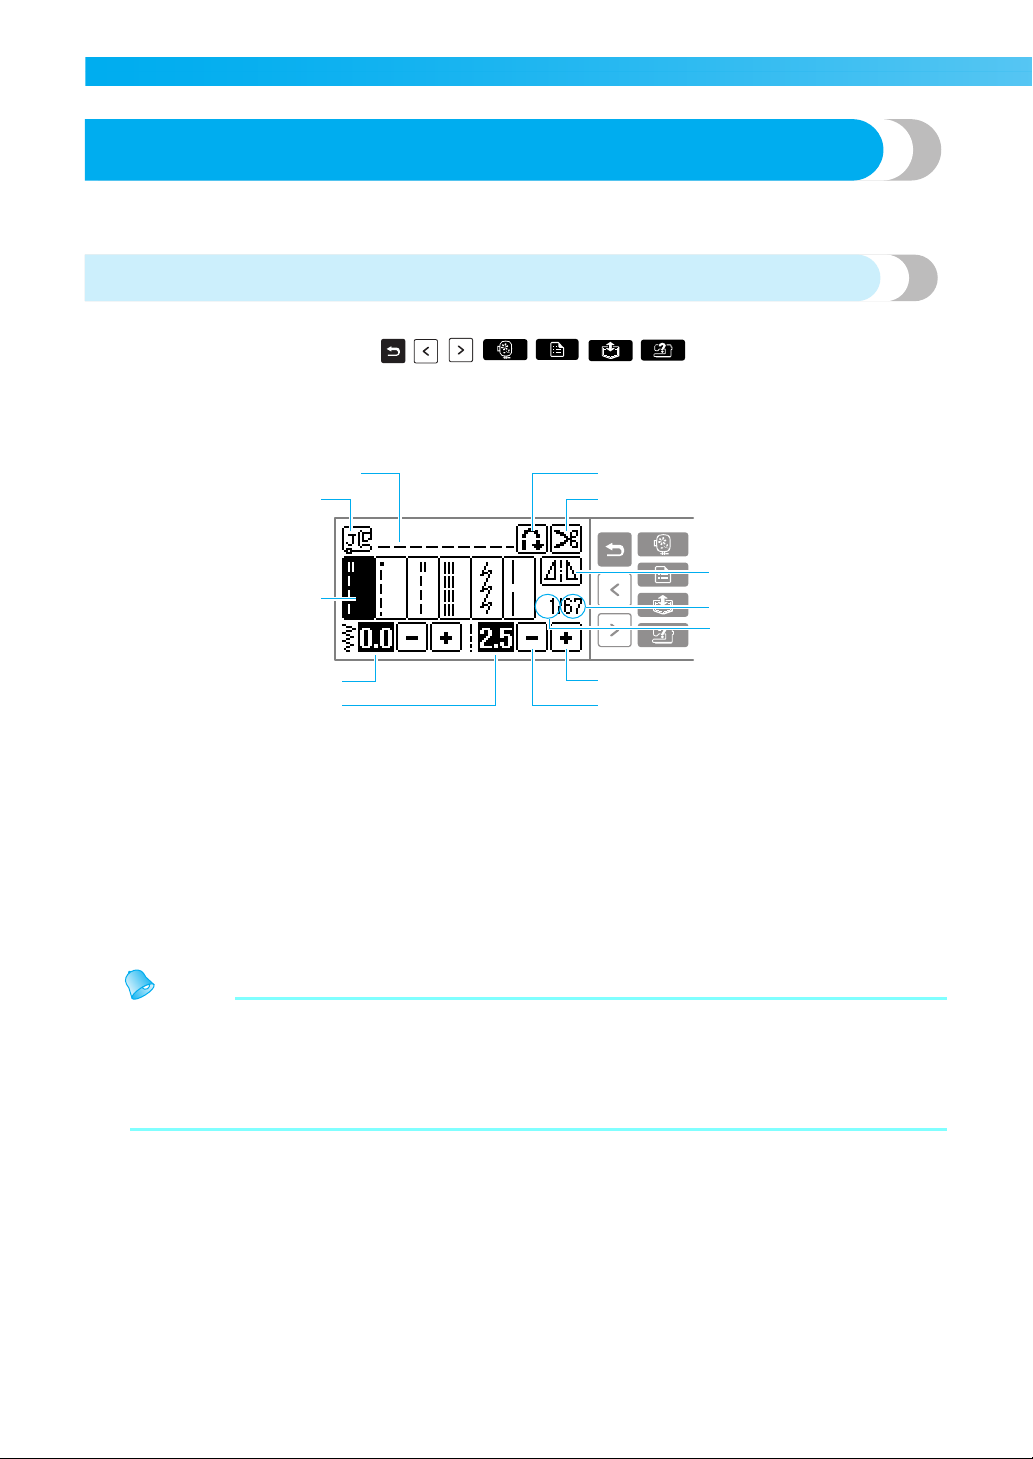
When the power is turned on, the LCD comes on, and the following screen is displayed.
The LCD display is changed using the keys on the right, and operations
performed by directly touching the LCD.
If it is difficult to press the buttons on the LCD by hand, you can use the touch pen to operate the LCD display.
■ Utility stitch selection screen
a Selected stitch
b Presser foot to be used
c Stitches
d Stitch width (mm)
e Stitch length (mm)
f Automatic reverse/reinforcement
g Automatic thread cutting
h Horizontal mirror image key
i Number of stitches in group
j Number of the selected stitch
k Increase value
l Decrease value
Memo
z A different screen is displayed when the embroidery unit is attached.
z Refer to "Error messages" (page 153) for messages displayed on the LCD.
z Depending on the model of sewing machine, an animation may be displayed when the power is turned
on. When an animation is displayed, the screen above will be displayed if you touch the LCD with
your finger.
2
1
5
4
6
7
9
0
8
A
B
3
LCD (liquid crystal display) operation 13
1
— — — — — — — — — — — — — — — — — — — — — — — — — — — — — — — — — — — — — — — — — — — — — — — — — — — —
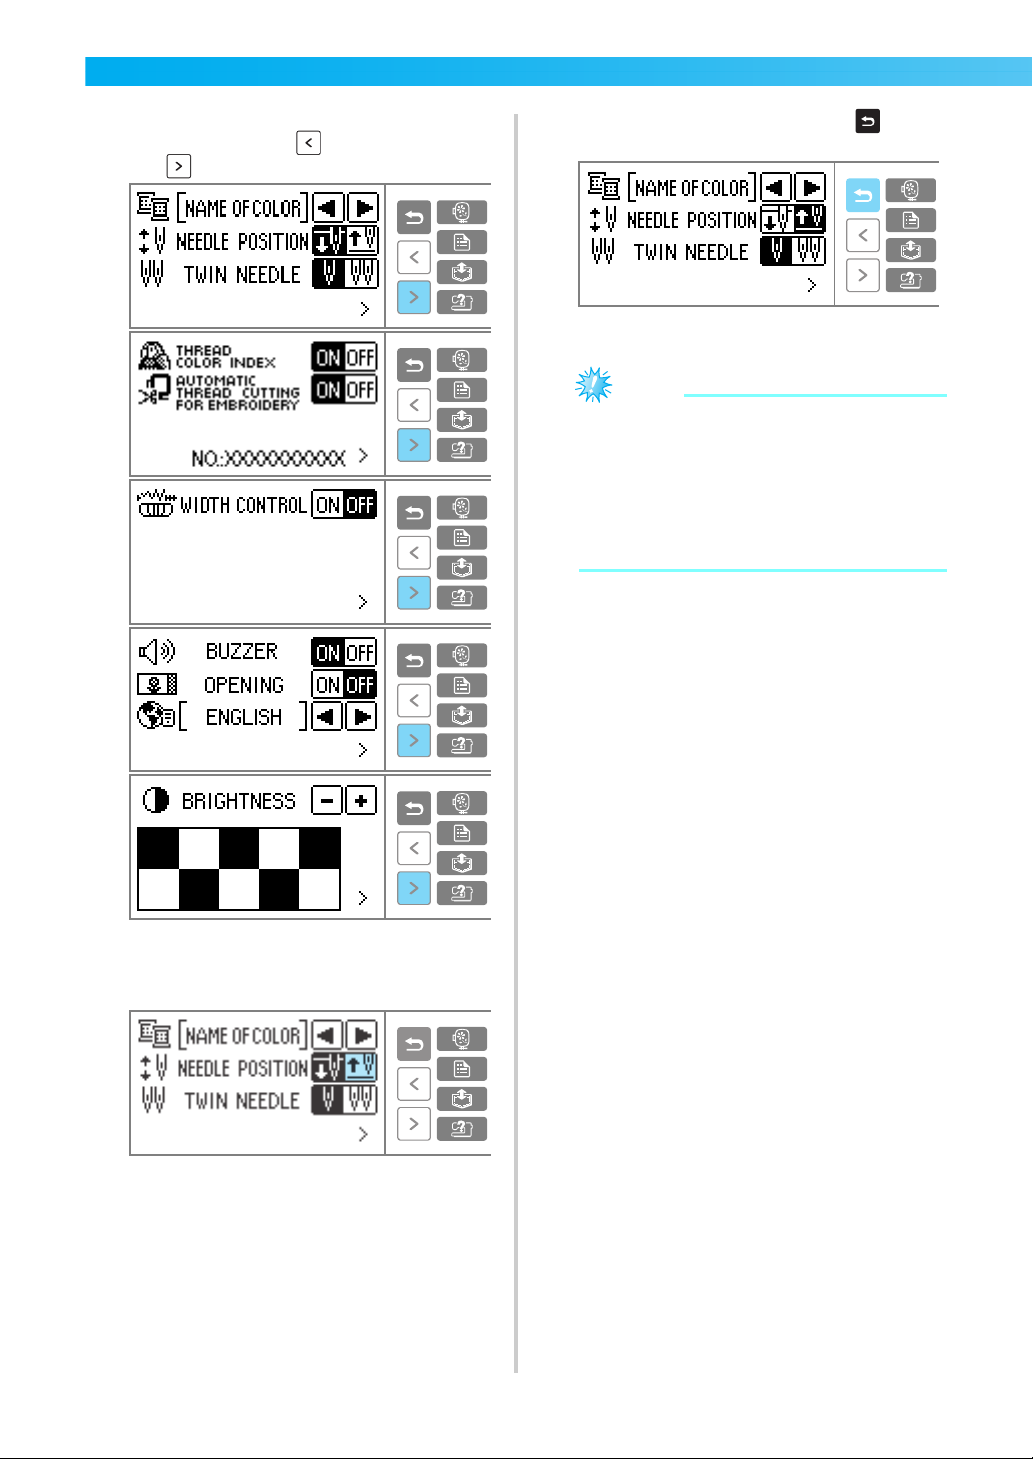
Changing the Machine Settings
Various sewing machine operations and sewing settings can be changed.
The stitch or machine attributes that can be set are listed below.
a
Turn on the sewing machine.
X The LCD comes on.
b
Press (Settings key) on the display panel.
X The settings screen appears.
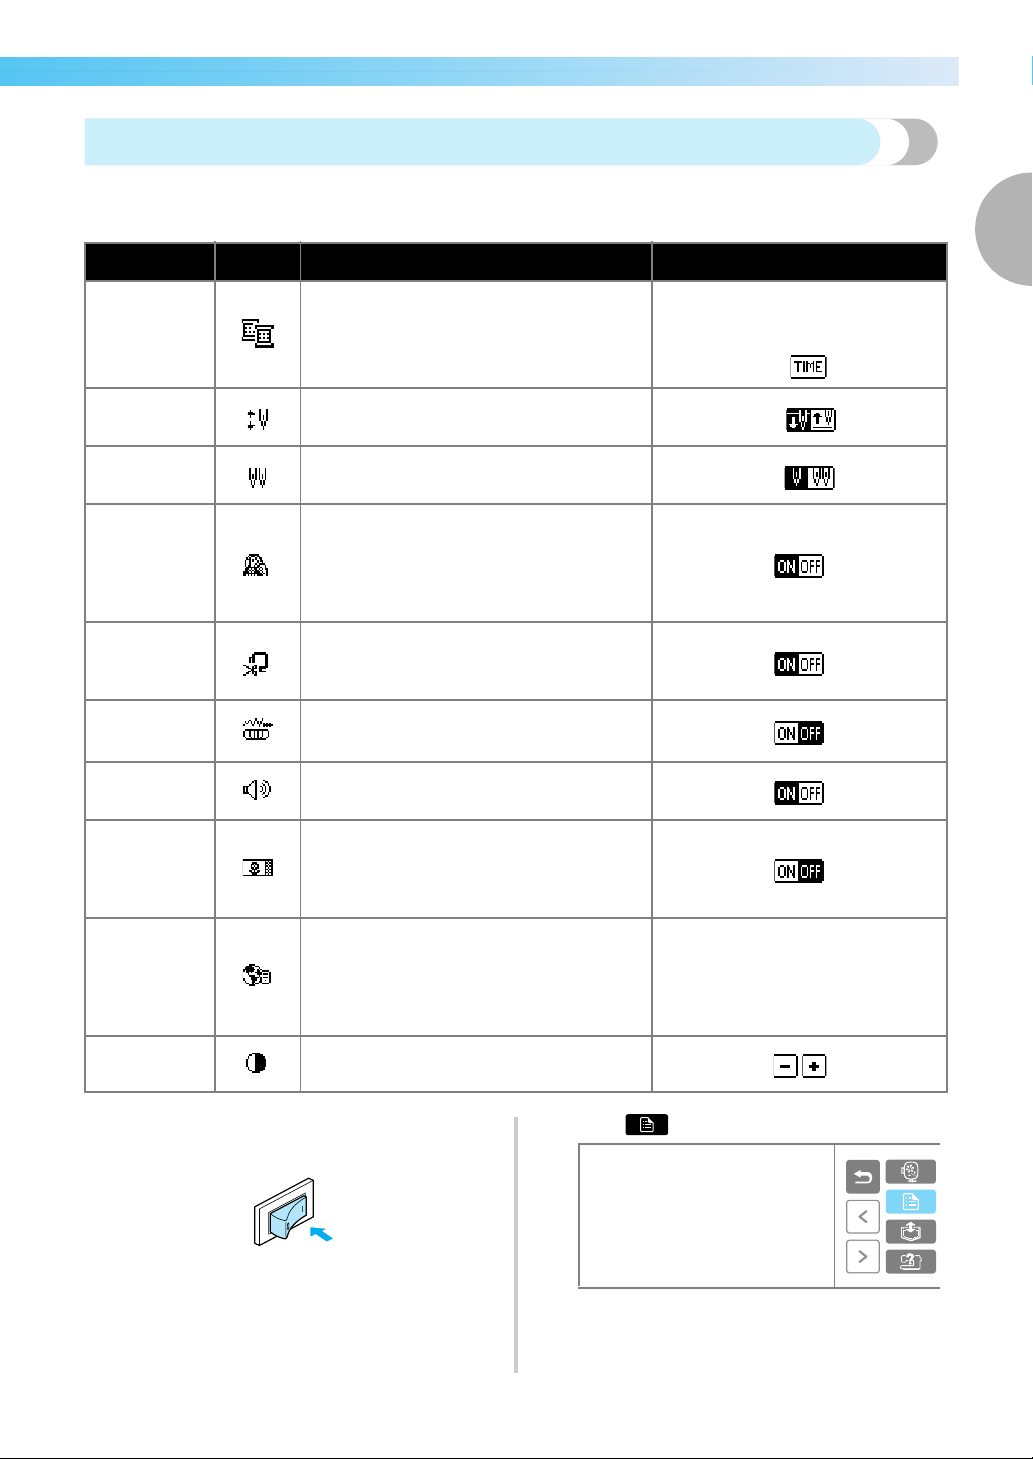
Attribute Icon Details Settings
Thread color/
needle count
You can switch among thread color/thread
number/needle count when embroidering.
Thread color/Embroidery thread
number/Country Embroidery thread
number/Needle count/Time to
Embroider (after is pressed)
Needle
position
Specifies where the needle is positioned
when the sewing machine is stopped.
Down Up
Twin needle
sewing
Specifies the twin needle.
Normal needle Twin needle
Thread color
index
When embroidery data containing custom
thread colors specified with the PE-DESIGN
Ver.5.0 is saved on a blank card, the stored
custom thread colors are displayed on the
machine, if "ON" is selected for this setting.
Automatic
thread cutting
for embroidery
Press this key to use the automatic thread
cutting function when embroidering.
Stitch width
control
Allows the stitch width to be adjusted with
the sewing speed controller.
Buzzer
Specifies whether or not a beep is sounded
with each operation (page 156).
Opening
screen
Sets whether or not to display the opening
screen when the power is turned on.
(There are models where this cannot be
changed.)
Language
Allows the language used in the screens to
be changed.
English, French, German, Dutch,
Spanish, Italian, Danish,
Norwegian, Finnish, Swedish,
Portuguese, Russian, Japanese,
Korean or others
LCD brightness
Adjusts the brightness of the LCD.
Lighter Darker
GETTING READY — — — — — — — — — — — — — — — — — — — — — — — — — — — — — — — — — — — — — — — — — — — —
14
c
Press the item to be set.
Switch screens using (Previous page key)
and (Next page key).
• The items shown in reverse highlighting are
the settings at the time of purchase.
Example: Changing the needle stop position
d
When settings are complete, press (Back
key).
X The initial screen appears again.
Note
z The "Thread color index" is the color
number display used when embroidery
cards made by "PE-Design" are used.
z The "NO." is the number for the sewing
machine.
z Settings that are changed are not lost when
the power is turned off.

LCD (liquid crystal display) operation 15
1
— — — — — — — — — — — — — — — — — — — — — — — — — — — — — — — — — — — — — — — — — — — — — — — — — — — —
Checking machine operating
procedures
Displays simple explanations of setting upper thread /
bobbin winding / setting bobbin thread / needle
replacement / embroidery unit attachment /
embroidery frame attachment / embroidery foot
attachment / presser foot replacement on the LCD.
a
Turn on the sewing machine.
X The LCD comes on.
b
Press (Sewing machine help key) on the
display panel.
X The sewing machine help screen appears.
c
Press the item to be displayed.
a Threading the upper thread
b Winding the bobbin
c Installing the bobbin
d Needle replacement
e Embroidery unit attachment
f Embroidery frame attachment
g embroidery foot attachment
h Replacing the presser foot
X The first screen describing the procedure for
the selected topic appears.
• Pressing (Back key), returns you to the
item selection screen.
d
Press (Next page key) to switch to the
next page.
If you press (Previous page key), you return
to the previous page.
Example: Upper threading
e
After you finish looking, press (Back key)
two times.
X The initial stitch screen appears again.
Note
z For details on each topic, refer to the
corresponding page in this Operation
Manual.
1
2
3
4
5
67
8
GETTING READY — — — — — — — — — — — — — — — — — — — — — — — — — — — — — — — — — — — — — — — — — — — —
16
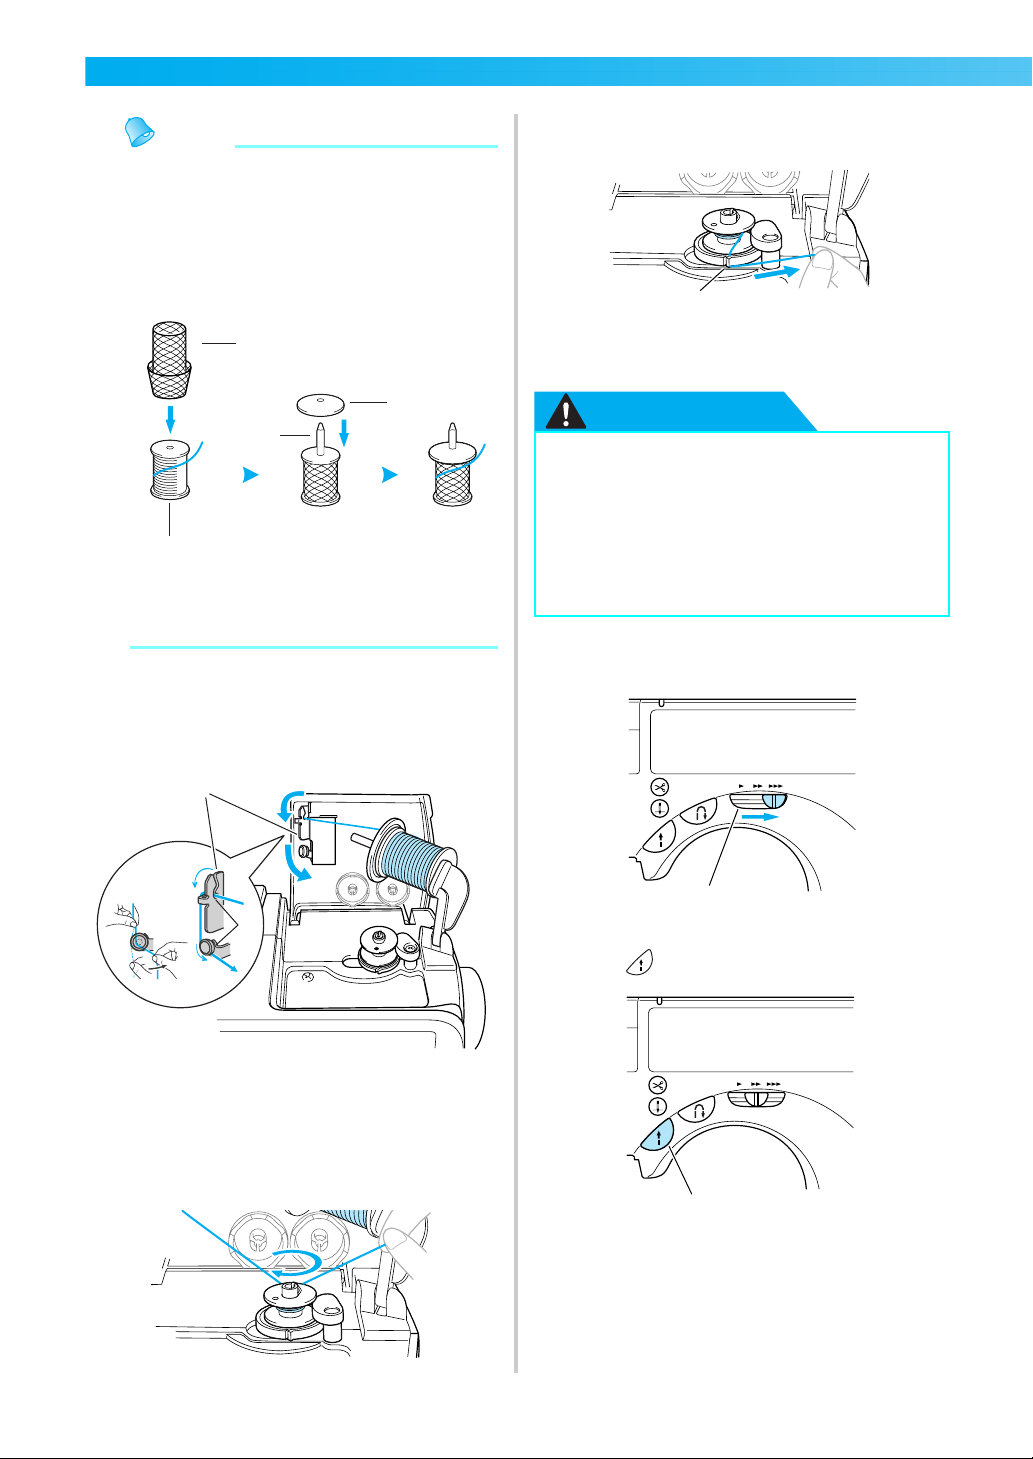
Winding/Installing the Bobbin
This section describes how to wind the thread onto the bobbin, and then insert the bobbin thread.
Bobbin precautions
Be sure to observe the following precautions
concerning the bobbin.
CAUTION
Winding the bobbin
Wind the thread around the bobbin to prepare the
bobbin thread.
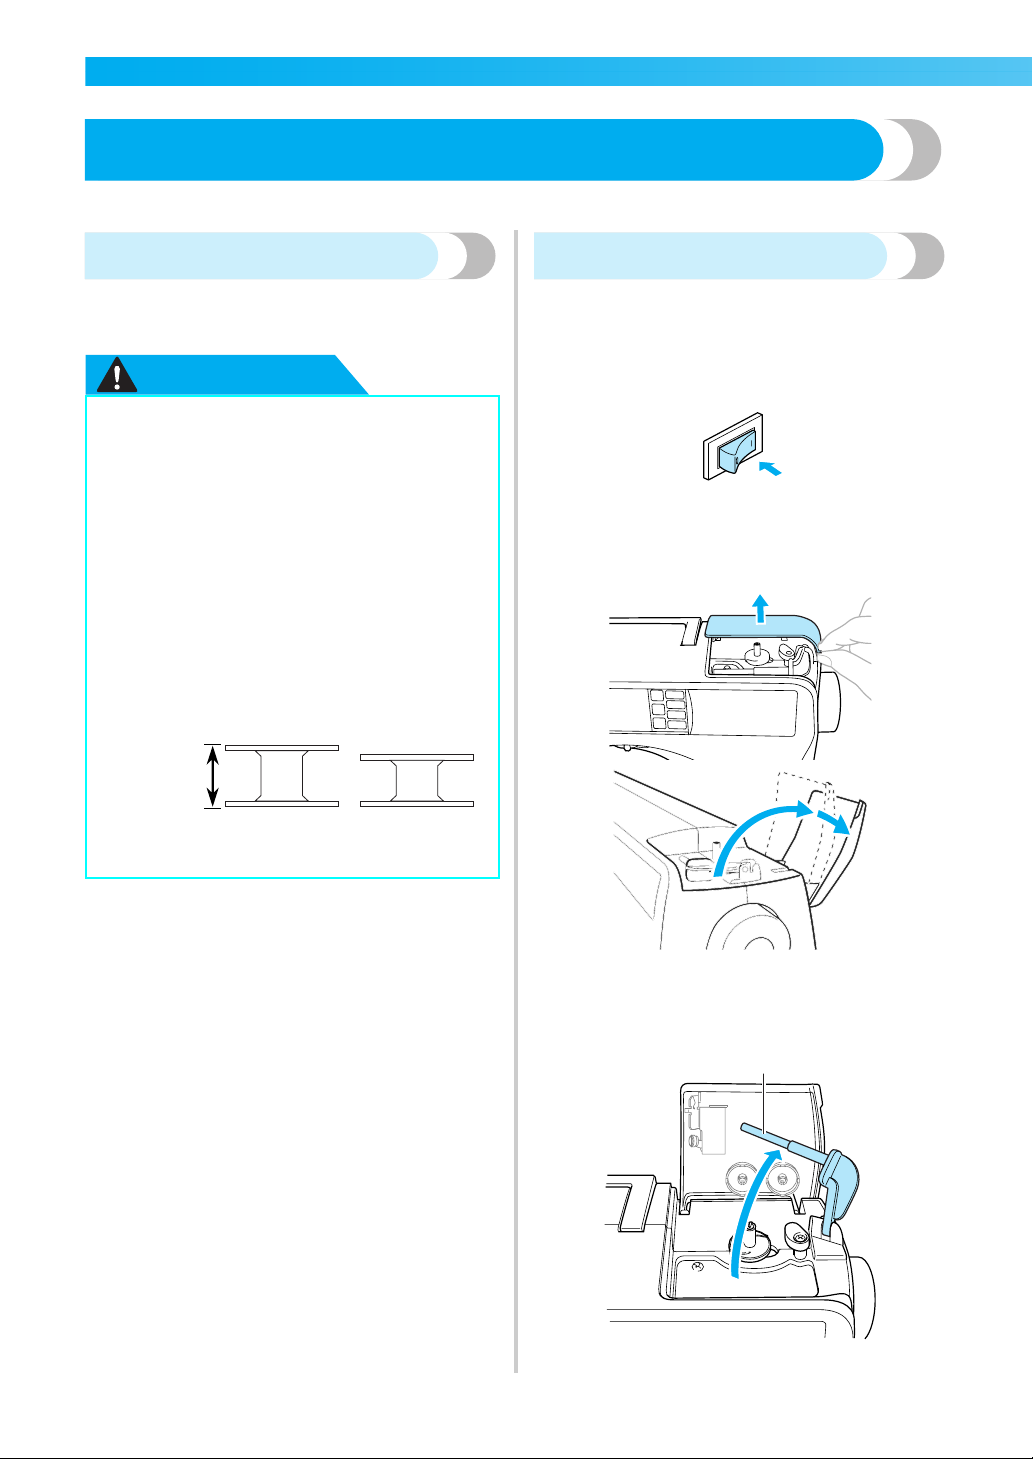
a
Turn on the sewing machine.
b
Open the bobbin winder cover at the top on
the right side of the sewing machine.
Raise until it stops with a click.
c
Swing up the bobbin thread spool pin.
Move the bobbin thread spool pin up as far as
possible.
a Bobbin thread spool pin
● Only use the Bobbin (part code: SA156,
SFB:XA5539-151) designed specifically
for this sewing machine. Use of any other
bobbin may result in injuries or damage
to the machine.
● The included bobbin was designed
specifically for this sewing machine. If
bobbins from older models are used, the
machine will not operate correctly. Use
only the included bobbin or bobbins of
the same type (part code: SA156,
SFB:XA5539-151).
● Please use a transparent bobbin.
11.5 mm
Actual size
This model
Older model
(7/16 inch)
1
Winding/Installing the Bobbin 17
1
— — — — — — — — — — — — — — — — — — — — — — — — — — — — — — — — — — — — — — — — — — — — — — — — — — — —
d
Place the bobbin on the bobbin winder shaft so
that the spring on the shaft fits into the notch
in the bobbin.
a Notch
b Bobbin winder shaft spring
e
Slide the bobbin winder shaft to the right.
f
Place the spool of thread for the bobbin onto
the bobbin thread spool pin.
• Use the special Brother embroidery bobbin
thread when embroidering.
g
Slide the spool cap onto the bobbin thread
spool pin.
With the rounded side of the spool cap
positioned toward the left, slide the spool cap
onto the bobbin thread spool pin as far as
possible until the right side of the spool touches
the right end of the bobbin thread spool pin.
CAUTION
Note
z If a spool of thread 12 mm (1/2 inch) in
diameter and 75 mm (3 inch) high is inserted
onto the bobbin thread spool pin, use the
special spool cap.
a 12 mm (1/2 inch)
b 75 mm (3 inch)
1
2
● Two spool cap sizes are available,
allowing you to choose a spool cap that
best fits the size of spool being used. If the
spool cap is too small for the spool being
used, the thread may catch on the slit in
the spool or the needle may break.
●
1
2
GETTING READY — — — — — — — — — — — — — — — — — — — — — — — — — — — — — — — — — — — — — — — — — — — —
18
Memo
z When using thread that winds off quickly,
such as transparent nylon thread or metallic
thread, place the spool net over the spool
before placing the spool of thread onto the
spool pin.
If the spool net is too long, fold it to fit the
size of the spool.
a Spool net
b Spool
c Spool pin
d Spool cap
h
Pull out some thread, and then thread the
thread guide for bobbin winding.
Be sure that the thread is fully in the two thread
guides for bobbin winding.
a Thread guide for bobbin winding
b Two slits
i
Wind the thread that was pulled out onto the
bobbin.
Wind the thread that was pulled clockwise five
or six times without any slack.
j
Pull the thread to the right and pass it through
the slit in the bobbin winder seat.
a Slit in bobbin winder seat (with built-in cutter)
X The thread is cut to a suitable length.
CAUTION
k
Slide the sewing speed controller to the right
(so that the speed will be fast).
a Sewing speed controller
l
Press (Start/stop button) once.
a Start/stop button
• If it does not start when the start/stop button
is pressed, an animation is displayed on the
LCD. Press the start/stop button after
touching the LCD.
1
2
3
4
1
2
● Be sure to cut the thread as described. If
the bobbin is wound without cutting the
thread using the cutter built into the slit in
the bobbin winder seat, the thread may
become tangled in the bobbin or the
needle may bend or break when the
bobbin thread starts to run out.
1
1
1

Winding/Installing the Bobbin 19
1
— — — — — — — — — — — — — — — — — — — — — — — — — — — — — — — — — — — — — — — — — — — — — — — — — — — —
X The bobbin starts spinning and winding the
thread, and "Winding bobbin thread..."
appears on the LCD.
X When winding is complete, the bobbin stops
spinning or spins freely.
m
When the bobbin either stops spinning or spins
freely, press (Start/stop button).
X The sewing machine stops, and the
"Winding bobbin thread..." display
disappears from the LCD.
n
Use scissors to cut the end of the thread
wound around the bobbin.
o
Slide the bobbin winder shaft to the left.
p
Remove the bobbin from the shaft.
q
Remove the spool cap and spool.
r
Swing down the bobbin thread spool pin, close
the bobbin winder cover, and then slide the
sewing speed controller back to its original
position.
Memo
z When the sewing machine is started or the
balance wheel is turned after winding the
bobbin, the machine will make a clicking
sound; this is not a malfunction.
Installing the bobbin
Install the bobbin wound with thread.
CAUTION
a
Slide the bobbin cover latch to the right.
a Bobbin cover
b Latch
X The bobbin cover opens.
b
Remove the bobbin cover.
c
Hold the bobbin with your right hand and hold
the end of the thread with your left.
• Be careful not to drop the bobbin.
● Use a bobbin that has been correctly
wound with thread, otherwise the needle
may break or the thread tension will be
incorrect.
● The bobbin was designed specifically for
this sewing machine. If bobbins from older
models are used, the machine will not
operate correctly. Use only the included
bobbin or bobbins of the same type (part
code: SA156, SFB:XA5539-151).
Actual size
11.5 mm
This model Older model
(7/16 inch)
1
2
GETTING READY — — — — — — — — — — — — — — — — — — — — — — — — — — — — — — — — — — — — — — — — — — — —
20
d
Insert the bobbin into the shuttle so that the
thread unrolls to the left.
• Be sure to insert the bobbin correctly.
CAUTION
Memo
z The order that the bobbin thread should be
passed through the shuttle is indicated by
marks around the shuttle. Be sure to thread
the machine as indicated.
e
Lightly hold down the bobbin with your right
hand, and then guide the thread as shown with
your left hand.
f
Pass the thread through the slot as shown, and
then pull the thread out toward the front.
a Cutter
X The cutter cuts the thread.
• Make sure that the thread is correctly inserted
through the tension-adjusting spring of the
shuttle. If it is not inserted, re-insert the
thread.
a Tension-adjusting spring
g
Reattach the bobbin cover.
Insert the tab in the lower-left corner of the
bobbin cover, and then lightly press down on
the right side.
X The bobbin threading is finished.
Next, thread the upper thread. Continue with
the procedure in "Upper Threading" (on the
next page).
Memo
z You can begin sewing without pulling up the
bobbin thread. If you wish to pull up the
bobbin thread before starting to sew, pull up
the thread according to the procedure in
"Pulling up the bobbin thread" (page 31).
● Be sure to hold down the bobbin with
your finger and unroll the bobbin thread
correctly, otherwise the thread may break
or the thread tension will be incorrect.
1
1
2
1
Upper Threading 21
1
— — — — — — — — — — — — — — — — — — — — — — — — — — — — — — — — — — — — — — — — — — — — — — — — — — — —
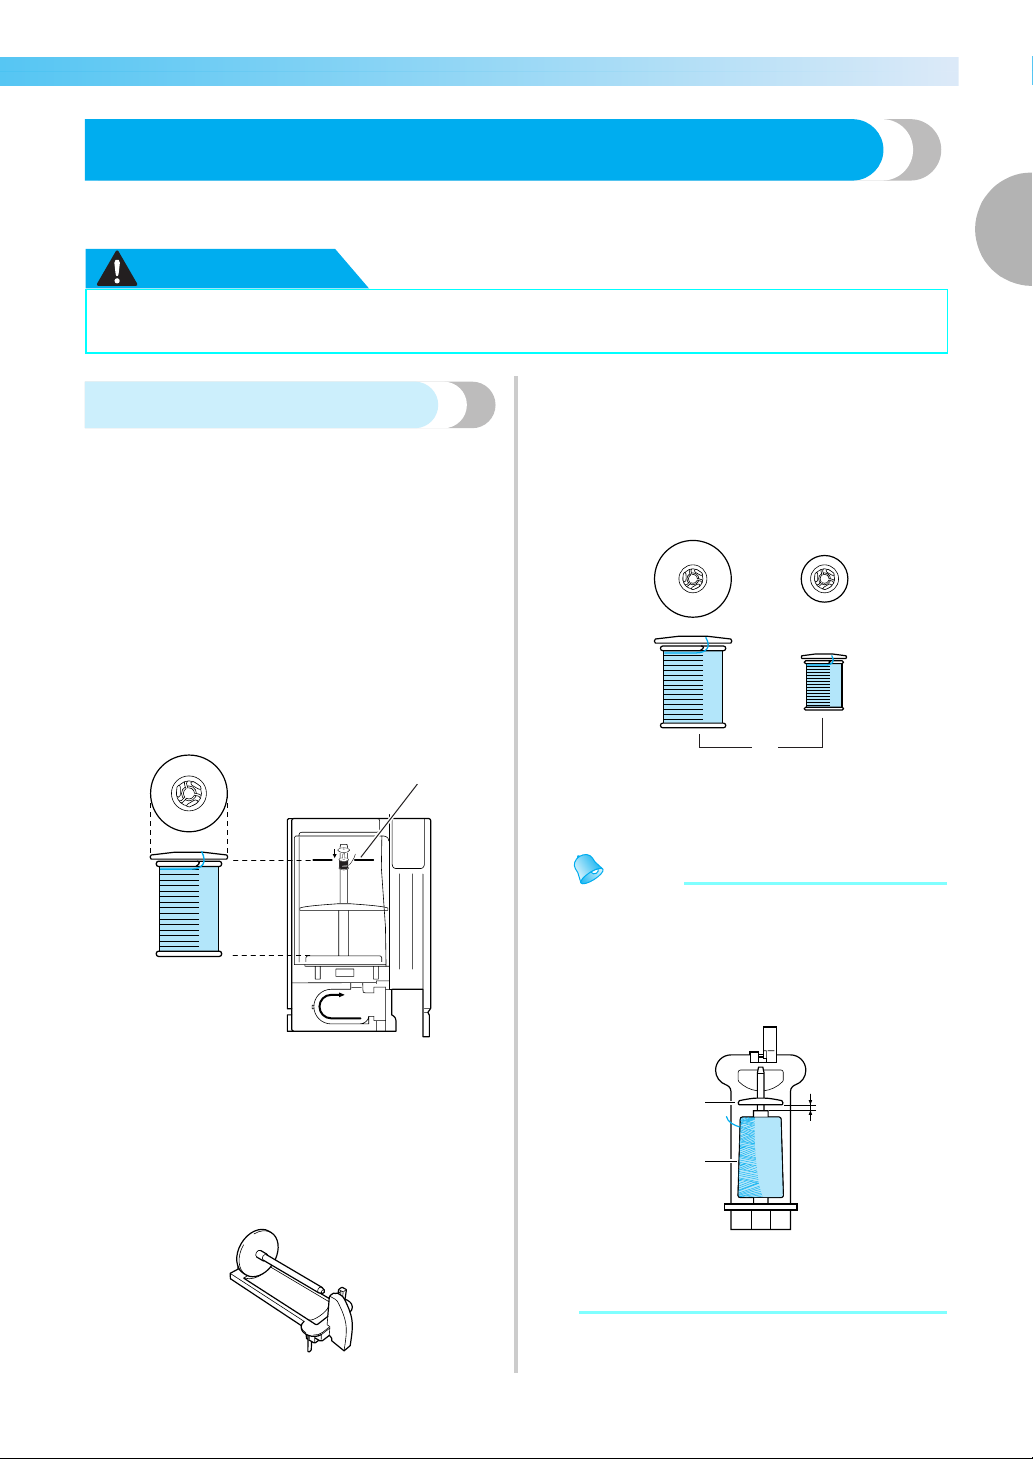
Upper Threading
In this section, the procedures for positioning the spool for the upper thread and threading the needle are
described.
CAUTION
About the spool of thread
With this sewing machine, a spool of thread can be
loaded into the thread cassette, and then the thread
cassette can be threaded. Information about the
spools of thread is described below.
■ Spools that can be loaded into the thread
cassette
Normally, a spool of thread is loaded into the
thread cassette and used. The spools that can be
loaded must have a diameter smaller than the
orange spool cap and a height shorter than the
mark on the cover of the thread cassette.
a Spool cap (orange)
b Spool
c Mark on thread cassette compartment cover
■ Spools that cannot be loaded into the thread
cassette
When using spools that cannot be loaded into the
thread cassette, use the extra spool pin.
When using the extra spool pin, attach either the
large or small white spool cap, depending on the
size of the spool. Use the spool cap with a
diameter that is slightly larger than the diameter
of the spool.
a Spool cap (large)
b Spool cap (small)
c Spool
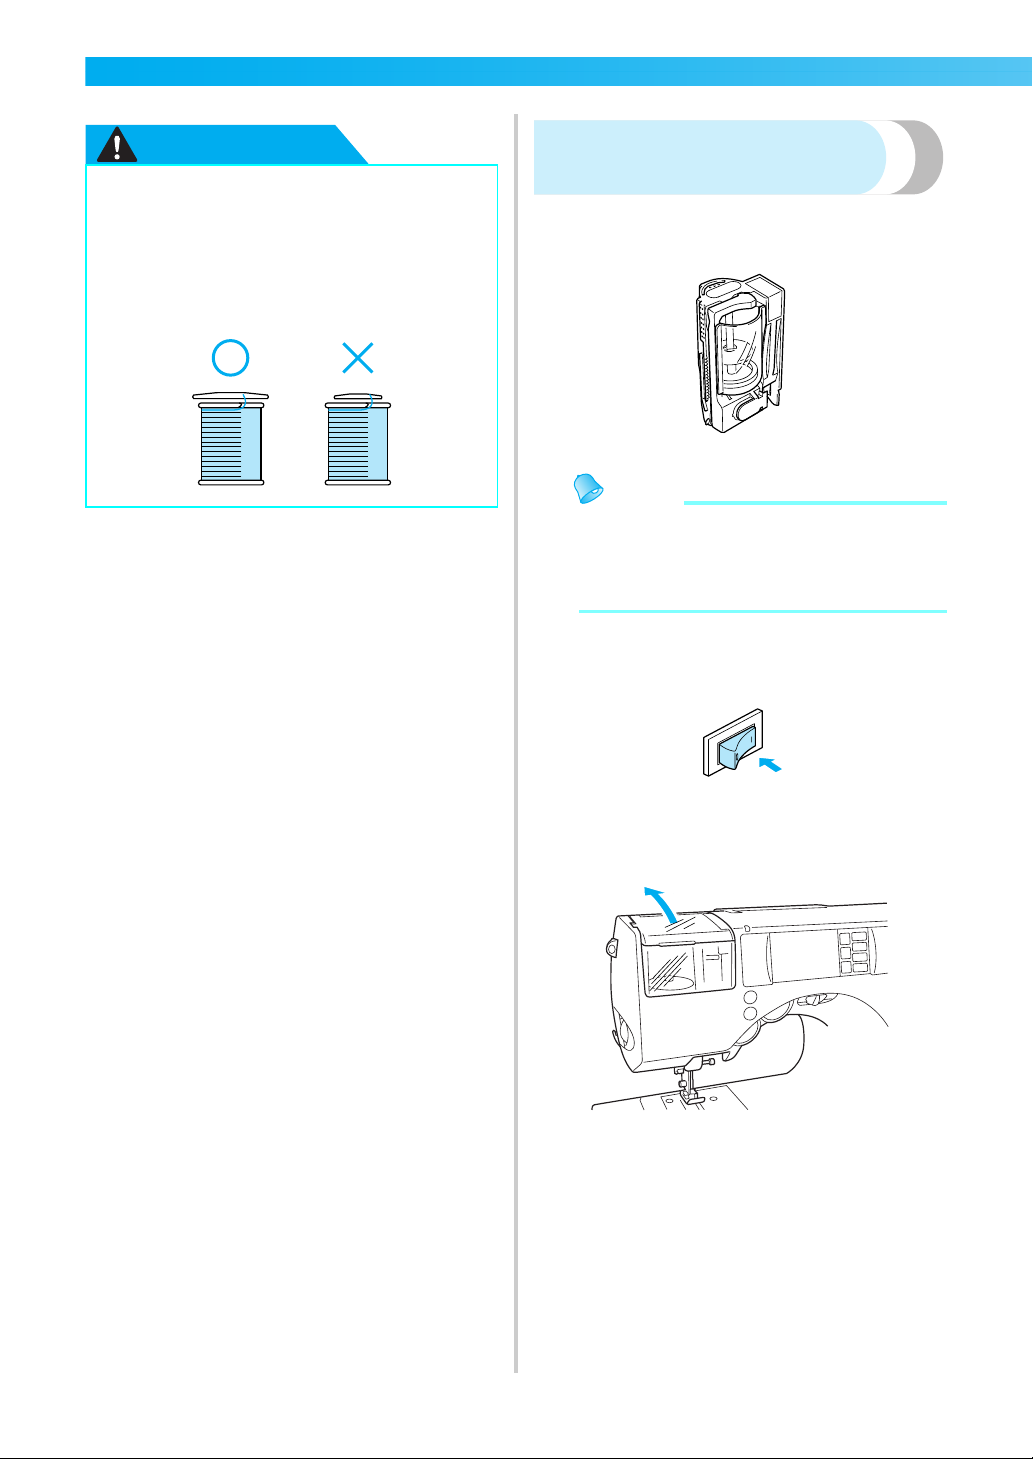
Memo
z For details on using the extra spool pin, refer
to "Using the extra spool pin" (page 27).
z When using a spool of cross-wound thread,
install the small white spool cap with some
space between the cap and the spool.
a Spool cap (small)
b Gap
c Spool
● When threading the upper thread, carefully follow the instructions. If the upper threading is
not correct, the thread may become tangled or the needle may bend or break.
11
1
2
3
1
2
3
1
3
2
GETTING READY — — — — — — — — — — — — — — — — — — — — — — — — — — — — — — — — — — — — — — — — — — — —
22
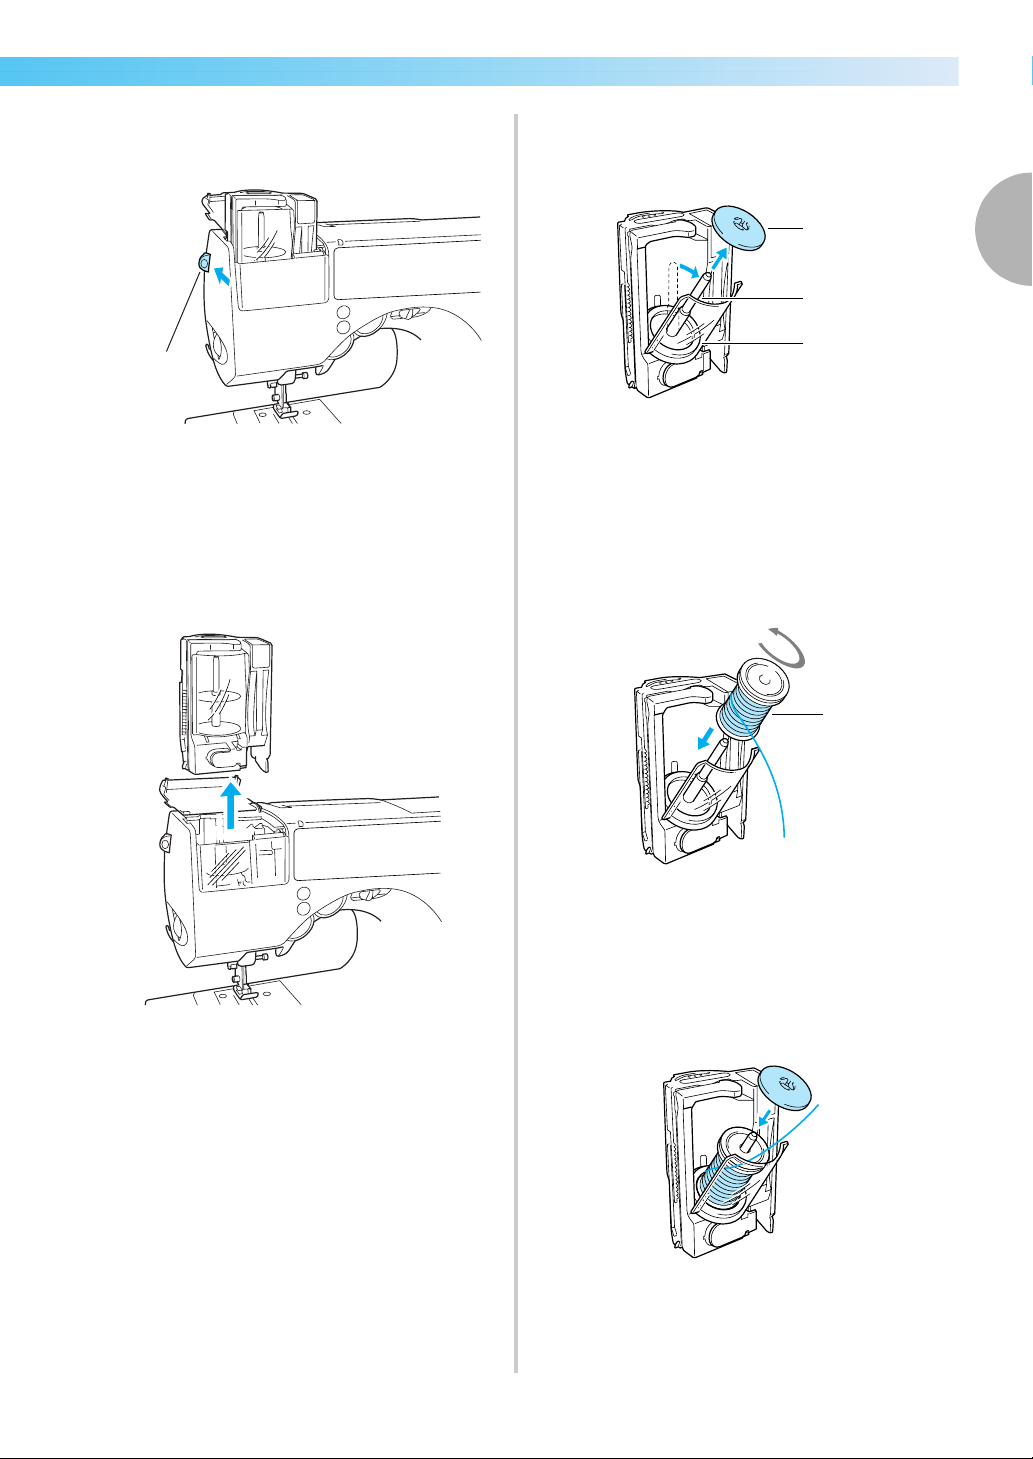
CAUTION
Loading the spool into the
thread cassette
Load the spool of thread into the thread cassette to
prepare the upper thread.
Memo
z The order for threading the thread cassette is
indicated on the thread cassette. Also check
the markings on the thread cassette while
threading it.
a
Turn on the sewing machine.
b
Open the thread cassette compartment cover
at the top on the left side of the machine.
● Two spool cap sizes are available,
allowing you to choose a spool cap that
best fits the size of spool being used. If
the spool cap is too small for the spool
being used, the thread may catch on the
slit in the spool or the needle may break.
Upper Threading 23
1
— — — — — — — — — — — — — — — — — — — — — — — — — — — — — — — — — — — — — — — — — — — — — — — — — — — —
c
Push the thread cassette eject lever on the left
side of the machine toward the back.
a Thread cassette eject lever
X The thread cassette is raised.
• If the sewing machine is turned off, the
thread cassette will not be ejected correctly.
d
Remove the thread cassette.
e
Pull the cover of the thread cassette out
toward you, and then pull off the spool cap
that is inserted onto the spool pin.
a Spool cap (orange)
b Spool pin
c Cover
f
Place the spool for the upper thread onto the
spool pin.
Slide the spool onto the spool pin so that the
thread unwinds from the left, as seen from the
top.
a Spool
g
Slide the spool cap onto the spool pin.
With the rounded side of the spool cap
positioned toward the top, slide the spool cap
onto the spool pin as far as possible until the
down side of the spool touches the down end
of the spool pin.
• Only the orange spool cap should be placed
on the spool pin in the thread cassette.
1
3
2
1
1
GETTING READY — — — — — — — — — — — — — — — — — — — — — — — — — — — — — — — — — — — — — — — — — — — —
24
CAUTION
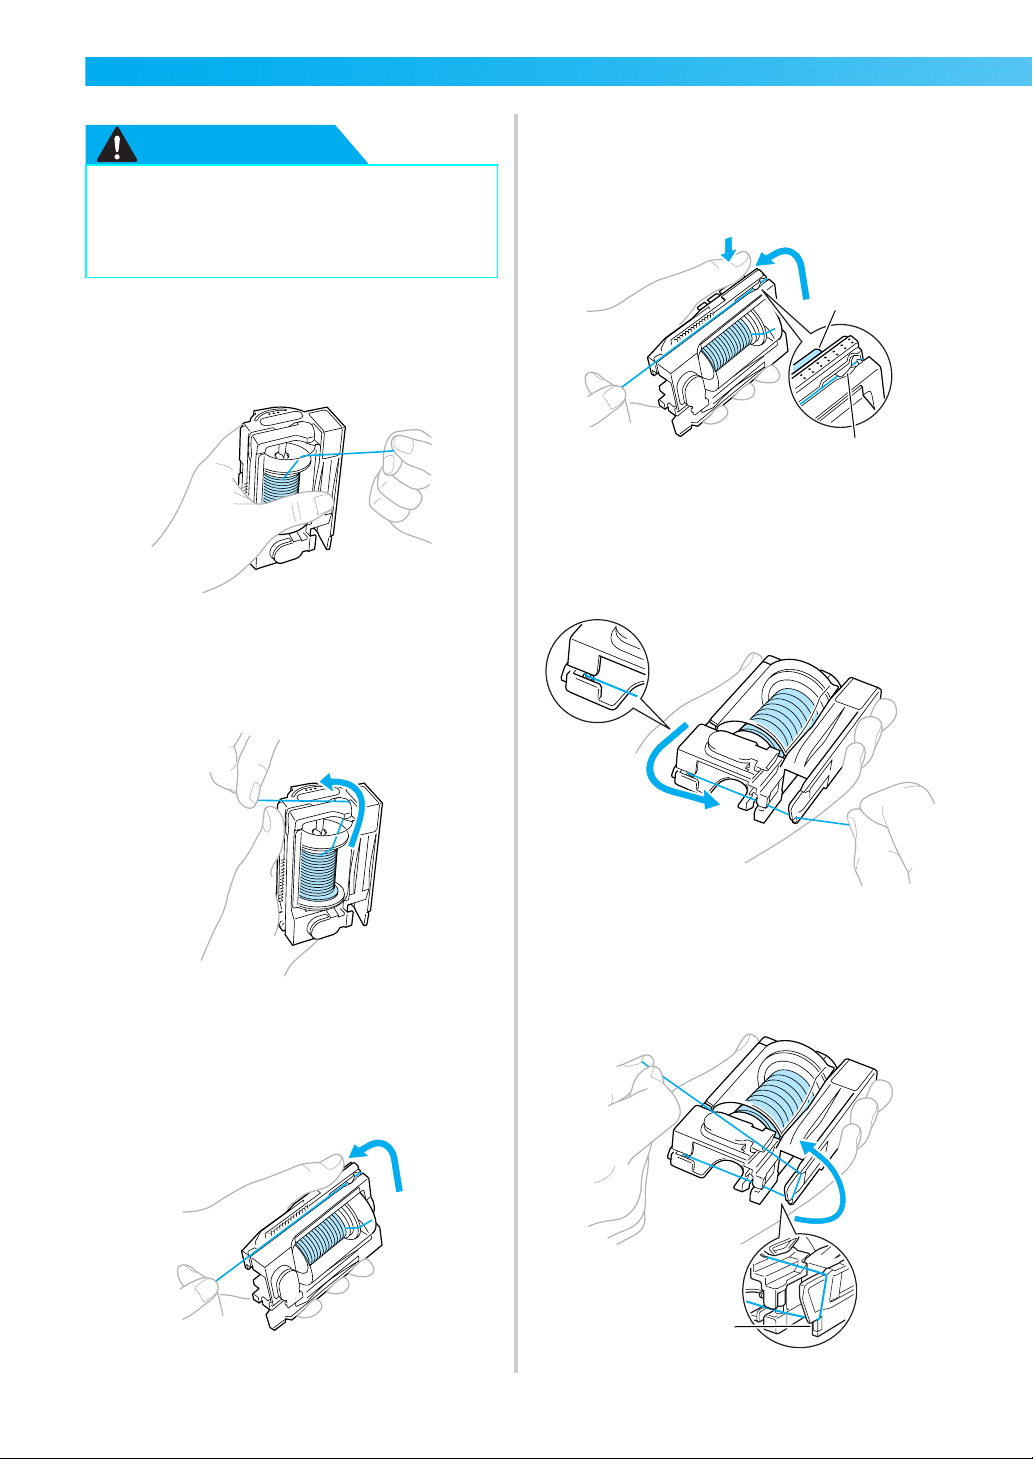
h
While holding the end of the thread with your
right hand and the thread cassette with your
left hand, close the cover.
Close until it clicks.
i
Pass the thread through the slit in the top of
the thread cassette.
Follow arrow 2 indicated on the thread
cassette.
j
Pull the thread to the left and pass it through
the slit along the left side of the thread
cassette.
Follow arrow 3 indicated on the thread
cassette.
• When using special thread such as metallic
thread, use the thumb of your left hand to
lightly press down on the area indicated in
the illustration to create an opening that
allows for easier threading.
a Push
b Gap
k
Pass the thread along the bottom of the thread
cassette.
Follow arrow 4 indicated on the thread
cassette.
l
Pass the thread through the notch in the
lower-right corner of the thread cassette, and
then pull the thread to the left.
Follow arrow 5 indicated on the thread
cassette.
a Notch
● If the spool or the spool cap is not
positioned correctly, the thread may
become tangled around the spool pin or
the needle may break.
2
1
1
 Loading...