


Brandt CO31AWLN, COB290WU, COB220WU, CO31JWKU, CO29AWLU User Manual
...Instructions for installation and use
COMBINED FRIDGE AND FREEZER

|
|
|
|
|
|
|
|
|
|
|
|
|
|
|
|
|
|
|
|
|
|
|
|
|
|
|
|
|
|
CONGRATULATIONS! |
|
;QW JCXG OCFG CP GZEGNNGPV EJQKEG |
||
|
|
$[ RWTEJCUKPI QWT FQOGUVKE CRRNKCPEG [QW JCXG EJQUGP C TGNKCDNG JKIJN[ RGTHQTOKPI |
||
|
|
PQP EWODGTUQOG GHHKEKGPV CPF WUGHWN RTQFWEV +PFGGF VJG RGTHGEV YC[ VQ RTGUGTXG [QWT HQQFUVWHHU |
||
|
|
HQT VJG RTGRCTCVKQP QH XCTKGF JGCNVJ[ OGCNU |
||
|
|
;QWT PGY CRRNKCPEG KU GCU[ VQ WUG 0GXGTVJGNGUU RNGCUG TGCF VJG KPUVTWEVKQPU CPF VJG VKRU FGUETKDGF |
||
|
|
VJGTGKP VQ GPCDNG [QW VQ WUG [QWT TGHTKIGTCVQT VQ KVU JKIJGUV ECRCEKV[ YJKNUV UCXKPI QP GNGEVTKEKV[ |
||
|
|
9G CTG EGTVCKP VJCV VJKU CRRNKCPEG YKNN OGGV YKVJ [QWT TGSWKTGOGPVU CPF YG NQQM HQTYCTF VQ JCXKPI |
||
|
|
[QW CU QPG QH QWT RGTOCPGPV ENKGPVU |
||
INDEX |
SAFETY REGULATIONS |
|
|
|
YOUR APPLIANCE |
|
|
|
REVERSIBILITY OF THE DOORS |
|
|
|
APPLIANCE INSTALLATION |
|
|
|
SAVING ENERGY |
|
|
|
ELECTRICAL CONNECTION |
|
|
|
STARTING PROCEDURE |
|
|
|
USE OF THE APPLIANCE |
|
|
|
FREEZING |
|
|
|
DEFREEZING |
|
|
|
DEFROSTING |
|
|
|
CLEANING |
|
|
|
MINOR BREAKDOWNS AND ANOMALIES |
|
|
SAFETY REGULATIONS
Disposal Of Used Appliances
6JKU CRRNKCPEG RTGUGTXGU CPF HTGG\GU HQQFUVWHHU HQT JQWUGJQNF WUG #XQKF CP[ QVJGT WUG +PUVCNNCVKQP QH VJG CRRNKCPEG OWUV DG ECTTKGF QWV CEEQTFKPI VQ VJG +PUVTWEVKQPU /CPWCN #P KPEQTTGEV KPUVCNNCVKQP OC[ FCOCIG VJG CRRNKCPEG
5JQWNF [QW JCXG CP[ RTQDNGOU TGICTFKPI VJG IQQF RGTHQTOCPEG QH VJG CRRNKCPEG MKPFN[ EQPVCEV VJG CWVJQTK\GF 5GTXKEG %GPVTGU QT URGEKCNK\GF VGEJPKEKCPU QPN[
2TKQT VQ CP[ OCKPVGPCPEG QRGTCVKQP WPRNWI VJG CRRNKCPEG HTQO VJG RQYGT UWRRN[ #XQKF
RWNNKPI QHH VJG HGGF ECDNG QT VJG CRRNKCPEG KVUGNH 5KORN[ RWNN QWV VJG RNWI
-GGR VJG +PUVTWEVKQPU /CPWCN KP IQQF EQPFKVKQP CPF RCUU KV QP VQ CP[ HWVWTG QYPGT QH VJG
CRRNKCPEG
+P CFJGTGPEG VQ VJG OQUV TGEGPV NCYU QP VJG RTQVGEVKQP QH VJG GXKTQPOGPV YG WUG UOCNN SWCPVKVKGU
QH C EQQNCPV ECNNGF 4 C QT 4 C CEEQTFKPI VQ VJG OQFGN 6JG V[RG QH TGHTKIGTCPV KU ENGCTN[
URGEKHKGF QP VJG FCVC RNCVG +P VJG ECUG QH FCOCIG VQ VJG EQORQPGPVU QH VJG TGHTKIGTCVKPI EWTEWKV
VWDKPI GVE QH CRRCTCVWUGU UWRRNKGF YKVJ 4 C VJG TQQO KP YJKEJ VJG CRRCTCVWU KU UKVWCVGF OWUV
DG CKTGF CPF HNCOGU URCTMU QT QVJGT UQWTEGU QH HKTG OWUV DG CXQKFGF HQT C HGY OKPWVGU
6JG RCTVU FGUVKPGF VQ DG KP EQPVCEV YKVJ HQQFU CTG KP CEEQTFCPEG YKVJ VJG ''% FKTGEVKXGU
%' OCTMKPI EGTVKHKGU VJCV VJKU CRRNKCPEG EQORNKGU YKVJ ''% &KTGEVKXGU GNGEVTQOCIPGVKE
EQORCVKDKNKV[ NQY XQNVCIG GPGTI[ GHHKEKGPE[ CPF VJGKT UWDUGSWGPV COGPFOGPVU
5JQWNF VJKU CRRNKCPEG TGRNCEG CPQVJGT GSWKRRGF YKVJ UPCR URTKPI QT NQEM ENQUKPI FGXKEGU GVE RNGCUG
TGOGODGT VQ TGOQXG VJGUG DGHQTG FKURQUKPI QH [QWT QNF CRRNKCPEG QT DGVVGT UVKNN FQ FKUCUUGODNG
VJG FQQT UQ CU VQ RTGXGPV CP[QPG NKMG HQT KPUVCPEG EJKNFTGP CV RNC[ CPKOCNU GVE HTQO DGEQOKPI
GPVTCRRGF YKVJKP
4GOQXG VJG RNWI HTQO VJG UQEMGV CPF EWV VJG RQYGT UWRRN[ VQ VJG ECDNGU
6JG TGHTKIGTCVQTU CPF HTGG\GTU EQPVCKP TGHTKIGTCPV ICUGU CPF UWDUVCPEGU YJKEJ TGSWKTG VQ DG RTQRGTN[ FKURQUGF QH (WTVJGTOQTG VJG[ EQPVCKP QVJGTU OCVGTKCNU YJKEJ ECP DG TGE[ENGF
2NGCUG FKURQUG QH UWEJ OCVGTKCNU D[ FGNKXGTKPI VJGO VQ URGEKHKE EQNNGEVKQP EGPVTGU ;QWT QYP /WPKEKRCNKV[ YKNN DG CDNG VQ CFXKUG [QW QP EQTTGEV GEQNQIKECN FKURQUCN OGVJQFU
2
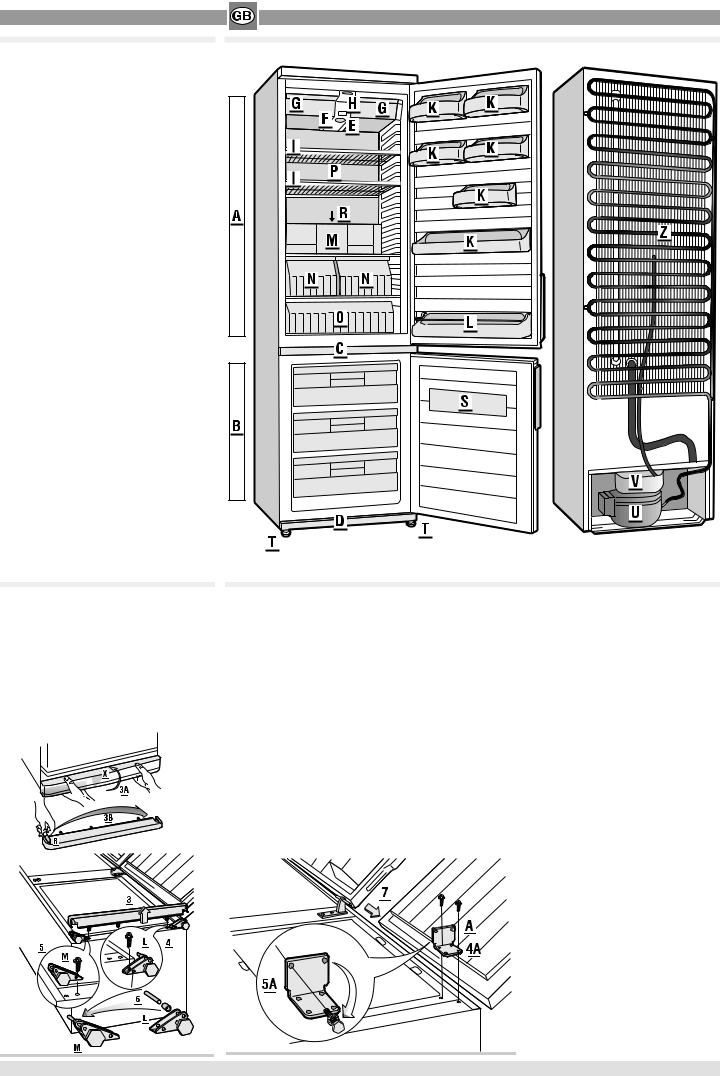
YOUR APPLIANCE
CAPTION
ARefrigerator zone
BFreezer zone
CIntermediate moulding*
DBase trim
EThermostat knob*
FLight box
GExtractable trays*
HLuminous switch for fast freezing
IShelves
KDoor trays
LBottle holders
MAir feeder*
NSalad/vegetable drawers
OMeat/fish packing area*
PEvaporator
RWater drainage outlet
SFreezing calendar
TAdjustable feet
UCompressor
VWater collecting tray
Z Condenser
*Available with some models only Drawing is purely illustrative
REVERSIBILITY OF THE DOORS
The doors normally open on the left (with the hinge on the right). If instead you wish to revert the process, you may proceed as shown on the illustration on the following pages. Your appliance may have different types of hinges. Please refer to the drawings which correspond to your model.
1.Lay the device gently down at the back (with the doors facing upwards).
2.Extract the base trim (by pulling it towards the top) (fig. 3) or if you have type X (fig. 3A), remove the base trim by inserting your hands below it. Pull the tongues which are found in the middle of the base trim towards the bottom, in order to release them from the pivots. Rotate the base trim towards the top to release it.
3.Remove tongue R (fig. 3B) from the left seat of the base trim and re-insert it into the right seat.
4.Unscrew the two lower hinges L and M (fig. 4/5) or unscrew hinge A (fig. 4A).
5.Remove the pivot from hinge L and place in into hinge M (fig. 6), or unscrew the pivot on the right and re-screw it on the left (fig. 5A).
6.Remove the freezer door from the intermediary hinge P (fig. 7).
3

7. Unscrew hinge (fig. 8/8B) and close the holes with the caps which have been removed from the left (fig. 9).
8. Remove the refrigerator door from the upper hinge D (fig. 10).
9. Unscrew hinge D (fig. 11) and assemble it on the left (fig. 12).
10. Insert the refrigerator door into the pivot of hinge D (fig. 13).
11. Rotate hinge 8 by 180° and assemble it (fig. 14). Re-insert the freezer door (fig. 15).
12. Remove the P pin from the 8B hinge, which is now on the right-hand side, and insert it on the left-hand seat (fig 16).
13. Screw the 8B hinge on the left-hand side and insert the freezer door again (fig. 15).
14. Re-screw hinges L and M, already modified at point 4, (fig. 17) or hinge A (fig. 18).
15. Re-insert the base trim and bring the device back into a vertical position (fig. 19).
Reversibility of the handles
If the appliance has vertical handles, you must unscrew them from the left-hand side and screw them on the right moving the protection caps from right to left.
4
 Loading...