


Instructions pour utilisation et installation
Instructions for installation and use
Aufstellund Gebrauchsanweisung
Handleiding voor gebruik en installatie
Instruções de instalação e utilização
Instrucciones para la instalación y utilización
/ 0" . 2 0 .2 12.1 . 2 $!1
BLOC REFRIGERATEUR-CONGELATEUR AVEC 2 COMPRESSEURS COMBINED FRIDGE AND FREEZER WITH 2 COMPRESSORS
KÜHL-GEFRIER-KOMBINATION MIT 2 AGGREGATEN
GECOMBINEERDE KOEL-VRIESKAST MET 2 COMPRESSOREN COMBINADO FRIGORÌFICO-CONGELADOR COM 2 COMPRESSORES
COMBINADO FRIGO-CONGELADOR 2 COMPRESORES
#/#.1)" #0 .2.%*2" 0 # Œ012"

|
|
|
|
|
|
|
|
|
|
|
|
|
|
|
|
|
|
|
|
|
|
|
|
|
|
|
|
|
|
FÉLICITATIONS! |
|
Excellent choix! |
||
|
|
Avec l'achat de notre électroménager vous avez choisi un produit de confiance, offrant de |
||
|
|
grandes prestations, discret, efficace, utile: grâce au froid qui conserve les aliments, notre |
||
|
|
alimentation est plus variée et saine. |
||
|
|
Votre nouvel appareil est facile à utiliser. Nous vous prions quand même de lire attentivement |
||
|
|
les instructions, pour découvrir les petits détails qui vous permettront d'exploiter au |
||
|
|
maximum les potentialités de votre appareil, en économisant de l'énergie. |
||
|
|
Certains que l'utilisation vous satisfera, nous souhaitons de vous avoir toujours comme clients. |
||
TABLE DES MATIÈRES
CONSIGNES DE SÉCURITÉ
CONSIGNES DE SÉCURITÉ
DECOUVREZ VOTRE APPAREIL
RÉVERSIBILITÉ DES PORTES
INSTALLATION DE L’APPAREIL
COMMENT ÉCONOMISER DE L'ÉNERGIE
BRANCHEMENT ÉLECTRIQUE
PROCÉDURE DE MISE EN MARCHE
UTILISATION DE L'APPAREIL
CONGELATION
DÉCONGÉLATION
DÉGIVRAGE
NETTOYAGE
PETITES PANNES ET ANOMALIES
L'appareil est adapté à conserver et congeler les aliments pour l'usage domestique: toute autre utilisation est impropre.
L'installation doit être effectuée selon les instructions du livret; une installation incorrecte peut endommager l'appareil. Pour d'éventuels problèmes de fonctionnement de l'appareil, adressez-vous aux centres d'assistance autorisés ou, de toute manière, toujours et uniquement au personnel spécialisé.
Avant chaque opération d'entretien, enlever la fiche d'alimentation électrique en évitant de tirer le câble d'alimentation ou l'appareil, mais en saisissant directement la
fiche.
Conservez le livret avec soin et donnez-le à un éventuel futur propriétaire de l'appareil.
Pour être en accord avec les dispositions législatives les plus récentes sur la protection de l'environnement, nous utilisons en petite quantité un réfrigérant appelé R600a. En cas de dommages aux éléments du circuit réfrigérateur (tuyaux,etc.) il est suffisant d'aérer le local dans lequel se trouve l'appareil et ne pas déclencher de flammes, d'étincelles ou d'autres sources d'allumage pendant quelques minutes.
Les parties, qui sont en contact avec les aliments, sont conformes aux dispositions de la directive CEE 89/109.
Le marquage CE atteste que cet appareil est conforme aux dispositions des Directives Européennes suivantes: 89/336 (compatibilité électromagnétique), 73/23 (basse tension), 96/57 (efficacité énergétique) et à leurs modifications ultérieures.
2
DECOUVREZ VOTRE
APPAREIL
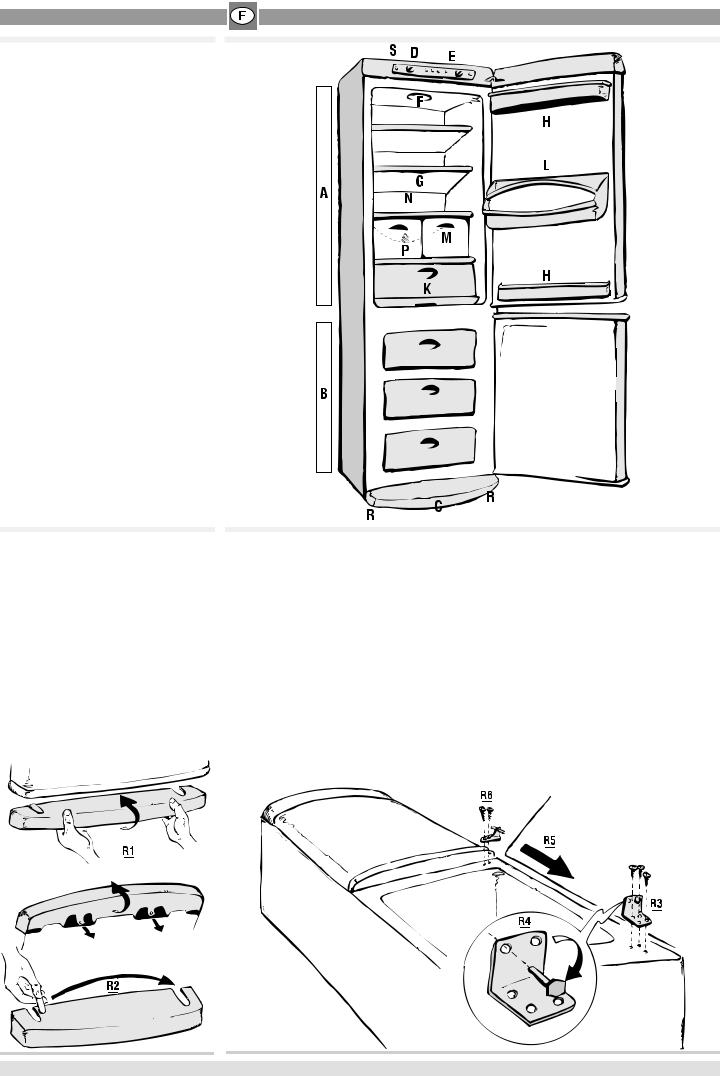
DESCRIPTION
APartie réfrigérateur
BPartie congélateur
C |
Plinthe |
D |
Boîtier régulateur thermostat congélateur |
E |
Boîtier régulateur thermostat réfrigérateur |
F |
Boîtier éclairage |
G |
Clayettes |
H |
Etagères de porte |
K |
Compartiment Maxi Fresh |
L |
Porte-bouteilles |
M |
Bacs à légumes |
N |
Evaporateur |
POrifice d’écoulement de l’eau de dégivrage
R |
Pieds réglables |
STouche “Super” congélation
Dessin uniquement explicatif
Dans votre modèle, si les bacs M ne sont pas présent, le compartiment K a la fonction de bac à légumes et non de compartiment Maxi Fresh.
RÉVERSIBILITÉ DES PORTES Normalement, l'ouverture de la porte est à gauche (charnières à droite); si vous préférez qu'elle soit à droite, vous pouvez la modifier avant d’installer votre appareil en vous conformant aux explications illustrées ci-après.
1.Couchez délicatement l'appareil sur l'arrière (de façon à ce que les portes soient tournées vers le haut).
2.Ôtez la plinthe en passant vos mains dessous et tirez les languettes que vous trouverez au milieu vers le bas; tournez la plinthe vers le haut pour la détacher (R1). Dégagez la languette de dégagement de gauche et introduisez-la dans le dégagememnt de droite (R2).
3.Dévissez la charnière inférieure (R3), dévissez le pivot de droite et revissez-le à gauche (R4).
4.Dégagez la porte du congélateur (R5).
5.Dévissez la charnière intermédiaire (R6) et bouchez les trous à l'aide des bouchons cache trou fournis.
3

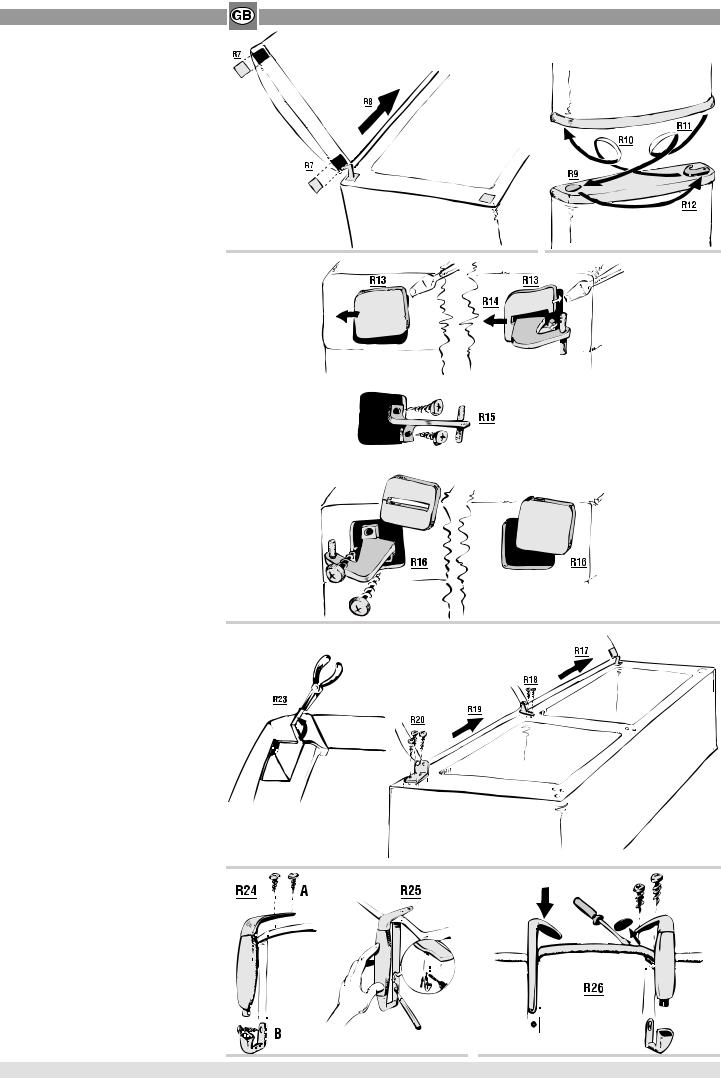
6.Ôtez les goujons de couverture qui se trouvent à l'arrière, dans la partie supérieure de la porte du réfrigérateur (R7) et dégagez la porte de la charnière supérieure (R8). Dégagez le goujon qui bouche l'orifice sur la gauche de la porte du congélateur (R9).
7.Dévissez le système de blocage sur la porte du congélateur, retournez-le et vissez-le sur le côté gauche de la porte du réfrigérateur (R10). Dévissez le système de blocage de droite sur la porte du réfrigérateur, retournez-le et vissez-le sur le côté gauche de la porte du congélateur (R11).
8.Introduisez le goujon qui bouchait l'orifice de gauche dans la partie droite de la porte du congélateur (R12).
9.Ôtez les goujons de couverture du bandeau de commande (R13) et dégagez la charnière (R14).
10.Dévissez la charnière supérieure (R15).
11.Visser la charnière supérieure à gauche après l'avoir faite tourner de 180° et replacer les chevilles de couverture (R16).
12.Enlever avec une pince la languette predecoupée sur le chapeau de porte (R23).
13.Introduisez la porte du réfrigérateur dans la charnière supérieure (R17), vissez la charnière intermédiaire (R18), introduisez la porte du congélateur (R19) et vissez la charnière inférieure (R20).
14.Remontez la plinthe
Réversibilité des poignées
1.Dévisser les vis A et enlever verticalement le corps poignée et l'extrêmité, comme c'est illustré dans la fig. R24.
2.Dévisser l'extrêmité B et la revisser sur le côté opposé après avoir effectué un trou avec une perceuse ayant une pointe d'un diamètre de 2,5 mm (fig. R25).
3.Enlever, au moyen d'une pointe, (par ex. un tournevis) la chevillede fermeture des trous et terminer le montage en exécutant à l'envers tout ce qui est indiqué au point 1 (fig. R26).
4.Visser sur le côté original de la poignée la rencontre spéciale en plastique fournie dans le matériel de l'appareil (fig. R26).
4
INSTALLATION DE
L’APPAREIL
Installation d’appareils équipés
de roulettes
Si votre appareil est équipé de roulettes, n’oubliez pas qu’elles servent uniquement à faciliter les petits mouvements: ne vous en servez pas pour déplacer l’appareil sur de longues distances!
Après avoir placé l’appareil à l’endroit voulu, réglez les pieds avant.
Après avoir déballé l'appareil, contrôlez qu'il ne soit pas endommagé. Les dommages éventuels doivent être signalés immédiatement à votre vendeur.
Ne jetez pas dans l'environnement les parties de l'emballage (sachets en plastique, bandes de polystyène, etc.) et ne les laissez pas à la portée des enfants.
Si l'appareil a été transporté chez vous en position horizontale, attendez deux heures
avant d'introduire la fiche électrique, compresseur.
Placez l'appareil dans un endroit sec et aéré, à l'abri des agents atmosphériques.
Eviter les balcons, les vérandas, les terrasses: la chaleur excessive en été et le froid en hiver pourraient altérer le fonctionnement de l'appareil ou même l'endommager.
Ne le mettez pas près d'une source de chaleur comme un four ou un radiateur et maintenez-le à une distance minimale des autres meubles de 3/5 cm sur les côtés et de 10 cm au-dessus.
Tenez l'appareil écarté du mur au moyen des entretoises à monter sur l'arrière.
Réglez les pieds antérieurs pour que l'appareil soit légèrement incliné en arrière : de
cette façon, vous faciliterez la fermeture correcte de la porte.
Nettoyez-le à l'intérieur en utilisant du bicarbonate de sodium dissous dans l'eau (1 cuillère pour 4 litres d' eau). N'utilisez pas d'alcool, de poudres abrasives ou de détergents, car ils pourraient endommager les surfaces.
Cet appareil offre de meilleures performances quand la température ambiante est comprise entre 10 °C et 32 °C.
PROCÉDURE DE MISE EN MARCHE
COMMENT ÉCONOMISER DE L'ÉNERGIE
La première façon pour économiser de l'énergie est de bien choisir l'endroit où placer l'appareil, comme cela a été expliqé dans la partie concernant l'installation.
La deuxième façon d'économiser de l'énergie est de ne pas faire entrer de chaleur dans les compartiments: laissez donc les portes ouvertes le moins possible, et n'introduisez pas d'aliments encore chauds, surtout s'il s'agit de soupes ou semblables qui dégagent une grande quantité de vapeur. Contrôlez périodiquement les joints des portes et assurez-vous qu'elles se ferment toujours de manière correcte, dans le cas contraire, adressez-vous au centre d' assistance.
La troisième façon d'économiser de l'énergie est de maintenir intactes les parties qui échangent la chaleur: ne laissez pas le givre s'accumuler dans le congélateur (dégivrez-le quand l'épaisseur du givre dépasse 1-2 cm., dans le cas d'appareils no-frost cela n'est pas nécessaire) et nettoyez périodiquement le condensateur comme il est indiqué par la suite dans le livre.
BRANCHEMENT ÉLECTRIQUE
Important pour votre securité.
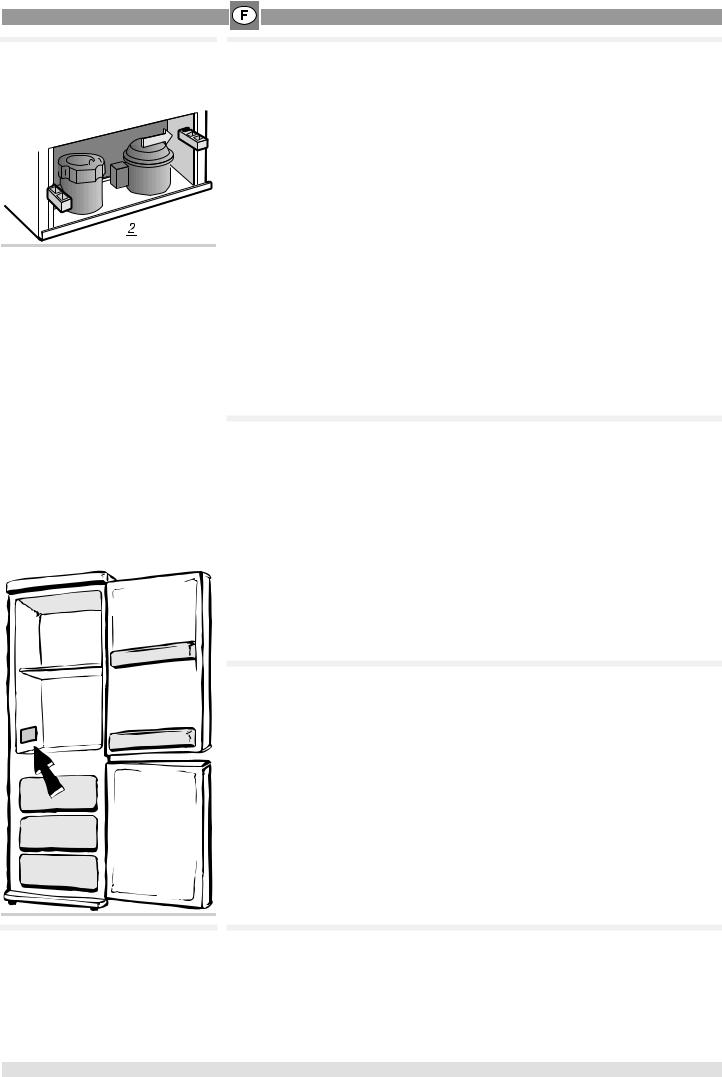
Prévoyez une prise de courant 10-16 A avec prise de terre. Assurez vous que la tension indiquée sur la plaque signalétique de l’appareil (celle-ci se trouve à l’intérieur de votre appareil, à gauche au niveau du bac à légumes) correspond bien à la tension de l’installation électrique de l’habitation.
La mise à terre de l’appareil est obbligatoire aux termes de la loi. Nous ne pouvons être tenus pour responsables pour tout incident causé par la non observation de cette
exigence.
Veillez à ce que vous puissiez accéder facilement à la prise qui aliment l’appareil, de façon à pouvoir le brancher et débrancher sans problème (nettoyage, dégivrage, etc.).
Si le câble d’alimentation est détérioré, remplacez-le immédiatement par un autre du même modèle et veillez à bien connecter le câble de terre jaune/vert.
Avant la mise en service:
žLaissez votre appareil à l’arrêt pendant 2 heures pour permettre au liquide réfrigérant de se stabiliser.
žNettoyez l’intérieur à l’aide, par exemple, d’une éponge imbibée d’eau et de vinaigre.
žRégler les thermostats sur la position de conservation qui vous semble la plus adéquate (Voir: Utilisation de l’appareil).
žBranchez l’appareil sur la prise de courant.
5
UTILISATION DE L'APPAREIL
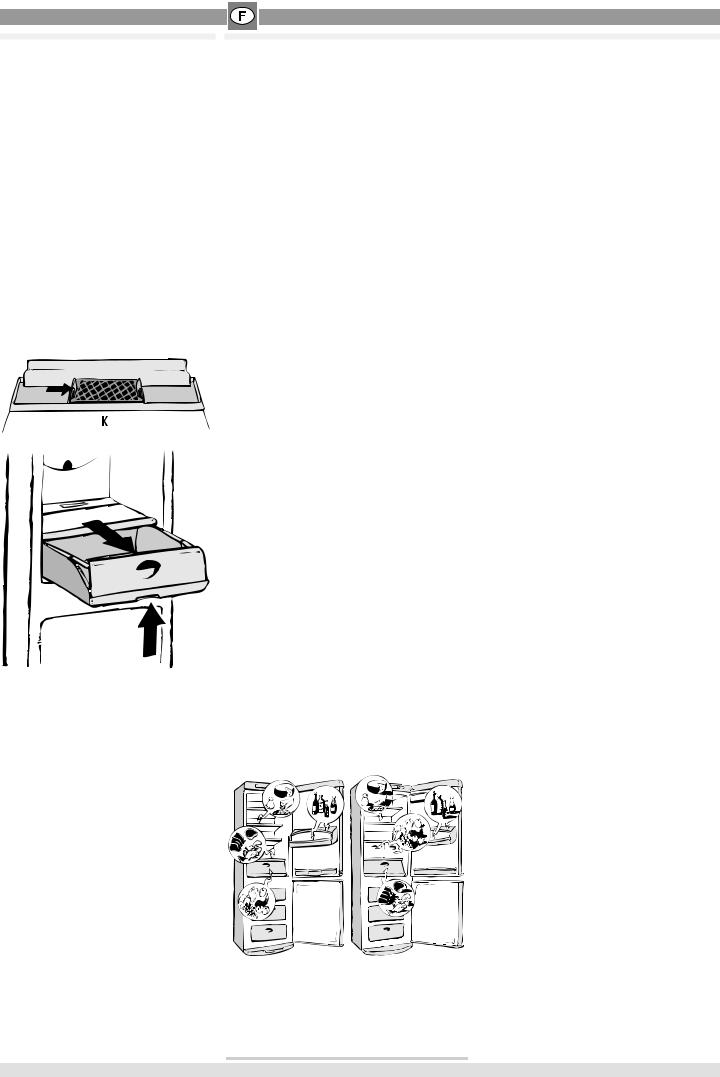
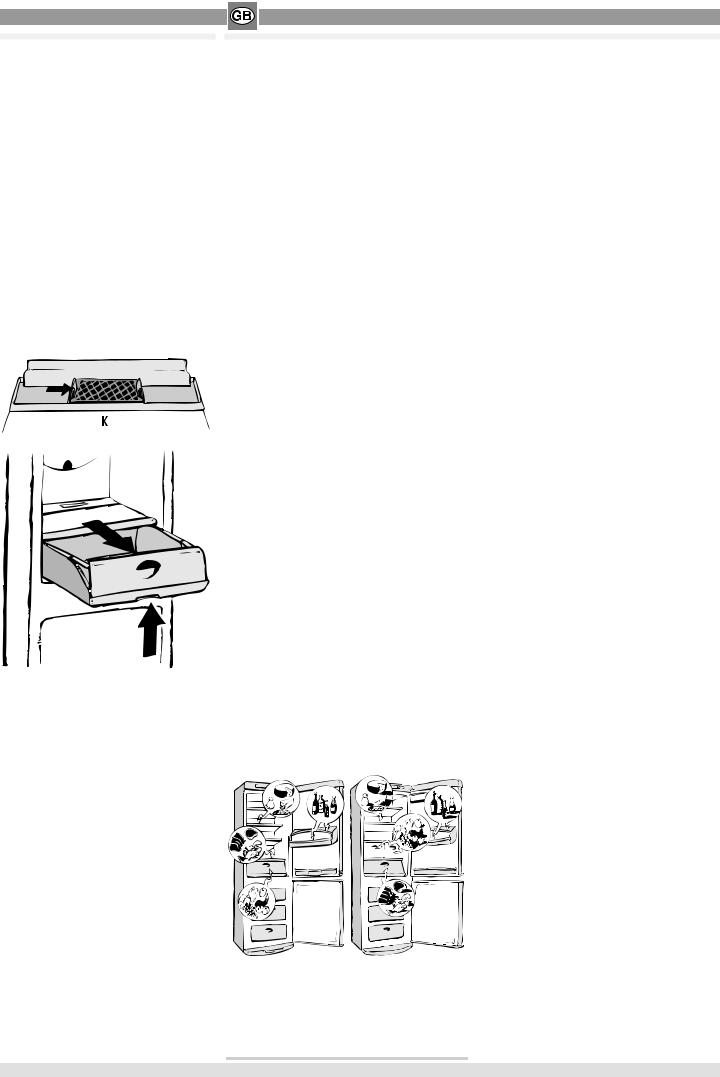
Le compartiment coulissant pour fruits et légumes est muni d'un filtre qui contrôle le niveau d'humidité en le maintenant adapté à la conservation optimale de ces aliments. Pour effectuer le nettoyage du filtre,:enlever l'étagère, démonter le couvercle, enlever le filtre "K" et le laver sous l'eau courante. Le panier coulissant peut s'enlever de la manière suivante: extraire le panier jusqu'au fond de course, soulever la partie antérieure et la tirer vers soi.
Stockez les aliments les plus sensibles dans la zone la plus froide de l’appareil (voir croquis). En particulier le bac MAXI-FRESH est recommandé pour la conservation de poisson et viande.
Thermostat
Le thermostat permet de régler la température intérieure de votre appareil en fonction de la charge et de la température ambiante. Positionnez le thermostat sur l’index moyen. Laissez votre réfrigérateur ainsi pendant 24 heures. Ajustez ultérieurement le réglage en fonction de vos besoins. L’index 1 indique le réglage le moins froid et l’index maximum le réglage le plus froid. Remarque: l’index 0 interrompt le fonctionnement du compresseur. Ne mettez jamais d’aliments encore chauds dans le réfrigérateur, laissez-les refroidir à température ambiante.
ATTENTION! Quand le thermostat est sur la position “0” l’appareil n’est pas isolé de la prise de courant. Avant d’effectuer une quelconque intervention sur l’appareil, débranchez la fiche de la prise de courant. Les températures internes sont influencées par la température ambiante, par la fréquence d'ouverture des portes, par la quantité d'aliments introduits. Selon les cas, vous pouvez choisir la position qui vous donne la meilleure température. Dans des conditions environnantes extrêmes, il est recommandé d'utiliser le thermostat de façon différente. Quand la température environnante est très chaude (ex en été) il est conseillé de régler le bouton sur des chiffres bas. Vice-versa, avec des températures environnantes froides, il est conseillé de régler le bouton sur des chiffres plus hauts.
Les emballages et les aliments ne doivent toucher en aucun cas la paroi du fond du réfrigérateur.
Réglage Congélateur
Pour régler la température interne tournez le bouton thermostat qui se trouve dans la zone des commandes. Normalement, une position intermédiaire est conseillée.
TÉMOIN VERT
Ce témoin indique que l'appareil est en marche. Vous pouvez arrêter le fonctionnement de l'appareil tout en le laissant branché: pour cela, positionnez le thermostat sur l'index "0" (bouton tourné a fond dans le sens des aiguilles d'une montre).
TEMOIN ROUGE
TEMOIN ROUGE allumé indique que la température dans le congélateur est trop chaude (ex. manque de courant, dommage, ecc.): insérez la congélation rapide et contrôlez que les aliments dans le congélateur ne soient pas décongelés,pas même partiellement.
Maintenez la porte fermée, contrôlez que le témoin rouge s'éteigne en deux heures environ et réglez éventuellement le thermostat sur une position plus froide.
Le témoin rouge peut s'allumer, pendant une brève période de temps, avec l'insertion de la congélation rapide, en tenant la porte ouverte pendant une période prolongée, après l'introduction de grandes quantités de denrées fraîches, sans que l'allumage indique une anomalie.
TEMOIN JAUNE
Allumé: il indique la phase de congélation rapide. Le congélateur est entrain de produire le maximum de froid possible.
CONGELATION RAPIDE
Allumez la congelation rapide en appuyant sur le bouton situé sur le tableau de bord et eteignez-la en appuyant à nouveau sur le même bouton (voir chapitre Congelation).
Pour obtenir le volume utile maximal, vous pouvez enlever les tiroirs éventuels présents dans le congélateur, sauf le premier en bas.
ATTENTION: avant de refermer la porte du congelateur, veillez à ce que les abattants et/ou les tiroirs soient bien tous fermés.
6

CONGELATION
Remarques importantes
Si vous achetez des produits surgelés vérifiez:
•qu’ils soient bien fermés ou enveloppés, que l’emballage soit intact et qu’ils n’aient pas été abîmés;
•qu’il n’y ait pas de gouttelettes glacées (qui indiquent que le produit a été partiellement décongelé);
•qu’ils indiquent bien la date de préparation ainsi que les dates correspondant aux différents modèles de congélateurs (le votre est ****)
•qu’ils ne se soient pas, même partiellement, décongelés entre-temps.
Ne mangez pas les produits lorsqu’ils sont à peine sortis du congélateur (glaces, esquimaux, glaçons, etc.): la température très froide à laquelle ils se trouvent pourrait provoquer des brûlures par le froid, spécialement sur la langue. En cas de coupure de courant prolongée, transférez les aliments congelés dans un congélateur qui marche. Même si les aliments ne se
sont que partiellement décongelés, ils ne pourront être recongelés qu’après avoir été cuisinés.
DÉCONGÉLATION
Congélation
Effectuez cette opération le plus hygiéniquement possible, étant donné que la congélation ne stérilise pas les aliments. II est préférable de congeler les aliments en les subdivisant dans des sacs, et en quantité consommables lors d’un seul repas. N’introduisez jamais d’aliments chauds, ni même tièdes! Avant de mettre les aliments dans le congélateur, veillez à bien les envelopper dans des sacs en plastique, dans des feuilles de polyéthylène ou d’aluminium ou bien mettez-les dans des barquettes destinées à la congélation (ce matériel est en vente avec l’étiquette “pour congélateur”). Chaque sac, chaque boîte, etc. que vous mettrez dans le congélateur devra respecter les conditions suivantes:
•indication de la date de préparation et de la date de validité.
•le nombre de portions qui y sont contenues;
•les pots en verre devront être du type Pyrex et ils ne devront JAMAIS être entièrement remplis (la congélation dilate les liquides);
•les sacs auront été comprimés afin d’en éliminer l’air à l’intérieur et ils devront être le plus plats possible;
•chaque emballage, quel qu’il soit, devra être fermé de façon à bien protéger les aliments. La plaque signalétique indique la quantité maximum des aliments que vous pouvez congeler en 24 heures. N’y introduisez jamais une quantité supérieure. N’approchez pas les aliments frais des aliments surgelés, afin de ne pas rehausser la température de ces derniers.
Pour obtenir la capacité maximum de congélation, allumez l'interrupteur de congélation rapide (voir Description) 24 heures avant d'introduire les aliments dans le congélateur.
Le compartiment de congélation rapide est le premier compartiment en haut.
La quantité maximum d'aliments qui peuvent être congelés est reportée dans la plaque des données au paragraphe "Capacité de congélation/Freezing capacity (Kg/24h)". Ne jamais introduire une quantité supérieure en une seule fois. Quand la congélation a été complétée (max. 24 heures), ne pas oubliez d’eteindre l’interrupteur.
Décongelez les produits seulement avant l'utilisation immédiate. La décongélation peut toujours être exécutée de quatre façons:
•dans le réfrigérateur;
•à température ambiante;
•dans le four à 40/50° ou avec le micro-ondes;
•directement à la cuisson.
La décongélation dans le frigo est la plus lente mais la plus sûre et vous permet d'économiser de l'énergie (le froid transmis durant la décongélation est cédé au réfrigérateur).
DÉGIVRAGE
Avertissement pour appareils
“Système Alto”
Lors d’une mise en arrêt de l’appareil pour une opération de dégivrage/nettoyage, attendre 24 heures pour permettre une remontée en température des accumulateurs de froid.
Dégivrage du réfrigérateur
Il est automatique et l’eau qui se forme s’écoule par l’orifice d’écoulement dans le bac de recuperation. Elle s’évapore ensuite grâce à la chaleur transmise par le compresseur.
Dégivrage du congélateur
Dégivrez le congélateur lorsque l’intérieur de ce dernier présente une formation de givre et de glace supérieure à 1-2 cm. Cette couche réduit le pouvoir de refroidissement et augmente la consommation d’électricité.
Débranchez l’appareil avant toute opération. Enveloppez les aliments dans du papier-journal et ensuite dans des morceaux de couverture (on peut se servir aussi de sacs isothermes), puis mettez-les au frais en attendent de les remettre dans le congélateur.
Insérez la languette A (fig. 35) ou insérez l’ailette A1 (fig. 35) et mettez un récipient bas pour recueillir l’eau. Lorsque la couche de glace commencera à fondre, vous pourrez alors la détacher délicatement des parois du congélateur en vous servant de la spatule en plastique destinée à cet effet.
Vous pouvez accélérer la liquéfaction de la glace en posant une casserole d’eau chaude à l’intérieur du congélateur, en ayant soin de l’isoler, sur le fond, au moyen d’une planchette en bois. N’utilisez jamais ni radiateur, ni sèche-cheveux ni autres appareils électriques, couteaux ni autres objets en métal: vous pourriez endommager définitivement l’appareil. Après avoir dégivré l’appareil, suivez attentivement les indications se rapportant au nettoyage et à la réintroduction des produits.
7
NETTOYAGE
Nettoyage intérieur
Avant de commencer n'importe quelle opération il faut tout d'abord enlever la fiche de la prise de courant. Effectuer le nettoyage aussi bien du frigidaire que du congélateur en utilisant du bicarbonate de soude dissout dans de l'eau (1 cuillère tous les 4 litres d'eau). NE PAS UTILISER DE PRODUITS DETERGENTS ABRASIFS. Rincer avec de l'eau et essuyer à l'aide d' un chiffon. Brancher la fiche dans la prise de courant. Positionner le bouton du frigidaire sur la température de conservation. Attendre pendant 3/4 heures avant d'introduire les aliments. Pour utiliser le congélateur mettre en route la congélation rapide, attendre pendant 3/4 heure avant de placer, dans les casiers respectifs, les produits surgelés et/ou frais. 24 heures après le branchement de la congélation rapide, la débrancher.
Nettoyage extérieur
Avant de commencer toute opération, débranchez préalablement l’appareil. Pour le nettoyage extérieur, utilisez de l’eau tiède additionée d’un peu de produit veisselle. N’oubliez pas de nettoyer, de temps en temps, le condenseur situé derrière l’appareil. Pour cette opération, servez-vous d’un chiffon sec ou, mieux encore, de l’aspirateur.
PETITES PANNES ET
ANOMALIES
La lumière intérieure du réfrigérateur est éteinte
•Vérifiez les points qui sont annoncés au paragraphe “La puissance de refroidissement diminue”.
•L’ampoule est grillée
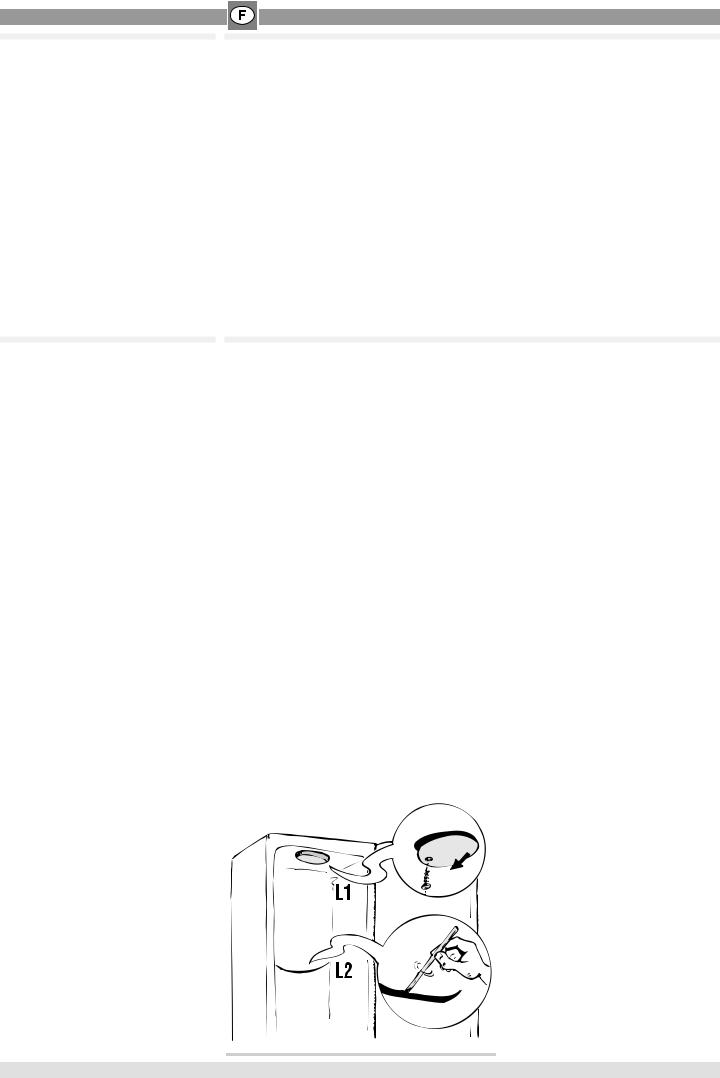
Changez-la en procédant de la façon suivante: débranchez l’appareil, devissez le boîtier d’éclairage, enlevez-le et changez l’ampoule en veillant qu’elle soit de même caractéristique (15 WATT max) (fig. L1): revissez le boîtier. Retirez l’ampoule grillée seulement si vous en avez une autre qui puisse la remplacer aussitôt.
Avant de faire appel au Service Après Vente, vérifier s'il est possible d'éliminer l'ennui en effectuant les contrôles suivants:
Bruits inhabituels: Vous n'avez pas réglé les petits pieds comme il faut et le congélateur vibre.
La puissance de refroidissement diminue: Vous avez introduit une quantité d'aliments supérieure à celle conseillée. Vous avez ouvert la porte trop souvent. La porte n'est pas bien fermée.
L'appareil ne refroidit pas: Contrôler si le courant passe de la fiche à la prise de courant. Vous avez peut-être un fusible dans l'installation électrique qui est grillé. Votre interrupteur général a disjoncté. Le thermostat est éteint, placer le bouton sur 0.
Meuble chaud extérnement: C’est normal car un système intégré à l’appareil permet d’éviter la condensation sur les parties extérieures du congélateur.
Les viandes congelées ont des striures blanchâtres: Vous utilisez des températures trop basses ou bien vous n'avez pas respecté les dates d'échéances indiquées dans les tableaux. La congélation est incomplète: Il est tout à fait normal que les produits qui contiennent beaucoup de sucre, de graisse et d'alcool comme les glaces ou bien les jus de fruits ne se congèlent pas complètement et qu'ils restent partiellement mous.
Il y a des gouttes d'eau sur les parois extérieures de l'appareil: Au cours des saisons intermédiaires, au printemps et en automne, quand il n'y a pas de chauffage dans la maison, il peut arriver que les parois extérieures de l'appareil se recouvrent de petites gouttes d'eau (eau de condensation). Ce phénomène ne compromet absolument pas le bon fonctionnement de l'appareil et il ne comporte aucun danger pour les personnes.
Formation de givre à l'intérieur: Vous n'avez pas bien fermé les portes. Vous avez ouvert les portes trop fréquemment.
Il y a des gouttes d'eau ou bien de la glace sur la paroi verticale du fond du réfrigérateur: Il s’agit du fonctionnement normal du systeme de dégivrage.
La porte ne s'ouvre pas facilement: Il est tout à fait normal, et ce tout de suite après l'avoir fermée, que la porte oppose une certaine résistance à l'ouverture; ceci assure une parfaite étanchéité des portes. Il suffit d'attendre quelques minutes avant de l'ouvrir à nouveau.
Gouttes d’eau sur le fond du
compartiment réfrigérateur
Le orifice d’écoulement de l’eau est bouché. Nettoyez-le à l’aide d’une aiguille à tricoter (fig. L2).
8

|
|
|
|
|
|
|
|
|
|
|
|
|
|
|
|
|
|
TABLEAUX CONGÉLATION |
Viande fraîche |
|
|
||
|
|
|
|
|
|
|
PRODUIT |
VALIDITÉ |
|
||
|
Agneau petits morceaux |
8 mois |
|
||
|
Porc rôti |
5 mois |
|
||
|
Porc côtes |
4 mois |
|
||
|
Boeuf bouilli, rosbif |
10 mois |
|
||
|
Boeuf biftecks, entrecôtes, en sauce |
8 mois |
|
||
|
Veau rôti |
|
|||
|
|
|
|||
|
Veau biftecks, côtelettes |
10 mois |
|
||
|
Viande hachée |
4 mois |
|
||
|
Abats |
3 mois |
|
||
|
Saucisses |
2 mois |
|
||
|
Nous vous conseillons de décongeler complètement la viande avant de la cuisiner, afin d’évi- |
||||
|
ter qu’elle ne cuise plus vite à l’extérieur qu’à l’intérieur, à l’exception des petites tranches |
||||
|
panées, qui peuvent être sautées directement à feu doux/moyen, et des viandes bouillies. |
||||
Animaux de basse-cour
Préparez-les plumés/écorchés, étripés, éventuellement coupés en morceaux, lavés et essuyés.
|
PRODUIT |
VALIDITÉ |
|
||
|
Canard |
4 mois |
|
Lapin |
6 mois |
|
Poule pour bouillon |
7 mois |
|
Oie |
4 mois |
|
Poulet |
10 mois |
|
Dinde |
6 mois |
|
Abats |
3 mois |
Gibier
Préparez-le plumé/éncorché, étripé, éventuellement coupé en morceaux, lavé et essuyé.
|
PRODUIT |
VALIDITÉ |
|
||
|
Canard sauvage |
|
|
Bécasse |
8 mois |
|
Faisan |
|
|
Lièvre |
6 mois |
|
Perdrix |
8 mois |
|
Caille |
|
|
|
Poisson
|
PRODUIT |
VALIDITÉ |
PRÉPARATION |
|
|||
|
Carpe |
|
|
|
Brochet |
|
|
|
Turbot |
|
|
|
Saumon |
2 mois |
Ecaillez, videz, ôtez la tête. Lavez, essuyez et surgelez |
|
Maquereau |
|
|
|
Tanche |
|
|
|
Truite |
|
|
|
Daurade |
3 mois |
Ecaillez, videz, ôtez la tête, lavez, mettez-la pendant 30 secondes dans de l’eau froide |
|
Sole |
salée, essuyez et surgelez. |
|
|
|
Aliments cuisinés
La durée de conservation des plats cuisinés diminue si vous servez de lard ou de bacon pour relever les plats.
|
PRODUIT |
VALIDITÉ |
CUISSON DE PRÉPARATION |
|
|||
|
Sauce au jus de viande |
3 mois |
mi-cuisson |
|
Sauce à la tomate |
à point |
|
|
|
||
|
Minestrone” aux légumes |
2 mois |
sans pâtes |
|
Lasagne |
4 mois |
mi-cuisson |
|
Rôtis |
2 mois |
à point |
|
Rouelle de veau |
1 mois |
mi-cuisson |
|
Viandes en sauce |
3 mois |
|
|
|
||
|
Civets de gibier |
|
|
|
Poisson cuit à l’eau |
|
à point |
|
Poisson au four |
2 mois |
|
|
|
||
|
Poivrons, aubergines, courgettes farcies avec de la viande |
|
|
|
|
|
|
|
Champignons sautés avec ail et persil, ratatouille de poivrons |
|
mi-cuisson |
|
Epinards cuits à l’eau |
|
|
|
|
|
|
|
Pizza |
6 mois |
à point |
Mettez directement votre plat à chauffer sans décongeler.
9
Nous vous conseillons de blanchir les légumes à la vapeur, afin qu’ils ne perdent ni leurs vitamines ni leurs sels minéraux dans l’eau de cuisson. Ainsi, vous n’aurez pas non plus besoin d’attendre qu’ils soient secs pour les congeler, il suffira d’attendre qu’ils refroidissent.
|
|
|
|
|
Asperges |
12 mois |
Lavez et retirez les fils |
2 minutes |
|
Choux, chou-fleur |
6 mois |
nettoyez, coupez en morceaux |
2 minutes (1) |
|
Artichauts |
|
Enlevez les feuilles externes |
6 minutes (1) |
|
Haricots |
|
Ecossez |
3 minutes |
|
Haricots verts |
|
Lavez, enlevez les queues |
4 minutes |
|
Champignons |
12 mois |
Nettoyez |
2 minutes (1) |
|
Aubergines |
Lavez, coupez en tranches |
4 minutes (2) |
||
|
||||
Poivrons (3) |
|
Lavez, coupez en tranches, enlevez les graines |
|
|
Petits pois, Tomates (3) |
|
Ecossez et congelez immédiatement en les |
ne pas les |
|
|
disposant sur une seule couche puis enveloppez |
blanchir |
||
|
|
|||
Persil, basilic |
8 mois |
Lavez |
|
|
Epinards |
|
2 minutes |
||
|
|
|||
Jardinière pour minestrone (céleri, |
12 mois |
Lavez, coupez en morceaux, divisez en portions. N’y |
ne pas les |
|
carottes, bettes, poireaux, etc.) |
|
mettez pas de pommes de terre, elles noircissent. |
blanchir |
(1)Mettez un peu de vinaigre et de citron dans l’eau de cuisson (eau acidulée).
(2)Saumurez avant de procéder à la cuisson.
(3)Lors de la décongélation, ces légumes se réduisent en bouille, car ils contiennent énormément d’eau. Nous vous conseillons donc de décongeler uniquement si vous avez l’intention de les manger cuits.
En général, les légumes sont meilleurs s’ils sont cuits directement sans être décongelés. Réduisez les temps de cuisson en tenant compte du blanchiment avant la congélation.
Les fruits devront être recouverts de sucre ou de sirop, suivant les cas. La quantité de sucre à utiliser pour la conservation est d’environ 250 gr. pour 1 kilo de fruits. Les sirops sont utilisés dans des pourcentages variables; on les prépare en faisant bouillir de l’eau sucrée. Les différentes concentrations sont les suivantes:
•solution à 30%, sucre 450 gr. par litre d’eau;
•solution à 40%, sucre 650 gr. par litre d’eau;
•solution à 50%, sucre 800 gr. par litre d’eau;
Pour que la couleur des fruits ne soit pas altérée, mettez-les dans du jus de citron avant de les recouvrir de sucre, ou bien versez du jus de citron dans le sirop. Les récipients de fruits à congeler devront rester une heure au réfrigérateur avant d’être introduits dans le congélateur. Les fruits devront être entièrement recouverts de sirop.
|
|
|
|
|
|
Abricots |
8 mois |
Lavez, dénoyautez, sirop à 30% |
|||
Ananas |
|
Epluchez, coupez en tranches, sirop à 50% |
|
||
Oranges |
10 mois |
Epluchez, coupez en tranches, sirop à 30% |
|
||
Cerises |
|
Lavez, dénoyautez, recouvrez de sucre ou de sirop à 30% |
|
||
Fraises |
12 mois |
Lavez, retirez le pédoncule et recouvrez de sucre |
|
|
|
Melon |
Epluchez, coupez en tranches, retirez les graines, recouvrez de sirop à 30% |
||||
|
|||||
Pêches |
8 mois |
Epluchez, dénoyautez, coupez en tranches, recouvrez de sirop à 50% |
|
||
Pamplemousse |
12 mois |
Epluchez, coupez en tranches, sirop à 30% |
|
||
Jus d’agrumes |
10 mois |
Pressez, retirez les pépins, sucrez à volonté |
|
||
Prunes |
12 mois |
Lavez, dénoyautez, recouvrez de sucre ou de sirop à 50% |
|
|
|
Raisin |
Séparez les grains de la grappe, lavez, recouvrez de sucre ou de sirop à 30% |
|
|||
|
|||||
Myrtilles, mûres, cassis, |
10 mois |
Lavez, retirez les pédoncules, recouvrez de sucre |
|||
framboises, groseilles |
|||||
|
|
|
|
||
On peut le conserver 2 mois. Décongelez au four à 50 C, en l’allumant après y avoir mis le pain.
Congelez le beurre et le fromage en les divisant par morceaux pour une consommation hebdomadaire. Le beurre et les fromages durs (ex. parmesan) se conservent 8 mois, les autres fromages 4 mois. On doit les décongeler dans le réfrigérateur en veillant à la condensation qui se formera sur ces produits.
10
|
|
|
|
|
|
|
|
|
|
|
|
|
|
|
|
|
|
|
|
|
|
|
|
|
|
|
|
|
|
CONGRATULATIONS! |
|
You have made an excellent choice! |
||
|
|
By purchasing our domestic appliance, you have chosen a reliable, highly performing, |
||
|
|
non-cumbersome, efficient and useful product. Indeed, the perfect way to preserve your |
||
|
|
foodstuffs for the preparation of varied, healthy meals. |
||
|
|
Your new appliance is easy to use. Nevertheless, please read the instructions and the tips |
||
|
|
described therein, to enable you to use your refrigerator to its highest capacity, whilst saving |
||
|
|
on electricity. |
||
|
|
We are certain that this appliance will meet with your requirements and we look forward to |
||
|
|
having you as one of our permanent clients. |
||
INDEX
SAFETY REGULATIONS
SAFETY REGULATIONS
YOUR APPLIANCE
REVERSIBILITY OF THE DOORS
APPLIANCE INSTALLATION
SAVING ENERGY
ELECTRICAL CONNECTION
STARTING PROCEDURE
USE OF THE APPLIANCE
FREEZING
DEFREEZING
DEFROSTING
CLEANING
MINOR BREAKDOWNS AND ANOMALIES
This appliance preserves and freezes foodstuffs for household use. Avoid any other use. Installation of the appliance must be carried out according to the Instructions Manual. An incorrect installation may damage the appliance.
Should you have any problems regarding the good performance of the appliance, kindly contact the authorized Service Centres, or, specialized technicians only.
Prior to any maintenance operation, unplug the appliance from the power supply. Avoid pulling off the feed cable or the appliance itself. Simply pull out the plug.
Keep the Instructions Manual in good condition and pass it on to any future owner of the appliance.
In order to comply with the latest legislation concerning environmental protection, we use little quantities of the refrigerant called R600a.
In the event of any damage to the components of the refrigerator circuit (pipes, etc.), it will suffice to aerate the place in which the appliance has been positioned and avoid causing flames, sparks or other sources of ignition, for a few minutes.
The parts destined to be in contact with foods are in accordance with the EEC 89/109 directives.
CE marking certifies that this appliance complies with EEC Directives 89/336 (electromagnetic compatibility), 73/23 (low voltage), 96/57 (energy efficiency) and their subsequent amendments.
11

YOUR APPLIANCE
CAPTION
ARefrigerator zone
BFreezer zone
CBase trim
DFreezer thermostat knob
EFridge thermostat knob
FLight box
GShelves
HMaxi Fresh Opening
KDoor trays
LBottle holders
MSalad/vegetable drawers
NEvaporator
PWater drainage outlet
RAdjustable feet
SFast Freeze button
Drawing is purely illustrative
Should your model not have the drawers M, opening K
can be used for the vegetable compartment and not as
a Maxi Fresh opening.
REVERSIBILITY OF THE DOORS
The opening of the door is usually to the left (hinges on the right); if instead you wish to invert it, you may proceed as follows:
1.Lay the appliance carefully on its back (doors facing upwards).
2.Remove the base trim by placing your hands below it and pulling the tongues which you will find about half way along. Rotate the base trim upwards to release it (R1). Remove the tongue from the socket on the left and reinsert it into the socket on the right (R2).
3.Unscrew the bottom hinge (R3), unscrew the pin on the right and screw it in on the left (R4).
4.Remove the freezer door (R5).
5.Unscrew the middle hinge (R6) and close the holes on the cabinet with the plugs supplied.
12
6.Remove the concealing plugs from the top rear of the refrigerator door (R7) and remove the door from the top hinge (R8). Remove the blanking plugs from the left-hand side of the freezer door (R9).
7.Unscrew the stop from the freezer door, turn it the other way round and screw it onto the left-hand side of the refrigerator door (R10). Unscrew the right-hand stop from the refrigerator door, reverse, and screw it onto the left-hand side of the freezer door (R11).
8.Insert the blanking plug, which was originally on the left, into the right-hand side of the freezer door (R12).
9.Remove the concealing plugs from the control panel (R13) and free the hinge (R14).
10.Unscrew the top hinge (R15).
11.Tighten the upper left-hand hinge after having turned it 180° and replace the concealing plugs (R16).
12.Remove with a plier the preengraved stripe positioned laterally on the plastic door cap (R23).
13.Slide the refrigerator door onto the top hinge (R17), screw on the middle hinge (R18), fit the freezer door (R19) and screw on the bottom hinge (R20).
14.Refit the base trim.
Reversibility of the handles
1.Unfasten screws A and extract the handle vertically and the extremity as illustrated under fig. R24.
2.Unfasten extremity B and screw on again on the opposite side after drilling a hole with a 2,5 mm. Diameter point drill (fig. R25).
3.Remove the holes closing dowel by means of a bit (for instance, of a screwdriver) and finish off the assembly by reversing the above mentioned operation as indicated under item (fig R26).
4.Fasten the plastic plate which has been supplied with the appliance, onto the original side of the handle (fig. R26)
13

APPLIANCE INSTALLATION
Appliance fitted with rollers
If your appliance is equipped with rollers, remember that these rollers serve to facilitate small movements. Do not pull or push it for long distances. Having set up the appliance in its proper position, adjust the small front feet.
After installing your appliance, check that nothing has been damaged. Should you detect any possible damage to the appliance, please contact your appliance salesman immediately.
Do not disperse packaging material such as plastic bags, polystyrene strips, etc., around the environment. Keep such material away from children.
If the appliance has been transported in a horizontal position, do not plug in the appliance but wait for a few hours in order to allow the oil to flow back into the compressor. Place the appliance in a dry and aerated environment, duly protected from weather elements. Avoid placing your appliance on balconies, verandas, terraces. Excessive heat during summer and cold during winter could alter the good functioning operation of the appliance or even damage it altogether.
Do not position your appliance near a source of heat like an oven or a central heating plant. Do not place your appliance next to other pieces of furniture, but leave at least a 3 to 5 cm space on the sides and 10 cm on the top.
Keep your appliance away from the wall by inserting spacers at the back of the said appliance.
Adjust the front legs so that the appliance will lean slightly backwards, to allow the door to close properly.
Clean your refrigerator compartment with a solution of sodium bicarbonate dissolved in water (1 spoon for every 4 litres of water). Do not use alcohol, abrasive powders or detergents, as these could ruin the surface.
This appliance works best when the ambient temperature is between 10 °C and 32 °C.
SAVING ENERGY
The first way to save electricity is to select the correct place for appliance installation as specified above under installation instructions.
The second way to save electricity is to prevent heat from entering the refrigerator compartments. Keep the refrigerator doors open for as little time as possible and never store hot food inside, like soups or similar dishes in particular, as these will produce a great deal of steam. Periodically check the door gaskets. Ensure the perfect closure of the doors. Should this not be the case, please contact the Service Centre.
The third way to save electricity is to maintain the heat exchange parts in good condition. Prevent condensation from accumulating in the refrigerator. Defrost the appliance whenever the frost thickness exceeds 1-2 cm. This is not necessary with NO-FROST appliances. Clean the condenser periodically as specified below in this Booklet.
ELECTRICAL CONNECTION
Please ensure that the voltage (Volt, V) of the mains socket matches the indications on the data plate which you will find inside your appliance.
Should the socket and the appliance plug not be compatible, do not use adapters, multiple plugs or extensions, but have the socket replaced with another suitable kind by qualified personnel.
The socket which feeds the appliance must be kept operational for future operations (cleaning, defrosting, etc.).
Should the cable become damaged, replace it timeously by contacting specialized Service Centres for the purchase and assembly of the said cable.
Electric safety of this appliance is assured only when it has been connected to a perfectly effective earthing installation as specified in the electric safety norms in force.
STARTING PROCEDURE |
Important: if the appliance has been transported to your house in a horizontal |
|
position, please wait for a few hours before plugging in the appliance to allow oil to |
|
flew back into the compressor. |
|
Proceed with the Internal cleaning , then connect the appliance to the electric socket without |
|
using an adaptor (see Electrical connection). |
|
Adjust the thermostats to the food preservation position of your choice (see Instructions for |
|
fridge-freezer use). |
14
USE OF THE APPLIANCE
The sliding fruit and vegetables department is equipped with a filter which controls the humidity levels, thus maintaining an optimal preservation of such foodstuffs. to clean the filter remove the shelf, dissemble the cover, remove filter "k" and wash in running water. The sliding container basket can be removed in the following manner: extract the basket till the end of the run, lift the front part and pull towards you.
Thermostat Adjustment
To adjust the internal temperature, turn the thermostat KNOB positioned on the controls section. Position 1 corresponds to milder temperatures. For colder temperatures turn knob to higher numbers. Normally, an intermediate position will be appropriate.
To switch the appliance off, turn the thermostat knob to the 0/STOP position.
WARNING: the appliance remains "live"!
The internal temperatures are influenced by ambient temperatures, according to how many times the refrigerator door has been opened and the quantity of food placed in the refrigerator. You can choose the perfect temperature accordingly.
In extreme ambient conditions, it is best to use the thermostat differently.
When the room temperature is very hot (e.g. in summer) we recommend adjusting the knob to the lower numbers. On the other hand, with cold room temperatures, we recommend adjusting the knob to higher numbers.
Packaged foodstuffs and other food that has been packed on the shelves must not touch the back wall of the appliance.
Freezer adjustment
To adjust the internal temperature turn the thermostat knob which is found in the controls section. Normally an intermediate position will be appropriate.
GREEN PILOT LIGHT
Green pilot light switched off indicates that the appliance is off.
WARNING: the appliance is still "live"!
RED PILOT LIGHT
Red pilot light switched on indicates that the temperature inside the freezer is too hot (e.g. "no electric current", failure, etc.): Set to fast-freezing and check that the food inside the freezer has not started defrosting, not even partially!
Keep the door closed and check that the red pilot light will switch off within 2 hours. If necessary, adjust thermostat to colder position.
The red pilot light may go "on" for a brief period of time after setting the fast-freezing position. This is due to the door being kept open for a long period of time when storing large quantities of fresh foodstuffs. This does not necessarily indicate any anomaly.
YELLOW LIGHT
Yellow light “on”, indicates that fast freezing is in action. The freezer is working to get the coldest temperature.
FAST FREEZE
Switch Fast Freeze on by pushing the button on the control panel, and switch it off by pushing it again.
In order to maintain maximum capacity, remove any drawers found in the freezer except the first one at the bottom.
*-9)4- before closing the freezer door, ensure that every container flap and/or drawer be perfectly closed within the appliance.
15

FREEZING
Important notice
If you purchase frozen foodstuffs verify that:
•the packing has boon well sealed and not mishandled or damaged;
•there are no iced lenses (this means that the product has already been oven partially thawed);
•the processing date and dates relevant to the type of freezer have boon clearly marked (yours is * * * * );
•in the meantime the products have not thawed, not oven partially;
Never put into your mouth frozen products that have just been taken out of the freezer (ice-cream, ice-blues, ice cubes, etc.), where the low temperature to which they have been subjected may cause ice burns and possible tongue damage.
In case of prolonged current absence transfer the frozen foodstuffs into another working freezer.
If the food stuffs have been thawed, even partially, you may re-freeze them only after having cooked them!
DEFREEZING
Freezing
Ensure that your freezing operations are carried out under the most hygienic conditions as freezing alone does not sterilise the food. It is advisable to freeze the food by packing it into separate meal portions and not in bulk form. Never put hot or even warm foodstuffs into the freezer! Prior to storing the frozen food, pack it in plastic bags, polyethylene sheets, aluminium foil or freezing containers (this material is found on the market and is labelled “suitable for freezing”). Each pack or container, etc. which you will store into the freezer must follow the instructions below:
•freezing date and expiry date;
•number of portions;
•the glass containers must be of the Pyrex type and MUST NEVER be filled to the brim: (freezing expands liquids);
•the packs must be pressed down for air elimination within and must be as flat as possible;
•all frozen food packs, whatever the type, must be closed in order to protect the food.
The maximum quantity of food which can be stored within a period of 24 hours is shown on the data table. Never store a higher quantity of food than indicated.
Do not place fresh foodstuffs next to frozen food. This would cause an increase in the temperature of the frozen foodstuffs.
In order to obtain maximum freezing capacity, turn on the fast-freeze switch (see Caption) 24 hours before putting in food to be frozen.
The fast freezing compartment is the first compartment at the top.
The maximum amount of food that can be frozen is stated on the information plate under the heading " "Capacità di congelazione/Freezing capacity (kg/24h)". Never place larger amounts inside all at the same time. It is better that you turn the switch off as soon as the freezing is completed (max 24 hours).
Defrost foodstuffs for immediate use only. Defrosting can be carried out in the following four manners:
•inside the refrigerator;
•in ambient temperatures;
•inside an oven at 40/50° or in a micro-wave oven;
•directly by cooking.
Defrosting in the refrigerator is a slower but safer operation and allows you to save electricity. The freezing temperature of the foodstuff is released into the refrigerator during defrosting.
DEFROSTING
Warning for “Alto System” appliances
When you unplug the appliance for defrosting and cleaning, you should wait for about 24 hours so that the accumulators warm up to room temperature. They will continue to frost up and form condensation water until they become warm.
Defrosting of the refrigerator
This is an automatic operation and the water which is formed is discharged through the DRAINAGE OUTLET into the COLLECTION TRAY. The water will then evaporate through the heat transmitted by the COMPRESSOR.
Defrosting of the freezer
Defrost every time you notice the formation of frost or ice 5-6 mm. thick. This layer of ice will reduce the freezing power and will increase energy consumption.
Wrap the frozen food in newspaper and then cover out with wrappers (insulated bags or boxes are also suitable). Place them in a cool place, preferably in the fridge, awaiting to be put into the freezer again. Before carrying out any other operation unplug the electric current.
Insert the tongue A (fig. 35) or insert pallet A1 (fig. 35) and place a low container to collect water. As the layer of ice begins to melt you may ease the separation from the walls by delicately using the special plastic spatula.
You may hasten this process by placing inside the freezer a pot with hot water isolating it from the bottom with a small wooden board.
Do not use heaters, hairdryers or other electrical appliances, knives or any other metal objects. You may damage the freezer beyond repair.
Once the defrosting has been completed, in order to carry out cleaning operation and re-packing the freezer you have to strictly follow the instructions.
16

CLEANING
MINOR BREAKDOWNS AND ANOMALIES
The light inside the refrigerator is off
•Check the points detailed under “No cooling power”
•The refrigerator light is burnt out. Replace bulb in this manner: unplug the electric current, unscrew the screw on the light box, remove the light box and replace the bulb with a similar one (15 WATT max) (fig. L1); screw the light box again. Remove the burnt-out bulb only if you have another to replace it.
Internal cleaning
Before carrying out any other operation, unplug the freezer. Clean both the refrigerator and the freezer by using sodium bicarbonate dissolved in water (1 spoonful every 4 litres of water).
DO NOT USE ABRASIVE DETERGENTS.
Rinse off with water and dry with a cloth. Plug into the socket. Turn the knob to the conservation temperature position. Wait 3-4 hours before placing food inside. To use the freezer activate fast freeze and wait 3-4 hours before placing deep frozen and/or fresh products into the respective compartments of the freezer. Remove the fast freeze operation after 24 hours.
External cleaning
Before carrying out any other operation, unplug the freezer. Use the same delicate method for external cleaning as you did for the internal cleaning. Remember to dust off the condenser placed at the back of the appliance. Use a dry brush or better still, a vacuum cleaner.
Before calling the Service department, check whether you can solve the problem through the following check-points:
Unusual noises - You haven't regulated the base properly and so the freezer vibrates. Reduced cooling power - You have placed a larger quantity of food than advisable. You have opened the door too many times. The door has not been properly closed.
The appliance does not cool - Check that the plug and socket are making contact. You may have blown a mains fuse. The main light switch has tripped. The thermostat is off, the knob is on "0" position.
The exterior of the appliance is hot - This is NOT a defect, but helps to prevent formation of condensate on the external parts of the appliance.
White streaking on frozen meats - The temperature is too low or you have not heeded the expiry dates indicated on the freezing chart.
Part-freezing - Normally, products containing lots of sugar, fats and alcohol such as ice-creams or juices, do not freeze completely and remain partially soft.
Water droplets on the external walls of the appliance - During the Spring and Autumn seasons, when the house heating is turned off, it may happen that the external walls of the appliance show some water droplets (condensate). This phenomenon does not interfere with the good functioning of the appliance and is not dangerous to people.
Frost build up inside - The doors are not properly shut. You have opened the doors too often.
Water or ice droplets on the back vertical wall of the refrigerator compartment - This is not a defect.
The door opens with difficulty - It is normal for the door to offer some resistance to opening after being closed. This is to ensure a perfect seal of the doors. Wait a few minutes before opening once again.
Water droplets at the bottom of the refrigerator
The water drainage outlet is obstructed. Clean it with the help of a small wire (fig. L2).
17

|
|
|
|
|
|
|
|
|
|
|
|
|
|
|
|
|
|
FREEZING TABLES |
Fresh meat |
|
|
||
|
|
|
|
|
|
|
PRODUCT |
TIME LIMIT |
|
||
|
Small cuts of lamb |
6 months |
|
||
|
Roasted pig |
5 months |
|
||
|
Pork chops |
4 months |
|
||
|
Boiled beef, roast beef |
10 months |
|
||
|
Beef steaks, ribs, stew |
8 months |
|
||
|
Roast veal |
|
|||
|
|
|
|||
|
Veal steaks, choice veal cuts |
10 months |
|
||
|
Minced meat |
4 months |
|
||
|
Giblets |
3 months |
|
||
|
Sausages |
2 months |
|
||
|
We advise you to thaw the meat completely before cooking it to avoid meat from cooking |
||||
|
quicker on the outside than on the inside, with the exception of schnitzels that can be put |
||||
|
directly to cook with a low/medium flame and for boiled meats. |
||||
Poultry
They must be plucked, skinned and the innards removed, cut into pieces, washed and dried.
|
PRODUCT |
TIME LIMIT |
|
||
|
Duck |
4 months |
|
Rabbit |
6 months |
|
Chicken for broth |
7 months |
|
Goose |
4 months |
|
Chicken |
10 months |
|
Turkey |
6 months |
|
Giblets |
3 months |
Feathered game
They must be plucked, skinned and the innards removed, cut into pieces, washed and dried.
|
PRODUCT |
TIME LIMIT |
|
||
|
Wild duck |
|
|
Woodcock |
8 months |
|
Pheasant |
|
|
Hare |
6 months |
|
Partridge |
8 months |
|
Quail |
|
|
|
Fish
|
PRODUCT |
TIME LIMIT |
PREPARATION |
|
|||
|
Carp |
|
|
|
Pike |
|
|
|
Rhomb |
|
|
|
Salmon |
2 months |
Remove scales, gut and clean fish, remove head, wash, dry and freeze |
|
Mackerel |
|
|
|
Tench |
|
|
|
Trout |
|
|
|
Gilthead |
3 months |
Remove scales, gut and clean fish, remove head, wash, immerse in cold salt water |
|
Sole |
for 30 seconds, dry and freeze |
|
|
|
Cooked food
N.B. The time limit of preservation of cooked food is reduced if you use fat bacon or lard as sauces.
|
PRODUCT |
TIME LIMIT |
COOKING PREPARATIONS |
|
Meat stew sauce |
3 months |
Not fully cooked |
|
Tomato sauce |
Fully cooked |
|
|
|
||
|
Vegetable soup |
2 months |
Without pasta |
|
Lasagne |
4 months |
Not fully cooked |
|
Roast |
2 months |
Fully cooked |
|
Osso buco (Marrow-bone) |
1 month |
Not fully cooked |
|
Meat stews |
3 months |
|
|
|
||
|
Game in salmi |
|
|
|
Boiled fish |
|
Fully cooked |
|
Baked fish |
2 months |
|
|
|
||
|
Pepperoni, eggplant (aubergines), Meat-stuffed |
|
|
|
|
|
|
|
baby marrows |
|
Not fully cooked |
|
Boiled spinach |
|
|
|
|
|
|
|
Pizza |
6 months |
Fully cooked |
Put directly onto the flame or into the oven without thawing.
18
It is advisable to steam cook the vegetables so as not to loose the vitamins and minerals into the water. Therefore there is no need to wait for them to dry before freezing them, but allow them to cool first.
|
|
|
|
|
|
Asparagus |
12 months |
Wash, remove hard parts |
2 minutes |
|
Cabbage, cauliflower |
6 months |
Wash, cut into pieces |
2 minutes (1) |
|
Artichokes |
|
Remove external leaves |
6 minutes (1) |
|
Beans |
|
Shell |
3 minutes |
|
French beans |
|
Wash, remove stalk |
4 minutes |
|
Mushrooms |
12 months |
Wash |
2 minutes (1) |
|
Eggplants |
Wash, slice |
4 minutes (2) |
|
|
|
|||
|
Pepperonies (3) |
|
Wash, slice, remove pips |
|
|
Peas, tomatoes (3) |
|
Shell, freeze, immediately placing them on one layer |
Do not boil |
|
|
|
only, pack them |
|
|
Parsley, basil |
8 months |
Wash |
|
|
Spinach |
|
2 minutes |
|
|
|
|
||
|
Mixed vegetables ready for |
12 months |
Wash, cut into pieces, divide into portions, do not |
|
|
soup (Celery, carrots, |
Do not boil |
||
|
|
put potatoes as they turn black |
||
|
beetroot, leaks, etc.) |
|
|
|
|
|
|
|
(1)Put a bit of vinegar or lemon in the cooking water.
(2)Salt well before cooking.
(3)The vegetables become mushy during the thawing, owing to the high content of water in them. We advise freezing only if you intend consuming the cooked products.
Generally, the vegetables are better if they are cooked directly without thawing. Reduce the cooking times bearing in mind the boiling effected before freezing.
Fruit must be covered with sugar or syrup according to the cases. The quantity of sugar to use in order to preserve it is about 250 gr. per kg of fruit. Syrups are to be used in different percentages and they are prepared by boiling water with some sugar already melted in it. The various concentration are:
•30% solution, 450 gr. of sugar for every litre of water
•40% solution, 650 gr. of sugar for every litre of water
•50% solution, 800 gr. of sugar for every litre of water
To maintain the colour of the fruit unaltered, dip it into some lemon juice before covering it with sugar, or otherwise add some lemon juice to the syrup. Fruit to be freezed needs an hour in the fridge for setting before being placed into the freezer. The syrup must cover the fruit completely.
|
|
|
|
|
Apricots |
8 months |
Wash, stone, 40% syrup |
|
Pineapple |
|
Peel, slice, 50% syrup |
|
Oranges |
10 months |
Peel, slice, 30% syrup |
|
Cherries |
|
Wash, stone, cover with sugar or with 30% syrup |
|
Strawberries |
12 months |
Wash, remove stalks and cover with sugar |
|
Melons |
Peel, slice, remove pips and cover with 30% syrup |
|
|
|
||
|
Peaches |
8 months |
Peel, stone, slice and cover with 50% syrup |
|
Grapefruit |
12 months |
Peel, slice, 30% syrup |
|
Citrus juice |
10 months |
Squeeze, remove pips, sugar according to taste |
|
Plums |
12 months |
Peel, stone, cover with sugar or with 50% syrup |
|
Grapes |
Separate the grapes from the stalk, wash, cover with sugar or with 30% syrup |
|
|
Whortleberries, blackberries |
|
|
|
red, black current goose |
10 months |
Wash, remove stalks, cover with sugar |
|
berries, raspberries |
|
|
To be preserved for 2 months. Defreeze the bread in the oven at 50 C having put it in before switching the oven on.
Before freezing butter and cheese, cut them into pieces for weekly consumption. Butter is preserved for 8 months and so is hard cheese (parmesan). Other types of cheese need 4 months. defreezing must be done in the fridge being careful about the condensation which logically forms on these products.
19

HERZLICHEN GLÜCKWUNSCH!
Sie haben eine gute Wahl getroffen. Mit dem Kauf dieses Gerätes haben Sie sich für ein Produkt entschieden, daß höchste technische Ansprüche mit praxisgerechtem Bedienungskomfort verbindet. Bevor Sie Ihr neues Kühl-Gefriergerät in Betrieb nehmen, lesen Sie bitte diese Gebrauchsanweisung aufmerksam durch. Sie enthält wichtige Informationen zum sicheren Gebrauch, zum Aufstellen und zur Pflege des Gerätes. Bewahren Sie bitte die Gebrauchsanweisung zum späteren Nachschlagen auf. Geben Sie sie an eventuelle Nachbesitzer weiter.
Diese Gebrauchsanweisung bezieht sich auf mehrere Modelle. Daher sind Abweichungen zu Ihrem Gerät möglich.
INHALTSVERZEICHNIS
SICHERHEITSVORSCHRIFTEN
WECHSEL DES TÜRANSCHLAGES
INSTALLATION DES GERÄTES
SO SPAREN SIE ENERGIE
ELEKTRISCHER ANSCHLUß
EINSCHALTEN
GEBRAUCHSHINWEISE
EINFRIEREN
AUFTAUEN
ABTAUEN
REINIGEN
KLEINE STÖRUNGEN UND UNREGELMÄSSIGKEITEN
SICHERHEITSVORSCHRIFTEN |
|
Das Gerät eignet sich zum Einfrieren und Tiefkühllagern von Lebensmitteln für den |
|
|
Haushaltsgebrauch. Wird das Gerät zweckentfremdet oder falsch bedient, kann vom |
|
|
Hersteller keine Haftung für eventuelle Schäden übernommen werden. Die Installation muß |
|
|
gemäß der Anleitung in dieser Gebrauchsanweisung erfolgen. Bei Nichtbeachtung kann das |
|
|
Gerät beschädigt werden. Umbauten oder Veränderungen am Gefriergerät sind aus |
|
|
Sicherheitsgründen nicht zulässig. Sollten Probleme bei der Funktion des Gerätes auftreten, so |
|
|
wenden Sie sich bitte an unseren Kundendienst. |
|
|
Ziehen Sie vor jedem Wartungsvorgang den Netzstecker aus der Steckdose, aber zerren |
|
|
Sie dabei nicht am elektrischen Zuleitungskabel oder am Gerät. |
|
|
Ausgediente Altgeräte bitte vor der Entsorgung unbrauchbar machen. Netzstecker ziehen, |
|
|
Netzkabel durchtrennen, eventuell vorhandene Schnappoder Riegelschlösser entfernen, |
|
|
zerstören oder die Tür abmontieren. Dadurch verhindern Sie, daß sich spielende Kinder im |
|
|
Gerät einsperren (Erstickungsgefahr!) oder in andere lebensgefährliche Situationen geraten. |
|
|
Um den neuesten gesetzlichen Umweltschutzbestimmungen zu entsprechen, verwenden wir |
|
|
in einer kleinen Menge Kühlmittel mit der Bezeichnung R600a. |
|
|
Sollten Teile des Kühlkreises beschädigt werden (Rohre, etc.), genügt es, den Raum, in dem |
|
|
das Gerät aufgestellt ist, zu lüften. Vermeiden Sie einige Minuten lang Flammen, Funken oder |
|
|
andere Feuerquellen. |
|
|
Die Gefrierteile, die mit den Lebensmitteln in Berührung kommen, entsprechen den |
|
|
EG-Vorschriften Nr. EWG/89/109. Das Gerät entspricht außerdem den vorgesehenen |
|
|
Sicherheitsvorschriften für Elektrogeräte. |
|
|
Die CE-Markierung bezeugt, dass dieses Gerät den in der EWG-Richtlinie 89/336 angeführten |
|
|
Bestimmungen (elektromagnetische Verträglichkeit), 73/23 (Niederspannung), 96/57 |
|
|
(Energieeffizienz) und deren weiteren Veränderungen entspricht. |
|
|
|
|
|
|
20
ZEICHENERKLÄRUNGEN
AKühlbereich
BGefrierbereich
CSockel
DThermostatregler Gefrierschrank
EThermostatregler Kühlschrank
FLichtkasten
GAbstellflächen
HSeitenfächer
KRaum Maxi Fresh
LAbstellfläche für Flaschen
MSchubfächer für Gemüse
NVerdampferplatte
PTauwasseröffnung
REinstellbare Füsse
STaste “Super”
Zeichnung nur zu Illustrationszwecken
Solten in Ihrem Modell nicht die Kästen M vorhanden sein, hat der K Raum die Funktion eines Gemüsefachs und nicht die des Maxi Fresh-Raums.
WECHSEL DES TÜRANSCHLAGES
Der Türanschlag befindet sich normalerweise auf der linken Seite (Scharnier auf der rechten Seite); wünschen Sie den Türanschlag auf der rechten Seite, so gehen Sie zu seinem Wechsel wie folgt vor:
1.Legen Sie das Gerät vorsichtig auf die Rückseite (Türen zeigen nach oben).
2.Nehmen Sie den Sockel ab, indem Sie mit beiden Händen darunter greifen, die beiden Laschen, die sich in der Mitte befinden, nach unten ziehen und den Sockel nach oben drehen, um ihn auszuhängen (R1). Ziehen Sie die Lasche aus dem linken Sitz und führen Sie sie in den rechten Sitz ein (R2).
3.Schrauben Sie das untere Scharnier los (R3), schrauben Sie sodann den Bolzen rechts ab und links wieder an (R4).
4.Nehmen Sie die Tür des Gefrierschranks ab (R5).
5.Schrauben Sie das mittlere Scharnier (R6) ab und schließen Sie die Bohrungen im Gerät mit den mitgelieferten Stopfen.
21
 Loading...