


CONTENTS
Bluetooth-Enabled
In-Dash Motorized Double-DIN
DVD/MP3/CD AM/FM Receiver
With 7" Widescreen
Touch Screen TFT Monitor
Welcome |
3 |
Warning |
3 |
Note |
4 |
Features |
5 |
Basic Operation |
6 |
Panel Arrangement |
7 |
Basic Functions |
8 |
Main Menu Touch Operation |
10 |
OSD Setup |
11 |
Adjust Mode |
12 |
Remote Control Function |
13 |
Loading |
15 |
Disc Play Touch Operation |
16 |
DVD Mode |
17 |
RDS User Operation |
19 |
Radio Operation |
21 |
DVD Basic Operation |
22 |
VCD Basic Operation |
32 |
CD/MP3 Basic Operation |
35 |
Music Surroundings Setting |
37 |
EQ Setting |
38 |
Audio Frequency/Tone |
39 |
BLUETOOTH Touch Operation |
40 |
BLUETOOTH Operation & Setting-Up |
41 |
Other Play Mode |
42 |
Trouble Shooting |
43 |
Wiring Diagram |
44 |
Specifications |
45 |
Accessory |
46 |

INSTRUCTIONS
ACCESSORY
Accessory |
Quantity |
|
|
User Manual |
1PC |
|
|
Wire |
1PC |
|
|
USB Cable |
1PC |
|
|
Keys |
2PCS |
|
|
Install metal bar |
1PC |
|
|
Remote controller |
1PC |
|
|
Warranty card |
1PC |
|
|
INSTRUCTIONS
WELCOME
Thank you for choosing Boss Audio for your A/V product.
To properly use this product, please go through this instruction manual for installation and operation, put it in a safe place for future use!
WARNING
1.Please keep the disc slot clean, wipe it off when there is some dirt on it. You should wipe off any dirt on the disc before you place it into the unit. If the disc is dirty and you place it inside the unit, it will cause the unit to go into an error and will not play the disc. Please ask professional to clean the laser.
2.Playing the radio at higher volumes for a long period of time may cause hearing issues. You should play this unit at a moderate listen level.
3.This unit is set up by precision parts. If you open up this unit, you will void any and all of your warranty.
4.Please do not touch LCD display with any hard object so that you prevent it from getting scratched or damaged.
5.To avoid an accident caused by watching the LCD screen. This unit has a vehicle lock out wire so that you will not be allowed to watch a video while driving down the road.
6.This unit is meant for a 12V power and negative ground system from a vehicle.
NOTE:
We keep improving this product all the time. There may be some changes in it that are not in this manual.
INSTRUCTIONS
NOTE
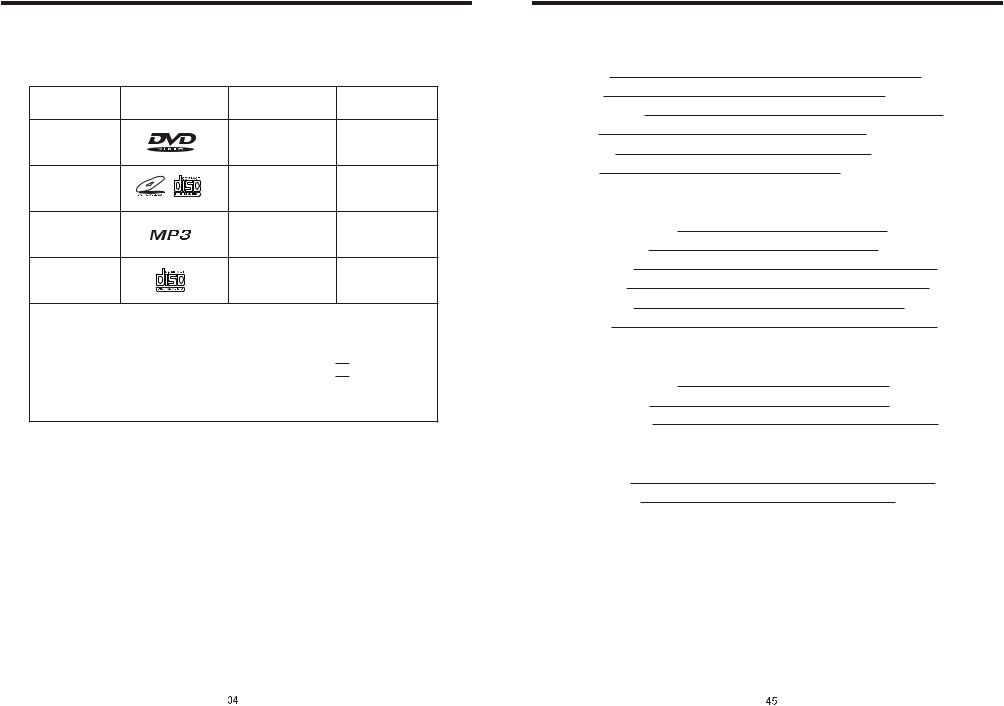
● This unit can play the following disc
MODE |
ICON |
CONTENT |
DISC SIZE |
DVD |
|
Sound, image |
12cm |
VCD |
|
Sound, image |
12cm |
MP3 |
|
Sound only |
12cm |
CD |
|
Sound only |
12cm |
Note: 1. This unit is compatible with MP4/DVD/VCD1.0/2.0/3.0 version, DVD, CD-R, CD-RW, MP3, WMA, JPEG.
2. When playing a DVD, VCD, MP3, CD disc the display will auto identify the disc and show corresponding word. 

 When appears on the display, that means that there is no function, please choose another mode.
SPECIFICATIONS:
Power supply
Power range
Max operate current
Dimensions
Ground system
Amp Rating
FM tuner
European frequency range USA frequency range Signal/Noisse ratio
Stereo separation
Search station volt
Distortion rate
AM tuner
European frequency range USA frequency range Limit noise sensitivity
DVD PLAYER
Signal/Noise ratio
Frequency response
INSTRUCTIONS
DC 12V 10.8-16.0V DC 10A 178X153X101MM Negative ground
85 Watts x 4 Channels
87.5-108MHz
87.5-107.9MHz 55dB 30dB 20-30dBuv
1.5%
522-1620KHz
530-1710KHz 32dB
70dB 20Hz-20KHz
INSTRUCTIONS
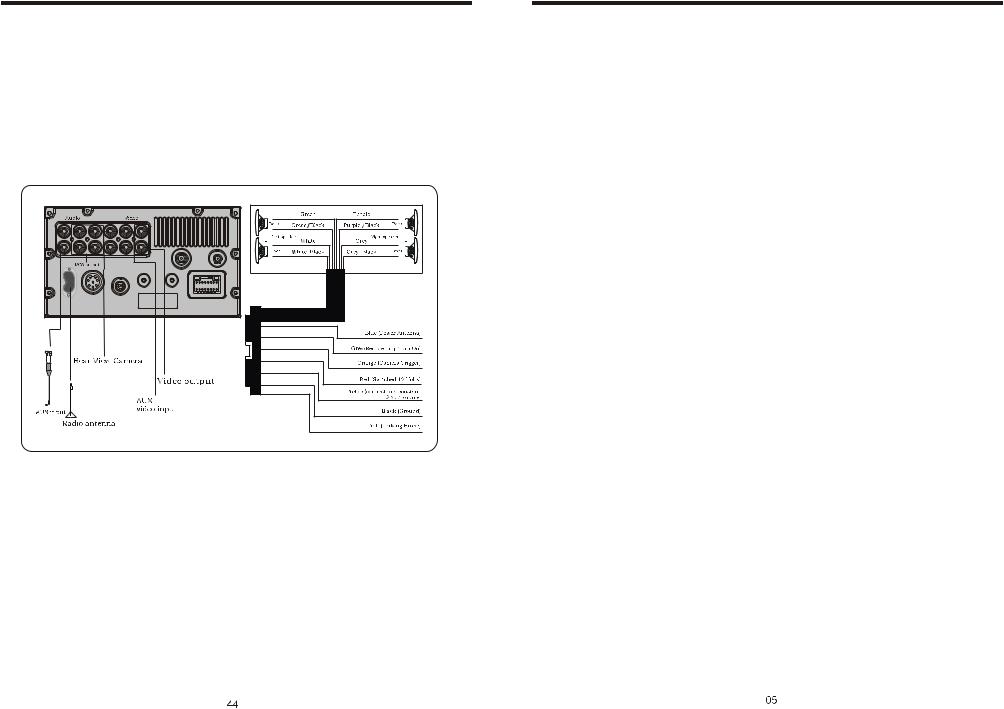
WIRING DIAGRAM
This player is equipped with ISO standard connector, please follow below instruction:
●Red - ACC ON (+12V)
●Yellow – 12 V Constant
●Black – Ground wire
●Blue - Power Antenna / Remote Amp Turn On
●Orange – Back-Up Camera Trigger (+)
●Grey/Grey black - Right front speaker (+/-)
●White/White black - Left front speaker (+-)
●Purple/Purple black - Right rear speaker (+/-)
●Green/Green - Left rear speaker (+/-)
●Pink – Parking Brake (-)
Note:
The “PARKING BRAKE” wire must be connected to the parking brake system of your car. When the parking brake is engages, the LCD will be allowed to view your video. If not, the screen will produce an image saying, “PARKING BRAKE”.
This is a safety feature designed for the driver not to watch a video while driving. The video output on this unit will not be affected by this.
INSTRUCTIONS
FEATURES
DVD PLAYER
1.MPEG-4 Decoder Technology
2.Compatible with MP4 (AVI/5.X), DVD (DVD-R/DVD-RW), VCD, SVCD, CD-RW, WMA, MP3, JPG
3.Supporting Multiple Subtitles, Angles, Languages
4.Child lock function
5.4-Channel Audio Output
6.Pause, Play, Up/Down, Stop, Zoom, PBC Function
RADIO
1.AM/FM Radio Tuner
2.30 Radio Preset Stations (18FM, 12AM)
BULETOOTH FUNCTION
1.Bluetooth wireless transfers
2.Displaying bluetooth paring and connection status, call status, and caller's ID
3.Fast performance, fast connection, accurate and sensible search of devices in range
4.Support A2DP, AVRCP, HS/HF for handing calls and playing music
LCD DISPLAY
1.7” - 16:9 TFT LCD Display
2.Touchscreen

INSTRUCTIONS
BASIC OPERATION
1. SOURCE ON/OFF
Press SRC button on panel or SOURCE button on remote control quickly to power on. Press SRC button on panel or SOURCE button on remote control longer to power off.
2. PLAYING SOURCE CHOOSE
Press SOURCE button on remote control, unit will switch sources in the following sequence: RADIO → DVD → AUX
3. MUTE CONTROL
Press MUTE button on panel or MUTE button on remote control shortly to turn off sound output, press again to back to sound output.
4. VOLUME ADJUSTMENT
1)Press VOL+/VOLbutton on panel, VOL+/VOLbutton on remote control or touch button on display to adjust volume level.
2)The volume setting on this unit is 0 - 39.
BASS, TREBLE, BALANCE & FADER ADJUSTING (SELECT)
Press SEL button on remote control to choose your desired Bass, Treble, Balance & Fader level:
VOL  BAS
BAS  TRE
TRE  L/R
L/R
F/R
NOTE:
1)DVD playing mode, MBP & User will be automatically activated.
2)After 5 seconds you choose desired mode, do not adjust volume button. The mode will automatically take you back to status before adjustment.
5. RESET
1)If unit is not working correctly, you should press the RES button. This will reset the radio and should start working correctly afterwards.
2)After reset, all settings will resume back to the factory default settings.
|
|
|
INSTRUCTIONS |
|
TROUBLE SHOOTING |
|
|||
PROBLEM |
CAUSE |
SOLUTION |
||
|
|
|
|
|
|
|
Check whether power fuse |
Change fuse same as the old one |
|
|
|
blew or not |
||
|
|
|
||
Can not power on |
Some factor cause MPU wrong |
Press RESET button on the panel by pen |
||
|
|
|||
|
|
operation |
point, then, power on |
|
|
|
|
|
|
After ignition |
Wrong connection between |
Change the wiring around |
||
switch off, setting |
ignition line ACC and |
|||
information all lose |
Constant 12 Volt wire |
|
||
|
|
|
||
Remote control no |
No enough power supply |
Change battery in remote control |
||
function |
from battery |
|||
|
||||
|
|
|
|
|
Poor performance |
Improper length of antenna, |
Check whether antenna is connected or not, |
||
poor connection of antenna |
||||
of radio station |
or poor connection |
|||
grounding |
||||
|
|
|
||
|
|
|
|
|
Can not load disc |
The disc will not go in all |
Remove the 2 screws on top of the radio |
||
the way |
||||
|
|
|
|
|
|
|
Disc is scratched |
Change new disc |
|
|
|
|
|
|
Can not play disc |
Put wrong side of disc into unit |
Slot in the disc with sign side up |
||
|
|
|
|
|
|
|
Lens has dirty |
Clean lens by lens clean disc |
|
|
|
|
||
Can not switch |
There is only one language/ |
If disc is not with multi-language/subtitle, it |
||
language/subtitle |
subtitle in disc |
cannot switch language/subtitle |
||
No image |
Video line between unit and |
Reconnect lines |
||
TV is not properly connected |
||||
INSTRUCTIONS |
INSTRUCTIONS |
OTHER PLAY MODE
AUX IN:
AUX IN OPERATION
1)Press “Source” button on remote control or touch “AUX” on the touch screen, to switch to AUX mode.
2)This will allow you to listen and or watch any source that you have plugged into this section of the radio.
3)This unit has 1 - Video RCA input & 1 pair of Audio RCA’s for this feature.
CCD (Back-Up Camera)
1)If there is a back-up camera installed onto your car, you will need to connect it to the CCD video input.
2)When you are backing up the car there you will see this image 


 on your screen.
3)You can set CCD image according to your car's own position in general setting mode.
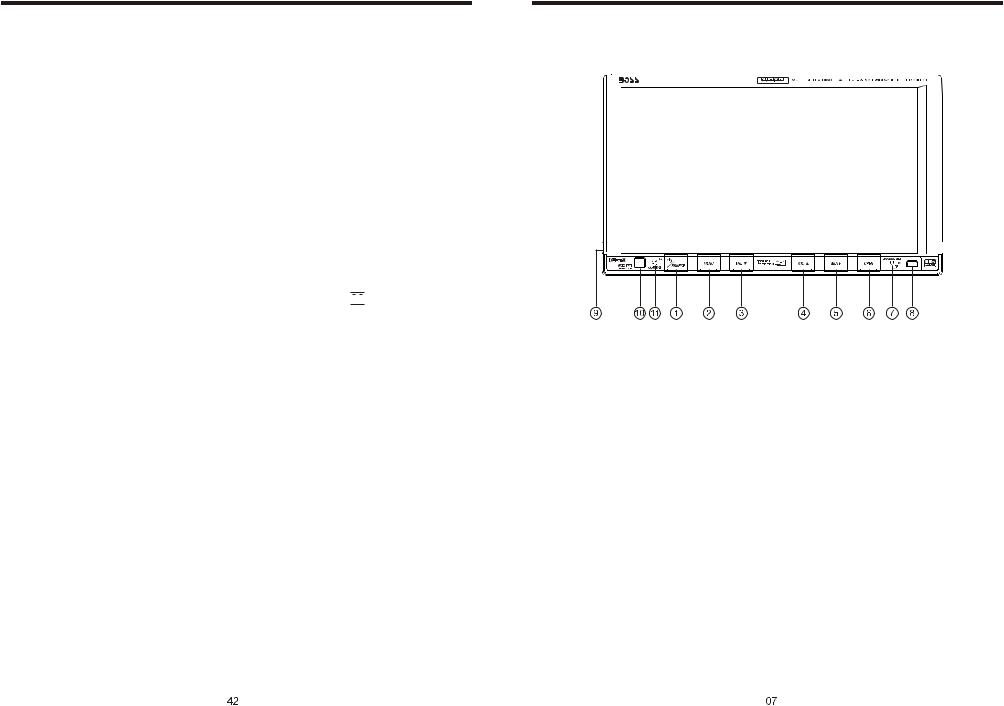
PANEL ARRANGEMENT
1.SOURCE Button
2.MENU Button
3.VOL - Button
4.VOL + Button
5.MUTE Button
6.OPEN Button
7.RESET Button
8.USB Slot
9.AUX IN
10.Remote Control Receiver
11.MIC input
INSTRUCTIONS
BASIC FUNCTION
1. SRC Button
Short press this button to power on . Long press this button to power off .
2. MENU Button
Press this button to back to the main menu.
3. VOL - Button
Press this button to reduce the volume.
4. VOL + Button
Press this button to increase the volume.
5. MUTE / TFT on/off Button
Press this button to shut off the sound output, re-press this button can resume the sound output, long press this button can turn off the TFT LCD display.
6. OPEN Button
Press this button can eject the disc.
7. RESET Button
Press this button and this unit will be restored to the initial state.
8. USB Slot
Connect the USB memory to this socket, and the unit can play music format files supported by this unit in the USB memory.
9. AUX IN
External connected audio input.
10. Remote control receiver
It is able of receiving infrared signals launched by the remote control matching the nuit.
11. MIC input
Bluetooth MIC input.
INSTRUCTIONS
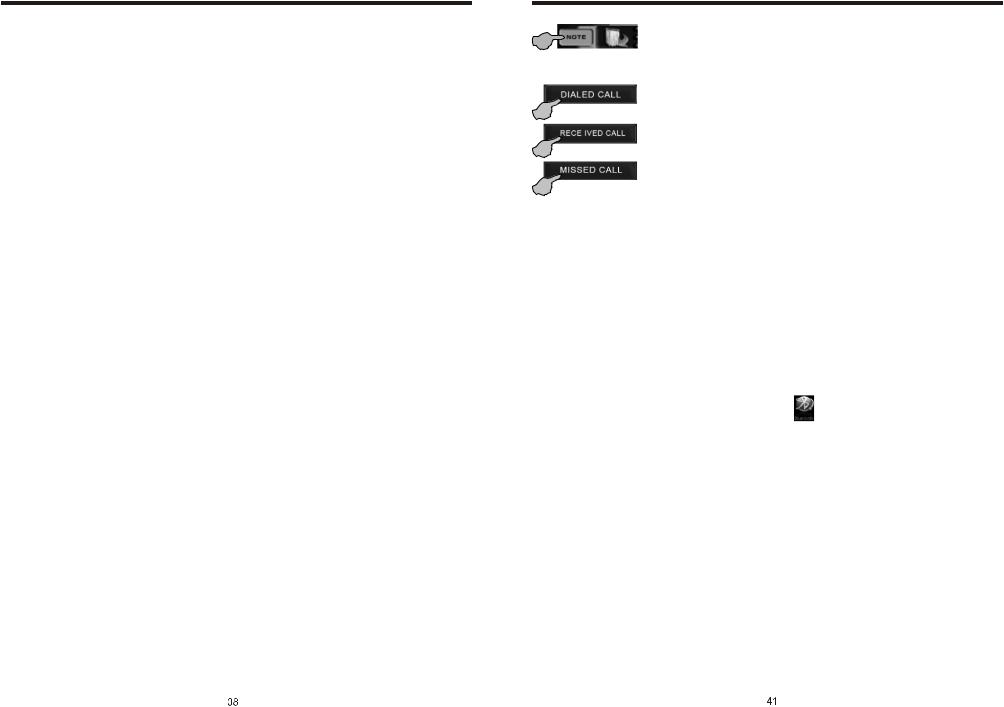
Contact book mode switching
You can touch this button under the Bluetooth mode to select the next mode.
Touch this function key to search the dialed numbers. Each time this key is touched, the cursor will move to the next dialed number.
Touch this function key to search the received numbers. Each time this key is touched, the cursor will move to the next received number.
Touch this function key to search the missed numbers. Each time this key is touched, the cursor will move to the next missed number.
Operations and Settings for the Bluetooth Function
1. Features of the Bluetooth function
1)You can use the function buttons on the unit to receive a call or dial a phone number.
2)You can directly use the hand-free microphone to talk on the phone.
3)You can use the build-in volume control switch to adjust the volume at will.
4)You can switch between the Bluetooth hand-free mode and the cell phone mode.
5)You can use your voice to dial a new number (valid only for cell phones with voice dialing function).
6)With the Bluetooth function, you can use the Bluetooth microphone in the car to talk with your folks and friends without having to hold your cell phone, so that your hands are dedicated for driving, which is safer and law-observing. In the mean time, magnetic radiation from the cell phone is avoided.
2. Bluetooth match conditions |
|
You can shortly touch the Bluetooth function key |
under the main menu to directly |
access the Blueetooth interface. |
|
With a cell phone that supports the function of Blueetooth wireless connection, you can establish a connection between your cell phone and the automobile-loaded unit under the Bluetooth mode to achieve date exchange and synchronization.
3. Matching and connections between the cell phone and the Bluetooth of the unit
Set your cell phone to the Bluetooth mode, and use the cell phone to search equipments. After the Bluetooth equipment of the unit is searched, the cell phone will ask you for the Bluetooth password. Press the unit matching setup button  , and enter the Bluetooth password (0000) and confirm it, and then the cell phone will ask you whether you authorize the connection with this equipment or not. Please select “YES”, and the cell phone will be automatically connected with the said Bluetooth equipment within 30 seconds. “OK LINK” will be displayed on the Bluetooth interface to show that a connection between the cell phone and the Bluetooth device has been successfully established. Under and mode (radio, TV, DVD, etc.), if there is an incoming call to your cell phone which has been stably connected to the Bluetooth device of the unit, the unit will switch from other mode to the Bluetooth mode after the cell phone rings for about 10 seconds. Current mode will be automatically restored after hang-up.
 Loading...