


Content
Accessories ………………………………………………………………………………………………………………………………………...02
Unit Installation………………………………………………………………………………………………………………………………..03
Wire Connection………………………………………………………………………………………………………………………………03
Parking Brake Connection ………………………………………………………………………………………………………04
Speaker connection……………………………………………………………………………………………………………………….05
Button Description………………………………………………………………………………………………………………………….06
Remote Control………………………………………………………………………………………………………………………………..08
Main Menu…………………………………………………………………………………………………………………………………………...11
Radio Operation……………………………………………………………………………………………………………………………….11
DVD Operation………………………………………………………………………………………………………………………………..12
USB /SD Operation………………………………………………………………………………………………………………………..13
Settings Operation ………………………………………………………………………………………………………………………..14
Bluetooth Operation……………………………………………………………………………………………………………………..16
Aux-In Operation ……………………………………………………………………………………………………………………………17
Notes of Disc……………………………………………………………………………………………………………………………………...18
Troubleshooting ……………………………………………………………………………………………………………………………...19
General Specification……………………………………………………………………………………………………………….…..21
To ensure safety while driving and to comply with laws, drivers should not watch video or operate the video device while driving.
01
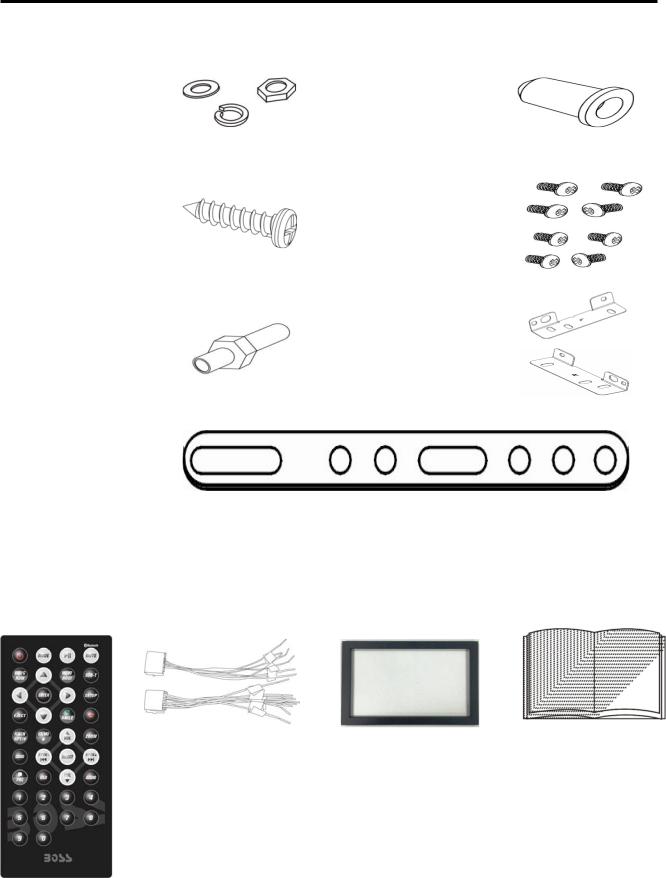
Accessories
Package contains the following accessories for installation and operation of the unit.
(1) |
Washer, |
|
|
(5) Rubber |
|
|
|
|
Spring |
1 |
|
1 |
|
|
|
(2) |
Washer, |
|
Cushion |
|
|
||
|
|
|
|
|
|||
|
M5 Nut |
|
|
|
|
|
|
|
|
|
|
|
|
|
|
(3) |
Screw |
1 |
|
(6) Screw |
8 |
|
|
|
|
|
|
|
|
||
|
|
|
|
|
|
|
|
|
|
|
|
|
1 |
Left |
|
(4) |
Bolt |
1 |
|
(7)installation |
|
|
|
|
bracket |
|
|
|
|||
|
|
|
|
|
|
|
|
|
|
|
|
|
1 |
Right |
|
|
|
|
|
|
|
|
|
(5) |
Mounting |
|
|
|
|
|
|
|
Strap |
1 |
|
|
|
|
|
|
|
|
|
|
|
|
|
Remote Control |
|
Power Cable |
Trim Ring |
|
|
User Manual |
|
02

Unit Installation
Bracket
Screw
1.Put the 2 brackets to the left and right side of the unit;
2.Use screws to fix the brackets to the unit.
Wire Connection
The Description of the Input/output Interface of the Rear Chassis
03
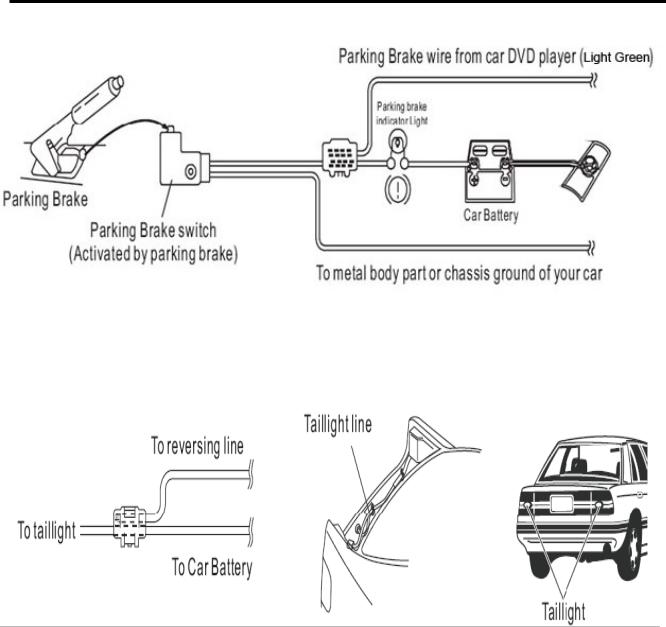
Parking Brake Connection
In order to view videos, the parking brake wire must be connected, and the vehicle stopped
Connecting the reversing line to taillight on the car
04
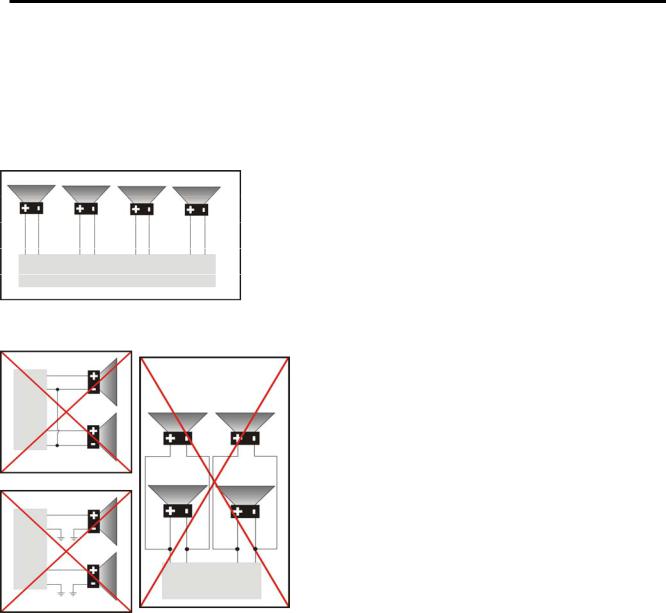
Speaker Connection
After connecting, when you start up the reverse gear, the unit will receive the picture from car rear view camera.
Connect the speakers according the following diagram, incorrect connections will damage the unit or your loudspeakers.
Correct connection
Left front - Right front | Left rear - Right rear
Incorrect connections
05

Button Description
1 |
8 |
9 |
10 |
|
2
3
4
5
6
7
1. MIC
2. EJECT Button
Press to eject a disc. If the disc is not removed for about 10 seconds after eject, the disc is reinserted automatically.
3. HOME BUTTON
Press home button to return back to main menu.
4. SOURCE BUTTON
Press source button to change mode.
5. POWER / MUTE Button /VOL
Press it to turn on the unit. Press and hold for 2 seconds to turn the unit off .Press the button. briefly to mute .Please notes that the volume will be muted on all audio output connector.
06
 Loading...