


Trouble Shooting
Before going through the check list, check wiring connection. If any of the problems persist after check list has been made, consult your nearest service dealer.
Symptom |
Cause |
Solution |
|
|
|
|
|
No power |
The car ignition is not on. |
If the power supply is properly connected |
|
|
|
to the car accessory terminal, switch the |
|
|
|
ignition key to " ACC " |
|
|
|
|
|
|
The fuse is blown. |
Replace the fuse. |
|
|
|
|
|
No sound |
Volume is in minimum. |
Adjust volume to a desired level. |
|
|
|
||
Wiring is not properly |
Check wiring connection. |
||
|
|||
|
connected. |
|
|
The radio does not |
The antenna cable is not |
Insert the antenna cable firmly. |
|
work. |
connected. |
|
|
The radio station |
|
|
|
|
|
||
automatic selection |
The signal are too weak. |
Select a station manually. |
|
does not work. |
|
|
|
|
|
|
Specifications
Supply voltage |
: 12V DC(11V-15V) |
|
|
Current consumption |
: Less than 10A |
|
|
Audio Signal Output |
: 2ch line out |
|
|
Characteristics |
: (1) |
Frequency Response: |
20Hz-20KHz |
|
(2) |
S/N Ratio: |
50 dB(JIS) |
|
(Europe) |
(U.S.A.) |
Frequency Coverage: |
FM |
FM |
87.5 to 108Mhz |
87.5 to 107.9Mhz |
|
IF |
10.7Mhz |
10.7Mhz |
Sensitivity (S/N = 30dB) : |
20dBu |
20dBu |
Frequency Coverage: |
AM |
AM |
522 to 1620Khz |
530 to 1710Khz |
|
IF |
450Khz |
450Khz |
Sensitivity (S/N = 20dB) : |
45dBu |
45dBu |
NOTE:
Specifications and design are subject to modification, without notice, due to improvements in technology.
If at any time in the future you should need to dispose of this product please note that Waste electrical products should not be disposed of with household waste. Please recycle where facilities exist. Check with your Local Authority or retailer for recycling advice.(Waste Electrical and Electronic Equipment Directive)
PDF created with FinePrint pdfFactory trial version http://www.pdffactory.com
Setting Mode
You can make changes to the system setting in the following area: Radio Frequency Range + Enable/Disable AUX In+ Clock Format
To enter setting mode, input the following command by pressing remote keys" 8, DOWN DIRECTION KEY, 9, ENTER "
The display will show "TEST MOD " breifly to indicate you are in system setting area and then automatically change to Radio Frequency
selection mode. At anytime, you can press the DOWN ARROW to step through the above areas. When you are ready to leave the System Setting area,
press ENTER. The unit will reboot to initialize with the new setting.
- Radio Settings
The unit can operate on several different frequency ranges. Please see the following for these ranges.
BAND NAME |
FREQUENCY RANGE |
|
AMERICA 1 |
FM:87.5-107.9MHz |
AM:530-1710kHz |
AMERICA 2 |
FM:87.5-108MHz |
AM:520-1620kHz |
AMERICA 3 |
FM:87.5-107.9MHz |
AM:530-1620kHz |
EUROPE |
FM:87.5-108MHz |
AM:522-1620kHz |
MIDEAST |
FM:87.5-108MHz |
AM:531-1602kHz |
AUST(AUSTRALIA) |
FM:87.5-108MHz |
AM:522-1710kHz |
RUSSIA |
FM:65.0-108MHz |
AM:522-1620kHz |
To change the range to suit your location, press DOWN ARROW unit the desired frequency range is hight lighted. The press ENTER
to save it and move to next setting area.
- AUX Input Enable/Disable
Press DOWN ARROW to move between Enable and Disable modes. When the selection has been made, press ENTER to save it and move to next setting area.
If AUX Input is disable in System Settings, any input connected will not be played.
- Clock Format (12-hour or 24-hour)
Press DOWN ARROW to move between 12-hour or 24-hour format, press ENTER to save it and turn off this unit.
Page 10
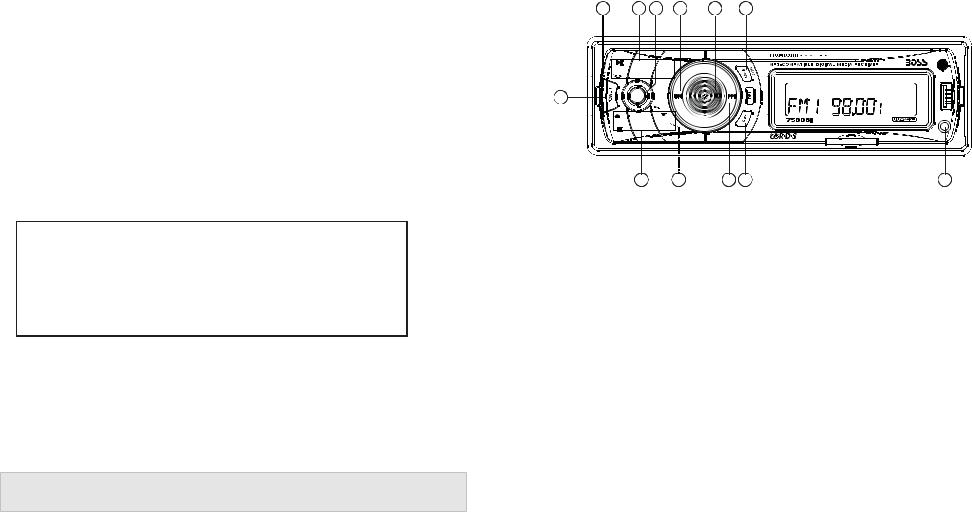
General and Radio Controls |
|||||
7 |
5 |
3 |
11 |
1 |
9 |
1 |
RPT |
|
RDM |
|
|
2 |
|
3 |
TA |
|
|
|
|
|
|
|
|
2 |
MODE |
|
|
|
|
|
|
|
|
|
|
4 |
ENTER |
6 |
|
|
AUX IN |
5 |
|
|
|||
AF |
|
|
|||
|
-10 |
+10 |
|
|
|
|
6 |
8 |
10 |
12 |
4 |
1.VOLUME UP/DOWN KNOB (turn)& AUDIO MODE SELECTOE (push)
In normal mode, use this knob to increase or decrease the volume level.
To access the various sound parameters push the knob (like a button) to cycle through the following adjustable settings:
VOLUME -> BASS ->TREBLE -> BALANCE -> FADER
Use the knob to increase or decrease the settings for Volume, Bass, Treble, Balance and Fader.
In each mode, the waiting time is about 5 seconds, and the time waiting time is over, it returns to the last display mode .
The control mode of E.VOL is operated with following numeric display.
-VOL: (MIN)00, 01,......46, 47(MAX).
-BASS/TRE: -07, -06,...,00,...+06,+07
-BAL: 0LR9, 1LR9, ..., 9LR9,..., 9LR1, 9LR0
-FAD: 0FR9,1FR9, ..., 9FR9,..., 9FR1, 9FR0
Push and hold the knob (like a button) for more than 2 seconds to turn on TA ON/TA OFF, then push it and repeatedly to select TA SEEK/TA ALARM,
PI SOUND/PI MUTE, RETUNE S/RETUNE L, MASK DPI/MASK ALL, BEEP ON /BEEP OFF, USER SET(FLAT, CLASSIC, ROCK, POP), VOL LAST/ VOL DEFA, STEREO/MONO(in RADIO mode), LOUND ON/LOUND OFF,
DX/LOCAL(in RADIO mode), CLK ON/CLK OFF, CLK 12/CLK 24 mode.
Use the knob to increase or decrease the settings for these functions.
2.POWER/MUTE
Press POWER to turn unit on. Press the button to MUTE the audio. Press and hold POWER to turn it off.
3.MODE (Input Select)
Press this button repeatedly to cycle through the audio input sources: BLUETOOTH > AUX >TUNER > USB > CARD > IPOD
Please note:
iPod Mode can only be selected if an iPod is present in the dock.
Page 1
PDF created with FinePrint pdfFactory trial version http://www.pdffactory.com
 Loading...