


Content
………………………………………………………………………………………………………………………………………..
……………………………………………………………………………………………………………...
…………………………………………………………………………………………………………………………..
…………………………………………………………………………………………………………………………………………………....
………………………………………………………………………………………………………………………………….
…………………………………………………………………………………………………………………………………………..
…………………………………………………………………………………………………………………………………..
………………………………………………………………………………………………………………………………....
………………………………………………………………………………………………………………………...
…………………………………………………………………………………………………………………………...
………………………………………………………………………………………………………………………….
……………………………………………………………………………………………………………………………...
……………………………………………………………………………………………………………………………………...
………………………………………………………………………………………………………………………………..
………………………………………………………………………………………………………………….........
01
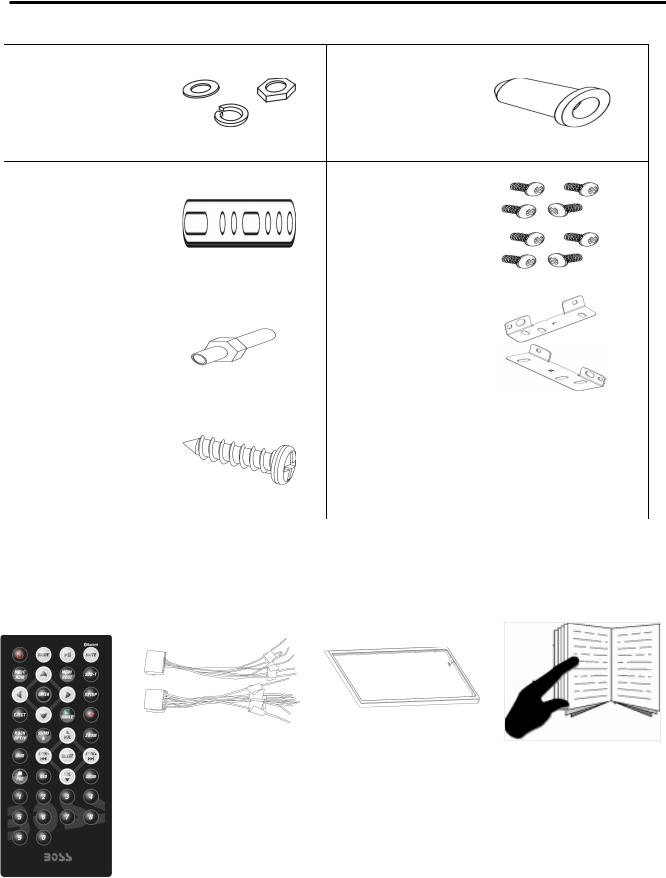
Accessories
Package contains the following accessories for installation and operation of the unit.
(1) |
Washer, |
|
(5) Rubber |
|
|
Spring |
1 |
1 |
|
|
Washer, |
Cushion |
||
|
M5 Nut |
|
|
|
(2) |
Mounting |
1 |
(6) Screw |
8 |
|
Strap |
|
||
(3) |
Bolt |
1 |
(7)installation |
2 |
bracket |
||||
(4) |
Screw |
1 |
|
|
Remote Control |
Trim Ring |
|
|
|
|
Note:
Product image may vary from the actual product.
02
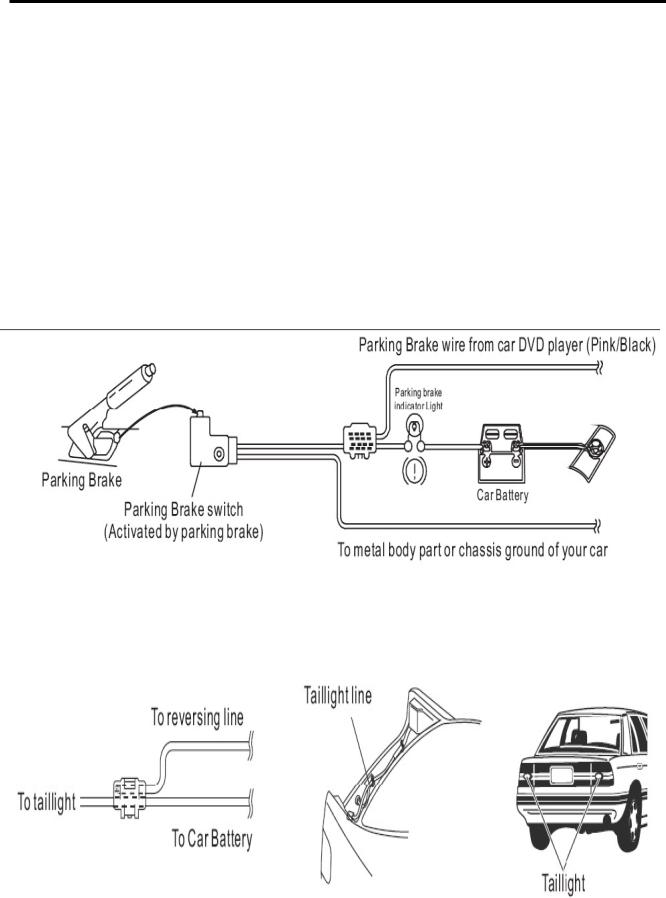
Parking Brake Connection
Note: Never connect cable to the system while it is connected to the battery power, whenever the unit is disconnected from the battery, the preset memory will be erased and the unit will go back to its factory defaults.
1.To watch video the parking wire should be connected to break signal. 2 cables are connected to a hands-free device (not included).
2.The GND of parking wire is connected with brake signal, while the GND of SWC wire is connected with steering wheel.
3.The restriction of use SWC is the voltage between the adjacent buttons are above 0.2 V that can be identified.
Parking brake wire
Note: The parking wire is connected with brake signal; for safety, the programs can be seen on the monitor after braking the car.
Connecting the reversing line to taillight on the car
03
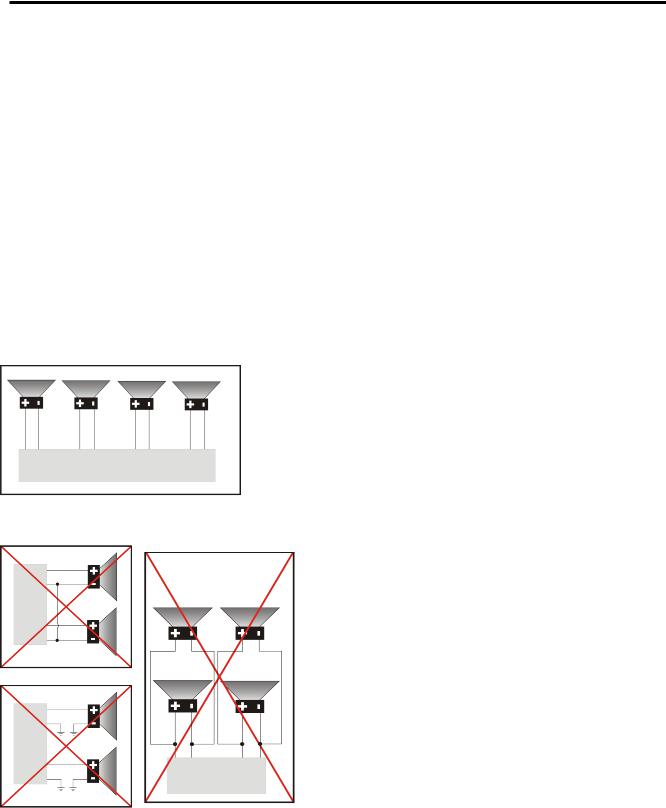
Speaker Connection
After connecting, when you start up the reverse gear, the unit will receive the picture from car rear view camera.
Note:- Only use groundless loudspeakers.
- Use only loudspeakers of minimal 40Watt, using fewer watts may result in damaging your loudspeakers at higher volumes.
- Use 4~8 Ω (Ohm impedance) loudspeakers only; using higher or lesser impedance may damage the unit.
- Do not use 3-cable loudspeakers and do not connect the loudspeakers minus to the car body (GND). The unit is using a BTL circuit and each loudspeaker must be connected with insulated cables according the diagram.
- Loudspeaker cables and/or optional external power amplifiers must always be about 30cm away from the antenna and/or antenna extension parts.
Connect the speakers according the following diagram, incorrect connections will damage the unit or your loudspeakers.
Correct connection
Left front - Right front | Left rear - Right rear
Incorrect connections
04
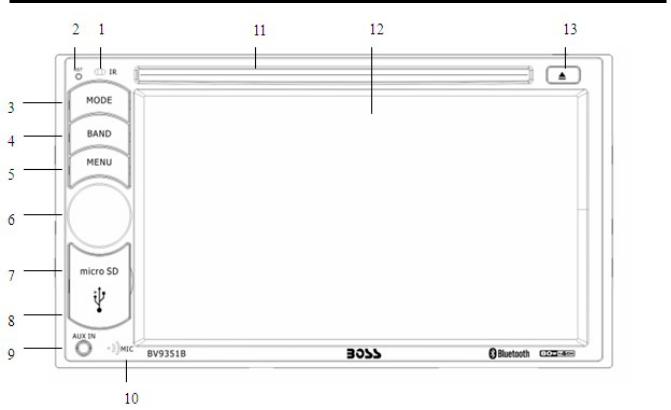
Intro
1. IR Sensor
IR Remote control signal receiving window. Max distance is 6-8 meters, 45 angels.
2. RST
Press it with a thin, sharp object, the device will then be reset to factory default settings.
3. MODE BUTTON
Press mode button to change mode.
4. BAND BUTTON
Press band button to band of FM and AM.
5. MENU BUTTON
Press menu button to return back to main menu.
6. POWER / MUTE Button /VOL
Press it to turn on the unit. Press and hold for 2 seconds to turn the unit off .Press the button. briefly to mute .Please notes that the volume will be muted on all audio output connector. Press VOL knob to power on unit, and Press and hold for 2 seconds to turn the unit off Rotate VOL knob to increase or reduce the volume.
7. SD/MMC CARD Slot
SD/MMC card slot, for Multimedia playback files only. Insert a SD/MMC CARD into this slot and the unit will automatically start reading and playback. * Supported Music File Format:MP3, WMA files.
8. USB Slot
USB slot for Multimedia playback files only. insert a USB into this slot and the unit will automatically start reading and playback. * Supported Music File Format: MP3, WMA files.
9. AUX-IN Jack
Put the Aux plug into the AUX-IN jack which was marked on front panel.
10. MIC
11. DISC Slot
12. Info Display
LCD display Information when operation the unit.
13. EJECT Button
Press to eject a disc. If the disc is not removed for about 10 seconds after eject, the disc is reinserted automatically. 05
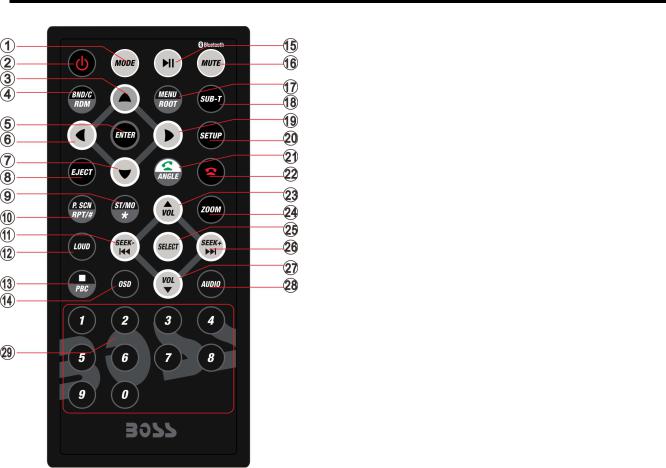
Remote Control
1:MODE
2:POWER
3:UP
4:BAND/RANDOM/CLEAR
5:ENTER
6:LEFT
7:DOWN
8:EJECT
9:STEREO/MONO/*
10:P.SCAN/REPEAT/#
11:SEEK-/BACKWARD
12:LOUD
13:STOP/PBC
14:OSD
15:PLAY/PAUSE
16:MUTE/BLUETOOTH
17:MENU/ROOT
18:SUBTITLE
19:RIGHT 20:SETUP
21:DIAL/ANGLE
22:HANG UP 23:VOLUME UP
24:ZOOM
25:SELECT
26:SEEK+/FORWARD
27:VOLUME DOWN 28:AUDIO 29:NUMERIC KEY
1. MODE button
Press it to select the mode: radio, disc (if there is a disc in unit), USB (if there is a USB device in the unit), SD (if there is a SD/MMC card in the unit), Bluetooth, AUX IN
2. POWER button
Power on or power off.
3. UP button
Press it to move the cursor up.
4. BAND/RDM/CLEAR button
In radio mode, press to change radio band in sequence of FM1 → FM2 → FM3 → AW1 → AW2; In DVD mode, press to play randomly; In Bluetooth mode, short press it to clear the single phone number; long press it to clear all the phone number.
5: ENTER
Press it to confirm your selection
6. LEFT button
Press it to move the cursor left
7. DOWN button
Press it to move the cursor d
8. EJECT button
Press it to eject the disc.
9. STEREO/MONO/* button
Press to switch the radio in stereo and mono sound. In bluetooth mode, press it to make a symbol. 06
 Loading...