


850BRGB

CONTENTS
Precautions..................................................................................................................1
How to Handle Discs...................................................................................................1
Precautions & Warnings..............................................................................................1
Lithium Battery Cell Warnings.....................................................................................1
Drivers and Connections.............................................................................................1
Other Warnings..........................................................................................................1
Installation....................................................................................................................2
Installation Opening...................................................................................................2
To Install the Car Radio...............................................................................................2
Electrical Connections...................................................................................................3
Control Panel Button Locations.......................................................................................4
General Operation.........................................................................................................5
Turn Unit On/Off.........................................................................................................5
Adjust Volume (VOL)..................................................................................................5
Adjust Menu Options (SEL)......................................................................................5-6
Set the Clock (CLK)....................................................................................................6
Change the Source (SRC)...........................................................................................6
Mute on/off................................................................................................................6
Loudness on/off.........................................................................................................6
Preset EQ(Equalizer).................................................................................................6
USB Port...................................................................................................................6
Micro-SD Card Slot.....................................................................................................6
Hands-free Microphone..............................................................................................6
AUX input Connector..................................................................................................6
Reset Sytstem (Reset)................................................................................................6
Radio Operation............................................................................................................7
Change Bands (BAND)................................................................................................7
Manual Tuning ( / ).............................................................................................7
Auto Seek Tuning ( / )........................................................................................7
To Store/Recall Preset Stations (1 - 6)...........................................................................7
Disc/USB/SD Card Operation.........................................................................................8
To Insert Disc/USB/SD Card........................................................................................8
Eject Disc/USB/SD Card..............................................................................................8
Play/Pause.................................................................................................................8
Next/Previous Track....................................................................................................8
Fast Forward/Backward...............................................................................................8
Introduction Scan........................................................................................................8
Repeating the same track...........................................................................................8
Playing All Tracks in Random.......................................................................................8
Track/Folder Navigation..............................................................................................8
Remote Control...........................................................................................................11
Troubleshooting...........................................................................................13
Switch Between USA area and Europe area Frequency...................................................7
Automatic Store Station / Preset Station Scan (AMS).....................................................7
Local/DX....................................................................................................................7
Stereo/Mono...............................................................................................................7
Pair and Connect.......................................................................................................10
Make a Call...............................................................................................................10
Redial Last Dialed Number.........................................................................................10
Answer a Call / Reject a Call / End a Call......................................................................10
Switch Audio Between Car audio and Moble Phone.......................................................10
Adjust Call Volume....................................................................................................10
Audio Streaming (A2DP)............................................................................................10
Specifications.............................................................................................................12
Select the track or file for playback in MP3 format...........................................................9
Auxiliary Input operation................................................................................................9
Bluetooth Operation.....................................................................................................10

How to Handle Discs
Lithium Battery Cell Warnings
Drives and connections
Others Warnings
• Handle a disc by its edges. Do not touch the playing side
• Before inserting a disc, wipe the disc outward from the disc center with a
clean, soft, dry and lint-free cloth. Do not use solvents or thinners such a
petrol/benzene or cleaners.
• After removing a disc from the disc slot, place the disc in a sleeve or case
to keep it clean and prevent scratches.
• Do not stick paper or tape on the disc surface. If there is glue (or adhesive)
on the disc surface, remove it before using the disc.
• Cell leakage may cause damage to the remote control.
• Do not throw cells into as this may cause an explosion.
• Keep battery cells out of reach of children.
Never place any foreign objects into the openings of the car radio (disc compartment, USB
jack, card slot, AUX IN connection). Otherwise you might damage the slots and connections.
Do not switch on the car radio for long periods of time when the motor is switched off.
This could cause the car battery to discharge and the vehicle can no longer be started.
Precautions & Warnings
• To reduce the risk of fire, electric shock, and interfer-ence, do not attempt to repair this
unit yourself. Refer all service to a qualified technician.
• Some MP3/WMAfiles may not be playable.
• Keep the volume at a reasonable level to avoid distracted driving. High volume levels
may make it difficult to concentrate on traffic and road conditions while driving.
• If the car has been in direct sunlight for an extended period, you may need to reduce the
temperature inside the car before turning on and using the unit.
• If the battery is disconnected, discharged, or changed, the preset memory of the unit will
be lost and require reprogramming.
• The unit is designed to be installed in a level,horizontal position.
For optimal performance, avoid installing the unit at an angle.
• Never use excessive force when removing or attaching the faceplate.
Do not tightly grip the display and buttons to avoid damage.
PRECAUTIONS
1
INSTALLATION
2
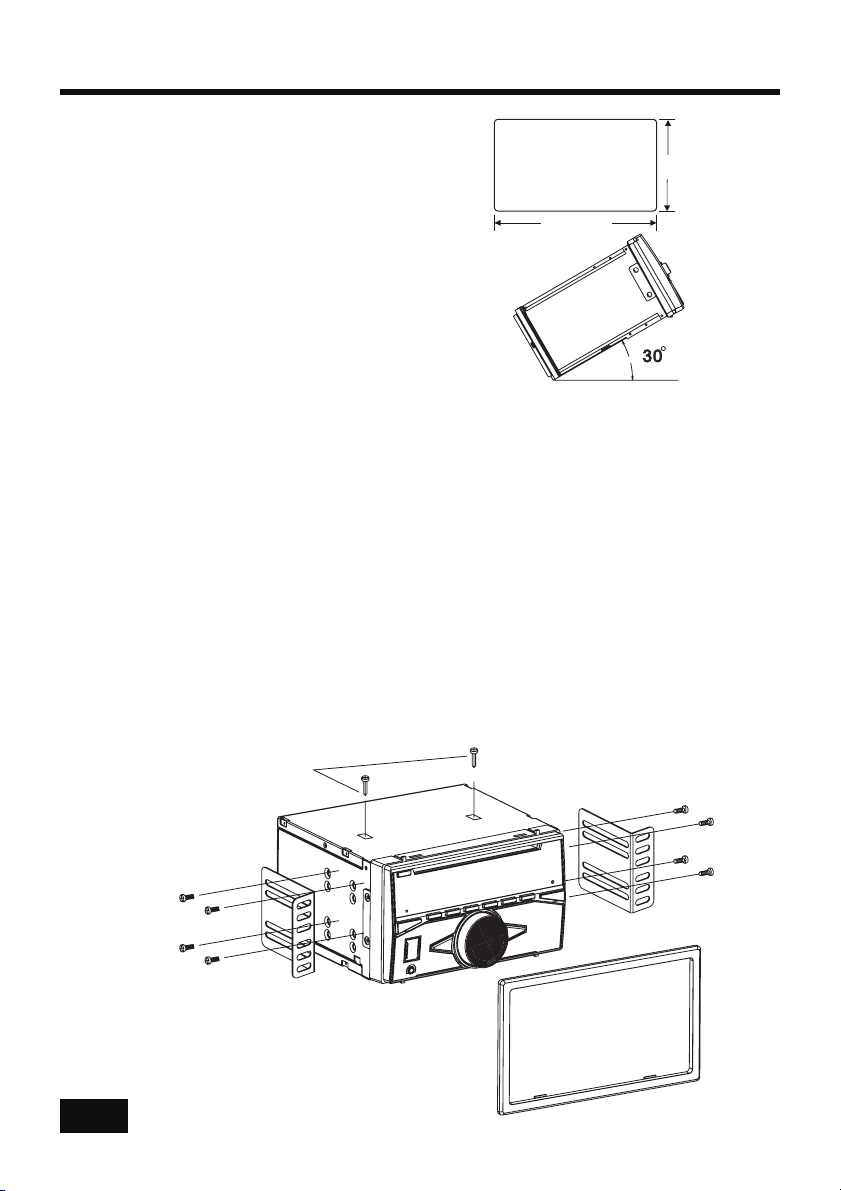
182 mm
103 mm
Installation Opening
To Install the Car Radio
This unit can be installed in any dashboard Having an
opening as shown the right figure.
If installation angle exceeds30 horizontal, the unit may
not perform properly.
1. Make sure the ignition is turned off, and then disconnect the cable from the vehicle
battery’s negative (-) terminal. You never want electricity running while you install this
double-DIN car receiver.
2. Before installation, remove the transport screws, disconnect the wire harness and the
antenna. Remove the detachable faceplate from the car receiver.
3. Attach the “L ” brackets (2pcs) on the both sides of the car receiver with screws(M5 x 8BM)
as shown as the below figure. The others fixing screws that fix the other terminal of the “L”
metal bracket, please buy from your dealer according to the drilling of holes size.
4. Consult with you nearest dealer if installation requires the drilling of holes or other modifi-
cations of the vehicle.
5.
6.
7. Install the detachable faceplate & plastic outer trim ring onto the car receiver.
8. Reconnect the battery and run through all of the options on this car receiver to ensure that
everything is working correctly.
Particulars will vary widely depending upon the kind of your car and the car you intend to
install it in.
Always contact the car dealer or manufacturer if you have any questions.
Install the car receiver in the dashboard.
Connect the wire harness & the antenna to the car receiver (see “Electrical Connections”)
being careful not to pinch any wires or cables.
9.
Please choose the correct installation method according to the actual situation
of your car.
Remove the transport
screws before installation.

Electrical Connections
- Only use speakers with 4 ohm impedance.
- Do not attach the control panel to the chassis before wiring is complete.
- The maximum current of theAmp Remote trigger is 200mA.
WIRING DIAGRAM
CAUTION
+12V DC
NEGATIVE
GROUND
3
15A
15A
8. Front left PRE-AMP output (White)
9. Front right PRE-AMP output (Red)
10. Rear left PRE-AMP output (White)
11. Rear right PRE-AMP output (Red)
12. Radio antenna socket
15
 Loading...