


BV8724

BV8720
Contents
In-Dash AM/FM-RDS
DVD/MP3/CD Receiver With
4.3 Widescreen Touchscreen TFT Monitor
With Front Panel USB Por t and
SD/MMC Card Slot
Precautions ...................................
Safety Information.........................
Disc Notes ....................................
Installation ....................................
Detaching the front panel ...............
Attaching the front panel ................
How to clean the connectors ..........
Angle panel adjustment .................
Electric Connection ......................
Remote Control ...........................
Basic Operations ..........................
TFT Monitor Adjustment .............
Rear View Camera .......................
Audio Quality Adjustments ............
Selecting Preset Sound Modes .....
Setting The Time .........................
Reset Factory Settings ................
Control Panel ................................
Unit keys ....................................
Radio Operations ..........................
Listening to the radio ...................
Storing stations in memory ...........
Listening to a preset station ..........
RDS Function .............................
DISC Operations ...........................
Basic Operations .........................
Select Playback Mode .................
On-Screen Disc Operations ..........
DISC Special Functions ................
2
Selecting audio languages ............
3
Selecting Subtitles ......................
4
Selecting multi-angle views ..........
5
Title menu function .......................
7
Setup .............................................
7
System Setup...............................
7
Languages Setup.........................
8
Audio Setup .................................
9
Video Setup .................................
10
Digital Setup ................................
13
AUX Operations .............................
13
USB Operations .............................
13
SD Card Operations .......................
14
MP3/WMA/JPEG/MPEG4 Play .........
14
Specifications ...............................
14
Trouble Shooting ..........................
14
15
15
18
18
19
19
20
22
22
23
25
26
26
26
26
26
27
27
29
30
30
31
32
33
35
36
37
38
-1-

Precautions
THANK YOU FOR PURCHASING THIS CAR DVD PLAYER .
Befo re operatin g the unit, rea d this manual t horoughly a nd keep it hand y
for fu ture refere nce.
To avoid injury or accident, read the following precautions before
inst alling and operating the unit.
ON INS TALLATION
DO NOT install any receiver in locations where;
- it may o bstruct the s teering whe el and gearsh ift lever ope rations, as t his
may re sult in a traffic accident.
- it may o bstruct the o peration of s afety devic es such as air ba gs, as this
may re sult in a fatal a ccident.
- it may o bstruct vis ibility.
DO NOT operate any receiver while manipulating the steering wheel, as
this m ay result in a tr affic accident.
The dr iver must not w atch the moni tor while dri ving.
IF THE DRIVER watches the monitor while driving, it may lead to
care lessness an d cause an accident.
IF YOU NEED to operate the receiver while driving, be sure to look ahead
care fully or you ma y be involved in a traffic accident.
IF THE PARKING BR AKE is not enga ged.“ParkingBrake” flashes on the
moni tor, and no playback picture will be shown.
- This warning appears only when the parking brake wire is connected to
the pa rking brake s ystem built i n the car. (refe r to the electr ic connecti on)
ABOUT THE LIQUID CRYSTAL DISPLAY (LCD) PANEL
Do not p ress on the LCD p anel on the uni t as doing so can d istort the
pict ure or cause a ma lfunction . The picture may become unclear, or the
LCD pa nel may be damaged.
NOTE S ON CLEANING
-Cle an the LCD pane l with a slightly damp soft cl oth.
-Do no t use solvent s such as benzi ne, thinner, c ommercial ly available
clea ners or antis tatic spray.
-Do no t use alcohol to clean the scr een.
If you r car was parke d in a cold or hot pl ace, the pict ure may not be cl ear.
The monitor is not damaged. The picture wi ll become cle arer the temp er atur e in your car bec omes normal .
-2-

Safety Information
CAUTION:
THIS DVD PLAYE R IS A CLA SS I L AS ER P RO DU CT. HO WE VE R THIS DVD
PLAYER USES A VISIBLE/INVISIBLE LASER BEAM WHICH COULD CAUSE
HAZARDOUS RADIATION EXPOSURE IF DIRECTED. BE SURE TO OPERATE
THE DVD PLAYER C OR RE CT LY AS INSTRUCTED.
USE OF CONTROLS, ADJUSTMENTS OR PERFORMANCE OF
PROCEDURES OTHER THAN THO SE S PE CI FI ED H ER EI N MAY RESULT IN
HAZARDOUS RADIATION EXPOSURE. DO NOT OPE N CO VE RS AN D DO N OT
REPAIR YOU RS EL F. REF ER S ERVICING TO Q UA LI FI ED P ER SO NN EL .
WARNING:
TO RE DU CE THE RISK OF FIRE OR ELECTRIC SHOCK, DO NOT EXPOSE THIS
EQUIPMENT TO RAIN OR MOISTURE.
TO RE DU CE THE RISK OF FIRE OR ELECTRIC SHOCK, AND ANNOYING
INTERFERENCE, USE ONLY THE RECOMMENDED ACCESSORIES.
THIS DEVICE IS INTENDED FOR CONTINUOUS OPERATI ON .
This product incorporates copyright protection technology that is protected
by method claims of certain U.S. Patents and other intellectual property rights
owned by Macrovision Corporation and other rights owners. Use of this
copyright protection technology must be authorized by Macro vision Corporation,
and is intended for home and other limited viewing uses only unless
otherwise authorized by Macrovision Corporation. Reverse engineering or
disassembly is prohibited.
REGI ON MANAGEME NT INFORMATION:
This DVD Player is designed and manufactured to respond to the Region
Management Information that is recorded on a DVD disc. If the Region number
described on the DVD disc does not correspond to the Region number of this
DVD Player, this DVD Player cannot play this disc.
-3-
Disc Notes
Disc formats supp orted by this
play er
DVD
VCD
CD
MP3
DVD
VCD
CD
MP3
Audio and Vide o
Disc size 1 2 cm
Audio and Vide o
Disc size 1 2 cm
Audio
Disc size 1 2 cm
Audio
Disc size 1 2 cm
Discs which canno t be played
with t his player
DVD-RAM
CDV
CDG
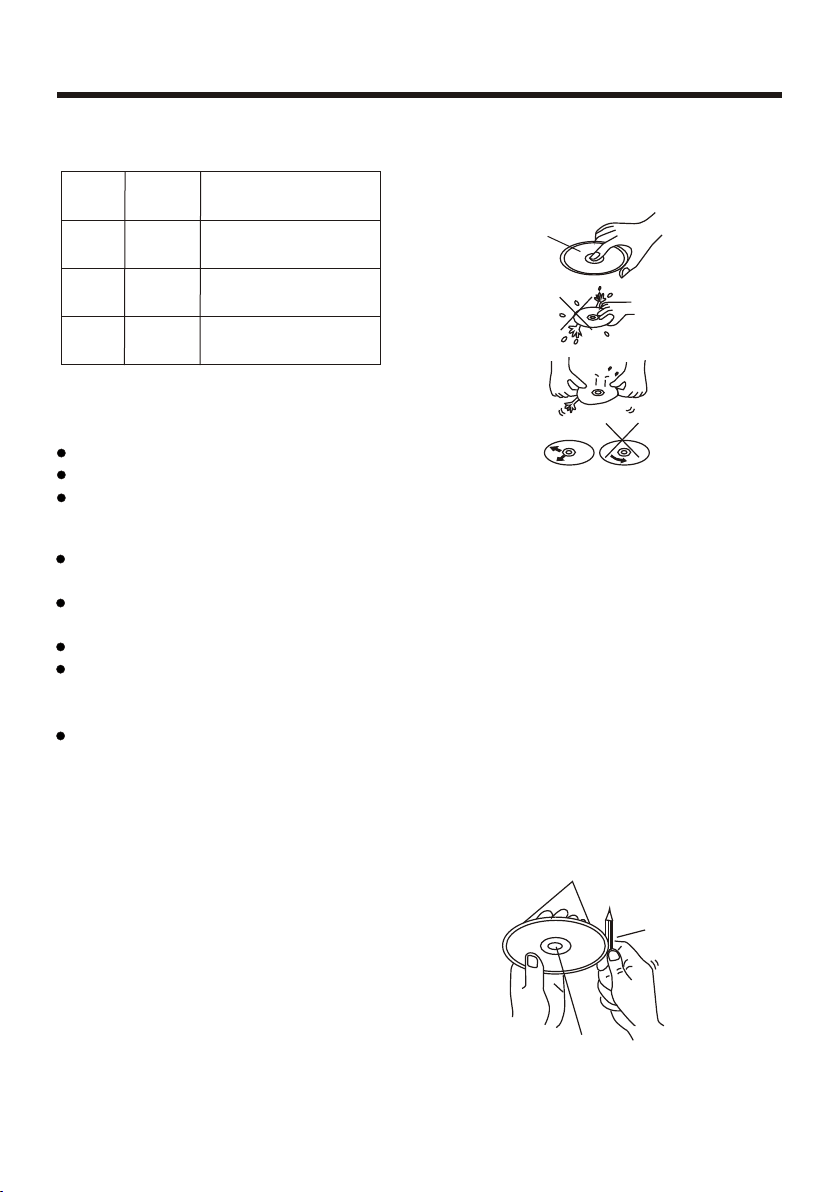
Handling and Clea ning
Dirt, dust, scratches and warping disc
will cause misoperation.
Do not place stickers or make
scratches on discs.
Do not warp discs.
A disc should always be kept in its
case when not in use to prevent from
damaging.
Do not place discs in the following
places:
1. Direct sunlight
2. Dirty, dusty and damp areas
3. Near car heaters
4. On the seats or dashboard
Disc Cleaning
Use a dry soft cloth to wipe the surface.
If the disc is quite dirty, use a soft cloth
slightly moistured with isopropyl (rubbing)
alcohol. Never use solvents such as
benzine, thinner or conventional record
cleaners as they may mar the surface of
the disc.
Note :
A disc may become somewhat scratched
(although not enough to make it
-4-
unusable) depending on your handle it
and conditions in the usage environment.
Note these scratches are not an
indication of any problem with the player.
Lab el si de
up
Do no t tou ch
the
und ers ide
of th e dis c
Do no t
ben d
Wip e the d isc f rom
center
tow ard t he ou tsi de
edg e
Preparing New Dis cs with Rough
Spot s
A new dis c ma y ha ve r ough edg es o n
its ins ide and outs ide edge s. I f a disc
with r ough edg es i s us ed, the prop er
setting wil l no t be per form ed a nd t he
player will no t p lay t he disc. Ther efo re,
remove the r o u gh ed g e s in a d v a nce
by using a ball point pen or pencil as
shown on the right. To r e m ove t h e
rough edges, press the s i d e o f t h e pen
or pencil against the inside and outside
edges of the disc.
Rou gh spot s
on
out side ed ge
Bal l point p en
or pe ncil
Rou gh spot s
on in side
edg e

Installation
NOTE S:
Choose the mounting location where the unit will not interfere with the normal
driving function of the driver.
Before finally installing the unit, connect the wiring temporarily and make sure
it is all connected up properly and the unit and the system work properly.
Use only the parts included with the unit to ensure proper installation. The use
of unauthorized parts can cause malfunctions.
Consult with your nearest dealer if installation requires the drilling of holes or
other modifications of the vehicle.
Install the unit where it does not get in the driver s way and cannot injure the
passenger if there is a sudden stop, like an emergency stop.
If installation angle exceeds 30 from horizontal, the unit might not give its
optimum performance.
'
30
Avoid installing the unit where it would be subject to harmful elements such as high
temperature, direct sunlight, dust, dirt or excessive
vibration.
DIN FR ONT/REAR- MOUNT
This unit can be properly installed either from "Front"(conventional DIN
Front-mount) or "Rear"(DIN Rear-mount installation, utilizing threaded
screw holes at the sides of the unit chassis). For details, refer to the following
illustrated installation methods.
hot air (even if from the heater),
USA/EURO FREQUE NCY SWITCH
On the right of this device, there is a USA/EURO frequency switch, you can select
the desired radio frequency before installing.
USA/EURO Frequency Switch (radio frequency
switch for selecting between the USA and EUROPE
frequency band. )
-5-

Installation
SPRING WAS HE R
PLAIN WASH ER
TAPPIN G SC REW
DASH BOAR D
HEX NUT
METAL MOUNT ING
STRAP
CONSOLE
SLIDE BRA CK ET
HOUSING
HEX BOLT
KEY PLATE
PLASTIC C OV ER
KEY PLATE
If you want to take CHASSIS out of the SLIDE BRACKET HOUSING, first remove
the PLASTIC COVER of the both sides away, then insert the two KEY PLATE into
left and right side of chassis as above illustration.
-6-
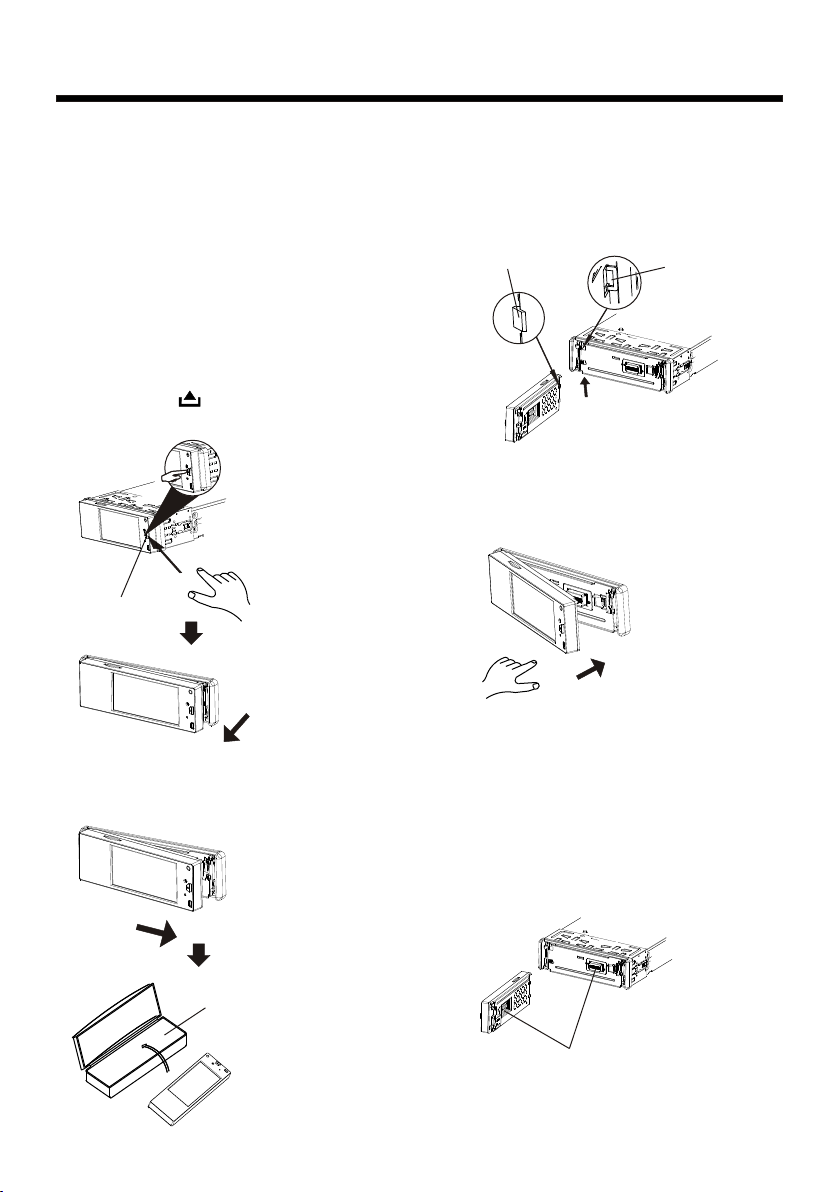
Installation
How To Remove And Install
The Front Panel
When detaching or attaching the control
panel, be careful not to damage the
connectors on the back of the control
panel and on the panel holder.
Detaching The Fro nt Panel
Befo re detaching the control p anel,
be sure to turn off the power.
1). Press the button and the right
hand side of the front panel will release.
REL EASE BU TTON
Attaching The Fro nt Panel
1). First insert the left hand side of the
front panel into the hollow of the unit.
(NOTE : the “bulge” point on the panel
must be attached into the hollow of unit.)
Bul ge
2). Gently push the right hand side of
the front panel until you feel a “Click”.
Hol low
2). Pull-off the front panel and keep the
front panel into the case.
PROTEC TIVE CA SE
How to clean the connectors
Frequent detachment will deteriorate
the connectors.
To minimize this possibility, periodically
wipe the connectors with a clean, soft,
dry cloth only, being careful not to
damage the connectors.
Connec tor
-7-
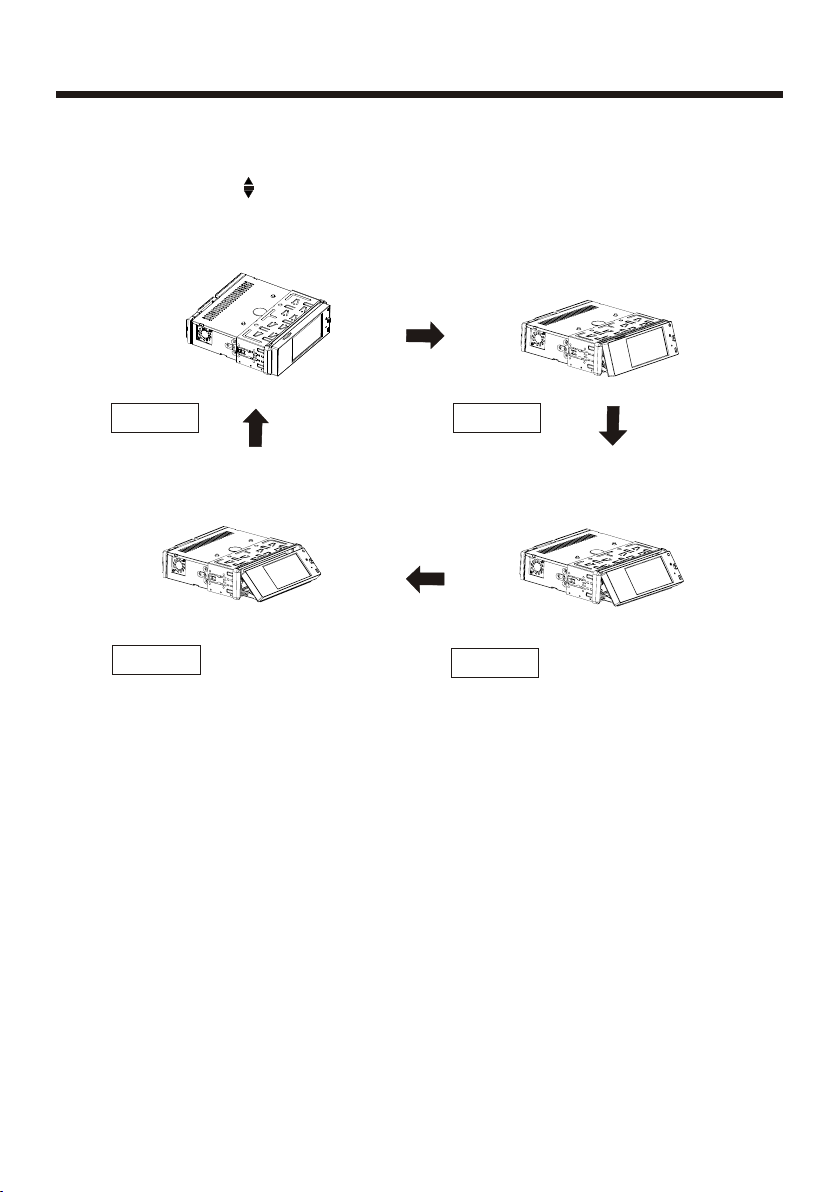
Panel Angle Adjustment
CHANGING THE CONTROL PANEL ANGLE
When you want to chan ge the viewing angle of the operating unit to play,
you can press the (an gle)butto n repeatedl y to select the d esired angl e
as fol lows:
Angl e 1 Angl e 2
Angl e 4
Angl e 3
Caution:
Do not insert your fi nger behind the control panel.
-8-
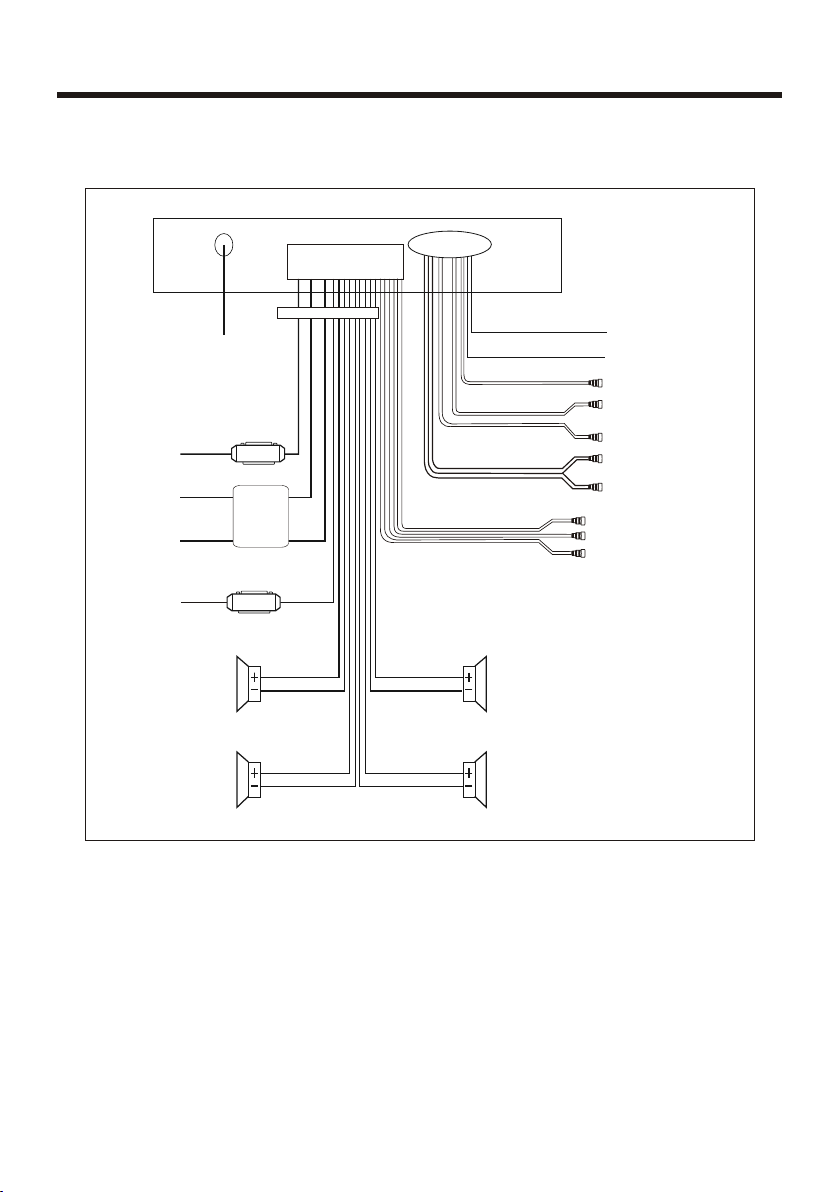
Electric Connection
WI RIN G CON NEC TIO N
MAIN UNIT
RADIO ANT ENN A JACK
IGN ITION
SWI TCH(B +)
CON STANT
12 VO LTS
GRO UND(B -)
AUT O ANT ENN A
& AM P TUR N ON
RED
YEL LOW
BLA CK
BLUE
FRONT
Lch SPK.
REAR
Lch SPK.
FUSE
CHOKE
BOX
FUSE
WHI TE/BL ACK
GRE EN/BL ACK
ISO C ONNEC TOR
WHI TE
GREEN
FRO NT RCA OUT PUT
CAB LE
GREY
GREY/B LAC K
VIO LET
VIO LET /BL ACK
WHI TE
GRE EN
YEL LOW
RCA CA BLE
REA R RCA OUTP UT
CAB LE
FRONT
Rch SPK.
REAR
Rch SPK.
(B+ )12V
REA R CAMER A SWI TCH
(B- )PARKI NG BR AKE
REA R CAMER A INP UT
GRE Y SUB WOO FER
VID EO IN YEL LOW
RCH R ED
LCH W HITE
FRO NT RCA RED R
VID EO OUT YE LLOW
FRO NT RCA WHI TE L
Note :
The "PARKING BRAKE" wire must be connected to the parking brake system of
your car. When the parking brake is engaged, the LCD screen will be allowed to
view your video. If not, the screen will produce an image saying,
"PARKING BRAKE" this is a safety feature designed for the driver not to watch a
video while driving. The video output on this unit is not affected by this.
-9-

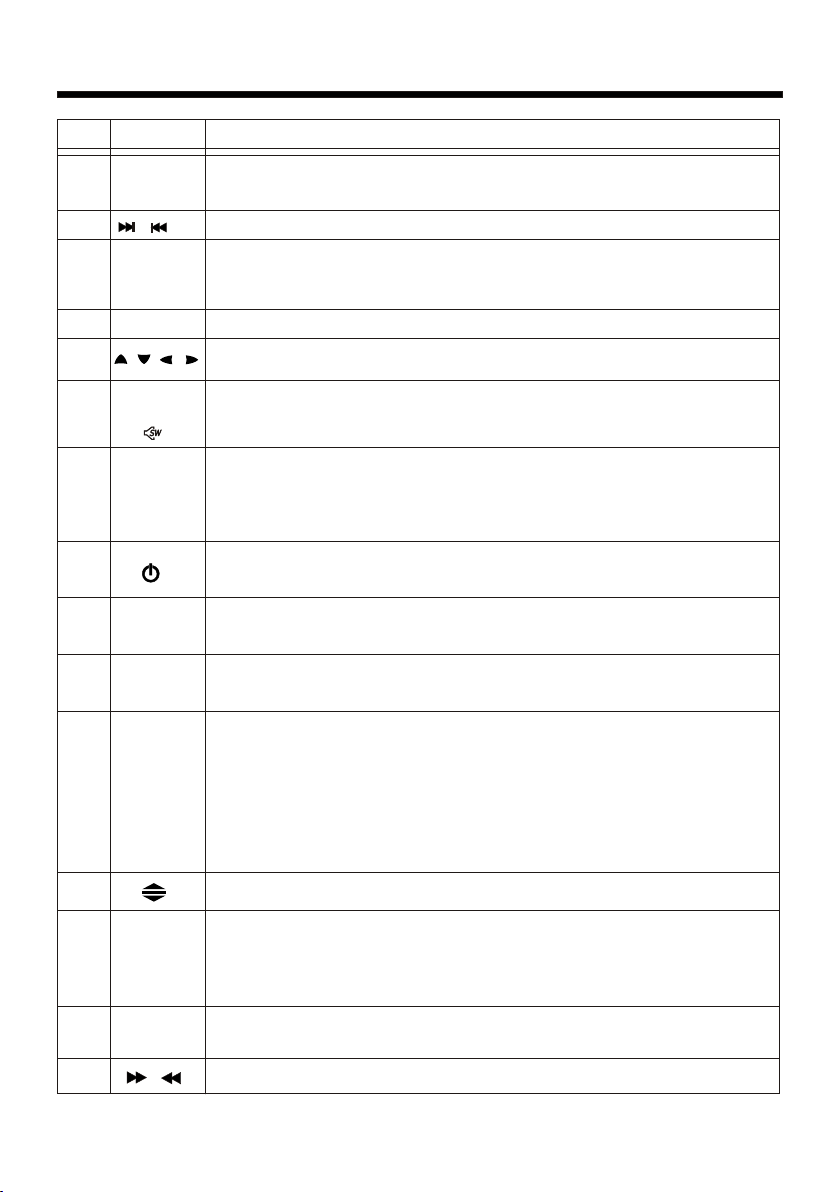
Remote Control
Ref #
1
2
3
4
5
6
7
Button
CLOCK
MODE
STOP
SETUP
MO/ST
(AUDIO)
SUBTITL E
LOCAL/
DISTAN T
REPEAT
17
15
19
7
2
13
6
22
14
18
11
10
4
16
3
5
20
1
21
23
9
12
26
25
24
8
Function
Press it briefly to view the clock time. Press again to return to
normal display mode.
Press it to select the input mode, such as DVD, RADIO, etc.
Press once to pause playback. Press PLAY/PAUS E to r es um e
playback. Please note: if you press STOP tw ic e, p la yb ac k wi ll
start at the beginning of the disc.
Press this button to open the SETUP menu.
In Radio mode, press this button to change between Mono and
Stereo reception modes (when a station is weak, sometimes
switching to Mono will improve sound quality). In Disc Playback
mode, pressing this button opens the AUDIO setup menu for
making changes to the way the soundtrack is reproduced.
In DVD Disc Playback mode, pressing this button will allow you to
change the subtitle language on discs which have this as an
option.
In Radio mode, press this button to change the radio reception
sensitivity in stations are near or far.
Pressing the button will open a menu presenting you with the
playback repeat options available for that kind of disc.
-10-
Remote Control
Ref #
8
9
10
11
12
13
14
15
16
17
Button
GOTO
/
SELECT
VOL+/-
/ / /
Menu
SubWo of er
( )
BAND
(OSD)
PLAY/
PAUSE
MUTE
Function
Press button to begin playback at a moment in the program you
designate. Use number buttons to enter the data that is needed.
Press these buttons to skip ahead or back one track.
Press this button repeatedly to cycle through the various audio
and video adjustments you can make: Volume, Bass, Treble,
Balance, Fader, Color, Brightness, Contrast and Tint.
Use these controls to adjust the volume level.
Press to navigate the various menus present in the product.
Press this button briefly to display the root level directory of a
DVD disc. Press and hold this button to turn on or off the
SUBWOOFER output.
In Radio mode, press this button repeatedly to switch between
the five radio bands: FM1 > FM2 > FM3 > AM1(MW 1) > AM 2 (M W2).
In Disc Playback modes, Press this button to see information
about the disc currently in play.
Press this button to turn the unit ON, press it again to turn the
unit OFF.
In Disc Playback mode, press to pause playback. Press again to
start where playback stopped.
Press this button to turn off the audio. Press again to restore the
sound to its prior volume level.
18
19
20
21
22
TITLE/
PBC
(AS/PS)
ZOOM/
ANGLE
EQ
/
When playing a DVD, pressing this button will open the TITLE
menu which is recorded on the DVD. When playing a VCD disc,
press this button to create a PBC (Playback Control) menu for the
disc to assist in making playback selections. In Radio mode,
press and hold this button to start the Auto-Program mode, during
which the tuner will scan for all strong stations and assign them
to the radio preset buttons.
Press this button to change the viewing angle of the operate unit.
For DVD discs which have alternate viewing angles encoded,
when you see the "angle mark" symbol advising you that these
angles are available, longer press this button to see them.
Shortly press it button to increase the picture in size.
Press repeatedly to cycle through the different equalizer curve
presets you may wish to use for enhanced listening.
In Disc Playback mode, press for fast forward/reverse playback.
-11-
Remote Control
Ref #
23
24
25
26
Button
ENTER
0-9
+10
1-6
This button is used to confirm selections and settings within many
of the menus in the OSD system.
Use to input numerical values during programming, with the GOTO
button, or to directly select a track to play.
In Radio mode, (when the RDS engaged), 0 serves as TA function,
9 serves as the AF function.
This button is used with the other number buttons for use with
two-digit number entries.
Six numbered preset buttons store and recall stations for each band.
Function
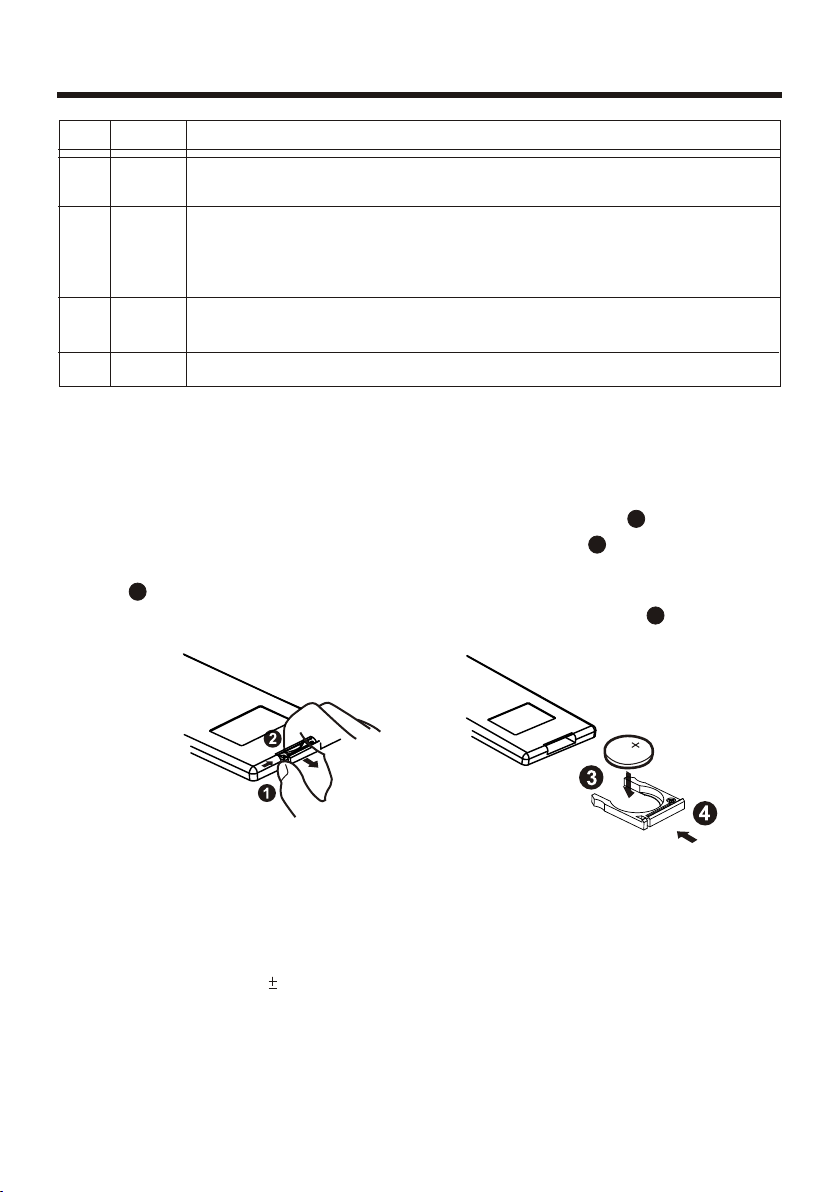
Preparing the Remote Control
Inse rting the Bat tery
1.First push to inside as the direction indicated by the arrow (See ) then remove
battery holder as the direction indicated by the arrow (See ).
2.Replace battery. Set a new battery property with (+)side up as illustrated
(See ).
3.Insert the battery holder. Push holder to the original position(See ).
3
1
2
4
Using the Remote Co ntrol
Face the remote control towards the player front face IR mark (remote control signal
receiver).
Operation angle: About 30 degree in each the direction of the front of the IR mark.
Note :
The lithium cell in the battery compartment of remote control has been secured for
transport with a foil. Before initial use please remove this foil so that the remote
control is ready for operation.
-12-
 Loading...